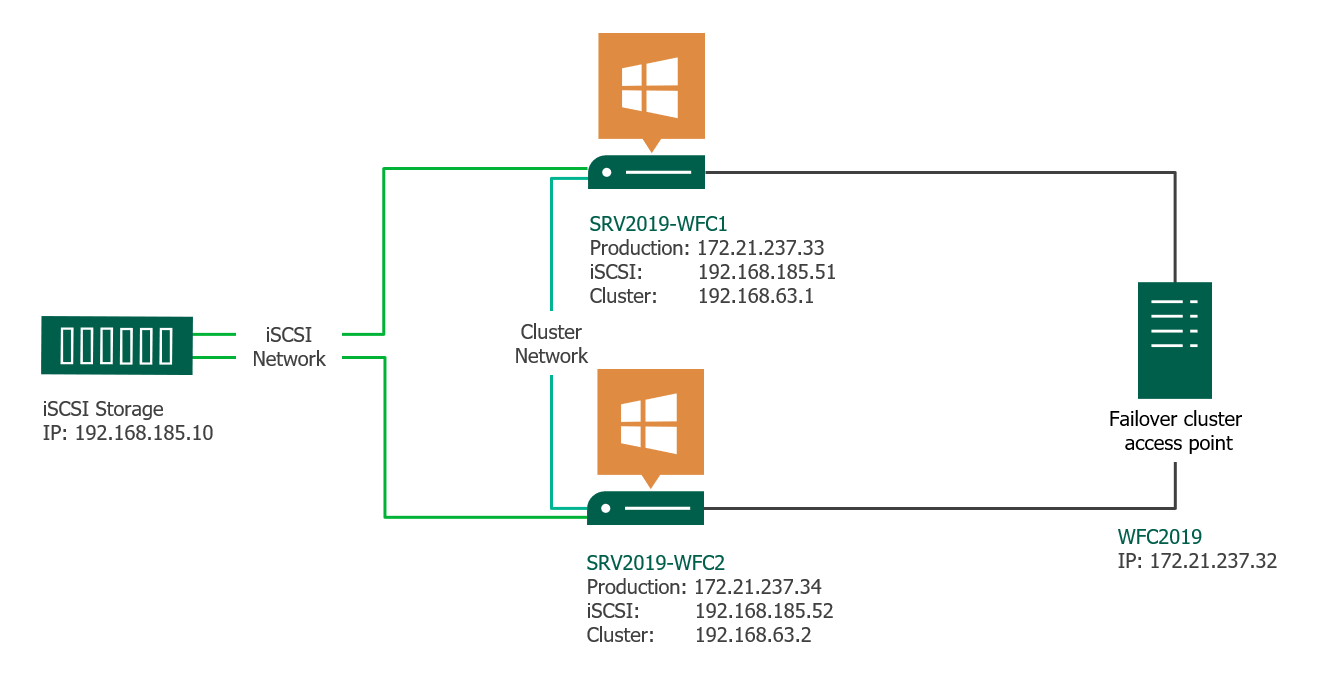
В статье приводится краткий обзор
создания отказоустойчивого кластера Microsoft Windows (WFC) в ОС Windows Server
2019 или 2016. В результате вы получите двухузловой кластер с одним общим
диском и кластерный вычислительный ресурс (объект «компьютер» в Active
Directory).
Подготовка
Не имеет значения, какие машины вы
используете — физические или виртуальные, главное, чтобы технология подходила
для создания кластеров Windows. Перед тем, как начать, проверьте соответствие
необходимым требованиям:
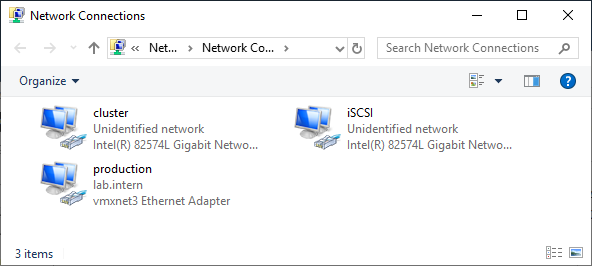
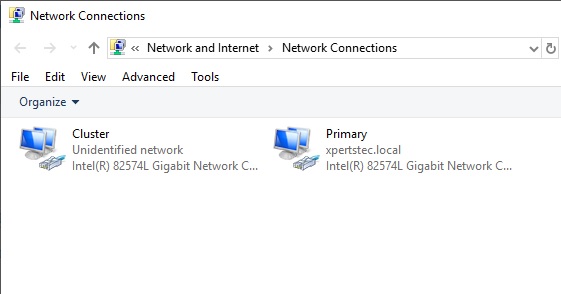
Две машины Windows 2019 с установленными последними обновлениями. У них должно быть по крайней мере два сетевых интерфейса: один для производственного трафика и один для кластерного трафика. В моем примере у машин три сетевых интерфейса (один дополнительный для трафика iSCSI). Я предпочитаю статические IP-адреса, но также можно использовать DHCP.
Введите оба сервера в домен
Microsoft Active Directory и убедитесь, что они видят общий ресурс хранения,
доступный в Disk Management. Пока не переводите диск в режим «онлайн».
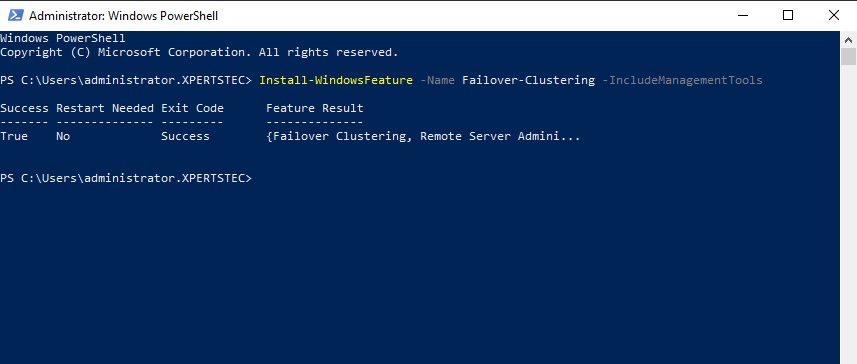
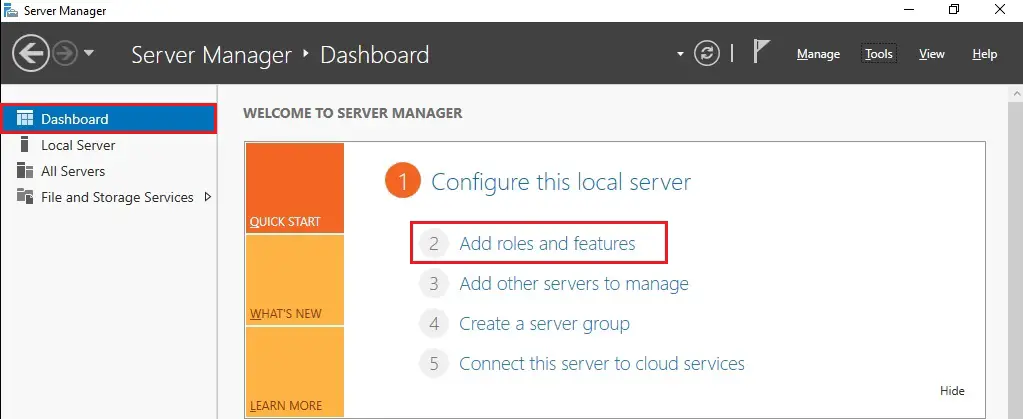
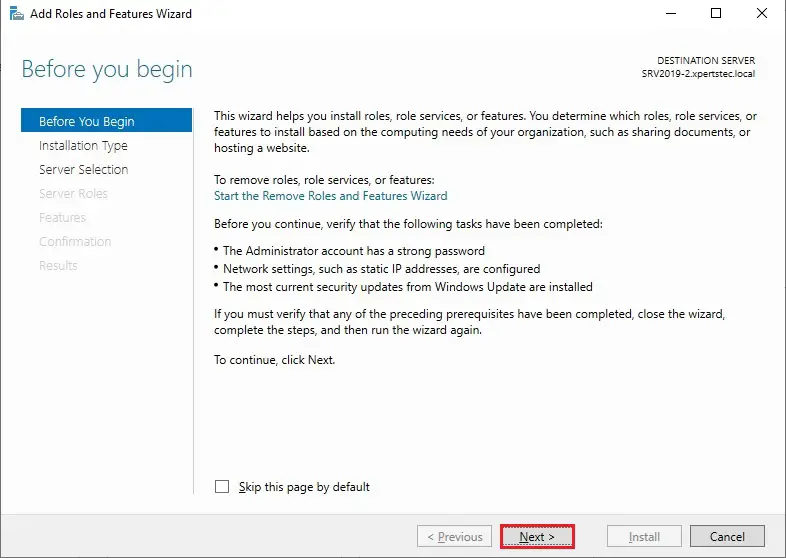
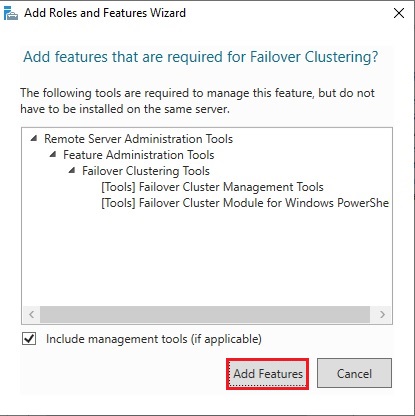
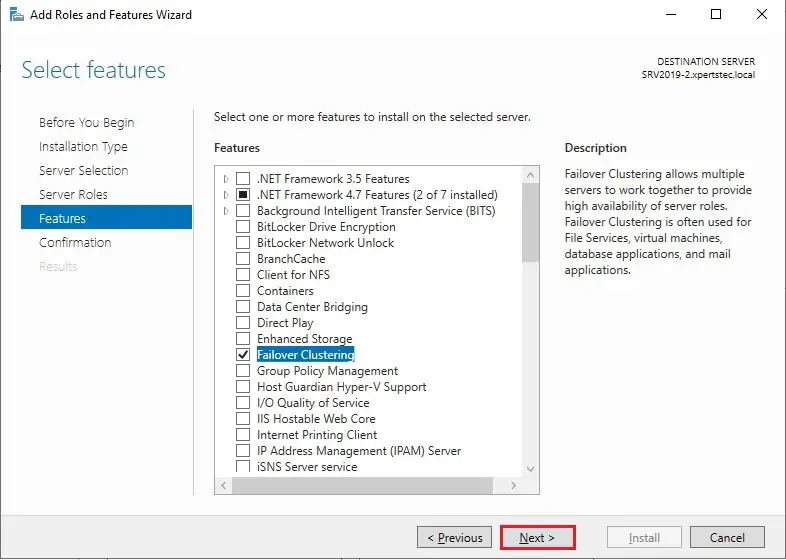
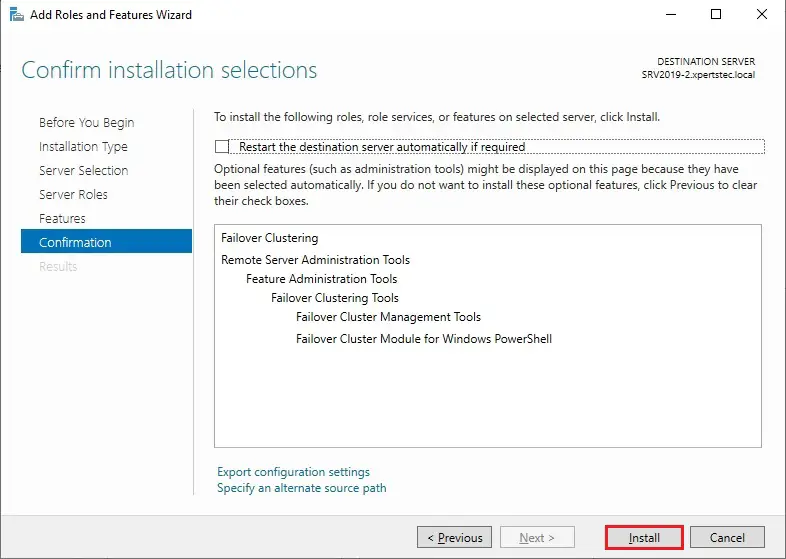
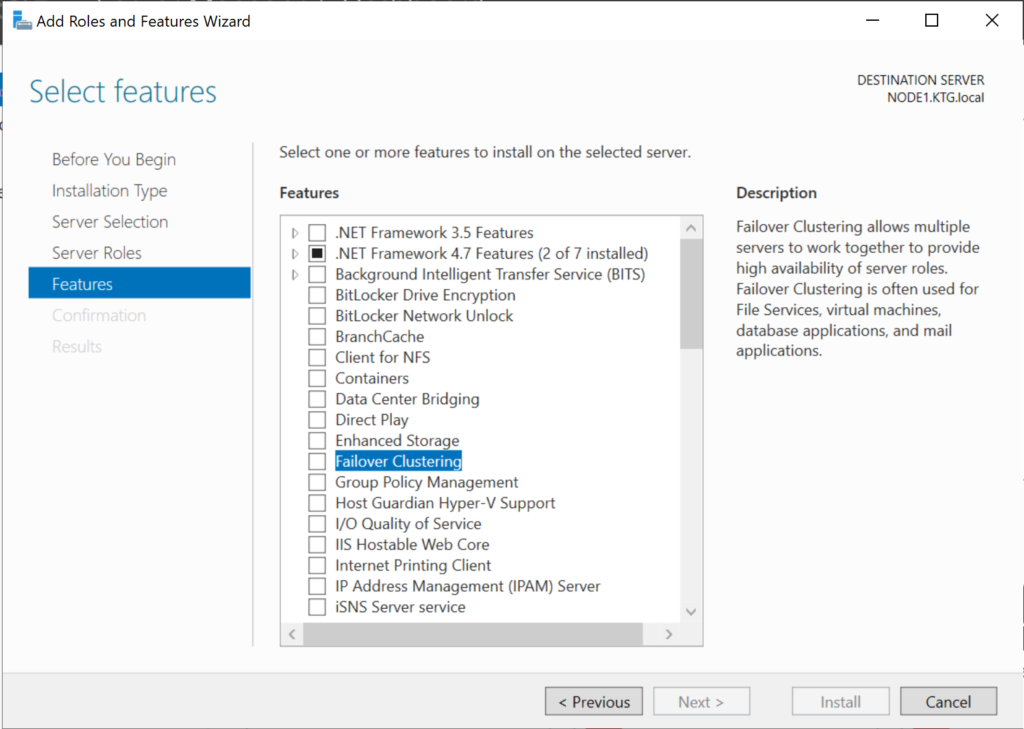
Далее необходимо добавить функциональность Failover clustering (Server Manager > Аdd roles and features).
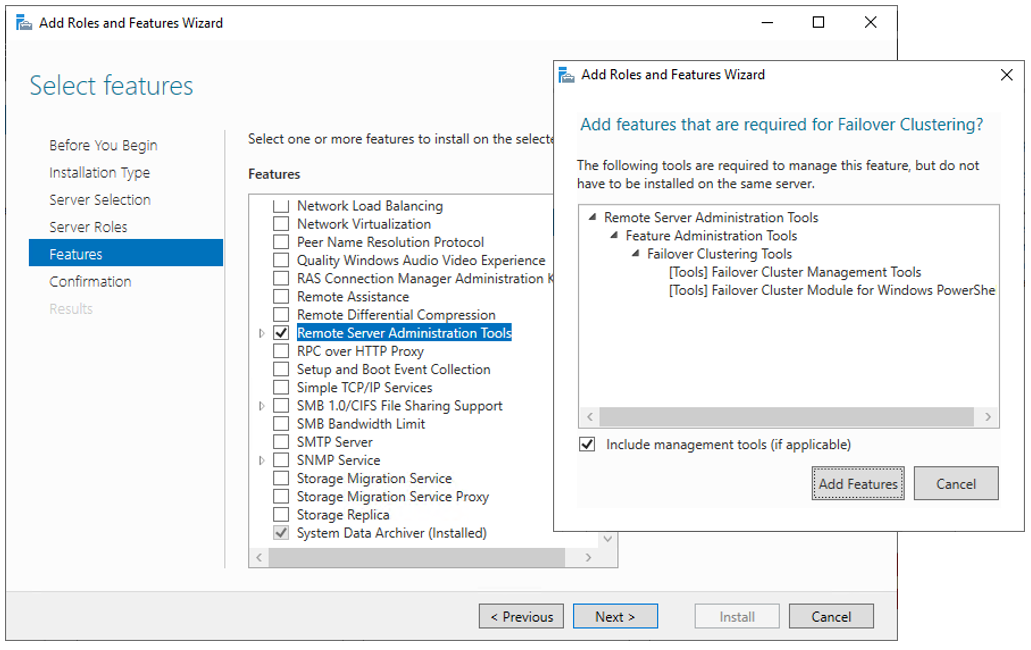
Перезапустите сервер, если требуется. В качестве альтернативы можно использовать следующую команду PowerShell:
Install-WindowsFeature -Name Failover-Clustering –IncludeManagementTools
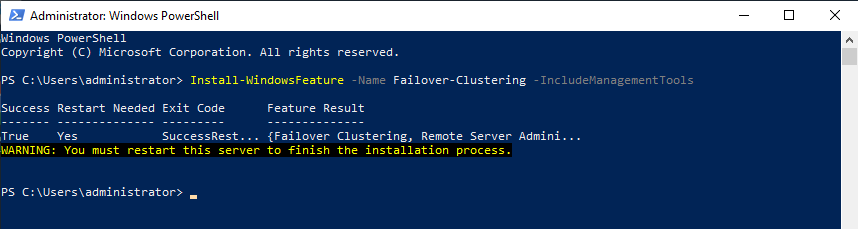
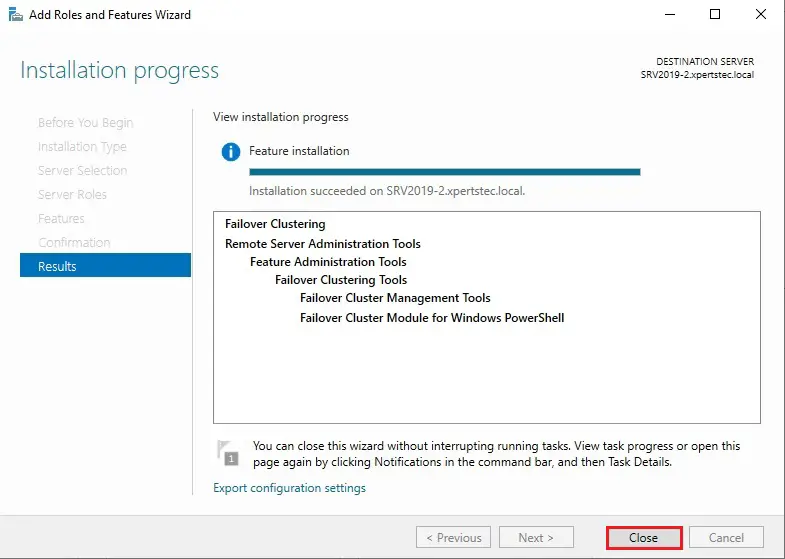
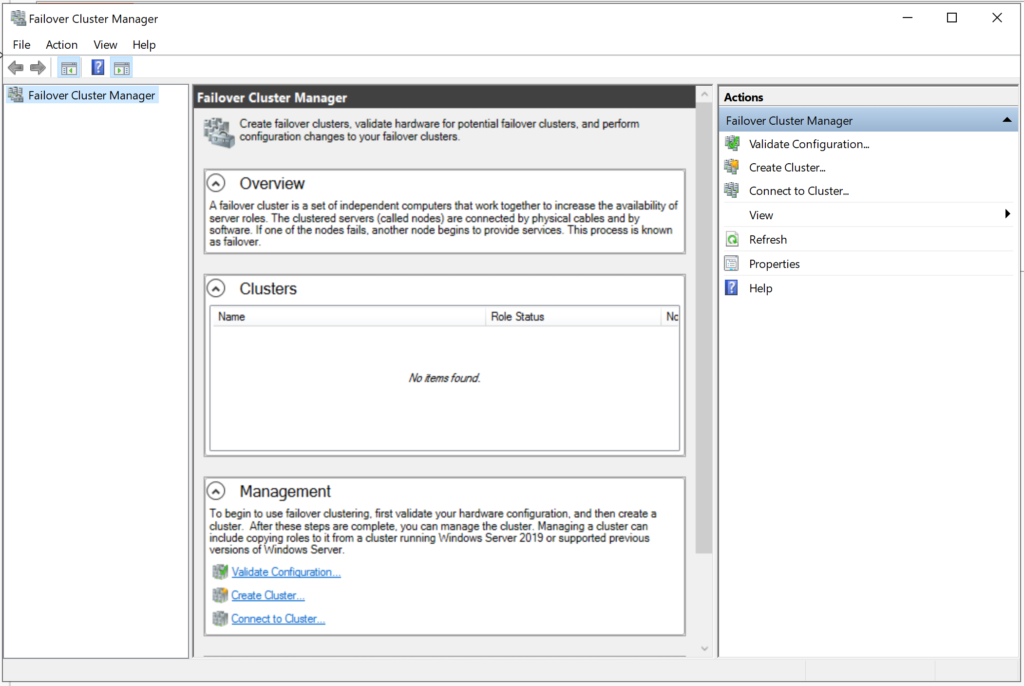
После успешной установки в меню
Start, в Windows
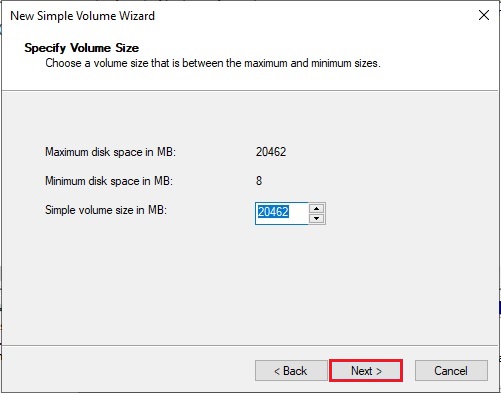
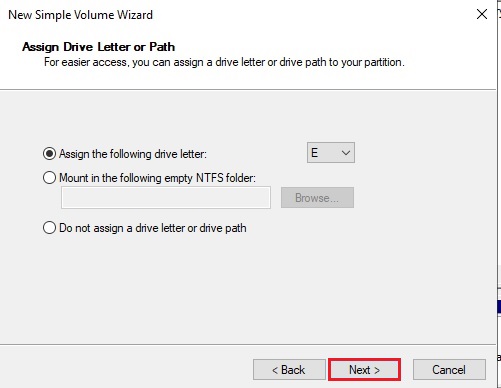
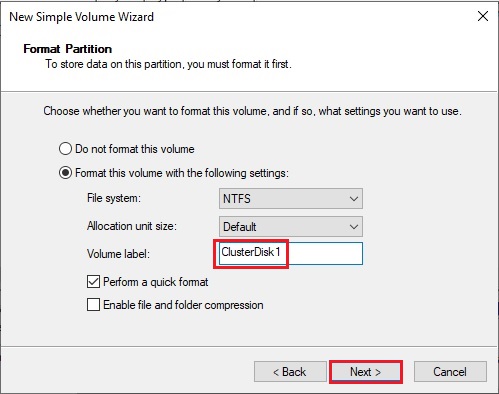
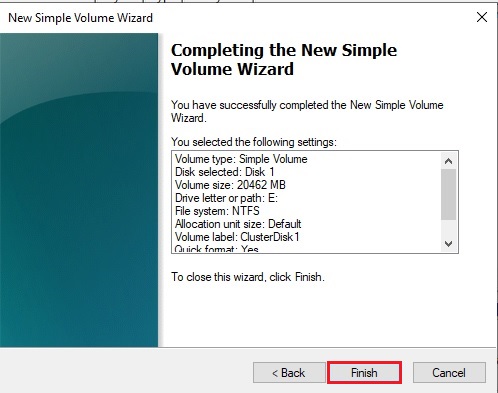
Administrative Tools появится Failover Cluster Manager .
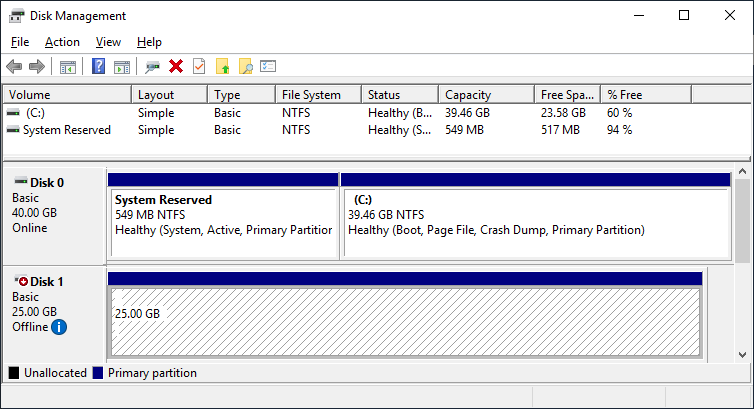
После установки Failover-Clustering
можно перевести общий диск в режим «онлайн» и отформатировать его на одном из
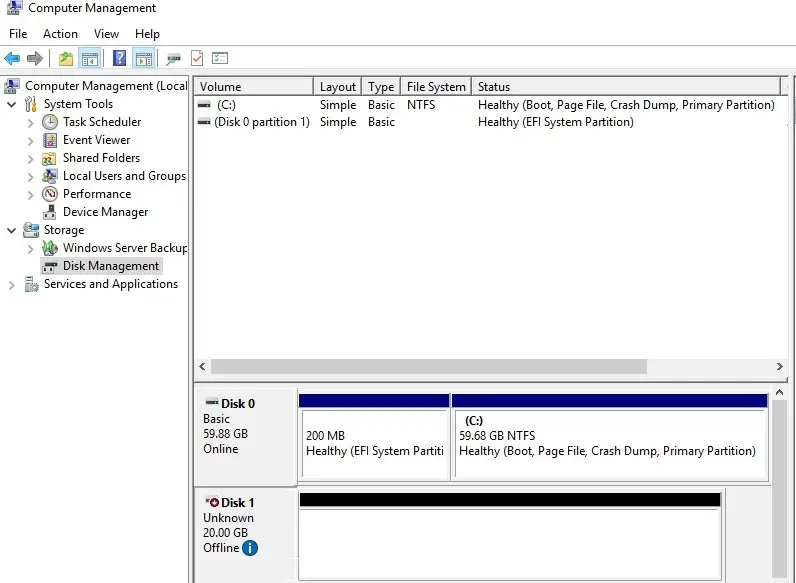
серверов. Не меняйте ничего на втором сервере. Там диск остается в режиме
offline.
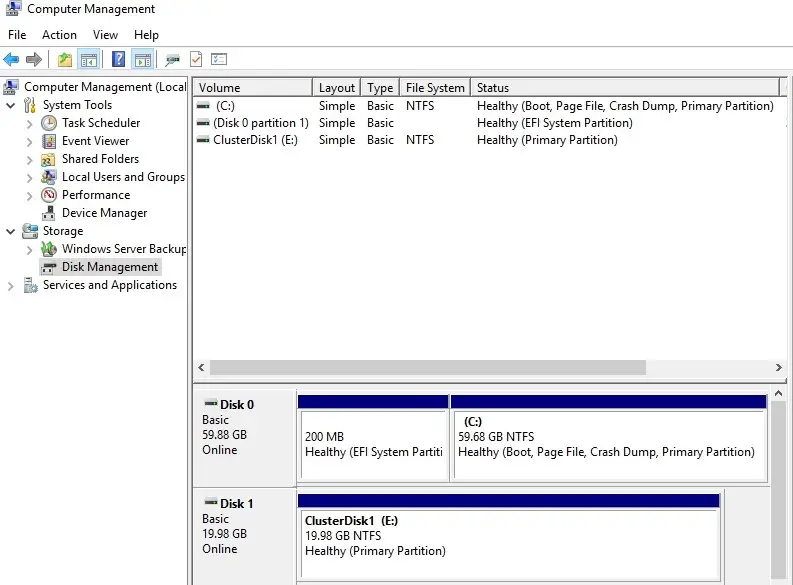
Обновив Disk Management, вы увидите
что-то типа такого:
Server 1 Disk Management (disk status online)
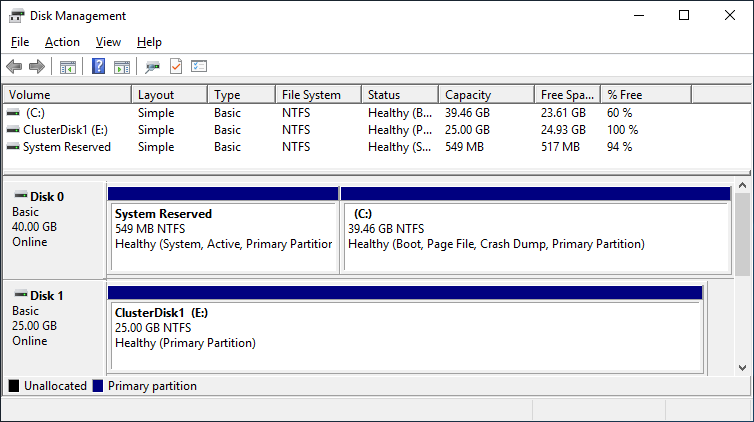
Server 2 Disk Management (disk status offline)
Проверка готовности
отказоустойчивого кластера
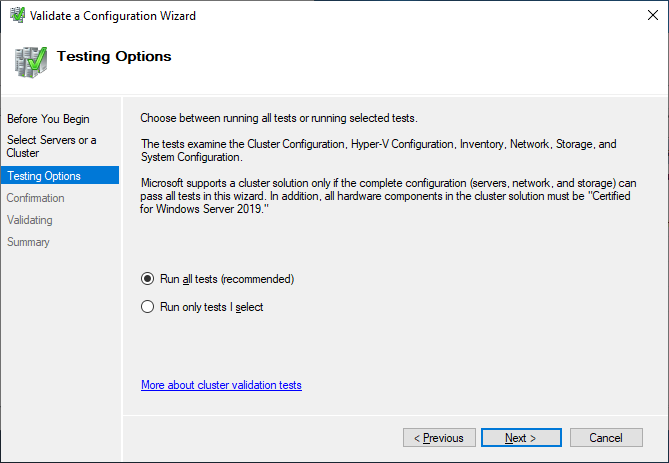
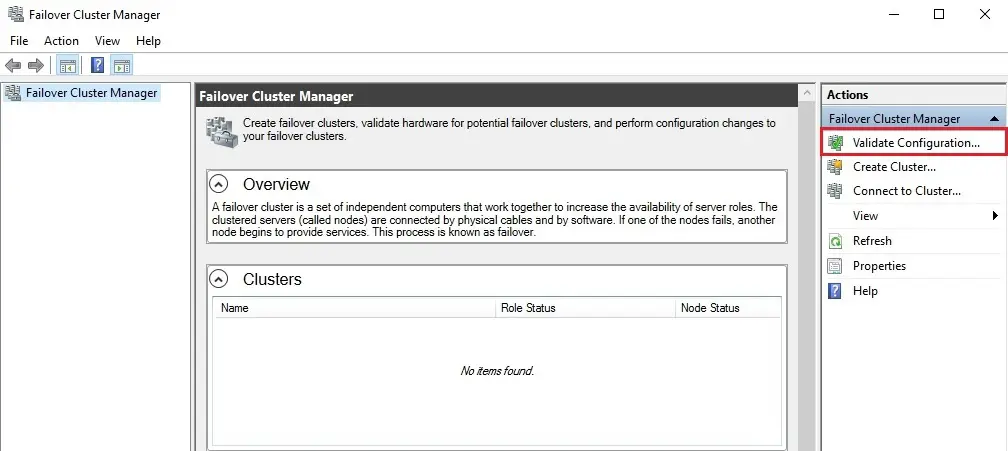
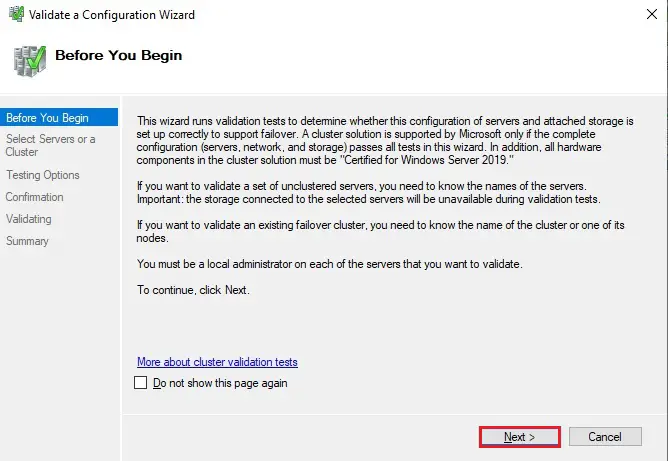
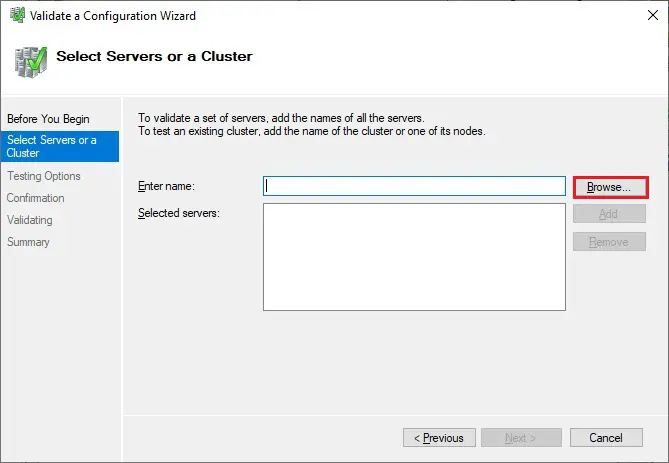
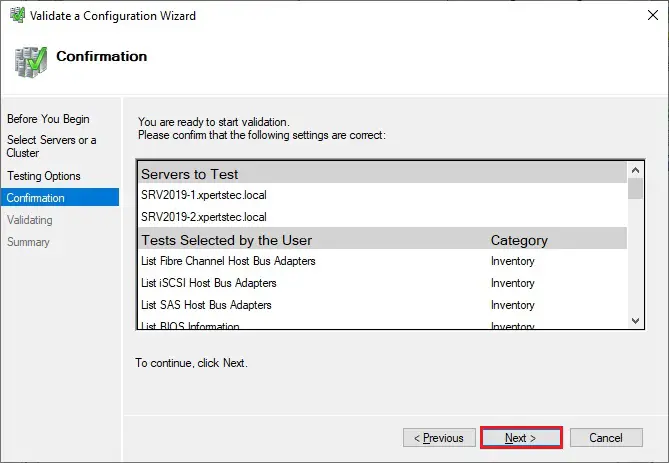
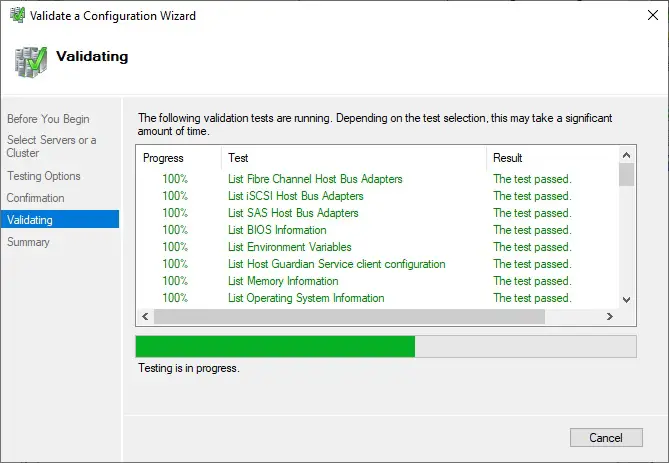
Перед созданием кластера необходимо убедиться, что все настройки правильно сконфигурированы. Запустите Failover Cluster Manager из меню Start, прокрутите до раздела Management и кликните Validate Configuration.

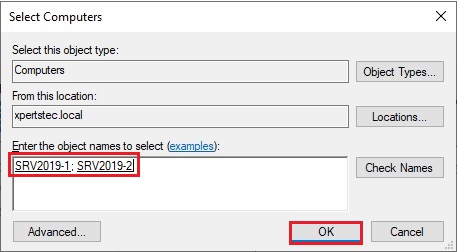
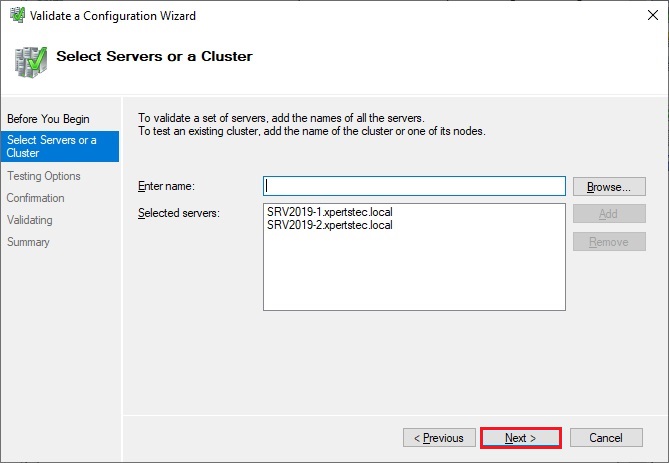
Выберите для валидации оба сервера.

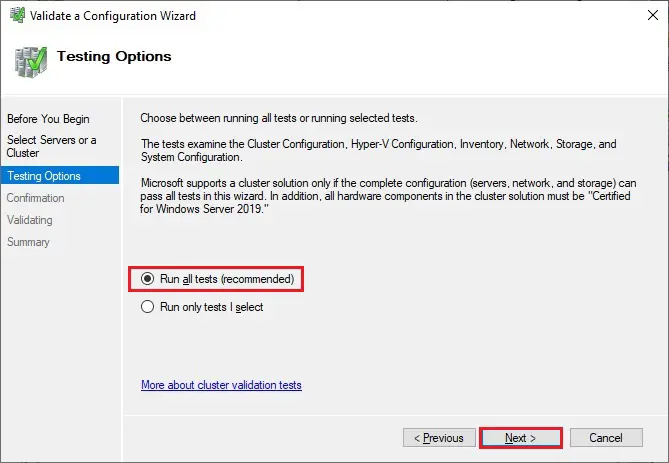
Выполните все тесты. Там же есть описание того, какие решения поддерживает Microsoft.
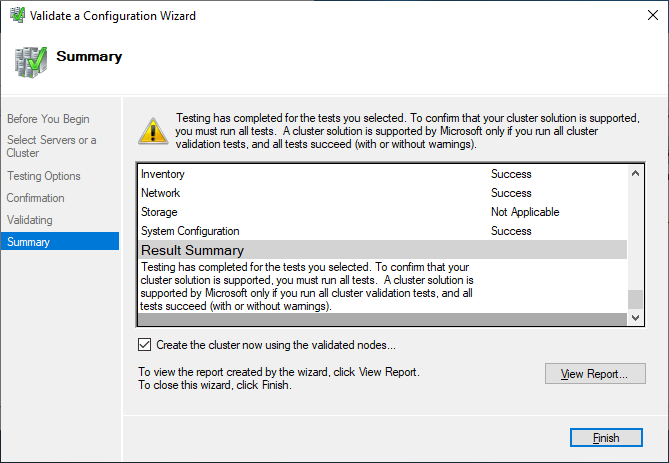
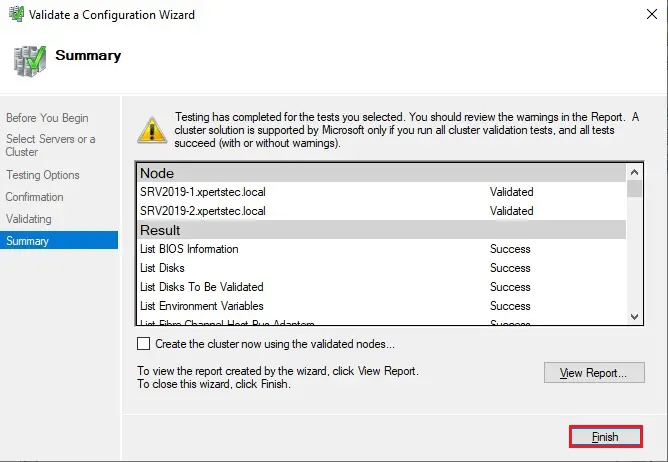
После успешного прохождения всех нужных тестов, можно создать кластер, установив флажок Create the cluster now using the validated nodes (создать кластер с помощью валидированных узлов), или это можно сделать позже. Если во время тестирования возникали ошибки или предупреждения, можно просмотреть подробный отчет, кликнув на View Report.
Создание отказоустойчивого
кластера
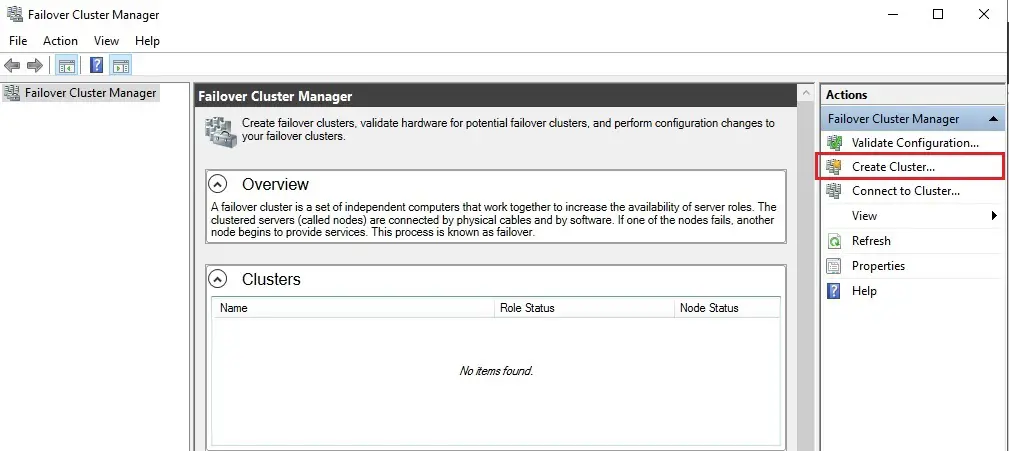
Если вы решите создать кластер,
кликнув на Create Cluster в Failover Cluster Manager,
потребуется снова выбрать узлы кластера. Если вы используете флажок Create
the cluster now using the validated nodes в мастере валидации
кластера, выбирать узлы не понадобится. Следующим шагом будет создание точки
доступа для администрирования кластера — Access Point for
Administering the Cluster. Это будет виртуальный объект, с которым позже
будут коммуницировать клиенты. Это объект «компьютер» в Active Directory.
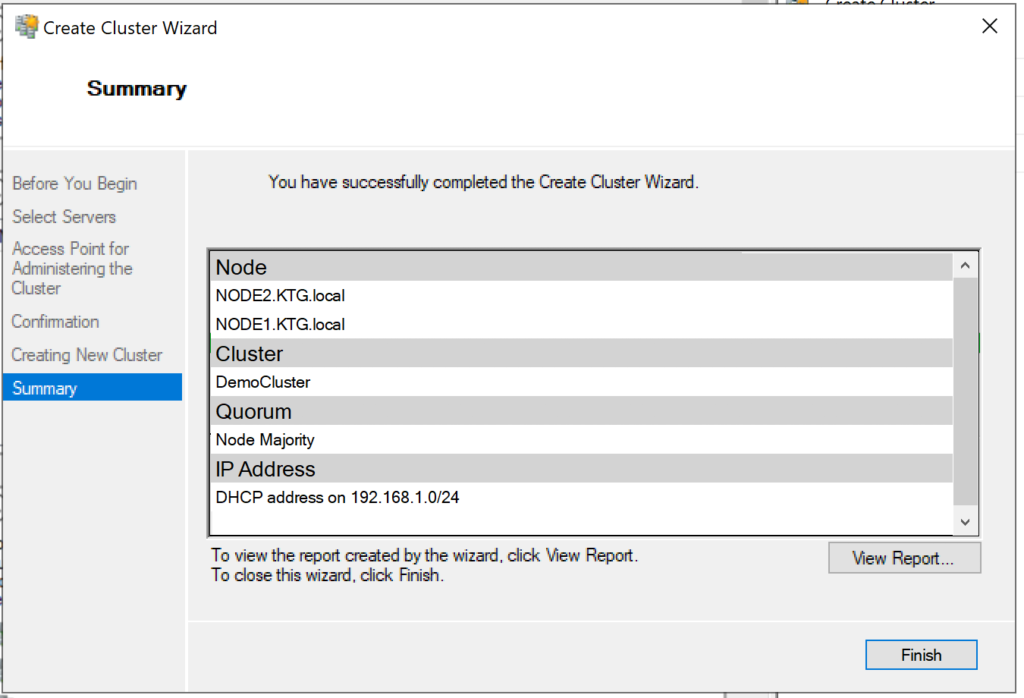
В мастере нужно будет задать имя кластера — Cluster Name и сетевую конфигурацию.
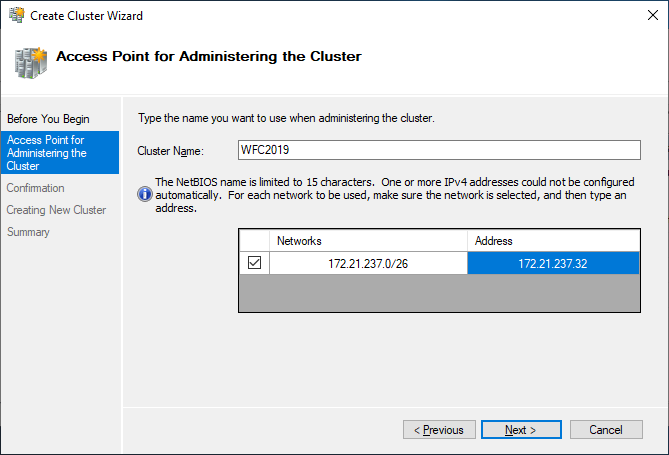
На последнем шаге подтвердите выбранные настройки и подождите создания кластера.
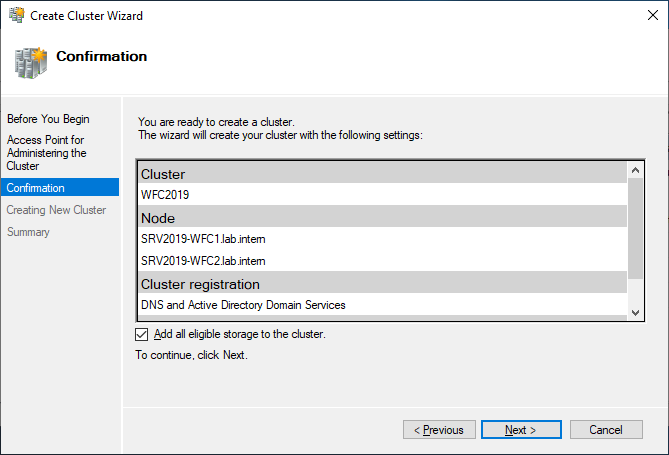
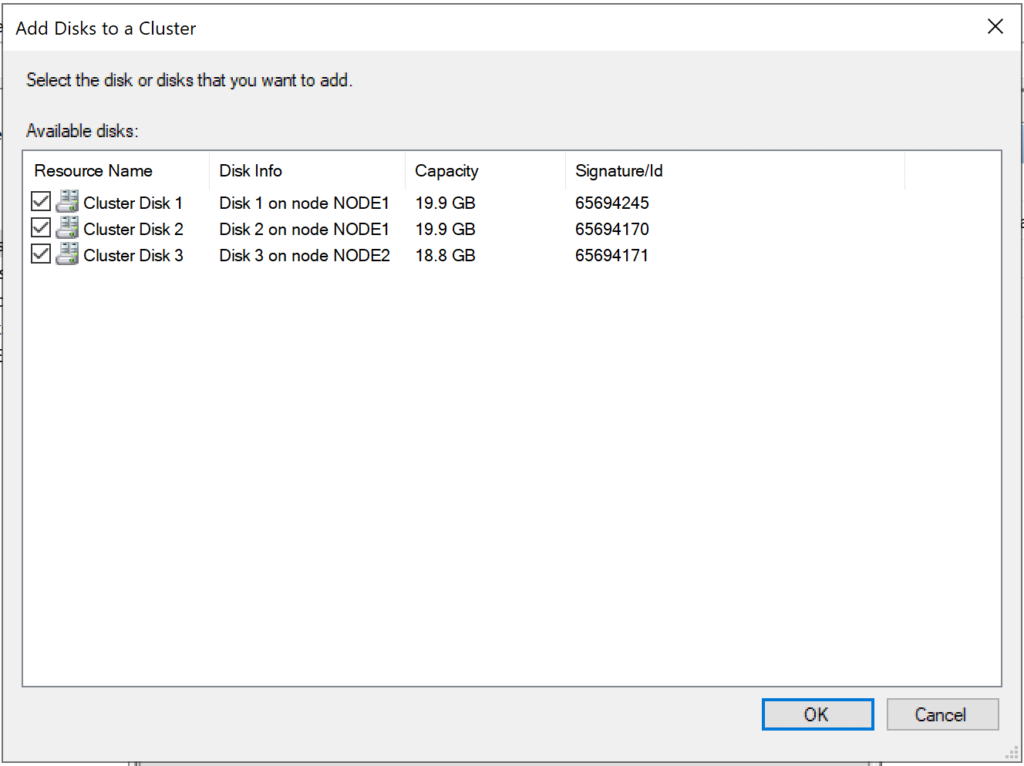
По умолчанию мастер автоматически
добавит общий диск к кластеру. Если вы его еще не сконфигурировали, будет
возможность сделать это позже.
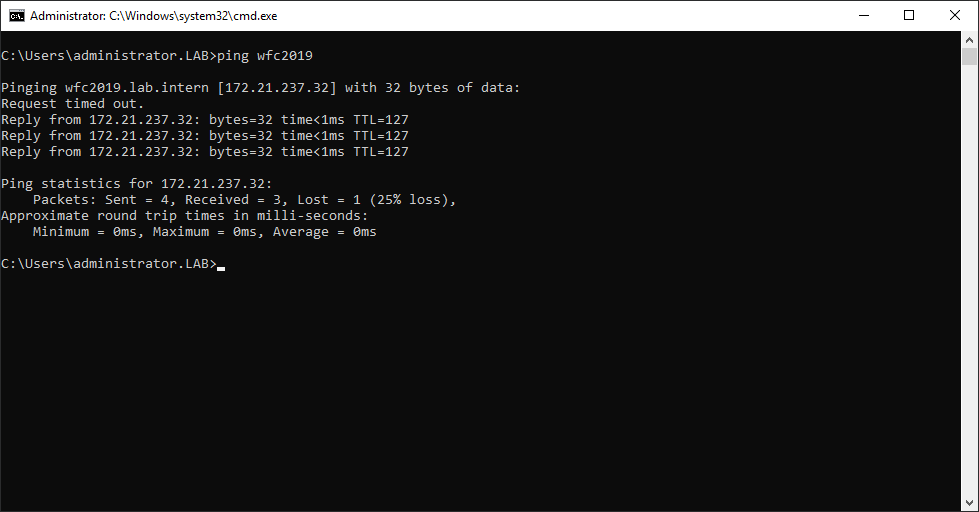
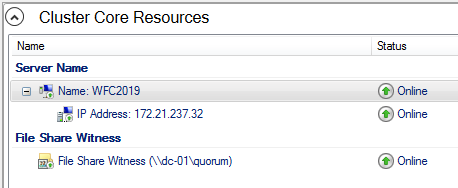
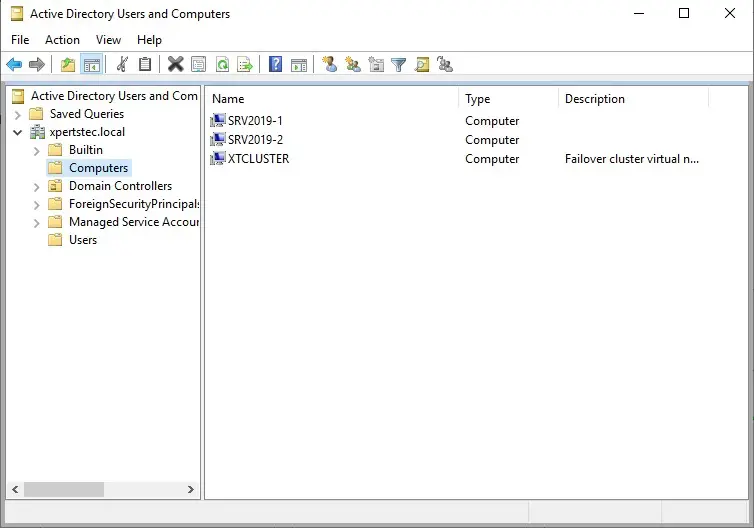
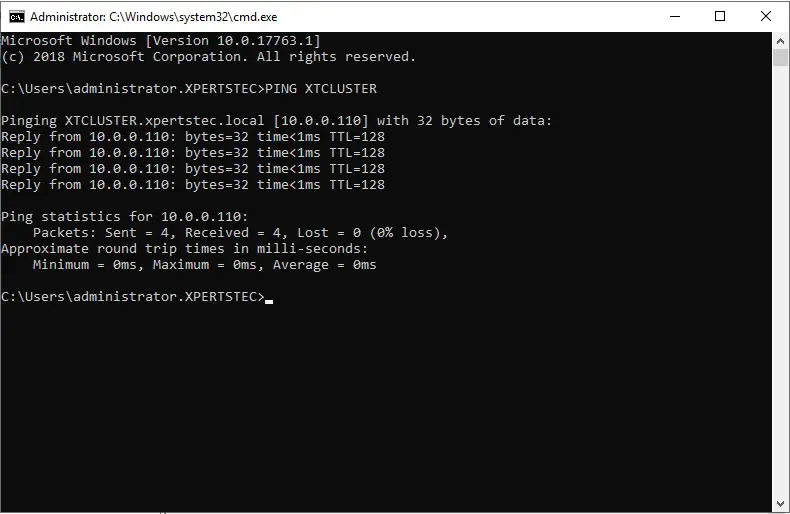
В результате вы увидите новый объект «компьютер» Active Directory под названием WFC2019.

Вы можете отправить запрос к новому компьютеру, чтобы убедиться в его доступности (если ICMP-запросы разрешены в брандмауере Windows).
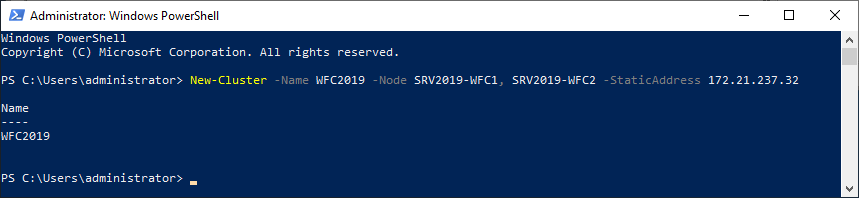
В качестве альтернативы можно создать кластер с помощью PowerShell. Следующая команда автоматически добавит подходящее хранилище:
New-Cluster -Name WFC2019 -Node SRV2019-WFC1, SRV2019-WFC2 -StaticAddress 172.21.237.32
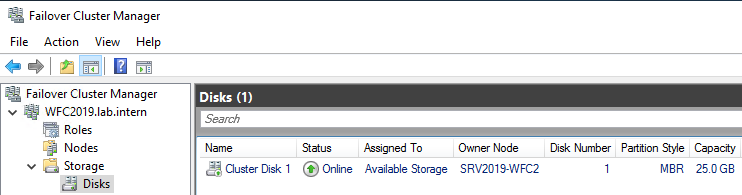
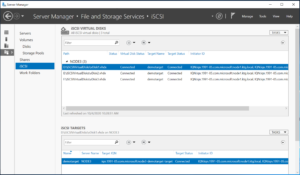
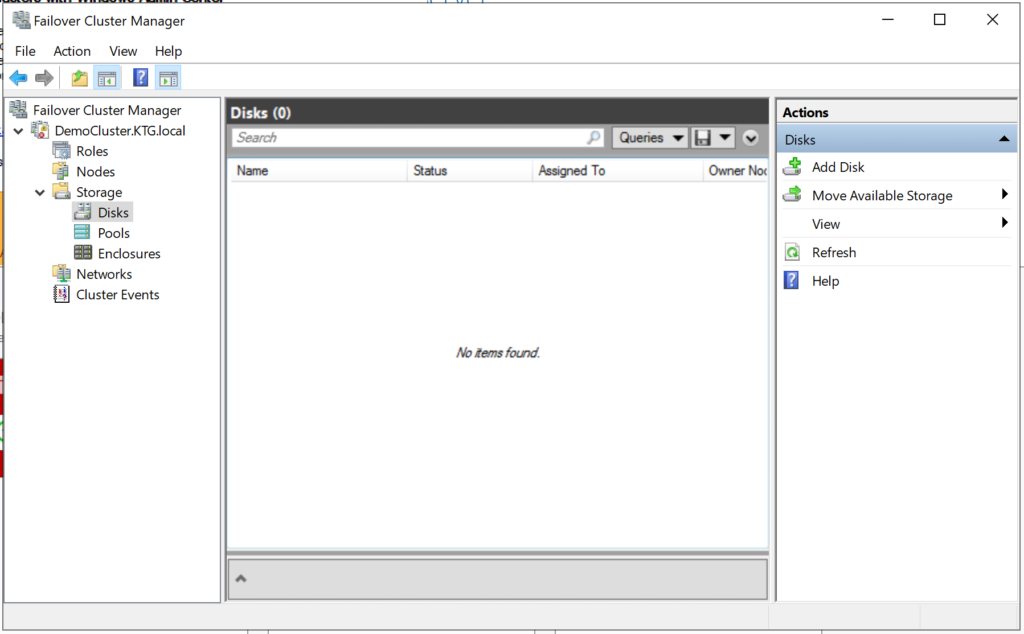
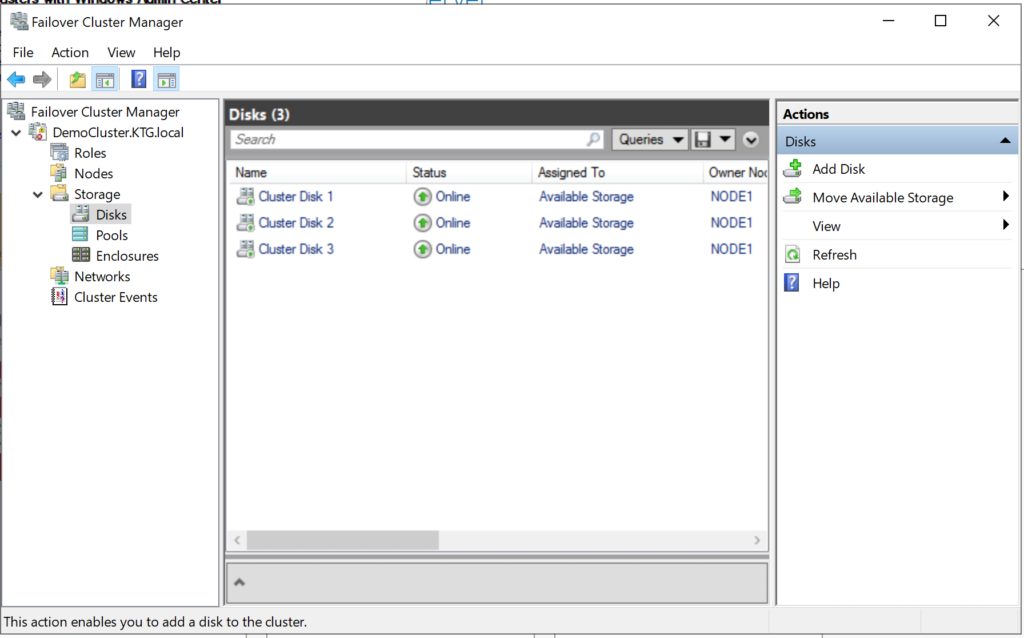
Результат можно будет увидеть в Failover Cluster Manager, в разделах Nodes и Storage > Disks.
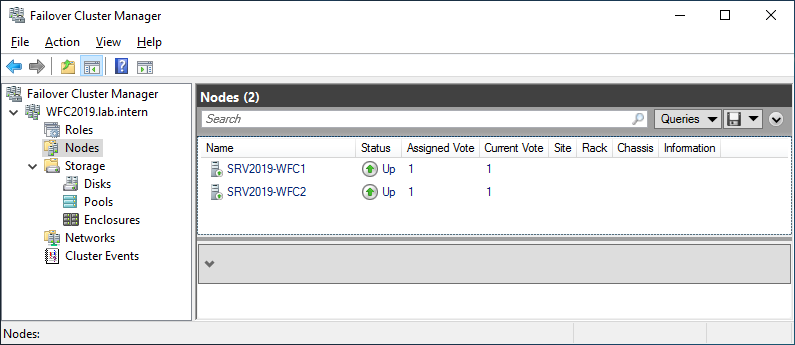
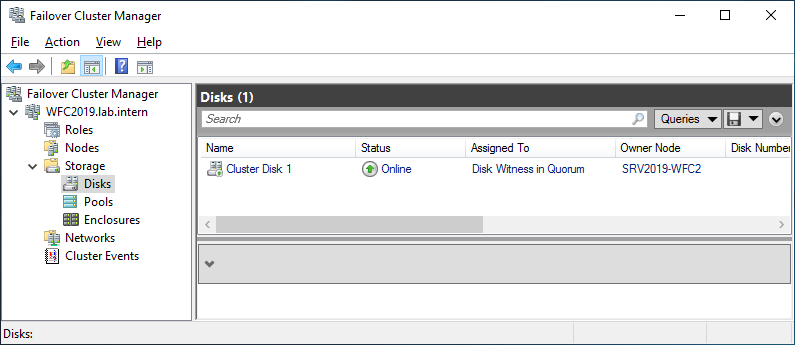
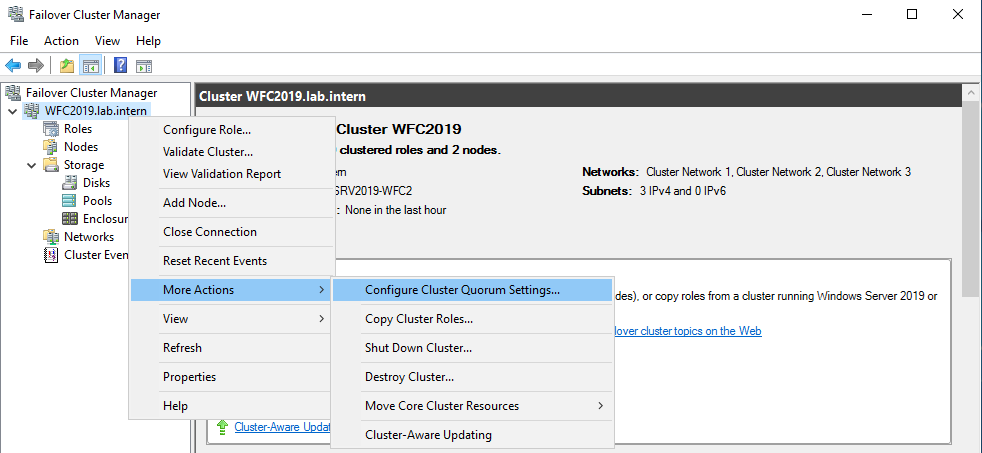
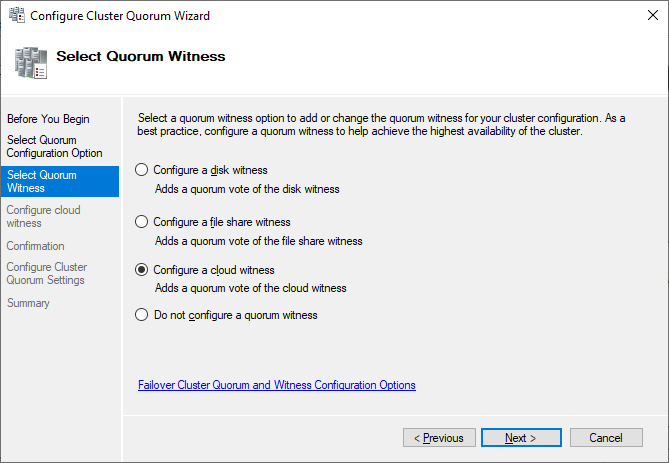
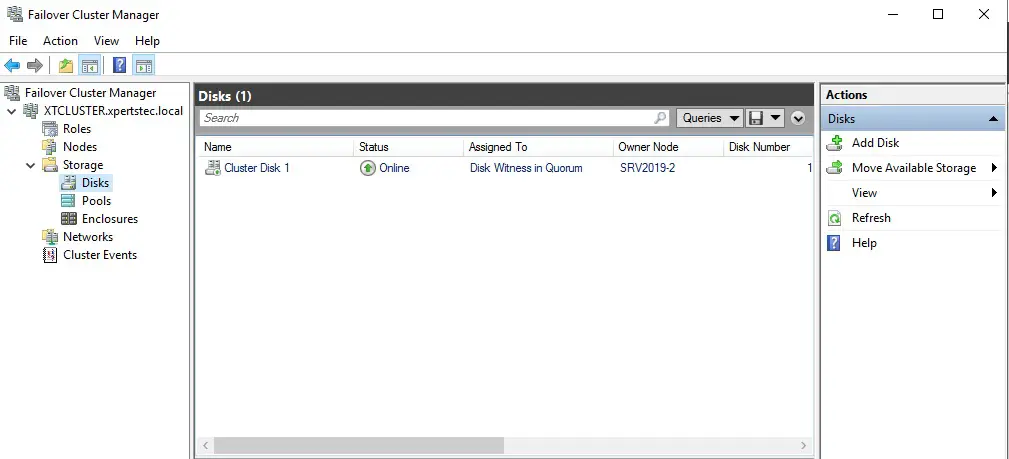
Иллюстрация показывает, что в данный момент диск используется в качестве кворума. Поскольку мы хотим использовать этот диск для данных, нам необходимо сконфигурировать кворум вручную. Из контекстного меню кластера выберите More Actions > Configure Cluster Quorum Settings (конфигурирование настроек кворума).
Мы хотим выбрать диск-свидетель вручную.
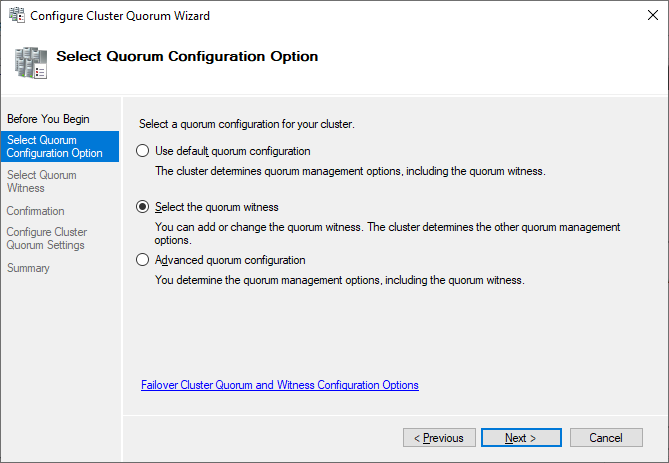
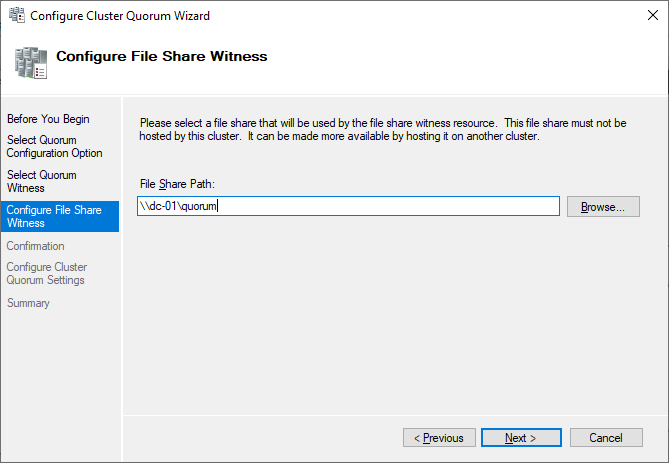
В данный момент кластер использует диск, ранее сконфигурированный как диск-свидетель. Альтернативно можно использовать в качестве свидетеля общую папку или учетную запись хранилища Azure. В этом примере мы используем в качестве свидетеля общую папку. На веб-сайте Microsoft представлены пошаговые инструкции по использованию свидетеля в облаке. Я всегда рекомендую конфигурировать свидетель кворума для правильной работы. Так что, последняя опция для производственной среды не актуальна.
Просто укажите путь и завершите мастер установки.
После этого общий диск можно использовать для работы с данными.
Поздравляю, вы сконфигурировали отказоустойчивый кластер Microsoft с одним общим диском.
Следующие шаги и резервное
копирование
Одним из следующих шагов будет
добавление роли для кластера, но это выходит за рамки данной статьи. Когда
кластер будет содержать данные, пора будет подумать о его резервном копировании.
Veeam Agent for Microsoft Windows может применяться для
резервного копирования отказоустойчивых кластеров Windows с общими дисками. Мы
также рекомендуем осуществлять резервное копирование «всей системы» кластера.
При этом выполняется резервное копирование операционных систем узлов кластера.
Это поможет ускорить восстановление отказавшего узла кластера, так как вам не
придется искать драйверы и прочее при восстановлении.
Руководство по созданию отказоустойчивых
кластеров для Windows Server 2019
| title | description | ms.topic | author | ms.author | manager | ms.date |
|---|---|---|---|---|---|---|
|
Create a failover cluster |
How to create a failover cluster for Windows Server 2012 R2, Windows Server 2012, Windows Server 2016, and Windows Server 2019. |
article |
JasonGerend |
jgerend |
lizross |
10/20/2021 |
Create a failover cluster
Applies to: Windows Server 2022, Windows Server 2019, Windows Server 2016, Windows Server 2012 R2, Windows Server 2012, Azure Stack HCI, versions 21H2 and 20H2
This topic shows how to create a failover cluster by using either the Failover Cluster Manager snap-in or Windows PowerShell. The topic covers a typical deployment, where computer objects for the cluster and its associated clustered roles are created in Active Directory Domain Services (AD DS). If you’re deploying a Storage Spaces Direct cluster, instead see Deploy Storage Spaces Direct. For information about using a failover cluster in Azure Stack HCI, see Create an Azure Stack HCI.
You can also deploy an Active Directory-detached cluster. This deployment method enables you to create a failover cluster without permissions to create computer objects in AD DS or the need to request that computer objects are prestaged in AD DS. This option is only available through Windows PowerShell, and is only recommended for specific scenarios. For more information, see Deploy an Active Directory-Detached Cluster.
Checklist: Create a failover cluster
| Status | Task | Reference |
|---|---|---|
| ☐ | Verify the prerequisites | Verify the prerequisites |
| ☐ | Install the Failover Clustering feature on every server that you want to add as a cluster node | Install the Failover Clustering feature |
| ☐ | Run the Cluster Validation Wizard to validate the configuration | Validate the configuration |
| ☐ | Run the Create Cluster Wizard to create the failover cluster | Create the failover cluster |
| ☐ | Create clustered roles to host cluster workloads | Create clustered roles |
Verify the prerequisites
Before you begin, verify the following prerequisites:
- Make sure that all servers that you want to add as cluster nodes are running the same version of Windows Server.
- Review the hardware requirements to make sure that your configuration is supported. For more information, see Failover Clustering Hardware Requirements and Storage Options. If you’re creating a Storage Spaces Direct cluster, see Storage Spaces Direct hardware requirements.
- To add clustered storage during cluster creation, make sure that all servers can access the storage. (You can also add clustered storage after you create the cluster.)
- Make sure that all servers that you want to add as cluster nodes are joined to the same Active Directory domain.
- (Optional) Create an organizational unit (OU) and move the computer accounts for the servers that you want to add as cluster nodes into the OU. As a best practice, we recommend that you place failover clusters in their own OU in AD DS. This can help you better control which Group Policy settings or security template settings affect the cluster nodes. By isolating clusters in their own OU, it also helps prevent against accidental deletion of cluster computer objects.
Additionally, verify the following account requirements:
- Make sure that the account you want to use to create the cluster is a domain user who has administrator rights on all servers that you want to add as cluster nodes.
- Make sure that either of the following is true:
- The user who creates the cluster has the Create Computer objects permission to the OU or the container where the servers that will form the cluster reside.
- If the user does not have the Create Computer objects permission, ask a domain administrator to prestage a cluster computer object for the cluster. For more information, see Prestage Cluster Computer Objects in Active Directory Domain Services.
[!NOTE]
This requirement does not apply if you want to create an Active Directory-detached cluster in Windows Server 2012 R2. For more information, see Deploy an Active Directory-Detached Cluster.
Install the Failover Clustering feature
You must install the Failover Clustering feature on every server that you want to add as a failover cluster node.
Install the Failover Clustering feature
-
Start Server Manager.
-
On the Manage menu, select Add Roles and Features.
-
On the Before you begin page, select Next.
-
On the Select installation type page, select Role-based or feature-based installation, and then select Next.
-
On the Select destination server page, select the server where you want to install the feature, and then select Next.
-
On the Select server roles page, select Next.
-
On the Select features page, select the Failover Clustering check box.
-
To install the failover cluster management tools, select Add Features, and then select Next.
-
On the Confirm installation selections page, select Install.
A server restart is not required for the Failover Clustering feature. -
When the installation is completed, select Close.
-
Repeat this procedure on every server that you want to add as a failover cluster node.
[!NOTE]
After you install the Failover Clustering feature, we recommend that you apply the latest updates from Windows Update. Also, for a Windows Server 2012-based failover cluster, review the Recommended hotfixes and updates for Windows Server 2012-based failover clusters Microsoft Support article and install any updates that apply.
Validate the configuration
Before you create the failover cluster, we strongly recommend that you validate the configuration to make sure that the hardware and hardware settings are compatible with failover clustering. Microsoft supports a cluster solution only if the complete configuration passes all validation tests and if all hardware is certified for the version of Windows Server that the cluster nodes are running.
[!NOTE]
You must have at least two nodes to run all tests. If you have only one node, many of the critical storage tests do not run.
Run cluster validation tests
-
On a computer that has the Failover Cluster Management Tools installed from the Remote Server Administration Tools, or on a server where you installed the Failover Clustering feature, start Failover Cluster Manager. To do this on a server, start Server Manager, and then on the Tools menu, select Failover Cluster Manager.
-
In the Failover Cluster Manager pane, under Management, select Validate Configuration.
-
On the Before You Begin page, select Next.
-
On the Select Servers or a Cluster page, in the Enter name box, enter the NetBIOS name or the fully qualified domain name of a server that you plan to add as a failover cluster node, and then select Add. Repeat this step for each server that you want to add. To add multiple servers at the same time, separate the names by a comma or by a semicolon. For example, enter the names in the format
server1.contoso.com, server2.contoso.com. When you are finished, select Next. -
On the Testing Options page, select Run all tests (recommended), and then select Next.
-
On the Confirmation page, select Next.
The Validating page displays the status of the running tests.
-
On the Summary page, do either of the following:
-
If the results indicate that the tests completed successfully and the configuration is suited for clustering, and you want to create the cluster immediately, make sure that the Create the cluster now using the validated nodes check box is selected, and then select Finish. Then, continue to step 4 of the Create the failover cluster procedure.
-
If the results indicate that there were warnings or failures, select View Report to view the details and determine which issues must be corrected. Realize that a warning for a particular validation test indicates that this aspect of the failover cluster can be supported, but might not meet the recommended best practices.
[!NOTE]
If you receive a warning for the Validate Storage Spaces Persistent Reservation test, see the blog post Windows Failover Cluster validation warning indicates your disks don’t support the persistent reservations for Storage Spaces for more information.
-
For more information about hardware validation tests, see Validate Hardware for a Failover Cluster.
Create the failover cluster
To complete this step, make sure that the user account that you log on as meets the requirements that are outlined in the Verify the prerequisites section of this topic.
-
Start Server Manager.
-
On the Tools menu, select Failover Cluster Manager.
-
In the Failover Cluster Manager pane, under Management, select Create Cluster.
The Create Cluster Wizard opens.
-
On the Before You Begin page, select Next.
-
If the Select Servers page appears, in the Enter name box, enter the NetBIOS name or the fully qualified domain name of a server that you plan to add as a failover cluster node, and then select Add. Repeat this step for each server that you want to add. To add multiple servers at the same time, separate the names by a comma or a semicolon. For example, enter the names in the format server1.contoso.com; server2.contoso.com. When you are finished, select Next.
[!NOTE]
If you chose to create the cluster immediately after running validation in the configuration validating procedure, you will not see the Select Servers page. The nodes that were validated are automatically added to the Create Cluster Wizard so that you do not have to enter them again. -
If you skipped validation earlier, the Validation Warning page appears. We strongly recommend that you run cluster validation. Only clusters that pass all validation tests are supported by Microsoft. To run the validation tests, select Yes, and then select Next. Complete the Validate a Configuration Wizard as described in Validate the configuration.
-
On the Access Point for Administering the Cluster page, do the following:
-
In the Cluster Name box, enter the name that you want to use to administer the cluster. Before you do, review the following information:
- During cluster creation, this name is registered as the cluster computer object (also known as the cluster name object or CNO) in AD DS. If you specify a NetBIOS name for the cluster, the CNO is created in the same location where the computer objects for the cluster nodes reside. This can be either the default Computers container or an OU.
- To specify a different location for the CNO, you can enter the distinguished name of an OU in the Cluster Name box. For example: CN=ClusterName, OU=Clusters, DC=Contoso, DC=com.
- If a domain administrator has prestaged the CNO in a different OU than where the cluster nodes reside, specify the distinguished name that the domain administrator provides.
-
If the server does not have a network adapter that is configured to use DHCP, you must configure one or more static IP addresses for the failover cluster. Select the check box next to each network that you want to use for cluster management. Select the Address field next to a selected network, and then enter the IP address that you want to assign to the cluster. This IP address (or addresses) will be associated with the cluster name in Domain Name System (DNS).
[!NOTE]
If you’re using Windows Server 2019, you have the option to use a distributed network name for the cluster. A distributed network name uses the IP addresses of the member servers instead of requiring a dedicated IP address for the cluster. By default, Windows uses a distributed network name if it detects that you’re creating the cluster in Azure (so you don’t have to create an internal load balancer for the cluster), or a normal static or IP address if you’re running on-premises. For more info, see Distributed Network Name.- When you are finished, select Next.
-
-
On the Confirmation page, review the settings. By default, the Add all eligible storage to the cluster check box is selected. Clear this check box if you want to do either of the following:
- You want to configure storage later.
- You plan to create clustered storage spaces through Failover Cluster Manager or through the Failover Clustering Windows PowerShell cmdlets, and have not yet created storage spaces in File and Storage Services. For more information, see Deploy Clustered Storage Spaces.
-
Select Next to create the failover cluster.
-
On the Summary page, confirm that the failover cluster was successfully created. If there were any warnings or errors, view the summary output or select View Report to view the full report. Select Finish.
-
To confirm that the cluster was created, verify that the cluster name is listed under Failover Cluster Manager in the navigation tree. You can expand the cluster name, and then select items under Nodes, Storage or Networks to view the associated resources.
Realize that it may take some time for the cluster name to successfully replicate in DNS. After successful DNS registration and replication, if you select All Servers in Server Manager, the cluster name should be listed as a server with a Manageability status of Online.
After the cluster is created, you can do things such as verify cluster quorum configuration, and optionally, create Cluster Shared Volumes (CSV). For more information, see Understanding Quorum in Storage Spaces Direct and Use Cluster Shared Volumes in a failover cluster.
Create clustered roles
After you create the failover cluster, you can create clustered roles to host cluster workloads.
[!NOTE]
For clustered roles that require a client access point, a virtual computer object (VCO) is created in AD DS. By default, all VCOs for the cluster are created in the same container or OU as the CNO. Realize that after you create a cluster, you can move the CNO to any OU.
Here’s how to create a clustered role:
-
Use Server Manager or Windows PowerShell to install the role or feature that is required for a clustered role on each failover cluster node. For example, if you want to create a clustered file server, install the File Server role on all cluster nodes.
The following table shows the clustered roles that you can configure in the High Availability Wizard and the associated server role or feature that you must install as a prerequisite.
Clustered Role Role or Feature Prerequisite Namespace Server Namespaces (part of File Server role) DFS Namespace Server DHCP Server role Distributed Transaction Coordinator (DTC) None File Server File Server role Generic Application Not applicable Generic Script Not applicable Generic Service Not applicable Hyper-V Replica Broker Hyper-V role iSCSI Target Server iSCSI Target Server (part of File Server role) iSNS Server iSNS Server Service feature Message Queuing Message Queuing Services feature Other Server None Virtual Machine Hyper-V role WINS Server WINS Server feature -
In Failover Cluster Manager, expand the cluster name, right-click Roles, and then select Configure Role.
-
Follow the steps in the High Availability Wizard to create the clustered role.
-
To verify that the clustered role was created, in the Roles pane, make sure that the role has a status of Running. The Roles pane also indicates the owner node. To test failover, right-click the role, point to Move, and then select Select Node. In the Move Clustered Role dialog box, select the desired cluster node, and then select OK. In the Owner Node column, verify that the owner node changed.
Create a failover cluster by using Windows PowerShell
The following Windows PowerShell cmdlets perform the same functions as the preceding procedures in this topic. Enter each cmdlet on a single line, even though they may appear word-wrapped across several lines because of formatting constraints.
[!NOTE]
You must use Windows PowerShell to create an Active Directory-detached cluster in Windows Server 2012 R2. For information about the syntax, see Deploy an Active Directory-Detached Cluster.
The following example installs the Failover Clustering feature.
Install-WindowsFeature –Name Failover-Clustering –IncludeManagementTools
The following example runs all cluster validation tests on computers that are named Server1 and Server2.
Test-Cluster –Node Server1, Server2
[!NOTE]
The Test-Cluster cmdlet outputs the results to a log file in the current working directory. For example: C:Users<username>AppDataLocalTemp.
The following example creates a failover cluster that is named MyCluster with nodes Server1 and Server2, assigns the static IP address 192.168.1.12, and adds all eligible storage to the failover cluster.
New-Cluster –Name MyCluster –Node Server1, Server2 –StaticAddress 192.168.1.12
The following example creates the same failover cluster as in the previous example, but it does not add eligible storage to the failover cluster.
New-Cluster –Name MyCluster –Node Server1, Server2 –StaticAddress 192.168.1.12 -NoStorage
The following example creates a cluster that is named MyCluster in the Cluster OU of the domain Contoso.com.
New-Cluster -Name CN=MyCluster,OU=Cluster,DC=Contoso,DC=com -Node Server1, Server2
For examples of how to add clustered roles, see topics such as Add-ClusterFileServerRole and Add-ClusterGenericApplicationRole.
After the AD Detached failover Cluster is created backup the certificate with private key exportable option. Open MMC ==>File ==>Add remove Snap in ==>Certificates==>Services Accounts==>Next==>Local Computer==>Cluster Service==>Certificates==>ClussvcPersonal==>Select Certificate right click==>export ==>Next==>Yes export the Private Key ==>PfX Format==>Choose Password or you can add group ==>Next==>Select path where you want to store certificate==>Next ==>Finish.
More information
- Failover Clustering
- Deploy a Hyper-V Cluster
- Scale-Out File Server for Application Data
- Deploy an Active Directory-Detached Cluster
- Using Guest Clustering for High Availability
- Cluster-Aware Updating
- New-Cluster
- Test-Cluster
Windows Server Failover Cluster (FWSF) — группа независимых серверов, совместная работа которых позволяет повысить отказоустойчивость и доступность приложений и служб. Кластерные серверы соединены на физическом (кабели) и логическом (программное обеспечение) уровнях. При сбое на одном из узлов кластера его его функции передаются на другой узел. Так же происходит постоянное автоматическое слежение за работоспособностью служб и ролей кластера.
Начиная с версии Windows Server 2016 стало возможно создать отказоустойчивый кластер состоящий из серверов, входящих в разные домены или в рабочую группу (без домена Active Directory).
Поддерживаются следующие сценарии кластеризации.
| Служба | Статус | Комментарий |
| SQL server | Поддерживается |
Рекомендуется использовать встроенную аутентификацию SQL Server |
| Файловый сервер |
Поддерживается, но не рекомендуется |
Не поддерживается Kerberos-аутентфикация для SMB |
| Hyper-V |
Поддерживается, но не рекомендуется |
Не поддерживается режим Live Migration, доступна только Quick migration |
| Message Queuing (MSMQ) |
Не поддерживается |
MSMQ хранит свои свойства в Active Diectory. |
Отказоустойчивый кластер будем создавать из двух одинаковых серверов. Тут есть нюанс: при создании кластера с чётным числом членов кластера настоятельно рекомендуется использовать диск-свидетель (witness) для нормальной работы кворума. Подробнее о кворуме и свидетелях в следующих статьях.
Подготовка к созданию отказоустойчивого кластера.
На каждом узле необходимо создать локальную учётную запись (cladmin) с правами администратора и одинаковыми паролями
net user /add cladmin pa$$w0rd@
net localgroup administrators cladmin /add
На обоих узлах кластера необходимо создать одинаковый DNS-суффикс чтобы серверы кластера могли обращаться друг к другу по FQDN.
Сначала смотрим какое имя присвоено сетевой карте, через которую узел кластер должен быть доступен для других серверов в кластере.
Get-NetAdapter

Теперь нам необходимо указать DNS-суффикс и отключить автоматическую регистрацию интерфейса в DNS:
Set-DnsClient -InterfaceAlias 'Ethernet' -ConnectionSpecificSuffix 'itsberg.ru' -RegisterThisConnectionsAddress:$false
В файл hosts необходимо внести изменения на всех узлах кластера, чтобы серверы могли отрезолвить имена других членов кластера и самого кластера (FQDN в том числе). Дописываем в конец файла примерно такое, исправив IP-адреса и имена на свои:
#Первый сервер
192.168.88.51 CL-TEST-01
192.168.88.51 CL-TEST-01.ITSBERG.RU
#Второй сервер
192.168.88.52 CL-TEST-02
192.168.88.52 CL-TEST-02.ITSBERG.RU
#Кластер
192.168.88.50 CL-ITSBERG-01
192.168.88.50 CL-ITSBERG-01.ITSBERG.RU
Установить роль Failover Clustering на всех серверах кластера
Install-WindowsFeatureFailover -Clustering –IncludeManagementTools
Теперь можем создавать отказоустойчивый кластер
New-Cluster –Name "CL-ITSBERG-01" -Node "CL-TEST-01","CL-TEST-02" -AdministrativeAccessPoint DNS -StaticAddress 192.168.88.50
Всё, примитивный кластер из двух серверов создан.
Далее необходимо добавить общее хранилище, роли кластера и т.д. В зависимости от целей.
In this blog, we’ll learn the skill to make a Microsoft Windows Failover Cluster with Windows Server 2019. The environment may be a two-node cluster with one shared disk.
Environment details:
SRV2019-DC
10.0.0.20
SRV2019-1
Primary – 10.0.0.30
Cluster – 192.168.0.10
SRV2019-2
Primary : 10.0.0.40
Cluster: 192.168.0.20
iSCSI Storage : 10.0.0.100
Cluster Name – XTCLUSTER
Cluster IP Address – 10.0.0.110
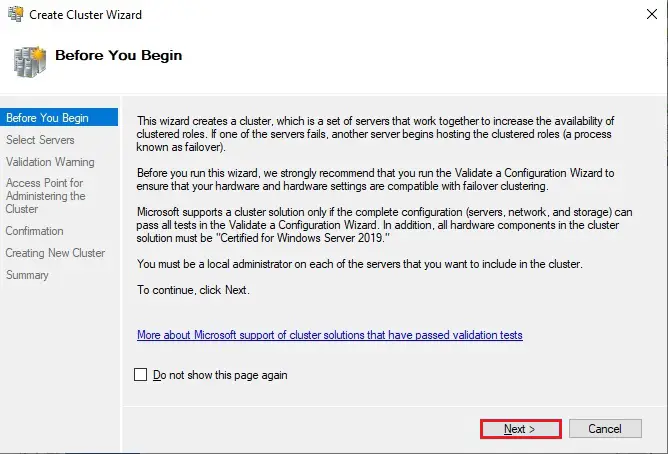
1- Before we start, make sure you meet the following prerequisites:
I have 2 Windows Server 2019 machines with the latest updates installed. The machines have at least two network interfaces, I rename them Primary and Cluster.
Join both servers to your Microsoft Active Directory domain and confirm that both servers see the shared memory device available in disk management. So, don’t bring the disk online yet.
2- User the Following PowerShell command to enable failover clustering and management Toole 1 Node (SRV2019-1)
Install-WindowsFeature -Name Failover-Clustering –IncludeManagementTools
Failover Cluster Server 2019
Enabling Failover Manager Feature in 2 Node (SRV2019-2).
3- Open Server Manage select dashboard and then click on ADD Roles and Features.
4- So, click Next.
5- Click Role-based or feature-based installation and then click Next.
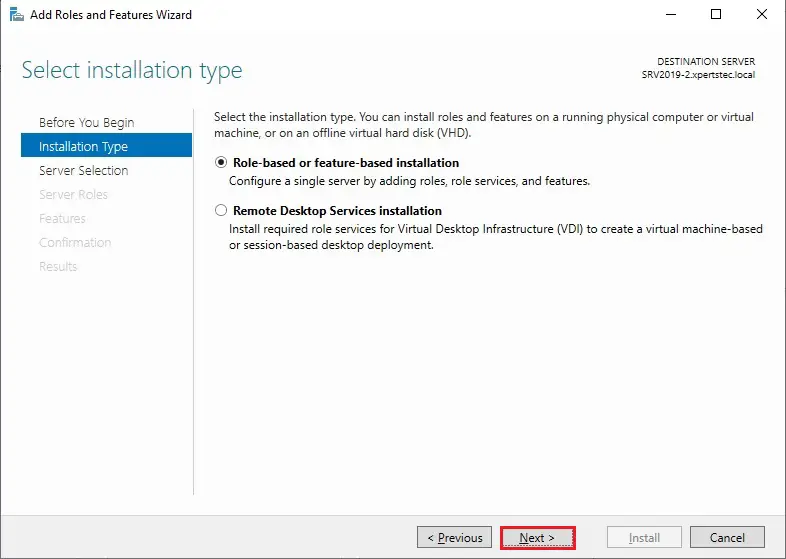
6- Select a server from the server pool and then click next.
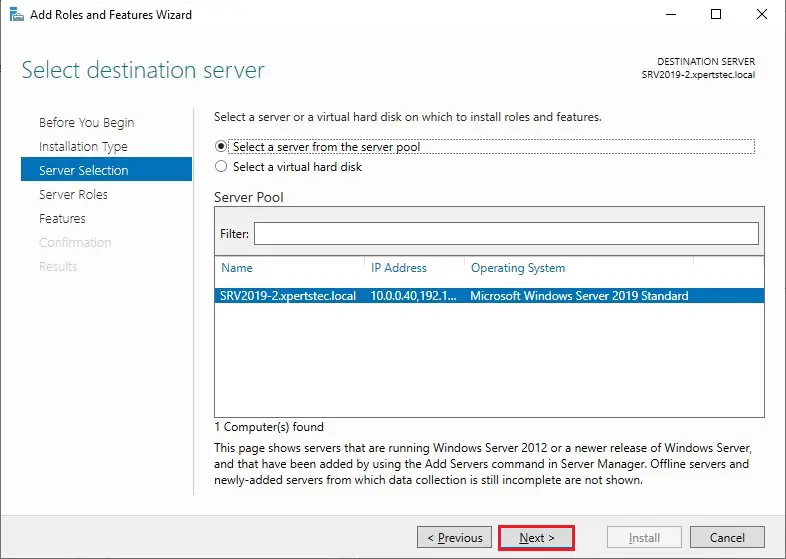
7- So, click Next.
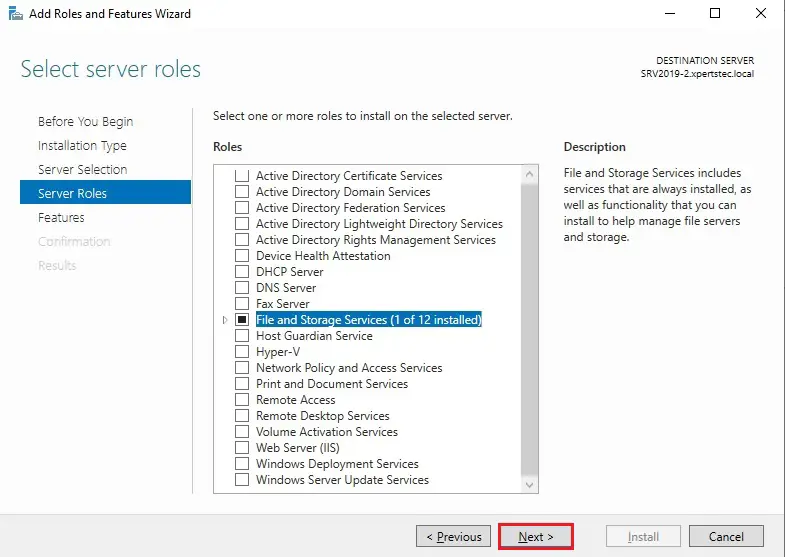
8- Select Failover clustering.
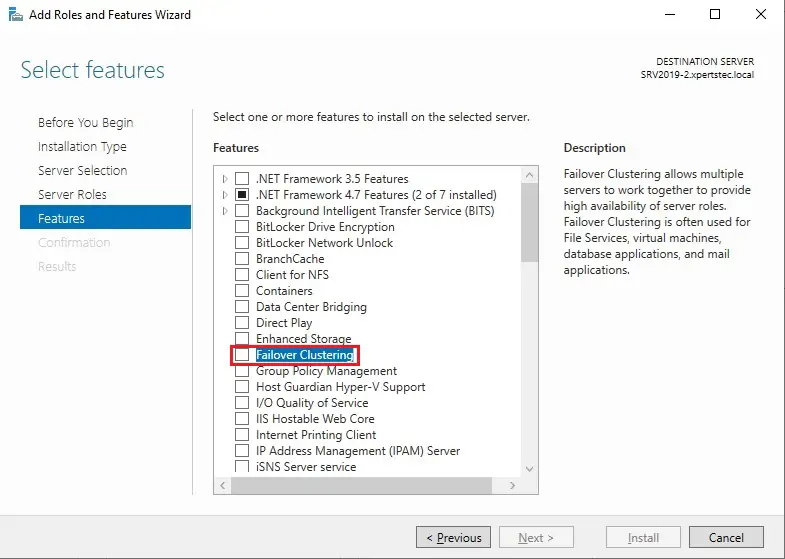
9- Click Add features.
10- After enabling the failover clustering feature so, click next.
11- Then click Install.
12- Successfully enable the Failover cluster feature so, click Close.
13- After a successful installation, it appears in the Server Manager, click Tools, and then Failover Cluster Manager.

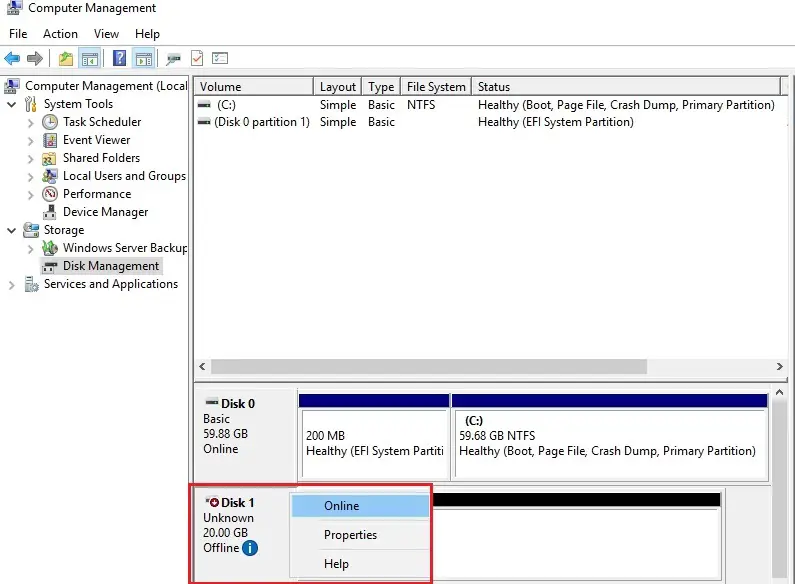
After you installed the Failover Clustering feature so, you can bring the shared disk online and format it on one of the servers 1 Node (SRV2019-1).
The following steps are performed on the 1 Node (SRV2019-1).
14- In Server Manager click Tools and then click Computer Management.
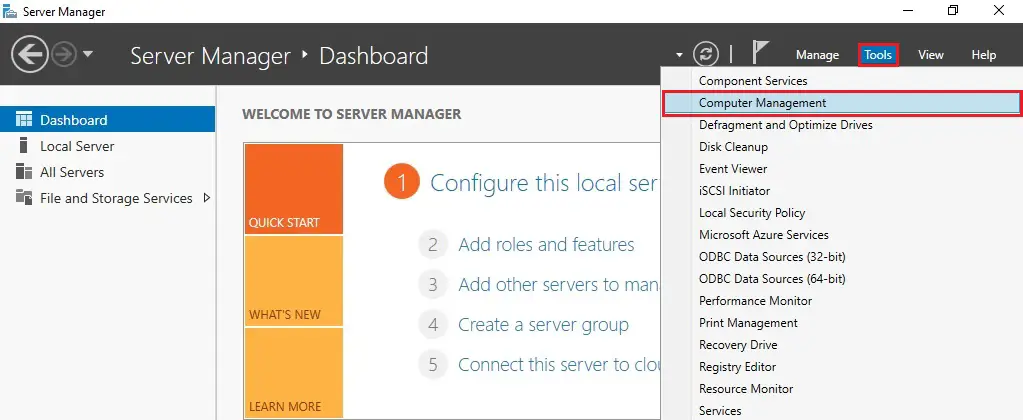
15- Click on Disk Management.
ou will see disk 1 which is in offline status right click on disk 1 and then select Online.
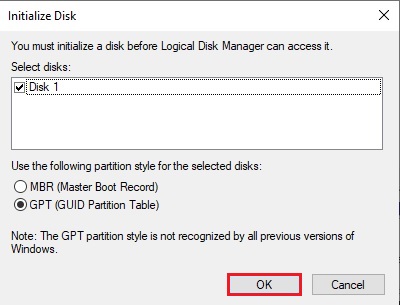
16- Right-click on disk 1 and click Initialize Disk.

17- Click OK.
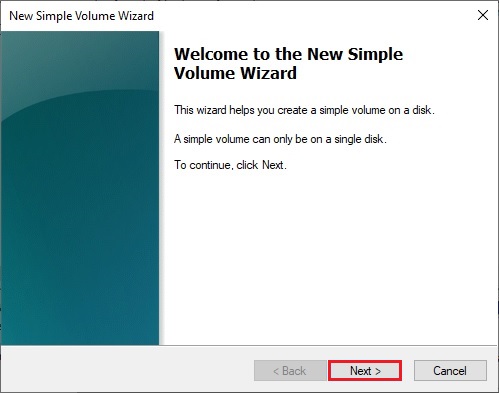
18- Right-click on unallocated disk 1 and select New Simple Volume.

19- Click Next.
20- Click Next.
21- Assign a drive letter and click Next.
22- Type a volume label and click next.
23- Click Finish.
24- 1 Node (SRV2019-1) Disk Management (disk status online)
25- Please Don’t change anything on the 2nd Node (SRV2019-2), the disk stays offline. 2ND Node (SRV2019-2) Disk Management (disk status offline).
Failover Cluster readiness check-in 1 Node (SRV2019-1).
Before we create the cluster, we’d like to form sure that everything is about up properly.
26- In Server Manager click Tools and Click Failover Cluster Manager.

27- Under Action menu click Validate Configuration.
28- Click Next.
29- Select the browse button.
30- Type both the Nodes name, click check name and click ok.
31- After Selecting the two-node servers for validation, click next.
32- Select Run all tests (recommended) and click next.
33- Review the validate configuration confirmation and click next.
34- Cluster validation testing is in progress.
35- After you make sure that every applicable test passed with the status successful. If you have any errors or warnings, you can use the detailed report by clicking on View Report and click Finish.
Create a Failover Cluster Server 2019
36- Under Action Menu so, select Create Cluster.
37- Click Next.
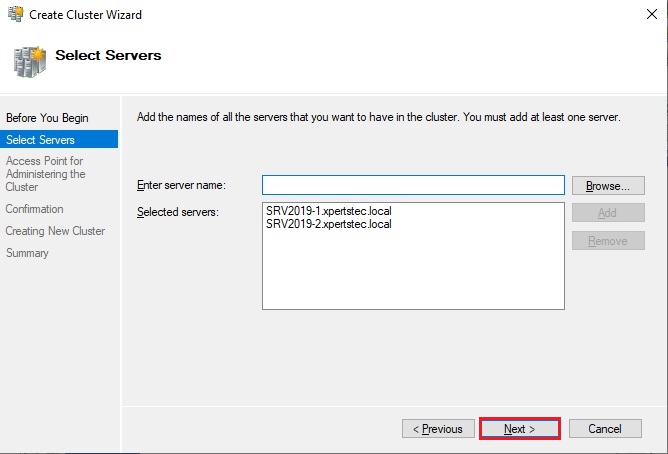
38- Click the browse button.

39- Type both the node names, click check names and click ok.

40- Both the servers nodes selected, click next.
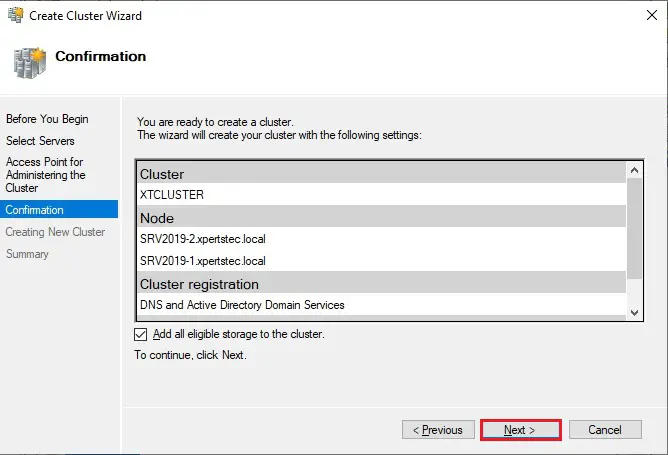
41- Type a Cluster name, select the IP address and click next.

42- As a last step, confirm everything, click next and wait for the cluster to be created.
43- Cluster setup successfully completed and click Finish.
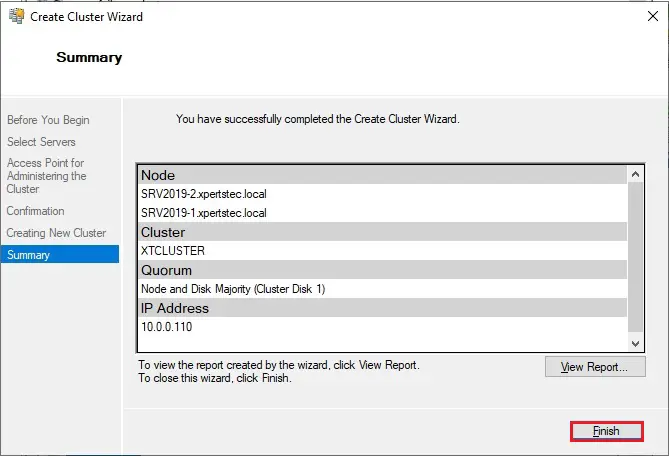
44- The wizard will add the shared disk automatically to the cluster per default. If you did not configure it yet, then it is also possible afterward. As a result, you can see a new Active Directory computer object named XTCLUSTER.
45- You can ping the new computer to check whether it is online (if you allow ping on the Windows firewall).
As an alternative, you’ll create the cluster also with PowerShell. the subsequent command also will add all eligible storage automatically:
New-Cluster -Name XTCLUSTER -Node SRV2019-1, SRV2019-2 -StaticAddress 10.0.0.110
46- Both the Nodes are up now.
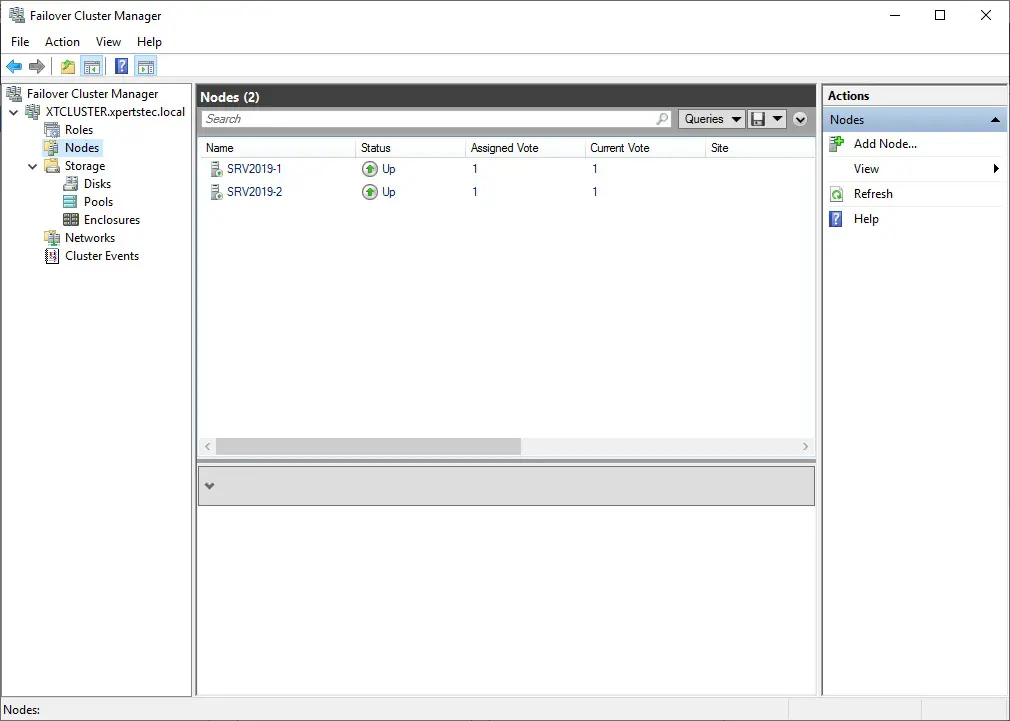
47- You can see the result in the Failover Cluster Manager in the Nodes and Storage under Disks sections.
For more information click here
How to Configure Network Load Balancing In Windows Server 2019.
Installing the Cluster is easy now days. But just this I post a little blog on how to do this, In my blog stats it shows that the 2012 post is still very active , so time for an update to Windows Server 2019. in the creation there isn’t much changed, it gets only easier. but If you still not in PowerShell you got more clicks to do an less Coffee. And Windows Admin Center is also a great addition to manage a cluster. This blog post is also usable in Azure Only you need to add Storagespacesdirect and a CSV file share.
Just install a bare metal (VM) windows Server 2019 and do a domain join and the fun can start.
Installing the Cluster Feature in powershell
Install-WindowsFeature –Name Failover-Clustering –IncludeManagementTools
#Create cluster validation report
Test-Cluster -Node MVP19-01,MVP19-02
#Create new Cluster
New-Cluster -Name MVP1911-27 -Node MVP19-01,MVP19-02 -NoStorage -StaticAddress «10.255.255.45»
#place witness file on USB device from my router
Set-ClusterQuorum -FileShareWitness \SERVERSHARE -Credential $(Get-Credential)
Now that the basic cluster is ready we start with the HA share

File share witness enhancements We enabled the use of a file share witness in the following scenarios:
- Absent or extremely poor Internet access because of a remote location, preventing the use of a cloud witness.
- Lack of shared drives for a disk witness. This could be a Storage Spaces Direct hyperconverged configuration, a SQL Server Always On Availability Groups (AG), or an * Exchange Database Availability Group (DAG), none of which use shared disks.
- Lack of a domain controller connection due to the cluster being behind a DMZ.
-
A workgroup or cross-domain cluster for which there is no Active Directory cluster name object (CNO). Find out more about these enhancements in the following post in Server & Management Blogs: Failover Cluster File Share Witness and DFS.
We now also explicitly block the use of a DFS Namespaces share as a location. Adding a file share witness to a DFS share can cause stability issues for your cluster, and this configuration has never been supported. We added logic to detect if a share uses DFS Namespaces, and if DFS Namespaces is detected, Failover Cluster Manager blocks creation of the witness and displays an error message about not being supported.
that’s it the cluster is created, we can start with the File server
Next is installation of the file server role

A restart is needed! After the restart we can build the cluster with the HA file share
$servers = («MVP19-01», «MVP19-02»)
foreach ($server in $servers) {Install-WindowsFeature -Name file-services -ComputerName $server}
Now that the File Server Role is added we can add the Disk. Or use a disk that you already added before.
First we need to add a disk this can be done in the Failover Cluster manager or with PowerShell


Get-ClusterAvailableDisk | Add-ClusterDisk

The Roles are there and the Disk is added


Next step is adding the File server Role to the Cluster and add the HA File Share.
In this case I have a fail over disk and I use the File Server for general use.


So when adding the Disk it is not showing the disk. This is The disk is added to the cluster but the disk isn’t formatted!

Keep in mind that formating the cluster disk while it is online is not possible. You need to set the disk in maintenance mode else the format will fail.


So after the disk format we will see the Disk appear and can be added to the File server


After this the File server is up and running. As you can see the setup is screen intense, building this with PowerShell is a lot faster.
Powershell
add-ClusterFileServerRole -Storage «Cluster Disk 1» -Name MyFiles
New-SmbShare -Name «Data» -Path «J:Data» -EncryptData $True
Quick steps with powershell and even the share is created and encrypted

Next step is adding the file share.

go for the Quick setup


Pick the disk and select the folder with the data on the disk, if there is no data then create a folder that will hold the data later.

as you can see the UNC path from the File Server.


As you can see the settings can be adjusted for you needs and also set the right access, and keep in mind this needs to be don on the Cluster Level!

All Done

So creating a File Server and 2 file shares is Click intensive if you don’t use PowerShell.
But What about Windows Admin Center ? yes that would be an option also except here you can’t create a cluster role.


You can create a new role but no file server /share etc.
But when the share is created and running like now you can use Windows Admin Center for migration the data to the file share.

But more and more options are coming in Windows Admin Center below are some links that you can use to add your request to the UserVoice
https://docs.microsoft.com/en-us/windows-server/manage/windows-admin-center/use/manage-failover-clusters
More Coming
Failover cluster management in Windows Admin Center is actively under development and new features will be added in the near future. You can view the status and vote for features in UserVoice:
Feature Request
Show more clustered disk info
Support additional cluster actions
Support converged clusters running Hyper-V and Scale-Out File Server on different clusters
View CSV block cache
See all or propose new feature
+++++++++++++++
Follow Me on Twitter @ClusterMVP
Follow My blog https://robertsmit.wordpress.com
Linkedin Profile Robert Smit MVP Linkedin profile
Google : Robert Smit MVP profile
![]()
Robert Smit is Senior Technical Evangelist and is a current Microsoft MVP in Clustering as of 2009.
Robert has over 20 years experience in IT with experience in the educational, health-care and finance industries.
Robert’s past IT experience in the trenches of IT gives him the knowledge and insight that allows him to communicate effectively with IT professionals
who are trying to address real concerns around business continuity, disaster recovery and regulatory compliance issues. Robert holds the following certifications:
MCT — Microsoft Certified Trainer, MCTS — Windows Server Virtualization, MCSE, MCSA and MCPS. He is an active participant in the Microsoft newsgroup community and is currently focused on Hyper-V, Failover Clustering, SQL Server, Azure and all things related to Cloud Computing and Infrastructure Optimalization.
Follow Robert on Twitter @ClusterMVP
Or follow his blog https://robertsmit.wordpress.com
Linkedin Profile Http://nl.linkedin.com/in/robertsmit
Robert is also capable of transferring his knowledge to others which is a rare feature in the field of IT. He makes a point of not only solving issues but also of giving on the job training of his colleagues.
A customer says » Robert has been a big influence on our technical staff and I have to come to know him as a brilliant specialist concerning Microsoft Products. He was Capable with his in-depth knowledge of Microsoft products to troubleshoot problems and develop our infrastructure to a higher level. I would certainly hire him again in the future. »
Details of the Recommendation: «I have been coordinating with Robert implementing a very complex system. Although he was primarily a Microsoft infrastructure specialist; he was able to understand and debug .Net based complext Windows applications and websites. His input to improve performance of applications proved very helpful for the success of our project
View all posts by Robert Smit [MVP]
In this tutorial, we would learn how to install and setup Failover cluster in Windows Server 2019 step by step. In the previous tutorial, we configures an iSCSI storage server and created three virtual disk.
To install and configure a failover cluster, let’s look at our network setup, then we follow some steps
- Our Network Environment
- Determine the Cluster Disks
- Add Failover Clustering Role
- Create the Failover Cluster
- Add Disks to the Cluster
1. Our Network Environment
Our lab network is set up using VirtualBox and consists of 4 computers:.
How to set up a domain network is explained here.
DC (192.168.1.90) – This is our domain controller.
Node1 (192.168.1.91) – This is one of the failover cluster nodes and a iSCSI initiator.
Node2 (192.168.1.92) – This is the second failover cluster nodes and an iSCSI initiator.
Node3 (192.168.1.93) – This is out iSCSI target server. It hosts the virtual disks
2. Determine the Cluster Disks
Before you start creating the failover cluster, you need to determine the disk that hold the cluster data. This is so that if a member of the cluster fails, then the data would still be available. In our setup, we have decided to host the disks in another computer (Node3). This is configured as iSCSI target server and contain 3 virtual disk.
The figure below shows Node3 with the 3 iSCSI disks configured.
How to configure iSCSI target server and disks
Note: Ensure that the disks are iSCSI virtual disks are initialized on one of the failover nodes
3. Add the Failover Clustering Role
Now we have to install the Failover cluster role in Node1 and Node2. Follow the steps below to do that.
Step 1 – In Node1, click on Add Roles and Feature. This will launch the Add Roles and Features wizard. Follow the steps and select Failover Clustering as shown below. Then complete the installation.
Step 2 – Repeat the process for Node2
4. Create the Failover Cluster
We would now use the Failover cluster manager to create a cluster. Follow the steps below:
Step 1 – In Node1, click on Manager and select Failover Cluster Manager. The window is shown below
Step 2 – Click on Validate Configuration and follow the wizard steps to do the validation (this is done only in Node1). The wizard will ask you to specify the Servers you want to participate in the clustering. You will use AD to find Node1 and Node2 and select them.
At the end of the validation, you may have warning relating to unsigned drivers. Ignore these warnings because they come from VirtualBox Guest Additions.
Step 3 – Click on Create Cluster. You will have to select the Node1 and Node1. Then you need to specify the cluster name. The complete the cluster creation. The figure below shows the final screen indicating the cluster creation was successful.
5. Add Disks to the Cluster
Failover clusters require disks and in this case we would used virtual disks from the iSCSI target server.
Step 1– Add storage to the cluster. To do that open the Failover Cluster manager as shown below.
Step 2 – Click on Add Disk. The three iSCSI disks would be listed. Ensure that they are selected.
Click on OK.
At this point, the disks are added to the cluster and they are online as well. See the figure below
In subsequent tutorials, I discuss the concept of Witness in failover cluster and how to configure Quorum witness and Disk witness.
I also recommend you watch the video in my Youtube Channel.
Данная статья подойдёт для новичков, которые хотят потренироваться в настройке кластера Hyper-V 2019. Итак, имеется:
— Тестовый комп1 «железный»
— Тестовый комп2 «железный»
— Тестовый комп3 «виртуальный» с Windows srv 2019 и настроенной ролью контроллера домена.
— Тестовый комп4 «железный» с расшаренным диском по протоколу iSCSI.
— Всё это соединено через обычный пассивный коммутатор.
На тестовый комп1 установлена Windows Srv 2019 Standard Evaluation с графической оболочкой. На тестовый комп2 установлена Microsoft Hyper-V Server 2019 — данная ОС бесплатна и устанавливается как обычная Windows 10/2019. Скачать эту ОС можно с оф.сайта Microsoft:
https://www.microsoft.com/ru-ru/evalcenter/evaluate-hyper-v-server-2019
Собственно, на этой же странице можно скачать и Windows Srv 2019 Standard Evaluation. И если, после установки Windows Srv 2019 с графической оболочкой, вопросов о том, как ей пользоваться дальше, нету, то после установки Hyper-V Server 2019 могут возникнуть вопросы, что с этой ОС делать дальше. Ведь у Hyper-V Server 2019 графической оболочки нет. После установки есть лишь вот такое окно:

Здесь можно сделать самые основные настройки: задать имя компьютера, прописать статический IP, включить доступ по RDP.


Для дальнейшего удобства администрирования данной ОС, я установлю пару инструментов. Первый из них — это банальный Total Commander portable, который я просто скопирую на диск C: с флэшки. Сделать это можно командой:
xcopy f:totalcmd c:totalcmd /y /e
Где f:totalcmd — это каталог с total командером на флэшке, а c:totalcmd — каталог, в который копирую.

Потом перехожу в этот каталог и запускаю тотал командер:
c:
cd c:totalcmd
totalcmd.exe

Дальше уже будет проще. Пользуясь тотал командером, нахожу каталог с драйверами и устанавливаю их.

Следующий инструмент, который облегчит администрирование Hyper-V Server 2019 — это WINDOWS ADMIN CENTER. Это вэб-админка от Microsoft, с помощью которой можно администрировать сервер через вэб-интерфейс. Некий аналог Webmin, но для Windows-систем. Скачать его можно на той же странице, где скачивались установочные образы операционных систем:
https://www.microsoft.com/ru-ru/evalcenter/evaluate-windows-admin-center
Дистрибутив Windows админ центра можно тоже перенести через флэшку на сервер.
Установка данного программного обеспечения самая обычная, где все параметры можно оставить по умолчанию.

После установки Windows админ центра нужно зайти на сервер через обычный браузер по https протоколу:
https://192.168.0.206/
Сообщение безопасности нужно игнорировать, т.к. используется самоподписанный сертификат. Логин и пароль при подключении — это виндовый «администратор» с его паролем в самой ОС. Вот так выглядит Windows Admin Центр:

В списке серверов выбираю свой, который также стал шлюзом Windows AdminЦентра. Ну и подробно на всех возможностях останавливаться не буду, т.к. их много. Вэб-интерфейс хоть и тормозной, но довольно функциональный — через него можно будет управлять и виртуальными машинами в том числе. Или, например, если какие-то драйвера не установлены, то их можно доустановить уже через Windows AdminЦентр:

Я же пробую ввести данный сервер в домен. Жму на меню «Обзор» и затем на «Изменить идентификатор компьютера».

Ну а дальше, всё как обычно:

Сервер перезагрузится. После чего, в Windows Admin Центр рекомендуется войти уже под доменным администратором! Имя пользователя надо вводить в таком формате:

Ну и кстати, желательно бы установить обновления для Windows Admin Центра, если они есть. Для этого надо нажать на шестерёнку и выбрать пункт «расширения». Ну и там дальше всё понятно будет:

Разобравшись с сервером на ОС Hyper-V Server 2019, сделаю всё то же самое и на сервере под управлением Windows Srv 2019 Standard Evaluation. Там уже всё делается в привычном виде — через графическую оболочку Windows. Установил драйверы, ввел сервер в домен AD — подробности этого всего описывать не буду.
Следующим шагом будет подключение сетевого диска iSCSI. Захожу в «Средства администрирования»:

И там выбираю Инициатор iSCSI:

При первом запуске выйдет сообщение о том, что служба iSCSI не запущена, и будет предложено запустить эту службу и включить её автозапуск при старте сервера. Ну а потом появится окно, в котором надо будет перейти на вкладку «Обнаружение» и нажать на кнопку «Обнаружить портал»:

Затем надо ввести IP-адрес сервера iSCSI:

В моём случае, этого будет достаточно. Но если iSCSI сервер требует пароль для подключения к себе, то надо нажать кнопку «Дополнительно» и там ввести этот пароль.
Далее, надо перейти на вкладку «Конечные объекты» и нажать кнопку «Подключить»:

В появившемся окне надо нажать на «ОК», после чего диск перейдёт в состояние «Подключено»:

Всё, это окно можно закрывать. Дальше надо зайти в диспетчер управления дисками, в котором отобразится подключенный iSCSI диск. Его надо проинициализировать и отформатировать в NTFS:


Сильно подробно это не буду расписывать. Уверен, что форматировать диск под NTFS умеют все ИТ-специалисты. После форматирования можно попробовать что-нибудь записать на него, чтобы убедиться в работоспособности диска.

Далее, этот же диск надо подключить на втором сервере под управлением Hyper-V Server 2019. На самом деле, там это всё делается точно также. Надо лишь в командной строке ввести:
iscsicpl
Появится точно такое же окно, как и на сервере с графической оболочкой:

Нужно проделать те же действия, что и на первом сервере. Но в диспетчер дисков заходить уже не нужно. Достаточно просто подключить диск по iSCSI.
Теперь снова перехожу к серверу под управлением Windows Srv 2019 Standard Evaluation, на котором нужно установить роль Hyper-V, а также роль Кластера. В диспетчере сервером жму «Добавить роли и компоненты»:

В первом шаге жму «далее», потом снова «далее», оставив на месте крыжик «Установка ролей или компонентов». Выбираю в списке свой сервер, который там пока один, жму «далее»:

Ставлю галку на Hyper-V и соглашаюсь с добавлением остальных компонентов по зависимостям:

Жму «далее». На следующем шаге, где уже предлагается выбрать компоненты, ставлю галку на «Отказоустойчивой кластеризации» и соглашаюсь с добавлением остальных компонентов по зависимостям:

Жму кнопку «Далее». На следующем шаге предлагается сразу создать виртуальный коммутатор, но я пока не буду. Создам его потом вручную. Просто жму «Далее».

На следующем шаге предлагается включить и выбрать протокол для динамической миграции. Однако внизу есть предупреждение, что если данный сервер будет членом кластера, то этого делать на надо. Поэтому ничего не трогаю и жму «далее».

Расположение по умолчанию дисков и конфигурации виртуальных машин тоже пока не трогаю. Эти значения надо менять уже после настройки кластера. Жму «далее», а затем «установить». Дожидаюсь окончания установки.

Теперь кое-какие компоненты надо установить на машине с Hyper-V Server 2019. Для этого открываю диспетчер серверов на машине с Windows Srv 2019 Standard Evaluation и жму «Добавить другие серверы для управления»:

В поле «Имя» ввожу имя компьютера машины Hyper-V Server 2019, жму «найти» и потом добавляю его в правый список. Жму «ОК»:

Потом жму «Добавить роли и компоненты» и на шаге, где предлагается выбрать сервер, выбираю машину с Hyper-V Server 2019:

На шаге с выбором ролей сервера ничего не трогаю и жму «далее». А вот на шаге выбора компонентов добавляю «Отказоустойчивую кластеризацию» и соглашаюсь с добавлением остальных компонентов по зависимостям:

Жму «далее» и «установить», дожидаюсь окончания установки.
Теперь надо создать кластер. На машине Windows Srv 2019 Standard Evaluation захожу в «средства администрирования» и выбираю «Диспетчер отказоустойчивости кластеров»:

В открывшемся окне жму «Создать кластер».

На первом шаге «Перед началом работы» жму «далее». А на следующем шаге выбираю, какие серверы будут членами кластера:

На следующем шаге предлагается выполнить проверочные тесты для выбранных серверов. Пусть выполнит. Оставляю «да» и жму «далее».

Откроется дополнительный мастер с вопросом, какие тесты выполнить. Оставляю «Выполнить все тесты» и жму «далее».

Запускается тестирование, жду его окончания:

У меня тестирование нашло ошибки, которые я и предполагал, что будут:

Да, действительно, у меня тестовые компы на разных процессорах. Один на Intel Xeon 2620 v3, а второй на AMD FX 8350. Но других компов у меня нет, да и это лишь тестовая установка. Сеть у меня тоже одна, хотя рекомендуется иметь выделенную сеть для соединения с дисками iSCSI. Ну и разные версии операционных систем я выбрал нарочно — хочу посмотреть, как оно будет работать именно в таком варианте. Повторюсь, что установка тестовая, в домашних условиях и лишь для ознакомления. Для продакшена надо делать следуя рекомендациям Microsoft.
После тестов появляется следующий шаг, на котором надо задать имя кластера и указать его IP-адрес:

Жму «далее». Здесь тоже жму «далее»:

После создание кластера появится такое окно:

Иии… Сразу обращаю внимание, что есть какие-то ошибки.

Смотрю их подробнее:
Ресурсу сетевого имени «Имя кластера» кластера не удалось зарегистрировать одно или несколько связанных DNS-имен по следующей причине:
Неверный раздел DNS.
Убедитесь, что сетевые адаптеры, связанные с зависимыми ресурсами IP-адресов, настроены для доступа хотя бы к одному DNS-серверу.
И действительно на DNS-сервере запись о кластере не добавилась. Причину тому не знаю:

Но не страшно, добавляю эту запись вручную.

После создания кластера надо настроить для него параметры кворума. Что это за кворум, почитать можно тут:
https://docs.microsoft.com/ru-ru/windows-server/storage/storage-spaces/understand-quorum
Вообще, мастер установки сделал правильно. Он под кворум забрал диск iSCSI. Но дело в том, что это мой единственный диск iSCSI, который я хочу использовать под виртуальные машины, а не под кворум. Кворум можно разместить в обычной сетевой папке. Поэтому захожу вот сюда:

Там выбираю «Выбрать свидетель кворума»:

И дальше выбираю «Настроить файловый ресурс-свидетель»:

И указываю сетевую папку:

Потом жму везде «далее».

Важно! В правах доступа к этому каталогу должны быть указаны не только администраторы, но и сам кластер:

Добавить его можно, включив галку «Компьютеры» вот тут:

После того, как диск высвободился из-под кворума, добавляю его в общие тома кластера:

Теперь надо добавить виртуальный коммутатор на обе машины. Важно, чтобы виртуальные коммутаторы имели одинаковое название. Создать их можно как через оснастку на Windows Srv 2019 Standard Evaluation, так и через Windows Admin Center. Я, ради интереса, создам виртуальный коммутатор на машине с Windows Srv 2019 Standard Evaluation через Windows Admin Center. А виртуальный коммутатор на машине с Hyper-V Server 2019 создам через оснастку на Windows Srv 2019 Standard Evaluation.
Итак, захожу в Windows Admin Center и выбираю «Диспетчер кластеров»:

Потом жму «Добавить»:

И справа будет предложено ввести имя кластера, а также учётные данные для подключения к нему. Заполняю и жму «Подключитесь с помощью учётной записи»:

Потом жму «Добавить»:

Теперь вижу кластер в списке хостов для управления через Windows Admin Center. Выбираю его:

Ну а там перехожу в меню «Виртуальные коммутаторы» и жму «Создать».

Ну а там дальше выбираю узел, задаю название коммутатора и тип выбираю ему внешний. Жму создать.

Во время создания виртуального коммутатора отвалится ненадолго связь с машиной, на которой он создаётся. Потом он отобразится в списке виртуальных коммутаторов:

Теперь создам виртуальный коммутатор для машины с Hyper-V Server 2019, но через оснастку на машине Windows Srv 2019 Standard Evaluation. Открываю «Средства администрирования» и выбираю оснастку «Диспетчер Hyper-V»:

Там выбираю «Подключиться к серверу», пишу его имя и жму «ОК»:

Дальше захожу в «Диспетчер виртуальных коммутаторов»:

Выбираю внешний и жму «Создать виртуальный коммутатор»:

Задаю такое же имя, как и на первой машине, жму «ОК»:

Выйдет предупреждение, что связь с машиной потеряется на некоторое время. Соглашаюсь и жду завершения. После чего снова захожу в «Диспетчер виртуальных коммутаторов» и вижу, что коммутатор там появился:

Также его можно видеть и через Windows Admin Center:

Что ж, пришло время создать виртуальную машину. Я попробую что-нибудь лёгкое, например, виртуальную машину с Windows XP. Создаю:

Выбираю хост:

Задаю название машины и расположение её конфигурации. Каталог C:ClusterStoragevolume1 — это и есть тот самый iSCSI диск.

Далее предлагается выбрать поколение виртуальной машины. Для Windows XP надо выбирать первое поколение.
Оперативной памяти выделяю 1Гб, хватит сполна.
Далее настройка сети. Там выбираю виртуальный коммутатор komm1.
Дальше мастер предлагает сразу создать виртуальный диск для этой виртуальной машины. Для XP большой диск не нужен. Также указываю месторасположение диска — тоже на ресурсе iSCSI:

Жму «Далее». На следующем шаге предлагается выбрать установочный носитель с операционной системой. В моём случае, он лежит на флэшке, подключенной к серверу. Выбираю его:

Жму «далее», жму «готово» и получаю вот такую непонятную ошибку:

Не удалось создать виртуальную машину. Проблема оказалась в правах доступа файловой системы. Мастер не мог создать виртуальную машину, т.к. у него просто не было доступа в указанный каталог. Дал вот такие права, и виртуальная машина создалась:

Пробую запустить и установить Windows XP. Жму сначала «Запустить», а потом «Подключить»:


Началась установка Windows XP. Кстати, эту виртуальную машину видно и в Windows Админ Центре:

И от туда к ней тоже можно подключиться:

После установки в Windows XP даже мышь работать не будет. Чтобы всё заработало, надо установить службы интеграции. Установочный образ можно взять тут:
https://disk.yandex.ru/d/b8dcTwIQerC-EQ/vmguest.iso
А затем подставить его в свойствах виртуальной машины вместо установочного образа Windows XP:

Это можно сделать даже при включённой виртуальной машине. Сработает автозапуск с виртуального CD, и интеграционные службы начнут сразу устанавливаться:

Потом установщик попросит перезагрузку. После перезагрузки Windows XP будет работать абсолютно нормально.
Теперь хочется проверить, как виртуальная машина будет переходить с одного узла на другой в кластере. Пробую запустить динамическую миграцию на узел Hyper1:

И получаю ошибку. В подробных сведениях написано вот что:

Собственно, это то, о чём и предупреждал мастер создания кластера на этапе тестирования. Невозможно произвести динамическую миграцию от узла с процессором Intel на узел с процессором AMD. И наоборот — тоже нельзя. Но зато можно это сделать, завершив работу виртуальной машины. Пробую. Работу Windows XP завершил и теперь пробую сделать быструю миграцию (меню динамической миграции уже неактивно):

На этот раз всё успешно, виртуальная машина переместилась на узел Hyper1. Пробую запустить:

Работает. Пробую теперь погасить сервер Hyper2. Виртуальная машина с Windows XP осталась работать при этом:

На этом можно и заканчивать статью. Конечно, для продакшена такая настройка кластера не подойдёт. Но для ознакомления — вполне себе вариант. Так что, может кому и пригодится.
Донаты принимаются на кошельки:
Yoomoney:
4100118091867315
BTC:
bc1qzw9vam8mv6derwscxl0vrnd6m9t2rpjg273mna
ETH / BNB BSC / Polygon MATIC:
0x5cc07FF76490350ac6112fbFdA1B545Bc794602F
Tron:
TJUz8sJr9XYMjVqzmFNnCzzRWfPa57X2RV
USDT/USDC в сетях ETH/BSC/Polygon:
0x5cc07FF76490350ac6112fbFdA1B545Bc794602F
USDT в сети TRX (Tron):
TJUz8sJr9XYMjVqzmFNnCzzRWfPa57X2RV
LTC:
LRMZaFCSyCT6FUF62WEX1BokWV7v2dh2zo
Doge:
DTEnGLZRps9XaWNtAhchJWSeD4uTNDRxg7
XMR:
4A6uP1WxEc7HktToZFyiJuK6YmjdL8bSn2aY653qPwABhT4Y56iFuedgHcmpvLwWE55u8qkjGc715ZJs761FqedA8gkgznr
TON:
UQAdSPiWIDx2Q1VIeezkUV3s4sNlZM90w2ohSO6bD2-okwgY