|
0 / 0 / 0 Регистрация: 22.09.2007 Сообщений: 314 |
|
|
1 |
|
|
29.05.2011, 16:48. Показов 27740. Ответов 7
Для корректной установки WinGate требуется полностью отключить ICS, иначе может возхникнуть конфликт по портам, НО КАК ЭТО СДЕЛАТЬ?????? Заранее благодарен
__________________
0 |

")
|
51 / 17 / 6 Регистрация: 18.05.2007 Сообщений: 1,322 |
|
|
29.05.2011, 17:02 |
2 |
|
В свойствах сетевого соединения, в дополнительных настройках снять флажок Internet Connection Sharing.
0 |
|
0 / 0 / 0 Регистрация: 22.09.2007 Сообщений: 314 |
|
|
30.05.2011, 03:12 [ТС] |
3 |
|
Он все-равно пишет, что ICS включен. Еслиб так легко было, я б не спрашивал
0 |
|
Messir |
|
|
02.06.2011, 06:25 |
4 |
|
net stop SharedAccess |
|
0 / 0 / 0 Регистрация: 22.09.2007 Сообщений: 314 |
|
|
02.06.2011, 23:25 [ТС] |
5 |
|
А где это вводить???
0 |
|
Messir |
|
|
03.06.2011, 02:35 |
6 |
|
есть сильные подозрения, что в командной строке… |
")
|
0 / 0 / 0 Регистрация: 15.01.2018 Сообщений: 12 |
|
|
22.03.2018, 22:57 |
7 |
|
net stop SharedAccess Системная ошибка 5
0 |
|
0 / 0 / 0 Регистрация: 15.01.2018 Сообщений: 12 |
|
|
22.03.2018, 23:01 |
8 |
|
вот тут получилось Миниатюры
0 |

Если вы хотите отключить Совместное использование подключения к Интернету (ICS) в Windows 10 следуйте этому пошаговому руководству. Поскольку Windows 10 поставляется со встроенной опцией, установка дополнительного программного обеспечения для отключения этой функции не требуется.
ICS или общий доступ к подключению к Интернету — это такая функция, которая позволяет вам совместно использовать подключение к Интернету одного компьютера с несколькими компьютерами, подключенными к локальной сети или LAN. Другими словами, можно обеспечить подключение к Интернету более чем одного компьютера с одного IP-адреса через технологию NAT.
Чтобы отключить общий доступ к подключению к Интернету (ICS) в Windows 10, выполните следующие действия:
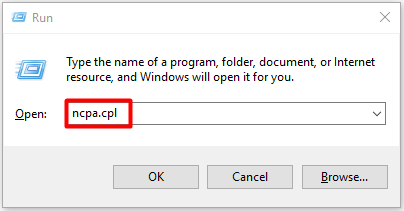
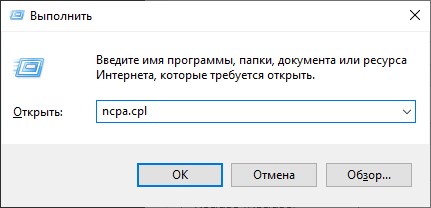
- Нажмите Win + R, чтобы открыть окно «Выполнить».
- Тип ncpa.cpl и нажмите кнопку Enter.
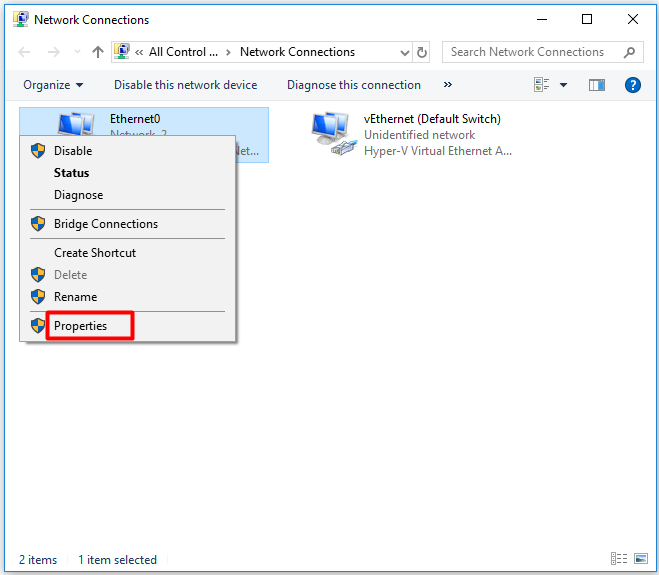
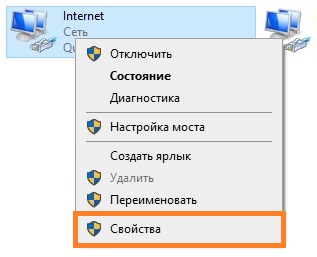
- Щелкните правой кнопкой мыши сетевой адаптер.
- Выберите Характеристики вариант.
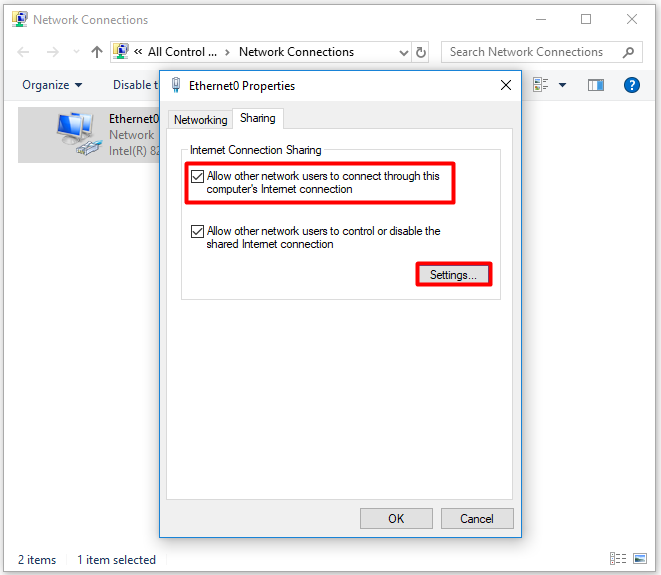
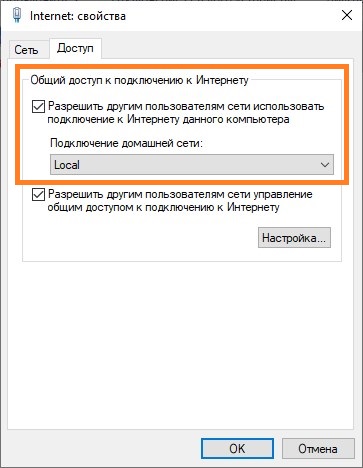
- Переключитесь на Совместное использование таб.
- Снимите галочку с Разрешить другим пользователям сети подключаться через Интернет-соединение этого компьютера флажок.
- Щелкните значок Ok кнопка.
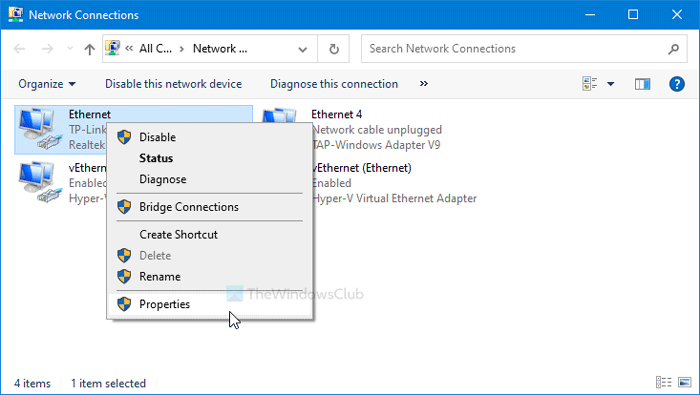
Ппресс Win + R , чтобы открыть приглашение «Выполнить». Введите ncpa.cpl и нажмите Войти кнопку, чтобы открыть Сетевые соединения окно. Кроме того, вы можете найти «сетевые подключения» в поле поиска на панели задач и щелкнуть соответствующий результат. После открытия окна щелкните правой кнопкой мыши нужный сетевой адаптер и выберите Характеристики вариант.
Затем переключитесь на Совместное использование вкладку и снимите галочку с Разрешить другим пользователям сети подключаться через Интернет-соединение этого компьютера флажок.
Щелкните значок Ok кнопку, чтобы сохранить изменение.
Этот метод работает для каждого источника подключения. Другими словами, если вы хотите отключить его для нескольких интернет-источников, вам нужно повторить шаги для каждого из них. Однако, если вы хотите полностью отключить его, вы можете использовать Услуги панель.
Связанный: Общий доступ к подключению к Интернету не работает в Windows 10.
Отключить общий доступ к подключению Интернета (ICS) с помощью служб
Чтобы отключить общий доступ к подключению к Интернету (ICS) в Windows 10 с помощью служб, выполните следующие действия:
- Ищи Сервисы в поле поиска на панели задач.
- Щелкните соответствующий результат.
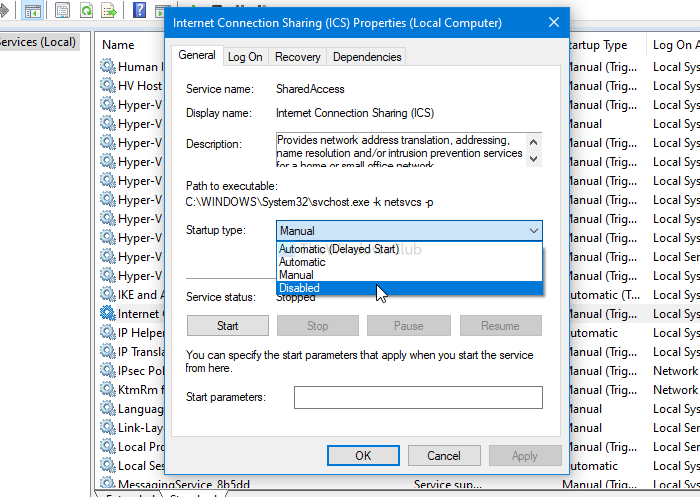
- Дважды щелкните значок Совместное использование подключения к Интернету (ICS).
- Щелкните значок Останавливаться кнопка.
- выбирать Неполноценный из Тип запуска выпадающий список.
- Нажать на Ok кнопка.
Давайте проверим подробную версию этих шагов.
Для начала найдите службы в поле поиска на панели задач и щелкните соответствующий результат. Далее узнайте Совместное использование подключения к Интернету (ICS) и дважды щелкните по нему. Нажать на Останавливаться кнопка.
После этого разверните Тип запуска раскрывающийся список и выберите Неполноценный.
Затем щелкните значок Ok кнопку, чтобы сохранить изменение.
Надеюсь, это поможет.
Читать дальше: Произошла ошибка при включении общего доступа к подключению к Интернету.
Download PC Repair Tool to quickly find & fix Windows errors automatically
If you want to disable Internet Connection Sharing (ICS) in Windows 11/10, follow this step-by-step guide. As Windows 10 comes with an in-built option, no additional software is required to install to disable this functionality.
ICS or Internet Connection Sharing is a feature that lets you share one computer’s internet connection with multiple computers connected in a Local Area Network or LAN. In other words, it is possible to provide an internet connection to more than one computer from a single IP address via NAT technology.
To disable Internet Connection Sharing (ICS) in Windows 11/10, follow these steps-
- Press Win+R to open the Run prompt.
- Type ncpa.cpl and hit the Enter button.
- Right-click on the network adapter.
- Select the Properties option.
- Switch to the Sharing tab.
- Remove the tick from Allow other network users to connect through this computer’s Internet connection checkbox.
- Click the OK button.
Ppress Win+R to open the Run prompt. Type ncpa.cpl, and hit the Enter button to open the Network Connections window. Alternatively, you can search for “network connections” in the Taskbar search box and click on the respective result. After opening the window, right-click on the desired network adapter and select the Properties option.
Then, switch to the Sharing tab and remove the tick from the Allow other network users to connect through this computer’s Internet connection checkbox.
 in Windows 10")
Click the OK button to save the change.
This method works per connection source basis. In other words, if you want to disable it for multiple internet sources, you have to repeat the steps for each one of them. However, if you want to disable it altogether, you can use the Services panel.
Related: Internet Connection Sharing not working on Windows.
Turn off Internet Connection Sharing (ICS) using Services
To turn off Internet Connection Sharing (ICS) in Windows 11/10 using Services, follow these steps-
- Search for services in the Taskbar search box.
- Click on the respective result.
- Double-click on the Internet Connection Sharing (ICS).
- Click the Stop button.
- Choose Disabled from Startup type drop-down list.
- Click on the OK button.
Let’s check out the detailed version of these steps.
To get started, search for services in the Taskbar search box, and click on the corresponding result. Next, find out Internet Connection Sharing (ICS) and double-click on it. Click on the Stop button.
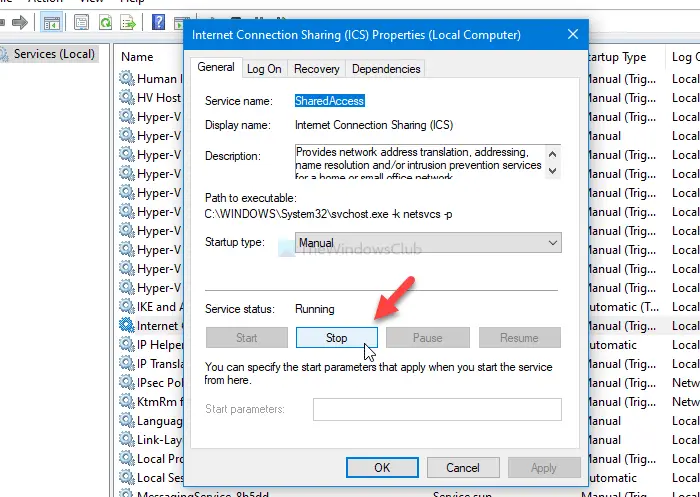
Following that, expand the Startup type drop-down list and choose Disabled.
Then, click the OK button to save the change.
I hope it helps.
Read next: An error occurred while Internet Connection Sharing was being enabled.

Anand Khanse is the Admin of TheWindowsClub.com, a 10-year Microsoft MVP (2006-16) & a Windows Insider MVP (2016-2022). Please read the entire post & the comments first, create a System Restore Point before making any changes to your system & be careful about any 3rd-party offers while installing freeware.
-
Partition Wizard
-
Partition Magic
- Internet Connection Sharing | How to Disable/Enable It
By Amy | Follow |
Last Updated April 26, 2021
This post mainly shows you what Internet connection sharing is and how to enable and disable the service. In addition, it also provides you with some extra information about Internet connection sharing Windows 10. Explore the content with MiniTool now.
What Is Internet Connection Sharing
Internet connection sharing (ICS), a Windows service, enables an Interne-connected computer to share its Internet connection with other PCs on a local area network. The PC that shares its Internet connection serves as a gateway device, which means all the traffic between other computers and the Internet go through this computer.
Tip: The Internet connection sharing is a feature in Windows 98 SE and all versions of Windows personal computers systems thereafter.
Computers connected to the gateway computer (both wired and wireless) can utilize ICS. This service offers Dynamic Host Configuration Protocol (DHCP) and network address translation (NAT) services to the LAN computers.
The Windows 10 Internet connection sharing service allows most devices (even includes non-Windows and previous Windows systems) to connect without having extra client software installed.
With this service, all the connected clients can utilize many different protocols like VPN and Internet gaming. Through the ICS computer, clients are given an IP address and configured for DNS automatically.
Also read: How to Block Internet Access? Try These Methods Now
How to Disable/Enable the Internet Connection Sharing Service
Enable/Disable the Internet Connection Sharing Service via Run
You can enable the Internet connection sharing service with the steps below.
Step 1: Open the Run window by pressing Windows + R key, and then input ncpa.cpl and click OK.
Step 2: Right-click on your network adapter and choose the Properties option.
Step 3: Navigate to the Sharing tab and check the Allow other network users to connect through this computer’s Internet connection checkbox. Then, click Settings to choose the specific services.
Tip: If you want to disable the Internet connection sharing service, uncheck the Allow other network users to connect through this computer’s Internet connection checkbox instead.
Step 4: Choose the service to enable and click OK in the pop-up window to confirm the operation. Then click OK in the original window to save and execute the changes.
If you want to share Wi-Fi over Ethernet Windows 10, you need to build a new network to allow other users to connect to your host computer and access the Internet. For that, follow these steps.
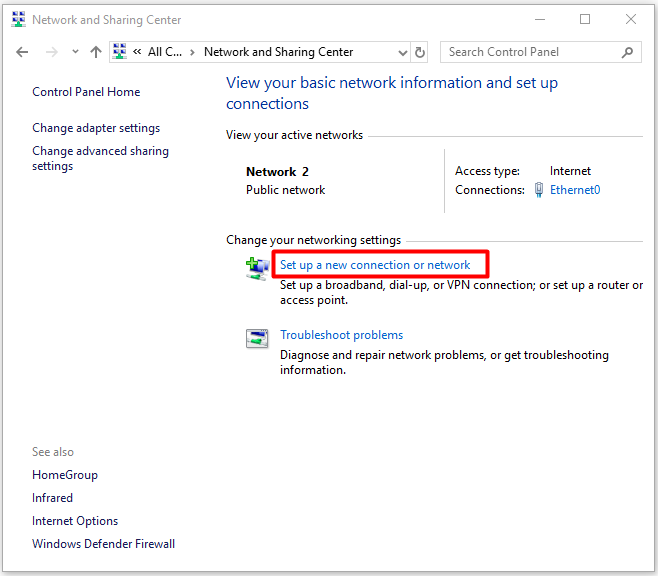
Step 1: After opening Control Panel, move to the Network and Sharing Center. Click the Set up a new connection or network link to continue.
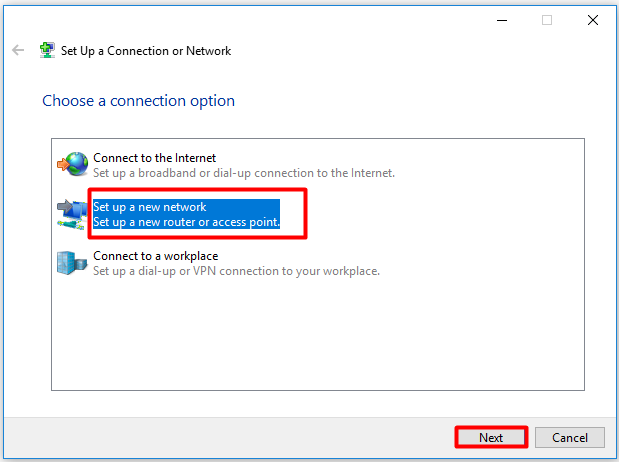
Step 2: In the next window, choose the Set up a new network option and click Next. The follow the prompted instruction to finish the operation.
Step 3: Now, other computers can connect to the network of this computers.
Enable/Disable the Internet Connection Sharing Service via Services
To enable/disable ICS via Services, you can refer to the following steps.
Step 1: Open the Run window, and type services.msc and click OK.
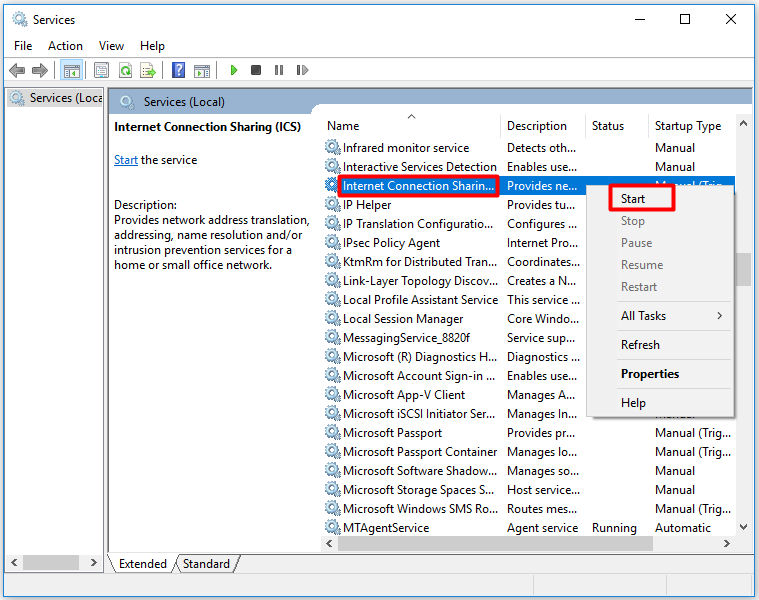
Step 2: In the Services window, scroll down the content until you find the Internet Connection Sharing service. Then right-click on it and click the Start button.
Tip: To disable Windows 10 Internet Connection Sharing, click the Properties option after right-clicking on the service and then select Disabled as its startup type.
About The Author

Position: Columnist
Having writing articles about computer tech for a long time, I am rather experienced especially on the aspect of computer optimization, PC enhancement, as well as tech terms explanation. The habit of looking through tech forums makes me a great computer issues collector. And then, many articles related to these issues are released, which benefit plenty of users. Professional, effective, and innovative are always the pursuit of an editing worker.
-
Partition Wizard
-
Partition Magic
- Internet Connection Sharing | How to Disable/Enable It
By Amy | Follow |
Last Updated April 26, 2021
This post mainly shows you what Internet connection sharing is and how to enable and disable the service. In addition, it also provides you with some extra information about Internet connection sharing Windows 10. Explore the content with MiniTool now.
What Is Internet Connection Sharing
Internet connection sharing (ICS), a Windows service, enables an Interne-connected computer to share its Internet connection with other PCs on a local area network. The PC that shares its Internet connection serves as a gateway device, which means all the traffic between other computers and the Internet go through this computer.
Tip: The Internet connection sharing is a feature in Windows 98 SE and all versions of Windows personal computers systems thereafter.
Computers connected to the gateway computer (both wired and wireless) can utilize ICS. This service offers Dynamic Host Configuration Protocol (DHCP) and network address translation (NAT) services to the LAN computers.
The Windows 10 Internet connection sharing service allows most devices (even includes non-Windows and previous Windows systems) to connect without having extra client software installed.
With this service, all the connected clients can utilize many different protocols like VPN and Internet gaming. Through the ICS computer, clients are given an IP address and configured for DNS automatically.
Also read: How to Block Internet Access? Try These Methods Now
How to Disable/Enable the Internet Connection Sharing Service
Enable/Disable the Internet Connection Sharing Service via Run
You can enable the Internet connection sharing service with the steps below.
Step 1: Open the Run window by pressing Windows + R key, and then input ncpa.cpl and click OK.
Step 2: Right-click on your network adapter and choose the Properties option.
Step 3: Navigate to the Sharing tab and check the Allow other network users to connect through this computer’s Internet connection checkbox. Then, click Settings to choose the specific services.
Tip: If you want to disable the Internet connection sharing service, uncheck the Allow other network users to connect through this computer’s Internet connection checkbox instead.
Step 4: Choose the service to enable and click OK in the pop-up window to confirm the operation. Then click OK in the original window to save and execute the changes.
If you want to share Wi-Fi over Ethernet Windows 10, you need to build a new network to allow other users to connect to your host computer and access the Internet. For that, follow these steps.
Step 1: After opening Control Panel, move to the Network and Sharing Center. Click the Set up a new connection or network link to continue.
Step 2: In the next window, choose the Set up a new network option and click Next. The follow the prompted instruction to finish the operation.
Step 3: Now, other computers can connect to the network of this computers.
Enable/Disable the Internet Connection Sharing Service via Services
To enable/disable ICS via Services, you can refer to the following steps.
Step 1: Open the Run window, and type services.msc and click OK.
Step 2: In the Services window, scroll down the content until you find the Internet Connection Sharing service. Then right-click on it and click the Start button.
Tip: To disable Windows 10 Internet Connection Sharing, click the Properties option after right-clicking on the service and then select Disabled as its startup type.
About The Author
Position: Columnist
Having writing articles about computer tech for a long time, I am rather experienced especially on the aspect of computer optimization, PC enhancement, as well as tech terms explanation. The habit of looking through tech forums makes me a great computer issues collector. And then, many articles related to these issues are released, which benefit plenty of users. Professional, effective, and innovative are always the pursuit of an editing worker.

- Содержание статьи
- Настройка шлюза
- Настройка клиента
- Дополнительная настройка
- Проброс портов
- Использование статических адресов
- Возможные проблемы
- Отключить использование прокси-сервера.
- Добавить комментарий
Еще с 90ых годов, в операционных системах Windows присутствует возможность предоставления доступа к интернету другим компьютерам. Называется данное решение «Возможность совместного подключения к Интернету» (англ. Internet Connection Sharing или ICS), и было введено в Windows 98 SE. В данной статье мы не будем рассматривать столь старую операционную систему, и попробуем изучить её использование на более современных вариантах Windows — а именно Windows Vista, Windows 7, Windows 8 и Windows 10 — которые в этом плане имеют абсолютно одинаковые настройки.
Настройка шлюза
В данном разделе мы рассмотрим настройку компьютера, который будет выступать в роли шлюза «раздачи интернета». Единственное требование к этому компьютеру — наличие двух и более сетевых интерфейсов, один из которых должен быть иметь доступ к интернету, а другой — к локальной сети. Например:
- Первый интерфейс — VPN соединение, обеспечивающее доступ к интернету, второй интерфейс — подключение к локальной сети, без доступа к интернету;
- Первый интерфейс — Ethernet подключение к сети, с доступом в интернет, второй интерфейс — Ethernet подключение к локальной сети, без доступа к интернету.
Как видно из примеров выше, использовать одно и то же Ethernet подключение для получения и раздачи интернета не получится. Если в компьютере отсутствует вторая сетевая карта, то придется её купить, благо стоят они не дорого.
Давайте рассмотрим самый минимум настроек, который необходимо сделать для предоставления интернет-соединения компьютером-шлюзом.
- Для включения раздачи интернета, нужно открыть список сетевых подключений — нажимаем поочередно клавиши Win + R и набираем там команду
ncpa.cplпосле чего нажимаем кнопку «ОК».

- Откроются сетевые подключения, среди которых нужно найти то, которое имеет доступ к интернету — вычислив такое подключение, нажимаем на нем правой кнопкой мыши, и выбираем пункт контекстного меню «Свойства».

- В окне свойств необходимо перейти на вкладку «Доступ» и отметить галочкой пункт «Разрешить другим пользователям сети управление общим доступом к подключению к Интернету». В поле «Подключение к домашней сети» нужно выбрать подключение к локальной сети, из которой планируется открыть доступ к интернету.

На этом базовая настройка компьютера-шлюза закончена. Дальше нужно перейти к компьютеру, которому нужен доступ в интернет, и настроить его.
Настройка клиента
Фактически, в роли клиента может выступить любое устройство, подключенное к локальной сети — но в данном примере мы рассмотрим компьютер под управлением операционной системы Windows. Для настройки возможности подключения к интернету со стороны компьютера-клиента, на нем необходимо выполнить следующие действия:
- Открываем сетевые подключения, нажав поочередно клавиши Win + R, и введя там команду
ncpa.cpl. Нажимаем ОК, после чего откроются Сетевые подключения.
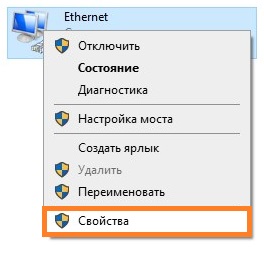
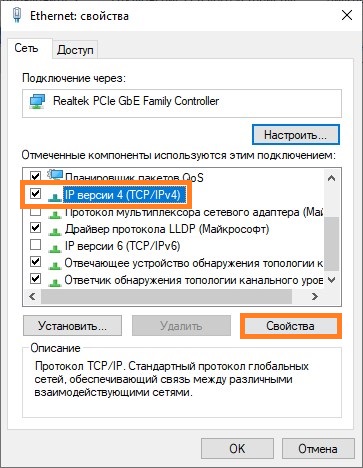
- Находим подключение к локальной сети, нажимаем на нем правой кнопкой мыши и выбираем пункт «Свойства».

- В свойствах сети ищем пункт «IP версии 4 (TCP/IPv4), выбираем его, после чего нажимаем на кнопку «Свойства».
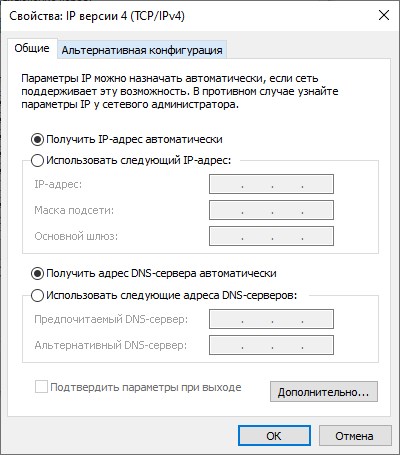
- В свойствах данного протокола убеждаемся, что выбраны пункты «Получать IP-адрес автоматически» и «Получить адрес DNS-сервера автоматически».

После этого, на данном компьютере должно появится соединение с интернетом, что легко проверить, к примеру через браузер.
Дополнительная настройка
Проброс портов
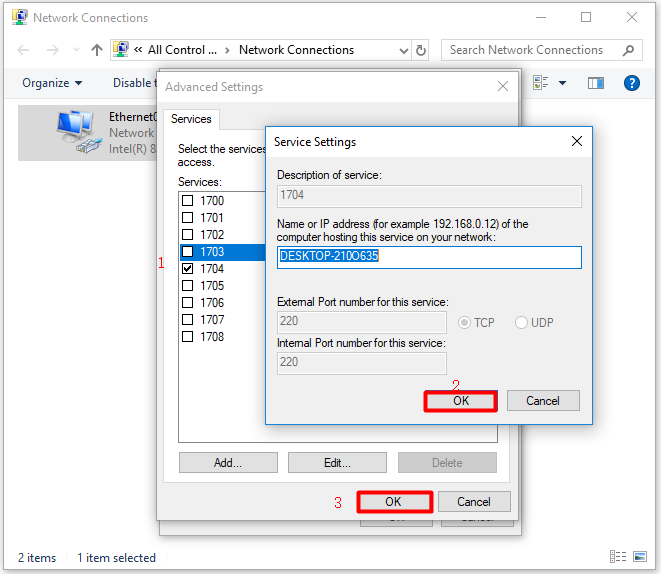
В Windows так же можно реализовать проброс портов, с интерфейса, который «смотрит в мир» на компьютеры внутри локальной сети — делается это в настройках сетевого интерфейса, с доступом в интернет. Для этого, открываем свойства данного подключения, и переходим на вкладку «Доступ». Там в самом низу будет находится кнопка «Настройка», которую необходимо нажать.

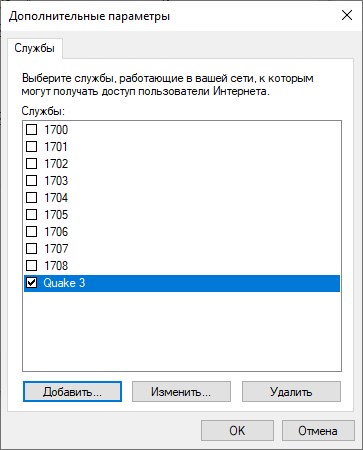
Откроется окно с настройками проброса портов. В нем будет присутствовать уже некоторое количество готовых вариантов, имена которых по каким-то причинам отображается в виде цифровых значений. Посмотреть, что за службы/порты скрываются за этими цифрами, можно открыв каждую из них, или же посмотреть на готовый список ниже:
- 1700 — FTP — порт TCP 21
- 1701 — Telnet — порт TCP 23
- 1702 — SMTP — порт TCP 25
- 1703 — POP3 — порт TCP 110
- 1704 — IMAP3 — порт 220
- 1705 — IMAP — порт 143
- 1706 — HTTP — порт 80
- 1707 — HTTPS — порт 443
- 1708 — RDP — порт 3389
Для добавления своего варианта нужно нажать кнопку «Добавить».

Заполняется окно с пробросом порта следующим образом:
- Описание службы — любое имя, которое поможет идентифицировать в дальнейшем, что за порт и зачем он был проброшен.
- Имя или IP-адрес компьютера вашей сети, на котором располагается эта служба — IP адрес компьютера, на который нужно пробросить порт.
- Номер внешнего порта службы — порт, который доступен извне.
- Номер внутреннего порта службы — порт, на который нужно выполнить проброс — может отличаться от внешнего.
- Так же рядом присутствует выбор протокола — TCP или UDP.
Пример настройки проброса для игрового сервера Quake 3 можно увидеть на картинке ниже.

После нажатия на кнопку «ОК», данный порт появится в списке служб локальной сети, которым предоставлен доступ из интернета.
Использование статических адресов
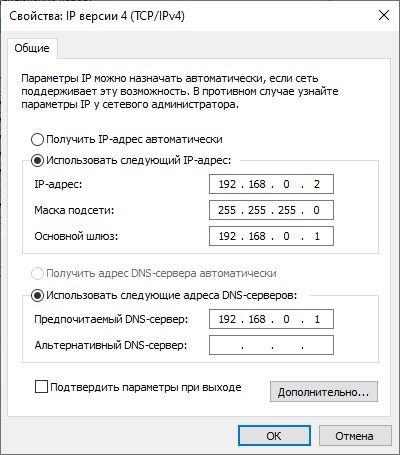
Если Вам не по душе использование встроенного в Windows DHCP сервера, то Вы можете задать свои собственные уникальные сетевые адреса из диапазона 192.168.0.2 – 192.168.0.254 — к сожалению, сам DHCP сервер не отключить, и диапазон адресов не поменять. Сетевой маской будет 255.255.255.0, а сетевым шлюзом — 192.168.0.1. В качестве DNS-сервера так же следует прописать 192.168.0.1. Пример таких сетевых настроек можно увидеть на скриншоте ниже.
Возможные проблемы
В ряде случаев, возможно, что интернет не появится на стороне компьютера-клиента, не смотря на то, что все выше перечисленные настройки были сделаны правильно. В таком случае, следует проверить ряд настроек.
Отключить использование прокси-сервера.
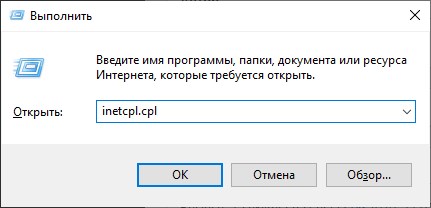
- Нажимаем клавиши Win + R, вводим команду
inetcpl.cplи нажимаем кнопку «ОК».
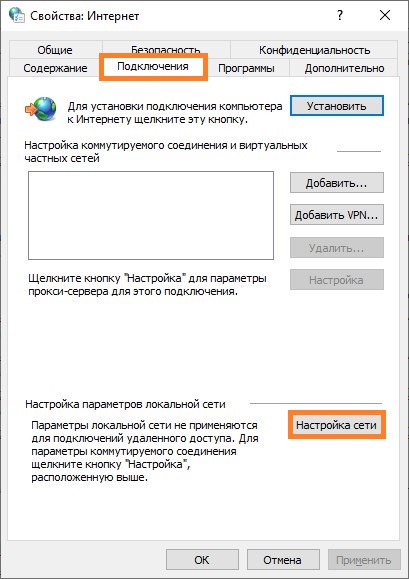
- В открывшемся окне свойств интернета, нужно перейти на вкладку «Подключения» и в самом низу нажать на кнопку «Настройка сети».

- В открывшихся настройках параметров локальной сети нужно убрать все галочки, в том числе с пункта «Автоматическое определение параметров», после чего закрыть все ранее открытые окна кнопками «ОК».