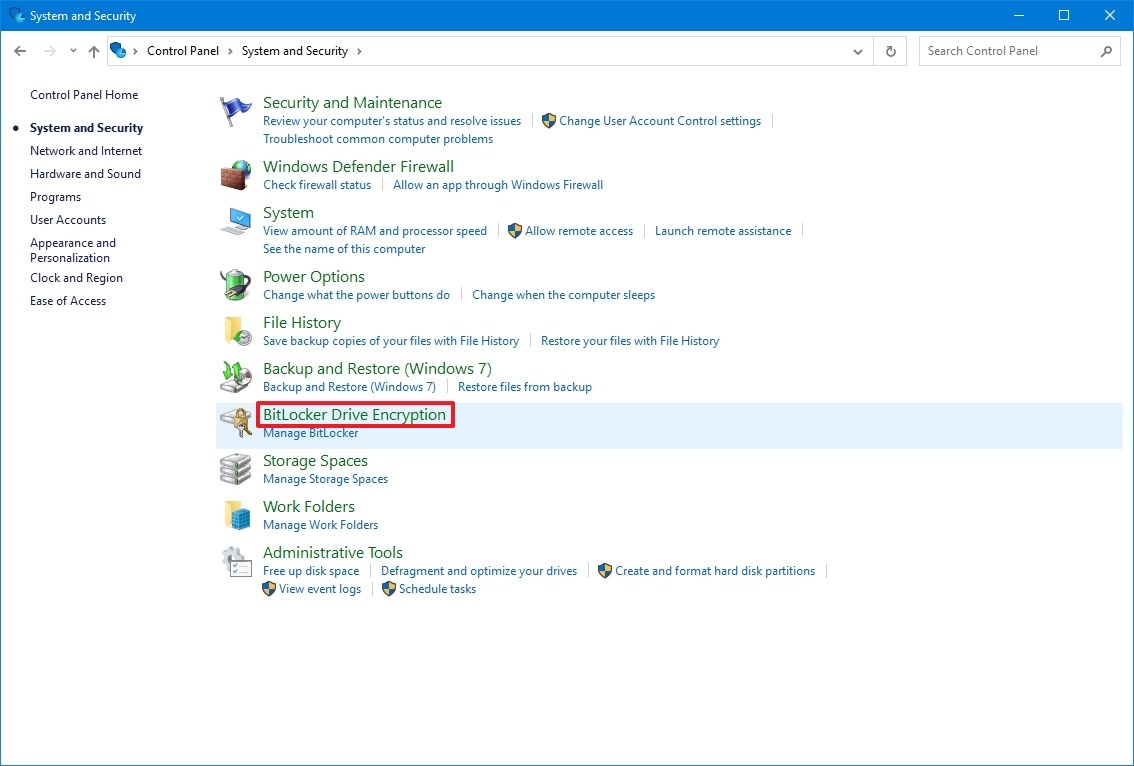
Для дополнительной защиты Windows 10 позволяет включить BitLocker для фиксированных дисков (разделов дисков и внутренних устройств хранения). Он поддерживает защиту с помощью смарт-карты или пароля. Есть также возможность автоматической разблокировки дисков при входе в учетную запись.
BitLocker был впервые представлен в Windows Vista и до сих пор существует в Windows 10. Он был реализован исключительно для Windows и не имеет официальной поддержки в альтернативных операционных системах. BitLocker может использовать доверенный платформенный модуль (TPM) вашего ПК для хранения секретных ключей шифрования.
РЕКОМЕНДУЕМ:
Как посмотреть информацию о шифровании диска BitLocker в Windows 10
В современных версиях Windows, таких как Windows 8.1 и Windows 10, BitLocker поддерживает аппаратно-ускоренное шифрование, если выполняются определенные требования (диск должен поддерживать его, должна быть включена безопасная загрузка и многие другие требования).
Без аппаратного шифрования BitLocker переключается на программное шифрование, что снижает производительность вашего диска. BitLocker в Windows 10 поддерживает ряд методов шифрования и поддерживает изменение силы шифрования.
Содержание
- Шифрование диска Butlocker
- Отключить BitLocker из командной строки
- Отключить BitLocker с помощью PowerShell
Шифрование диска Butlocker
В Windows 10 шифрование диска BitLocker доступно только в выпусках Pro, Enterprise и Education. BitLocker может зашифровать системный диск (на котором установлена ОС Windows) и внутренние жесткие диски. Функция
BitLocker To Go позволяет защитить файлы, хранящиеся на съемных дисках, таких как флэш-накопитель USB.
Существует разные способы отключения BitLocker жестких и твердотельных дисков.
Шаг 1: Откройте командную строку от имени администратора. Для этого, на панели задач нажмите иконку поиска, введите «cmd» и нажмите «Запуска от имени администратора».
Шаг 2: Введите и выполните следующую команду:
|
manage—bde —off <букву диска>: |
Шаг 3: Замените
<букву диска> фактической буквой диска, который вы хотите расшифровать.
Например отключим BitLocker на диске D:

Отключить BitLocker с помощью PowerShell
Шаг 1: Откройте новую командную строку от имени администратора. Для этого, на панели задач нажмите иконку поиска, введите «powershell» и нажмите «Запуска от имени администратора».
Шаг 2: Введите и выполните следующую команду:
|
Disable—BitLocker —MountPoint «<drive letter>:» |
Шаг 3: Замените <букву диска> фактической буквой диска, который вы хотите расшифровать.
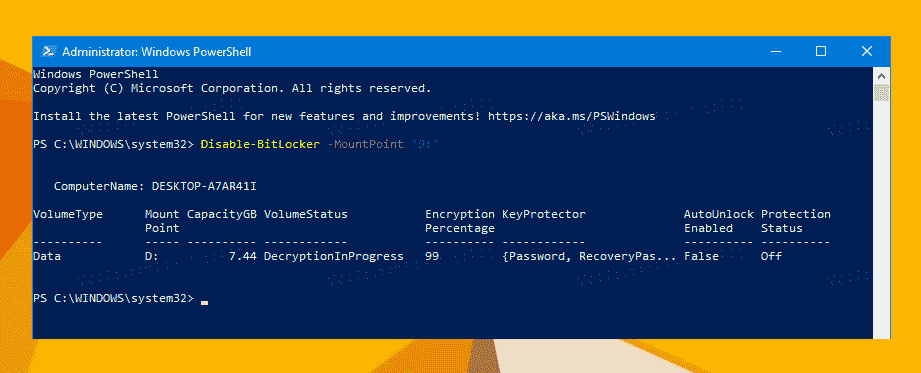
Например отключим шифрования BitLocker диска D:
|
Disable—BitLocker —MountPoint «D:» |
РЕКОМЕНДУЕМ:
Лучшие аналоги Bitlocker
На этом все. Теперь вы знаете, как отключить BitLocker из командной строки и с помощью PowerShell.

 (4 оценок, среднее: 4,25 из 5)
![]() Загрузка…
Загрузка…
Bitlocker is not such an essential tool for most users, but a very powerful one to secure your data with a confidential password. It helps add an extra layer of security to your device, which can be an internal hard drive partition, a volume or an external HDD, or any removable storage drives. It’s of great importance to turn on BitLocker protection in companies, or the workplace that connected to public networks! However, some of you may think it not necessary when you work at home and store data on your personal computer. Will you be able to disable BitLocker in Windows 10 once it’s already on?

***Note that BitLocker is not available on Windows 10 Home edition. It’s a device encryption feature built in Windows 10 Pro, Enterprise and Education.
***Note that BitLocker is designed to protect data by providing encryption for entire volumes. To encrypt only files or folders on your computer, you shall find a file encryption program.
How to Disable BitLocker Encryption on A Single Partition (6 Ways)
Windows 10 allows you to turn off the BitLocker and on a drive in many places, and the following paths are all effective to reach:
- 1. Control Panel
- 2. Settings
- 3. Command Prompt
- 4. PowerShell
- 5. Group Policy Editor
- 6. Windows Services
Way 1. Turn off BitLocker via Windows 10 Control Panel
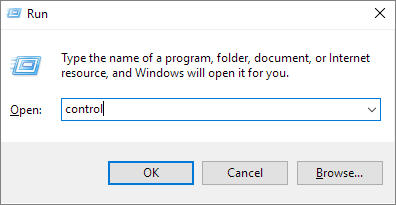
Step 1. Here use the most direct way to open Control Panel in Windows 10: Press Windows + R keys and type control/control panel in the Run box and hit OK.
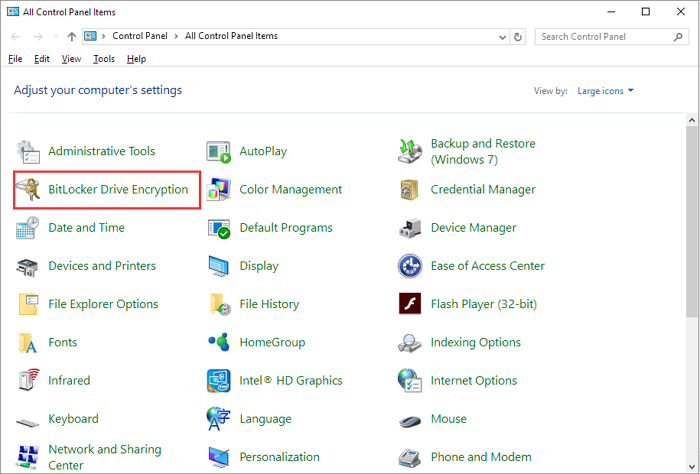
Step 2. Click BitLocker Drive Encryption to open a new window.
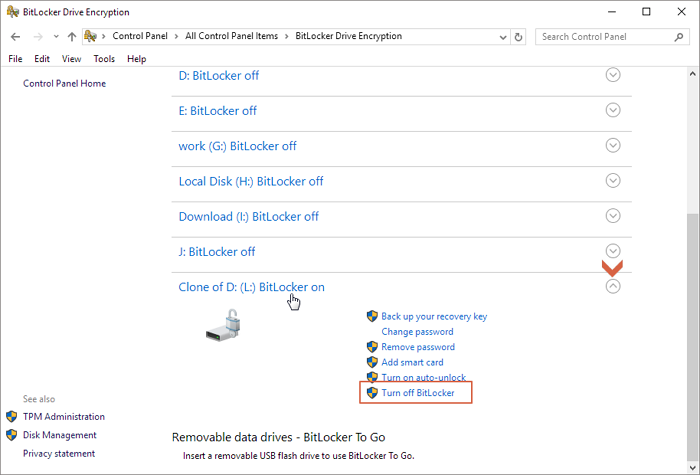
Step 3. There you will see all the drive partitions. Find the target partition where displays (X: BitLocker on) and click «Turn off BitLocker» by expanding the down-arrow area.
Way 2. Turn off BitLocker via Windows 10 Settings
Step 1. Press Windows + I keys to open the Windows 10 Settings window.
Step 2. Click the System option.
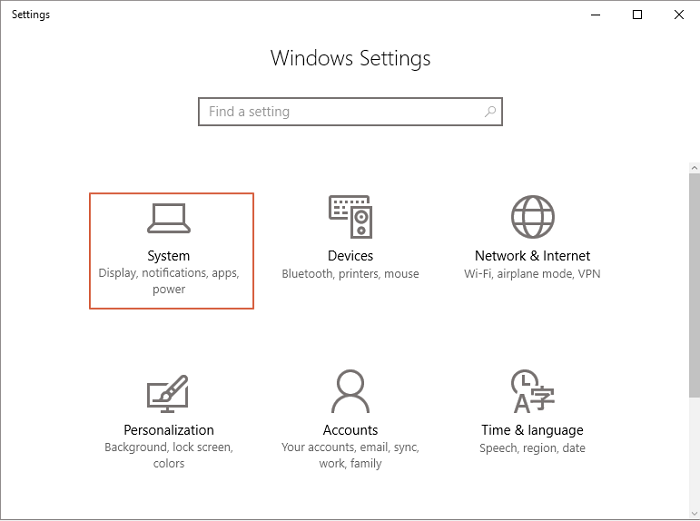
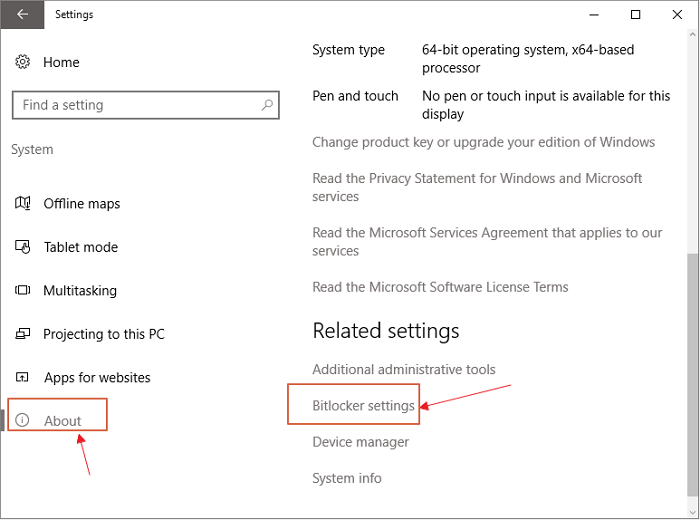
Step 3. Go on with the About option at the bottom on the left and then BitLocker settings on the right.
Step 4. This will open the same [BitLocker Drive Encryption] window, so follow the same procedure in #Way 1# to choose an encrypted drive to unlock it.
Way 3. Turn off BitLocker via Windows 10 Command Prompt
Anyway, the manual solution provided in the Windows 10 Control Panel and Settings does the same to help you suspend the BitLocker protection on a hard drive. For those who are used to tackling issues in Windows Command Prompt, we also provide you with a guide.
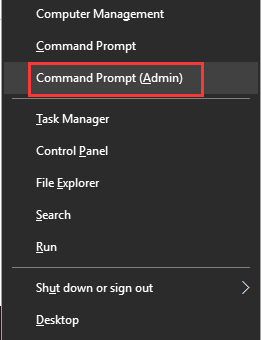
Step 1. Press Windows +X keys and click Command Prompt (Admin) from the menu.
Step 2. Enter the below command line and hit Enter. The X: refers to your own drive that is currently locked by BitLocker. So, replace X with the correct drive letter of yours.
manage-bde -off X:
Way 4. Turn off BitLocker via Windows 10 PowerShell
It’s another command method to remove the BitLocker protection from your drive. Still, for people who are not familiar with the command thing, the former two ways are good to go.
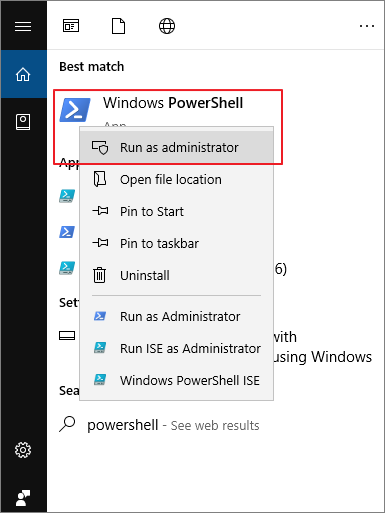
Step 1. Type powershell in Windows Search (Windows + S). Right-click on the result and select Run as administrator.
Step 2. Enter the below command line and hit Enter. X: represents a drive letter under BitLocker encryption. So, replace it with your own. Do not omit the quotation mark.
Disable-BitLocker -MountPoint «X:»
Step 3. (Optional) If it’s to turn off BitLocker for multiple drives on your computer, you need to perform different command lines each by each:
$BLV = Get-BitLockerVolume
Disable-BitLocker -MountPoint $BLV
Way 5. Turn off BitLocker via Windows 10 Local Group Policy Editor
Though Windows Local Group Policy Editor is an option to manage BitLocker drives, it’s the most complicated method compared with the other four we gave to you. In spite of the fact, we still feel responsible to offer all the possible solutions including the last one here.
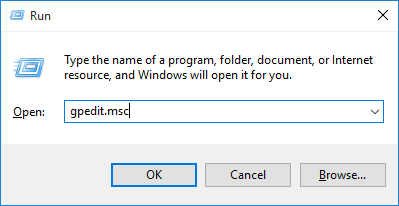
Step 1. Type group policy in Windows Search (Windows + S). If this is not a valid solution for you, open it in the Run box should be the easiest and quickest for everyone: Press Windows + R and type gpedit.msc in the Run box and hit Enter.
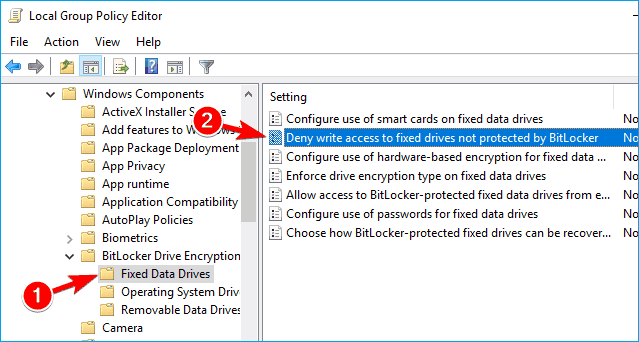
Step 2. After the Local Group Policy Editor is open, strictly follow the path to complete the whole process to disable BitLocker:
- Computer Configuration -> Administrative Templates -> Windows Components – > BitLocker Drive Encryption -> Fixed Data Drives
- Stay here and then select the Deny write access to fixed drives not protected by BitLocker option and double click on it
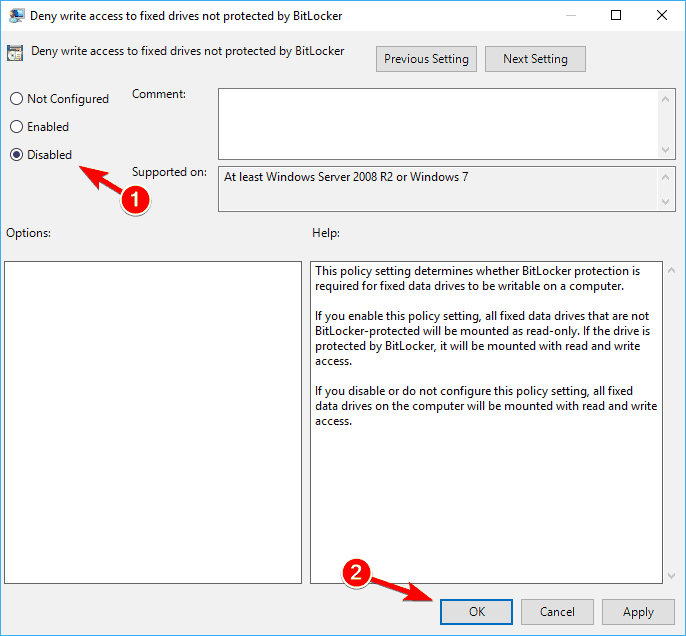
- Next, click either Not Configured or Disabled. Both are options to remove the BitLocker protection on the drive. Click Apply and OK to save changes.
Way 6. Turn off BitLocker via Windows Services
Windows Services are in charge of turning on or off all the services in Windows, including the BitLocker service. Here’s how to disable BitLocker service permanently from the Services window.
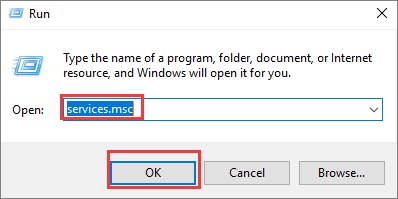
Step 1. Press Windows + R keys and type services.msc in the Run box and hit Enter.
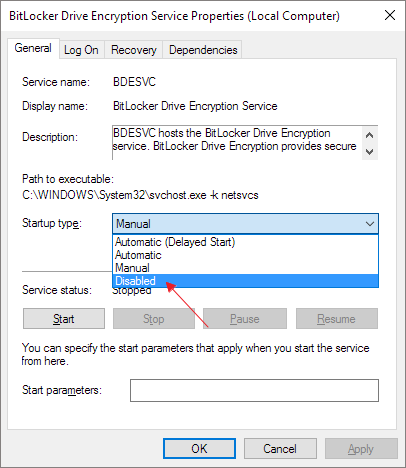
Step 2. Under the Name tab, locate and double click on the BitLocker Drive Encryption Service option.
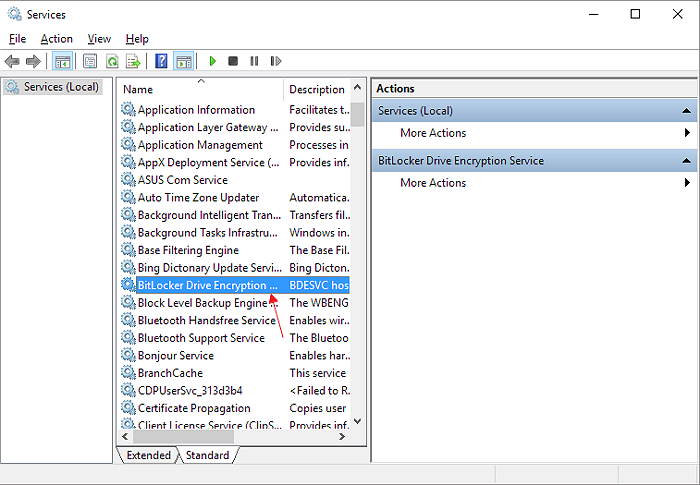
Step 3. Select Disabled from the Startup type lists and click Apply and then OK to save changes.
Bonus Tip#1: How to Recover Data from BitLocker Encrypted Hard Drive
BitLocker doubles the data protection on a hard drive, however, it cannot resist the outside damage that might remove or corrupt the encrypted data! The hard drive that is locked by a password is also likely to infect a virus or experience common hard drive problems like bad sectors, RAW file system, or unrecognized by a computer. In front of all the foreseen disasters, it’s always the data that matters!
Is there any EaseUS Data Recovery Wizard we can adopt once the BitLocker encrypted hard drive had some issues? EaseUS Data Recovery Wizard can help. It fully supports encrypted data recovery from BitLocker protected hard drives, external HDDs and USB flash drives.
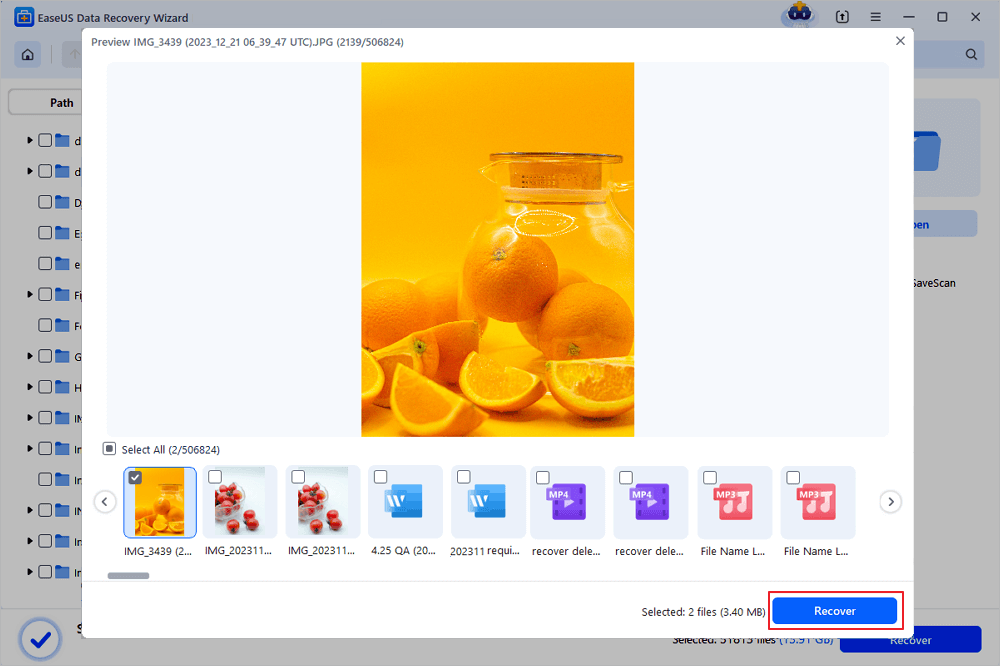
Step 1. Choose the encrypted drive to scan
Launch EaseUS Data Recovery Wizard and you will see the BitLocker encrypted drive displayed there.
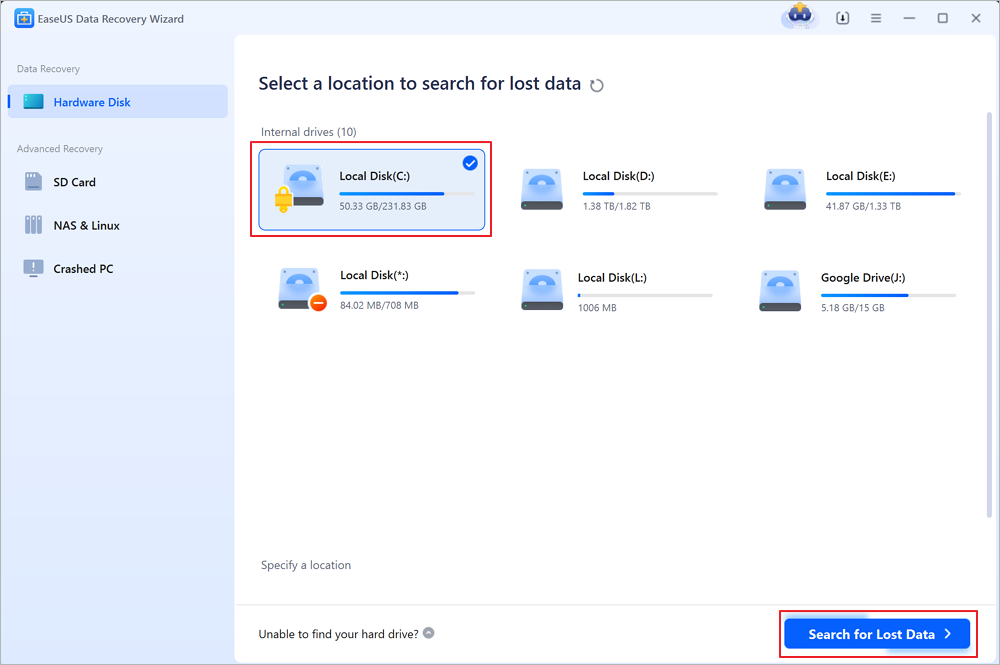
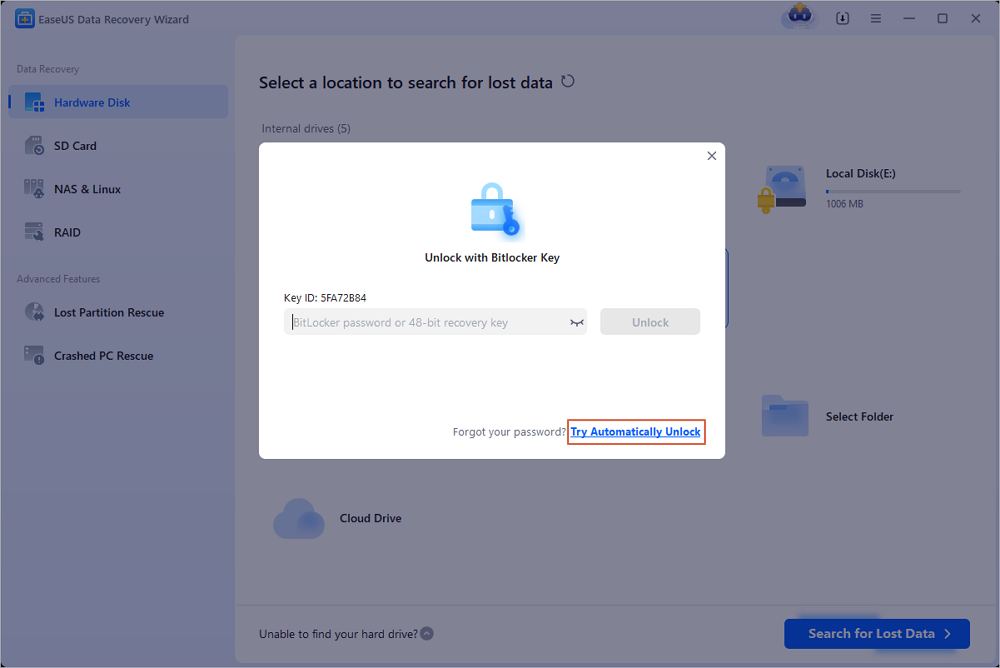
When you click on the encrypted partition, a pop-up window will remind you to enter a password to unlock it. Input the key and click the «Scan» button to look for lost files.
Note: If you forget the key, you can use «Try Automatically Decrypt,» which may help you decrypt the drive. But this may not work. If it failed, this program can’t scan the drive.
Step 2. Select and preview scanned files
The software will start a quick scan for deleted files and perform advanced scan for more lost files. When the process completes, you can apply the «Filter» feature or click the «Search files or folders» button to find the lost files in a short time.

Step 3. Recover lost files from BitLocker encrypted hard drive
After previewing the file, click the «Recover» button to restore deleted or lost files from BitLocker encrypted partition on Windows.
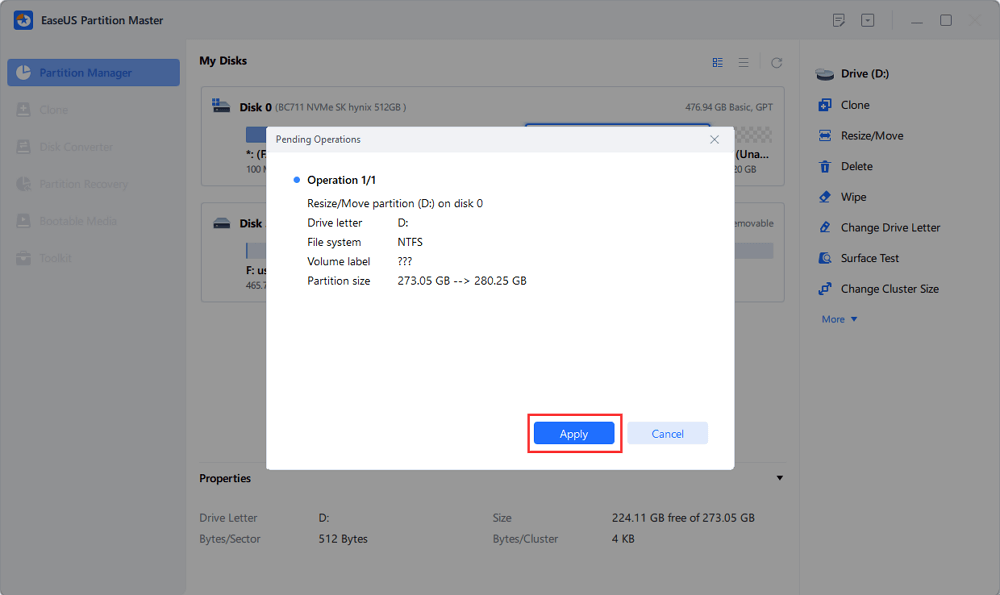
Bonus Tip #2. How to Manage BitLocker Partition by Resize/Move
At times, you may want a bigger BitLocker drive partition to store large multimedia files, and EaseUS Partition Master can facilitate the job by adding free space from other Partitions to the BitLocker one!
Step 1. Click «Partition Manager», select the Bitlocker partition and choose the «Unlock» option. Then, enter your password to unlock Bitlocker.

Step 2. Right-click the Bitlocker partition and select the «Resize/Move» option.
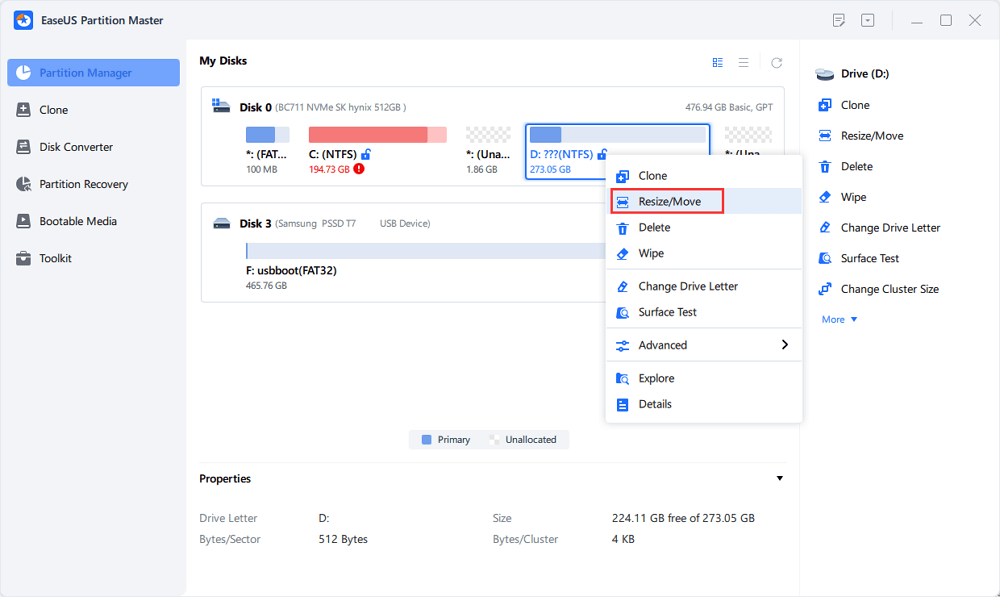
Step 3. Shrink or extend your Bitlocker by dragging your mouse towards the unallocated space

Step 4. Click Execute Operation and the «Apply» button to start partitioning or resizing the Bitlocker drive.
Bitlocker is not such an essential tool for most users, but a very powerful one to secure your data with a confidential password. It helps add an extra layer of security to your device, which can be an internal hard drive partition, a volume or an external HDD, or any removable storage drives. It’s of great importance to turn on BitLocker protection in companies, or the workplace that connected to public networks! However, some of you may think it not necessary when you work at home and store data on your personal computer. Will you be able to disable BitLocker in Windows 10 once it’s already on?
***Note that BitLocker is not available on Windows 10 Home edition. It’s a device encryption feature built in Windows 10 Pro, Enterprise and Education.
***Note that BitLocker is designed to protect data by providing encryption for entire volumes. To encrypt only files or folders on your computer, you shall find a file encryption program.
How to Disable BitLocker Encryption on A Single Partition (6 Ways)
Windows 10 allows you to turn off the BitLocker and on a drive in many places, and the following paths are all effective to reach:
- 1. Control Panel
- 2. Settings
- 3. Command Prompt
- 4. PowerShell
- 5. Group Policy Editor
- 6. Windows Services
Way 1. Turn off BitLocker via Windows 10 Control Panel
Step 1. Here use the most direct way to open Control Panel in Windows 10: Press Windows + R keys and type control/control panel in the Run box and hit OK.
Step 2. Click BitLocker Drive Encryption to open a new window.
Step 3. There you will see all the drive partitions. Find the target partition where displays (X: BitLocker on) and click «Turn off BitLocker» by expanding the down-arrow area.
Way 2. Turn off BitLocker via Windows 10 Settings
Step 1. Press Windows + I keys to open the Windows 10 Settings window.
Step 2. Click the System option.
Step 3. Go on with the About option at the bottom on the left and then BitLocker settings on the right.
Step 4. This will open the same [BitLocker Drive Encryption] window, so follow the same procedure in #Way 1# to choose an encrypted drive to unlock it.
Way 3. Turn off BitLocker via Windows 10 Command Prompt
Anyway, the manual solution provided in the Windows 10 Control Panel and Settings does the same to help you suspend the BitLocker protection on a hard drive. For those who are used to tackling issues in Windows Command Prompt, we also provide you with a guide.
Step 1. Press Windows +X keys and click Command Prompt (Admin) from the menu.
Step 2. Enter the below command line and hit Enter. The X: refers to your own drive that is currently locked by BitLocker. So, replace X with the correct drive letter of yours.
manage-bde -off X:
Way 4. Turn off BitLocker via Windows 10 PowerShell
It’s another command method to remove the BitLocker protection from your drive. Still, for people who are not familiar with the command thing, the former two ways are good to go.
Step 1. Type powershell in Windows Search (Windows + S). Right-click on the result and select Run as administrator.
Step 2. Enter the below command line and hit Enter. X: represents a drive letter under BitLocker encryption. So, replace it with your own. Do not omit the quotation mark.
Disable-BitLocker -MountPoint «X:»
Step 3. (Optional) If it’s to turn off BitLocker for multiple drives on your computer, you need to perform different command lines each by each:
$BLV = Get-BitLockerVolume
Disable-BitLocker -MountPoint $BLV
Way 5. Turn off BitLocker via Windows 10 Local Group Policy Editor
Though Windows Local Group Policy Editor is an option to manage BitLocker drives, it’s the most complicated method compared with the other four we gave to you. In spite of the fact, we still feel responsible to offer all the possible solutions including the last one here.
Step 1. Type group policy in Windows Search (Windows + S). If this is not a valid solution for you, open it in the Run box should be the easiest and quickest for everyone: Press Windows + R and type gpedit.msc in the Run box and hit Enter.
Step 2. After the Local Group Policy Editor is open, strictly follow the path to complete the whole process to disable BitLocker:
- Computer Configuration -> Administrative Templates -> Windows Components – > BitLocker Drive Encryption -> Fixed Data Drives
- Stay here and then select the Deny write access to fixed drives not protected by BitLocker option and double click on it
- Next, click either Not Configured or Disabled. Both are options to remove the BitLocker protection on the drive. Click Apply and OK to save changes.
Way 6. Turn off BitLocker via Windows Services
Windows Services are in charge of turning on or off all the services in Windows, including the BitLocker service. Here’s how to disable BitLocker service permanently from the Services window.
Step 1. Press Windows + R keys and type services.msc in the Run box and hit Enter.
Step 2. Under the Name tab, locate and double click on the BitLocker Drive Encryption Service option.
Step 3. Select Disabled from the Startup type lists and click Apply and then OK to save changes.
Bonus Tip#1: How to Recover Data from BitLocker Encrypted Hard Drive
BitLocker doubles the data protection on a hard drive, however, it cannot resist the outside damage that might remove or corrupt the encrypted data! The hard drive that is locked by a password is also likely to infect a virus or experience common hard drive problems like bad sectors, RAW file system, or unrecognized by a computer. In front of all the foreseen disasters, it’s always the data that matters!
Is there any EaseUS Data Recovery Wizard we can adopt once the BitLocker encrypted hard drive had some issues? EaseUS Data Recovery Wizard can help. It fully supports encrypted data recovery from BitLocker protected hard drives, external HDDs and USB flash drives.
Step 1. Choose the encrypted drive to scan
Launch EaseUS Data Recovery Wizard and you will see the BitLocker encrypted drive displayed there.
When you click on the encrypted partition, a pop-up window will remind you to enter a password to unlock it. Input the key and click the «Scan» button to look for lost files.
Note: If you forget the key, you can use «Try Automatically Decrypt,» which may help you decrypt the drive. But this may not work. If it failed, this program can’t scan the drive.
Step 2. Select and preview scanned files
The software will start a quick scan for deleted files and perform advanced scan for more lost files. When the process completes, you can apply the «Filter» feature or click the «Search files or folders» button to find the lost files in a short time.
Step 3. Recover lost files from BitLocker encrypted hard drive
After previewing the file, click the «Recover» button to restore deleted or lost files from BitLocker encrypted partition on Windows.
Bonus Tip #2. How to Manage BitLocker Partition by Resize/Move
At times, you may want a bigger BitLocker drive partition to store large multimedia files, and EaseUS Partition Master can facilitate the job by adding free space from other Partitions to the BitLocker one!
Step 1. Click «Partition Manager», select the Bitlocker partition and choose the «Unlock» option. Then, enter your password to unlock Bitlocker.
Step 2. Right-click the Bitlocker partition and select the «Resize/Move» option.
Step 3. Shrink or extend your Bitlocker by dragging your mouse towards the unallocated space
Step 4. Click Execute Operation and the «Apply» button to start partitioning or resizing the Bitlocker drive.
В Windows Vista не было особых поводов для радости, но одна хорошая вещь, которую она сделала, — это новая функция под названием BitLocker. Эта функция позволяет пользователям шифровать диски для предотвращения несанкционированного доступа.
Если вы зашифровали свой диск с помощью BitLocker, вы, возможно, заметили, что у него есть несколько особенностей. Таким образом, вот как отключить или приостановить BitLocker в Windows 10.
Допустим, вы зашифровали свой диск с помощью текущего ПК с Windows 7, а теперь приобрели новый элегантный ПК с Windows 10. Вы хотите установить старый зашифрованный жесткий диск на новый компьютер. Однако, когда вы пытаетесь получить доступ к диску, Windows 10 просит вас отключить BitLocker или не распознает ваш пароль.
BitLocker также плохо взаимодействует с другими программами и не допускает двойную загрузку, особенно если вы зашифровали диск C:. Таким образом, хотя шифрование может быть приятным штрихом, Bitlocker иногда может быть скорее проклятием, чем благословением.
Если эти неприятности заставили вас пересмотреть использование BitLocker, мы расскажем, как отключить его в Windows 10. Хотя это не означает, что вам нужно идти на компромисс с безопасностью. Существует несколько альтернатив шифрования Syskey, которые вы можете рассмотреть.
Как отключить BitLocker из панели управления
Это самый простой способ отключить BitLocker. Сначала найдите управление битлокером в меню «Пуск» и запустите наиболее подходящее из результатов поиска. Откроется окно BitLocker Drive Encryption, в котором вы увидите список всех своих дисков. Рядом с диском вы увидите параметр «Выключить BitLocker». Нажмите на нее и продолжайте следовать инструкциям мастера.
Как отключить BitLocker из редактора локальной групповой политики
Версии Windows 10 Professional и Enterprise имеют более полную консоль для изменения параметров Windows, которая называется «Редактор локальной групповой политики». Нажмите Win + R, введите gpedit.msc и нажмите Enter, чтобы запустить редактор групповой политики.
На левой панели перейдите в «Конфигурация компьютера» -> «Административные шаблоны» -> «Компоненты Windows» -> «Шифрование диска BitLocker» -> «Фиксированные диски данных».
Переключитесь на правую панель и дважды кликните Запретить доступ на запись к фиксированным дискам, не защищенным BitLocker, чтобы настроить параметр.
Если вы используете BitLocker, этот параметр будет в состоянии «Включено». Измените состояние на Не настроено или Отключено и нажмите OK, чтобы сохранить изменения и выйти. Перезагрузите компьютер, и ваш диск больше не должен быть зашифрован.
К сожалению, если вы используете Windows 10 Home, групповая политика не будет включена по умолчанию. Однако есть способ получить доступ к групповой политике в Windows 10 Home.
Как отключить BitLocker с помощью командной строки
Если вы более технически склонны и предпочитаете использовать командные строки, вы можете использовать командную строку или PowerShell (обсуждается далее), чтобы отключить BitLocker. Кроме того, это также экономит ваше время.
Если у вас включено шифрование BitLocker для нескольких дисков, перейдите к следующему способу, чтобы отключить BitLocker для всех сразу.
Найдите cmd в меню «Пуск», кликните правой кнопкой мыши «Командная строка» и выберите «Запуск от имени администратора», чтобы запустить командную строку с повышенными привилегиями. Выполните следующую команду:
manage -bde -off D:
Замените букву D на диск, для которого вы хотите отключить BitLocker.
Как отключить BitLocker с помощью PowerShell
Найдите powershell в меню «Пуск», кликните правой кнопкой мыши PowerShell и выберите «Запуск от имени администратора», чтобы запустить PowerShell с правами администратора. Выполните следующую команду:
Disable-BitLocker -MountPoint "D:"
Снова замените букву D на диск, для которого вы хотите отключить BitLocker.
Однако, если вы включили шифрование BitLocker для нескольких дисков, вы можете выполнить следующие команды:
$BLV = Get-BitLockerVolume
Disable-BitLocker -MountPoint $BLV
Первая команда идентифицирует все тома, зашифрованные с помощью BitLocker, и сохраняет их в переменной $BLV. Следующая команда отключает BitLocker для всех томов, хранящихся в переменной $BLV.
Как отключить BitLocker из панели служб
По крайней мере, один из методов, которые мы обсуждали до сих пор, должен работать. В любом случае у вас также есть возможность отключить службу шифрования диска BitLocker, чтобы отключить BitLocker.
Нажмите Win + R, введите services.msc и нажмите Enter, чтобы открыть панель «Службы». Найдите в списке службу шифрования диска BitLocker.
Дважды кликните службу и измените тип запуска на Disabled. Нажмите OK, чтобы сохранить изменения и выйти.
Когда вам не нужно отключать BitLocker?
Если вы планируете отключить BitLocker для выполнения обновления UEFI/BIOS, изменения аппаратного компонента или обновления до более новой версии Windows 10, вам не обязательно отключать BitLocker.
Хотя оставление BitLocker включенным, безусловно, может вызвать затруднения, если вы пытаетесь выполнить одну из этих задач, есть альтернатива отключению BitLocker; вы можете приостановить его. Обратите внимание, что вы обязательно должны либо отключить, либо приостановить BitLocker при обновлении UEFI/BIOS. В противном случае обновление удалит все ключи, хранящиеся в TPM.
В отличие от отключения BitLocker, его приостановка не приводит к расшифровке данных на ваших дисках. Кроме того, любые дополнительные данные, которые вы добавляете на диск во время приостановки, по-прежнему зашифрованы. Поэтому, как только вы закончите вносить изменения в свой компьютер, вы можете вернуться в панель управления и возобновить шифрование.
Как приостановить BitLocker из панели управления
Введите в меню «Пуск» команду «Управление битлокером» и откройте наиболее подходящий вариант в результатах поиска. В BitLocker Drive Encryption вы увидите, что зашифрованные вами диски будут иметь возможность приостановить защиту.
Нажмите «Приостановить защиту» и нажмите «Да», когда появится предупреждение. Затем, когда вы захотите возобновить защиту, повторите те же шаги, за исключением того, что вам нужно нажать «Возобновить защиту» вместо «Приостановить защиту».
Как приостановить BitLocker с помощью командной строки
Найдите cmd в меню «Пуск», кликните правой кнопкой мыши «Командная строка» и выберите «Запуск от имени администратора», чтобы запустить командную строку с правами администратора. Выполните следующую команду:
manage -bde -Protectors -Enable D:
Замените букву D на нужный диск.
Как приостановить BitLocker с помощью PowerShell
Найдите powershell в меню «Пуск», кликните правой кнопкой мыши PowerShell и выберите «Запуск от имени администратора», чтобы запустить PowerShell с повышенными правами. Выполните следующую команду:
Resume-BitLocker -MountPoint "D:"
Конечно, замените букву D на букву вашего целевого диска.
Освободитесь от BitLocker
BitLocker, несомненно, является одной из самых полезных функций безопасности в Windows. Однако иногда вам может потребоваться отключить его или приостановить при выполнении некоторых важных операций. На самом деле несложно отключить или приостановить работу BitLocker, если у вас есть ключ BitLocker.
In my last post, I outlined how you can enable BitLocker with PowerShell and manage key protectors. Today, I will cover BitLocker management with PowerShell. In particular, I will describe how you can unlock, suspend, resume, and disable BitLocker with PowerShell.
Contents
- Manage BitLocker auto unlock with PowerShell
- Enable auto unlock
- Disable auto-unlock
- Backup key protectors
- Manually lock and unlock encrypted drives
- Suspend/Resume BitLocker protection
- Disable BitLocker
- Author
- Recent Posts

Surender Kumar has more than twelve years of experience in server and network administration. His fields of interest are Windows Servers, Active Directory, PowerShell, web servers, networking, Linux, virtualization, and penetration testing. He loves writing for his blog.
Latest posts by Surender Kumar (see all)
- Extending LVM space in Ubuntu — Thu, Feb 2 2023
- Backup in Proxmox VE — Thu, Jan 26 2023
- Snapshots in Proxmox VE — Wed, Jan 25 2023
Manage BitLocker auto unlock with PowerShell
When you have multiple data drives attached to your computer that are encrypted using BitLocker, you might want to unlock them automatically once the OS drive is decrypted using TPM, PIN, or a startup key. The auto-unlock feature works only with data drives.
Enable auto unlock
To enable auto-unlock for a particular volume, use the following command:
Enable-BitLockerAutoUnlock -MountPoint "D:"

Enable auto unlock for a BitLocker encrypted data volume using PowerShell
To enable auto-unlock for all data drives at once, use the following command:
Get-BitLockerVolume | ? {$_.VolumeType -eq 'Data'} | Enable-BitLockerAutoUnlock

Enable auto unlock for all BitLocker encrypted data volumes using PowerShell
This command gets all the data volumes on the computer and passes them to the Enable-BitLockerAutoUnlock cmdlet to enable auto-unlock. Remember, auto-unlock does not work with operating system volumes.
Disable auto-unlock
To disable auto-unlock for a specific volume, use the Disable-BitLockerAutoUnlock cmdlet, as shown below:
Disable-BitLockerAutoUnlock -MountPoint "F:"

Disable BitLocker auto unlock for a particular volume using PowerShell
To disable auto-unlock on all data drives at once, use the Clear-BitLockerAutoUnlock cmdlet, which doesn’t require any additional parameters.

Disable BitLocker auto unlock for all data volumes at once using PowerShell
Backup key protectors
If your computer belongs to an Active Directory domain, you could use the Backup-BitLockerKeyProtector cmdlet to save the recovery password key protector to Active Directory. Once again, you need to specify the key protector using its ID.
$BVol = Get-BitLockerVolume -MountPoint "C"
Backup-BitLockerKeyProtector -MountPoint "C" -KeyProtectorId $BVol.KeyProtector[2].KeyProtectorId

Save the recovery password key protector to Active Directory using PowerShell
Make sure you supply the right array index for the recovery password key protector; otherwise, you will get an error. To learn how to use BitLocker in the Active Directory domain environment in detail, read the series of posts written by Kyle Beckman.
Manually lock and unlock encrypted drives
If you do not want to enable auto-unlock for data drives, the BitLocker PS module offers the Lock-BitLocker and Unlock-BitLocker cmdlets. These cmdlets let you control access to encrypted volumes manually on demand.
To manually lock a data volume, use the following command:
Lock-BitLocker -MountPoint "D:"

Manually lock a BitLocker volume using PowerShell
You will receive an error if the drive is currently in use. In this case, you could use the -ForceDismount parameter to override. Use this option only when necessary, as it could result in data loss. It is a good idea to gracefully close all apps and files before using the Lock-BitLocker command.
To unlock the encrypted data volume, use the following command:
Unlock-BitLocker -MountPoint "D:" -RecoveryKeyPath "E:2D64E750-ED79-425A-A084-2CCE6B2F8CC6.BEK"

Manually unlock a BitLocker volume using PowerShell
You need to specify the right key protector using a switch parameter to unlock the drive. To unlock the drive using a password, make sure you generate a secure string with the help of the ConvertTo-SecureString cmdlet.
Suspend/Resume BitLocker protection
During a system or firmware upgrade, you might want to temporarily suspend BitLocker protection. Note that suspending BitLocker doesn’t mean the data is no longer encrypted. Data is still encrypted, but BitLocker will make the decryption key available to everyone. The Suspend-BitLocker cmdlet is used to suspend BitLocker protection on a specific drive.
By default, BitLocker suspension resumes automatically when the computer is restarted, but you could use the -RebootCount parameter to specify the number of reboots when BitLocker protection resumes.
Suspend-BitLocker -MountPoint "C" -RebootCount 2

Suspend BitLocker protection on a volume using PowerShell
To make the BitLocker suspension indefinite until you manually resume it, set the value of the -RebootCount parameter to 0. File Explorer displays a warning on a volume with suspended BitLocker protection.

File Explorer showing a suspended BitLocker volume
To resume the protection manually, use the following command:
Resume-BitLocker -MountPoint "C"

Resume BitLocker protection on a volume using PowerShell
To resume protection on all drives, use the Get-BitLockerVolume | Resume-BitLocker command.
Disable BitLocker
To permanently decrypt a volume and disable BitLocker protection on it, use the Disable-BitLocker cmdlet as shown below:
Disable-BitLocker -MountPoint "D:"

Disable BitLocker protection and decrypt a volume using PowerShell
Note that if you’re decrypting an operating system drive containing auto-unlocking keys, you need to use Clear-BitLockerAutoUnlock first. To disable BitLocker and decrypt all the volumes on a computer, use the following commands:
Subscribe to 4sysops newsletter!
Clear-BitLockerAutoUnlock
Get-BitLockerVolume | Disable-BitLocker

Disable BitLocker and decrypt all volumes using PowerShell
This post was all about the BitLocker PowerShell module. In the next post, I will cover how to fix various errors that you might encounter while working with the BitLocker module.
![]()
Вы хотите убедиться, что ваши ценные данные в безопасности. Последнее, что вы хотите услышать, — это то, что ваши данные попали в чужие руки, особенно если вы потеряете свое драгоценное устройство.
BitLocker предоставляет пользователям Windows 10 простой способ защитить свои данные с помощью шифрования. Программа создает безопасную среду для всех ваших файлов без каких-либо дополнительных усилий с вашей стороны.

Если вам больше не нужен BitLocker, вы можете отключить его, выполнив несколько быстрых шагов. Однако при отключении BitLocker в Windows 10 он расшифровать все ваши файлы, и ваши данные больше не будут защищены.
BitLocker — это встроенная функция, встроенная в ПК с версиями Windows 10 Pro или Enterprise. Эта функция шифрует весь ваш жесткий диск, чтобы защитить ваши данные от несанкционированного доступа и посторонних глаз.
Не знаете, какую версию Windows используете? Ознакомьтесь с нашим руководством о том, как узнать, какую версию Windows вы установили.
Примечание. Хотя в Windows 10 Home нет BitLocker, вы все равно можете использовать шифрование устройства для защиты файлов от несанкционированного доступа в случае потери или кражи устройства. Вы также можете поместить важные файлы в личное хранилище OneDrive.
BitLocker использует ваш логин Windows для защиты ваших данных, не требуя дополнительных паролей. Эта функция шифрует ваши данные, скремблируя их, так что никто не может получить к ним доступ или прочитать их без использования ключа восстановления.
BitLocker защищает ваши данные только в случае кражи или потери устройства. Если вы хотите защитить свои файлы от программ-вымогателей или других вредоносных программ, ознакомьтесь с нашими лучшими выборами для лучшие сканеры вредоносных программ и вирусов гарантированно уничтожат любой вирус.
Как отключить Bitlocker в Windows 10
BitLocker — это дискретный метод защиты ваших данных от несанкционированного доступа. Отключение этой функции не приведет к удалению каких-либо файлов, но все же рекомендуется хранить резервные копии файлов.
Вы можете отключить BitLocker в Windows 10 разными способами, например, с помощью настроек, панели управления, поля поиска Windows или через PowerShell и командную строку. Ниже приведены шаги, которые необходимо предпринять при использовании каждого из этих методов для отключения BitLocker.
На некоторых сайтах предлагается отключить службу BitLocker Windows или использовать групповую политику для отключения BitLocker, но эти методы на самом деле не работают и могут привести к неправильной настройке и ошибкам.
Как отключить BitLocker в Windows 10 через поиск Windows
Инструмент поиска Windows позволяет выполнять узкий поиск для поиска определенных элементов в проводнике, меню «Пуск» или меню «Настройки». Отсюда вы также можете выполнять поиск в Интернете, не открывая браузер, и получать доступ к файлам или приложениям, которые вы используете чаще всего.
Если вы хотите отключить BitLocker, вы можете легко сделать это через окно поиска Windows.
- Войдите на свой компьютер, используя учетную запись администратора, введите «Управление BitLocker» в поле поиска Windows, а затем выберите его из списка результатов.
- Затем выберите Отключить BitLocker.
Как отключить BitLocker в Windows 10 через меню настроек
Меню настроек Windows содержит основные настройки, которые вы можете использовать для внесения изменений в приложение на вашем ПК. Вот как отключить BitLocker через меню настроек.
- Выберите Пуск> Настройки.
- В окне «Настройки» выберите «Система».
- Выберите «О программе» в левом нижнем углу, найдите раздел «Связанные параметры» на правой панели и выберите «Параметры BitLocker».
Примечание. Если вы по-прежнему не видите вкладку, это означает, что на вашем компьютере нет BitLocker.
- Затем выберите Отключить BitLocker.
- При появлении запроса снова выберите Отключить BitLocker. BitLocker зашифрует ваш жесткий диск, после чего Windows предложит вам ввести пароль, прежде чем функция будет отключена.
Как удалить BitLocker в Windows 10 через панель управления
Панель управления Windows 10 содержит настройки, которые контролируют практически все, что касается внешнего вида и работы Windows. Вот как отключить BitLocker через панель управления.
- Откройте панель управления из меню «Пуск» или введите «Панель управления» в поле поиска и выберите ее в результатах поиска.
- Выберите Система и безопасность.
- Затем выберите Шифрование диска BitLocker> Управление BitLocker.
- Выберите ссылку Отключить BitLocker.
- Появится всплывающее окно с сообщением: Ваш диск будет расшифрован. Это может занять много времени, но вы можете продолжать использовать свой компьютер во время процесса дешифрования. Выберите Отключить BitLocker, чтобы подтвердить действие.
Примечание. Если BitLocker зашифровал один жесткий диск, он начнет процесс расшифровки для этого диска. Если есть разные диски, вам нужно выбрать диск, для которого вы хотите отключить BitLocker.
Как отключить BitLocker с помощью PowerShell и командной строки
Наконец, если у вас возникли проблемы с использованием графического интерфейса пользователя или вы можете получить доступ только к инструментам командной строки, вы можете отключить BitLocker с помощью PowerShell или командной строки. Обязательно запускайте оба инструмента от имени администратора.
Для PowerShell команда приведена ниже, но вы замените X буквой зашифрованного диска.
Отключить Bitlocker –MountPoint «X:»
Состояние тома должно быть «Полностью зашифровано», а состояние защиты — «Выкл.».
Если вы используете командную строку, вам сначала понадобится ключ восстановления, который вы сохранили в своей учетной записи Microsoft или в файле при первой установке BitLocker. Обычно это набор из восьми чисел, каждое из которых состоит из шести цифр, разделенных тире. После этого вам нужно будет ввести следующую команду, заменив X буквой диска на вашем ПК:
manage-bde -unlock X: -RecoveryPassword Recovery-Key
Обратите внимание, что это разблокирует диск, но не отключает BitLocker полностью. Если вы хотите полностью отключить его, используйте эту команду:
управление-bde -off X:
Если вы хотите снова включить BitLocker позже, обратитесь к нашему руководству о том, как настроить полное шифрование диска в Windows с помощью BitLocker.
Безопасное отключение BitLocker в Windows 10
Отключение BitLocker расшифрует все ваши файлы, а это значит, что ваши данные больше не будут защищены. Однако вы все равно можете зашифровать свои текстовые файлы или зашифровать все свои онлайн и офлайн данные.
Что бы вы ни решили сделать, убедитесь, что ваши файлы защищены. Если ваши данные попадут в чужие руки, хакеры могут использовать ваши данные против вас.
On Windows 10, BitLocker is a security feature that allows you to encrypt the entire system drive (and external storage) to protect your documents, pictures, music, videos, and other files from unauthorized access if your device gets stolen or lost.
Although BitLocker Drive Encryption is a useful feature (especially for mobile devices, such as laptops and tablets), it has a drawback. If you enable encryption on a system drive, during a Unified Extensible Firmware Interface (UEFI) or Basic Input/Output System (BIOS) updates, during hardware change, or while upgrading to a new version of the operating system, you may run into issues, such as having to enter a recovery key during startup, because BitLocker will think that the device is being tampered with.
However, you can prevent encryption problems by suspending BitLocker on a system drive to perform firmware, hardware, or Windows 10 updates in at least three different ways, using Control Panel, PowerShell, and Command Prompt.
This guide will walk you through the steps to suspend (and resume) BitLocker on your device to prevent issues during system modifications on Windows 10.
How to suspend BitLocker from Control Panel
To suspend BitLocker using Control Panel on Windows 10, use these steps:
- Open Control Panel.
- Click on System and Security.
- Click on BitLocker Drive Encryption.
- Click the Suspend protection option.
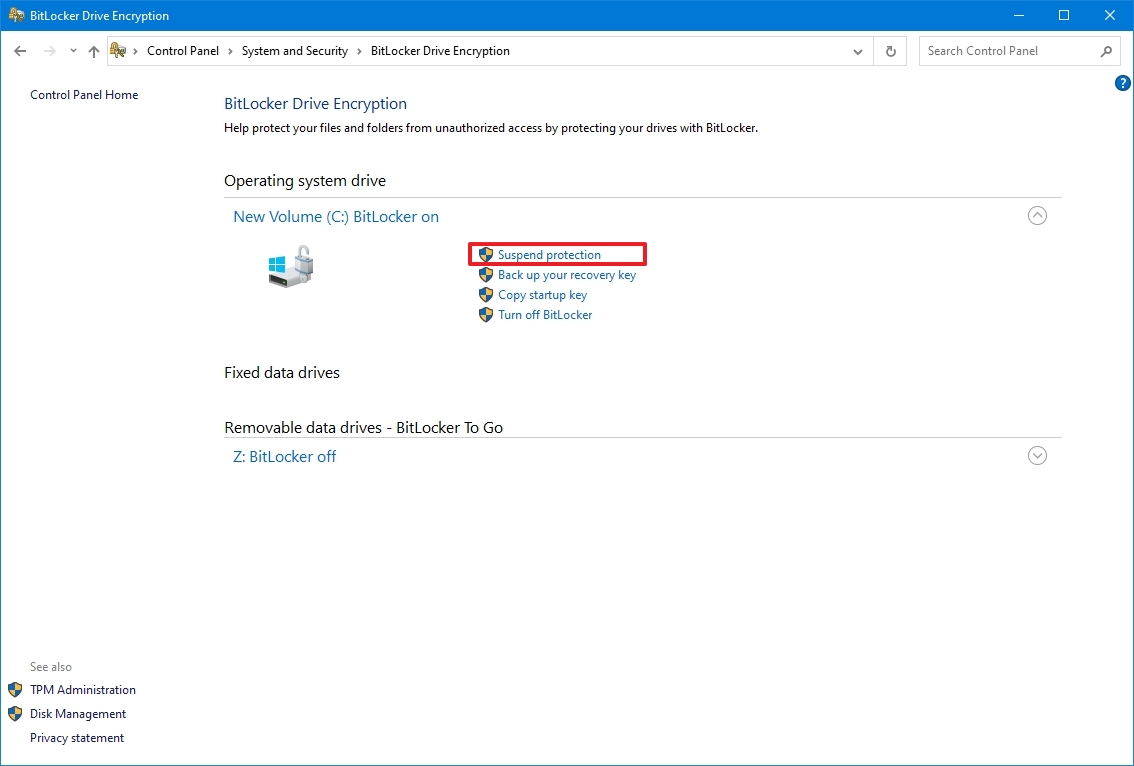
- Click the Yes button.
Once you complete these steps, the BitLocker protection will be temporarily disabled without decrypting your data to perform firmware and system updates without problems.
Using suspension doesn’t decrypt the data. Instead, the option makes the BitLocker key available to anyone in clear text, and additional data you create will still be encrypted on the drive. Once you’re done making system changes, you can always resume encryption to keep your files protected.
Resume BitLocker protection
To resume the BitLocker protection on your device, use these steps:
- Open Control Panel.
- Click on System and Security.
- Click on BitLocker Drive Encryption.
- Click the Resume protection option.
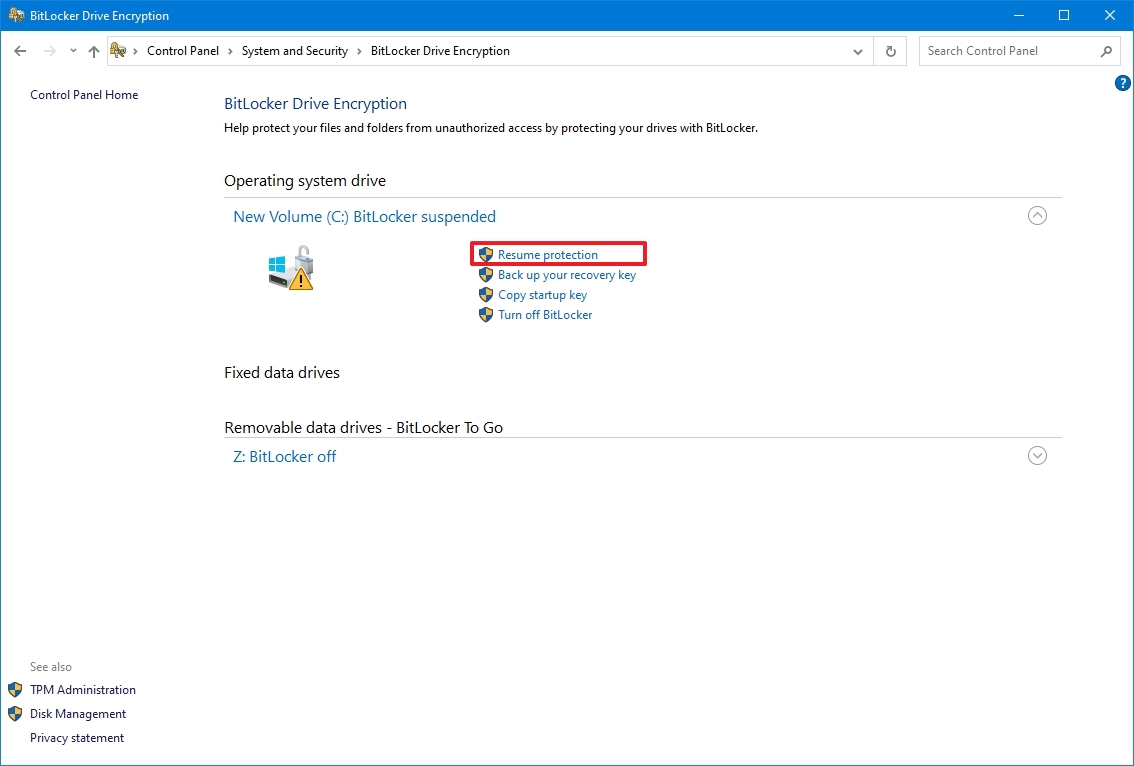
Alternatively, restarting your computer will also resume the BitLocker protection automatically.
How to suspend BitLocker from PowerShell
If you feel comfortable using commands, or you’re building an automated script, you can use PowerShell to suspend BitLocker on Windows 10 with these steps:
- Open Start.
- Search for PowerShell, right-click the top result, and select the Run as administrator option.
- Type the following command to suspend BitLocker and press Enter: Suspend-BitLocker -MountPoint «C:» -RebootCount 0
In the command, the —RebootCount allows you to determine how many times your computer can restart before BitLocker re-enables automatically. You can use values 0 through 15, while zero suspends BitLocker until you resume the protection manually.

After you complete the steps, Windows 10 will disable BitLocker indefinitely unless you specify the reboot count option, in which case, the protection will re-enable automatically after the number of restarts that you chose.
Resume BitLocker
After applying a new firmware update or a version of Windows 10, you can resume BitLocker at any time with PowerShell using these steps:
- Open Start.
- Search for PowerShell, right-click the top result, and select the Run as administrator option.
- Type the following command to resume BitLocker and press Enter: Resume-BitLocker -MountPoint «C:»
After you complete the steps, the encryption protection feature will enable on your device.
How to suspend BitLocker from Command Prompt
You can also use Command Prompt to disable BitLocker on Windows 10 temporarily using these steps:
- Open Start.
- Search for Command Prompt, right-click the top result, and select the Run as administrator option.
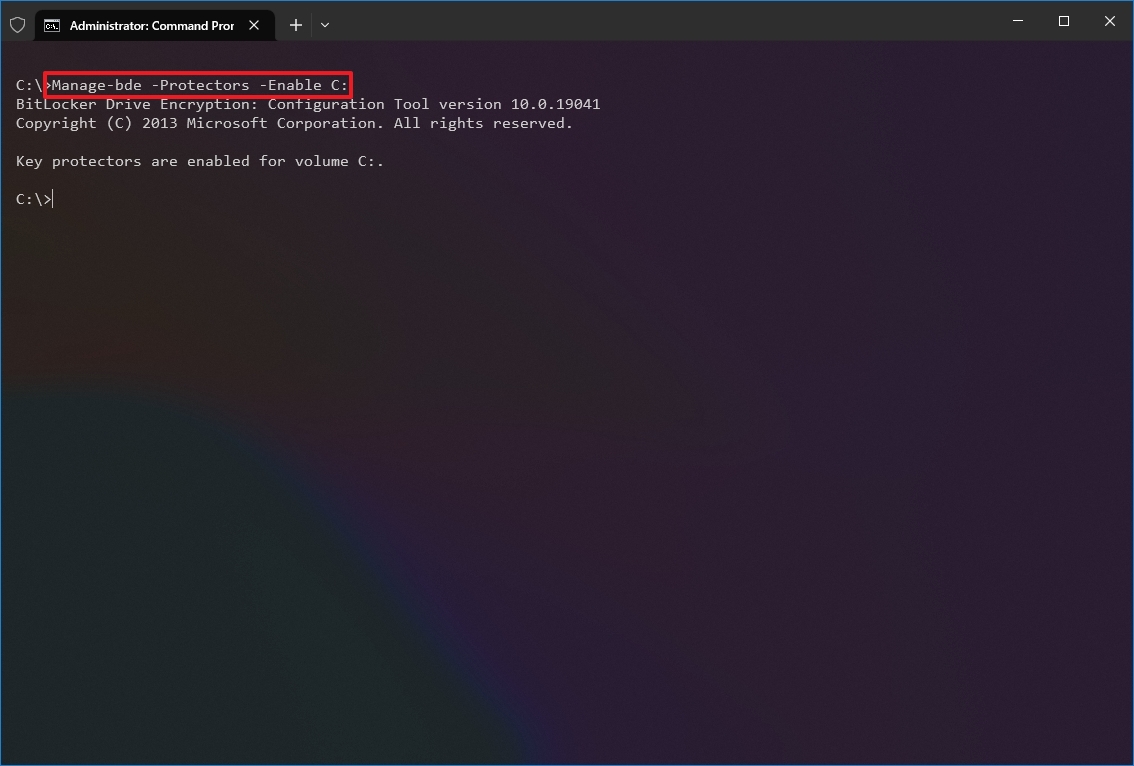
- Type the following command to identify the drive you want to suspend BitLocker and press Enter: Manage-bde -protectors -Disable C: -RebootCount 0
In the command, the -RebootCount allows you to specify how many times your computer can restart before BitLocker re-enables automatically. You can use values 0 through 15, while zero suspends BitLocker until you resume the protection manually.

Once you complete these steps, your computer will temporarily stay without encryption protection to perform system changes.
Resume BitLocker
After applying the system changes, you can re-enable the BitLocker protection with Command Prompt using these steps:
- Open Start.
- Search for Command Prompt, right-click the top result, and select the Run as administrator option.
- Type the following command to resume BitLocker and press Enter: Manage-bde -Protectors -Enable C:
After you complete the steps, BitLocker will resume keeping the system drive fully encrypted.
While we’re showing you multiple ways to suspend BitLocker on Windows 10, the command options using PowerShell and Command Prompt are the only methods that let you pause encryption indefinitely.
More resources
For more helpful articles, coverage, and answers to common questions about Windows 10, visit the following resources:
- Windows 11 on Windows Central — All you need to know
- Windows 10 on Windows Central — All you need to know

(opens in new tab)
Get the best of Windows Central in in your inbox, every day!
Mauro Huculak is technical writer for WindowsCentral.com. His primary focus is to write comprehensive how-tos to help users get the most out of Windows 10 and its many related technologies. He has an IT background with professional certifications from Microsoft, Cisco, and CompTIA, and he’s a recognized member of the Microsoft MVP community.
Вы можете отключить BitLocker прямо из самой панели управления. Вот как это сделать.
Шаг 1. Откройте меню «Пуск».
Шаг 2. Введите «Панель управления» и нажмите Enter.
Шаг 3. После открытия панели управления установите для параметра «Просмотр по» значение «Крупные значки».
Шаг 4. Затем найдите и выберите параметр «Шифрование диска BitLocker».
Шаг 5. Найдите диск с поддержкой BitLocker и щелкните по нему.
Шаг 6. Нажмите на опцию «Отключить BitLocker».
Шаг 7. Когда будет предложено ввести пароль, введите пароль и нажмите Enter.
Как только вы подтвердите действие, BitLocker расшифрует диск и выключится.
2. Отключите BitLocker с помощью CMD.
Вы можете выполнить одну команду, чтобы быстро отключить BitLocker в Windows 10. Перед выполнением приведенной ниже команды обязательно запишите букву зашифрованного диска. Вы можете найти букву диска в проводнике.
Шаг 1. Откройте меню «Пуск».
Шаг 2. Введите «Командная строка», щелкните ее правой кнопкой мыши и выберите «Запуск от имени администратора».
Шаг 3. После открытия CMD от имени администратора выполните команду ниже. Замените «X» фактической буквой зашифрованного диска.
управление-bde -off X:
Шаг 4. При появлении запроса введите свой пароль BitLocker и нажмите Enter.
После аутентификации с паролем Windows 10 расшифрует диск и отключит BitLocker.
3. Отключите BitLocker с помощью PowerShell.
PowerShell также имеет специальную команду для полного отключения BitLocker в Windows 10.
Шаг 1. Откройте меню «Пуск».
Шаг 2. Войдите в «PowerShell», щелкните его правой кнопкой мыши и выберите «Запуск от имени администратора».
Шаг 3. После открытия PowerShell от имени администратора выполните в нем команду ниже. Замените «X» фактической буквой диска.
Отключить-BitLocker -MountPoint «X:»
Шаг 4. Когда будет предложено ввести пароль, введите пароль и нажмите Enter.
Как только вы введете пароль, Windows расшифрует том и отключит BitLocker на этом конкретном диске.
На чтение 7 мин. Просмотров 19.6k. Опубликовано 03.09.2019
Некоторые пользователи жалуются на проблему, связанную с шифрованием BitLocker на устройствах Windows 8.1, главным образом на несовместимость диска, зашифрованного в Windows 7, и более позднего, используемого на компьютере под управлением Windows 8.1.
Если у вас возникла эта проблема, возможно, это руководство поможет вам решить проблему.
Если вы до сих пор не слышали о BitLocker и хотите получить дополнительный уровень безопасности для вашего компьютера с Windows, то вам определенно следует изучить, что он может делать и как он может защитить ваши файлы.
Но даже несмотря на свои преимущества, у функции шифрования Microsoft есть некоторые проблемы при перемещении дисков с компьютеров с Windows 7 на Windows 8 или Windows 8.1.
Содержание
- Как отключить BitLocker в Windows 8/8.1
- Решение 1. Отключите BitLocker из панели управления Windows 8
- Решение 2. Отключите BitLocker из Windows 8 с помощью редактора локальной групповой политики
- Способ 3 – использовать другой компьютер для отключения BitLocker
- Решение 4 – Использование командной строки
- Решение 5 – Используйте PowerShell
- Решение 6 – отключить службу BitLocker
- Решение 7. Отключите шифрование устройства в приложении «Настройки».
Как отключить BitLocker в Windows 8/8.1
BitLocker – отличный способ защитить ваши файлы, и в этой статье мы рассмотрим следующие вопросы:
- Отключить BitLocker для Windows 8, 10 . Отключить BitLocker довольно просто, и процесс отключения практически идентичен в Windows 8 и Windows 10.
- Отключить командную строку BitLocker, PowerShell . Если вы являетесь опытным пользователем, вы можете отключить BitLocker с помощью командной строки. Вы можете отключить BitLocker с помощью PowerShell и командной строки, и в этой статье мы покажем вам, как это сделать.
- Полностью удалите BitLocker Windows 10 . BitLocker – это встроенная функция Windows, и хотя вы не можете удалить ее, вы можете отключить ее и все связанные с ней службы. Тем самым вы навсегда отключите BitLocker на своем ПК.
- Отключить внешний жесткий диск BitLocker, USB , шифрование, съемный диск, USB диск – BitLocker также работает с внешним диском и съемным носителем. Если вы хотите отключить BitLocker для вашего USB-накопителя, вы можете сделать это, используя любое из наших решений.
- Отключить BitLocker для обновления BIOS . Мало кто сообщил, что не может обновить BIOS до отключения BitLocker. Однако вы должны иметь возможность отключить BitLocker после прочтения этой статьи.
- Отключить BitLocker для Windows 8.1 G roup P olicy – при желании вы можете отключите BitLocker, просто изменив групповую политику. Этот метод работает как для Windows 8, так и для Windows 10.
Хакеры будут любить вас, если вы не защитите свои файлы! Эти антивирусные инструменты с шифрованием защитят ваши данные!
Мы рассмотрим следующий сценарий: вы используете BitLocker на компьютере с Windows 7, недавно купили новый компьютер с Windows 8/8.1 и хотите установить старый жесткий диск в новую башню.
При попытке доступа к зашифрованным разделам Windows 8/8.1 рекомендует отключить BitLocker или не распознает ваш пароль.
Существует несколько способов решения этой проблемы, некоторые из которых проще, чем другие, и вам решать, какой из них может быть полезен в вашем случае.
Вот как вы отключаете BitLocker в Windows 8 или Windows 8.1
Решение 1. Отключите BitLocker из панели управления Windows 8
Подобно тому, как вы решали эту проблему в Windows 7, он может отключить BitLocker из панели управления, если вы знаете свой пароль и он все еще работает.
Чтобы отключить BitLocker, вам необходимо сделать следующее:
-
Откройте панель поиска и введите Управление BitLocker . Выберите в меню Управление BitLocker .

-
Откроется окно BitLocker, где вы увидите все свои разделы и можете либо выбрать приостановку BitLocker, либо полностью отключить его. Выберите нужный вариант и следуйте указаниям мастера.


После этого BitLocker должен быть постоянно отключен для выбранного диска.
Решение 2. Отключите BitLocker из Windows 8 с помощью редактора локальной групповой политики
Если первый метод не подходит для вас, то решение может быть предложено с помощью утилиты групповой политики (GPO). Для этого вам просто нужно выполнить следующие простые шаги:
-
Откройте панель поиска и введите Групповая политика , затем выберите в меню Изменить групповую политику .
-
Отсюда с помощью меню в левой части экрана выберите Конфигурация компьютера -> Административные шаблоны -> Компоненты Windows -> Диск BitLocker. Шифрование -> Фиксированные диски данных , выберите параметр Запретить запись на фиксированные диски, не защищенные с помощью BitLocker , и дважды щелкните его.
-
Нажмите Не настроено или Отключено и нажмите Применить и ОК , чтобы сохранить изменения.


После этого перезагрузите компьютер, и ваша проблема должна быть полностью решена.
Научитесь редактировать групповую политику, как эксперт, с нашим подробным руководством!
Способ 3 – использовать другой компьютер для отключения BitLocker
Если оба метода не сработали, вам остается только установить зашифрованный жесткий диск обратно на другой компьютер и повторить эти методы еще раз.
В этом сценарии способ 1 решит вашу проблему и расшифрует диск, что позволит вам использовать его на вашем компьютере с Windows 8/8.1.
Решение 4 – Использование командной строки
Если вы опытный пользователь, вы можете отключить BitLocker с помощью командной строки. Это довольно просто, и вы можете сделать это, выполнив следующие действия:
-
Откройте Командную строку от имени администратора. Чтобы сделать это быстро, нажмите Windows Key + X , чтобы открыть меню Win + X, и выберите в меню Командная строка (Admin) .
-
Когда откроется Командная строка , введите команду manage-bde -off X: и запустите ее. Обязательно замените X фактической буквой жесткого диска.


Процесс расшифровки начнется. Имейте в виду, что этот процесс может занять некоторое время, поэтому не прерывайте его.
После завершения процесса ваш диск будет разблокирован и BitLocker будет отключен для этого диска.
Как видите, это быстрый и простой способ отключить Bitlocker, и, если вы знакомы с командной строкой, не стесняйтесь попробовать это решение.
Работа с командной строкой будет похожа на прогулку по парку после прочтения этого руководства!
Решение 5 – Используйте PowerShell
Если вы предпочитаете использовать инструменты командной строки, вы должны знать, что вы можете отключить BitLocker для конкретного диска просто с помощью PowerShell. Для этого выполните следующие действия:
-
Нажмите Windows Key + S и введите powershell . Нажмите правой кнопкой мыши Windows PowerShell в списке результатов и выберите Запуск от имени администратора .
-
Когда откроется PowerShell , введите команду Disable-BitLocker -MountPoint «X:» и нажмите Enter , чтобы запустить ее. Перед выполнением команды обязательно замените X буквой, обозначающей раздел жесткого диска.


Вы также можете отключить BitLocker для всех дисков на вашем ПК, используя PowerShell. Для этого выполните следующие действия:
- Откройте PowerShell от имени администратора.
-
Теперь выполните следующие команды:
- $ BLV = Get-BitLockerVolume
- Отключить-BitLocker -MountPoint $ BLV
Запустив эти две команды, вы получите список зашифрованных томов и расшифруете их одной командой.
Имейте в виду, что процесс расшифровки может занять некоторое время, поэтому не прерывайте его. После расшифровки диска BitLocker будет отключен для этого диска.
Решение 6 – отключить службу BitLocker
Если вы хотите отключить BitLocker, вы можете сделать это, отключив его службу. Это довольно просто, и вы можете сделать это, выполнив следующие действия:
-
Нажмите Windows Key + R и введите services.msc . Нажмите Enter или нажмите ОК .
-
Когда откроется окно Службы , найдите и дважды щелкните Служба шифрования диска BitLocker .
-
Установите для Тип запуска значение Отключено и нажмите Применить и ОК , чтобы сохранить изменения.


После отключения службы BitLocker BitLocker должен быть отключен на вашем устройстве.
Решение 7. Отключите шифрование устройства в приложении «Настройки».
Если вы хотите отключить BitLocker, вам будет приятно узнать, что вы можете сделать это прямо из приложения «Настройки». Для этого выполните следующие действия:
- Откройте Настройки приложения . Вы можете сделать это, нажав сочетание клавиш Windows Key + I .
-
Когда откроется Приложение настроек , перейдите в раздел Система .
-
На левой панели выберите О программе . Теперь найдите раздел Шифрование устройства на правой панели и нажмите кнопку Выключить .
- Когда появится диалоговое окно подтверждения, снова нажмите Отключить .


После этого BitLocker должен быть отключен на вашем компьютере.
BitLocker может быть полезен, если вы хотите защитить свои файлы от несанкционированного доступа, но если вы не хотите использовать эту функцию, вы сможете отключить ее с помощью одного из наших решений.
Спите ночью, зная, что ваши данные защищены лучшим программным обеспечением для шифрования из нашего списка!
Примечание редактора . Этот пост был первоначально опубликован в марте 2014 года и с тех пор был полностью переработан и обновлен для обеспечения свежести, точности и полноты.