Windows Server 2019 contains a firewall program called Windows Defender Firewall with Advanced Security. The firewall filters incoming and outgoing traffic on your Windows Server 2019 instance to safeguard it from common network attacks. By default, the firewall is configured to allow access to all pre-installed system programs.
However, several programs may use multiple different ports for operation, and these will be automatically blocked because they don’t match with the rules in your firewall configuration. In this case, you need to open the specific port on Windows Server.
Prerequisites
-
Deploy a Windows Server 2019 Instance on Vultr
-
A Remote Desktop Connection App
Establish a connection to your server by logging in through any remote desktop app or click the console on your Vultr dashboard to access your server. After you connect you can start configuring your Windows server 2019 firewall rules.
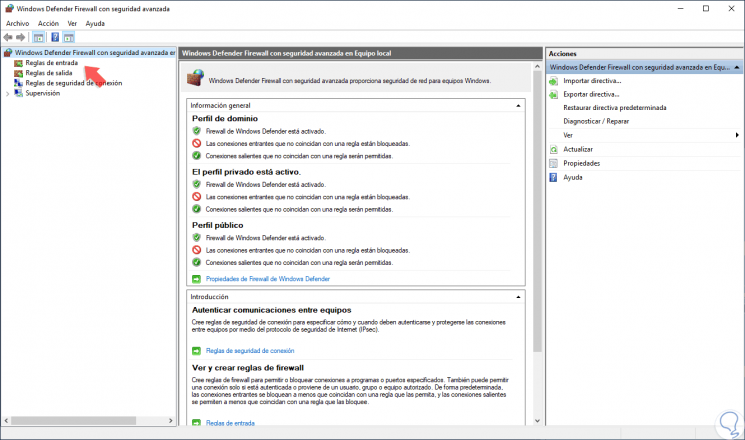
By default, Windows Defender Firewall is turned on, but in any case, you should confirm the current status and turn on firewall. To do this, click the tools node under server manager and select Windows Defender Firewall with Advanced Security from the drop down list.

From the open group policy management window, check the current status of Windows Firewall profiles if it is set to ON; otherwise, click the Windows Defender Firewall properties option and turn the service on per profile.

Firewall Rules
Windows Firewall rules allow you to either permit or block specific incoming and outgoing network packets on your server. You can choose multiple parameters for each inbound or outbound rule. A rule can consist of a TCP or UDP port, program name, service, or a protocol to filter for every server profile.
Windows server profiles are grouped into, Domain, Private and Public. Domain represents your server’s connection to a corporate domain network, Private applies to your home or workplace network connection, and Public represents non-secure public network locations.
Open an Inbound Port (Incoming connections)
Launch windows defender firewall from the tools sub-menu under server manager. Then, select Inbound Rules on the left panel of the Firewall console.
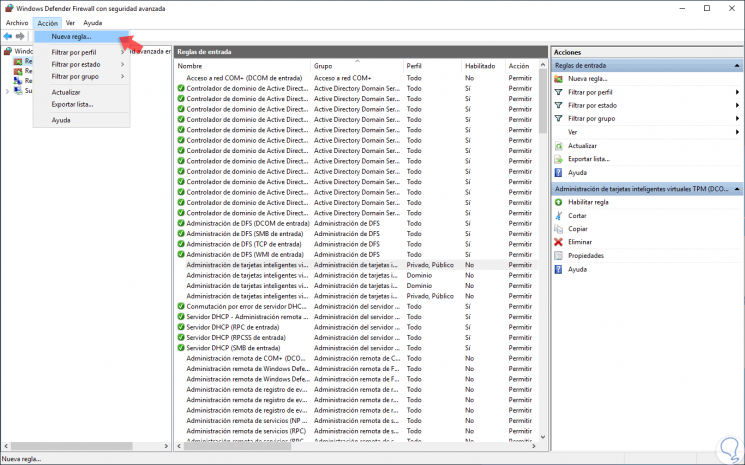
A list of current rules will be displayed. Now, on the left Inbound Rules sub-menu under actions, click New Rule.

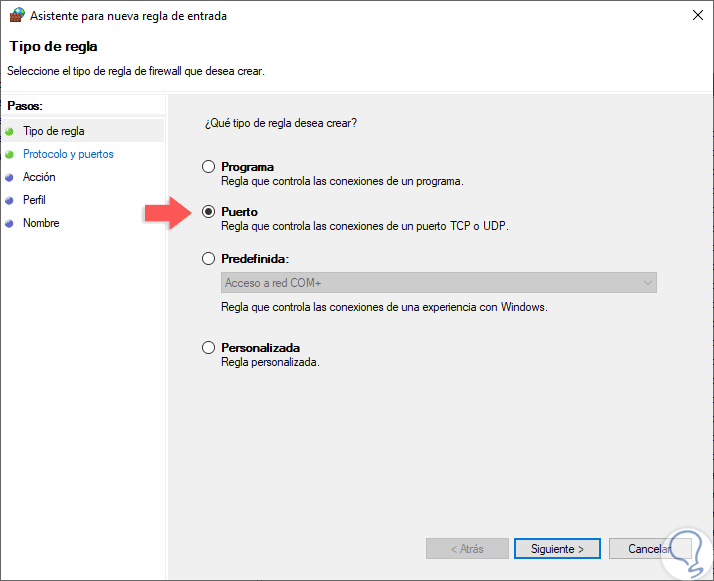
Select Port as the rule type in the rule wizard and click Next.

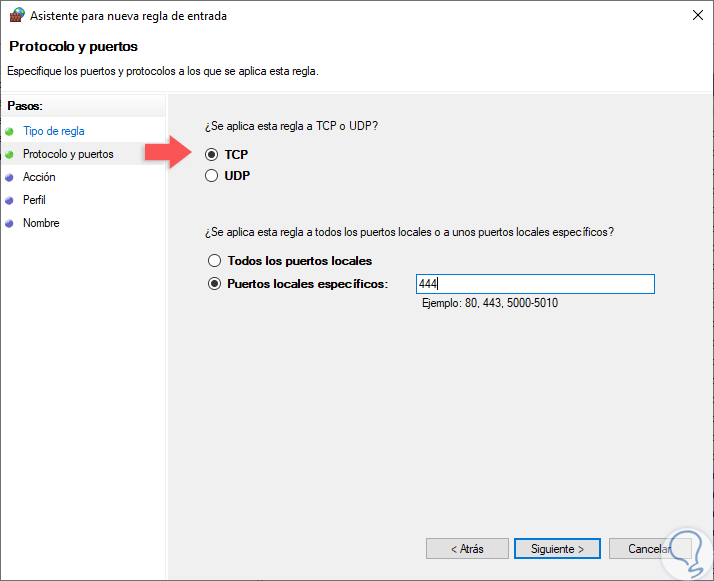
Now, choose whether the new rule applies to a TCP or UDP port on your server. Then, select specific ports and enter your target port number, you can enter a ports range, or multiple ports separated by - and , respectively, then click Next.

Define your TCP or UDP port rule.

-
Allow the connectionwill allow incoming connections to the specified server port -
Allow the connection if it is securewill authenticate with IP security and either deny or allow the connection. For example,httpsconnections will be allowed andhttpblocked. -
Block the connectionwill block all incoming connections to your server through the specified port
In this case, choose Allow the connection to open the port.
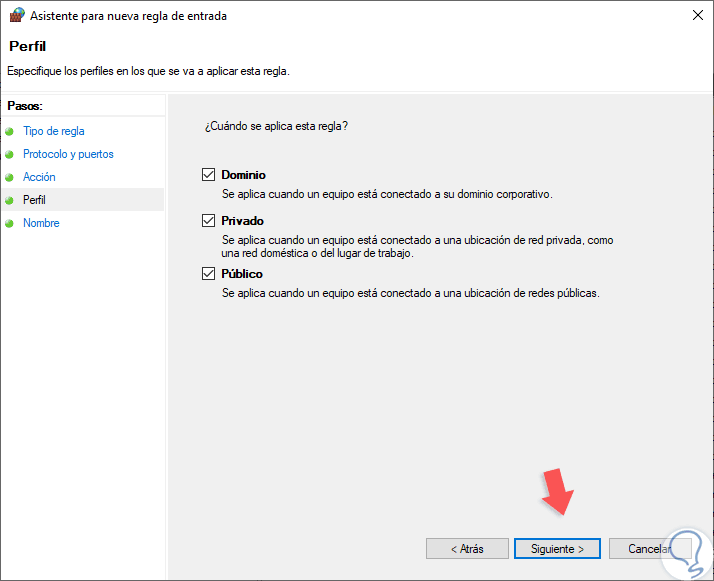
Click Next to assign the new rule to one or more profiles. You can select between Domain, Private, and Public, or choose all to apply the firewall rule on multiple profiles.
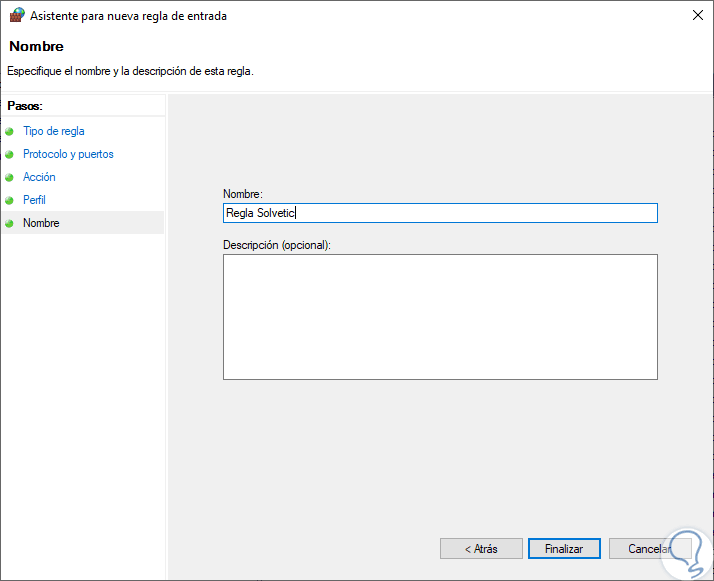
Next, give your new firewall rule a custom name and description for easy identification. Then, Click finish to enable the new rule. Your new Inbound (Incoming) port rule will be enabled, and all connections to the server that match the port will be accepted.
Open an Outbound Port (Outgoing connection)
From the Windows Defender Firewall console, click Outbound Rules on the left pane, and a list of available outgoing connection rules will be displayed.
Now, click New Rule on the right pane under the outbound rules node.
In the new outbound rule wizard, select Port as the rule type and click Next.

Now, let’s choose whether the new rule applies to a TCP or UDP port. Then, select specific remote ports and enter the target server port number; you can enter a range of ports, a single port, or multiple different ports you intend to open.

Next, on the Action page, select Allow the connection, then click next to select the server profile on which the rule should be enabled.
Give the new outbound rule a name and description that uniquely describes it. Then, click Finish to enable the outbound rule for the target port to be open on all selected server profiles.

Open a Port through Windows PowerShell
From the Windows start menu, open PowerShell. Then, edit the following command and replace it with your settings.
New-NetFirewallRule -Enabled:True -LocalPort 21 -Protocol TCP -Direction Inbound -Profile Domain -Action Allow -DisplayName example opening a port rule"
-
New-NetFirewallRuleCreates a new Firewall rule. -
EnabledThis enables the new rule, by default, it will be set to True. -
LocalPortYour target port number. -
ProtocolSpecifies the protocol associated with your port number. -
DirectionSets your target direction to either Inbound (Incoming) or Outbound (Outgoing). -
ProfileAssigns the new rule to a server profile; you can choose domain, private, or public. -
Actiondefines the state for the new firewall rule, enter allow. -
DisplayNamesets a custom name for the new firewall rule
Your Output should be similar to the one below.
PS C:UsersAdministrator> New-NetFirewallRule  -Enabled:True  -LocalPort 21  -Protocol TCP  -Direction Inbound  -Profile Domain  -Action Allow  -DisplayName "example opening a port rule"


Name                  : {427a1b12-ece6-4d54-847d-de482b227c6c}

DisplayName           : example opening a port rule

Description           :

DisplayGroup          :

Group                 :

Enabled               : True

Profile               : Domain

Platform              : {}

Direction             : Inbound

Action                : Allow

EdgeTraversalPolicy   : Block

LooseSourceMapping    : False

LocalOnlyMapping      : False

Owner                 :

PrimaryStatus         : OK

Status                : The rule was parsed successfully from the store. (65536)

EnforcementStatus     : NotApplicable

PolicyStoreSource     : PersistentStore

PolicyStoreSourceType : Local
Congratulations, you just opened a network port on your Windows Server 2019. The server will accept incoming and outgoing connections through the selected ports, but the firewall will block connections from a profile that doesn’t match the port rule.
— Advertisement —
Hello! One of the protection mechanisms of the server is the implementation of the Firewall. Although there are third party options, Microsoft offers a Firewall integrated into the operating system. It is very efficient and highly configurable. Additionally, it can allow or block connections or redirect connection requests. Also, by customizing the rules it is possible to allow only authorized communications. On the other hand, port management is vital within the Firewall. Since they allow communication between the server and the external network. In fact, the vast majority of attacks are carried out through these ports. For this reason, the Firewall blocks most of the ports. However, it is occasionally necessary for an app to have access to one. In this case, the administrator must authorize the program’s access to the required port. So let’s see how to open a firewall port in Windows Server 2019/2016.
How to open the firewall port using the advanced settings.
In the first place it is necessary to enter the Control Panel and follow the next path:
- System and security
- Windows Defender Firewall
- Advanced Settings

The advanced settings of the Windows Firewall are immediately displayed. There are the entry and exit rules plus the security rules for connections. Finally, there are the firewall supervision options.

Clicking on the input rules will display the pre-configured Windows Server rules. As the name implies, they are related to incoming network connections and packets. Also, some rules are not activated by default. Therefore, you just need to double-click on them and then enable them.

Creating a new rule in the Windows Server Firewall.
By right-clicking on inboud rules, you can create a new rule.

There are several options for the creation of the rule. However, you should only select Port. Press Next to continue

Now it’s time to set your connection preferences:
- TCP: It is a connection-oriented protocol. In other words, its function is to create connections with the aim of sending data flow.
- UDP: It is a non connection-oriented protocol. Consequently, its development is based on the exchange of data grams.
On the other hand, it is possible to enable all ports for connection. This is obviously an unsecured option. Or you can configure specific ports.

Now it is time to determine what action the new rule will take:
- Allow connection through the port.
- Allow connection if secure. That is, allow data to be transmitted only if the connection is authenticated through Ipsec.
- Block connection through the port.

Please select the option corresponding to Allow connection and press Next. Now it is time to determine which profiles the new rule will be applied to.

Finally, you can assign a name and description to the new rule. This way it is easier to locate it later.

Back to the previous screen, you can see the new rule created.

Ultimately we have seen how to open a firewall port in Windows Server 2019/2016. In addition, the tutorial also serves to block a specific port. This way, the administrator can increase the functionality of the Firewall. All right, that’s it for now. Greetings!
Содержание
- DATAENGINER
- Configure a Firewall for Report Server Access
- Предварительные требования
- Открытие портов в брандмауэре Windows
- Открытие порта 80
- Дальнейшие действия
- Настройка брандмауэра для доменов и трастов Active Directory
- Дополнительная информация
- Windows Сервер 2008 и более поздние версии
- Active Directory
- Справка
- Как открыть порт брандмауэра Windows Server 2019
- Откройте порт брандмауэра с расширенными настройками брандмауэра в Windows Server 2019
- СТАТЬЯ ПО ТЕМЕ Как изменить пароль учетной записи пользователя Microsoft Windows 10
- How to open a firewall port in Windows Server 2019/2016
- How to open the firewall port using the advanced settings.
- Creating a new rule in the Windows Server Firewall.
DATAENGINER
Добрый день! Сегодня мы продолжаем настраивать наш Ftp — Server для ОС Windows Server 2019! И сегодня мы рассмотрим как открыть порты, для доступа по сети к ftp-серверу.
Для того, чтобы мы могли подключиться к нашему ftp-серверу необходимо в брандмауэре открыть соответствующие порты. Как правило Ftp-сервер использует 21 порт, а sftp 22.
Шаг 1. Для того чтобы открыть порт, для нашего ftp-сервера, нам необходимо открыть firewall windows. Поэтому открываем меню пуск и пишем в поиске firewall.

Шаг 2. Открываем приложение Windows Defender Firewall.

Шаг 3. В левом боковом меню выберем inbound Rules. Далее в правом боковом меню выбираем New Rules.

Шаг 4. В появившемся окне добавления новой роли выбираем Predefined (предопределенные), и в выпадающем списке выбираем ftp-server.

Шаг 5. Отмечаем галочкой все предложенные роли.

Шаг 6. Теперь на следующей странице выбираем разрешить все подключения (Allow Connection) и нажимаем финиш.

Теперь у нас появится три новых правила, для входящих подключений к ftp-серверу.

Вот мы и рассмотрели как добавить правило для работы ftp — сервера.
Источник
Configure a Firewall for Report Server Access
Службы Reporting Services и опубликованным отчетам производится по URL-адресам, которые состоят из IP-адреса, номера порта и имени виртуального каталога. Если включен брандмауэр Windows, то порт, на который настроен сервер отчетов, скорее всего, закрыт. Обычно это выражается в том, что при обращении с удаленного клиентского компьютера к веб-порталу отображается пустая страница либо при запросе отчета открывается пустая веб-страница.
Открыть порт можно при помощи брандмауэра Windows на компьютере сервера отчетов. Службы Reporting Services не открывают порты автоматически, этот шаг необходимо выполнить вручную.
По умолчанию сервер отчетов слушает HTTP-запросы для порта 80. Следующие пошаговые инструкции позволяют настроить порт. Если URL-адреса сервера отчетов настроены на другой порт, при выполнении описанных ниже инструкций необходимо указывать его номер.
Предварительные требования
Выполнение следующих инструкций предполагает, что создана база данных сервера отчетов, настроена учетная запись службы и URL-адреса веб-портала и веб-службы сервера отчетов. Дополнительные сведения см. в разделе Управление сервером отчетов служб Reporting Services в собственном режиме.
Кроме этого, необходимо проверить доступность экземпляра сервера отчетов из веб-браузера через локальное соединение. Этот шаг необходим для проверки работоспособности установки. Прежде чем приступать к открытию портов, необходимо проверить правильность настройки установки. Чтобы выполнить этот шаг в Windows Server, потребуется также добавить сервер отчетов к доверенным сайтам. Дополнительные сведения см. в разделе Настройка сервера отчетов, работающего в основном режиме, для локального администрирования (службы SSRS).
Открытие портов в брандмауэре Windows
Открытие порта 80
В меню Пуск выберите Панель управления, Система и безопасностьи Брандмауэр Windows. Если на панели управления не включено представление по категориям, сразу выберите Брандмауэр Windows.
Нажмите кнопку Дополнительные параметры.
Выберите Правила для входящих подключений.
Выберите Создать правило в окне Действия.
Выберите Тип правила в разделе Порт.
Щелкните Далее.
На странице Протокол и порты выберите TCP.
Выберите Указанные локальные порты и введите значение 80.
Щелкните Далее.
На странице Действие выберите Разрешить соединение.
Щелкните Далее.
На странице Профиль выберите необходимые параметры для среды.
Щелкните Далее.
Нажмите кнопку Готово.
Дальнейшие действия
После открытия порта, прежде чем удаленные пользователи смогут производить доступ к серверу отчетов, им необходимо предоставить доступ к корневой папке и на уровне сайта. Даже если порт правильно открыт, пользователи не смогут соединяться с сервером отчетов, если им не предоставлены необходимые разрешения. Дополнительные сведения см. в статье Предоставление пользователям доступа к серверу отчетов.
Правильность открытия порта можно также проверить, открыв веб-портал с другого компьютера. См. подробнее о веб-портале сервера отчетов.
Источник
Настройка брандмауэра для доменов и трастов Active Directory
В этой статье описывается настройка брандмауэра для доменов и трастов Active Directory.
Применяется к: Windows Server 2019, Windows Server 2016, Windows Server 2012 R2 Standard, Windows Server 2012 Standard
Исходный номер КБ: 179442
Не все порты, перечисленные в таблицах, требуются во всех сценариях. Например, если брандмауэр разделяет членов и DCs, вам не нужно открывать порты FRS или DFSR. Кроме того, если вы знаете, что клиенты не используют LDAP с SSL/TLS, вам не нужно открывать порты 636 и 3269.
Дополнительная информация
Два контроллера домена находятся в одном лесу или два контроллера домена находятся в отдельном лесу. Кроме того, доверия в лесу Windows server 2003 или более поздние версии.
| Клиентский порт (s) | Порт сервера | Служба |
|---|---|---|
| 1024-65535/TCP | 135/TCP | Картограф конечной точки RPC |
| 1024-65535/TCP | 1024-65535/TCP | RPC для LSA, SAM, NetLogon (*) |
| 1024-65535/TCP/UDP | 389/TCP/UDP | LDAP |
| 1024-65535/TCP | 636/TCP | LDAP SSL |
| 1024-65535/TCP | 3268/TCP | LDAP GC |
| 1024-65535/TCP | 3269/TCP | LDAP GC SSL |
| 53,1024-65535/TCP/UDP | 53/TCP/UDP | DNS |
| 1024-65535/TCP/UDP | 88/TCP/UDP | Kerberos; |
| 1024-65535/TCP | 445/TCP | SMB |
| 1024-65535/TCP | 1024-65535/TCP | RPC FRS (*) |
Порты NetBIOS, указанные в Windows NT, также необходимы для Windows 2000 и Windows Server 2003, когда настраиваются доверия к доменам, которые поддерживают только связь на основе NetBIOS. Примерами являются Windows NT операционные системы или сторонние контроллеры домена, основанные на Samba.
Дополнительные сведения о том, как определить порты серверов RPC, используемые службами RPC LSA, см. в.
Windows Сервер 2008 и более поздние версии
Windows Более новые версии сервера 2008 Windows Server увеличили динамический диапазон клиентских портов для исходяющих подключений. Новый порт запуска по умолчанию — 49152, а конечный порт по умолчанию — 65535. Поэтому необходимо увеличить диапазон порта RPC в брандмауэрах. Это изменение было сделано в соответствии с рекомендациями управления номерами, заданными в Интернете (IANA). Это отличается от домена смешанного режима, состоящего из контроллеров домена Windows Server 2003, контроллеров доменов на основе сервера Windows 2000 или устаревших клиентов, где динамический диапазон портов по умолчанию составляет от 1025 до 5000.
Дополнительные сведения о динамическом изменении диапазона портов в Windows Server 2012 и Windows Server 2012 R2 см.:
Порты NetBIOS, указанные в Windows NT, также необходимы для Windows 2000 и Server 2003, когда настраиваются доверия к доменам, которые поддерживают только связь на основе NetBIOS. Примерами являются Windows NT операционные системы или сторонние контроллеры домена, основанные на Samba.
(*) Сведения о том, как определить порты серверов RPC, используемые службами RPC LSA, см. в.
(**) Для работы доверия этот порт не требуется, он используется только для создания доверия.
Внешнее доверие 123/UDP необходимо только в том случае, если вы вручную Windows службу времени для синхронизации с сервером во внешнем доверии.
Active Directory
Клиент Microsoft LDAP использует icMP-инг, когда запрос LDAP ожидается в течение продолжительного времени и ожидает ответа. Он отправляет запросы на ping, чтобы убедиться, что сервер по-прежнему находится в сети. Если он не получает ответы на запросы ping, он сбой запроса LDAP с LDAP_TIMEOUT.
Кроме того Windows перенаправление использует сообщения ICMP Ping для проверки того, что IP-адрес сервера разрешен службой DNS перед подключением и когда сервер расположен с помощью DFS. Чтобы свести к минимуму трафик ICMP, можно использовать следующее правило брандмауэра:
В отличие от уровня протокола TCP и уровня протокола UDP, у ICMP нет номера порта. Это связано с тем, что ICMP непосредственно находится на уровне IP.
По умолчанию серверы Windows Server 2003 и Windows 2000 Сервер DNS используют эфемерные клиентские порты при запросе других DNS-серверов. Однако это поведение может быть изменено определенным параметром реестра. Или можно установить доверие через обязательный туннель с точкой на точку (PPTP). Это ограничивает количество портов, которые должен открыть брандмауэр. Для PPTP необходимо включить следующие порты.
| Клиентские порты | Порт сервера | Протокол |
|---|---|---|
| 1024-65535/TCP | 1723/TCP | PPTP |
Кроме того, необходимо включить ПРОТОКОЛ IP 47 (GRE).
При добавлении разрешений к ресурсу в доверяемом домене для пользователей доверенного домена существуют некоторые различия между поведением Windows 2000 и Windows NT 4.0. Если компьютер не может отображать список пользователей удаленного домена, рассмотрите следующее поведение:
Справка
Обзор службы и требования к сетевому порту для Windows — это ценный ресурс с описанием необходимых сетевых портов, протоколов и служб, используемых клиентской и серверной операционными системами Майкрософт, серверными программами и их субкомпонентами в системе Microsoft Windows Server. Администраторы и специалисты по поддержке могут использовать статью в качестве дорожной карты для определения портов и протоколов операционных систем и программ Майкрософт для подключения к сети в сегментной сети.
Не следует использовать сведения о порте в обзоре службы и требования к сетевому порту для Windows для настройки Windows брандмауэра. Сведения о настройке брандмауэра Windows см. в Windows брандмауэра с расширенным обеспечением безопасности.
Источник
Как открыть порт брандмауэра Windows Server 2019
Одним из наиболее фундаментальных механизмов безопасности, которые предлагают нам текущие операционные системы, является внедрение и активация брандмауэра, хотя мы много раз слышали этот термин, но не всегда осознаем, какое влияние он оказывает на систему как на корпоративном, так и на личном уровне, Хотя некоторые компании действительно предлагают брандмауэрные решения на физическом уровне, являющемся мостом между внешней сетью и локальной сетью, сама операционная система, в данном случае речь идет о Windows Server 2019, имеет собственный встроенный брандмауэр, который при правильной конфигурации это даст нам возможность повысить уровни безопасности и, таким образом, гарантировать доступность и целостность всех элементов, размещенных на сервере, таких как роли, службы, общие папки и многое другое.
В брандмауэре Windows Server обычно бывает необходимо настроить определенные исключения, чтобы разрешить обмен приложениями с сервером, в этом случае эти исключения необходимо настроить в соответствии с требованиями приложения и разрешить доступ к ним. Контроль всех ваших возможностей.
Набор правил, которыми управляет межсетевой экран, дает возможность установки метода фильтрации на основе политик безопасности организации, обычно у нас есть два типа политик безопасности, благодаря которым можно будет выполнять действия как:
В администрировании брандмауэра порты играют жизненно важную роль, поскольку они обеспечивают связь между сервером и внешней сетью. Вот почему в этих портах проводится более 95% атак, поскольку они действуют как дверь, открывающаяся для злоумышленников. Вот почему брандмауэр блокирует или закрывает большинство портов, это очевидно из соображений безопасности, но возможно, что какое-то управляющее приложение запрашивает открытие определенного порта в брандмауэре, чтобы его доступ был авторизован. В этом случае как администраторы мы должны разрешить этому конкретному порту иметь надлежащую авторизацию в брандмауэре.
Вот почему Solvetic объяснит, как мы можем открыть и авторизовать порт в брандмауэре Windows Server 2019 и, таким образом, гарантировать, что приложения или службы, использующие этот порт, будут иметь необходимые разрешения.
Откройте порт брандмауэра с расширенными настройками брандмауэра в Windows Server 2019
Шаг 3
При выборе раздела «Входящие правила» будут отображаться все предварительно настроенные правила Windows Server 2019, связанные с входящими сетевыми подключениями и пакетами, некоторые из этих правил не включены по умолчанию, поэтому, если мы хотим активировать их, просто щелкните правой кнопкой мыши на правиле и выберите опцию «Включить правило»:
$config[ads_text5] not found
$config[ads_text6] not found
Шаг 6
При выборе этой опции будет отображаться следующий мастер, где мы определяем тип создаваемого правила, в этом случае мы выбираем поле «Порт»:
$config[ads_text5] not found
Шаг 7
В следующем окне мы определим тип порта для включения:
TCP (протокол управления передачей)
Это протокол, ориентированный на установление соединения, то есть с помощью TCP можно будет создавать соединения друг с другом для отправки потока данных. Этот протокол гарантирует, что данные доставляются получателю без ошибок и в том же порядке, в котором они были передается.
UDP (протокол дейтаграмм пользователя)
Это протокол, не ориентированный на установление соединения, его разработка основана на обмене дейтаграммами и облегчает отправку дейтаграмм через сеть, для которой необходимо предварительно установить соединение с пунктом назначения.
$config[ads_text6] not found
Шаг 8
Мы также можем установить флажок «Все локальные порты», чтобы включить все незащищенные порты TCP или UDP на сервере, или установить флажок «Определенные локальные порты», чтобы определить, какой порт должен быть авторизован на основе требованиям. Определив это, нажмите на кнопку Далее, и теперь мы определим действие, которое будет иметь это правило, варианты:
Эта опция обеспечивает полную связь через этот порт.
Разрешить соединение, если оно безопасно
Эта опция позволяет передавать данные только в том случае, если соединение аутентифицировано через Ipsec.
Эта опция предотвращает направление данных через этот порт.
$config[ads_text5] not found
Шаг 9
Выберите опцию «Разрешить подключение» и нажмите «Далее», теперь мы должны определить, какие профили брандмауэра применить, помните, что мы можем использовать их в публичных, доменных или приватных профилях:
Шаг 10
Мы можем активировать их всех, если захотим. Наконец, мы должны присвоить имя и, если пожелаем, описание нового правила, чтобы облегчить его использование:
Шаг 11
Нажмите кнопку «Готово», чтобы завершить процесс и создать новое правило в Windows Server 2019:
$config[ads_text6] not found
Шаг 12
Там мы можем дважды щелкнуть правило и во всплывающем окне перейти на вкладку «Дополнительные параметры» и проверить аспекты этого правила:
При желании мы можем внести изменения на уровне безопасности созданного нового правила. С помощью этого простого метода мы можем создавать и настраивать правила в брандмауэре Windows Server 2019 и повышать безопасность нашей сети.
СТАТЬЯ ПО ТЕМЕ Как изменить пароль учетной записи пользователя Microsoft Windows 10
По соображениям безопасности идеально время от времени изменять этот пароль и, таким образом, предотвратить обнаружение злоумышленником текущего пароля, и сегодня в TechnoWikis мы проанализируем, как выполнить это действие.
Источник
How to open a firewall port in Windows Server 2019/2016

Hello! One of the protection mechanisms of the server is the implementation of the Firewall. Although there are third party options, Microsoft offers a Firewall integrated into the operating system. It is very efficient and highly configurable. Additionally, it can allow or block connections or redirect connection requests. Also, by customizing the rules it is possible to allow only authorized communications. On the other hand, port management is vital within the Firewall. Since they allow communication between the server and the external network. In fact, the vast majority of attacks are carried out through these ports. For this reason, the Firewall blocks most of the ports. However, it is occasionally necessary for an app to have access to one. In this case, the administrator must authorize the program’s access to the required port. So let’s see how to open a firewall port in Windows Server 2019/2016.
How to open the firewall port using the advanced settings.
In the first place it is necessary to enter the Control Panel and follow the next path:
The advanced settings of the Windows Firewall are immediately displayed. There are the entry and exit rules plus the security rules for connections. Finally, there are the firewall supervision options.
Advanced Windows Server Firewall Settings
Clicking on the input rules will display the pre-configured Windows Server rules. As the name implies, they are related to incoming network connections and packets. Also, some rules are not activated by default. Therefore, you just need to double-click on them and then enable them.
Enabling a rule within the inbound rules.
Creating a new rule in the Windows Server Firewall.
By right-clicking on inboud rules, you can create a new rule.
Creating a new inbound rule.
There are several options for the creation of the rule. However, you should only select Port. Press Next to continue
Please select Port
Now it’s time to set your connection preferences:
On the other hand, it is possible to enable all ports for connection. This is obviously an unsecured option. Or you can configure specific ports.
Setting port connection values.
Now it is time to determine what action the new rule will take:
Please select the option corresponding to Allow connection and press Next. Now it is time to determine which profiles the new rule will be applied to.
Please select the connection profiles for the new rule.
Finally, you can assign a name and description to the new rule. This way it is easier to locate it later.
Optionally you can assign a name and description for the new rule.
Back to the previous screen, you can see the new rule created.
Newly created inbound connection rule.
Ultimately we have seen how to open a firewall port in Windows Server 2019/2016. In addition, the tutorial also serves to block a specific port. This way, the administrator can increase the functionality of the Firewall. All right, that’s it for now. Greetings!
Источник
One of the most fundamental security mechanisms that current operating systems offer us is the implementation and activation of the firewall, although we have heard this term many times, we are not always aware of the high impact it has on the system both at a corporate and personal level . While it is true that certain companies offer firewall solutions on a physical level, which is a bridge between the external network and the local network, the operating system itself, in this case we talk about Windows Server 2019 , has its own integrated firewall which with a correct configuration it will give us the possibility to increase the security levels and thus guarantee the availability and integrity of all the elements that are hosted on the server, such as roles, services, shared folders and more..
In Windows Server Firewall, it is normal that it is often necessary to configure certain exceptions to allow communication of applications with the server, in this case these exceptions must be configured based on the requirements of the application and enable your access to have Control of all your capabilities.
Usage options
When using the integrated Windows Server 2019 firewall we will have management options such as:
- Authorize a connection (Allow).
- Block a connection (Deny).
- Redirect a connection request without notifying the sender of said redirection (Drop).
The set of rules that are managed by the firewall, give the possibility of installing a filtration method based on the security policies of the organization, normally we have two types of security policies thanks to which it will be possible to carry out actions as:
- Allow only authorized communications.
- Prevent any type of communication that has been explicitly prohibited.
In the administration of the firewall , the ports play a vital role since they are the ones that allow communication between the server and the external network. That is why these ports are where more than 95% of the attacks are carried out since they act as a door that opens for attackers. That is why the firewall blocks or closes most of the ports, this is obviously for security reasons but it is possible that some management application requests the opening of a certain port in the firewall so that its access is authorized. In this case as administrators we must allow that particular port to have proper authorization in the firewall..
This is why TechnoWikis will explain how we can open and authorize a port in the Windows Server 2019 firewall and thus ensure that the applications or services that use that port will have the required permissions.
To keep up, remember to subscribe to our YouTube channel! SUBSCRIBE
Open Firewall port with advanced firewall settings in Windows Server 2019
Step 1
To start this process we must go to the next route. Alternatively we can go to the Windows Server 2019 search box and enter the term «firewall» and select the «Windows Defender Firewall» option.
- Control Panel
- Security system
- Windows Defender Firewall

Step 2
In the displayed window we will click on the “Advanced configuration†line and a new window will be displayed where we find parameters such as:
- Entry and exit rules
- Connection Security Rules
- Server firewall monitoring options
Step 3
When selecting the «Inbound rules» section, all the preconfigured Windows Server 2019 rules associated with incoming network connections and packages will be displayed, some of these rules are not enabled by default so if we want to activate them, just right click on the rule and select the option “Enable ruleâ€: 
Step 4
We can find specific details of the rules such as:
- Rule Name
- Group to which it belongs
- Profile (Public, Private or Domain)
- Actual state
Step 5
To create a new rule in Windows Server 2019, we have the following options:
- Right click on the «Inbound rules» section and select «New rule».
- Go to the «Action» menu and select «New rule»
- By clicking on the “New rule†option located in the right side panel.
Step 6
When selecting this option, the following wizard will be displayed where we define the type of rule to be created, in this case we select the “Port†box:
Step 7
In the next window we will define the type of port to enable:
TCP (Transmission Control Protocol)
It is a connection-oriented protocol, that is, with TCP it will be possible to create connections with each other in order to send data flow, this protocol guarantees that the data is delivered to the recipient without errors and in the same order in which they were transmitted.
UDP (User Datagram Protocol)
It is a non-connection-oriented protocol, its development is based on the exchange of datagrams and facilitates the sending of datagrams through the network that it is necessary to have previously established a connection with the destination.
Step 8
We can also select the «All local ports» box to enable all TCP or UDP ports on the server which is not secure, or check the «Specific local ports» box to determine which port is to be authorized based to the requirements. Defined this, click on the Next button and now we will define the action that this rule will have, the options are:
Allow connection
This option enables full communication through this port.
Allow connection if it is secure
This option allows data to be transmitted only if the connection is authenticated through Ipsec.
Block connection
This option prevents data from being directed through this port.
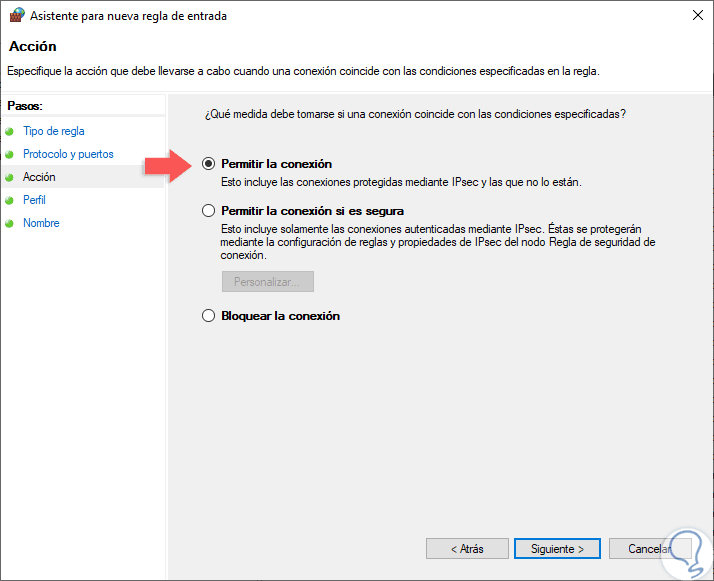
Step 9
Select the option «Allow connection» and click Next, now we must define which firewall profiles to apply, remember that we can use it in Public, Domain or Private profiles:
Step 10
We can activate them all if we wish. Finally, we must assign a name and, if we wish, a description of the new rule to facilitate its use:
Step 11
Click on the «Finish» button to complete the process and create the new rule in Windows Server 2019: 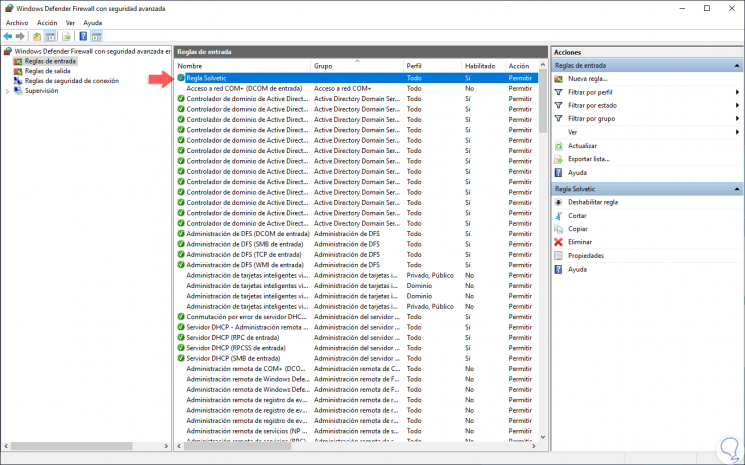
Step 12
There we can double-click on the rule and in the pop-up window go to the «Advanced options» tab and check aspects of that rule:

If we want there we can make changes at the security level of the new rule created. With this simple method, we can create and configure rules in the Windows Server 2019 firewall and improve the security of our network..
- Remove From My Forums
-
Question
-
On Windows Server 2016 and 2019, I go to Firewall and open port 10005 or other ports such as 10002 — 100020, 5000… then I use:
— Netstat -a -n to check open port list but I cannot found these ports.
— Telnet to the server via these ports but failed. But I can successfully telnet to the server via default port that Windows 2019 already opened such as 49669, 49668, 5985… (listening ports)
— I can telnet via 3389 port.
— Note that the service that use the port that I open already run/ configured.
Any one can help me?

-
Edited by
Thursday, November 29, 2018 4:18 AM
-
Edited by
- Remove From My Forums
-
Question
-
On Windows Server 2016 and 2019, I go to Firewall and open port 10005 or other ports such as 10002 — 100020, 5000… then I use:
— Netstat -a -n to check open port list but I cannot found these ports.
— Telnet to the server via these ports but failed. But I can successfully telnet to the server via default port that Windows 2019 already opened such as 49669, 49668, 5985… (listening ports)
— I can telnet via 3389 port.
— Note that the service that use the port that I open already run/ configured.
Any one can help me?
-
Edited by
Thursday, November 29, 2018 4:18 AM
-
Edited by