![]()
Download Article
![]()
Download Article
This wikiHow teaches you how to open the Command Prompt or PowerShell terminal window, using a Windows PC. You can open the Command Prompt or PowerShell from your Start menu or from any folder in the File Explorer. You can also use the Windows Run feature.
-

1
Open your computer’s Start menu. Click the Windows
icon on the bottom-left corner of your desktop or press the ⊞ Win key on your keyboard.
- Alternatively, you can click the search or Cortana button next to the Start menu icon.
-
2
Type cmd, Command Prompt or PowerShell. After opening the Start menu, type this on your keyboard to search the menu items. Command Prompt or PowerShell will show up as the top result.
- Alternatively, you can manually find Command Prompt or PowerShell on the Start menu.
- Command Prompt or PowerShell is in the Windows System folder on Windows 10 & 8, and in the Accessories folder under All Programs on Windows 7, Vista & XP.
Advertisement
-
3
Click the
Command Prompt or PowerShell app on the menu. This will open the Command Prompt or PowerShell terminal in a new window.


Advertisement
-
1
Right-click on the Start menu
icon. You can find this button in the lower-left corner of your desktop. It will open your Power User Menu options in a pop-up.
- You can also just press ⊞ Win+X on your keyboard to open this menu.
- Alternatively, you can right-click on any folder to start Command Prompt or PowerShell from a specific directory.
-
2
Find «Command Prompt» or «PowerShell» on the right-click menu. It’s usually located between «Computer Management» and «Task Manager» on the Power User Menu.
- If you right-click on a folder instead of the Start menu, you will see Open command window here on the right-click menu.
-
3
Click
Command Prompt or PowerShell on the right-click menu. This will open the Command Prompt or PowerShell terminal in a new window.


Advertisement
-
1
Press ⊞ Win+R on your keyboard. Hold down the Windows key on your keyboard, and press the «R» button. This will open the «Run» tool in a new pop-up window.
- Alternatively, you can find and click Run on the Start menu.
-
2
Type cmd in the Run window. This shortcut will open the Command Prompt or PowerShell terminal.
-
3
Click OK in the Run window. This will run your shortcut command, and open the Command Prompt or PowerShell terminal in a new window.


Advertisement
Add New Question
-
Question
How do I open terminal on Mac?

Ken Colburn is a Consumer Electronics Expert and the Founder & CEO of Data Doctors Computer Services. With more than 34 years of experience, he specializes in computer checkups and repairs, data recovery, and teaching others about technology. Ken also provides one-minute tech tips through his broadcast, Data Doctors Tech Tips.
Consumer Electronics Expert
Expert Answer
There’s actually a terminal application in the Utilities folder that you can click out. Or, you can use the command space shortcut and type in the word «terminal,» which essentially gets you to the command line. From there, type the word «terminal» to access the terminal application that way.

Ask a Question
200 characters left
Include your email address to get a message when this question is answered.
Submit
Advertisement
About This Article
Article SummaryX
1. Open the Start menu.
2. Type «cmd».
3. Click Command Prompt.
Did this summary help you?
Thanks to all authors for creating a page that has been read 158,934 times.
Is this article up to date?
![]()
Download Article
![]()
Download Article
This wikiHow teaches you how to open the Command Prompt or PowerShell terminal window, using a Windows PC. You can open the Command Prompt or PowerShell from your Start menu or from any folder in the File Explorer. You can also use the Windows Run feature.
-
1
Open your computer’s Start menu. Click the Windows
icon on the bottom-left corner of your desktop or press the ⊞ Win key on your keyboard.
- Alternatively, you can click the search or Cortana button next to the Start menu icon.
-
2
Type cmd, Command Prompt or PowerShell. After opening the Start menu, type this on your keyboard to search the menu items. Command Prompt or PowerShell will show up as the top result.
- Alternatively, you can manually find Command Prompt or PowerShell on the Start menu.
- Command Prompt or PowerShell is in the Windows System folder on Windows 10 & 8, and in the Accessories folder under All Programs on Windows 7, Vista & XP.
Advertisement
-
3
Click the
Command Prompt or PowerShell app on the menu. This will open the Command Prompt or PowerShell terminal in a new window.
Advertisement
-
1
Right-click on the Start menu
icon. You can find this button in the lower-left corner of your desktop. It will open your Power User Menu options in a pop-up.
- You can also just press ⊞ Win+X on your keyboard to open this menu.
- Alternatively, you can right-click on any folder to start Command Prompt or PowerShell from a specific directory.
-
2
Find «Command Prompt» or «PowerShell» on the right-click menu. It’s usually located between «Computer Management» and «Task Manager» on the Power User Menu.
- If you right-click on a folder instead of the Start menu, you will see Open command window here on the right-click menu.
-
3
Click
Command Prompt or PowerShell on the right-click menu. This will open the Command Prompt or PowerShell terminal in a new window.
Advertisement
-
1
Press ⊞ Win+R on your keyboard. Hold down the Windows key on your keyboard, and press the «R» button. This will open the «Run» tool in a new pop-up window.
- Alternatively, you can find and click Run on the Start menu.
-
2
Type cmd in the Run window. This shortcut will open the Command Prompt or PowerShell terminal.
-
3
Click OK in the Run window. This will run your shortcut command, and open the Command Prompt or PowerShell terminal in a new window.
Advertisement
Add New Question
-
Question
How do I open terminal on Mac?
Ken Colburn is a Consumer Electronics Expert and the Founder & CEO of Data Doctors Computer Services. With more than 34 years of experience, he specializes in computer checkups and repairs, data recovery, and teaching others about technology. Ken also provides one-minute tech tips through his broadcast, Data Doctors Tech Tips.
Consumer Electronics Expert
Expert Answer
There’s actually a terminal application in the Utilities folder that you can click out. Or, you can use the command space shortcut and type in the word «terminal,» which essentially gets you to the command line. From there, type the word «terminal» to access the terminal application that way.
Ask a Question
200 characters left
Include your email address to get a message when this question is answered.
Submit
Advertisement
About This Article
Article SummaryX
1. Open the Start menu.
2. Type «cmd».
3. Click Command Prompt.
Did this summary help you?
Thanks to all authors for creating a page that has been read 158,934 times.
Is this article up to date?
Терминал Windows поставляется с множеством функций, которые позволяют настраивать его и взаимодействовать с ним наиболее удобным для вас способом. Давайте рассмотрим несколько советов и приемов, которые помогут вам настроить свой терминал так, чтобы он идеально вам подходил. На момент публикации этого сообщения в блоге Windows Terminal имел версию 1.3, а Windows Terminal Preview — версию 1.4.
При первом запуске
При первой установке Windows Terminal вы будете поприветствованы строкой Windows PowerShell. Терминал Windows по умолчанию поставляется с профилями Windows PowerShell, командной строки и Azure Cloud Shell.
В дополнение к этим профилям, если у вас установлены какие-либо дистрибутивы Подсистемы Windows для Linux (WSL), терминал также автоматически создаст профили для этих дистрибутивов. Если вы хотите установить дополнительные дистрибутивы WSL на свой компьютер, вы можете сделать это после установки терминала и при следующем запуске терминала профили для этих дистрибутивов должны появиться автоматически. Эти профили будут иметь значок Tux, однако вы можете изменить значок дистрибутива в своих настройках, чтобы он соответствовал любому дистрибутиву, который у вас есть. Вы можете найти дополнительную информацию о WSL на сайте с документацией WSL.
Примечание. Вам нужно будет загрузить значки дистрибутивов, поскольку они не поставляются внутри терминала.
Кастомизация
Терминал Windows поставляется с большим набором настроек по умолчанию, включая цветовые схемы и сочетания клавиш. Если вы хотите просмотреть файл настроек по умолчанию, удерживайте Alt и нажмите кнопку «Настройки» в раскрывающемся меню.
Глобальные настройки профиля
Терминал Windows предоставляет вам возможность применить настройку к каждому профилю без необходимости дублировать настройку для каждой записи профиля. Это можно сделать, добавив параметр в массив "defaults" внутри объекта "profiles". Список всех возможных настроек профиля можно найти на странице настроек профиля в нашей документации.
"profiles":
    {
        "defaults":
        {
            // Поместите здесь настройки, которые вы хотите применить ко всем профилям.
            "fontFace": "Cascadia Code"
        },
        "list":
        []
    }
Кастомные цветовые схемы
Терминал Windows по умолчанию поставляется с набором цветовых схем. Однако, когда дело касается цветовых схем, есть неограниченные возможности. Отличное место для поиска дополнительных схем терминалов — terminalplash.com.
Если вы хотите создать свою собственную цветовую схему, terminal.sexy — отличный инструмент для создания и визуализации ваших собственных цветовых схем.
Совет. Вы можете сопоставить свою цветовую схему с фоновым изображением, используя палитру цветов PowerToys, чтобы получить коды цветов для использования в вашей схеме. PowerToys можно установить с помощью winget с winget install powertoys.
Настраиваемая командная строка
Вы можете придать стиль своей командной строке с помощью Oh my Posh и Terminal-Icons. Эти инструменты позволяют настроить внешний вид вашей командной строки с помощью цветов, глифов и смайликов. Чтобы запустить Oh my Posh с Posh-Git и PSReadline, следуйте этому руководству.
Oh my Posh недавно выпустили Oh my Posh 3, который имеет гораздо больше возможностей настройки и не является эксклюзивным только для PowerShell. Пройдя руководство, указанное выше, вы можете перейти на V3 с помощью следующей команды:
Update-Module -Name oh-my-posh -AllowPrerelease -Scope CurrentUser
Вы можете добавить немного изюминки своей оболочке, добавив пользовательские значки с помощью значков терминала. На изображении ниже также используется настраиваемая тема Posh для добавления смайлов в строку.
Примечание. Для отображения значков терминала вам необходимо установить шрифт Nerd Font.
Олдскульный шрифт
Для тех из вас, кто является поклонником эффекта ретро-терминала, отличное место для поиска шрифтов старой школы находится на странице https://int10h.org/oldschool-pc-fonts/.

Места для фоновых изображений
Обои для рабочего стола часто отлично смотрятся в Windows Terminal в качестве фоновых изображений. Отличные места для поиска фоновых изображений — это темы Windows, а также WallpaperHub. Терминал Windows поддерживает как изображения, так и гифки для фоновых изображений.
Другой популярный вариант — размещение логотипа оболочки, которую вы используете в качестве фонового изображения, чтобы помочь определить, в какой оболочке вы находитесь. Вы можете указать, где будет размещаться фоновое изображение, с помощью "backgroundImageAlignment" в настройках. Дополнительную информацию о настройках фонового изображения можно найти в нашей документации.
Функции
аргументы командной строки wt.exe
Вы можете запустить свой терминал в определенной конфигурации с помощью команды wt.exe. Некоторые параметры, которые вы можете установить, — это расположение вкладок и панелей, а также их начальные каталоги и профили. Вы можете сохранить настраиваемую команду как ярлык и закрепить ее на панели задач, чтобы открыть желаемую конфигурацию.
Если вы используете команду wt.exe внутри палитры команд, она вступит в силу в вашем текущем окне терминала, вместо того, чтобы запускать новый экземпляр терминала.
В этом примере профиль PowerShell откроется в текущем рабочем каталоге на новой вкладке с вертикальной панелью, на которой будет запущен ваш профиль по умолчанию.
wt -p "PowerShell" -d . ; split-pane -VFull documentation about wt command line arguments can be found on our docs site.
Панели
Терминал Windows поддерживает панель для профилей. Вы можете открыть новую панель профиля, удерживая Alt и щелкнув профиль в раскрывающемся списке, или используя следующие сочетания клавиш:
- Автоматическое разделение панели текущего профиля:
Alt+Shift+D - Горизонтальное разделение панели профиля по умолчанию:
Alt+Shift+Minus - Вертикальное разделение панели профиля по умолчанию:
Alt+Shift+Plus
Вы также можете перемещать фокус по панелям, удерживая Alt и используя клавиши со стрелками. Наконец, вы можете изменить размер панелей, удерживая Alt + Shift и используя клавиши со стрелками. Дополнительную информацию о панелях можно найти на нашем сайте документации.
Копи-паст
В Терминале Windows по умолчанию используются сочетания клавиш для копирования и вставки Ctrl+C и Ctrl+V, соответственно. Если у вас нет выделения, Ctrl + C будет действовать как обычно, как команда break.
Вы можете настроить, какие клавиши вы хотите использовать для "копировать" и "вставить", редактируя привязки клавиш. Если вы удалите эти привязки клавиш из файла settings.json, терминал по умолчанию будет использовать Ctrl + Shift + C и Ctrl + Shift + V. Это может быть особенно полезно для пользователей WSL, которым нужны свободные Ctrl + C и Ctrl + V для своих оболочек.
Вы также можете выбрать, какое форматирование копируется в буфер обмена вместе с символами новой строки с помощью действий "copyFormatting" и "singleLine", связанных с командой копирования. Полную документацию по командам интеграции с буфером обмена можно найти на нашем сайте документации.
Определение привязок клавиш и действий
Большая часть настраиваемых свойств внутри Windows Terminal зависит от привязок клавиш и действий. Команды внутри массива "actions" будут автоматически добавлены в вашу палитру команд. Если вы хотите также использовать их с привязками клавиш, вы можете добавить к ним «ключи», чтобы вызывать их с клавиатуры. Полный список всех возможных команд можно найти на странице действий нашего сайта документации.
Отправка команд input
Терминал Windows дает вам возможность отправлять input в вашу оболочку с привязкой клавиш. Это можно сделать с помощью следующей структуры внутри массива "actions" .
{ "command": {"action": "sendInput", "input": ""}, "keys": "" }Отправка ввода в оболочку с помощью сочетания клавиш может быть полезна для часто выполняемых команд. Одним из примеров может быть очистка экрана:
{ "command": {"action": "sendInput", "input": "clearr"}, "keys": "alt+k" }Также может быть полезен переход к родительскому каталогу с привязкой клавиш.
{ "command": {"action": "sendInput", "input": "cd ..r"}, "keys": "ctrl+up" }Вы также можете использовать эту функцию для запуска сборок или тестовых сценариев.
Начальный каталог WSL
На данный момент Терминал Windows по умолчанию устанавливает начальный каталог профилей WSL в качестве папки профиля пользователя Windows. Чтобы настроить запуск вашего профиля WSL в папке ~, вы можете добавить следующую строку в настройки своего профиля, заменив DISTRONAME и USERNAME соответствующими полями.
"startingDirectory": "//wsl$/DISTRONAME/home/USERNAME"Windows 11 по умолчанию поставляется с предустановленным Windows Terminal. Это новое консольное приложение от Microsoft, которое объединяет несколько приложений на основе командной строки в единую среду. Windows Terminal также поддерживает аппаратное ускорение, пользовательские шрифты, анимацию, интерфейс с вкладками и другие улучшения. В этой инструкции мы расскажем обо всех известных способах открыть терминал Windows.
Запуск терминала Windows в Windows 11
Открыть Терминал Windows в Windows 11 можно несколькими способами: с помощью меню Пуск, Поиска, диалогового окна «Выполнить» и Проводника. Другие способы предполагают использование приложения «Диспетчер задач» и меню Win + X.
Совет: Работа с терминалом Windows довольно часто требует уровня доступа администратора. Узнайте, как запустить Терминал от имени администратора в Windows 11 с помощью нашей специальной инструкции.
Способ 1: с помощью меню «Пуск»
- Нажмите кнопку «Пуск», которая теперь представлена в виде четырех синих квадратов и расположена слева на панели задач.
Как отключить Пуск и иконки приложений по центру в Windows 11?
- Нажмите на кнопку «Все приложения».

- Прокрутите список вниз и нажмите на Windows Terminal. Вы также можете найти приложение по букве W в Windows 11 с помощью алфавитной навигации.

Закрепление терминала Windows на панели задач и в меню Пуск
Если вы планируете часто работать с терминалом Windows, закрепите приложение на панели задач, чтобы оно всегда было на виду.
- Запустите Windows Terminal любым из способов, описанных в настоящей статье.
- Нажмите правой кнопкой мыши по иконке запушенного приложения Windows Terminal.
- В появившемся контекстном меню нажмите на «Закрепить на панели задач».

Добиться закрепления приложения Windows Terminal можно не только на панели задач, но и в меню «Пуск».
- Нажмите правой кнопкой мыши по приложению Windows Terminal в списке всех приложений и выберите «Закрепить на начальном экране».
- Вы также можете нажать на кнопку «Дополнительно» и закрепить Windows Terminal на панели задач.

Способ 2: с помощью поиска
- Нажмите на клавиатуре кнопки Windows + S или откройте меню «Пуск» и щелкните строку поиска в верхней части. Также вы можете просто начать вводить текст сразу после открытия меню «Пуск».

- Введите текст
Windows Terminalили простоTerminal. Windows покажет приложение в разделе «Лучшее соответствие» или «Приложения». - Запустите приложение
Windows Terminalдля запуска в стандартном режиме. Либо в правой части окна нажмите на иконку раскрывающегося списка, чтобы отобразить расширенные параметры приложения.

- Так, например, можно запустить терминал Windows от имени администратора.

Способ 3: с помощью окна «Выполнить»
- Нажмите на клавиатуре клавиши Windows + R
- В открывшемся окне «Выполнить» введите следующую двухбуквенную команду:
wtа затем нажмите на клавиатуре кнопку «Enter» или кнопку «OK».

С помощью окна «Выполнить» вы также можете открыть Windows Terminal от имени администратора, нажав комбинацию клавиш Ctrl + Shift + Enter.
Способ 4: С помощью диспетчера задач
Windows 11 позволяет запускать приложения и процессы в диспетчере задач. Прежде чем продолжить, рекомендуем прочитать статью «Как открыть диспетчер задач в Windows 11», поскольку компания Microsoft удалила некоторые популярные способы открытия диспетчера задач.
- Откройте диспетчер задач.
- Нажмите в меню на вкладку «Файл», а затем на «Запустить новую задачу».

- В открывшемся окне введите команду
wt. При необходимости установите флажок напротив опции «Создать задачу с правами администратора».

Способ 5: с помощью меню Win + X
Вы также можете использовать горячие клавиши Windows + X в Windows 11 для запуска различных утилит, таких как Диспетчер задач, Диспетчер устройств, Управление дисками и Терминал Windows.
- Нажмите на клавиатуре клавиши Windows + X или щелкните правой кнопкой мыши на кнопке «Пуск». Если у вас компьютер с сенсорным экраном, вы можете нажать и удерживать кнопку «Пуск».
- Найдите в меню и нажмите на Windows Terminal.

- Также, при необходимости, щелкните Windows Terminal (Admin), чтобы открыть Windows Terminal от имени администратора в Windows 11.
Способ 6: С помощью контекстного меню
С помощью последнего способа вы сможете открыть любую папку в Windows Terminal с помощью встроенной команды или добавить набор пользовательских команд, чтобы открыть ее непосредственно в нужном профиле и/или от имени Администратора.
- Щелкните правой кнопкой мыши для открытия Терминала Windows в Проводнике. Это работает на Рабочем столе и в любой другой директории.

На этом всё. Теперь вы знаете все способы открытия терминала Windows в Windows 11.
Какой способ запуска Терминала Windows удобнее, на ваш взгляд?
Поделитесь в комментариях 😉
Содержание
- Способ 1: Контекстное меню «Пуска»
- Способ 2: Поиск в меню «Пуск»
- Способ 3: «Командная строка»
- Способ 4: «Панель управления»
- Способ 5: Утилита «Выполнить»
- Способ 6: Пользовательский ярлык
- Способ 7: Автоматический запуск «Терминала Windows» при старте ОС
- Вопросы и ответы
Способ 1: Контекстное меню «Пуска»
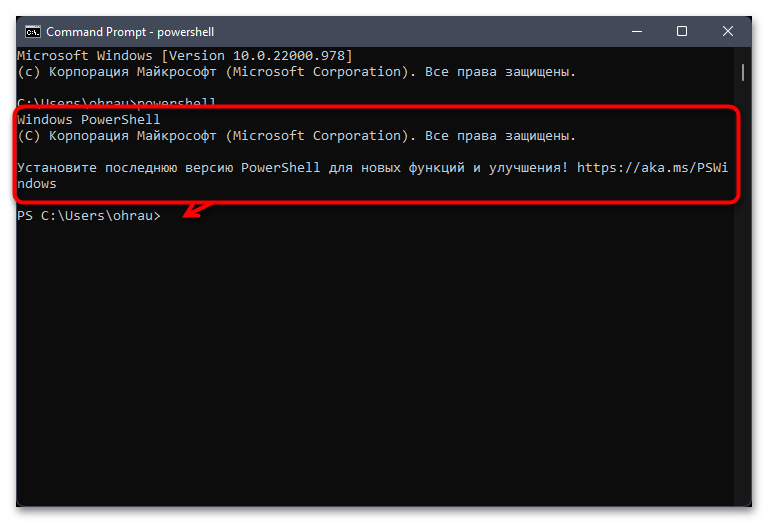
Самый простой метод запуска «Терминала» в Windows 11, который окажется подходящим для большинства пользователей, подразумевает использование для этого контекстного меню, открывающегося нажатием правой кнопкой мыши по «Пуску». Давайте более наглядно разберемся с тем, как реализовать этот метод, и еще не просто запустить консоль, а сделать это от имени администратора.
- Щелкните правой кнопкой мыши по кнопке «Пуск» и из отобразившегося контекстного меню выберите пункт «Терминал Windows», если хотите просто перейти к консоли без повышенных прав.
- Для запуска от имени администратора нажмите по следующему пункту, который называется «Терминал Windows (Администратор)».
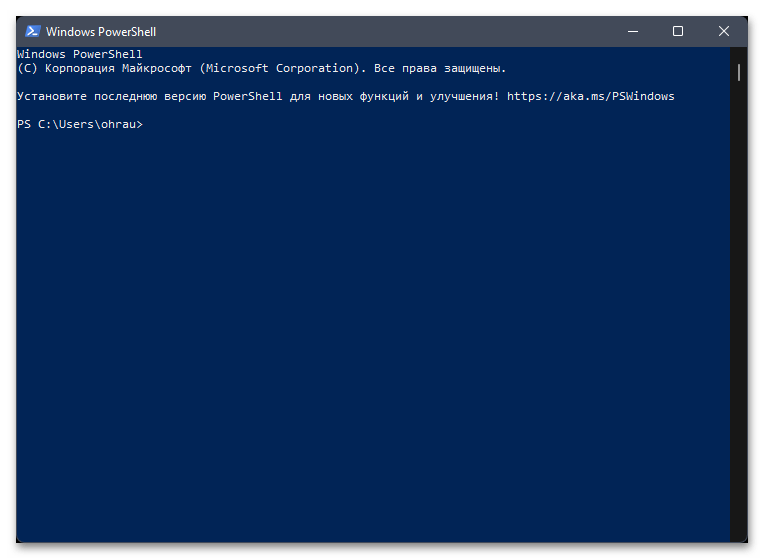
- После запуска Windows PowerShell дождитесь отображения строки ввода, и можете приступать к вводу и использованию требуемых команд.
- Отметим, что в Виндовс 11 появилась возможность открывать несколько вкладок в рамках одного окна «Терминала Windows», поэтому больше не придется запускать много окон для выполнения сложных процессов, связанных с консольными утилитами.

Способ 2: Поиск в меню «Пуск»
Запустить «Терминал Windows» для дальнейшего выполнения команд можно не только через контекстное меню «Пуска», но и через само окно, используя для этого поиск. При этом есть несколько важных нюансов, которые тоже будут описаны в следующей инструкции.
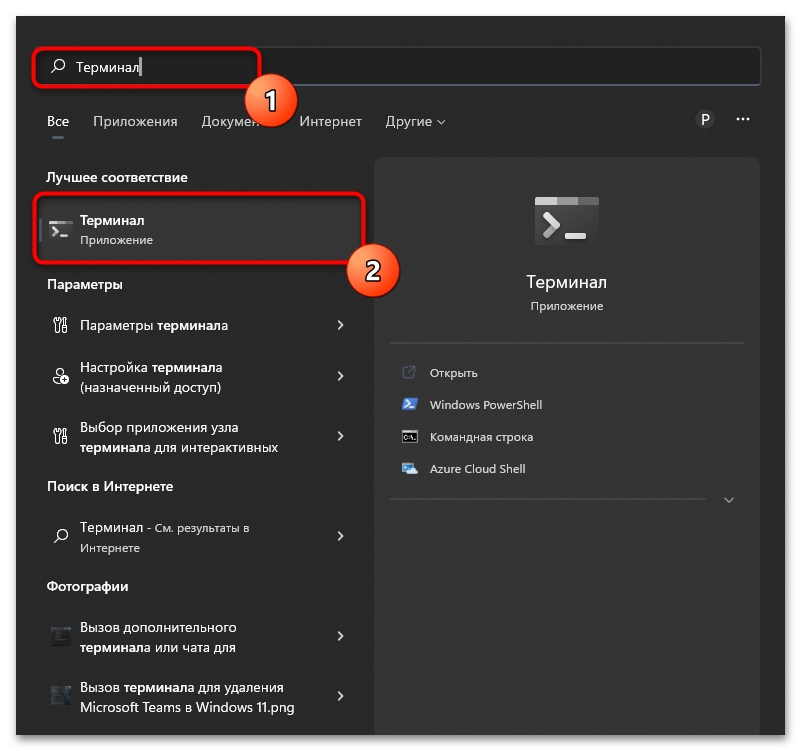
- Если вас интересует простой запуск консоли, откройте «Пуск» и введите в поиске «Терминал». Кликните левой кнопкой по результату, чтобы запустить приложение.
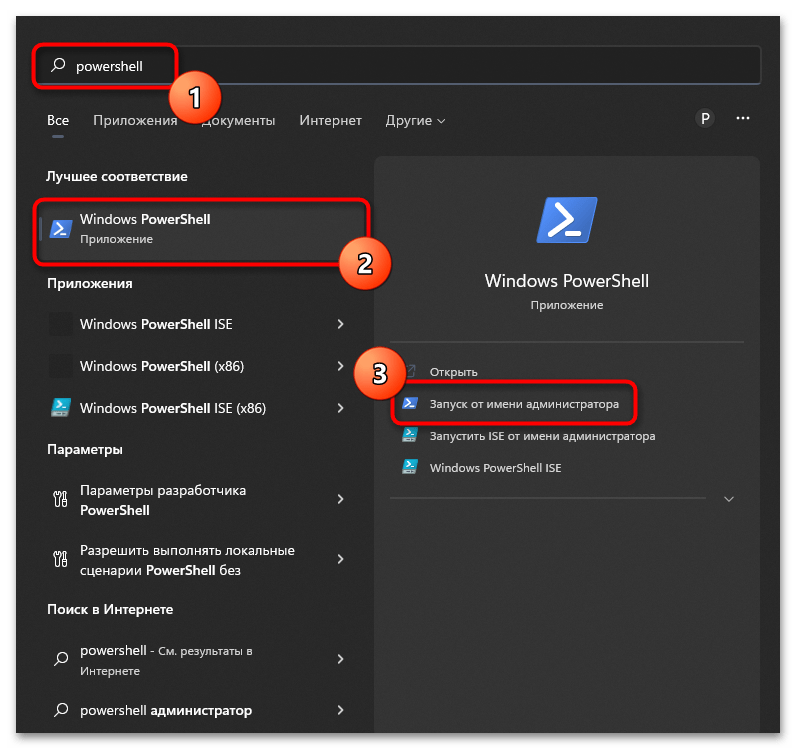
- В случае необходимости запуска PowerShell от имени администратора понадобится найти более старую версию консоли, введя соответствующий запрос в поле поиска. Справа от приложения появится кнопка «Запуск от имени администратора», которая и позволит выполнить поставленную задачу.
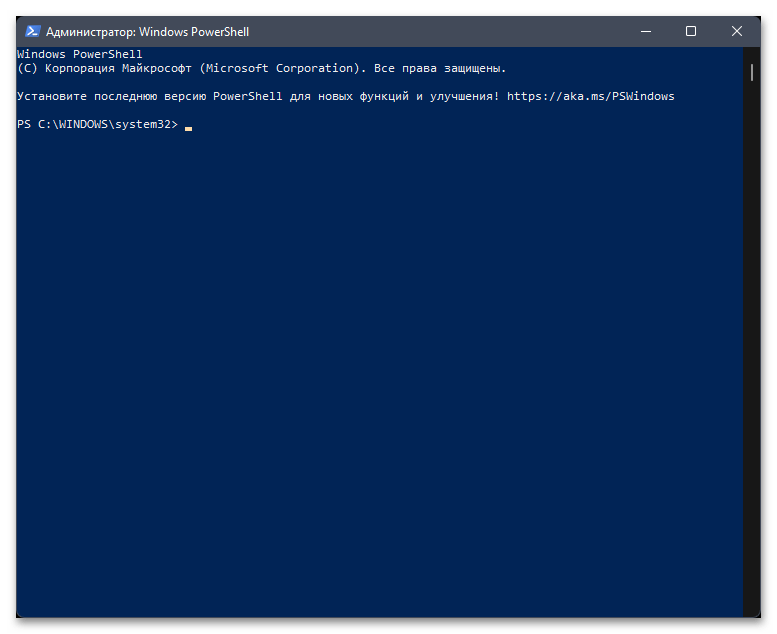
- Обратим ваше внимание на то, что во втором случае будет запущена все та же оснастка с теми же функциями, но у нее синее окно и отсутствуют вкладки.
Способ 3: «Командная строка»
Этот метод может показаться странным, ведь практически никто не будет использовать одну консоль для запуска второй. Однако он все же может оказаться полезным, например в тех случаях, когда возникают какие-либо проблемы со взаимодействием с графическим интерфейсом Windows 11.
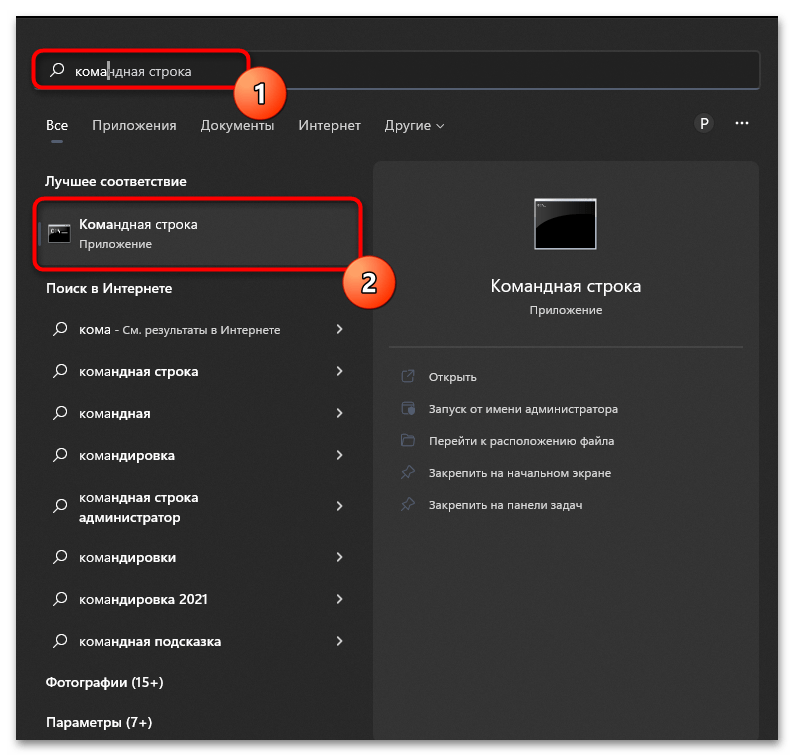
- Если есть возможность, запустите «Командную строку» через поиск в «Пуске» или любым другим известным вам методом. Если графическое меню не отвечает, вызовите утилиту «Выполнить», используя сочетание клавиш Win + R, в ней введите
cmdи нажмите Enter для запуска консоли. - Теперь нужно использовать команду
powershell, чтобы запустить соответствующую оснастку. - Она будет открыта в этом же окне, просто произойдет переход к другому расположению, о чем вы будете уведомлены. Используйте появившееся поле ввода для активации требуемых команд.

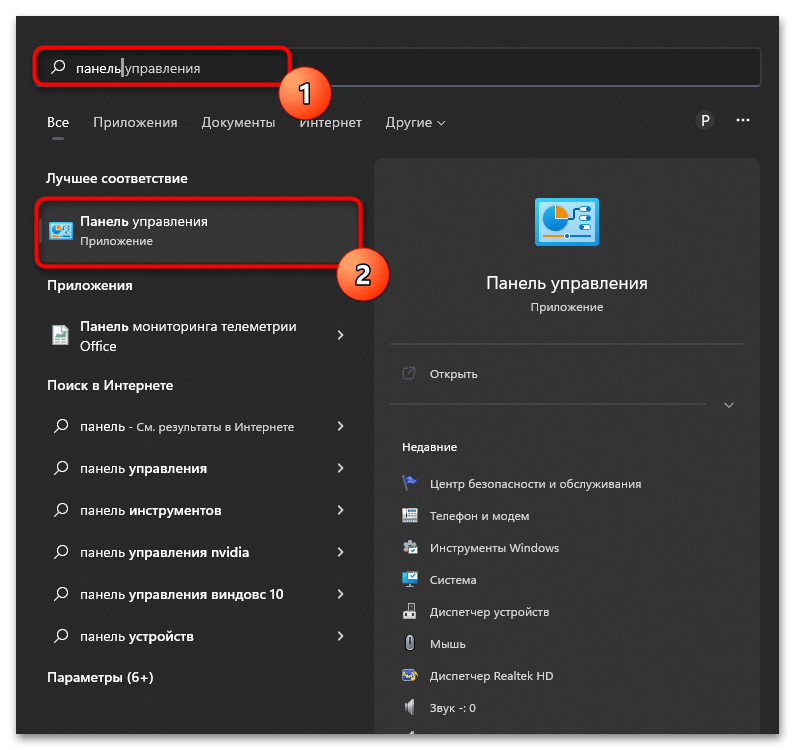
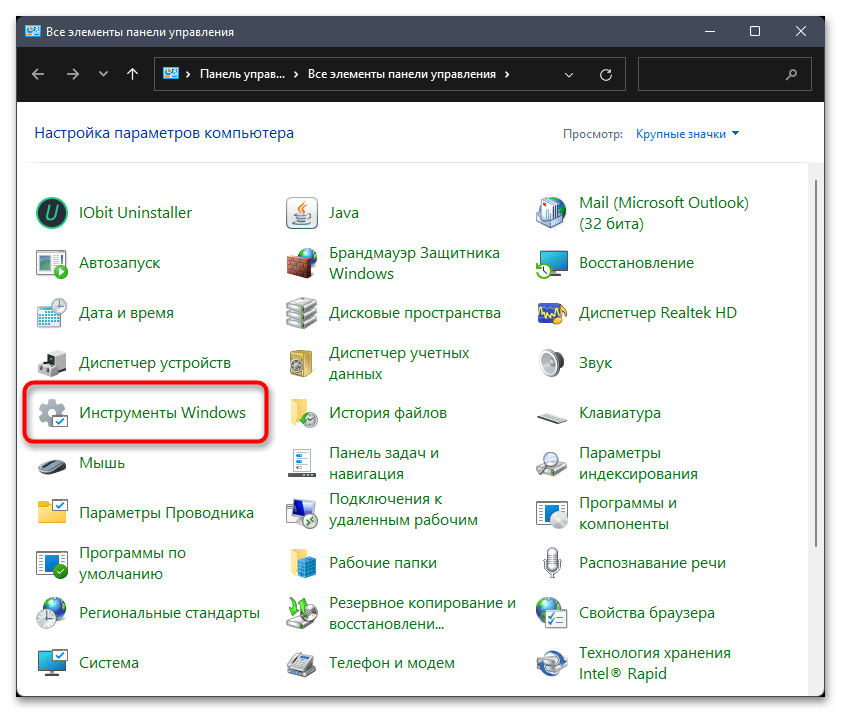
Способ 4: «Панель управления»
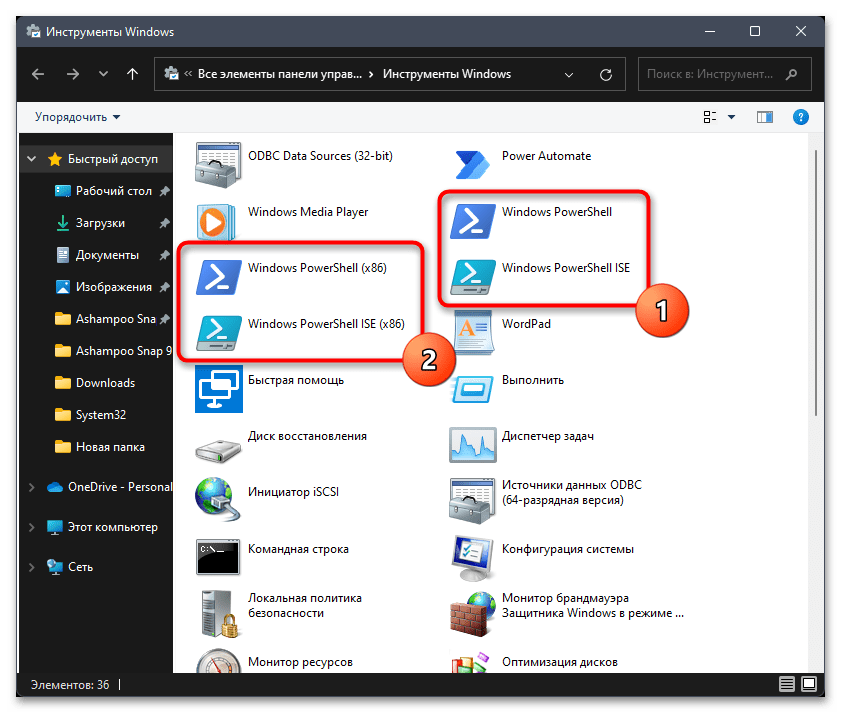
Следующий возможный вариант запуска «Терминала Windows» — поиск его через «Панель управления». В этом случае вы будете иметь возможность запустить приложение в любой разрядности, если это принципиально, или открыть его ISE-версию при необходимости использования интегрированной среды сценариев для запуска и тестирования скриптов.

- Через «Пуск» отыщите «Панель управления» и перейдите к данному окну.
- В нем отыщите значок «Инструменты Windows» и кликните по нему дважды левой кнопкой мыши, чтобы перейти к списку доступных приложений.
- Теперь вы имеете возможность запустить PowerShell в одной из двух разрядностей или открыть ISE для работы со скриптами.
- В этом случае тоже открывается синее окно оснастки без доступа ко вкладкам, что необходимо учитывать при выполнении метода.
Способ 5: Утилита «Выполнить»
Существует специальная команда, позволяющая запустить «Терминал Windows», а именно его новую версию со вкладками, как это было показано в первых двух методах статьи. Для этого понадобится использовать утилиту «Выполнить», которая быстро открывается путем использования горячей клавиши Win + R. В ней введите wt.exe — для запуска именно «Терминала», cmd — для запуска «Командной строки» или powershell — для запуска «PowerShell» и нажмите Enter для применения команды. Дождитесь загрузки оснастки и переходите к использованию команд.

Способ 6: Пользовательский ярлык
Описанную только что команду для запуска консоли можно использовать при создании пользовательского ярлыка на рабочем столе. Он поможет запускать надстройку в тех случаях, когда нужно сделать это быстро, а описанные выше методы не подходят. Давайте более детально разберем процесс создания ярлыка.
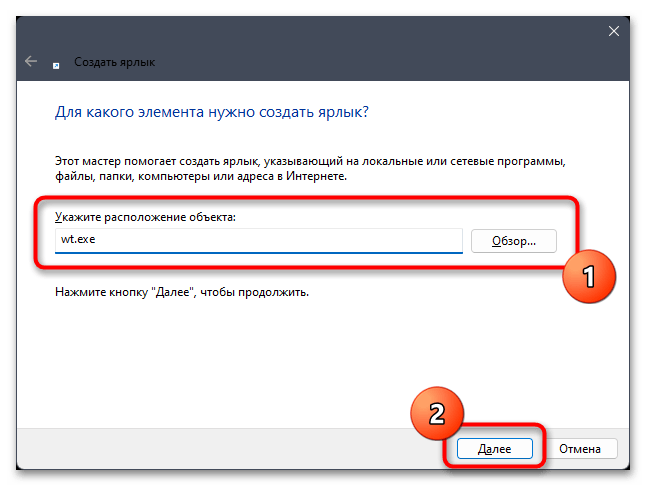
- Щелкните правой кнопкой мыши в пустом месте на рабочем столе, наведите курсор на «Создать» и выберите пункт «Ярлык».
- В качестве расположения объекта укажите «wt.exe» и переходите к следующему шагу.
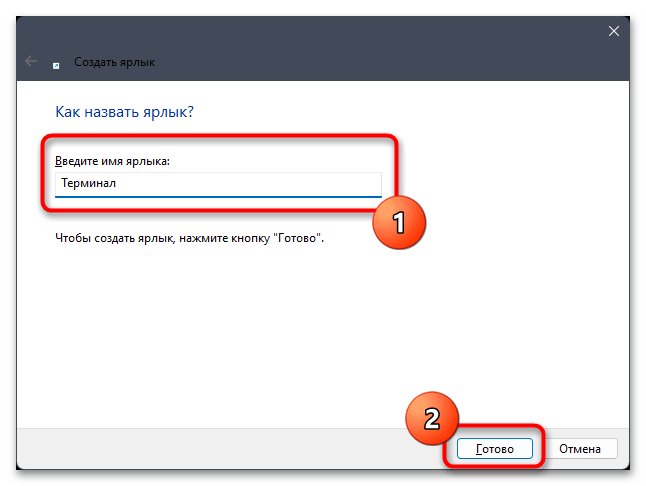
- Переименуйте ярлык, чтобы понимать, за запуск какого приложения он отвечает. По завершении нажмите «Готово» для выхода из данного окна.
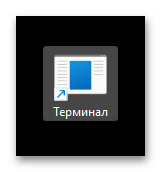
- Теперь вы можете использовать появившийся на рабочем столе ярлык для быстрого запуска «Терминала Windows». Если нужно запустить приложение от имени администратора, кликните по ярлыку ПКМ и из контекстного меню выберите соответствующий вариант.

Многие программы в Windows 11, включая стандартные, можно добавить в автозагрузку, чтобы они включались при запуске операционной системы. Относится это и к «Терминалу Windows». Консоль будет показана на экране сразу же после входа в ОС и доступна для ввода команд. Активация автоматического старта приложения происходит следующим образом:
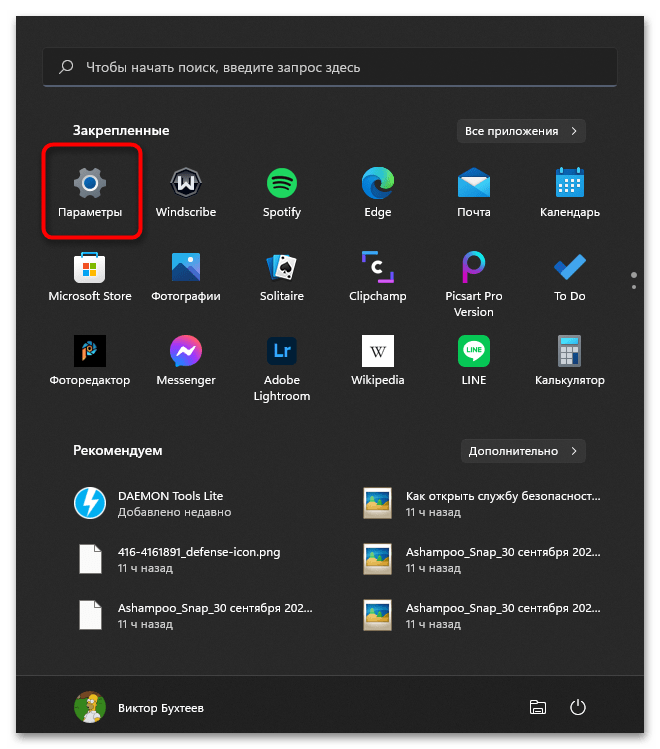
- Откройте «Пуск» и нажмите по значку с изображением шестеренки, чтобы перейти в «Параметры».
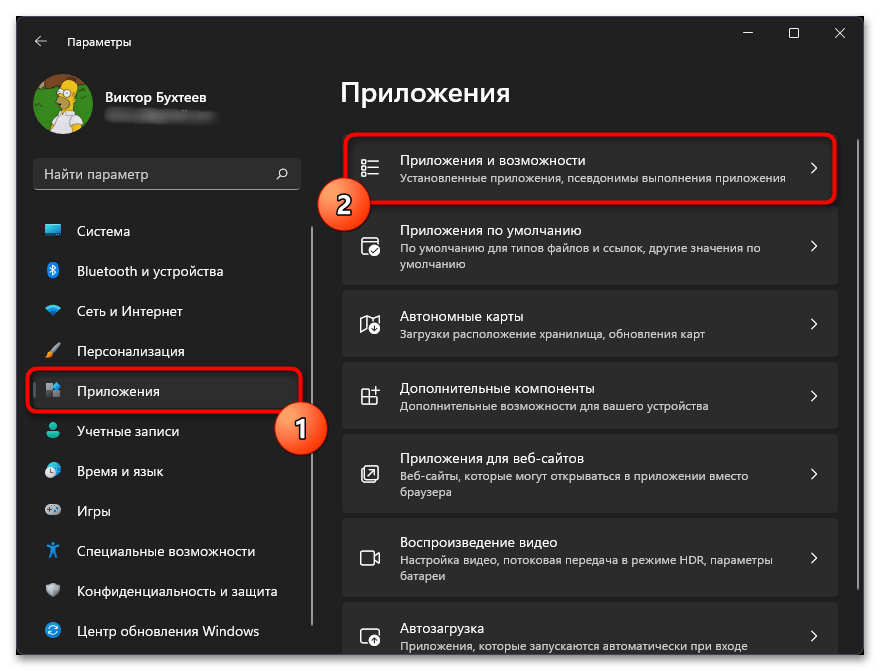
- В новом окне выберите раздел «Приложения» и в блоке справа отыщите «Приложения и возможности».
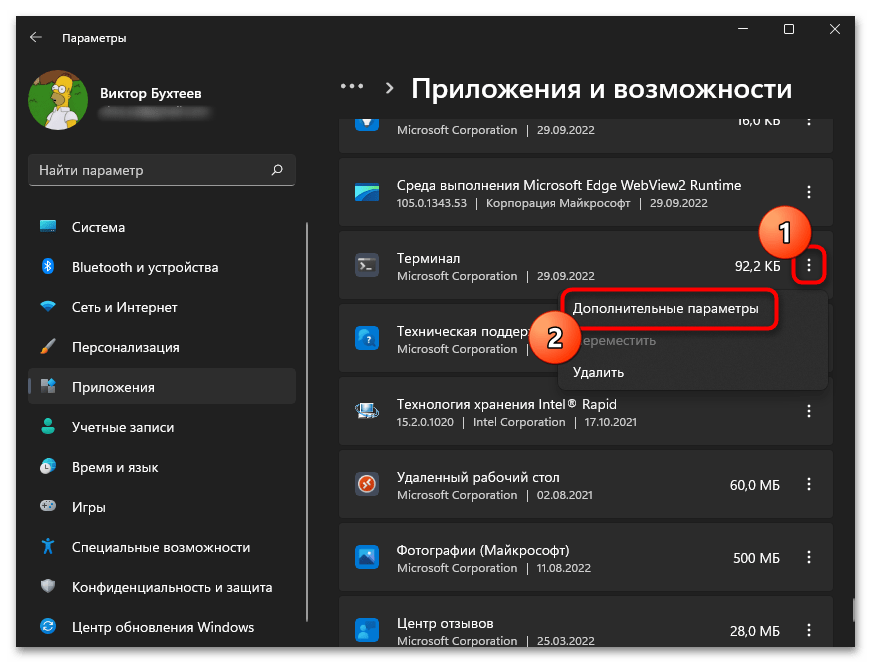
- Прокрутите список с приложениями вниз, найдите «Терминал», справа от него нажмите по трем вертикальным точкам и из появившегося меню выберите пункт «Дополнительные параметры».
- Теперь вы можете активировать параметр «Запускается при входе», чтобы включить автоматическое открытие консоли.

Еще статьи по данной теме:
Помогла ли Вам статья?
Terminal Basics
Visual Studio Code includes a full featured integrated terminal that conveniently starts at the root of your workspace. It provides integration with the editor to support features like links and error detection.
To open the terminal:
- Use the ⌃` (Windows, Linux Ctrl+`) keyboard shortcut to toggle the terminal panel.
- Use the ⌃⇧` (Windows, Linux Ctrl+Shift+`) keyboard shortcut to create a new terminal.
- Use the View > Terminal or Terminal > New Terminal menu commands.
- From the Command Palette (⇧⌘P (Windows, Linux Ctrl+Shift+P)), use the View: Toggle Terminal command.
Note: Open an external terminal with the ⇧⌘C (Windows, Linux Ctrl+Shift+C) keyboard shortcut if you prefer to work outside VS Code.
Terminal shells
The integrated terminal can use various shells installed on your machine, with the default being pulled from your system defaults. Shells are detected and presented in the terminal profiles dropdown.
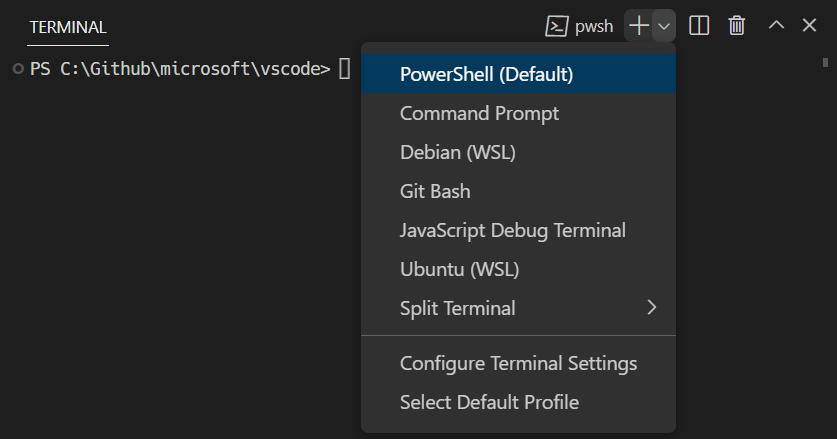
You can learn more about configuring terminal shells in the terminal profiles article.
Managing terminals
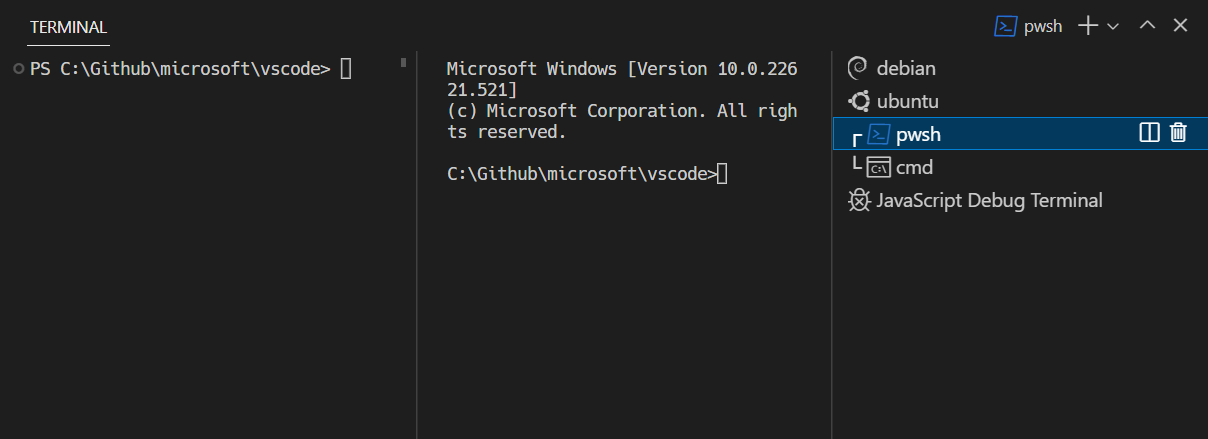
The terminal tabs UI is on the right side of the terminal view. Each terminal has an entry with its name, icon, color, and group decoration (if any).
Terminal instances can be added by selecting the + icon on the top-right of the TERMINAL panel, selecting a profile from the terminal dropdown, or by triggering the ⌃⇧` (Windows, Linux Ctrl+Shift+`) command. This action creates another entry in the tab list associated with that terminal.
Remove terminal instances by hovering a tab and selecting the Trash Can button, selecting a tab item and pressing Delete, using Terminal: Kill the Active Terminal Instance command, or via the right-click context menu.
Navigate between terminal groups using focus next ⇧⌘] (Windows, Linux Ctrl+PageDown) and focus previous ⇧⌘[ (Windows, Linux Ctrl+PageUp).
Icons may appear to the right of the terminal title on the tab label when a terminal’s status changes. Some examples are a bell (macOS) and for tasks, displaying a check mark when there are no errors and an X otherwise. Hover the icon to read status information, which may contain actions.
Groups (split panes)
Multiple terminals can be placed side-by-side are called a group and are created by splitting a terminal:
- On hover, selecting the inline split button.
- Right-clicking the context menu and selecting the Split menu option.
- Alt and click on a tab, the + button, or the single tab on the terminal panel.
- Triggering the ⌘ (Windows, Linux Ctrl+Shift+5) command.
Tip: The working directory for the new terminal depends on the
terminal.integrated.splitCwdsetting.
Navigate between terminals in a group by focusing the previous pane, ⌥⌘← (Windows, Linux Alt+Left), or the next pane, ⌥⌘→ (Windows, Linux Alt+Right).
Dragging and dropping tabs in the list will rearrange them. Dragging a tab into the main terminal area allows moving a terminal from one group to another.
Moving a terminal into its own group can be done with the Terminal: Unsplit Terminal command through the Command Palette or in the right-click context menu.
Terminals in editor area
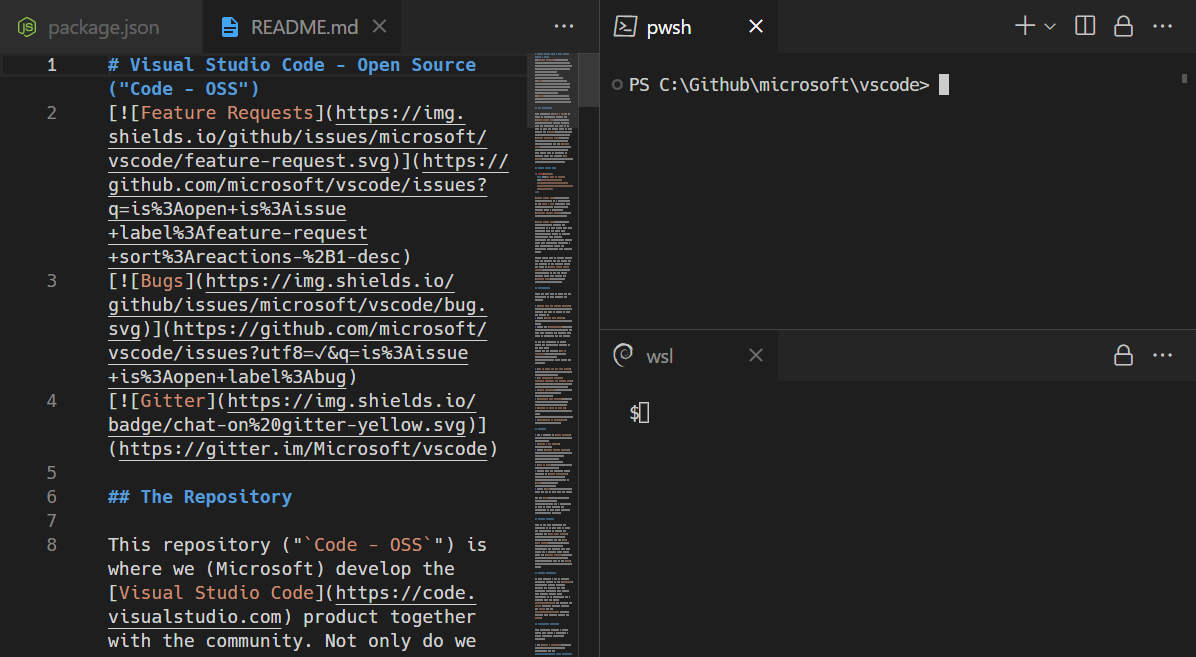
Terminal in the editor area, also known as terminal editors, can be created through the Terminal: Create New Terminal in Editor Area and Terminal: Create New Terminal in Editor Area to the Side commands or by dragging a terminal from the terminal view into the editor area.
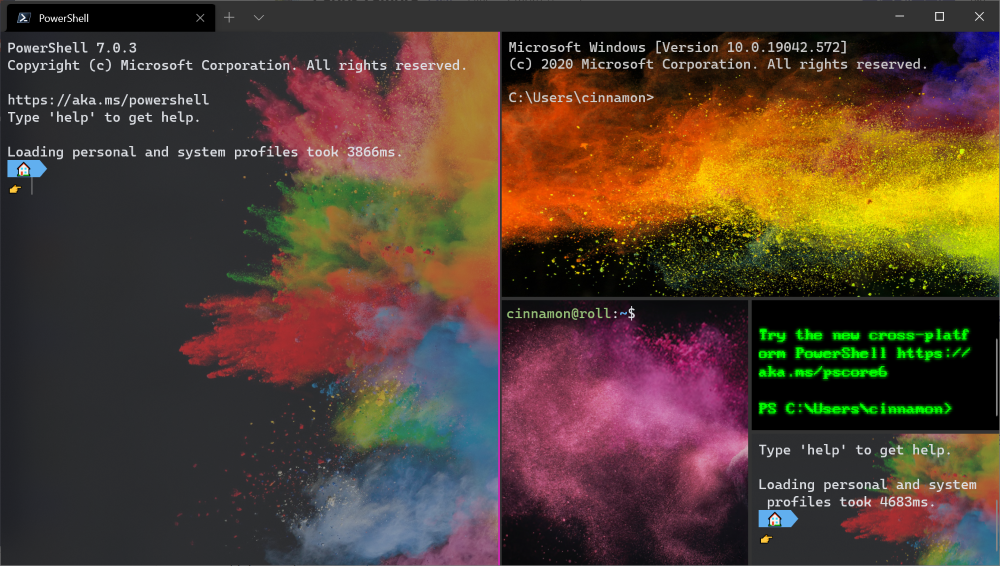
Terminal editors are ideal if you want a complex workbench layout such as terminals on either side of an editor or terminals arranged in two dimensions. Below PowerShell and WSL terminals are stacked in an editor group to the right of a group of file editors.
The terminal.integrated.defaultLocation setting can change the default terminal location to be in either the view or editor areas.
Navigating the buffer
The content in the terminal is called the buffer, with the section right above the bottom viewport being called «scrollback». The amount of scrollback kept is determined by the terminal.integrated.scrollback setting and defaults to 1000 lines.
There are various commands available to navigate around the terminal buffer:
- Scroll up a line — ⌥⌘PageUp (Windows Ctrl+Alt+PageUp, Linux Ctrl+Shift+Up)
- Scroll down a line — ⌥⌘PageDown (Windows Ctrl+Alt+PageDown, Linux Ctrl+Shift+Down)
- Scroll up a page — PageUp (Windows, Linux Shift+PageUp)
- Scroll down a page — PageDown (Windows, Linux Shift+PageDown)
- Scroll to the top — ⌘Home (Windows Ctrl+Home, Linux Shift+Home)
- Scroll to the bottom — ⌘End (Windows Ctrl+End, Linux Shift+End)
Command navigation is also available (see shell integration):
- Scroll to the previous command — ⌘↑ (Windows, Linux Ctrl+Up)
- Scroll to the next command — ⌘↓ (Windows, Linux Ctrl+Down)
Scrolling will happen instantaneously, but can be configured to animate over a short duration with the terminal.integrated.smoothScrolling setting.
Links
The terminal features sophisticated link detection with editor integration and even extension contributed link handlers. Links are activated by mousing over the link so an underline appears, then hold Ctrl/Cmd and click.
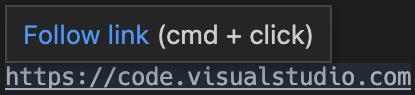
There are several built-in link handlers that are used in the following priority order:
-
URIs/URLs: These are links that look like URIs, such as
https://code.visualstudio.com,vscode://file/path/to/fileorfile://path/to/file. These will open using the standard handler for the protocol. For example,httpslinks will open the system browser at that location. -
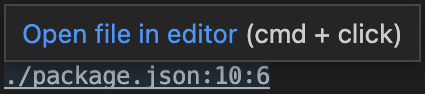
File links: These are links to files that have been verified to exist on the system. These will open the file in a new editor tab and support many common line/column formats such as
file:1:2,file:line 1, column 2. -
Folder links: These are similar to file links but will open a new VS Code window at the folder.
-
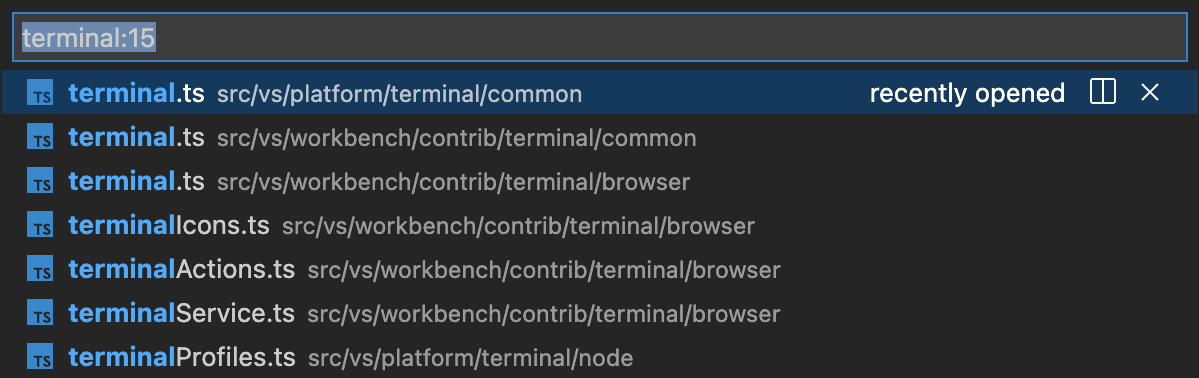
Word links: This is the fallback link type and uses the
terminal.integrated.wordSeparatorssetting to define word boundaries and make nearly all text into words. Activating a word link will search the workspace for the word, if there is a single result it will open, otherwise it will present the search results. Word links are considered «low confidence» and will not show an underline or tooltip unless Ctrl/Cmd is held. They also have limited support for line and column suffixes.

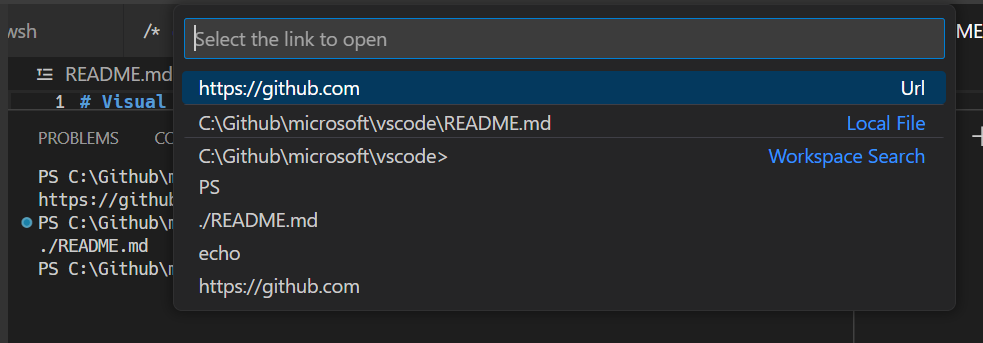
The Open Detected Link command (⇧⌘O (Windows, Linux Ctrl+Shift+O)) can be used to access links via the keyboard:
Tip: If link verification causes performance issues, like in high latency remote environments, it can be disabled via the
terminal.integrated.enableFileLinkssetting.
Extensions handling links
Extensions can contribute link providers which allow the extension to define what happens when clicked. An example of this is the GitLens extension detecting Git branch links.

Keyboard accessibility
Links are keyboard accessible through several commands that open links based on the type of link.
- Terminal: Open Last Local File Link — Opens the most recent local file link. No default keybinding.
- Terminal: Open Last URL link — Opens the most recent URI/URL link. No default keybinding.
- Terminal: Open Detected Link… — Opens a searchable Quick Pick with all detected links, including word links. The default keybinding is Ctrl/Cmd+Shift+O, which is the same as the Go to Symbol in Editor keyboard shortcut.
Copy & paste
The keybindings for copy and paste follow platform standards:
- Linux: Ctrl+Shift+C and Ctrl+Shift+V; selection paste is available with Shift+Insert
- macOS: Cmd+C and Cmd+V
- Windows: Ctrl+C and Ctrl+V
Copying is done automatically on selection when terminal.integrated.copyOnSelection is enabled.
By default there is a warning when pasting multiple lines, which can be disabled with the terminal.integrated.enableMultiLinePasteWarning setting. This is only done when the shell does not support «bracketed paste mode». When that mode is enabled, the shell is indicating that it can handle multiple line pasting.
Using the mouse
Right-click behavior
The right-click behavior differs based on the platform:
- Linux: Show the context menu.
- macOS: Select the word under the cursor and show the context menu.
- Windows: Copy and drop selection if there is a selection, otherwise paste.
This can be configured using the terminal.integrated.rightClickBehavior setting. The options are:
default— Show the context menu.copyPaste— Copy when there is a selection, otherwise paste.paste— Paste on right-click.selectWord— Select the word under the cursor and show the context menu.nothing— Do nothing and pass event to terminal.
Reposition the cursor with Alt
Alt and left-click will reposition the cursor to underneath the mouse. This works by simulating arrow keystrokes, which may not work reliably for some shells or programs. This feature can be disabled with the terminal.integrated.altClickMovesCursor setting.
Mouse events mode
When applications running in the terminal turn on mouse events mode, such as Vim mouse mode, mouse interaction is sent to the application instead of the terminal. This means that clicking and dragging will no longer create a selection. Terminal selection can be forced by holding the Alt key on Windows and Linux, this can also be done with the Option key on macOS but requires enabling the terminal.integrated.macOptionClickForcesSelection setting first.
Find
The integrated terminal has find functionality that can be triggered with ⌘F (Windows, Linux Ctrl+F).
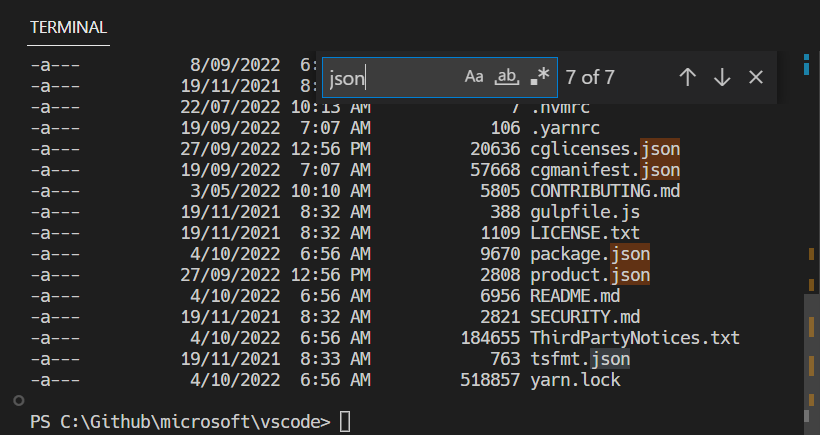
Tip: Ctrl+F can be sent to the shell by removing the
workbench.action.terminal.focusFindcommand from commands to skip shell.
Run selected text
To use the runSelectedText command, select text in an editor and run the command Terminal: Run Selected Text in Active Terminal via the Command Palette (⇧⌘P (Windows, Linux Ctrl+Shift+P)), the terminal will attempt to run the selected text. If no text is selected in the active editor, the entire line that the cursor is on will run in the terminal.
Tip: Also run the active file using the command
workbench.action.terminal.runActiveFile.
Maximizing the terminal
The terminal view can be maximized by clicking the maximize panel size button with the upwards chevron icon. This will temporarily hide the editors and maximize the panel. This is useful to temporarily focus on a large amount of output. Some developers use VS Code as a standalone terminal by opening a new window, maximizing the panel, and hiding the side bar.
Select all
There is a Terminal: Select All command, which is bound to Cmd+A on macOS, but does not have a default keybinding on Windows and Linux as it may conflict with shell hotkeys. To use Ctrl+A to select all, add this custom keybinding:
{
  "key": "ctrl+a",
  "command": "workbench.action.terminal.selectAll",
  "when": "terminalFocus && !isMac"
},
Drag and drop file paths
Dragging a file into the terminal will input the path into the terminal, with escaping to match the active shell.
Automating terminals with tasks
The Tasks feature can be used to automate the launching of terminals, for example, the following .vscode/tasks.json file will launch a Command Prompt and PowerShell terminal in a single terminal group when the window starts:
{
  "version": "2.0.0",
  "presentation": {
    "echo": false,
    "reveal": "always",
    "focus": false,
    "panel": "dedicated",
    "showReuseMessage": true
  },
  "tasks": [
    {
      "label": "Create terminals",
      "dependsOn": [
        "First",
        "Second"
      ],
      // Mark as the default build task so cmd/ctrl+shift+b will create them
      "group": {
        "kind": "build",
        "isDefault": true
      },
      // Try start the task on folder open
      "runOptions": {
        "runOn": "folderOpen"
      }
    },
    {
      // The name that shows up in terminal tab
      "label": "First",
      // The task will launch a shell
      "type": "shell",
      "command": "",
      // Set the shell type
      "options": {
        "shell": {
          "executable": "cmd.exe",
          "args": []
        }
      },
      // Mark as a background task to avoid the spinner animation on the terminal tab
      "isBackground": true,
      "problemMatcher": [],
      // Create the tasks in a terminal group
      "presentation": {
        "group": "my-group"
      }
    },
    {
      "label": "Second",
      "type": "shell",
      "command": "",
      "options": {
        "shell": {
          "executable": "pwsh.exe",
          "args": []
        }
      },
      "isBackground": true,
      "problemMatcher": [],
      "presentation": {
        "group": "my-group"
      }
    }
  ]
}
This file could be committed to the repository to share with other developers or created as a user task via the workbench.action.tasks.openUserTasks command.
Working directory
By default, the terminal will open at the folder that is opened in the Explorer. The terminal.integrated.cwd setting allows specifying a custom path to open instead:
{
  "terminal.integrated.cwd": "/home/user"
}
Split terminals on Windows will start in the directory that the parent terminal started with. On macOS and Linux, split terminals will inherit the current working directory of the parent terminal. This behavior can be changed using the terminal.integrated.splitCwd setting:
{
  "terminal.integrated.splitCwd": "workspaceRoot"
}
There are also extensions available that give more options such as Terminal Here.
Fixed dimension terminals
The Terminal: Set Fixed Dimensions command allows changing the number of columns and rows that the terminal and it’s backing psuedoterminal uses. This will add scroll bars when necessary, which may lead to an unpleasant UX and is generally not recommended, but it is a common ask on Windows in particular for reading logs or long lines when paging tools aren’t available.
You can also right-click on a terminal tab and select Toggle Size to Content Width (⌥Z (Windows, Linux Alt+Z)) to resize the number of terminal columns to the largest wrapped line in the terminal.
Next steps
The basics of the terminal have been covered in this document. Read on to find out more about:
- Tasks — Tasks let you integrate with external tools and leverage the terminal heavily.
- Mastering VS Code’s Terminal — An external blog with plenty of power user tips for the terminal.
- Explore terminal commands by browsing the keyboard shortcuts within VS Code (Preferences: Open Keyboard Shortcuts then search on ‘terminal’).
Common questions
I’m having problems launching the terminal
There’s a dedicated troubleshooting guide for these sorts of problems.
Why is nvm complaining about a prefix option when the integrated terminal is launched?
nvm (Node Version Manager) users often see this error for the first time inside VS Code’s integrated terminal:
nvm is not compatible with the npm config "prefix" option: currently set to "/usr/local"
Run `npm config delete prefix` or `nvm use --delete-prefix v8.9.1 --silent` to unset it
This is mostly a macOS problem and does not happen in external terminals. The typical reasons for this are the following:
npmwas globally installed using another instance ofnodethat is somewhere in your path (such as/usr/local/bin/npm).- To get the development tools on the
$PATH, VS Code will launch a bash login shell on startup. This means that your~/.bash_profilehas already run and when an integrated terminal launches, it will run another login shell, reordering the$PATHpotentially in unexpected ways.
To resolve this issue, you need to track down where the old npm is installed and remove both it and its out-of-date node_modules. Find the nvm initialization script and run which npm before it runs, which should print the path when you launch a new terminal.
Once you have the path to npm, find the old node_modules by resolving the symlink by running a command something like this:
ls -la /usr/local/bin | grep "np[mx]"
This will give you the resolved path at the end:
... npm -> ../lib/node_modules/npm/bin/npm-cli.js
... npx -> ../lib/node_modules/npm/bin/npx-cli.js
From there, removing the files and relaunching VS Code should fix the issue:
rm /usr/local/bin/npm /usr/local/lib/node_modules/npm/bin/npm-cli.js
rm /usr/local/bin/npx /usr/local/lib/node_modules/npm/bin/npx-cli.js
Why does macOS make a ding sound when I resize terminal split panes?
The keybindings ⌃⌘← and ⌃⌘→ are the defaults for resizing individual split panes in the terminal. While they work, they also cause a system «invalid key» sound to play due to an issue in Chromium. The recommended workaround is to tell macOS to no-op for these keybindings by running this in your terminal:
mkdir -p ~/Library/KeyBindings
cat > ~/Library/KeyBindings/DefaultKeyBinding.dict <<EOF
{
  "^@UF701" = "noop";
  "^@UF702" = "noop";
  "^@UF703" = "noop";
}
EOF
I’m having problems with the terminal rendering. What can I do?
By default, the integrated terminal will render using GPU acceleration on most machines. Typically when there are rendering problems it’s an issue of something in your hardware/OS/drivers not playing nicely with the GPU renderer. The first thing to try is to disable GPU acceleration, trading off rendering speed for DOM-based rendering, which is more reliable:
{
  "terminal.integrated.gpuAcceleration": "off"
}
See the GPU acceleration section for more information.
I see 1~ or [201~ when I paste something
This normally means that the program/shell running inside the terminal requested to turn on «bracketed paste mode» but something doesn’t support it properly. To work around this, you could run printf "e[?2004l" to disable it for that session or add the following to your ~/.inputrc file:
set enable-bracketed-paste off
Ctrl+A, Ctrl+R output ^A, ^R on zsh
This can happen if zsh is in Vim mode instead of Emacs mode, due to setting $EDITOR or $VISUAL to vi/vim in your init scripts.
To work around this, you have two options:
- Ensure that you don’t set
$EDITORtovi(m). However, this isn’t an option if you want your Git editor to work. - Add
bindkey -eto your init script to set Emacs explicitly.
How can I configure Cmd+. to map to Ctrl+C like macOS’ built-in terminal?
The macOS default terminal uses Cmd+. to perform the same as Ctrl+C. To get this behavior in VS Code, add this custom keybinding:
{
  "key": "cmd+.",
  "command": "workbench.action.terminal.sendSequence",
  "when": "terminalFocus",
  "args": { "text": "u0003" }
}
Why are the colors in the terminal not correct?
One of our accessibility features we enable by default is to ensure a minimum contrast ratio of at least 4.5 is met for the foreground text. This feature ensures that text is readable regardless of the shell and theme used which is not possible otherwise. To disable this feature, you can set:
"terminal.integrated.minimumContrastRatio": 1
See the minimum contrast ratio section for more information.
2/2/2023
Terminal Basics
Visual Studio Code includes a full featured integrated terminal that conveniently starts at the root of your workspace. It provides integration with the editor to support features like links and error detection.
To open the terminal:
- Use the ⌃` (Windows, Linux Ctrl+`) keyboard shortcut to toggle the terminal panel.
- Use the ⌃⇧` (Windows, Linux Ctrl+Shift+`) keyboard shortcut to create a new terminal.
- Use the View > Terminal or Terminal > New Terminal menu commands.
- From the Command Palette (⇧⌘P (Windows, Linux Ctrl+Shift+P)), use the View: Toggle Terminal command.
Note: Open an external terminal with the ⇧⌘C (Windows, Linux Ctrl+Shift+C) keyboard shortcut if you prefer to work outside VS Code.
Terminal shells
The integrated terminal can use various shells installed on your machine, with the default being pulled from your system defaults. Shells are detected and presented in the terminal profiles dropdown.
You can learn more about configuring terminal shells in the terminal profiles article.
Managing terminals
The terminal tabs UI is on the right side of the terminal view. Each terminal has an entry with its name, icon, color, and group decoration (if any).
Terminal instances can be added by selecting the + icon on the top-right of the TERMINAL panel, selecting a profile from the terminal dropdown, or by triggering the ⌃⇧` (Windows, Linux Ctrl+Shift+`) command. This action creates another entry in the tab list associated with that terminal.
Remove terminal instances by hovering a tab and selecting the Trash Can button, selecting a tab item and pressing Delete, using Terminal: Kill the Active Terminal Instance command, or via the right-click context menu.
Navigate between terminal groups using focus next ⇧⌘] (Windows, Linux Ctrl+PageDown) and focus previous ⇧⌘[ (Windows, Linux Ctrl+PageUp).
Icons may appear to the right of the terminal title on the tab label when a terminal’s status changes. Some examples are a bell (macOS) and for tasks, displaying a check mark when there are no errors and an X otherwise. Hover the icon to read status information, which may contain actions.
Groups (split panes)
Multiple terminals can be placed side-by-side are called a group and are created by splitting a terminal:
- On hover, selecting the inline split button.
- Right-clicking the context menu and selecting the Split menu option.
- Alt and click on a tab, the + button, or the single tab on the terminal panel.
- Triggering the ⌘ (Windows, Linux Ctrl+Shift+5) command.
Tip: The working directory for the new terminal depends on the
terminal.integrated.splitCwdsetting.
Navigate between terminals in a group by focusing the previous pane, ⌥⌘← (Windows, Linux Alt+Left), or the next pane, ⌥⌘→ (Windows, Linux Alt+Right).
Dragging and dropping tabs in the list will rearrange them. Dragging a tab into the main terminal area allows moving a terminal from one group to another.
Moving a terminal into its own group can be done with the Terminal: Unsplit Terminal command through the Command Palette or in the right-click context menu.
Terminals in editor area
Terminal in the editor area, also known as terminal editors, can be created through the Terminal: Create New Terminal in Editor Area and Terminal: Create New Terminal in Editor Area to the Side commands or by dragging a terminal from the terminal view into the editor area.
Terminal editors are ideal if you want a complex workbench layout such as terminals on either side of an editor or terminals arranged in two dimensions. Below PowerShell and WSL terminals are stacked in an editor group to the right of a group of file editors.
The terminal.integrated.defaultLocation setting can change the default terminal location to be in either the view or editor areas.
Navigating the buffer
The content in the terminal is called the buffer, with the section right above the bottom viewport being called «scrollback». The amount of scrollback kept is determined by the terminal.integrated.scrollback setting and defaults to 1000 lines.
There are various commands available to navigate around the terminal buffer:
- Scroll up a line — ⌥⌘PageUp (Windows Ctrl+Alt+PageUp, Linux Ctrl+Shift+Up)
- Scroll down a line — ⌥⌘PageDown (Windows Ctrl+Alt+PageDown, Linux Ctrl+Shift+Down)
- Scroll up a page — PageUp (Windows, Linux Shift+PageUp)
- Scroll down a page — PageDown (Windows, Linux Shift+PageDown)
- Scroll to the top — ⌘Home (Windows Ctrl+Home, Linux Shift+Home)
- Scroll to the bottom — ⌘End (Windows Ctrl+End, Linux Shift+End)
Command navigation is also available (see shell integration):
- Scroll to the previous command — ⌘↑ (Windows, Linux Ctrl+Up)
- Scroll to the next command — ⌘↓ (Windows, Linux Ctrl+Down)
Scrolling will happen instantaneously, but can be configured to animate over a short duration with the terminal.integrated.smoothScrolling setting.
Links
The terminal features sophisticated link detection with editor integration and even extension contributed link handlers. Links are activated by mousing over the link so an underline appears, then hold Ctrl/Cmd and click.
There are several built-in link handlers that are used in the following priority order:
-
URIs/URLs: These are links that look like URIs, such as
https://code.visualstudio.com,vscode://file/path/to/fileorfile://path/to/file. These will open using the standard handler for the protocol. For example,httpslinks will open the system browser at that location. -
File links: These are links to files that have been verified to exist on the system. These will open the file in a new editor tab and support many common line/column formats such as
file:1:2,file:line 1, column 2. -
Folder links: These are similar to file links but will open a new VS Code window at the folder.
-
Word links: This is the fallback link type and uses the
terminal.integrated.wordSeparatorssetting to define word boundaries and make nearly all text into words. Activating a word link will search the workspace for the word, if there is a single result it will open, otherwise it will present the search results. Word links are considered «low confidence» and will not show an underline or tooltip unless Ctrl/Cmd is held. They also have limited support for line and column suffixes.
The Open Detected Link command (⇧⌘O (Windows, Linux Ctrl+Shift+O)) can be used to access links via the keyboard:
Tip: If link verification causes performance issues, like in high latency remote environments, it can be disabled via the
terminal.integrated.enableFileLinkssetting.
Extensions handling links
Extensions can contribute link providers which allow the extension to define what happens when clicked. An example of this is the GitLens extension detecting Git branch links.
Keyboard accessibility
Links are keyboard accessible through several commands that open links based on the type of link.
- Terminal: Open Last Local File Link — Opens the most recent local file link. No default keybinding.
- Terminal: Open Last URL link — Opens the most recent URI/URL link. No default keybinding.
- Terminal: Open Detected Link… — Opens a searchable Quick Pick with all detected links, including word links. The default keybinding is Ctrl/Cmd+Shift+O, which is the same as the Go to Symbol in Editor keyboard shortcut.
Copy & paste
The keybindings for copy and paste follow platform standards:
- Linux: Ctrl+Shift+C and Ctrl+Shift+V; selection paste is available with Shift+Insert
- macOS: Cmd+C and Cmd+V
- Windows: Ctrl+C and Ctrl+V
Copying is done automatically on selection when terminal.integrated.copyOnSelection is enabled.
By default there is a warning when pasting multiple lines, which can be disabled with the terminal.integrated.enableMultiLinePasteWarning setting. This is only done when the shell does not support «bracketed paste mode». When that mode is enabled, the shell is indicating that it can handle multiple line pasting.
Using the mouse
Right-click behavior
The right-click behavior differs based on the platform:
- Linux: Show the context menu.
- macOS: Select the word under the cursor and show the context menu.
- Windows: Copy and drop selection if there is a selection, otherwise paste.
This can be configured using the terminal.integrated.rightClickBehavior setting. The options are:
default— Show the context menu.copyPaste— Copy when there is a selection, otherwise paste.paste— Paste on right-click.selectWord— Select the word under the cursor and show the context menu.nothing— Do nothing and pass event to terminal.
Reposition the cursor with Alt
Alt and left-click will reposition the cursor to underneath the mouse. This works by simulating arrow keystrokes, which may not work reliably for some shells or programs. This feature can be disabled with the terminal.integrated.altClickMovesCursor setting.
Mouse events mode
When applications running in the terminal turn on mouse events mode, such as Vim mouse mode, mouse interaction is sent to the application instead of the terminal. This means that clicking and dragging will no longer create a selection. Terminal selection can be forced by holding the Alt key on Windows and Linux, this can also be done with the Option key on macOS but requires enabling the terminal.integrated.macOptionClickForcesSelection setting first.
Find
The integrated terminal has find functionality that can be triggered with ⌘F (Windows, Linux Ctrl+F).
Tip: Ctrl+F can be sent to the shell by removing the
workbench.action.terminal.focusFindcommand from commands to skip shell.
Run selected text
To use the runSelectedText command, select text in an editor and run the command Terminal: Run Selected Text in Active Terminal via the Command Palette (⇧⌘P (Windows, Linux Ctrl+Shift+P)), the terminal will attempt to run the selected text. If no text is selected in the active editor, the entire line that the cursor is on will run in the terminal.
Tip: Also run the active file using the command
workbench.action.terminal.runActiveFile.
Maximizing the terminal
The terminal view can be maximized by clicking the maximize panel size button with the upwards chevron icon. This will temporarily hide the editors and maximize the panel. This is useful to temporarily focus on a large amount of output. Some developers use VS Code as a standalone terminal by opening a new window, maximizing the panel, and hiding the side bar.
Select all
There is a Terminal: Select All command, which is bound to Cmd+A on macOS, but does not have a default keybinding on Windows and Linux as it may conflict with shell hotkeys. To use Ctrl+A to select all, add this custom keybinding:
{
  "key": "ctrl+a",
  "command": "workbench.action.terminal.selectAll",
  "when": "terminalFocus && !isMac"
},
Drag and drop file paths
Dragging a file into the terminal will input the path into the terminal, with escaping to match the active shell.
Automating terminals with tasks
The Tasks feature can be used to automate the launching of terminals, for example, the following .vscode/tasks.json file will launch a Command Prompt and PowerShell terminal in a single terminal group when the window starts:
{
  "version": "2.0.0",
  "presentation": {
    "echo": false,
    "reveal": "always",
    "focus": false,
    "panel": "dedicated",
    "showReuseMessage": true
  },
  "tasks": [
    {
      "label": "Create terminals",
      "dependsOn": [
        "First",
        "Second"
      ],
      // Mark as the default build task so cmd/ctrl+shift+b will create them
      "group": {
        "kind": "build",
        "isDefault": true
      },
      // Try start the task on folder open
      "runOptions": {
        "runOn": "folderOpen"
      }
    },
    {
      // The name that shows up in terminal tab
      "label": "First",
      // The task will launch a shell
      "type": "shell",
      "command": "",
      // Set the shell type
      "options": {
        "shell": {
          "executable": "cmd.exe",
          "args": []
        }
      },
      // Mark as a background task to avoid the spinner animation on the terminal tab
      "isBackground": true,
      "problemMatcher": [],
      // Create the tasks in a terminal group
      "presentation": {
        "group": "my-group"
      }
    },
    {
      "label": "Second",
      "type": "shell",
      "command": "",
      "options": {
        "shell": {
          "executable": "pwsh.exe",
          "args": []
        }
      },
      "isBackground": true,
      "problemMatcher": [],
      "presentation": {
        "group": "my-group"
      }
    }
  ]
}
This file could be committed to the repository to share with other developers or created as a user task via the workbench.action.tasks.openUserTasks command.
Working directory
By default, the terminal will open at the folder that is opened in the Explorer. The terminal.integrated.cwd setting allows specifying a custom path to open instead:
{
  "terminal.integrated.cwd": "/home/user"
}
Split terminals on Windows will start in the directory that the parent terminal started with. On macOS and Linux, split terminals will inherit the current working directory of the parent terminal. This behavior can be changed using the terminal.integrated.splitCwd setting:
{
  "terminal.integrated.splitCwd": "workspaceRoot"
}
There are also extensions available that give more options such as Terminal Here.
Fixed dimension terminals
The Terminal: Set Fixed Dimensions command allows changing the number of columns and rows that the terminal and it’s backing psuedoterminal uses. This will add scroll bars when necessary, which may lead to an unpleasant UX and is generally not recommended, but it is a common ask on Windows in particular for reading logs or long lines when paging tools aren’t available.
You can also right-click on a terminal tab and select Toggle Size to Content Width (⌥Z (Windows, Linux Alt+Z)) to resize the number of terminal columns to the largest wrapped line in the terminal.
Next steps
The basics of the terminal have been covered in this document. Read on to find out more about:
- Tasks — Tasks let you integrate with external tools and leverage the terminal heavily.
- Mastering VS Code’s Terminal — An external blog with plenty of power user tips for the terminal.
- Explore terminal commands by browsing the keyboard shortcuts within VS Code (Preferences: Open Keyboard Shortcuts then search on ‘terminal’).
Common questions
I’m having problems launching the terminal
There’s a dedicated troubleshooting guide for these sorts of problems.
Why is nvm complaining about a prefix option when the integrated terminal is launched?
nvm (Node Version Manager) users often see this error for the first time inside VS Code’s integrated terminal:
nvm is not compatible with the npm config "prefix" option: currently set to "/usr/local"
Run `npm config delete prefix` or `nvm use --delete-prefix v8.9.1 --silent` to unset it
This is mostly a macOS problem and does not happen in external terminals. The typical reasons for this are the following:
npmwas globally installed using another instance ofnodethat is somewhere in your path (such as/usr/local/bin/npm).- To get the development tools on the
$PATH, VS Code will launch a bash login shell on startup. This means that your~/.bash_profilehas already run and when an integrated terminal launches, it will run another login shell, reordering the$PATHpotentially in unexpected ways.
To resolve this issue, you need to track down where the old npm is installed and remove both it and its out-of-date node_modules. Find the nvm initialization script and run which npm before it runs, which should print the path when you launch a new terminal.
Once you have the path to npm, find the old node_modules by resolving the symlink by running a command something like this:
ls -la /usr/local/bin | grep "np[mx]"
This will give you the resolved path at the end:
... npm -> ../lib/node_modules/npm/bin/npm-cli.js
... npx -> ../lib/node_modules/npm/bin/npx-cli.js
From there, removing the files and relaunching VS Code should fix the issue:
rm /usr/local/bin/npm /usr/local/lib/node_modules/npm/bin/npm-cli.js
rm /usr/local/bin/npx /usr/local/lib/node_modules/npm/bin/npx-cli.js
Why does macOS make a ding sound when I resize terminal split panes?
The keybindings ⌃⌘← and ⌃⌘→ are the defaults for resizing individual split panes in the terminal. While they work, they also cause a system «invalid key» sound to play due to an issue in Chromium. The recommended workaround is to tell macOS to no-op for these keybindings by running this in your terminal:
mkdir -p ~/Library/KeyBindings
cat > ~/Library/KeyBindings/DefaultKeyBinding.dict <<EOF
{
  "^@UF701" = "noop";
  "^@UF702" = "noop";
  "^@UF703" = "noop";
}
EOF
I’m having problems with the terminal rendering. What can I do?
By default, the integrated terminal will render using GPU acceleration on most machines. Typically when there are rendering problems it’s an issue of something in your hardware/OS/drivers not playing nicely with the GPU renderer. The first thing to try is to disable GPU acceleration, trading off rendering speed for DOM-based rendering, which is more reliable:
{
  "terminal.integrated.gpuAcceleration": "off"
}
See the GPU acceleration section for more information.
I see 1~ or [201~ when I paste something
This normally means that the program/shell running inside the terminal requested to turn on «bracketed paste mode» but something doesn’t support it properly. To work around this, you could run printf "e[?2004l" to disable it for that session or add the following to your ~/.inputrc file:
set enable-bracketed-paste off
Ctrl+A, Ctrl+R output ^A, ^R on zsh
This can happen if zsh is in Vim mode instead of Emacs mode, due to setting $EDITOR or $VISUAL to vi/vim in your init scripts.
To work around this, you have two options:
- Ensure that you don’t set
$EDITORtovi(m). However, this isn’t an option if you want your Git editor to work. - Add
bindkey -eto your init script to set Emacs explicitly.
How can I configure Cmd+. to map to Ctrl+C like macOS’ built-in terminal?
The macOS default terminal uses Cmd+. to perform the same as Ctrl+C. To get this behavior in VS Code, add this custom keybinding:
{
  "key": "cmd+.",
  "command": "workbench.action.terminal.sendSequence",
  "when": "terminalFocus",
  "args": { "text": "u0003" }
}
Why are the colors in the terminal not correct?
One of our accessibility features we enable by default is to ensure a minimum contrast ratio of at least 4.5 is met for the foreground text. This feature ensures that text is readable regardless of the shell and theme used which is not possible otherwise. To disable this feature, you can set:
"terminal.integrated.minimumContrastRatio": 1
See the minimum contrast ratio section for more information.
2/2/2023
 Впервые новая оболочка для команд Windows 11 и Windows 10 была представлена в мае 2020, а уже осенью была выпущена первая стабильная версия. С тех пор Windows Terminal продолжает обновляться, но уже сейчас более чем пригоден к работе как с командной строкой или PowerShell, так и другими оболочками, например, Ubuntu, установленной в рамках WSL (Подсистема Windows для Linux).
В этом обзоре — базовые сведения о том, где скачать и как настроить Windows Terminal, о некоторых его возможностях и дополнительная информация, которая может оказаться полезной.
Где скачать Windows Terminal
Прежде чем приступить, два важных примечания: в Windows 11 Терминал Windows уже встроен (нажмите правой кнопкой мыши по кнопке Пуск и вы сможете его запустить), а для работы нового терминала в Windows 10 требуется версия 1903 или новее.
Бесплатно скачать Windows Terminal можно из двух официальных источников:
- Microsoft Store — достаточно ввести Windows Terminal в поиске магазина или перейти на страницу приложения https://www.microsoft.com/ru-ru/p/windows-terminal/9n0dx20hk701

- Загрузить последний релиз из GitHub, скачиваем файл .msixbundle из раздела Assets и устанавливаем его как обычное приложение — https://github.com/microsoft/terminal/releases/

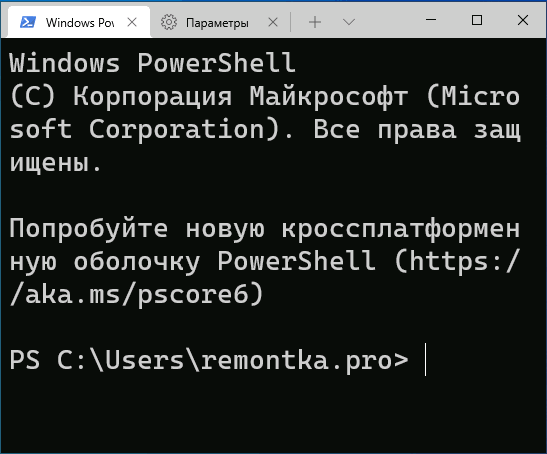
После установки Windows Terminal готов к работе — можно запускать. При первом старте по умолчанию будет открыта вкладка с PowerShell.

Использование Windows Terminal, возможности управления
Скорее всего, с открытием новых вкладок с командной строкой, PowerShell и другими оболочками проблем не возникнет, достаточно нажать «+» если требуется открыть новую вкладку с консолью по умолчанию, либо по стрелке и выбрать нужную оболочку, там же можно увидеть и сочетания клавиш для быстрого открытия соответствующих новых вкладок.
Не будем торопиться с переходом к настройкам Windows Terminal, для начала некоторые вещи, которые вы можете сделать, не переходя к ним:
- Сочетания клавиш Ctrl + «+» и аналогичное сочетание с клавишей «минус» позволяет изменить размер текста в текущей вкладке.

- Нажмите клавиши Alt+Shift+D, чтобы разделить текущую вкладку на две панели. Действие можно повторять: выделенная панель будет разделяться при нажатии этих клавиш. Если вместо D использовать клавишу «минус» или «плюс», разделение будет происходить горизонтально и вертикально соответственно.

- Для панелей доступны и другие клавиши: Ctrl+Shift+W — закрыть текущую, Alt+Shift+стрелки — изменение размеров, Alt+стрелки — переключение между панелями.
- Если в Windows включены эффекты прозрачности, удержание клавиш Ctrl+Shift и вращение колеса мыши вниз позволяет сделать активное окно Windows Terminal более прозрачным.
- Windows Terminal добавляет пункт в контекстное меню Windows, позволяющий быстро запустить оболочку по умолчанию в текущей вкладке.

- «Стандартные» сочетания клавиш, такие как копирование и вставка, отмена (Ctrl+Z) и другие здесь также исправно работают.
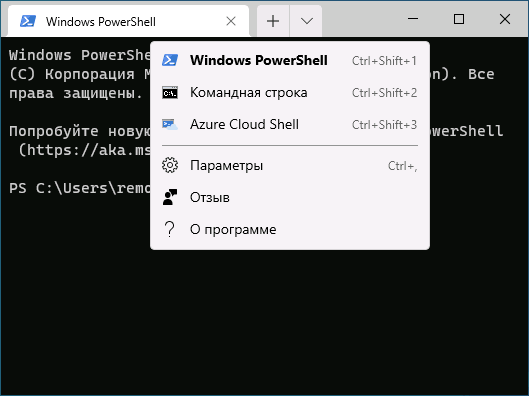
- Если вам нужно запустить Windows Terminal от имени администратора, можно использовать правый клик по нему в меню «Пуск» и выбор нужного пункта в разделе «Дополнительно» или, поиск в панели задач, как на изображении ниже.


Настройки
Зайти в настройки Windows Terminal можно, нажав по кнопке со стрелкой или же с помощью сочетания клавиш Ctrl + «запятая». Параметры меняются от версии к версии и на момент написания этого обзора выглядят следующим образом:

Большинство вкладок вполне понятны и на русском языке:
- На вкладке «Запуск» можно выбрать оболочку по умолчанию, например, выбрать «Командная строка» вместо «Windows PowerShell», включить автозапуск, изменить режим запуска.
- Вкладки «Оформление» и «Цветовые схемы» позволяют изменить общие параметры оформления приложения, а также отредактировать цветовые схемы (их мы можем указать отдельно для каждой консоли в разделе «Профили»), при необходимости — создать собственную цветовую схему.
- В разделе «Действия» — базовые сочетания клавиш для работы в Windows Terminal. Эти сочетания подлежат редактированию в файле конфигурации.
- Если перейти в подраздел «Профили», мы можем настроить отдельные параметры оформления, запуска, значка, папки запуска, прозрачности и другие для каждой «командной строки». В оформлении можно не только выбрать цветовую схему и настроить прозрачность (акриловый эффект), но и задать обои для соответствующих вкладок.

- Настройки в достаточной мере гибкие и скриншот ниже — далеко не всё, чего можно добиться.

- При нажатии кнопки «Добавить», вы можете добавить собственную консоль в Windows Terminal (или использовать системную — тот же PowerShell или Командную строку, но с другим профилем настроек).
- Кнопка «Открытие файла JSON» позволяет открыть файл конфигурации для редактирования.


Если после проделанных экспериментов с настройками вам потребуется сбросить все параметры Windows Terminal на настройки по умолчанию, достаточно проделать следующие шаги:
- Запустите Windows Terminal и перейдите в его параметры.
- Нажмите «Открытие файла JSON» и откройте его в текстовом редакторе.
- Удалите всё содержимое файла и сохраните файл.
- Закройте и снова запустите Windows Terminal — он будет запущен с настройками по умолчанию.
Windows Terminal has several hotkeys or keybindings. Here is a list of all the useful Windows Terminal keyboard shortcuts you should know.
Windows Terminal is the application that many users have been asking, especially those who spend a lot of time with command-line tools. The application is open-source, easy to use, configurable, has some of the best features, and actively developed by Microsoft to add more features.
Like any modern application, the Windows Terminal is entirely usable with the mouse. This means it is easy to navigate tabs and do other things like opening new tabs, selecting the text, copying, pasting, etc. When you compare it to the regular Command Prompt and PowerShell support, the difference is night and day.
As good as the mouse support is, it is far better to control Windows Terminal with keyboard shortcuts. After all, it can be a pain in the back to constantly move your hand away from the keyboard to control the mouse. Thankfully, Windows Terminal has keyboard shortcuts for almost all essential tasks like opening a new shell, navigating between shells, etc.
This quick and straightforward guide will share some of the most useful Windows Terminal keyboard shortcuts that every user should know. These shortcuts will make your command-line life a bit easy.

Following are the Windows Terminal keyboard shortcuts that you should know.
Ctrl + Shift + Number: Open new profiles/tabs. Use this shortcut to open a new profile or tab in Windows Terminal. Each number represents a specific profile in the Terminal. Profiles are numbered in the top-down form in the profile selection dropdown menu on the title bar. For example, if the PowerShell profile is in the second position, you should press the “Ctrl + Shift + 2” to open it.
Ctrl + Alt + Number: Switch to a specific tab. Use this shortcut to switch between tabs. Tabs are numbered from left to right and start with “1.” For example, if you want to switch to the third tab, press “Ctrl + Alt + 3.”
Ctrl + Shift + Space: Opens profile selection dropdown menu. You can then use the up/down arrow keys to select and open the profile.
Ctrl + Shift + T: Opens a new tab with the default profile.
Ctrl + Shift + N: Opens a new Windows Terminal instance.
Ctrl + Shift + D: This shortcut will duplicate or open another instance of the current tab. However, it will not copy the content of the original tab.
Ctrl + C: Copy selected text. Select the text in the Terminal and press the shortcut to copy it to the clipboard. Once copied, you can paste it anywhere you want.
Ctrl + V: Paste clipboard content. Pressing this shortcut will paste the clipboard contents into the Terminal. Keep in mind that only compatible content, like text, will be pasted. If you try to paste incompatible content, like an image, the result will not be as expected or intended.
Ctrl + Shift + W: Close the current tab (not the entire application).
Alt + F4: Close the Windows Terminal window. If there are multiple tabs, you might see a warning prompt. In that case, click “Close all” to continue.
Ctrl + Shift + F: Opens the “Find” function. It can be used to find instances of a text or sentence in a terminal tab. This functionality is similar to what you find in a browser or other applications like Notepad, Word, etc.
Ctrl + Numpad Add/Minus: Increase or decrease the text size in the Windows Terminal tab.
Ctrl + 0: Reset the font or text size its default (100%).
Ctrl + Shift + Up/Down arrow: Scroll up or down in the Windows Terminal.
Ctrl + Shift + PageUp/PageDown: Move to top or bottom in the Windows Terminal.
Alt + Shift + Minus/Plus: Split current pane horizontally or vertically.
Ctrl + Shift + P: Toggle command palette. It can be used to select and execute a command or action from the available list.
Ctrl + Shift + ,: This shortcut opens the Settings tab in the Windows Terminal.
F11: Toggle fullscreen.
That is it. These are essential Windows Terminal keyboard shortcuts that every user should know.
I hope that helps.
If you are stuck or need some help, comment below, and I will try to help as much as possible.
Related: How to change default font in Windows Terminal.