- Remove From My Forums
![]()
Отсутствует локальная группа Пользователи удаленного рабочего стола
-
Question
-
Добрый день!
На ПК с ОС Windows 10 Pro (x64) отсутствует локальная группа «Пользователи удаленного рабочего стола» в связи с чем нет возможности подключаться к ПК по RDP. Была попытка создать вручную указанную группу с последующим добавлением
требуемого пользователя, но это не решило проблемы. Прошу подсказать почему все-таки отсутствует указанная локальная группа и в каком направлении двигаться для решения проблемы?Спасибо.
Answers
-
Попробуйте сделать следующее:
1) Создайте на компьютере локальную группу с произвольным именем (например «RDS Users»).
2) В редакторе локальной политики (gpedit.msc) пропишите эту группу в качестве значения параметра: «Computer Configuration» -> «Windows settings» -> «Security Settings» -> «Local policies» ->
«User Rights Assignment» -> «Allow log on through Remote Desktop Services»-
Proposed as answer by
Monday, November 2, 2020 10:24 PM
-
Marked as answer by
Иван ПродановMicrosoft contingent staff, Moderator
Wednesday, November 4, 2020 8:44 AM
-
Proposed as answer by
|
7 / 7 / 0 Регистрация: 06.09.2014 Сообщений: 257 |
|
|
1 |
|
Пропали группы удаленных рабочих столов18.08.2022, 20:47. Показов 977. Ответов 2
Всем привет. Вот такая тема. Буквально месяц назад еще мог по рдп подключаться к этому пк, а теперь нет. Посмотрел группы, а групп удаленных рабочих столов нет. Удалил обновления примерно после каких думал могло такое случиться — не помогло. Как думаете, что может быть и как это починить? Миниатюры
__________________
0 |

|
Робот сгибальщик 831 / 456 / 95 Регистрация: 29.07.2020 Сообщений: 2,351 Записей в блоге: 7 |
|
|
19.08.2022, 15:12 |
2 |
|
Создай группу и включи в её состав пользователя «УДАЛЁННЫЙ ДОСТУП».
0 |
|
7 / 7 / 0 Регистрация: 06.09.2014 Сообщений: 257 |
|
|
20.08.2022, 14:08 [ТС] |
3 |
|
не помогло. Добавил в эту созданную группу пользователя админа вручную, тоже нет
0 |
If you want to add or remove Remote Desktop users in Windows 11 or Windows 10, here is how you can do that. It is possible to create or assign a new Remote Desktop user in Windows PC with the help of Windows Settings, Local Users and Groups, PowerShell, and Command Prompt. Here we have explained all the methods, and you can follow any of them as per your wish.
Remote Desktop functionality helps you connect a computer remotely to help fix a problem on the computer. To do that, you need to assign a user so that the account can be connected for using Remote Desktop.
To add or remove Remote Desktop users using Windows Settings, follow these steps:
- Press Win+I to open Windows Settings.
- Go to System > Remote Desktop.
- Click on the Remote Desktop users option.
- Click the Add button.
- Click the Advanced button.
- Click on the Find Now button.
- Choose the user from search results.
- Click the OK button twice.
To learn more about these steps, continue reading.
First, you need to open Windows Settings on your Windows 11/10 PC. For that, you can press the Win+I. Then, make sure that you are in the System tab. If so, find the Remote Desktop option on the right-hand side. Then, click on the Remote Desktop users option.
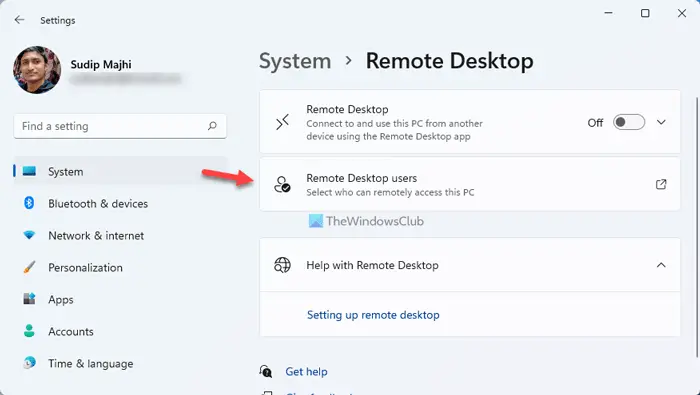
It will open the Remote Desktop Users panel on your computer. If you haven’t used the Remote Desktop earlier, you can find a blank box. To add a new user, click the Add button.

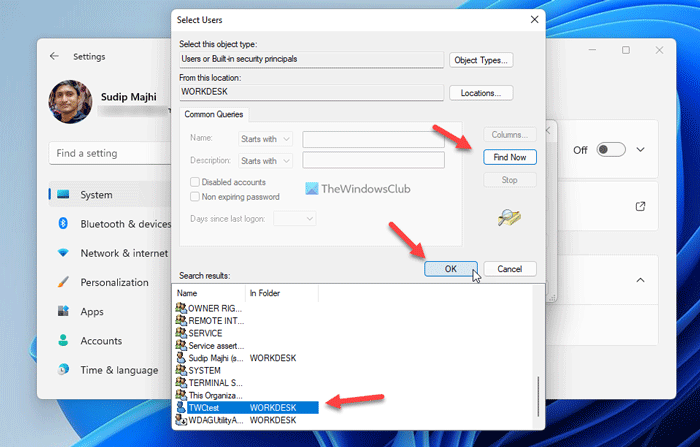
Then, click on the Advanced button and the Find Now option.
It displays all the users you can add for using the Remote Desktop on your computer. For your information, you can find Administrator, ALL APPLICATION PACKAGES, ANONYMOUS LOGON, CREATOR GROUP, CREATOR OWNER, and so on. You need to choose the user you want to allow to access the Remote Desktop on your computer and click the OK button.
Following that, you can find the username in the Remote Desktop Users box or wizard. You can again click on the OK button to save the change.
This is how you can add a Remote Desktop user in Windows 11/10. However, if you want to remove a user or prevent one from using Remote Desktop, you can open the same Remote Desktop Users panel from the Windows Settings, where it displays all the users. Then, choose a user that you want to remove from the list by clicking on it once.
After that, click on the Remove button.
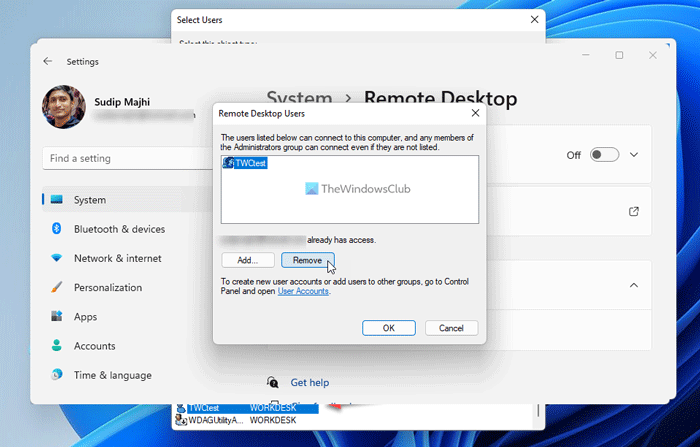
Once you do that, the user will be removed from the list. Then, you can click on the OK button to save the change.
How to add or remove Remote Desktop users using Local Users and Groups
To add or remove Remote Desktop users using Local Users and Groups, follow these steps:
- Press Win+I to open the Run prompt.
- Type lusrmgr.msc and hit the Enter
- Expand the Groups section.
- Double-click on the Remote Desktop Users option.
- Click on the Add button.
- Click on the Advanced button.
- Choose Users or Built-in security principalsand click the Find Now button.
- Choose a user from the list.
- Click the OK button.
- Click the OK button again to save the change.
Let’s check out these steps in detail.
First, you need to open the Local Users and Groups panel on your computer. For that, you can press the Win+R to open the Run prompt, type lusrmgr.msc, and hit the Enter button. Alternatively, you can search for lusrmgr.msc in the Taskbar search box and click on the individual search result.
Then, expand the Groups section on the left side and double-click on the Remote Desktop Users menu in the middle of the screen.
It opens the Remote Desktop Users Properties panel. From here, you can add or remove new users. To add a new user, click the Add button and click on the Advanced button.

Then, select Users or Built-in security principals and click on the Find Now button. Here it displays a list of all the users you can add to the list.
You need to choose a user and click the OK button.
Then, click on the OK button again to save the change. If you want to remove a user, you need to open the Remote Desktop Users Properties panel, select the users from the list, and click on the Remove button.
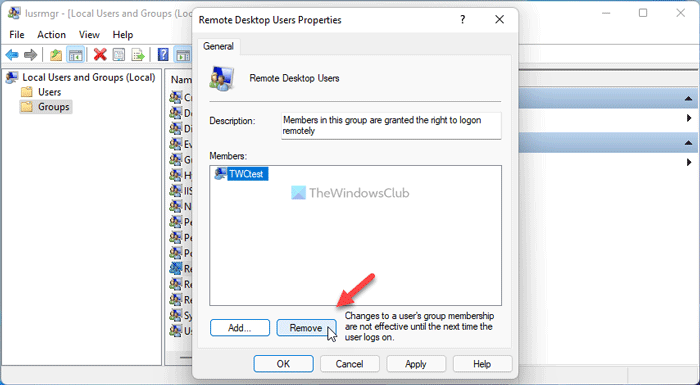
Click the OK button to save the change.
How to add or remove Remote Desktop users using PowerShell
It is very straightforward to add or remove a Remote Desktop user using Windows PowerShell. You can use the Windows PowerShell or the PowerShell instance in Windows Terminal. However, to do that, you must know the exact username of the user. Otherwise, it is not possible to use this method to add or remove any user in Windows 11/10.
To get started, you need to open Windows Terminal with administrator rights. For that, press Win+X to open the WinX menu, select Windows Terminal (Admin) and click the Yes button in the UAC prompt.
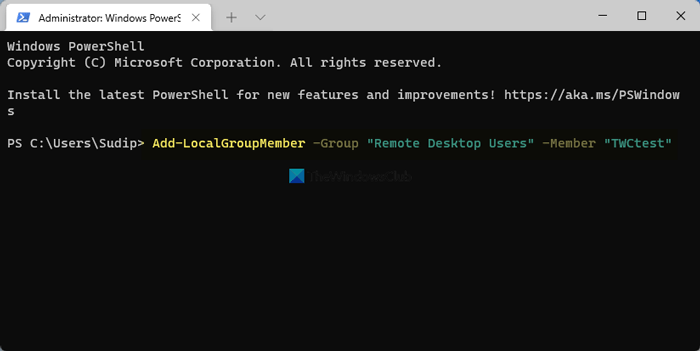
Then, enter the following command to add a Remote Desktop user:
Add-LocalGroupMember -Group "Remote Desktop Users" -Member "username"
Don’t forget to replace username with the original username of the user account you want to assign as a Remote Desktop user on your computer.
However, if you want to remove a user, enter this command:
Remove-LocalGroupMember -Group "Remote Desktop Users" -Member "username"
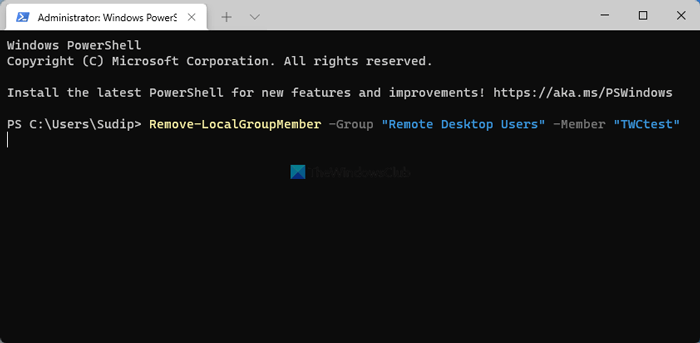
Like the aforementioned command, you must replace username with the original username of the account you want to remove from the list.
How to add or remove Remote Desktop users using Command Prompt
To add or remove Remote Desktop users using Command Prompt, follow these steps:
Like the PowerShell method, you can open Command Prompt with administrator privilege or the Command Prompt instance in Windows Terminal. To do that, search for cmd in the Taskbar search box, click on the search result and click the Yes button.
Then, enter the following command to add a user:
net localgroup "Remote Desktop Users" "username" /add
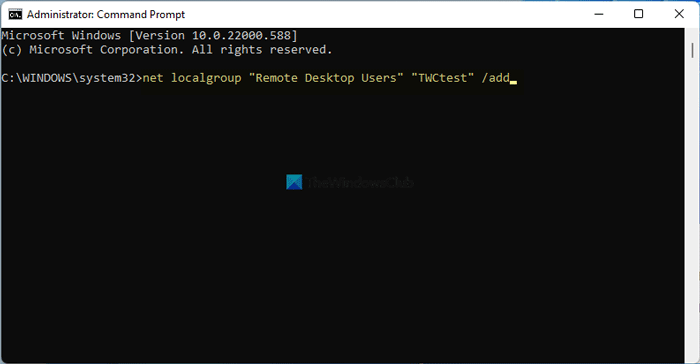
It is mandatory to replace username with the original username of the user account.
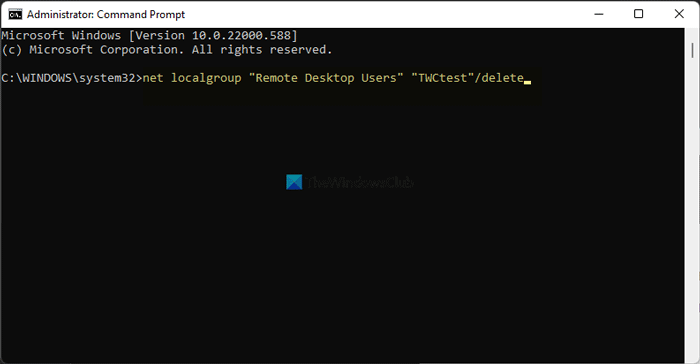
On the other hand, if you want to remove a user, enter this command:
net localgroup "Remote Desktop Users" "username" /delete
Now you can close the window.
Read: Enable Remote Desktop using Command Prompt or PowerShell.
How do I remove users from Remote Desktop?
To remove users from Remote Desktop, you can follow any of the aforementioned guides. There are mainly four different methods you can follow to get the job done. However, if you use the Windows PowerShell or Command Prompt method, it will be less time-consuming. For the Command Prompt method, you need to open CMD with administrator privilege and enter this command: net localgroup “Remote Desktop Users” “username”/delete.
How do I add a user to Remote Desktop?
It is possible to add or remove users to Remote Desktop with the help of Windows Settings, Local Users and Groups, Command Prompt, and Windows PowerShell. All the methods are mentioned in this article, and you can follow any one of them to get the job done. However, if you use the Windows PowerShell or Command Prompt method, you must know the exact username of the user account you want to add.
That’s all! Hope it helps.
If you want to add or remove Remote Desktop users in Windows 11 or Windows 10, here is how you can do that. It is possible to create or assign a new Remote Desktop user in Windows PC with the help of Windows Settings, Local Users and Groups, PowerShell, and Command Prompt. Here we have explained all the methods, and you can follow any of them as per your wish.
Remote Desktop functionality helps you connect a computer remotely to help fix a problem on the computer. To do that, you need to assign a user so that the account can be connected for using Remote Desktop.
To add or remove Remote Desktop users using Windows Settings, follow these steps:
- Press Win+I to open Windows Settings.
- Go to System > Remote Desktop.
- Click on the Remote Desktop users option.
- Click the Add button.
- Click the Advanced button.
- Click on the Find Now button.
- Choose the user from search results.
- Click the OK button twice.
To learn more about these steps, continue reading.
First, you need to open Windows Settings on your Windows 11/10 PC. For that, you can press the Win+I. Then, make sure that you are in the System tab. If so, find the Remote Desktop option on the right-hand side. Then, click on the Remote Desktop users option.
It will open the Remote Desktop Users panel on your computer. If you haven’t used the Remote Desktop earlier, you can find a blank box. To add a new user, click the Add button.
Then, click on the Advanced button and the Find Now option.
It displays all the users you can add for using the Remote Desktop on your computer. For your information, you can find Administrator, ALL APPLICATION PACKAGES, ANONYMOUS LOGON, CREATOR GROUP, CREATOR OWNER, and so on. You need to choose the user you want to allow to access the Remote Desktop on your computer and click the OK button.
Following that, you can find the username in the Remote Desktop Users box or wizard. You can again click on the OK button to save the change.
This is how you can add a Remote Desktop user in Windows 11/10. However, if you want to remove a user or prevent one from using Remote Desktop, you can open the same Remote Desktop Users panel from the Windows Settings, where it displays all the users. Then, choose a user that you want to remove from the list by clicking on it once.
After that, click on the Remove button.
Once you do that, the user will be removed from the list. Then, you can click on the OK button to save the change.
How to add or remove Remote Desktop users using Local Users and Groups
To add or remove Remote Desktop users using Local Users and Groups, follow these steps:
- Press Win+I to open the Run prompt.
- Type lusrmgr.msc and hit the Enter
- Expand the Groups section.
- Double-click on the Remote Desktop Users option.
- Click on the Add button.
- Click on the Advanced button.
- Choose Users or Built-in security principalsand click the Find Now button.
- Choose a user from the list.
- Click the OK button.
- Click the OK button again to save the change.
Let’s check out these steps in detail.
First, you need to open the Local Users and Groups panel on your computer. For that, you can press the Win+R to open the Run prompt, type lusrmgr.msc, and hit the Enter button. Alternatively, you can search for lusrmgr.msc in the Taskbar search box and click on the individual search result.
Then, expand the Groups section on the left side and double-click on the Remote Desktop Users menu in the middle of the screen.
It opens the Remote Desktop Users Properties panel. From here, you can add or remove new users. To add a new user, click the Add button and click on the Advanced button.
Then, select Users or Built-in security principals and click on the Find Now button. Here it displays a list of all the users you can add to the list.
You need to choose a user and click the OK button.
Then, click on the OK button again to save the change. If you want to remove a user, you need to open the Remote Desktop Users Properties panel, select the users from the list, and click on the Remove button.
Click the OK button to save the change.
How to add or remove Remote Desktop users using PowerShell
It is very straightforward to add or remove a Remote Desktop user using Windows PowerShell. You can use the Windows PowerShell or the PowerShell instance in Windows Terminal. However, to do that, you must know the exact username of the user. Otherwise, it is not possible to use this method to add or remove any user in Windows 11/10.
To get started, you need to open Windows Terminal with administrator rights. For that, press Win+X to open the WinX menu, select Windows Terminal (Admin) and click the Yes button in the UAC prompt.
Then, enter the following command to add a Remote Desktop user:
Add-LocalGroupMember -Group "Remote Desktop Users" -Member "username"
Don’t forget to replace username with the original username of the user account you want to assign as a Remote Desktop user on your computer.
However, if you want to remove a user, enter this command:
Remove-LocalGroupMember -Group "Remote Desktop Users" -Member "username"
Like the aforementioned command, you must replace username with the original username of the account you want to remove from the list.
How to add or remove Remote Desktop users using Command Prompt
To add or remove Remote Desktop users using Command Prompt, follow these steps:
Like the PowerShell method, you can open Command Prompt with administrator privilege or the Command Prompt instance in Windows Terminal. To do that, search for cmd in the Taskbar search box, click on the search result and click the Yes button.
Then, enter the following command to add a user:
net localgroup "Remote Desktop Users" "username" /add
It is mandatory to replace username with the original username of the user account.
On the other hand, if you want to remove a user, enter this command:
net localgroup "Remote Desktop Users" "username" /delete
Now you can close the window.
Read: Enable Remote Desktop using Command Prompt or PowerShell.
How do I remove users from Remote Desktop?
To remove users from Remote Desktop, you can follow any of the aforementioned guides. There are mainly four different methods you can follow to get the job done. However, if you use the Windows PowerShell or Command Prompt method, it will be less time-consuming. For the Command Prompt method, you need to open CMD with administrator privilege and enter this command: net localgroup “Remote Desktop Users” “username”/delete.
How do I add a user to Remote Desktop?
It is possible to add or remove users to Remote Desktop with the help of Windows Settings, Local Users and Groups, Command Prompt, and Windows PowerShell. All the methods are mentioned in this article, and you can follow any one of them to get the job done. However, if you use the Windows PowerShell or Command Prompt method, you must know the exact username of the user account you want to add.
That’s all! Hope it helps.
На чтение 8 мин. Просмотров 4.1k. Опубликовано 03.09.2019
Удаленный рабочий стол – это один из самых простых способов удаленного решения проблем на компьютере, но, похоже, у этой функции есть некоторые проблемы в Windows 10.
Пользователи сообщали об ошибке Удаленное соединение было отказано в Windows 10, поэтому давайте посмотрим, как это исправить.
Содержание
- Что делать, если в удаленном соединении было отказано
- Удаленное подключение было отклонено, поскольку учетная запись пользователя не авторизована для удаленного входа [FIX]
- Исправлено – «Удаленное соединение было отклонено из-за комбинации имени пользователя и пароля» Windows 10
Что делать, если в удаленном соединении было отказано
Содержание .
-
-
Исправлено: удаленное подключение было отклонено, поскольку учетная запись пользователя не авторизована для удаленного входа
- Изменить настройки пульта
- Изменить параметры локальной политики безопасности
- Удалить локальный и перемещаемый профиль
- Установите для входа службы удаленных рабочих столов значение Сетевая служба
- Измените свой реестр
- Воссоздать доменные сертификаты
- Создать новый DWORD
- Выровняйте MaxTokenSize для сервера
- Добавить пользователей домена вместо пользователей удаленного рабочего стола
-
Исправлено – удаленному соединению было отказано из-за комбинации имени пользователя и пароля
- Включите CHAP и CHAPv2
- Используйте команду rasphone
- Создать NTLMv2 совместимость DWORD
-
Исправлено: удаленное подключение было отклонено, поскольку учетная запись пользователя не авторизована для удаленного входа
Удаленное подключение было отклонено, поскольку учетная запись пользователя не авторизована для удаленного входа [FIX]
Решение 1. Изменить настройки пульта
По словам пользователей, они не могут запустить сеанс Remote Destkop из-за этой ошибки, поэтому для решения этой проблемы вам необходимо проверить настройки Remote на вашем хост-компьютере. Для этого выполните следующие действия:
-
Нажмите Windows Key + S и войдите в систему. Выберите в меню Система .

-
Выберите Удаленные настройки на левой панели.
-
Убедитесь, что выбран параметр Разрешить удаленные подключения к этому компьютеру , и нажмите Выбрать пользователей .
-
Нажмите кнопку Добавить .
-
Введите имя пользователя в Введите имена объектов для выбора и нажмите Проверить имена . Обязательно введите имя компьютера перед именем пользователя, например: COMPUTERNAMEusername .
- Сохраните изменения и попробуйте снова использовать Remote Desktop.


Если у вас есть группа «Пользователи удаленного рабочего стола», обязательно добавьте ее, выполнив действия, описанные выше.
Решение 2. Изменить параметры локальной политики безопасности
Иногда вы можете получить сообщение об ошибке Удаленное соединение было отказано , если настройки локальной политики безопасности неверны. Чтобы решить эту проблему, вам нужно отредактировать локальную политику безопасности, выполнив следующие действия:
-
Нажмите Windows Key + R и введите secpol.msc . Нажмите ОК или нажмите Enter , чтобы запустить его.
- Когда откроется окно Локальная политика безопасности , перейдите в Локальные политики> Назначение прав пользователя в левой панели.
-
На правой панели найдите Разрешить вход в систему через службы удаленных рабочих столов и дважды щелкните его.
-
Нажмите кнопку Добавить пользователя или группу .
- Введите имя пользователя или имя группы в поле . Введите имена объектов для выбора и нажмите кнопку Проверить имена . Если введенные данные верны, нажмите ОК , чтобы сохранить изменения. Если у вас есть группа служб удаленных рабочих столов, обязательно добавьте ее.


- ЧИТАЙТЕ ТАКЖЕ: Исправлено: удаленный рабочий стол не подключается в Windows 10
Решение 3. Удалите локальный и перемещаемый профиль .
Немногие пользователи утверждают, что вы можете решить эту проблему, удалив локальный и перемещаемый профиль. Мы не знаем, работает ли это решение, но вы можете попробовать его.
Решение 4. Установите для входа службы удаленных рабочих столов значение «Сетевая служба» .
Пользователи сообщали, что ошибка Удаленное подключение было отклонено появляется, если для входа службы удаленных рабочих столов установлено значение «Локальная система». Чтобы изменить это, выполните следующие действия:
-
Нажмите Windows Key + R и введите services.msc . Нажмите Enter или ОК.
-
Когда откроется окно Службы , найдите Службы удаленных рабочих столов и дважды щелкните его.
-
Когда откроется окно Свойства , перейдите на вкладку Вход в систему и убедитесь, что Локальная системная учетная запись не выбрана . ,
- После выбора службы сети нажмите Применить и ОК , чтобы сохранить изменения.


После изменения входа службы удаленных рабочих столов в службу сети, проблема должна быть полностью решена.
Решение 5 – измените свой реестр
Одним из предложенных пользователями решений является редактирование вашего реестра. Чтобы решить эту проблему, вам нужно предоставить определенные разрешения группе пользователей. Прежде чем мы начнем, мы должны упомянуть, что редактирование вашего реестра может вызвать определенные проблемы, поэтому вы можете создать резервную копию вашего реестра на всякий случай. Чтобы отредактировать реестр, сделайте следующее:
-
Нажмите Windows Key + R и введите regedit. Нажмите Ввод или нажмите ОК.
-
Перейдите к клавише HKEY_LOCAL_MACHINESOFTWAREMicrosoftWindows NTCurrentVersionWinlogon на левой панели, щелкните правой кнопкой мыши и выберите Разрешения.
-
В разделе Группы или имена пользователей выберите Пользователи. Убедитесь, что группе Пользователи присвоено разрешение Чтение , установленное на Разрешить . После установки разрешений на чтение на Разрешить нажмите Применить и ОК , чтобы сохранить изменения.


Решение 6 – воссоздать доменные сертификаты
После небольшого исследования немногие пользователи обнаружили, что их сервер входа в систему предупреждает их о событии 29, и именно это предупреждение стало причиной этой проблемы. Чтобы устранить эту проблему, вам необходимо заново создать доменные сертификаты, выполнив следующие действия:
-
На главном контроллере домена нажмите Ключ Windows + R . Введите mmc.exe и нажмите Enter , чтобы запустить его.
-
Перейдите в Файл> Добавить/удалить оснастку .
-
Выберите Сертификаты и нажмите кнопку Добавить .
-
Выберите Аккаунт компьютера и нажмите Далее.
-
Теперь нажмите кнопку Готово .
-
Нажмите кнопку ОК .
-
Перейдите на страницу Сертификаты (локальный компьютер)> Личные> Сертификаты .
- Найдите старый сертификат контроллера домена, щелкните его правой кнопкой мыши и выберите Удалить. Нажмите Да , чтобы подтвердить, что вы хотите удалить сертификат.


- ЧИТАЙТЕ ТАКЖЕ: Исправлено: удаленный сеанс был отключен, клиентские лицензии на доступ к удаленному рабочему столу недоступны
После удаления сертификата вам необходимо запросить новый, выполнив следующие действия:
-
Разверните Сертификаты (локальный компьютер) и щелкните правой кнопкой мыши Личные. Выберите Все задачи> Запросить новый сертификат .
-
Следуйте инструкциям мастера, чтобы запросить новый сертификат.


Наконец, вам просто нужно проверить сертификат. Для выполнения этого шага вы должны быть членом группы администраторов домена или иметь соответствующие привилегии, назначенные вашей учетной записи вашим администратором. Чтобы проверить Kerberos Key Distribution Center (KDC), выполните следующие действия:
-
Откройте Командную строку от имени администратора. Для этого нажмите Ключ Windows + X и выберите в меню Командная строка (Администратор) .
-
Когда откроется командная строка, введите certutil -dcinfo verify и нажмите Enter , чтобы запустить ее.


Если процедура прошла успешно, перезагрузите контроллер домена и сервер, к которому вы пытаетесь подключиться, и проблема должна быть решена.
Решение 7. Создайте новый DWORD .
По словам пользователей, вы можете решить эту проблему, создав новый DWORD в реестре. Для этого выполните следующие действия:
- Запустите редактор реестра.
- В левой панели перейдите к ключу HKEY_LOCAL_MACHINESYSTEMCurrentControlSetControlTerminal Server .
-
На правой панели щелкните правой кнопкой мыши пустое место и выберите Создать> Значение DWORD (32-разрядное) .
- Введите IgnoreRegUserConfigErrors в качестве имени нового DWORD и дважды щелкните его, чтобы открыть его свойства.
-
Когда откроется окно свойств, установите для Значения данных значение 1 . Нажмите ОК , чтобы сохранить изменения.


Решение 8. Настройте MaxTokenSize для сервера .
По словам пользователей, вы должны иметь возможность подключиться к серверу с помощью команды mstsc.exe/admin . После этого вам нужно настроить MaxTokenSize для этого сервера, и это должно решить проблему.
Решение 9. Добавьте пользователей домена вместо пользователей удаленного рабочего стола
Пользователи сообщали об ошибке Удаленное соединение было отказано на их ПК при попытке использовать функцию удаленного рабочего стола, и, по их мнению, по какой-то странной причине они не смогли добавить пользователей удаленного рабочего стола. Чтобы обойти эту проблему, предлагается добавить пользователей домена вместо пользователей удаленного рабочего стола. После этого эта ошибка должна быть исправлена.
- ЧИТАЙТЕ ТАКЖЕ: Исправлено: удаленный рабочий стол перестает работать в Windows 8.1, Windows 10
Исправлено – «Удаленное соединение было отклонено из-за комбинации имени пользователя и пароля» Windows 10
Решение 1. Включите CHAP и CHAPv2 .
Пользователи сообщали об этой проблеме, пытаясь использовать VPN, и для ее устранения вам нужно включить CHAP и CHAPv2. По умолчанию Windows 10 отключает эти функции, поэтому вам необходимо включить их. Для этого просто найдите свою VPN-сеть, щелкните ее правой кнопкой мыши и выберите в меню Свойства . Перейдите на вкладку Безопасность и убедитесь, что вы выбрали Microsoft Chap Version 2 (MS-CHAP v2) . После этого нажмите Применить и ОК , чтобы сохранить изменения.
Решение 2. Используйте команду rasphone
Вы можете быстро подключиться к вашей VPN с помощью команды rasdial , но иногда вы можете получить ошибку Удаленное соединение было отклонено при использовании этой команды. Чтобы обойти эту проблему, пользователи предлагают вместо этого использовать команду rasphone. Чтобы использовать его, просто запустите инструмент командной строки, введите rasphone -d «Имя вашего VPN-подключения» и нажмите Enter.
Решение 3. Создание DWORD совместимости NTLMv2
Вы должны быть в состоянии решить эту проблему, добавив определенный DWORD в реестр. Для этого выполните следующие действия:
- Запустите Редактор реестра и перейдите к ключу HKEY_LOCAL_MACHINESYSTEMCurrentControlSetServicesRemoteAccessPolicy на левой панели.
-
На правой панели щелкните правой кнопкой мыши пустое место и выберите Создать> Значение DWORD (32-разрядное) . Введите NTLMv2-совместимость в качестве имени нового DWORD.
- Дважды нажмите NTLMv2-совместимость DWORD, чтобы открыть его свойства.
-
Когда откроется окно Свойства , введите 1 в поле Значение данных и нажмите ОК , чтобы сохранить изменения.
- Закройте Редактор реестра .


Удаленное соединение было отклонено . Ошибка может помешать вам использовать удаленный рабочий стол или VPN, но мы надеемся, что вам удалось решить эту проблему с помощью одного из наших решений.