- Remove From My Forums
-
Question
-
Having a hard stop to find ways to delete pagefile.sys while windows server 2008 r2 is operational .
Anand Shankar
-
Changed type
Santosh Bhandarkar
Sunday, February 24, 2013 11:07 AM
Question
-
Changed type
All replies
-
Having a hard stop to find ways to delete pagefile.sys while windows server 2008 r2 is operational .
Anand Shankar
Technically it’s possible to remove pagefile.sys however, it’s NOT a Good Practice to delete pagefile on an operating system.
Here is a way to remove pagefile.sys
Start -> Run -> type sysdm.cpl {press Enter} -> click
Advanced (tab) -> Performance, click
Settings -> click Advanced (tab) under
Virtual memory, click on Change -> Uncheck Automatically manage paging file size for all drives -> Select C drive -> select
No paging File, click on Set -> Click on OK twice ->
Reboot the serverUpdate: To remove pagefile, Server has to be rebooted after changes have been done as mentioned above. Pagefile.sys cannot be deleted while OS is up and running !
Regards, Santosh
I do not represent the organisation I work for, all the opinions expressed here are my own.
This posting is provided «AS IS» with no warranties or guarantees and confers no rights.
Whenever you see a helpful reply, click on
Vote As Helpful & click on
Mark As Answer if a post answers your question.
-
Edited by
Santosh Bhandarkar
Sunday, February 24, 2013 11:09 AM
update
-
Edited by
-
Thanks Santosh — But I was looking for out of box solution where I can delete pagefile.sys whithout a reboot I.E when I am up and running with windows 2008r2.
Anand Shankar
-
Thanks Santosh — But I was looking for out of box solution where I can delete pagefile.sys whithout a reboot I.E when I am up and running with windows 2008r2.
Anand Shankar
Unfortunately that’s not possible. When server is up and running, pagefile would be in locked state, you must reboot the machine to free up the lock on pagefile.sys, that’s how it works.
Regards, Santosh
I do not represent the organisation I work for, all the opinions expressed here are my own.
This posting is provided «AS IS» with no warranties or guarantees and confers no rights.
Whenever you see a helpful reply, click on
Vote As Helpful & click on
Mark As Answer if a post answers your question.
-
Proposed as answer by
Yagmoth555MVP
Monday, February 25, 2013 2:23 AM
-
Proposed as answer by
-
-
Marked as answer by
Anand —
Wednesday, February 27, 2013 5:38 PM -
Unmarked as answer by
Anand —
Friday, September 23, 2016 7:40 PM
-
Marked as answer by
-
Even after rebooting still the pagefile is not deleted. Currently, on one of the server C drive space if fully occupied due to pagefile, i want to delete that file.
I have performed the above steps, but still the page file is not deleted.
Please someone help me out in deleting the pagefile.
-
Note If
you enable this feature, the shutdown time may be increased. (Again editing registry at your own risk )- Start Registry Editor (Regedt32.exe).
- Change the data value of the ClearPageFileAtShutdown value in the following registry key to a value of 1:
HKEY_LOCAL_MACHINESYSTEMCurrentControlSetControlSession ManagerMemory Management
If the value does not exist, add the following value:
Value Name: ClearPageFileAtShutdown
Value Type: REG_DWORD
Value: 1
Please remember to click “Mark as Answer” on the post that helps you, and to click “Unmark as Answer” if a marked post does not actually answer your question. This can be beneficial to other community members reading the thread. Anand Shankar
-
Hi,
I tried all the above steps and registry updated and reboot the server and I still see pagefile.sys 8GB
Can you please help?
-
Edited by
University AZ
Tuesday, July 9, 2019 2:15 AM
-
Edited by
-
Did you create another page file on another volume? Windows needs at least one page file. If you do not have it, it will create it.
Then, determine why you are creating another page file. In general, if your system is performing a lot of hard paging, it means that you do not have enough memory on the system. When compared to moving a page file to a faster disk versus adding
more memory to the system, adding memory will always perform better than moving the page file.In general, I would always configure my page file to be just 1-4 GB, even on systems with 256 to 512 GB of RAM. Never had an issue with it because I always configured the system to not need the page file except for the basics required by the operating
system.
tim
Total ALLOCATED doesn’t mean USED. The best approach is to disable Windows permanent process of calculating paging file size by setting:
Virtual Memory – Custom size – Initial size = Maximum size = identical value = e.g. 16 384.
Microsoft has still some problems with elementary school calculus. But understands if two numbers are equal then there is no need to calculate any more.
You could add a second HDD just for the paging file. If you have more than one HDD spread this value evenly across all your HDD’s to speed up computer. You can eventually set No paging file for you system drive but only if you have at least total 3 HDD’s. I mean physical HDD and not partition. Again very condition is Initial = Maximum.
In case of having Google Chrome clear its cache, which goes through the roof in size, and set its limit:
[HKEY_LOCAL_MACHINESOFTWAREPoliciesGoogleChrome]
«DiskCacheSize»=dword:00002000
You may try also enable Large System Cache
HKEY_LOCAL_MACHINESystemCurrentControlSetControl Session ManagerMemory Management
«LargeSystemCache»=dword:00000001
and eventually enable Executive paging under the same key
«DisablePagingExecutive»=dword:00000000
You may also have an issue when Windows is paging without a real reason but only because of the historical percentage setting for the paging threshold. You can have plenty of free memory but it is not used effectively by WS, the paging threshold is set too low in relation to your 8 GB. The post above is not entirely correct in this respect. Here are articles that fully clarify the issue.
Pushing the Limits of Windows: Virtual Memory
http://blogs.technet.com/b/markrussinovich/archive/2008/11/17/3155406.aspx?PageIndex=1#comments Opens a new window
How to disable low memory warnings
http://halflight.com.au/2011/04/06/how-to-disable-low-memory-warnings-and-the-advantages-of-removing… Opens a new window.
I had a similar issue of a full disk pointed later to a program that was creating a lot of small logs 20 GB although a total log’s size limit 1 MB was set in the program. The program went berserk in this regard without any reason and warning. I didn’t notice as it was growing at a rate about 1 kB a day.
I never tested CleanMgr.exe on WS 2008. It can make a lot of room on the HDD. Attached file runs CleanMgr with what to clean settings in the reg file. How to enable CleanMgr on WS 2008 is here.
http://www.basics.net/2013/02/25/win-server-2008-r2-how-to-enable-the-disk-cleanup-utility/ Opens a new window
attach_file
Attachment
Cleanmgr_W7.zip
960 Bytes
Was this post helpful?
thumb_up
thumb_down
Every Windows Server has a page file and Windows Server 2008 Server Core installations are no exception. Neither should they be an exception when it comes to tuning the page file for optimal performance and reliability.
What the page file is
The page file is usually described as a file that allows to use disk storage for data that do not fit into physical RAM. Other names for the page file are the ‘swap file’ and the ‘paging file’. Most administrators wouldn’t mind their page file settings, since they stuffed the server with RAM. Windows will always use the page file however, regardless of the amount of physical RAM.
The page file is located on the boot partition (or volume) by default, represented with the C:pagefile.sys file. After a clean install the initial size of the file varies with the amount of physical RAM in the server.
Page file best practices
There are a couple of page file best practices:
- Make your page file a fixed size and make your page file size roughly between 1,5 and 2,5 times larger than the amount of physical RAM.
- Place your page file on a separate partition (or volume) to prevent page file defragmentation. A non-fragmented page file allows for better page file performance than a fragmented page file since the head of the hard disk won’t have to skip to the next part of the page file.
Windows Server 2008 Full installations and Server Core installation both share the same installer routine up to a certain point. Because the check for the system requirements is done before choosing a specific Windows Server 2008 version the same memory requirements for Full installations and Server Core installations apply.
Default page file settings in Server Core
By default Server Core installations of Windows Server 2008 have an automatically configured page file, which is roughly 2x the size of the physical RAM.
Since Server Core doesn’t have explorer.exe as its default shell I think it’s a good thing Server Core has an automatically configured page file. The Operating System will adjust the size of the page file according to the needs of the box. It’s unlikely you will run into serious problems as long as you have thought your server dimensions through and do not install memory leaking (web)applications.
Page file Management
Microsoft has decided to change Page File Management in Server Core around the Beta 3 era. In early versions of Server Core you could use the SCregEdit.wsf script with the PF switch. I included the command line switches for these early versions to complete this post.
Windows Server Codename «Longhorn»
In the Windows Server Codename «Longhorn» era (up until 3 weeks after Beta 3) you needed to use the SCregEdit.wsf script to manage Server Core’s page file. SCregEdit.wsf was Server Core’s own Registry editing tool for editing multiple related registry values. If you’re a frequent visitor to this blog you’ve seen it used to change Automatic Update settings.
View page file settings
You can use SCregEdit.wsf to view page file settings with the following switches:
cd C:windowssystem32
cscript SCregEdit.wsf /PF /v
Change page file settings
Using SCregEdit.wsf you can not only view the Automatic Update and Page File settings, but also control the page file settings. To change the page file configuration simply type:
cd C:windowssystem32
cscript SCregEdit.wsf /PF PageFileSize PageFileSize
This command will automatically disable the automatic configuration of the page file settings.
Windows Server 2008 (post-Beta 3)
The PF switch in SCregEdit.wsf has been deprecated in the latest versions of Windows Server 2008. It can not be used in builds later than Beta 3.
I feel leaving SCregEdit.wsf for page file management was a good idea. It wasn’t possible to change the location of the Page File with SCregEdit.wsf and it therefor wasn’t possible to move the Page File from the default C:pagefile.sys location to a different location.
The Server Core team must have thought: «Since Server Core has the Windows Management Instrumentation Console (wmic.exe) onboard, why not use it?»
In the Windows Management Instrumentation (WMI) the automatic page file and the set page file have different aliases:
- (wmic.exe) pagefile is used for the automatically configured page file
- (wmic.exe) pagefileset is used for the user configured page file
View automatic page file settings
You can check the automatic page file settings by typing:
wmic.exe pagefile
or
wmic.exe pagefile list /format:list
This command will return the values for allocated base size, current usage, description, installation date, name, peak usage and status. I prefer the latter command because it outputs in a more humanly readable format.
View user defined page file settings
You can check on your self configured page file by using one of the following commands:
wmic.exe pagefileset
or
wmic.exe pagefileset list /format:list
This will return the values for description, initial size, maximum size, name and SettingID.
Note:
You can not see the amount of page file in use. You can use the Task Manager for this purpose. Open it by running taskmgr.exe or pressing CTRL + Shift + ESC.
Setting your page file
When you want to configure your page file yourself you need to first disable the automatic configuration. After that you can create your own page file. Here’s a little Step by Step:
- Disable the automatic configuration of the Windows page file:
wmic.exe computersystem where name=”%computername%” set AutomaticManagedPagefile=False
Note:
This command deletes all page file settings and sets the value for your pagefile to zero bytes.
- Specify your page file settings:
wmic.exe pagefileset where name=”C:\pagefile.sys” set InitialSize=PageFileSize,MaximumSize=PageFileSize
To manage your Page File according to best practices I recommend using equal PageFileSize values for InitialSize and MaximumSize. Values for PageFileSize are measured in MegaBytes. (MB’s)
- Reboot
Changing page file location
Another management option is to move the page file to another partition (or volume). Moving a page file involves deleting an existing page file and making a new one somewhere else. I used the following set of commands to move the Page File from the C: drive to the D: drive on my test system.
diskpart.exe
DISKPART> select disk 0
DISKPART> select partition 1
DISKPART> shrink desired=2280
DISKPART> create partition primary
DISKPART> select partition 2
DISKPART> format fs=ntfs label=»Swap»
DISKPART> assign letter=E
DISKPART> exit
wmic.exe pagefileset create name=»E:pagefile.sys»
wmic.exe pagefileset where name=»E:\pagefile.sys» set InitialSize=2048,MaximumSize=2048
wmic.exe pagefileset where name=»C:\pagefile.sys» delete
You can replace values to suit your situation. Your settings will take effect after a reboot of the system.
Reverting back to the automatic page file
If you feel Windows is better than you in managing the page file you can revert back to the automatically configured page file by typing the following command:
wmic.exe computersystem where name=”%computername%” set AutomaticManagedPagefile=True
Reboot after typing the command.
Checking the registry
Of course the registry contains information on the page file. Within the registry you can view the location, the minimum size, the maximum size and loads of other information like the PagefileOnOSVolume registry key in the following location:
- HKEY_LOCAL_MACHINESYSTEMCurrentControlSetControlSession ManagerMemory Management
Using the registry to look at (and change) page file settings is version independent. You can use it on pre-Beta 3 and post-Beta 3 installations of Windows Server 2008.
Concluding
Page file management was changed in Server Core since Beta 3.
In early versions of Windows Server Codename «Longhorn» you could use the SCregEdit.wsf script to change page file settings, but this command wasn’t very strong. The /PF command switch was deprecated.
You can still use the Windows Management Instrumentation Console (wmic.exe) to change many of your page file settings after you disable the AutomaticManagedPagefile setting.
You can also use the registry to change your page file settings, but this is a very error prone scenario. Using the Windows Management Instrumentation Console (wmic.exe) seems to be the easiest way, unless you want to change fancy settings.
Further reading
Optimizing Your Paging File (PAGEFILE.SYS)
How to use the 4GT RAM Tuning feature
How to verify the Page File location using a script
How to overcome the 4,095 MB paging file size limit in Windows
Definitions for system volume and boot volume
How to Move the Windows Default Paging File and Print Spooler to a Different Hard Disk
Windows Server 2008 System Requirements
How to verify the Page File location through a script
Server Core Tips and Tricks Vol. 4
Server Core – first steps
What’s going on with my Pagefile?
Windows Server 2008 Step-by-Step Guides
How can I optimize the Windows 2000/XP/2003 virtual memory (Pagefile)?
Tuning Windows Server 2003
BitLocker Drive Encryption (BDE) enables the PagefileOnOSVolume registry setting
Disclaimer Beta Software
The information on this webpage applies to software from Microsoft that was in testing phase but utilizable by experienced users by the time the webpage was written. This software has not been released for sale, distribution or usage for the general public. The information on this webpage and the beta software are provided «as is» without warranty of any kind, either expressed or implied, including, but not limited to, the implied warranties of merchantability and fitness for a particular purpose.
Обновлено 20.07.2016
Что такое файл подкачки Pagefile.sys-01
Всем привет сегодня расскажу что такое файл подкачки Pagefile.sys.
Pagefile.sys — файл, который отвечает за хранение информации и данных, не помещающихся в оперативную память (ОЗУ), файл подкачки автоматически создается на системном диске и имеет атрибуты: скрытый, системный. С помощью него Windows освобождает часть ОЗУ для запуска новых программ. ОЗУ вместе с файлом подкачки образуют виртуальную память.
Как увеличить файл подкачки Pagefile.sys
Необходимость увеличить файл подкачки возникает при ошибках системы, связанных с недостаточным объемом виртуальной памяти; требуется добавить ОЗУ или увеличить размер файла подкачки. Для увеличения объема файла подкачки следуем дальнейшей инструкции:
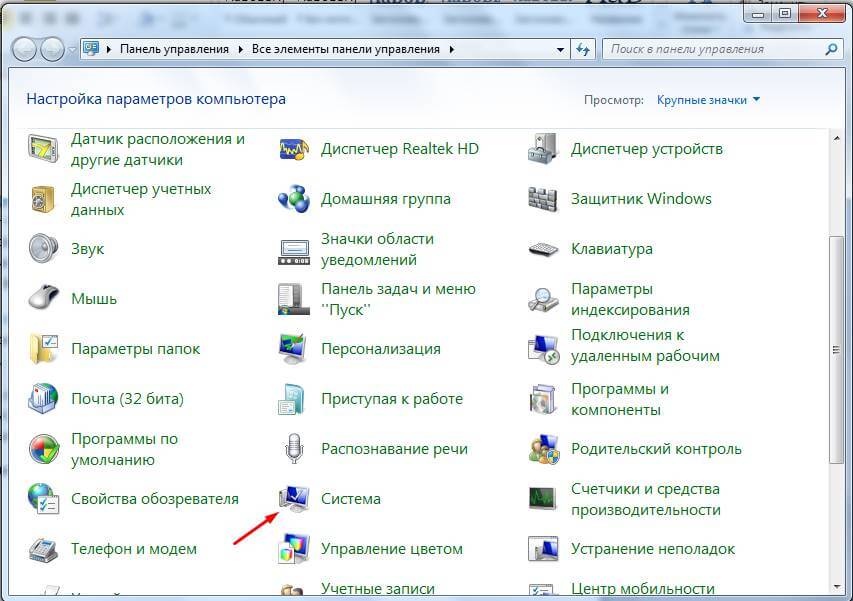
- Открываем меню пуск.
- Переходим в панель управления.
- Заходим во вкладку система или правым кликом по значку мой компьютер и выбираем свойства.
Что такое файл подкачки Pagefile.sys-02
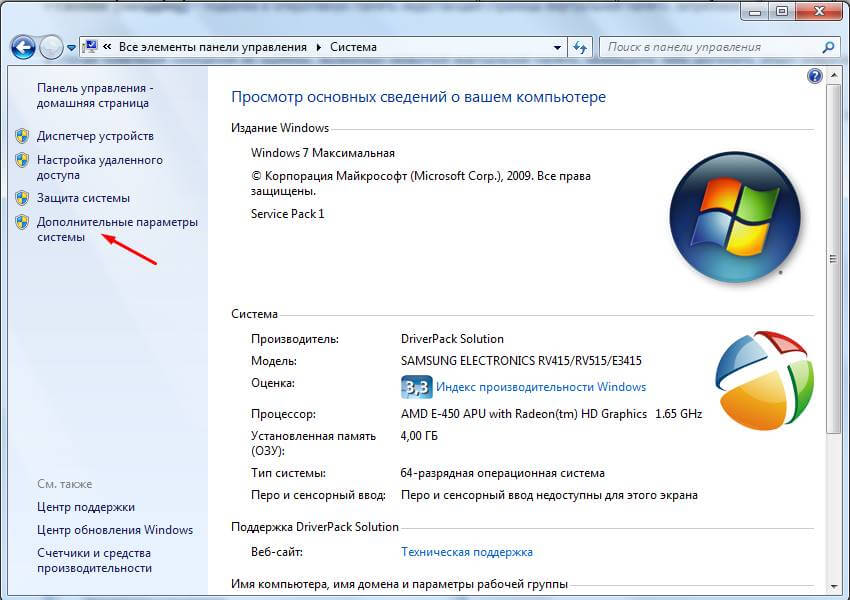
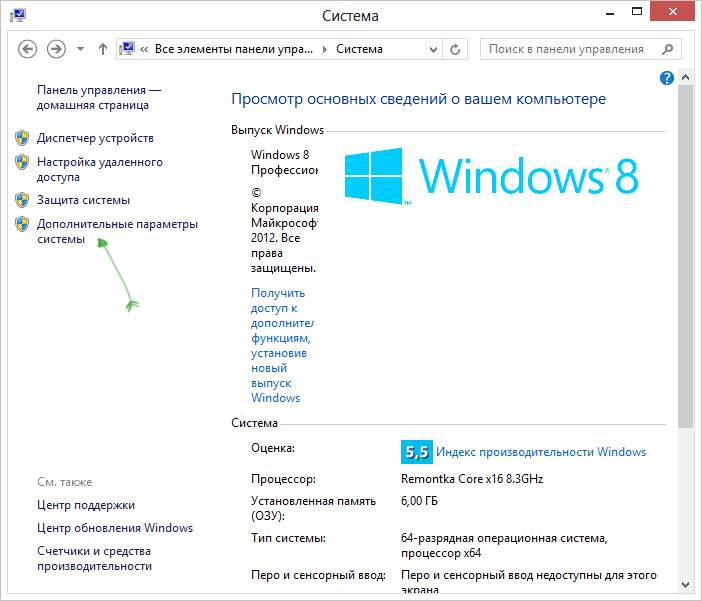
4. В левом меню нажимаем по вкладке дополнительные параметры системы.
Что такое файл подкачки Pagefile.sys-03
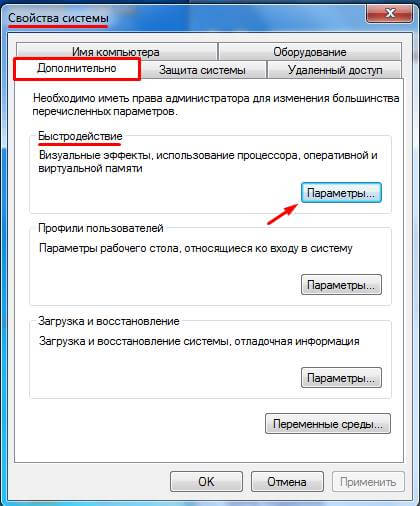
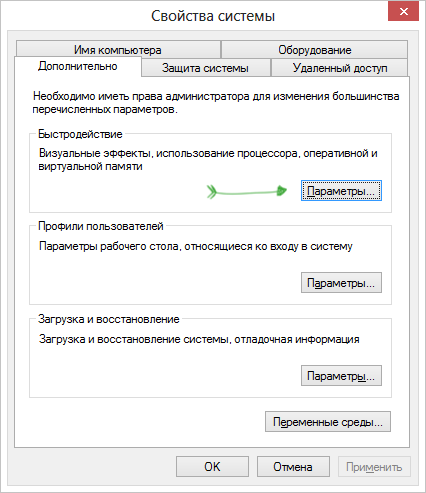
5. В появившемся окне переходим в раздел дополнительно. Открываем параметры раздела быстродействие.
Что такое файл подкачки Pagefile.sys-04
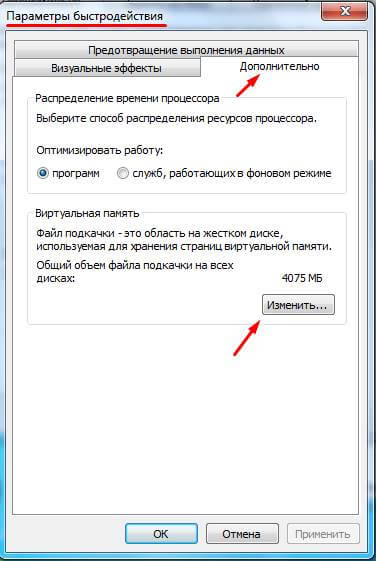
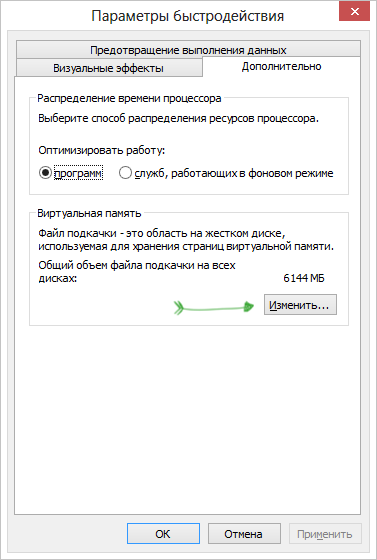
6. В открывшемся окне переходим по вкладке дополнительно. Нажимаем изменить
Что такое файл подкачки Pagefile.sys-05
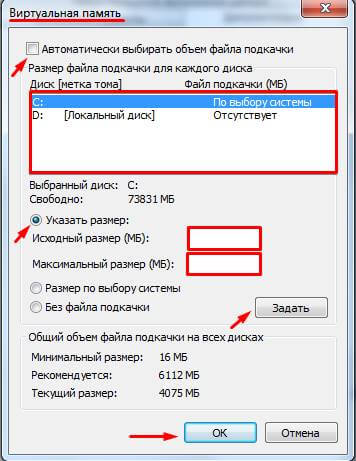
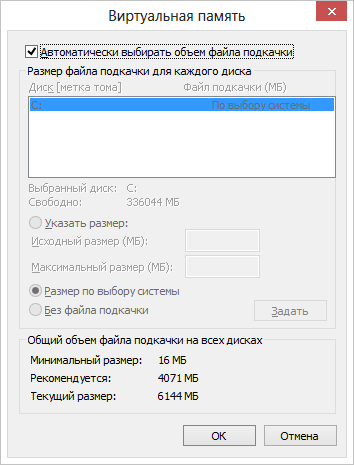
7. Снимаем галочку с пункта автоматически выбирать объем файла подкачки. Выбираем диск, где он будет расположен в дальнейшем. Ставим флажок рядом с опцией указать размер. Задаем исходный размер файла подкачки (в МБ). Задаем максимальный размер файла подкачки (в МБ). Нажимаем кнопку задать.Подтверждаем изменения нажатием на ОК.
Что такое файл подкачки Pagefile.sys-06
8. В появившемся окне снова нажимаем ОК (соглашаемся с тем, что надо перезагрузить компьютер). Перезагружаем компьютер сейчас или позже (высветится новое окно, в котором надо сделать выбор).
С помощью данной инструкции можно не только увеличить, но и уменьшить файл подкачки, что тоже часто необходимо.
Как удалить файл подкачки Pagefile.sys
Если у вас стоит более 8 Гб ОЗУ и больше, то можно просто удалить файл подкачки. Это не будет нести за собой каких-либо критических последствий, просто ОС Windows не сможет снять дамп при критической ошибке. Разберемся, как удалить файл подкачки:
- Заходим в настройки виртуальной памяти.
- Снимаем галочку с пункта «автоматически выбирать объем файла подкачки».
- Выбираем пункт «без файла подкачки».
- Нажимаем задать.
- Применяем изменения
Что такое файл подкачки Pagefile.sys-07
Вот мы и разобрали что такое файл подкачки Pagefile.sys.
Материал сайта pyatilistnik.org
Возвращаясь к вопросу безопасности данных, находящихся в оперативной памяти, столкнулся с необходимостью организации автоматической очистки файла подкачки в Windows. При выключении компьютера, данные в его памяти (RAM) автоматически очищаются, однако по-умолчанию данные из файла подкачки pagefile.sys не удаляются. При работе системы часть конфиденциальных данных или пароли сторонних приложений из памяти могут попасть в файл подкачки pagefile.sys на жестком диске (например, при нехватке физической памяти или при вытеснении данных неактивных приложений). И хотя в процессе работы системы файл подкачки доступен монопольно только для самой Windows, в том случае если компьютер выключить, то потенциально злоумышленник при наличии доступа к диску может скопировать файл подкачки и извлечь из него конфиденциальные данные.
Таким образом, было бы логично очищать при выключении (или перезагрузке) Windows. По умолчанию эта функций отключена.
Включить функцию автоматической очистки файла подкачки при перезагрузке можно через групповую политику либо через реестр.
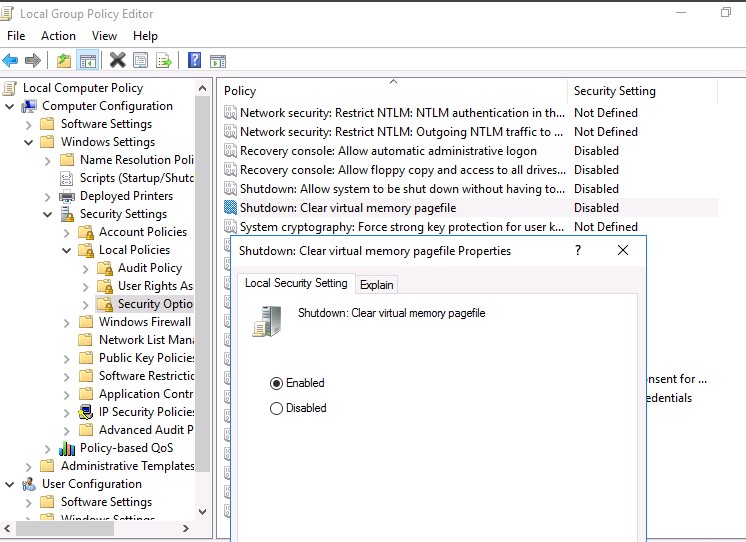
В первом случае, нужно открыть консоль редактора групповых политик (локальный gpedit.msc или доменный gpmc.msc) и перейти в раздел Computer Configuration->Windows Settings -> Security Settings -> Local Policies -> Security Options. В левой панели найдите политику Shutdown: Clear virtual memory pagefile и включите ее (Enabled).
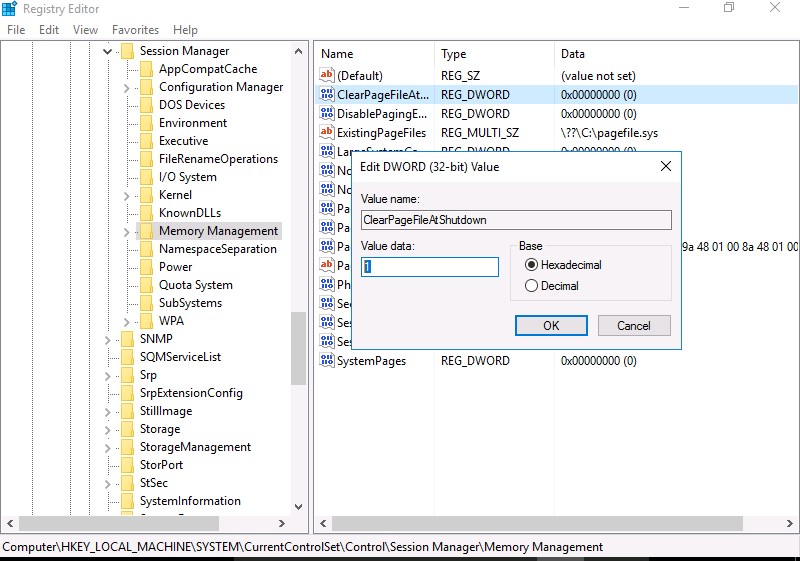
Set-ItemProperty -Path 'HKLM:SYSTEMCurrentControlSetControlSession ManagerMemory Management' -Name ClearPageFileAtShutdown -Value 1

При следующем выключении ОС, система очищает файл pagefile.sys, перезаписывая его нулями. В зависимости от размера файла подкачки это может существенно увеличить время выключения (перезагрузки) системы на 10-30 минут. Кроме того, при включении данной политики также выполняется обнуление и файла режима гибернации hiberfil.sys (если отключен спящий режим). Теперь восстановить данные из файла подкачки практически невозможно.
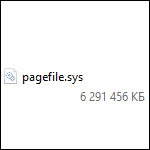
Обновление 2016: более подробная инструкция по удалению файла pagefile.sys, а также видео руководство и дополнительная информация доступны в стать Файл подкачки Windows.
Как удалить pagefile.sys
Один из главных вопросов пользователей — можно ли удалить файл pagefile.sys. Да, можно, и сейчас я напишу о том, как это сделать, а далее поясню, почему этого делать не стоит.
Итак, для того, чтобы изменить параметры файла подкачки в Windows 7 и Windows 8 (и в XP тоже), зайдите в Панель управления и выберите пункт «Система», затем в меню слева — «Дополнительные параметры системы».
Затем, на вкладке «Дополнительно» кликните кнопку «Параметры» в разделе «Быстродействие».
В параметрах быстродействия откройте вкладку «Дополнительно» и в разделе «Виртуальная память» нажмите «Изменить».
Настройки pagefile.sys
По умолчанию, Windows автоматически управляет размером файла pagefile.sys и, в большинстве случаев это является оптимальным вариантом. Тем не менее, если вы хотите удалить pagefile.sys, вы можете это сделать, сняв галочку «Автоматически выбирать объем файла подкачки» и установив пункт «Без файла подкачки». Также вы можете изменить размер этого файла, указав его самостоятельно.
Почему не следует удалять файл подкачки Windows
Есть несколько причин, по которым люди решают удалить pagefile.sys: он занимает место на диске — это первая из них. Вторая — они думают, что без файла подкачки компьютер будет работать быстрее, так как на нем и так достаточно оперативной памяти RAM.
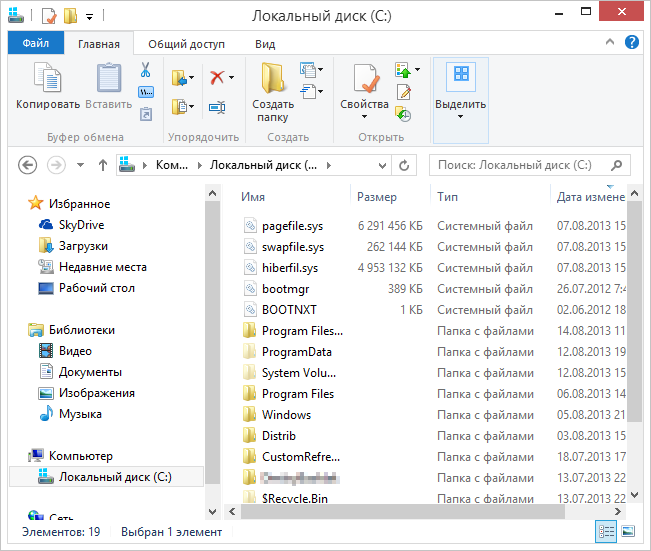
Pagefile.sys в проводнике
Что касается первого варианта, то с учетом объемов сегодняшних жестких дисков, удаление файла подкачки навряд ли может оказаться критически необходимым. Если у Вас стало кончаться место на жестком диске, то скорее всего это говорит о том, что вы там храните что-то ненужное. Гигабайты образов дисков игр, фильмы и прочее — это не то, что обязательно держать на своем жестком диске. К тому же, если вы скачали некий Repack объемом несколько гигабайт, и установили его на компьютер, сам файл ISO можно удалять — работать игра будет и без него. Так или иначе, это статья не о том, как почистить жесткий диск. Просто, если для вас являются критичными несколько гигабайт, занимаемые файлом pagefile.sys, лучше поискать что-то другое, явно ненужное, и оно, скорее всего найдется.
Второй пункт, касающийся производительности — тоже миф. Windows может работать без файла подкачки при условии большого количества установленной оперативной памяти RAM, однако никакого положительного влияния на производительность системы это не имеет. Кроме этого, отключение файла подкачки может привести к некоторым неприятным вещам — некоторые программы, не получив достаточно свободной памяти для работы, будут сбоить и «вылетать». Некоторое программное обеспечение, например виртуальные машины, могут вообще не запуститься, если вы отключите файл подкачки Windows.
Подводя итог, нет разумных причин, чтобы избавляться от pagefile.sys.
Как переместить файл подкачки Windows и в каких случаях это может быть полезным
Несмотря на все вышесказанное об отсутствии необходимости менять стандартные настройки для файла подкачки, в некоторых случаях перемещение файла pagefile.sys на другой жесткий диск может быть полезным. Если у вас на компьютере установлено два отдельных жестких диска, один из которых системный и на нем же установлены необходимые программы, а второй содержит относительно редко используемые данные, перемещение файла подкачки на второй диск может положительно сказаться на производительности в те моменты, когда виртуальная память задействована. Переместить pagefile.sys можно там же, в настройках виртуальной памяти Windows.
Нужно учесть, что это действие разумно только в том случае, когда у Вас два отдельных физических жестких диска. Если же ваш жесткий диск разбит на несколько разделов, перемещение файла подкачки на другой раздел не только не поможет, но в некоторых случаях может и замедлить работу программ.
Таким образом, суммируя все вышенаписанное, файл подкачки — важная составляющая часть Windows и лучше бы Вам его не трогать, если Вы только точно не знаете, зачем вы это делаете.
Does anyone know how to move the page file on Windows Server 2008. Everything seems to be in a different spot on this OS!
Also, I would like to tweak it’s size. If you know where that is (probably in the same spot) please let me know.
asked Jun 17, 2009 at 16:56
Advanced System Settings, on the Advanced tab click the Performance/Settings button.
Advanced System Settings can be reached by right clicking My Computer and choosing Properties or from Server Manager by clicking the Change System properties link.
JR
answered Jun 17, 2009 at 17:05
John RennieJohn Rennie
7,7661 gold badge22 silver badges34 bronze badges
1
answered Jan 18, 2010 at 16:08


