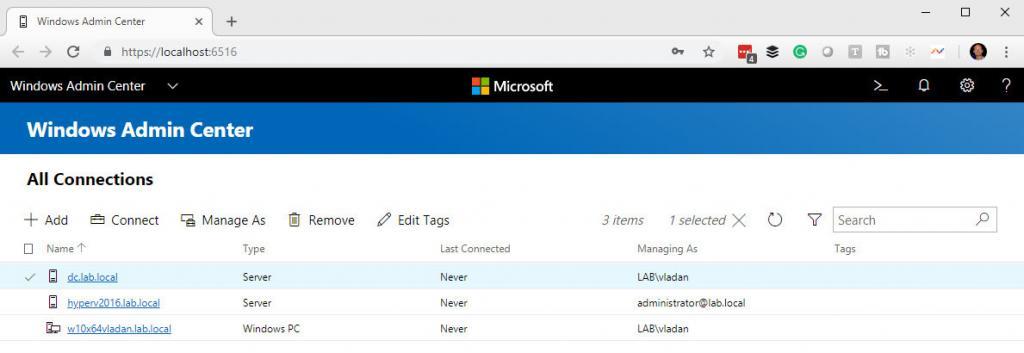
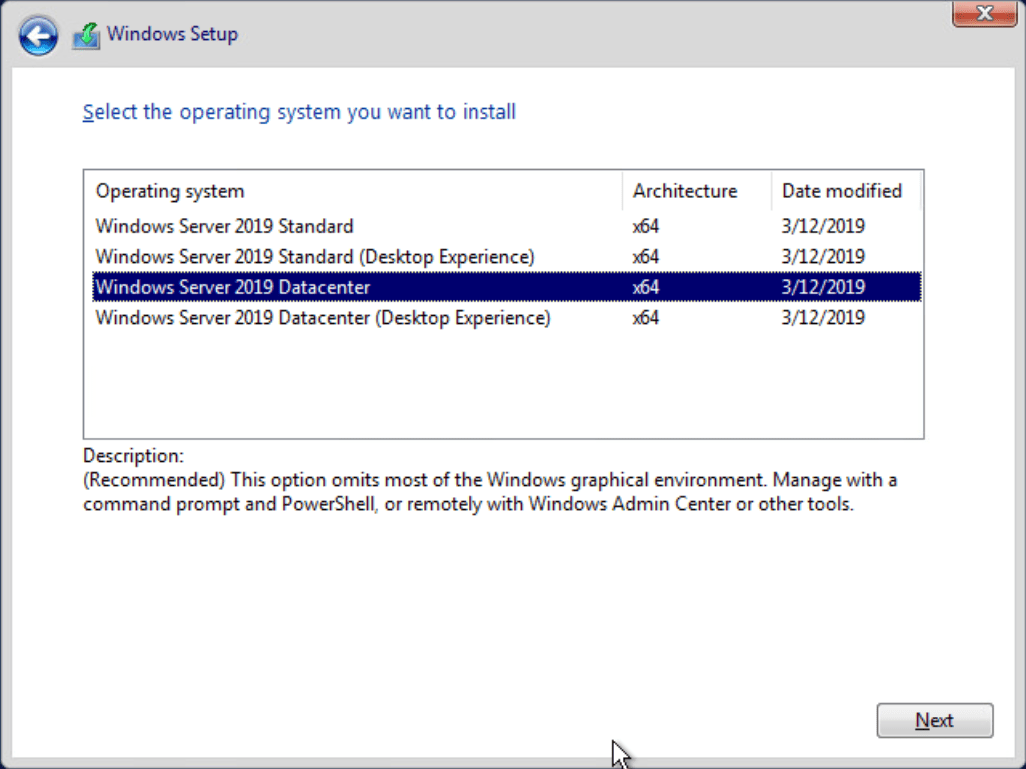
В данной статье мы продолжаем рассказывать про работу с Windows Server Core 2019. В прошлых постах мы рассказали как готовим клиентские виртуальные машины на примере нашего нового тарифа VDS Ultralight с Server Core за 99 рублей. Затем показали как работать с Windows Server 2019 Core и как установить на него GUI. Сегодня мы поговорим про управление с помощью Windows Admin Center.

Головной болью было, наверное, по соображениям безопасности, разделять роли серверов. Заводить несколько машин, чтобы физически разделить контроллер домена и файловый сервер.
Благо нам на помощь пришла виртуализация, и теперь изолированно друг от друга могут работать несколько служб, которые из соображений безопасности не могут работать на том же сервере. Виртуализация принесла массу удобства, развертывание виртуальных машин из одного шаблона экономит время специалистам, и физически, все в одной коробке с мощным железом.
Машин все меньше, а серверов все больше, даже у меня, для «просто посмотреть» образовалось два контроллера домена, файловый сервер, сервер под Java приложения и еще пачка веб серверов, поэтому давайте поговорим о том, как можно эффективно управлять серверами на Windows, не отрывая левой руки от кофе.
— С помощью Powershell!
Конечно да, но… нет. Продукт позиционируется как удобный инструмент управления гигантской инфраструктурой. Понятно, что это не совсем так, для таких случаев есть Powershell ISE и скрипты, поэтому хотелось бы рассмотреть действительно полезные юзкейсы. Если у вас есть свой опыт, которым вы вы хотели поделиться, мы можем добавить его в эту статью.
TL;DR
Windows Admin Center лучше подходит для управления стоковыми компонентами. На текущий момент только RSAT может управлять установленными ролями.
Используя WAC, можно улучшить безопасность вашей инфраструктуры, если будете использовать его как шлюз.
Сводная таблица того, он умеет и не умеет:
Управление системой
Управление ролями
Превью — установка бета версий компонентов для WAC, не входит в состав сборки. Перечислять все не нужно, потому что буквально все компоненты управляются только с помощью RSAT.
Нюансы
Powershell в Windows Admin Center не имеет своей среды сценариев аналогичной Powershell ISE.
Windows Admin Center не поддерживает Powershell ниже 5.0, на старых машинах обязательно нужно ставить новый Powershell, если хотите использовать его.
Главным минусом Windows Admin Center в микро инстансах является потребление оперативной памяти сервера. Он создает четыре сессии по 50-60 мегабайт каждая, и каждая эта сессия остается даже после закрытия Windows Admin Center.
Та же самая проблема и с Powershell через Enter-PSSession, он так же создает новую сессию, и если просто закрыть окно терминала, сессия весом и 70 мегабайт так и останется на удалённом сервере, если её не закрыть её перед выходом с помощью Exit-PSSession или Remove-Pssession.
При использовании Windows Admin Center с этим придется мириться, он отнимет около 170 мегабайт ОЗУ, RSAT таким не страдает.
(См. wsmprovhost.exe)
Упрощаем работу
Максимальное удобство управления достигается если ваша рабочая станция, на которой установлен WAC находится в домене. Он берет учетные данные пользователя, который зашел в систему, подключение к серверам осуществляется по одному щелчку мыши.
Импортировать список серверов можно с помощью txt файла, перечислив имена серверов переносом строки, как и в RSAT.
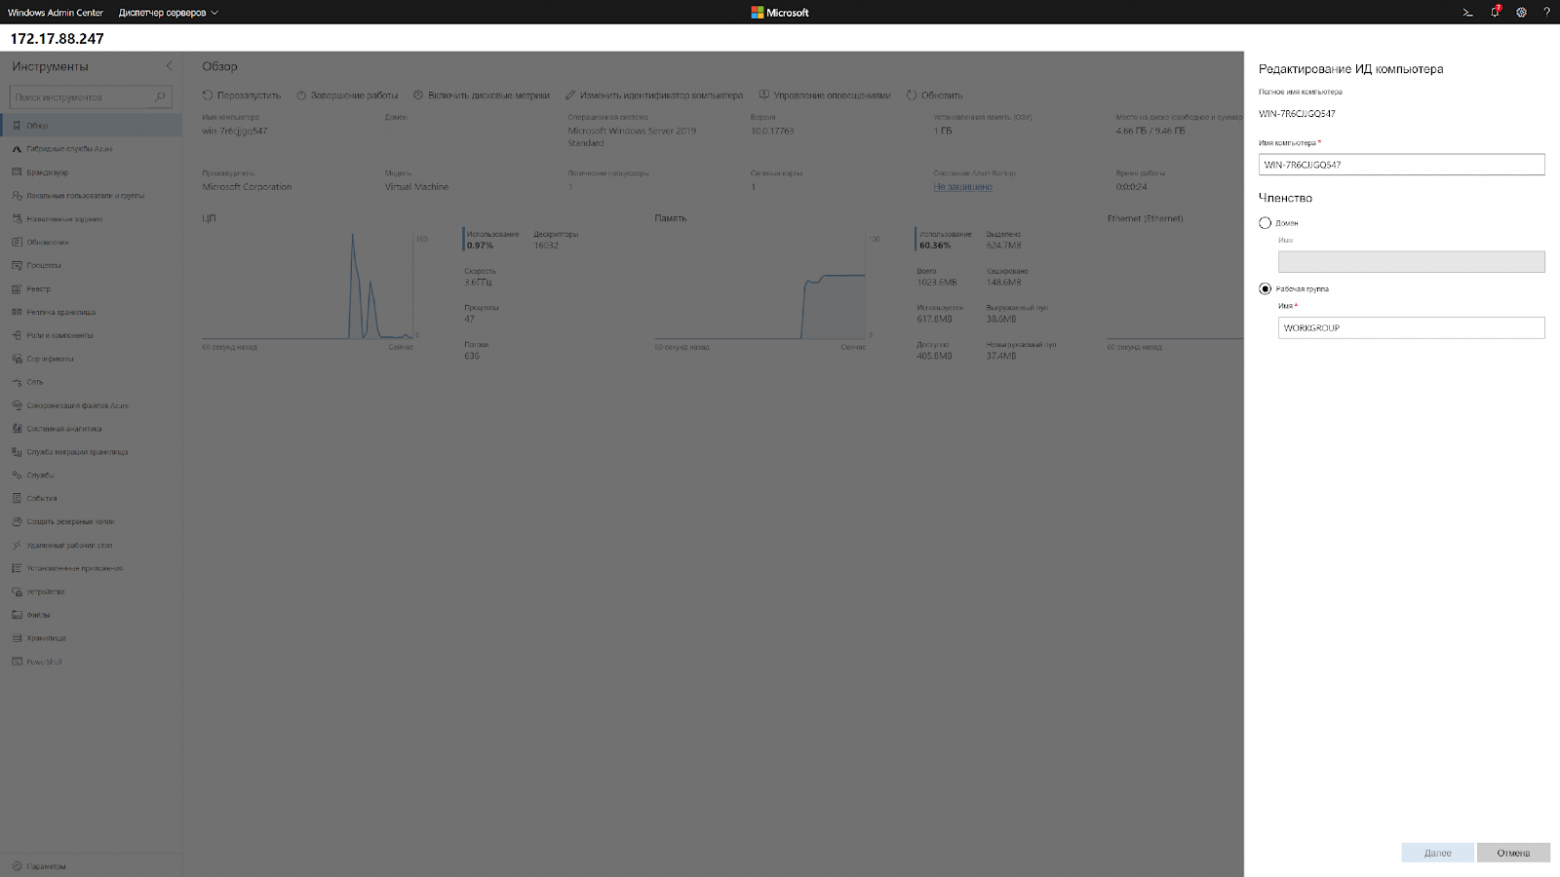
Что тоже радует, ранее, чтобы интегрировать в AD виртуальную машину на Server Core, приходилось делать это через sconfig, а это значит нужен прямой доступ к его экрану. В случае с хостингами приходилось делать все это через VNC. Теперь, при переходе на главную страницу можно нажать «Изменить идентификатор компьютера» и ввести в домен.
Кстати, чтобы ввести в домен Windows Server 2019, больше не требуется делать Sysprep, потому что Sysprep тоже нужно было завершать через VNC.
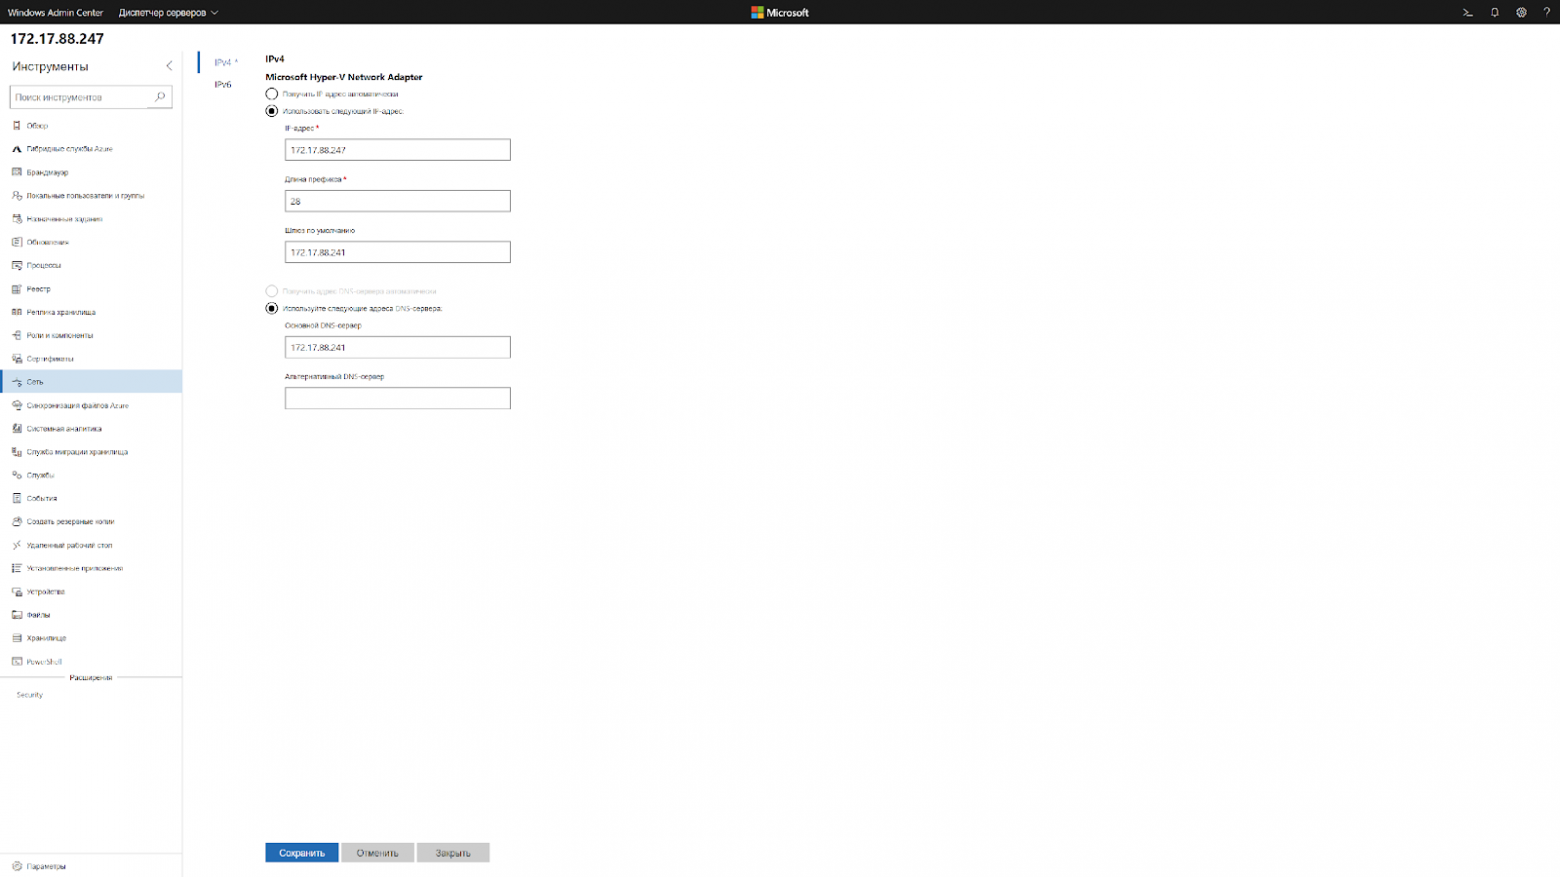
Чтобы изменить сетевые настройки теперь нужно сделать два клика. Подключаешься к серверу и меняешь.
Это выходит так же быстро, как и через WinRM, только одной рукой.
Повышаем безопасность
На текущий момент есть четыре типа развертывания. Локальный, в качестве шлюза, установка на один из продакшн серверов и в составе кластера.
*Картинка с сайта майкрософт
Установка в качестве шлюза, на отдельный сервер, наиболее безопасный и рекомендуемый вариант. Это аналог схемы с VPN, когда доступ к управлению имеется только с определенного IP адреса или участка сети.
Согласитесь, гораздо удобнее держать на одной вкладке видосы и мемасы, а на другой Windows Admin Center, нежели целиком терять подключение к ютубу из-за входа в защищенную сеть.
Как же обезопасить все свои N серверов? С помощью следующего скрипта:
## Список серверов через запятую ##
$servers = Get-Content -Path .Servers.txt
## Список правил через перенос строки ##
$rules = Get-Content -Path .Rules.txt
## IP адрес нашего гейта с установленным WAC ##
$gate = "1.1.1.1"

$MySecureCreds = Get-Credential

foreach ($server in $servers.Split("`n")) {
    foreach ($line in $rules.Split("`n")) {
        Invoke-Command -ComputerName $server -ScriptBlock {
            Set-NetFirewallRule -Name $Using:line -RemoteAddress $Using:gate
        } -Credential $MySecureCreds
    }
}

# список правил, RULES.txt#

RemoteDesktop-UserMode-In-TCP
RemoteDesktop-UserMode-In-UDP
WINRM-HTTP-In-TCP
WINRM-HTTP-In-TCP-PUBLIC

# список ваших серверов, SERVERS.txt#

1.1.1.1, 1.1.1.2, 1.1.1.3
Этот скрипт изменит стандартные правила брандмауэра таким образом, что вы сможете использовать RDP и WinRM только с определенного IP адреса, понадобится для организации безопасного доступа к инфраструктуре.
Powershell в Windows Admin Center не имеет своей среды сценариев аналогичной Powershell ISE, можно только вызывать готовые скрипты.
Кстати, вот так выглядит RDP на Windows Server Core.
Выводы
На текущий момент Windows Admin Center не способен заменить RSAT, однако в нём уже присутствуют функции, которых нет у RSAT. Добавляются старые оснастки, которые не так удобны для управления через браузер.
Странным является приоритет разработки, наиболее активно добавляются функции интегрированные с Azure, хостингом от Майкрософт, вместо реально полезных функций.
К сожалению, пока что, управлять всеми функциями Windows Server с удобствами можно только подключившись к нему по RDP.
Не смотря на все минусы, у Windows Admin Center есть свой SDK, с помощью которого можно писать свои собственные модули и управлять своим собственным ПО через него, что однажды сделает его лучше RSAT.
I traveled to a couple of Microsoft Ignite The Tour stops and was not just presenting but also speaking to a lot of IT admins around the globe. I was surprised at how many didn’t know about our new Windows Server management tools. In this blog post, I am going to show you how you can manage Windows Server 2019 and even previous Windows Server versions with Windows Admin Center and PowerShell.
Classic Windows Server Management
First, let me start by saying the classic Windows Server management tools, like Server Manager, the Microsoft Management Console (MMC), sconfig on Windows Server Core, Perfmon, and the local-only tools are still part of Windows Server. And if you have built some automation and process using these tools, they are still going to work.

However, most of these tools have some limitations, especially when it comes to efficient remote management or automation. That is why I want to show you more modern ways to manage Windows Server 2019.
PowerShell
Windows PowerShell 5.1 is built-in into Windows Server, and it does not only provide an excellent automation experience to write scripts but also provides a secure way of remote managing your Windows Server environment. And with PowerShell Core 6 and PowerShell 7, you also get cross-platform support, to manage your Linux and macOS systems as well, using SSH remoting.

Many of the new Windows Server features get their PowerShell module. For example, if you look at the new Systems Insights feature, which locally analyzes Windows Server system data, such as performance counters and events and provides you with insight into the functioning of your servers using machine-learning models, can be managed directly through PowerShell.
Windows Admin Center
Windows Admin Center is a locally deployed, browser-based app for managing Windows servers, clusters, hyper-converged infrastructure, as well as Windows 10 PCs. It comes at no additional cost beyond Windows and is ready to use in production. This is what it says on the official Microsoft Docs page of Windows Admin Center. I simply call it the next generation of your Windows Server management tools.

You can download and install Windows Admin Center locally, in Azure or where ever you need to manage your Windows Server. Windows Admin Center runs in a web browser and manages and manages different versions of Windows Server, Clusters, and Windows 10, through the Windows Admin Center Gateway. The gateway manages servers by using Remote PowerShell and WMI over WinRM, with no agent required.
So next to having a fast and elegant way to manage Windows Server systems remotely from basically any device, what are the other advantages of using Windows Admin Center?
Lightweight and easy to install
Windows Admin Center is very lightweight and easy to install. You can even install it on Windows 10, Windows Server 2016, Windows Server 2019, and start managing your machines in minutes. There is no need for an agent, and if you don’t want to use Windows Admin Center anymore, you simply uninstall it.
Functionally you know, but remotely and secure

Windows Admin Center provides you with the evolution of the classic and well-known management tools like MMC or local-only tools in a modern web-based experience. Besides, it also allows you to use these tools remotely, without connecting to your servers using Remote Desktop (RDP). This and many other enhancements, make your management platform more secure.
Extensible

Windows Admin Center was built with extensibility in mind from the beginning, with the ability for Microsoft and 3rd party developers to develop tools and solutions beyond the current offerings. Microsoft offers an SDK that enables developers to build their own tools for Windows Admin Center.
Manage Azure Stack HCI and Storage Spaces Direct
Windows Admin Center does not only allow you to manage single server instances but also Windows Server Failover Clusters and hyper-converged clusters such as Azure Stack HCI, which is part of the Azure Stack portfolio.
Azure Hybrid integration

If you want to take advantage of the Azure Hybrid services, to make your on-premises environment even better using Microsoft Azure, Windows Admin Center makes it easy to take advantage of services like Azure Active Directory, Azure Backup, Azure Site Recovery, Azure Update management and many more. You can find more about integrating Azure Hybrid services in Windows Server using Windows Admin Center on our blog.
Manage modern Windows Server 2019 features

The management UI for new features like System Insights and the Storage Migration Services, which allows you to easily migrate file servers, are built-in to Windows Admin Center.
You also get an extension to manage your Windows Containers. You can find a video about that here.
Get updates and new functionality
Windows Admin Center gets monthly updates, including new features, to improve the management experience. Check out the Windows Admin Center release history here.
Windows Admin Center complements existing management solutions like Azure management, System Center, RSAT, Remote Desktop, and other in-box tools. You can find more about related management tools on Microsoft Docs.
System Center 2019

System Center is an on-premises data center management solution for deployment, configuration, management, monitoring your entire data center. Windows Admin Center and System Center are complementary management solutions.
I hope this gives you an overview of the different management tools you can use with Windows Server 2019, depending on your needs. If you have any questions, please let me know in the comments.
Windows Server 2019 was released on the 4th of October 2019. This was a very expected and highly attended release of the latest Microsoft Server Operating System (OS). Microsoft has also released a new free utility called Windows Admin Center (WAC), which can manage your whole production environment via a web-based console.
You can manage clusters of servers, Hyper-V clusters, and hosts that run on-premises or in Azure. And this tool is particularly useful when used for hybrid workloads.

Managing Windows Server Failover Clustering: Pick the best option
Learn from this video about:
- Characteristics of different Windows Server Failover Clustering (WSFC) management options
- Analysis of the pros and cons of each option
- Identification of what to use and when
- Demo-time: demonstration of WSFC management options
Free of Charge. No Registration.
Windows Admin Center integrates with Azure services. It provides services, such as Azure Active Directory, Azure Backup, Azure Site Recovery, and more.
This environment can be mixed (starting with Windows Server 2008 R2 with limited functionalities), and the tool can handle all different versions of the server OS from Microsoft.
It is a web-based tool that we’ll be using in this article, and I’ll provide you with the necessary steps, allowing you to get started.
This tool was previously called “Project Honolulu”, but this was only during the early stage of development. Then, after the final release, the name was changed to Windows Admin Center.
Windows Admin Center uses PowerShell under the hood, and there is a way that you can see those scripts, too, which is pretty cool.
What’s important to know is the fact that the tool can be managed via a web browser, and the list is rather strict. It’s supported only by the latest releases of the Microsoft Edge or Google Chrome browsers. As you can see, even Microsoft’s older browser, Internet Explorer, isn’t supported.
If you’re a System Center user, it’s worth to know that Microsoft is still planning to release a new version of System Center compatible with WS 2019. So Windows Admin Center isn’t a replacement for Microsoft’s System Center, Microsoft Intune, or the Operations Management Suite, but it is rather a complementary tool or tool used by smaller organizations.
System Requirements:
Installation is possible on Windows 10 Fall Anniversary Update (1709) or newer, or Server core (gateway), or on one of the management servers itself – Windows Server 2016 or newer.
Then, you can manage Windows Server 2008 R2 (with limited functionality), 2012, or 2012 R2, 2016 and, lastly, Windows Server 2019. (Note that you can also manage Windows 10 systems.).
Installation of Windows Management Framework 5.1 is required on those servers. There are no other dependencies.
Figure 1: Overall Architecture
It’s a very lightweight solution provided as a small MSI package (60Mb).
Download
You can download Windows Admin Center from here. You can use Windows Admin Center free of charge.
After downloading, start the installation by clicking the MSI. Below, you can see the different installation screens.
You have the option to add a shortcut to your desktop or change the default port through which this solution will be accessed.
Figure 2: Installation screens of Windows Admin Center
Open your web browser and type “localhost” or “FQDN” of the machine where the installation has been done. Then, you can access Windows Admin Center (WAC).
https://’FQDN of server’:’port specified in setup’
ex. https://W10:443
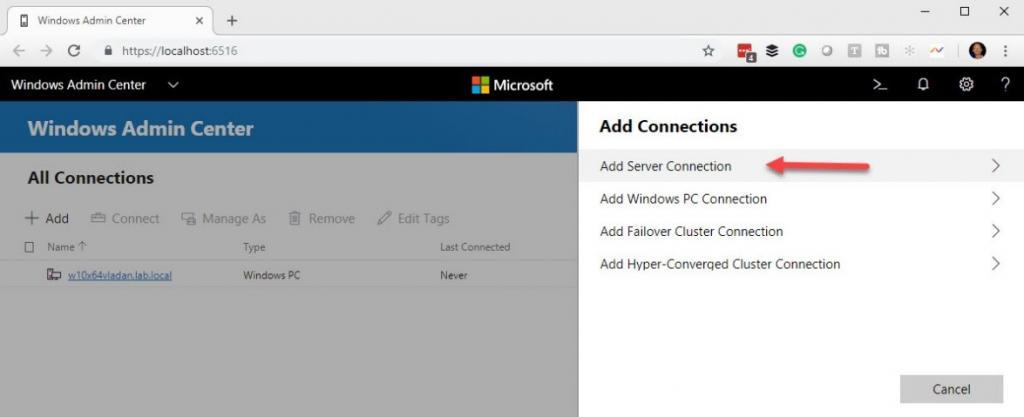
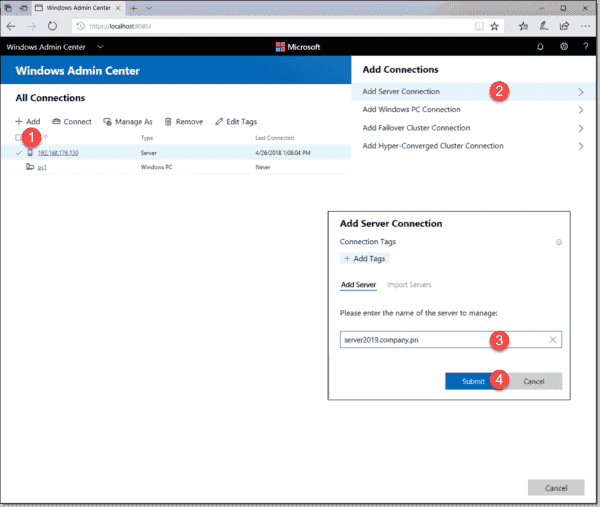
Add your first server….
Figure 3: Adding a server connection
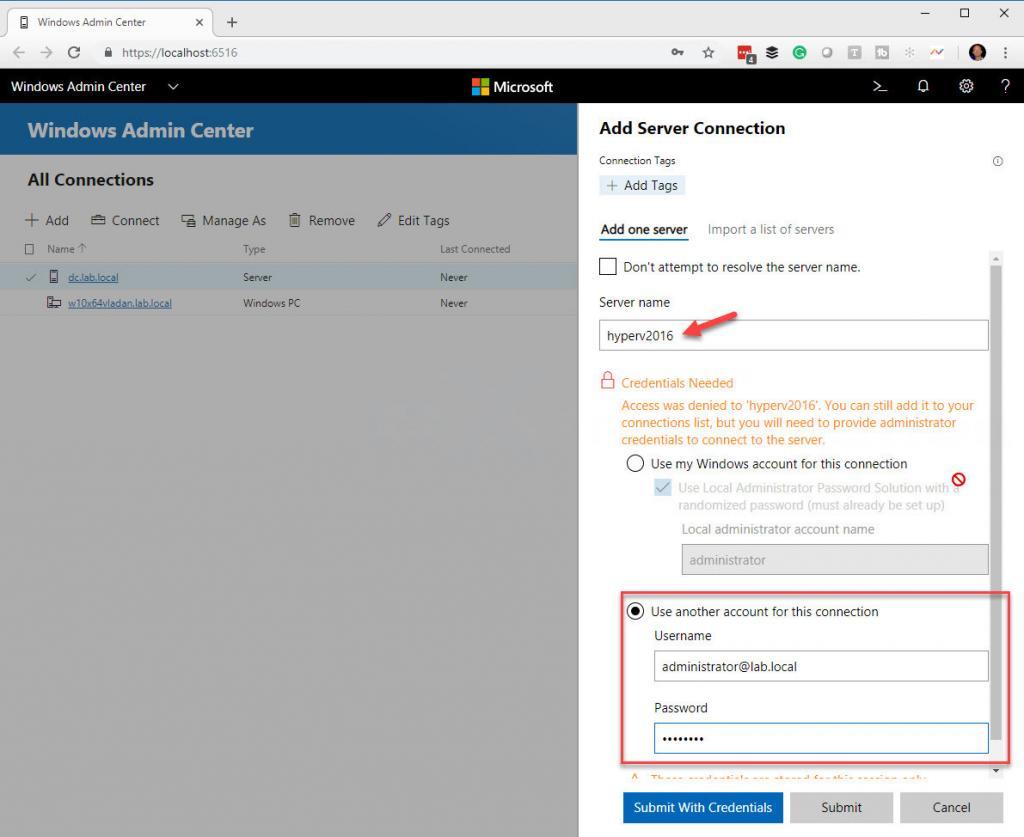
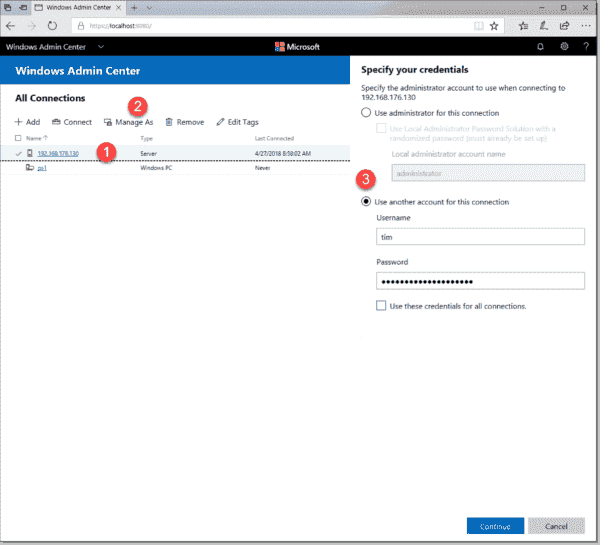
And then specify the credentials used for this connection.
Figure 4: Credentials settings
You’ll add this system to the central console from where you can manage pretty much everything. It is very convenient.
If the system where WAC is installed has an internet connection, and if you setup your router with port forwarding, you can even manage the whole infrastructure while you are on the go.
Figure 5: Different server connections
Windows Admin Center supports several optional features that integrate with Azure services. In order to be able to do that, you’ll need to configure WAC to leverage AD authentication for gateway access.
Figure 6: Integration with Azure
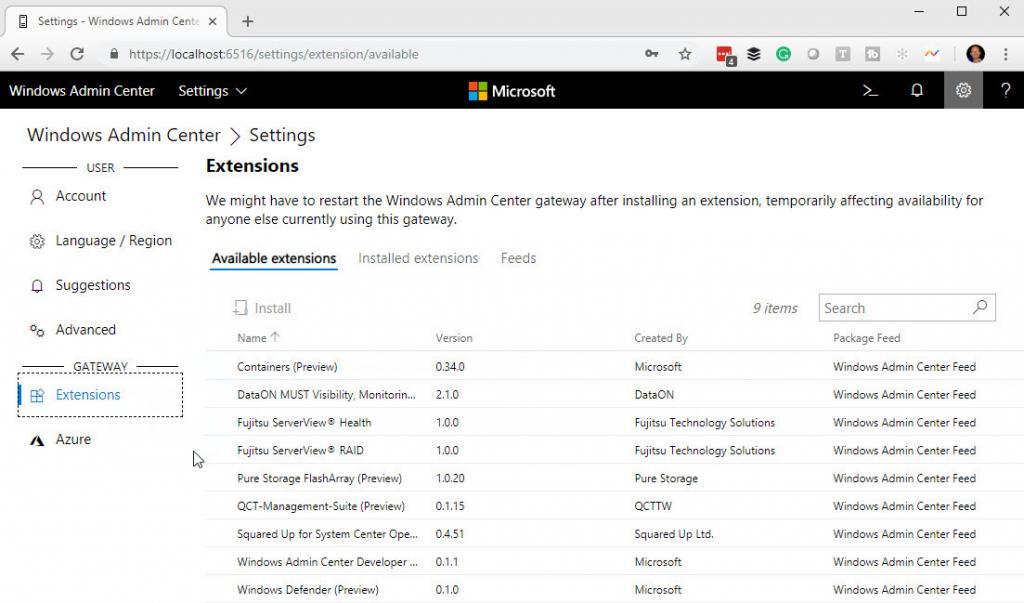
If you check the image above, you can see the “Extensions”. If you click that, you’ll see that WAC is the base framework and all you can do with it can be easily extended, and many vendors can step in to integrate their solutions there.
There are no extensions installed by default. By selecting an extension and clicking the Install button, you’ll install a vendor’s extension.
Figure 7: WAC’s Extensions
The tool allows to manage not only server systems, but also Windows 10 client systems. This might give you ideas about integrating it for the sake of your small network of W10 client computers or lab environments.
VSAN from StarWind is software-defined storage (SDS) solution created with restricted budgets and maximum output in mind. It pulls close to 100% of IOPS from existing hardware, ensures high uptime and fault tolerance starting with just two nodes. StarWind VSAN is hypervisor and hardware agnostic, allowing you to forget about hardware restrictions and crazy expensive physical shared storage.
Build your infrastructure with off-the-shelf hardware, scale however you like, increase return on investment (ROI) and enjoy Enterprise-grade virtualization features and benefits at SMB price today!
Wrap Up:
As you can see, getting started is really fast, and this tool will be very popular among server administrators and users. Microsoft has done a great job on this.
By integrating Azure directly into the console, Microsoft hopes that even more admins will embrace Azure services and consume them.
WAC allows to manage servers, Hyper-converged infrastructures, Failover clusters, Hyper-V Virtual Machines (VMs) and consume Azure services.
WAC can also be managed from free versions of Hyper-V servers.
- In-Place upgrade domain controllers from Windows Server 2016 to Windows Server 2019
- Windows Server 2019 Insider Preview Build 17709: A Brief Features Overview
Learn how to administer Windows Server 2019 running in the Server Core configuration. We will focus on the new Windows Admin Center and PowerShell remoting.
Contents
- The sconfig utility
- Install PowerShell Core
- Install Windows Admin Center
- Wrap-up
In my opinion, the Windows Server Core installation option is mature enough such that Windows administrators should standardize all of their servers to run as Core. Why? It makes sense that the fewer operating systems you have present, the better your performance and the smaller your system attack surface.
The bottom line though is that you had better start to enjoy Server Core because as of the 1709 update, Windows Server 2016 (semi-annual update channel) no longer allows you to add the GUI layer to a Server Core installation.
In Windows Server 2019 (in Insider Preview build 17650 as of this writing in late April 2018), we have Server Core and that’s it. The long-term servicing branch (LTSB) of Windows Server 2016 still has the Desktop Experience option; I’m not sure what the feature’s status is in Windows Server 2019.
In today’s lesson I will teach you how to manage your Windows Server 2019 Server Core box with the greatest of ease. Yes, I mean that! Let’s begin.
The sconfig utility
Of course, Server Core does not have a Desktop Experience GUI, so you need to navigate using command-line tools. After you log into the server, type sconfig to open the sconfig.cmd configuration utility, shown in the next screenshot.
The sconfig utility
With sconfig, you use the numbered menu to configure the most important server properties, including:
- Hostname
- Time, time zone, and date
- Domain membership
- IP addressing
- Remote access
While we’re at it, we should ensure WinRM-based PowerShell remoting is enabled. Type 15 to exit to a command line, type powershell to start PowerShell, and run the following command:
Enable-PSRemoting -SkipNetworkProfileCheck -Force
Install PowerShell Core
I verified Windows Server 2019 ships with PowerShell 5.1 Desktop edition. Let’s make sure we have the latest PowerShell 6 Core build on our new server, shall we?
On your Windows 10 administrative workstation, fire up an administrative PowerShell console and run the following command to ensure we can perform remote management of our Server Core box:
Set-Item -Path WSMan:localhostClientTrustedHosts -Value * -Force
Download the latest x64 PowerShell Core release from Microsoft’s GitHub releases page. Next, let’s define a persistent PowerShell remoting session with the Server Core box (substituting your own server’s IPv4 address, naturally) and copy the .msi to the root of its drive C:
$session = New-PSSession -ComputerName 192.168.176.130 -Credential (Get-Credential)
Copy-Item PowerShell-6.1.0-preview.1-win-x64.msi C: -ToSession $session
To install PowerShell Core, I’m going to cheat by running the following commands directly on the Windows Server 2019 server. Yes, I know you can run cmd.exe and msiexec remotely, but it’s a bit of a hassle. My friend and fellow MVP Max Trinidad wrote a blog post using a mapped drive as a workaround.
cmd
msiexec /i C: PowerShell-6.1.0-preview.1-win-x64.msi
exit
Install Windows Admin Center
Windows Admin Center, formerly called Project Honolulu, has been a long time coming in Windows Server. I never liked Server Manager, and the Server Management Tools in Azure were woefully misguided.
Given that, I was skeptical of Honolulu—browser-based management of local and remote server and desktop systems. Yawn. My biggest concern was speed—was this tool going to be responsive?
I’m grateful to report that Windows Admin Center is super-fast, flexible, and yes, I am now a fan—big time.
What we’ll do now is install Windows Admin Center in Desktop mode on our Windows 10 administrative workstation. Here’s the procedure:
Download the software, run the .msi installer, and select a management port. That’s it!
Windows Admin Center can manage Windows Server 2019, Windows Server 2016, Windows Server 2012 R2, and Windows 10 hosts from a central web console. On first launch, be sure to accept the self-signed management certificate as shown in the next screenshot.
Connecting to Windows Admin Center
Logging in takes you to the All Connections list by default. Windows Admin is a modular web application; the default solutions included (as of this writing in late April 2018) are:
- Server Manager (to manage Windows Servers)
- Computer Management (to manage Windows 10 hosts)
- Failover Cluster Manager
- Hyper-Converged Cluster Manager
Click Add, select Add Server Connection, specify the DNS name or IP address of your new Windows Server 2019 host, and click Submit. Here’s a composite screenshot that shows the process:
Creating a remote server connection
Click Connect to authenticate to the remote server. As you can see in the next screenshot, your options include:
- Your current credentials, with or without Local Administrator Password Solution (LAPS)
- Alternate credentials
Authenticate to the remote server
Finally, you reach the Server Manager installed solution. Check out the following screenshot and appreciate all the administrative goodness available to you. I’m a particularly strong fan of the integrated PowerShell console and file system browser.
Remote management goodness
Wrap-up
For my part, I don’t plan to use the Desktop Experience with Windows Server ever again. For that matter, Features on Demand and PowerShell allow you to remove unneeded Windows Server role and feature bits from the system entirely:
Subscribe to 4sysops newsletter!
Remove-WindowsFeature <feature-name> -Remove
Our goal is to reduce the attack surface of our servers. Also, in keeping with the DevOps mantra of managing our servers as a herd rather than pets, the combination of PowerShell and the Windows Admin Center make for a forward-thinking solution.
Recently, a blog post from Microsoft caught my attention as the discussion was around the adoption of Window Server 2019 Core edition. Microsoft detailed in this post that Windows Server 2019 Core edition has the fastest adoption rate of any Windows Server Core edition in since it was an official option. One of the boosts to the adoption of Windows Server 2019 Core edition is Windows Admin Center. Windows Admin Center provides the management front end that has long been missing with Windows Server Core edition. In this post, we will take a look at managing Windows Server 2019 Core with Windows Admin Center to get a look at the basic steps you need to manage Windows Server Core with Windows Admin Center as well as a good overview of the capabilities you will have with WAC and Windows Server 2019 Core edition.
What is Windows Admin Center and Why is it Important with Windows Server Core?
As I mentioned above, the Windows Admin Center solution is the long missing piece that Microsoft has needed to make Windows Server Core edition a success and a release that customers will actually pick when installing Windows Server in their environments.
The benefits to running Windows Server Core edition are obvious. You get a minimized security footprint, a much smaller, less bloated server operating system and a Windows Server version that provides what many have been looking for to compete with Linux installations over the years, simplicity.
However, the old Windows Server GUI administration mentality has long plagued the Windows Server Core edition. Many have struggled to be able to effectively manage Windows Server Core edition when coming from the GUI-driven Windows Server interface that administrators love/hate.

With the struggles that many IT admins have had with effectively interacting with Windows Server Core edition and being able to properly install, manage, configure, and troubleshoot the platform, many simply forgo the benefits of the minimized operating system and simply install the Windows Server Desktop version.
Windows Admin Center is a brand new management solution from Microsoft that is set to change the way administrators interact with Windows Servers, both GUI and Core versions. The great news as well with WAC is that it is free. This is no paid solution and is readily available from Microsoft as a free download.
What I really like about WAC is the way it brings all the tools that we know and love under one management tool. You have all the standard tools that you are used to with Windows Server, all in a single dashboard and readily accessible.
Windows Admin Center provides an extremely effective way to manage Windows Server. It is installed either on Windows Server or Windows client operating systems like Windows 10.
There are two installation modes:
- Local Client – Install on a local Windows 10 client that has connectivity to the managed servers. Great for quick start, testing, ad-hoc or small scale scenarios.
- Gateway Server – Install on a designated gateway server and access from any client browser with connectivity to the gateway server. Great for large-scale scenarios.
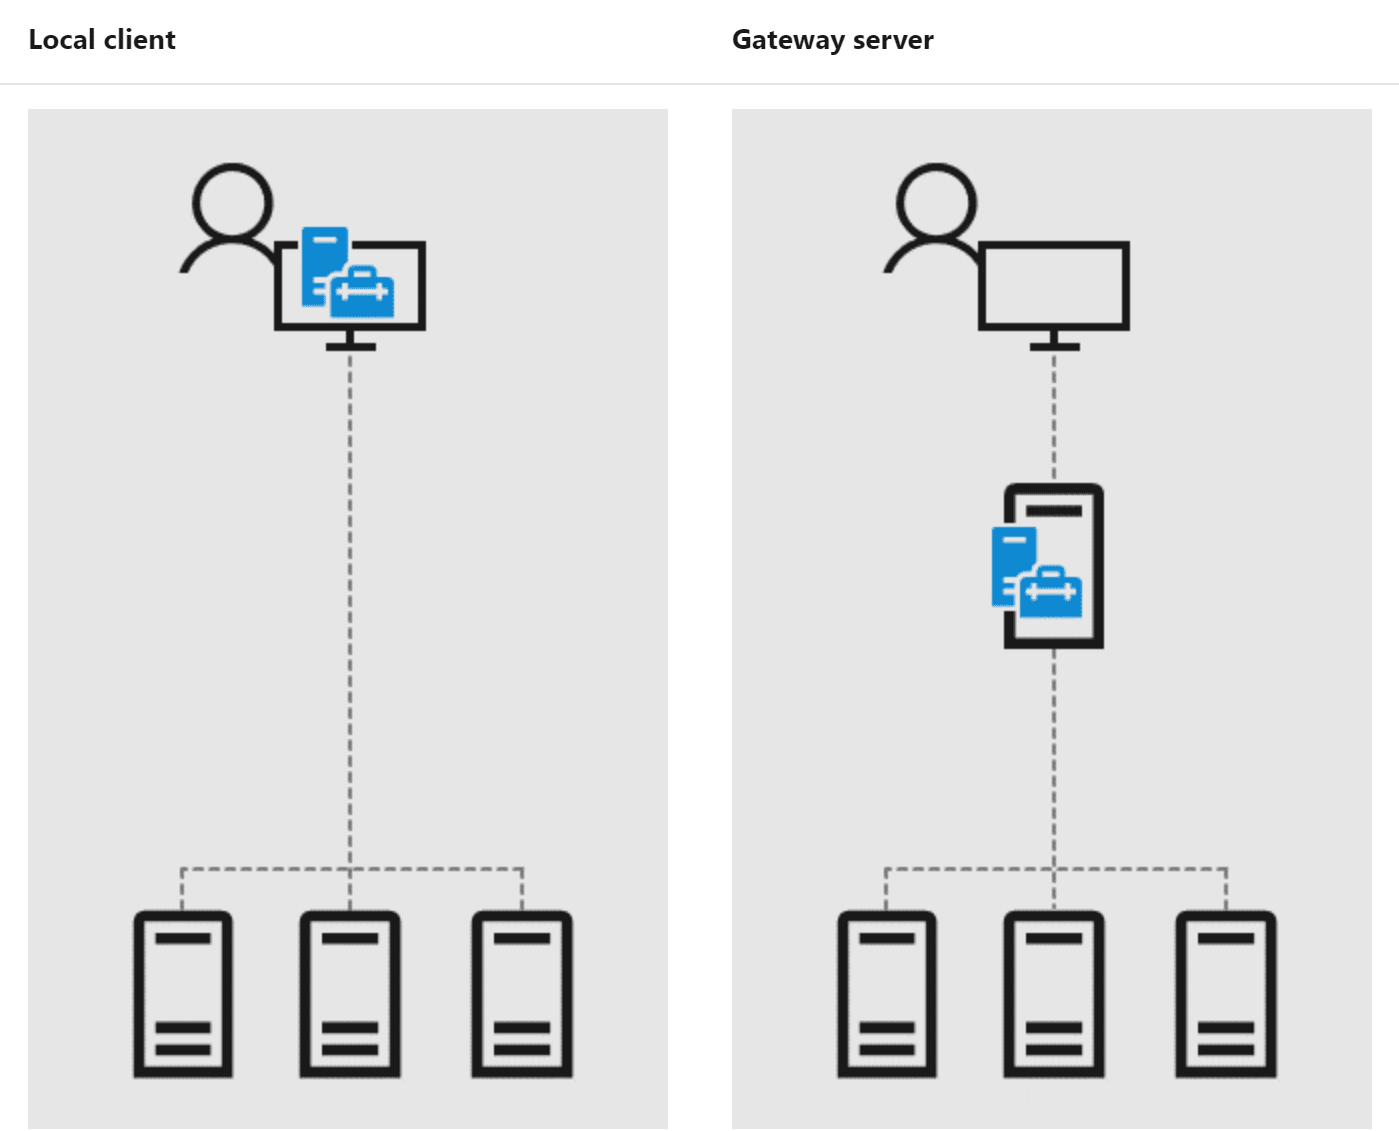
Windows Admin Center, once installed, is accessed via a web browser. This allows easily accessing your WAC dashboards and managed servers for easy administration. In gateway server mode, you can have WAC installed on a server that everyone logs into for administration. This helps to centralize the layout of your tools in the environment for managing your servers by means of a management server running WAC for centralized administration.
Installing Windows Admin Center
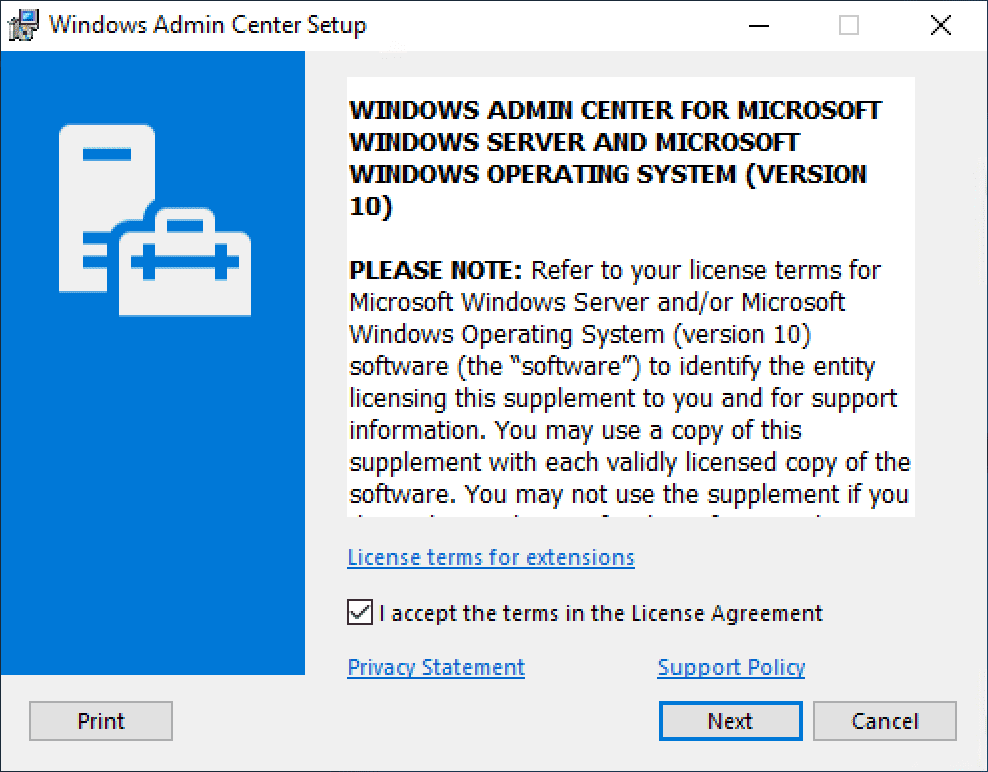
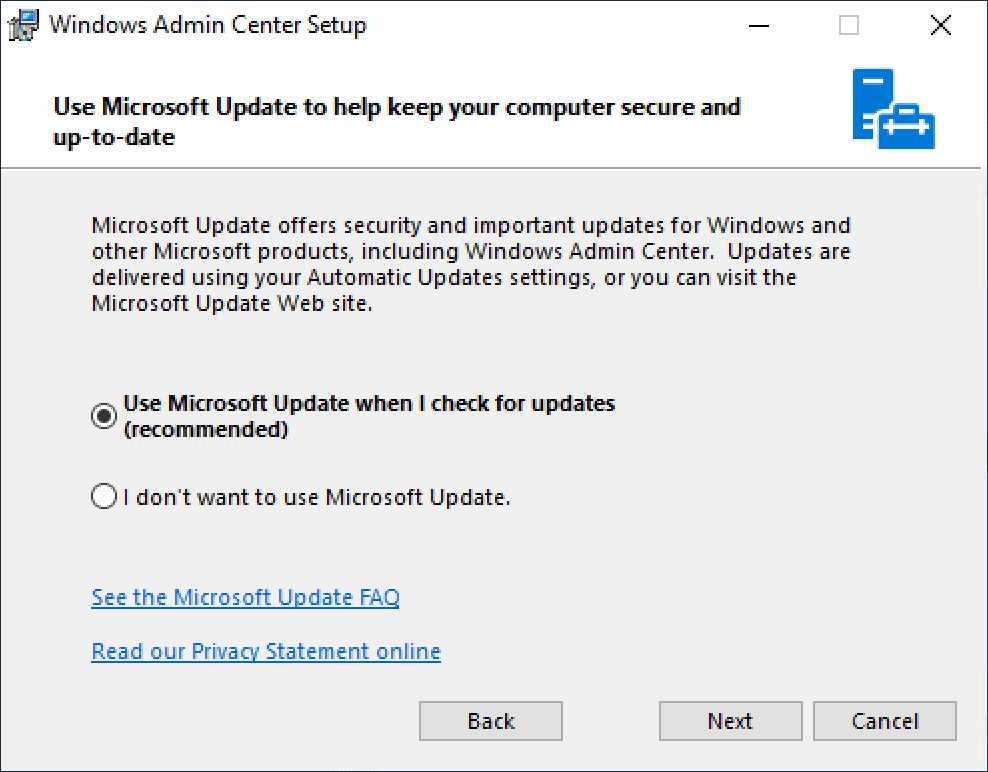
The process to install Windows Admin Center is very straightforward. First, you will want to snag the latest release of WAC. The link below will take you directly to be able to download the latest releases.
- https://docs.microsoft.com/en-us/windows-server/manage/windows-admin-center/understand/windows-admin-center
There is always the Preview version that contains all the features up to this point, however, may have some stability issues and other bugs.
There is always a stable, broadly tested version on the page as well that is probably the best option for use in production.
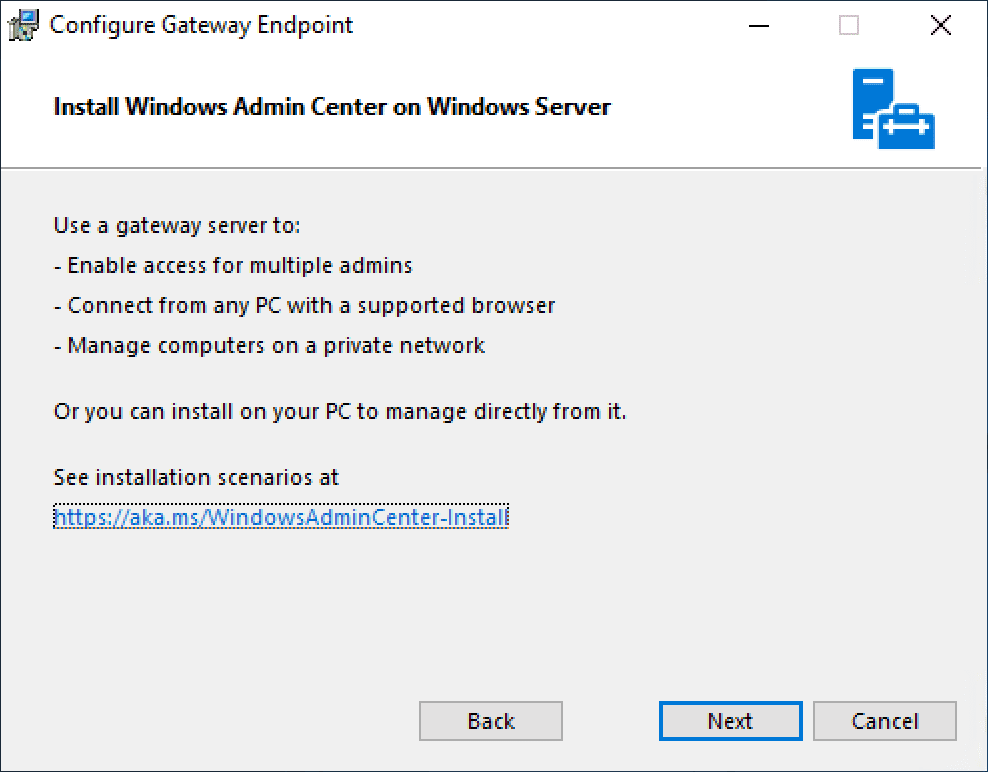
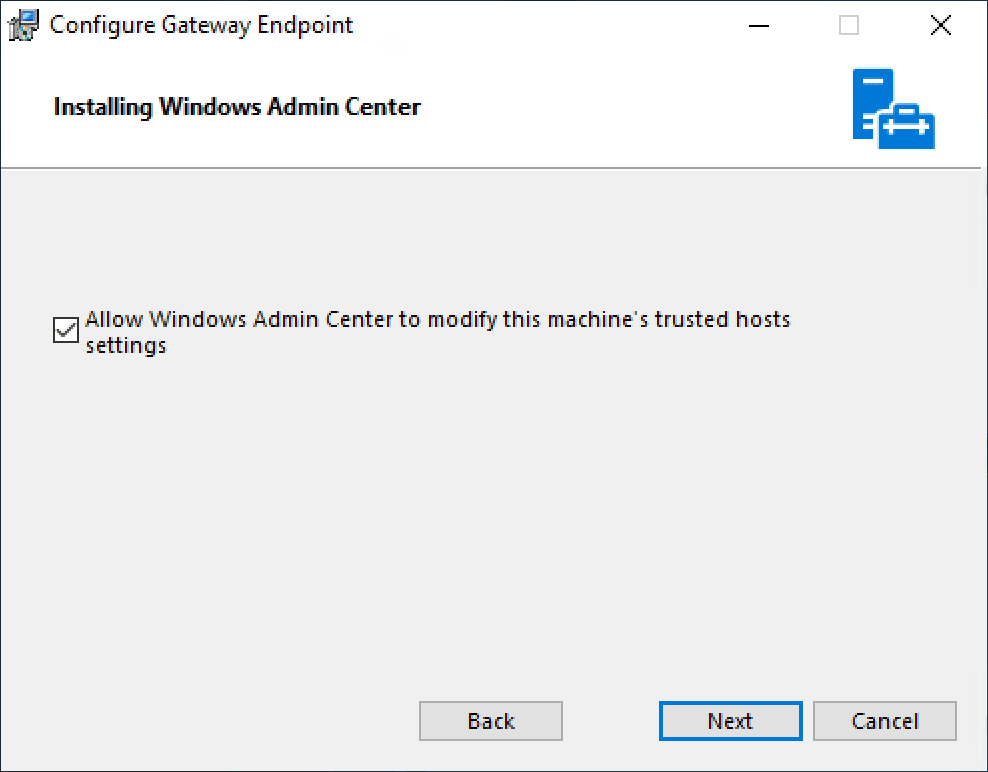
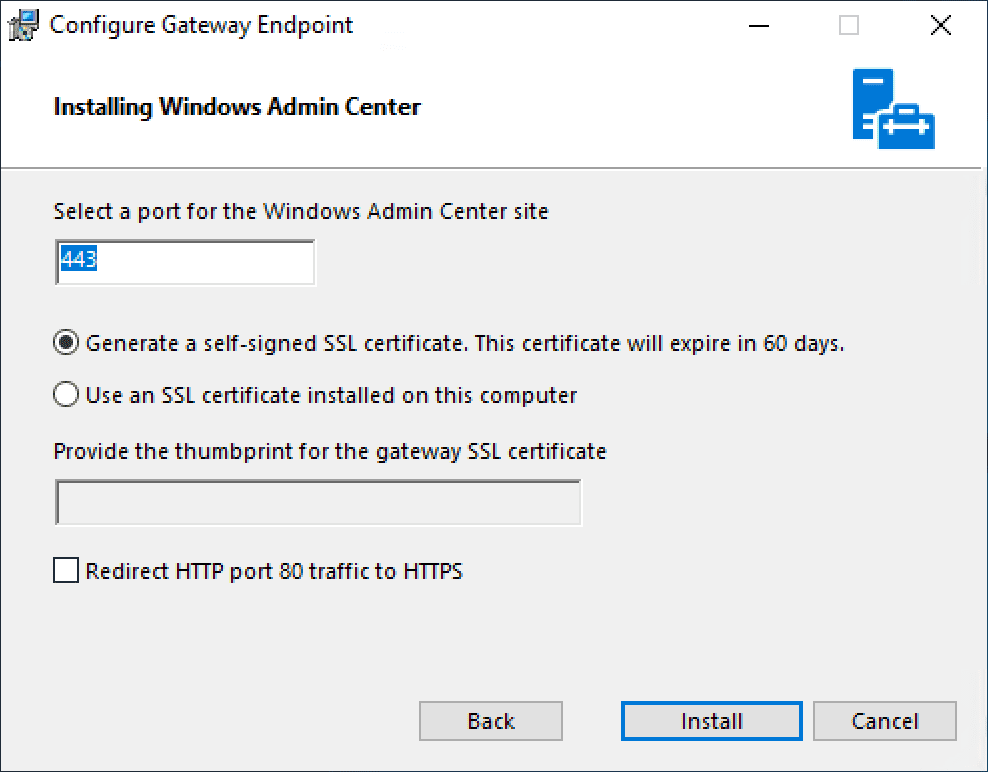
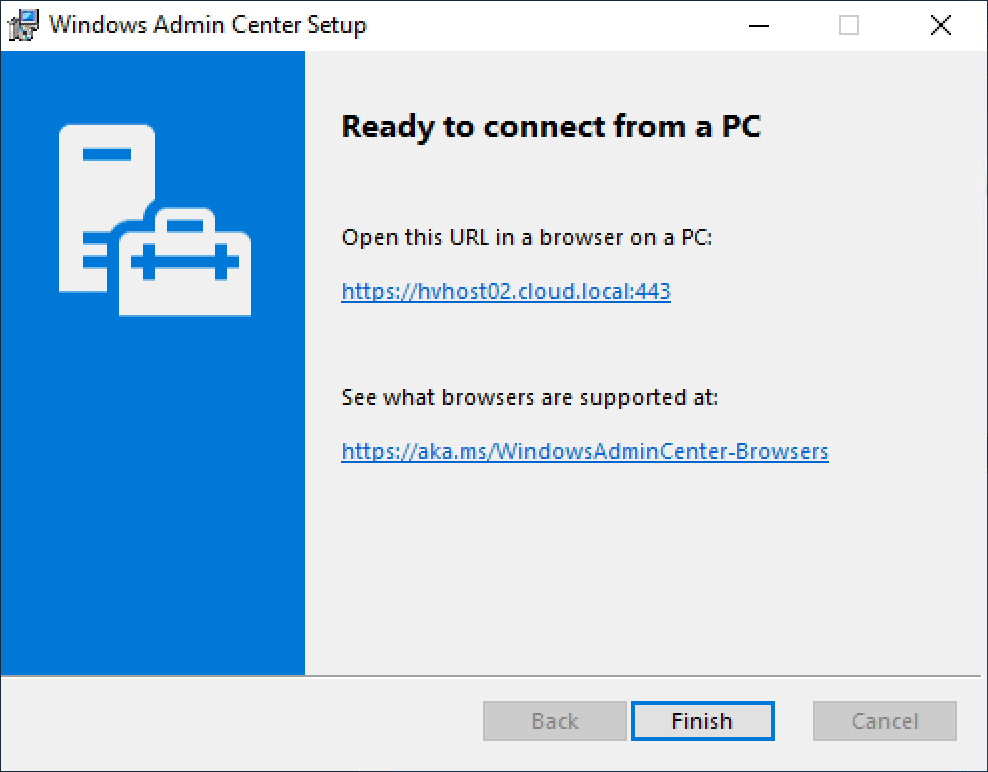
Managing Windows Server 2019 Core from Windows Admin Center
The first thing you will want to do in Windows Admin Center is Add the server you want to manage with Windows Admin Center. There is a special configuration we need to enable for Windows Server Core however.
Below, I am attempting to add the Windows Server 2019 Core server to Windows Admin Center without any configuration changes. As you can see, Windows Admin Center attempts to add the server, but tells you basically that it can’t connect to the server in question. You can go ahead and add it to Windows Admin Center, but most likely you will not be able to manage it, unless you have made a chance to your Windows Server Core installation.
Notice the message below, “You can add this server to your list of connections, but we can’t confirm it’s available.” Inevitably, this means that it is not communicating with your Windows Server Core server.
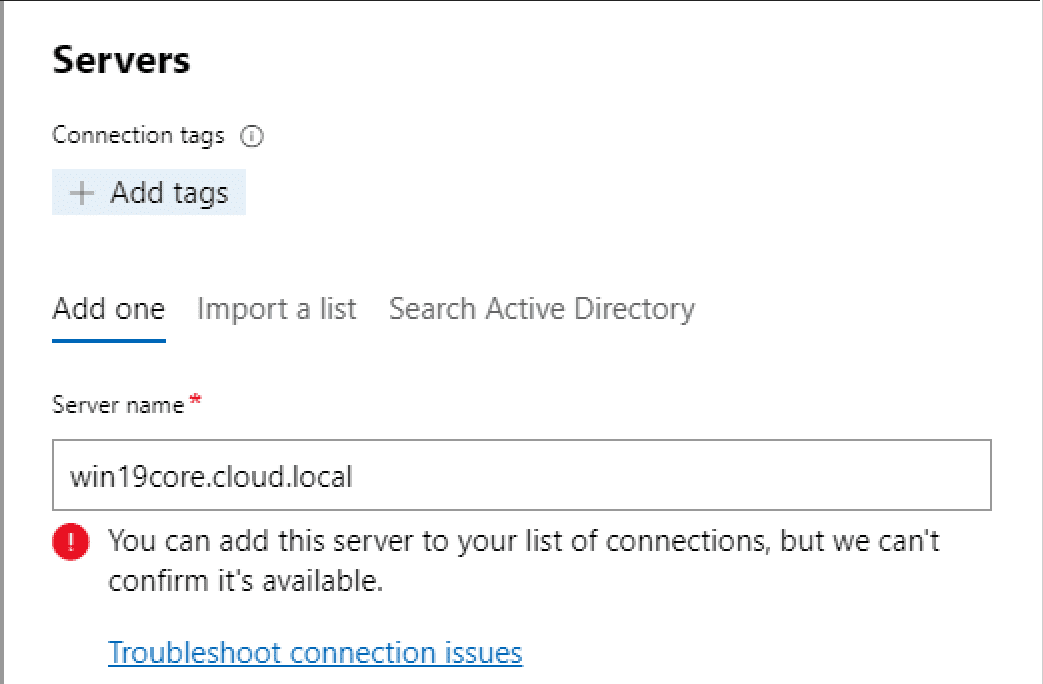
Enable Remote Management for Windows Server 2019
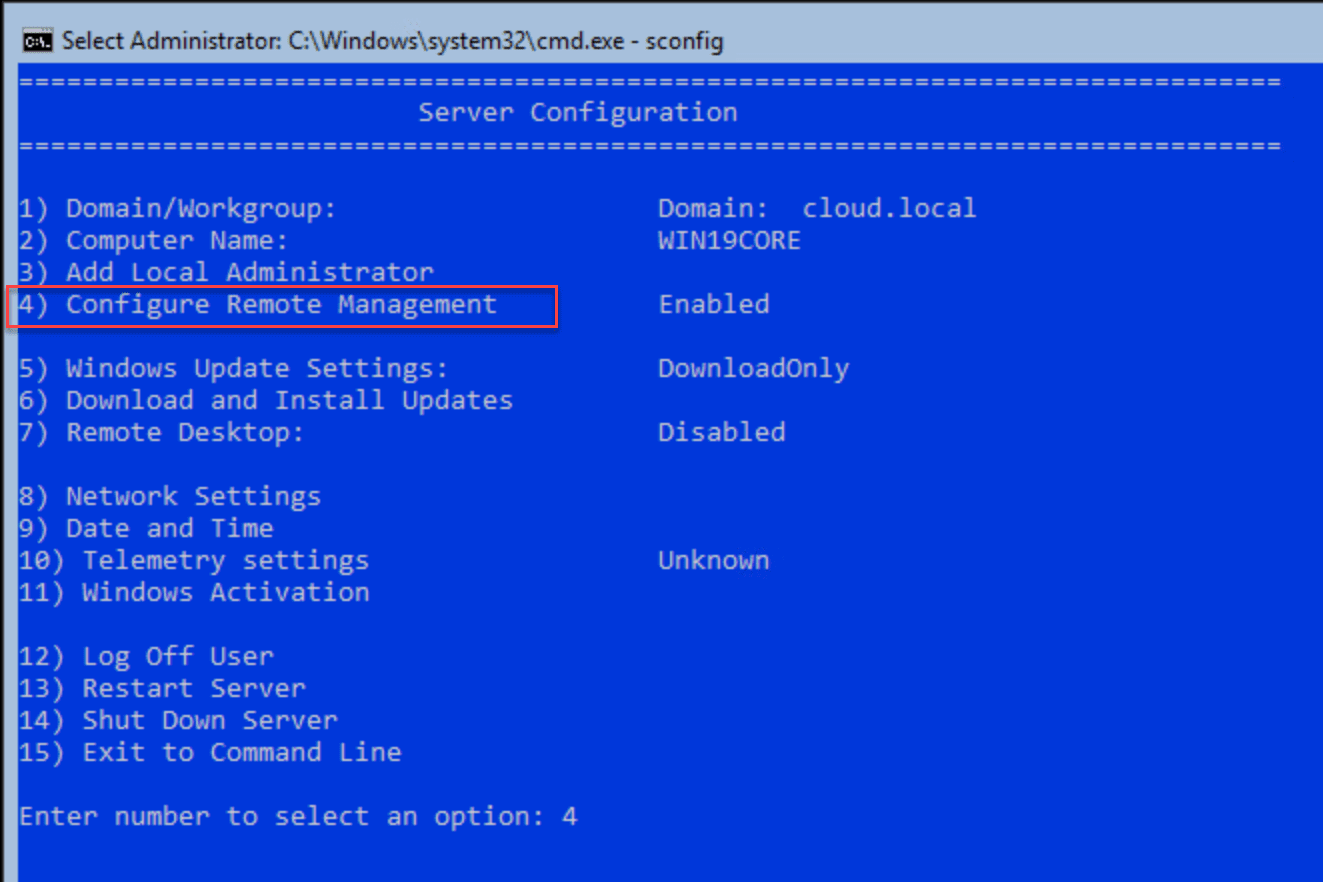
If you have used any version of Windows Server Core edition prior to Windows Server 2019, you are most likely already familiar with sconfig. If not, it is easy to become acquainted with this utility. It provides a simple, menu driven interface that allows you to quickly perform very common admin tasks on your Windows Server Core installation. By default, this utility launches once you login with Windows Server Core.
Notice Option 4 – Configure Remote Management. This simple menu option allows you to configure the remote management configuration for your Core installation, simply and easily.
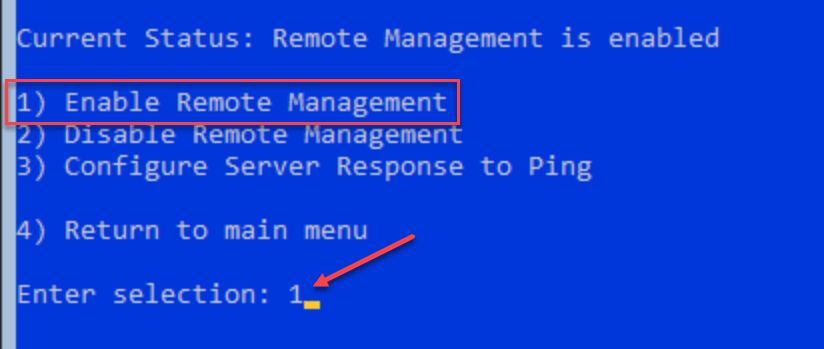
After choosing option 4, select Option 1 – Enable Remote Management.
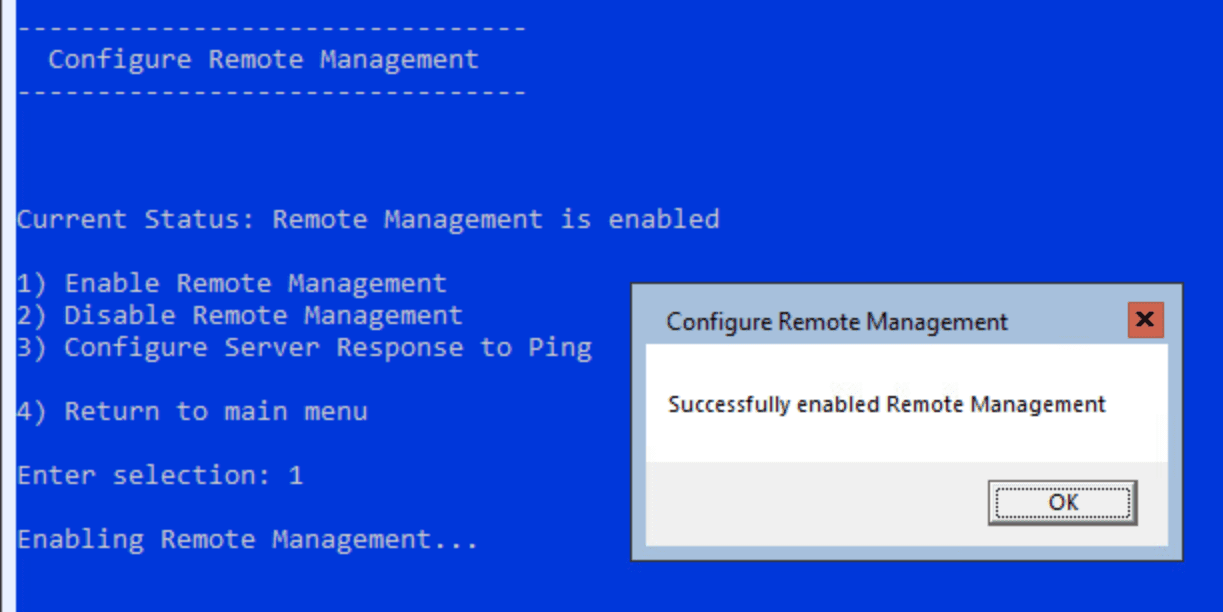
You will quickly see a dialog box pop up saying Successfully enabled Remote Management which confirms the remote management features and connectivity settings have been enabled.
Now we get a different response. Windows Admin Center is now able to connect remotely to the Windows Server Core installation. Now, we are simply being prompted for credentials. You have a few options here.
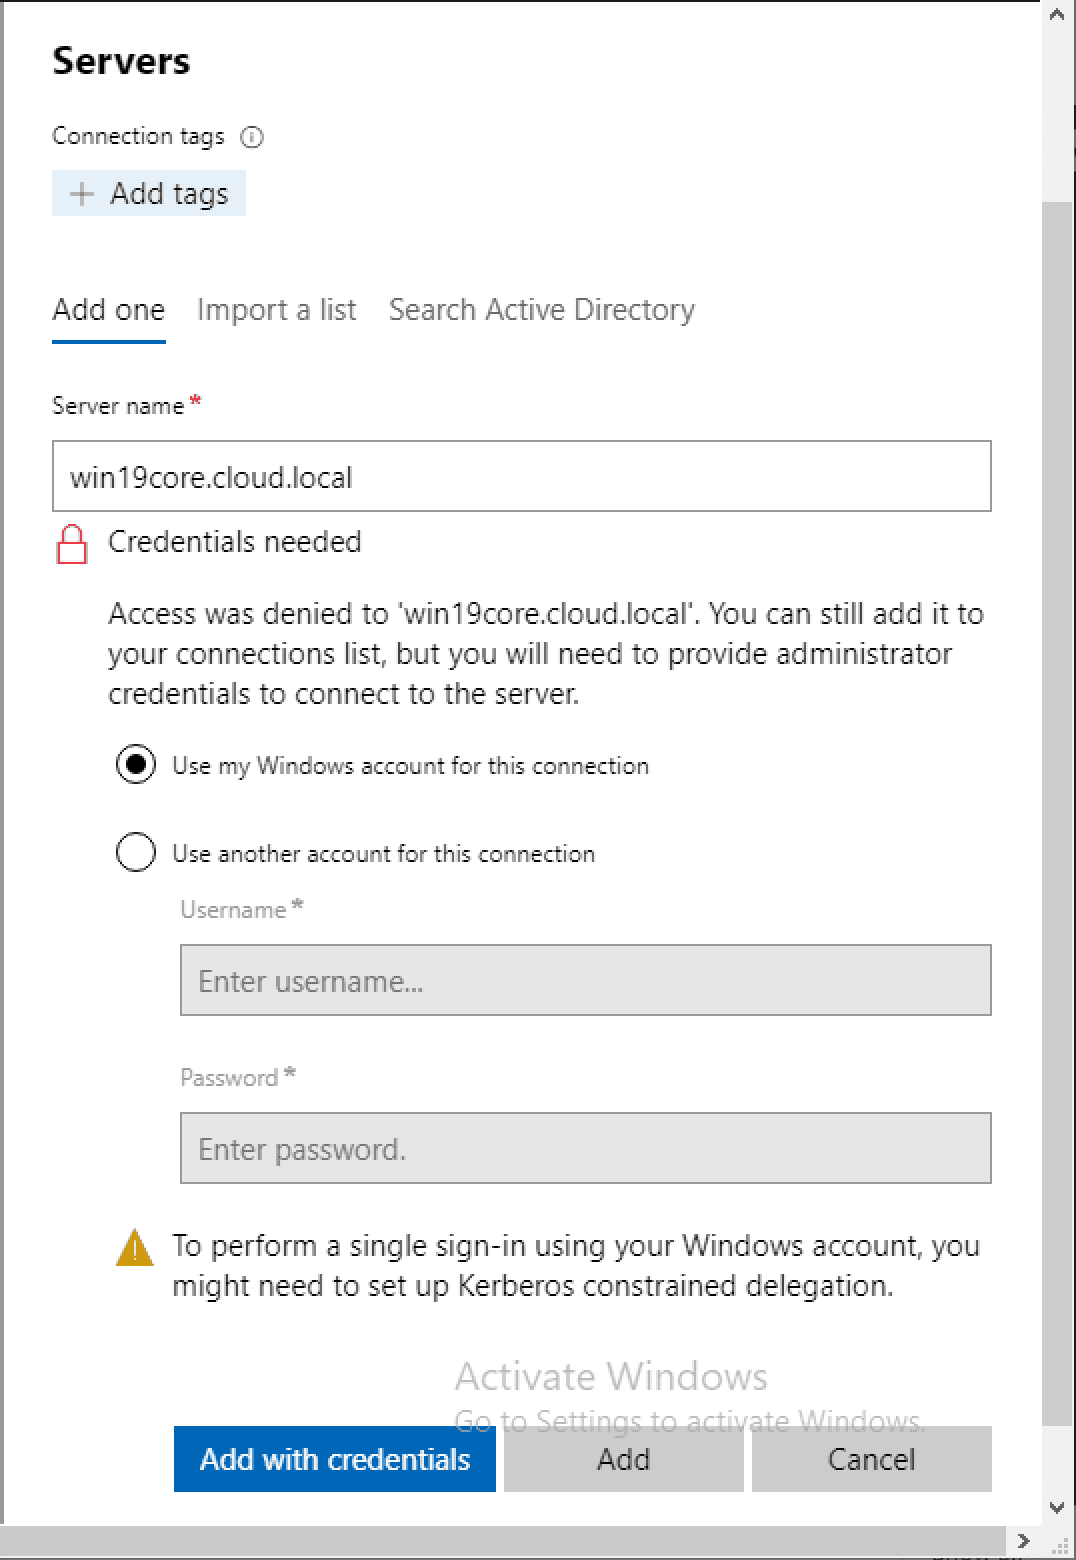
Now let’s take a look at Managing Windows Server 2019 Core with Windows Admin Center. There are so many things you can do with Windows Admin Center that makes life very easy to manage Windows Server 2019 Core installations. Let’s go through a few of the capabilities of Managing Windows Server 2019 Core with Windows Admin Center.
As mentioned earlier, one of the hurdles to using Windows Server Core is the lack of easy GUI tools to configure, manage, and interact with the system.
Adding Roles and Features
No doubt, one of the first things you will want to do with your Windows Server 2019 Core installation is add roles and features to the server. Whether, you are going to use it as a domain controller, file server, DNS, DHCP, etc, you will need to install the appropriate role.
Using Windows Admin Center, simply clcik the Roles & Features menu. Once you highlight a role/feature, you can place a check in the box next to it. This enables the +Install button at the top. This makes Roles & Features installation easy on Windows Server 2019 Core.
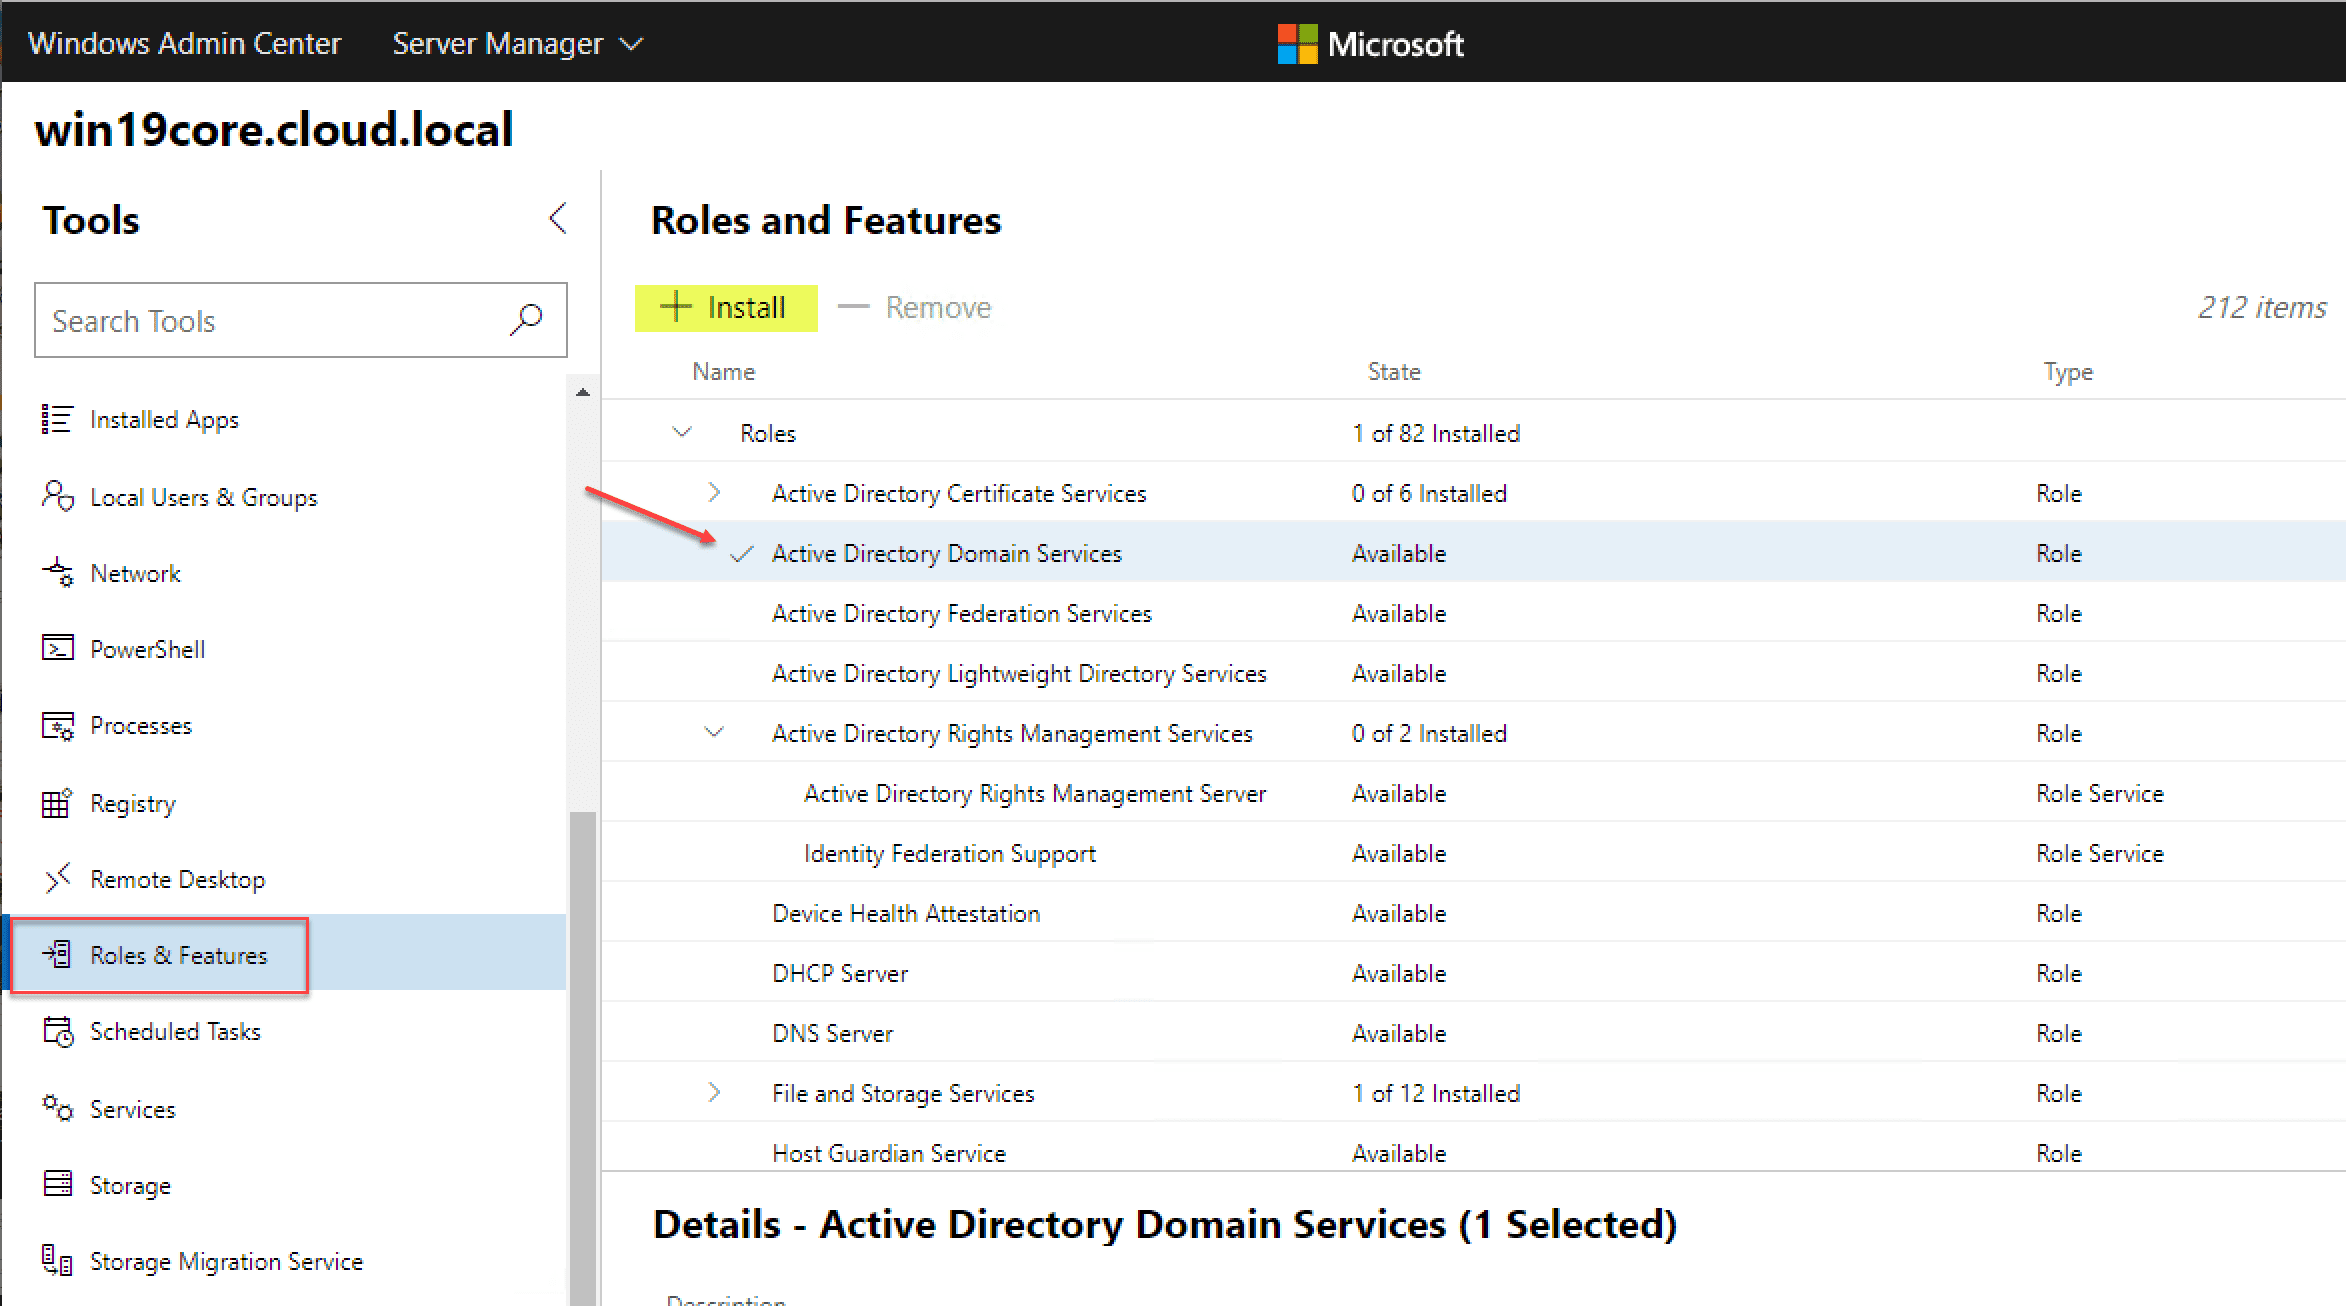
Remote PowerShell with Windows Admin Center
Using Remote PowerShell on your Windows Server 2019 Core installation is extremely easy with Windows Admin Center. Click the PowerShell menu option on the left. You will then be prompted for credentials on your Windows Server 2019 Core server. Enter your credentials and you will be able to use remote PowerShell right from the interface of Windows Admin Center!
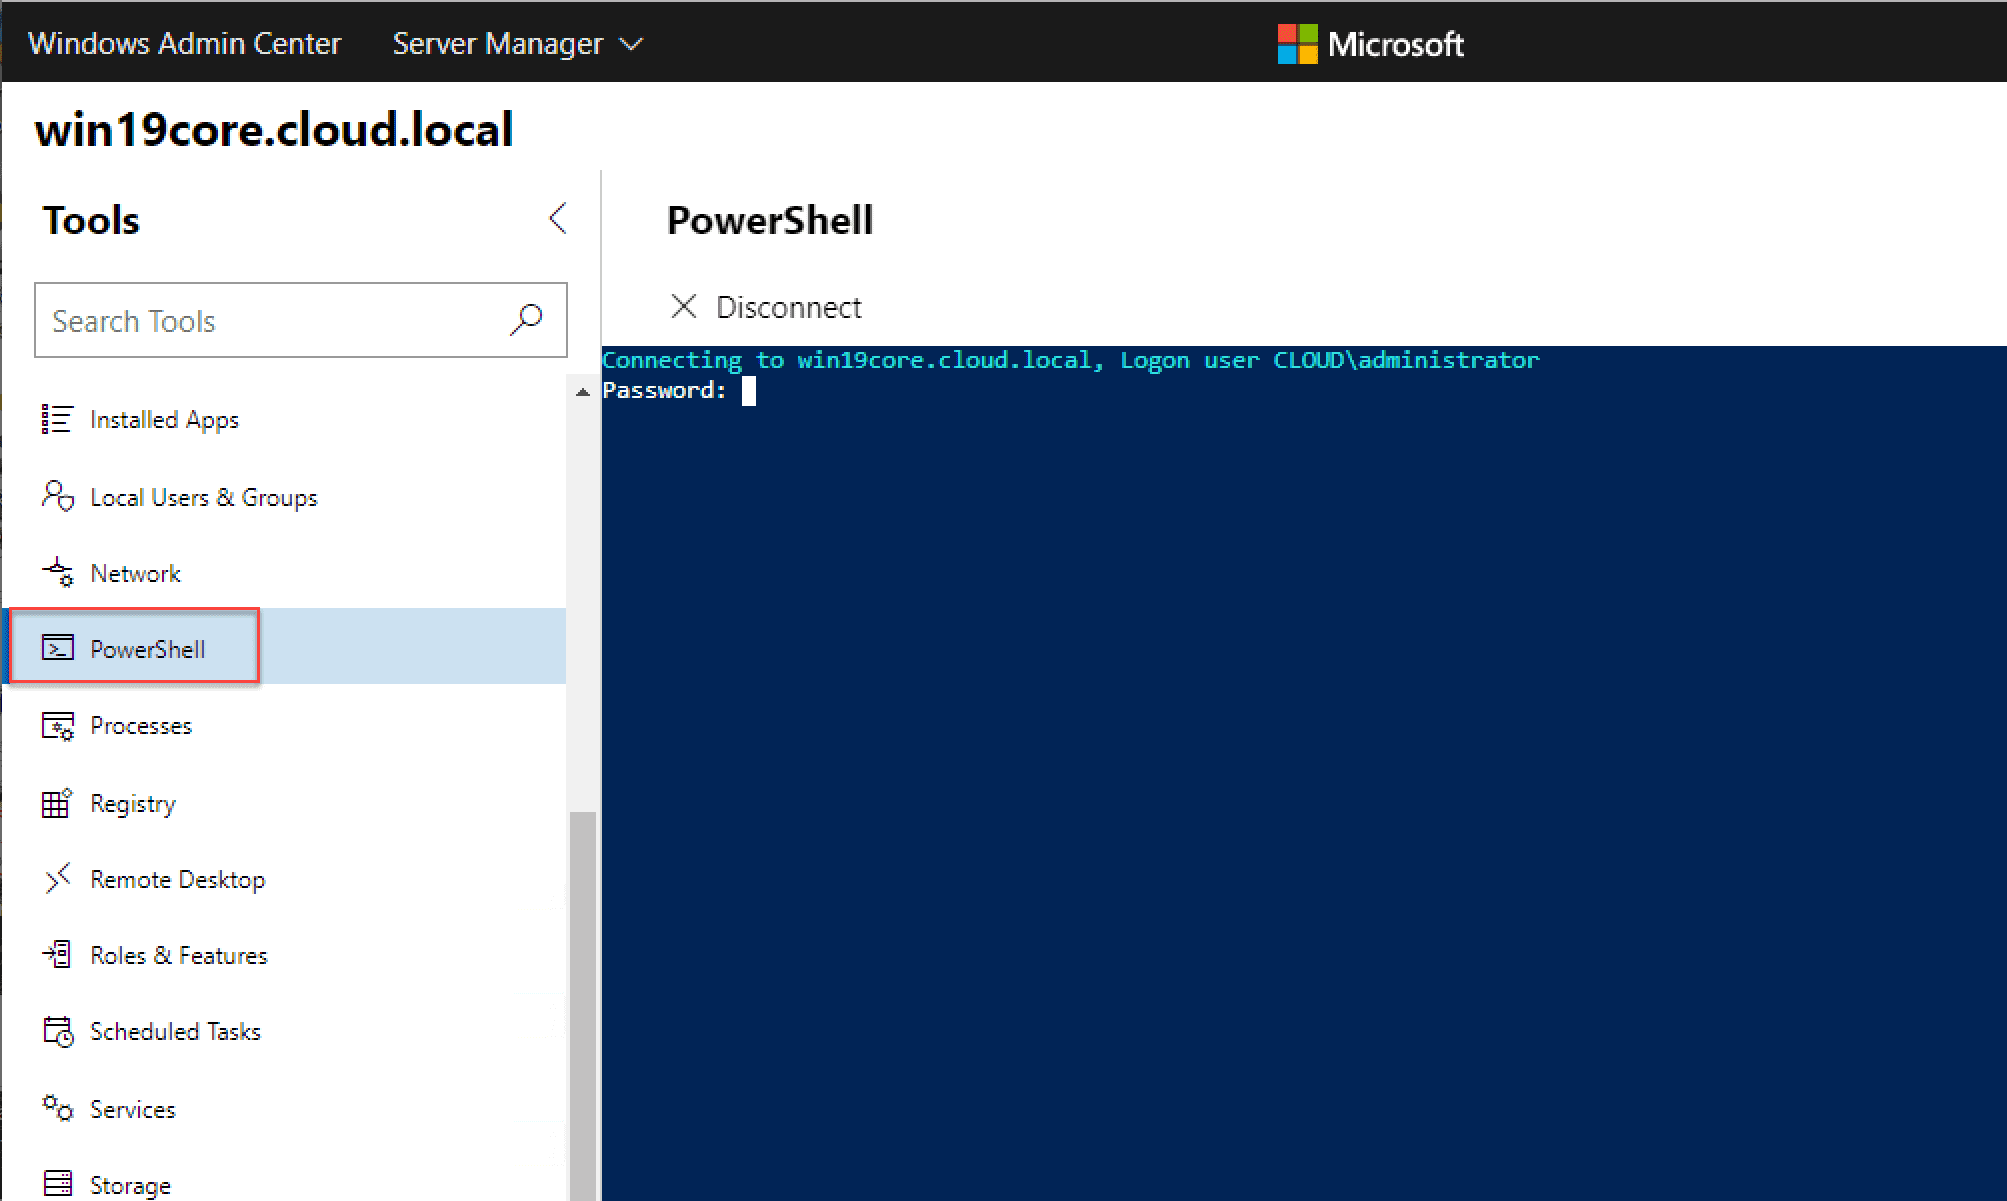
Enable Remote Desktop with Windows Admin Center
You will most likely want to have Remote Desktop enabled on your Windows Server 2019 Core installation. Under the Settings menu > Remote Desktop you will have the familiar menu presented to enable remote desktop with NLA and other options.
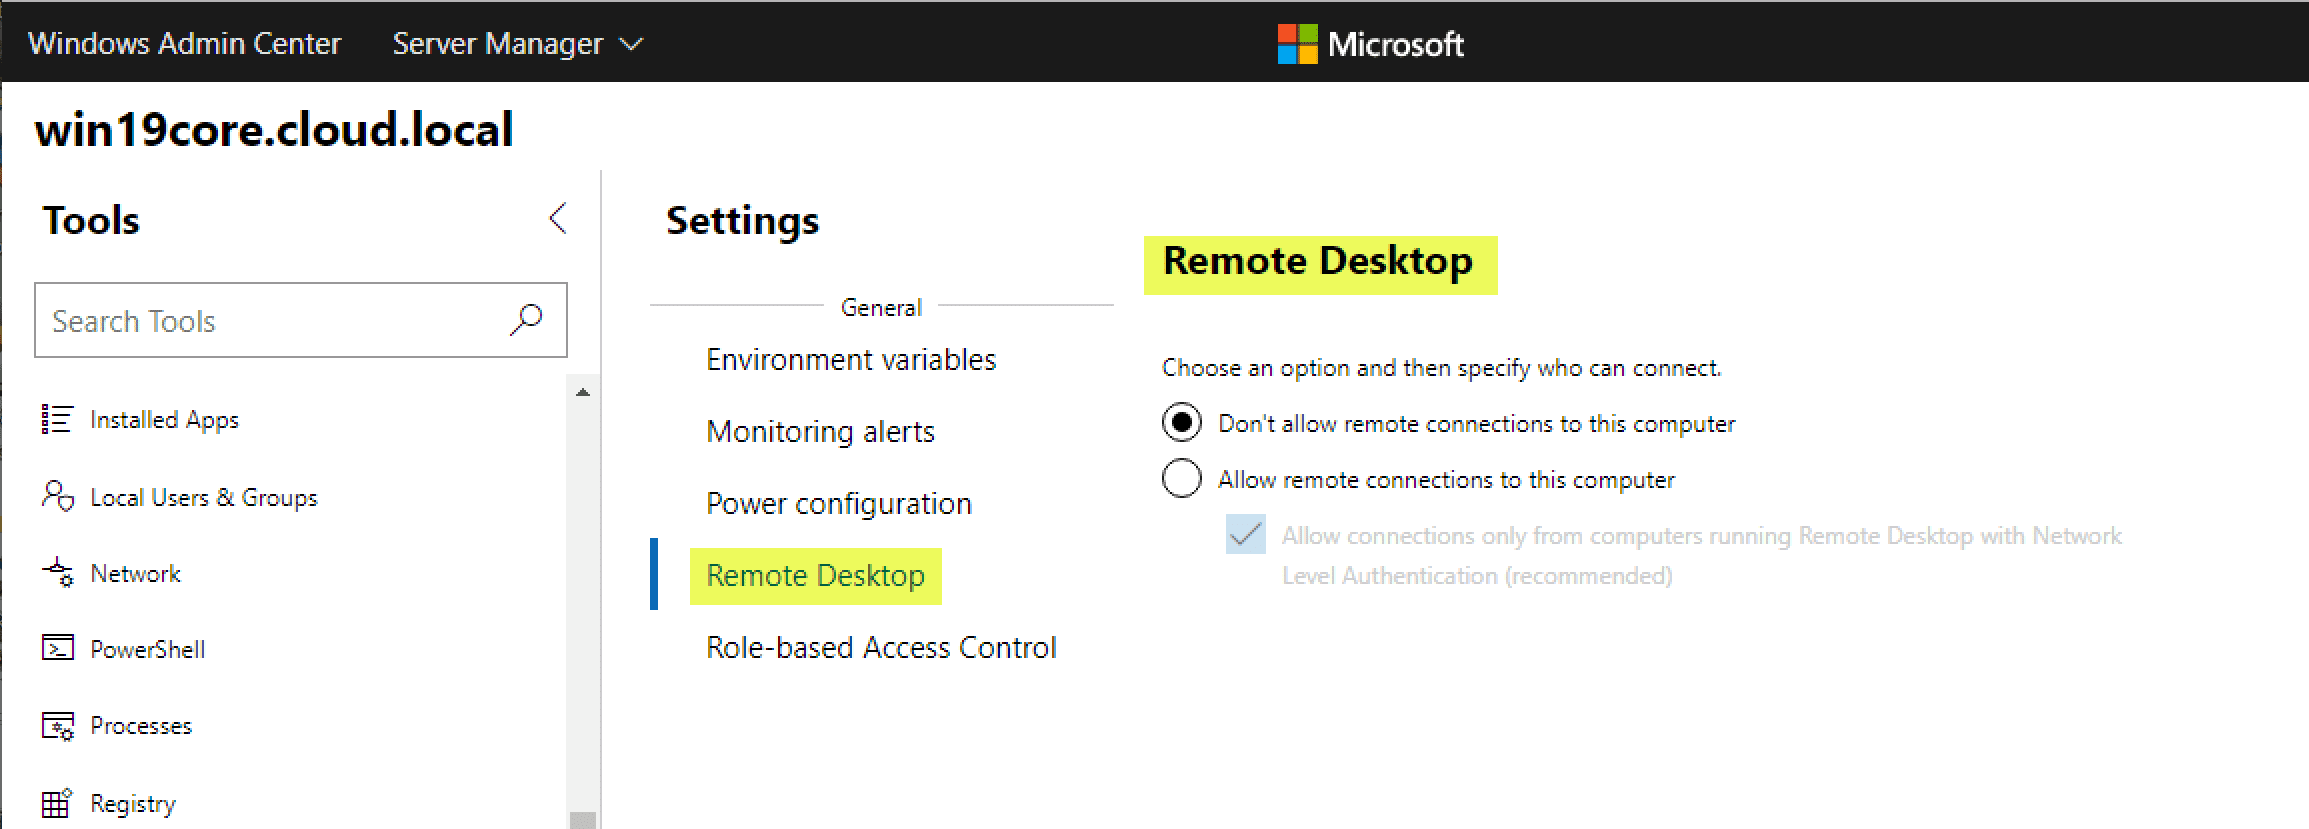
Managing Windows Server 2019 Core Services with Windows Admin Center
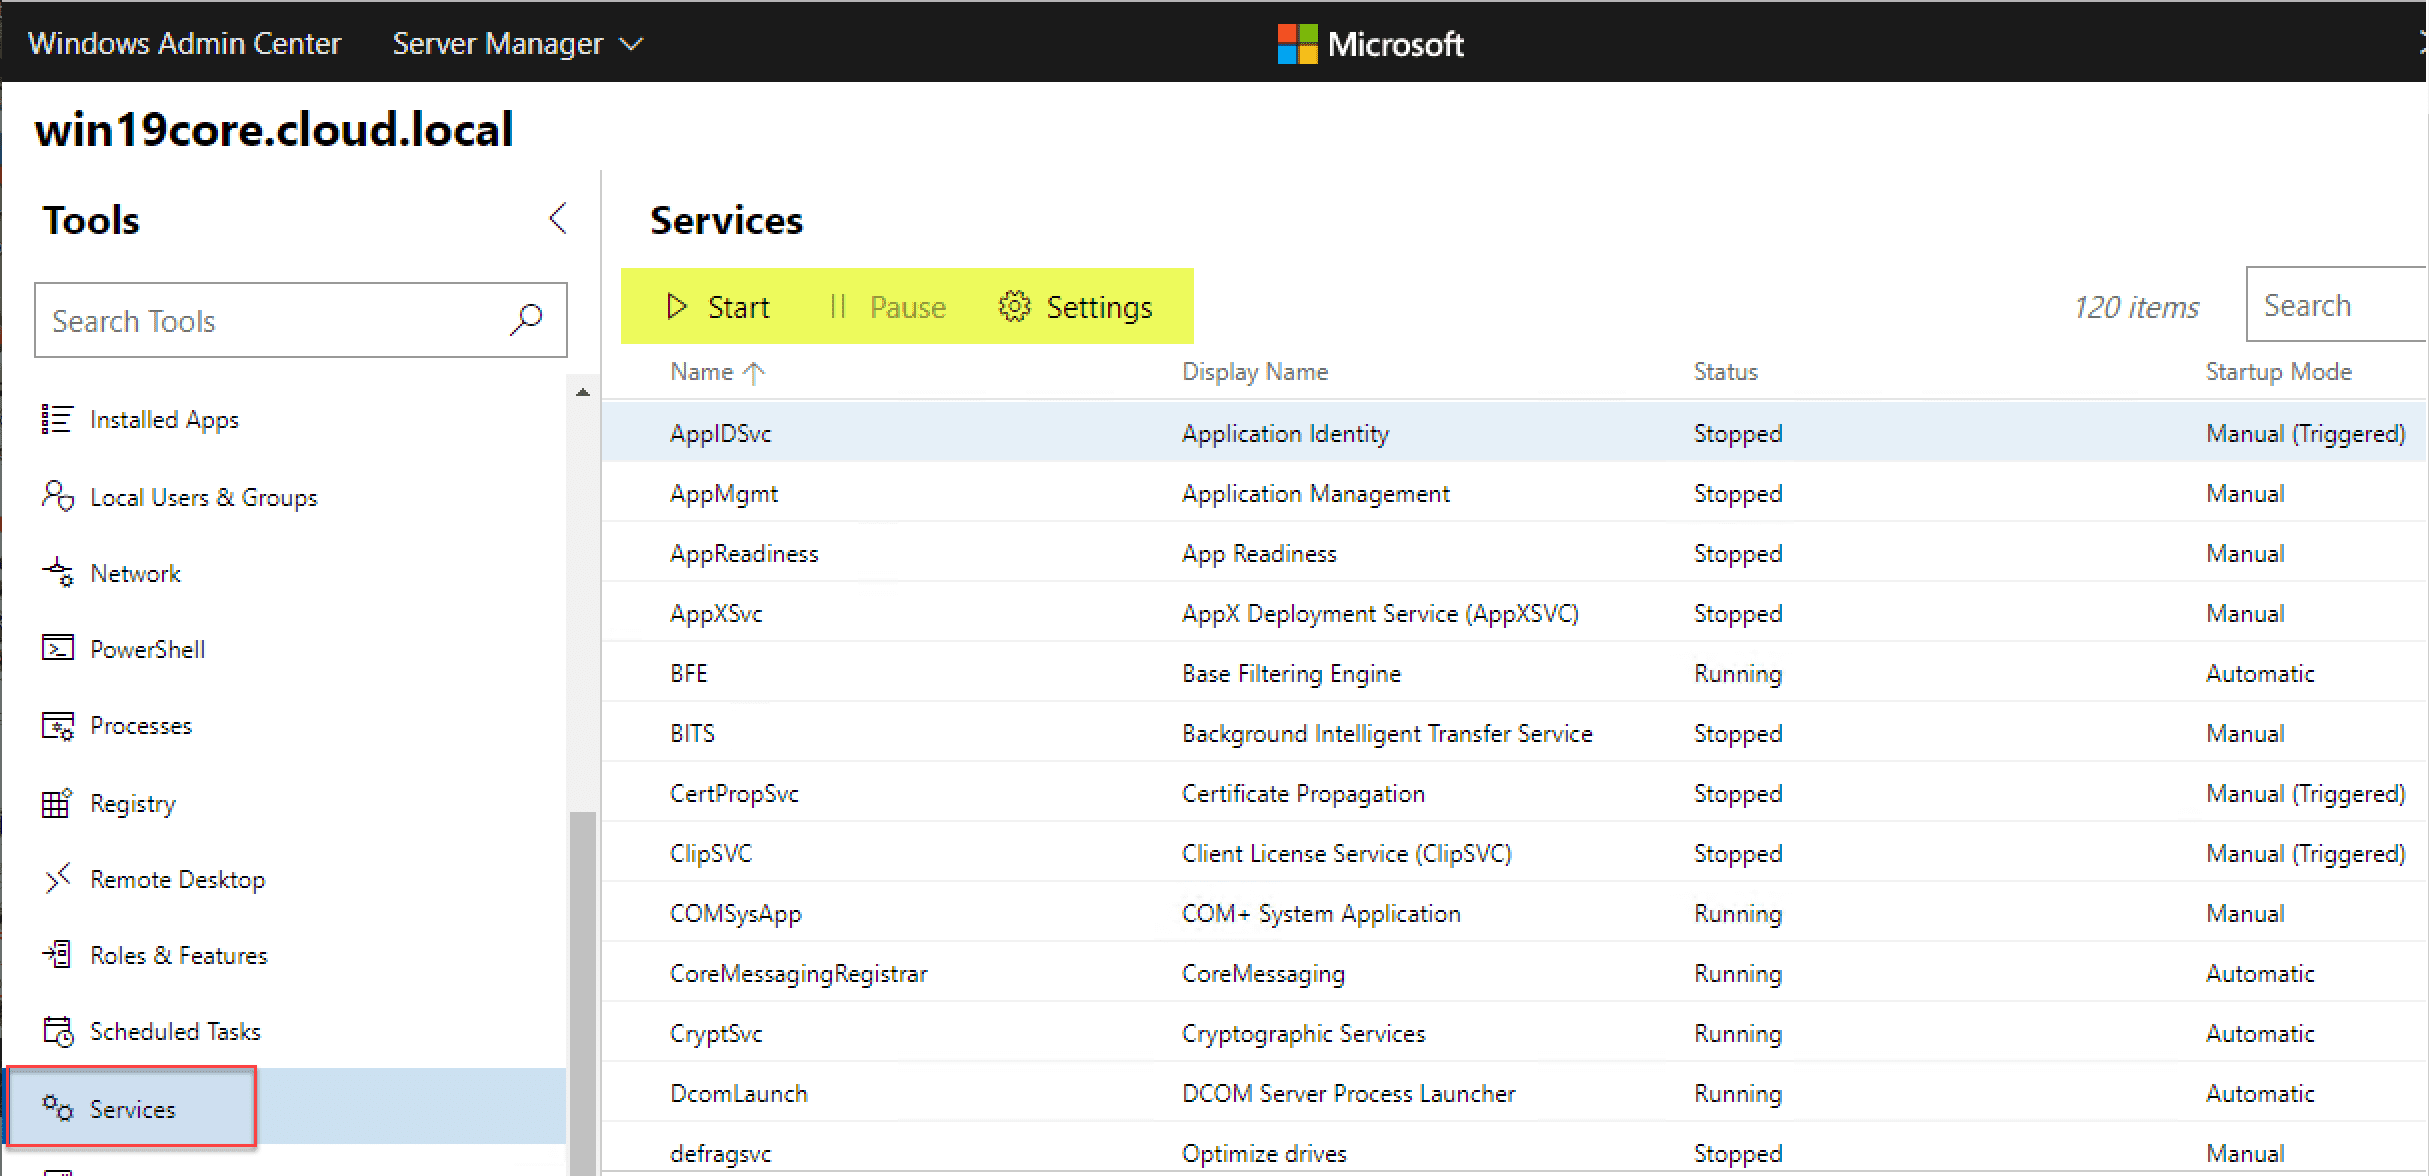
Managing your Windows Server 2019 Core services is easily accomplished using Windows Admin Center. Click Services and you will see your services with the ability to start, pause, and configure settings for the services.
Configure Network Settings Remotely on Windows Server Core
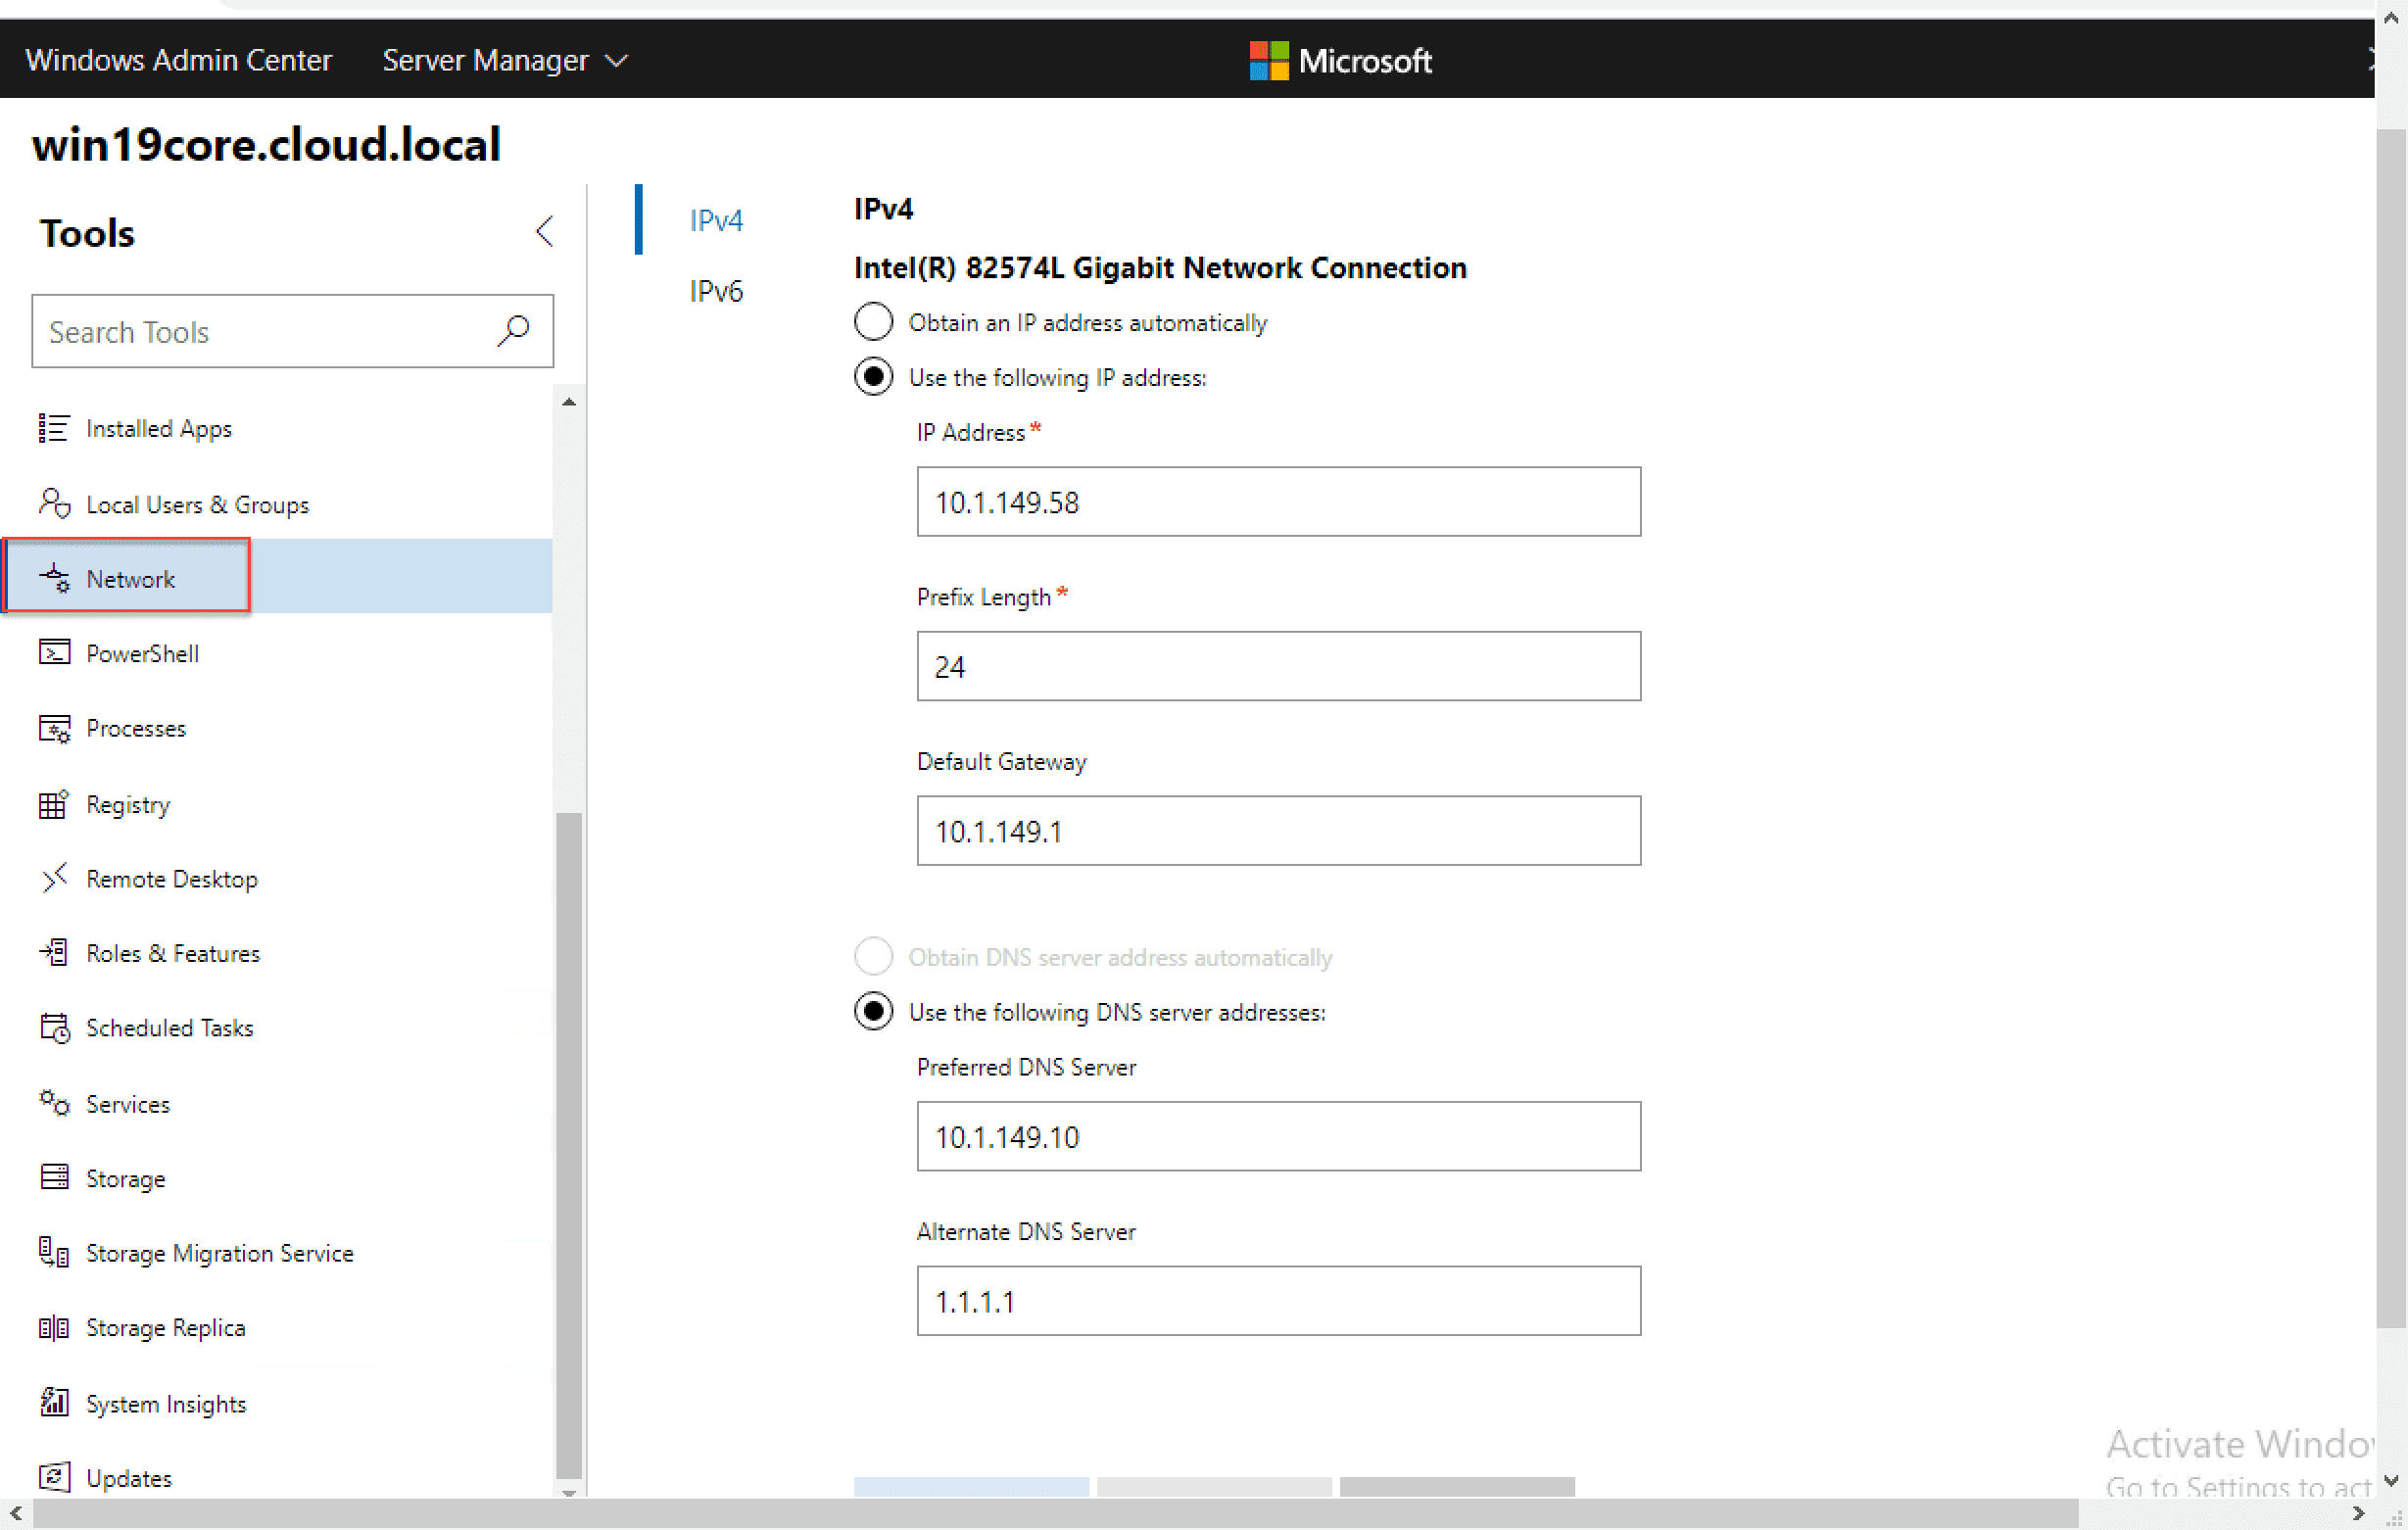
Windows Admin Center Network menu allows you to configure your network settings for the Windows Server Core installation. You can change all the expected settings from address, gateway, DNS, and others.
Configure System Insights
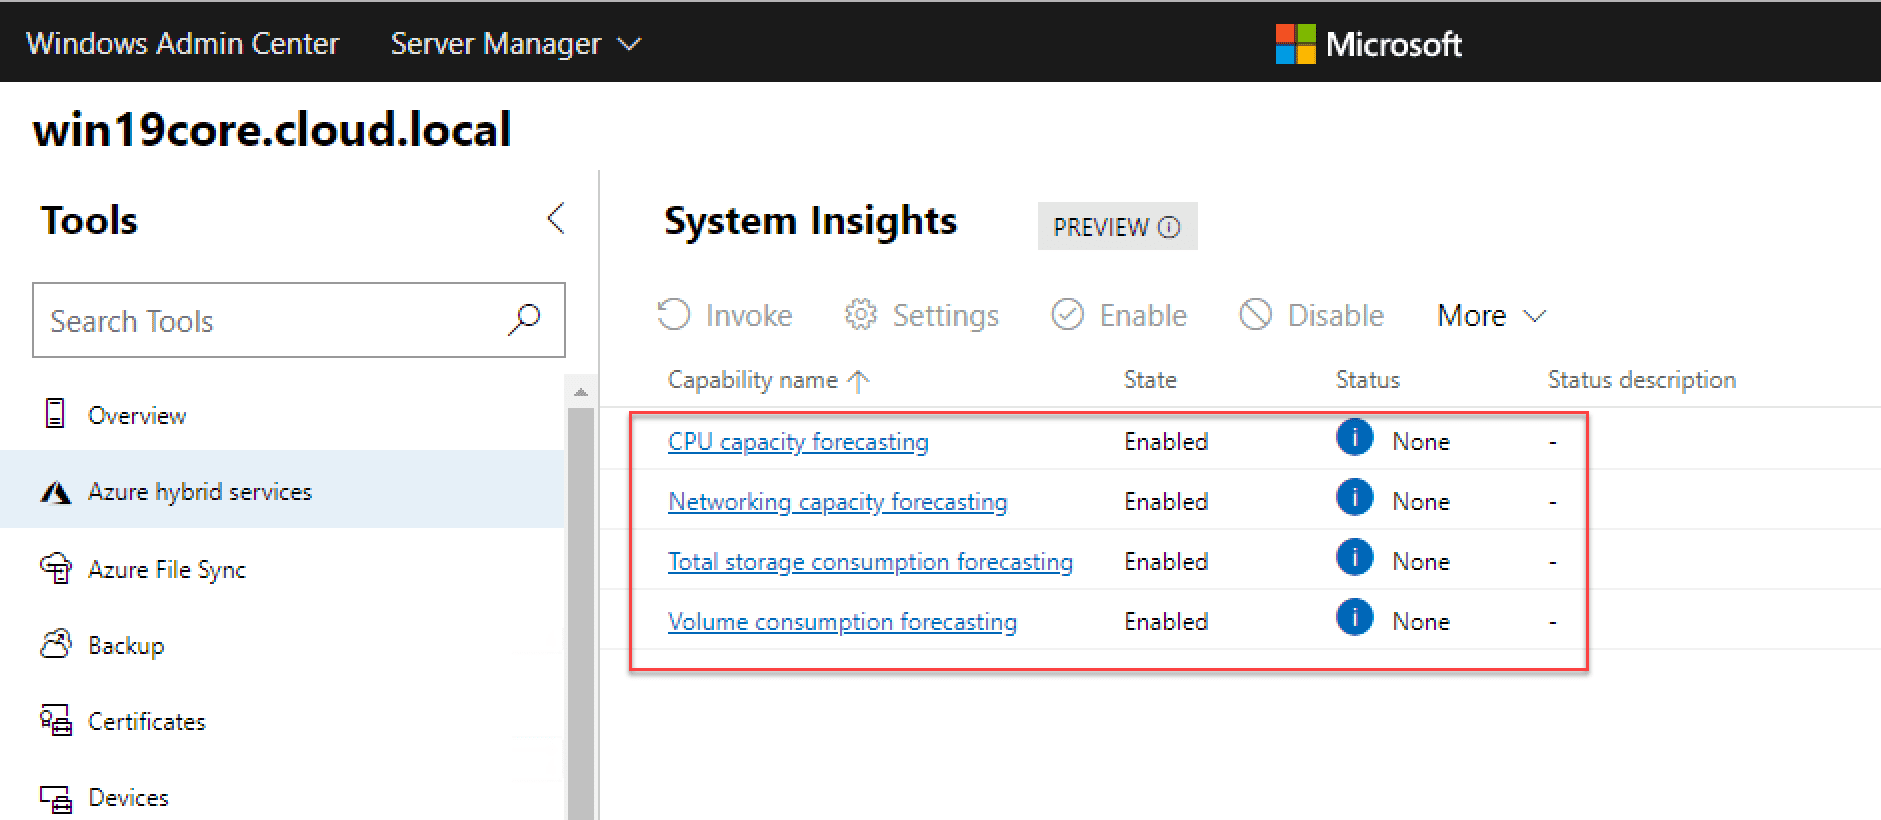
System Insights provides a powerful, predictive analytics, performance, and monitoring platform, built right into Windows Admin Center. When you click on System Insights, you will be prompted to Install the plugin. This will be done for you automatically.
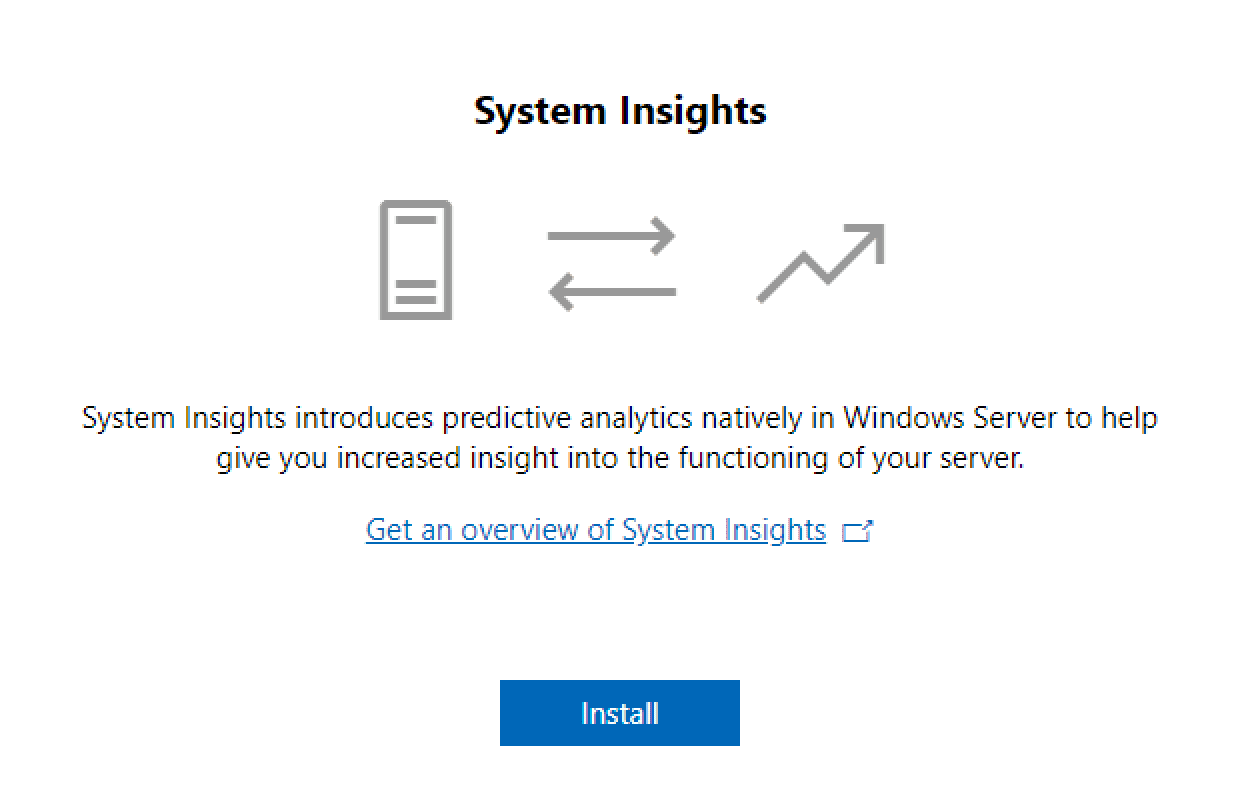
After installing System Insights, you will have the ability to forecast CPU, networking, storage consumption, and volume consumption. Keep in mind it will take a while for the initial metrics to pull and the forecast to be generated. This provides a great tool for capacity management and other purposes.
Enable Azure Backups
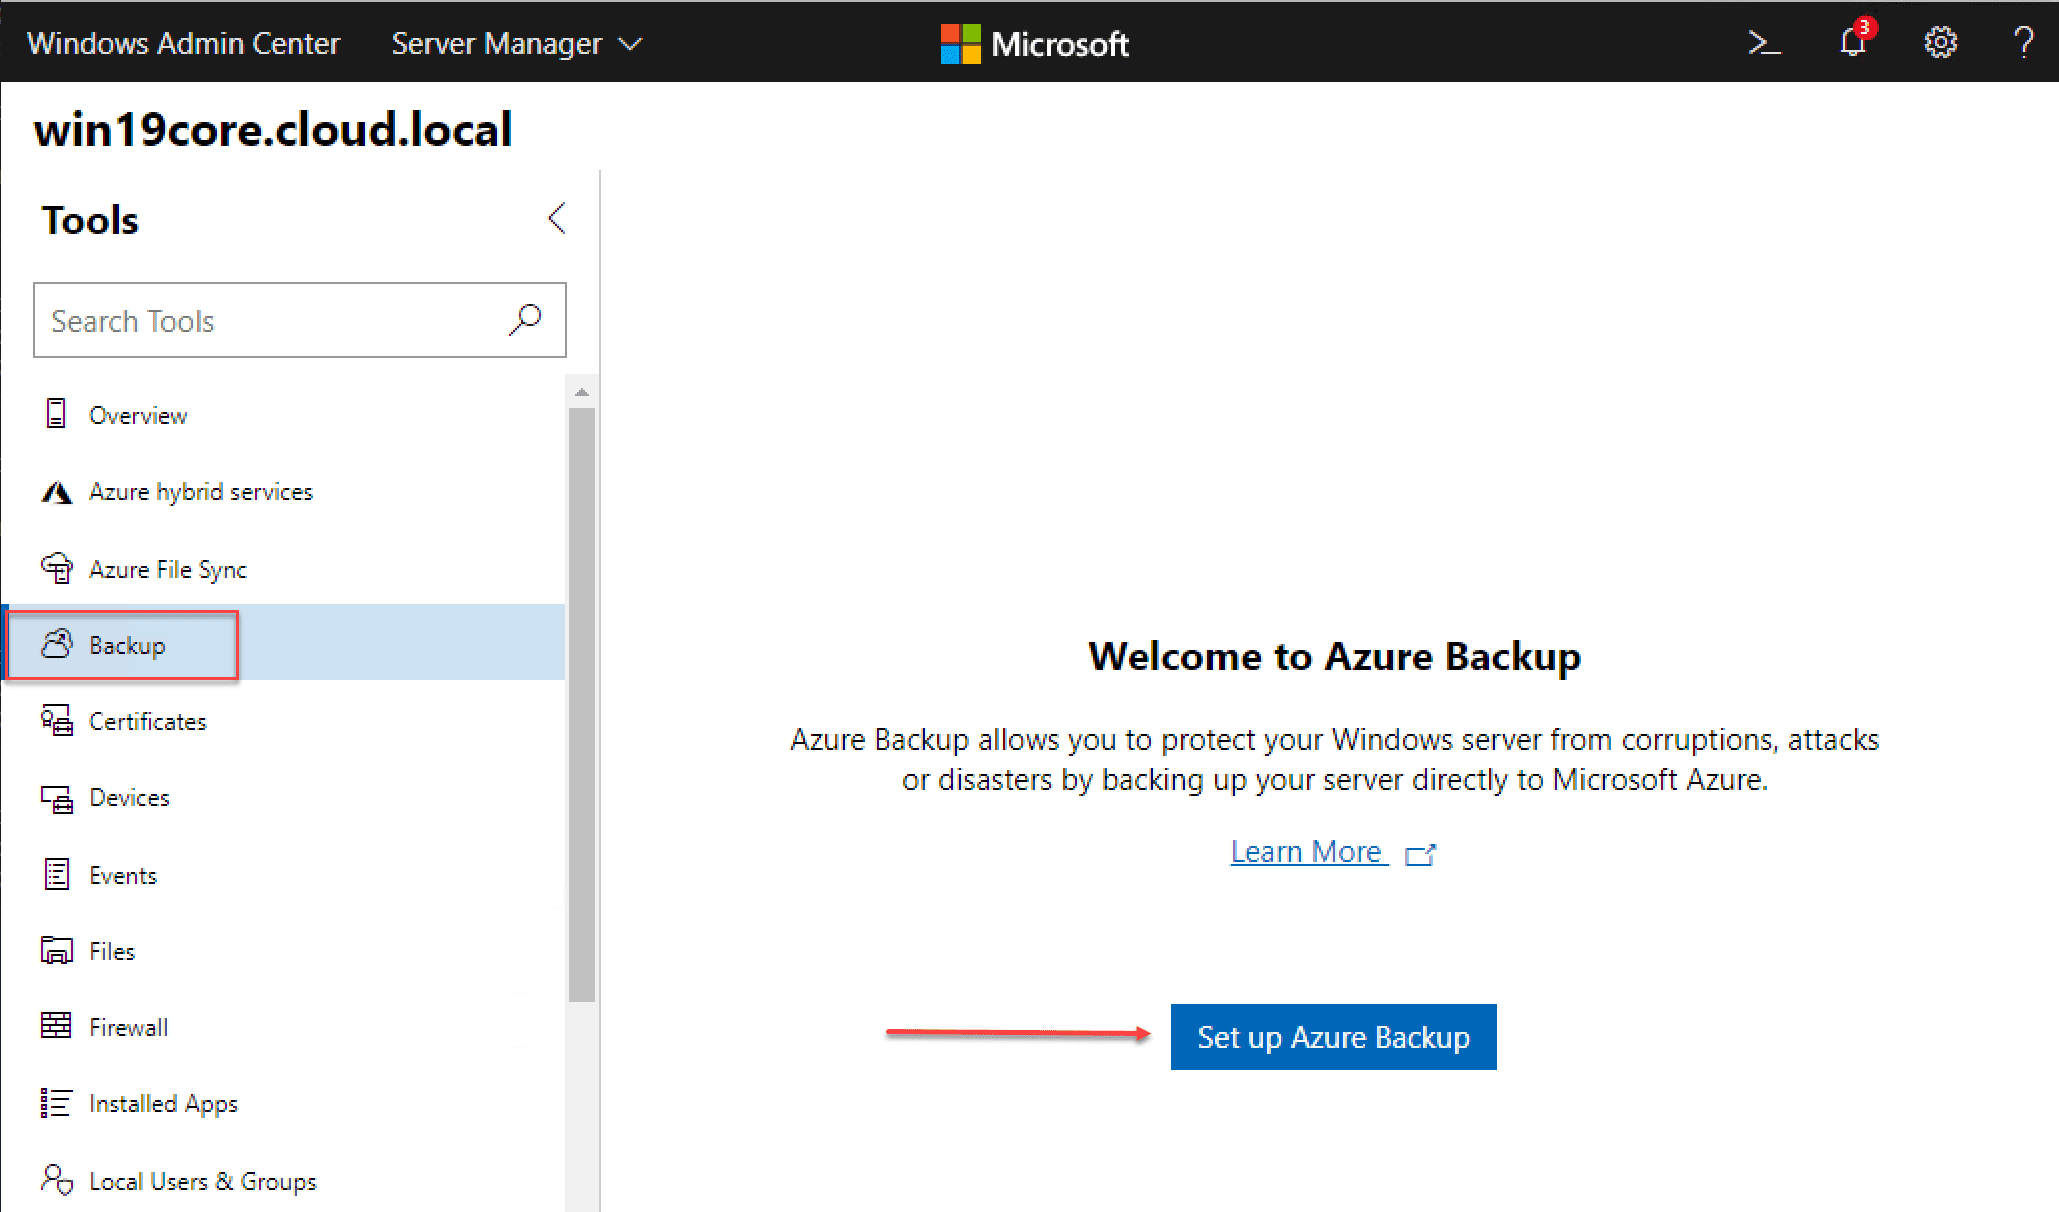
Windows Admin Center provides great built-in integration with Microsoft Azure. Backup is a great example of this. Right from the Windows Admin Center interface, you can configure Azure Backup for your Windows Server Core installation.
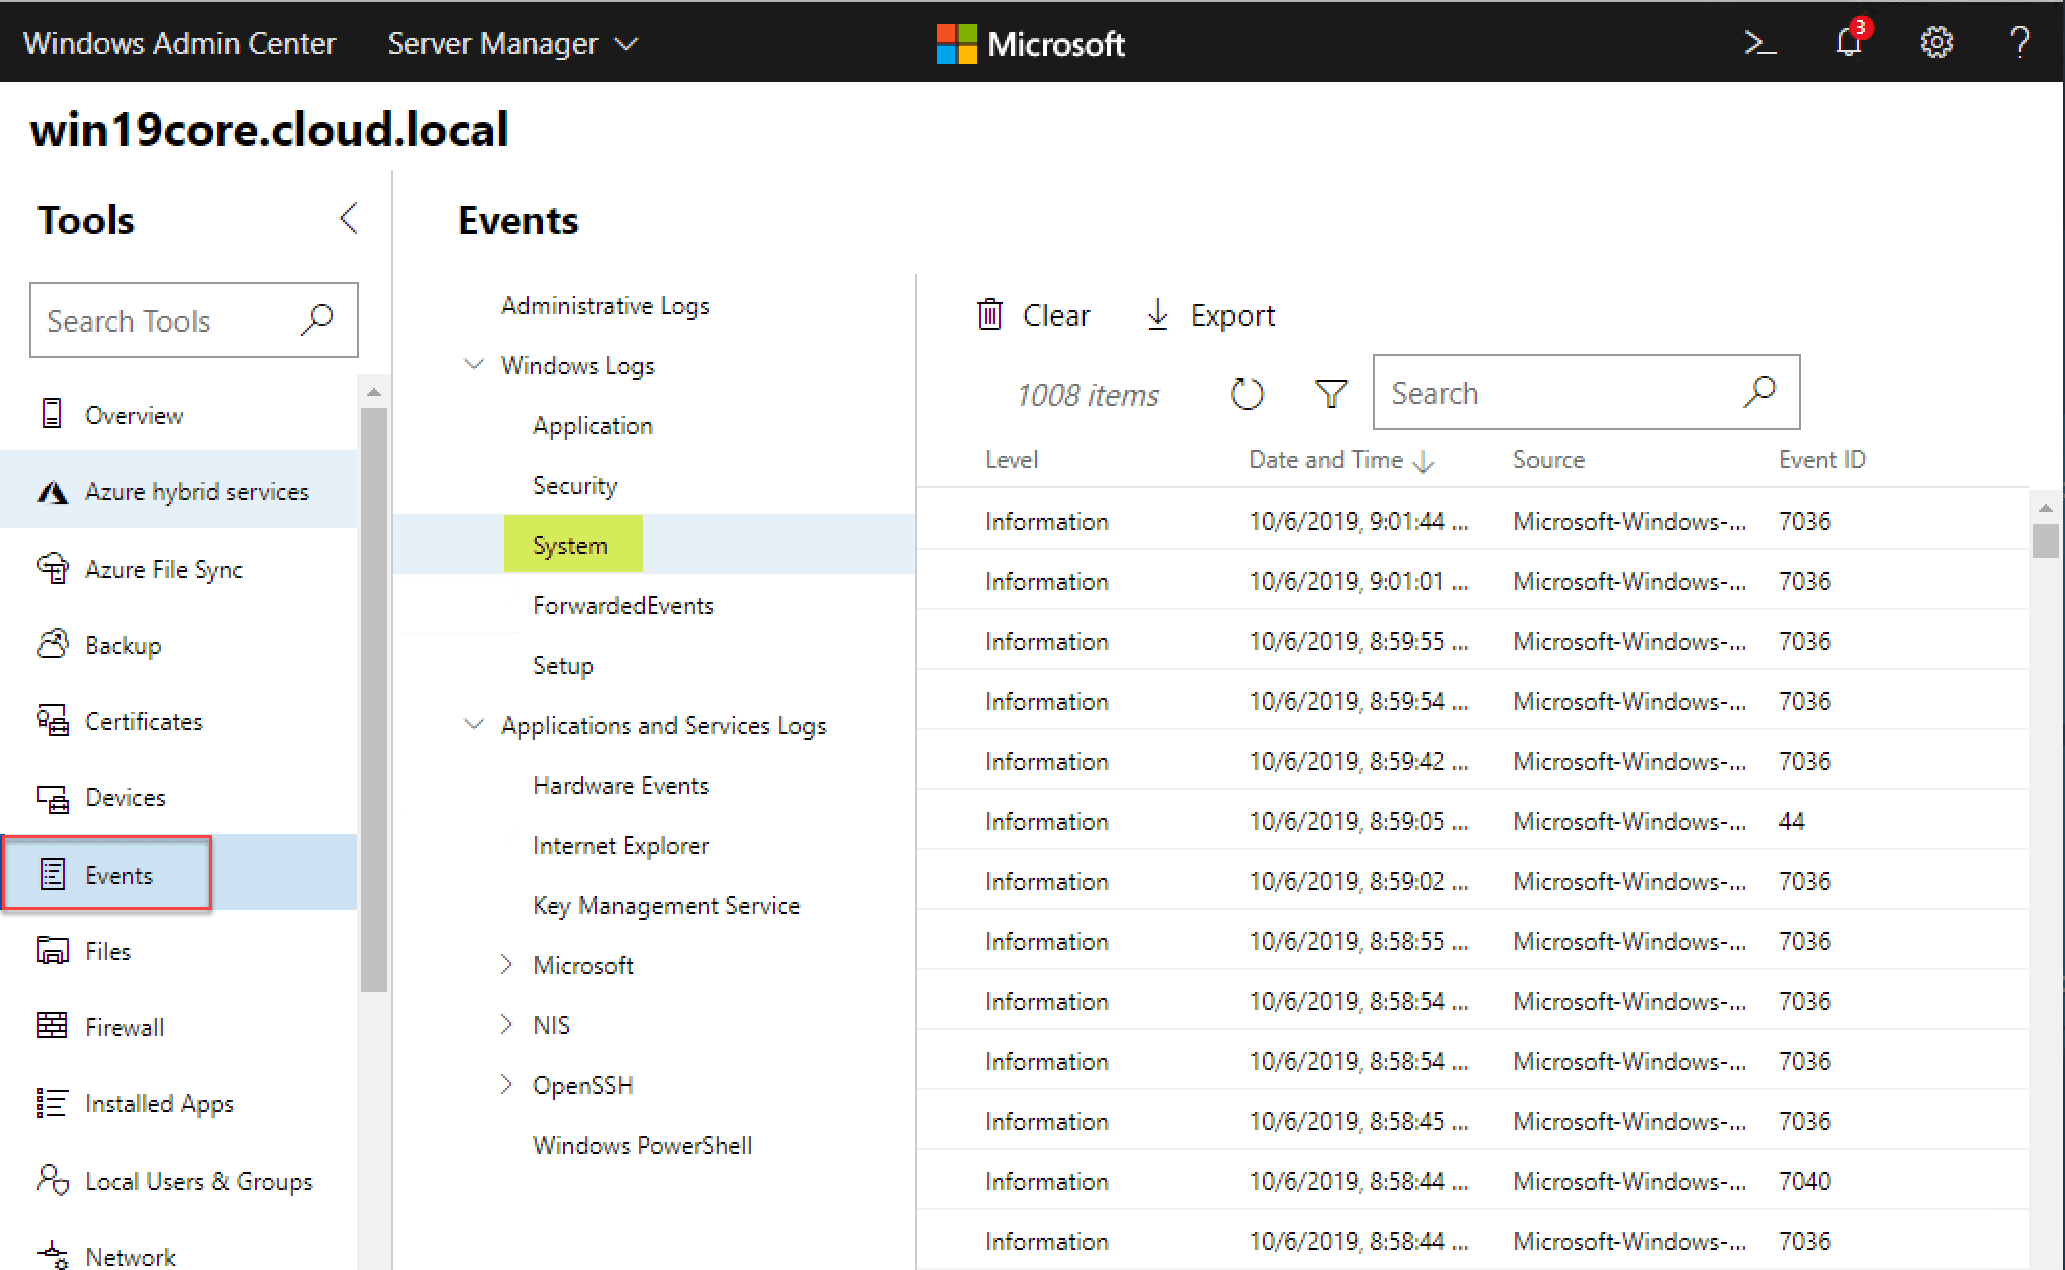
Viewing Events on your Windows Server 2019 Core Server with Windows Admin Center
Viewing events on the server by using the Events menu allows viewing all the expected event logs as you would see in the normal management console locally on the server.
Managing Files Remotely on your Windows Server 2019 Core Installation
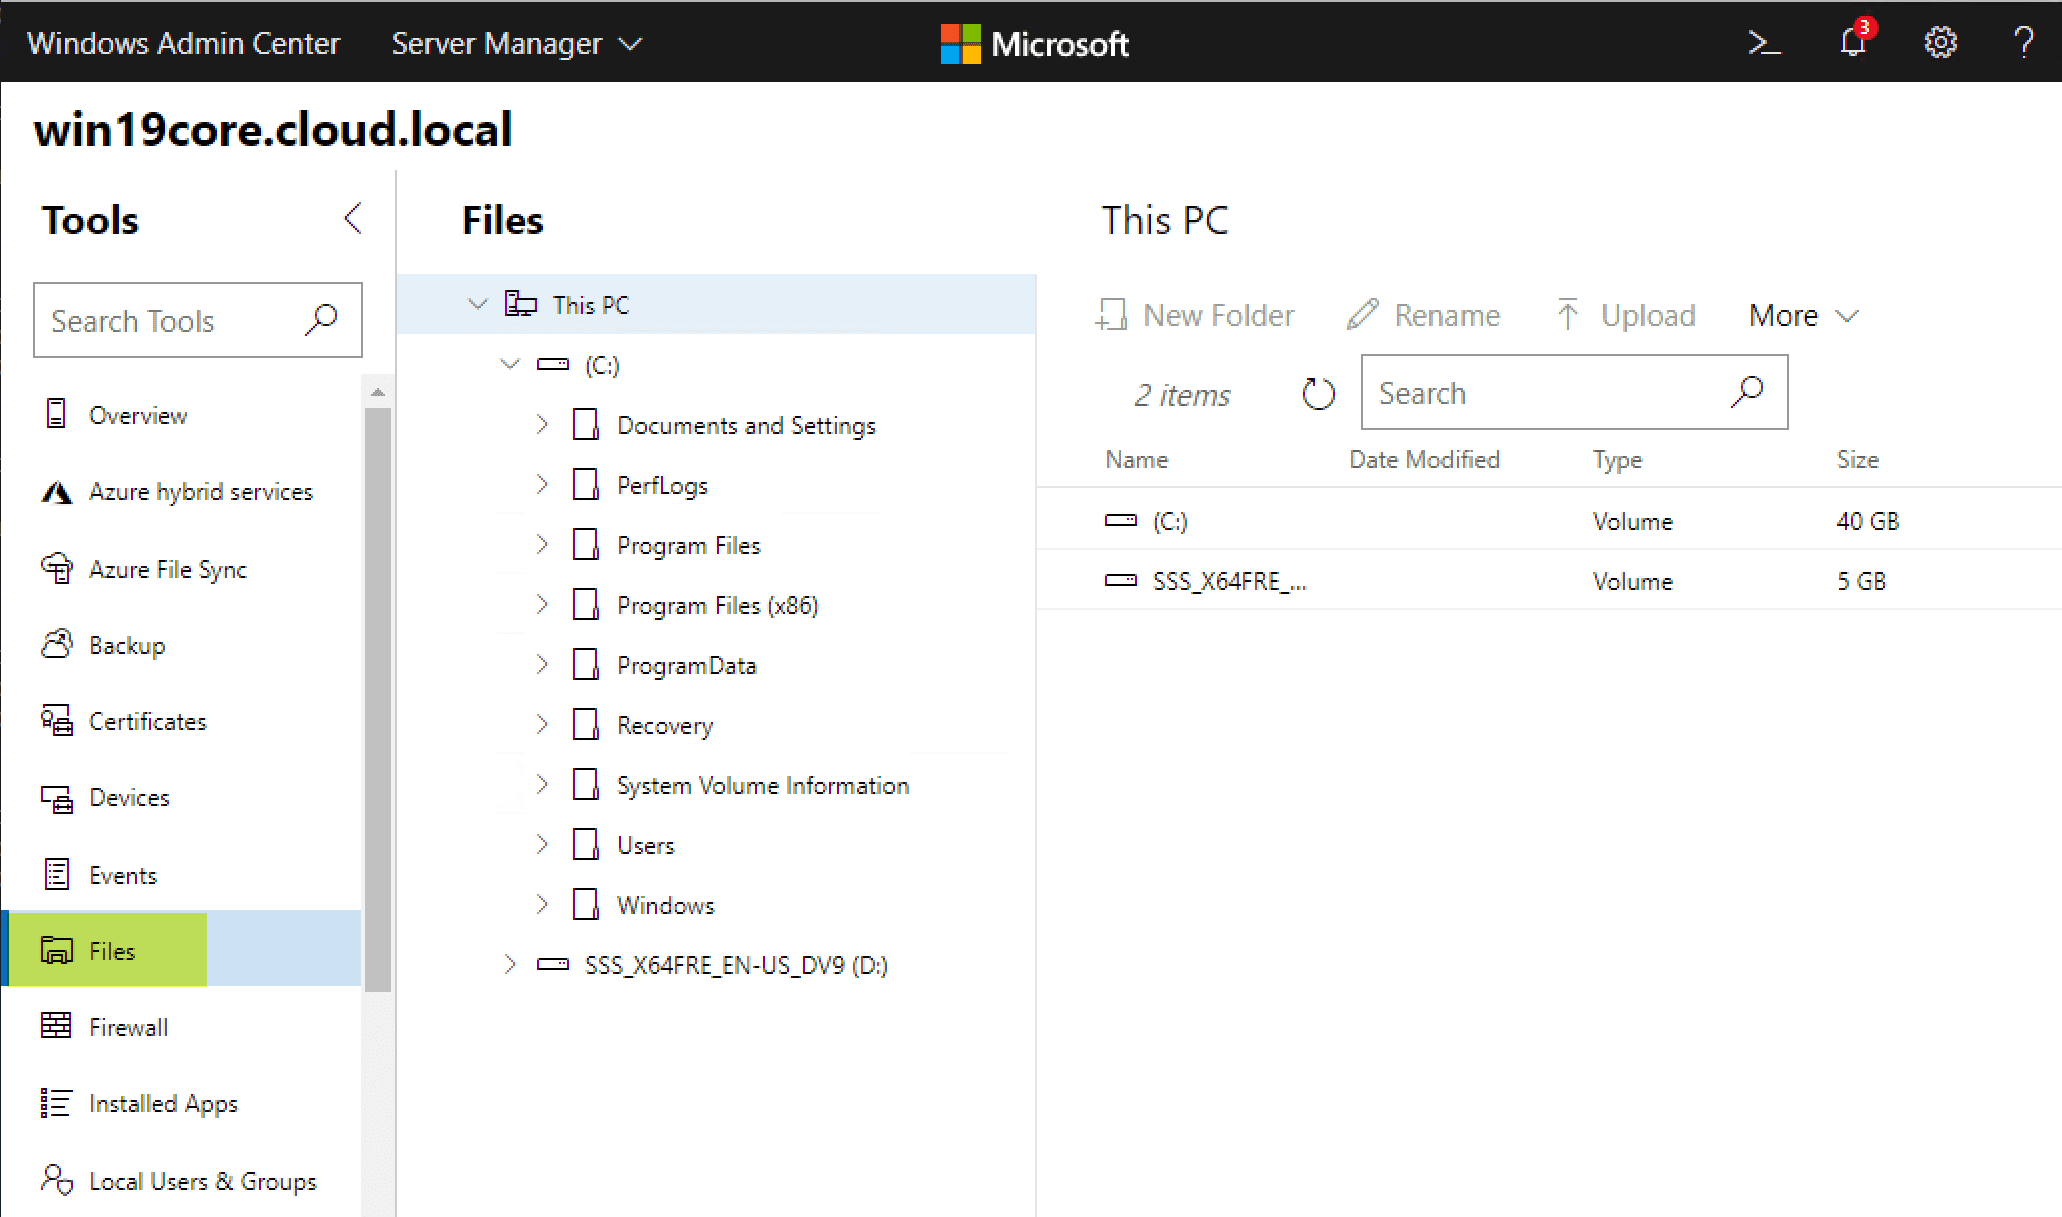
Using the Files menu, you can easily browse the files on your remote Windows Server Core server.
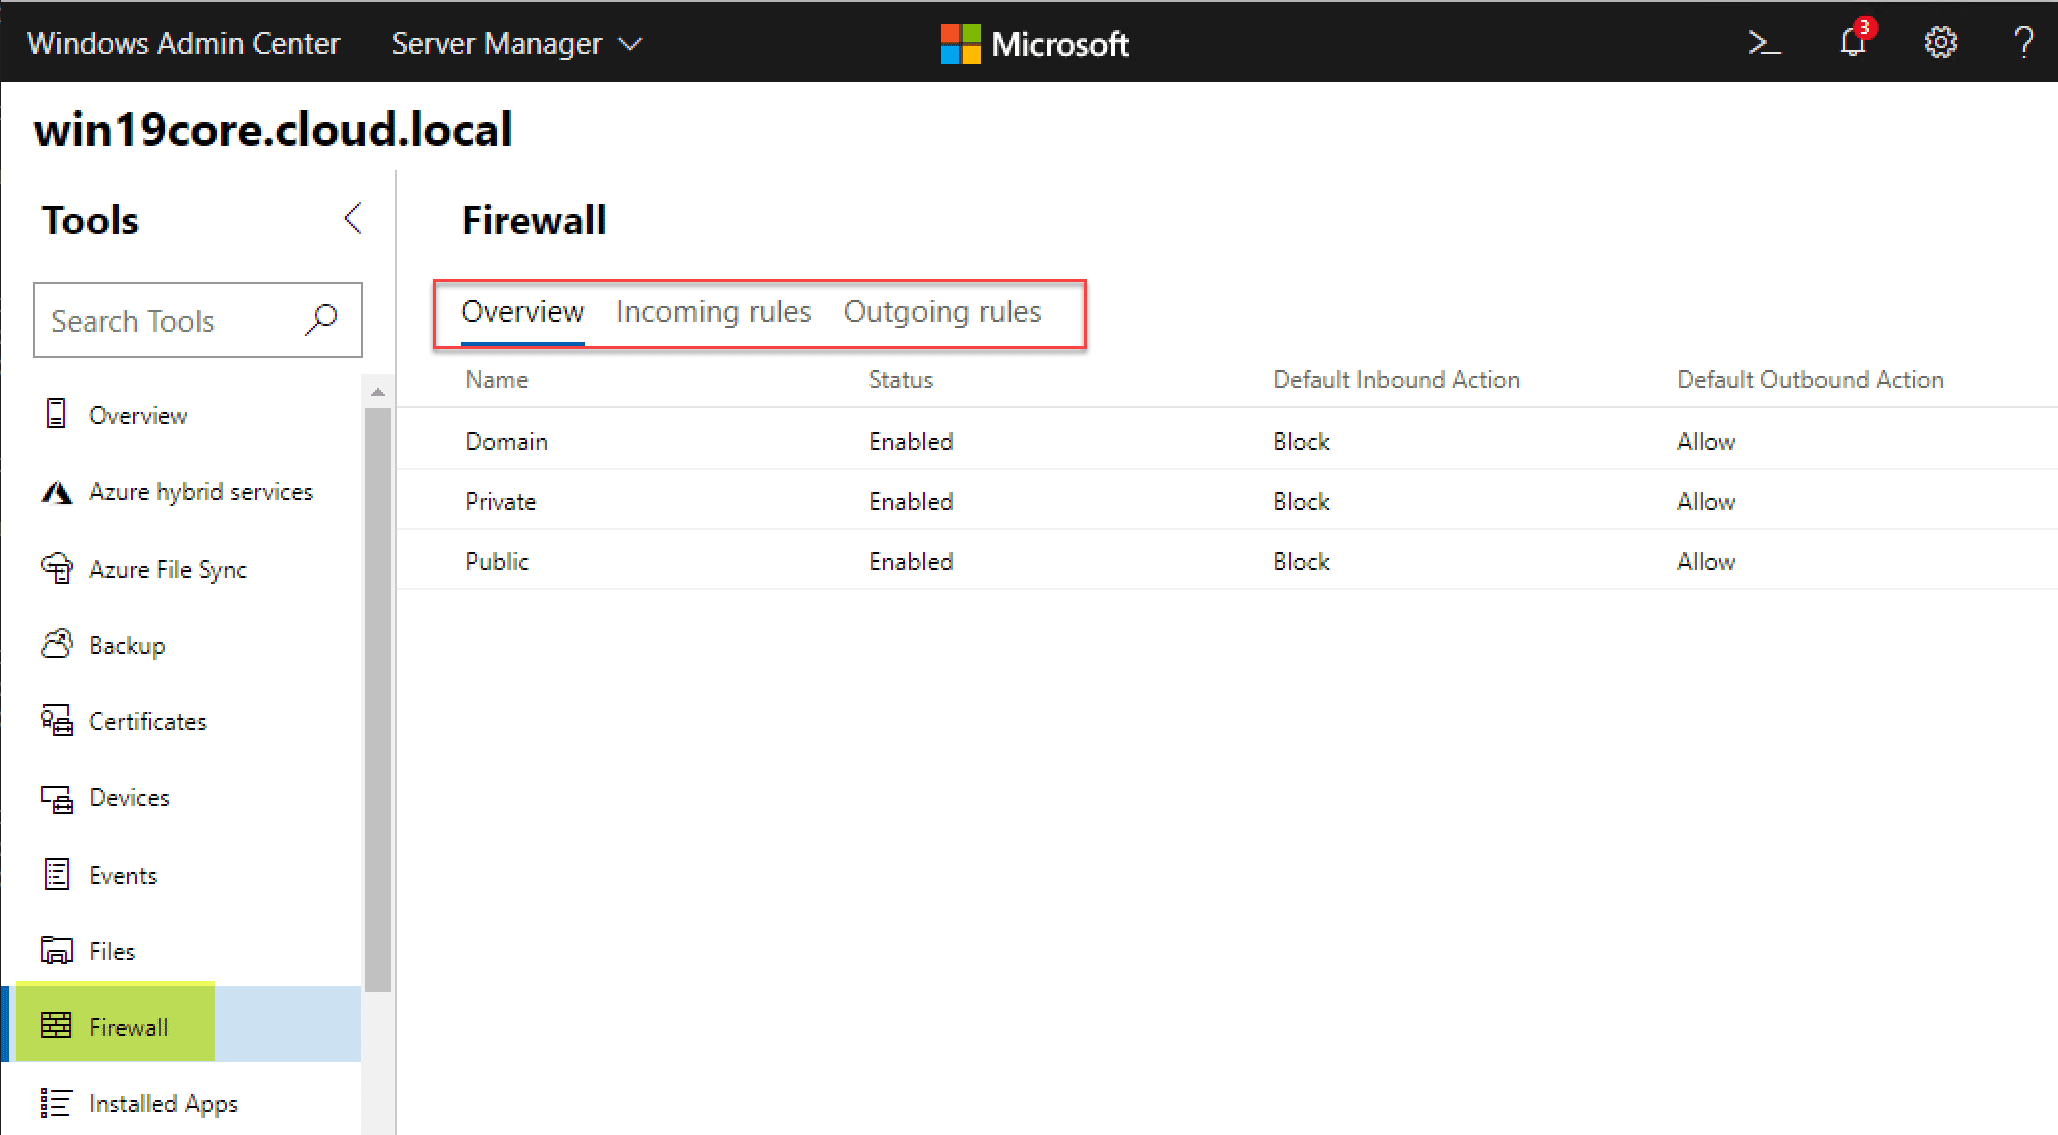
Remotely Managing Windows Firewall using Windows Admin Center
Managing your Windows Firewall settings using Windows Admin Center provides all the functionality you will need to configure your firewall exceptions and configuration.
Managing Local Users and Groups with Windows Admin Center
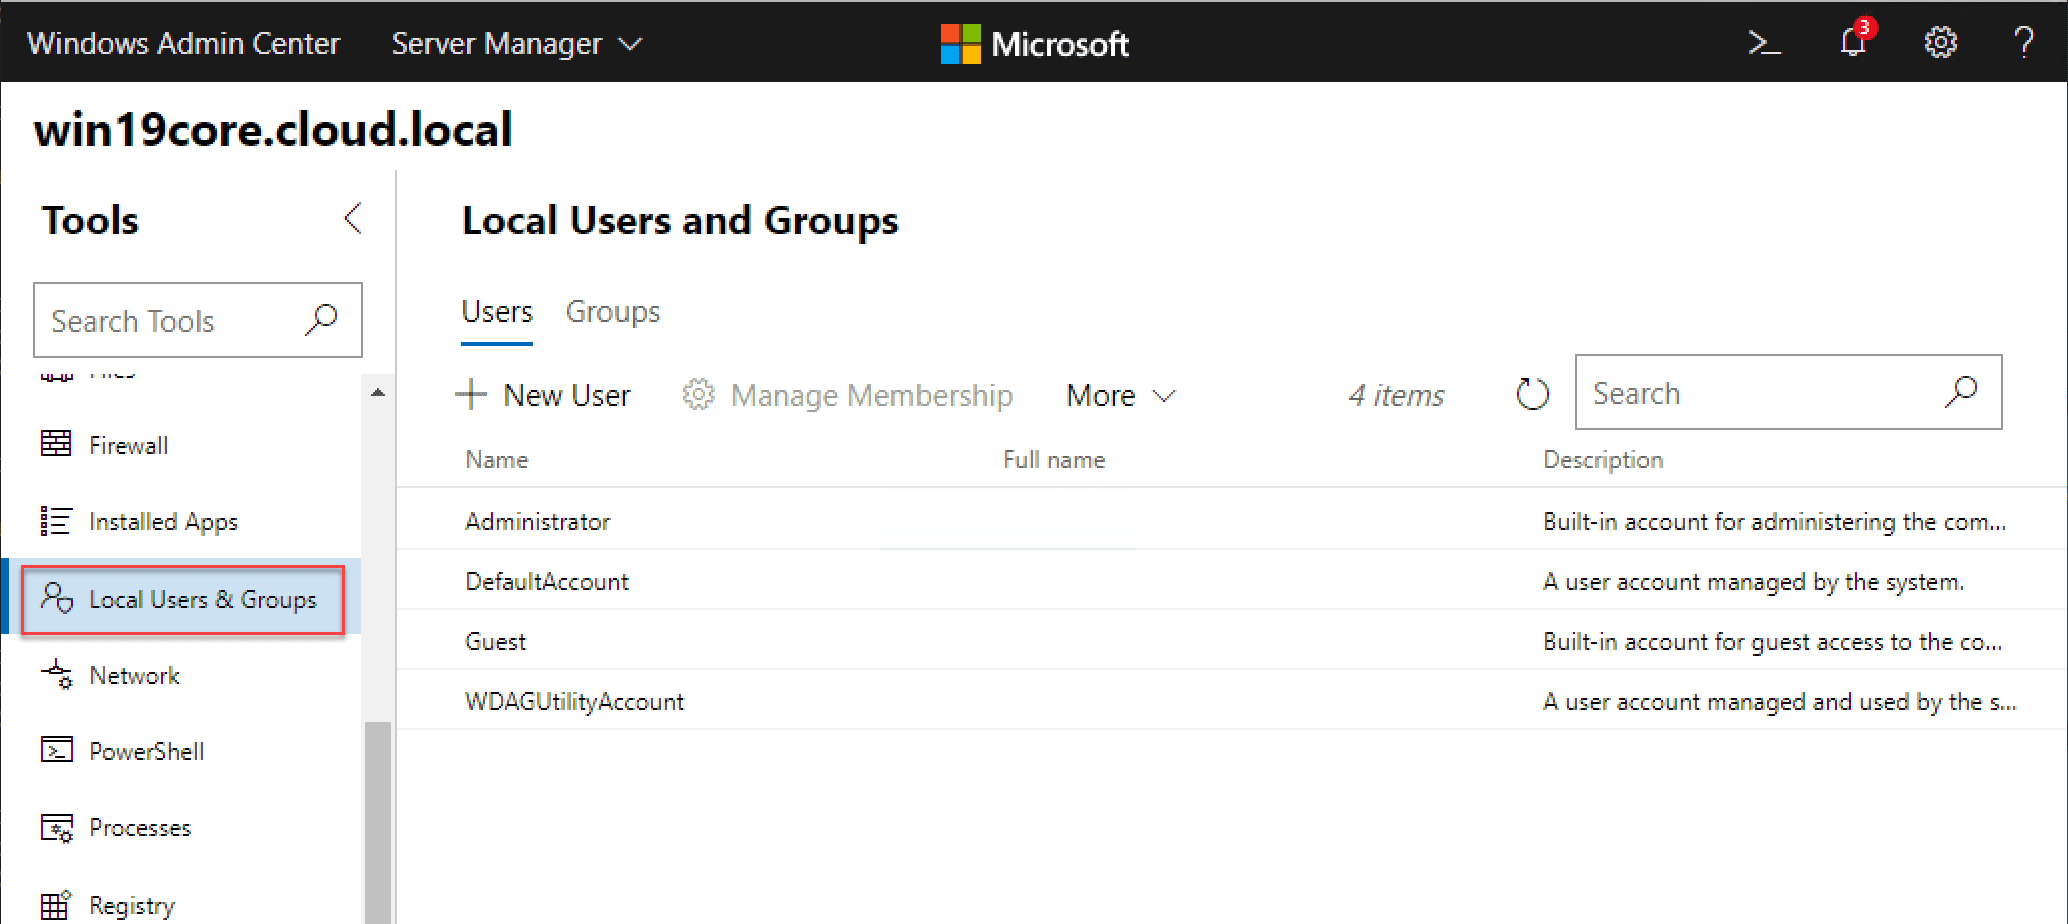
Using Windows Admin Center, you can easily add local users and groups to your remote Windows Server Core installation.
View PowerShell Script Examples
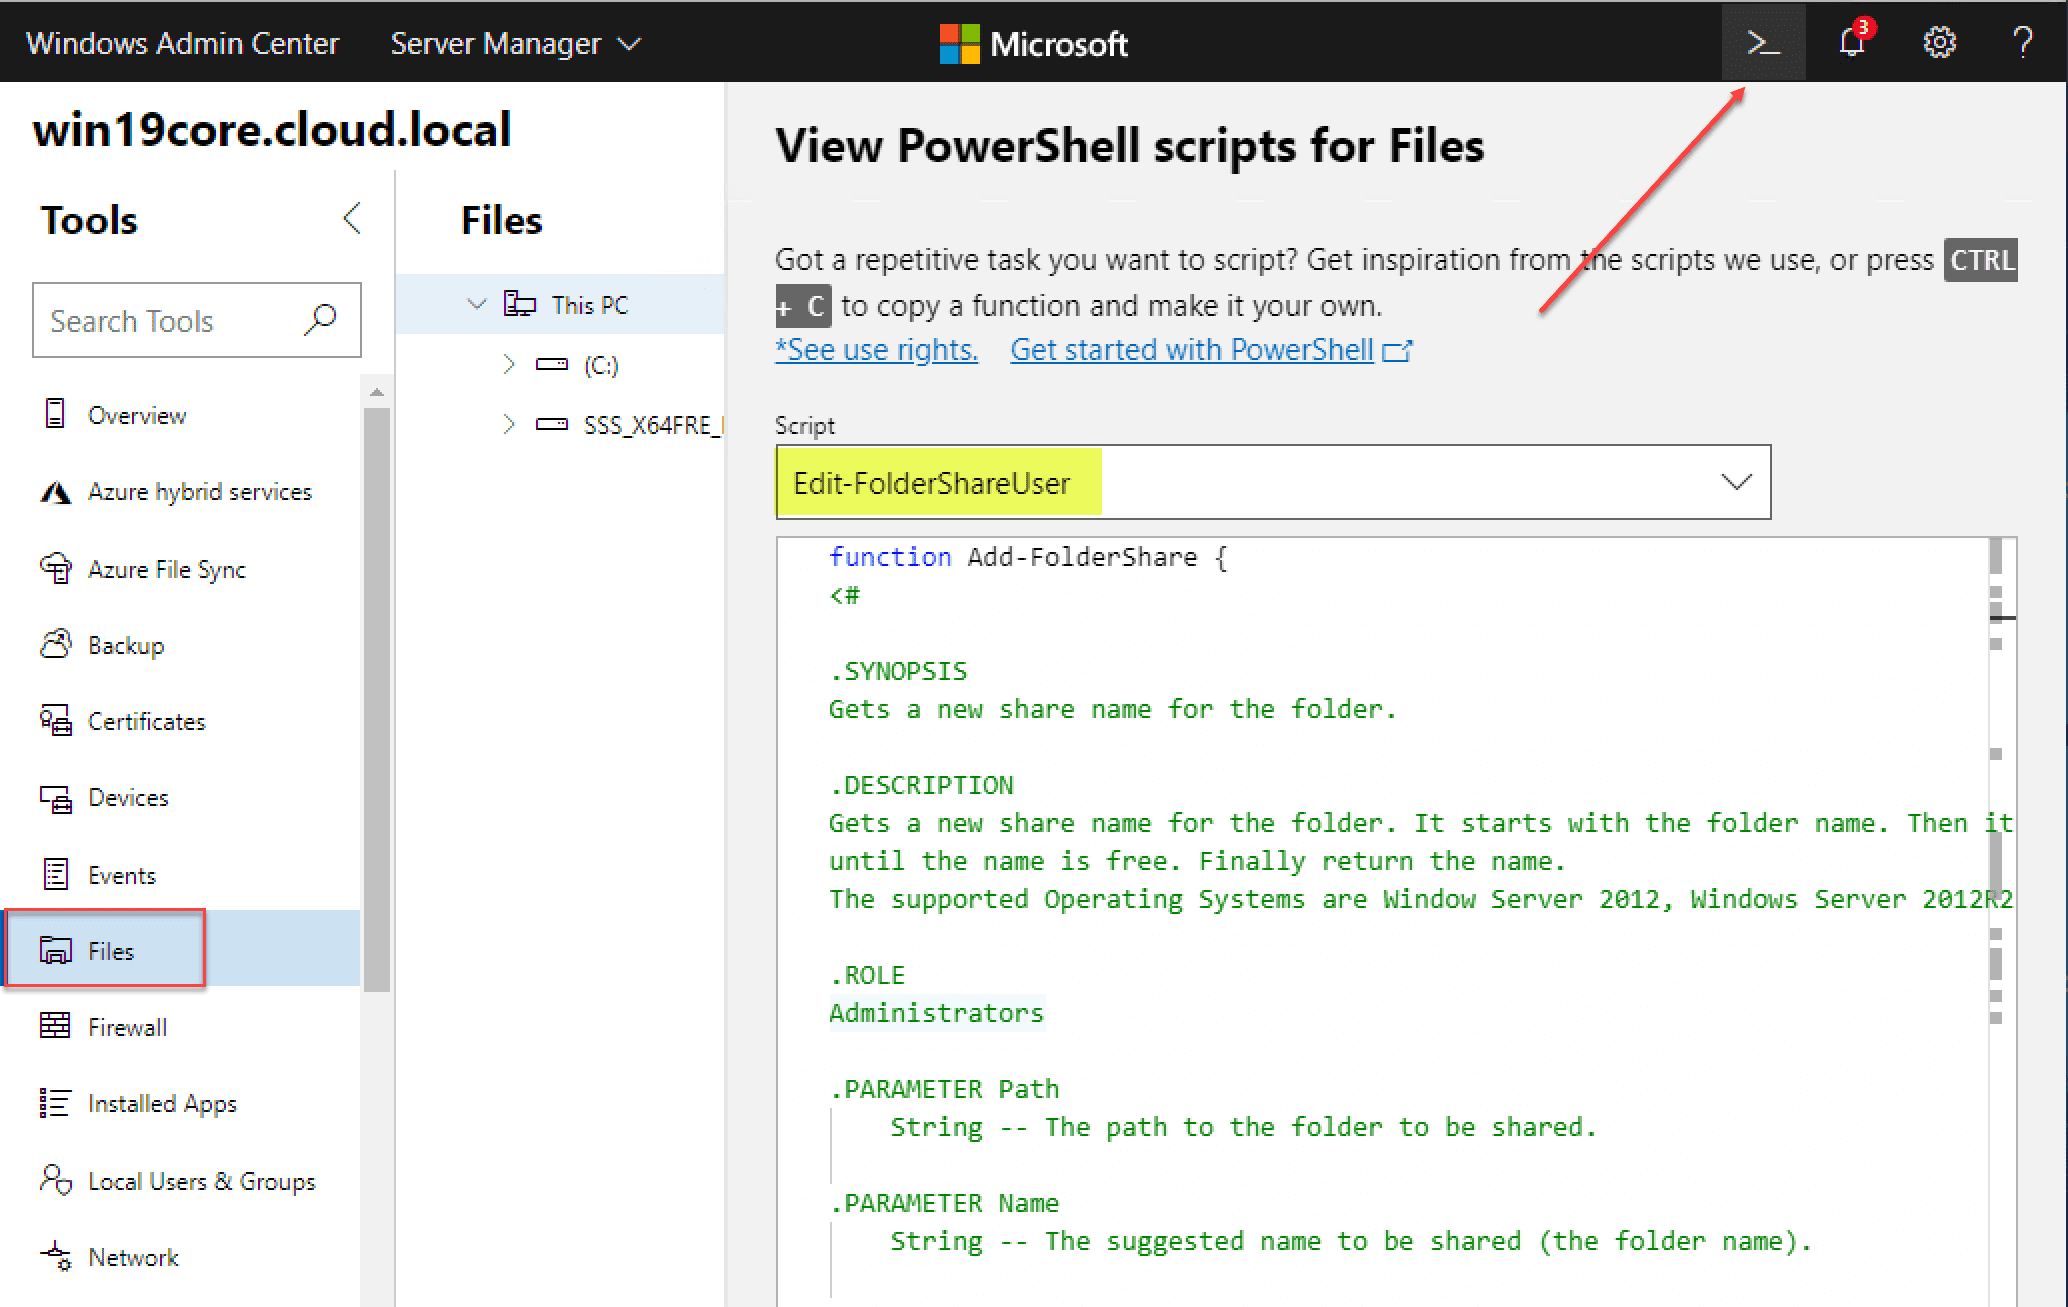
One of the coolest features I like about Windows Admin Center is that it gives you tons of PowerShell script examples in the context of each menu you are in. For example, below, we are in the Files menu. If you hit the PowerShell icon as pointed out, you will have a dropdown menu under Script that gives you many examples of PowerShell scripts in the context of working with your Files. The same is true of all the other menus. Really, really cool.
Wrapping Up
Managing Windows Server 2019 Core with Windows Admin Center is the gold standard for managing your Windows Server Core installations moving forward. Windows Admin Center is a game changer for the adoption rate of Windows Server Core installations across the board.
It provides all the needed tools in a single pane of glass management interface that allows easily configuring, managing, and provisioning needed components on your Windows Server Core installations. Since it is a free download from Microsoft, there is no downside to downloading the tool and using it.
После установки Windows Server 2019 и перед сдачей сервера клиенту вы, как хороший системный администратор, должны выполнить первоначальную настройку сервера. Во-первых, это избавит вас от возможных претензий и при этом не займёт много времени. Во-вторых, покажет вас с лучшей стороны. В третьих, другой сисадмин, который будет настраивать сервер после вас, не будет ругаться и стонать.
Установка Windows Server 2019 на виртуальную машину VMware
Итак, ОС установлена, что дальше?
Настройка сети и Интернет
Сначала настраиваем сеть. Убедитесь что драйвера сетевой карты корректно настроены. Если драйвера не настроены, то нужно их установить.
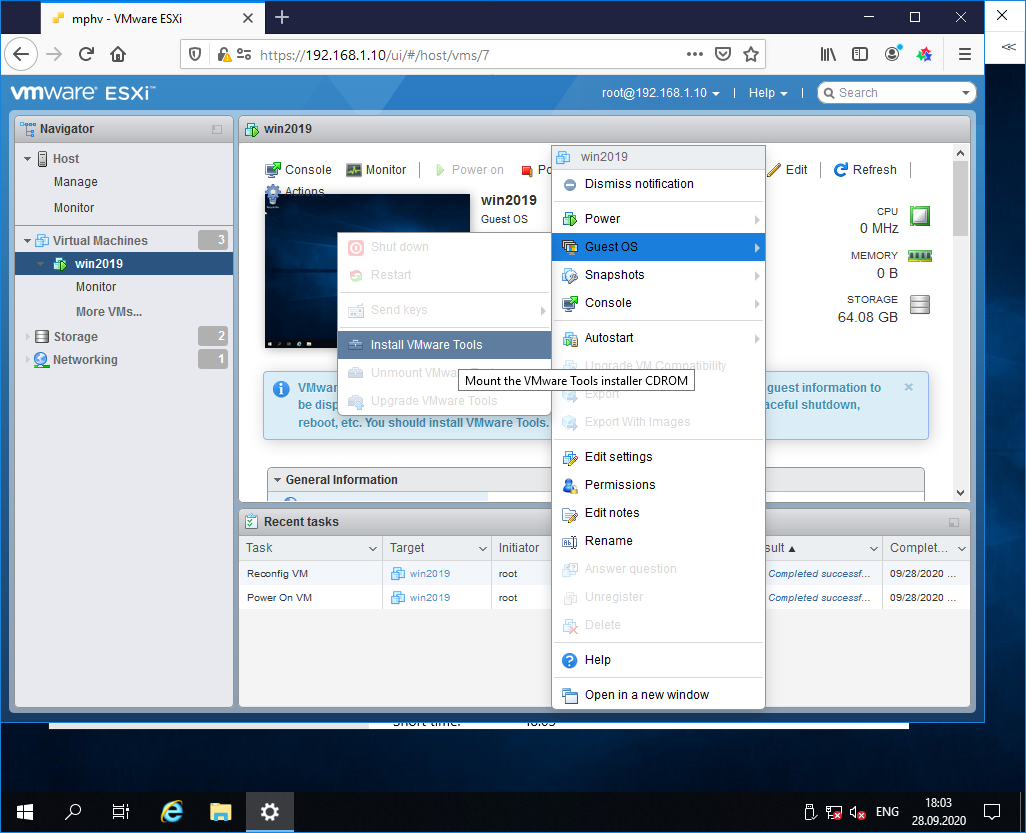
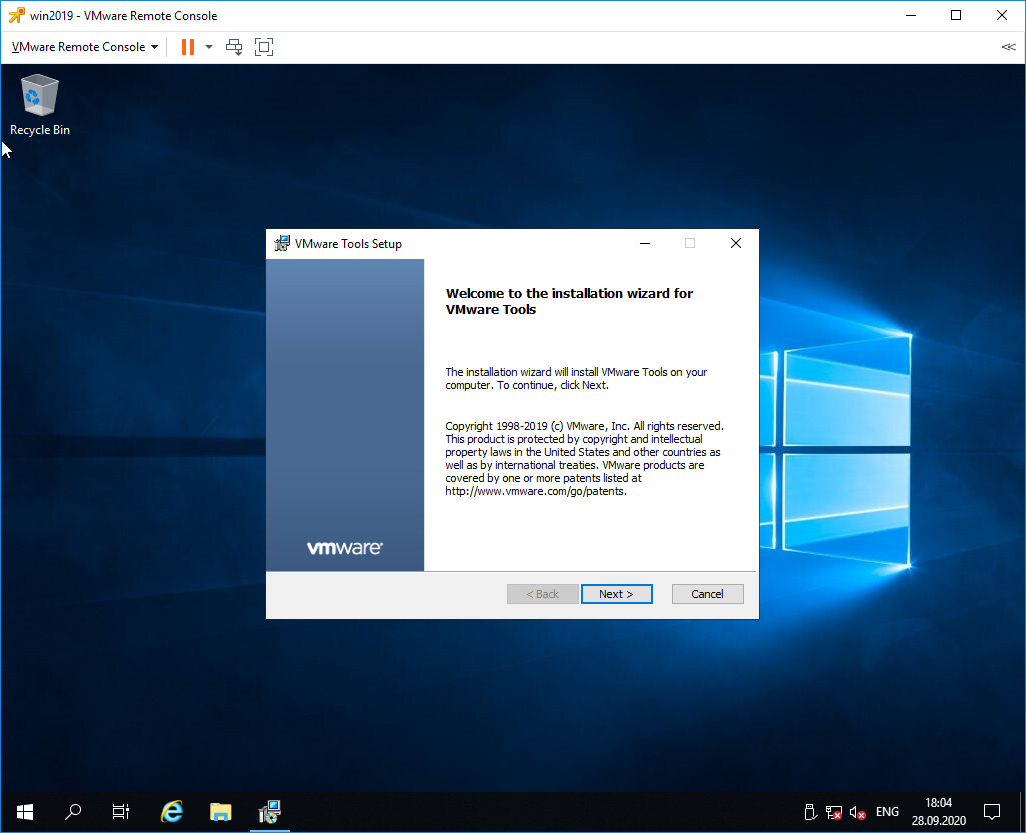
Например, при установке Windows Server 2019 на виртуальную машину VMware с сетевой картой VMXNET3, драйвера устанавливаются вместе с VMware Tools.
VMware Tools устанавливаются просто, подробно останавливаться на этом не будем.
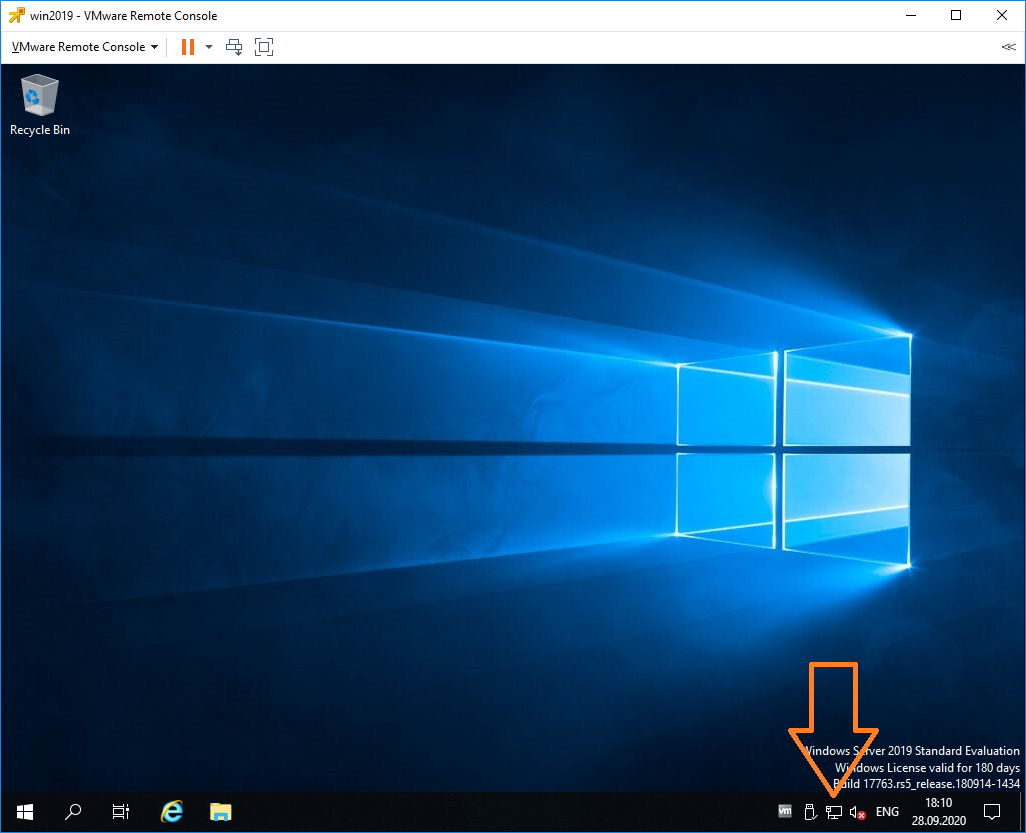
Если в сети доступен DHCP сервер и есть доступ к интернету, то сеть автоматически заработает и появится Интернет, это видно по значку.
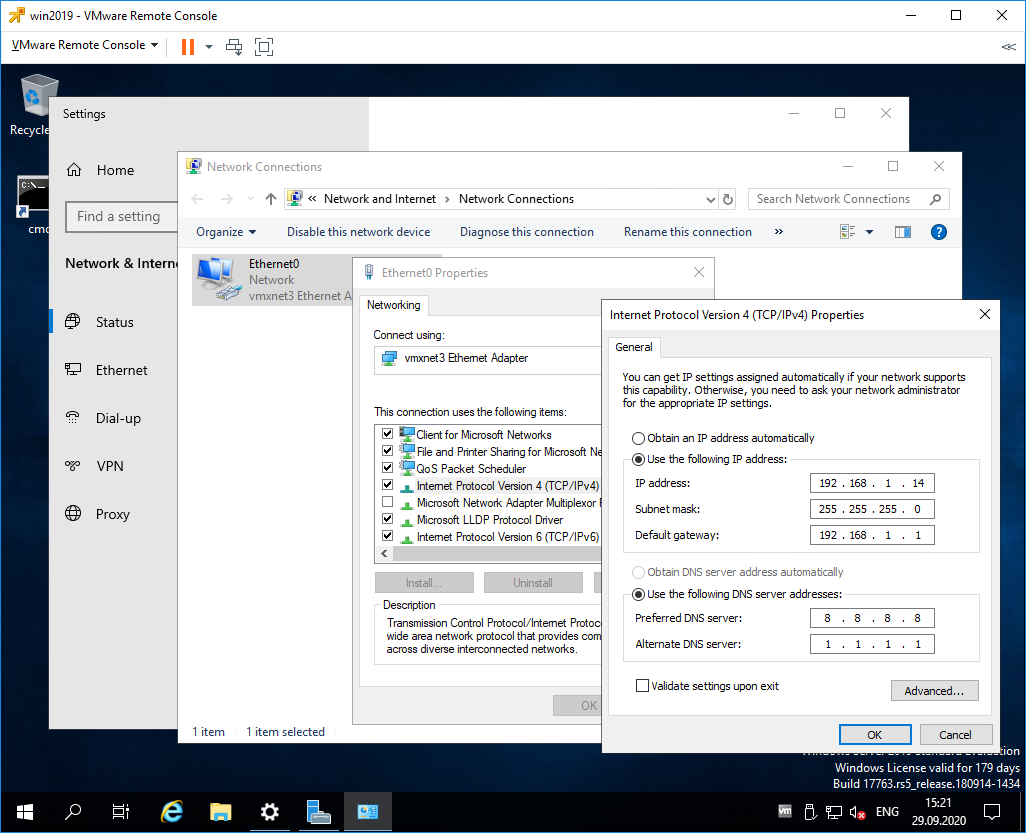
По умолчанию сеть настроена на получение IP адреса по DHCP. Обычно принято назначать серверам статические IP адреса. Выясните у клиента настройки для сети сервера и настройте IPv4 в свойствах сетевого адаптера.
Если в компании нет DNS сервера и провайдер не указал свои адреса, то можно использовать публичные DNS сервера, такие как:
- 8.8.8.8
- 8.8.4.4
- 1.1.1.1
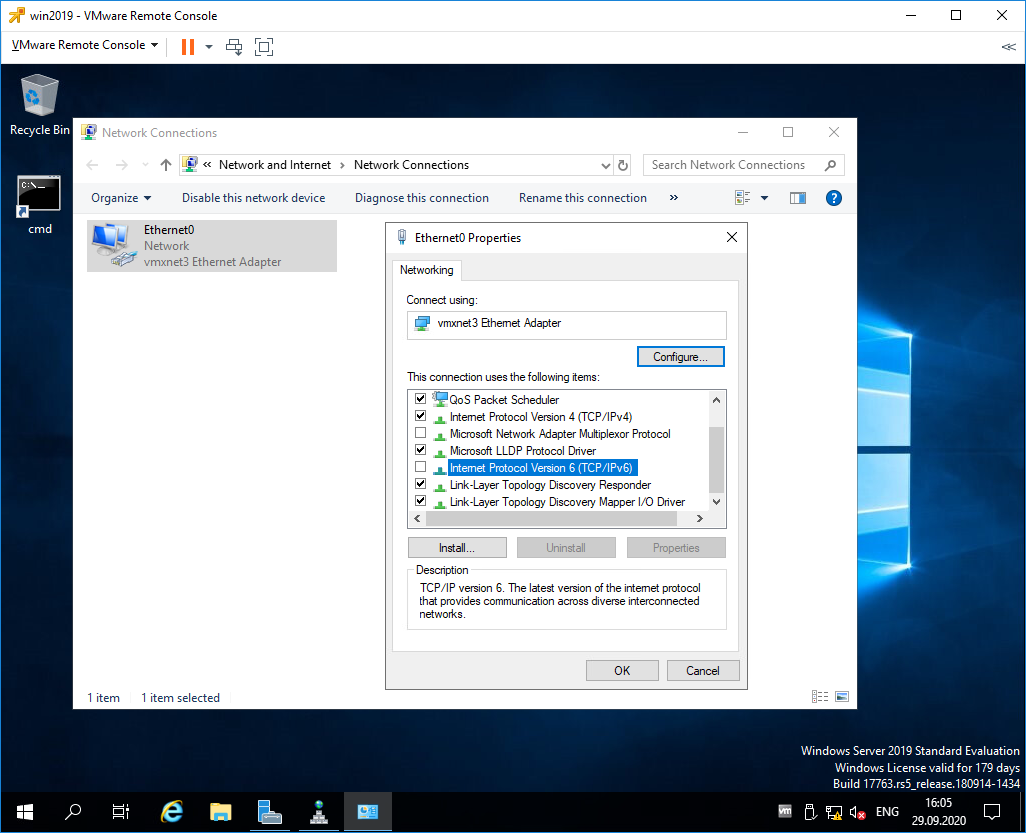
Если в компании явно не требуется протокол IPv6, то лучше его отключить.
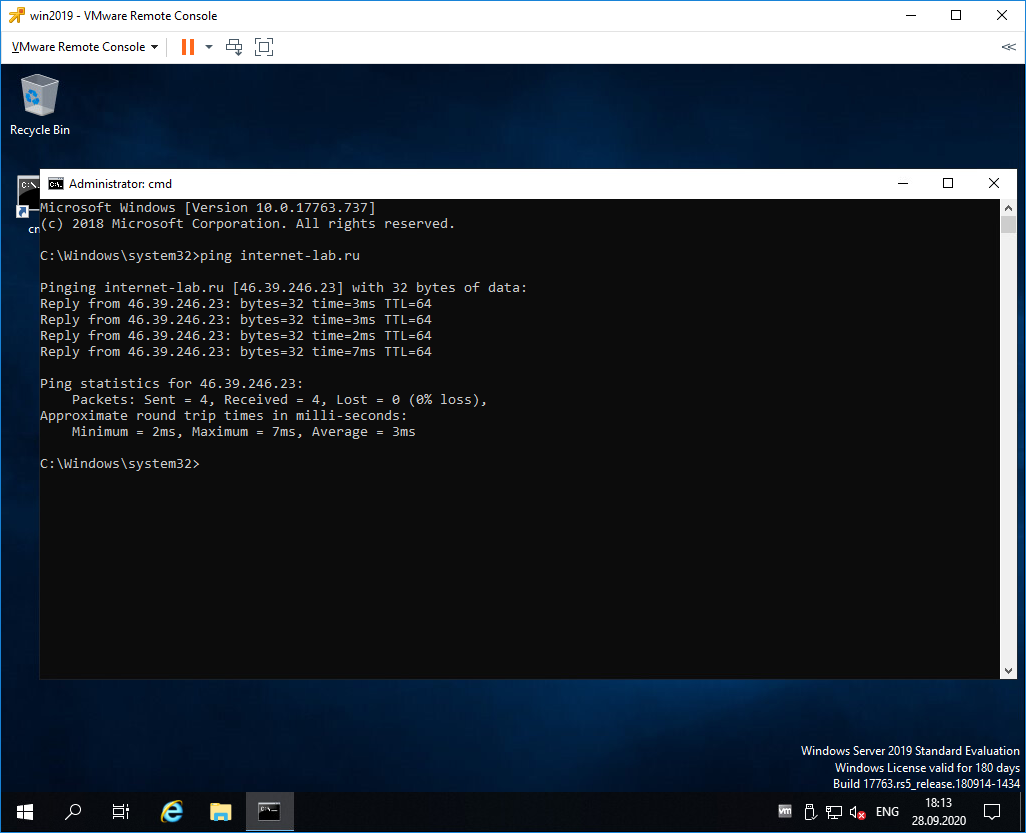
Сеть настроена, Интернет есть. Можно для уверенности выполнить ping любого сайта в Интернет.
Настройка драйверов
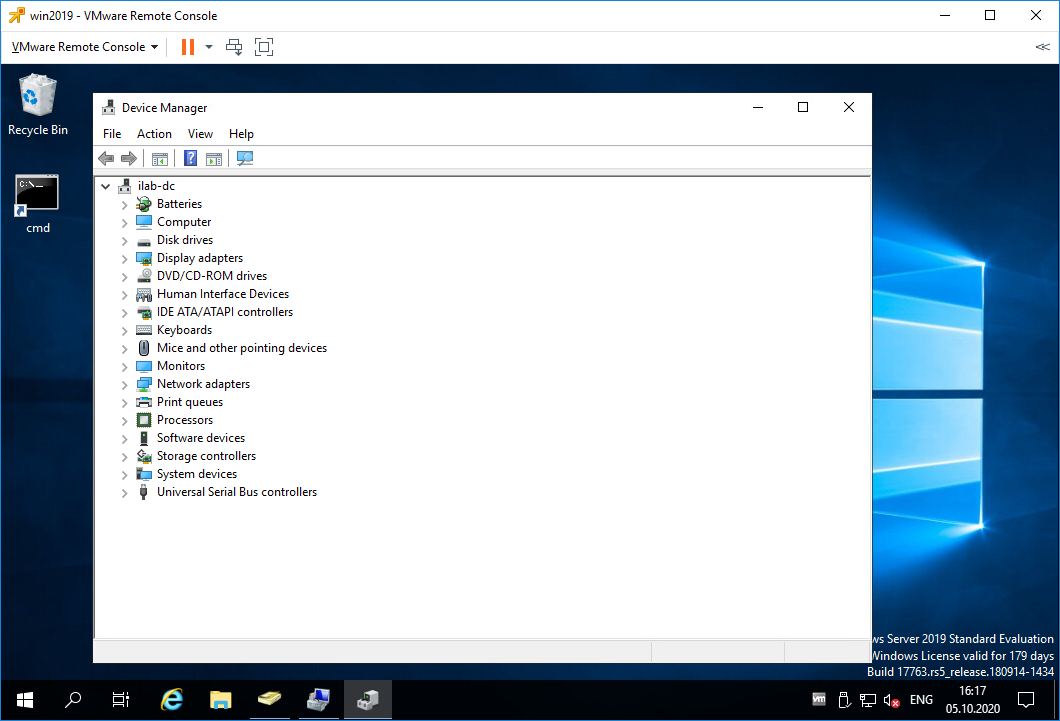
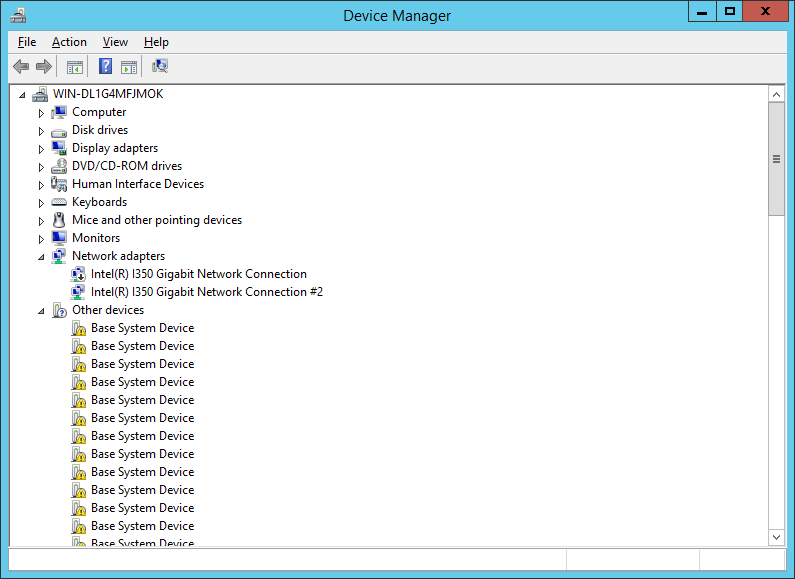
Диспетчер устройств покажет вам, есть ли неизвестные устройства.
При установке на виртуальную машину обычно проблем с драйверами не много, но если вы устанавливаете Windows Server 2019 на железный сервер, то картина может быть такой:
В этом случае драйвера можно найти на сайтах производителей серверов. Например, драйвера для серверов HPE можно установить из Service Pack for ProLiant:
SPP — установка Service Pack for Proliant из Windows
В крайнем случае можно найти в Интернете сборник драйверов и воспользоваться им, но я таким обычно не занимаюсь.
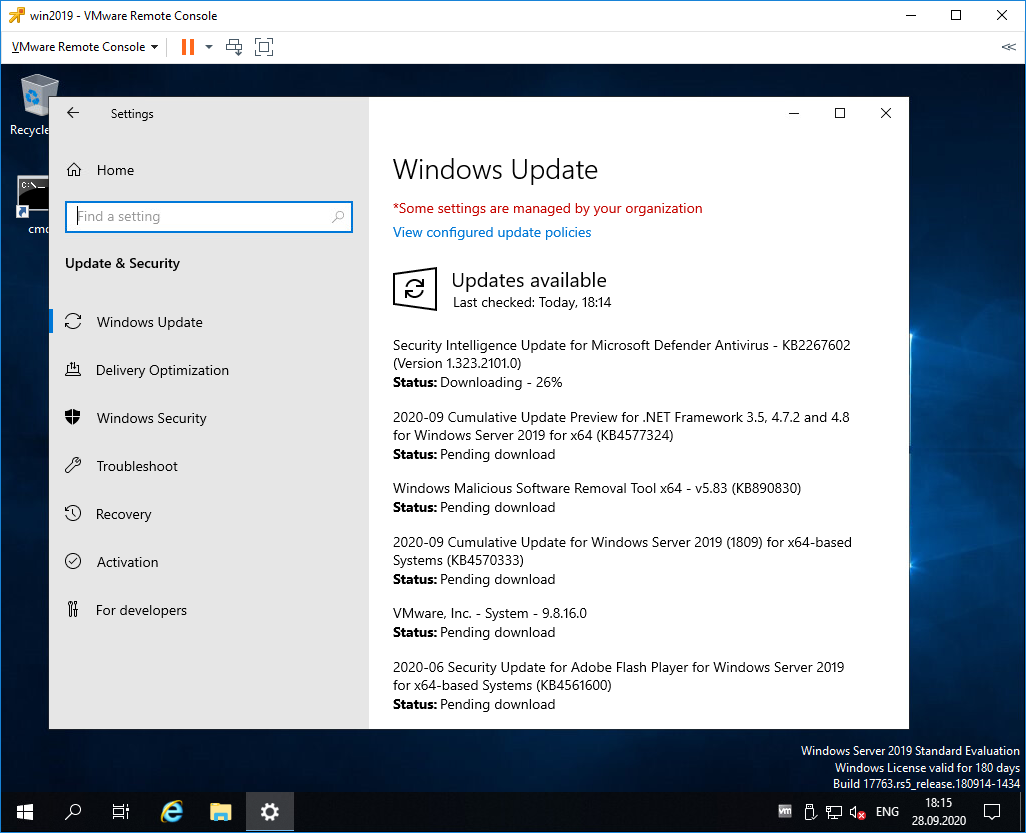
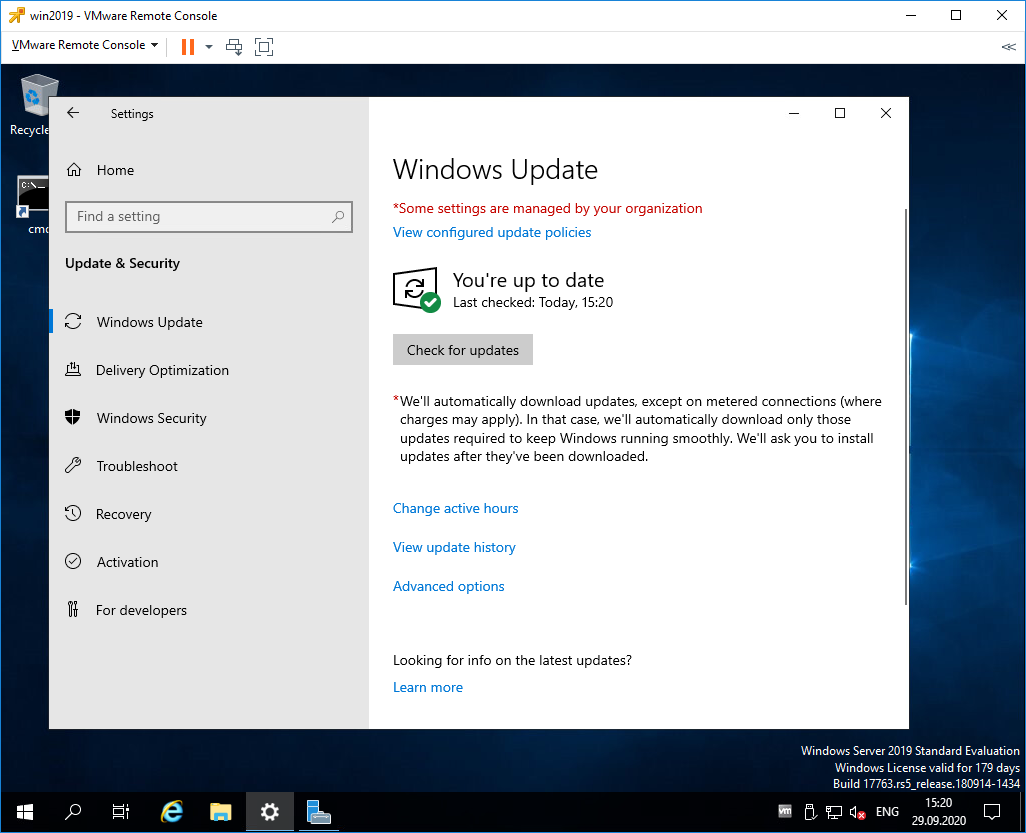
Установка обновлений
Устанавливать обновления нужно. Если вы скачали самый свежий образ Windows Server 2019, то и в этом случае найдётся парочка обновлений.
Процесс обновления может затянуться, иногда я оставляю эту операцию на ночь.
Активация Windows
Активируйте Windows, если у вас есть ключ. Даже если у вас ознакомительная версия и Windows активируется сам, то проверьте доступность Интернет. В ином случае без активации через 10 дней сервер начнёт выключаться каждые 30 минут.
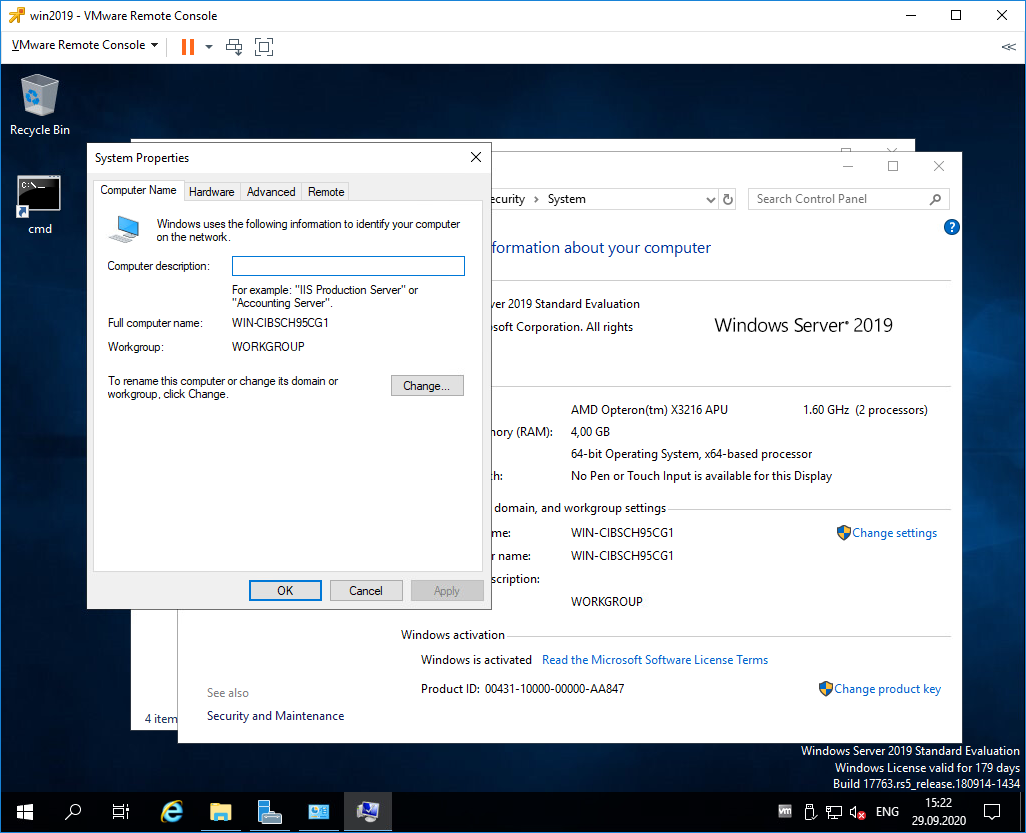
Имя сервера
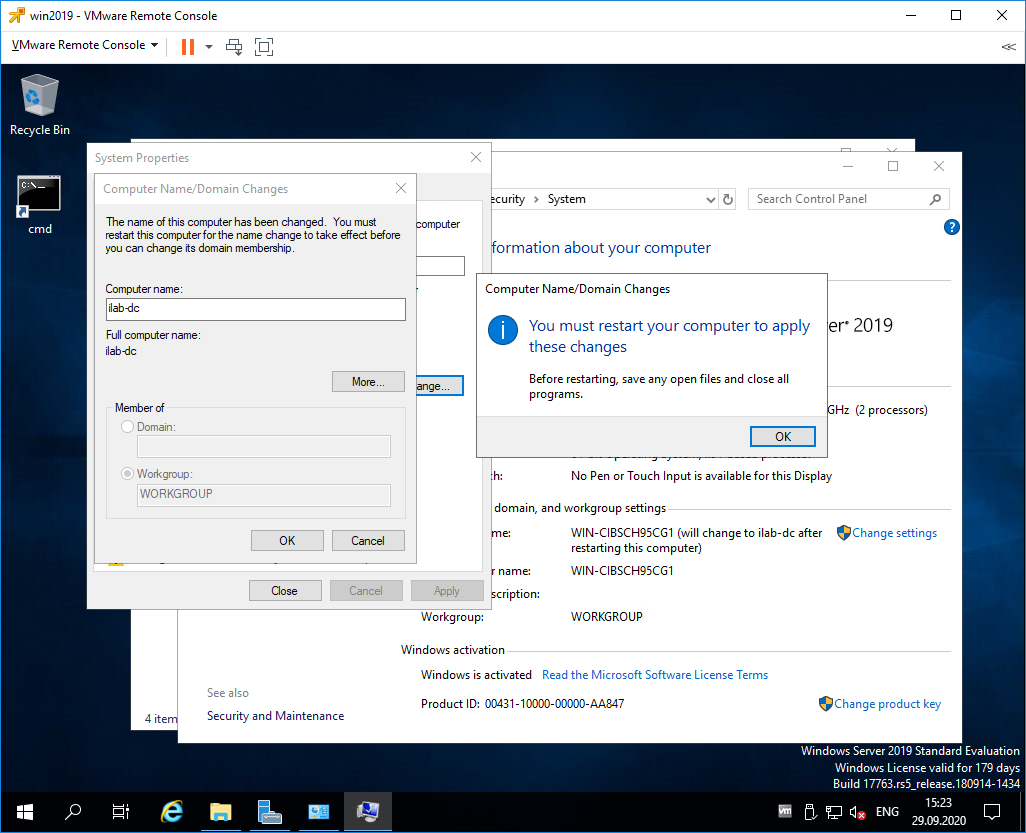
Укажите имя сервера (узнайте у клиента), при необходимости введите сервер в домен, для этого потребуются права администратора домена.
После смены имени сервера может потребоваться перезагрузка.
Региональные настройки, время и временная зона
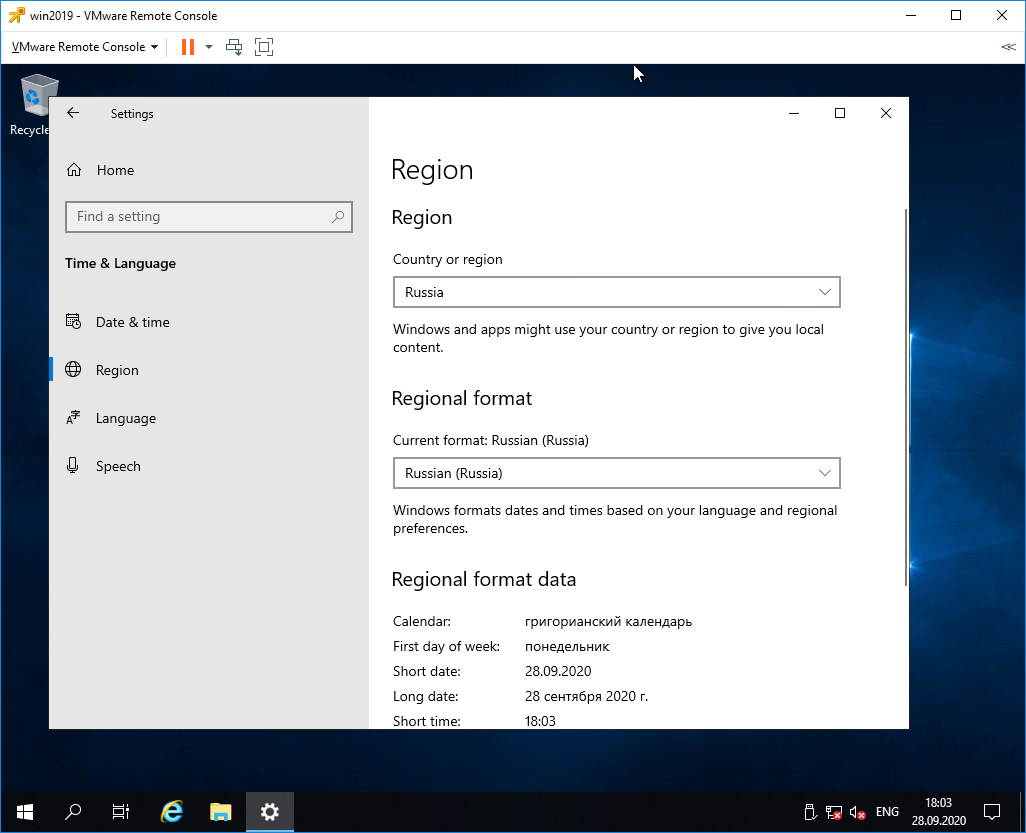
Настройте язык, временную зону и время. Временную зону уточните у клиента. В Windows Server 2019 эти настройки можно сделать с помощью панели управления. Единственное, теперь регион вынесен в настройки интерфейса метро: Settings > Region.
Роль сервера и софт
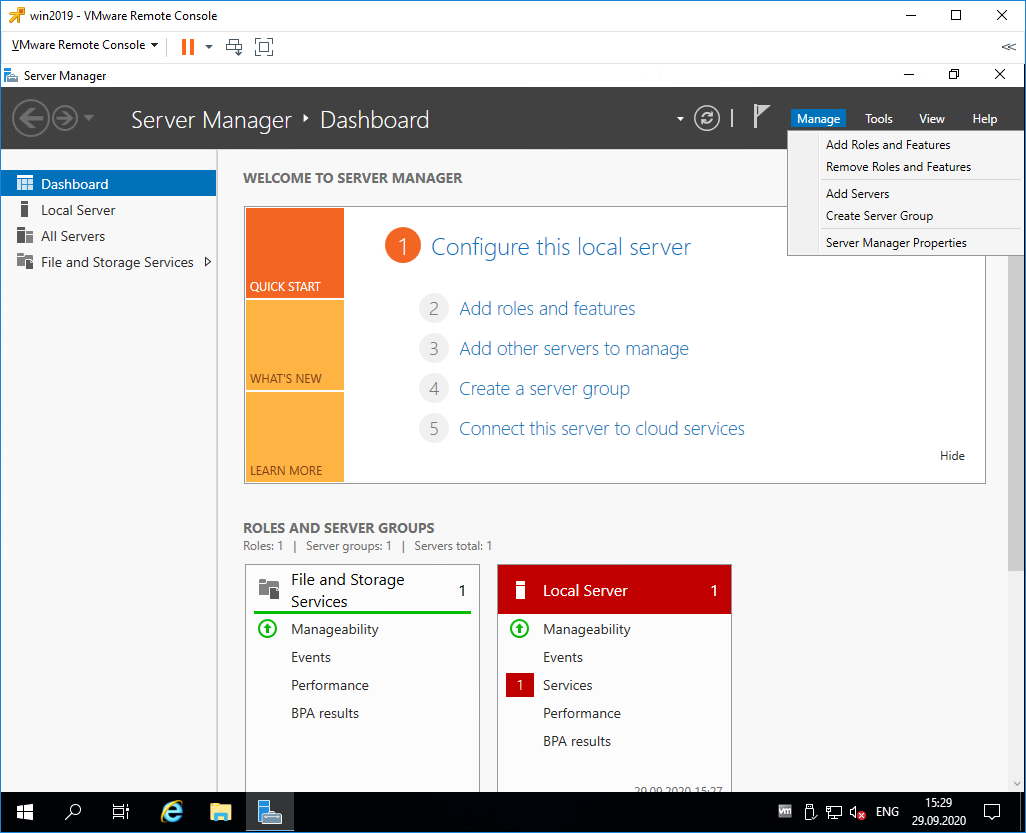
В зависимости от требований установите роли сервера и необходимый софт.
Удалённый доступ
В зависимости от необходимости настройте удалённый доступ к серверу. Это может быть RDP, VNC, виртуальная или KVM консоль.
Заключение
Драйвера установлены, сеть настроена, регион проверен, обновления есть, активация выполнена, имя задано, роли и софт присутствует, доступ есть. Сервер можно отдавать заказчику.
Содержание
- DATAENGINER
- Установка и настройка WEB-сервера IIS, PHP и MySQL на Windows Server 2012
- Сейчас читают:
- Установка для Windows Server 2012
- Устанавливаем и настраиваем службу IIS
- Устанавливаем PHP
- Устанавливаем MySQL
- Установка модуля rewrite
- Установка для Windows Server 2019
- Установка и настройка веб-сервера IIS + PHP + MySQL
- Установка IIS
- Развертывание отдельного сайта
- Hello from PHP site
- Установка PHP
- Настройка сайта на IIS для работы с PHP
- PHP Manager в IIS
- Установка MySQL
- Создание сайта на windows server 2019
DATAENGINER
Добрый день! Сегодня мы продолжаем создавать наш ftp-server на ОС Windows Server 2019. В данной статье мы подробно рассмотрим создание своего первого ftp-сайта.
Итак, приступим к установке.
Шаг 1. Откроем панель управления сервером Windows 2019, в боковом меню выбираем IIS.
Шаг 2. Перед нами dashboard (рабочий стол) IIS Windows Server 2019, где будет указан наш сервер. Выделяем его и нажимаем правой кнопкой мыши, в появившемся меню выбираем Internet Information Server Manager.
Шаг 3. Перед нами появится консоль управления IIS Manager.Нажмем на наш сервер и перед нами появятся настройки и конфигурация нашего IIS 10.
Как видите – это довольное большое меню с различными значками и множеством настроек.
Шаг 4. Для дальнейшей работы, нам необходимо создать сайт Ftp. Нажмем в боковом меню на наш сервер и выберем Добавить ftp – сайт (Add ftp – site)
Шаг 5. Укажем имя сайта и путь к директории ftp-сайта(где будут храниться файлы). Я уже предварительно создал папку Ftp на локальном диске C. Сайт назовем «FtpTest».
Шаг 6. Далее в выпадающем списке выбираем наш ip-адрес, а также отмечаем NoSSL. No SSL значит, что мы не будем использовать SSL шифрование.
Шаг 7. Далее в качестве аутентификации, выбираем «Basic», а на вопрос кому предоставлять доступ в выпадающем списке выбираем «Specified roles or user groups». В качестве группы, указываем группу ftp-test. Разрешаем запись и чтение установив галочки «Read» и «Write». Нажимаем Finish.
Теперь наш новый Ftp-сайт появится в боковом меню IIS Manager.
Источник
Установка и настройка WEB-сервера IIS, PHP и MySQL на Windows Server 2012
Сейчас читают:
IIS — служба Microsoft Windows, предназначенная для развертывания web-сервера. Служба IIS является отдельной функцией ОС, и изначально она не установлена.
Установка для Windows Server 2012
Устанавливаем и настраиваем службу IIS
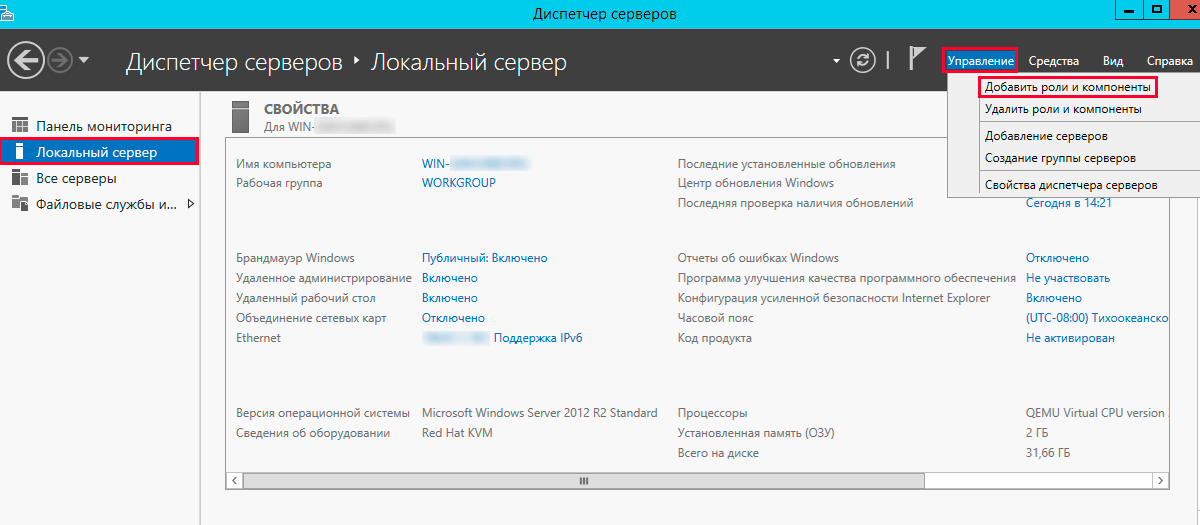
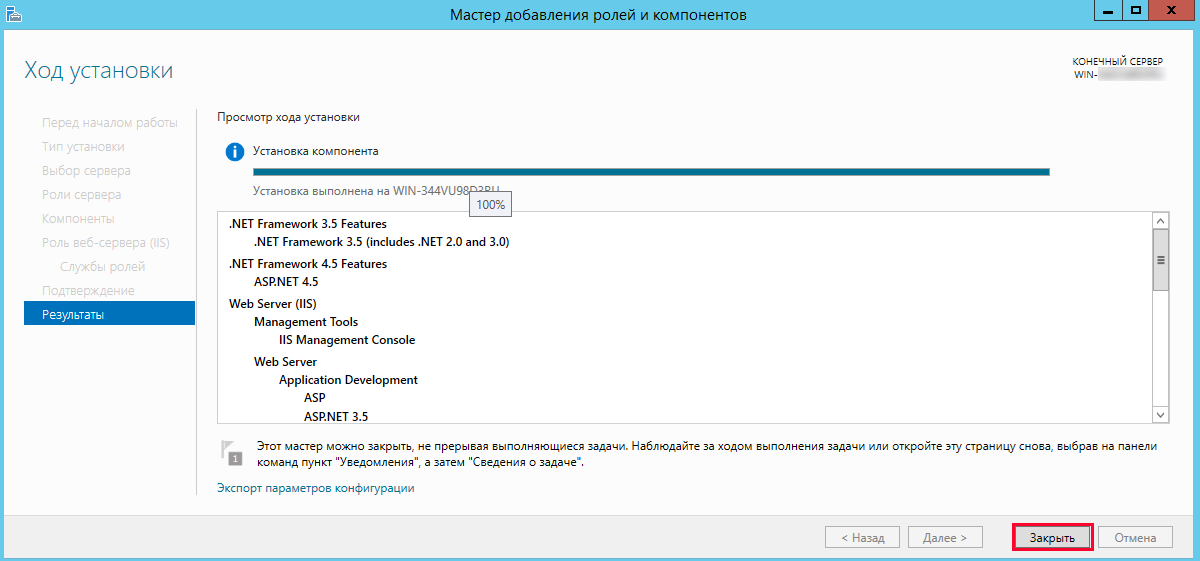
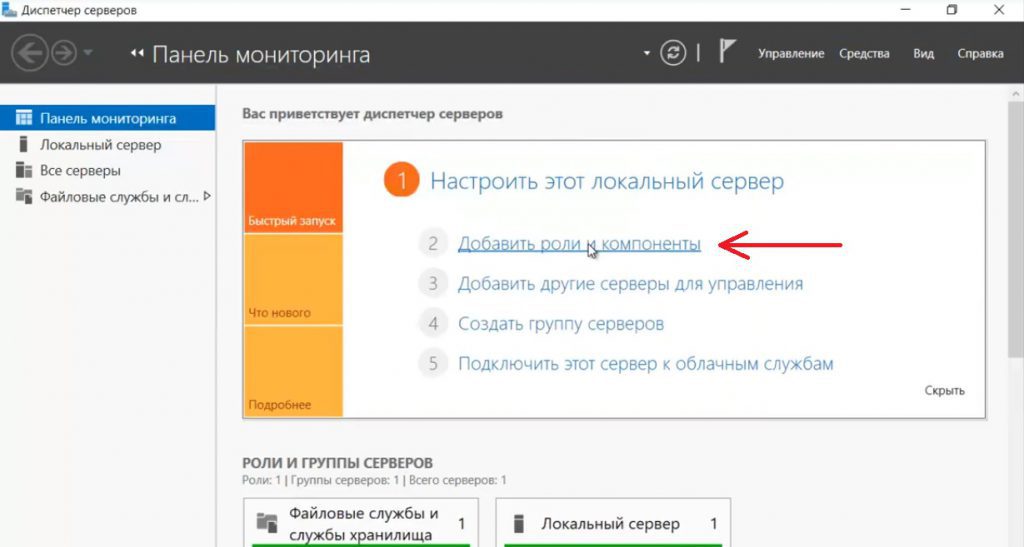
Заходим в «Диспетчер серверов», нажимаем на вкладку «Управление» и выбираем «Добавить роли и компоненты».
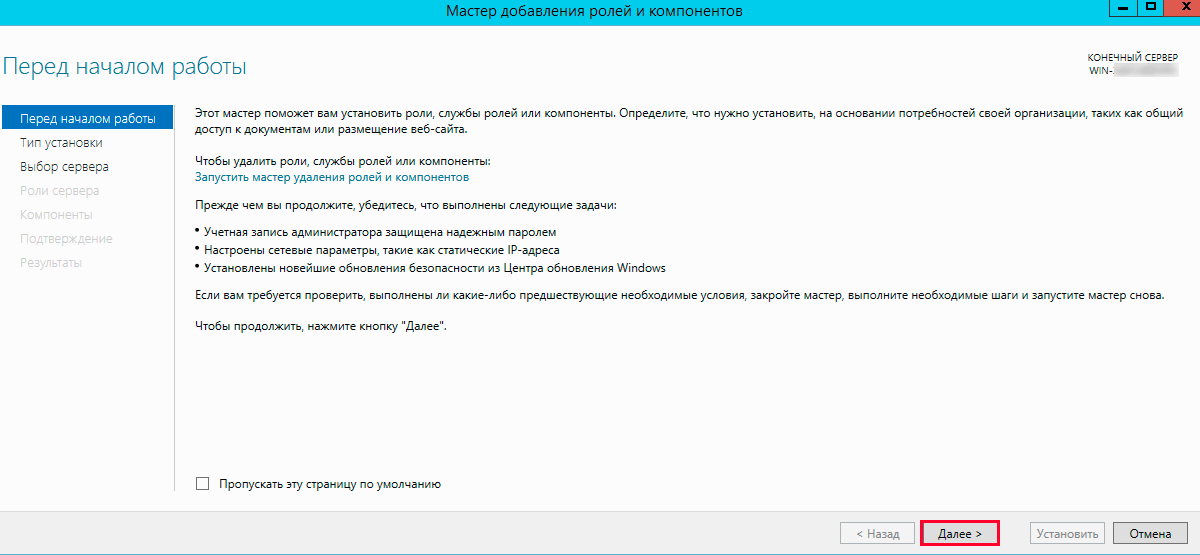
Откроется «Мастер добавления ролей и компонентов». В разделе «Перед началом работы» ознакомимся с информацией и нажмем кнопку «Далее».
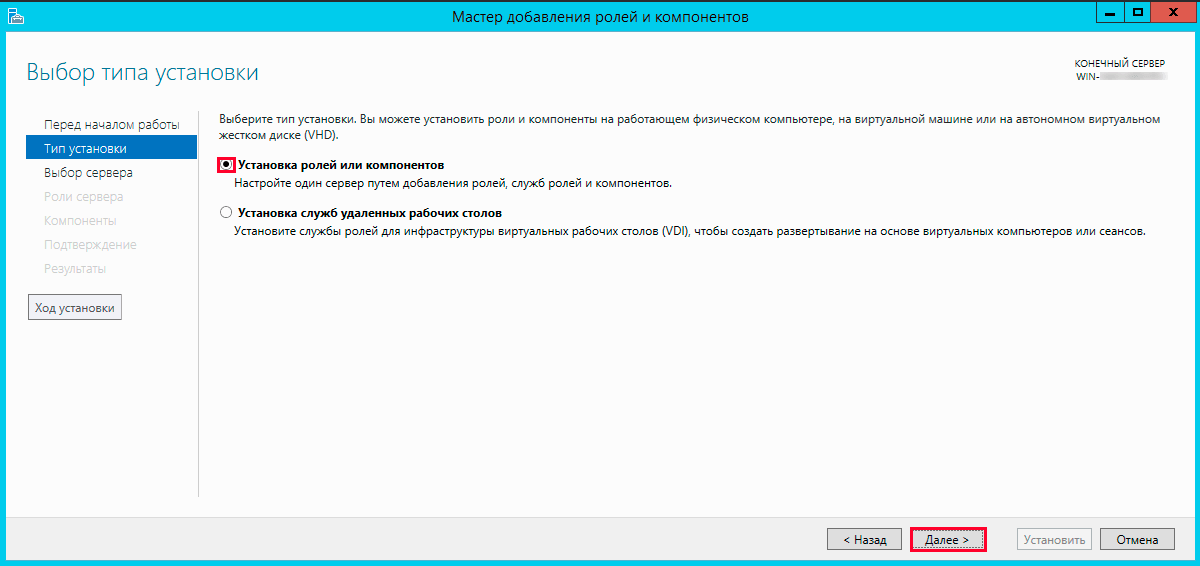
В разделе тип «Тип установки» выбираем «Установка ролей или компонентов» и жмем «Далее»
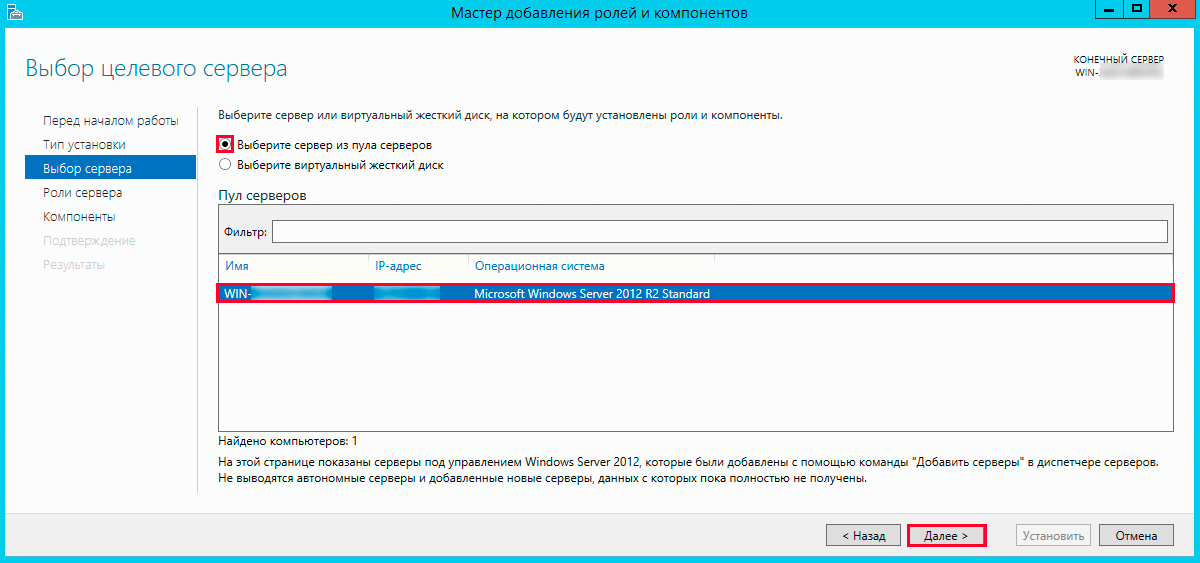
Ставим флажок на «Выберите сервер из пула серверов», выбираем сервер и нажимаем «Далее».
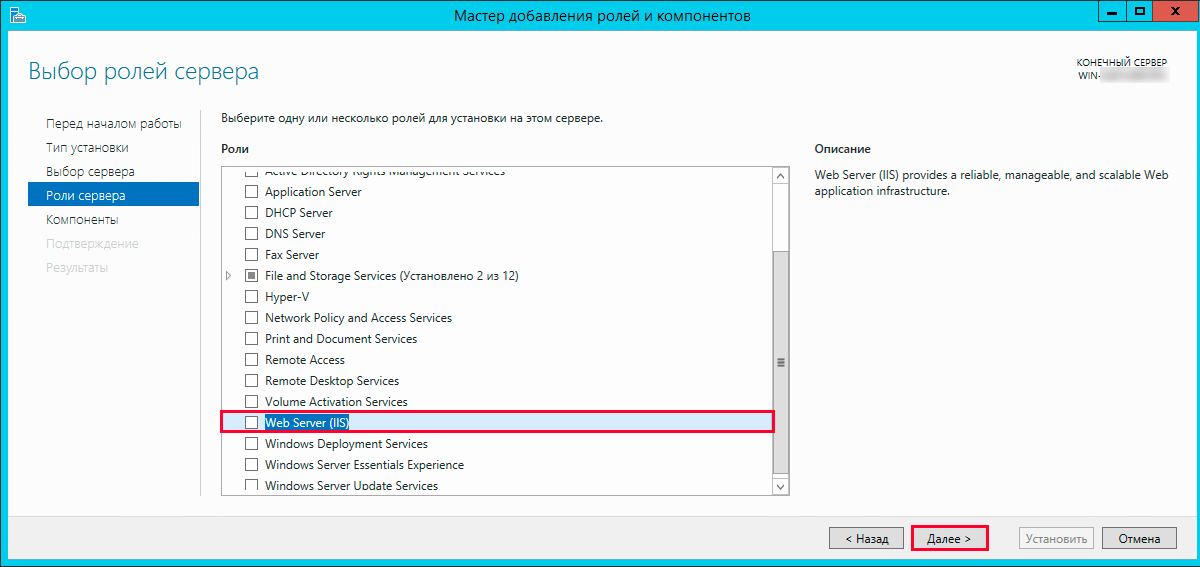
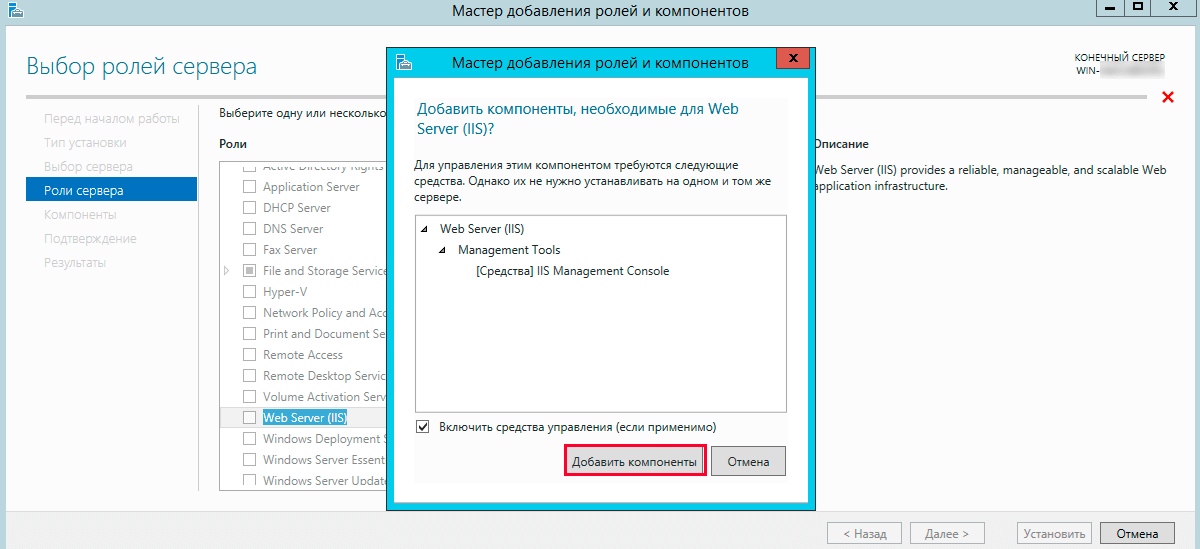
Отмечаем «Веб-сервер (IIS)».
Появится окно, в нем необходимо нажать «Добавить компоненты». Затем нажимаем «Далее».
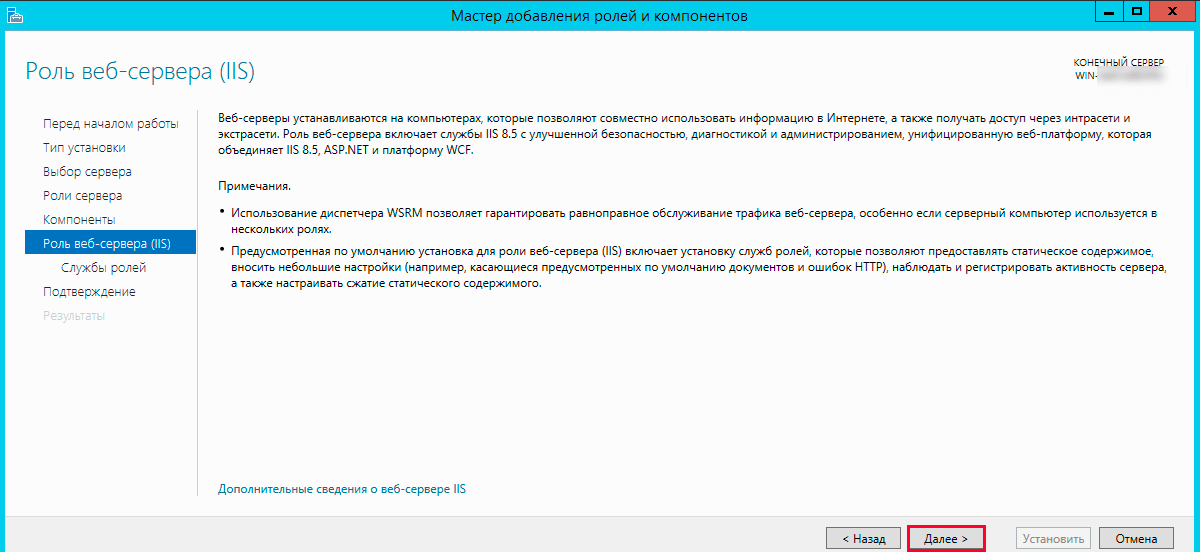
После этого откроется информационный раздел «Роль веб-сервера (IIS)», ознакомить с ним и нажмите «Далее».
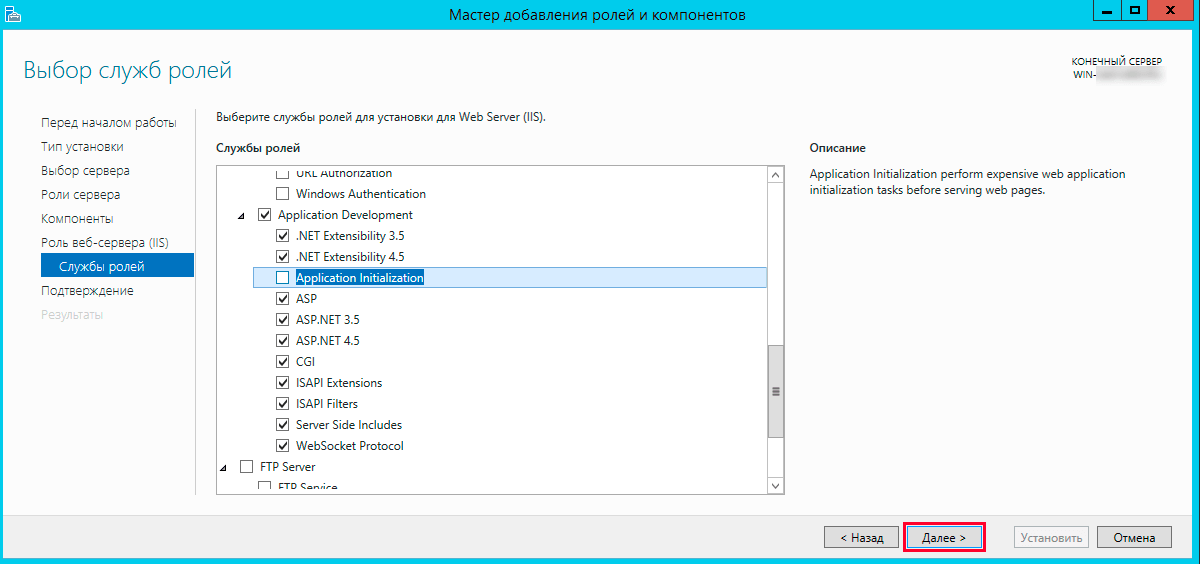
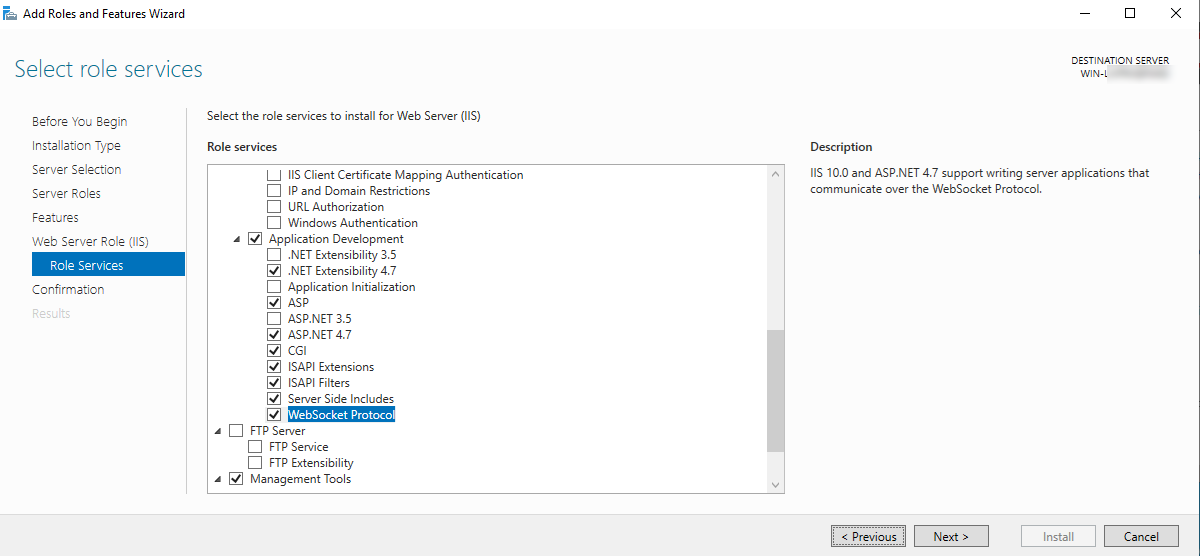
Открываем «Службы ролей», и в «Разработке приложений» отмечаем все, кроме «Инициализация приложений».
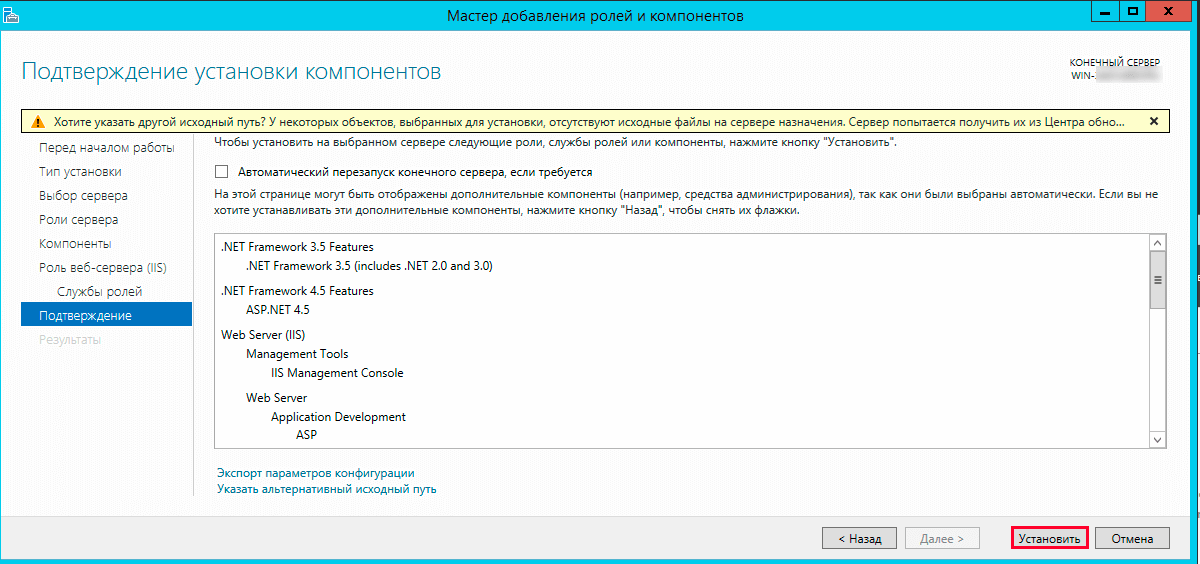
После этого появится надпись об отсутствии исходников. Интернет должен быть включен, нажимаем «Установить», далее установка пройдет в автоматическом режиме.
По окончанию инсталляции настраиваем веб-сервер IIS.
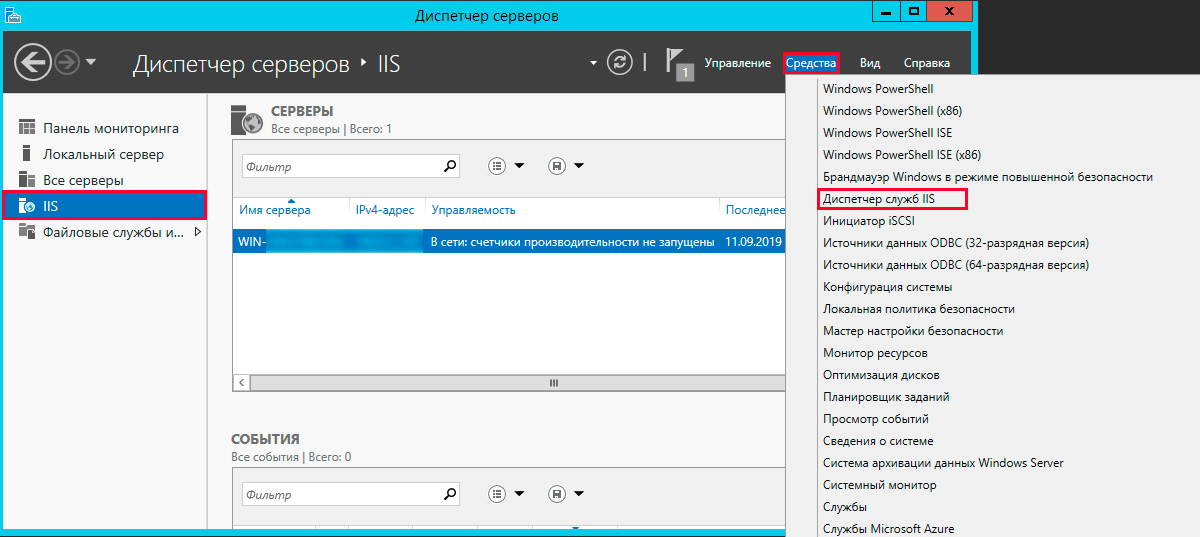
Открываем «Диспетчер серверов» переходим в «IIS» нажимаем «Средства», и из списка выбираем «Диспетчер служб IIS».
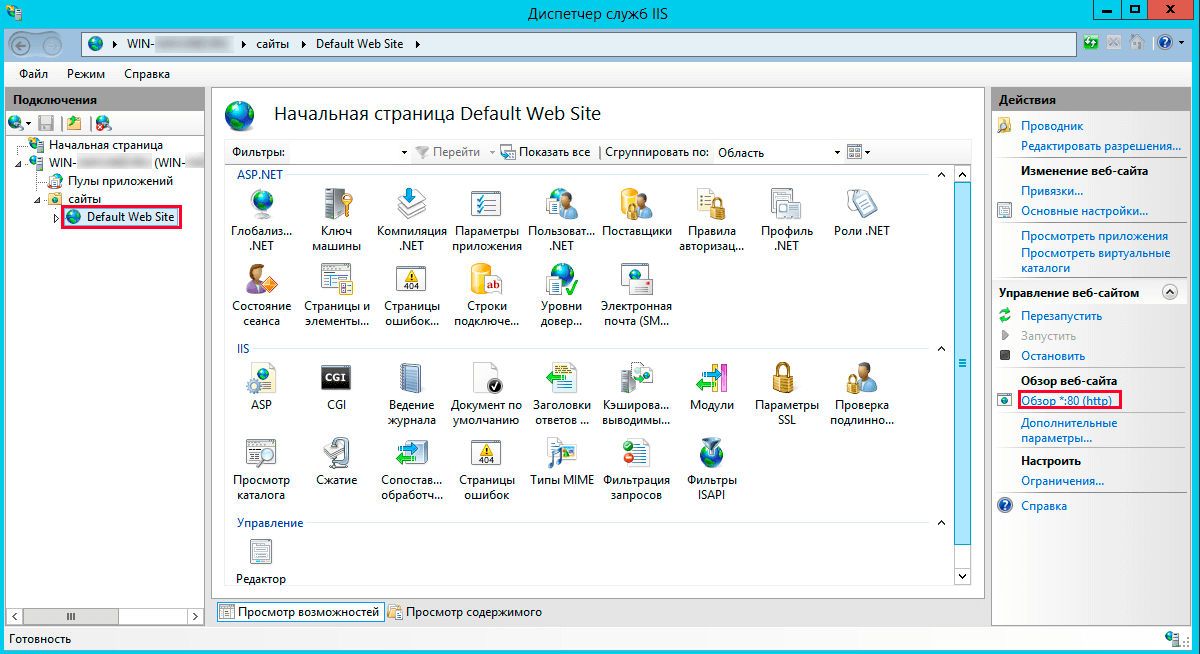
Мы видим созданный веб-сайт. Для его просмотра на правой панели нажимаем «Обзор *:80 (http)»
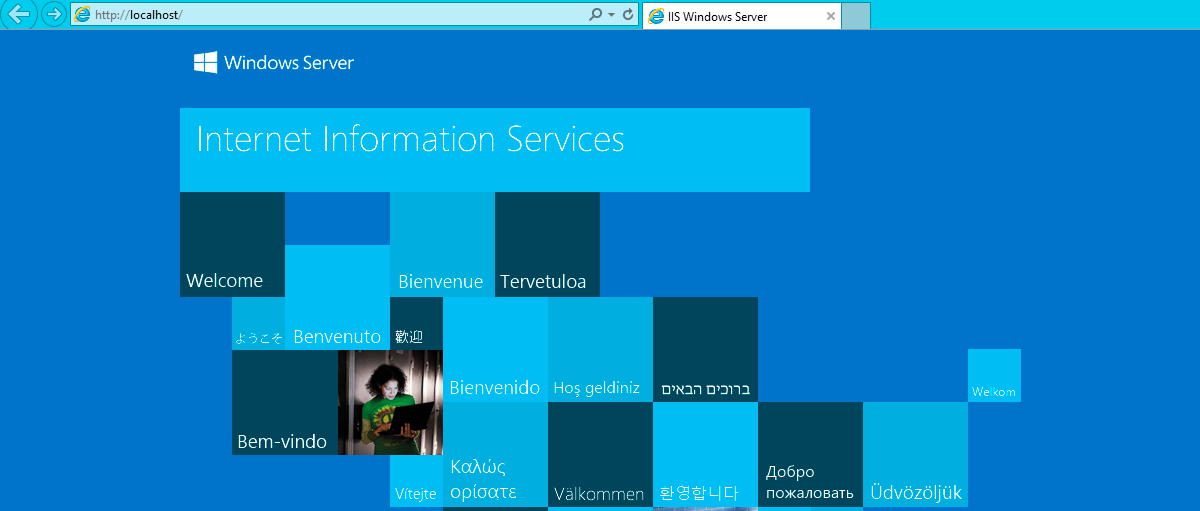
При его просмотре откроется приветственная страница.
Устанавливаем PHP
Для установки PHP потребуется скачать PHP Manager for IIS и необходимую вам версию PHP (рекомендуем 5.6.40).
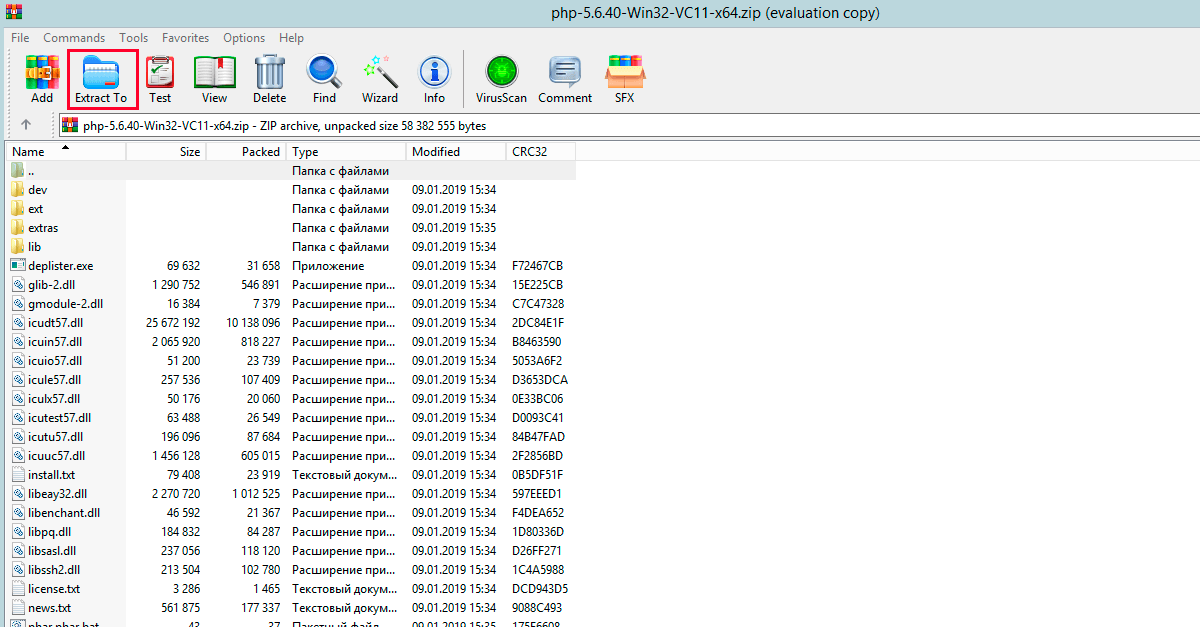
Скачиваем архив с файлами PHP и распаковываем его в С:php.
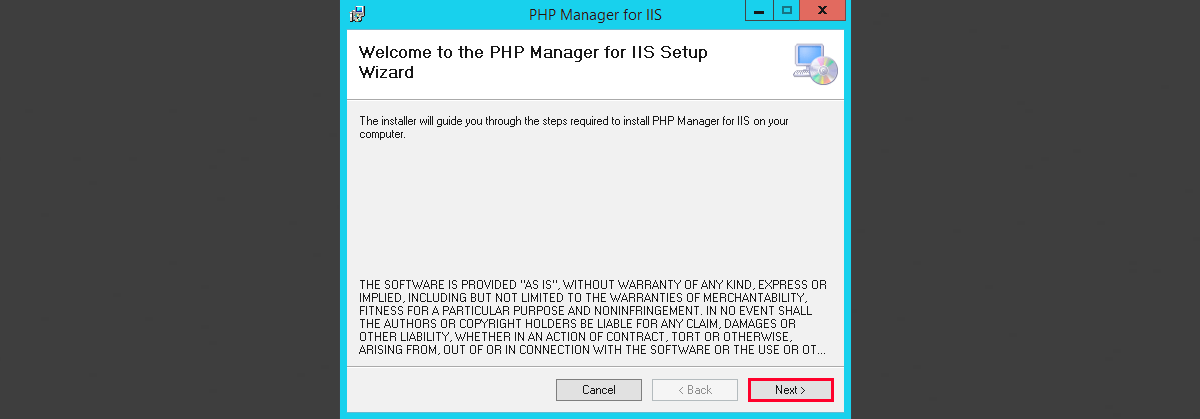
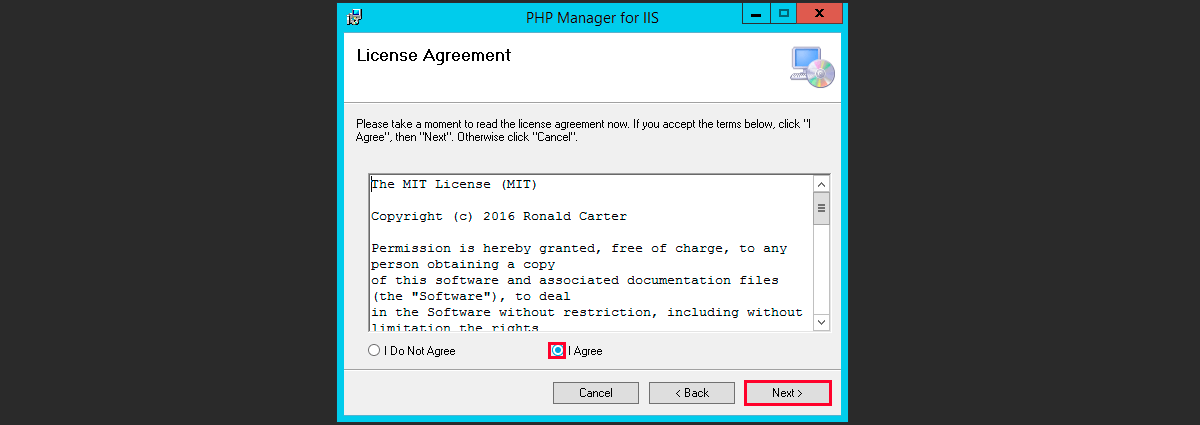
Затем скачиваем и устанавливаем PHP Manage For IIS. Дальше везде кликаем «Next».
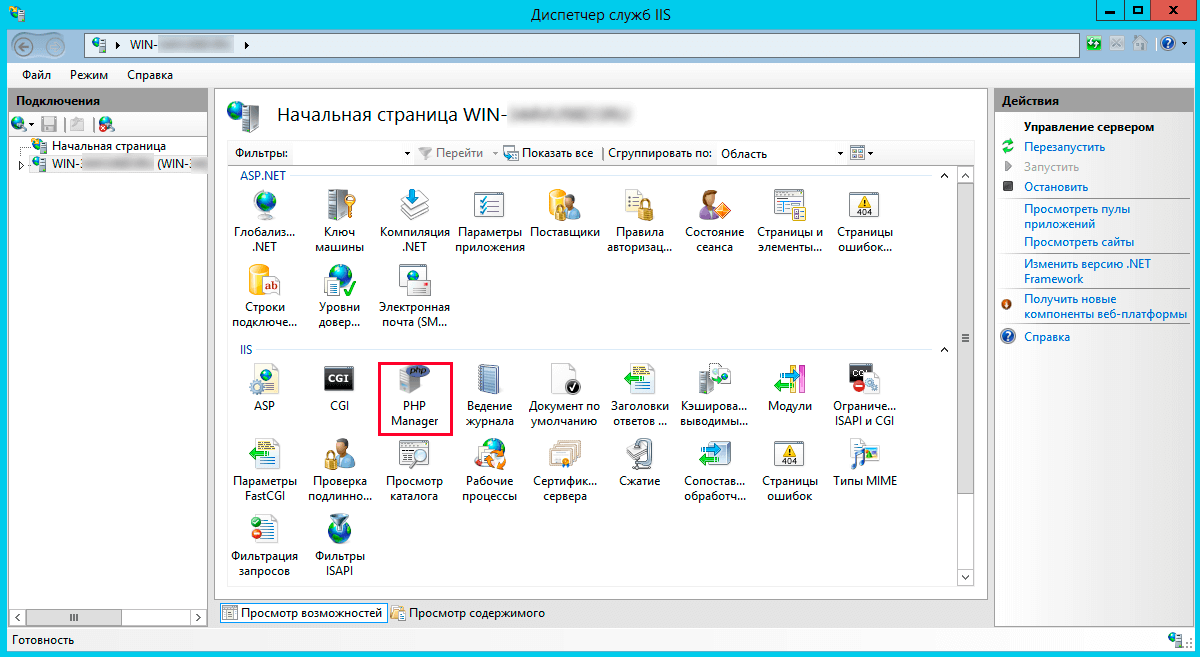
По окончанию инсталляции в Диспетчере служб IIS появится иконка «Администратор PHP». Кликаем по ней.
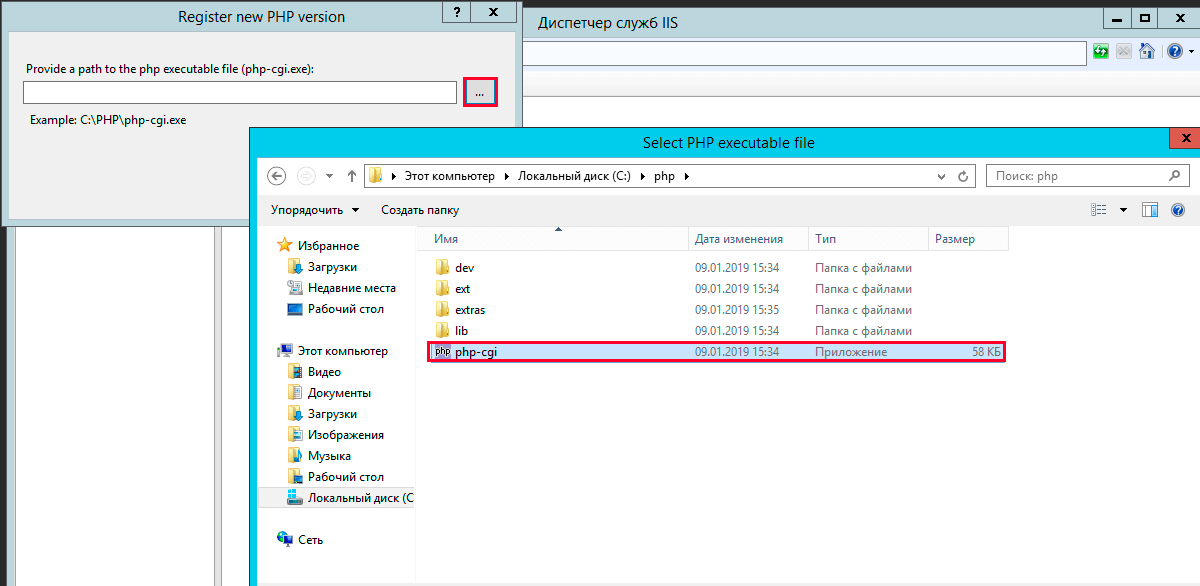
Далее нажимаем «зарегистрировать новую версию PHP».
При регистрации переходим в папку С:php и выбираем файл «php-cgi.exe».
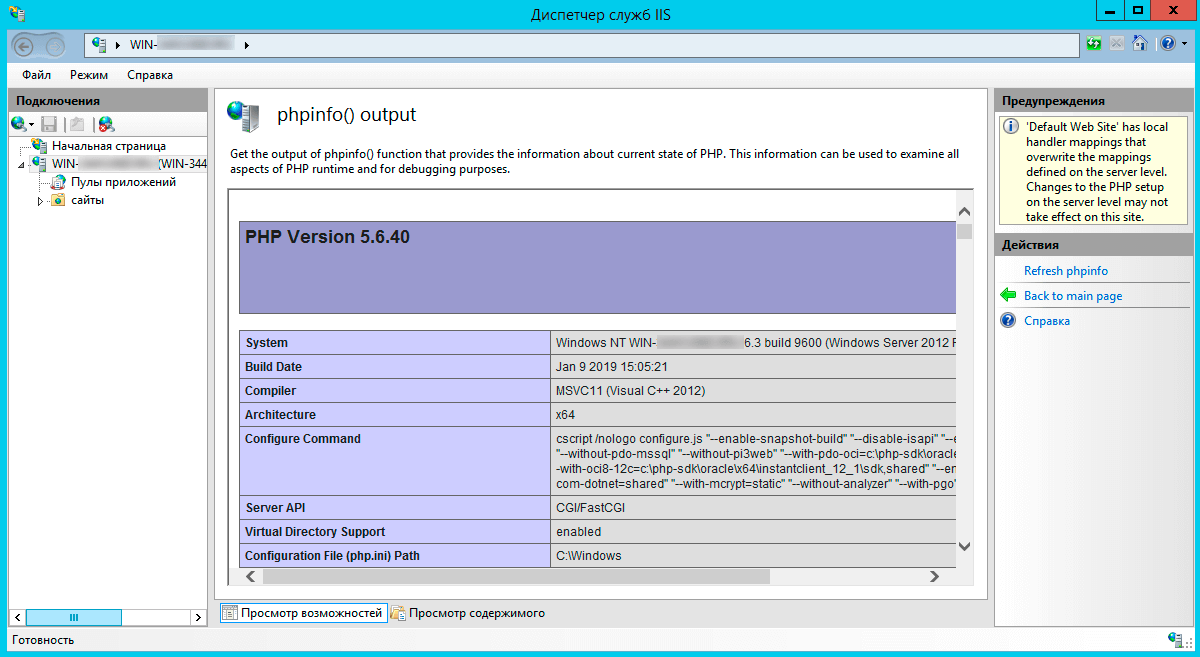
Проверяем работоспособность РНР. В этой же вкладке кликаем «проверить phpinfo()».
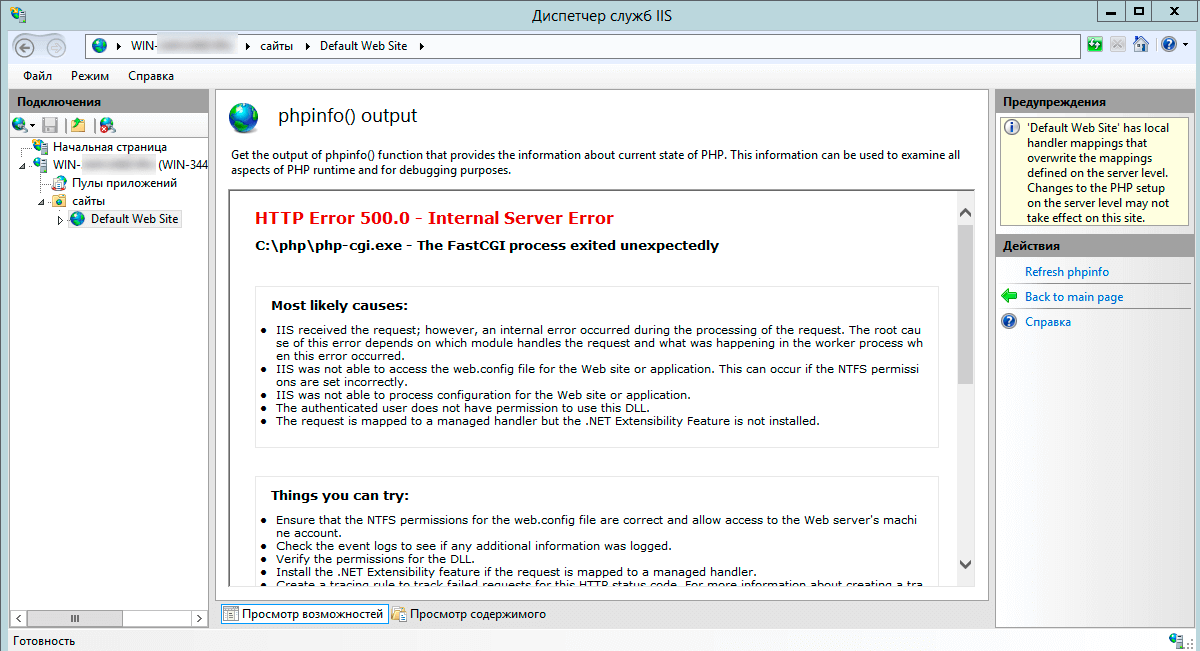
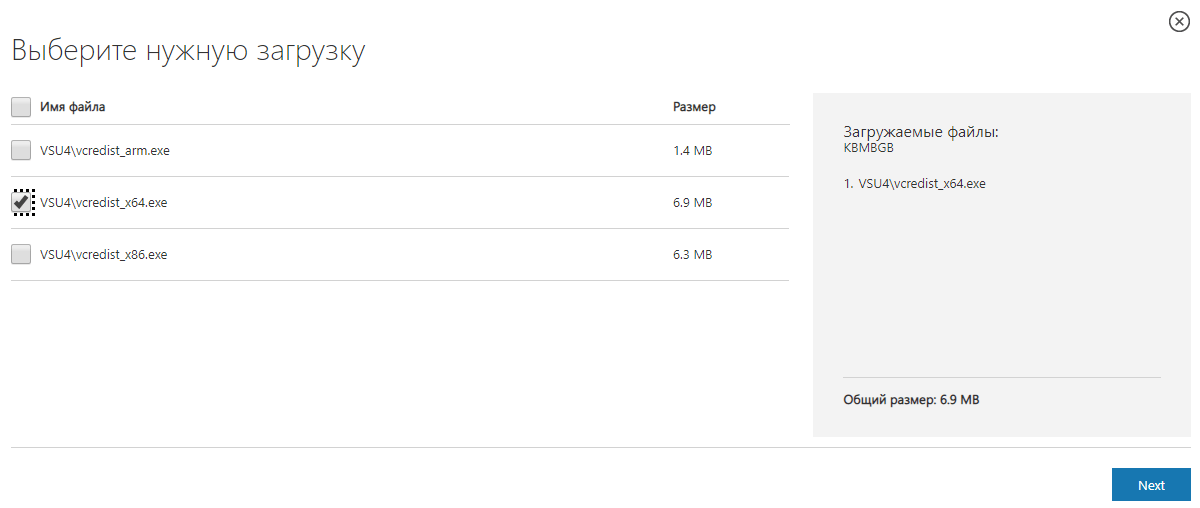
Если при открытии тестовой страницы появилась ошибка «HTTP 500.0 — Internal Server Error», то нужно установить пакет Visual C++ для Visual Studio 2012.
Для этого переходим на сайт Microsoft и скачиваем «Распространяемый пакет Visual C++ для Visual Studio 2012 Обновление 4».
Затем устанавливаем его на сервере и снова нажимаем «проверить phpinfo()».
Устанавливаем MySQL
Скачиваем версию MySQL необходимую для вашего проекта и запускаем установщик.
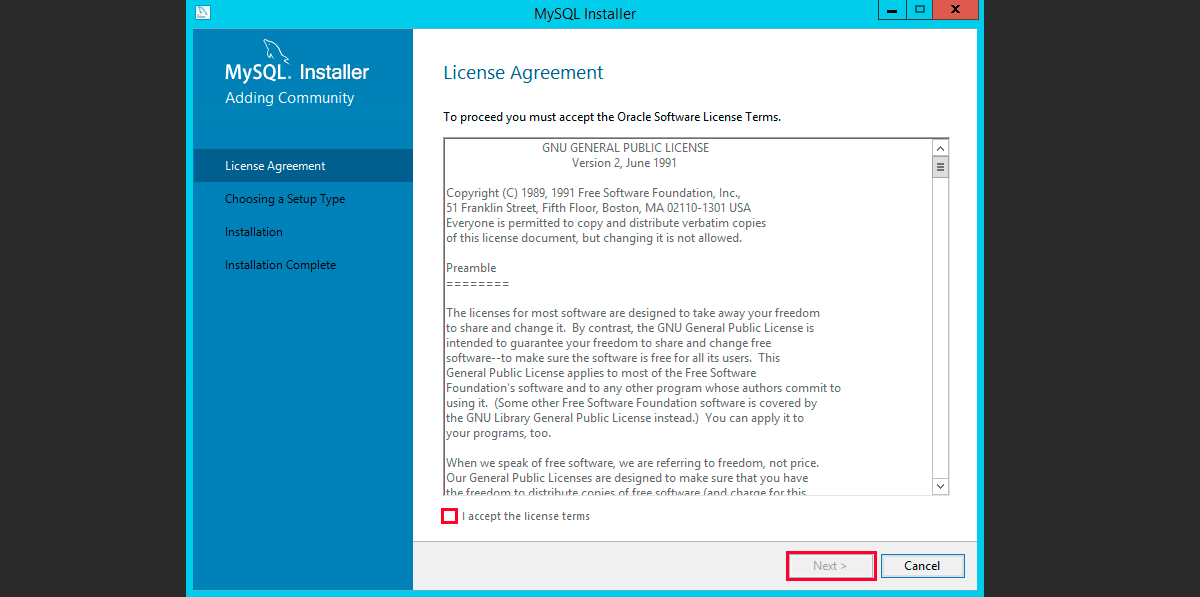
Читаем лицензионное соглашение, ставим галочку и нажимаем «Next».
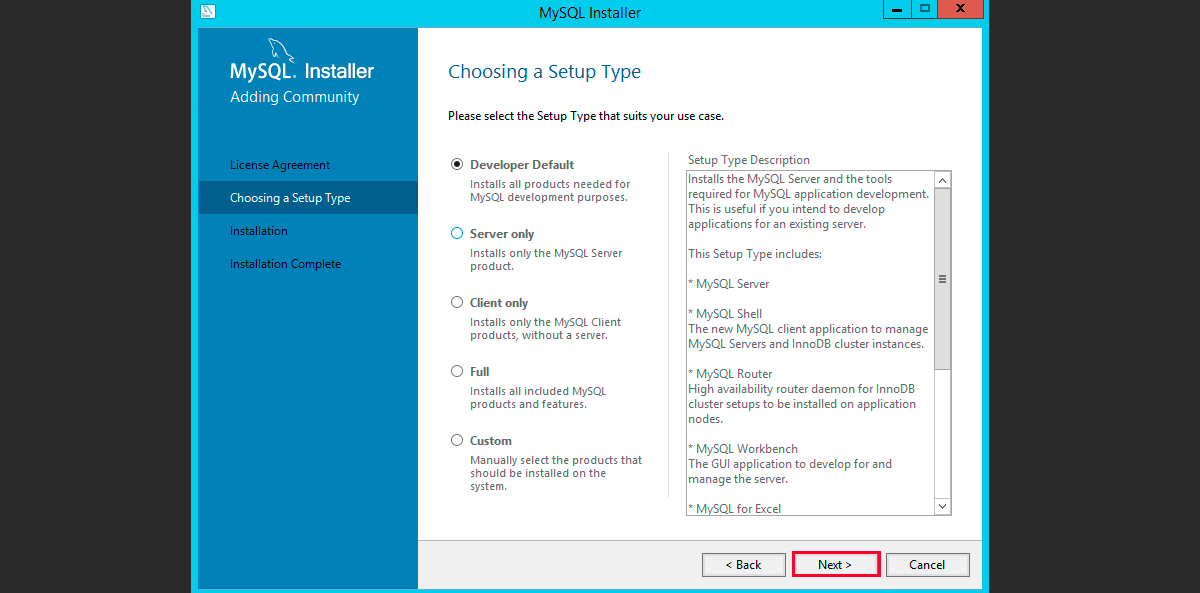
Выбираем «Developer Default» и нажимаем «Next».
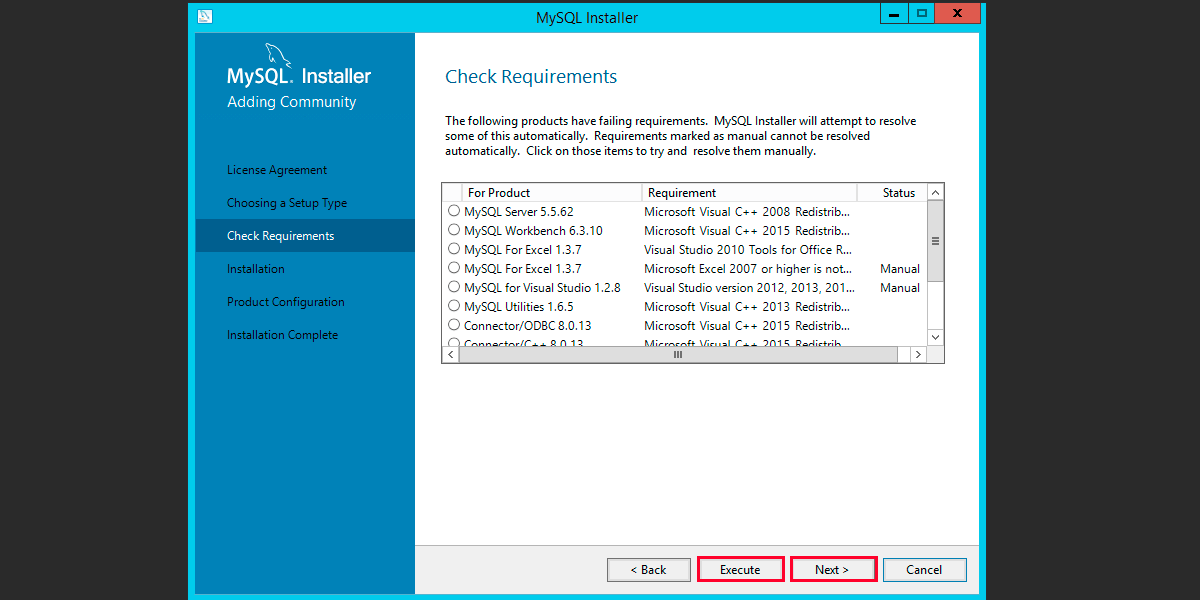
Затем нажимаем «Execute» и ждем пока установщик проверит конфигурацию, при необходимости загрузит недостающие компоненты, а затем нажмем «Next».
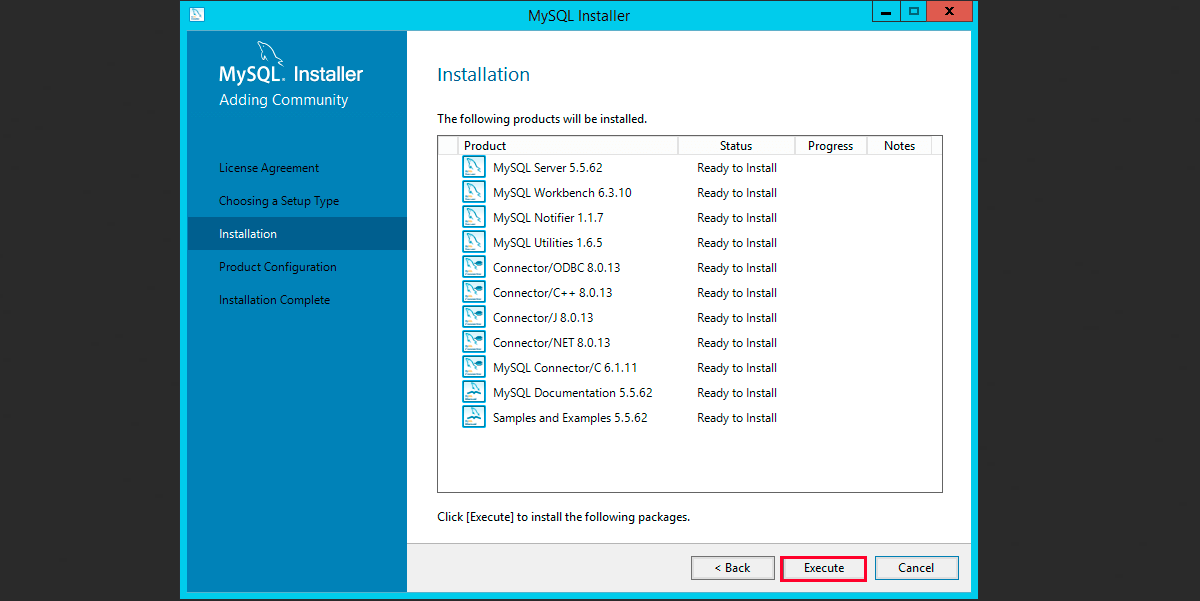
Соглашаемся с лицензией и запускаем установку.
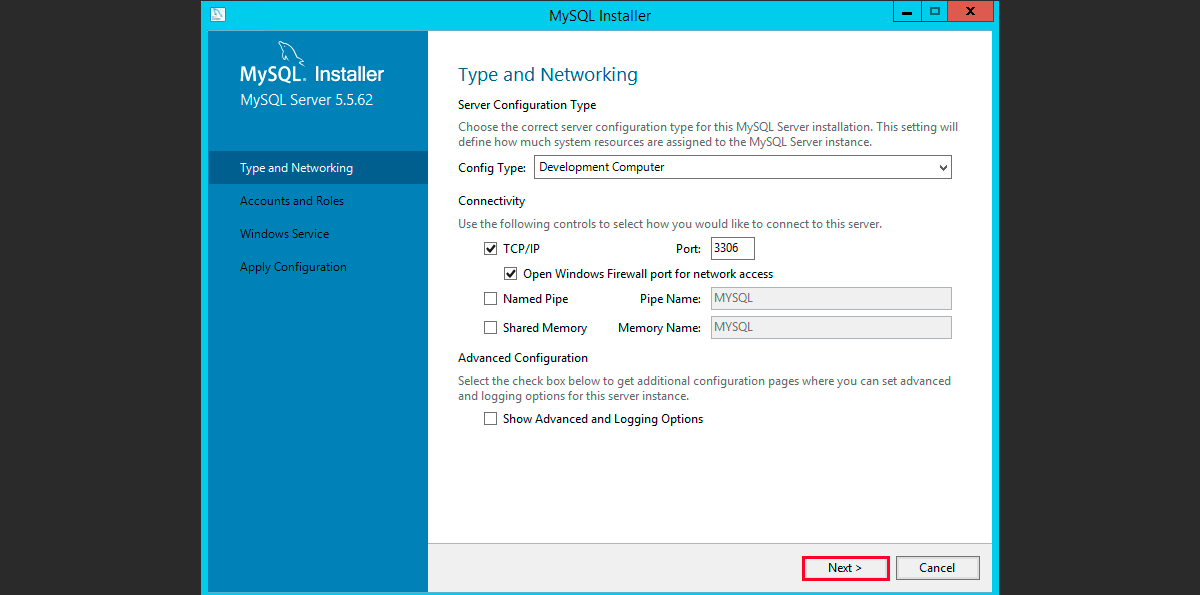
Параметры сети для MySQL сервера оставляем по умолчанию и нажимаем «Next».
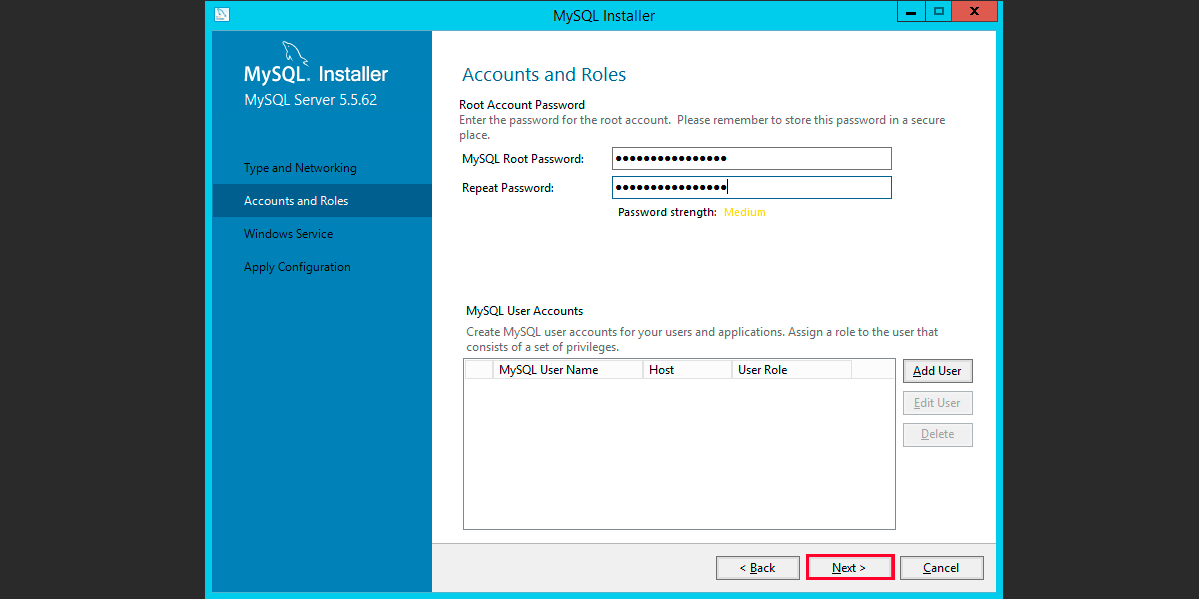
Задаем пароль для root пользователя и нажимаем «Next».
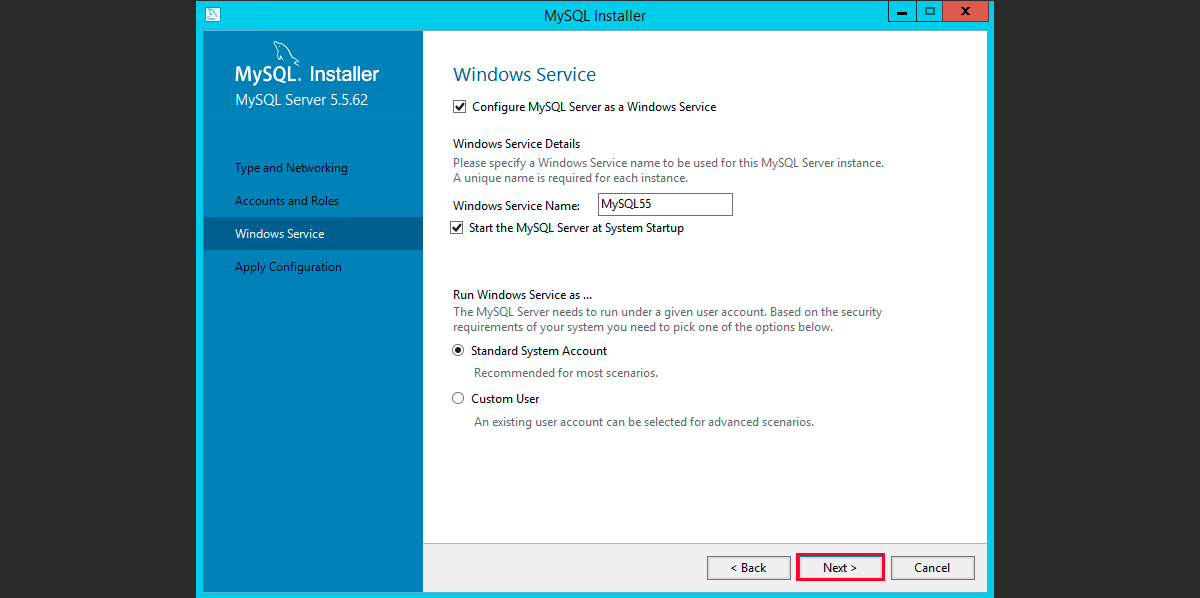
Дальнейшие настройки оставляем по умолчанию и и нажимаем «Next».
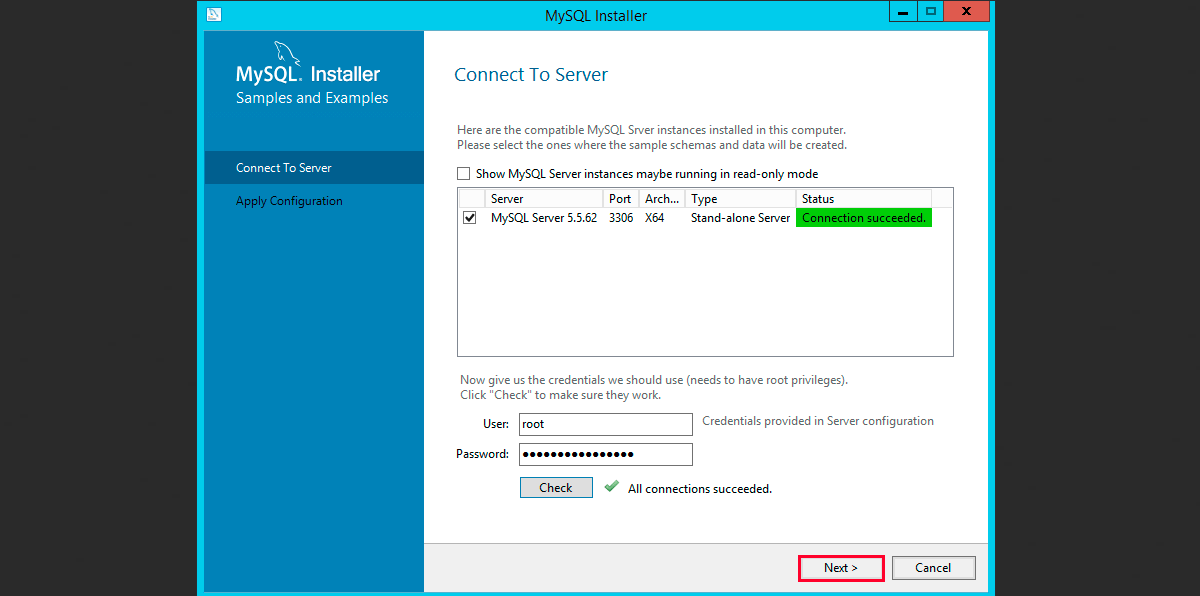
Присоединяемся к серверу MySQL серверу.
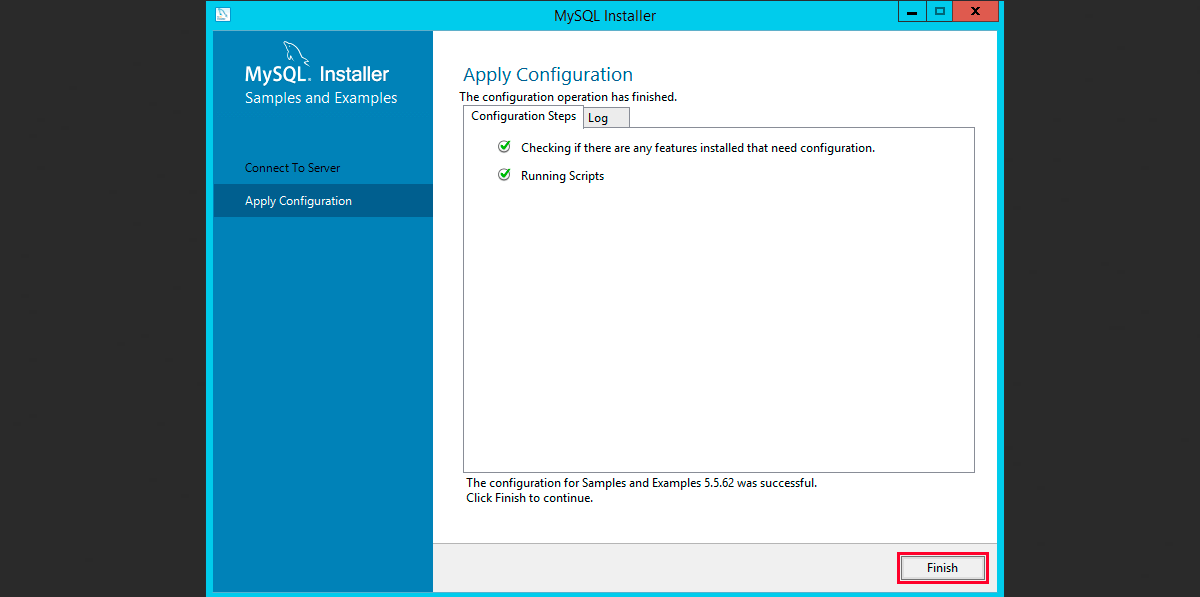
Принимаем настройки и нажимаем «Finish».
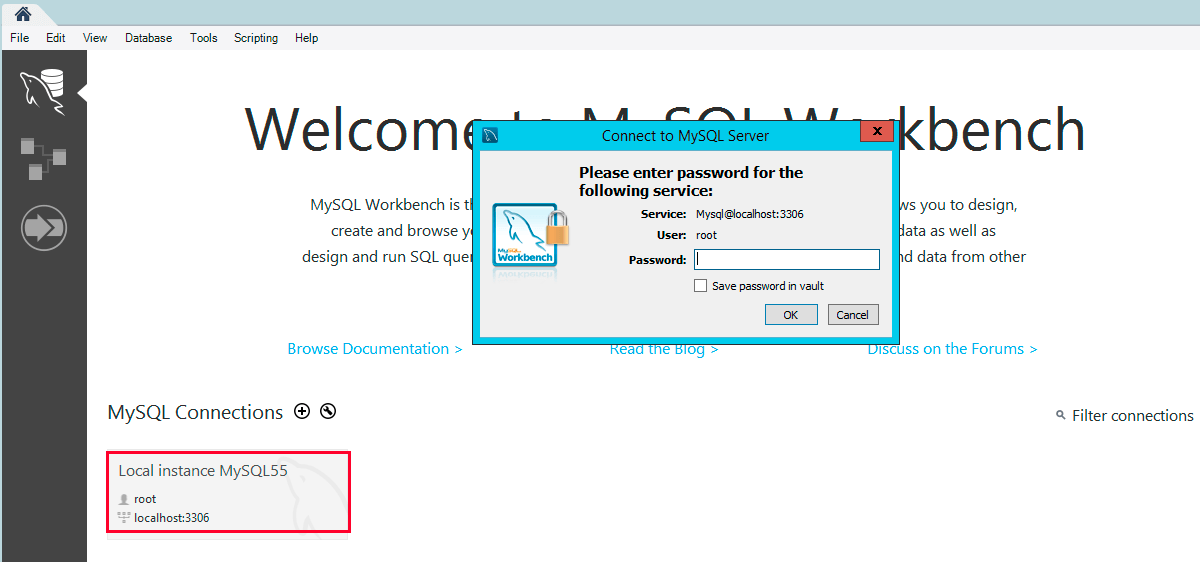
Откроется MySQL Workbench нажмем на «Local instance MySQL» и в появившемся окне введем заданный ранее пароль.
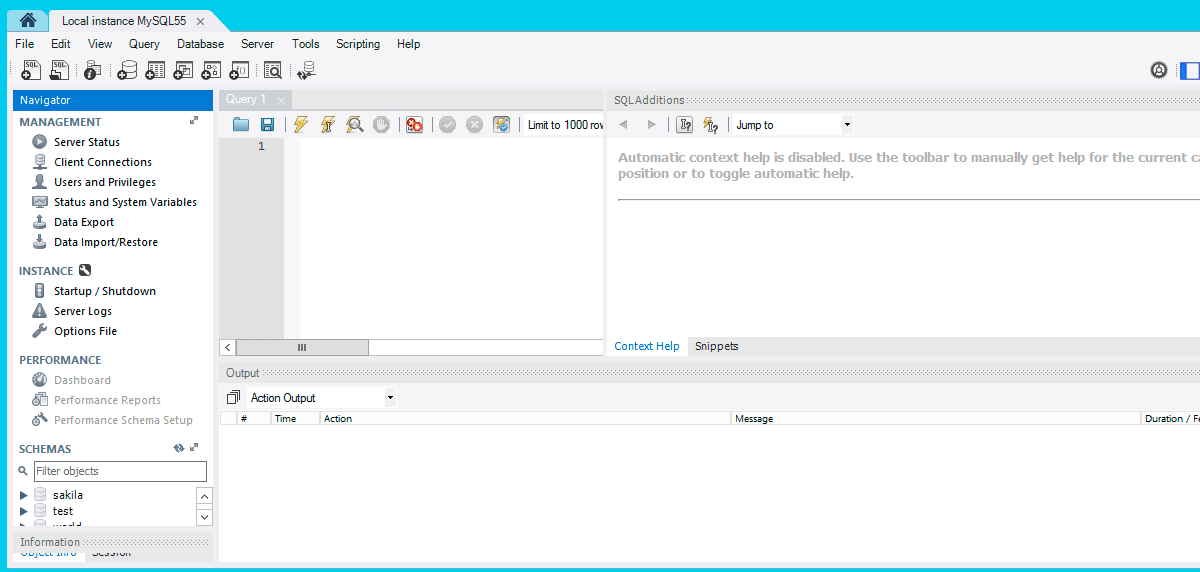
Откроется окно управления нашим MySQL-сервером.
Установка модуля rewrite
Скачиваем Модуль переопределения URL-адресов (URLRewriter) 2.0 для IIS с сайта Microsoft.
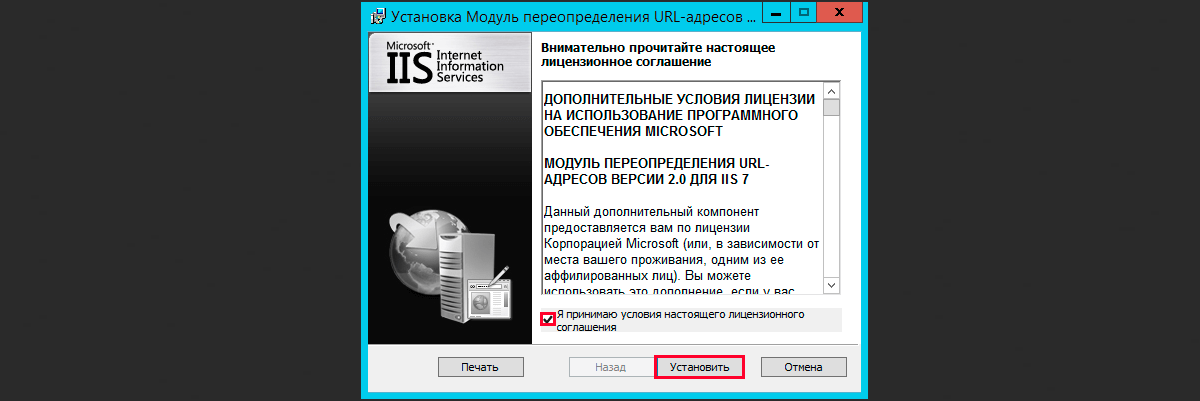
Запускаем установщик, читаем лицензионное соглашение, ставим галочку о согласии и нажимаем «Установить».
Ждем завершения установки и нажимаем «Готово»
Установка для Windows Server 2019
Установка для Windows Server 2019 не имеет значительных отличий, но при добавлении ролей и компонентов не нужно указывать «.NET Extensibility» 3.5 и «ASP.NET 3.5».
Начни экономить на хостинге сейчас — 14 дней бесплатно!
Источник
Установка и настройка веб-сервера IIS + PHP + MySQL
Чаще всего, PHP и MySQL устанавливается на серверы с Linux. Однако, при необходимости, можно настроить запуск и обработку PHP скриптов на Windows. Версии последней могут быть разные, например, Server 2008/2012/2016/2019 или не серверные системы, такие как, 7/8/10. Данная инструкция подойдет как для чайника, так и опытного специалиста (в качестве шпаргалки).
Установка IIS
Если откроется окно с приветствием, нажимаем Далее:
При выборе типа установки выбираем Установка ролей или компонентов:
При выборе целевого сервера оставляем локальный сервер (или выбираем удаленный, если установка выполняется из удаленной консоли):
Также среди ролей в подразделе «Разработка приложений» ставим галочку для установки CGI — этот компонент нам нужен для работы PHP:
Выбор служб ролей — нажимаем далее или, при необходимости, выбираем FTP-сервер:
В следующем окне ставим галочку Автоматический перезапуск конечного сервера, если требуется и кликаем по Установить:
Дожидаемся окончания процесса установки.
Сразу после установки IIS запускается автоматически. Но, если что, его можно запустить с помощью команды iisreset:
* если выполнить данную команду без опций, то она перезапустить веб-сервер.
Также мы можем открыть диспетчер служб (команда services.msc) и перезапустить Службу веб-публикаций:
Открываем браузер и вводим адрес http://localhost — должен открыться стартовый портал:
Развертывание отдельного сайта
Мы можем пропустить данный пункт, если хотим использовать сайт по умолчанию. Однако, в данной инструкции мы разберем пример, когда для сайта на PHP будет создана отдельная настройка.
Заполняем данные для нового сайта:
После заходим в каталог с сайтом (в нашем примере, это C:inetpubwwwrootphp) и создадим в нем файл index.html со следующим содержимым:
Hello from PHP site
Открываем браузер и переходим на созданный сайт, например, как в нашей инструкции — http://php.dmosk.ru. Мы должны увидеть страницу с написанным нами текстом:
Тестовый сайт создан.
Установка PHP
Откроется страница с несколькими версиями пакета — там как мы ставим PHP как FastCGI, нам нужна версия «Non Thread Safe» (не потокобезопасная), так как она будет работать быстрее. И так, скачиваем zip-архив на сервер:
Для установка PHP на Windows достаточно просто распаковать содержимое архива в любой каталог, например, C:Program FilesPHP:
Делаем копию файла php.ini-production и переименовываем его в php.ini:
Открываем на редактирование данный файл и правим следующее:
open_basedir = C:inetpubwwwroot
.
cgi.force_redirect = 0
.
short_open_tag = On
* где open_basedir — директория, в которой будут разрешены PHP-скрипты; cgi.force_redirect — указывает будет ли скрипты обрабатываться при прямом запросе или только при запросе от веб-сервера. В IIS запросы контролируются самим веб-сервером, поэтому опция может оказать обратный эффект; short_open_tag — позволяет использовать короткий вид открывающих тегов для PHP.
cd «C:Program FilesPHP»
Мы должны получить список подключенных модулей:
[PHP Modules]
bcmath
calendar
Core
ctype
.
Но если мы получим ошибку, связанную с отсутствием файла VCRUNTIME140.dll:
. необходимо установить Microsoft Visual C++ Redistributable. Переходим на страницу https://www.microsoft.com/ru-RU/download/details.aspx?id=52685 и скачиваем компонент:
После загрузки, устанавливаем его на сервер, после чего, снова пробуем вывести на экран модули php:
Настройка сайта на IIS для работы с PHP
В меню справа кликаем по Добавить сопоставление модуля:
Нажимаем OK и подтверждаем действие. Сопоставление создано.
Теперь заходим в Документ по умолчанию:
. и добавляем новый документ:
* в данном примете мы указываем, что по умолчанию сервер будет искать файл index.php, если таковой не указан явно в запросе.
Открываем в проводнике папку, в которой находятся файлы сайта (в нашем примере, C:inetpubwwwrootphp). Создаем файл index.php с содержимым:
Открываем браузер и снова переходим на наш сайт — мы должны увидеть страницу с информацией о php:
PHP Manager в IIS
Для того, чтобы упростить настройку PHP мы можем установить диспетчер PHP для IIS. Для этого переходим по ссылке https://www.iis.net/downloads/community/category/manage и переходим по ссылке для скачивания стабильной версии php-менеджера:
Выполняем установку на сервере, запустив загруженный файл. Открываем диспетчер управления IIS — мы должны увидеть PHP Manager:
Установка MySQL
На следующей странице выбираем для скачивания mysql-installer-community:
В открывшемся окне кликаем по No thanks, just start my download:
В следующем окне кликаем по Execute:
. и дожидаемся установки СУБД:
Откроется окно конфигурации MySQL — нажимаем Next:
Выбираем установку одиночного сервера MySQL:
Оставляем все значения по умолчанию для настроек сети:
Требуем сложные пароли:
Вводим дважды пароль для пользователя root:
* также, на данном этапе мы можем сразу добавить новых пользователей.
Устанавливаем СУБД как сервис и стартуем его:
Настройки готовы для применения — нажимаем Execute:
Дожидаемся применения настроек и кликаем по Next:
Установка завершена — нажимаем Finish.
Сервер баз данных готов к использованию.
По умолчанию, PHP поддерживаем mysql — в этом можно убедиться на странице phpinfo, найдя раздел mysqlnd:
Источник
Создание сайта на windows server 2019
В этой статье мы рассмотрим базовые настройки Windows Server 2019, это AD, DNS, DHCP и лицензирование терминального сервера. Данные настройки актуальны на большинстве серверов и являются самыми необходимыми.
Как установить Windows Server и произвести первичные настройки по активации можете ознакомиться в нашей прошлой статье по этой ссылке.
1) Меняем имя сервера и его описание (если нужно). Переходим в свойства системы => изменить параметры => изменить. Задаем «Имя компьютера», и если нужно, то имя рабочей группы. После изменения параметров нужно перезагрузиться.
После перезагрузки можете проверить, все ли у вас прошло успешно с изменением имени.
2) Далее меняем сетевые настройки, IP, маску и шлюз ставите обязательно статичными, настройки производятся в зависимости от Вашей сети.
Переходим в свойства сетевой карты.
И далее в свойства IPv4
3) Следующим пунктом настраиваем Active Directory. Добавляем роли и компоненты. Для этого переходим меню «Пуск» => Диспетчер серверов.
Установка «Ролей и компонентов».
Соответственно выбираем нужный нам пул сервера.
В «Роли сервера» для всех наших настроек выберем «DHCP-сервер», «DNS-сервер», «Доменные службы Active Directory» и «Службы удаленных рабочих столов».
Идем далее до «Службы ролей» и выбираем пункты как на скриншоте ниже.
После так же идем «Далее» до пункта «Подтверждение» и устанавливаем все, что мы выбрали.
После установки в «Результатах» выбираем пункт «Повысить роль этого сервера до уровня контроллера домена».
В мастере настроек доменных служб выбираем «Добавить лес» и вводим имя корневого домена, это может быть любое имя, к примеру домен вашего сайта.
В параметрах контроллера нужно придумать пароль.
По каталогу настроек идем дальше, до дополнительных параметров, там нужно указать имя домена NetBIOS, если он у вас там уже стоит, то можете оставить как есть, либо поменять по своему желанию.
Далее идем до «Проверки предварительных требований», если проверка прошла успешно, то устанавливаем примененные настройки.
После полной установки необходимо перезагрузиться.
4) Производим настройку «Зона обратного просмотра».
На пункте «Зона обратного просмотра» => Создать новую зону.
Выбираем «Основную зону».
Для всех DNS-серверов, работающих на контроллерах домена в этом домене:
Зона обратного просмотра IPv4
Ну и соответственно выводим индефикатор сети.
Проверяем, что все установилось.
5) Переходим к настройке DHCP. Переходим в мастер установки.
После завершения установки => Диспетчер => Средства => DHCP
Задаем любое имя области DHCP.
В диапазоне адресов задаем начальный и конечный интервал области IP адресов, который будет раздавать сервер.
Далее в дереве каталогов DHCP => Имя сервера => Область => Пул адресов. В списке должен быть указан начальный и конечный диапазон, который Вы указывали в настройках.
6) Теперь по настройкам лицензирования удаленных рабочих столов (терминального сервера). Пошаговую инструкцию как лицензировать терминальный сервер можете прочитать в нашей ранней статье на следующей странице.
Источник
В предыдущих операционных системах мы входили в Панель управления через меню «Пуск». В новых версиях такая возможность осталась, но что делать, если заветная плитка на начальном экране исчезла?
Мы нашли 6 способов, как открыть панель управления в Windows Server.
Откройте панель управления на начальном экране
В левом нижнем углу нажмите кнопку Пуск. На начальном экране можно увидеть Control Panel, кликните по плашке, чтобы открыть.
Откройте панель управления с помощью быстрого доступа
Нажмите сочетанием клавиш Windows + X на рабочем столе и выберите Control Panel.
Доступ к Control Panel с рабочего стола
На рабочем столе Windows Server 2012 переместите указатель мыши в верхний правый угол, появится боковая панель, в которой кликните на Settings и далее нажмите на Control Panel.

Запустите панель управления через диалоговое окно “Run” (Выполнить)
Нажмите Windows + R и введите команду: control, а затем нажмите Enter.
Запустите панель управления с помощью командной строки
Сначала откройте командную строку. Нажмите Windows + R и введите команду: cmd.
Введите control и нажмите Enter.
Зайдите в Control Panel через проводник
Нажмите Windows + E, затем введите в адресной строке проводника Control и нажмите Enter.
Шаг 1. Откройте панель управления с используя любой метод, о котором мы рассказали выше
Шаг 2: В поле поиска на верху справа введите desktop. Появятся настройки экрана. Снизу от иконки Display нажмите на Show or hide common icons on the desktop
Шаг 3: В окне поставьте галочку на Control Panel и нажмите OK.
Алексей Бегин
Блогер из Перми, веб-разработчик с десятилетним стажем. На сайте Инклиент я делюсь опытом. Рассказываю как вести личные блоги и монетизировать контент. Подпишитесь на мой телеграмм-канал Бегин про блоги, чтобы получить первым советы по блоггингу, SEO и маркетингу.


