Обновлено 09.10.2018
Добрый день! Уважаемые читатели и гости, крупного IT блога Pyatilistnik.org. В прошлый раз я вам рассказал, о решении ситуации, с процессом Print Filter Pipeline Host загружающим процессор на 100%, сегодня мы вернемся опять к терминальным службам и рассмотрим ситуацию, когда у вас заканчивается дисковое пространство на ваших узлах сеансов удаленных рабочих столов (RDSH — Remote Desktop Session Host). Я покажу, как производится очистка места на RDS ферме. Уверен, что данная ситуацию, рано или поздно случается со многими компаниями.
Куда девается свободное место в службах удаленных рабочих столов
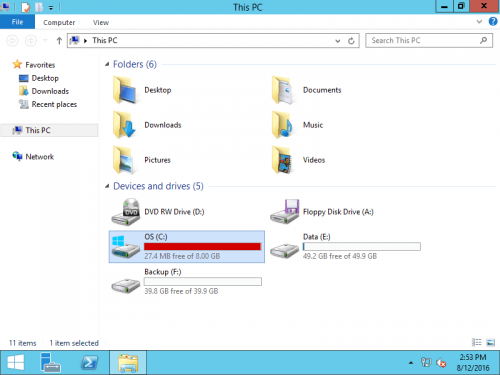
Описываю классическую ситуацию. Есть RDS ферма, которая состоит из двух посредников (RD Connection Broker) и 15-20 хостов RDSH, к котором непосредственно подключаются удаленные пользователи. В большинстве случаев, пользователи имеют перемещаемые профили. Все хорошо, все работает, но случается момент, что появляется еще пара сотен юзеров, например, из-за расширения компании или поглощения другой, это не важно. На ваших узлах, становится катастрофически не хватать свободного места. Если у вас виртуальные машины, то тут проще можно расширить ресурсы, при наличии места на датасторах, в случае с физическими серверами сложнее, так как расширять существующие RAID массивы, очень геморройная вещь, да и места на СХД, может так же не хватать. Да и расширять до бесконечности вы не можете. Плюс за счет того, что профили перемещаемые, то вы должны умножить новое дисковое пространство на количество ваших узлов, вот такая математика.
Давайте посмотрим, что вы можете предпринять для оптимизации, без расширения дискового пространства. Первым делом мы с вами воспользуемся утилитами, которые позволят посмотреть, чем конкретно заняты ваши жесткие диски. Тут утилит много, я могу выделить бесплатную WinDirStat или платную TreeSize.
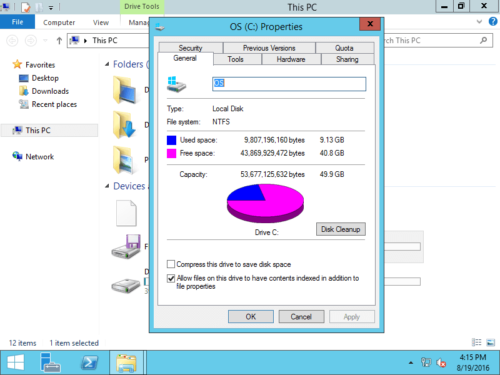
Установка WinDirStat, очень тривиальная, я не буду ее приводить. После инсталляции запускаем утилиту. На первом экране WinDirStat, попросит вас выбрать локальный диск или каталог для сканирования файлов. В моем примере на Remote Desktop Session Host хосте, один диск C:, его я и выбирая.

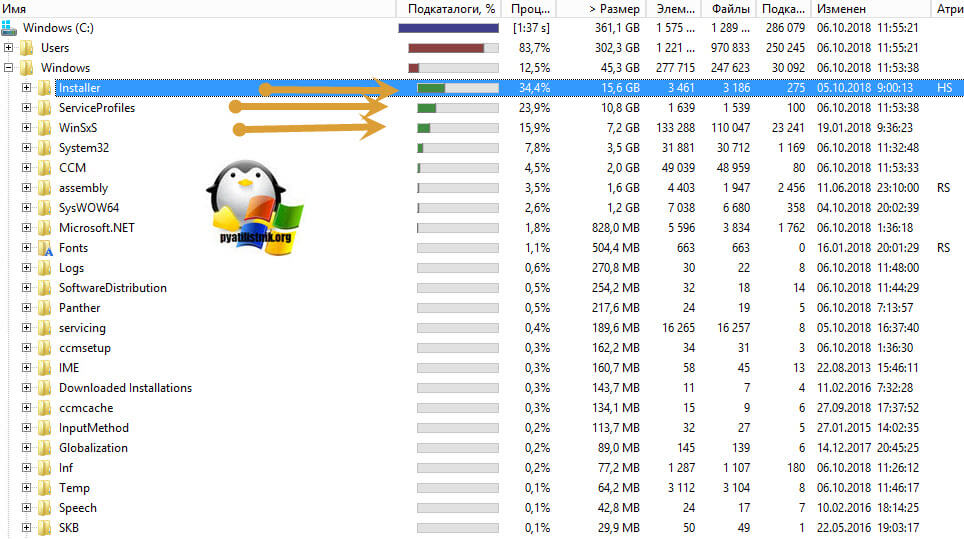
У вас начнется сканирование вашего локального диска, на предмет того, чем он занят. Вы увидите забавных пакменов.
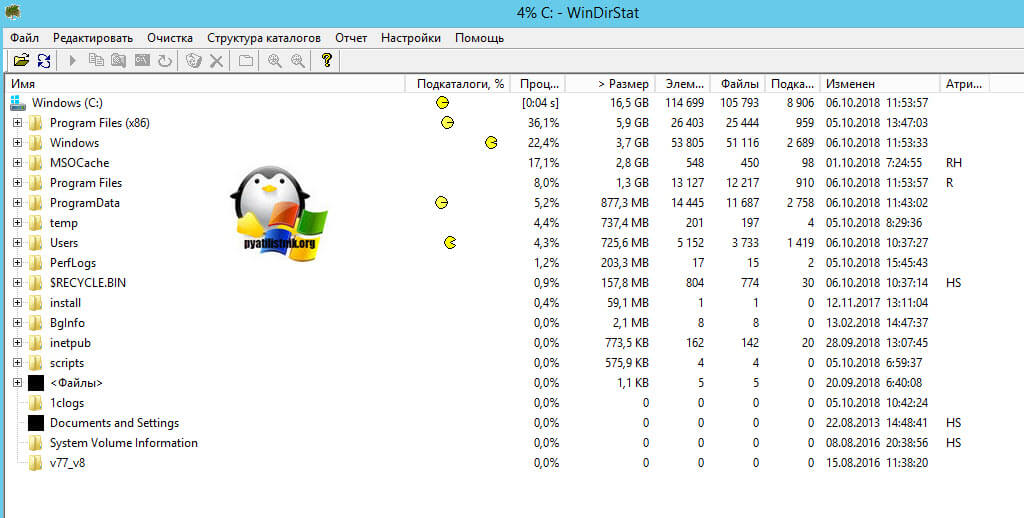
Как видим, у меня самым объемным является папка Users, второй папка Windows 45 ГБ. С правой стороны вы увидите столбец по форматам, там сразу можно выделить MP4 или MSI, видно сколько они занимают. Ниже разноцветные квадраты, это так выглядят все типы файлов на жестком диске в этой утилите.
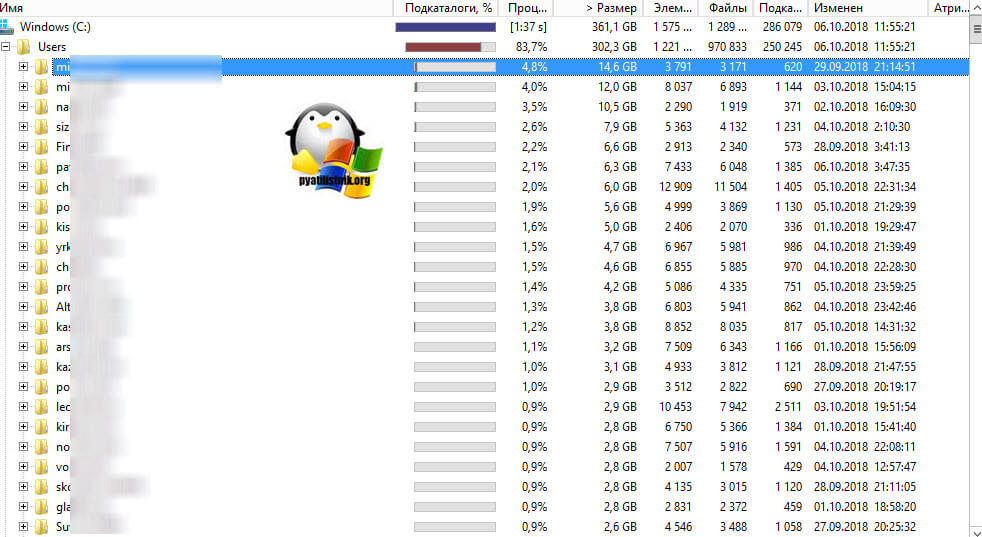
Открыв папку профили, вы сразу видите самые объемные из них, смотрите, чем они заняты и проводите зачистку, с визгами и орами от пользователей. Но тут никак больше.
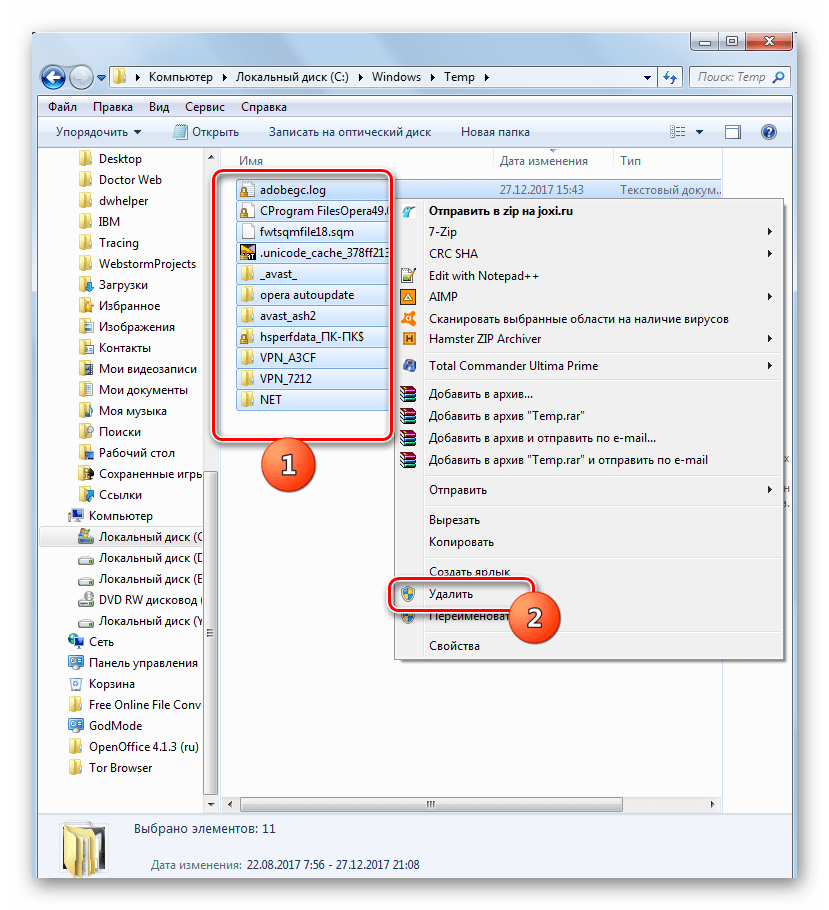
Очистка папки Windows от мусора
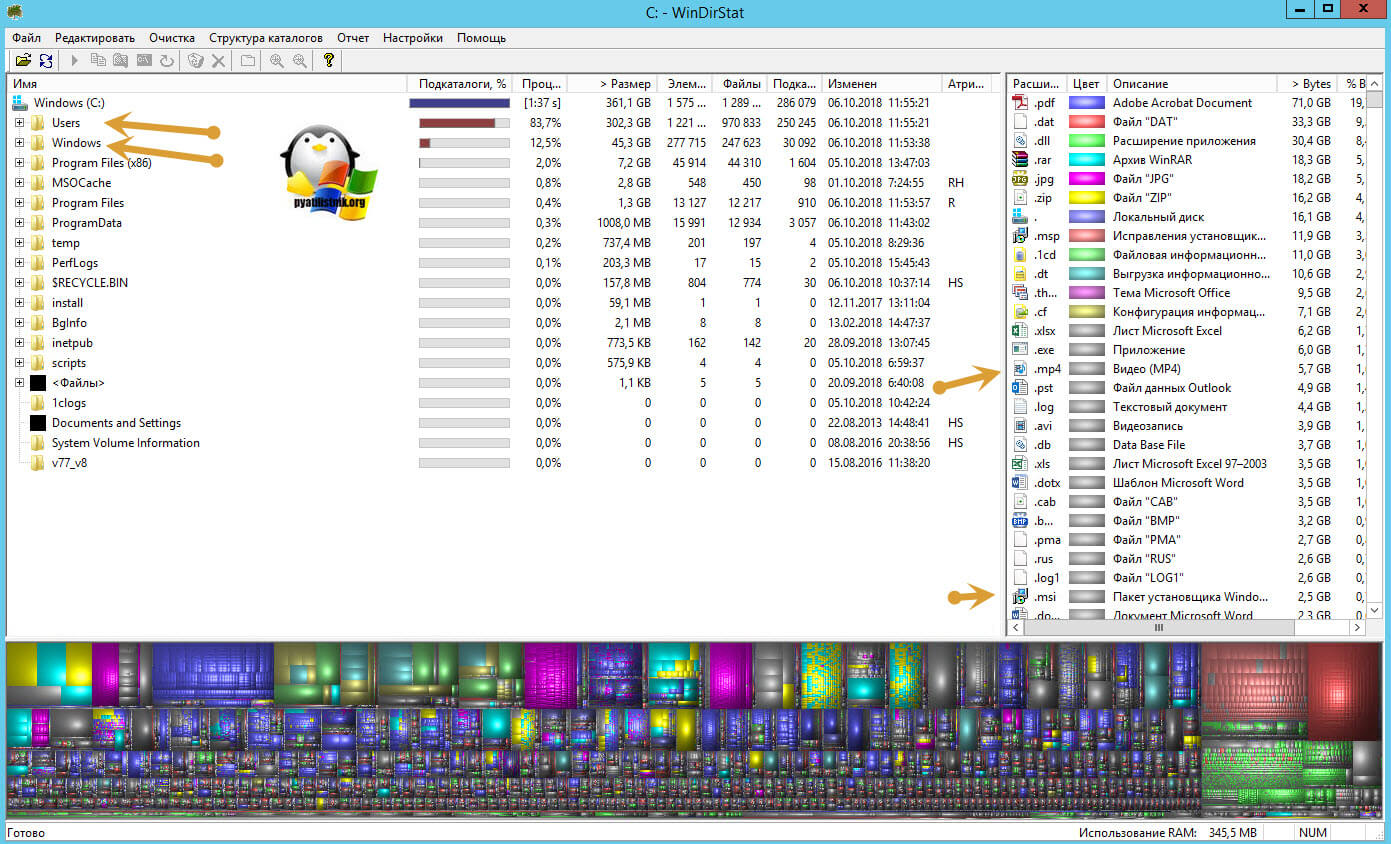
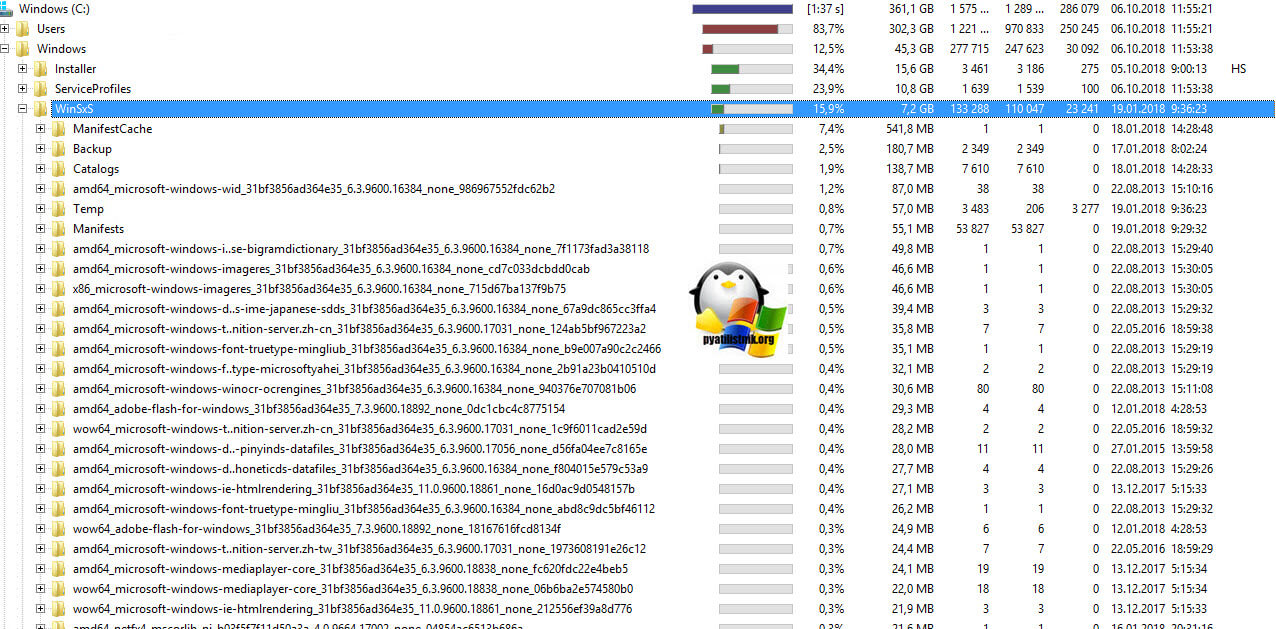
Далее мы посмотрим, почему папка Windows занимает 45 ГБ, что очень странно. Открыв более подробное описание, мы с вами видим, что 70% папки Windows на моем хосте RDS фермы, занимают три папки:
- Installer
- ServiceProfiles — в данной папке хранятся кэшированные шрифты для различных программ, для каждого пользователя
- WinSxS — Это служебная папка операционной системы Windows служащая для хранения ранее установленных версий системных компонентов. Благодаря ее наличию существует возможность отката к более старой версии обновления в случае необходимости
Что такое и как очистить папку Installer
Папка Windows Installer — это системная папка, где хранятся необходимые для удаления или обновления программ их инсталляторы, дистрибутивы различных программных компонентов, патчи, файлы не установившихся системных обновлений и прочие данные, которые необходимы системе и установленному софту для определенных процессов.
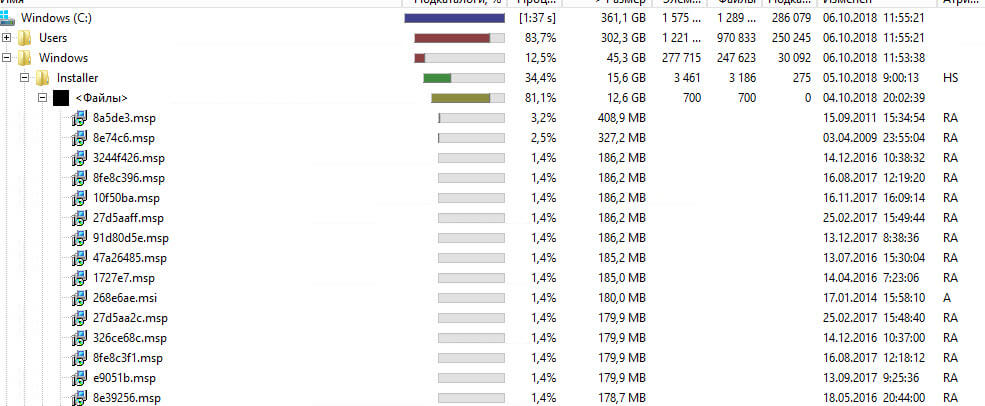
Как видите у меня папка Windows Installer занимает много места, это аж 15 ГБ. Если открыть ее содержимое, то вы увидите GUID номера, ваших программ.
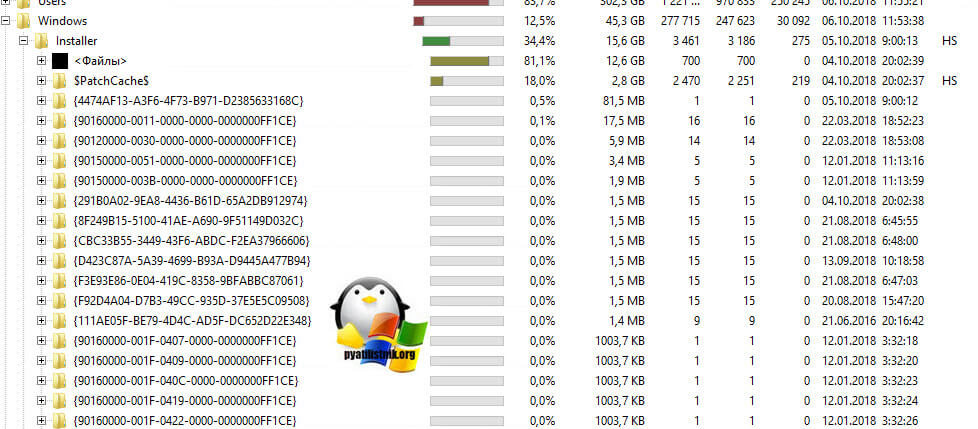
Если более детально капнуть в папку Windows Installer, то тут в основном лежат файлы msp, это пакеты обновления, MSI и MST файлы.
Хочу отметить, что папка Installer, по умолчанию скрыта, и для ее отображения, вы должны включить скрытые файлы и папки в Windows.
Можно ли удалить папку Windows Installer?
Напоминаю, что в папке C:WindowsInstaller лежат инсталляторы программ, которые используются для их правильного удаления, восстановления. Простой пример, когда вы заходите в панель управления Windows, то на большинстве программ вы видите эти статусы.
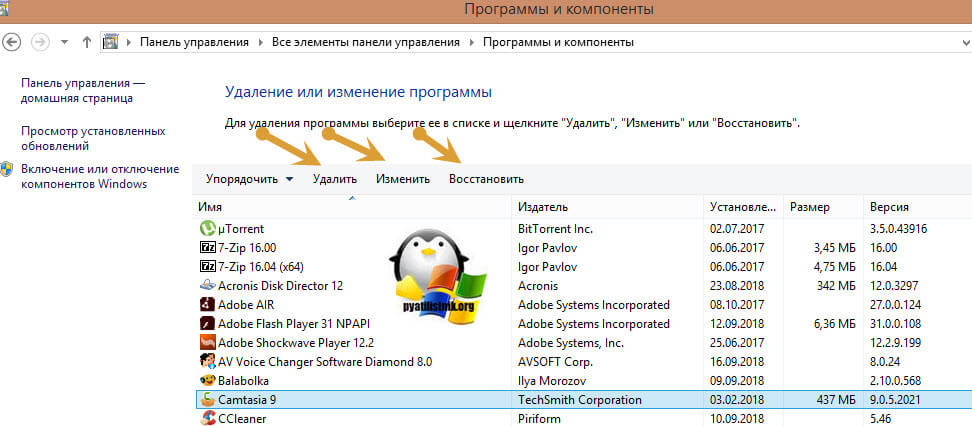
Простой пример из жизни, один из моих приятелей удалил содержимое Installer, в итоге получил ситуацию, что когда ему нужно было удалить Microsoft Office и поставить новую версию, он получил ошибку, что этого сделать нельзя.
Полностью удалять содержимое папки Windows Installer НЕЛЬЗЯ!!!!
Так, что если Windows Installer занимает много места, не стоит ее сразу полностью удалять, к этому делу нужно отнестись, очень избирательно. Как мы поняли, она точно нужна и отвечает за ваши программы, но парадокс операционной системы Windows в том, что когда вы удалил какую-то программу, ее инсталлятор, останется лежать в данной папке, в виде мусора и занимать дисковое пространство, вам ведь это не нужно. Так что приступам к ее чистке.
Как правильно очистить папку windows installer
Перед всеми нашими манипуляциями, вы должны обязательно выполнить вот что:
- Создать точку восстановления системы Windows, чтобы легко можно было откатиться назад
- в случае с RDS фермой в виде виртуальной машины, можно сделать простой снапшот, и не придется делать точку восстановления в Windows
- Если первые два пункта не выполнимы, то хотя бы скопируйте ее содержимое в другое место, на случай восстановления
Для того, чтобы правильно очистить каталог C:WindowsInstaller, можно воспользоваться бесплатной утилитой PatchCleaner.
Скачать PatchCleaner вы можете у меня по ссылке или же с официального сайта http://www.homedev.com.au/Free/PatchCleaner
Как работает PatchCleaner. Операционная система Windows содержит список текущих установщиков и патчей, к которым можно получить доступ через вызовы WMI ( Инструментарий управления Windows ). PatchCleaner получает этот список известных файлов msi/msp и сравнивает их со всеми файлами msi/msp, которые находятся в каталоге c:WindowsInstaller. Все, что находится в папке, но не в списке, представленном окнами, считается сиротскими файлами и помечено для перемещения или удаления.
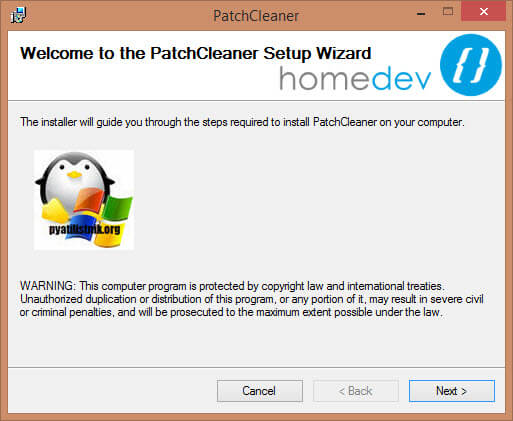
Производим установку PatchCleaner , для очистки места на RDS ферме. На пермом экране мастера установки, нажмите «Next».
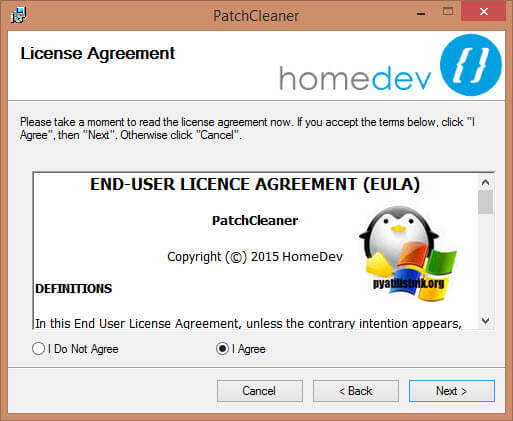
Принимаем лицензионное соглашение «I Agree»
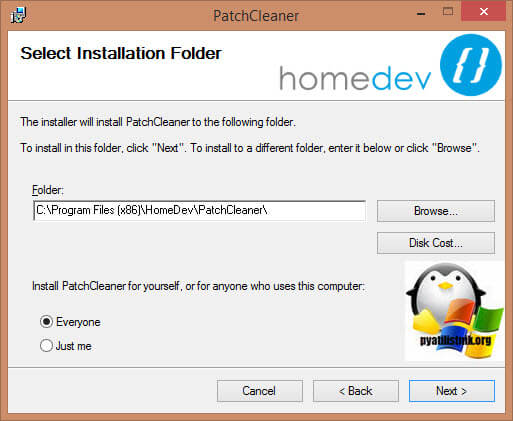
Указываем для каких пользователей будет устанавливаться PatchCleaner.
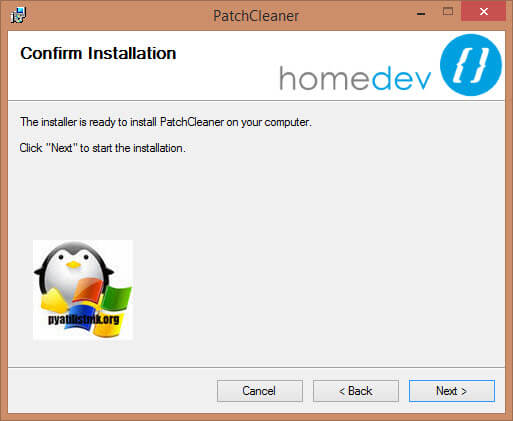
next.
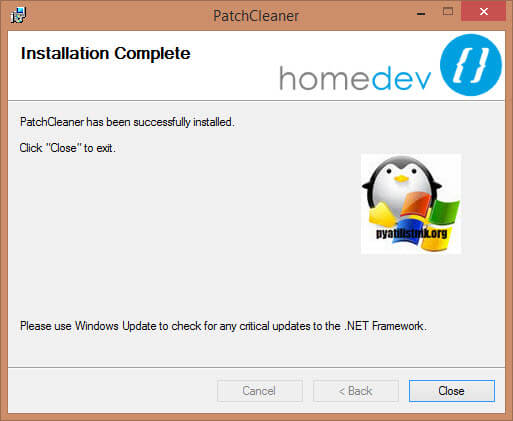
Установка PatchCleaner завершена, запускаем ее.
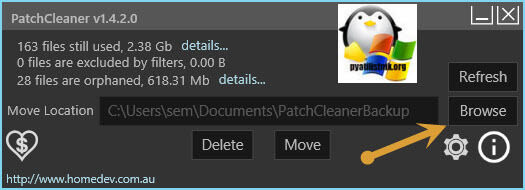
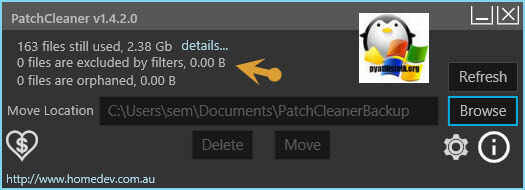
После запуска, утилита проведет сканирование. У вас будет два показателя:
- Общее количество пакетов в папке Installer
- Количество устарелых файлов
По пути Move Loction, будет делаться резервная копия, на всякий случай, можете при желании изменить данный путь.
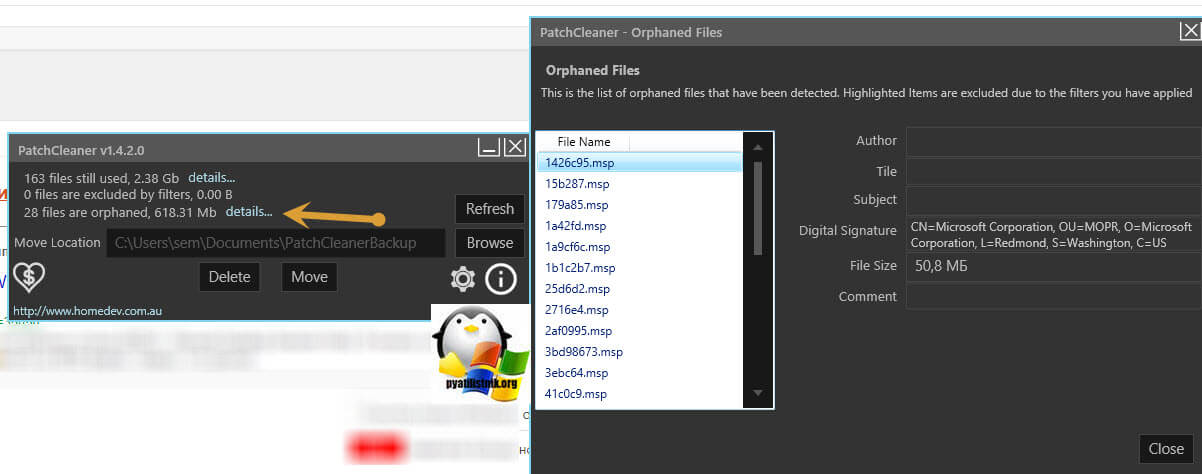
Нажав на кнопку «details», вы увидите более подробный список, устаревших пакетов msp, прочитать к каким программам, они относились.
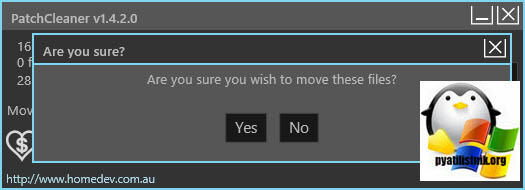
Чтобы запустить процесс освобождения дискового пространства на ферме RDS и уменьшить размер папки C:WindowsInstaller, нажмите кнопку «Move».
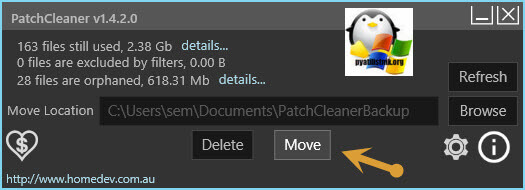
Вас спросят, хотите ли вы этого, нажимаем yes
Все уменьшение папки Installer выполнено.
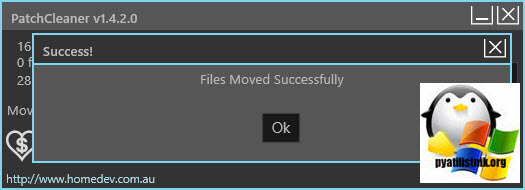
Видим, что больше в системе нет устаревших файлов.
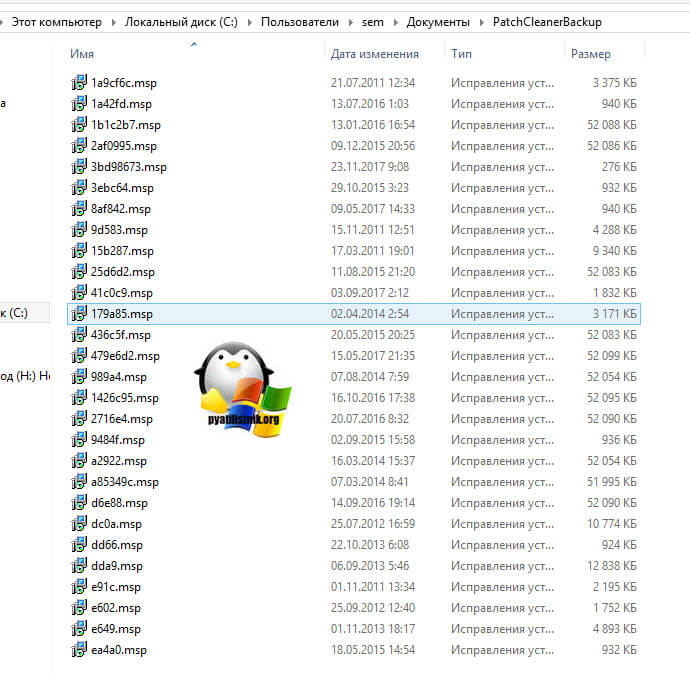
В папке с резервной копией, теперь лежат ваши устаревшие файлы.
Если вы не хотите производить чистку Windows Installer, или просто боитесь это делать, но располагаете в системе другим, дополнительным диском, на котором есть свободное место, то можете перенести C:WindowsInstaller на него, для этого можно воспользоваться символическими ссылками, мы их уже использовали когда переносили OST файл в Outlook.
Предположим у меня есть еще диск E:, и на нем есть 100 гб свободного места и я бы хотел на него перенести системную папку, для этого открываем командную строку с правами администратора и вводим команду, но перед этим ОБЯЗАТЕЛЬНО, скопируйте C:WindowsInstaller в E:Installer.
mklink /j «c:windowsinstaller» «e:Installer»
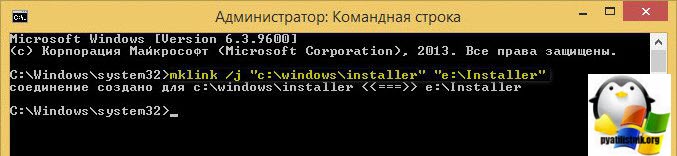
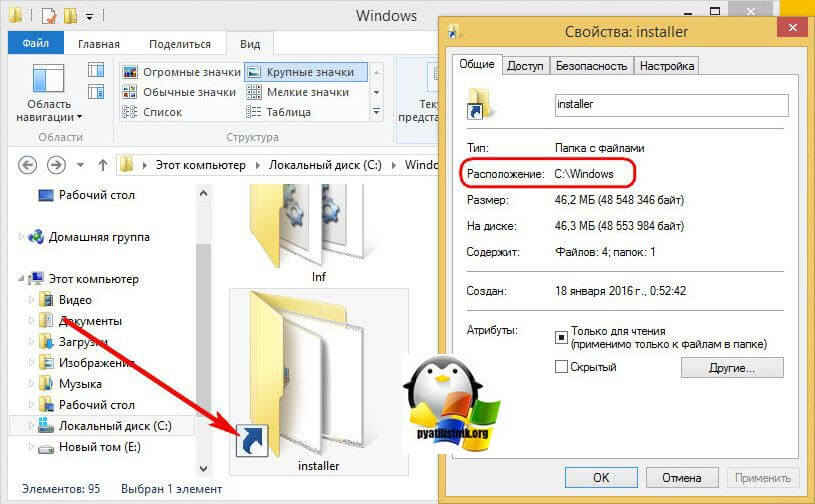
Теперь если вы зайдете в каталог C:WindowsInstaller, то увидите на папке стрелочку в левом углу, это означает, что это символическая ссылка, ведущая в другое место. Надеюсь с папкой Installer мы разобрались, и очистили часть места на RDS ферме.
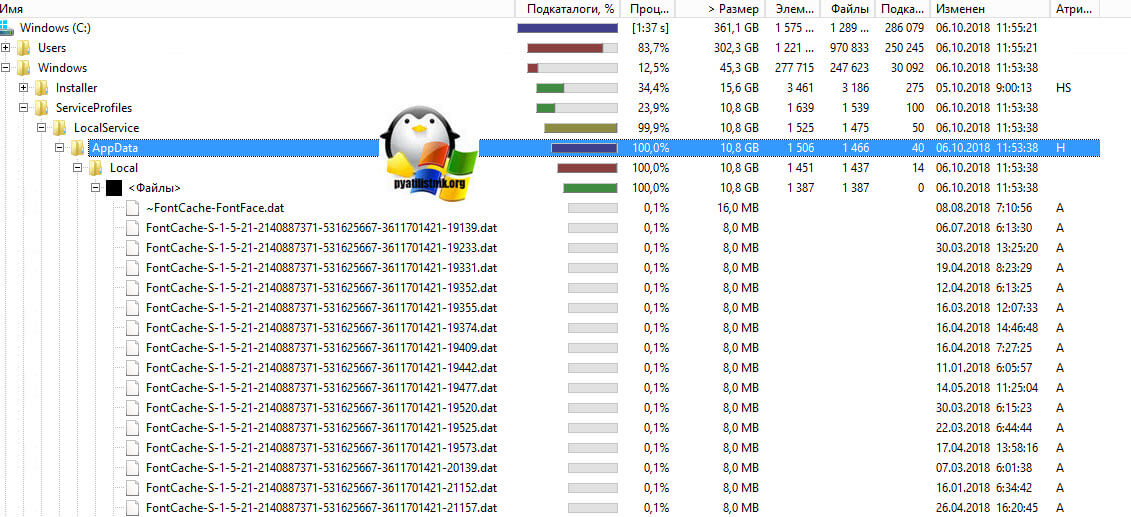
Что такое и как очистить папку ServiceProfiles
ServiceProfiles — в данной папке хранятся кэшированные шрифты для различных программ, для каждого пользователя. Когда таких пользователей много, то и размер папки может быть большим. Как видите по пути C:WindowsServiceProfilesLocalServiceAppDataLocal, лежит огромное количества FontCache файлов, по 8 МБ. Как я и говорил выше, это кэшированные шрифты, под каждую программу для каждого пользователя. В моем случае, данная папка занимает 10 ГБ, что очень много.
Я нашел ответ от разработчика Windows, что делал эту службу кэширования, его зовутNiklas Borson, вот что он отвечал, на вопрос, почему на RDS ферме, папка ServiceProfiles имеет большой размер.
Эти файлы FontCache-S — * .dat создаются службой Windows Font Cache. Я разработчик этой службы и могу подтвердить, что сказал Крис выше. Можно безопасно удалять эти файлы. Служба просто обновит их по мере необходимости. Просто чтобы подтвердить, проблему, которую вы наблюдаете, — с большим количеством файлов. Другими словами, упомянутый выше размер, должен быть общим размером для всех файлов. В Windows 8 и 8.1 каждый файл должен быть 8 МБ.
Как вы уже догадались, эти файлы предназначены для каждого пользователя, поэтому, если многие пользователи заходят на сервер, вы можете получить множество из этих файлов. К сожалению, служба Font Cache автоматически не удаляет старые файлы кэша для каждого пользователя, поэтому я боюсь, что вам придется обойти это самостоятельно. Например, вы можете создать запланированную задачу обслуживания, которая автоматически удалит все файлы FontCache-S — * .dat, если их общий размер превышает определенную сумму. Это безопасное обходное решение.
Кэширование происходит, чтобы разгрузить центральный процессор от постоянного обращения, тем самым сэкономив производительность.
Вот тут есть обсуждение данной проблемы https://social.technet.microsoft.com/Forums/ie/en-US/3795364f-b66c-43ae-82d3-8ed5eb1aa2ce/local-service-system-profile-grown-to-extremely-large-size?forum=winserverTS
В свою очередь, вы можете сделать bat файл вот с таким содержимым, и удалять файлы старше 30 дней из папки ServiceProfiles. Скрипт останавливает две службы:
- Служба кэша шрифтов Windows (Windows Font Cache Service)
- Кэш шрифтов Windows Presentation Foundation 3.0.0.0 (Windows Presentation Foundation Font Cache 3.0.0.0
net stop FontCache && net stop FontCache3.0.0.0
forfiles /P C:WindowsServiceProfilesLocalServiceAppDataLocal /M FontCache* /D -30 /C «cmd /c del @path»
net start FontCache && net start FontCache3.0.0.0
Что такое и как очистить папку WinSxS
Папка WinSxS — Это служебная папка операционной системы Windows служащая для хранения ранее установленных версий системных компонентов. Благодаря ее наличию существует возможность отката к более старой версии обновления в случае необходимости.
Очистка папки WinSxS в Windows 10, 8 и Windows 7
Продолжаем с вами производить очистку в папке Windows, от всевозможного хлама, и на очереди у нас с вами папка WinSXS, выше я написал, что из себя представляет данная папка. Как видите утилита WinDirStat, показывает что WinSxS, занимает 7,2 гб, для этой папки, это размер в пределах нормы, но если вы у себя видите, здесь 10-15 гб и более, то это повод задуматься над ее очисткой.
Есть распространенный миф о гигантских размерах этой папки, что на самом деле не совсем так. Дело в том, что подавляющее большинство содержимого папки WinSxS является «жесткими ссылками», а Проводник и файловые менеджеры это не учитывают. Реальный вес этой папки гораздо меньше, чем пишется в ее свойствах.
Можно ли удалить папку winsxs
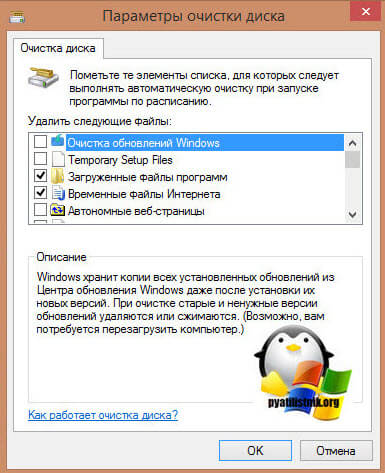
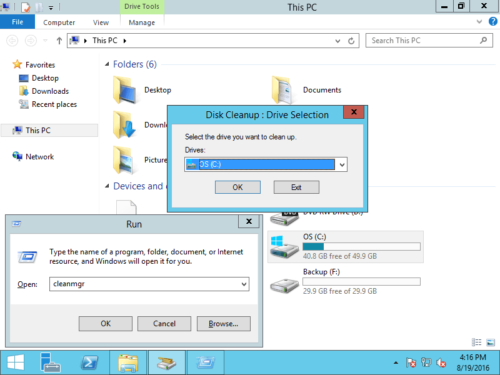
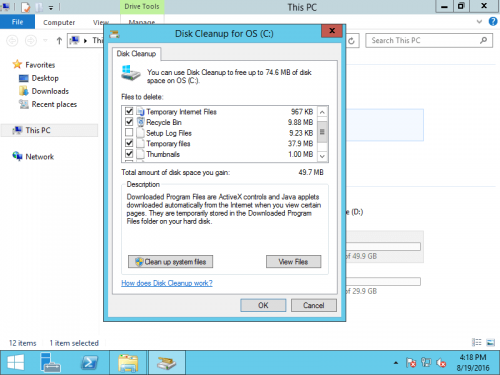
Саму папку удалять конечно же не стоит, а вот правильно ее почистить, это правильное решение. Ранее я вам рассказывал про встроенную утилиту в Windows, под названием cleanmgr (Очистка диска). Там запустив утилиту у вас появлялся мастер «Параметры чистки диска», в котором, чтобы была произведена очистка папки winsxs, нужно было выбрать пункт «Очистка обновлений Windows».
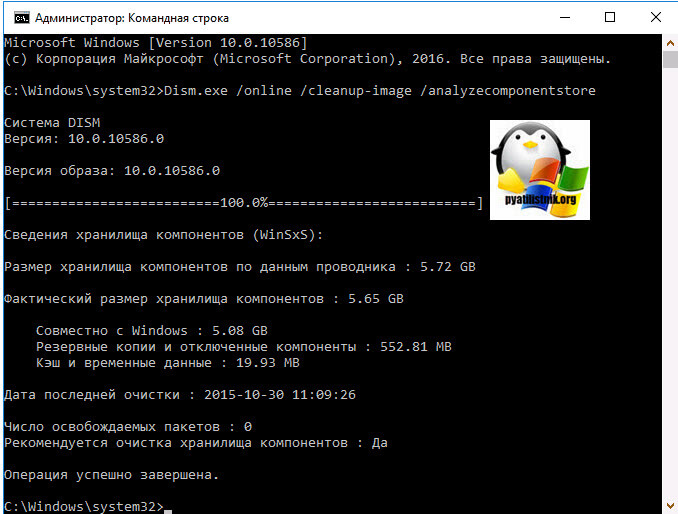
Если вы любите все делать из консоли, то вот вам пример очистки папки WinSxS в Windows 10. Запускаем командную строку от имени администратора и вводим команду:
Dism.exe /online /cleanup-image /AnalyzeComponentStore
Папка хранилища компонентов будет проанализирована и вы увидите сообщение о необходимости ее очистки, вы увидите ее размер.
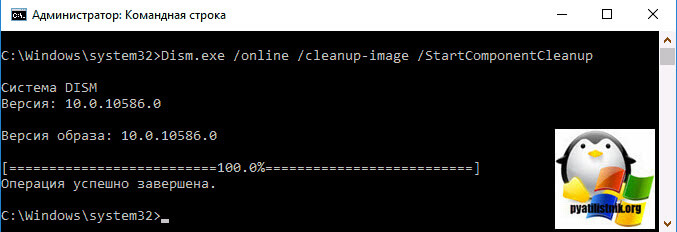
Введите команду Dism.exe /online /cleanup-image /StartComponentCleanupи нажмите Enter для запуска автоматической очистки папки WinSxS.
Для операционной системы Windows 8.1 или Windows Server 2012 R2, подойдет команда:
dism.exe /Online /Cleanup-Image /StartComponentCleanup /ResetBase
Автоматическая очистка резервных копий обновлений в WinSxS
Помимо очистки содержимого данной папки вручную, вы можете воспользоваться планировщиком заданий Windows, для того, чтобы это происходило автоматически.
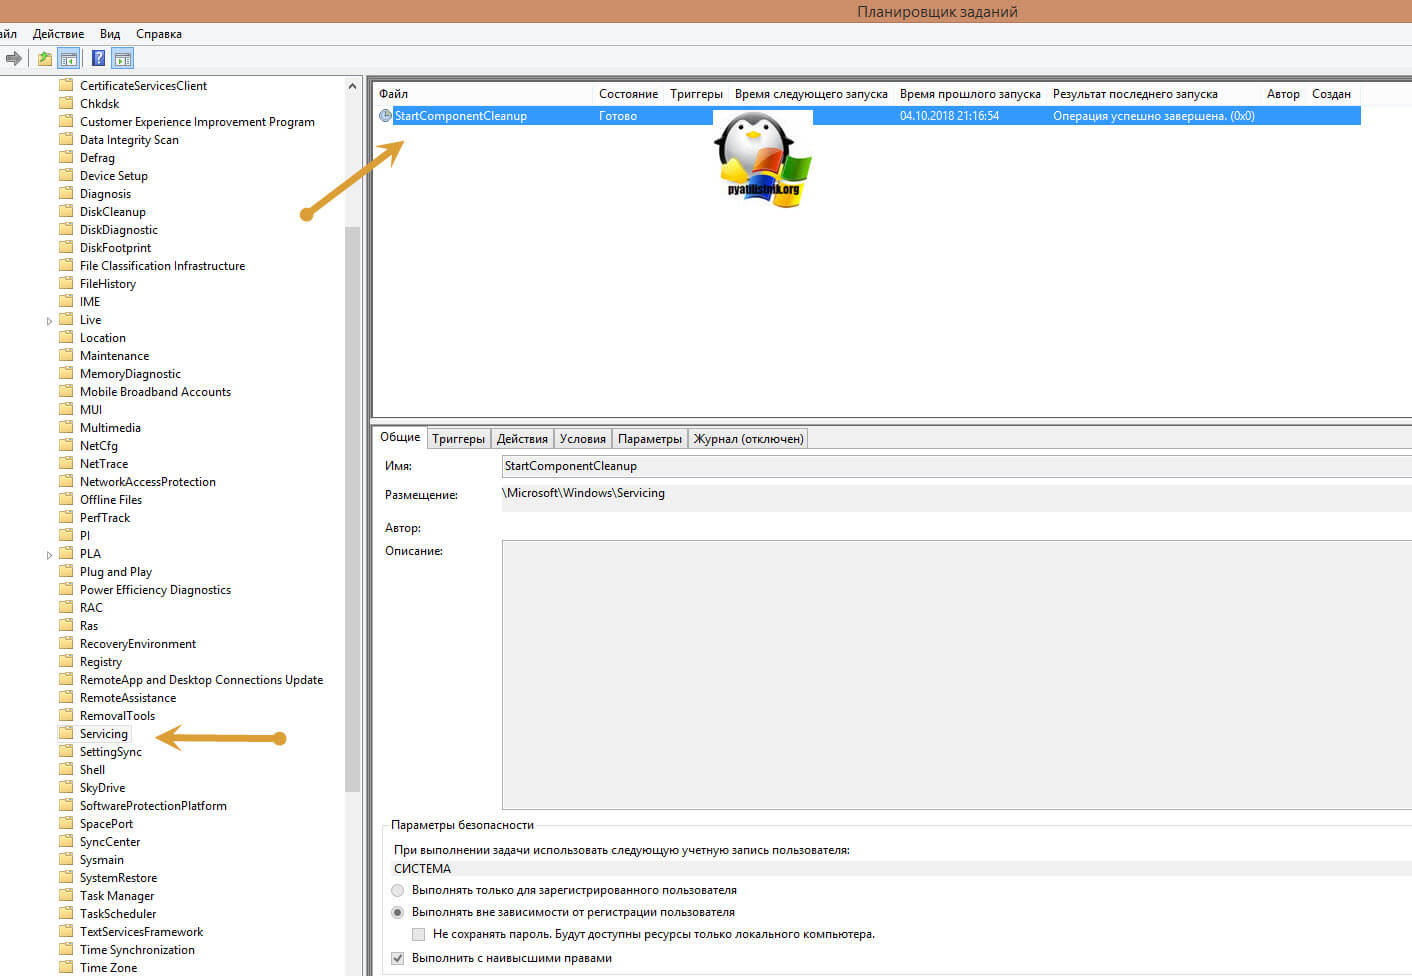
Для этого необходимо создать простую задачу StartComponentCleanup в MicrosoftWindowsServicing с нужной периодичностью выполнения. Как видите ваши RDSH хосты могут быть забиты большим количеством мусора и старых файлов, которые создает сама Windows, поэтому обязательно производите чистку папок Installer, ServiceProfiles, WinSxS. С вами был Иван Семин, автор и создатель IT блога Pyatilistnik.org.
Обновлено 13 июня 2022 г. в 5:19| Рекомендуемые
Чем дольше вы используете сервер, тем меньше свободного места остается на системном диске C:. Обновления Windows, системные службы, приложения, кеш и многие другие файлы очень быстро съедают свободное место. Однажды системный диск C заполнится и станет красным в проводнике.
В этой ситуации лучше освободить место на диске в сервере Windows 2012 как можно быстрее. В противном случае этот сервер станет медленным, зависнет или даже выйдет из строя, если диск C будет полностью заполнен. Чтобы очистить диск C в Windows Server 2012 (R2), вы можете использовать собственный инструмент очистки диска или стороннее программное обеспечение для оптимизации системы. Но я всегда рекомендую встроенную очистку диска Windows, потому что она безопасна, быстра и способна удалить большинство типов ненужных файлов.
В отличие от других версий Windows, Очистка диска в Server 2012 по умолчанию не включен. Когда вы щелкаете правой кнопкой мыши по мало места на диске C в проводнике вы не увидите кнопку «Очистка».
Если вы попытаетесь запустить из «Выполнить», вы получите сообщение об ошибке: Windows не может найти cleanmgr. Убедитесь, что вы правильно ввели имя, а затем повторите попытку..
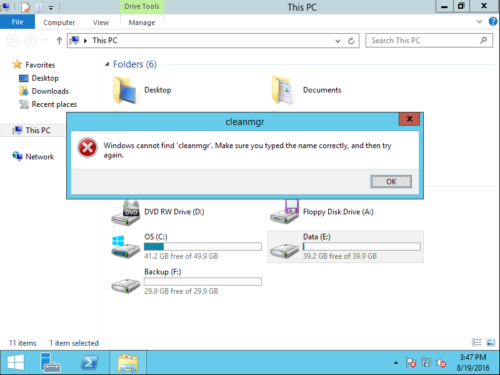
Прежде чем освобождать место на диске в Windows Server 2012 (R2), необходимо включить или установить утилиту очистки диска.
Как включить/установить очистку диска в Windows Server 2012
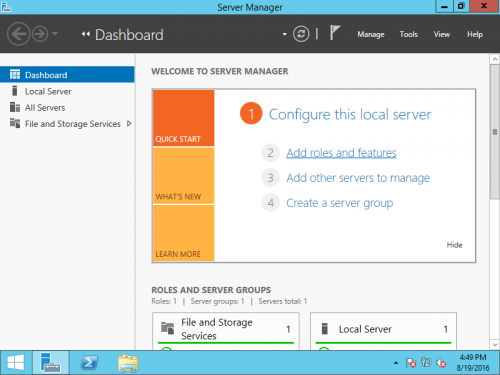
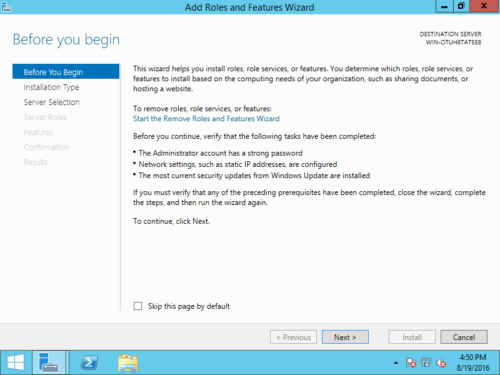
Шаг 1: Нажмите Диспетчер серверов в левом нижнем углу нажмите второй вариант «Добавить роли и функции».
Шаг 2: Нажмите Далее пока не увидишь Особенности.
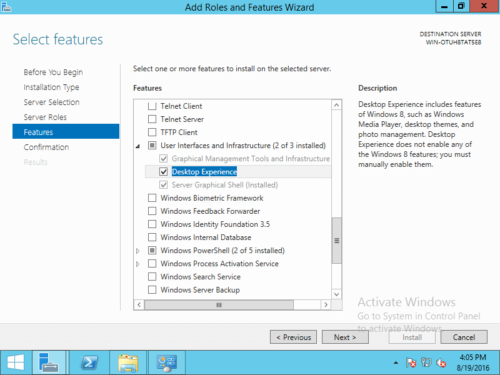
Шаг 3: Установите флажок напротив «Рабочий стол«И нажмите Далее.
Шаг 4: В течение нескольких минут, установка завершена, нажмите Закрыть.
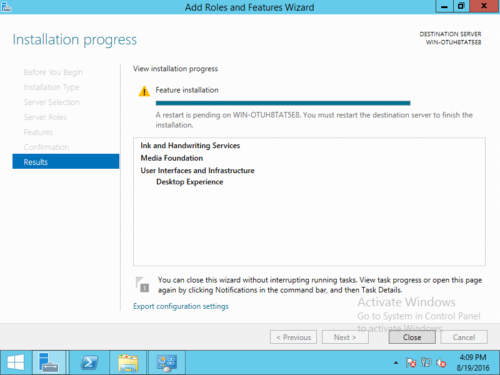
Шаг 5: Перезапустите сервер, чтобы завершить добавление функций.
После загрузки на рабочий стол, щелкнув правой кнопкой мыши диск C в проводнике, вы увидите утилиту очистки.
Другим способом является нажатие Windows + R на клавиатуре, чтобы начать с Run, напишите cleanmgr, Очистка диска будет запущена.
Как освободить место в Windows Server 2012 R2
Шаг 1: используйте любой из описанных выше способов, чтобы открыть Очистку диска.
Шаг 2: установите флажок напротив файлов, которые вы хотите удалить, и нажмите кнопку ОК. Нажмите на каждый тип файлов, вы увидите соответствующее описание внизу. В общем, все типы файлов могут быть выбраны для безопасного удаления. Однако вам лучше прочитать описание, а затем решить, удалять их или нет.
Шаг 3: Подтвердите, если вы хотите очистить эти файлы.
Шаг 4: повторите с шага 1 и нажмите Очистить системные файлы на этапе 2.
Очистка диска — отличный инструмент для освобождения места в Windows Server 2012 (r2). Он может очищать многие типы файлов, такие как временные файлы Интернета, файлы в корзине, временные файлы, файлы журналов, эскизы и файлы отчетов об ошибках Windows. Я не предлагаю удалять файлы с помощью стороннего программного обеспечения, потому что некоторые люди сообщали о проблемах после использования этого программного обеспечения.
Расширьте диск C после освобождения места на диске
Администратор сервера с более чем 15-летним опытом работы говорит, что лучший способ решить проблему нехватки места на диске — расширить диск C:, потому что:
- Удаление всех ненужных файлов требует слишком много времени.
- В большинстве случаев вы не получите большого количества свободного места.
- Существует потенциальный риск потери данных или выхода из строя сервера, если вы попробуете некоторые методы, с которыми вы не знакомы.
- На сервере через короткое время снова заканчивается место на диске.
Работы С Нами программное обеспечение серверного раздела, вы можете расширить диск C, переместив свободное место с других разделов. Ваша операционная система, программы и все остальное остается прежним.
Как увеличить свободное место на диске C:
Помимо сжатия и расширения разделов в Windows Server 2003/2008/2012/2016/2019/2022, этот инструмент помогает выполнять множество других операций по управлению разделами диска. Например: переместить расположение раздела, clone disk раздел, преобразование типа раздела диска, дефрагментация, очистка, скрытие раздела, сканирование поврежденных секторов, оптимизация файловой системы и т. д.
Подробнее Скачать, чтобы попробовать
The necessity of cleaning up C drive in Windows Server computers
The importance of having free space on your Windows Server C drive cannot be overstated. If your Windows Server does not have free space, then it will cause complications for you. As a result, having some free space on your C drive is critical.
Without free space in C drive, Windows Server will face lags during operation. Your system will boot up slowly, and your system can get stuck at stages. Therefore, you must clean your C drive in Windows Server from time to time.
There is seven easy and effective method that you can follow to perform C drive cleanup in Windows Server computers. The methods and enlisted below:
1. Turn Off Hibernation
2. Run Disk Cleanup
3. Move Big Programs from C Drive to Another Drive
4. Uninstall Useless Apps
5. Run System Cleanup and Large File Cleanup
6. Add More Space to System C Drive
7. Turn on Storage Sense
Guide using the above methods for cleaning up C Drive in Windows Server computers
While using the enlisted methods, one must determine the end goal for clean up. The first two methods are perfect if you wish to delete and clean up the useless files from your C drive.
Contrary to the first two methods, follow the other methods to clean your C drive and enhance its storage. They can also help your Windows computer have faster speed, free up C drive space, and enhance the storage capacity for C drive.
1. Turn Off Hibernation
Your Windows Server computer’s C drive holds a hibernation file called «hiberfil.sys.» The hiberfil.sys file is created during the hibernation mode. When your computer goes to hibernation mode, it saves all the current state of your Windows Server computer.
Although it does save the state, it costs the storage space of your C drive in return. Turning off the hibernation can help you save some space on your C drive.
Follow the below method to turn off hibernation in your Windows Server 2022/2019/2016 computer:
Step 1: Open Command Line Interface (CMD).
Press the Windows + R key and then type cmd in the Run Window. Hit the enter key after that, and it will open the CMD for you.
Step 2: Type «powercfg.exe /hibernate off» command in the CMD window and press the Enter key.
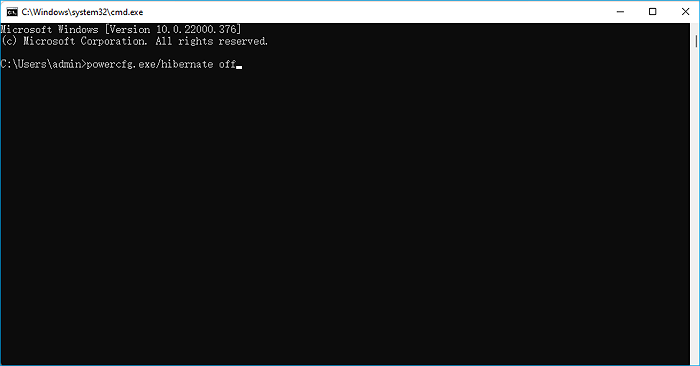
Entering the command will turn off the hibernate off for you. It will free up some space in your C drive and clean it.
2. Run Disk Cleanup
On Windows Server, the C drive stores all of the files relevant to your programs and server. Some of the files on the C drive are superfluous and waste a lot of space.
You may use Disk Cleanup to clean up your Windows Server C Drive and eliminate files such as useless data, temporary files, cached files, recycle bin, etc. To execute Disk Cleanup on your Windows Server, follow the steps below.
Note: Be careful during the disk cleanup of your server computer. Make sure you only clean the unnecessary files and prevent deleting any necessary server computer files.
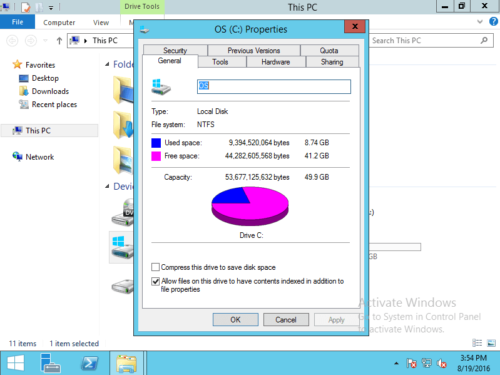
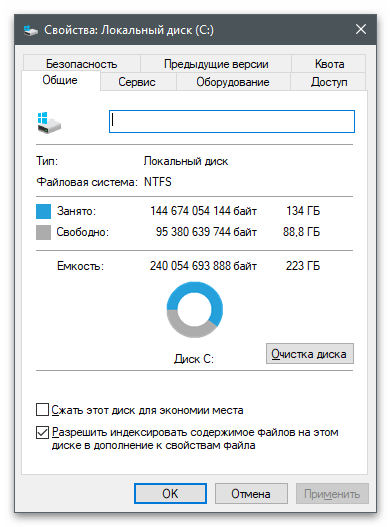
Step 1: Open properties of your Windows Server C drive.
By navigating to your file explorer, right-clicking on the C drive, and selecting properties, you can open the C drive properties.
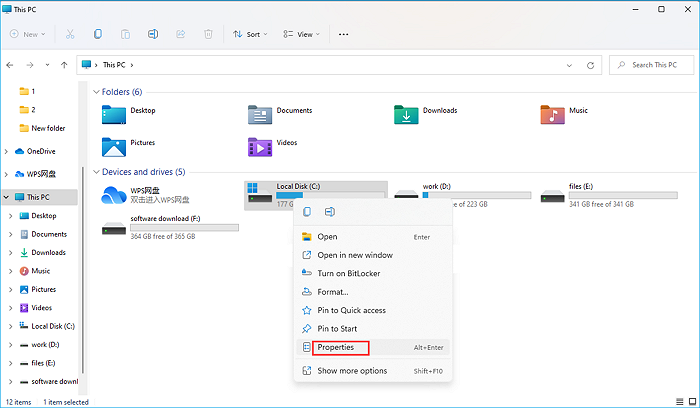
Step 2: From the opening pop-up box, select Disk Cleanup.
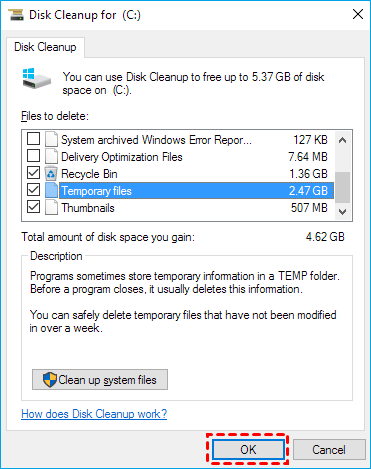
Step 3: Disk cleanup will show how much space on your C drive you can clear up.
Step 4: Check the boxes next to the files you don’t require. When you’re finished, press the OK button.
3. Move Big Programs from C Drive to Another Drive
You can clean up your Windows Server C drive by moving extensive programs from the C drive to another drive. Doing that will free up space on your C drive.
However, migrating an application is more complicated than simply copying and pasting it from one location to another. The reason for this is that a program has many libraries and dependent modules, all of which must be relocated correctly.
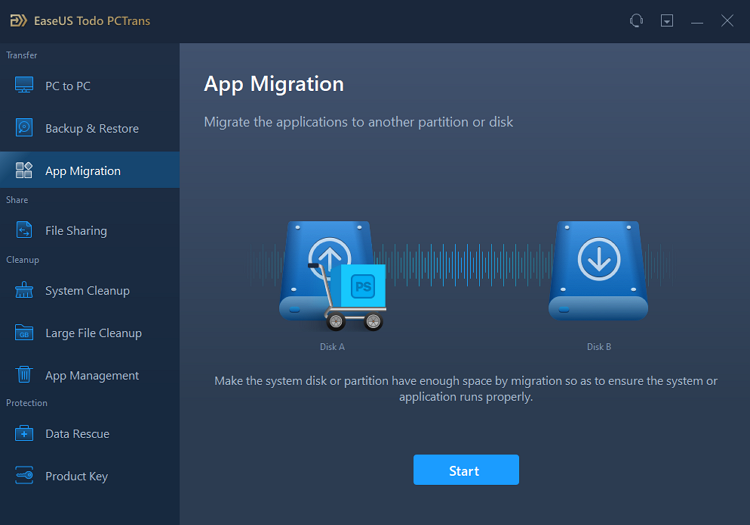
Professional file transfer software, EaseUS Todo PCTrans Technician, can effortlessly migrate a program from your Windows Server C disk. Applications moved using this method do not require you to reinstall the apps.
The Easeus Todo PCTrans Technician software is the most recommended technique to migrate installed applications. It offers an app migration feature that lets you migrate installed apps from one drive to another.
EaseUS Todo PCTrans Technician
- ☆ Deploy & install Todo PCTrans on multiple PCs.
- Transfer unlimited files, programs, apps between Servers.
- Transfer account, domain account, and settings.
- Data rescue, find product key of installed programs.
- One license for multiple PCs.
To quickly move installed programs from C drive to another disk on Windows Server, follow the instructions below:
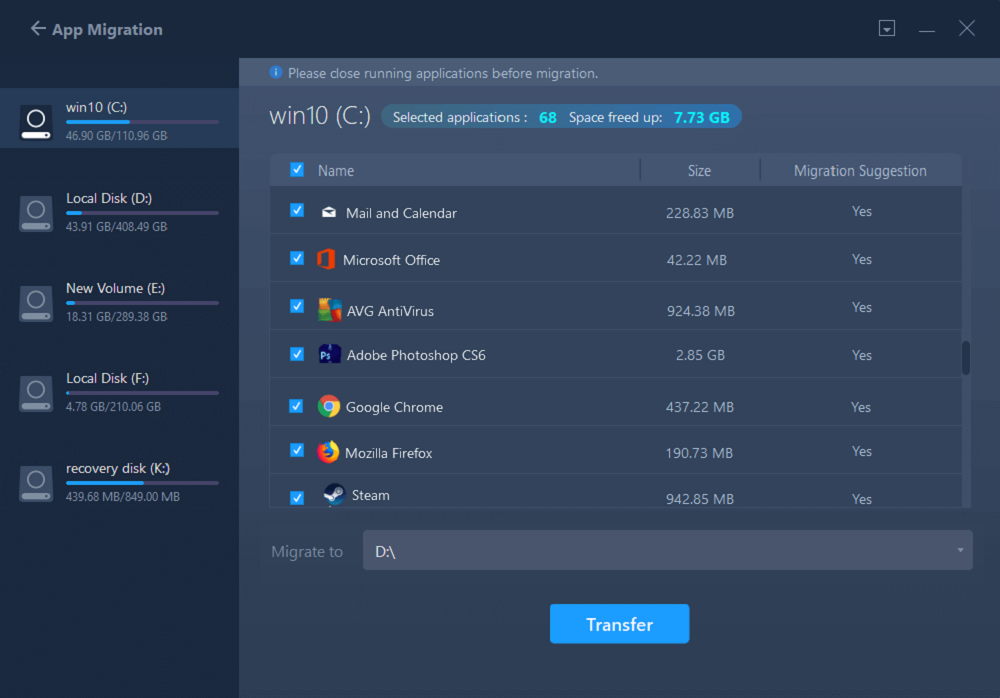
Step 1. Launch EaseUS Todo PCTrans and select transfer mode
On the main screen of EaseUS Todo PCTrans, go to «App Migration» section and click «Start» to continue.
Step 2. Select apps and another drive to transfer
1. Select the source partition and tick applications, programs and software (marked as «Yes») that you’d like to migrate.
2. Click triangle icon to select another drive or disk as your target device and click «Transfer» to start the migration.
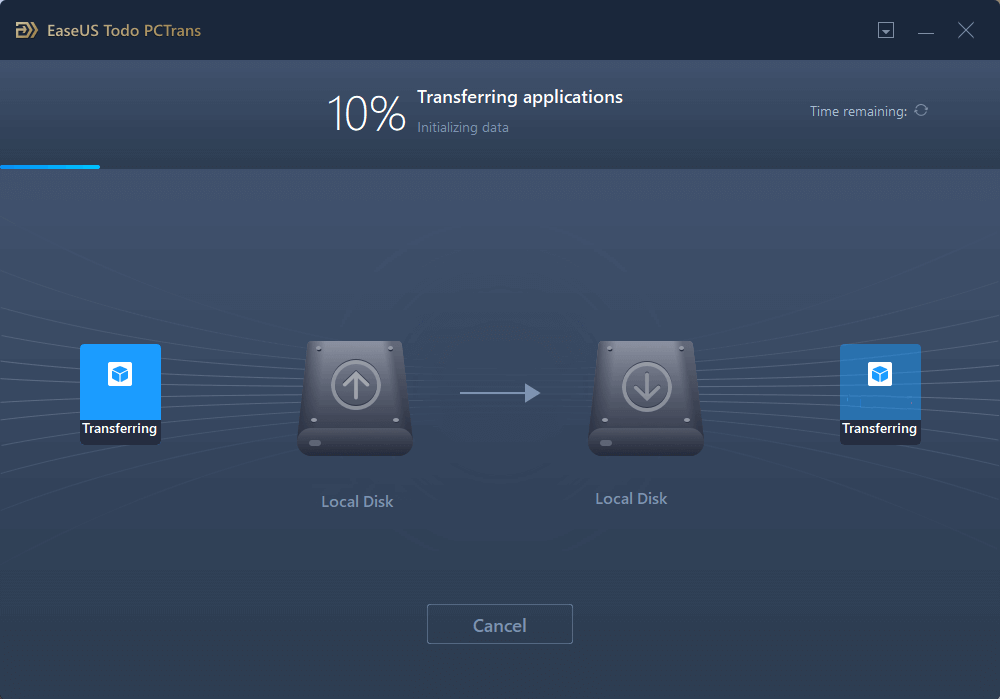
Step 3. Finish the migration process
When the transferring process finishes, click «OK» to complete.
You can restart your PC to keep all the changes, and you should be able to run your migrated apps on the other drive again.
4. Uninstall Useless Apps
Uninstalling useless applications can also help you clean up your C drive on a Windows Server computer. Sometimes there can be some large applications on your C drive that are of no use. Uninstalling them can create free space for you.
Follow the below steps to uninstall useless apps from C drive in your Windows computer:
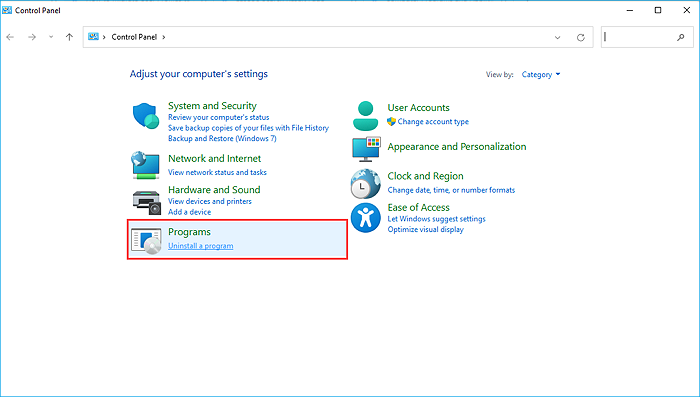
Step 1: Open Control Panel.
You can open the control panel by searching for it from the search button in your taskbar.
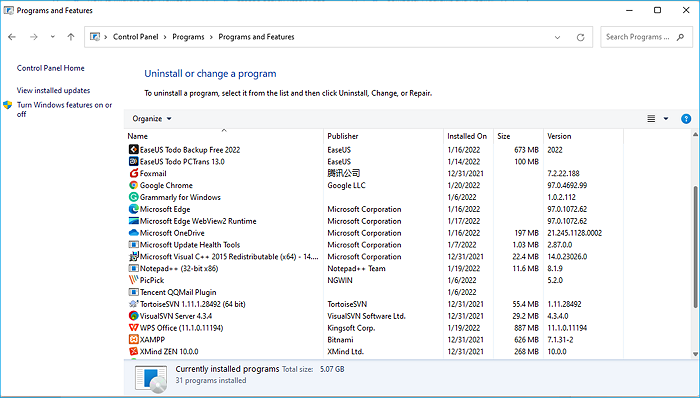
Step 2: From Control Panel, select Uninstall a program under the Programs section.
Step 3: Find the useless applications and uninstall them one by one.
Note: You can also use EaseUS Todo PCTrans Technician to uninstall useless applications.
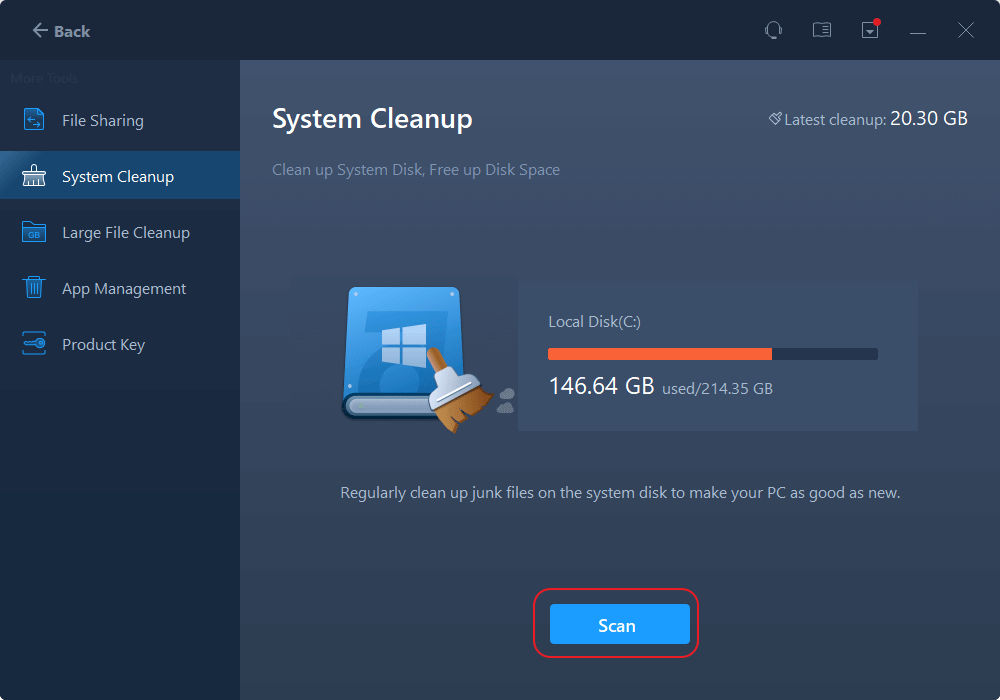
5. Run System Cleanup and Large File Cleanup
EaseUS Todo PCTrans Technician also assists you in performing System cleanup and Large File cleanup to free up space in your C drive. The system cleanup feature can clear all the useless and junk files from the C drive.
You can also move the User folder from C drive to another location using EaseUS Todo PCTrans Technician software. You may clear up a lot of space on your C drive by using these two fantastic EaseUS Todo PCTrans Technician capabilities.
Windows Server users are highly recommended to download and install this software. Once it is downloaded and installed, follow the below steps to execute System cleanup and Large File cleanup using it:
Step 1. Open EaseUS Todo PCTrans on your computer. Click «System Cleanup» and click the «Scan» button to go on.
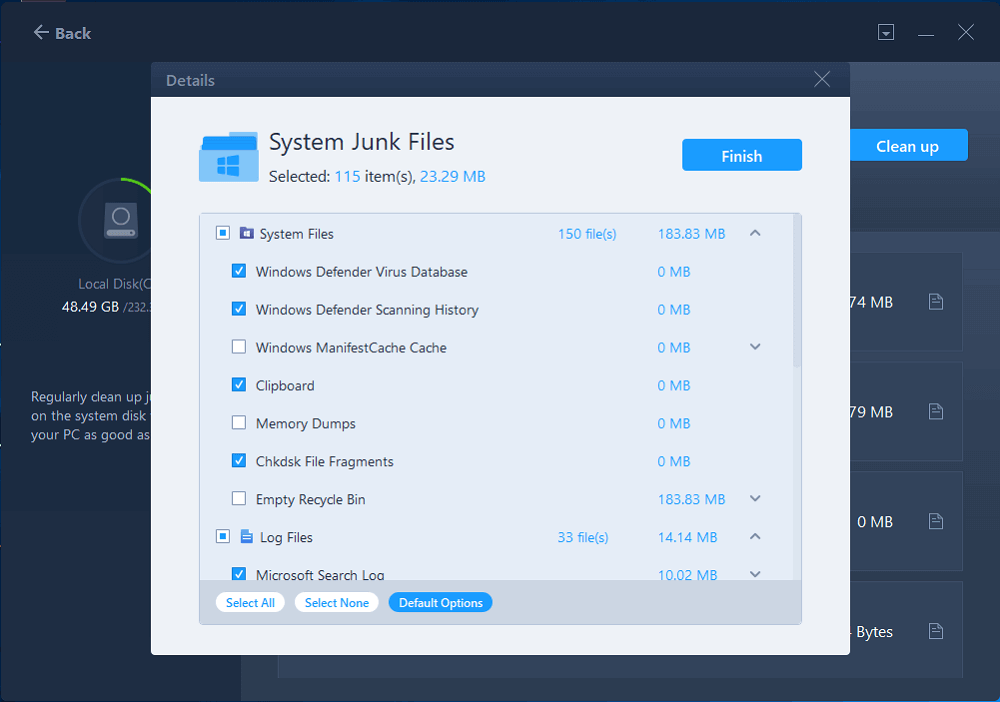
Step 2. When the scan completes, junk files will be listed. Selected the unwanted files. Be careful not to mistakenly delete files that affect the normal operation of your computer or software.
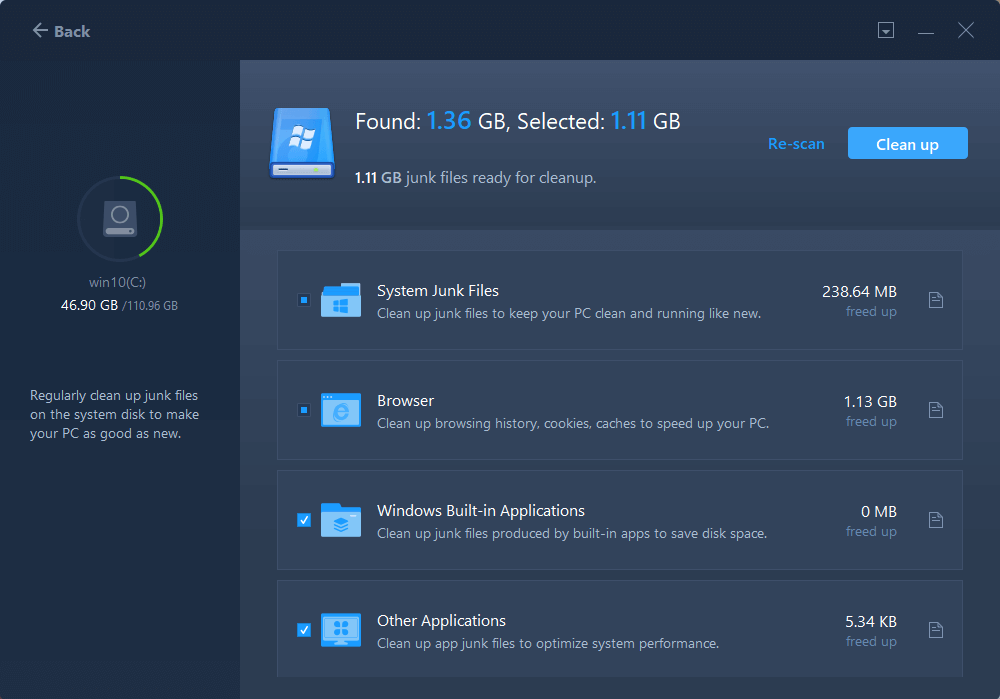
Step 3. Click the «Clean up» button and confirm the cleanup operation. You can regularly use this function to free up disk space.
6. Add More Space to C Drive
By altering the current partitions, you can increase the size of the system C Drive. When it comes to changing partitions on your computer, there is a significant danger involved. You risk losing your data and messing up the entire partition system if something goes wrong.
As a result, if you want to expand the space on your system’s C drive, you’ll require reliable partition management software. EaseUS Partition Master Server Enterprise Edition is a highly rated program.
You can add more space to your Windows server C driver with only a few simple steps. To efficiently utilize the EaseUS Partition Master Server program to expand the storage capacity of your C drive, follow the steps below:
Option 1. Extend System C drive with unallocated space
- 1. Right-click on the System C: drive and select «Resize/Move».
- 2. Drag the system partition end into the unallocated space so to add it to the C: drive. And click «OK».
- 3. Click «Execute Task» and «Apply» to execute the operations and extend the C drive.
Option 2. Extend System C drive without unallocated space
- 1. Right-click a big partition with enough free space on the system disk, select «Allocate Space».
- 2. Select the system drive at the Allocate Space From (*) To section, and drag the end of System C drive into the unallocated space. Click «OK» to confirm.
- 3. Click «Execute Task», it will list the pending operations, and click «Apply» to save the changes and extend the C drive.
0:00-0:26 Extend System Drive with Unallocated Space; 0:27-0:58 Extend System Drive without Unallocated Space.
7. Turn on Storage Sense
If you can’t clean the C drive on your Windows Server C on your own, the storage sense feature can help. Storage sense is available in Windows Server. Enabling storage sense can help your system automatically wipe out unnecessary files and data.
To enable storage sense on Windows Server, follow the instructions below:
Step 1: Launch the Windows Settings application.
Step 2: Navigate to the Storage section of the System menu.
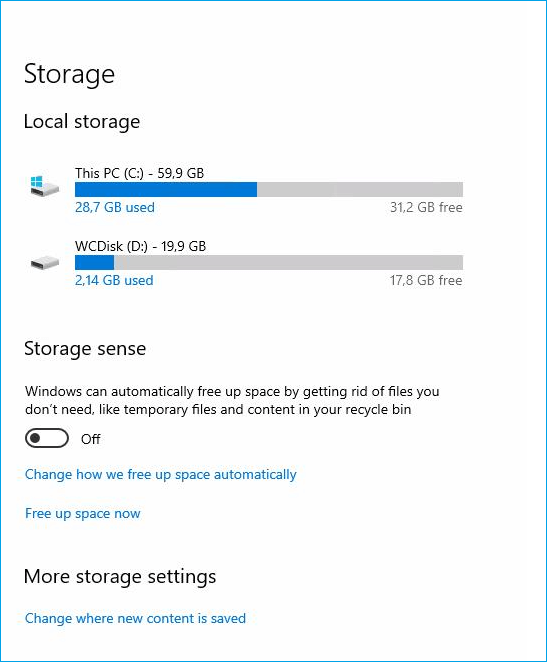
Step 3: Toggle the Storage Sense slider.
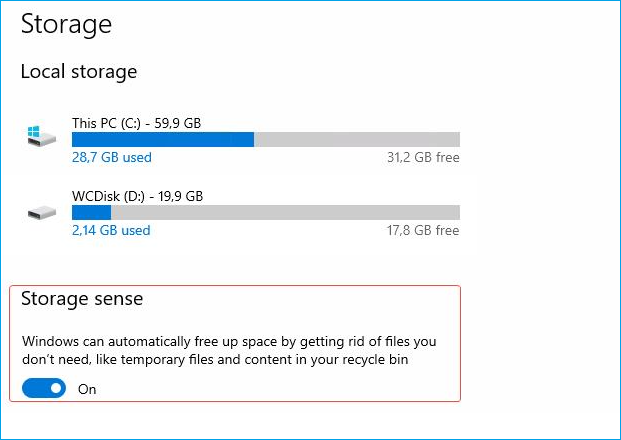
Step 4: Configure the storage sense settings.
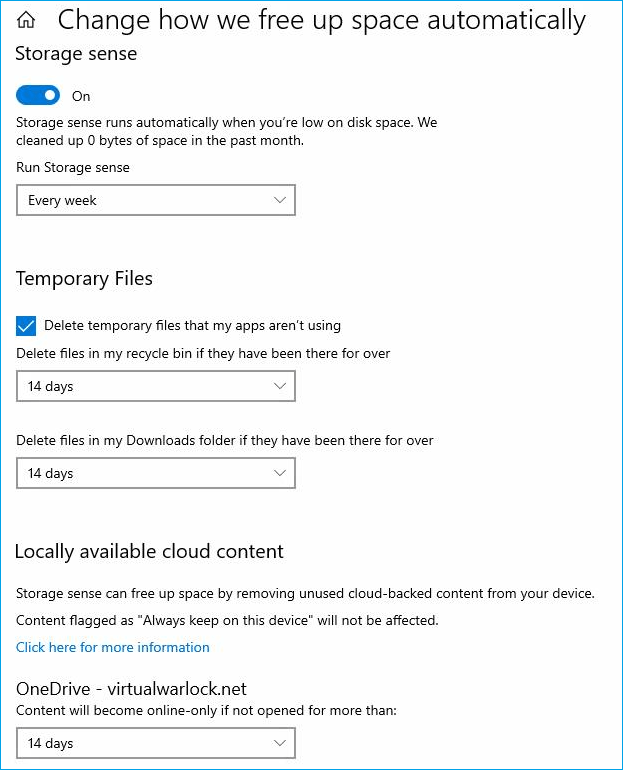
You can use the default storage sense settings or customize them to your preferences.
Conclusion
Windows Server computer helps to manage and create server computers. Usually, the Windows Server operating system is installed in your computer’s C drive. Therefore, you must clean up your C drive in Windows Server to avoid problems.
When cleaning up the C drive in Windows Server 2022/2019/2016, you can use seven methods to achieve the cleanup. If you wish to clean junk files, you can try turning off hibernation and performing disk cleanup.
The other methods, such as moving applications, uninstalling apps, performing system cleanup, and extensive file cleanup, help optimize server performance.
Also, instead of doing things manually, the most recommended software is EaseUS Todo PCTrans Technician software which lets you do the cleanup in simple steps.
The necessity of cleaning up C drive in Windows Server computers
The importance of having free space on your Windows Server C drive cannot be overstated. If your Windows Server does not have free space, then it will cause complications for you. As a result, having some free space on your C drive is critical.
Without free space in C drive, Windows Server will face lags during operation. Your system will boot up slowly, and your system can get stuck at stages. Therefore, you must clean your C drive in Windows Server from time to time.
There is seven easy and effective method that you can follow to perform C drive cleanup in Windows Server computers. The methods and enlisted below:
1. Turn Off Hibernation
2. Run Disk Cleanup
3. Move Big Programs from C Drive to Another Drive
4. Uninstall Useless Apps
5. Run System Cleanup and Large File Cleanup
6. Add More Space to System C Drive
7. Turn on Storage Sense
Guide using the above methods for cleaning up C Drive in Windows Server computers
While using the enlisted methods, one must determine the end goal for clean up. The first two methods are perfect if you wish to delete and clean up the useless files from your C drive.
Contrary to the first two methods, follow the other methods to clean your C drive and enhance its storage. They can also help your Windows computer have faster speed, free up C drive space, and enhance the storage capacity for C drive.
1. Turn Off Hibernation
Your Windows Server computer’s C drive holds a hibernation file called «hiberfil.sys.» The hiberfil.sys file is created during the hibernation mode. When your computer goes to hibernation mode, it saves all the current state of your Windows Server computer.
Although it does save the state, it costs the storage space of your C drive in return. Turning off the hibernation can help you save some space on your C drive.
Follow the below method to turn off hibernation in your Windows Server 2022/2019/2016 computer:
Step 1: Open Command Line Interface (CMD).
Press the Windows + R key and then type cmd in the Run Window. Hit the enter key after that, and it will open the CMD for you.
Step 2: Type «powercfg.exe /hibernate off» command in the CMD window and press the Enter key.
Entering the command will turn off the hibernate off for you. It will free up some space in your C drive and clean it.
2. Run Disk Cleanup
On Windows Server, the C drive stores all of the files relevant to your programs and server. Some of the files on the C drive are superfluous and waste a lot of space.
You may use Disk Cleanup to clean up your Windows Server C Drive and eliminate files such as useless data, temporary files, cached files, recycle bin, etc. To execute Disk Cleanup on your Windows Server, follow the steps below.
Note: Be careful during the disk cleanup of your server computer. Make sure you only clean the unnecessary files and prevent deleting any necessary server computer files.
Step 1: Open properties of your Windows Server C drive.
By navigating to your file explorer, right-clicking on the C drive, and selecting properties, you can open the C drive properties.
Step 2: From the opening pop-up box, select Disk Cleanup.
Step 3: Disk cleanup will show how much space on your C drive you can clear up.
Step 4: Check the boxes next to the files you don’t require. When you’re finished, press the OK button.
3. Move Big Programs from C Drive to Another Drive
You can clean up your Windows Server C drive by moving extensive programs from the C drive to another drive. Doing that will free up space on your C drive.
However, migrating an application is more complicated than simply copying and pasting it from one location to another. The reason for this is that a program has many libraries and dependent modules, all of which must be relocated correctly.
Professional file transfer software, EaseUS Todo PCTrans Technician, can effortlessly migrate a program from your Windows Server C disk. Applications moved using this method do not require you to reinstall the apps.
The Easeus Todo PCTrans Technician software is the most recommended technique to migrate installed applications. It offers an app migration feature that lets you migrate installed apps from one drive to another.
EaseUS Todo PCTrans Technician
- ☆ Deploy & install Todo PCTrans on multiple PCs.
- Transfer unlimited files, programs, apps between Servers.
- Transfer account, domain account, and settings.
- Data rescue, find product key of installed programs.
- One license for multiple PCs.
To quickly move installed programs from C drive to another disk on Windows Server, follow the instructions below:
Step 1. Launch EaseUS Todo PCTrans and select transfer mode
On the main screen of EaseUS Todo PCTrans, go to «App Migration» section and click «Start» to continue.
Step 2. Select apps and another drive to transfer
1. Select the source partition and tick applications, programs and software (marked as «Yes») that you’d like to migrate.
2. Click triangle icon to select another drive or disk as your target device and click «Transfer» to start the migration.
Step 3. Finish the migration process
When the transferring process finishes, click «OK» to complete.
You can restart your PC to keep all the changes, and you should be able to run your migrated apps on the other drive again.
4. Uninstall Useless Apps
Uninstalling useless applications can also help you clean up your C drive on a Windows Server computer. Sometimes there can be some large applications on your C drive that are of no use. Uninstalling them can create free space for you.
Follow the below steps to uninstall useless apps from C drive in your Windows computer:
Step 1: Open Control Panel.
You can open the control panel by searching for it from the search button in your taskbar.
Step 2: From Control Panel, select Uninstall a program under the Programs section.
Step 3: Find the useless applications and uninstall them one by one.
Note: You can also use EaseUS Todo PCTrans Technician to uninstall useless applications.
5. Run System Cleanup and Large File Cleanup
EaseUS Todo PCTrans Technician also assists you in performing System cleanup and Large File cleanup to free up space in your C drive. The system cleanup feature can clear all the useless and junk files from the C drive.
You can also move the User folder from C drive to another location using EaseUS Todo PCTrans Technician software. You may clear up a lot of space on your C drive by using these two fantastic EaseUS Todo PCTrans Technician capabilities.
Windows Server users are highly recommended to download and install this software. Once it is downloaded and installed, follow the below steps to execute System cleanup and Large File cleanup using it:
Step 1. Open EaseUS Todo PCTrans on your computer. Click «System Cleanup» and click the «Scan» button to go on.
Step 2. When the scan completes, junk files will be listed. Selected the unwanted files. Be careful not to mistakenly delete files that affect the normal operation of your computer or software.
Step 3. Click the «Clean up» button and confirm the cleanup operation. You can regularly use this function to free up disk space.
6. Add More Space to C Drive
By altering the current partitions, you can increase the size of the system C Drive. When it comes to changing partitions on your computer, there is a significant danger involved. You risk losing your data and messing up the entire partition system if something goes wrong.
As a result, if you want to expand the space on your system’s C drive, you’ll require reliable partition management software. EaseUS Partition Master Server Enterprise Edition is a highly rated program.
You can add more space to your Windows server C driver with only a few simple steps. To efficiently utilize the EaseUS Partition Master Server program to expand the storage capacity of your C drive, follow the steps below:
Option 1. Extend System C drive with unallocated space
- 1. Right-click on the System C: drive and select «Resize/Move».
- 2. Drag the system partition end into the unallocated space so to add it to the C: drive. And click «OK».
- 3. Click «Execute Task» and «Apply» to execute the operations and extend the C drive.
Option 2. Extend System C drive without unallocated space
- 1. Right-click a big partition with enough free space on the system disk, select «Allocate Space».
- 2. Select the system drive at the Allocate Space From (*) To section, and drag the end of System C drive into the unallocated space. Click «OK» to confirm.
- 3. Click «Execute Task», it will list the pending operations, and click «Apply» to save the changes and extend the C drive.
0:00-0:26 Extend System Drive with Unallocated Space; 0:27-0:58 Extend System Drive without Unallocated Space.
7. Turn on Storage Sense
If you can’t clean the C drive on your Windows Server C on your own, the storage sense feature can help. Storage sense is available in Windows Server. Enabling storage sense can help your system automatically wipe out unnecessary files and data.
To enable storage sense on Windows Server, follow the instructions below:
Step 1: Launch the Windows Settings application.
Step 2: Navigate to the Storage section of the System menu.
Step 3: Toggle the Storage Sense slider.
Step 4: Configure the storage sense settings.
You can use the default storage sense settings or customize them to your preferences.
Conclusion
Windows Server computer helps to manage and create server computers. Usually, the Windows Server operating system is installed in your computer’s C drive. Therefore, you must clean up your C drive in Windows Server to avoid problems.
When cleaning up the C drive in Windows Server 2022/2019/2016, you can use seven methods to achieve the cleanup. If you wish to clean junk files, you can try turning off hibernation and performing disk cleanup.
The other methods, such as moving applications, uninstalling apps, performing system cleanup, and extensive file cleanup, help optimize server performance.
Also, instead of doing things manually, the most recommended software is EaseUS Todo PCTrans Technician software which lets you do the cleanup in simple steps.
Содержание
- Причины, по которым папка «Windows» занимает много места
- Очистка папки «Windows»
- Windows 10
- Windows 7
- Вопросы и ответы

Начать необходимо с перечисления причин, по которым папка «Windows» может занимать много места. При этом стоит учитывать, что она постоянно расширяется во время взаимодействия с компьютером и даже после очистки ее размер снова увеличится спустя всего пару недель или месяцев. Сейчас предлагаем разобраться, почему это происходит и как с этим бороться.
- Деинсталляторы обновлений. В папку «Windows» помещаются деинсталляторы всех устанавливаемых обновлений. Это необходимо для того, чтобы пользователь в любой момент мог сделать откат до прежней версии Виндовс, не потеряв при этом никаких важных для себя данных и не сломав всю работу операционной системы. Эти файлы можно смело удалить, если после обновления прошло много времени или вы точно уверены в том, что делать откат не придется.
- Временные файлы. Пожалуй, временные файлы занимают больше всего места в данной папке, поскольку они связаны со всеми запускаемыми на компьютере программами. Соответственно, чем их больше, тем больше файлов хранится в подпапке с названием «Temp». Туда же помещаются разные объекты при инсталляции софта, и не всегда их очистка происходит автоматически, особенно при непредвиденном завершении работы установщика. Большинство из находящихся там файлов можно удалить как самостоятельно, так и при помощи специальных приложений.
- Папка «WinSxS». Данный каталог заслуживает отдельного внимания, поскольку именно он, находясь в папке «Windows», чаще всего весит больше остальных. Практически все содержимое этой директории относится к резервным копиям различных системных файлов и, выполнив простые действия, можно понять, необходима ли очистка этой директории. Если ранее вы уже обнаружили, что основная проблема как раз и заключается в этом каталоге, перейдите по ссылке ниже, чтобы получить соответствующие инструкции.
Подробнее: Способы очистки папки WinSxS в Windows 10
Есть и другие причины, по которым увеличивается объем папки «Windows», однако они не такие значимые и только в совокупности выдают большой объем занятого дискового пространства. Далее, когда речь пойдет об очистке каталога, все эти причины будут рассмотрены, поэтому вы сможете грамотно справиться с поставленной задачей, по максимуму освободив каталог от ненужной информации.
Очистка папки «Windows»
Отметим, что не стоит самостоятельно удалять абсолютно все файлы, которые весят много, поскольку так можно избавиться от важных системных элементов, влияющих на корректность работы операционной системы. Следуйте только предложенным инструкциям и выполняйте меры предосторожности, описанные в представленных материалах.
Windows 10
Проще всего очистить хранилище от мусора, обратившись к специальным программам. Такой метод подойдет начинающим или тем, кто не хочет тратить время на самостоятельный анализ. Есть и системные инструменты, работающие примерно по такому же принципу и справляющиеся с поставленной задачей ничуть не хуже. Однако самым эффективным методом считается ручная очистка всех важных подкаталогов, где чаще всего и хранится мусор.
Подробнее: Очистка папки «Windows» на компьютере с Windows 10
Windows 7
С «семеркой» дела обстоят примерно так же, как и с актуальной версией операционной системы, однако есть нюансы в заполненности определенных папок и важности находящихся там файлов. Нажмите по следующей ссылке, чтобы попасть на страницу статьи, посвященной данной теме. В ней вы можете ознакомиться как со встроенными средствами очистки, так и со сторонними программами, а также найдете руководство по ручному удалению мусора.
Подробнее: Очистка папки «Windows» на компьютере с Windows 7
Если же после выполнения рекомендаций папка «Windows» действительно стала весить меньше, но системный раздел жесткого диска все еще загружен большим количеством файлов и вы не знаете, что из этого можно удалить для освобождения места, перейдите к руководству по следующей ссылке и прочитайте информацию обо всех предложенных методах. Они не влияют на работу ОС и позволяют удалить только ненужные файлы.
Подробнее: Освобождаем место на диске C в Windows 10
Еще статьи по данной теме:
Помогла ли Вам статья?
- Remove From My Forums
-
Question
-
Hello, my server2012 is 9 GB after the following command : dism /online /cleanup-image /spsuperseded /hidesp
I want to clean this up.
What is a full working procedure to clean this up, without messing up?
Thx
Answers
-
It reports the size consumption on the disk which is approx 10,5G counting each hardlink as a different instance. If you execute the same command without the -u switch you may get a different, lower, size because the utility will not count each hardlink
as a different instance and will report the real consumption on the HDD.In my last answer I pointed you to use the -u switch to get the single the instance result. It was a fast typing mistake. You should use the command without the -u switch!
————————-
Lefteris Karafilis
MCSE, MCT, SEC+
LinkedIn: http://www.linkedin.com/in/lkarafilis
Mail: lefteris@karafilis.net
Blog: http://itbully.com/ideas/ekarafilis-
Marked as answer by
Monday, January 14, 2013 8:56 AM
-
Marked as answer by