В больших компьютерных сетях, когда рабочее место пользователя не привязано к определенному компьютеру удобно использовать перемещаемые профили пользователей.
Рассмотрим процесс настройки перемещаемых профилей пользователей с использованием групповой политики.
Первым делом, создадим специальную группу. Назовем ее, к примеру, Users with roaming profiles.

Сразу после создания группы можно определить для кого и на каком компьютере будут действовать перемещаемые профили.
Поскольку нас интересует создание перемещаемых профилей для всех пользователей мы добавим в группу Users with roaming profiles всех пользователей домена и все компьютеры домена.

На этом подготовка группы закончена, переходим к работе с файловой системой. На сервере, который будет хранилищем перемещаемых профилей создадим новый общий ресурс.

Если не стоит задачи управлять общим ресурсом (к примеру создавать квоты и ограничения), то выбираем профиль SMB Share ProFile

Если требуется настройка квот и ограничений, либо общий ресурс создается на удаленном сервере то потребуется установка дополнительных компонентов.

Если нужно создать общий ресурс на удаленном сервере, то Компоненты ролей должны быть установлены на управляемом и управляющем серверах.
После установки дополнительных компонентов перейдем непосредственно к созданию общей папки.
Определяем параметры Общего ресурса. К этому моменту папка для хранение перемещаемых профилей должна быть создана.


На следующем шаге включим галочку Enable acces-based enumeration. В этом случае пользователь будет иметь доступ только к файлам своего профиля.

Для организации совместного доступа потребуется произвести настройку прав
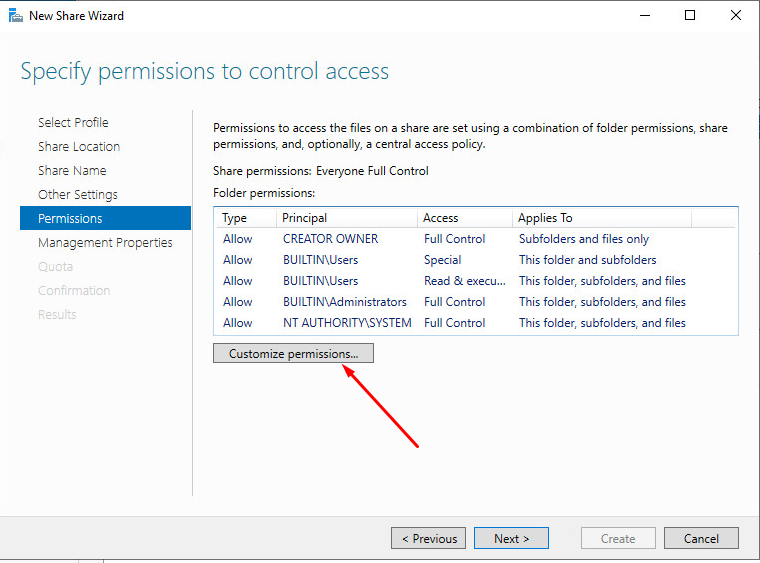
В частности нужно отключить наследование

Выбираем пункт

В данном примере нас будут интересовать только пользовательские файлы
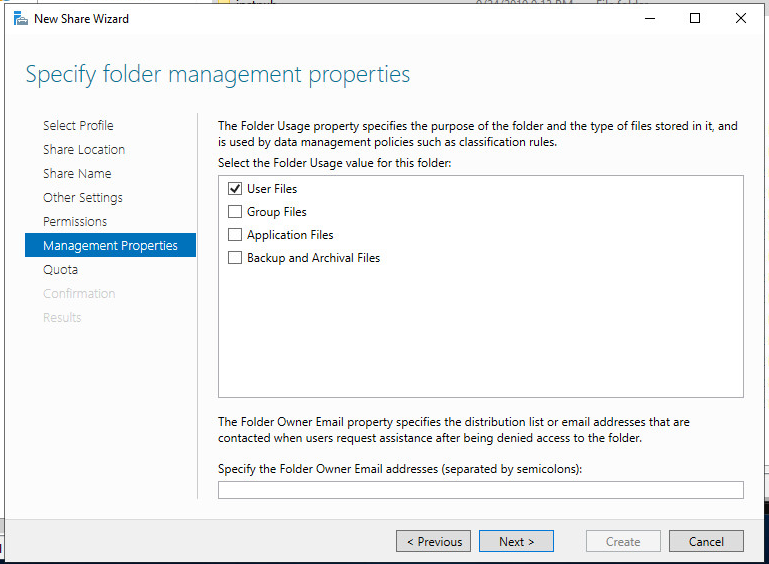
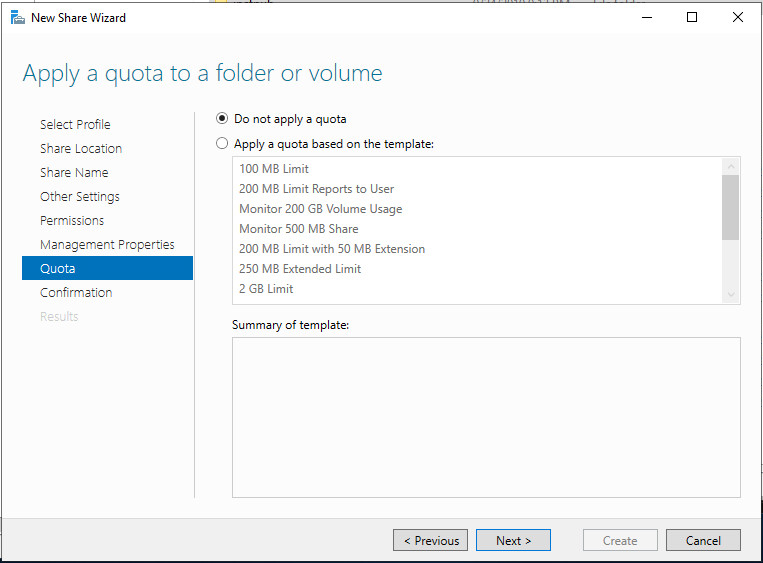
Если добавление квот не требуется, продолжим работу мастера
Подготовка общего ресурса завершена, осталось все проверить и нажать кнопку Create.

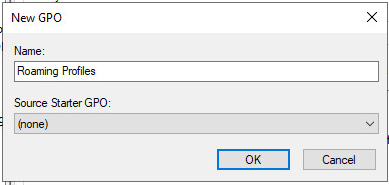
Создав общий ресурс перейдем в редактор групповой политики для окончательно настройки перемещаемых профилей.
Создадим новый объект групповой политики
Откроем его для изменения и найдем параметр Set roaming path for all users logging omto this computer в ветке Computer Configuration-Profiles- Administartive Template Policity definitions-System-User Profile

Указываем путь к созданной ранее общей папке

| title | description | ms.topic | author | ms.author | ms.date |
|---|---|---|---|---|---|
|
Deploy primary computers for Folder Redirection and Roaming User Profiles |
How to enable primary computer support and designate primary computers for users with Folder Redirection and Roaming User Profiles. |
article |
JasonGerend |
jgerend |
06/06/2019 |
Deploy primary computers for Folder Redirection and Roaming User Profiles
Applies to: Windows Server 2022, Windows 10, Windows 8, Windows 8.1, Windows Server 2019, Windows Server 2016, Windows Server 2012, Windows Server 2012 R2
This topic describes how to enable primary computer support and designate primary computers for users. Doing so enables you to control which computers use Folder Redirection and Roaming User Profiles.
[!IMPORTANT]
When enabling primary computer support for Roaming User Profiles, always enable primary computer support for Folder Redirection as well. This keeps documents and other user files out of the user profiles, which helps profiles remain small and sign on times stay fast.
Prerequisites
Software requirements
Primary computer support has the following requirements:
- The Active Directory Domain Services (AD DS) schema must be updated to include Windows Server 2012 schema additions (installing a Windows Server 2012 domain controller automatically updates the schema). For information about updating the AD DS schema, see Adprep.exe integration and Running Adprep.exe.
- Client computers must run Windows 10, Windows 8.1, Windows 8, Windows Server 2019, Windows Server 2016, Windows Server 2012 R2, or Windows Server 2012.
[!TIP]
Although primary computer support requires Folder Redirection and/or Roaming User Profiles, if you are deploying these technologies for the first time, it is best to set up primary computer support before enabling the GPOs that configure Folder Redirection and Roaming User Profiles. This prevents user data from being copied to non-primary computers before primary computer support is enabled. For configuration information, see Deploy Folder Redirection and Deploy Roaming User Profiles.
Step 1: Designate primary computers for users
The first step in deploying primary computers support is designating the primary computers for each user. To do so, use Active Directory Administration Center to obtain the distinguished name of the relevant computers and then set the msDs-PrimaryComputer attribute.
[!TIP]
To use Windows PowerShell to work with primary computers, see the blog post Digging a little deeper into Windows 8 Primary Computer.
Here’s how to specify the primary computers for users:
- Open Server Manager on a computer with Active Directory Administration Tools installed.
- On the Tools menu, select Active Directory Administration Center. Active Directory Administration Center appears.
- Navigate to the Computers container in the appropriate domain.
- Right-click a computer that you want to designate as a primary computer and then select Properties.
- In the Navigation pane, select Extensions.
- Select the Attribute Editor tab, scroll to distinguishedName, select View, right-click the value listed, select Copy, select OK, and then select Cancel.
- Navigate to the Users container in the appropriate domain, right-click the user to which you want to assign the computer, and then select Properties.
- In the Navigation pane, select Extensions.
- Select the Attribute Editor tab, select msDs-PrimaryComputer and then select Edit. The Multi-valued String Editor dialog box appears.
- Right-click the text box, select Paste, select Add, select OK, and then select OK again.
Step 2: Optionally enable primary computers for Folder Redirection in Group Policy
The next step is to optionally configure Group Policy to enable primary computer support for Folder Redirection. Doing so enables a user’s folders to be redirected on computers designated as the user’s primary computers, but not on any other computers. You can control primary computers for Folder Redirection on a per-computer basis, or a per-user basis.
Here’s how to enable primary computers for Folder Redirection:
- In Group Policy Management, right-click the GPO you created when doing the initial configuration of Folder Redirection and/or Roaming User Profiles (for example, Folder Redirection Settings or Roaming User Profiles Settings), and then select Edit.
- To enable primary computers support using computer-based Group Policy, navigate to Computer Configuration. For user-based Group Policy, navigate to User Configuration.
- Computer-based Group Policy applies primary computer processing to all computers to which the GPO applies, affecting all users of the computers.
- User-based Group Policy to applies primary computer processing to all user accounts to which the GPO applies, affecting all computers to which the users sign on.
- Under Computer Configuration or User Configuration, navigate to Policies, then Administrative Templates, then System, then Folder Redirection.
- Right-click Redirect folders on primary computers only, and then select Edit.
- Select Enabled, and then select OK.
Step 3: Optionally enable primary computers for Roaming User Profiles in Group Policy
The next step is to optionally configure Group Policy to enable primary computer support for Roaming User Profiles. Doing so enables a user’s profile to roam on computers designated as the user’s primary computers, but not on any other computers.
Here’s how to enable primary computers for Roaming User Profiles:
- Enable primary computer support for Folder Redirection, if you haven’t already.
This keeps documents and other user files out of the user profiles, which helps profiles remain small and sign on times stay fast. - In Group Policy Management, right-click the GPO you created (for example, Folder Redirection and Roaming User Profiles Settings), and then select Edit.
- Navigate to Computer Configuration, then Policies, then Administrative Templates, then System, and then User Profiles.
- Right-click Download roaming profiles on primary computers only, and then select Edit.
- Select Enabled, and then select OK.
Step 4: Enable the GPO
Once you have completed configuring Folder Redirection and Roaming User Profiles, enable the GPO if you have not already. Doing so permits it to be applied to affected users and computers.
Here’s how to enable the Folder Redirection and/or Roaming User Profiles GPOs:
- Open Group Policy Management
- Right-click the GPOs that you created, and then select Link Enabled. A checkbox should appear next to the menu item.
Step 5: Test primary computer function
To test primary computer support, sign in to a primary computer, confirm that the folders and profiles are redirected, then sign in to a non-primary computer and confirm that the folders and profiles are not redirected.
Here’s how to test primary computer functionality:
-
Sign in to a designated primary computer with a user account for which you have enabled Folder Redirection and/or Roaming User Profiles.
-
If the user account has signed on to the computer previously, open a Windows PowerShell session or Command Prompt window as an administrator, type the following command and then sign off when prompted to ensure that the latest Group Policy settings are applied to the client computer:
-
Open File Explorer.
-
Right-click a redirected folder (for example, the My Documents folder in the Documents library), and then select Properties.
-
Select the Location tab, and confirm that the path displays the file share you specified instead of a local path. To confirm that the user profile is roaming, open Control Panel, select System and Security, select System, select Advanced System Settings, select Settings in the User Profiles section and then look for Roaming in the Type column.
-
Sign in with the same user account to a computer that is not designated as the user’s primary computer.
-
Repeat steps 2–5, instead looking for local paths and a Local profile type.
[!NOTE]
If folders were redirected on a computer before you enabled primary computer support, the folders will remain redirected unless the following setting is configured in each folder’s folder redirection policy setting: Redirect the folder back to the local userprofile location when the policy is removed. Similarly, profiles that were previously roaming on a particular computer will show Roaming in the Type columns; however, the Status column will show Local.
More information
- Deploy Folder Redirection with Offline Files
- Deploy Roaming User Profiles
- Folder Redirection, Offline Files, and Roaming User Profiles overview
- Digging a little deeper into Windows 8 Primary Computer
Имеется следующая проблема: при синхронизации перемещаемых профилей в домене не синхронизируются удалённые файлы.
Данная проблема наблюдается на 2х предприятиях, где
— Используются идентичные групповые политики, но дело вряд ли в них, тк их отключение ситуацию не исправило.
— Контроллер домена на Windows 2019
core.
— Пользовательские компьютеры на Windows 10
pro.
— Службы AD и
GPO на Windows
server 2019.
— Перемещаемые профили пользователей хранятся на NAS’е/Win2019 сервере (на разных предприятиях).
— В среднем перемещаемые профили весят 5-15 гигов.
На данный момент ситуация выглядит следующим образом: При
logoff’е синхронизируются все файлы, кроме удалённых (не удаляются из перемещаемого профиля на NAS), при
logon’е на компах пользователей, удалённые в предыдущей сессии, файлы восстанавливаются на своих исходных местах, как будто и не удалялись.
Проблема наблюдается со всеми пользователями, чьи профили хоть сколько-то весят. На чистом тестовом профиле всё удаляется. (Возможно, потому, что он крайне мало весит). В ближайшее время попробую его
чем нибудь забить и потестировать дополнительно – отпишусь по результатам.
При этом в журнале событий нет ошибок, порождаемых службой профилей пользователей. В правах на директории перемещаемых профилей ничего не менялось и стоят права, выставленные системой при создании директории перемещаемого
профиля – полный доступ для всех.
Если удалить директорию перемещаемого профиля с сервера, при следующем
logon’е она создастся вновь и синхронизируется с
локальным профилем. Пересоздание директории проблему не решает.
-
Изменено
13 января 2021 г. 14:08
-
Изменен тип
Dmitriy VereshchakMicrosoft contingent staff, Moderator
26 февраля 2021 г. 14:24
Отсутствие активности
Задача: Перенести профили и папки сотрудников с одного сервера на другой
У меня на работе что-то стал тупить сервер (физический S5000VSA, 2 sockets Intel Xeon CPU E6405 2.00Ghz, 4Gb RAM) на котором располагаются профили и перемещаемые папки пользователей. Вот просто так система подвисала и ничего с ней делать нельзя было, но проходило какое-то время и как ни в чем не бывало. Но вот у пользователей в связи с использованием перемещаемых профилей и папок "Мои документы", "Рабочий стол", "Application Data" происходило повисание программ, с которыми они работают, отваливается рабочий стол и ничего сделать нельзя, проходит какое-то время и все возвращается к работе как ни в чем не бывало. Перво-наперво был проверено состояние RAID контроллера через утилиту MegaRAID Storage Manager. RAID массив в оптимальном состоянии, ошибок нет. Удалены оставшиеся от предыдущего системного администратора зачем-то развернутые роли, не относящиеся к работе. Такое ощущение, что он учился на боевом окружении. Нагрузки по памяти, по сети нет. Предварительно с него были вынесены LUN где располагались "Почтовые архивы пользователей", LUN с дистрибутивами, LUN где располагался "Консультант+". Но все это ни к чему не привело, по данным анализа за сетевыми интерфейсами через Zabbix, мы сетевую пропускную способность линка 1Gbps даже и близко не использовали.
Поэтому я принял решение, что нужно на новом сервере развернуть VM и перенести на него: Профили
Шаг №1: Разворачиваю виртуальную машину на ESXi 6.7.0 и именую ее как srv-shares02 (текущий srv-shares01), ось использую Windows Server 2012 R2 Std.
Шаг №2: Создаю каталог на srv-shares02 где будут размещаться профили с соответствующими правами доступа:
Ниже какие права делаю я:
|
C:Windowssystem32>net share Profiles=D:Profiles /GRANT:«Authenticated Users»,FULL C:Windowssystem32>icacls D:Profiles /inheritance:d C:Windowssystem32>icacls D:Profiles /remove «Users» /T C:Windowssystem32>icacls D:Profiles /grant «CREATOR OWNER»:(OI)(CI)(IO)(F) C:Windowssystem32>icacls D:Profiles /grant «NT AUTHORITYAuthenticated Users»:(OI)(CI)(RX) C:Windowssystem32>icacls D:Profiles /grant «NT AUTHORITYSYSTEM»:(OI)(CI)(F) C:Windowssystem32>icacls D:Profiles /grant «POLYGONekzorchik»:(OI)(CI)(F) C:Windowssystem32>icacls D:Profiles /grant «BUILTINAdministrators»:(OI)(CI)(F) |
Шаг №3: Я использую DFS как доступ к сетевым ресурсам, у меня есть дефолтные пути, в которые я добавляю:
\polygon.localUsers
Archives – почтовые архивы, где путь до сервера \srv-cons.polygon.localArchivesDocuments – общий диск, \srv-shares01.polygon.localDocumentsForwarded folders – перемещаемые папки, \srv-shares01.polygon.localForwarded foldersProfiles – профили, \srv-shares01.polygon.localProfiles
Создаю каталог
Profiles2 - \srv-shares02.polygon.localProfiles
Шаг №4: У каждой доменной учетной записи (к примеру, alektest4) в свойствах прописан на вкладке Profile
(User profile)
Profile path: \polygon.localUsersProfilesalektest4
Шаг №5: Перехожу к процедуре переноса профилей в домене для пользователей, которые отделены у меня контейнером Office Users. Действия ниже проделываем вручную с srv-shares01
На компьютере пользователя выполняем Logoff или лучше выключаем компьютер
В свойствах учетной записи в домене во вкладке Profile меняем путь:
Profile path: на \polygon.localusersProfiles2alektest4
Затем на srv-shares01 запускаю консоль командной строки с правами администратора и переношу профиль пользователя с srv-shares01
|
C:Windowssystem32>robocopy D:SharesUsersProfilesalektest4.V6 «\polygon.localusersProfiles2alektest4.V6» /J /E /COPYALL /Z /R:3 |
На заметку: имя alektest4.V6 – это профиль на Windows 10 Pro, если имя alektest4.V2 – это профиль Windows 8.
После завершения копирования, включаем компьютер пользователя и авторизуемся под пользователем (он может сделать это сам) и его профиль теперь на другом сервере и считается успешно перенесенным.
Шаг №6: Теперь проработаю шаги по перемещению папок пользователя (все пользователя в OU=Office Users), это:
AppData(Roaming): \polygon.localusersForwarded folders%USERNAME%Application DataDesktop: \polygon.localusersForwarded folders%USERNAME%DesktopDocuments: \polygon.localusersForwarded folders%USERNAME%My Documents
У меня есть GPO которая была: GPO_Office_Users_Policy
User Configuration – Policies – Windows Settings – Folder Redirection – и через правый клик на AppData (Roaming) открываю свойства
Setting: Basic – Redirect everyone’s folder to the same locationTarget folder location: Redirect to the following locationRoot Path: \polygon.localusersForwarded folders%USERNAME%Application Data
И для других папок по аналогии.
Также в этой политике предопределены доверенные сайты
User Configuration – Policies – Administrative Templates – Windows Components – Internet Explorer – Internet Control Panel – Security Page –
Site to Zone Assignment List: EnabledValue name: *.gs.service.nalog.ruValue: 2
И многие сайты *.sberbank.ru,*.service.nalog.ru
-
Value name: \polygon.localValue: 1
В этой политики ограничение распространения стоит: OU=Office Users, а Scope: Authenticated Users
Через вкладку Delegation – Advanced добавляю созданную под это дело (перемещение) группу: GRP_GPO_Office_Users_Policy_Deny где права выставляю, как Deny (Apply group policy)
Шаг №7: Создаю дубль такой политики выше, именую ее как: GPO_Office_Users_Forward
В этой политики ограничение распространения стоит: OU=Office Users, а Scope: указываю группу GRP_GPO_Office_Users_Forward
Шаг №8: Создаю каталог на srv-shares02 где будут располагаться перемещаемые папки пользователя:
|
C:Windowssystem32>net share users=«D:Forwarded folders» /GRANT:«Authenticated Users»,FULL C:Windowssystem32>icacls «D:Forwarded folders» /inheritance:d C:Windowssystem32>icacls «D:Forwarded folders» /remove «Users» /T C:Windowssystem32>icacls «D:Forwarded folders» /grant «CREATOR OWNER»:(OI)(CI)(IO)(F) C:Windowssystem32>icacls «D:Forwarded folders» /grant «NT AUTHORITYAuthenticated Users»:(OI)(CI)(RX) C:Windowssystem32>icacls «D:Forwarded folders» /grant «NT AUTHORITYSYSTEM»:(OI)(CI)(F) C:Windowssystem32>icacls «D:Forwarded folders» /grant «POLYGONekzorchik»:(OI)(CI)(F) C:Windowssystem32>icacls «D:Forwarded folders» /grant «BUILTINAdministrators»:(OI)(CI)(F) |
Шаг №9: Создаю новый путь в DFS:
\polygon.localUsersForwarded folder 2 - \srv-shares02users
Шаг №10: Итого текущая последовательность действия по перемещению папок пользователя:
1) Выходим на компьютере где пользователь или выключаем его компьютер
2) Учетную запись пользователя папки которого перемещаем включаем в группы:
GRP_GPO_Office_Users_ForwardGRP_GPO_Office_Users_Policy_Deny
3) на srv-shares01 запускаем консоль командной строки
|
robocopy «\srv-shares01Forwarded foldersalektest4» «\srv-shares02usersalektest4» /J /E /COPYALL /Z /R:3 |
4) Авторизуемся на компьютере
Проверяем работу всех программ или ждем покуда пользователь начнет жаловаться, обычно это в какие-либо программах нужно поменять путь.
На заметку: Важно не переносите перемещаемые папки пользователей в рабочее время, т.к. просадите скорость доступа к основному серверу, у меня было так.
Итого я практически разобрал, как успешно мигрировать профили пользователей и перемещаемые папки на другой сервер. Теперь после рабочего дня или в выходные данная миграция будет выполнена, а мне как бонус более стабильная работа и оплата переработок.
На этом у меня все, с уважением автор блога Олло Александр
Email: support@ekzorchik.ru
Telegram: @aka_ekzorchik