 Эта инструкция к iPad относится косвенно – но при этом iPad у меня там был главным участником. Дело в том, что мною был приобретен Mac Book Pro и старый компьютер я отдал жене. Потому встал вопрос переноса всего того, что у меня было в iTunes (приложения, книги, музыку, видео и т.д) на старом ноутбуке на новенький Mac. Инструкция по переносу и о том с какими сложностями я столкнулся.
Сразу предупреждаю – инструкция не претендует на какую-то научность: я просто сделал так, как опишу и у меня все получилось.
Как перенести iTunes c Windows на Mac OS
Итак, главная проблема в том, что это разные операционные системы с разной файловой структурой. Это надо помнить – потому как перенос данных iTunes между компьютерами с одинаковой ОС наверняка проще.
1. Итак заходим в iTunes на Windows – в настройки. Вкладка “Дополнительные”. Ставим две галочки, как показано на рисунке – “Сохранять информацию о песнях в папке iTunes Media” и “Копировать в папку iTunes Media при добавлении в медиатеку”. И жмем ОК.

2. Далее заходим в меню – “Файл” -> “Медиатека” -> “Организовать медиатеку”!
3. Далее ставим галочку “Собрать файлы” и нажимаем “ОК”.
4. Начинается длинный и невеселый процесс копирования.
Объясняю – что происходит в данный момент. Многие, наверняка, добавляли в iTunes медиатеку как придется, то есть файлы книг перетаскивали из папки books, взломанные игры еще из какой-либо папки, фильмы с третьей. Этот процесс собирает все ваши файлы в одно место – называемое медиатекой iTunes. Находится она по адресу, который мы видим на первом скриншоте статьи в поле “Расположение папки iTunes Media”. Поэтому озаботьтесь свободным местом на жестком диске для копирования всей ваши медиатеки.

5. Дальше я скопировал файлы библиотек из Windows на Mac OS. Находятся в Windows они по тому же пути, что и папка iTunes media из пункта 1. Но на одну директорию выше. В моем случае в папке: C:UsersDimaMusiciTunes
Копируем, чтобы уж наверняка, все файлы в этой папке. Их там 5 или 4 – папки копировать не надо.
На Mac Os надо файлы скопировать в папку: /Users/Имя пользователя/Music/iTunes
6. Заходим в папку iTunes Media (в моем случае – C:UsersDimaMusiciTunesiTunes media (см. пункт 1)) и копируем все папки оттуда в папку на Mac Os: /Users/Имя пользователя/Music/iTunes
Чтобы было понятней – что должно быть в папке на Mac OS после 5-го и 6-го пункта см на скриншот ниже – содержимое папки iTunes на моем компе – не обращайте внимание на даты (плюс-минус пара папок):

7. Запускаем iTunes на Mac OS при этом зажимаем кнопку OPTION на клавиатуре. Приложения на Mac OS находятся в папке applications.
Появится вопрос на том языке, на котором у вас iTunes – выбрать ли библиотеку iTunes или создать новую. Нажимаем “выбрать…” (“Choose Library”)

В появившемся окне выбираем папку iTunes (/Users/Имя пользователя/Music/iTunes).
Далее ждем окончания всех манипуляций.
8. Затем очень важный пункт – заходим в iTunes store и логинимся с тем именем пользователя и паролем, который до этого использовали на Windows. Или проще говоря с тем логином и паролем, с которым вы регистрировались в iTunes Store. И затем в меню iTunes ищем пункт “Авторизовать этот компьютер” (“Authorize this computer”) и нажимаем. Если на компьютере с Windows вы больше не планируете использовать iTunes – то можете там провести обратную операцию “Деавторизовать…”
9. Подключаем iPad к Маку и синхронизируем его с iTunes.
По идее после этих операций все у вас перенесется без потерь данных – у меня всё прошло успешно. Способ работает даже для аппарата с Джейлбрейком. Но если у вас до этого будет сделана резервная копия iPad в iTunes – лишним это точно не будет.
Вот такая инструкция – если есть какие-то вопросы – пишите в комментариях. Или возможно будут какие-то нюансы, а они по идее должны быть… Инструкция “Как перенести iTunes c Windows на Mac OS” по мере необходимости будет пополняться.
![]() Загрузка…
Загрузка…
Introduction
You bought a new computer but have no idea how to transfer iTunes to your new computer? No need to worry. In this passage, we will show you how to transfer iTunes to a new computer on Windows or Mac. Just keep reading.
For Windows users, it is a little bit difficult to do this transfer. We recommend EaseUS Todo PCTrans here, as this is a good choice to transfer iTunes to a new computer. EaseUS Todo PCTrans is an excellent software to transfer data, files, and applications. It is accessible for you to transfer iTunes to a new computer with EaseUS Todo PCTtrans. However, most Mac users can easily transfer their iTunes through MacOS. We list out two methods to help you transfer. You can jump to Transfer iTunes to a New Computer on Mac to follow the full steps.
What is iTunes?
iTunes acts as a media player, media library, and mobile device management utility for the iTunes Store. It is developed by Apple and is used to purchase, play, download, and organize digital multimedia, on personal computers. Basic iTunes features can be generalized as:
- Listen to music and audiobooks
- Download and streaming media from the iTunes store
- Access specific services: Apple Music, iTunes Match, iCloud Music Library; Podcasts; etc.
- Import and export playlists
You can use this software on both Mac and Windows computers.

iTunes is mostly affiliated with Mac. After you change your computer from Mac to Windows, you may wonder how to transfer your iTunes to the Windows system. In this guide, we provide two methods to help you to transfer.
Method 1 — Transfer iTunes to a New Windows with EaseUS Todo PCTrans
EaseUS Todo PCTrans can safely transfer programs from one computer to another. It is an excellent software to transfer large files, especially those application files or server files that take up much disk space. It supports the most common applications/programs, including MS Office (Word, Excel, Outlook, etc.) It is available for you to transfer iTunes to a new computer with EaseUS Todo PCTtrans.
Steps of how to use EaseUS Todo PCTrans to transfer iTunes are listed below:
Step 1. Open EaseUS Todo PCTrans on both of your computers. Choose «PC to PC» to go to the next step.

Step 2. Make sure you have chosen the right transfer direction.
«New» — Move data from old computer to current new computer.
«Old» — Move data from current old n computer to remote new computer.
Step 3. Connect two PCs via the network by entering the password or verification code of the target PC. Besides, make sure you have chosen the right transfer direction and click «Connect» to continue.
The verification code is on the right top of the «PC to PC» main screen on the target computer.

Step 4. Then, choose «Files» to select files to transfer. Select the specific files as you want. What’s more, you can click the Edit icon to customize the storage path for transferred data.
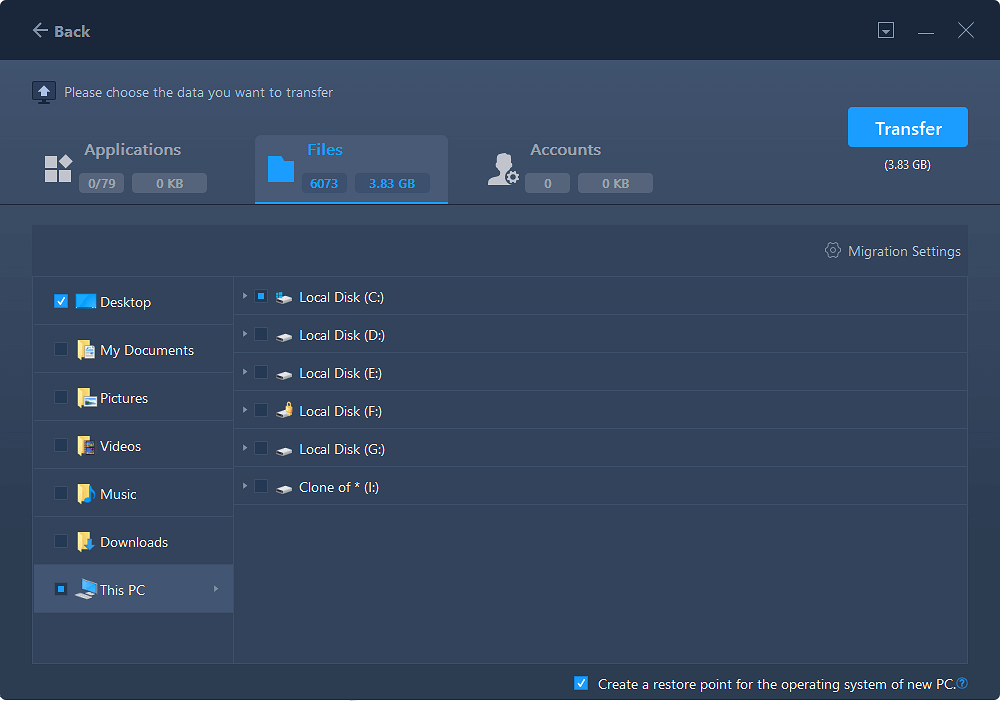
Step 5. Now, click «Transfer» to begin to transfer files from PC to PC. The size of the file determines the transfer time. Wait patiently.

Method 2 — Transfer iTunes to a New Windows Using an External Hard Drive
To follow this method, you should prepare an external hard drive. If you don’t have one, you can jump to Method 1 and use the software to transfer. The steps of using an external hard drive are listed below:
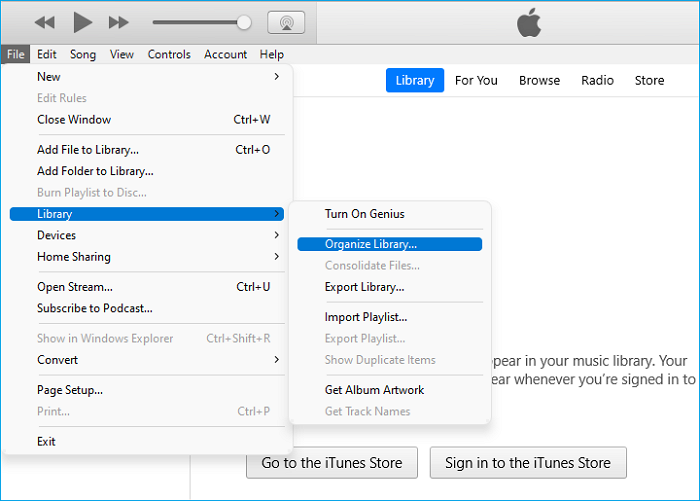
Step 1. Open the iTunes app, click on File, and select Library. Then click on Organize Library.
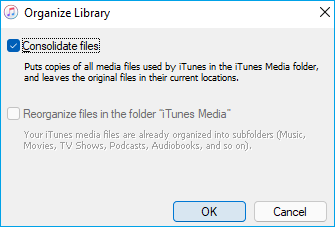
Step 2. Click on the checkbox labeling «Consolidated Files» and click on OK to proceed.
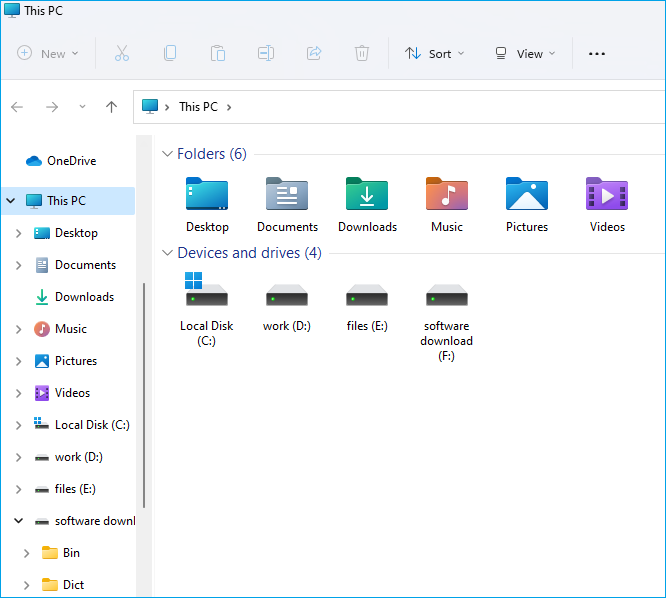
Step 3. Press «Windows + E» to open File Explorer, select the present user and then click on Music.
Step 4. Find the iTunes folder and copy it to your hard drive.
Step 5. Open your hard drive and paste the folder. Then connect the drive to your new computer.
Step 6. Copy the iTunes backup from your hard drive and paste it to your new computer’s path of «Music > iTunes folder».
The iTunes library has now been successfully transferred to another computer. Open iTunes in your new computer to access the library.
Transfer iTunes to a New Computer on Mac
Losing your iTunes media all the time while moving from one system to another? Well, you don’t have to encounter this issue anymore and can easily transfer the iTunes library to a new computer with our help. In this part, we will provide two methods to help you transfer your iTunes to a new computer on Mac. You can follow the full guides of one as you like.
Method 1 — Transfer iTunes to a New Mac with Home Sharing
The Home Sharing feature has been included in iTunes. To implement this method, both the computers should be linked to the same Apple ID and must be connected to the same WiFi network. Please note that this method is only available in iTunes 9 or a newer version. If you are running an older version of iTunes on your computer, then update it before you do the transfer.
Step 1. Launch iTunes on both systems and make sure they are connected to the same network.
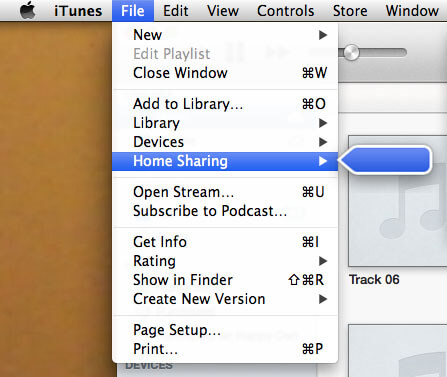
Step 2. Go to iTunes menu > File > Home Sharing and turn this feature on.
Step 3. Enter your Apple ID and start home-sharing.
Step 4. Launch iTunes on your new computer and go to Account > Authorizations > Authorize This Computer.

Step 5. Enter the same Apple ID to link iTunes on your new computer to your existing account.
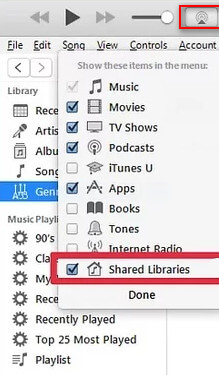
Step 6. Go to iTunes on the first computer and click on Home Sharing. From the list of the things you can sync, enable «Shared Library».
Step 5. Wait for a while for the iTunes library to sync your music to your target system.
After these operations, you can later find the newly transferred data in your iTunes library.
Method 2 — Transfer iTunes to a New Mac with iTunes Match
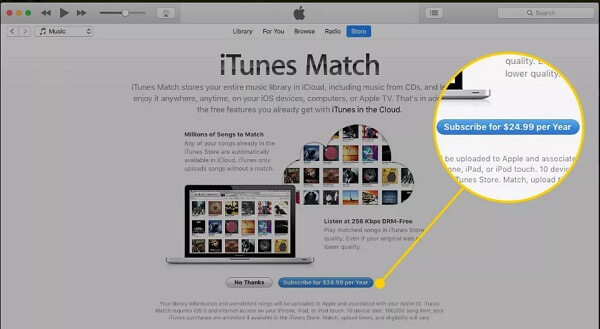
Apple has come up with iTunes Match to make it easier to migrate our music from one computer to another. However, using this method to transfer the iTunes library to another computer will only work for music. It can’t move your videos, apps, or any other kind of data between different systems. Also, you need to have an active iTunes Match subscription beforehand, which costs $24.99 a year. Once you are ready, you can follow these steps to copy iTunes to a new computer.
Step 1. Launch iTunes on your old computer and go to Store > iTunes Match to check its status.
Step 2. Launch iTunes on your target system, and again browse to Store > iTunes Match.
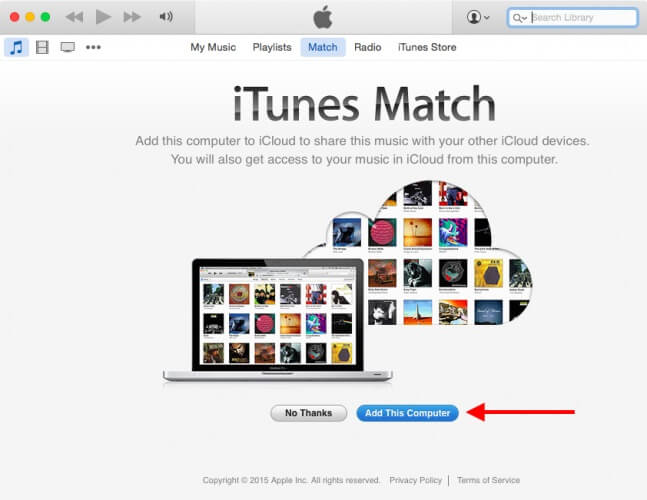
Step 3. Click on Add This Computer and log in to your Apple ID.
Step 4. This will make iTunes sync your linked library to your Apple account.
Now you can just visit your iTunes on your new system and access the transferred content.
Conclusion
In this passage, we’ve talked about how to transfer your iTunes to a new computer both on Mac and on Windows. All these methods can help you do the transferring. For Windows users, we recommend you to use EaseUS Todo PCTrans to transfer iTunes to a new computer on Windows as it is the easiest to operate and saves a lot of time for you. For Mac users, we provide two methods of Home Sharing and iTunes Match. You can choose the way you like to transfer iTunes. Wish you good luck on your way to transferring iTunes!
Introduction
You bought a new computer but have no idea how to transfer iTunes to your new computer? No need to worry. In this passage, we will show you how to transfer iTunes to a new computer on Windows or Mac. Just keep reading.
For Windows users, it is a little bit difficult to do this transfer. We recommend EaseUS Todo PCTrans here, as this is a good choice to transfer iTunes to a new computer. EaseUS Todo PCTrans is an excellent software to transfer data, files, and applications. It is accessible for you to transfer iTunes to a new computer with EaseUS Todo PCTtrans. However, most Mac users can easily transfer their iTunes through MacOS. We list out two methods to help you transfer. You can jump to Transfer iTunes to a New Computer on Mac to follow the full steps.
What is iTunes?
iTunes acts as a media player, media library, and mobile device management utility for the iTunes Store. It is developed by Apple and is used to purchase, play, download, and organize digital multimedia, on personal computers. Basic iTunes features can be generalized as:
- Listen to music and audiobooks
- Download and streaming media from the iTunes store
- Access specific services: Apple Music, iTunes Match, iCloud Music Library; Podcasts; etc.
- Import and export playlists
You can use this software on both Mac and Windows computers.
iTunes is mostly affiliated with Mac. After you change your computer from Mac to Windows, you may wonder how to transfer your iTunes to the Windows system. In this guide, we provide two methods to help you to transfer.
Method 1 — Transfer iTunes to a New Windows with EaseUS Todo PCTrans
EaseUS Todo PCTrans can safely transfer programs from one computer to another. It is an excellent software to transfer large files, especially those application files or server files that take up much disk space. It supports the most common applications/programs, including MS Office (Word, Excel, Outlook, etc.) It is available for you to transfer iTunes to a new computer with EaseUS Todo PCTtrans.
Steps of how to use EaseUS Todo PCTrans to transfer iTunes are listed below:
Step 1. Open EaseUS Todo PCTrans on both of your computers. Choose «PC to PC» to go to the next step.
Step 2. Make sure you have chosen the right transfer direction.
«New» — Move data from old computer to current new computer.
«Old» — Move data from current old n computer to remote new computer.
Step 3. Connect two PCs via the network by entering the password or verification code of the target PC. Besides, make sure you have chosen the right transfer direction and click «Connect» to continue.
The verification code is on the right top of the «PC to PC» main screen on the target computer.
Step 4. Then, choose «Files» to select files to transfer. Select the specific files as you want. What’s more, you can click the Edit icon to customize the storage path for transferred data.
Step 5. Now, click «Transfer» to begin to transfer files from PC to PC. The size of the file determines the transfer time. Wait patiently.
Method 2 — Transfer iTunes to a New Windows Using an External Hard Drive
To follow this method, you should prepare an external hard drive. If you don’t have one, you can jump to Method 1 and use the software to transfer. The steps of using an external hard drive are listed below:
Step 1. Open the iTunes app, click on File, and select Library. Then click on Organize Library.
Step 2. Click on the checkbox labeling «Consolidated Files» and click on OK to proceed.
Step 3. Press «Windows + E» to open File Explorer, select the present user and then click on Music.
Step 4. Find the iTunes folder and copy it to your hard drive.
Step 5. Open your hard drive and paste the folder. Then connect the drive to your new computer.
Step 6. Copy the iTunes backup from your hard drive and paste it to your new computer’s path of «Music > iTunes folder».
The iTunes library has now been successfully transferred to another computer. Open iTunes in your new computer to access the library.
Transfer iTunes to a New Computer on Mac
Losing your iTunes media all the time while moving from one system to another? Well, you don’t have to encounter this issue anymore and can easily transfer the iTunes library to a new computer with our help. In this part, we will provide two methods to help you transfer your iTunes to a new computer on Mac. You can follow the full guides of one as you like.
Method 1 — Transfer iTunes to a New Mac with Home Sharing
The Home Sharing feature has been included in iTunes. To implement this method, both the computers should be linked to the same Apple ID and must be connected to the same WiFi network. Please note that this method is only available in iTunes 9 or a newer version. If you are running an older version of iTunes on your computer, then update it before you do the transfer.
Step 1. Launch iTunes on both systems and make sure they are connected to the same network.
Step 2. Go to iTunes menu > File > Home Sharing and turn this feature on.
Step 3. Enter your Apple ID and start home-sharing.
Step 4. Launch iTunes on your new computer and go to Account > Authorizations > Authorize This Computer.
Step 5. Enter the same Apple ID to link iTunes on your new computer to your existing account.
Step 6. Go to iTunes on the first computer and click on Home Sharing. From the list of the things you can sync, enable «Shared Library».
Step 5. Wait for a while for the iTunes library to sync your music to your target system.
After these operations, you can later find the newly transferred data in your iTunes library.
Method 2 — Transfer iTunes to a New Mac with iTunes Match
Apple has come up with iTunes Match to make it easier to migrate our music from one computer to another. However, using this method to transfer the iTunes library to another computer will only work for music. It can’t move your videos, apps, or any other kind of data between different systems. Also, you need to have an active iTunes Match subscription beforehand, which costs $24.99 a year. Once you are ready, you can follow these steps to copy iTunes to a new computer.
Step 1. Launch iTunes on your old computer and go to Store > iTunes Match to check its status.
Step 2. Launch iTunes on your target system, and again browse to Store > iTunes Match.
Step 3. Click on Add This Computer and log in to your Apple ID.
Step 4. This will make iTunes sync your linked library to your Apple account.
Now you can just visit your iTunes on your new system and access the transferred content.
Conclusion
In this passage, we’ve talked about how to transfer your iTunes to a new computer both on Mac and on Windows. All these methods can help you do the transferring. For Windows users, we recommend you to use EaseUS Todo PCTrans to transfer iTunes to a new computer on Windows as it is the easiest to operate and saves a lot of time for you. For Mac users, we provide two methods of Home Sharing and iTunes Match. You can choose the way you like to transfer iTunes. Wish you good luck on your way to transferring iTunes!
Бывают ситуации, когда нужно перенести вашу медиатеку на другой компьютер. Это может быть еще один ваш Mac или рабочий компьютер, с которым вы хотите синхронизировать свой iPhone или iPad. Для таких целей, конечно же, можно воспользоваться Ассистентом миграции, но если в ваши планы входит только перенос медиатеки, проще и быстрее сделать это вручную.
Перенос медиатеки подразумевает два действия — копирование файлов и привязка iTunes на другом компьютере к новой медиатеке.
Копирование
Эта часть не должна вызвать у вас никаких затруднений, все что нам понадобится — это флешка или USB-жесткий диск подходящего размера, ну или подключение к второму компьютеру по сети (неважно по кабелю или беспроводное). Скопировать нам нужно папку iTunes, которая находится вот здесь:
/Users/имя_пользователя/Music
Это директория для хранения по умолчанию и если вы ее не изменяли, то она будет именно там.
Назначение новой библиотеки
Переносим скопированную папку на новый компьютер и кладем ее по тому же пути, что и на старом. Если вы не меняли директорию хранения по умолчанию, iTunes при первом же запуске должен подхватить новый контент и отобразить его в соответствующих категориях. Однако если этого не произошло или если вы скопировали медиатеку в другое место — нужно назначить расположение новой медиатеки вручную.
Для того, чтобы сделать это — запускаем iTunes, удерживая клавишу strong>Option (Alt в Windows). При этом будет показан диалог выбора — жмем Выбрать медиатеку…
Теперь нужно указать расположение файла iTunes Library.itl (он находится в скопированной ранее папке iTunes). После запуска iTunes просканирует файлы и они появятся в соответствующих разделах на своих местах.
Остается проверить, правильно ли назначен путь к папке iTunes Media, в которой хранятся все ваши медиафайлы, включая музыку, фильмы, приложения и т.д. Открываем настройки iTunes и переходим на вкладку Дополнения. Нажимаем кнопку Изменить и указываем путь к папке iTunes Media.
После таких манипуляций iTunes корректно привяжется к новой медиатеке и всем вашим файлам. Дополнительно вам может понадобиться только авторизовать компьютер, чтобы загружать музыку и приложения, купленные с вашего аккаунта.
Остались вопросы, замечания или предложения? Добро пожаловать в комментарии — я всегда рад пообщаться и помочь. Оставайтесь с нами, впереди еще много интересного!