- Remove From My Forums
-
Вопрос
-
Добрый день!
Встала задача перенести всех терминальных пользователей на другой сервер терминалов (с Windows Server 2008 32-bit на Windows Server 2008 R2).
Существует ли у Microsoft какой-нибудь автоматизированный механизм по миграции профилей пользователей (с сохранением всех параметров и настроек) с Windows Server 2008 32-bit на Windows Server 2008 R2. Если кто что знает,
то вышлите, пожалуйста, ссылки на статьи или документацию или поделитесь опытом, как это делать.-
Перемещено
21 апреля 2012 г. 13:07
merge forums (От:Windows Server 2008)
-
Перемещено
Ответы
-
Попробуйте на тестовом пользователе следующие (пользователя не должен быть залогинен на сервере )
- на W28K экспортируйте в файл ветки реестра HKEY_LOCAL_MACHINESOFTWAREMicrosoftWindows NTCurrentVersionProfileGuid и
HKEY_LOCAL_MACHINESOFTWAREMicrosoftWindows NTCurrentVersionProfileList - на W2K8 R2 ипрортируем файл реестра
- на W2K8 R2 воспользуйтесь robocopy для копирования профиля со старого терминального сервера на новый —
robocopy «\old_serverc$UsersAPP» «c:UersAPP» /copyall /s
Если получится, то скопируйте все остальные профили, исключение составляют только профили
«All Users» «Default» «Default User» «Public» «Administrator»
Вот команда которая скопирует все профили:- robocopy «\old_serverc$Users» «c:UersAPP» /copyall /s /xd «\old_serverc$usersAdministrator» «\old_serverc$usersdefault» «\old_serverc$userspublic» «\old_serverc$usersDefault User» «\old_serverc$usersAll
Users»
Dmitriy Poberezhniy ( my web blog http://dimsan.blogspot.com
)-
Помечено в качестве ответа
Nikita Panov
24 декабря 2010 г. 9:53
- на W28K экспортируйте в файл ветки реестра HKEY_LOCAL_MACHINESOFTWAREMicrosoftWindows NTCurrentVersionProfileGuid и
Иногда, в меру ряда причин, остро встает задача переноса папки профилей пользователей с системного диска на другой логический или физический диск, например:
- Необходимость разделения оперативной информации (система) и архивных данных (данные пользователей) обусловленная, к примеру, необходимостью хранения системных файлов на высокоскоростном, но менее надежном массиве дисков RAID0;
- Отсутствие необходимости дополнительного переноса информации при переустановке ОС.
- По сравнению с переносом отдельного профиля пользователя перенос папки Users более предпочтителен, поскольку профили всех последующих пользователей компьютера будут также сохранены в нужном месте, и не будет необходимости снова проделывать процедуру переноса.
Одним из наиболее правильным методов осуществления такого переноса является возможность определения месторасположения папки профилей пользователей на этапе установки системы. Такую возможность в отношении Windows server 2008 r2 нам предоставляет Microsoft под названием Audit Mode. Подробнее об этом режиме можно почитать в следующей статье. Единственный нюанс, то, что в статье написано не подходит для сервера, т.к. в нем нет экрана на котором предлагают назвать компьютер и создать пользователя. Хотя на самом деле для серверной версии все оказалось на много проще. И так, потратив некоторое время на поиск решения, появился следующий сценарий.
Теперь собственно о сценарии переноса папки Users:
- Необходимо создать файл ответов и положить его в корень флешки. Загрузить для х64
- Перед началом установки нужно правильно установить диски. Определение в системе начинается с порта с меньшим номером. На первый мы устанавливаем ОС, на втором у нас будут находиться папки профилей.
- Начните установку Windows server 2008 r2, на этапе настройки дисков, отформатируйте оба диска (обязательно оба!!!). И укажите установку на первый.
- После того как началось копирование файлов, подключаем флешку в корне которой лежит файл ответов. ( не знаю почему, но если ее подключить сразу ничего не получается)
- Дожидаемся окончания установки, входим в систему и видим папки Users и ProgramData на диске который мы указали в файле ответов, в данном случае диск D:
Для предотвращения ошибок, связанных с явным указанием прежних путей папок профилей пользователей создадим при помощи утилиты mklink две символические ссылки:
mklink /D C:Users D:Users
mklink /D C:ProgramData D:ProgramData
Так как я собирал сервер на дисках SSD, то решил перенести папку временных файлов то же на диск D, по этому в настройках расположения временных папок я указал путь D:Temp и создал еще одну ссылку:
mklink /D C:Temp D:Temp (в принципе она не обязательна, на всякий случай)
Таким образом теперь даже при обращении по прежним путям любая программа не заметит подмены и будет работать с папками на диске C, хотя фактически они будут расположены в настроенном Вами месторасположении.
(Как скопировать учетные записи пользователей из одного домена в другой на Windows 2008)
Абсолютно не травильная задача особенно если хочется перенести пользователей с паролями.
Есть несколько способов от примитивных до самых изощрённых. Отличия в трудоемкости переноса и в конечном результате. (Для своей задачи рассмотрел всего лишь несколько первых попавшихся из-за ограниченности времени).
Итак, способы (обзор):
1) Командная строка и Excel.
2) Утилита CSVDE.
3) Утилиты из Resource Kit 2008 Server.
4) Active Directory Migration Tool.
5) Программа POINTDEV IDEAL Migration.
——————————————————————————————-
1. Командная строка и Excel
Для создания пользователей используется команда net user (Использование команды «net user»), например так
net user bob 123 /add /comment:»My user» /fullname:»Иванов Иван» /domain
Чтобы получить набор строк net user, нужно получить список пользователей, который можно обработать в Excel. Пример, вот такой список

В столбце D – формула:
=СЦЕПИТЬ(«net user «;A2;» 123 /add /comment:»;СИМВОЛ(34);»My user»;СИМВОЛ(34);» /fullname:»;СИМВОЛ(34);C2;» «;B2;СИМВОЛ(34);» /domain»)
Как получить список пользователей: Список может существовать в виде файла (админы иногда сохраняют списки пользователей в файлы). Можно с помощью программы POINTDEV IDEAL Migration, она даже в триальном варианте позволяет выгрузить пользователей в файл cvs. Можно прямо с экрана снять снимок и распознать в ABBYY FineReader, если снимок снимать SnagIt то он сам умеет распознавать.
— Пользователи создаются в примитивном варианте, большая часть полей и опций не переноситься
— Пароль не переноситься
+ Всё очень просто и может быть быстро
——————————————————————————————-
2. Утилита CSVDE
Позволяет импортироватьэкспортировать данные из каталога LDAP в файл cvs (в том числе и учетные записи пользователей).
Есть целый сайт посвященный описанию CSVDE Home
— Желательно знать устройство LDAP Active Directory (какие поля чего означают)
+ Бесплатно и не нужно устанавливать
——————————————————————————————-
3. Утилиты из Resource Kit 2008 Server
Утилиты addusers, moveuser. Addusers – аналог net user, но более функциональный, например позволяет создавать сразу кучу пользователи из файла-списка. Moveuser – позволяет перенести учетную запись прямо с одного компьютера на другой.
Описание есть здесь:
ADDUSERS.exe
MOVEUSER.exe
Сам набор утилит Resource Kit 2008 Server официально он продается в виде набора классных книг (сам не читал – сужу по отзывам) и CDROM диска к ним. Не официально есть на торренте.
— Нужно искать, скачивать или покупать
— Платно
+ Более функционально чем net user
——————————————————————————————-
4. Active Directory Migration Tool
Дистрибутив v.3.2 — Active Directory Migration Tool version 3.2
Документация — Active Directory Migration Tool (ADMT) Guide: Migrating and Restructuring Active Directory Domains
Набор средств (утилит) для миграции Active Directory. Изучить – не просто.
— Сложно освоить (документация 263 страницы)
+ Бесплатно
+ Перенести можно наверное что угодно (например, пароли переносятся, но при установке еще каких-то дополнительных компонентов)
——————————————————————————————-
5. Программа POINTDEV IDEAL Migration
POINTDEV IDEAL Migration
Позволяет переносить полные сведения домена. Программа платная. Можно получить триальный ключ за просто так, но только на 15 дней и мигрировать можно только 5 пользователей. Программа в триальном варианте позволяет просто выгрузить список пользователей в файл cvs.
При переписке с ними, прислали письмо с ключом, но сам ключ приложить забыли 🙂 поэтому даже попробовать не удалось, хотя список пользователей в Excel я выгрузить сумел.
— Программа платная
+ Переносить ВСЁ
——————————————————————————————-
|
9 / 9 / 1 Регистрация: 28.07.2011 Сообщений: 101 |
|
|
1 |
|
|
18.03.2013, 07:15. Показов 44804. Ответов 14
Есть 2 сервера на Windows Server 2008 R2 x86 и x64
__________________
0 |

|
81 / 81 / 7 Регистрация: 07.12.2012 Сообщений: 540 |
|
|
18.03.2013, 17:52 |
2 |
|
если настройки путей будут совпадать, в чем проблема ctrl+c ctrl+v Если нужно сохранить ACl, воспользоваться robocopy
1 |
|
9 / 9 / 1 Регистрация: 28.07.2011 Сообщений: 101 |
|
|
18.03.2013, 20:05 [ТС] |
3 |
|
Да, будут совпадать. В реестре ничего дополнять ненужно?
0 |
|
81 / 81 / 7 Регистрация: 07.12.2012 Сообщений: 540 |
|
|
19.03.2013, 10:37 |
4 |
|
Да, будут совпадать. В реестре ничего дополнять ненужно? я имел ввиду прав доступ NTFS, если не нужно, то просто копируете да и все.
0 |

|
9 / 9 / 1 Регистрация: 28.07.2011 Сообщений: 101 |
|
|
19.03.2013, 11:45 [ТС] |
5 |
|
Скопировал один профиль для теста. При входе говорит: «Подключение было запрещено, так как учетная запись пользователя не имеет прав для удаленного входа в систему.»
0 |
|
81 / 81 / 7 Регистрация: 07.12.2012 Сообщений: 540 |
|
|
19.03.2013, 11:52 |
6 |
|
Подключение было запрещено, так как учетная запись пользователя не имеет прав для удаленного входа в систему Эта надпись лишь говорит о том, что терминальный сервер настроен не корректно, или вы не добавили пользователи на вкладке удаленный доступ. ? Добавлено через 2 минуты
0 |
|
9 / 9 / 1 Регистрация: 28.07.2011 Сообщений: 101 |
|
|
19.03.2013, 11:52 [ТС] |
7 |
|
Есть права у этого пользователя удаленно подключатся. Он спокойно подключается на старый сервер.
0 |
|
81 / 81 / 7 Регистрация: 07.12.2012 Сообщений: 540 |
|
|
19.03.2013, 11:58 |
8 |
|
Есть права у этого пользователя удаленно подключатся. Он спокойно подключается на старый сервер. и что? ну а на новый сервер прав у него значит нет…… вы сами попробуйте, комбинаторика Все это делать надо на новом сервере и проверять! удалите скопированый профиль зайдите под пользователем, сможет он зайти? ( создасцо дефолтный профиль. если не указан иной путь в свойствах учетки в АД ) Если да? значит была проблема в правах на профиль скопированный Если нет? все то, что я и сказал, проблема в том, что ОН НЕ ИМЕЕТ ПРАВ НА УДАЛЕННЫЙ СЕАНС НА НОВОМ СЕРВЕРЕ! во вкладке удаленный доступ.
0 |
|
9 / 9 / 1 Регистрация: 28.07.2011 Сообщений: 101 |
|
|
19.03.2013, 13:11 [ТС] |
9 |
|
Все, пардон. Не добавил группу пользователей домена для удаленного подкл. Вы были правы. Сейчас заново попробую! Добавлено через 1 час 10 минут
0 |
|
81 / 81 / 7 Регистрация: 07.12.2012 Сообщений: 540 |
|
|
19.03.2013, 13:17 |
10 |
|
После того как скопировали профиль, выставите в свойствах безопасности доступно всем, проверьте подгрзут эту папку? могло случится так, что у пользователя элементарно, не прав на свой профиль… в логах такое бы отобразилось. Добавлено через 1 минуту Есть 2 сервера на Windows Server 2008 R2 x86 и x64
0 |
|
9 / 9 / 1 Регистрация: 28.07.2011 Сообщений: 101 |
|
|
19.03.2013, 13:19 [ТС] |
11 |
|
Это значит один сервер С Win Serv 2008 R2 x64
0 |
|
81 / 81 / 7 Регистрация: 07.12.2012 Сообщений: 540 |
|
|
19.03.2013, 13:25 |
12 |
|
Windows Server 2008 R2 — серверная операционная система компании «Microsoft», являющаяся усовершенствованной версией Windows Server 2008. Поступила в продажу 22 октября 2009[1]. Как и Windows 7, Windows Server 2008 R2 использует ядро Windows NT 6.1. Новые возможности включают улучшенную виртуализацию, новую версию Active Directory, Internet Information Services 7.5 и поддержку до 256 процессоров. Это первая ОС Windows, доступная только в 64-разрядном варианте.
1 |
|
9 / 9 / 1 Регистрация: 28.07.2011 Сообщений: 101 |
|
|
20.03.2013, 06:40 [ТС] |
13 |
|
Спасибо вам за помощь. Все получилось. Перенес профили и они заработали! Добавлено через 16 часов 32 минуты
1 |
|
9 / 9 / 1 Регистрация: 28.07.2011 Сообщений: 101 |
|
|
21.03.2013, 07:03 [ТС] |
14 |
|
Может возникнуть такая трабла, вроде профили перенесены и в реестр добавлены но Винда все равно пускает с временным профилем Temp. Чтобы этого не было копируйте профили с правами NTFS.
0 |
|
9 / 9 / 1 Регистрация: 28.07.2011 Сообщений: 101 |
|
|
22.03.2013, 10:29 [ТС] |
15 |
|
Дело в следующем. 2 дня танцов с бубном по переносу профилей с одного сервера на другой. Добавлено через 1 минуту
Спасибо вам за помощь. Все получилось. Перенес профили и они заработали! Добавлено через 16 часов 32 минуты Уважаемые админы удалите пож это сообщения чтобы в замешательство людей не приводить. Ниже правельная инструкция
1 |
When we talk about how to migrate Windows Server 2008 to 2016 step by step, it usually refers to two requirements: one is to upgrade Windows Server system from 2008 R2 to 2016, and the other is migrate data and files from Windows Server 2008 to 2016 directly. You can check the complete guide to upgrade Windows Server 2008 R2 to 2016, including the migration of the Active Directory (AD) environment, Domain Naming System (DNS) and Dynamic Host Configuration Protocol (DHCP).
In this article, we mainly focus on how to migrate data, applications, or user account from Windows Server 2008 to 2016 with an easy Windows data transfer tool.
EaseUS Todo PCTrans — The Ultimate Windows Data Transfer Tool
EaseUS Todo PCTrans is one of the best Windows data transfer applications for files, applications, user accounts, and settings sharing between two Windows PCs or Windows Servers. For Windows Server migration, it has the following key features.
01
For all Windows Server data copying
It supports data, program, user profiles and settings migration between Windows Servers in one-click without data loss.
02
Simple solution and interface
The graphical user interface makes it intuitive to transfer data in simple clicks. Both computer experts and beginners can get started quickly.
03
3 flexible transfer modes
You can choose the mode of transmission according to your actual needs, transfer via PC to PC, locally, or via backup files.
04
Full support for Windows Server
It’s compatible with all Windows Server versions, including Windows Server 2019, 2016, 2012, 2008, and 2003.
You can learn from the following instructions on how to migrate Windows Server 2008 to 2016, including transfer files over the network (on the same LAN) and migrate data using backup files offline. First, click the button below to install EaseUS Todo PCTrans on your computer if you haven’t installed it yet.
EaseUS Todo PCTrans Technician
- ☆ Deploy & install Todo PCTrans on multiple PCs.
- Transfer unlimited files, programs, apps between Servers.
- Transfer account, domain account, and settings.
- Data rescue, find product key of installed programs.
- One license for multiple PCs.
Migrate Windows Server 2008 to 2016 via Network Connection
Connect your two Windows Server computers on the same LAN and transfer files, apps with account settings through the network.
Step 1. Launch EaseUS Todo PCTrans on your source and target computers, connect both PCs via the internet.
1. At the «PC to PC» section, click «PC to PC» to continue.

2. Select your target computer via its device name, then enter its account password or verification code and select the transfer direction. Then click «Connect» to continue.
You can check the verification code on the right top of «PC to PC» mainscreen on the target computer.

Step 2. Select the categories Applications, Files, and Accounts to transfer via the internet.
If you want to transfer data selectively, click «Edit» under each category, and choose the specific items.

Step 3. Click «Transfer» to start transferring your apps/files/accounts from one computer to another computer via the Internet.

Also read: How to share files between two laptops using WiFi in Windows 10
Transfer Data from Windows Server 2008 to 2016 via Backup Files
This Windows data migration program enables you to create backups of your files, programs & accounts on the Windows Server 2008, and then restore and move them to the Windows Server 2016 or 2019.
Step 1. Create a backup file.
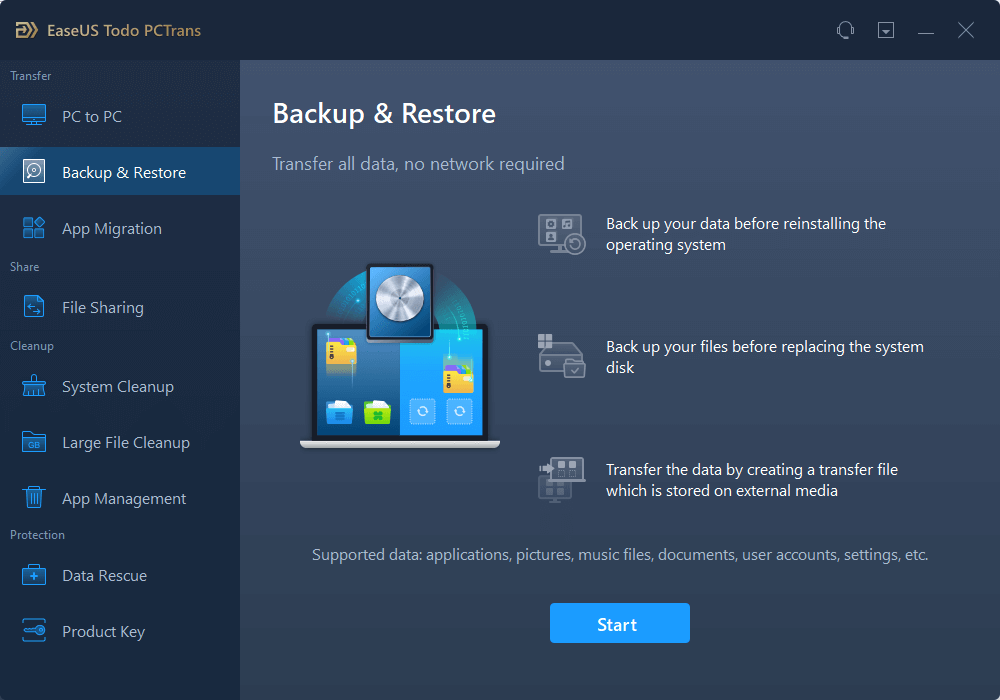
1. Connect your USB (flash) drive/external hard drive to your source computer. Launch Todo PCTrans, click «Backup & Restore > Start» on the main screen.
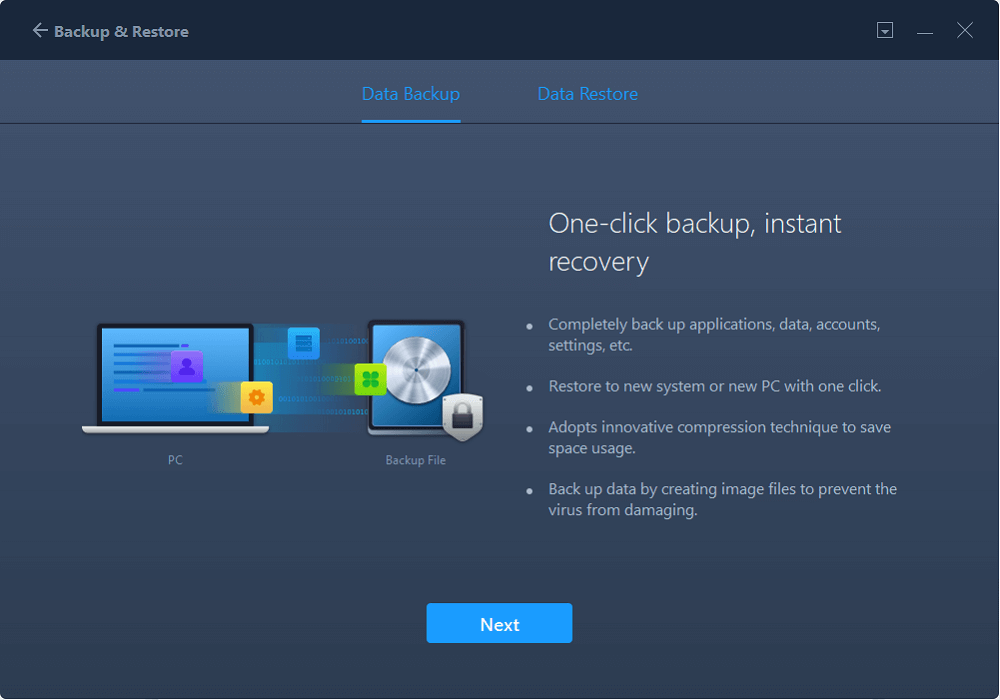
2. Select «Data Backup» to move on.
3. Hover over «Applications», «Files» and «Accounts» columns to choose the specific data, applications, etc., and click «Back up» to create a backup file.

Step 2. Recover via the created backup file.
1. Plugin your USB drive which stores the created backup file to the target PC and open EaseUS Todo PCTrans. Click «Backup & Restore > Start > Data Restore».
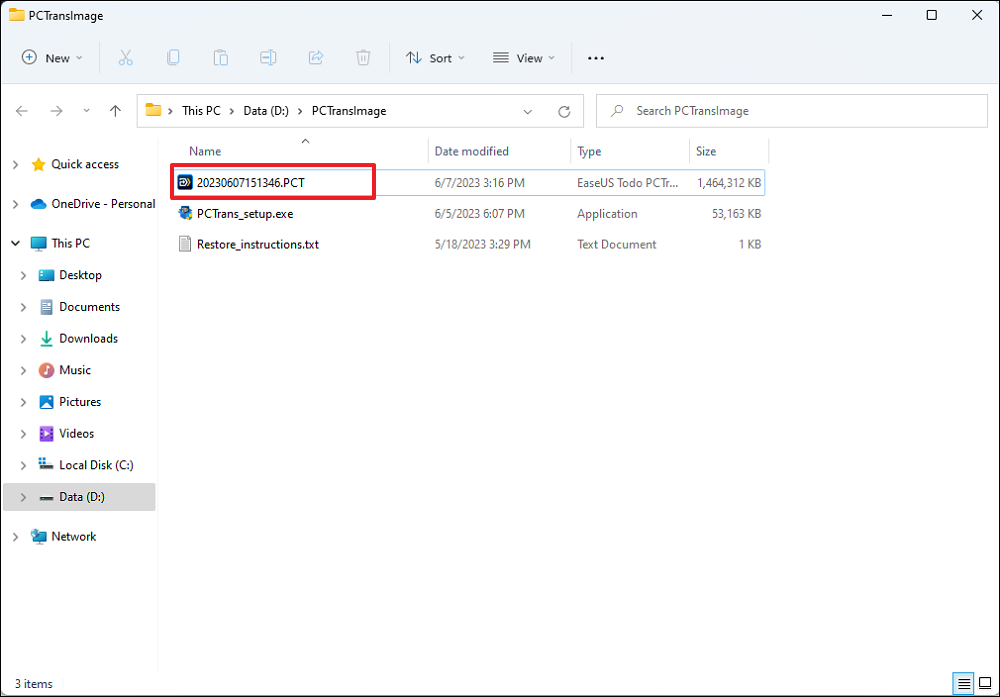
2. Click «Browse» to locate the Image file. Then, choose «Restore» and go to the next step.
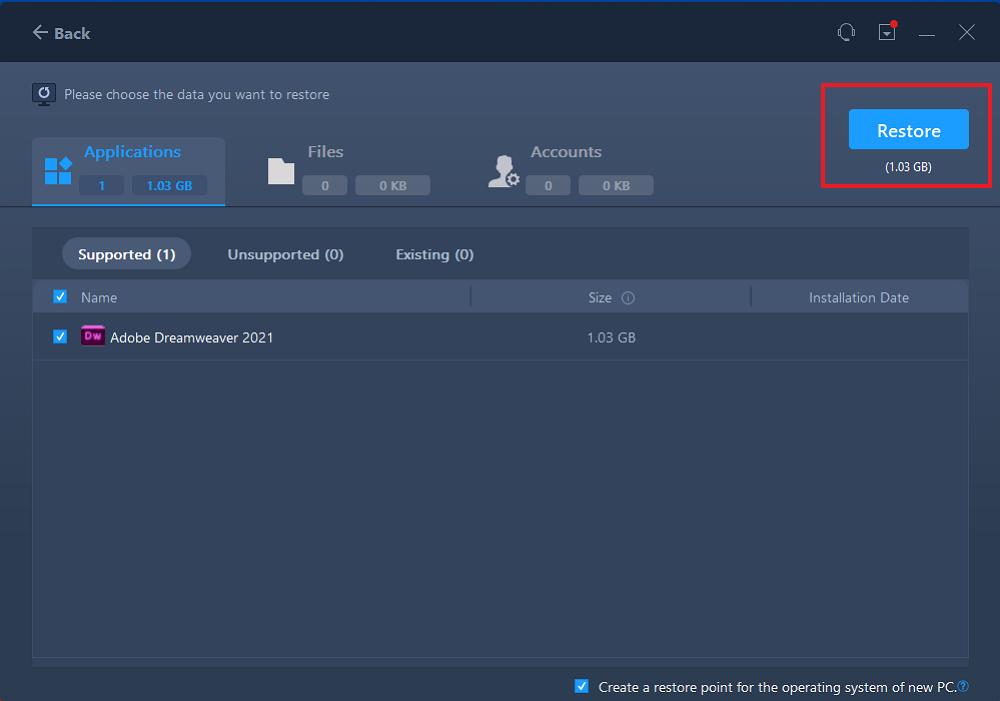
3. Now, you can select Applications/Files/Accounts you want to restore.
Over on Applications, Files, or Accounts to choose the specific data you want transfer flexibly. Click «Restore» to confirm. Besides, you can also click the «Migration Settings» icon to change the target path to recover and save the files.
Conclusion
To migrate from old Windows Server 2003 or 2008 to new Windows Server 2012, 2016, or 2019, EaseUS Todo PCTrans provides you one-stop solutions to copy files, applications, as well as other indispensable data, which are as simple as a click away. If you don’t know how to migrate data between two Windows Servers or how to do it effortlessly, be sure to try this tool out.
Migrate Windows Server 2008 to 2016 FAQs
Check the following frequently asked questions on Windows Server 2008 to 2016 migration.
1. Can Windows Server 2008 be upgraded to 2016?
You can’t upgrade Windows Server 2008 to 2016 directly unless performing a clean installation. If you want to complete an in-place upgrade, you need to first upgrade from Windows Server 2008 to 2012, and then upgrade to 2016.
2. How do I move DHCP from 2008 to 2016?
How to migrate DHCP from Windows Server 2008 to 2012/2016:
- Log on to the old/existing DHCP server.
- Open the Command Prompt and run as Administrator.
- On the Action menu (from within the DHCP management console), click «Backup».
- In CMD, type netsh dhcp server export C:Users\Desktopdhcp.txt all, and then press ENTER.
- Install the DHCP role on the new (2012/2016) DHCP server using the Server Manager.
- Copy the exported DHCP text file to the desktop of the new DHCP server.
- Make sure that the DHCP service is installed and started on the new DHCP server.
- Open the command prompt as Administrator (on the new server)
- Type netsh dhcp server import C:Users\Desktopdhcp.txt all, and then press ENTER
- Open the DHCP management console on the new server.
- In the console tree, right-click DHCP and select «Authorize».
3. Can Windows Server 2012 be upgraded to 2016?
You can only upgrade Windows Server 2012 to Server 2016. You can’t skip the upgrade, which means you’re going to need to plan ahead for a more substantial upgrade, like you can’t upgrade Windows Server 2012 Standard edition to Windows Server 2016 Datacenter edition.
4. Can Windows Server 2008 be upgraded to 2012?
Yes, you can upgrade Windows server 2008 R2 Enterprise to Windows Server 2012 Datacenter. After upgrading, you can log in to the server and check for the edition. Click on «Server Manager», then «Local Server», and check the properties of the server. You a see the operating system version is Microsoft Windows Server 2012 Datacenter.
When we talk about how to migrate Windows Server 2008 to 2016 step by step, it usually refers to two requirements: one is to upgrade Windows Server system from 2008 R2 to 2016, and the other is migrate data and files from Windows Server 2008 to 2016 directly. You can check the complete guide to upgrade Windows Server 2008 R2 to 2016, including the migration of the Active Directory (AD) environment, Domain Naming System (DNS) and Dynamic Host Configuration Protocol (DHCP).
In this article, we mainly focus on how to migrate data, applications, or user account from Windows Server 2008 to 2016 with an easy Windows data transfer tool.
EaseUS Todo PCTrans — The Ultimate Windows Data Transfer Tool
EaseUS Todo PCTrans is one of the best Windows data transfer applications for files, applications, user accounts, and settings sharing between two Windows PCs or Windows Servers. For Windows Server migration, it has the following key features.
01
For all Windows Server data copying
It supports data, program, user profiles and settings migration between Windows Servers in one-click without data loss.
02
Simple solution and interface
The graphical user interface makes it intuitive to transfer data in simple clicks. Both computer experts and beginners can get started quickly.
03
3 flexible transfer modes
You can choose the mode of transmission according to your actual needs, transfer via PC to PC, locally, or via backup files.
04
Full support for Windows Server
It’s compatible with all Windows Server versions, including Windows Server 2019, 2016, 2012, 2008, and 2003.
You can learn from the following instructions on how to migrate Windows Server 2008 to 2016, including transfer files over the network (on the same LAN) and migrate data using backup files offline. First, click the button below to install EaseUS Todo PCTrans on your computer if you haven’t installed it yet.
EaseUS Todo PCTrans Technician
- ☆ Deploy & install Todo PCTrans on multiple PCs.
- Transfer unlimited files, programs, apps between Servers.
- Transfer account, domain account, and settings.
- Data rescue, find product key of installed programs.
- One license for multiple PCs.
Migrate Windows Server 2008 to 2016 via Network Connection
Connect your two Windows Server computers on the same LAN and transfer files, apps with account settings through the network.
Step 1. Launch EaseUS Todo PCTrans on your source and target computers, connect both PCs via the internet.
1. At the «PC to PC» section, click «PC to PC» to continue.
2. Select your target computer via its device name, then enter its account password or verification code and select the transfer direction. Then click «Connect» to continue.
You can check the verification code on the right top of «PC to PC» mainscreen on the target computer.
Step 2. Select the categories Applications, Files, and Accounts to transfer via the internet.
If you want to transfer data selectively, click «Edit» under each category, and choose the specific items.
Step 3. Click «Transfer» to start transferring your apps/files/accounts from one computer to another computer via the Internet.
Also read: How to share files between two laptops using WiFi in Windows 10
Transfer Data from Windows Server 2008 to 2016 via Backup Files
This Windows data migration program enables you to create backups of your files, programs & accounts on the Windows Server 2008, and then restore and move them to the Windows Server 2016 or 2019.
Step 1. Create a backup file.
1. Connect your USB (flash) drive/external hard drive to your source computer. Launch Todo PCTrans, click «Backup & Restore > Start» on the main screen.
2. Select «Data Backup» to move on.
3. Hover over «Applications», «Files» and «Accounts» columns to choose the specific data, applications, etc., and click «Back up» to create a backup file.
Step 2. Recover via the created backup file.
1. Plugin your USB drive which stores the created backup file to the target PC and open EaseUS Todo PCTrans. Click «Backup & Restore > Start > Data Restore».
2. Click «Browse» to locate the Image file. Then, choose «Restore» and go to the next step.
3. Now, you can select Applications/Files/Accounts you want to restore.
Over on Applications, Files, or Accounts to choose the specific data you want transfer flexibly. Click «Restore» to confirm. Besides, you can also click the «Migration Settings» icon to change the target path to recover and save the files.
Conclusion
To migrate from old Windows Server 2003 or 2008 to new Windows Server 2012, 2016, or 2019, EaseUS Todo PCTrans provides you one-stop solutions to copy files, applications, as well as other indispensable data, which are as simple as a click away. If you don’t know how to migrate data between two Windows Servers or how to do it effortlessly, be sure to try this tool out.
Migrate Windows Server 2008 to 2016 FAQs
Check the following frequently asked questions on Windows Server 2008 to 2016 migration.
1. Can Windows Server 2008 be upgraded to 2016?
You can’t upgrade Windows Server 2008 to 2016 directly unless performing a clean installation. If you want to complete an in-place upgrade, you need to first upgrade from Windows Server 2008 to 2012, and then upgrade to 2016.
2. How do I move DHCP from 2008 to 2016?
How to migrate DHCP from Windows Server 2008 to 2012/2016:
- Log on to the old/existing DHCP server.
- Open the Command Prompt and run as Administrator.
- On the Action menu (from within the DHCP management console), click «Backup».
- In CMD, type netsh dhcp server export C:Users\Desktopdhcp.txt all, and then press ENTER.
- Install the DHCP role on the new (2012/2016) DHCP server using the Server Manager.
- Copy the exported DHCP text file to the desktop of the new DHCP server.
- Make sure that the DHCP service is installed and started on the new DHCP server.
- Open the command prompt as Administrator (on the new server)
- Type netsh dhcp server import C:Users\Desktopdhcp.txt all, and then press ENTER
- Open the DHCP management console on the new server.
- In the console tree, right-click DHCP and select «Authorize».
3. Can Windows Server 2012 be upgraded to 2016?
You can only upgrade Windows Server 2012 to Server 2016. You can’t skip the upgrade, which means you’re going to need to plan ahead for a more substantial upgrade, like you can’t upgrade Windows Server 2012 Standard edition to Windows Server 2016 Datacenter edition.
4. Can Windows Server 2008 be upgraded to 2012?
Yes, you can upgrade Windows server 2008 R2 Enterprise to Windows Server 2012 Datacenter. After upgrading, you can log in to the server and check for the edition. Click on «Server Manager», then «Local Server», and check the properties of the server. You a see the operating system version is Microsoft Windows Server 2012 Datacenter.