
- Remove From My Forums
-
Общие обсуждения
-
Нужно перенести windows server 2008 r2 на другой компьютер. На windows server 2008r2 стоит MS SQL server, AD, разные программы специфичные и он является еще терминальным сервером. Подскажите пожалуйста как это лучше всего сделать правильно?
-
Изменен тип
Vinokurov Yuriy
20 февраля 2012 г. 13:50
-
Изменен тип
Все ответы
-
На новом железе разворачиваем Hyper-V и
мигрируем русерсы на виртуальные машины. Виртуальные машины создаем на основании Best Practice Hyper-V и рекомендаций для разварачиваемых ролей.
MCITP. Знание — не уменьшает нашей глупости.
-
А возможен ли такой вариант снимаю жесткий диск со старого компьютера и ставлю его на новый. При загрузке запускаю восстановление системы. Такой вариант прокатит? =)
-
А возможен ли такой вариант снимаю жесткий диск со старого компьютера и ставлю его на новый. При загрузке запускаю восстановление системы. Такой вариант прокатит? =)
Нет не прокатит.
Возможен варинат через Full Backup, Full Restor, но учитывая что вы незнаете настроек которые у вас существуют, то только через миграцию.
MCITP. Знание — не уменьшает нашей глупости.
-
Изменено
Oleg.Kovalenko
7 февраля 2012 г. 13:00
-
Изменено
-
hyper-v далеко не всегда прокатит, например если там специализированное железо (usb устройства, ленточные библиотеки через sas/scsi/fc и т.д.)
есть решения по клонирвоанию систем в том числе на абсолютно другое железо.
-
hyper-v далеко не всегда прокатит, например если там специализированное железо (usb устройства, ленточные библиотеки через sas/scsi/fc и т.д.)
есть решения по клонирвоанию систем в том числе на абсолютно другое железо.
Что за решение не подскажите?
-
Старый сервер остаеться поэтому ленточные библиотеки и usb устройства можно оставить на старом, остальное можно разнести по витуальным системам.
MCITP. Знание — не уменьшает нашей глупости.
-
hyper-v далеко не всегда прокатит, например если там специализированное железо (usb устройства, ленточные библиотеки через sas/scsi/fc и т.д.)
есть решения по клонирвоанию систем в том числе на абсолютно другое железо.
Что за решение не подскажите?
DPM BareMetal Restore, например
-
Чем новое железо отличается от старого?
-
Уважаемый пользователь,
В вашей теме отсутствует активность в течение последних 5 дней. При отсутствии каких-либо действий в течение 2 последующих дней, тема будет переведена в разряд обсуждений. Вы можете возобновить дискуссию, просто оставив сообщение в данной теме
-
Тема переведена в разряд обсуждений по причине отсутствия активности
-
Реанимирую тему.
Похожая ситуация. Старый сервачок — SCSI диски, система на программном RAID-1 средствами самой ОС. Впоследствии был добавлен контроллер и на него зацеплены два САТА диска — собраны в железный RAID-1.
Сегодня один SCSI диск умер, сдается мне что второй тоже готов к выносу вперед ногами.
Думаю перенести систему на САТА RAID. В системе установлены: Symantec Endpoint Protectiion Manager, DFS (не критичный и есть реплика), Принт-сервер.
Есть DPM. Подумал полностью забакапить с бареметал и восстановить на САТА Раид. Т.к. есть диски С и D, то думаю на САТА Раиде откусить партицию и на нее восстановить Систему. Чтобы DFS и прочие фенички не перецеплять. Пройдет такая
операция?В принципе, после бакапа, можно просто отсоединить диски SCSI и проверить как пройдет восстановление и работа системы. Если что криво пойдет просто подцепить обратно SCSI диски. По идее должно все сработать?
ИЛИ:
взять какую-либо сторонюю утилиту, загрузиться скажем с Hiren и тупо копирнуть партицию, а потом исправить в bcdedit загрузку?
-
Изменено
ibGrass
7 февраля 2013 г. 6:47
-
Изменено
-
-
Изменено
Oleg.Kovalenko
7 февраля 2013 г. 9:02
-
Изменено
-
Олег, да это второе , после бакапа, что я сделал. сижу жду когда зальется на сервер с гипером. Чтобы на время «разборок» люди могли печатать на принтера.
Зесь именно вопрос в том чтобы оставить эту систему на этом же железе, т.к. переносить шары и WDS на гипер не охота.
-
кстати, пошукав по инету, появились сомнения на счет гибели скази диска. До сей ночи диски работали и намека на битый диск не было. А вчера сделал кое какие настройки в Симантеке и он сожрал диск до 90% его емкости. Осталось 11%.
И после этого в диск манаджере появилось сообщение о битом РАИД массиве.Сейчас после Reactivate Volume оба диска в составе РАИД-1 показывает онлайн. Но сам ТОМ все равно показывает в Fialed Redudancy. Так вот у людей такая же проблема — после занятия определенного кол-ва места на томе, получают сбой массива, и
в РАИД-1 и в РАИД-5.зы: есть мысль разобрать массив и занова собрать. НО! какой же из дисков содержит конечные данные, если том в фаулте?
зыы: верно ли мое предположение, что реальные данные на том диске который в diskpart показывает как бутовый? и на него система пишет данные в состояние Fialed Redudancy Тома.
-
Изменено
ibGrass
7 февраля 2013 г. 9:26
-
Изменено
-
Винт реально сдох. А вот софтовый раид-1 вел себя странно. Если винда не смогла зареактивейтить мертвый винт, зачем она стала писать что живой винт тоже Error?
Перенос такого софт.раида-1 через disk2vhd ни чего не дал, система просто валится в синий экран, даже в safe mode.
Сделал подругому. Разобрал раид-1 до динамик диск, заранее определил какой именно диск живой, чтобы исправить загрузку в bcdedit и в diskpart.
Проверил загрузку системы с него. Взял Hiren’s с него запустил бесплатную утилиту Parted magic, ей перенес системные партиции — 100Мб и основную с виндой, на САТА диск. При переносе есть нюансы, т.к. тулза используют линух софт для работы с нтфс. Проверил
загрузку системы с САТА диска.Потом в биосе РАИДа САТА создал РАИД-1 и при построение массива указал родительский винт с которого копировалась партиция.
И вуаля, все живое и шуршит.
-
Делал перенос из железа в виртуальную среду:
cmd> c:WindowsSystem32sysprepsysprep.exe
Параметры: Переход в окно приветствия системы (OOBE), Подготовка к использованию,Завершение работы.
Ок, выполняется, выключается. После этого можно жесткий диск ставить надругое железо.
Рассмотрим технологию Storage Migration Service (служба миграции хранилища) на примере задачи переноса файлового сервера Windows Server 2008R2 на Windows Server 2019.
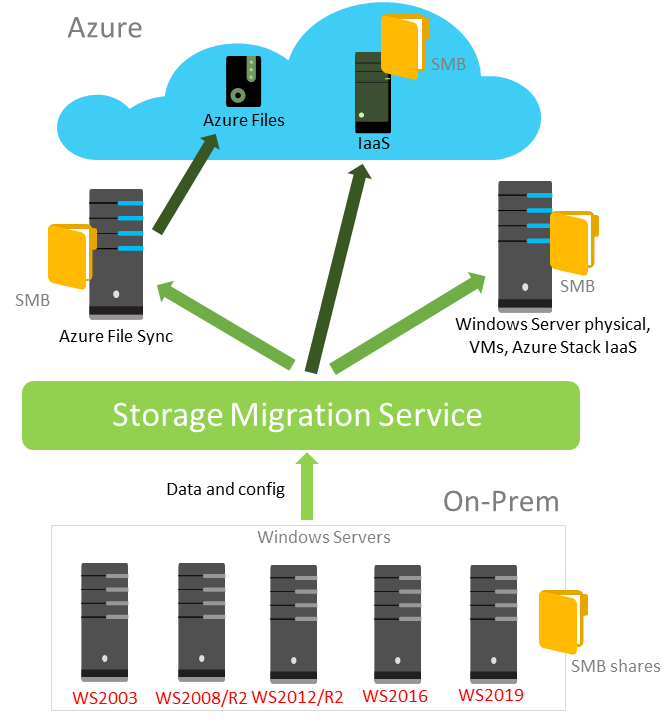
Начиная с Windows Server 2019 появилась возможность установки фич Storage Migration Services
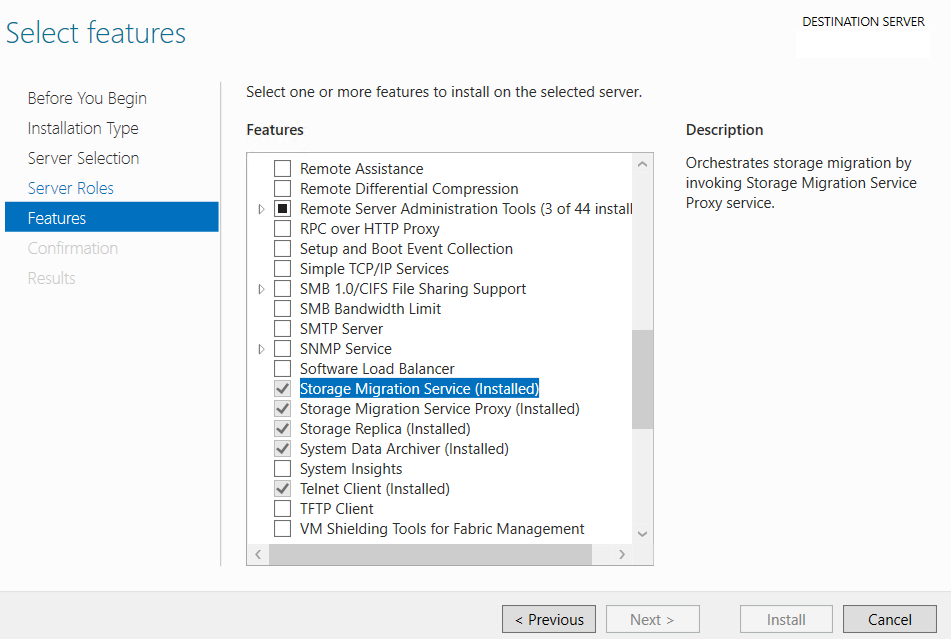
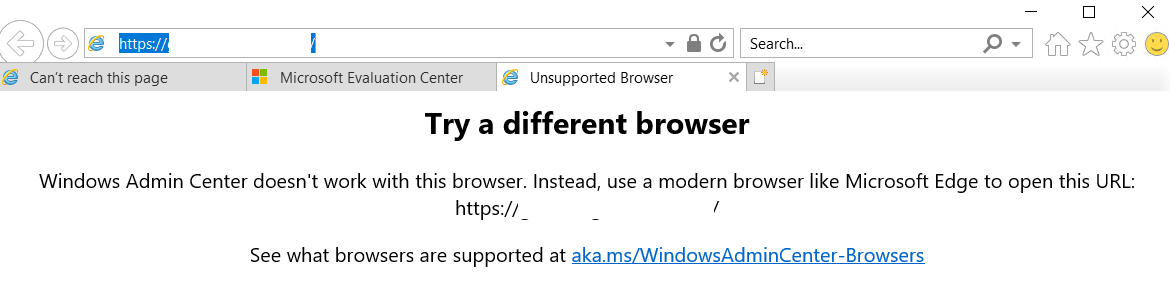
Первая особенность, что если хочется воспользоваться графическим интерфейсом то придется установить новомодный Windows Admin Center, который на удивление не вшит в Windows Server 2019 и скачивается и ставится отдельно с Evaluation Center. без Windows Admin Center возможно использование через Power-Shell
A PC or server running Windows Admin Center to run the Storage Migration Service user interface, unless you prefer using PowerShell to manage the migration. The Windows Admin Center and Windows Server 2019 version must both be at least version 1809.
После установки управление возможно с веб-браузера, идея хороша, получаем extended Server Manager в веб-управлялке с агрегацией хостов.
Но первый «прикол» в неподдерживаемой Windows Admin Center версии нативного браузера в Windows Server 2019
После авторизации переходим на (первое ощущение, что очень медленно работает Windows Admin Center) службу миграции хранилища и видим plan по трехэтапной миграции:
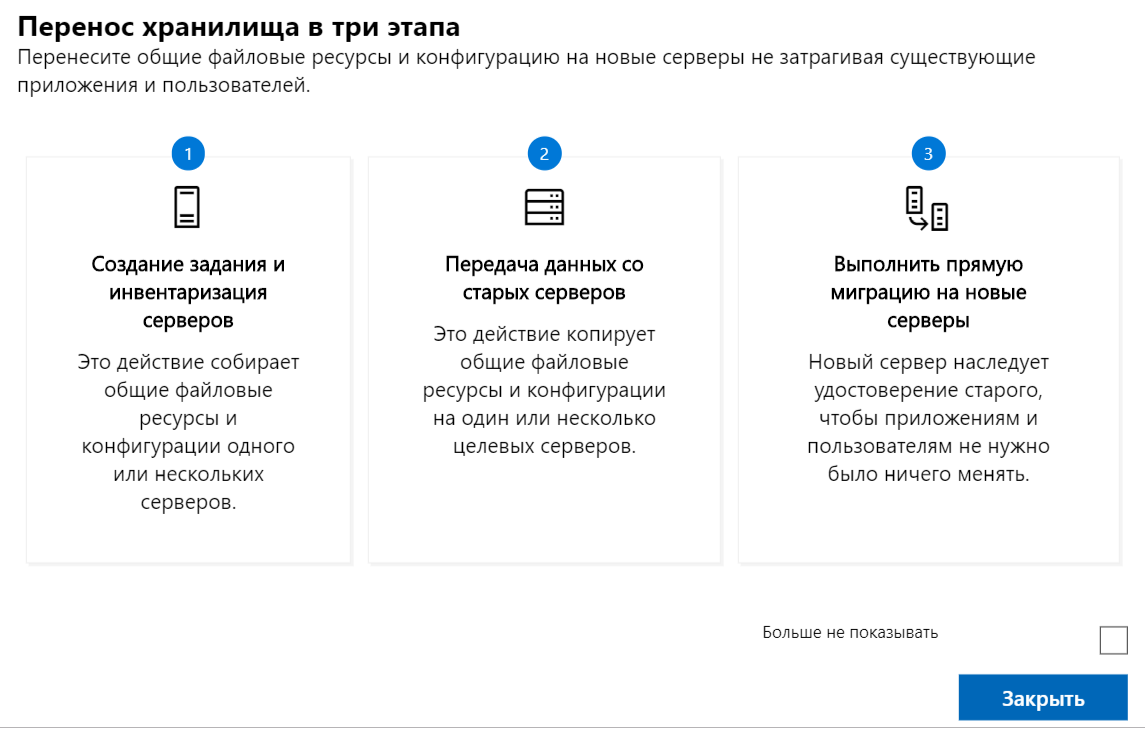
Отматываем вниз и создаём задание
В задании добавляем учетные данные и целевую систему (в нашем случае WIndows Server 2008 R2)
и приступаем к инвентаризации. Инвентаризация заняла около 15 минут для системы на 2 ТБ данных в нашем случае.
Второй этап — передача данных, требует повторного ввода учетных данных и идентификации, что странно.
Выбор целевого расположения так же порадовал, так как в нашем случае объекты данных переносятся в иное расположение (с C: на D: на новой машине)
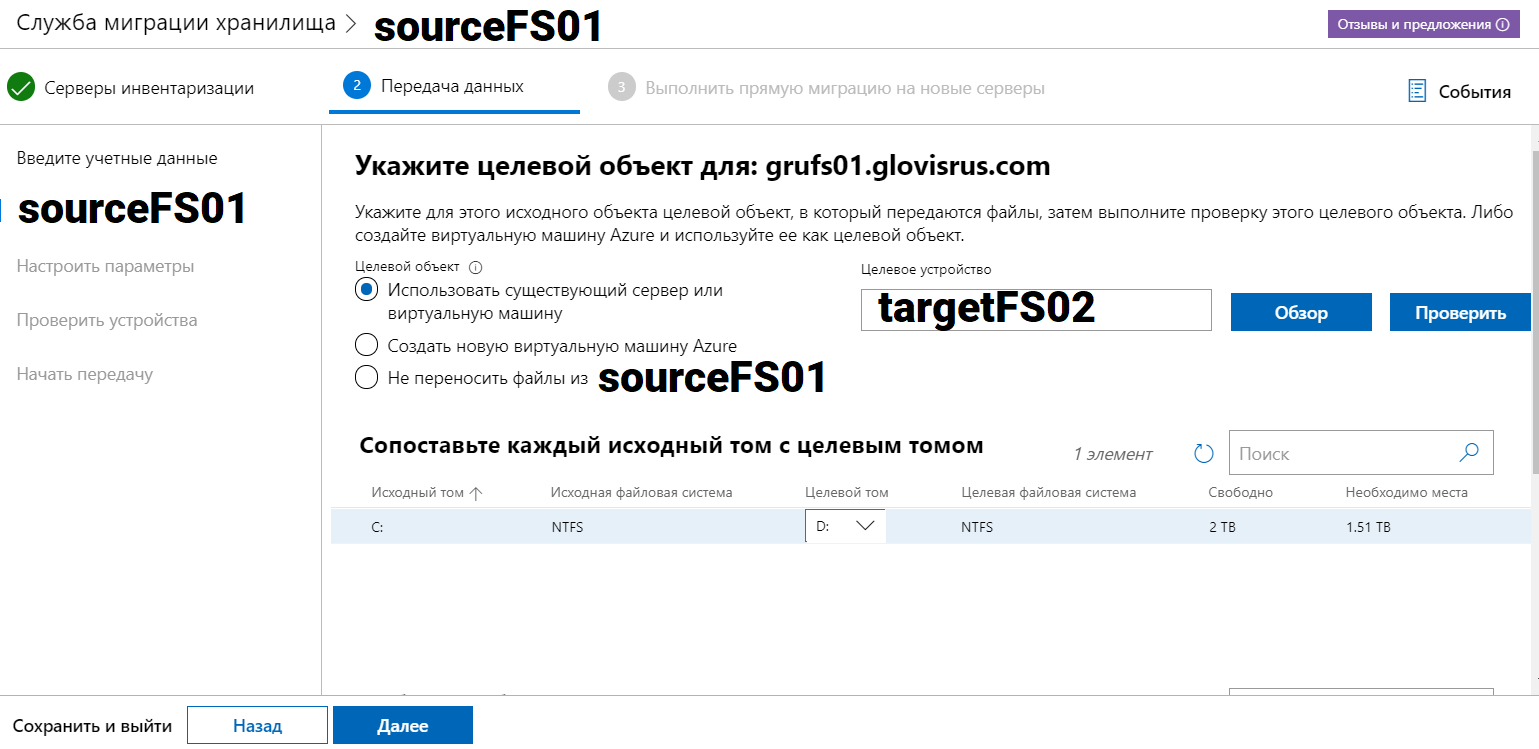
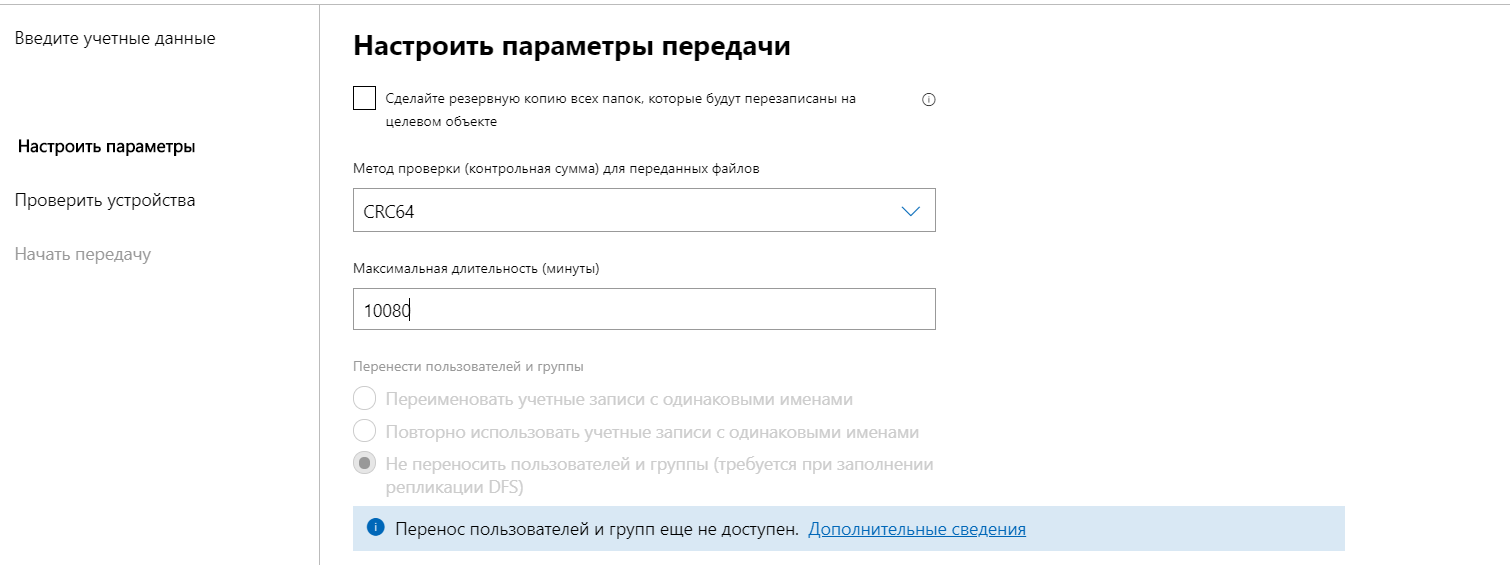
Настройки предлагают перезапись, резервную копию, контрольную сумму и длительность процессов.
Далее проверка и начало передачи данных, права файловой системы, как и ожидается сохраняются
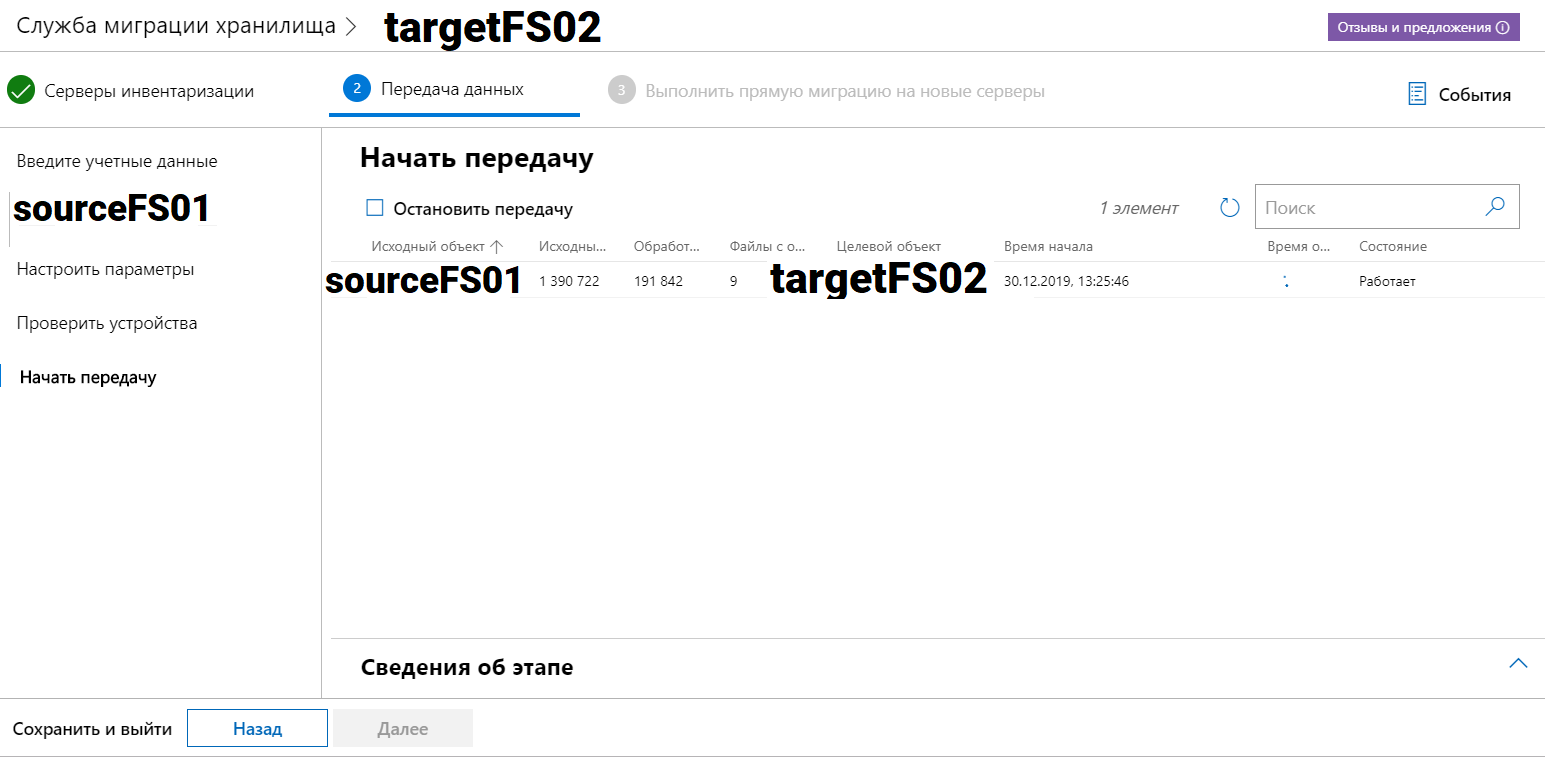
Ну и потом момент SwitchOver
Система выводит старый сервер под старым именем из домена, меняет hostname и сетевые настройки.
Прежние настройки в переходят на новый сервер.
Разумный путь.
Подготовьте:
- Новый IP адрес для СТАРОГО сервера
- Новый HOSTNAME старого сервера
- Новый сетевой адаптер на НОВОМ сервере
Система всё сделает автоматически. Время простоя зависит от времени перезагрузки систем.
P.S.
Из плюсов отмечу, что развернутый один раз Windows Admin Center может использоваться для миграции множества различных серверов (или слития воедино), хоть все системы в одну/две последовательно. Удобно и просто.
Ничего технологически нового тут нет, можно обойтись ROBOCOPY или XCOPY, с последующими ручными манипуляциями и предварительным просмотром логов на предмет рассинхрона/ошибок, НО зачем, когда есть новые удобные остнаски Windows Admin Center, которые всё равно microsoft пропихнёт под множество иных задач в ИТ-инфраструктуре в качестве основного средства управления.
Categories
- Transfer Programs from C Drive to D Drive
- Transfer Installed Software to New PC
- Transfer Files from Old PC to New PC
- Transfer Microsoft Office
- Find Office Product Key
- Move User Folder
- Move Google Chrome Bookmarks
Applies to: Migrate Server content in Windows Server 2022/2019/2016/2012/2012 r2/2008/2008 r2/2003, etc.
This page covers everything you need to know about Server Migration and shows you the complete transfer procedure between Server computers.
What Is Server Migration
Server Migration is the process of applying a tool or advanced Server transferring software to migrate data, transfer software, and even user data from one Server to another Server.
So when and why do you need to perform Server Migration? Here is a list of all possible reasons:
- Server computer gets old and slow.
- There is not sufficient space for the Server to store data and applications.
- Server is too old, and you need to upgrade Server data to a new one.
- Protect company data from Server crashes or outdated Server machines.
- Speed up Server computer, optimize company website loading performance.
To get rid of this issue, one efficient way is to free up disk space in Windows Server. However, this only temporarily fixes these issues. A forever solution to these problems is to apply Server Migration.
What Are the Windows Server Migration Tools
So, what tools can you apply for Server Migration? Alongside Windows Server Migration Tools built-in Server Manager, there are many tools and methods that Server managers can apply for data, files, and even application migration between two Windows Server computers.
Here is a list of tools that you can apply to transfer data from on Window Server to another:
- Windows Server Migration Software — EaseUS Todo PCTrans Technician
- Windows Server Migration Tools in Server Manager
- Server Data Migration via Cloud Drive
- Data Transfer via USB or External Storage Devices
How Long Does Server Migration Take
According to experienced Windows Server experts, server Migration’s duration varies depending on many factors. Here is a list of most factors that may affect the speed of Server data migration:
- Data amount
- Network speed
- File type — files, pictures are faster than videos, audios
- USB port type of external storage drives, USB 4.0 and USB 3.0 are much faster than USB 2.0
- Free space on the target drive, the more free space left, the faster server migration speed will be.
- The file transfer speed of Cloud drives may be different.
Suppose all the factors stay the same, so how long would it be for each Server Migration Tool to transfer files, apps, etc., to a new Server computer?
Here is a comparison table that lists the transition speed of the above four recommended methods, and it helps you to figure out which is the fastest for Server data migration:
| Tools for Server Migration | Speed for File Transfer | Transfer Duration for 1TB of Data |
|---|---|---|
| Windows Copy/Paste |
|
|
| Cloud Drive |
|
|
| Windows Server Migration Tools | 100MB/s | 2.9 hours |
| EaseUS Server Migration Software | / | / |
- Notice:
- EaseUS Server Migration Software — PC Transfer is a software that connects two computers via a network. The transfer speed is highly affected by the hard drive’s network stability, file amount, and read/write speed. So the transferring speed may vary on different computers with this Server migration software.
So when to use the above 4 Server Migration tools and how to use them? First, check the tutorial guide below, you’ll transfer files and content from Server to Server successfully.
How to Perform Server Migration and Migrate Files/Data, Apps
To help you fully understand and learn how to use the recommended methods for transferring files, we have decided to offer you the complete guide and list methods from easy to complex.
Follow and get the most suitable tool for Server Migration now:
#1. Transfer Files, Apps, User Account & Settings to New Server via Server Migration Software
- Device: Two Server computers, network connection in the same LAN
- Tools: Server Migration Software — EaseUS Todo PCTrans Technician
- Transfer Content: Files, folders, applications, Server users’ accounts, and settings.
EaseUS Todo PCTrans Technician is reliable and trustworthy in assisting Server users in migrating almost everything to a new Server computer. You can download, install and apply this tool to see how to own old Server data to a new computer within only a few simple clicks.
EaseUS Todo PCTrans Technician
- ☆ Deploy & install Todo PCTrans on multiple PCs.
- Transfer unlimited files, programs, apps between Servers.
- Transfer account, domain account, and settings.
- Data rescue, find product key of installed programs.
- One license for multiple PCs.
#1. Transfer Data to New Server
Step 1. Open EaseUS Todo PCTrans on both of your server computers. Choose «PC to PC» to go to the next step.

Step 2. Choose the transfer direction — New PC or Old PC.
«New» — Transfer files from old Server to current new Server.
«Old» — Transfer files from current old Server to a new Server.

Step 3. Connect the current PC to the target PC by entering the target computer’s account password or its verification code. You can turn on the «Connection Verification»on the right top of the «PC to PC» mainscreen on the target computer.

Step 4. Click «Files» > «Transfer» to check all the files you want to transfer to another Server computer. Then click «Transfer» to migrate specific data you have chosen.
Step 5. Wait for the process finishes. PCTrans will transfer files at a fast speed. It won’t take too long.

#2. Migrate Apps, Software to Another Server
Step 1. Run EaseUS Todo PCTrans on both PCs
On the source PC, select «PC to PC» on the main screen of EaseUS Todo PCTrans and move on.
Step 2. Choose transfer direction — Old or New Computer
«New» — Transfer all data from remote old computer to current new computer.
«Old» — Transfer all data from current old device to a new computer.
Step 3. Connect two computers
1. Select your target PC to connect via its IP address or device name and click «Connect».
2. Enter the login password of your target PC and click «OK» to confirm.
If you didn’t see the target PC in the listed devices, you can also click «Add PC» to manually connect the target PC by inputting its IP address or device name.
Step 4. Select apps, programs, and software and transfer to the target computer
1. You can select and choose what you want to transfer from the current computer to the target PC.
2. After selecting desired applications and programs, click «Transfer» to start the transferring process.

You May Also Feel Like to Learn:
![]()
How to Transfer User Account to a New PC
This tutorial article provides you with a step-by-step guide to transfer a User Account with the password to a new computer in Windows 10/8/7 with a few simple clicks.
#2. Migrate Data Between Servers via External Storage Devices
- Device: A big USB or external hard drive with sufficient free space, two Server computers
- Tools: Windows Copy & Paste
- Transfer Content: Files and folders stored on Server computers, Database content, etc.
How to Transfer:
Step 1. Connect the USB or external hard drive to the source Server.
Step 2. Copy and paste files and folders that you need to migrate to a new Server into the external storage device.
Step 3. Disconnect the external storage drive, once done, connect it to the new Server.
Step 4. Copy and paste files and folders to the new Server’s target location.

#3. Transfer Server Content to a New One Using Cloud Drive
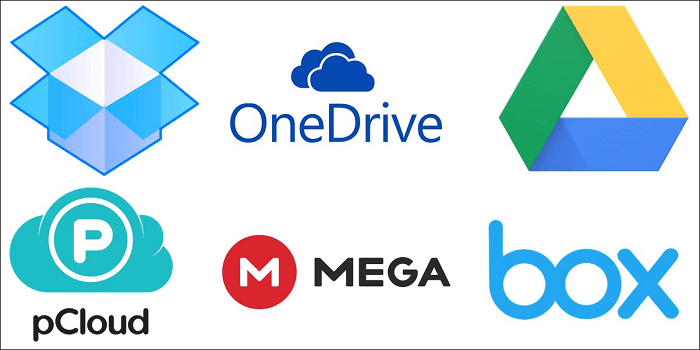
- Device: Two Server computers, cloud drive account
- Tools: OneDrive, Dropbox, Google Drive, pCloud, etc.
- Transfer Content: Files, folders, and desktop content in Server computer.
How to Transfer Server Files:
Step 1. Launch the cloud drive app on the Server computer or open the could website via browser.
Step 2. Log in with your cloud drive account and password.
Step 3. Click «Add» or «Upload» to select files or documents on the computer to upload.
Step 4. Once done, launch the cloud drive app on the new Server computer, log in and select files to download to the new Server.
#4. Export Server Data and Import to a New Server via Windows Server Migration Tools
- Device: Two Server computers, an external USB drive with sufficient free space
- Tools: Windows Server Migration Tools
- Transfer Content: Files, folders, and desktop content in Server computer.
Windows Server Migration Tools is a built-in tool that Micorosft added to Windows Server Manager, and advanced Server experts would apply this tool for file migration between Servers.
How to Use Windows Server Migration Tools for Server File Transferring:
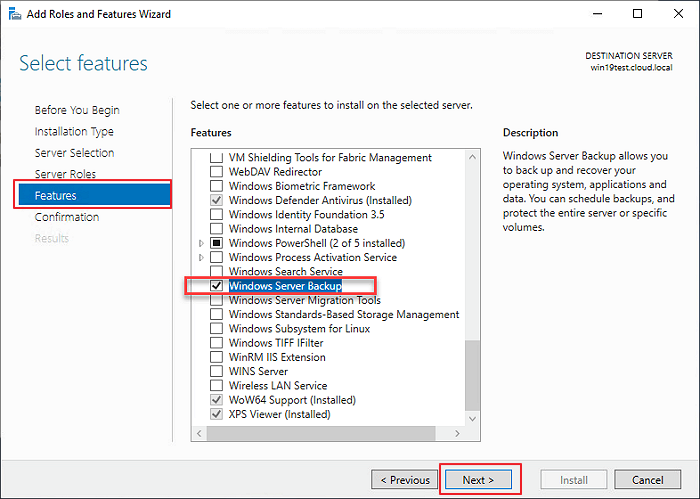
Step 1. Enable Windows Server Migration Tools in Server Manager:
Type and search Server Manager, click to open it > Click «Manage» > «Add Roles and Features».
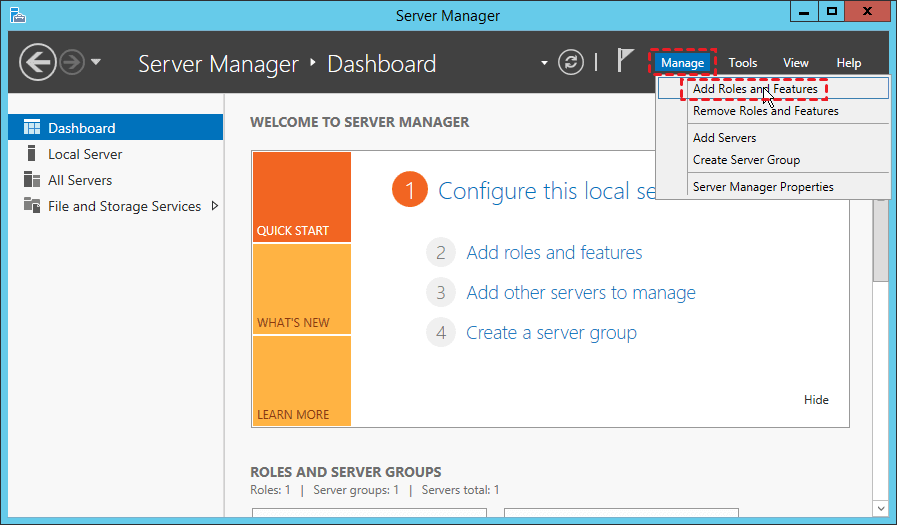
Check «Windows Server Migration Tools» and click «Next» > Click «Install» to continue.
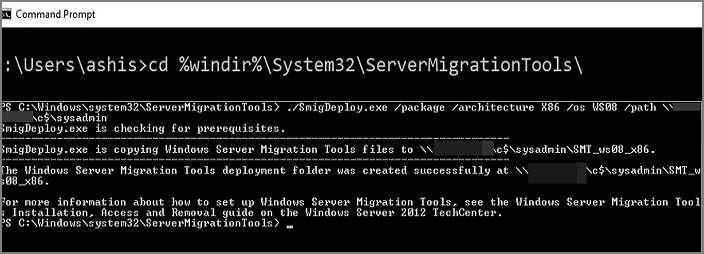
Step 2. Create a deployment folder on the target server computer:
Open «PowerShell» , type the following command lines and enter each time.
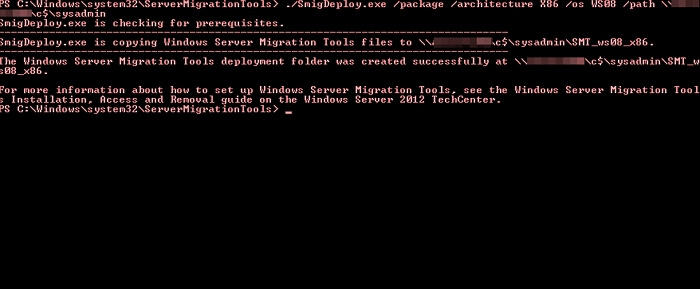
- cd %Windir%System32ServerMigrationTools
- SmigDeploy.exe /package /architecture X64 /os WS08 /path
Step 3. Register Windows Server Migration Tools on the source Server computer:
- Copy the deployment folder to a local drive of the source computer.
- Open Command Prompt, type .Smigdeploy.exe, and hit Enter.
Step 4. Migrate Server Data from Server to Server
- Open Windows Server Manager on the source Server, click to open Windows Server Migration Tools.
- Open PowerShell and type Export-SmigServerSetting -User All -Group –Path C:SysAdminExportMigUsersGroups –Verbose, then hit Enter.
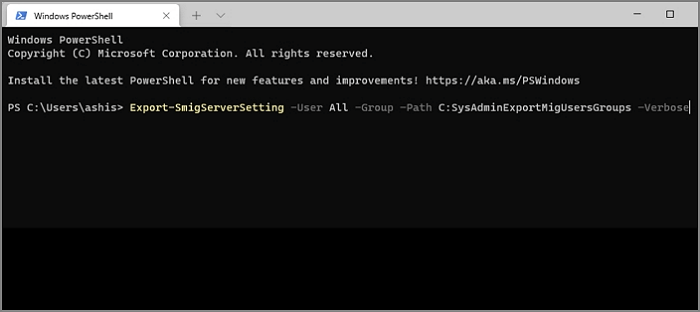
This will help to export files from the source Server computer.
- On the target Server computer, open Server Migration Tools by launching Server Manager > Tools > Windows Server > Migration Tools.
- Open Powershell and type Import-SmigServerSetting–UserEnabled–Group-PathC:SysAdminExportMigUsersGroups -Verbose, hit Enter.
This command will import the exported Server data to the new Server computer.
All you need is to wait for the process to complete.
Server Migration Is Easy, and You Can Be an Expert with the Right Solution
This page explained what Server Migration is and listed 4 normal Server Migration tools for any level of Serve users to apply for transferring data from Server to Server.
- For the easiest method, don’t miss Windows Copy and Paste via an external storage device.
- For a comprehensive solution to migrate everything to a new Server computer, you can always rely on EaseUS Todo PCTrans Technician.
- For experienced Server users, Windows Server Migration Tools is economical for Server file migration.
Categories
- Transfer Programs from C Drive to D Drive
- Transfer Installed Software to New PC
- Transfer Files from Old PC to New PC
- Transfer Microsoft Office
- Find Office Product Key
- Move User Folder
- Move Google Chrome Bookmarks
Applies to: Migrate Server content in Windows Server 2022/2019/2016/2012/2012 r2/2008/2008 r2/2003, etc.
This page covers everything you need to know about Server Migration and shows you the complete transfer procedure between Server computers.
What Is Server Migration
Server Migration is the process of applying a tool or advanced Server transferring software to migrate data, transfer software, and even user data from one Server to another Server.
So when and why do you need to perform Server Migration? Here is a list of all possible reasons:
- Server computer gets old and slow.
- There is not sufficient space for the Server to store data and applications.
- Server is too old, and you need to upgrade Server data to a new one.
- Protect company data from Server crashes or outdated Server machines.
- Speed up Server computer, optimize company website loading performance.
To get rid of this issue, one efficient way is to free up disk space in Windows Server. However, this only temporarily fixes these issues. A forever solution to these problems is to apply Server Migration.
What Are the Windows Server Migration Tools
So, what tools can you apply for Server Migration? Alongside Windows Server Migration Tools built-in Server Manager, there are many tools and methods that Server managers can apply for data, files, and even application migration between two Windows Server computers.
Here is a list of tools that you can apply to transfer data from on Window Server to another:
- Windows Server Migration Software — EaseUS Todo PCTrans Technician
- Windows Server Migration Tools in Server Manager
- Server Data Migration via Cloud Drive
- Data Transfer via USB or External Storage Devices
How Long Does Server Migration Take
According to experienced Windows Server experts, server Migration’s duration varies depending on many factors. Here is a list of most factors that may affect the speed of Server data migration:
- Data amount
- Network speed
- File type — files, pictures are faster than videos, audios
- USB port type of external storage drives, USB 4.0 and USB 3.0 are much faster than USB 2.0
- Free space on the target drive, the more free space left, the faster server migration speed will be.
- The file transfer speed of Cloud drives may be different.
Suppose all the factors stay the same, so how long would it be for each Server Migration Tool to transfer files, apps, etc., to a new Server computer?
Here is a comparison table that lists the transition speed of the above four recommended methods, and it helps you to figure out which is the fastest for Server data migration:
| Tools for Server Migration | Speed for File Transfer | Transfer Duration for 1TB of Data |
|---|---|---|
| Windows Copy/Paste |
|
|
| Cloud Drive |
|
|
| Windows Server Migration Tools | 100MB/s | 2.9 hours |
| EaseUS Server Migration Software | / | / |
- Notice:
- EaseUS Server Migration Software — PC Transfer is a software that connects two computers via a network. The transfer speed is highly affected by the hard drive’s network stability, file amount, and read/write speed. So the transferring speed may vary on different computers with this Server migration software.
So when to use the above 4 Server Migration tools and how to use them? First, check the tutorial guide below, you’ll transfer files and content from Server to Server successfully.
How to Perform Server Migration and Migrate Files/Data, Apps
To help you fully understand and learn how to use the recommended methods for transferring files, we have decided to offer you the complete guide and list methods from easy to complex.
Follow and get the most suitable tool for Server Migration now:
#1. Transfer Files, Apps, User Account & Settings to New Server via Server Migration Software
- Device: Two Server computers, network connection in the same LAN
- Tools: Server Migration Software — EaseUS Todo PCTrans Technician
- Transfer Content: Files, folders, applications, Server users’ accounts, and settings.
EaseUS Todo PCTrans Technician is reliable and trustworthy in assisting Server users in migrating almost everything to a new Server computer. You can download, install and apply this tool to see how to own old Server data to a new computer within only a few simple clicks.
EaseUS Todo PCTrans Technician
- ☆ Deploy & install Todo PCTrans on multiple PCs.
- Transfer unlimited files, programs, apps between Servers.
- Transfer account, domain account, and settings.
- Data rescue, find product key of installed programs.
- One license for multiple PCs.
#1. Transfer Data to New Server
Step 1. Open EaseUS Todo PCTrans on both of your server computers. Choose «PC to PC» to go to the next step.
Step 2. Choose the transfer direction — New PC or Old PC.
«New» — Transfer files from old Server to current new Server.
«Old» — Transfer files from current old Server to a new Server.
Step 3. Connect the current PC to the target PC by entering the target computer’s account password or its verification code. You can turn on the «Connection Verification»on the right top of the «PC to PC» mainscreen on the target computer.
Step 4. Click «Files» > «Transfer» to check all the files you want to transfer to another Server computer. Then click «Transfer» to migrate specific data you have chosen.
Step 5. Wait for the process finishes. PCTrans will transfer files at a fast speed. It won’t take too long.
#2. Migrate Apps, Software to Another Server
Step 1. Run EaseUS Todo PCTrans on both PCs
On the source PC, select «PC to PC» on the main screen of EaseUS Todo PCTrans and move on.
Step 2. Choose transfer direction — Old or New Computer
«New» — Transfer all data from remote old computer to current new computer.
«Old» — Transfer all data from current old device to a new computer.
Step 3. Connect two computers
1. Select your target PC to connect via its IP address or device name and click «Connect».
2. Enter the login password of your target PC and click «OK» to confirm.
If you didn’t see the target PC in the listed devices, you can also click «Add PC» to manually connect the target PC by inputting its IP address or device name.
Step 4. Select apps, programs, and software and transfer to the target computer
1. You can select and choose what you want to transfer from the current computer to the target PC.
2. After selecting desired applications and programs, click «Transfer» to start the transferring process.
You May Also Feel Like to Learn:
![]()
How to Transfer User Account to a New PC
This tutorial article provides you with a step-by-step guide to transfer a User Account with the password to a new computer in Windows 10/8/7 with a few simple clicks.
#2. Migrate Data Between Servers via External Storage Devices
- Device: A big USB or external hard drive with sufficient free space, two Server computers
- Tools: Windows Copy & Paste
- Transfer Content: Files and folders stored on Server computers, Database content, etc.
How to Transfer:
Step 1. Connect the USB or external hard drive to the source Server.
Step 2. Copy and paste files and folders that you need to migrate to a new Server into the external storage device.
Step 3. Disconnect the external storage drive, once done, connect it to the new Server.
Step 4. Copy and paste files and folders to the new Server’s target location.
#3. Transfer Server Content to a New One Using Cloud Drive
- Device: Two Server computers, cloud drive account
- Tools: OneDrive, Dropbox, Google Drive, pCloud, etc.
- Transfer Content: Files, folders, and desktop content in Server computer.
How to Transfer Server Files:
Step 1. Launch the cloud drive app on the Server computer or open the could website via browser.
Step 2. Log in with your cloud drive account and password.
Step 3. Click «Add» or «Upload» to select files or documents on the computer to upload.
Step 4. Once done, launch the cloud drive app on the new Server computer, log in and select files to download to the new Server.
#4. Export Server Data and Import to a New Server via Windows Server Migration Tools
- Device: Two Server computers, an external USB drive with sufficient free space
- Tools: Windows Server Migration Tools
- Transfer Content: Files, folders, and desktop content in Server computer.
Windows Server Migration Tools is a built-in tool that Micorosft added to Windows Server Manager, and advanced Server experts would apply this tool for file migration between Servers.
How to Use Windows Server Migration Tools for Server File Transferring:
Step 1. Enable Windows Server Migration Tools in Server Manager:
Type and search Server Manager, click to open it > Click «Manage» > «Add Roles and Features».
Check «Windows Server Migration Tools» and click «Next» > Click «Install» to continue.
Step 2. Create a deployment folder on the target server computer:
Open «PowerShell» , type the following command lines and enter each time.
- cd %Windir%System32ServerMigrationTools
- SmigDeploy.exe /package /architecture X64 /os WS08 /path
Step 3. Register Windows Server Migration Tools on the source Server computer:
- Copy the deployment folder to a local drive of the source computer.
- Open Command Prompt, type .Smigdeploy.exe, and hit Enter.
Step 4. Migrate Server Data from Server to Server
- Open Windows Server Manager on the source Server, click to open Windows Server Migration Tools.
- Open PowerShell and type Export-SmigServerSetting -User All -Group –Path C:SysAdminExportMigUsersGroups –Verbose, then hit Enter.
This will help to export files from the source Server computer.
- On the target Server computer, open Server Migration Tools by launching Server Manager > Tools > Windows Server > Migration Tools.
- Open Powershell and type Import-SmigServerSetting–UserEnabled–Group-PathC:SysAdminExportMigUsersGroups -Verbose, hit Enter.
This command will import the exported Server data to the new Server computer.
All you need is to wait for the process to complete.
Server Migration Is Easy, and You Can Be an Expert with the Right Solution
This page explained what Server Migration is and listed 4 normal Server Migration tools for any level of Serve users to apply for transferring data from Server to Server.
- For the easiest method, don’t miss Windows Copy and Paste via an external storage device.
- For a comprehensive solution to migrate everything to a new Server computer, you can always rely on EaseUS Todo PCTrans Technician.
- For experienced Server users, Windows Server Migration Tools is economical for Server file migration.
Обновлено 12.04.2019

Теория как перенести контроллер домена windows server 2008 R2
Всем привет! Сегодня расскажу теоретическую последовательность переноса контроллера домена windows server 2008 R2. Краткий конспект по переносу DC (единственного в домене), являющегося по совместительству сервером глобального каталога и носителем ролей FSMO, на новый сервер. Никогда не создавайте себе такую ситуацию и всегда имейте, как минимум дублирующий сервер с такой же ролью. В противном случае, у вас есть все шансы полностью потерять ваше рабочее окружение.
- Делаем опись ресурсов на старом DC (чаще всего это DNS, DHCP, WINS, File Server, Print Server).
- Создаем на старом сервере резервную копию system state с помощью ntbackup.
- Инсталлируем на новый сервер Windows Server 2008 r2.
- Поднимаем его до дополнительного контроллера домена и перезагружаем.
- Поднимаем его до сервера глобального каталога и перезагружаем.
- Инсталлируем DNS-сервер на новый контроллер.
- Если на старом DC есть WINS, то инсталлируем его на новый и переносим базу данных.
- Переносим роли FSMO на новый DC.
- Снимаем роль глобального каталога со старого сервера и перезагружаем его.
- Понижаем старый контроллер до рядового сервера.
- Переносим настройки сервера печати (например, с помощью Windows Print Migrator).
- Переносим настройки файлового сервера (с помощью Microsoft File Server Migration Toolkit).
- Инсталлируем DHCP-сервер на новый контроллер и переносим на него параметры со старого (указав в параметрах сервера IP-адреса новых DNS и WINS).
- Перерегистрируем клиентские компьютеры на новый DHCP с помощью команд ipconfig /release и ipconfig /renew
Материал сайта pyatilistnik.org.
Апр 12, 2019 23:33
Как недавно выяснилось, процесс миграции домена с Windows Server 2003 на Windows Server 2008/R2 (либо просто на другой сервер) для начинающих системных администраторов представляет сложности и даже вызывает некоторую боязнь, хотя на самом деле он настолько прост, что о написании такой статьи я даже и не задумывался никогда, тем более что в интернете их полно.
Тем не менее, целью данной статьи было объединить типовые действия, возникающие при миграции, поэтому приступим. Статья будет представлять собой пошаговый мануал, с наиболее распространенным случаем миграции с 2003 на 2008 R2 и с необходимыми отступлениями для других вариантов.
Собственно шаги:
- Исходные данные и техзадание,
- Подготовительные работы,
- Обновление схемы леса и домена,
- Передача ролей FSMO,
- Перенос глобального каталога,
- Перенастройка интерфейсов, DNS и другие послеустановочные задачи.
Исходные данные и техзадание
Исходная ситуация — существует домен, testcompany.local. Для упрощения в нем будет один контроллер домена под Windows Server 2003, с именем dc01. DNS-сервер также на нем, основная зона интегрирована в Active Directory.
Сетевые настройки контроллера:
IP-адрес — 192.168.1.11
Маска — 255.255.255.0
Шлюз — 192.168.1.1
DNS-сервер — 192.168.1.11
Задача — установить контроллер домена на другом сервере, причем работающем под Windows Server 2008 R2, старый контроллер понизить до рядового сервера (а затем возможно, удалить вообще), а все функции старого контроллера передать новому.
Подготовительные работы
В качестве подготовительных работ следует запустить команды netdiag (эта команда существует только в 2003 Server, Support Tools) и dcdiag, убедиться в отсутствии ошибок, а при их наличии исправить эти ошибки.
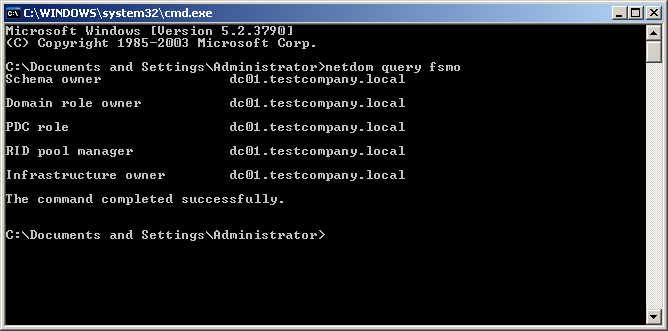
В первую очередь определяем держателя FSMO-ролей в домене, командой:
netdom query fsmoУтилита netdom.exe в состав Windows Server 2003 по умолчанию не входит, поэтому нужно установить Support Tools. В рассматриваемом случае от нее смысла никакого нет, так как контроллер домена всего один и роли FSMO все равно все на нем. Тем же, у кого контроллеров домена больше одного, это будет полезно, чтобы знать, какие именно роли и откуда переносить. Результат команды будет примерно таким:
Далее, устанавливаем операционную систему Windows Server 2008 R2 на новый сервер, даем имя dc02, задаем сетевые настройки:
IP-адрес — 192.168.1.12
Маска — 255.255.255.0
Шлюз — 192.168.1.1
DNS-сервер — 192.168.1.11
и вводим его в существующий домен, testcompany.local в нашем случае.
Обновление схемы леса и домена
Следующий этап — обновление схемы леса и домена до Windows Server 2008 R2, что мы будем делать с помощью утилиты adprep. Вставляем установочный диск с Windows Server 2008 R2 в сервер dc01. На диске нас интересует папка X:supportadprep (X: — буква диска DVD-ROM). Если windows Server 2003 у вас 32-х битная, следует запускать запускать adprep32.exe, в случае 64-х битной — adprep.exe.
Для выполнения команды adprep /forestprep никаких требований к функциональному режиму леса нет. Для выполнения команды adprep /domainprep требуется, чтобы в домене использовался функциональный уровень домена не ниже Windows 2000 native.
Вводим команду:
X:supportadprep>adprep32.exe /forestprepПосле предупреждения о том, что все контроллеры домена Windows 2000 должны быть минимум с SP4 вводим С и нажимаем Enter:

Команда отрабатывает довольно долго, несколько минут и должна завершиться следующей фразой:
Adprep successfully updated the forest-wide information.После этого вводим команду:
X:supportadprep>adprep32.exe /domainprep /gpprepКоторая отработает не в пример быстрее:
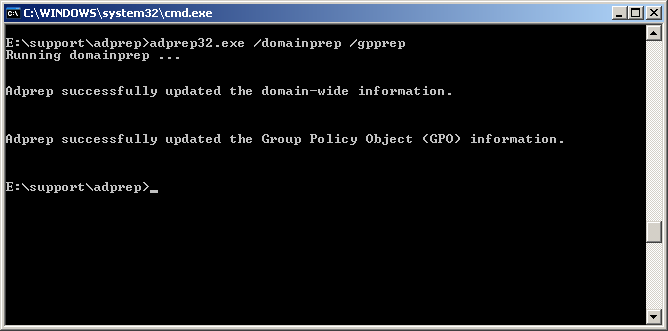
Также стоит выполнить команду adprep /rodcprep. Даже если вы и не собираетесь использовать в вашей сети контроллеры домена только для чтения (Read Only Domain Controller — RODC), эта команда как минимум уберет ненужные сообщения об ошибках в журнале событий.
После завершения действия команд по обновлению схемы можно приступать к повышению роли нового сервера до контроллера домена.
На сервере dc02 заходим в Server Manager, добавляем роль Active Directory Domain Services. После установки роли, зайдя в Server Manager > Roles > Active Directory Domain Services, мы увидим желтую подсказку «Run the Active Directory Domain Services Installation Wizard (dcpromo.exe)». Ее и запускаем. Либо можно в командной строке набрать dcpromo, что будет равноценно вышеприведенному действию.
Так как освещение процесса установки контроллера домена в эту статью не входит, остановлюсь лишь на некоторых ключевых моментах. На шаге Additional Domain Controller Options поставьте обе галки, DNS Server и Global catalog.
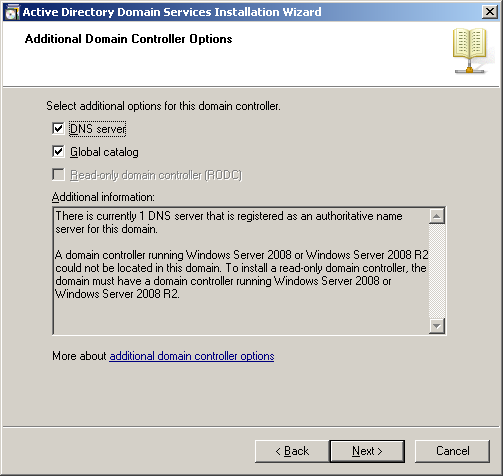
Если галку Global Catalog и DNS Server не поставить, придется их переносить отдельно. А при миграции с 2003 на 2003 это придется делать в любом случае, так как в Windows 2003 такой возможности (установки DNS-сервера и глобального каталога при добавлении добавочного контроллера домена) нет. О переносе глобального каталога и DNS-сервера будет немного ниже.
Завершаем установку контроллера домена, перезагружаем сервер. Теперь у нас есть два контроллера домена, работающих одновременно.
Передача ролей FSMO
Передачу ролей FSMO можно производить как через графический интерфейс, так и с помощью утилиты ntdsutil.exe. В этой статье будет описан способ с использованием графического интерфейса, как более наглядный, кого интересует другой способ, он по этой ссылке: http://support.microsoft.com/kb/255504.
Передача ролей FSMO будет состоять из следующих шагов:
- Передача роли Schema Master,
- Передача роли Domain Naming Master,
- Передача ролей RID Master, PDC Emulator и Infrastructure Master.
Передача роли Schema Master
Заходим на сервер dc02, на тот, на который будем передавать роли. Для того, чтобы получить доступ к оснастке Active Directory Schema, сначала необходимо зарегистрировать библиотеку schmmgmt.dll. Это делается с помощью команды:
regsvr32 schmmgmt.dllДалее, Start > Run > mmc > Enter. В окне оснастки находим и добавляем компонент Active Directory Schema.
В дереве оснастки нужно щелкнуть правой кнопкой мыши элемент Active Directory Schema и выбрать пункт Change Domain Controller. Там меняем контроллер на dc02.
Далее опять нажимаем правой кнопкой мыши элемент Active Directory Schema и выбираем пункт Operations Master. Появляется вот такое окно:
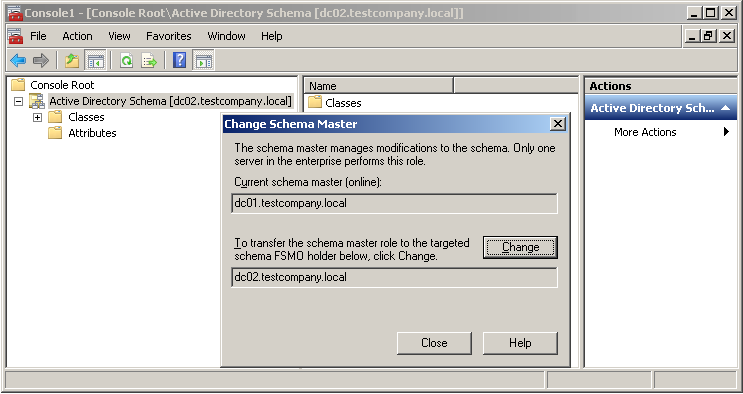
Нажимаем Change > Yes > OK и закрываем все эти окна.
Передача роли Domain Naming Master
Открываем оснастку Active Directory Domains and Trusts, щелкаем правой кнопкой мыши элемент Active Directory Domains and Trusts и выбираем команду Change Active Directory Domain Controller. Это действие необходимо, если работа ведется не с контроллера домена, которому передается роль. Пропустите его, если подключение к контроллеру домена, чья роль передается, уже установлено. В открывшемся окне выбираем контроллер домена, которому присваивается роль (dc02 в нашем случае), в списке и нажимаем кнопку ОК.
В оснастке щелкаем правой кнопкой мыши элемент Active Directory Domains and Trusts и выбираем пункт Operations Master. В появившемся окне нажимаем кнопку Change.
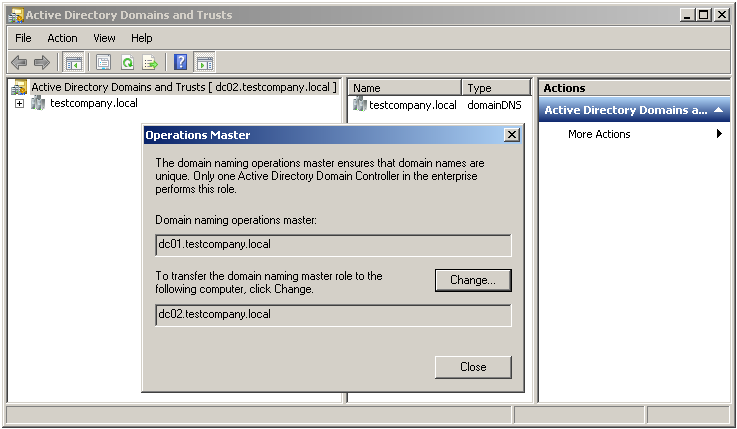
Чтобы подтвердить передачу роли, нажимаем кнопку ОК, а затем — Close.
Передача ролей RID Master, PDC Emulator и Infrastructure Master
Открываем оснастку Active Directory Users and Computers. Щелкаем правой кнопкой мыши элемент Active Directory Users and Computers и выбираем команду Change Domain Controller. Пропустите его, если подключение к контроллеру домена, чья роль передается, уже установлено. В открывшемся окне выбираем контроллер домена, которому присваивается роль (dc02 в нашем случае), в списке и нажимаем кнопку ОК.
В оснастке щелкаем правой кнопкой мыши элемент Active Directory Users and Computers, выбираем пункт All Tasks, а затем Operations Master.
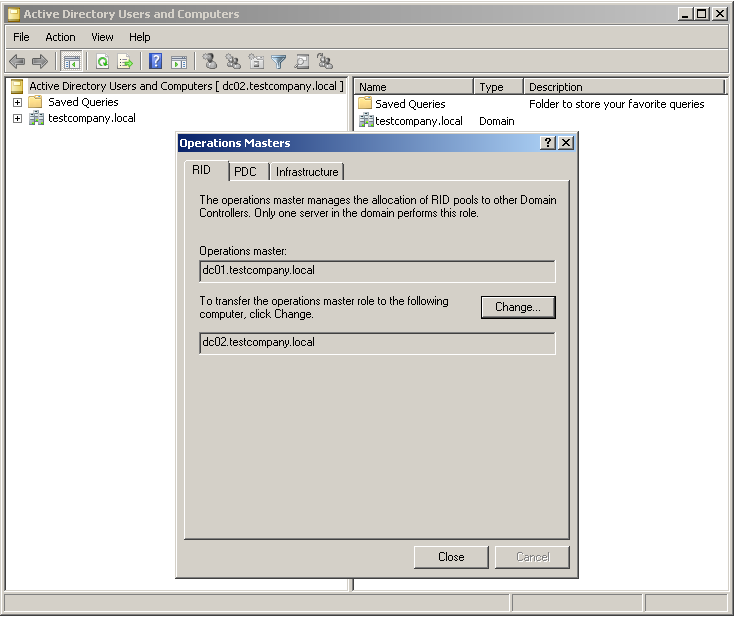
Выбираем вкладку, соответствующую передаваемой роли (RID, PDC или Infrastructure Master), и нажимаем кнопку Change. Чтобы подтвердить передачу роли, нажимаем кнопку ОК, а затем — Close.
Перенос глобального каталога
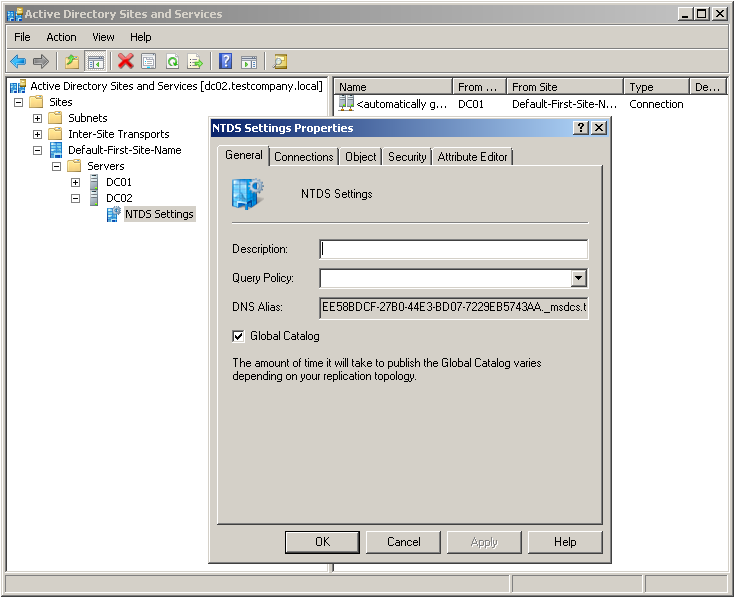
Если мы делаем миграцию не на 2008, а на 2003, в котором при добавлении добавочного контроллера домена глобальный каталог не ставится, либо вы не поставили галку Global Catalog при установке добавочного контроллера домена, тогда нужно назначить роль глобального каталога новому контроллеру домена вручную. Для этого, заходим в оснастку Active Directory Sites and Services, раскрываем Sites > сайт Default-First-Site-Name > Servers > DC02 > щелкаем правой кнопкой мыши по NTDS Settings > Properties. В открывшемся окне ставим галку Global Catalog > OK.
После этого, в логах Directory Service появится сообщение, что повышение роли контроллера до глобального каталога будет отложено на 5 минут:
Event Type: Information
Event Source: NTDS General
Event Category: (18)
Event ID: 1110
Date: 12.07.2011
Time: 22:49:31
User: TESTCOMPANYAdministrator
Computer: dc02.testcompany.local
Description:
Promotion of this domain controller to a global catalog will be delayed for the following interval.

Interval (minutes):
5

This delay is necessary so that the required directory partitions can be prepared before the global catalog is advertised. In the registry, you can specify the number of seconds that the directory system agent will wait before promoting the local domain controller to a global catalog. For more information about the Global Catalog Delay Advertisement registry value, see the Resource Kit Distributed Systems Guide.
Ждем пять минут и дожидаемся события 1119 о том, что этот контроллер стал глобальным каталогом:
Event Type: Information
Event Source: NTDS General
Event Category: (18)
Event ID: 1119
Date: 12.07.2011
Time: 22:54:31
User: NT AUTHORITYANONYMOUS LOGON
Computer: dc02.testcompany.local
Description:
This domain controller is now a global catalog.
Перенастройка интерфейсов, DNS и другие послеустановочные задачи
Далее, так как DNS-сервер на dc02 мы установили, теперь нужно в свойствах сетевого интерфейса первичным DNS-сервером указать самого себя, т. е. адрес 192.168.1.12. И на dc01 соответственно поменять на 192.168.1.12.
В свойствах DNS-сервера на dc02 проверьте вкладку Forwarders, на 2003, в отличие от 2008, она не реплицируется. После этого можно понижать контроллер домена dc01 до рядового сервера.
Если вам необходимо у нового контроллера оставить старое имя и IP-адрес, то это также делается без проблем. Имя меняется как для обычного компьютера, либо командой netdom renamecomputer.
После смены IP-адреса выполните команды ipconfig /registerdns и dcdiag /fix.
Использованные источники:
http://support.microsoft.com/kb/324801
http://technet.microsoft.com/en-us/library/cc731728(WS.10).aspx
http://technet.microsoft.com/ru-ru/library/upgrade-domain-controllers-to-windows-server-2008-r2(WS.10).aspx#BKMK_FL
(c) sysadminz.ru