Пытаюсь перенести рабочий Windows Server 2003 R2 (x86) на виртуальную машину Hyper-V в Windows Server 2012.
Пробовал создавать образ 2003 системы и Акронисом и утилитой Disk2vhd v1.63
Сначала попробовал «на кошечках».
Перенес образ в VirtualBox. Всё работает нормально.
После этого решил перенести так-же и на Hyper-V в Windows Server 2012.
После старта перенесённого образа ВМ идёт сразу в ребут. Т.е. не доходит даже до графического бегущего индикатора.
НО! При этом грузится в Безопасном режиме.
В Безопасном режиме замена драйверов контроллеров дисков, удаление «драйверов процессоров» и всего лишнего не принесли желаемой загрузки.
После этого начитавшись интернета я решил от безнадёги поиграться с HAL.
И о-чудо! После того как я в Безопасном режиме заменил HAL на Standart PC у меня после ребута начал грузиться 2003 Server.
В результате экспериментов с HALя выяснил, что сервер грузится только при следующих HAL:
Standart PC, MPS Multiprocessor PC, MPS Uniprocessor PC
Если HAL Advanced Configuration and Power Interface (ACPI) PC, ACPI Multiprocessor PC, ACPI Uniprocessor PC, то система не грузится.
Создал новую ВМ в Hyper-V 2012 и установил Windows Server 2003 «начисто». Система нормально установилась с HAL ACPI Uniprocessor PC.
Вопрос:
1) Почему в VirtualBox’е работает без изменения HAL, а в Hyper-V нет?
2) Как всётаки перенести 2003 сервер с «нормальным» (не MPS PC) HAL на Hyper-V 2012 ?
3) Я что-то делаю неправильно?
Перенос физических серверов в виртуальную среду (Physical-to-Virtual, P2V) может преследовать различные цели. Например, выведя из эксплуатации устаревшие сервера и смигрировав их в виртуальную среду можно оптимизировать загрузку оборудования, не говоря о том что виртуальными машинами гораздо легче управлять. Способов P2V-миграции достаточно много, и сегодня я опишу один из них.
Переходим к конкретной задаче. Имеется одинокий 🙂 сервер с установленной на нем Windows Server 2003 R2. На сервере крутятся несколько важных сервисов, остановка которых более чем на несколько минут недопустима. Физический доступ к серверу ограничен, так как он стоит в датацентре. Задача — смигрировать его на Hyper-V, при этом минимизировав время недоступности сервисов.
Для решения этой задачи я решил воспользоваться программой Disk2VHD от Sysinternals. Disk2VHD умеет конвертировать физические жесткие диски в виртуальные диски формата VHD. Подключив созданные программой VHD-файлы к виртуальной машине, мы получаем полную копию физического сервера со всеми установленными ролями, приложениями и настройками.
При создании VHD программа использует службу теневого копирования (Volume Shadow Copy Service, VSS), что позволяет создавать образ диска прямо на работающей машине, без необходимости ее остановки. Более того, образ можно создать на том же диске, который вы конвертируете, правда скорость работы при этом будет несколько ниже, чем при использовании другого диска.
Disk2VHD бесплатна, не требует установки и поддерживает все более-менее актуальные операционные системы Microsoft начиная с Windows XP SP2 и Server 2003 SP1, как 32-х так и 64-битные версии. В общем, Disk2VHD оптимальна для решения нашей задачи, по крайней мере в теории. Посмотрим, что покажет практика ?
Создание образа
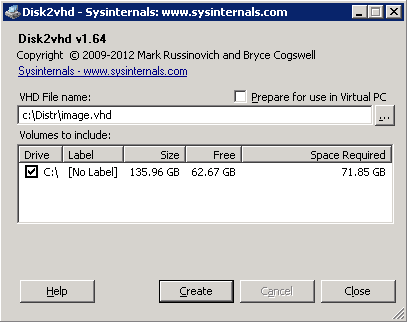
Одним из достоинств Disk2VHD является простота использования. Для того чтобы создать образ, просто загружаем программу на сервер и запускаем ее. В окне программы будут показаны все логические диски, имеющиеся в системе. Отмечаем те из них, которые нужно включить в образ, вводим имя VHD-файла и путь для сохранения, жмем «Create» и ждем, пока образ будет создан.
Если в системе несколько дисков, то для каждого физического диска, содержащего выбранные разделы, создается отдельный VHD-файл. Логическая структура диска при этом не изменится, если он был разбит на несколько логических разделов, то все они будут скопированы и помещены в один VHD-файл. Впрочем, при необходимости отдельные разделы можно исключить из образа. В этом случае разбиение на разделы сохранится, но скопируются только данные, относящиеся к выбранным разделам. Такой подход позволяет, например, включить в образ только системный раздел диска, исключив разделы с данными.
Важно. Если на системном диске есть скрытый раздел, не забудьте добавить его в образ, иначе система не загрузится. Опознать его просто, он не имеет буквы диска.
Disk2VHD может работать как в графическом режиме, так и из командной строки. Например, сконвертировать диск C: можно командой:
disk2vhd C: C:DistrImage.vhd
А так сконвертируются все диски, имеющиеся на сервере:
disk2vhd * C:DistrImage.vhd
Подключение образа
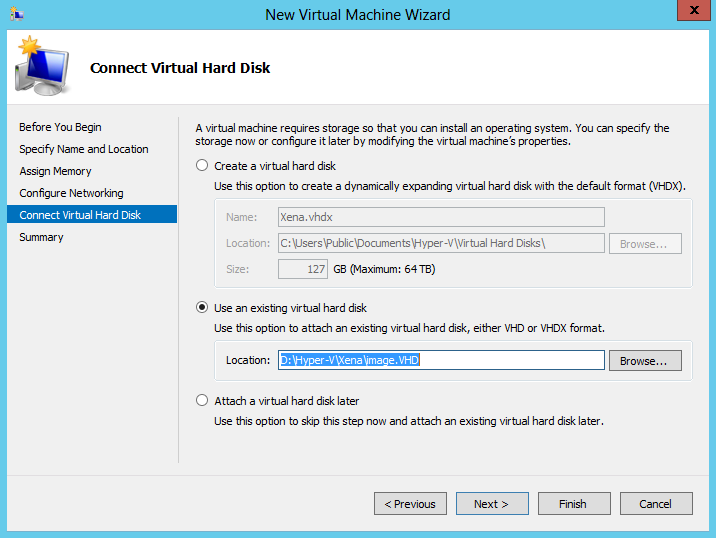
Получившийся образ переносим на сервер Hyper-V. Открываем Hyper-V Manager и запускаем процесс создания новой виртуальной машины. Параметры машины (процессор, память, сеть) устанавливаем в соответствии с характеристиками копируемого физического сервера, а в качестве виртуального диска указываем использовать полученный VHD-файл.
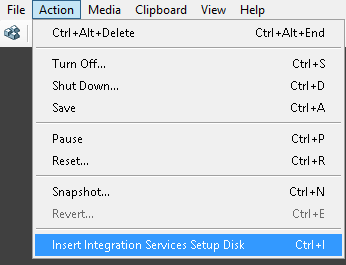
Запускаем виртуальную машину. При первой загрузке система попытается определить и установить драйвера на новое оборудование. Для новых ОС, таких как Windows Server 2012, этот процесс проходит автоматически, в нашем же случае надо перейти в меню Action — Insert Integration Services Setup Disk, после чего вручную запустить установку сервисов интеграции.
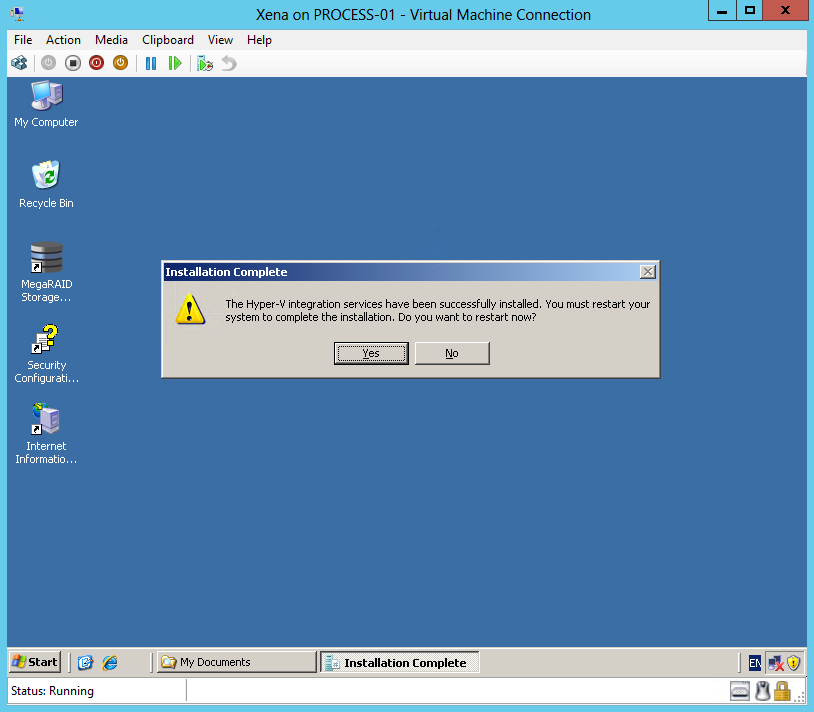
По окончании установки сервисов интеграции система потребует перезагрузки.
После перезагрузки мы получаем готовый к работе сервер. Единственное что еще может потребоваться — настроить параметры сетевого адаптера, в том случае если вы используете статическую адресацию.
Заключение
Программы от Sysinternals выручали меня в различных ситуациях, не подвели и на этот раз. С помощью Disk2VHD сервер успешно смигрировал в виртуальную среду с минимальными потерями. Допускаю, что мне просто повезло и я не столкнулся с проблемами в процессе перехода, однако у меня использование Disk2VHD вызвало только положительные эмоции 🙂
What is the easiest way to convert a Win2003 server to a Hyper-V Virtual machine?
Ideally, I’d like to use a backup tool to create an image across the network.
What is the best way to do this?
asked Dec 18, 2009 at 3:00
Microsoft SysInternals has a utility, Disk2Vhd, which will do this for you. You can run this on a live machine, and it can create a VHD file to an external location, such as a network drive. You can then copy this VHD to where it needs to live on the Hyper-V host, and create a new VM guest using that file.
http://technet.microsoft.com/en-us/sysinternals/ee656415.aspx
answered Dec 18, 2009 at 3:24
Greg AskewGreg Askew
34.7k4 gold badges52 silver badges82 bronze badges
Disk2Vhd works great as a one-off tool (you may have to do some manual fixup to the HAL to get it to boot after converting the physical server to a VHD). If you are looking to do this in an enterprise environment (perhaps P2V-ing and managing multiple virtual servers) you would want to take a look at System Center Virtual Machine Manager 2008 R2 (that’s a mouthful!)
answered Dec 18, 2009 at 3:58
Sean EarpSean Earp
7,2173 gold badges35 silver badges38 bronze badges
| title | description | author | ms.author | ms.manager | ms.topic | ms.date | ms.custom |
|---|---|---|---|---|---|---|---|
|
Prepare Windows Server 2003 servers for migration with Azure Migrate |
Learn how to prepare Windows Server 2003 servers for migration with Azure Migrate. |
vijain |
vijain |
kmadnani |
how-to |
12/12/2022 |
engagement-fy23 |
Prepare Windows Server 2003 machines for migration
This article describes how to prepare machines running Windows Server 2003 for migration to Azure.
[!NOTE]
Windows Server 2003 extended support ended on July 14, 2015. The Azure support team continues to help in troubleshooting issues that concern running Windows Server 2003 on Azure. However, this support is limited to issues that don’t require OS-level troubleshooting or patches. Migrating your applications to Azure instances running a newer version of Windows Server is the recommended approach to ensure that you are effectively leveraging the flexibility and reliability of the Azure cloud. However, if you still choose to migrate your Windows Server 2003 to Azure, you can use the Migration and modernization tool if your Windows Server is a VM running on VMware or Hyper-V.
- You can use agentless migration to migrate Hyper-V VMs and VMware VMs to Azure.
- In order to connect to Azure VMs after migration, Hyper-V Integration Services must be installed on the Azure VM. Windows Server 2003 machines don’t have this installed by default.
- There’s no direct download link to install Hyper-V Integration Services, so you need to do the following:
- For Hyper-V VMs that don’t have it installed, you extract installation files for Integration Services on a machine running Windows Server 2012 R2/Windows Server 2012 with the Hyper-V role, and then copy the installer to the Windows Server 2003 machine. The installation files aren’t available on machines running Windows Server 2016.
- For VMware VMs, you create a startup task that installs Integration Services when the Azure VM starts after migration.
Install on Hyper-V VMs
Before migration, check whether Hyper-V Integration Services is installed, and then install if needed.
- Follow these instructions to check whether it’s installed.
- If it isn’t installed, sign into a machine running Windows Server 2012 R2/Windows Server 2012 with the Hyper-V role.
- Navigate to the installation file at C:WindowsSystem32vmguest.iso, and mount the file.
- Copy the installation folder to the Windows Server 2003 machine, and install Integration Services.
- After installation, you can leave the default settings in Integration Services.
Install on VMware VMs
- Sign into a machine running Windows Server 2012 R2/Windows Server 2012 with the Hyper-V role.
- Navigate to the installation file at C:WindowsSystem32vmguest.iso, and mount the file.
- Copy the installation folder to the VMware VM.
- From the command line on the VM, run
gpedit.msc. - Open Computer Configuration > Windows Settings > Scripts (Startup/Shutdown).
- In Startup > Add > Script Name, type the setup.exe address.
- After migration to Azure, the script runs the first time the Azure VM starts.
- Manually restart the Azure VM. There’s a pop-up in boot diagnostics to indicate that a restart is needed.
- After the script runs and Hyper-V Integration Services is installed on the Azure VM, you can remove the script from startup.
- After installation, you can leave the default settings in Integration Services.
Next steps
- Review migration requirements for VMware and Hyper-V VMs.
- Migrate VMware and Hyper-V VMs.
█ 19.07.2013 07:57
Кто магазинные сервера переносил? 
█ 19.07.2013 14:30
Acronis True Image 9.7 EE with UR
если что могу тебе ссылки выдать на «свеже найденные» версии… с учётом что тебе на разок… я думаю это не сильно тебе попортит карму…
█ 26.07.2013 12:00
переносил виндовым бекапом
█ 05.08.2013 19:17
переносил. и себе и Dim. убираешь сервер из под нагрузки и не останавливая винду запускаешь disk2vhd. создается виртуальный образ того(тех) дисков которых укажешь и куда укажешь в виде файлов. создаешь на принимающей стороне виртуалку и подсовываешь полученные образы в качестве дисков.
запускаешь и ставишь под нагрузку.
какие диски неважно, disk2vhd запускаешь в самой копируемой системе.
ключ — да это проблема, в одном случае я использую usbip с маленьким компом под линуксом в качестве сервера держателя ключей. виртуалки с Win работают клиентами.
█ 07.08.2013 09:47
Цитата:
mamont ➤ … использую usbip с маленьким компом под линуксом в качестве сервера держателя ключей…
можно подробнее ….
█ 10.08.2013 23:08
на обычном компе который живет под столом в серверной стоит ubuntu 10.4 без иксов, на ней из родного репозитория установлен пакет usbip
на старт добавлены моды usbip, usbip_common_mod и демон usbipd
следом добавлена публикация устройств в виде usbip_bind_driver —usbip 2-1
где 2-1 это код устройства увиденный usbip_bind_driver -list
на клиенте скачиваешь пакет usbip_windows, устанавливешь драйвер нового устройства usbip Enumerator, ставишь на запуск при старте компа usbip.exe -a 192.168.1.10 2-1
где ип-адрес а где номер устройства указывают на комп с убунтой
Часовой пояс GMT +3, время: 00:15.
Форум на базе vBulletin®
Copyright © Jelsoft Enterprises Ltd.
В случае заимствования информации гипертекстовая индексируемая ссылка на Форум обязательна.


