- Remove From My Forums
-
Вопрос
-
Хочу полностью поменять железо у своего второго сервера, который сделан как контроллер домена в существующем домене. Установлены роли AD DS, DNS, DHCP, которые «завязаны» с основным сервером. Тут было: http://social.technet.microsoft.com/Forums/ru-RU/WS8ru/thread/20e627be-da85-4130-8dc7-11fd6c8e3b19.
Ещё стоит файловый сервер, но его наличие не критично, всё равно диски с данными буду перемонтировать, на них можно сказать ничего нет. Менять буду практически всё — мать, процессор, память, WS2012 переставлять с одного SSD на
другой. Причина — хочу «поживее» железку и чтобы виртуализация была. Как сделать безболезненный (чтобы активация не слетела и крутить настройки не пришлось) перенос WS2012 с одного SSD на другой? Штатными средствами или сторонними.
Или тупо проинсталлировать с нуля и подымать как было? А основной сервер в этом случае как себя поведёт? Опыта с сервером пока нет, потому и спрашиваю.-
Изменено
26 марта 2013 г. 19:52
-
Изменено
Ответы
-
Хочу полностью поменять железо у своего второго сервера, который сделан как контроллер домена в существующем домене.
Установлены роли AD DS, DNS, DHCP, которые «завязаны» с основным сервером…. Причина — хочу «поживее» железку и
чтобы виртуализация была.Вы хотите на сервере, который будет контроллером домена, поднять ещё и роль Hyper-V? Крайне не рекомендую.
Лучше взять новый «железный» сервер, поднять на нём ТОЛЬКО роль HYPER-V, а уж в одной из его виртуальных машин поднять дополнительный контроллер домена. В виртуалке поднимите всё «с нуля». А потом, когда DC в виртуалке заживёт полной жизнью, опустить имеющийся
второй DC до обычного сервера и вывести из работы.
Сергей Панченко
-
Предложено в качестве ответа
AndricoRusModerator
27 марта 2013 г. 7:37 -
Помечено в качестве ответа
Petko KrushevMicrosoft contingent staff, Moderator
27 марта 2013 г. 12:25
-
Предложено в качестве ответа
![]()
Сообщение от Maks

поднимаю дочерний домен (AD)
В данном случае это никакой не дочерний домен, а дополнительный (2-й, 3-й, n-й…) контролер (DC) для имеющегося домена.
![]()
Сообщение от Maks
через dcpromo передаю ему права главного сервера AD
Передаются не права, а FSMO роли, т.е. новый DC назначается хозяином операций/схемы, а так же: RID, PDC и Infrastructure.
![]()
Сообщение от Афанас
Подскажите каким образом мигрировать полностью на новый сервер не теряя никаких настроек? (по крайней мере каталоги AD. DNS, NAT и т.п. думаю можно будет заново настроить).
В целом же, Maks, посоветовал верно — настраиваете новый сервер и переносите на него нужные роли (кстати DNS-зоны интегрированы в AD базу):
— ставите ОС на новом сервере
— добавляете этот сервер в имеющийся AD домен
— поднимаете на нём ADDS роль и на этапе настройки, выбираете: Add a domain controller to an existing domain (добавить контроллер домена в имеющийся домен)
— дожидаетесь завершения репликации
— передаёте FSMO роли — RID, PDC и Infrastructure — новому DC
— Назначаете новый DC — Operations и Schema Мастером
— Убирает у всех клиентов из настроек IP DNS старого DC
— Убираете роль ADDS у старого DC
Вот здесь подробно показаны все необходимые этапы:
https://blogs.technet.microsof… 2-to-2016/
Updated by
Sherly on Dec 06, 2022
- Duration: 30 minutes — 1 hour.
- Applies to: Migrate Windows Server 2022/2019/2016/2013/2008/2002 to a new HDD/SSD.
Can You Perform a Server OS Migration on the Same Server? Are you looking for a reliable Windows Server migration tool to transfer and upgrade Windows Server to a new disk? Do you want to upgrade the Windows Server OS disk?
You’ll get a complete guide to migrate Windows Server OS to a new disk with success on this page.
# 1. Prepare New Disk for Windows Server OS Migration
In the process of preparing a new disk for Windows Server migration, you may encounter two issues:
- 1. Which type of disk to select?
- 2. How to make the new disk ready?
Let’s first figure out what your goal for Windows Server OS migration is:
- Upgrade Windows Server to a bigger disk, hard disk drives with big storage capacity is what you need.
- To optimize Windows Server running speed, SSDs with sufficient storage capacity should work.
A hard drive with 32GB — 4 TB or SSD with 2-4TB or even bigger storage size is recommended for Windows Server installation.
When you get the disk back, you’ve now come to the next step: getting the new disk ready for Windows Server migration. Here are the steps:
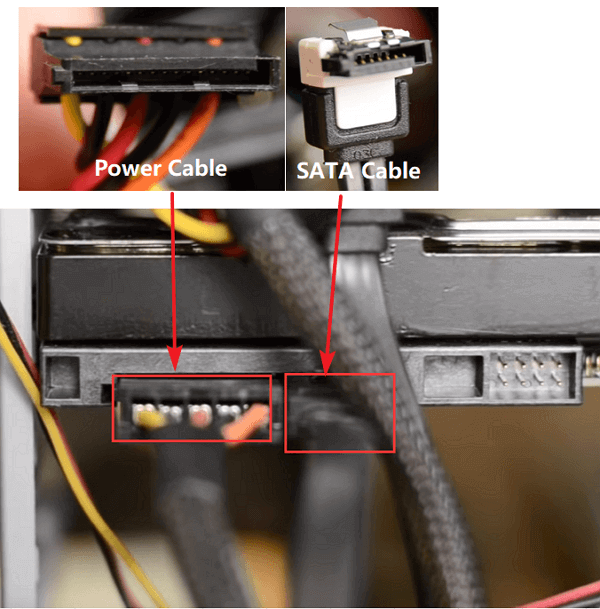
Step 1. Add new disk to Windows Server computer via a SATA cable and a power cable.
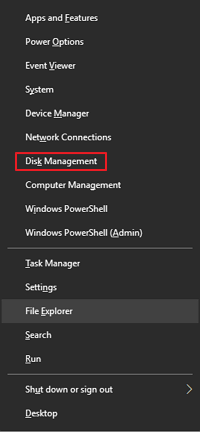
Step 2. Once connected the new disk to your computer, open Disk Management in Windows Server.
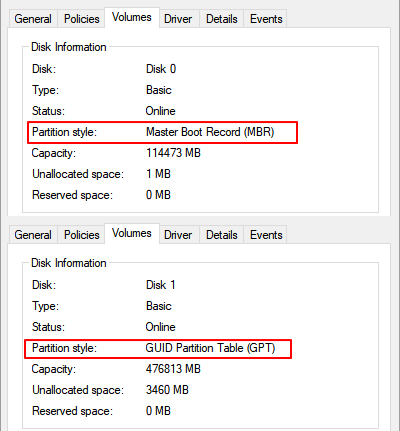
Step 3. Right-click the old system drive and select «Properties», confirm its disk partition style is MBR or GPT.
Step 4. Locate and right-click the new disk, which will display as «Unknown or Not Initialized», and select «Initialize Disk».
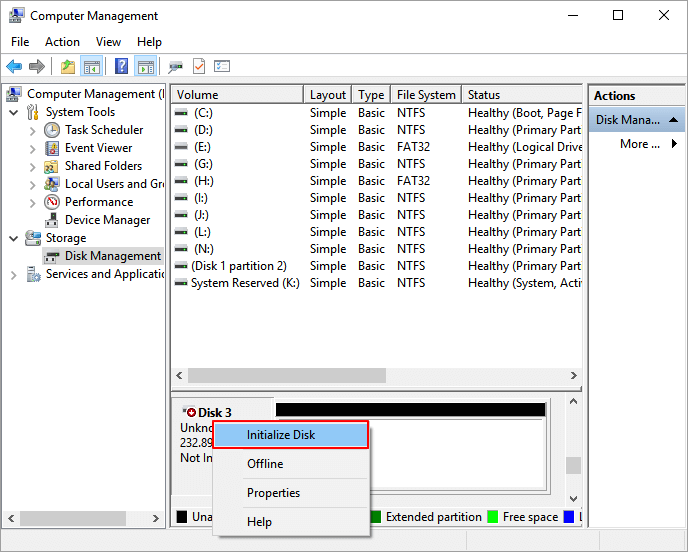
Step 5. Select the disk style for the new disk, make sure it’s the same as the old system disk — MBR or GPT, and click «OK» to confirm.
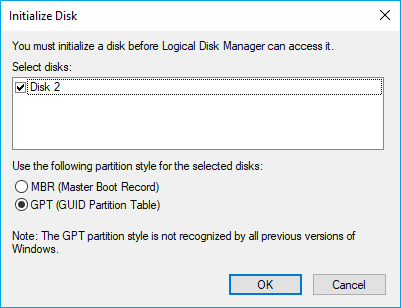
Once done, your new disk is ready for Windows Server migration, and you can move to the next guide for further operation.
#2. Pick and Download Windows Server Migration Tool for Help
Windows Server Manager has Windows Server Migration Tools that you can turn to for help. But this tool only works efficiently in transferring Windows Server system to another computer with a complex operation procedure. And it doesn’t work quite well in updating Windows Server OS within one computer.
To do an in-place upgrade of the Windows Server system disk, you’ll need to turn to a professional system migration tool or software for help.
EaseUS Partition Master Enterprise, with its reliable Migrate OS feature, allows any Windows Server and Windows users to efficiently migrate the operating system to a new hard drive or SSD with success. It requires no technical background to migrate Windows Server to a new HDD/SSD successfully.
EaseUS Partition Master Enterprise
Your trustworthy Windows Server disk manager.
- Extend System drive, combine/split partitions.
- Clone disk, migrate OS to HDD/SSD.
- Convert MBR to GPT, GPT to MBR, no data loss.
- 1-click adjust disk layout, create volumes at one time.
24/7 Tech Chat
Free Inquiry
After installing the Windows Server migration tool on your computer, you can refer to the next guide for system migration between old and new disks.
#3. Migrate Windows Server OS to a New Hard Drive or SSD
Here are the steps that you can follow to migrate your Windows Server system to the newly added hard drive or SSD:
Note: The operation of migrating OS to SSD or HDD will delete and remove existing partitions and data on your target disk when there is not enough unallocated space on the target disk. If you saved important data there, back up them to an external hard drive in advance.
Step 1. Select «Clone» from the left menu. Select the «Migrate OS» and click «Next» to continue..
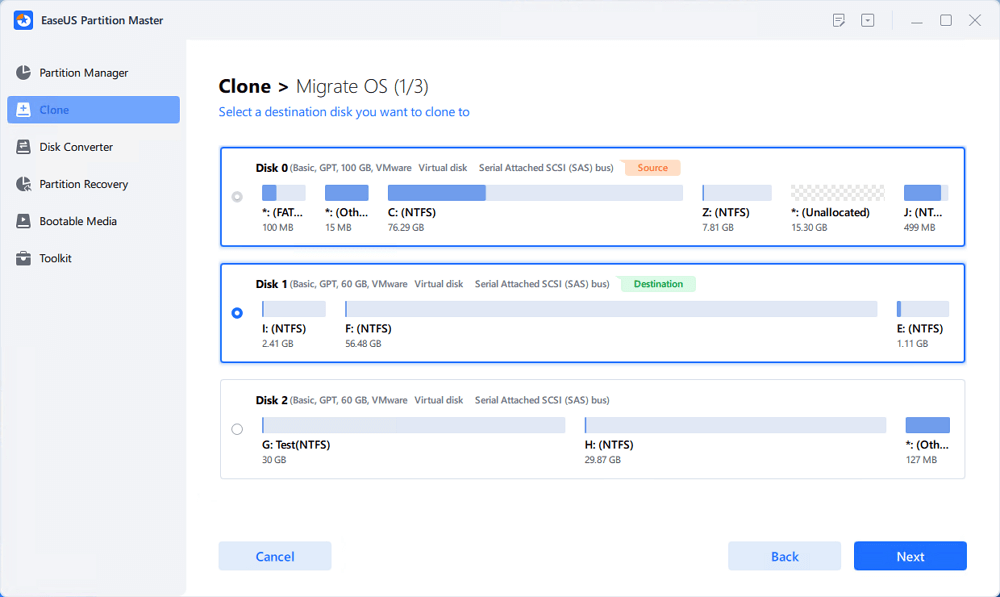
Step 2. Select the target disk you want to clone. Click «Next».
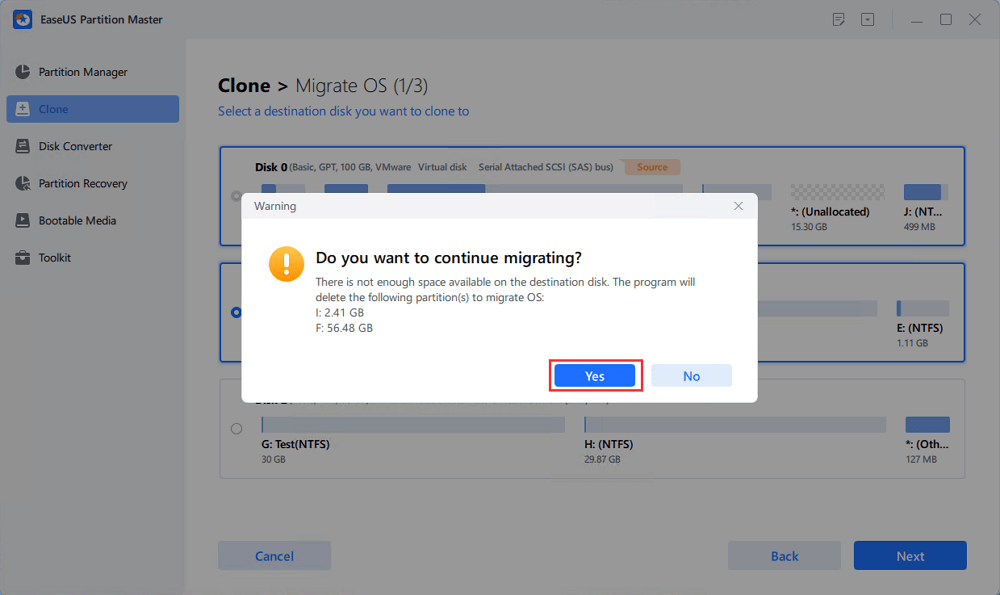
Step 3. Click «Yes» after checking the warning message. The data and partitions on the target disk will be deleted. Make sure that you’ve backed up important data in advance. If not, do it now.
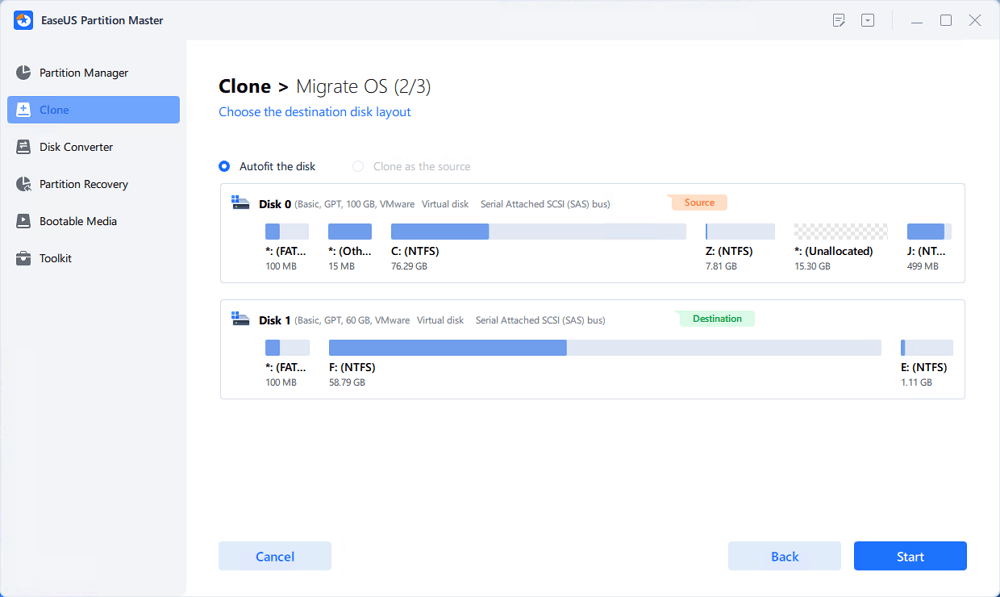
Step 4. Preview the layout of your target disk. You can also click the disk layout options to customize the layout of your target disk as you want. Then click «Start» to start migrating your OS to a new disk
Aside from OS migration, this tool also helps you to:
- Manage hard drive space in Windows Server
- Extend System C drive or fix low disk space error in C drive
- Merge or split hard drive partitions
- Create, format, convert, delete, and even wipe disk partitions
- Recover partitions, 4K align SSD, check and repair disk error, etc.
24/7 Tech Chat
Free Inquiry
When the system migration procedure completes, it’s essential that you enter the Windows Server BIOS settings to configure the system drive boot order. The steps are contained in the next guide.
#4. Set The New Disk as System Boot Drive
Step 1. Reboot Windows Server computer and press the F2/F8 or Del key to enter the BIOS settings.
Step 2. Go to the Boot Menu, find the Boot Order settings section, and click it.
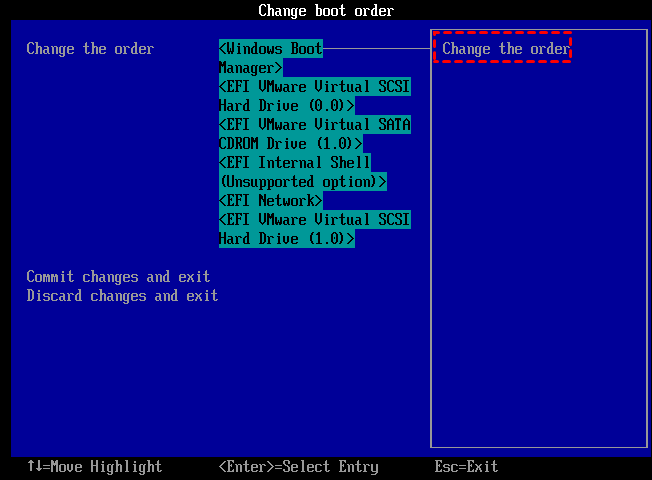
Step 3. Select the priority boot drive as the newly added drive and save the changes.
Step 4. Exit BIOS and restart the computer.
Wait for the computer to boot up and enter your Windows Server systems. When you see the login image, enter your account and password, you can then start using your Server computer on the new disk.
You Can Migrate Windows Server Computer to A New Hard Drive or SSD Now
We simplify the Windows Server OS migration procedure into 4 separate guides on this page.
Always remember, to migrate and configure Windows OS migration to a new disk, you should first prepare the disk, get a reliable OS migration tool like EaseUS Partition Master for help.
24/7 Tech Chat
Free Inquiry
Next, apply EaseUS Partition Master to migrate OS and configure the new disk as the boot drive.
As long as you follow the full guide one by one, you can successfully migrate the Windows Server systems to a new disk and enjoy optimized Server computer performance immediately.
FAQs About Migrate Windows Server to a New HDD/SSD
If you have further questions about migrating the Windows Server system to a new hard drive or SSD, follow and find answers to the listed questions below:
1. Can I move my Windows OS to another hard drive?
Yes, you can move Windows operating system to another hard drive successfully without reinstallation. All you need is to turn to a system migration tool like EaseUS Partition Master with its Migrate OS to SSD or HDD feature for help.
2. How do I move my Server OS?
- First, connect a new disk with equal or larger storage space than the used data size of the Server OS drive.
- Second, initialize the new disk to the same partition style as the Server OS disk — MBR or GPT.
- Third, run a reliable OS migration tool like EaseUS Partition Master to migrate the Server OS.
- Once done, reboot Windows Server and set the computer to boot from the new disk.
3. Can I migrate just my OS to an SSD?
Yes, you can only transfer OS to a new SSD without reinstalling the system on Windows computers. To do so, you’ll just need a new SSD with the same disk type as the OS drive and then migrate the OS to SSD with a reliable OS migration tool like Windows 11 System Migration Software for help. EaseUS Partition Master can fulfill your remands for OS migration between HDDs and SSDs.
Updated by
Sherly on Dec 06, 2022
- Duration: 30 minutes — 1 hour.
- Applies to: Migrate Windows Server 2022/2019/2016/2013/2008/2002 to a new HDD/SSD.
Can You Perform a Server OS Migration on the Same Server? Are you looking for a reliable Windows Server migration tool to transfer and upgrade Windows Server to a new disk? Do you want to upgrade the Windows Server OS disk?
You’ll get a complete guide to migrate Windows Server OS to a new disk with success on this page.
# 1. Prepare New Disk for Windows Server OS Migration
In the process of preparing a new disk for Windows Server migration, you may encounter two issues:
- 1. Which type of disk to select?
- 2. How to make the new disk ready?
Let’s first figure out what your goal for Windows Server OS migration is:
- Upgrade Windows Server to a bigger disk, hard disk drives with big storage capacity is what you need.
- To optimize Windows Server running speed, SSDs with sufficient storage capacity should work.
A hard drive with 32GB — 4 TB or SSD with 2-4TB or even bigger storage size is recommended for Windows Server installation.
When you get the disk back, you’ve now come to the next step: getting the new disk ready for Windows Server migration. Here are the steps:
Step 1. Add new disk to Windows Server computer via a SATA cable and a power cable.
Step 2. Once connected the new disk to your computer, open Disk Management in Windows Server.
Step 3. Right-click the old system drive and select «Properties», confirm its disk partition style is MBR or GPT.
Step 4. Locate and right-click the new disk, which will display as «Unknown or Not Initialized», and select «Initialize Disk».
Step 5. Select the disk style for the new disk, make sure it’s the same as the old system disk — MBR or GPT, and click «OK» to confirm.
Once done, your new disk is ready for Windows Server migration, and you can move to the next guide for further operation.
#2. Pick and Download Windows Server Migration Tool for Help
Windows Server Manager has Windows Server Migration Tools that you can turn to for help. But this tool only works efficiently in transferring Windows Server system to another computer with a complex operation procedure. And it doesn’t work quite well in updating Windows Server OS within one computer.
To do an in-place upgrade of the Windows Server system disk, you’ll need to turn to a professional system migration tool or software for help.
EaseUS Partition Master Enterprise, with its reliable Migrate OS feature, allows any Windows Server and Windows users to efficiently migrate the operating system to a new hard drive or SSD with success. It requires no technical background to migrate Windows Server to a new HDD/SSD successfully.
EaseUS Partition Master Enterprise
Your trustworthy Windows Server disk manager.
- Extend System drive, combine/split partitions.
- Clone disk, migrate OS to HDD/SSD.
- Convert MBR to GPT, GPT to MBR, no data loss.
- 1-click adjust disk layout, create volumes at one time.
24/7 Tech Chat
Free Inquiry
After installing the Windows Server migration tool on your computer, you can refer to the next guide for system migration between old and new disks.
#3. Migrate Windows Server OS to a New Hard Drive or SSD
Here are the steps that you can follow to migrate your Windows Server system to the newly added hard drive or SSD:
Note: The operation of migrating OS to SSD or HDD will delete and remove existing partitions and data on your target disk when there is not enough unallocated space on the target disk. If you saved important data there, back up them to an external hard drive in advance.
Step 1. Select «Clone» from the left menu. Select the «Migrate OS» and click «Next» to continue..
Step 2. Select the target disk you want to clone. Click «Next».
Step 3. Click «Yes» after checking the warning message. The data and partitions on the target disk will be deleted. Make sure that you’ve backed up important data in advance. If not, do it now.
Step 4. Preview the layout of your target disk. You can also click the disk layout options to customize the layout of your target disk as you want. Then click «Start» to start migrating your OS to a new disk
Aside from OS migration, this tool also helps you to:
- Manage hard drive space in Windows Server
- Extend System C drive or fix low disk space error in C drive
- Merge or split hard drive partitions
- Create, format, convert, delete, and even wipe disk partitions
- Recover partitions, 4K align SSD, check and repair disk error, etc.
24/7 Tech Chat
Free Inquiry
When the system migration procedure completes, it’s essential that you enter the Windows Server BIOS settings to configure the system drive boot order. The steps are contained in the next guide.
#4. Set The New Disk as System Boot Drive
Step 1. Reboot Windows Server computer and press the F2/F8 or Del key to enter the BIOS settings.
Step 2. Go to the Boot Menu, find the Boot Order settings section, and click it.
Step 3. Select the priority boot drive as the newly added drive and save the changes.
Step 4. Exit BIOS and restart the computer.
Wait for the computer to boot up and enter your Windows Server systems. When you see the login image, enter your account and password, you can then start using your Server computer on the new disk.
You Can Migrate Windows Server Computer to A New Hard Drive or SSD Now
We simplify the Windows Server OS migration procedure into 4 separate guides on this page.
Always remember, to migrate and configure Windows OS migration to a new disk, you should first prepare the disk, get a reliable OS migration tool like EaseUS Partition Master for help.
24/7 Tech Chat
Free Inquiry
Next, apply EaseUS Partition Master to migrate OS and configure the new disk as the boot drive.
As long as you follow the full guide one by one, you can successfully migrate the Windows Server systems to a new disk and enjoy optimized Server computer performance immediately.
FAQs About Migrate Windows Server to a New HDD/SSD
If you have further questions about migrating the Windows Server system to a new hard drive or SSD, follow and find answers to the listed questions below:
1. Can I move my Windows OS to another hard drive?
Yes, you can move Windows operating system to another hard drive successfully without reinstallation. All you need is to turn to a system migration tool like EaseUS Partition Master with its Migrate OS to SSD or HDD feature for help.
2. How do I move my Server OS?
- First, connect a new disk with equal or larger storage space than the used data size of the Server OS drive.
- Second, initialize the new disk to the same partition style as the Server OS disk — MBR or GPT.
- Third, run a reliable OS migration tool like EaseUS Partition Master to migrate the Server OS.
- Once done, reboot Windows Server and set the computer to boot from the new disk.
3. Can I migrate just my OS to an SSD?
Yes, you can only transfer OS to a new SSD without reinstalling the system on Windows computers. To do so, you’ll just need a new SSD with the same disk type as the OS drive and then migrate the OS to SSD with a reliable OS migration tool like Windows 11 System Migration Software for help. EaseUS Partition Master can fulfill your remands for OS migration between HDDs and SSDs.