How do I Move Windows Server to HDD or SSD
There are many reasons why there is an increasing demand for Windows Server users to transfer Server 2022/2019/2016 to HDD/SSD. Windows Server may run start to lag due to long-term use, so transferring it to a new HDD or SSD enhances the computer OS booting and operating performance.
Also, suppose you just got a new PC, and you want it running with the same operating system server. In that case, you need to transfer Windows Server to the new PC with the aid of an external HDD/SSD device, and sometimes your computer might face different boot issues, migrating the Windows Server OS to HDD/SSD helps you prepare for this.
| Workable Solutions | Step-by-step Troubleshooting |
|---|---|
| Prerequisite: Purchase a New HDD/SSD | The first is to purchase a new HDD/SSD, and the next is to prepare it…Full steps |
| Tutorial: Migrate or Transfer Windows Server | Step 1. Select «Migrate OS» from the top menu. Select the SSD or HDD as the destination disk…Full steps |
| Follow-up: Make Windows Server OS Bootable | Restart your PC with the new HDD/SSD inserted in your computer and press DEL, F1, or F2…Full steps |
A typical Windows user may create the idea of utilizing the copy and paste option for transferring data to a new disk. However, these operations aren’t performed by copying and pasting the Windows Server system and data to a new HDD/SSD. The Server system won’t be bootable using this process.
To effectively migrate Windows Server 2022/2019/2016 to a new HDD/SSD, you need reliable software to perform the task efficiently. Following this tutorial guide to the letter will enable you successfully transfer Windows Server 2022/2019/2016 or older Server system versions to a new hard drive or SSD.
Prerequisite: Purchase a New HDD/SSD and Get It Ready
There are a few measures you need to take before beginning the whole process of transferring Windows Server. The first is to purchase a new HDD/SSD, and the next is to prepare it for the migrating process.
#1. Purchase a New HDD/SSD
The first factor to consider when purchasing a data storage drive is deciding if you need a solid-state drive (SSD) or a hard disk drive (HDD). SSDs perform the same function like any traditional HDD except that they use flash memory in contrast to the spinning metal disk of HDDs. SSDs read/write data faster, consume less power, are noiseless, have a longer lifespan, are more expensive, and have smaller data space than HDDs at any price. If you require as much storage space you can get, and money is a limiting factor, you can go with an HDD.
For most internal drives (HDD/SSD), SATA connectors are used for connectivity, and for external drives, irrespective of whether they are HDDs or SSDs, they connect to your system through a USB port. HDDs cap out 18TB per drive storage space due to physical limitations, while consumer-grade SSDs maxes around 5 – 8TB per drive. However, SSDs are very efficient data read/write and possess higher RPM for quick data transfer to and from the drive.
Depending on what suits you, you can make your choice, as both HDDs and SSDs are sufficient for transferring Windows Server 2022/2019/2016.
#2. Initialize New HDD/SSD to Get It Ready
After purchasing your HDD/SSD, the next action is to get it ready by connecting it with your computer and initializing it with disk management. Here’s how to get started:
- Turn off your computer and insert the HDD/SSD through the SATA and power cable. Once done, restart the computer.
- Press the «Windows + R» key from your keyboard and type «diskmgmt.msc». Click OK or tap the Enter key to run Disk Management.
- Locate and right-click the HDD or SSD and click «Initialize Disk.» Should the disk be listed as offline, right-click it and select online.
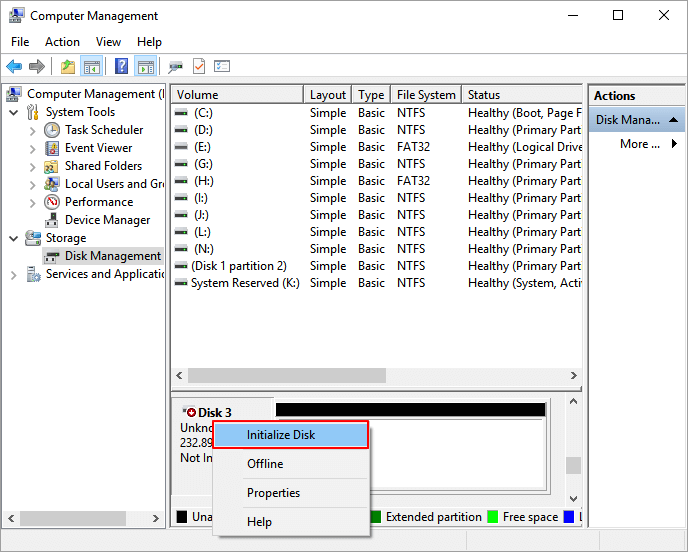
- From the Initialize Disk dialogue window, please choose the appropriate disk to initialize and click OK to use the source partition or adjust the partition style by converting it to MBR or GPT.
With the above process, the HDD/SSD is initialized with ready to use.
Tutorial: Migrate or Transfer Windows Server 2022/2019/2016 to HDD/SSD
To reiterate, you need a third-party tool to migrate or transfer Windows Server to HDD/SSD effectively. One such tool available for you is the EaseUS Partition Master Enterprise Edition. The EaseUS Partition Master Enterprise Edition is embedded with vital features that serve users’ disk management demands.
EaseUS Partition Master Enterprise
Your trustworthy Windows Server disk manager.
- Extend System drive, combine/split partitions.
- Clone disk, migrate OS to HDD/SSD.
- Convert MBR to GPT, GPT to MBR, no data loss.
- 1-click adjust disk layout, create volumes at one time.
24/7 Tech Chat
Free Inquiry
You can apply its Migrate OS feature to successfully transfer your Windows Server operating system to a new disk with a few easy clicks without reinstalling Windows Server.
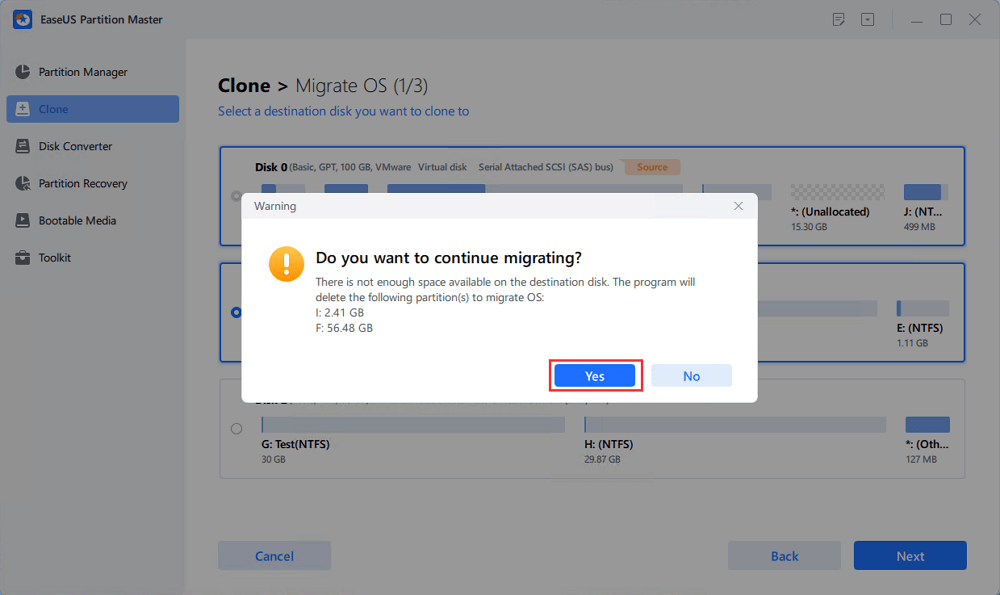
Note: The operation of migrating OS to SSD or HDD will delete and remove existing partitions and data on your target disk when there is not enough unallocated space on the target disk. If you saved important data there, back up them to an external hard drive in advance.
Step 1. Select «Clone» from the left menu. Select the «Migrate OS» and click «Next» to continue..
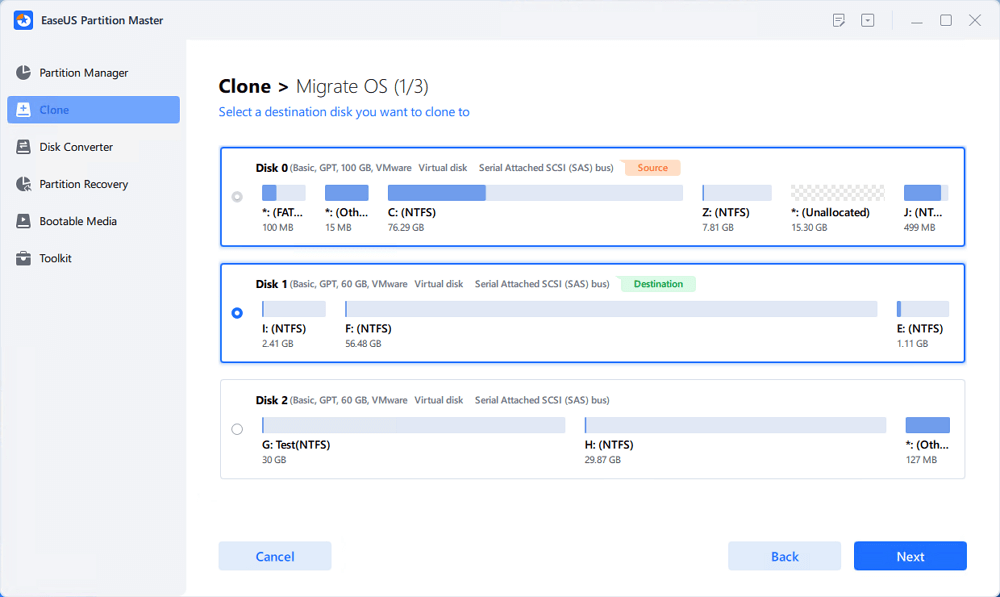
Step 2. Select the target disk you want to clone. Click «Next».
Step 3. Click «Yes» after checking the warning message. The data and partitions on the target disk will be deleted. Make sure that you’ve backed up important data in advance. If not, do it now.
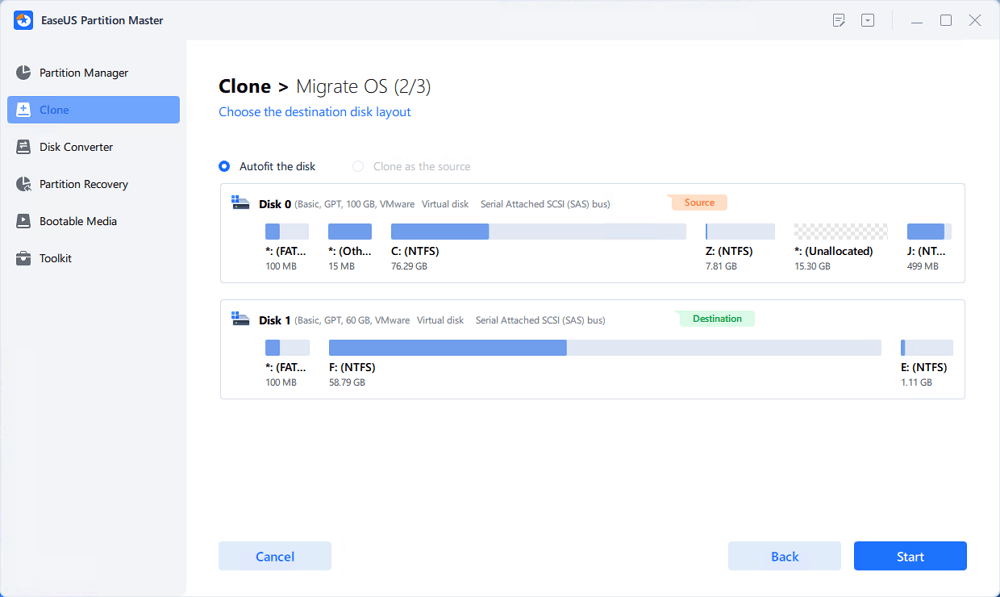
Step 4. Preview the layout of your target disk. You can also click the disk layout options to customize the layout of your target disk as you want. Then click «Start» to start migrating your OS to a new disk
Alongside OS migration, EaseUS Partition Master Enterprise can also wholly clone your disk and replace an outdated or damaged disk with a new one in a few simple clicks.
This software is fully compatible with Windows Server 2022, 2019, 2016, 2012 (R2), 2011, 2008 (R2), and 2003. Personal Windows Server users can directly download and install this software for easy and effective migration of Windows Server to a new HDD/SSD.
24/7 Tech Chat
Free Inquiry
Follow-up: Make Windows Server OS Bootable in New Disk
To finalize the whole Windows Server migrating process, you must ensure that the new hard disk drive (HDD) or solid-state drive (SSD) with the transferred OS is the boot drive in BIOS settings. Performing this task will enable your computer to boot the Windows Server OS from the new HDD/SSD. Here’s an easy guide to carrying out this task.
- Restart your PC with the new HDD/SSD inserted in your computer and press DEL, F1, or F2 (varies with different manufacturers) to enter the BIOS setup.
- Click on Boot located at the top bar of the setup menu to display the boot sequence.
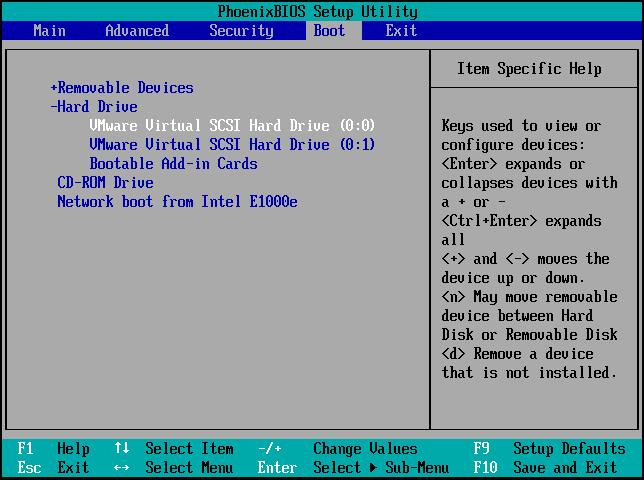
- Set the boot order by using the required key given on your system to set the sequence your device boots for an operating system.
- Set your order to boot from the new disk drive first.
- Press F10 to save the BIOS changes.
- Click Yes in the confirmation prompt to confirm your changes.
Start the computer with the new boot sequence. BIOS will boot from the new hard disk drive or SSD and to the next device on the boot order.
Conclusion
This guide explained the essential steps required in transferring Windows Server 2022/2019/2016 to HDD/SSD. We implored users to use the reliable Server Migrating software – EaseUS Partition Master Enterprise Edition to help perform the migration process. Also, users should make sure that their new drive is initialized and set to boot from BIOS after transferring the Windows OS. We hope you find the vista in this guide very useful as you embark on your Windows OS migrating task.
24/7 Tech Chat
Free Inquiry
FAQs About Transfer Windows Server System to HDD/SSD
If you have more questions on transferring Windows Server system to a new HDD or SSD disk, refer to the questions and find answers here below:
1. What SSDs are used in Server?
There are three types of SSDs that are widely used in Windows Servers: SATA (Serial Advanced Technology Attachment) SSD, SAS (Serial Attached SCSI) SSD, and NVMe (Non-Volatile Memory Express) SSD.
2. Can you put SSDs in a Server?
Yes, sure. Here are the steps to install a new SSD to Windows Server computer:
- Shut down the Windows Server computer.
- Open the computer case, and collect the SSD to PC.
- For SATA or SAS SSD, connect it to PC via Power Cable and SATA cable. For NVMe, find the SSD slot, slide in NVMe SSD and lock it by fasten its srews.
- Restart Windows Server and initialize SSD on computer in Disk Management.
- Then, you can use it to clone disk, migrate OS, or create new partitions on it to store files.
3. Are SSD better for Servers?
Compare the performance between HDDs and SSDs for Windows Server systems, SSD is faster in reading and reading files, while HDD is slower.Also, SSD is more stable to run programs and systems on it. However, the biggest thing that may attract Server usres to use HDDs could be the price. HDDs with larger storage capacity is cheaper than SSDs.
So, if you tend to use SSDs for operating systems, yes, SSD is better for Servers. As for data storage, HDD is better for Servers.
How do I Move Windows Server to HDD or SSD
There are many reasons why there is an increasing demand for Windows Server users to transfer Server 2022/2019/2016 to HDD/SSD. Windows Server may run start to lag due to long-term use, so transferring it to a new HDD or SSD enhances the computer OS booting and operating performance.
Also, suppose you just got a new PC, and you want it running with the same operating system server. In that case, you need to transfer Windows Server to the new PC with the aid of an external HDD/SSD device, and sometimes your computer might face different boot issues, migrating the Windows Server OS to HDD/SSD helps you prepare for this.
| Workable Solutions | Step-by-step Troubleshooting |
|---|---|
| Prerequisite: Purchase a New HDD/SSD | The first is to purchase a new HDD/SSD, and the next is to prepare it…Full steps |
| Tutorial: Migrate or Transfer Windows Server | Step 1. Select «Migrate OS» from the top menu. Select the SSD or HDD as the destination disk…Full steps |
| Follow-up: Make Windows Server OS Bootable | Restart your PC with the new HDD/SSD inserted in your computer and press DEL, F1, or F2…Full steps |
A typical Windows user may create the idea of utilizing the copy and paste option for transferring data to a new disk. However, these operations aren’t performed by copying and pasting the Windows Server system and data to a new HDD/SSD. The Server system won’t be bootable using this process.
To effectively migrate Windows Server 2022/2019/2016 to a new HDD/SSD, you need reliable software to perform the task efficiently. Following this tutorial guide to the letter will enable you successfully transfer Windows Server 2022/2019/2016 or older Server system versions to a new hard drive or SSD.
Prerequisite: Purchase a New HDD/SSD and Get It Ready
There are a few measures you need to take before beginning the whole process of transferring Windows Server. The first is to purchase a new HDD/SSD, and the next is to prepare it for the migrating process.
#1. Purchase a New HDD/SSD
The first factor to consider when purchasing a data storage drive is deciding if you need a solid-state drive (SSD) or a hard disk drive (HDD). SSDs perform the same function like any traditional HDD except that they use flash memory in contrast to the spinning metal disk of HDDs. SSDs read/write data faster, consume less power, are noiseless, have a longer lifespan, are more expensive, and have smaller data space than HDDs at any price. If you require as much storage space you can get, and money is a limiting factor, you can go with an HDD.
For most internal drives (HDD/SSD), SATA connectors are used for connectivity, and for external drives, irrespective of whether they are HDDs or SSDs, they connect to your system through a USB port. HDDs cap out 18TB per drive storage space due to physical limitations, while consumer-grade SSDs maxes around 5 – 8TB per drive. However, SSDs are very efficient data read/write and possess higher RPM for quick data transfer to and from the drive.
Depending on what suits you, you can make your choice, as both HDDs and SSDs are sufficient for transferring Windows Server 2022/2019/2016.
#2. Initialize New HDD/SSD to Get It Ready
After purchasing your HDD/SSD, the next action is to get it ready by connecting it with your computer and initializing it with disk management. Here’s how to get started:
- Turn off your computer and insert the HDD/SSD through the SATA and power cable. Once done, restart the computer.
- Press the «Windows + R» key from your keyboard and type «diskmgmt.msc». Click OK or tap the Enter key to run Disk Management.
- Locate and right-click the HDD or SSD and click «Initialize Disk.» Should the disk be listed as offline, right-click it and select online.
- From the Initialize Disk dialogue window, please choose the appropriate disk to initialize and click OK to use the source partition or adjust the partition style by converting it to MBR or GPT.
With the above process, the HDD/SSD is initialized with ready to use.
Tutorial: Migrate or Transfer Windows Server 2022/2019/2016 to HDD/SSD
To reiterate, you need a third-party tool to migrate or transfer Windows Server to HDD/SSD effectively. One such tool available for you is the EaseUS Partition Master Enterprise Edition. The EaseUS Partition Master Enterprise Edition is embedded with vital features that serve users’ disk management demands.
EaseUS Partition Master Enterprise
Your trustworthy Windows Server disk manager.
- Extend System drive, combine/split partitions.
- Clone disk, migrate OS to HDD/SSD.
- Convert MBR to GPT, GPT to MBR, no data loss.
- 1-click adjust disk layout, create volumes at one time.
24/7 Tech Chat
Free Inquiry
You can apply its Migrate OS feature to successfully transfer your Windows Server operating system to a new disk with a few easy clicks without reinstalling Windows Server.
Note: The operation of migrating OS to SSD or HDD will delete and remove existing partitions and data on your target disk when there is not enough unallocated space on the target disk. If you saved important data there, back up them to an external hard drive in advance.
Step 1. Select «Clone» from the left menu. Select the «Migrate OS» and click «Next» to continue..
Step 2. Select the target disk you want to clone. Click «Next».
Step 3. Click «Yes» after checking the warning message. The data and partitions on the target disk will be deleted. Make sure that you’ve backed up important data in advance. If not, do it now.
Step 4. Preview the layout of your target disk. You can also click the disk layout options to customize the layout of your target disk as you want. Then click «Start» to start migrating your OS to a new disk
Alongside OS migration, EaseUS Partition Master Enterprise can also wholly clone your disk and replace an outdated or damaged disk with a new one in a few simple clicks.
This software is fully compatible with Windows Server 2022, 2019, 2016, 2012 (R2), 2011, 2008 (R2), and 2003. Personal Windows Server users can directly download and install this software for easy and effective migration of Windows Server to a new HDD/SSD.
24/7 Tech Chat
Free Inquiry
Follow-up: Make Windows Server OS Bootable in New Disk
To finalize the whole Windows Server migrating process, you must ensure that the new hard disk drive (HDD) or solid-state drive (SSD) with the transferred OS is the boot drive in BIOS settings. Performing this task will enable your computer to boot the Windows Server OS from the new HDD/SSD. Here’s an easy guide to carrying out this task.
- Restart your PC with the new HDD/SSD inserted in your computer and press DEL, F1, or F2 (varies with different manufacturers) to enter the BIOS setup.
- Click on Boot located at the top bar of the setup menu to display the boot sequence.
- Set the boot order by using the required key given on your system to set the sequence your device boots for an operating system.
- Set your order to boot from the new disk drive first.
- Press F10 to save the BIOS changes.
- Click Yes in the confirmation prompt to confirm your changes.
Start the computer with the new boot sequence. BIOS will boot from the new hard disk drive or SSD and to the next device on the boot order.
Conclusion
This guide explained the essential steps required in transferring Windows Server 2022/2019/2016 to HDD/SSD. We implored users to use the reliable Server Migrating software – EaseUS Partition Master Enterprise Edition to help perform the migration process. Also, users should make sure that their new drive is initialized and set to boot from BIOS after transferring the Windows OS. We hope you find the vista in this guide very useful as you embark on your Windows OS migrating task.
24/7 Tech Chat
Free Inquiry
FAQs About Transfer Windows Server System to HDD/SSD
If you have more questions on transferring Windows Server system to a new HDD or SSD disk, refer to the questions and find answers here below:
1. What SSDs are used in Server?
There are three types of SSDs that are widely used in Windows Servers: SATA (Serial Advanced Technology Attachment) SSD, SAS (Serial Attached SCSI) SSD, and NVMe (Non-Volatile Memory Express) SSD.
2. Can you put SSDs in a Server?
Yes, sure. Here are the steps to install a new SSD to Windows Server computer:
- Shut down the Windows Server computer.
- Open the computer case, and collect the SSD to PC.
- For SATA or SAS SSD, connect it to PC via Power Cable and SATA cable. For NVMe, find the SSD slot, slide in NVMe SSD and lock it by fasten its srews.
- Restart Windows Server and initialize SSD on computer in Disk Management.
- Then, you can use it to clone disk, migrate OS, or create new partitions on it to store files.
3. Are SSD better for Servers?
Compare the performance between HDDs and SSDs for Windows Server systems, SSD is faster in reading and reading files, while HDD is slower.Also, SSD is more stable to run programs and systems on it. However, the biggest thing that may attract Server usres to use HDDs could be the price. HDDs with larger storage capacity is cheaper than SSDs.
So, if you tend to use SSDs for operating systems, yes, SSD is better for Servers. As for data storage, HDD is better for Servers.
- Remove From My Forums
-
Вопрос
-
Имеем Server 2016 Standart, на нем понята Hyper-v с 3 виртуальными машинами, 2012 сервер контроллер домена + 2 виртуалки 2016 с удаленными рабочими столами, задача перенести все это вместе
на новый сервер, как удобнее это сделать?
Ответы
-
Система покупалась отдельно, т.е проблем быть не должно?
Какой у вас тип лицензии? Если ОЕМ, то она не переносима, даже если и закупалась отдельно (что нормально на серверных ОС хотя и недопустимо на клиентских).
Проверить тип лицензии можно запустив такую команду:
slmgr /dlv
This posting is provided «AS IS» with no warranties, and confers no rights.
-
Помечено в качестве ответа
28 мая 2019 г. 7:54
-
Помечено в качестве ответа
-
#1
Всем привет,
Планирую перенести одиночный сервер Exchange 2016 на другое железо, возможно даже в ВМ на Hyper-V (Windows Server 2016). Прошу совета как это лучше сделать или киньте ссылкой где это описано.
Текущий Exchange 2016 CU10 развернут на Windows Server 2016.
Пока вижу два сценария миграции
- Чистая установка с подключением старой базы, но пугает как перенастроить “хвосты” от старой системы.
- Восстановление из бекапа на новом железе, наверняка тоже есть какие то нюансы..
-
#2
Можно, поставить еще один Exchange, создать группу доступности, перенести активную копию БД на новый сервер и старый выпилить
-
#3
Всем привет,
Планирую перенести одиночный сервер Exchange 2016 на другое железо, возможно даже в ВМ на Hyper-V (Windows Server 2016). Прошу совета как это лучше сделать или киньте ссылкой где это описано.
Текущий Exchange 2016 CU10 развернут на Windows Server 2016.
Пока вижу два сценария миграции
- Чистая установка с подключением старой базы, но пугает как перенастроить “хвосты” от старой системы.
- Восстановление из бекапа на новом железе, наверняка тоже есть какие то нюансы..
Вам может пригодиться вот эта тема
-
#4
Чистая установка с подключением старой базы, но пугает как перенастроить “хвосты” от старой системы.
Можно почистить мусор от старого Exchange в active directory но это плохая практика.
Восстановление из бекапа на новом железе, наверняка тоже есть какие то нюансы..
А бэкап чем сделан ?

-
#5
Скорее всего будет сценарий сосуществования старого и нового Exchange. Сначала делаем full бэкап, лучше еще иметь отдельно резервную копию БД Exchange.
Я бы попробовал поставить еще один сервер «рядом» с проблемным Exchange, такой же версии. Далее попробовал объединить их в группу доступности. Прочтите тему которую вам посоветовали..
Далее нужно собрать группу доступности и выбрать свидетеля, поскольку серверов у меня четное число -2.
Собираю DAG
New-DatabaseAvailabilityGroup -Name DAG16 -WitnessServer filesrv.rew.local -WitnessDirectory C:Witness16Теперь хотелось бы написать про имена серверов что бы было понятнее что происходит.
mail.rew.local — это почтовый сервер exchange 2010
mail1.rew.local — это почтовый сервер exchange 2016
mail2.rew.local — это почтовый сервер exchange 2016Теперь добавляю сервера в DAG
Код:
Add-DatabaseAvailabilityGroupServer -Identity DAG16 -MailboxServer MAIL1
Add-DatabaseAvailabilityGroupServer -Identity DAG16 -MailboxServer MAIL2Проверяю все ли успешно
Get-DatabaseAvailabilityGroup DAG16 -StatusТеперь реплики баз
Код:
Add-MailboxDatabaseCopy «REWMailbox» -MailboxServer mail2
Add-MailboxDatabaseCopy «REWArchive» -MailboxServer mail1
-
#6
Ну и да скорее всего будут перерывы работе.. и тд. Миграцию надо планировать
-
#7
Всем привет,
Планирую перенести одиночный сервер Exchange 2016 на другое железо, возможно даже в ВМ на Hyper-V (Windows Server 2016). Прошу совета как это лучше сделать или киньте ссылкой где это описано.
Текущий Exchange 2016 CU10 развернут на Windows Server 2016.
Пока вижу два сценария миграции
- Чистая установка с подключением старой базы, но пугает как перенастроить “хвосты” от старой системы.
- Восстановление из бекапа на новом железе, наверняка тоже есть какие то нюансы..
Снять образ акронисом, раскатать в виртуальную машину.
-
#8
Надо знать параметры сервера, объем информации, количество ящиков и тд..
Потом старый сервер выключить (не удалять) — новый включить, проверить где то недельку если ок то старый грохнуть не включая в сеть
-
#9
Можно почистить мусор от старого Exchange в active directory но это плохая практика.
А бэкап чем сделан ?
Стандартными средствами — Windows Server Backup 2016.
Да вы правы, наверное буду смотреть в сторону группы доступности.
А конфликта лицензий не будет у старого и нового exchange ? т.к буду использовать одну лицензию…
Спасибо большое за быстрые ответы
-
#10
Нужно 2 лицензии на server в случае построения DAG, на CAL нет по-моему, то есть сколько было столько и осталось.
-
#11
Надо знать параметры сервера, объем информации, количество ящиков и тд..
Потом старый сервер выключить (не удалять) — новый включить, проверить где то недельку если ок то старый грохнуть не включая в сеть
Акронисом тоже можно, только кофигурация железа изменится и неясно как это повлияет на стабильность, и взлетит ли в итоге?
Ещё на старом сервере есть каки-то подозрения на вирусы… хотя последующие сканирования пока не выявили ничего.
База ~50ГБ, ящиков ~20
-
#12
Нужно 2 лицензии на server в случае построения DAG, на CAL нет по-моему, то есть сколько было столько и осталось.
Можно просто в режиме триала попробовать построить DAG, грубо говоря использовать его для репликации базы Exchange. Затем опять его разломать, ну типа освободить лицензию..
-
#13
Снять образ акронисом, раскатать в виртуальную машину.
а если система повреждена, получите 2 поврежденные системы. Как говорится если смешать банку меда и банку меда то будет 2 банки меда. А если смешать банку меда и банку Г то будет две банки Г
-
#15
Акронисом тоже можно, только кофигурация железа изменится и неясно как это повлияет на стабильность, и взлетит ли в итоге?
Ещё на старом сервере есть каки-то подозрения на вирусы… хотя последующие сканирования пока не выявили ничего.База ~50ГБ, ящиков ~20
тюю. Ну это мало совсем. Мигрируйте на exchange 2019
![]()
Сообщение от Maks

поднимаю дочерний домен (AD)
В данном случае это никакой не дочерний домен, а дополнительный (2-й, 3-й, n-й…) контролер (DC) для имеющегося домена.
![]()
Сообщение от Maks
через dcpromo передаю ему права главного сервера AD
Передаются не права, а FSMO роли, т.е. новый DC назначается хозяином операций/схемы, а так же: RID, PDC и Infrastructure.
![]()
Сообщение от Афанас
Подскажите каким образом мигрировать полностью на новый сервер не теряя никаких настроек? (по крайней мере каталоги AD. DNS, NAT и т.п. думаю можно будет заново настроить).
В целом же, Maks, посоветовал верно — настраиваете новый сервер и переносите на него нужные роли (кстати DNS-зоны интегрированы в AD базу):
— ставите ОС на новом сервере
— добавляете этот сервер в имеющийся AD домен
— поднимаете на нём ADDS роль и на этапе настройки, выбираете: Add a domain controller to an existing domain (добавить контроллер домена в имеющийся домен)
— дожидаетесь завершения репликации
— передаёте FSMO роли — RID, PDC и Infrastructure — новому DC
— Назначаете новый DC — Operations и Schema Мастером
— Убирает у всех клиентов из настроек IP DNS старого DC
— Убираете роль ADDS у старого DC
Вот здесь подробно показаны все необходимые этапы:
https://blogs.technet.microsof… 2-to-2016/
Небольшой мануальчик по переносу операционной системы Windows на новое железо. Подходит для большинства вариантов — замена материнки, замена всего железа кроме hdd, перенос клонированием 1в1 и тд. Целиком и полностью стырен с руборда.
Часть 1
Подготовка операционной системы для переноса на другое железо.
В большинстве случаев достаточно выполнения трех первых пунктов.
- Intel base & Non Intel base matherboard >> Intel base matherboard 1
Перенос операционной системы с одной материнки с процессором Интел или Не Интел на другую материнку с процессором Интел.- Установка драйвера (HAL) — «Компьютер с ACPI»
Если уже стоит такой драйвер, тогда пропускаем.Панель управления > Система > Оборудование > Диспетчер устройств > Компьютер > правой кнопкой по установленному драйверу HAL > Обновить драйвер > Нет, не в этот раз > Установка из указанного места > Не выполнять поиск. Я сам выберу нужный драйвер > Компьютер с ACPI > Далее > Готово!
- Установка драйвера — «Стандартный двухканальный контроллер PCI IDE»
Если уже стоит такой драйвер, тогда пропускаем.Панель управления > Система > Оборудование > Диспетчер устройств > IDE ATA/ATAPI контроллеры > правой кнопкой по установленному IDE-контроллеру > Обновить драйвер > Нет, не в этот раз > Установка из указанного места > Не выполнять поиск. Я сам выберу нужный драйвер > Стандартный двухканальный контроллер PCI IDE > Далее > Готово!
- Удалить в реестре ссылки на старые диски.
Очистить раздел реестра HKEY_LOCAL_MACHINESYSTEMMountedDevices
- Установка драйвера (HAL) — «Компьютер с ACPI»
- Intel base matherboard >> Non Intel base matherboard 2
Если требуется выполнить перенос OS установленой на материнке с процессором Интел на новую материнку с процессором Не Интел.4. Удалить в реестре ссылки на драйвер процессора Интел.
Пуск > Выполнить > Regedit > HKLM > SYSTEM > ControlSet001 > Services > удаляем раздел Intelppm
Повторить для ControlSet002. - IDESATASCSIRAID >> SATASCSIRAID 3
Если на новом железе имеется диск(и) с SATASCSI или на дисках организован RAID — SATASCSI.5. Установить нужные драйвера для этих устройств.
Панель управления > Установка оборудования > Добавление нового устройства > Установка оборудования, выбранного из списка
в ручную > SCSI и RAID контроллеры > Установить с диска.4
Внимание: установить перед переносом, т.е. установить нужные драйвера на старую систему на старом железе, а потом делать перенос. - Перенос системы с современного железа на устаревшее. 5
Просто невероятный случай. Если вы переносите систему с новой материнки на старую мать не поддерживающую APIC (усовершенствованный контроллер прерываний). К слову, такие материнки не выпускаются с 1999-00 гг.6. Устанавливаем драйвер (HAL) — «Стандартный компьютер»
Панель управления > Система > Оборудование > Диспетчер устройств > Компьютер > правой кнопкой по установленному
драйверу HAL > Обновить драйвер > Нет, не в этот раз > Установка из указанного места > Не выполнять поиск. Я сам
выберу нужный драйвер > Стандартный компьютер > Далее > Соглашаемся на перезагрузку > Идём в BIOS > Отключаем APIC.
Комментарии к Первой части
1Трех первых пунктов достаточно.
2И напротив, если перенос выполняется с Non Intel base matherboard >> Intel base matherboard, то этот пункт выполнять не нужно.
3Перенос системы на разноуровневые RAID не возможен. может быть RAID5>IDE>RAID1?
4Если список оборудования не появился, открыть .*inf, найти секцию [ControlFlags] , в этой секции найти ExcludeFromSelect=* , удалить в этой строке * (звездочку).
5Наличие этого условия автоматически отменяет выполнение первого пункта инструкции
######################################################################################################Часть 2
Подготовка железа для принятия клона.
- old HDD >> new HDD
Перенос системы со старого HDD на новый HDD.1. Произвести подготовку системы к переносу по инструкции Часть 1 пункт 3. Клонировать систему подходящей программой.
Внимание: Если по каким-либо причинам вы не выполнили подготовку к переносу, то после переноса,
ни в коем случае не загружайте OS с нового HDD, пока не отключите старый HDD. - old HDD & Zalivka >> new matherboard
Разворачивание клона на новое железо2. Отключите любые сетевые контроллеры.
3. Произвести подготовку системы к переносу по инструкции Часть 1 пункты 1-3(4). Клонировать систему подходящей программой.
Перед проведением процедуры клонирования отключите все HDD, кроме диска на который вы будите проводить клонирование.
Подключайте все остальные диски только после окончания процедуры клонирования.
Внимание: Окончанием процедуры клонирования является успешная Загрузка OS с нового HDD.
До этого момента не подключайте других дисков.
######################################################################################################Часть 3
* Это не окончательная редакция Третьей Части
Универсальный образ или Zalivka.
Употребление sysprep не нужно, не обсуждается и больше не упоминается. 1
- Если образ готовится на реальном железе, тогда:
Отключите все лишние устройства.
В BIOS отключить все onboard устройства. - Если образ готовится в виртуальной машине, тогда:
в VPC или в VMWare не устанавливайте addons. - В обоих случаях выполните следующее:
Отведите для создания «Zalivka» раздел 6-7 Гиг. 2
Установите Windows + Update, Office + Update, Soft.
Не устанавливайте драйвера.
Не устанавливайте Alcohol и DaemonTools.
Не подключайте виртуальные CD-ROM’ы. - Выполните очистку. 3
Очистить C:WINDOWSSYSTEM32dllcache
Очистить C:WINDOWSPrefetch
Очистить C:WINDOWSTemp
Очистить C:Documents and Settings<user>Local SettingsTemp
Очистить C:Documents and Settings<user>Local SettingsTemporary Internet Files
Очистить C:Documents and Settings<user>Local SettingsHistory
Очистить C:Documents and Settings<user>Cookies
Очистить C:Documents and Settings<user>NetHood
Очистить C:Documents and Settings<user>Recent
Очистить C:RECYCLER
Очистить C:System Volume Information
Удалить C:WINDOWSWindows Update.log 4
Категорически не рекомендуется удалять папки оставшиеся после установки Update и Office. 5 - Выполнить дефрагментацию.
- Проведите настройку согласно инструкции Часть 1 пункты 1-3(4).
- Сохранить готовую и настроенную систему в образ.
Комментарии к Третьей части
1Sysprep в самом процессе подготовки к клонированию не участвует. Sysprep нужен для EULAOEM.
2Больший размер не нужен для сохранения возможности разворачивать клон на небольшие разделы или диски. Но и меньший размер не желателен, по соображениям оптимального расположения таблицы MFT.
3Очистка этих директорий нужна для сохранения вашей конфиденциальности (например вы админите на предприятии, или установщик в сервисном). Если вас конфиденциальность не беспокоит, тогда очистка данных директорий на ваше усмотрение.
4При обращении на WindowsUpdate в логе пишется дата и версия Биос.
5Категорически не рекомендуется. Места много не сэкономите, но в будущем траблы будут. Проверено.
######################################################################################################Часть 4
Решение проблем.
Q. После клонирования не могу сменить HAL с «Стандартный компьютер» или «Компьютер с ACPI» на другой.
A. Удалите в C:WINDOWSinfhal.pnfQ. Сгорела мать и т.п. , в результате подготовить систему к переносу не могу. На новом железе получаю ошибку 0х7b. Что делать?
A. by Artyk
Тут рег-файл устанавливающий драйвер «Стандартный двухканальный контроллер PCI IDE» . - Если образ готовится на реальном железе, тогда: