After upgrading to a new SSD, you may encounter SSD won’t boot issue. Or due to some reasons, you may come across SSD not booting issue. This article will show you 5 ways to fix SSD won’t boot issue.
When Windows won’t boot from SSD Windows 10, you may wonder: how this problem occurs? what are the reasons? Generally, there are some causes that will lead to SSD not booting. The below has list the most possible reasons to SSD won’t boot issue. Let’s check them out.
Reasons for SSD Won’t Boot
Here are some reasons for SSD not booting. Knowing the reasons, you can always find a solution for your SSD not booting.
- SSD not booting after cloned from HDD
- The SSD was not the first boot device
- The system partition is not active
- The file system of C drive may become corrupt or damaged.
- The System files are damaged
Solution 1. Migrate System Disk with Professional Software if Cloned SSD Won’t Boot
If your cloned SSD won’t boot Windows 10, you can try using MiniTool Partition Wizard Pro Ultimate to migrate OS to SSD, which is a professional system disk migration tool.
As a professional system migration tool, MiniTool Partition Wizard will not only copy all the data on system disk to your SSD, but also it will automatically fix and update the boot information and parameters, which puts an end to SSD not booting issues’ occurrence.
Besides, MiniTool Partition Wizard is an all-in-one partition manager, which enables you to manage SSD partitions in a flexible way. It’s features like align all partitions (for SSD alignment), convert MBR to GPT are very useful for SSD users.
Next, let’s see how to migrate Windows 10 to SSD with MiniTool Partition Wizard.
Step 1. Get MiniTool Partition Wizard by clicking the following button. Install it on your computer to open the main interface.
Buy Now
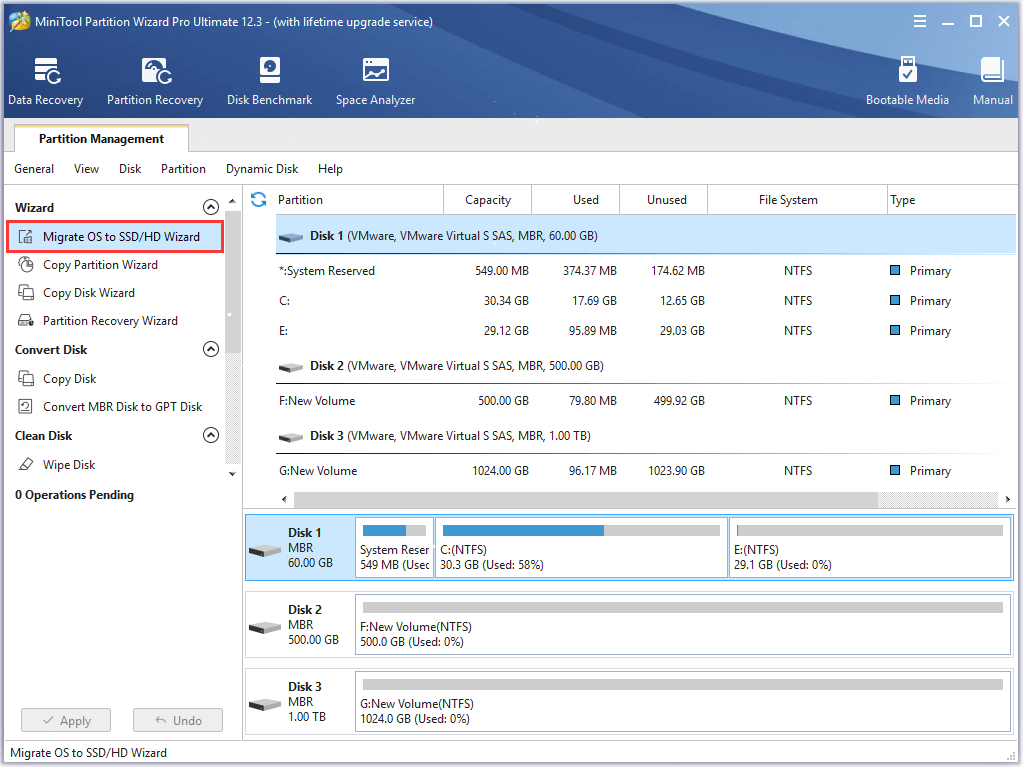
Step 2. Choose the function Migrate OS to SSD/HD Wizard from the left panel.
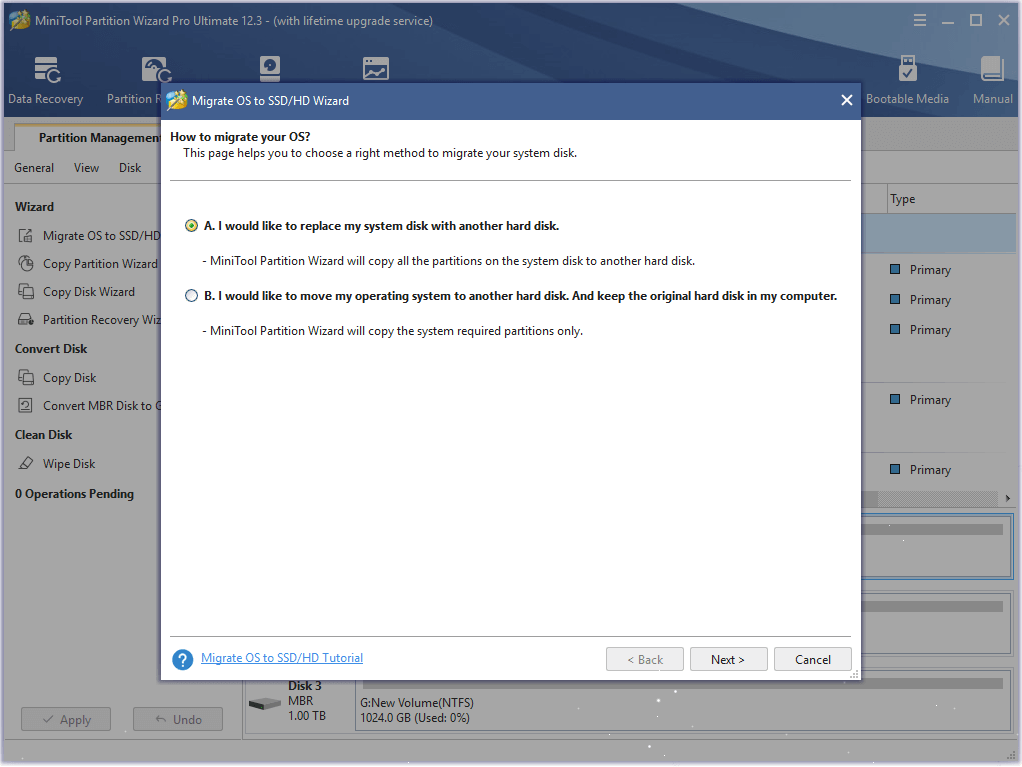
Step 3. Here are two ways for you to migrate. You can choose to migrate OS only or migrate the whole system disk, and then click Next button to continue. Here I choose to migrate the whole disk.
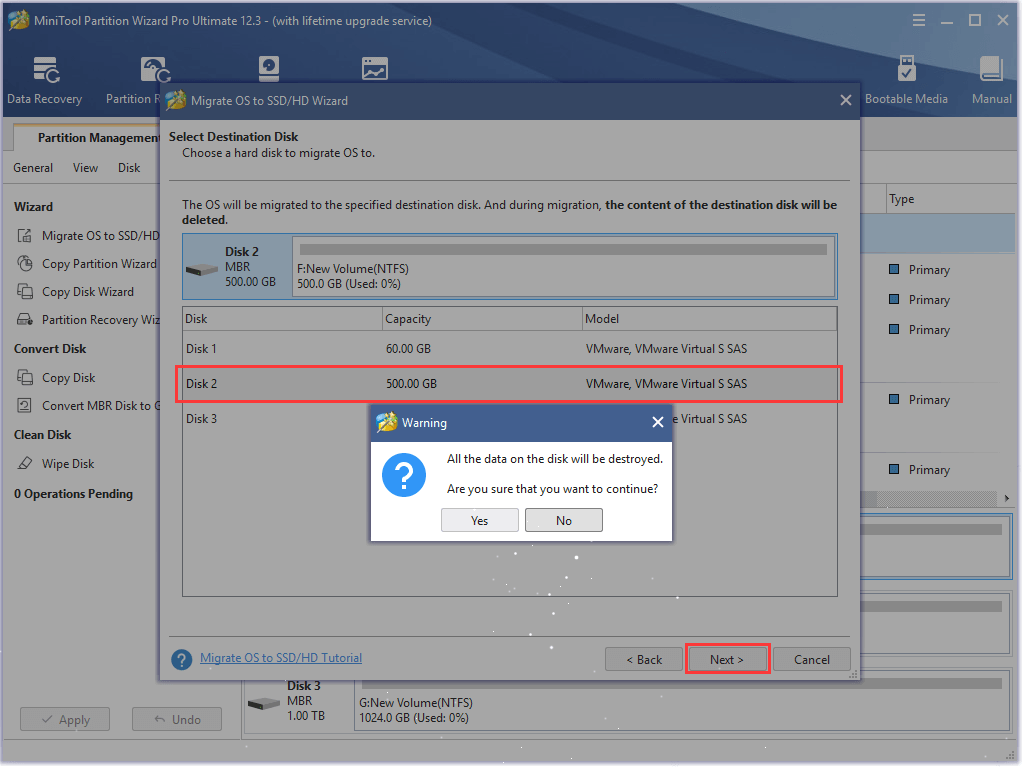
Step 4. Select the destination SSD disk to migrate OS to and click Next. Be aware that the target disk will get overwritten, so a backup in advance might be necessary.
Step 5. Here you are able to edit partition size and location of every partition on the SSD. After you set up everything, click Next.
Note: There is an option “Align partitions to 1MB” which is checked by default. With it checked, all partitions on SSD will be aligned automatically so that performance can be improved largely.

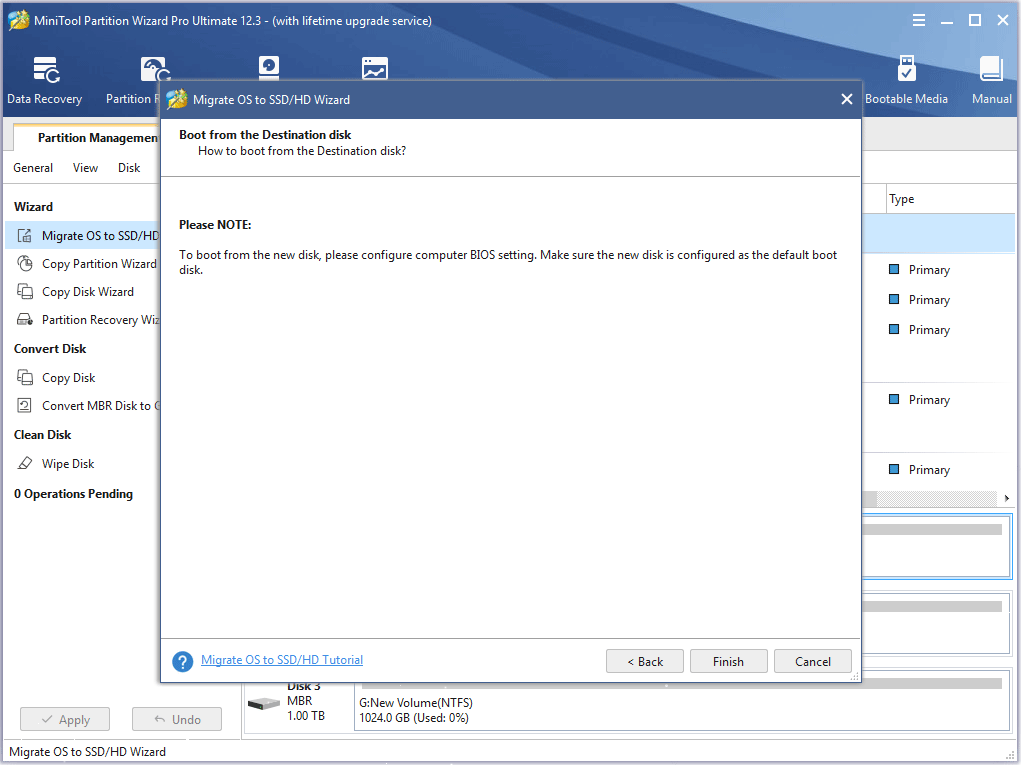
Step 6. This page will tell you how to boot from the SSD. You need to enter BIOS to set the SSD as the first boot device and click Finish to go back to the main interface.
Step 7. Click Apply button on the upper left corner to allow the pending operations.
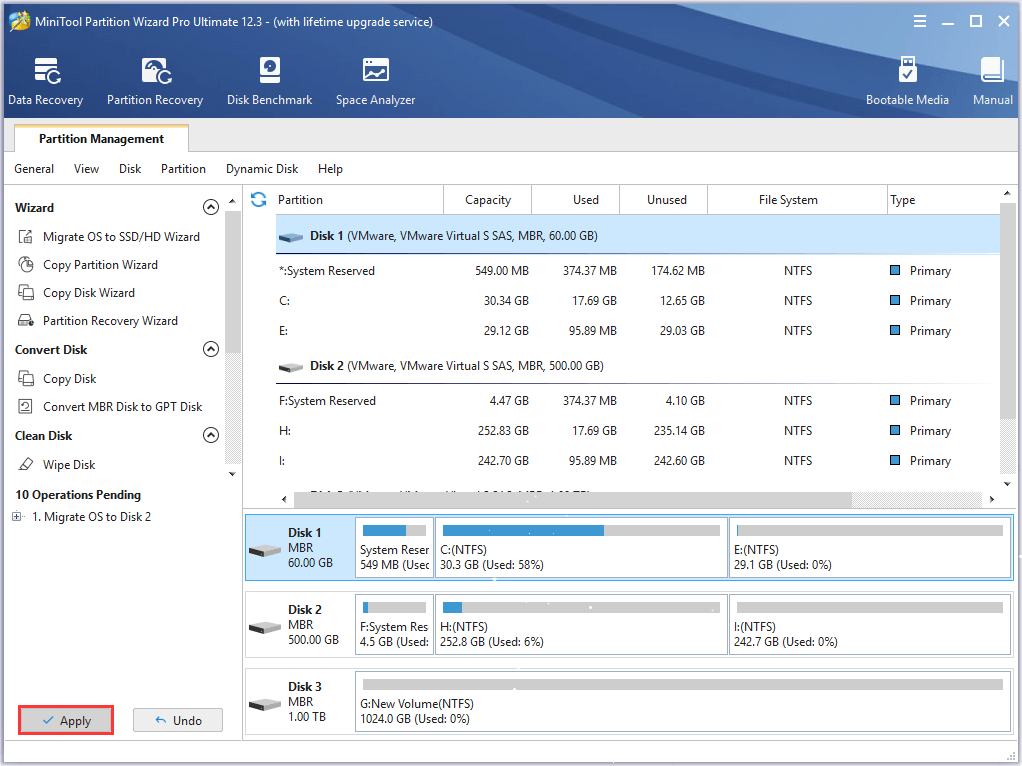
After clicking Apply, MiniTool Partition Wizard will ask for a restart, which is to protect system and data. You just need to click Restart Now, and then all changes will be made in boot mode.
Solution 2. Set BIOS Boot Order to give the SSD Boot Priority
SSD should be recognized as the primary boot device, in this case your computer can boot from SSD successfully. If not, you need to change BIOS boot order manually. Follow the steps as below to change BIOS boot order.
Step 1. Restart your PC. Continuously press a specific key (the key to enter BIOS can be different due to different computer manufactures but usually they are F2, F8, F12, Del) to enter BIOS Setup.
Step 2. Then, use the arrow keys to select Boot Option. Then select the new SSD as the new boot drive and save all the changes.
Step 3. Exit BIOS and restart your computer. Then you can check if SSD failed to boot issue has resolved or not.
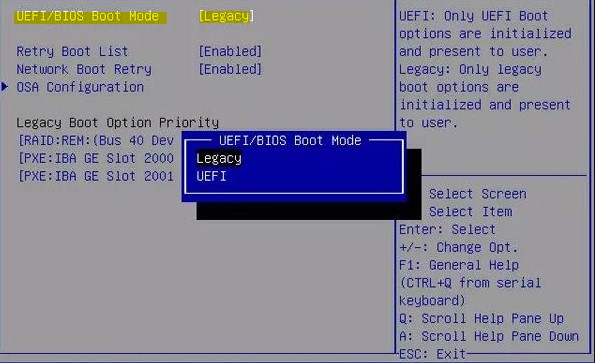
Note: If you cloned the MBR HDD to GPT SSD, it is necessary to change boot mode from Legacy to UEFI. The wrong boot mode will cause the SSD won’t boot after clone.
Solution 3. Rebuild MBR for the SSD
If MBR is damaged, the system cannot be booted. In this situation, you can rebuild MBR with a reliable and professional partition magic like MiniTool Partition Wizard Pro Ultimate.
MiniTool Partition Wizard Pro Ultimate is a professional partition manager, which possesses many advanced feature compare with MiniTool Partition Wizard Free Edition. It can help you perform many advanced operations like change cluster size, recover lost partition, convert NTFS to FAT without data loss, convert dynamic disk to basic, etc.
Besides, it can resolve a lot of boot issues like Windows 10 blue screen of death. With its user-friendly interface and comprehensive functions, most users rate it as the most powerful and good-to-use partition manager.
When SSD won’t boot, you can use MiniTool Partition Wizard Bootable Edition to rebuild MBR.
Note: MiniTool Partition Wizard Bootable Edition is created by Bootable Media feature, which offers an ISO file for users to burn it to CD, DVD, or USB flash disk so as to make a bootable media.
Step 1. Get MiniTool Partition Wizard Pro Ultimate by clicking the following button. Install it on a normal computer and launch it.
Buy Now
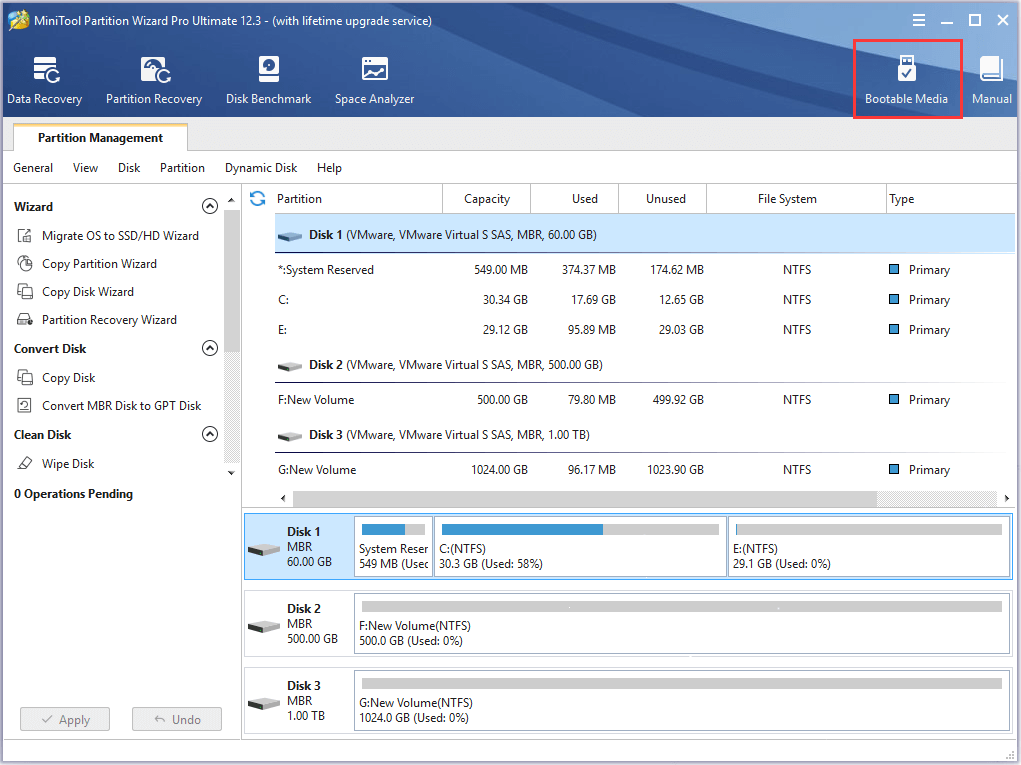
Step 2. At the main interface, click the Bootable Media on the upper toolbar to launch Bootable Media Builder.
Step 3. Select WinPE-based media with MiniTool plug-in to continue.

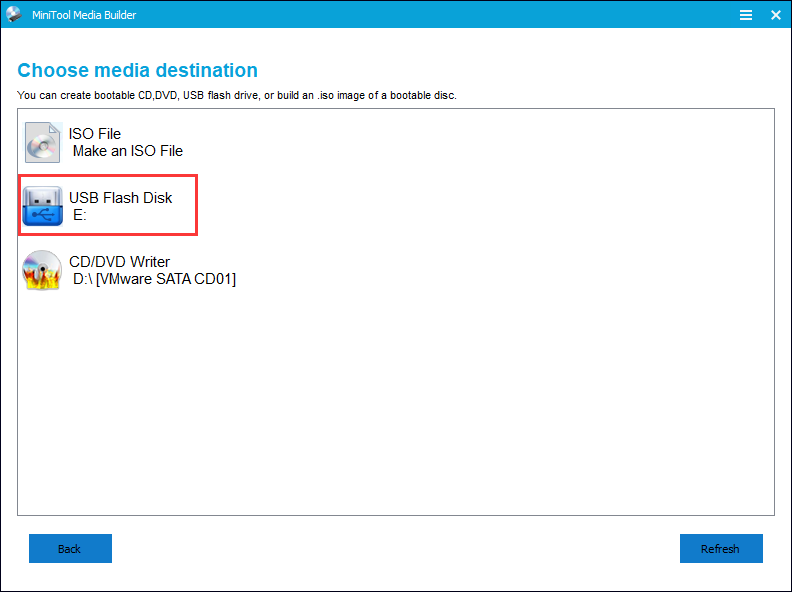
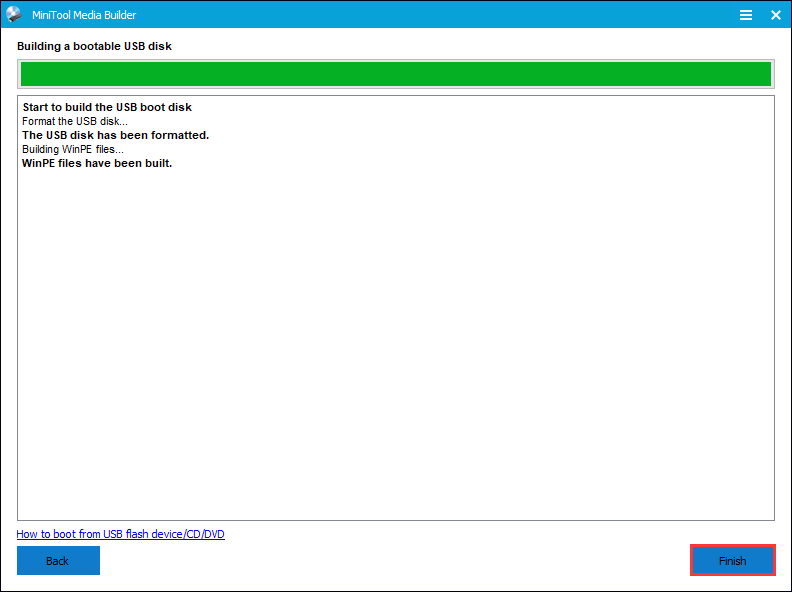
Step 4. If you are using a USB flash drive, choose USB Flash Disk. If you are using other devices like CD/DVD, you can choose CD/DVD writer. Here I use a USB drive for demonstration.
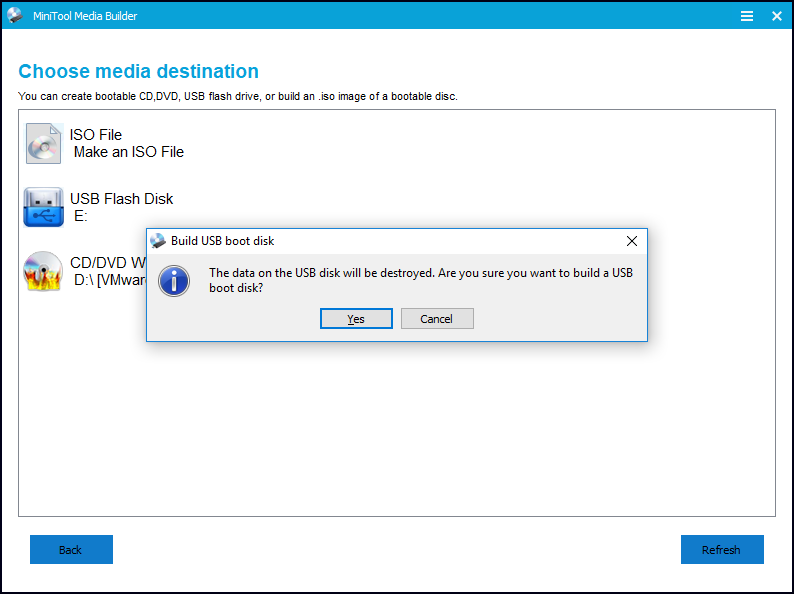
Step 5. Make sure there is no important files in the USB drive as the USB drive will be formatted to build a USB boot disk. Then click Yes to continue.
Step 6. Click Finish after it burns successfully.
Step 7. Insert the bootable USB or CD/DVD on your computer that SSD won’t boot. When you boot your computer successfully, you will receive the following page. MiniTool Partition Wizard will launch automatically.
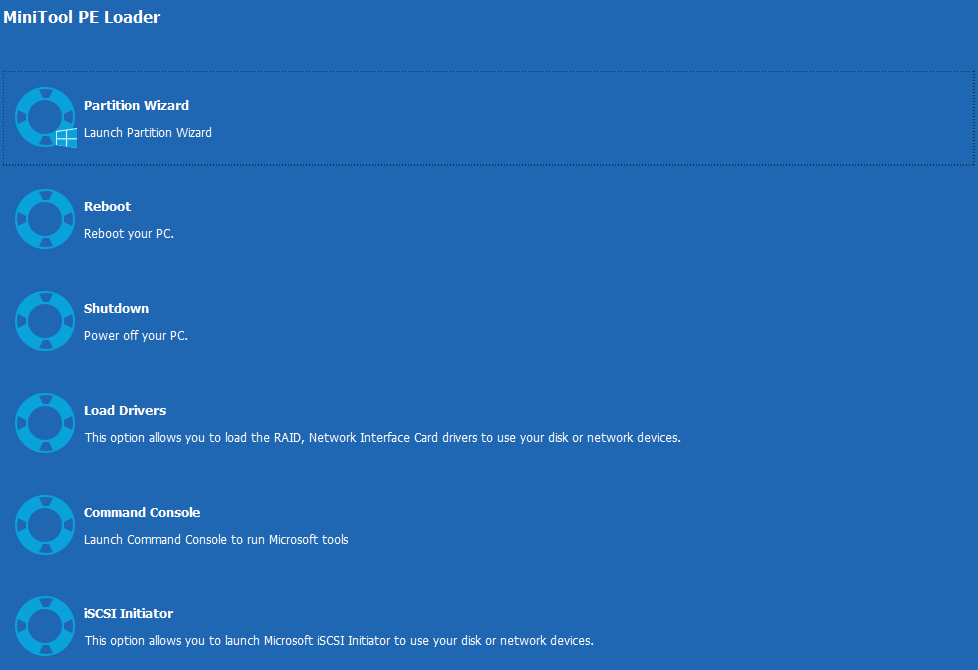
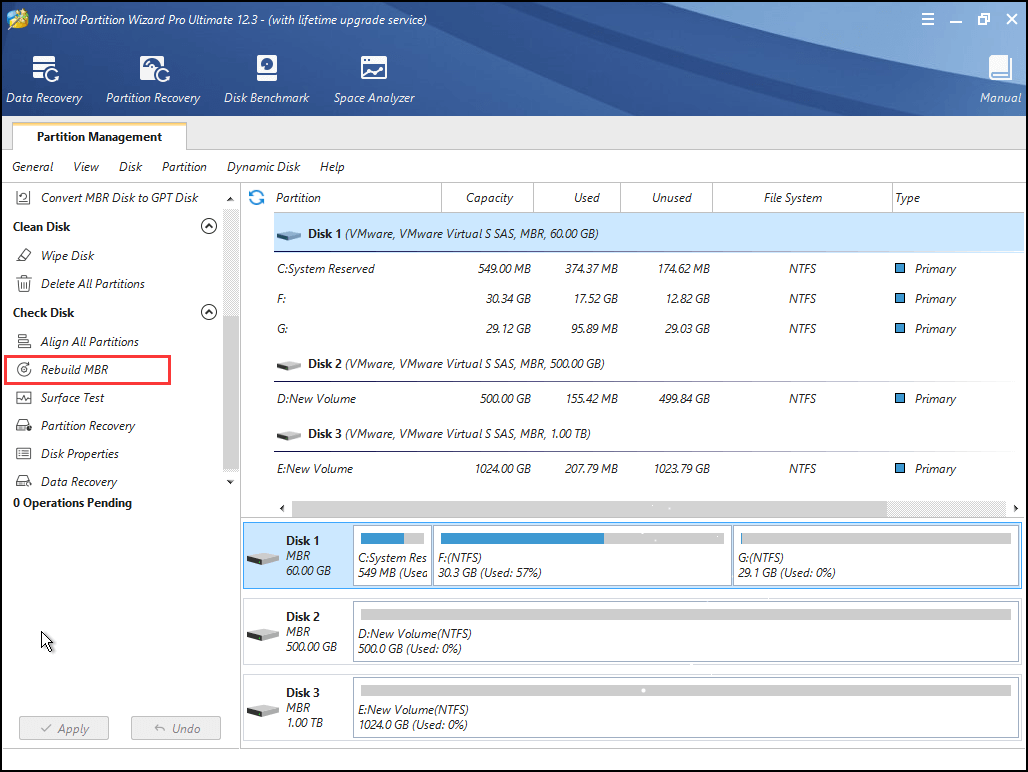
Step 8. When you get the main interface of MiniTool Partition Wizard Bootable Edition, you need to select the SSD and choose Rebuild MBR feature from the left action panel.
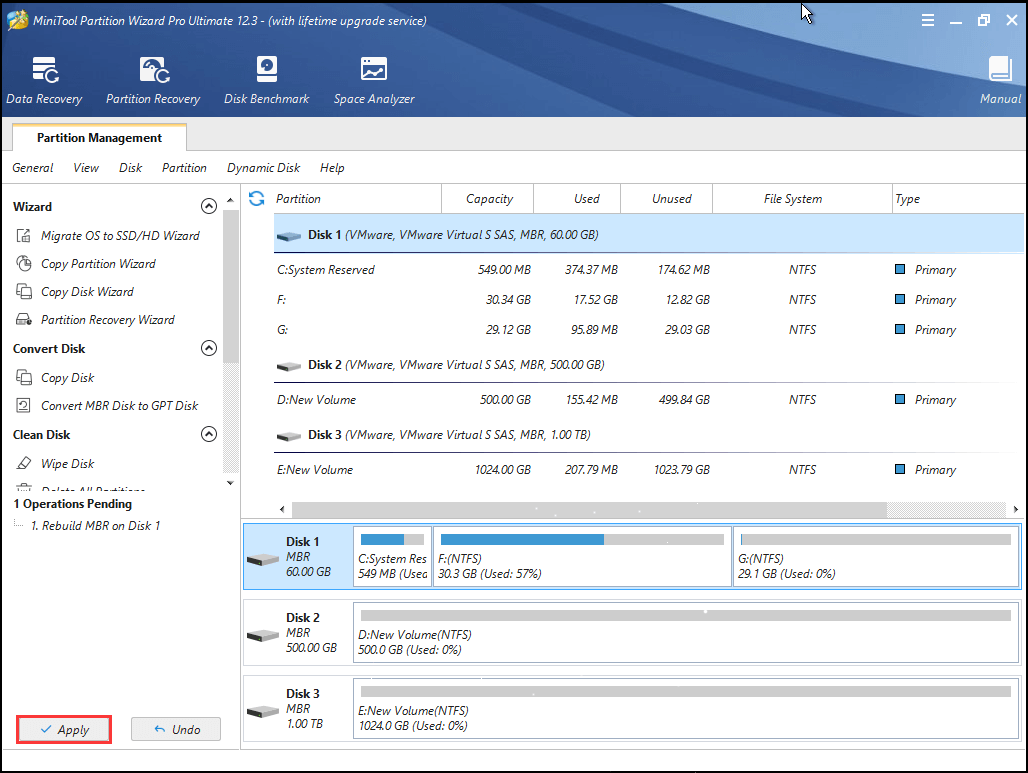
Step 9. At last, click Apply button on the top left corner to apply the change.
Once it is completed, you can take out the boot disc or USB flash drive and restart the computer. If the SSD still won’t boot, you can try the next method.
Solution 4. Set SSD Partition Active
If you didn’t set the right partition as active, you are unable to boot SSD successfully. How to set the right SSD drive active? Follow the steps as below, and then you will find it is very simple.
Step 1. Follow step 1 to step 7 in Solution 3 to launch MiniTool Partition Wizard Bootable Edition.
Buy Now
Step 2. When you get the main interface of MiniTool Partition Wizard Bootable Edition, then select the system partition (You may check the status to see which partition needs to be set active.) and click on Set Active.
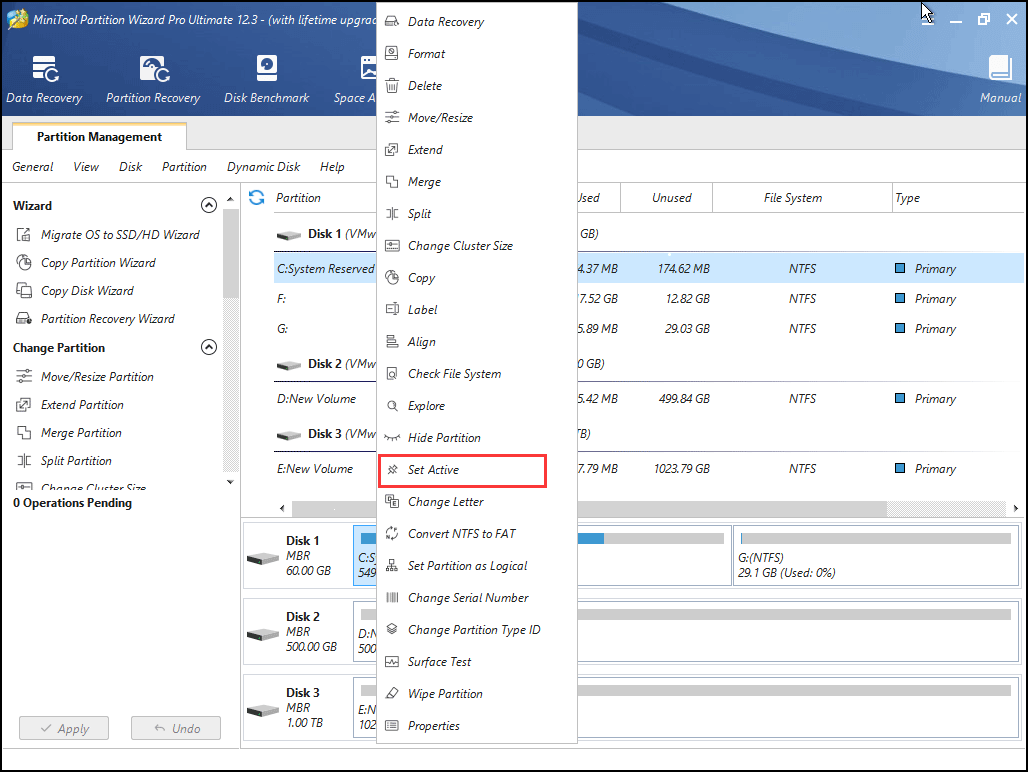
Note: In MiniTool Partition Wizard Bootable Edition, all partitions including the system reserved partition and EFI system partition will be given a drive letter, so a partition’s drive letter can be changed, for example, the original boot partition’s drive letter may not be C. In this case, you can explore partition to see if it is the partition you want to manage.
Step 3. Click on Apply button to allow the change.
Finally, restart your computer and then check if your computer can boot up successfully.
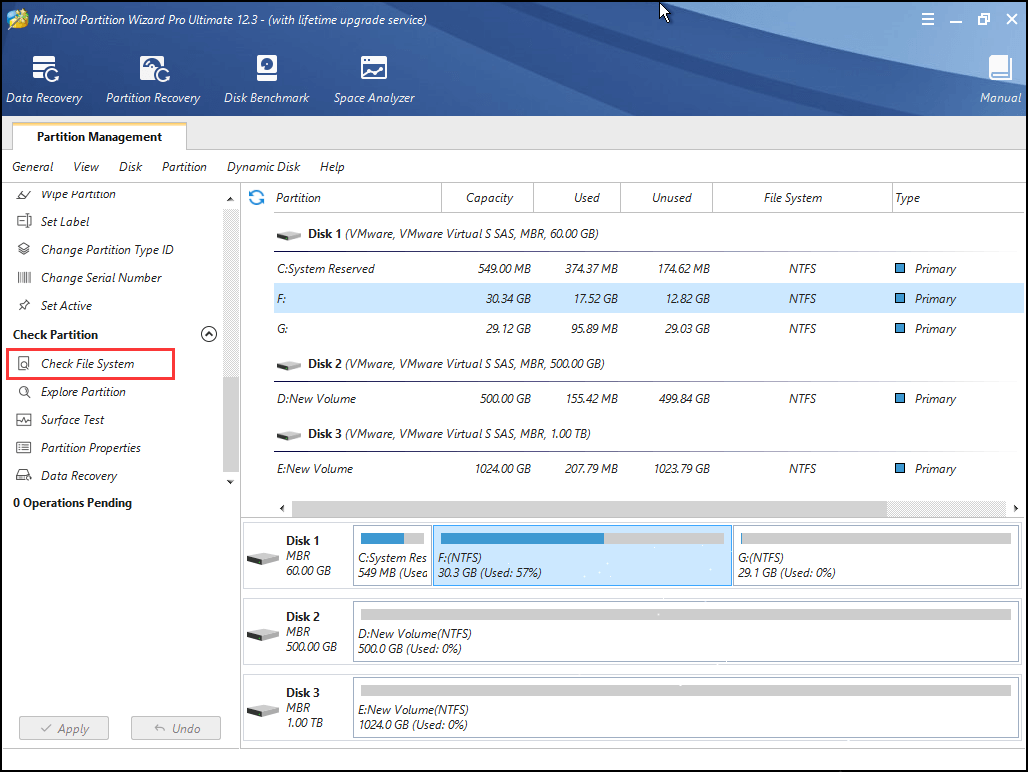
Solution 5. Check and Fix the Boot Partition’s File System Error
Step 1. Follow step 1 to step 7 in Solution 3 to launch MiniTool Partition Wizard Bootable Edition.
Buy Now
Step 2. After that, select the boot partition and choose Check File System.
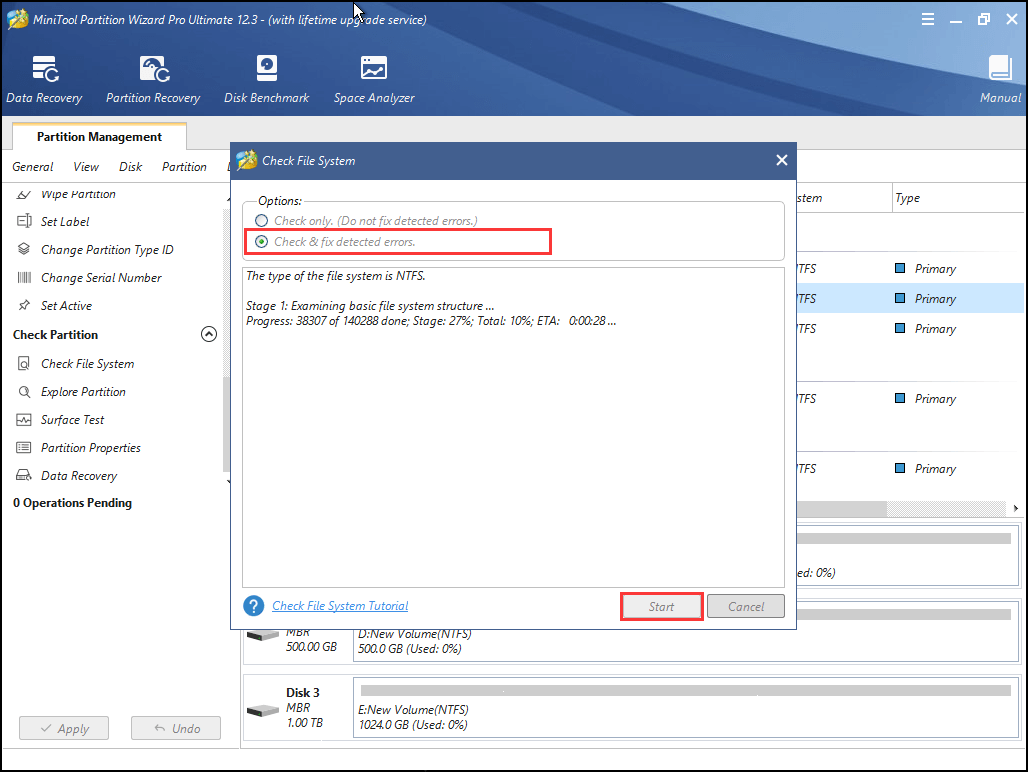
Step 3. To recover mistakes during the checking process, you should select Check & fix detected errors. After that, click Start button. Then MiniTool Partition Wizard will check/fix the file system error for you
After that, you can restart your computer and see if this method works.
Solution 6. Reinstall Window 10 on the New SSD
If none of these methods work, you’d back up important files on the SSD and reinstall Windows 10 by yourself. You can follow the steps as below to go ahead.
Step 1. Create a Windows 10 installation disc or USB flash drive with Windows 10 Media Creation Tool.
Step 2. Insert Windows 10 installation disc or USB flash drive to your computer that SSD won’t boot.
Step 3. Change the BIOS boot sequence to boot from the disc or USB drive.
Step 4. Select your language preference and click Next.
Step 4. Click Install now.
Step 5. Follow the on-screen instructions to let it install. See: How to Install Windows 10 on a New Hard Drive (with Pictures)
The installation process will start and your PC will reboot. When it’s finished, you just need to log in with your account.
After trying a few methods in this post, I successfully fixed SSD won’t boot Windows 10 issue. I would like to share this post with more friends whose Windows won’t boot from SSD.Click to Tweet
To Sum Up
After reading this post, have you learned how to fix it when SSD won’t boot? Now try these methods to fix SSD not booting issue!
If your SSD won’t boot, you can try the methods in this post to fix SSD boot failure. If you have any question about SSD won’t boot Windows 10 or you have other good solutions, you can leave a message in the following comment zone and we will reply as soon as possible. If you need any help when using MiniTool software, you can contact us via [email protected].
After upgrading to a new SSD, you may encounter SSD won’t boot issue. Or due to some reasons, you may come across SSD not booting issue. This article will show you 5 ways to fix SSD won’t boot issue.
When Windows won’t boot from SSD Windows 10, you may wonder: how this problem occurs? what are the reasons? Generally, there are some causes that will lead to SSD not booting. The below has list the most possible reasons to SSD won’t boot issue. Let’s check them out.
Reasons for SSD Won’t Boot
Here are some reasons for SSD not booting. Knowing the reasons, you can always find a solution for your SSD not booting.
- SSD not booting after cloned from HDD
- The SSD was not the first boot device
- The system partition is not active
- The file system of C drive may become corrupt or damaged.
- The System files are damaged
Solution 1. Migrate System Disk with Professional Software if Cloned SSD Won’t Boot
If your cloned SSD won’t boot Windows 10, you can try using MiniTool Partition Wizard Pro Ultimate to migrate OS to SSD, which is a professional system disk migration tool.
As a professional system migration tool, MiniTool Partition Wizard will not only copy all the data on system disk to your SSD, but also it will automatically fix and update the boot information and parameters, which puts an end to SSD not booting issues’ occurrence.
Besides, MiniTool Partition Wizard is an all-in-one partition manager, which enables you to manage SSD partitions in a flexible way. It’s features like align all partitions (for SSD alignment), convert MBR to GPT are very useful for SSD users.
Next, let’s see how to migrate Windows 10 to SSD with MiniTool Partition Wizard.
Step 1. Get MiniTool Partition Wizard by clicking the following button. Install it on your computer to open the main interface.
Buy Now
Step 2. Choose the function Migrate OS to SSD/HD Wizard from the left panel.
Step 3. Here are two ways for you to migrate. You can choose to migrate OS only or migrate the whole system disk, and then click Next button to continue. Here I choose to migrate the whole disk.
Step 4. Select the destination SSD disk to migrate OS to and click Next. Be aware that the target disk will get overwritten, so a backup in advance might be necessary.
Step 5. Here you are able to edit partition size and location of every partition on the SSD. After you set up everything, click Next.
Note: There is an option “Align partitions to 1MB” which is checked by default. With it checked, all partitions on SSD will be aligned automatically so that performance can be improved largely.
Step 6. This page will tell you how to boot from the SSD. You need to enter BIOS to set the SSD as the first boot device and click Finish to go back to the main interface.
Step 7. Click Apply button on the upper left corner to allow the pending operations.
After clicking Apply, MiniTool Partition Wizard will ask for a restart, which is to protect system and data. You just need to click Restart Now, and then all changes will be made in boot mode.
Solution 2. Set BIOS Boot Order to give the SSD Boot Priority
SSD should be recognized as the primary boot device, in this case your computer can boot from SSD successfully. If not, you need to change BIOS boot order manually. Follow the steps as below to change BIOS boot order.
Step 1. Restart your PC. Continuously press a specific key (the key to enter BIOS can be different due to different computer manufactures but usually they are F2, F8, F12, Del) to enter BIOS Setup.
Step 2. Then, use the arrow keys to select Boot Option. Then select the new SSD as the new boot drive and save all the changes.
Step 3. Exit BIOS and restart your computer. Then you can check if SSD failed to boot issue has resolved or not.
Note: If you cloned the MBR HDD to GPT SSD, it is necessary to change boot mode from Legacy to UEFI. The wrong boot mode will cause the SSD won’t boot after clone.
Solution 3. Rebuild MBR for the SSD
If MBR is damaged, the system cannot be booted. In this situation, you can rebuild MBR with a reliable and professional partition magic like MiniTool Partition Wizard Pro Ultimate.
MiniTool Partition Wizard Pro Ultimate is a professional partition manager, which possesses many advanced feature compare with MiniTool Partition Wizard Free Edition. It can help you perform many advanced operations like change cluster size, recover lost partition, convert NTFS to FAT without data loss, convert dynamic disk to basic, etc.
Besides, it can resolve a lot of boot issues like Windows 10 blue screen of death. With its user-friendly interface and comprehensive functions, most users rate it as the most powerful and good-to-use partition manager.
When SSD won’t boot, you can use MiniTool Partition Wizard Bootable Edition to rebuild MBR.
Note: MiniTool Partition Wizard Bootable Edition is created by Bootable Media feature, which offers an ISO file for users to burn it to CD, DVD, or USB flash disk so as to make a bootable media.
Step 1. Get MiniTool Partition Wizard Pro Ultimate by clicking the following button. Install it on a normal computer and launch it.
Buy Now
Step 2. At the main interface, click the Bootable Media on the upper toolbar to launch Bootable Media Builder.
Step 3. Select WinPE-based media with MiniTool plug-in to continue.
Step 4. If you are using a USB flash drive, choose USB Flash Disk. If you are using other devices like CD/DVD, you can choose CD/DVD writer. Here I use a USB drive for demonstration.
Step 5. Make sure there is no important files in the USB drive as the USB drive will be formatted to build a USB boot disk. Then click Yes to continue.
Step 6. Click Finish after it burns successfully.
Step 7. Insert the bootable USB or CD/DVD on your computer that SSD won’t boot. When you boot your computer successfully, you will receive the following page. MiniTool Partition Wizard will launch automatically.
Step 8. When you get the main interface of MiniTool Partition Wizard Bootable Edition, you need to select the SSD and choose Rebuild MBR feature from the left action panel.
Step 9. At last, click Apply button on the top left corner to apply the change.
Once it is completed, you can take out the boot disc or USB flash drive and restart the computer. If the SSD still won’t boot, you can try the next method.
Solution 4. Set SSD Partition Active
If you didn’t set the right partition as active, you are unable to boot SSD successfully. How to set the right SSD drive active? Follow the steps as below, and then you will find it is very simple.
Step 1. Follow step 1 to step 7 in Solution 3 to launch MiniTool Partition Wizard Bootable Edition.
Buy Now
Step 2. When you get the main interface of MiniTool Partition Wizard Bootable Edition, then select the system partition (You may check the status to see which partition needs to be set active.) and click on Set Active.
Note: In MiniTool Partition Wizard Bootable Edition, all partitions including the system reserved partition and EFI system partition will be given a drive letter, so a partition’s drive letter can be changed, for example, the original boot partition’s drive letter may not be C. In this case, you can explore partition to see if it is the partition you want to manage.
Step 3. Click on Apply button to allow the change.
Finally, restart your computer and then check if your computer can boot up successfully.
Solution 5. Check and Fix the Boot Partition’s File System Error
Step 1. Follow step 1 to step 7 in Solution 3 to launch MiniTool Partition Wizard Bootable Edition.
Buy Now
Step 2. After that, select the boot partition and choose Check File System.
Step 3. To recover mistakes during the checking process, you should select Check & fix detected errors. After that, click Start button. Then MiniTool Partition Wizard will check/fix the file system error for you
After that, you can restart your computer and see if this method works.
Solution 6. Reinstall Window 10 on the New SSD
If none of these methods work, you’d back up important files on the SSD and reinstall Windows 10 by yourself. You can follow the steps as below to go ahead.
Step 1. Create a Windows 10 installation disc or USB flash drive with Windows 10 Media Creation Tool.
Step 2. Insert Windows 10 installation disc or USB flash drive to your computer that SSD won’t boot.
Step 3. Change the BIOS boot sequence to boot from the disc or USB drive.
Step 4. Select your language preference and click Next.
Step 4. Click Install now.
Step 5. Follow the on-screen instructions to let it install. See: How to Install Windows 10 on a New Hard Drive (with Pictures)
The installation process will start and your PC will reboot. When it’s finished, you just need to log in with your account.
After trying a few methods in this post, I successfully fixed SSD won’t boot Windows 10 issue. I would like to share this post with more friends whose Windows won’t boot from SSD.Click to Tweet
To Sum Up
After reading this post, have you learned how to fix it when SSD won’t boot? Now try these methods to fix SSD not booting issue!
If your SSD won’t boot, you can try the methods in this post to fix SSD boot failure. If you have any question about SSD won’t boot Windows 10 or you have other good solutions, you can leave a message in the following comment zone and we will reply as soon as possible. If you need any help when using MiniTool software, you can contact us via [email protected].
0 / 0 / 0
Регистрация: 22.08.2016
Сообщений: 5
1
22.08.2016, 10:33. Показов 33399. Ответов 10

Доброго времени. Имею комп, относительно древний, собирал его в году 2011-2012.
1. Процессор Intel i5 2500K
2. мать ASUS P8Z68-V/GEN3 (биос последний)
3. Память Corsair Vengeance Low Profile CML8GX3M2A1600C9 (2х4Гб)
4. Видео ASUS GTX570
5. БП Zalman ZM660-XT (660Вт)
6. HDD WD HDD 1 Tb SATA 6Gb / s Western Digital Caviar Blue < WD10EZEX > 3.5″ 7200rpm 64Mb
7. Windows 7х64 SP1 (Ultimate)
Играю в основном в 1 динамичную онлаин игру.
В 2015 решил поставить SSD, был куплен 60 Гб SSD-накопитель Kingston V300. Установил, поставил с первого раза винду, все стало как по маслу, почитал статьи по настройке Windows, при установке SSD для продления его жизни, все соответственно настроил, итого связка HDD (хранилище всей информации) + SDD (Винда +1 онлаин игра+антивирусник+2-3 проги, из доступных 55Гб свободных всегда было не менее 25Гб)
В общем год я радовался скорости работы не одной проблемы не было. Вчера как обычно днем играл в онлаин игру, поиграв выключил комп. Прихожу вечером включаю, винда зависла на стадии загрузки и индикатор использования диска на корпусе горит непрерывно. Если подождать может 3, может 5, может 10 минут, то загружается. Индикатор использования диска еще минут 10 может гореть непрерывно комп работает медленно. В общем после разных манипуляций, сброса биос, перезагрузок, проверки антивирусником, было принято переустановить систему. Система переустановилась, но очень медленно, при каждой перезагрузке системы и драйверов комп зависал на загрузке винды (3-5-10минут), как будто комп пытался найти SDD диск или….. В общем я плюнул и пошел спать. Как вариант я сегодня поставлю винду на HDD (не хотелось, там много инфы, но один из разделов придется под винду отдать)
Вопросы: Ваше мнение на что грешить на SDD, что могло случиться? (если встанет беспроблем на HDD, то тогда SDD, а если не встанет, где искать проблему? Как можно проверить SSD диск, он еще на гарантии (3 года полная гарантия) перед сдачей его в магазин. В общем выслушаю любые советы, за ранее спасибо.
__________________
Помощь в написании контрольных, курсовых и дипломных работ, диссертаций здесь
0
Многие пользователи сталкиваются с проблемой установкой Windows 10 на компьютер или ноутбук, когда SSD диск распознается в BIOS, но не загружается с него. В большинстве случаев, пользователи не правильно создают установочную флешку при помощи различных программ или стандартной утилиты от Microsoft.
Дело в том, если у вас диск размечен под MBR, то нужно создать и установочную флешку с MBR, а не GPT таблицей. Программа Rusuf отлично подойдет для этого. Это главный момент, прежде чем приступить к проблеме, когда диск в БИОС виден, но ПК не загружается с него.
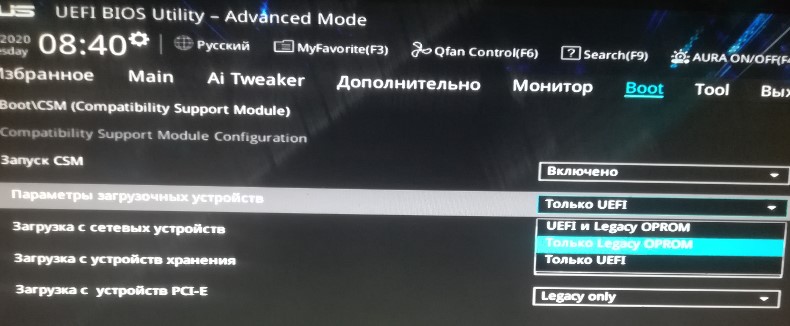
1. Изменить загрузку BIOS
Как правило, новые компьютеры и ноутбуки имеют комбинированный режим загрузки с устройства: Legacy и UEFI. Старые ПК, имеют одиночный режим, только Legacy или только UEFI. И когда пользователь создает установочную флешку под Legacy, а в BIOS установлено значение UEFI, то диск или флешка не будут читаться.
- Зайдите в параметры BIOS, нажать F2 или DEL при включении ПК, и перейдите в графу BOOT.
- Найдите UEFI/BIOS Boot Mode и выберите Legacy.
- Нажмите F10, чтобы сохранить изменения в BIOS и перезагрузитесь.
ВАЖНО: Так как материнские платы у всех разные, воспользуйтесь Google картинками, чтобы найти как правильно называется параметр для включения Legacy. Это может быть «Boot List Option», вместо «UEFI/BIOS Boot Mode», или «Параметры загрузочных устройств».
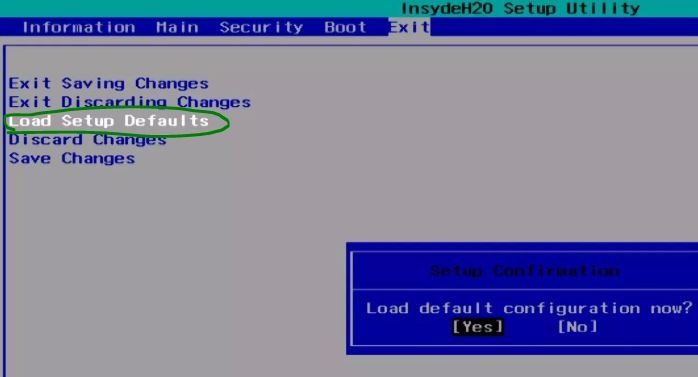
2. Сброс BIOS по умолчанию
В параметрах BIOS найдите пункт Load Setup Default, чтобы сбросить BIOS по умолчанию к заводским настройкам. Параметр Load Setup Default обычно находиться на вкладке EXIT в большинстве разновидностей BIOS.
Смотрите еще:
- Загрузочная флешка для установки windows 7/8.1/10
- Как войти в BIOS и выбрать первым загрузочный USB Flash или DVD
- Сбросить пароль BIOS на ноутбуке
- Как обновить БИОС или UEFI BIOS материнской платы
- Как включить режим AHCI в BIOS для ПК Windows 10
[ Telegram | Поддержать ]
Такая же проблема была, перепробовал все советы из гугла. В итоге помогла статья у офф сайта. А именно, в разделе установки где выбираете диск установки, нужно удалить все разделы, что бы остался один не разделенный диск, и просто устанавливаем винду в этот не разделенный диск.
https://docs.microsoft.com/ru-ru/windows-hardware/…
Переформатирование диска с использованием другого стиля разделов
очистка и преобразование диска с помощью программы установки Windows
выключите компьютер и вставьте Windowsный USB-ключ или DVD-диск.
Загрузите компьютер с помощью USB-ключа или DVD-диска в режиме UEFI. Дополнительные сведения см. в разделе Загрузка в режим UEFI или устаревший режим BIOS.
при выборе типа установки в Windows установки выберите пользовательский.
на экране где вы хотите установить Windows? выберите каждую из разделов на диске, на котором выполняется установка Windows, и нажмите кнопку удалить. На диске будет отображаться одна область нераспределенного пространства.
Внимание!
Если компьютер имеет несколько дисков, убедитесь, что вы удаляете разделы на нужном диске.
Выберите нераспределенное пространство и нажмите кнопку » Далее». Windows обнаружит, что компьютер был загружен в режим UEFI, а также отформатирует диск с помощью формата GPT и начнет установку.
Убил три часа времени, а разгадка была близко!!! Спасибо гигам за их материнки и UEFI.
Твердотельные накопители (SSD) являются более быстрым обновлением традиционных жестких дисков (HDD). Твердотельные накопители превосходят жесткие диски не только по скорости, но также по производительности и долговечности. Этот пост не о том, насколько хороши твердотельные накопители и почему вам следует их обновить. Это проблема, с которой пользователи столкнулись при загрузке с твердотельного накопителя.
При запуске вашего ПК он попросит вас выбрать загрузочное устройство, если у вас есть несколько дисков. Проблема здесь в том, что хотя BIOS видит подключенный SSD, он отказывается с него загружаться.
Если ваш SSD обнаружен, обнаружен и распознан BIOS, но Windows 10 не загружается, вот что вам нужно сделать, чтобы решить проблему:
- Включите устаревшую загрузку в BIOS.
- Сбросьте настройки BIOS.
Читайте дальше, поскольку мы разбиваем вышеупомянутые операции на простые для выполнения шаги.
1]Включите устаревшую загрузку в BIOS

Выключите компьютер и снова включите его. Сразу же он начнет загружаться, нажимайте F2 несколько раз, пока не появится экран BIOS Setup Utility. Здесь вы можете переходить к соседним вкладкам с помощью кнопок со стрелками влево и вправо.
Нажмите клавишу ENTER, и вам будет предложено сделать выбор.
Переместите курсор на Наследие режим загрузки и нажмите ENTER, чтобы выбрать его.
Теперь выйдите из меню BIOS и позвольте вашему компьютеру продолжить загрузку Windows, используя Legacy Boot.
ПРИМЕЧАНИЕ: Вышеописанный процесс может незначительно отличаться на материнских платах разных производителей.
2]Сбросьте настройки BIOS
Есть несколько способов сбросить BIOS, но самый безопасный и нетехнический метод — это сделать это из меню UEFI или BIOS. Сначала перезагрузите компьютер.
Удерживайте СДВИГ во время загрузки ПК, и вы попадете в Расширенные возможности устранения неполадок экран. Идти к Устранение неполадок> Дополнительные параметры и выберите Настройки прошивки UEFI.
Наконец, продолжайте перезагружать вашу машину. При запуске вы попадете в меню настройки. Здесь ищите перезагрузить кнопка. Кнопка не обязательно должна быть помечена перезагрузить; производитель может называть это как угодно.
Проверьте такие области настроек, как конфигурация, настройки, опциии т. д. На странице настроек нажмите кнопку, чтобы загрузить дефолт Параметры BIOS и нажмите да когда вас попросят подтвердить запись.
Теперь вы можете покинуть область дополнительных настроек и параметров загрузки. По завершении процесса ваши настройки BIOS вернутся к своим исходным значениям и теперь могут загружаться с SSD.
Надеюсь, это тебе поможет.
| Автор | Сообщение | ||
|---|---|---|---|
|
|||
|
Заблокирован Статус: Не в сети |
Перестал загружаться windows 10 на ssd, черный экран выдает ошибку reboot and select proper boot device. Подключил резервный hdd с windows 7, пишет ahci device error, hdd status — ok, ssd status — error что-то там. Загрузился с hdd, ssd видит, файлы доступны. Перед тем как винда на ssd перестала запускаться, система вела себя странно, зависала, перезагружалась. Думал что это было связано с перегревом видеокарты, теперь вот не знаю. Подскажите в чем может быть причина и главное как запустить винду без переустановки? Неужели ssd сломался? Kingston на 240gb, ему и полгода нет. Конфиг, i5-750, asrock h55, 4x2gb, gtx 285, aerocool 500w. |
| Реклама | |
|
Партнер |
|
sergtrav |
|
|
Member Статус: Не в сети |
Для начала заменить шлейф. |
|
vork777 |
|
|
Member Статус: Не в сети |
kfa3 писал(а): выдает ошибку reboot and select proper boot device. Скорее всего, кроме SSD у вас был еще винт или винты, на которых прописалась загрузочная запись. Если этот винт удалить из системы — появится подобная надпись. |
|
kfa3 |
|
|
Заблокирован Статус: Не в сети |
sergtrav пробовал менять. vork777 стоит hdd с windows 7, с него загрузился. Можно как-то без переустановки винды восстановить загрузку windows 10 на ssd? |
|
vork777 |
|
|
Member Статус: Не в сети |
kfa3 писал(а): ожно как-то без переустановки винды восстановить загрузку windows 10 на ssd? Можно, вставить носитель с виндой ( флешка, диск ) и запустить установку в режиме восстановления, тогда все недостающие файлы пропишутся на SSD. |
|
kfa3 |
|
|
Заблокирован Статус: Не в сети |
vork777 ясно, попробую, а установленные программы, типа автокада, после этого будут работать? И по вашему это произошло из-за того что стоял hdd с windows 7? Просто перед этим глюком система странно себя вела, как бы не пришлось ssd менять. |
|
vork777 |
|
|
Member Статус: Не в сети |
kfa3 писал(а): Просто перед этим глюком система странно себя вела, как бы не пришлось ssd менять. А что стоит посмотреть SMART винтов, нет ли там чего подозрительного. Может действительно шлейф винта накрылся, может просто тупо вытащить шлейф из матери и из винта и заново вставить, может не контакт, да мало ли еще чего — может БП дохлый, от которого винты приходят в негодность. Все это надо проверять, прежде чем бежать в магазин. |
|
Mordoc |
|
|
Member Статус: Не в сети |
ну если smart ssd в норме, то можно накатать на dvd cd диск или флешку образ EaseUS Partition Master, и с него посмотреть что там с разделом системы, и восстановить если требуется загрузочную область |
|
kfa3 |
|
|
Заблокирован Статус: Не в сети |
Smart ssd в норме. Перепробовал всевозможные варианты восстановления, максимум чего удалось добиться через командную строку это загрузки лого винды и надписи «inaccessible boot device». Пришлось переустанавливать винду. Комп не мой, попросили восстановить. Сам сижу на macOS с 2009 года, у меня такое ощущение что этот косяк связан с обновлениями, винда такая помойка, особенно 10я, самому приходилось переустанавливать ее в буткампе, грохнулась на ровном месте, также ни с того ни с сего, при том что я ей пару раз в год пользовался. Последний нормальный Windows был 98 SE. Сегодня была последняя капля, я презираю эту ублюдочную систему и больше никогда никому не буду чинить винду, время и нервы дороже. #77 |
|
Svenson |
|
|
Member Статус: Не в сети |
kfa3 писал(а): Сегодня была последняя капля, я презираю эту ублюдочную систему и больше никогда никому не буду чинить винду, время и нервы дороже. Может вы просто ее готовить не умеете? |
") Да, есть косяки, но не на столько фатальные.
Да, есть косяки, но не на столько фатальные.—
Кто сейчас на конференции |
|
Сейчас этот форум просматривают: нет зарегистрированных пользователей и гости: 11 |
| Вы не можете начинать темы Вы не можете отвечать на сообщения Вы не можете редактировать свои сообщения Вы не можете удалять свои сообщения Вы не можете добавлять вложения |