Introduction
The SSH Permission denied error appears after permission-related settings are modified on the SSH server. Usual scenarios include a new package installation or the creation of new users.
In this tutorial, you will learn how to troubleshoot the SSH Permission denied error and reconnect to your SSH server.
Prerequisites
- SSH client on the local machine and SSH server on the remote system
- A user account to access the remote server (for password-based login)
- A user account with sudo or root privileges
The SSH Permission denied error appears when trying to SSH into a server:
Permission denied (publickey,gssapi-keyex,gssapi-with-mic)
Following the Permission denied statement, the bracket contains the attempted authentication methods that failed at the initiation of the connection. The error suggests that the public key is the issue, which is misleading.
One reason for the error may be sshd_config, the file that contains SSH server configuration. The other possibility is that the authorized_keys file has insufficient permissions. This file contains the list of public keys for the clients allowed to SSH into the server. Consequently, the system’s inability to read from the file results in the Permission denied error.
How to fix SSH Permission denied
Both solutions contain steps you need to perform on the server-side. Start by opening the terminal on your server and proceed with one of the solutions below.
Solution 1: Enable Password Authentication
If you want to use a password to access the SSH server, a solution for fixing the Permission denied error is to enable password login in the sshd_config file.
To do this, open the file in a text editor. This example uses the nano editor:
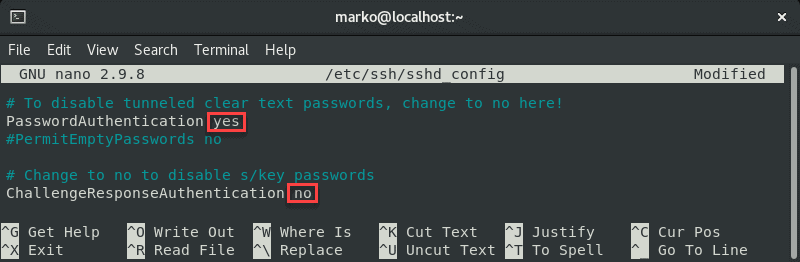
sudo nano /etc/ssh/sshd_configIn the file, find the PasswordAuthentication line and make sure it ends with yes.
Find the ChallengeResponseAuthentication option and disable it by adding no.
If lines are commented out, remove the hash sign # to uncomment them.
Save the file and exit.
Restart the SSH service by typing the following command:
sudo systemctl restart sshdSolution 2: Change File System Permissions
Using the password-based login as the SSH authentication method is not recommended due to security concerns. Therefore, the following solution may be preferable since it troubleshoots the public key authentication method.
First, open the sshd_config file using a text editor:
sudo nano /etc/ssh/sshd_configIn the file, make sure the following options are set as follows:
PermitRootLogin no
PubkeyAuthentication yes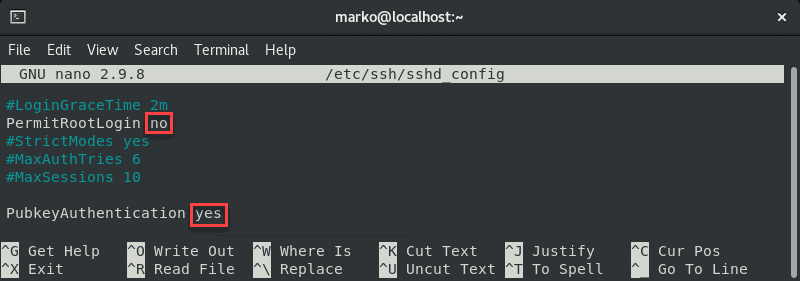
Note: The steps above are considered best security practices. If you need to use root login, set the relevant line to yes.
Comment out the GSSAPI-related options by adding the hash sign at the beginning of the line:
#GSSAPIAuthentication yes
#GSSAPICleanupCredentials no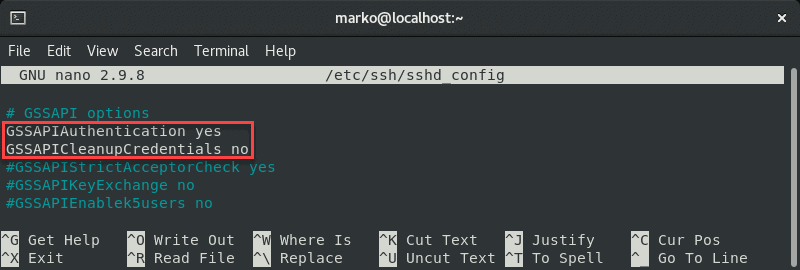
Also, make sure the UsePAM line is set to yes:
UsePAM yes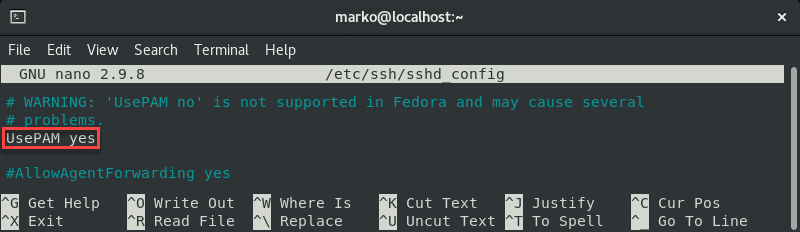
Save the file and restart the sshd service:
systemctl restart sshdNow navigate to your home folder and check the permissions:
ls -ld
If your owner permissions are not set to read, write, and execute (drwx------), use the chmod command to change them:
chmod 0700 /home/[your-username]Now go to the .ssh folder and recheck the permissions:
ls -ld
This directory should also have read, write, and execute permissions for the file owner. To enforce them, use chmod again:
chmod 0700 /home/your_home/.sshThe .ssh folder contains the authorized_keys file. Check its permissions with:
ls -ld authorized_keys
The file owner should have read and write permissions. To set them, use:
chmod 0600 /home/[username]/.ssh/authorized_keysNow try logging in with the key pair again. The output below shows a successful login attempt.

Conclusion
This tutorial covered the steps necessary to troubleshoot the SSH Permission denied (publickey,gssapi-keyex,gssapi-with-mic) error. By completing the steps in the guide, you should fix the error and successfully SSH into your server.
Should the sudo command or elevated privileges be used with Git?
You should not be using the sudo command or elevated privileges, such as administrator permissions, with Git. If you have a very good reason you must use sudo, then ensure you are using it with every command (it’s probably just better to use su to get a shell as root at that point). If you generate SSH keys without sudo and then try to use a command like sudo git push, you won’t be using the same keys that you generated.
Check that you are connecting to the correct server
Typing is hard, we all know it. Pay attention to what you type; you won’t be able to connect to «githib.com» or «guthub.com». In some cases, a corporate network may cause issues resolving the DNS record as well.
To make sure you are connecting to the right domain, you can enter the following command:
$ ssh -vT git@github.com
> OpenSSH_8.1p1, LibreSSL 2.7.3
> debug1: Reading configuration data /Users/YOU/.ssh/config
> debug1: Reading configuration data /etc/ssh/ssh_config
> debug1: /etc/ssh/ssh_config line 47: Applying options for *
> debug1: Connecting to github.com port 22.
The connection should be made on port 22, unless you’re overriding settings to use SSH over HTTPS.
Always use the «git» user
All connections, including those for remote URLs, must be made as the «git» user. If you try to connect with your GitHub username, it will fail:
$ ssh -T GITHUB-USERNAME@github.com
> Permission denied (publickey).
If your connection failed and you’re using a remote URL with your GitHub username, you can change the remote URL to use the «git» user.
You should verify your connection by typing:
$ ssh -T git@github.com
> Hi USERNAME! You've successfully authenticated...
Make sure you have a key that is being used
- Open TerminalTerminalGit Bash.
- Verify that you have a private key generated and loaded into SSH.
# start the ssh-agent in the background
$ eval "$(ssh-agent -s)"
> Agent pid 59566
$ ssh-add -l -E sha256
> 2048 SHA256:274ffWxgaxq/tSINAykStUL7XWyRNcRTlcST1Ei7gBQ /Users/USERNAME/.ssh/id_rsa (RSA)
If you have GitHub Desktop installed, you can use it to clone repositories and not deal with SSH keys.
-
If you are using Git Bash, turn on ssh-agent:
# start the ssh-agent in the background
$ eval "$(ssh-agent -s)"
> Agent pid 59566
If you are using another terminal prompt, such as Git for Windows, turn on ssh-agent:
# start the ssh-agent in the background $ eval $(ssh-agent -s) > Agent pid 59566 -
Verify that you have a private key generated and loaded into SSH.
$ ssh-add -l -E sha256
> 2048 SHA256:274ffWxgaxq/tSINAykStUL7XWyRNcRTlcST1Ei7gBQ /Users/USERNAME/.ssh/id_rsa (RSA)
- Open TerminalTerminalGit Bash.
- Verify that you have a private key generated and loaded into SSH.
$ ssh-add -l -E sha256
> 2048 SHA256:274ffWxgaxq/tSINAykStUL7XWyRNcRTlcST1Ei7gBQ /Users/USERNAME/.ssh/id_rsa (RSA)
The ssh-add command should print out a long string of numbers and letters. If it does not print anything, you will need to generate a new SSH key and associate it with GitHub.
Tip: On most systems the default private keys (~/.ssh/id_rsa and ~/.ssh/identity) are automatically added to the SSH authentication agent. You shouldn’t need to run ssh-add path/to/key unless you override the file name when you generate a key.
Getting more details
You can also check that the key is being used by trying to connect to git@github.com:
$ ssh -vT git@github.com
> ...
> debug1: identity file /Users/YOU/.ssh/id_rsa type -1
> debug1: identity file /Users/YOU/.ssh/id_rsa-cert type -1
> debug1: identity file /Users/YOU/.ssh/id_dsa type -1
> debug1: identity file /Users/YOU/.ssh/id_dsa-cert type -1
> ...
> debug1: Authentications that can continue: publickey
> debug1: Next authentication method: publickey
> debug1: Trying private key: /Users/YOU/.ssh/id_rsa
> debug1: Trying private key: /Users/YOU/.ssh/id_dsa
> debug1: No more authentication methods to try.
> Permission denied (publickey).
In that example, we did not have any keys for SSH to use. The «-1» at the end of the «identity file» lines means SSH couldn’t find a file to use. Later on, the «Trying private key» lines also indicate that no file was found. If a file existed, those lines would be «1» and «Offering public key», respectively:
$ ssh -vT git@github.com
> ...
> debug1: identity file /Users/YOU/.ssh/id_rsa type 1
> ...
> debug1: Authentications that can continue: publickey
> debug1: Next authentication method: publickey
> debug1: Offering RSA public key: /Users/YOU/.ssh/id_rsa
Verify the public key is attached to your account
You must provide your public key to GitHub to establish a secure connection.
-
Open Terminal.
-
Start SSH agent in the background.
$ eval "$(ssh-agent -s)" > Agent pid 59566 -
Find and take a note of your public key fingerprint.
$ ssh-add -l -E sha256 > 2048 SHA256:274ffWxgaxq/tSINAykStUL7XWyRNcRTlcST1Ei7gBQ /Users/USERNAME/.ssh/id_rsa (RSA) -
In the upper-right corner of any page, click your profile photo, then click Settings.

-
In the «Access» section of the sidebar, click SSH and GPG keys.
-
Compare the list of SSH keys with the output from the
ssh-addcommand.


-
Open the command line.
-
Start SSH agent in the background.
$ ssh-agent -s > Agent pid 59566 -
Find and take a note of your public key fingerprint.
$ ssh-add -l -E sha256 > 2048 SHA256:274ffWxgaxq/tSINAykStUL7XWyRNcRTlcST1Ei7gBQ /Users/USERNAME/.ssh/id_rsa (RSA) -
In the upper-right corner of any page, click your profile photo, then click Settings.
-
In the «Access» section of the sidebar, click SSH and GPG keys.
-
Compare the list of SSH keys with the output from the
ssh-addcommand.
-
Open Terminal.
-
Start SSH agent in the background.
$ eval "$(ssh-agent -s)" > Agent pid 59566 -
Find and take a note of your public key fingerprint. If you’re using OpenSSH 6.7 or older:
$ ssh-add -l
> 2048 a0:dd:42:3c:5a:9d:e4:2a:21:52:4e:78:07:6e:c8:4d /Users/USERNAME/.ssh/id_rsa (RSA)
If you’re using OpenSSH 6.8 or newer:
$ ssh-add -l -E md5 > 2048 MD5:a0:dd:42:3c:5a:9d:e4:2a:21:52:4e:78:07:6e:c8:4d /Users/USERNAME/.ssh/id_rsa (RSA) -
In the upper-right corner of any page, click your profile photo, then click Settings.
-
In the «Access» section of the sidebar, click SSH and GPG keys.
-
Compare the list of SSH keys with the output from the
ssh-addcommand.
If you don’t see your public key in GitHub, you’ll need to add your SSH key to GitHub to associate it with your computer.
Warning: If you see an SSH key you’re not familiar with on GitHub, delete it immediately and contact GitHub Support, for further help. An unidentified public key may indicate a possible security concern. For more information, see «Reviewing your SSH keys.»
День добрый. Возник вопрос с авторизацией в Windows OpenSSH по ключу.
До этого несколько раз доводилось настраивать без ключей (только по паролю) и вроде бы все было ок.
В этот раз решил сделать авторизацию только по SSH-ключу и напоролся на Permission denied (publickey,keyboard-interactive).
Кратко о сервере:
Сервер — винда 10
Юзер — локальная учетная запись (с правами администратора)
Публичный ключ лежит в authorized_keys в дирректории пользователя (C:UsersLocalUser.sshauthorized_keys).
Всевозможные перезапуски и перезагрузки были.
OpenSSH сервер установлен: (на всякий случай испробованы оба варианта)
1) Параметры -> Приложения -> Дополнительные компоненты -> Сервер OpenSSH
2) Через PowerShell согласно официальной инструкции
Поискав некоторые моменты из лога наткнулся на закрытую issue от 2017 года в которой было упомянуто, что
Windows inbox Beta version currently supports one key type (ed25519).
До этого использовал RSA-ключи и в логе мелькала информация о ключах в духе
debug1: identity file C:\Users\LocalUser/.ssh/id_rsa type 0
debug1: identity file C:\Users\LocalUser/.ssh/id_ed25519 type -1
Под каждым из которых была строка о том что файл не найден.
После чтения той issue стал использовать ed25519-ключ, теперь стало так:
debug1: identity file C:\Users\LocalUser/.ssh/id_ed25519 type 3
debug3: Failed to open file:C:/Users/LocalUser/.ssh/id_ed25519-cert error:2
debug3: Failed to open file:C:/Users/LocalUser/.ssh/id_ed25519-cert.pub error:2
debug1: identity file C:\Users\LocalUser/.ssh/id_ed25519-cert type -1
Собственно в конечном счете в логе мелькает (если я правильно понимаю) отправка ключа
debug1: Offering public key: C:\Users\LocalUser/.ssh/id_ed25519 ED25519 SHA256:xKMs9i1ZJyeQjvIY3jL2WIZnGNwOr6v/7QLUPu9t2Nw explicit
debug3: send packet: type 50
debug2: we sent a publickey packet, wait for reply
debug3: receive packet: type 51
Однако после него SSH пытается пройти авторизацию по другим включенным способам авторизации — если по паролю включена — спрашивает пароль (даже в случае когда ключ явно указан), если выключена — сразу Permission denied (publickey,keyboard-interactive).
Подскажите в чем проблема в этом случае?
Полный лог c клиента доступен на https://gist.github.com/NEK-RA/e3656f98ca7e1b6c4d7… (т.к. если вставить его напрямую тут, будет превышен лимит в 10 000 символов в тексте вопроса)
UPD: По той же ссылке добавлен и лог сервера с небольшим отличием — на текущий момент не было доступа к нужному устройству, поэтому ситуация продублирована в виртуальной машине.
We’ve all been there. You try to connect to your VPS, only to run into the dreaded permission denied (publickey) error. Unfortunately, the reason for this differs, which can make troubleshooting harder, but generally the issue falls into four categories:
- You’re trying to connect to the wrong server
- Your local machine doesn’t have a matching key for your VPS server
- Your key isn’t in the authorized_keys file on your VPS server
- Your local machine has too many keys
Let’s run through the troubleshooting process to determine what’s creating your ssh permission denied error and solve the root cause:
Run ssh -vvv [email protected] for more info
You can save a lot of time by determining why you can’t connect before you proceed. The following command will show you exactly what SSH is doing when you initiate a connection with your VPS server:
ssh -vvv [email protected]
Naturally, you should replace your.vps.ip with the relevant IP address, which can be found in your control panel. Note down any output.
Make sure you’re connecting to the right server
It sounds basic, but it’s all too easy to do. You may have typed in a single digit of your server’s IP address wrong, or tried to connect to an old, expired server rather than your new one.
Double-check your credentials in your server control panel and be sure to copy and paste the information rather than typing it to ensure accuracy. You’d be surprised how easy it is to get two numbers mixed up.
Additionally, if you’ve just created the server, wait a few minutes a try again. Sometimes the server may indicate that it’s live even if it’s not quite ready for connection.
Try logging in with a password instead
For the short term, you may be able to log in with a password instead. This won’t work if you’re using PuTTy, or if you have password authentication disabled. You can give it a try with the following command:
ssh -o PreferredAuthentications=password -o PubkeyAuthentication=no [email protected]
If you don’t have password authentication enabled, you can change that by clicking on the server in your BitLaunch control panel, selecting «Access», and entering a password. This will reboot your server and reset your password.
On your local machine, run ssh-keygen -R your.server.ip to get rid of your old key.
Now, you should be able to connect to your server both if your local machine or VPS server didn’t have a matching key.
Manually add your SSH key to the VPS server
Now that you’re able to log in to your VPS server with a password, you can add an SSH key again.
Generate a key with:
ssh-keygen -t rsa
Then, if needed, copy it to your vps manually by typing ssh-copy-id [email protected].
Alternatively, copy it via SSH with:
cat ~/.ssh/id_rsa.pub | ssh [email protected] "mkdir -p ~/.ssh && cat >> ~/.ssh/authorized_keys"
You may want to make SSH keys your sole authentication method by editing the ssh_config file:
sudo nano /etc/ssh/sshd_config
Change PasswordAuthentication yes to PasswordAuthentication no, and save the changes.
Manually choose which key to use
If you have too many keys on your local machine, your ssh -vvv output will have the output too many authentication failures for root. You can bypass this by explicitly mentioning the correct key, like so:
ssh -i /home/bitlaunch/.shh/id_rsa [email protected]
If you’re still struggling with these steps and you’re a BitLaunch customer, reach out to our expert support, who will be happy to aid you further.
If you aren’t a BitLaunch customer, please feel free to sign up for a bitcoin vps today.
I am trying to configure git server and client on two local windows machines. I installed git software on both the machines. Enabled openssh server optional feature on the server and created a bare repository on the server. Then tried to clone the server’s bare repository on the client, it asked me the password of the server’s user but, even after I entered the right password it was giving the below error message.
Permission denied (publickey,password,keyboard-interactive).
I have tried to figure out the cause for the error. After browsing for this error on google I got to know that it is ssh not configured properly. One suggestion I found was to check if ssh working properly without git involvement using the command
ssh -Tv ram-pc1@10.208.27.100, it also failed by giving below error message:
$ ssh -Tv ram-pc1@10.208.27.100
OpenSSH_7.7p1, OpenSSL 1.0.2p  14 Aug 2018
debug1: Reading configuration data /etc/ssh/ssh_config
debug1: Connecting to 10.208.27.100 [10.208.27.100] port 22.
debug1: Connection established.
debug1: identity file /c/Users/Admin/.ssh/id_rsa type 0
debug1: key_load_public: No such file or directory
debug1: identity file /c/Users/Admin/.ssh/id_rsa-cert type -1
debug1: key_load_public: No such file or directory
debug1: identity file /c/Users/Admin/.ssh/id_dsa type -1
debug1: key_load_public: No such file or directory
debug1: identity file /c/Users/Admin/.ssh/id_dsa-cert type -1
debug1: key_load_public: No such file or directory
debug1: identity file /c/Users/Admin/.ssh/id_ecdsa type -1
debug1: key_load_public: No such file or directory
debug1: identity file /c/Users/Admin/.ssh/id_ecdsa-cert type -1
debug1: key_load_public: No such file or directory
debug1: identity file /c/Users/Admin/.ssh/id_ed25519 type -1
debug1: key_load_public: No such file or directory
debug1: identity file /c/Users/Admin/.ssh/id_ed25519-cert type -1
debug1: key_load_public: No such file or directory
debug1: identity file /c/Users/Admin/.ssh/id_xmss type -1
debug1: key_load_public: No such file or directory
debug1: identity file /c/Users/Admin/.ssh/id_xmss-cert type -1
debug1: Local version string SSH-2.0-OpenSSH_7.7
debug1: Remote protocol version 2.0, remote software version OpenSSH_for_Windows_7.6
debug1: match: OpenSSH_for_Windows_7.6 pat OpenSSH* compat 0x04000000
debug1: Authenticating to 10.208.27.100:22 as 'ram-pc1'
debug1: SSH2_MSG_KEXINIT sent
debug1: SSH2_MSG_KEXINIT received
debug1: kex: algorithm: curve25519-sha256
debug1: kex: host key algorithm: ecdsa-sha2-nistp256
debug1: kex: server->client cipher: chacha20-poly1305@openssh.com MAC: <implicit> compression: none
debug1: kex: client->server cipher: chacha20-poly1305@openssh.com MAC: <implicit> compression: none
debug1: expecting SSH2_MSG_KEX_ECDH_REPLY
debug1: Server host key: ecdsa-sha2-nistp256 SHA256:27NSp0TODhiZ68zbYLvsaqPNMp8tE0ZanMeoeQp+u14
debug1: Host '10.208.27.100' is known and matches the ECDSA host key.
debug1: Found key in /c/Users/Admin/.ssh/known_hosts:1
debug1: rekey after 134217728 blocks
debug1: SSH2_MSG_NEWKEYS sent
debug1: expecting SSH2_MSG_NEWKEYS
debug1: SSH2_MSG_NEWKEYS received
debug1: rekey after 134217728 blocks
debug1: SSH2_MSG_EXT_INFO received
debug1: kex_input_ext_info: server-sig-algs=<ssh-ed25519,ssh-rsa,rsa-sha2-256,rsa-sha2-512,ssh-dss,ecdsa-sha2-nistp256,ecdsa-sha2-nistp384,ecdsa-sha2-nistp521>
debug1: SSH2_MSG_SERVICE_ACCEPT received
debug1: Authentications that can continue: publickey,password,keyboard-interactive
debug1: Next authentication method: publickey
debug1: Offering public key: RSA SHA256:2KyRU6bbWWkN+IBYN6xiuWQuHl0pKL6Cim6K4/6RBek /c/Users/Admin/.ssh/id_rsa
debug1: Authentications that can continue: publickey,password,keyboard-interactive
debug1: Trying private key: /c/Users/Admin/.ssh/id_dsa
debug1: Trying private key: /c/Users/Admin/.ssh/id_ecdsa
debug1: Trying private key: /c/Users/Admin/.ssh/id_ed25519
debug1: Trying private key: /c/Users/Admin/.ssh/id_xmss
debug1: Next authentication method: keyboard-interactive
debug1: Authentications that can continue: publickey,password,keyboard-interactive
debug1: Next authentication method: password
ram-pc1@10.208.27.100's password:
debug1: Authentications that can continue: publickey,password,keyboard-interactive
Permission denied, please try again.
ram-pc1@10.208.27.100's password:
debug1: Authentications that can continue: publickey,password,keyboard-interactive
Permission denied, please try again.
ram-pc1@10.208.27.100's password:
debug1: Authentications that can continue: publickey,password,keyboard-interactive
debug1: No more authentication methods to try.
ram-pc1@10.208.27.100: Permission denied (publickey,password,keyboard-interactive).
Below is my ssh_config file settings:
#Port 22
#AddressFamily any
#ListenAddress 0.0.0.0
#ListenAddress ::

#HostKey __PROGRAMDATA__/ssh/ssh_host_rsa_key
#HostKey __PROGRAMDATA__/ssh/ssh_host_dsa_key
#HostKey __PROGRAMDATA__/ssh/ssh_host_ecdsa_key
#HostKey __PROGRAMDATA__/ssh/ssh_host_ed25519_key

# Ciphers and keying
#RekeyLimit default none

# Logging
#SyslogFacility AUTH
#LogLevel INFO

# Authentication:

#LoginGraceTime 2m
#PermitRootLogin prohibit-password
#StrictModes yes
#MaxAuthTries 6
#MaxSessions 10

#PubkeyAuthentication yes

# The default is to check both .ssh/authorized_keys and .ssh/authorized_keys2
# but this is overridden so installations will only check .ssh/authorized_keys
AuthorizedKeysFile  .ssh/authorized_keys

#AuthorizedPrincipalsFile none

# For this to work you will also need host keys in %programData%/ssh/ssh_known_hosts
#HostbasedAuthentication no
# Change to yes if you don't trust ~/.ssh/known_hosts for
# HostbasedAuthentication
#IgnoreUserKnownHosts no
# Don't read the user's ~/.rhosts and ~/.shosts files
#IgnoreRhosts yes

# To disable tunneled clear text passwords, change to no here!
#PasswordAuthentication yes
#PermitEmptyPasswords no

#AllowAgentForwarding yes
#AllowTcpForwarding yes
#GatewayPorts no
#PermitTTY yes
#PrintMotd yes
#PrintLastLog yes
#TCPKeepAlive yes
#UseLogin no
#PermitUserEnvironment no
#ClientAliveInterval 0
#ClientAliveCountMax 3
#UseDNS no
#PidFile /var/run/sshd.pid
#MaxStartups 10:30:100
#PermitTunnel no
#ChrootDirectory none
#VersionAddendum none

# no default banner path
#Banner none

# override default of no subsystems
Subsystem   sftp    sftp-server.exe

# Example of overriding settings on a per-user basis
#Match User anoncvs
#   AllowTcpForwarding no
#   PermitTTY no
#   ForceCommand cvs server
I have spent a lot of time to resolve this error. But not succeeded. Please help in solving this problem. Thanks in advance.
#1 2018-07-14 15:26:02
- TheMohawkNinja
- Member
- Registered: 2017-07-11
- Posts: 39
[SOLVED] SSH into Windows permission denied
Hello,
I am trying to give my Arch machine the capability to SSH (via OpenSSH) into a Windows 10 machine. I’ve gotten it to the point where it will connect to the Windows 10 machine, however when I put in the password for the user, I receive a «Permission denied, please try again.» error.
-
I made sure that the user wasn’t attached to a Microsoft account to avoid potential authentication issues (it’s just a straight username and password).
-
I logged in to the user’s account in-case the profile would need to be generated.
-
I have tried both setting the user as a standard and administrator account.
-
I have made sure that port 22 is open on inbound traffic on the Windows 10 machine.
Unless the router is blocking local SSH access (which I won’t have the ability to check until Monday due to currently renting a router from my ISP which I discovered means I can’t do any configurations to said router), I have run out of things that I can think of to look for.
Last edited by TheMohawkNinja (2018-07-14 23:50:03)
#2 2018-07-14 15:30:29
- ewaller
- Administrator

- From: Pasadena, CA
- Registered: 2009-07-13
- Posts: 19,003

Re: [SOLVED] SSH into Windows permission denied
Post the actual output of the ssh command.
When you first tried, did ssh tell you that it could not verify the authenticity of the machine, and did you want to add the fingerprint of that machine to your known hosts? Did you?
This sounds like Windows «security» is rejecting the long in request. Check your logs on windows and see if it blocked a log on attempt
Nothing is too wonderful to be true, if it be consistent with the laws of nature — Michael Faraday
Sometimes it is the people no one can imagine anything of who do the things no one can imagine. — Alan Turing
—
How to Ask Questions the Smart Way
#3 2018-07-14 16:40:03
- TheMohawkNinja
- Member
- Registered: 2017-07-11
- Posts: 39
Re: [SOLVED] SSH into Windows permission denied
ewaller wrote:
Post the actual output of the ssh command.
ssh root@192.160.0.2
root@192.168.0.2’s password:
Permission denied, please try again.
ewaller wrote:
When you first tried, did ssh tell you that it could not verify the authenticity of the machine, and did you want to add the fingerprint of that machine to your known hosts? Did you?
Yes, I did add the fingerprint to the known hosts list, as I was prompted to.
ewaller wrote:
This sounds like Windows «security» is rejecting the long in request. Check your logs on windows and see if it blocked a log on attempt
Event Viewer seems to contradict what’s happening. It records the key check, a successful login of the user, and then an immediate logout of the user.
An account was logged off.

Subject:
	Security ID:		Ben_PCroot
	Account Name:		root
	Account Domain:		Ben_PC
	Logon ID:		0x25AC185

Logon Type:			2

This event is generated when a logon session is destroyed. It may be positively correlated with a logon event using the Logon ID value. Logon IDs are only unique between reboots on the same computer.

------------------------------------------------------------

An account was logged off.

Subject:
	Security ID:		Ben_PCroot
	Account Name:		root
	Account Domain:		Ben_PC
	Logon ID:		0x25AC1A7

Logon Type:			2

This event is generated when a logon session is destroyed. It may be positively correlated with a logon event using the Logon ID value. Logon IDs are only unique between reboots on the same computer.

------------------------------------------------------------

Special privileges assigned to new logon.

Subject:
	Security ID:		Ben_PCroot
	Account Name:		root
	Account Domain:		Ben_PC
	Logon ID:		0x25AC185

Privileges:		SeSecurityPrivilege
			SeTakeOwnershipPrivilege
			SeLoadDriverPrivilege
			SeBackupPrivilege
			SeRestorePrivilege
			SeDebugPrivilege
			SeSystemEnvironmentPrivilege
			SeImpersonatePrivilege

------------------------------------------------------------

An account was successfully logged on.

Subject:
	Security ID:		SYSTEM
	Account Name:		BEN_PC$
	Account Domain:		WORKGROUP
	Logon ID:		0x3E7

Logon Information:
	Logon Type:		2
	Restricted Admin Mode:	-
	Virtual Account:		No
	Elevated Token:		No

Impersonation Level:		Impersonation

New Logon:
	Security ID:		Ben_PCroot
	Account Name:		root
	Account Domain:		Ben_PC
	Logon ID:		0x25AC1A7
	Linked Logon ID:		0x25AC185
	Network Account Name:	-
	Network Account Domain:	-
	Logon GUID:		{00000000-0000-0000-0000-000000000000}

Process Information:
	Process ID:		0x1640
	Process Name:		C:WindowsSystem32svchost.exe

Network Information:
	Workstation Name:	BEN_PC
	Source Network Address:	-
	Source Port:		-

Detailed Authentication Information:
	Logon Process:		Advapi
	Authentication Package:	MICROSOFT_AUTHENTICATION_PACKAGE_V1_0
	Transited Services:	-
	Package Name (NTLM only):	-
	Key Length:		0

This event is generated when a logon session is created. It is generated on the computer that was accessed.

The subject fields indicate the account on the local system which requested the logon. This is most commonly a service such as the Server service, or a local process such as Winlogon.exe or Services.exe.

The logon type field indicates the kind of logon that occurred. The most common types are 2 (interactive) and 3 (network).

The New Logon fields indicate the account for whom the new logon was created, i.e. the account that was logged on.

The network fields indicate where a remote logon request originated. Workstation name is not always available and may be left blank in some cases.

The impersonation level field indicates the extent to which a process in the logon session can impersonate.

The authentication information fields provide detailed information about this specific logon request.
	- Logon GUID is a unique identifier that can be used to correlate this event with a KDC event.
	- Transited services indicate which intermediate services have participated in this logon request.
	- Package name indicates which sub-protocol was used among the NTLM protocols.
	- Key length indicates the length of the generated session key. This will be 0 if no session key was requested.

------------------------------------------------------------

An account was successfully logged on.

Subject:
	Security ID:		SYSTEM
	Account Name:		BEN_PC$
	Account Domain:		WORKGROUP
	Logon ID:		0x3E7

Logon Information:
	Logon Type:		2
	Restricted Admin Mode:	-
	Virtual Account:		No
	Elevated Token:		Yes

Impersonation Level:		Impersonation

New Logon:
	Security ID:		Ben_PCroot
	Account Name:		root
	Account Domain:		Ben_PC
	Logon ID:		0x25AC185
	Linked Logon ID:		0x25AC1A7
	Network Account Name:	-
	Network Account Domain:	-
	Logon GUID:		{00000000-0000-0000-0000-000000000000}

Process Information:
	Process ID:		0x1640
	Process Name:		C:WindowsSystem32svchost.exe

Network Information:
	Workstation Name:	BEN_PC
	Source Network Address:	-
	Source Port:		-

Detailed Authentication Information:
	Logon Process:		Advapi
	Authentication Package:	MICROSOFT_AUTHENTICATION_PACKAGE_V1_0
	Transited Services:	-
	Package Name (NTLM only):	-
	Key Length:		0

This event is generated when a logon session is created. It is generated on the computer that was accessed.

The subject fields indicate the account on the local system which requested the logon. This is most commonly a service such as the Server service, or a local process such as Winlogon.exe or Services.exe.

The logon type field indicates the kind of logon that occurred. The most common types are 2 (interactive) and 3 (network).

The New Logon fields indicate the account for whom the new logon was created, i.e. the account that was logged on.

The network fields indicate where a remote logon request originated. Workstation name is not always available and may be left blank in some cases.

The impersonation level field indicates the extent to which a process in the logon session can impersonate.

The authentication information fields provide detailed information about this specific logon request.
	- Logon GUID is a unique identifier that can be used to correlate this event with a KDC event.
	- Transited services indicate which intermediate services have participated in this logon request.
	- Package name indicates which sub-protocol was used among the NTLM protocols.

------------------------------------------------------------

An account was successfully logged on.

Subject:
	Security ID:		SYSTEM
	Account Name:		BEN_PC$
	Account Domain:		WORKGROUP
	Logon ID:		0x3E7

Logon Information:
	Logon Type:		2
	Restricted Admin Mode:	-
	Virtual Account:		No
	Elevated Token:		No

Impersonation Level:		Impersonation

New Logon:
	Security ID:		Ben_PCroot
	Account Name:		root
	Account Domain:		Ben_PC
	Logon ID:		0x25AC1A7
	Linked Logon ID:		0x25AC185
	Network Account Name:	-
	Network Account Domain:	-
	Logon GUID:		{00000000-0000-0000-0000-000000000000}

Process Information:
	Process ID:		0x1640
	Process Name:		C:WindowsSystem32svchost.exe

Network Information:
	Workstation Name:	BEN_PC
	Source Network Address:	-
	Source Port:		-

Detailed Authentication Information:
	Logon Process:		Advapi
	Authentication Package:	MICROSOFT_AUTHENTICATION_PACKAGE_V1_0
	Transited Services:	-
	Package Name (NTLM only):	-
	Key Length:		0

This event is generated when a logon session is created. It is generated on the computer that was accessed.

The subject fields indicate the account on the local system which requested the logon. This is most commonly a service such as the Server service, or a local process such as Winlogon.exe or Services.exe.

The logon type field indicates the kind of logon that occurred. The most common types are 2 (interactive) and 3 (network).

The New Logon fields indicate the account for whom the new logon was created, i.e. the account that was logged on.

The network fields indicate where a remote logon request originated. Workstation name is not always available and may be left blank in some cases.

The impersonation level field indicates the extent to which a process in the logon session can impersonate.

The authentication information fields provide detailed information about this specific logon request.
	- Logon GUID is a unique identifier that can be used to correlate this event with a KDC event.
	- Transited services indicate which intermediate services have participated in this logon request.
	- Package name indicates which sub-protocol was used among the NTLM protocols.
	- Key length indicates the length of the generated session key. This will be 0 if no session key was requested.

------------------------------------------------------------

An account was successfully logged on.

Subject:
	Security ID:		SYSTEM
	Account Name:		BEN_PC$
	Account Domain:		WORKGROUP
	Logon ID:		0x3E7

Logon Information:
	Logon Type:		2
	Restricted Admin Mode:	-
	Virtual Account:		No
	Elevated Token:		Yes

Impersonation Level:		Impersonation

New Logon:
	Security ID:		Ben_PCroot
	Account Name:		root
	Account Domain:		Ben_PC
	Logon ID:		0x25AC185
	Linked Logon ID:		0x25AC1A7
	Network Account Name:	-
	Network Account Domain:	-
	Logon GUID:		{00000000-0000-0000-0000-000000000000}

Process Information:
	Process ID:		0x1640
	Process Name:		C:WindowsSystem32svchost.exe

Network Information:
	Workstation Name:	BEN_PC
	Source Network Address:	-
	Source Port:		-

Detailed Authentication Information:
	Logon Process:		Advapi
	Authentication Package:	MICROSOFT_AUTHENTICATION_PACKAGE_V1_0
	Transited Services:	-
	Package Name (NTLM only):	-
	Key Length:		0

This event is generated when a logon session is created. It is generated on the computer that was accessed.

The subject fields indicate the account on the local system which requested the logon. This is most commonly a service such as the Server service, or a local process such as Winlogon.exe or Services.exe.

The logon type field indicates the kind of logon that occurred. The most common types are 2 (interactive) and 3 (network).

The New Logon fields indicate the account for whom the new logon was created, i.e. the account that was logged on.

The network fields indicate where a remote logon request originated. Workstation name is not always available and may be left blank in some cases.

The impersonation level field indicates the extent to which a process in the logon session can impersonate.

The authentication information fields provide detailed information about this specific logon request.
	- Logon GUID is a unique identifier that can be used to correlate this event with a KDC event.
	- Transited services indicate which intermediate services have participated in this logon request.
	- Package name indicates which sub-protocol was used among the NTLM protocols.
	- Key length indicates the length of the generated session key. This will be 0 if no session key was requested.

A logon was attempted using explicit credentials.

Subject:
	Security ID:		SYSTEM
	Account Name:		BEN_PC$
	Account Domain:		WORKGROUP
	Logon ID:		0x3E7
	Logon GUID:		{00000000-0000-0000-0000-000000000000}

Account Whose Credentials Were Used:
	Account Name:		root
	Account Domain:		Ben_PC
	Logon GUID:		{00000000-0000-0000-0000-000000000000}

Target Server:
	Target Server Name:	localhost
	Additional Information:	localhost

Process Information:
	Process ID:		0x1640
	Process Name:		C:WindowsSystem32svchost.exe

Network Information:
	Network Address:	-
	Port:			-

This event is generated when a process attempts to log on an account by explicitly specifying that account’s credentials.  This most commonly occurs in batch-type configurations such as scheduled tasks, or when using the RUNAS command.

------------------------------------------------------------

Cryptographic operation.

Subject:
	Security ID:		SYSTEM
	Account Name:		BEN_PC$
	Account Domain:		WORKGROUP
	Logon ID:		0x3E7

Cryptographic Parameters:
	Provider Name:	Microsoft Software Key Storage Provider
	Algorithm Name:	RSA
	Key Name:	Ssh-Rsa
	Key Type:	Machine key.

Cryptographic Operation:
	Operation:	Open Key.
	Return Code:	0x0

------------------------------------------------------------

Key file operation.

Subject:
	Security ID:		SYSTEM
	Account Name:		BEN_PC$
	Account Domain:		WORKGROUP
	Logon ID:		0x3E7

Process Information:
	Process ID:		5696
	Process Creation Time:	2018-07-14T14:46:59.595658200Z

Cryptographic Parameters:
	Provider Name:	Microsoft Software Key Storage Provider
	Algorithm Name:	UNKNOWN
	Key Name:	Ssh-Rsa
	Key Type:	Machine key.

Key File Operation Information:
	File Path:	C:ProgramDataMicrosoftCryptoKeys<key file name omitted>
	Operation:	Read persisted key from file.
	Return Code:	0x0

------------------------------------------------------------

Key migration operation.

Subject:
	Security ID:		SYSTEM
	Account Name:		BEN_PC$
	Account Domain:		WORKGROUP
	Logon ID:		0x3E7

Process Information:
	Process ID:		5696
	Process Creation Time:	2018-07-14T14:46:59.595658200Z

Cryptographic Parameters:
	Provider Name:	Microsoft Software Key Storage Provider
	Algorithm Name:	RSA
	Key Name:	Ssh-Rsa
	Key Type:	Machine key.

Additional Information:
	Operation:	Export of persistent cryptographic key.
	Return Code:	0x0

----------------------------------------------------------

Cryptographic operation.

Subject:
	Security ID:		SYSTEM
	Account Name:		BEN_PC$
	Account Domain:		WORKGROUP
	Logon ID:		0x3E7

Cryptographic Parameters:
	Provider Name:	Microsoft Software Key Storage Provider
	Algorithm Name:	RSA
	Key Name:	Ssh-Rsa
	Key Type:	Machine key.

Cryptographic Operation:
	Operation:	Open Key.
	Return Code:	0x0

------------------------------------------------------------

Key file operation.

Subject:
	Security ID:		SYSTEM
	Account Name:		BEN_PC$
	Account Domain:		WORKGROUP
	Logon ID:		0x3E7

Process Information:
	Process ID:		5696
	Process Creation Time:	2018-07-14T14:46:59.595658200Z

Cryptographic Parameters:
	Provider Name:	Microsoft Software Key Storage Provider
	Algorithm Name:	UNKNOWN
	Key Name:	Ssh-Rsa
	Key Type:	Machine key.

Key File Operation Information:
	File Path:	C:ProgramDataMicrosoftCryptoKeys<key file name omitted>
	Operation:	Read persisted key from file.
	Return Code:	0x0
Last edited by TheMohawkNinja (2018-07-14 16:40:54)
#4 2018-07-14 16:43:09
- loqs
- Member
- Registered: 2014-03-06
- Posts: 15,636
Re: [SOLVED] SSH into Windows permission denied
`ssh -vvv root@192.160.0.2` should provide more output that might explain the disconnect
#5 2018-07-14 16:54:45
- ewaller
- Administrator
- From: Pasadena, CA
- Registered: 2009-07-13
- Posts: 19,003
Re: [SOLVED] SSH into Windows permission denied
So, you are hitting the Windows box and you are trying to log in as root. Is that the user name you created on Windows?
Nothing is too wonderful to be true, if it be consistent with the laws of nature — Michael Faraday
Sometimes it is the people no one can imagine anything of who do the things no one can imagine. — Alan Turing
—
How to Ask Questions the Smart Way
#6 2018-07-14 18:41:25
- ua4000
- Member
- Registered: 2015-10-14
- Posts: 276
Re: [SOLVED] SSH into Windows permission denied
What happens, if you install and start Putty on Windows, and try to ssh with your credentials into Windows?
#7 2018-07-14 23:49:49
- TheMohawkNinja
- Member
- Registered: 2017-07-11
- Posts: 39
Re: [SOLVED] SSH into Windows permission denied
loqs wrote:
`ssh -vvv root@192.160.0.2` should provide more output that might explain the disconnect
I forgot about verbosity lol.
After a few hours of a rabbit hole of Google searches related to what outputted from that, I managed to track down the issue: Password authentication was commented out in the configuration file and the keys that generated were in someway corrupted or not being read correctly which led to OpenSSH Server service not starting.
Linux
Windows
This document describes common errors that you may run into when connecting to
virtual machine (VM) instances using SSH, ways to resolve errors, and
methods for diagnosing failed SSH connections.
Use the SSH troubleshooting tool to help determine why an SSH connection failed.
The troubleshooting tool performs the following tests to check for the cause of
failed SSH connections:
- User permissions tests: Checks if you have the required IAM
permissions to connect to the VM using SSH. - Network connectivity tests: Checks if the VM is connected to the network.
- VM instance status tests: Checks the VM’s CPU status to see if the VM is
running. - VPC settings tests: Checks the default SSH port.
Run the troubleshooting tool
You can use the Google Cloud console or the Google Cloud CLI to check for
networking problems and user permission errors that might cause SSH
connections to fail.
Permissions required for this task
To perform this task, you must have the following
permissions:
networkmanagement.connectivitytests.createon the VMnetworkmanagement.connectivitytests.deleteon the VMnetworkmanagement.connectivitytests.geton the VM
If you are missing any of the preceding permissions, the troubleshooting
tool skips network connectivity tests.
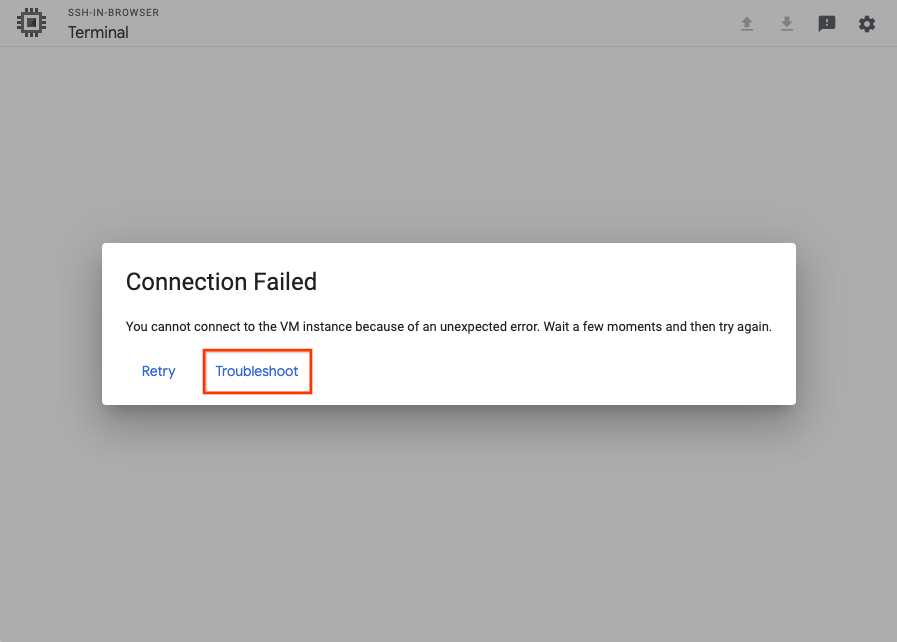
Console
After an SSH connection fails, you have the option to Retry the
connection, or Troubleshoot the connection using the SSH-in-browser
troubleshooting tool.
To run the troubleshooting tool, click Troubleshoot.
gcloud
Run the troubleshooting tool by using the
gcloud compute ssh command:
gcloud compute ssh VM_NAME
    --troubleshoot
Replace VM_NAME with the name of the VM that you
can’t connect to.
The tool prompts you to provide permission to perform the troubleshooting
tests.
Review the results
After running the troubleshooting tool, do the following:
- Review the test results to understand why the VM’s SSH connection isn’t
working. - Resolve SSH connections by performing the remediation steps provided by
the tool. -
Try reconnecting to the VM.
If the connection isn’t successful, try manually troubleshooting by doing
the following:- Debug issues using the serial console
- Ensure the VM is booting normally
Common SSH errors
The following are examples of common errors you might encounter when you use SSH
to connect to Compute Engine VMs.
SSH-in-Browser errors
The following error might occur when you connect to your VM using the
SSH-in-browser from
the Google Cloud console:
Unauthorized
Error 401
This error occurs if your user is part of an organization that is
managed from within Google Workspace and there is an active
restriction in the Workspace policy that prevents users from
accessing SSH-in-browser and the serial console within Google Cloud.
To resolve this issue, have a Google Workspace admin do the following:
-
Confirm that Google Cloud is enabled for the organization.
If Google Cloud is disabled, enable it and retry the connection.
-
Confirm that services that aren’t controlled individually are enabled.
If these services are disabled, enable them and retry the connection.
If the problem persists after enabling Google Cloud settings in
Google Workspace, do the following:
-
Capture the network traffic in an HTTP Archive Format (HAR) file
starting from when you start the SSH-in-Browser SSH connection. -
Create a Cloud Customer Care case and attache the HAR file.
Linux errors
Permission denied (publickey)
The following error might occur when you connect to your VM:
USERNAME@VM_EXTERNAL_IP: Permission denied (publickey).
This error can occur for several reasons. The following are some of the most
common causes of this error:
-
You used an SSH key stored in metadata to connect to a VM that has OS Login
enabled. If OS Login is enabled on your project, your VM doesn’t accept
SSH keys that are stored in metadata. If you aren’t sure if OS Login is
enabled, see
Checking if OS Login is configured.To resolve this issue, try one of the following:
- Connect to your VM using the Google Cloud console or the Google Cloud CLI. For
more information, see
Connecting to VMs. - Add your SSH keys to OS Login. For more information, see
Add keys to VMs that use OS Login. - Disable OS Login. For more information, see
Disabling OS Login.
- Connect to your VM using the Google Cloud console or the Google Cloud CLI. For
-
You used an SSH key stored in an OS Login profile to connect to a VM that
doesn’t have OS Login enabled. If you disable OS Login, your VM doesn’t
accept SSH keys that were stored in your OS Login profile. If you aren’t sure
if OS Login is enabled, see
Checking if OS Login is configured.To resolve this issue, try one of the following:
- Connect to your VM using the Google Cloud console or the Google Cloud CLI. For
more information, see
Connecting to VMs. - Enable OS Login. For more information, see
Enabling OS Login. - Add your SSH keys to metadata. For more information, see
Add SSH keys to VMs that use metadata-based SSH keys.
- Connect to your VM using the Google Cloud console or the Google Cloud CLI. For
-
The VM has OS Login enabled, but you don’t have sufficient IAM permissions
to use OS Login. To connect to a VM that has OS Login enabled, you must have
the permissions required for OS Login. If you aren’t sure if OS Login is
enabled, see
Checking if OS Login is configured.To resolve this issue,
grant the required OS Login IAM roles. -
Your key expired and Compute Engine deleted your
~/.ssh/authorized_keys
file. If you manually added SSH keys to your VM and then connected to your
VM using the Google Cloud console, Compute Engine created a new key pair for
your connection. After the new key pair expired, Compute Engine
deleted your~/.ssh/authorized_keysfile in the VM, which included your
manually added SSH key.To resolve this issue, try one of the following:
- Connect to your VM using the Google Cloud console or the Google Cloud CLI. For
more information, see
Connecting to VMs. - Re-add your SSH key to metadata. For more information, see
Add SSH keys to VMs that use metadata-based SSH keys.
- Connect to your VM using the Google Cloud console or the Google Cloud CLI. For
-
You connected using a third-party tool and your SSH command is
misconfigured. If you connect using thesshcommand but don’t specify
a path to your private key or you specify an incorrect path to your private
key, your VM refuses your connection.To resolve this issue, try one of the following:
- Run the following command:
ssh -i PATH_TO_PRIVATE_KEY USERNAME@EXTERNAL_IP
Replace the following:
PATH_TO_PRIVATE_KEY: the
path to your private SSH key file.USERNAME: the username of the user connecting
to the instance. If you manage your SSH keys in metadata, the username
is what you specified when you
created the SSH key.
For OS Login accounts,
the username is defined in your Google profile.EXTERNAL_IP: The external IP address for your
VM.
- Connect to your VM using the Google Cloud console or the Google Cloud CLI. When
you use these tools to connect, Compute Engine manages key creation for
you. For more information, see
Connecting to VMs.
- Run the following command:
-
Your VM’s guest environment is not running. If this is the first time that
you are connecting to your VM and the guest environment is not running, then
the VM might refuse your SSH connection request.To resolve this issue, do the following:
- Restart the VM.
- In the Google Cloud console, inspect the system startup logs in the
serial port output to determine if the guest environment is
running. For more information, see Validating the guest environment. - If the guest environment is not running, manually install the guest
environment by cloning VM’s boot disk and using a startup script.
-
The
sshddaemon isn’t running or isn’t configured
properly. Thesshddaemon enables SSH connections. If it’s misconfigured
or not running, you can’t connect to your VM.To resolve this issue, try the following:
- Review the user guide for your operating system to ensure that your
sshd_config
is set up correctly. -
If you previously modified the folder permissions on your VM, change them
back to the defaults:- 700 on the
.sshdirectory - 644 on the public key, which is stored in the
~/.ssh/authorized_keys
folder
Connect to the VM’s serial console as the root user, and modify the folder
permissions:chmod 700 /home/USERNAME/.ssh; chmod 644 /home/USERNAME/.ssh/authorized_keys
Replace USERNAME with the username for which you want to
modify folder permissions. - 700 on the
- Review the user guide for your operating system to ensure that your
-
The VM’s boot disk is full. When an SSH connection is established, the
guest environment adds the session’s public SSH key to the
~/.ssh/authorized_keysfile. If the disk is full, the connection fails.To resolve this issue, do one or more of the following:
- Confirm the boot disk is full by
debugging with the serial console to identify
no space left errors. - Resize the
disk. - If you know which files are using the disk space,
create a startup script that deletes
unnecessary files and frees space. After the VM starts and you connect
to it, delete thestartup-scriptmetadata.
- Confirm the boot disk is full by
-
The permissions or ownership on
$HOME,$HOME/.ssh, or
$HOME/.ssh/authorized_keysis wrong.-
Ownership: The guest environment stores a user’s public SSH key
in the$HOME/.ssh/authorized_keysfile. The owner of the$HOME
directory, the$HOME/.sshdirectory, and theauthorized_keysfile must
be the same as the user connecting to the VM. -
Unix permissions: The guest environment requires the following
Unix permissions:Directory/File Required Unix permission The $HOMEdirectory0755or0700The $HOME/.sshdirectory0700The authorized_keysfile0600
-
Connection failed
The following errors might occur when you connect to your VM from the
Google Cloud console or the gcloud CLI:
-
The Google Cloud console:
Connection Failed

We are unable to connect to the VM on port 22.
-
The gcloud CLI:
ERROR: (gcloud.compute.ssh) [/usr/bin/ssh] exited with return code [255].
These errors can occur for several reasons. The following are some of the most
common causes of the errors:
-
The VM is booting up and
sshdis not running yet. You can’t
connect to a VM before it is running.To resolve this issue, wait until the VM has finished booting and try to
connect again. -
sshdis running on a custom port. If you configuredsshdto run on a
port other than port 22, you won’t be able to connect to your VM.To resolve this issue, create a custom firewall rule allowing
tcptraffic on
the port that yoursshdis running on using the following command:gcloud compute firewall-rules create FIREWALL_NAME --allow tcp:PORT_NUMBER
For more information about creating custom firewall rules, see
Creating firewall rules. -
The SSH firewall rule is missing or doesn’t allow traffic from
IAP or the public internet. SSH connections are refused if
firewall rules do not allow connections from IAP or TCP ingress
traffic for IP range0.0.0.0/0.To resolve this issue, do one of the following:
-
If you use Identity-Aware Proxy (IAP) for TCP forwarding, update your custom
firewall rule to accept traffic from IAP, then check your IAM
permissions.- Update your custom firewall rule to allow traffic from
35.235.240.0/20,
the IP address range that IAP uses for TCP forwarding. For
more information, see
Create a firewall rule. - Grant permissions to use IAP TCP forwarding,
if you haven’t already done so.
- Update your custom firewall rule to allow traffic from
-
If you don’t use IAP update your custom firewall rule to
allow ingress SSH traffic.- Update your custom firewall rule to
Allow ingress ssh connections to VMs.
- Update your custom firewall rule to
-
-
The SSH connection failed after you upgraded the VM’s kernel. A VM might
experience a kernel panic after a kernel update, causing the VM to become
inaccessible.To resolve this issue, do the following:
- Mount the disk to another
VM. - Update the
grub.cfgfile
to use the previous version of the kernel. - Attach the disk to the
unresponsive VM. - Verify that the status of the VM is
RUNNINGby using the
gcloud compute instances describecommand. - Reinstall the kernel.
- Restart the VM.
Alternatively, if you created a snapshot of the boot disk before
upgrading the VM, use the snapshot to create a VM. - Mount the disk to another
-
The
sshddaemon isn’t running or isn’t configured
properly. Thesshddaemon enables SSH connections. If it’s misconfigured
or not running, you can’t connect to your VM.To resolve this issue, try the following:
- Review the user guide for your operating system to ensure that your
sshd_config
is set up correctly. -
If you previously modified the folder permissions on your VM, change them
back to the defaults:- 700 on the
.sshdirectory - 644 on the public key, which is stored in the
~/.ssh/authorized_keys
folder
Connect to the VM’s serial console as the root user, and modify the folder
permissions:chmod 700 /home/USERNAME/.ssh; chmod 644 /home/USERNAME/.ssh/authorized_keys
Replace USERNAME with the username for which you want to
modify folder permissions. - 700 on the
- Review the user guide for your operating system to ensure that your
-
The VM isn’t booting and you can’t connect using SSH or the serial
console. If the VM is inaccessible, then your OS might be corrupted. If the
boot disk doesn’t boot, you can diagnose the
issue.
If you want to recover the corrupted VM and retrieve data, see Recovering a
corrupted VM or a full boot disk. -
The VM is booting in maintenance mode. When booting in maintenance mode,
the VM doesn’t accept SSH connections, but you can connect to the VM’s serial
console and log in as the root user.To resolve this issue, do the following:
-
If you haven’t set a root password for the VM, use a
metadata startup script to run
the following command during boot:echo "NEW_PASSWORD" | chpasswd
Replace
NEW_PASSWORDwith a password of your choice. -
Restart the VM.
-
Connect to the VM’s serial console
and log in as the root user.
-
Failed to connect to backend
The following errors might occur when you connect to your VM from the
Google Cloud console or the gcloud CLI:
-
The Google Cloud console:
-- Connection via Cloud Identity-Aware Proxy Failed

-- Code: 4003

-- Reason: failed to connect to backend
-
The gcloud CLI:
ERROR: (gcloud.compute.start-iap-tunnel) Error while connecting [4003: u'failed to connect to backend'].
These errors occur when you try to use SSH to connect to a VM that doesn’t have
a public IP address and for which you haven’t configured Identity-Aware Proxy on port
22.
To resolve this issue
Create a firewall rule on
port 22 that allows ingress traffic from Identity-Aware Proxy.
Host key does not match
The following error might occur when you connect to your VM:
Host key for server IP_ADDRESS does not match
This error occurs when the host key in the ~/.ssh/known_hosts file
doesn’t match the VM’s host key.
To resolve this issue, delete the host key from the ~/.ssh/known_hosts
file, then retry the connection.
Metadata value is too large
The following error might occur when you try to add a new SSH key to metadata:
ERROR:"Value for field 'metadata.items[X].value' is too large: maximum size 262144 character(s); actual size NUMBER_OF_CHARACTERS."
Metadata values have a
maximum limit of 256 KB.
To mitigate this limitation, do one of the following:
- Delete expired or duplicated SSH keys from project or instance metadata. For more
information, see Update metadata on a running VM. - Use OS Login.
Windows errors
Permission denied, please try again
The following error might occur when you connect to your VM:
USERNAME@compute.INSTANCE_ID's password:
Permission denied, please try again.
This error indicates the user trying to connect to the VM doesn’t exist on the
VM. The following are some of the most common causes of this error:
-
Your version of gcloud CLI is out of date
If gcloud CLI is out of date, you may be attempting to connect
using a username that is not configured. To resolve this issue,
update the gcloud CLI. -
You tried to connect to a Windows VM that doesn’t have SSH enabled.
To resolve this error, set the
enable-windows-sshkey toTRUEin project
or instance metadata. For more information about setting medata, see
Set custom metadata.
Permission denied (publickey,keyboard-interactive)
The following error might occur when you connect to a VM that doesn’t have SSH
enabled:
Permission denied (publickey,keyboard-interactive).
To resolve this error, set the enable-windows-ssh key to TRUE in project
or instance metadata. For more information about setting medata, see
Set custom metadata.
Could not SSH into the instance
The following error might occur when you connect to your VM from the
gcloud CLI:
ERROR: (gcloud.compute.ssh) Could not SSH into the instance.
It is possible that your SSH key has not propagated to the instance yet.
Try running this command again.  If you still cannot connect, verify that the firewall and instance are set to accept ssh traffic.
This error can occur for several reasons. The following are some of the most
common causes of the errors:
-
You tried to connect to a Windows VM that doesn’t have SSH installed.
To resolve this issue, follow the instructions to
Enable SSH for Windows on a running VM. -
The
sshddaemon isn’t running or isn’t configured properly. Thesshd
daemon enables SSH connections. If it’s misconfigured or not running, you
can’t connect to a VM.To resolve this issue, review
OpenSSH Server configuration for Windows Server and Windows
to ensure thatsshdis set up correctly.
Connection timed out
Timed out SSH connections might be caused by one of the following:
-
The VM hasn’t finished booting. Allow a short time for the VM to boot.
To resolve this issue, wait until the VM has finished booting and try to
connect again. -
The SSH package isn’t installed. Windows VMs require you to install the
google-compute-engine-sshpackage before you can connect using SSH.To resolve this issue, install the SSH package.
Diagnose failed SSH connections
The following sections describe steps you can take to diagnose the cause of
failed SSH connections and the steps you can take to fix your connections.
Before you diagnose failed SSH connections, complete the following steps:
- Install or update to the latest version of the
Google Cloud CLI. - Run connectivity tests.
- If you are using a custom Linux image that isn’t running the guest environment,
Install the Linux guest environment. - If you use OS Login, view
Troubleshooting OS Login.
Diagnosis methods for Linux and Windows VMs
Test connectivity
You might not be able to SSH to a VM instance because of connectivity issues
linked to firewalls, network connection, or the user account. Follow the steps
in this section to identify any connectivity issues.
Check your firewall rules
Compute Engine provisions each project with a default set of firewall
rules that permit SSH traffic. If you are unable to access your instance, use
the gcloud compute command-line tool to
check your list of firewalls
and ensure that the default-allow-ssh rule is present.
On your local workstation, run the following command:
gcloud compute firewall-rules list
If the firewall rule is missing, add it back:
gcloud compute firewall-rules create default-allow-ssh
    --allow tcp:22
To view all data associated with the default-allow-ssh firewall rule in your
project, use the
gcloud compute firewall-rules describe command:
gcloud compute firewall-rules describe default-allow-ssh
    --project=project-id
For more information about firewall rules, see
Firewall rules in Google Cloud.
Test the network connection
To determine whether the network connection is working, test the TCP handshake:
-
Obtain the external
natIPfor your VM:gcloud compute instances describe VM_NAME --format='get(networkInterfaces[0].accessConfigs[0].natIP)'Replace
VM_NAMEwith the name of the VM you can’t
connect to. -
Test the network connection to your VM from your workstation:
Linux, Windows 2019/2022, and macOS
curl -vso /dev/null --connect-timeout 5 EXTERNAL_IP:PORT_NUMBER
Replace the following:
EXTERNAL_IP: the external IP address you
obtained in the previous stepPORT_NUMBER: the port number
If the TCP handshake is successful, the output is similar to the following:
Expire in 0 ms for 6 (transfer 0x558b3289ffb0)
Expire in 5000 ms for 2 (transfer 0x558b3289ffb0)
Trying 192.168.0.4...
TCP_NODELAY set
Expire in 200 ms for 4 (transfer 0x558b3289ffb0)
Connected to 192.168.0.4 (192.168.0.4) port 443 (#0)
> GET / HTTP/1.1
> Host: 192.168.0.4:443
> User-Agent: curl/7.64.0
> Accept: */*
>
Empty reply from server
Connection #0 to host 192.168.0.4 left intact
The
Connected toline indicates a successful TCP handshake.Windows 2012 and 2016
PS C:> New-Object System.Net.Sockets.TcpClient('EXTERNAL_IP',PORT_NUMBER)Replace the following:
EXTERNAL_IP: the external IP you obtained in
the previous stepPORT_NUMBER: the port number
If the TCP handshake is successful, the output is similar to the following:
Available           : 0
Client              : System.Net.Sockets.Socket
Connected           : True
ExclusiveAddressUse : False
ReceiveBufferSize   : 131072
SendBufferSize      : 131072
ReceiveTimeout      : 0
SendTimeout         : 0
LingerState         : System.Net.Sockets.LingerOption
NoDelay             : False
The
Connected: Trueline indicates a successful TCP handshake.
If the TCP handshake completes successfully, a software firewall rule is
not blocking the connection, the OS is correctly forwarding packets, and a
server is listening on the destination port. If the TCP handshake completes
successfully but the VM doesn’t accept SSH connections, the issue might be
with that the sshd daemon is misconfigured or not running properly. Review
the user guide for your operating system to ensure that your sshd_config
is set up correctly.
To run connectivity tests for analyzing the VPC network path configuration
between two VMs and check whether the programmed configuration should allow the
traffic, see Check for misconfigured firewall rules in Google Cloud.
Connect as a different user
The issue that prevents you from logging in might be limited to your user
account. For example, the permissions on the ~/.ssh/authorized_keys file
on the instance might not be set correctly for the user.
Try logging in as a different user with the gcloud CLI by
specifying ANOTHER_USERNAME with the SSH request.
The gcloud CLI updates the project’s metadata to add the
new user and allow SSH access.
gcloud compute ssh ANOTHER_USERNAME@VM_NAME
Replace the following:
ANOTHER_USERNAMEis a username other than your own
usernameVM_NAMEis the name of the VM you want to connect to
Debug issues using the serial console
We recommend that you review the logs from the serial console for
connection errors. You can access the serial console as the root user from your
local workstation by using a browser. This approach is useful when you cannot
log in with SSH, or if the instance has no connection to the network. The serial
console remains accessible in both of these situations.
To log into the VM’s serial console and troubleshoot problems with the VM,
follow these steps::
-
Enable interactive access to the VM’s serial console.
-
For Linux VMs, modify the root password, add the following startup script to your VM:
usermod -p $(echo "PASSWORD" | openssl passwd -1 -stdin) root
Replace PASSWORD with a password of your choice.
-
Use the serial console to connect to your VM.
-
For Linux VMs, after you’re done debugging all the errors, disable the root account login:
sudo passwd -l root
Diagnosis methods for Linux VMs
Inspect the VM instance without shutting it down
You might have an instance that you cannot connect to that continues to
correctly serve production traffic. In this case, you might want to inspect
the disk without interrupting the instance.
To inspect and troubleshoot the disk:
- Back up your boot disk by creating a snapshot of the disk.
- Create a regular persistent disk from that snapshot.
- Create a temporary instance.
- Attach and mount the regular persistent disk to your new temporary instance.
This procedure creates an isolated network that only allows
SSH connections. This setup prevents any unintended consequences of the
cloned instance interfering with your production services.
-
Create a new VPC network to host your cloned instance:
gcloud compute networks create debug-network
Replace
NETWORK_NAMEwith the name you want to call
your new network. -
Add a firewall rule to allow SSH connections to the network:
gcloud compute firewall-rules create debug-network-allow-ssh
   --network debug-network
   --allow tcp:22
-
Create a snapshot of the boot disk.
gcloud compute disks snapshot BOOT_DISK_NAME
   --snapshot-names debug-disk-snapshot
Replace
BOOT_DISK_NAMEwith the name of the boot
disk. -
Create a new disk with the snapshot you just created:
gcloud compute disks create example-disk-debugging
   --source-snapshot debug-disk-snapshot
-
Create a new debugging instance without an external IP address:
gcloud compute instances create debugger
   --network debug-network
   --no-address
-
Attach the debugging disk to the instance:
gcloud compute instances attach-disk debugger
   --disk example-disk-debugging
-
Follow the instructions to
Connect to a VM using a bastion host. -
After you have logged into the debugger instance, troubleshoot the instance.
For example, you can look at the instance logs:sudo su -
mkdir /mnt/VM_NAME
mount /dev/disk/by-id/scsi-0Google_PersistentDisk_example-disk-debugging /mnt/VM_NAME
cd /mnt/VM_NAME/var/log
# Identify the issue preventing ssh from working
ls
Replace
VM_NAMEwith the name of the VM you can’t
connect to.
Use a startup script
If none of the preceding helped, you can create a startup script to collect
information right after the instance starts. Follow the instructions for
running a startup script.
Afterward, you also need to reset your instance before the metadata takes
effect by using
gcloud compute instances reset.
Alternatively, you can also recreate your instance by running a diagnostic
startup script:
-
Run
gcloud compute instances deletewith the--keep-disksflag.gcloud compute instances delete VM_NAME --keep-disks boot
Replace
VM_NAMEwith the name of the VM you can’t
connect to. -
Add a new instance with the same disk and specify your startup script.
gcloud compute instances create NEW_VM_NAME
   --disk name=BOOT_DISK_NAME,boot=yes
   --metadata startup-script-url URL
Replace the following:
NEW_VM_NAMEis the name of the new VM you’re
creatingBOOT_DISK_NAMEis the name of the boot disk from
the VM you can’t connect toURLis the Cloud Storage URL to the
script, in either
gs://BUCKET/FILEor
https://storage.googleapis.com/BUCKET/FILE
format.
Use your disk on a new instance
If you still need to recover data from your persistent boot disk, you can
detach the boot disk and then attach that disk as a secondary disk on a
new instance.
-
Delete the VM you can’t connect to and keep its boot disk:
gcloud compute instances delete VM_NAME
   --keep-disks=boot
Replace
VM_NAMEwith the name of the VM you can’t
connect to. -
Create a new VM with your old VM’s boot disk.
Specify the name of the boot disk of the VM you just deleted. -
Connect to your new VM using SSH:
gcloud compute ssh NEW_VM_NAME
Replace
NEW_VM_NAMEwith the name of your new VM.
Check whether or not the VM boot disk is full
Your VM might become inaccessible if its boot disk is full. This scenario can be
difficult to troubleshoot as it’s not always obvious when the VM connectivity
issue is due to a full boot disk. For more information about this scenario,
see Troubleshooting a VM that is inaccessible due to a full boot disk.
Diagnosis methods for Windows VMs
Reset SSH metadata
If you can’t connect to a Windows VM using SSH, try unsetting the
enable-windows-ssh metadata key and re-enabling SSH for Windows.
-
Set the
enable-windows-sshmetadata key toFALSE. For information about
how to set metadata, see
Set custom metadata.Wait a few seconds for the change to take place.
-
Re-enable SSH for Windows
-
Reconnect to the VM.
Connect to the VM using RDP
If you can’t diagnose and resolve the cause of failed SSH connections to your
Windows VM, connect using RDP.
After you establish a connection to the VM, review the
OpenSSH logs.
What’s Next?
- Learn how SSH connections to Linux VMs work on
Compute Engine.
Обновлено 07.04.2022
![]()
Добрый день! Уважаемые читатели и гости одного из крупнейших IT блогов в рунете Pyatilistnik.org. В прошлый раз мы с вами разобрали ошибку, что для устройства не установлены драйверы (код 28). Идем далее и сегодня хочу с вами поделиться практическими знаниями, по устранению ошибки в open ssh клиенте Windows. Звучит она вот так, что на секретный ключ id_rca bad permissions (WARNING: UNPROTECTED PRIVATE KEY FILE, Permission denied publickey). В результате подключиться не получается. Давайте переходить от слов к делу.
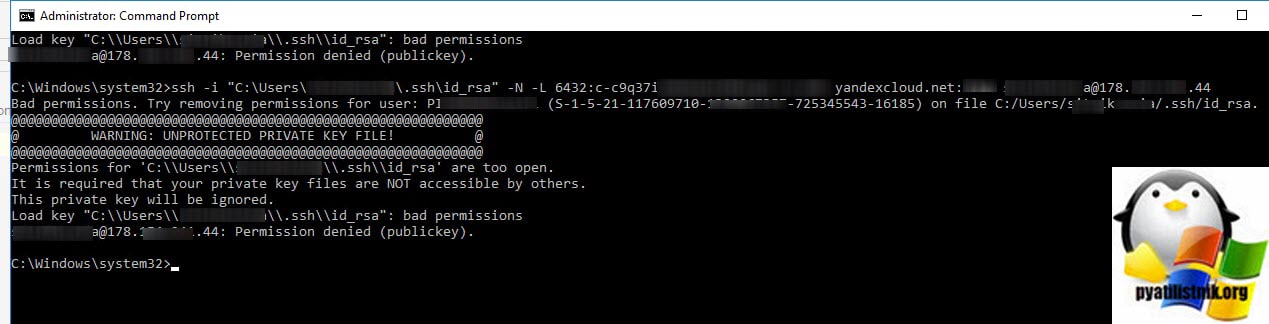
Как выглядит ошибка id_rsa bad permissions
В командной строке Windows при попытке подключения выскакивает ошибка:
Bad permissions. Try removing permissions for user: Pyatilistnik\seminivan (S-1-5-21-117609710-5564564-725645543-16185) on file C:/Users/barboskin/.ssh/id_rsa.
@@@@@@@@@@@@@@@@@@@@@@@@@@@@@@@@@@@@@@@@@@@@@@@@@@@@@@@@@@@
@ WARNING: UNPROTECTED PRIVATE KEY FILE! @
@@@@@@@@@@@@@@@@@@@@@@@@@@@@@@@@@@@@@@@@@@@@@@@@@@@@@@@@@@@
Permissions for ‘C:\Users\barboskin\.ssh\id_rsa’ are too open.
It is required that your private key files are NOT accessible by others.
This private key will be ignored.
Load key «C:\Users\barboskin\.ssh\id_rsa»: bad permissions
barboskin@178.15.24.44: Permission denied (publickey).
Как устранить ошибку Permission denied (publickey)
Проблема тут в том, что файл id_rca, который располагается в директории пользователя от имени которого запускается команда, имеет в списке доступа другие группы и пользователей, и вам это нужно избежать. Тут три варианта решения задачи:
Используем скрипт PowerShell
Запустите в режиме администратора оснастку PowerShell ISE и запустите в нем такой скрипт.
# Устанавливаем переменную для ключевого файла:
New-Variable -Name Key -Value «$env:UserProfile.sshid_rsa»
# Удаляем наследование:
Icacls $Key /c /t /Inheritance:d
# Делаем владельцем файла текущего пользователя:
# Key’s within $env:UserProfile:
Icacls $Key /c /t /Grant ${env:UserName}:F
# Ключ вне $env:UserProfile:
TakeOwn /F $Key
Icacls $Key /c /t /Grant:r ${env:UserName}:F
# Удаляем всех пользователей, кроме владельца из ACL:
Icacls $Key /c /t /Remove:g Administrator «Authenticated Users» BUILTINAdministrators BUILTIN Everyone System Users
# Проверка:
Icacls $Key
# Удаляем переменную:
Remove-Variable -Name Key
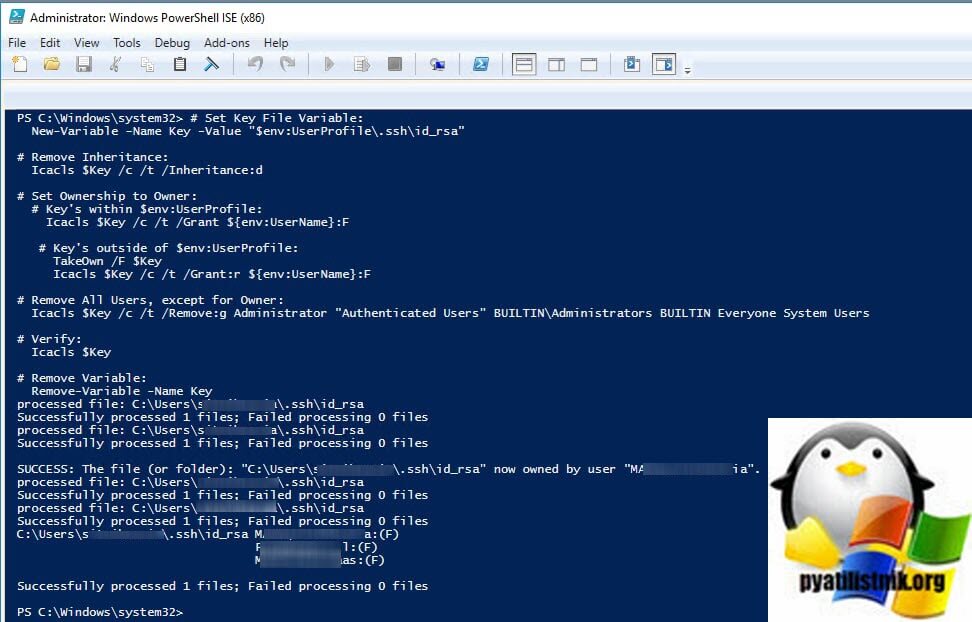
Иногда, данный скрипт все же не всех удалят пользователей из ACL, так, что если опять получаете ошибку, то зайдите и проверьте через графический интерфейс.
Редактирование ACL через графический интерфейс
Тут все просто, переходите в расположение файла:
C:Usersимя_пользователя.sshid_rsa
Щелкаем по файлу правым кликом, из контекстного меню выбираем пункт свойства и переходим на вкладку «Безопасность«. Нажмите кнопку «Дополнительно (Advanced)«
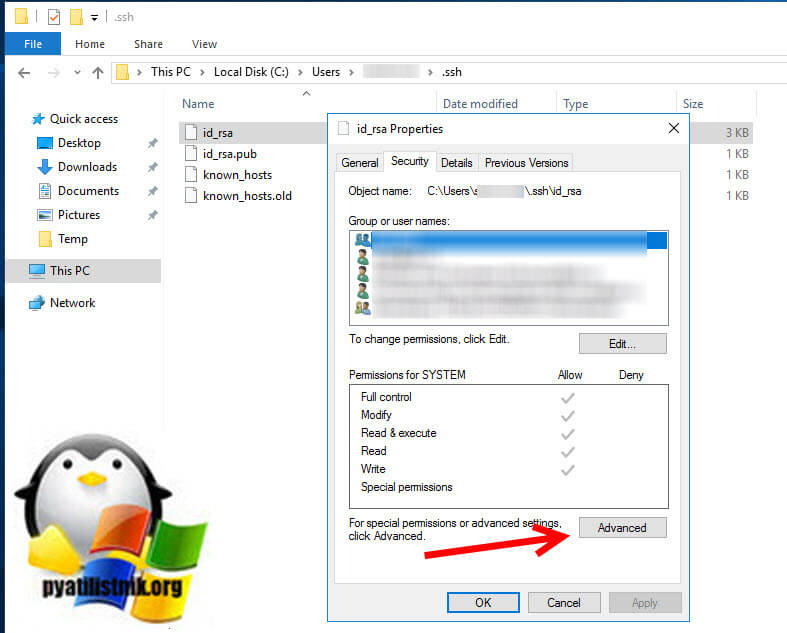
Отключаем наследование и сохраняем текущие разрешения «Преобразовать унаследованные разрешения в явные разрешения данного объекта (Convert inherited permission into explicit permissions on this object«.
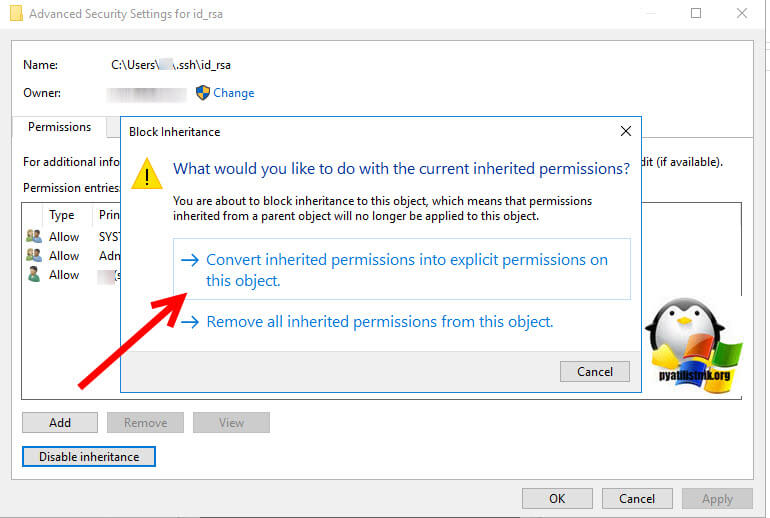
Далее если вы не являетесь текущим владельцем данного файла, то сделайте себя им и так же удалите потом всех кроме себя в данном списке доступа.
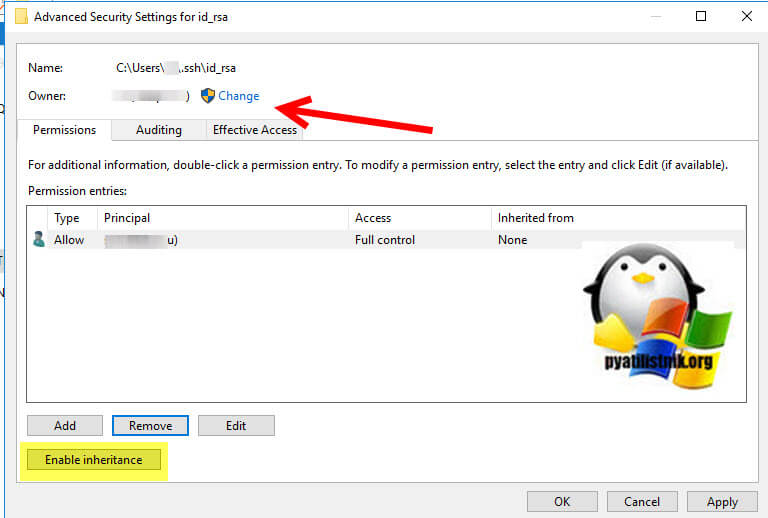
Сохраняем все, после этого у вас должна пропасть ошибка «id_rsa»: bad permissions» и «Permission denied (publickey)».
Используем скрипт командной строки
Во первых вам необходимо создать bat-файл. После чего запустите командную строку от имени администратора и запустите созданный ранее bat-файл.
# Установить переменную ключевого файла::
Set Key=»%UserProfile%.sshid_rsa»
::# Удалить наследование:
Icacls %Key% /c /t /Inheritance:d
::# Установить право собственности на владельца:
:: # Key’s within %UserProfile%:
Icacls %Key% /c /t /Grant %UserName%:F
:: # Ключ outside на %UserProfile%:
TakeOwn /F %Key%
Icacls %Key% /c /t /Grant:r %UserName%:F
::# Удалить всех пользователей, кроме владельца:
Icacls %Key% /c /t /Remove:g «Authenticated Users» BUILTINAdministrators BUILTIN Everyone System Users
::# Проверять:
Icacls %Key%
::# Удалить переменную:
set «Key=»
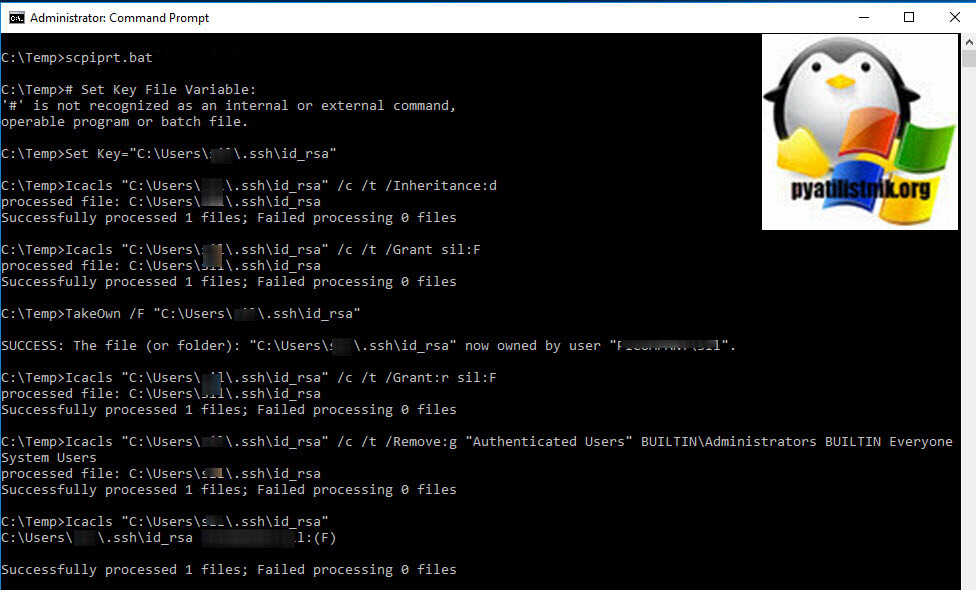
На этом все. Мы рассмотрели три метода позволяющих исправить ошибки «id_rsa»: bad permissions» и «Permission denied (publickey)» при попытке установить ssh соединение через OpenSSH в Windows. С вами был Иван Сёмин, автор и создатель IT проекта Pyatilistni.org.
Good day Community.
I try to setup ssh tunnel for TightVNC which will be used to secure remote desktop session between windows tablet and windows 10 PC.
ssh server OS: windows 10 pro ver 1909(2)
I installed openssh server via «add optional features.»
When I ssh in I from client with cmd command ssh admin1@ip server replies first with:
The authenticity of host (host’s IP)’ can’t be established.
ECDSA key fingerprint is SHA256:JqYEwLJJm/gR9by+aQhftpUsqbRnY06Cv/lRiC4syf4.
Are you sure you want to continue connecting (yes/no)? yes
but when I enter correct password, server replies with:
«permission denied, please try again» …» after 3 tries:(publickey,password,keyboard-interactive)»
I then created admin2 account on ssh server and tried ssh in again using admin2 credentials and I was able to dialin no problem.
How come I am able to access via admin2 and not admin1? Password is 100% correct.
The only thing is that I have Wonderware System Platform window viewer installed on this PC.
I tried to test openssh server on 2 different windows 10 machines and it was ok.
regards
I could successfully SSH into my machine yesterday with the exact same credentials I am using today. The machine is running CentOS 6.3. But now for some reason it is giving me permission denied.
Here is my -v print out, sshd_config, and ssh_config files.
$ ssh -vg -L 3333:localhost:6666 misfitred@devilsmilk

OpenSSH_6.1p1, OpenSSL 1.0.1c 10 May 2012
debug1: Reading configuration data /etc/ssh_config
debug1: Connecting to devilsmilk [10.0.10.113] port 22.
debug1: Connection established.
debug1: identity file /home/kgraves/.ssh/id_rsa type -1
debug1: identity file /home/kgraves/.ssh/id_rsa-cert type -1
debug1: identity file /home/kgraves/.ssh/id_dsa type -1
debug1: identity file /home/kgraves/.ssh/id_dsa-cert type -1
debug1: identity file /home/kgraves/.ssh/id_ecdsa type -1
debug1: identity file /home/kgraves/.ssh/id_ecdsa-cert type -1
debug1: Remote protocol version 2.0, remote software version OpenSSH_6.1
debug1: match: OpenSSH_6.1 pat OpenSSH*
debug1: Enabling compatibility mode for protocol 2.0
debug1: Local version string SSH-2.0-OpenSSH_6.1
debug1: SSH2_MSG_KEXINIT sent
debug1: SSH2_MSG_KEXINIT received
debug1: kex: server->client aes128-ctr hmac-md5 none
debug1: kex: client->server aes128-ctr hmac-md5 none
debug1: sending SSH2_MSG_KEX_ECDH_INIT
debug1: expecting SSH2_MSG_KEX_ECDH_REPLY
debug1: Server host key: ECDSA de:1c:37:d7:84:0b:f8:f9:5e:da:11:49:57:4f:b8:f1
debug1: Host 'devilsmilk' is known and matches the ECDSA host key.
debug1: Found key in /home/kgraves/.ssh/known_hosts:1
debug1: ssh_ecdsa_verify: signature correct
debug1: SSH2_MSG_NEWKEYS sent
debug1: expecting SSH2_MSG_NEWKEYS
debug1: SSH2_MSG_NEWKEYS received
debug1: Roaming not allowed by server
debug1: SSH2_MSG_SERVICE_REQUEST sent
debug1: SSH2_MSG_SERVICE_ACCEPT received

debug1: Authentications that can continue: publickey,password,keyboard-interacti                                ve

debug1: Next authentication method: publickey
debug1: Trying private key: /home/kgraves/.ssh/id_rsa
debug1: Trying private key: /home/kgraves/.ssh/id_dsa
debug1: Trying private key: /home/kgraves/.ssh/id_ecdsa

debug1: Next authentication method: keyboard-interactive
debug1: Authentications that can continue: publickey,password,keyboard-interacti                                ve

debug1: Next authentication method: password
misfitred@devilsmilk's password:
debug1: Authentications that can continue: publickey,password,keyboard-interacti                                ve
Permission denied, please try again.
misfitred@devilsmilk's password:
debug1: Authentications that can continue: publickey,password,keyboard-interacti                                ve
Permission denied, please try again.
misfitred@devilsmilk's password:
debug1: Authentications that can continue: publickey,password,keyboard-interactive
debug1: No more authentication methods to try.
Permission denied (publickey,password,keyboard-interactive).
Here is my sshd_config file on devilsmilk:
#    $OpenBSD: sshd_config,v 1.80 2008/07/02 02:24:18 djm Exp $

# This is the sshd server system-wide configuration file.  See
# sshd_config(5) for more information.

# This sshd was compiled with PATH=/usr/local/bin:/bin:/usr/bin

# The strategy used for options in the default sshd_config shipped with
# OpenSSH is to specify options with their default value where
# possible, but leave them commented.  Uncommented options change a
# default value.

Port 22
#AddressFamily any
#ListenAddress 0.0.0.0
#ListenAddress ::

# Disable legacy (protocol version 1) support in the server for new
# installations. In future the default will change to require explicit
# activation of protocol 1
#Protocol 2

# HostKey for protocol version 1
# HostKey /etc/ssh/ssh_host_key
# HostKeys for protocol version 2
# HostKey /etc/ssh/ssh_host_rsa_key
# HostKey /etc/ssh/ssh_host_dsa_key

# Lifetime and size of ephemeral version 1 server key
#KeyRegenerationInterval 1h
#ServerKeyBits 1024

# Logging
# obsoletes QuietMode and FascistLogging
#SyslogFacility AUTH
#LogLevel INFO

# Authentication:

#LoginGraceTime 2m
#PermitRootLogin yes
StrictModes no
#MaxAuthTries 6
#MaxSessions 10

#RSAAuthentication yes
#PubkeyAuthentication yes
#AuthorizedKeysFile    .ssh/authorized_keys
#AuthorizedKeysCommand none
#AuthorizedKeysCommandRunAs nobody

# For this to work you will also need host keys in /etc/ssh/ssh_known_hosts
#RhostsRSAAuthentication no
# similar for protocol version 2
#HostbasedAuthentication yes
# Change to yes if you don't trust ~/.ssh/known_hosts for
# RhostsRSAAuthentication and HostbasedAuthentication
#IgnoreUserKnownHosts no
# Don't read the user's ~/.rhosts and ~/.shosts files
#IgnoreRhosts yes

# To disable tunneled clear text passwords, change to no here!
#PasswordAuthentication yes
#PermitEmptyPasswords no

# Change to no to disable s/key passwords
#ChallengeResponseAuthentication yes

# Kerberos options
#KerberosAuthentication no
#KerberosOrLocalPasswd yes
#KerberosTicketCleanup yes
#KerberosGetAFSToken no
#KerberosUseKuserok yes

# GSSAPI options
#GSSAPIAuthentication no
#GSSAPIAuthentication yes
#GSSAPICleanupCredentials yes
#GSSAPICleanupCredentials yes
#GSSAPIStrictAcceptorCheck yes
#GSSAPIKeyExchange no

# Set this to 'yes' to enable PAM authentication, account processing,
# and session processing. If this is enabled, PAM authentication will
# be allowed through the ChallengeResponseAuthentication and
# PasswordAuthentication.  Depending on your PAM configuration,
# PAM authentication via ChallengeResponseAuthentication may bypass
# the setting of "PermitRootLogin without-password".
# If you just want the PAM account and session checks to run without
# PAM authentication, then enable this but set PasswordAuthentication
# and ChallengeResponseAuthentication to 'no'.
#UsePAM no

# Accept locale-related environment variables
#AcceptEnv LANG LC_CTYPE LC_NUMERIC LC_TIME LC_COLLATE LC_MONETARY LC_MESSAGES
#AcceptEnv LC_PAPER LC_NAME LC_ADDRESS LC_TELEPHONE LC_MEASUREMENT
#AcceptEnv LC_IDENTIFICATION LC_ALL LANGUAGE
#AcceptEnv XMODIFIERS

#AllowAgentForwarding yes
AllowTcpForwarding yes
GatewayPorts yes
#X11Forwarding no
X11Forwarding yes
#X11DisplayOffset 10
#X11UseLocalhost yes
#PrintMotd yes
#PrintLastLog yes
TCPKeepAlive yes
#UseLogin no
#UsePrivilegeSeparation yes
#PermitUserEnvironment no
#Compression delayed
#ClientAliveInterval 0
#ClientAliveCountMax 3
#ShowPatchLevel no
#UseDNS yes
#PidFile /var/run/sshd.pid
#MaxStartups 10
#PermitTunnel no
#ChrootDirectory none

# no default banner path
#Banner none

# override default of no subsystems
Subsystem    sftp    /usr/libexec/openssh/sftp-server

# Example of overriding settings on a per-user basis
#Match User anoncvs
#    X11Forwarding no
#    AllowTcpForwarding no
#    ForceCommand cvs server
And here is my ssh_config file:
#    $OpenBSD: ssh_config,v 1.25 2009/02/17 01:28:32 djm Exp $

# This is the ssh client system-wide configuration file.  See
# ssh_config(5) for more information.  This file provides defaults for
# users, and the values can be changed in per-user configuration files
# or on the command line.

# Configuration data is parsed as follows:
#  1. command line options
#  2. user-specific file
#  3. system-wide file
# Any configuration value is only changed the first time it is set.
# Thus, host-specific definitions should be at the beginning of the
# configuration file, and defaults at the end.

# Site-wide defaults for some commonly used options.  For a comprehensive
# list of available options, their meanings and defaults, please see the
# ssh_config(5) man page.

# Host *
#   ForwardAgent no
#   ForwardX11 no
#   RhostsRSAAuthentication no
#   RSAAuthentication yes
#   PasswordAuthentication yes
#   HostbasedAuthentication no
#   GSSAPIAuthentication no
#   GSSAPIDelegateCredentials no
#   GSSAPIKeyExchange no
#   GSSAPITrustDNS no
#   BatchMode no
#   CheckHostIP yes
#   AddressFamily any
#   ConnectTimeout 0
#   StrictHostKeyChecking ask
#   IdentityFile ~/.ssh/identity
#   IdentityFile ~/.ssh/id_rsa
#   IdentityFile ~/.ssh/id_dsa
#   Port 22
#   Protocol 2,1
#   Cipher 3des
#   Ciphers aes128-ctr,aes192-ctr,aes256-ctr,arcfour256,arcfour128,aes128-cbc,3des-cbc
#   MACs hmac-md5,hmac-sha1,umac-64@openssh.com,hmac-ripemd160
#   EscapeChar ~
#   Tunnel no
#   TunnelDevice any:any
#   PermitLocalCommand no
#   VisualHostKey no
#Host *
# GSSAPIAuthentication yes
# If this option is set to yes then remote X11 clients will have full access
# to the original X11 display. As virtually no X11 client supports the untrusted
# mode correctly we set this to yes.
    ForwardX11Trusted yes
# Send locale-related environment variables
    SendEnv LANG LC_CTYPE LC_NUMERIC LC_TIME LC_COLLATE LC_MONETARY LC_MESSAGES
    SendEnv LC_PAPER LC_NAME LC_ADDRESS LC_TELEPHONE LC_MEASUREMENT
    SendEnv LC_IDENTIFICATION LC_ALL LANGUAGE
    SendEnv XMODIFIERS
File /var/log/secure
Jan 29 12:26:26 localhost sshd[2317]: Server listening on 0.0.0.0 port 22.
Jan 29 12:26:26 localhost sshd[2317]: Server listening on :: port 22.
Jan 29 12:26:34 localhost polkitd(authority=local): Registered Authentication Agent for session /org/freedesktop/ConsoleKit/Session1 (system bus name :1.29 [/usr/libexec/polkit-gnome-authentication-agent-1], object path /org/gnome/PolicyKit1/AuthenticationAgent, locale en_US.UTF-8)
Jan 29 12:36:09 localhost pam: gdm-password[3029]: pam_unix(gdm-password:session): session opened for user misfitred by (uid=0)
Jan 29 12:36:09 localhost polkitd(authority=local): Unregistered Authentication Agent for session /org/freedesktop/ConsoleKit/Session1 (system bus name :1.29, object path /org/gnome/PolicyKit1/AuthenticationAgent, locale en_US.UTF-8) (disconnected from bus)
Jan 29 12:36:11 localhost polkitd(authority=local): Registered Authentication Agent for session /org/freedesktop/ConsoleKit/Session2 (system bus name :1.45 [/usr/libexec/polkit-gnome-authentication-agent-1], object path /org/gnome/PolicyKit1/AuthenticationAgent, locale en_US.UTF-8)
Jan 29 12:53:39 localhost polkitd(authority=local): Operator of unix-session:/org/freedesktop/ConsoleKit/Session2 successfully authenticated as unix-user:root to gain TEMPORARY authorization for action org.freedesktop.packagekit.system-update for system-bus-name::1.64 [gpk-update-viewer] (owned by unix-user:misfitred)
Jan 29 12:54:02 localhost su: pam_unix(su:session): session opened for user root by misfitred(uid=501)
Jan 29 12:54:06 localhost sshd[2317]: Received signal 15; terminating.
Jan 29 12:54:06 localhost sshd[3948]: Server listening on 0.0.0.0 port 22.
Jan 29 12:54:06 localhost sshd[3948]: Server listening on :: port 22.
Jan 29 12:55:46 localhost su: pam_unix(su:session): session closed for user root
Jan 29 12:55:56 localhost pam: gdm-password[3029]: pam_unix(gdm-password:session): session closed for user misfitred
Jan 29 12:55:56 localhost polkitd(authority=local): Unregistered Authentication Agent for session /org/freedesktop/ConsoleKit/Session2 (system bus name :1.45, object path /org/gnome/PolicyKit1/AuthenticationAgent, locale en_US.UTF-8) (disconnected from bus)
Jan 29 12:55:58 localhost polkitd(authority=local): Registered Authentication Agent for session /org/freedesktop/ConsoleKit/Session3 (system bus name :1.78 [/usr/libexec/polkit-gnome-authentication-agent-1], object path /org/gnome/PolicyKit1/AuthenticationAgent, locale en_US.UTF-8)
Jan 29 12:56:29 localhost pam: gdm-password[4044]: pam_unix(gdm-password:auth): conversation failed
Jan 29 12:56:29 localhost pam: gdm-password[4044]: pam_unix(gdm-password:auth): auth could not identify password for [misfitred]
Jan 29 12:56:29 localhost pam: gdm-password[4044]: gkr-pam: no password is available for user
Jan 29 12:57:11 localhost pam: gdm-password[4051]: pam_selinux_permit(gdm-password:auth): Cannot determine the user's name
Jan 29 12:57:11 localhost pam: gdm-password[4051]: pam_succeed_if(gdm-password:auth): error retrieving user name: Conversation error
Jan 29 12:57:11 localhost pam: gdm-password[4051]: gkr-pam: couldn't get the user name: Conversation error
Jan 29 12:57:17 localhost pam: gdm-password[4053]: pam_unix(gdm-password:session): session opened for user misfitred by (uid=0)
Jan 29 12:57:17 localhost polkitd(authority=local): Unregistered Authentication Agent for session /org/freedesktop/ConsoleKit/Session3 (system bus name :1.78, object path /org/gnome/PolicyKit1/AuthenticationAgent, locale en_US.UTF-8) (disconnected from bus)
Jan 29 12:57:17 localhost polkitd(authority=local): Registered Authentication Agent for session /org/freedesktop/ConsoleKit/Session4 (system bus name :1.93 [/usr/libexec/polkit-gnome-authentication-agent-1], object path /org/gnome/PolicyKit1/AuthenticationAgent, locale en_US.UTF-8)
Jan 29 12:57:49 localhost unix_chkpwd[4495]: password check failed for user (root)
Jan 29 12:57:49 localhost su: pam_unix(su:auth): authentication failure; logname=misfitred uid=501 euid=0 tty=pts/0 ruser=misfitred rhost=  user=root
Jan 29 12:58:04 localhost su: pam_unix(su:session): session opened for user root by misfitred(uid=501)
Jan 29 13:16:16 localhost su: pam_unix(su:session): session closed for user root
Jan 29 13:18:05 localhost su: pam_unix(su:session): session opened for user root by misfitred(uid=501)
Jan 29 13:21:14 localhost su: pam_unix(su:session): session closed for user root
Jan 29 13:21:40 localhost su: pam_unix(su:session): session opened for user root by misfitred(uid=501)
Jan 29 13:24:17 localhost su: pam_unix(su:session): session opened for user misfitred by misfitred(uid=0)
Jan 29 13:27:10 localhost su: pam_unix(su:session): session opened for user root by misfitred(uid=501)
Jan 29 13:28:55 localhost su: pam_unix(su:session): session closed for user root
Jan 29 13:28:55 localhost su: pam_unix(su:session): session closed for user misfitred
Jan 29 13:28:55 localhost su: pam_unix(su:session): session closed for user root
Jan 29 13:29:00 localhost su: pam_unix(su:session): session opened for user root by misfitred(uid=501)
Jan 29 13:31:48 localhost sshd[3948]: Received signal 15; terminating.
Jan 29 13:31:48 localhost sshd[5498]: Server listening on 0.0.0.0 port 22.
Jan 29 13:31:48 localhost sshd[5498]: Server listening on :: port 22.
Jan 29 13:44:58 localhost sshd[5498]: Received signal 15; terminating.
Jan 29 13:44:58 localhost sshd[5711]: Server listening on 0.0.0.0 port 22.
Jan 29 13:44:58 localhost sshd[5711]: Server listening on :: port 22.
Jan 29 14:00:19 localhost sshd[5711]: Received signal 15; terminating.
Jan 29 14:00:19 localhost sshd[5956]: Server listening on 0.0.0.0 port 22.
Jan 29 14:00:19 localhost sshd[5956]: Server listening on :: port 22.
Jan 29 15:03:00 localhost sshd[5956]: Received signal 15; terminating.
Jan 29 15:10:23 localhost su: pam_unix(su:session): session closed for user root
Jan 29 15:10:38 localhost pam: gdm-password[4053]: pam_unix(gdm-password:session): session closed for user misfitred
Jan 29 15:10:38 localhost polkitd(authority=local): Unregistered Authentication Agent for session /org/freedesktop/ConsoleKit/Session4 (system bus name :1.93, object path /org/gnome/PolicyKit1/AuthenticationAgent, locale en_US.UTF-8) (disconnected from bus)
Jan 29 15:11:21 localhost polkitd(authority=local): Registered Authentication Agent for session /org/freedesktop/ConsoleKit/Session1 (system bus name :1.29 [/usr/libexec/polkit-gnome-authentication-agent-1], object path /org/gnome/PolicyKit1/AuthenticationAgent, locale en_US.UTF-8)
Jan 29 15:11:32 localhost pam: gdm-password[2919]: pam_unix(gdm-password:session): session opened for user misfitred by (uid=0)
Jan 29 15:11:32 localhost polkitd(authority=local): Unregistered Authentication Agent for session /org/freedesktop/ConsoleKit/Session1 (system bus name :1.29, object path /org/gnome/PolicyKit1/AuthenticationAgent, locale en_US.UTF-8) (disconnected from bus)
Jan 29 15:11:33 localhost polkitd(authority=local): Registered Authentication Agent for session /org/freedesktop/ConsoleKit/Session2 (system bus name :1.45 [/usr/libexec/polkit-gnome-authentication-agent-1], object path /org/gnome/PolicyKit1/AuthenticationAgent, locale en_US.UTF-8)
Jan 29 15:15:10 localhost su: pam_unix(su:session): session opened for user root by misfitred(uid=501)
Jan 29 15:30:24 localhost userhelper[3700]: running '/usr/share/system-config-users/system-config-users ' with root privileges on behalf of 'root'
Jan 29 15:32:00 localhost su: pam_unix(su:session): session opened for user misfitred by misfitred(uid=0)
Jan 29 15:32:23 localhost passwd: gkr-pam: changed password for 'login' keyring
Jan 29 15:32:39 localhost passwd: pam_unix(passwd:chauthtok): password changed for misfitred
Jan 29 15:32:39 localhost passwd: gkr-pam: couldn't change password for 'login' keyring: 1
Jan 29 15:33:06 localhost passwd: pam_unix(passwd:chauthtok): password changed for misfitred
Jan 29 15:33:06 localhost passwd: gkr-pam: changed password for 'login' keyring
Jan 29 15:37:08 localhost su: pam_unix(su:session): session opened for user root by misfitred(uid=501)
Jan 29 15:38:16 localhost su: pam_unix(su:session): session closed for user root
Jan 29 15:38:16 localhost su: pam_unix(su:session): session closed for user misfitred
Jan 29 15:38:16 localhost su: pam_unix(su:session): session closed for user root
Jan 29 15:38:25 localhost su: pam_unix(su:session): session opened for user root by misfitred(uid=501)
Jan 29 15:42:47 localhost su: pam_unix(su:session): session closed for user root
Jan 29 15:47:13 localhost sshd[4111]: pam_unix(sshd:session): session opened for user misfitred by (uid=0)
Jan 29 16:49:40 localhost su: pam_unix(su:session): session opened for user root by misfitred(uid=501)
Jan 29 16:55:19 localhost su: pam_unix(su:session): session opened for user root by misfitred(uid=501)
Jan 30 08:34:57 localhost sshd[4111]: pam_unix(sshd:session): session closed for user misfitred
Jan 30 08:34:57 localhost su: pam_unix(su:session): session closed for user root
Jan 30 08:35:24 localhost su: pam_unix(su:session): session opened for user root by misfitred(uid=501)