-
Partition Wizard
-
Partition Manager
- Windows Sandbox No Hypervisor Was Found – Here’s How to Fix
By Amanda | Follow |
Last Updated January 07, 2020
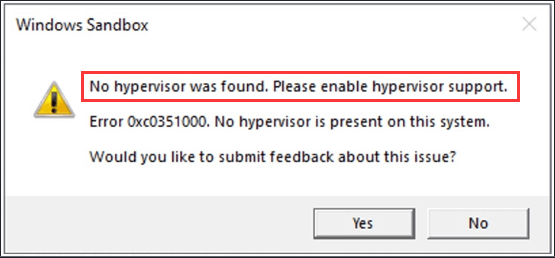
Sometimes, Windows users get an error prompting that “No hypervisor was found. Please enable hypervisor support” while opening Windows Sandbox. It can be fixed easily. Just keep reading this post to learn more about the detail.
Windows Sandbox is a phenomenal addition to Windows 10, which is susceptible to plenty of issues as well. No hypervisor was found is one of the common problems of Windows Sandbox. By the way, you can go ahead to MiniTool Partition Wizard to learn more information about Sandbox that make Windows 10 Pro the OS for PC enthusiasts.
About Windows Sandbox
Windows Sandbox is a built-in tool designed for users of Windows 10 Pro or Enterprise or later. It is used to safely running applications in isolation.
If you have downloaded an executable file but worry about whether it is safe to run in your computer, Windows Sandbox is a perfect tool for you.
Windows Sandbox is a part of Windows but is isolated from the host. You can run untrusted software in this isolated, temporary desktop environment without worrying about any impact to your host. Besides, any software installed in Windows Sandbox and its files will be deleted permanently when you close it.
However, certain issues could be found when using Windows Sandbox, including the internet connectivity problems and no hypervisor was found error.
In the next part of this post, I will tell you how to do if no hypervisor was found error appears when you run Windows Sandbox.
Fix 1: Make Sure Virtualization is Enabled
Just like any other virtual machine, Windows Sandbox is designed to use hardware-based virtualization for kernel isolation to isolate from the host. And this relies on Microsoft’s hypervisor.
Therefore, if no hypervisor was founder error appears, you need to check if CPU Virtualization is enabled.
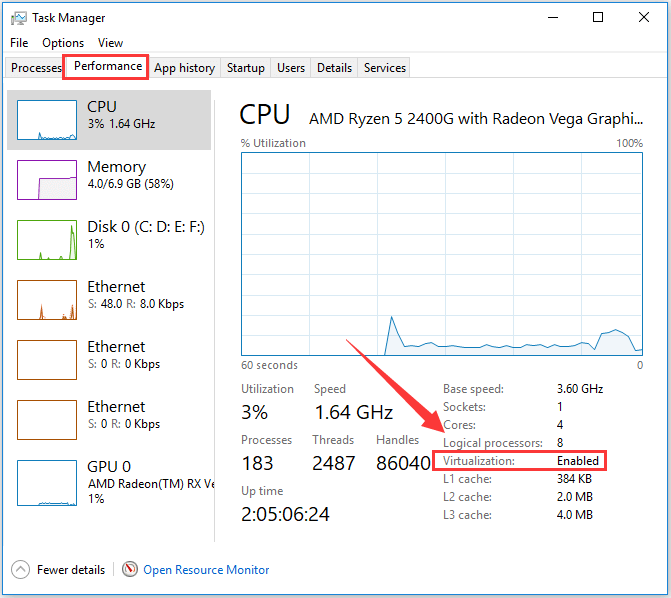
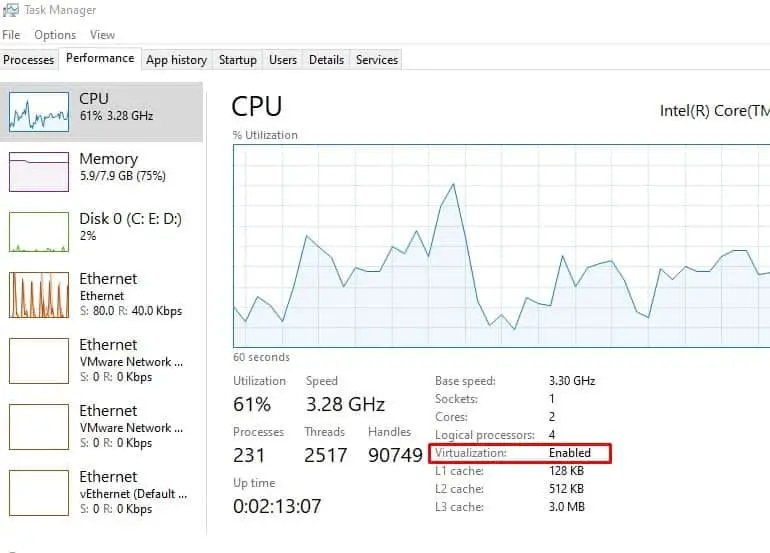
To check CPU Virtualization, you need to open the Task Manager first by right-clicking the Start button and choosing Task Manager from the menu. In the pop-up window, click the Performance tab and you can see the status of Virtualization just as the following picture shows.
If Virtualization is shown as disabled here, go ahead to enable it in BIOS or UEFI setting.
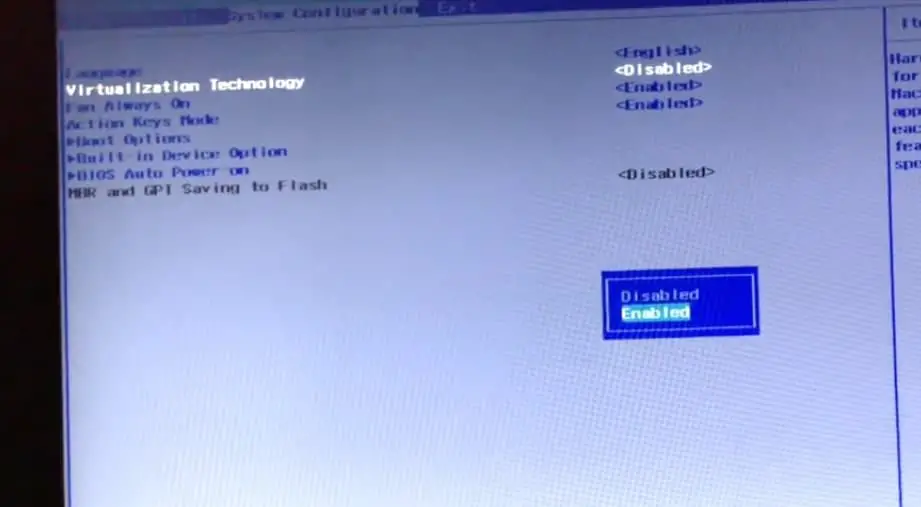
Take BIOS as an example, you need to enter the BIOS after saving and closing all the current tasks. Then jump to the Advanced tab and enable Intel Virtualization Technology.
Note: The way to enter the BIOS and the process to enable virtualization could be different if you operate on different computers. Besides, if you are using a virtual machine, enable nested virtualization with this PowerShell cmdlet: Set-VMProcessor -VMName <VMName> -ExposeVirtualizationExtensions $true
Fix 2: Turn on Windows Features
If “No hypervisor was found” error still shows up after enabling CPU Virtualization, it is wise for you to enable some Windows features. Windows Sandbox can run successfully with the help of some operating system-based features. Let’s see how to turn on these features.
Step 1: Type Windows Feature in the search box.
Step 2: Choose Turn Windows features on or off among the listed apps to open it.
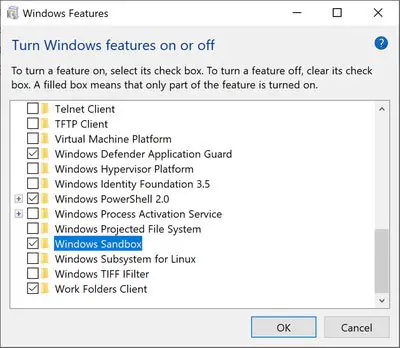
Step 3: Locate the features labeled Virtual Machine Platform and Windows Hypervisor Platform, and select the check boxes beside them.
Step 4: Click OK button to turn them on, then reboot your computer to see if the error has been resolved.
Fix 3: Add an Entry to BCD
The final operation you can do to remove the error is to ensure the hypervisor is configured to run automatically at computer startup. In order to make this configuration, you need to add an entry to the Boot Configuration Data (BCD) in Command Prompt.
Just do as the following steps.
Step 1: Run Command Prompt as Administrator.
Step 2: Type BCDEDIT /Set {current} hypervisorlaunchtype auto and press Enter key.
Step 3: Reboot your computer and run Command Prompt again as Step 1.
Step 4: Type bcdedit and press Enter.
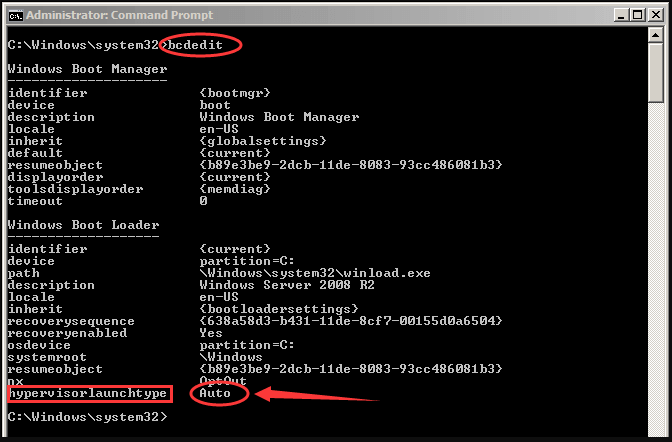
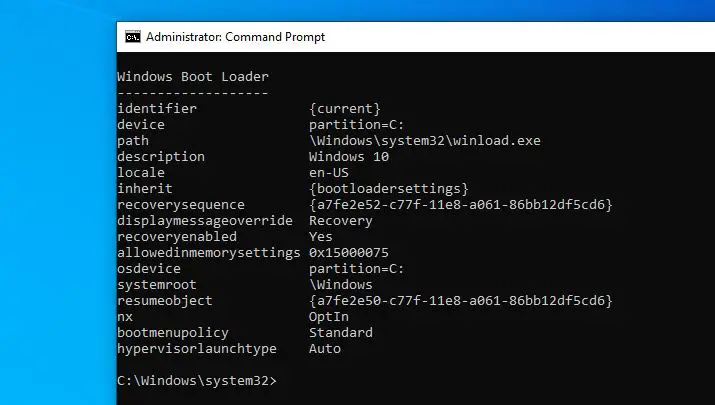
Then, you will get some information as the following screenshot shows.
Please pay attention to the item hypervisorlaunchtype. The status showing beside this item should be Auto, which means that hypervisor has been set to run at computer startup.
Now, it’s your turn. Just do according to the instruction above to fix Windows Sandbox no hypervisor was found error by yourself.
About The Author
Position: Columnist
Amanda has been working as English editor for the MiniTool team since she was graduated from university. She enjoys sharing effective solutions and her own experience to help readers fix various issues with computers, dedicated to make their tech life easier and more enjoyable.
She has published many articles, covering fields of data recovery, partition management, disk backup, and etc. In order to provide more useful tips and information, she is still committed to expand her technical knowledge.
-
Partition Wizard
-
Partition Manager
- Windows Sandbox No Hypervisor Was Found – Here’s How to Fix
By Amanda | Follow |
Last Updated January 07, 2020
Sometimes, Windows users get an error prompting that “No hypervisor was found. Please enable hypervisor support” while opening Windows Sandbox. It can be fixed easily. Just keep reading this post to learn more about the detail.
Windows Sandbox is a phenomenal addition to Windows 10, which is susceptible to plenty of issues as well. No hypervisor was found is one of the common problems of Windows Sandbox. By the way, you can go ahead to MiniTool Partition Wizard to learn more information about Sandbox that make Windows 10 Pro the OS for PC enthusiasts.
About Windows Sandbox
Windows Sandbox is a built-in tool designed for users of Windows 10 Pro or Enterprise or later. It is used to safely running applications in isolation.
If you have downloaded an executable file but worry about whether it is safe to run in your computer, Windows Sandbox is a perfect tool for you.
Windows Sandbox is a part of Windows but is isolated from the host. You can run untrusted software in this isolated, temporary desktop environment without worrying about any impact to your host. Besides, any software installed in Windows Sandbox and its files will be deleted permanently when you close it.
However, certain issues could be found when using Windows Sandbox, including the internet connectivity problems and no hypervisor was found error.
In the next part of this post, I will tell you how to do if no hypervisor was found error appears when you run Windows Sandbox.
Fix 1: Make Sure Virtualization is Enabled
Just like any other virtual machine, Windows Sandbox is designed to use hardware-based virtualization for kernel isolation to isolate from the host. And this relies on Microsoft’s hypervisor.
Therefore, if no hypervisor was founder error appears, you need to check if CPU Virtualization is enabled.
To check CPU Virtualization, you need to open the Task Manager first by right-clicking the Start button and choosing Task Manager from the menu. In the pop-up window, click the Performance tab and you can see the status of Virtualization just as the following picture shows.
If Virtualization is shown as disabled here, go ahead to enable it in BIOS or UEFI setting.
Take BIOS as an example, you need to enter the BIOS after saving and closing all the current tasks. Then jump to the Advanced tab and enable Intel Virtualization Technology.
Note: The way to enter the BIOS and the process to enable virtualization could be different if you operate on different computers. Besides, if you are using a virtual machine, enable nested virtualization with this PowerShell cmdlet: Set-VMProcessor -VMName <VMName> -ExposeVirtualizationExtensions $true
Fix 2: Turn on Windows Features
If “No hypervisor was found” error still shows up after enabling CPU Virtualization, it is wise for you to enable some Windows features. Windows Sandbox can run successfully with the help of some operating system-based features. Let’s see how to turn on these features.
Step 1: Type Windows Feature in the search box.
Step 2: Choose Turn Windows features on or off among the listed apps to open it.
Step 3: Locate the features labeled Virtual Machine Platform and Windows Hypervisor Platform, and select the check boxes beside them.
Step 4: Click OK button to turn them on, then reboot your computer to see if the error has been resolved.
Fix 3: Add an Entry to BCD
The final operation you can do to remove the error is to ensure the hypervisor is configured to run automatically at computer startup. In order to make this configuration, you need to add an entry to the Boot Configuration Data (BCD) in Command Prompt.
Just do as the following steps.
Step 1: Run Command Prompt as Administrator.
Step 2: Type BCDEDIT /Set {current} hypervisorlaunchtype auto and press Enter key.
Step 3: Reboot your computer and run Command Prompt again as Step 1.
Step 4: Type bcdedit and press Enter.
Then, you will get some information as the following screenshot shows.
Please pay attention to the item hypervisorlaunchtype. The status showing beside this item should be Auto, which means that hypervisor has been set to run at computer startup.
Now, it’s your turn. Just do according to the instruction above to fix Windows Sandbox no hypervisor was found error by yourself.
About The Author
Position: Columnist
Amanda has been working as English editor for the MiniTool team since she was graduated from university. She enjoys sharing effective solutions and her own experience to help readers fix various issues with computers, dedicated to make their tech life easier and more enjoyable.
She has published many articles, covering fields of data recovery, partition management, disk backup, and etc. In order to provide more useful tips and information, she is still committed to expand her technical knowledge.
Пользователи сообщают, что при попытке запустить функцию песочницы в Windows 10 они сталкиваются с ошибкой Гипервизор не найден. Включите поддержку гипервизора . Это мешает им использовать функцию песочницы.
Гипервизор не найден. Пожалуйста, включите поддержку гипервизора
Функция «Песочница» – это виртуальная одноразовая среда, которая позволяет пользователям запускать программы изолированно от хоста Windows 10. Это полезно для тестирования подозрительных или непроверенных программ. Все файлы, открытые в среде Sandbox, удаляются при закрытии его окна.
Ошибка в обсуждении вызвана тем, что технология виртуализации, необходимая для запуска и использования функции «Песочница», либо отсутствует в системе, либо отключена в BiOS.
Если эта функция отсутствует в самой системе, вы мало что можете с этим поделать. Однако редко, когда компьютер не поддерживает технологию виртуализации. Если вы не используете устаревшую систему, весьма вероятно, что система будет поддерживать виртуализацию.
Процедура включения функции из BiOS. Расположение опции в BIOS зависит от марки компьютера. Тем не менее, общая процедура объясняется ниже.
Перезагрузите систему и загрузитесь в режиме BIOS . В моей системе я использую кнопку Assist , чтобы войти в режим BiOS. Для системы HP пользователи нажимают F10 сразу после перезагрузки системы. Это зависит от марки компьютера.
На вкладке “Дополнительно” нажмите Конфигурация процессора .

Найдите в списке Intel Virtualization Technology, Intel® VT для направленного ввода-вывода, или Virtualization Technology . С помощью клавиш со стрелками перейдите к этой опции и нажмите Enter, чтобы активировать переключатель Включить/Отключить .

Выберите параметр Включить . Сохраните эти настройки, нажав F10 на клавиатуре. В качестве альтернативы вы можете выбрать параметр Сохранить в BIOS.
Выйдите из режима BIOS и загрузитесь в ОС Windows 10. Проверьте, решена ли проблема.
Надеюсь, это поможет!
Если вы используете Windows Sandbox, вы, скорее всего, столкнетесь с ошибкой не найден гипервизор с кодом ошибки 0xc0351000. Полная ошибка показана ниже:
Гипервизор не найден. Включите поддержку гипервизора.
Ошибка 0xc0351000. В этой системе нет гипервизора.
Если вы видите эту ошибку, читайте дальше. Мы разобрали некоторые исправления, которые могут помочь вам решить эту ошибку.
Исправление 1. Убедитесь, что виртуализация включена
Шаг 1. Прямо на панели задач и в контекстном меню выберите Диспетчер задач
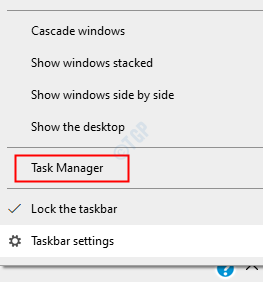
Шаг 2. Перейдите на вкладку Производительность
.
Шаг 3. Проверьте состояние виртуализации. Виртуализация должна быть включена
Шаг 4. Если виртуализация отключена, войдите на страницу настроек BIOS или UEFI.
См. ссылку Как открыть UEFI Настройки BIOS в Windows 10
Шаг 5. После открытия страницы BIOS с помощью клавиш со стрелками перейдите на вкладку Конфигурация системы и нажмите Enter
.
Шаг 6. С помощью клавиши со стрелкой вниз выберите Технология виртуализации и Включите ее.
Шаг 7. Сохраните изменения , нажав клавишу F10
Шаг 8. Закройте страницу BIOS и перезапустите систему.
Это должно помочь. Если проблема не исчезла, попробуйте следующее исправление.
Шаг 1. В строке поиска на панели задач введите Включите функции Windows
Шаг 2. В меню выберите параметр Включить или отключить функции Windows
.
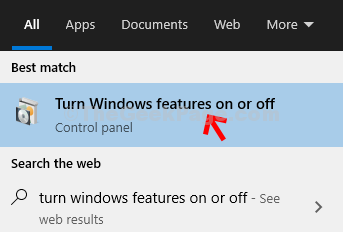
Шаг 3. В появившемся окне прокрутите вниз и найдите Платформа виртуальных машин и Платформа гипервизора Windows
Шаг 4: Установите флажок чтобы включить эти функции, нажмите кнопку ОК
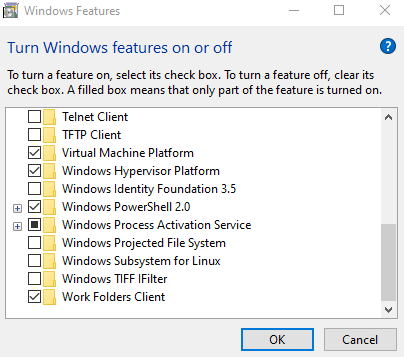
Шаг 5. Перезагрузите систему.
Надеюсь, это исправление поможет. Если нет, попробуйте следующее исправление.
Исправление 3. Убедитесь, что гипервизор включен для автоматического запуска
Шаг 1. Найдите CMD в поиске на панели задач Windows 10.
Шаг 2. Когда появится результат поиска, щелкните правой кнопкой мыши значок командной строки.
Шаг 3. В контекстном меню выберите R un as administrator
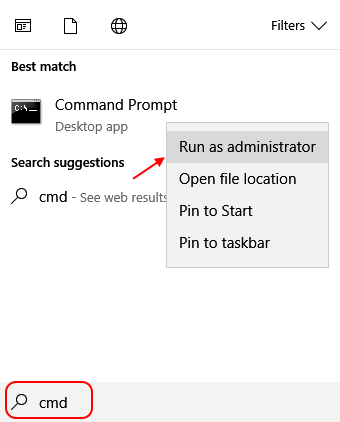
Шаг 4. В окне командной строки введите приведенную ниже команду и нажмите Enter
.
BCDEDIT/Установить {текущий} тип запуска гипервизора автоматически
Шаг 5. Перезагрузите компьютер
Шаг 6. Откройте командную строку от имени администратора
Шаг 7. Введите приведенную ниже команду и нажмите Enter
.
bcdedit
Шаг 8. В разделе Загрузчик Windows для типа запуска гипервизора должно быть значение Авто
.
На этом проблема должна быть решена.
Вот и все. Надеемся, это было информативным.
Просьба прокомментировать и сообщить нам, какое из вышеперечисленных исправлений помогло. Также сообщите нам, если у вас возникнут какие-либо проблемы. Будем рады помочь.
Спасибо за чтение.
Пользователи сообщают, что при попытке запустить Особенность песочницы in Windows 10они сталкиваются с ошибкой Гипервизор не найден. Пожалуйста, включите поддержку гипервизора, Это мешает им использовать функцию песочницы.
Гипервизор не найден. Пожалуйста, включите поддержку гипервизора
Компания Особенность песочницы является виртуальной одноразовой средой, которая позволяет пользователям запускать программы изолированно от Windows 10 хост. Это полезно для тестирования подозрительных или непроверенных программ. Все файлы, открытые в среде Sandbox, удаляются при закрытии его окна.
Ошибка в обсуждении вызвана тем, что технология виртуализации, необходимая для запуска и использования функции «Песочница», либо отсутствует в системе, либо отключена в BiOS.
Если эта функция отсутствует в самой системе, вы ничего не можете с этим поделать. Однако редко, чтобы компьютер не поддерживал технологию виртуализации. Если вы не используете устаревшую систему, весьма вероятно, что система будет поддерживать виртуализацию.
Процедура включения функции из BiOS. Расположение опции в BIOS зависит от марки компьютера. Тем не менее, общая процедура объясняется ниже.
Перезагрузите систему и загрузитесь в BIOS Режим. Для моей системы я использую Помощь кнопка для входа в режим BiOS. Для системы HP пользователи нажимают F10 сразу после перезагрузки системы. Это зависит от марки компьютера.
В разделе Вкладке, нажмите на Конфигурация процессора.
Найдите Технология виртуализации Intel, Intel® VT для направленного ввода-вывода, or Технология виртуализации из списка. Используйте клавиши со стрелками для перехода к опции и нажмите Enter, чтобы активировать Включить / Выключить переключатель.
Выберите Включите вариант. Сохраните эти настройки, нажав F10 на клавиатуре. Кроме того, вы можете выбрать Сохраните вариант в биосе.
Выйдите из режима BIOS и загрузитесь в Windows 10 ОПЕРАЦИОННЫЕ СИСТЕМЫ. Проверьте, решена ли проблема.
Надеюсь, поможет!
Оригинал статьи

Windows Песочница – феноменальное дополнение к Windows 10, с множеством применений, начиная от проверки файлов на наличие вредоносных программ и заканчивая возни с настройками операционной системы в целом. Тем не менее, он также подвержен ряду проблем. Некоторое время назад я говорил о различных решениях проблем с подключением к Интернету, которые могут мешать Windows Sandbox.
И сегодня я собираюсь обсудить действия, которые можно предпринять, если вы получите сообщение об ошибке «Не найден гипервизор» при попытке его запустить.
Гипервизор является важным компонентом операционной системы, необходимым для запуска виртуальных машин, и эта ошибка генерируется, когда Windows Песочница не имеет к ней доступа. Итак, ниже, я собираюсь предложить три исправления, которые вы можете легко использовать, чтобы заставить вещи двигаться в правильном направлении.
Я рекомендую вам начать с самого начала и продолжить свой путь вниз по списку. Последнее исправление помогло мне решить проблему, когда я столкнулся с ней некоторое время назад. Тем не менее, всегда лучше сначала устранить некоторые из наиболее вероятных причин.
1. Проверьте виртуализацию
Хотя Windows Песочница является одноразовой средой, она функционирует так же, как любая другая виртуальная машина. Это означает, что гипервизор, на котором он предположительно работает, не работает, если виртуализация ЦП отключена.
Виртуализация ЦП – это аппаратная функция, но если вы не используете устаревшую систему, шансы, что процессор ее поддерживает, достаточно высоки. Тем не менее, его необходимо включить, и есть простой способ узнать, если это так.
Начните с открытия диспетчера задач (щелкните правой кнопкой мыши панель задач и выберите Диспетчер задач). На вкладке «Быстродействие» нажмите «ЦП», а затем проверьте состояние рядом с «Виртуализация» – оно должно отображаться как «Включено». Если это так, перейдите к следующему разделу.
Если виртуализация отключена, вам нужно перейти в BIOS или UEFI вашей системы, чтобы активировать эту функцию. Подвох в том, что вся процедура, хотя и довольно простая, отличается от компьютера к компьютеру.
Если у вас есть опыт включения или выключения этой функции, сделайте это. Если нет, было бы целесообразно обратиться к документации для модели материнской платы вашего компьютера для точных инструкций. После того, как вы включили виртуализацию процессора, попробуйте запустить Windows Sandbox.
В моем случае мне нужно войти в BIOS при запуске компьютера, нажав клавишу F2, перейти на вкладку «Дополнительно» и затем включить опцию «Технология виртуализации Intel».
Note: Чтобы узнать больше информации о вашей системе в качестве средства, помогающего вам найти соответствующую документацию в Интернете, введите «msinfo32» в меню «Пуск» и нажмите «Открыть».
Если виртуализация ЦП включена, было бы странно встретить сообщение об ошибке «Гипервизор не найден». Поэтому целесообразно включить несколько функций на основе операционной системы, которые помогают виртуальным машинам успешно работать.
Для этого откройте Windows Особенности (тип windows функции в меню Пуск и нажмите кнопку Открыть). Для этого установите флажки рядом со следующими функциями:
- Платформа виртуальных машинПлатформа Windows Hypervisor
Нажмите OK, чтобы активировать их. После этого перезагрузите компьютер, а затем проверьте, Windows Песочница успешно запускается без сообщения об ошибке.
3. Добавить запись BCD
Последнее, что вам нужно сделать, это убедиться, что гипервизор настроен на автоматический запуск при запуске компьютера. Для этого необходимо добавить запись в данные конфигурации загрузки (BCD) вашего компьютера с помощью командной строки.
Откройте консоль командной строки с повышенными правами (введите cmd в меню «Пуск» и нажмите «Запуск от имени администратора»). Затем введите следующую команду в консоль командной строки и нажмите клавишу ВВОД:
BCDEDIT /Set {current} hypervisorlaunchtype auto
Перезагрузите компьютер. Еще раз запустите консоль командной строки с повышенными правами, введите BCDEDIT в консоль и нажмите клавишу ВВОД. В появившемся списке статус рядом с типом гипервизора должен читаться как Авто. Это означает, что гипервизор успешно настроен для запуска при запуске.
Теперь вы готовы к работе. запуск Windows Sandbox. И вуаля! Скорее всего, он должен загрузиться сразу.
Песочница
Одноразовый характер Windows Песочница делает его фантастическим инструментом для множества применений. И всегда лучше убедиться, что он работает должным образом, чтобы вы могли запустить его в любое время. И, надеюсь, исправления, приведенные выше, помогли избавиться от этой надоедливой ошибки «Гипервизор не найден» навсегда.
Если у вас по-прежнему возникают проблемы, попробуйте удалить с компьютера любые сторонние виртуальные машины (например, VirtualBox или VMWare), а затем повторите попытку. Гипервизоры, используемые этими платформами, могут вызвать конфликты с тем, который используется Windows Песочница, и это то, что вы должны принять во внимание.
Следующий: Забота о вашей конфиденциальности? Вот 5 Windows 10 настроек конфиденциальности, которые вы должны изменить прямо сейчас.
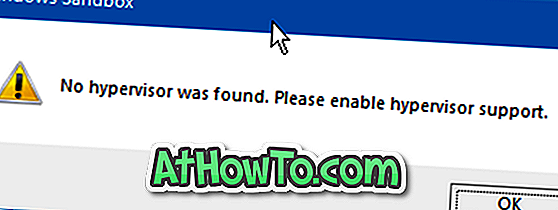
При попытке запустить функцию песочницы Windows в Windows 10 песочница может не запуститься и отобразить сообщение «Гипервизор не найден. Пожалуйста, включите поддержку гипервизора ».
«Гипервизор не был найден. Пожалуйста, включите поддержку гипервизора », поскольку Windows Sandbox требует технологии виртуализации, которая доступна в большинстве современных процессоров.
Технология виртуализации включена по умолчанию практически на всех ПК. Однако, если вы получаете сообщение об ошибке, это либо потому, что технология виртуализации отключена в BIOS, либо ваш компьютер не поддерживает ее.
Если вы приобрели компьютер за последние несколько лет, скорее всего, ваш компьютер поддерживает виртуализацию.
Исправлена ошибка, при которой гипервизор не был найден
Вот как включить технологию виртуализации в BIOS.
Шаг 1: Сохраните свою работу. Закройте все работающие программы и перезагрузите компьютер.
Шаг 2: Загрузитесь в BIOS. Перейдите на вкладку «Безопасность». Найдите опцию Intel Virtualization Technology или Virtualization Technology, выберите опцию, нажмите клавишу Enter, чтобы получить опции Enable и Disable.
Шаг 3. Выберите опцию « Включить», а затем нажмите клавишу F10, чтобы сохранить и выйти.
Обратите внимание, что расположение параметра технологии виртуализации в BIOS варьируется от производителя к производителю. Пожалуйста, проверьте все вкладки, если вы не можете найти его на вкладке Безопасность.
Если вы не можете найти вариант технологии виртуализации, скорее всего, потому что процессор вашего компьютера не поддерживает его. Пожалуйста, свяжитесь с производителем вашего ПК, чтобы подтвердить то же самое.
Шаг 4: Загрузитесь в Windows 10. Запустите «Песочницу» Windows. Теперь вы сможете запускать и использовать Windows Sandbox без «Гипервизор не найден. Пожалуйста, включите поддержку гипервизора ».
Как включить или отключить Windows Sandbox в руководстве по Windows 10 также может вас заинтересовать.
With Windows 10 Microsoft introduced the Windows Sandbox feature for Professional and Enterprise users, that designed to run untrusted applications inside a lightweight isolated environment running independently from your main installation. That means every time you launch the feature, it runs a new clean installation of Windows 10. Any software installed in Windows Sandbox stays only in the sandbox and cannot affect your host and Once Windows Sandbox is closed, all the software with all its files and state are permanently deleted. By default, the windows sandbox feature not enabled and you need to manually enable Windows sandbox from windows features.
Overall it’s a great addition to test unknown applications, check out websites that seem suspicious, unfamiliar browser extensions and add-ons, and other items you might not want to run in your regular Windows environment. But few users report while trying to launch the Sandbox feature they meet error no hypervisor was found. please enable hypervisor support. (0xc0351000).
As the error message shows virtualization technology required for launching and using the Sandbox feature is either not supported by the system or is disabled in the BiOS. If you are also struggling with similar problem “No hypervisor was found. Please enable hypervisor support” while opening Windows Sandbox apply the solutions below.
Check CPU virtualization enabled
- Open the task manager,
- move to the performance tab then select CPU on left,
- Now check the virtualization shows enabled (refer to image below)
If Virtualization is disabled, you need to head over to the BIOS or UEFI of your system to activate the feature.
Before this open command prompt, type systeminfo and hit enter key this will display whether your system supports virtual technology or not.
Restart your system and boot into the BIOS mode using del key (Note: Refer to the documentation for your computer’s motherboard model for the exact instructions to access BIOS)
- Most of the manufacturers support del, F10 or F2 key to access BIOS setup,
- Once you enter BIOS head over to system configuration using the arrow key on the keyboard,
- Here select the virtualization Technology and enable the option
- Save these settings by hitting F10 on the keyboard.
- Exit the BIOS mode and boot into the Windows 10 OS and Check if the issue is resolved.
Enable Hyper-V ‘Turn Windows features on or off’
If processor virtualization is enabled, then it would be strange to encounter the “No hypervisor found” error message. In such cases, you need to make sure the Hyper-V is enabled on Turn Windows features are on or off. If it is already enabled we recommend disabling the feature and re-enable the same again.
On the start menu search type Windows Features and select Turn windows feature on or off from search results, Now scroll down and look following features are enabled.
- Windows Sandbox
- Virtual machine platform
- Windows hypervisor platform
If not checkmark on them and click ok to enable these features. Restart your PC and check if this helps to fix no hypervisor was found. please enable hypervisor support. (0xc0351000) on Windows 10.
Add a BCD entry
Here is another solution users suggest on the Microsoft forum, adding an entry to the Boot Configuration Data (BCD) helps to fix the issue.
- Open the command prompt as administrator,
- Type command BCDEDIT /Set {current} hypervisorlaunchtype auto and hit the enter key.
- you will get a message The operation completed successfully
- Close the command prompt and restart your PC,
- Again open the command prompt and run command bcdedit and press Enter.
- Here look the hypervisorlaunchtype status showing Auto, That means the hypervisor is successfully configured to run at startup and You are now ready to go Launch Windows Sandbox
Also read:
- Solved: Headphones not recognized (Not working) on windows 10
- How to Clear the Pagefile at shutdown on Windows 10, 8.1 and 7
- How to Reset, Reinstall Microsoft Edge Browser in Windows 10
- How to Repair or rebuild Master Boot Record (MBR) on Windows 10/8.1
- How to Reset Windows 10 password without any Software

