Free instant access to BIOS tips!
Fill in your name and email and receive our ebook ‘How to update your PC BIOS in 3 easy steps’ (15$ value), free BIOS tips and updates about Wim’s BIOS!
Fast, Scalable and Secure Webhosting
Are you currently having hosting problems? Do you feel that your site slowlyness is killing sales or traffic?
Our book Fast, Scalable and Secure Webhosting for Web Developers will give you the knowledge to run your site on a speedy, scalable and secure server!
Start learning about Linux, Nginx, MariaDB, PHP-FPM, Java, IPv6, HTTPS, WordPress and much more!
Tip: Receive your free Chapter Secure your site with HTTPS by joining our mailing list!

We have three different kind of Phoenix BIOS Flashers available on Wim’s BIOS.
- phlash is a DOS based flasher.
- Winphlash lets you update your BIOS from within Windows (32 bit and 64 bit versions).
- If you have an UEFI based BIOS from Phoenix you’ll need to use Phoenix UEFI Flasher
phlash.exe — Phoenix Flasher (DOS based)
The below Phoenix BIOS flashers work under DOS only.
Winphlash.exe — Phoenix Flasher (Windows 32/64bit based)
The Phoenix WinPhlash utility is a 32-bit/64 bit application which runs in a Windows environment to update, backup, and restore the system BIOS on a flash device.
This utility can use an optional settings file called PHLASH.INI
The below Phoenix BIOS flashers work under Windows 32 and 64 bit versions.
Phoenix Winphlash allows you to flash your BIOS from within Windows (NT/2000 or later — 32 bit editions). Winphlash64 supports 64-bit versions of Windows.
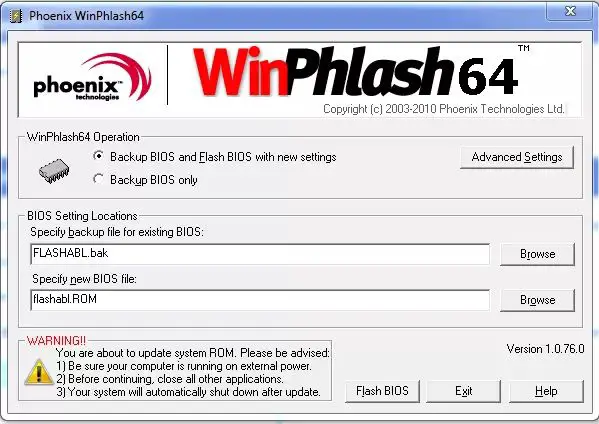
Please read the Phoenix Winphlash userguide first.
Phoenix UEFI Winflash (Windows 32/64bit based)
Phoenix UEFI Winflash lets you flash UEFI based BIOS updates for your computer system.
Need help? Ask your question here!
(Examples: how to update your BIOS, how to identify your motherboard)
This application is designed to modify the whitelist of your computer’s hardware through the BIOS. It changes the ROM image modules which are a part of the system.
Windows version:
Windows XP, Windows 7, Windows 2000, Windows Vista
Phoenix Bios Editor is a Windows application that allows users to modify the ROM modules which are part of BIOS and make changes to the image. The program is intended mainly for programmers.
Configuring the software
The software has a simple interface. It prevents you from having to reinstall BIOS in the future. The application supports the functions to unpack and replace components within the image. There is also an option to change the system settings.
To configure the application for Windows installation, you need to select the Advanced Features menu option. In some cases, you may want to remove firmware. BIOS Backup ToolKit can be helpful here.
BIOS Administration
For the correct operation of the system, in addition to the program you will need a BIOS set on your PC. First step is to open the archive containing the utility with a suitable tool and look for a file with the WPH extension in it. This is what you will change. After unpacking and installing the described software, you will need to open the previously mentioned file and agree to all the system warnings. Then in MOD _5100. ROM you can find the list of your computer’s hardware for editing.
It is recommended that you check everything thoroughly several times before confirming the changes. If you make a mistake, your PC may crash.
Features
- free to download and use;
- allows you to make changes to the hardware whitelist;
- the tool is intended for advanced users;
- the utility has a simple interface;
- compatible with modern versions of Windows.
![]() YUMI
YUMI
Windows 7, Windows 8, Windows 8.1, Windows 10, Windows 11 Free
This specialized tool is intended for creating multiboot USB storage devices that can contain several different ISO disk images with Windows and Linux distributions.
ver 2.0.9.4
![]() SymMover
SymMover
Windows XP, Windows Vista, Windows 7, Windows 8, Windows 8.1, Windows 10, Windows 11 Free
With the help of this utility users can move installed applications along with all related files to another location without going through the setup process again.
ver 1.5.1510
![]() Seagate DiscWizard
Seagate DiscWizard
Windows 7, Windows 8, Windows 10, Windows 11 Free
The software solution was designed to help you install and manage Seagate hard disc drives. Moreover, you have the ability to perform sector-by-sector backups.
ver 25.0.1.39818
![]() Norton Utilities
Norton Utilities
Windows 7, Windows 8, Windows 8.1, Windows 10, Windows 11 Free
With the help of this utility users can increase overall system performance by fixing various registry errors and removing unnecessary files from the hard drive.
ver 16.0
![]() NovaBACKUP
NovaBACKUP
Windows 8.1, Windows 10, Windows 11 Free
This corporate backup solution is oriented toward IT professionals. There are instruments for managing all endpoint client copies and monitoring remote machines.
ver 20.0.1118
![]() CleanWipe
CleanWipe
Windows XP, Windows Vista, Windows 7, Windows 8, Windows 8.1, Windows 10, Windows 11 Free
This official utility allows users to permanently delete all system records and files associated with the Symantec Endpoint Protection software products.
ver 14.3.9210.6000
![]() Intel Extreme Tuning Utility
Intel Extreme Tuning Utility
Windows 10, Windows 11 Free
This overclocking program lets you adjust multiple internal characteristics of various Intel processors to increase overall system performance and stability.
ver 7.10.0.65
![]() EaseUS Todo PCTrans Pro
EaseUS Todo PCTrans Pro
Windows 7, Windows 8, Windows 8.1, Windows 10, Windows 11 Free
With the help of this utility users can transfer the operating system, files, personal settings and installed applications from one hard drive to another.
ver 13.2
Содержание
- 1 Уточнение номера платы
- 2 Где скачать обновление BIOS Phoenix
- 3 Как происходит обновление
- 4 updates provided by eSupport.com
- 4.1 Update Tips
- 4.1.1 Improve Your Boot Up Speed By Upgrading Your BIOS
- 4.1.2 Improving Boot Speed Through BIOS Settings
- 4.1.3 Overclocking Assistant
- 4.1.4 Using Default BIOS Settings
- 4.1.5 HDD S.M.A.R.T. Monitor
- 4.1.6 Why Should I Update My BIOS?
- 4.1.7 USB Legacy Support
- 4.1.8 Virus Warning
- 4.1.9 Quick Power On Self Test
- 4.1.10 State After Power Fail
- 4.1.11 Keep Unauthorized Users from Making Changes
- 4.1.12 How to Enter the BIOS or CMOS Setup Screens
- 4.1.13 When is it Time to Update My BIOS?
- 4.1.14 Unknown Flash Type
- 4.1.15 How to Clear a BIOS Password
- 4.1 Update Tips

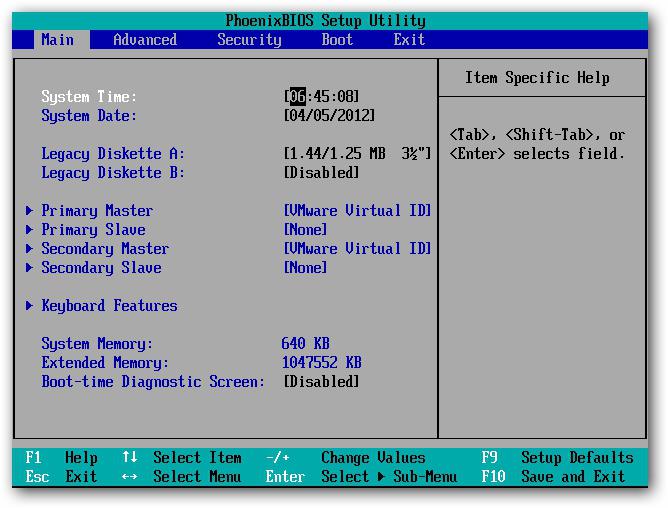
Периодически необходимо осуществлять обновление Phoenix BIOS. Это связывается с тем, что происходят улучшения, которые позволяют ускорить процесс загрузки операционной системы или добиться других преимуществ. В некоторых ситуациях процедура блокируется и это следует изменить в настройках. Опция называется «BIOS FLASH Protection». Она должна быть установлена в состояние «DISABLED».
Уточнение номера платы
Чтобы проводить обновление БИОС, надо сперва узнать, к какой именно модели относится материнская плата. Для этого можно использовать один из доступных способов.
- Требуется получить доступ к плате за счёт вскрытия системного блока. Номер имеет вид MS-XXXX и должен находиться между разъёмами PCI. Дополнительно, нужно узнать номер версии – он указывается здесь же.
- Уточнить информацию при загрузке системы. В процессе возникнет строка, где будет написано «W5252MS v2.1 133101» или другие сведения в аналогичном формате. Расшифровка является довольно простой и означает использование компьютером платы MS 5252 с версией 2.1.
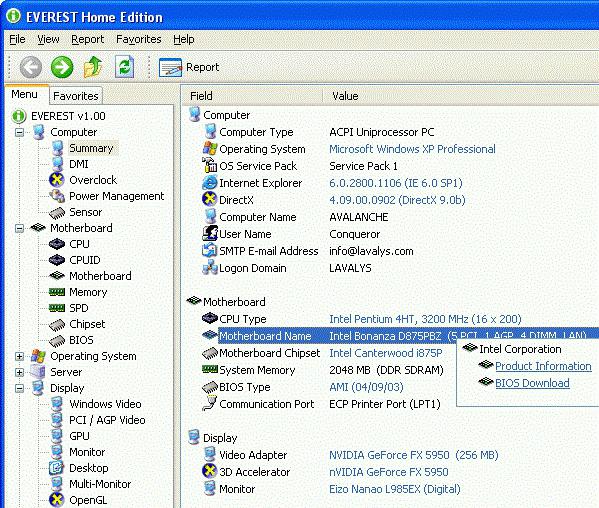
- Можно установить специализированное ПО для определения подключенных устройств. Существует довольно большое количество доступных вариантов. Можно отметить программу Everest.

Как видно из скриншота, появляется возможность не только узнать модель и версию материнской платы, но и получить сведения о месте загрузки обновления БИОС (BIOS Phoenix). Что касается интерфейса, то он является максимально простым.
Где скачать обновление BIOS Phoenix
Когда имеются сведения о том, к какой модели относится материнская плата и какой версией она обладает, можно приступать к следующему этапу. Он предусматривает переход на сайт официального производителя и поиск там соответствующего файла. Следует отметить удобные формы и фильтры на большинстве ресурсов, позволявшие быстро найти интересующий документ.
Вовсе не обязательно выполнять подобную задачу самостоятельно. На просторах интернета можно найти специальные программы. Они позволяют найти обновления для БИОС или других подключённых устройств. Например, это BIOS Wizard, MSI Live Update и другие. Всегда учитывайте, кто является производителем материнской платы.
Как происходит обновление
Когда скачивание файла завершено, следует учитывать возможность выполнить поставленную задачу тремя способами:
- Обновление BIOS в среде DOS. Для этого следует использовать утилиту @BIOS. Она позволяет работать не только с продуктом Award, но и AMI.
- Обновление в среде Windows. Это наиболее простой и удобный вариант, который должен учитываться в процессе осуществления поставленных задач. Он предусматривает необходимость применения описанной ранее утилиты @BIOS.
- В Phoenix БИОС имеется встроенная программа Q-Flash. Она позволяет провести обновление непосредственно из данной среды. Никакими специальными навыками обладать не требуется, поскольку всё выполняется автоматически.
После завершения процедуры, произойдёт перезагрузка системы.
Скачать бесплатно для материнской платы Asus Striker
Вы находитесь на странице скачивания прошивок и Биосов. Данный файл — «Утилита обновления биоса Phoenix (Phoenix Award BIOS flash tool Utility)». Для того, чтобы скачать Биос, необходимо выбрать один из представленных ниже серверов нажав на вкладку «Бесплатно скачать этот Биос, утилиту, файл», а затем на один из серверов в раскрывшемся списке — «Скачать файл с сервера №…». Загрузка начнется сразу или через несколько секунд, в зависимости от загруженности выбранного FTP сервера. В случае, если загрузка не началась в течение нескольких секунд – попробуйте выбрать другую ссылку из этого же списка.
updates provided by eSupport.com
- Home
- Update Tips
Update Tips
Improve Your Boot Up Speed By Upgrading Your BIOS
Does your system take a little too long to boot up? You can cut considerable time off of your boot time by tweaking the BIOS settings a bit. One of the ways is to adjust the QUICK POWER ON SELF TEST setting. This may also be called FAST BOOT, or QUICK BOOT.
Do you really want your system to test the RAM each time you boot up? Let me tell you that if you have more than 265MB, then no, you don’t, because the process can take minutes. Also, the RAM test won’t catch anything but the most catastrophic of RAM issues so it’s next to useless. So, to save time, leave the setting enabled.
Another way of improving your boot time is by simply updating the BIOS. Upgrading your BIOS can improve not only the boot up speed, but also significantly improve the overall performance of your computer as well.
Improving Boot Speed Through BIOS Settings
Tweaking your BIOS settings can be a good way to get your system to boot faster. Just a simple change of some of the key settings can make dramatic differences in how fast your system boots up.
Enable the «Quick Boot» Feature: Many newer PC’s have a special BIOS setting, usually called «Quick Boot» or «Quick Power On Self Test» that can be enabled to make the boot take less time. Try enabling this setting; this will cause the BIOS to skip some of the normal test routines that it performs at boot time, speeding up the boot process.
Remove the Boot Delay Setting: Some PC’s have a BIOS setting that you can use to intentionally delay the boot-up of the PC by several seconds. This setting is often called «Boot Delay» or «Power-on Delay». This can be useful when the BIOS is booting too quickly, causing hard disk drives to be booted before they are ready. However, it also slows the boot process down, so make sure that it is only enabled if it is needed.
Disable Floppy Drive Seek: Also called «Boot Up Floppy Seek.» Most PCs have a BIOS setting to disable floppy drive seeking, which is the short access the BIOS makes to the floppy disk just before it boots the system. This seek (unless disabled) is performed regardless of whether the system is being booted from the hard disk or floppy disk. Disabling the seek speeds up the boot process by a couple of seconds. This doesn’t really have any negative impact on the system, although if you are having problems with your floppy drive you will probably want to re-enable the seek as this makes troubleshooting some types of problems easier.
Overclocking Assistant
We are constantly asked about overclocking features and many new Intel BIOS contain a new feature called Overclocking Assistant.
Intel’s overclocking assistant in the BIOS makes Overclocking even easier if tweaking for performance and the BIOS options are a little much. By contrast, those who do tweak can use the tool to find some good baseline starting points for overclocking based on the data that Intel has acquired through its testing of the platform.
When set to Manual, the User must manually configure Performance questions.
When set to Automatic, all Performance questions (including those in subscreens) are grayed out except for Processor Speed (GHz), Internal Graphics Speed (GHz), Memory Speed (MHz); the following questions are set as follows:
- Failsafe Watchdog — Enable
- Host Clock Frequency (MHz) — 100
- Processor Voltage Override Type — None
- Intel® Turbo Boost Technology — Enable
- Sustained Mode Time (Seconds) — 1
- IGD Current Limit (Amps) — 64
- Active Core-Based Ratio Limits — Disable
Found in the performance section it allows you to quickly and simply choose processor speed (up to 4.6GHz) and memory speed, in excess of 2000MHz.
Using Default BIOS Settings
Are you having trouble with your computer? Do you have a suspicion that the issues may be BIOS related? Perhaps you are receiving BIOS or CMOS error messages, or Beep Codes at startup. Perhaps you are receiving hardware related errors in Windows, or even experiencing periodic Blue Screens in Windows. Maybe you have updated your BIOS and some things just don’t seem right.
These problems can be the result of a Windows Update, installation of new hardware, installation of new drivers, overclocking, configuration changes in the CMOS setup, or just a single change in your system’s configuration. The result is often configuration or compatibility issues stored in the CMOS Setup. If this is the case, these problems can often be resolved by resetting CMOS settings by loading either the default CMOS/BIOS settings, clearing the CMOS, or by upgrading the BIOS.
Always start with the simplest solution first. Enter the CMOS setup utility during the startup of your PC. Then load the defaults by selecting Load Fail-Safe Defaults, Load BIOS Defaults, or whatever your BIOS manufacturer has named this function in your particular type and version of BIOS. Be sure to save your changes before exiting the CMOS Setup.
If this has resolved your problem you can then start tweaking the CMOS settings again to optimize performance, or try loading the Optimized defaults from the CMOS setup. Continue tweaking the CMOS settings until you have configured your system to meet your requirements and preferences. If problems reoccur, repeat the process until you pinpoint the setting that is causing the problem and make the appropriate change.
If loading the defaults does not correct the problem clear the CMOS by powering off the system, unplugging it, and removing the CMOS battery for 8-10 hours. Then put the battery back, reconnect the power, and restart the PC. Note: You will need to enter the CMOS setup reset the date and time, and save the new date and time settings before exiting. Confirm if your problem is fixed, and again, proceed to tweaking the CMOS settings if desirable.
If you still suspect you have BIOS related issues after loading default CMOS/BIOS settings, or clearing your CMOS, you may need to upgrade your BIOS to support the latest system/configuration changes made to your PC. Visit your system manufacturer’s website, or use a program like BIOSAgentPlus (http://BIOSAgentPlus.com) to see if there is a newer BIOS available for your PC.
HDD S.M.A.R.T. Monitor
One of the settings you will find in your BIOS is something called HDD S.M.A.R.T. Capability. What is that setting and what does it do? Well S.M.A.R.T. is an acronym for Smart Monitoring Analysis and Reporting Technology.
S.M.A.R.T. is supported by all current hard disks and it allows the early prediction and warning of impending hard disk disasters. You should enable it if you want to use S.M.A.R.T.-aware utilities to monitor the hard disk’s condition. Enabling it also allows the monitoring of the hard disk’s condition over a network.
S.M.A.R.T. is useful in providing a modicum of data loss prevention by continuously monitoring hard disks for signs of impending failure. If you have critical or irreplaceable data, you should enable this BIOS feature and use an S.M.A.R.T.-aware hardware monitoring software. Just don’t rely completely on it. Back up your data on a CD or DVD!
Some of the newer BIOS now come with S.M.A.R.T. monitoring support built-in. When you enable HDD S.M.A.R.T. Capability, these new BIOS will automatically check the hard disk’s S.M.A.R.T. status at boot-up. However, such a feature has very limited utility as it can only tell you the status of the hard disk at boot-up. Therefore, it is still advisable for you to disable HDD S.M.A.R.T. Capability unless you use a proper S.M.A.R.T.-aware monitoring utility.
Why Should I Update My BIOS?
Even though updating your BIOS comes with a certain amount of risk, the potential rewards definitely make it worth it.
Motherboard manufacturers are constantly making enhancements to the BIOS firmware and the effects can significantly improve the performance of your system. It can also create additional functionality, make your system less buggy, and improve overclocking performance. BIOS updates can also be created to address something small but important, such as adding support for a higher frequency RAM or a new CPU.
It’s best to check periodically with BIOS Agent Plus to see if any new versions of your BIOS have been released.
USB Legacy Support
One issue that is very common with some of our customers is the failure of their USB keyboard to work in a DOS or pre-Windows environment. There is a setting in your BIOS that must be enabled in order for your USB keyboard to work in that situation. That setting is called USB Legacy Support.
This setting must be enabled if the PC has a USB Keyboard and the user wants to use this keyboard either in a DOS environment or before the operating system loads (in boot menus, for example). If this setting is disabled, then booting to a floppy disk or CD-ROM will render the keyboard useless. Also, ironically, trying to enter the PC’s BIOS may be impossible if this setting is disabled and a USB keyboard is connected. If the PC has a USB keyboard with a rectangular connector, then set this to Enabled . If it has a PS/2 keyboard (round connector), set this to Disabled . Be aware that enabling this feature may result in problems with the computer waking up from Standby or Hibernate mode, or cause the computer to not shut down properly. In other words, enable this only if you must.
Virus Warning
Many BIOS will have a setting called Virus Warning. This is different than any Anti-Virus software that you may have installed on your system. This is Boot Sector virus protection which protects the boot sector or partition table of your hard drive. When this function is enabled, if someone or something attempts to write to the boot sector or partition table of the hard drive, a warning message will appear on screen and an alarm will sound. When disabled, you will not get a warning message and no alarm will sound. This feature only protects the boot sector of the hard drive, it does not protect the entire drive. Your anti-virus program installed on your system will take care of the rest of the drive. Obviously, it is a very good idea to keep this option enabled in the BIOS.
Quick Power On Self Test
Last month we mentioned that we would be discussing different BIOS settings in this space in some issues. In this issue we are going to discuss the setting Quick Power On Self Test.
Enabling this setting allows the BIOS Power On Self Test to bypass some of its tests during the bootup. One of the key things this does is causes the POST to skip checking all of the extended memory for errors. This increases the boot time greatly.
One disadvantage of enabling this setting, however, is that you do increase the chances of the POST missing and error message. Luckily, the POST memory test is pretty much useless to detect transient memory errors. So once your system is up and running and stable, you can enable this setting without any worries that you are missing something.
The safest thing to do is to leave it disabled. Especially if you are someone who very rarely turns your system off. If you do turn your system off daily and have large amounts of RAM in your system, then enabling this option will improve your startup time significantly.
State After Power Fail
We get asked a lot of questions about what each setting in the BIOS does. Every so often we will review a setting in this space and explain what the setting does. In this issue we are going to discuss the setting State After Power Fail.
The setting State After Power Fail deals with the state of your system after the system loses power. In some systems it may be called Power On After Power Fail. In that case the setting is self explanatory. If you set Power On After Power Fail to YES, then when power resumes the system will power on. If you set it to NO, then the system will remain off when power resumes.
However with State After Power Fail, you will have several options.
The first option is a setting called Stay Off. This setting, when selected, will keep your computer off when the power is restored.
The second option is a setting called Last State. This setting, when selected, will put your system in the state it was in when power was lost.
The third option is a setting called Power On. This setting, when selected, will turn the system on when power is restored.
Keep Unauthorized Users from Making Changes
The Security section of the BIOS can be used to keep unauthorized people from making changes to the BIOS.
The option called Security Option can be set to either Setup or System. When it is set to SETUP the security is on the BIOS Setup screens. A user would need a password to be able to make changes to the BIOS Setup screens.
When the option SYSTEM is set, the user will need a password to even get the system to boot.
There are also settings for Supervisor Password and a User Password. If you choose to set the Security Option then you will need to set your Supervisor and User Password options. If you choose to select a Supervisor Password, a password will be required to enter the BIOS after you choose setup, as described above. If you choose SYSTEM as described above, then a password will be required for cold-booting as well.
With the User Password option, a different password assigned to users is required to boot the PC, and if a Supervisor Password has also been selected, permits the user to only adjust the date and time in the BIOS.
How to Enter the BIOS or CMOS Setup Screens
We still get asked quite often how to enter the BIOS or CMOS Setup screens. Thankfully, computers that have been manufactured in the last few years will allow you to enter the CMOS by pressing one of the below five keys during the boot. Usually it’s one of the first three.
- F1
- F2
- DEL
- ESC
- F10
A user will know when to press this key when they see a message similar to Press to enter BIOS setup as the computer is booting. Some older computers may also display a flashing block to indicate when to press the F1 or F2 keys.
If your computer is a new computer and you are unsure of what key to press when the computer is booting, try pressing and holding one or more keys on the keyboard. This will cause a stuck key error, which may allow you to enter the BIOS setup.
When is it Time to Update My BIOS?
We get a lot of people who ask, “How do I know when I should upgrade my BIOS?” It could be different for everyone, but usually there are some tell-tale signs.
If you’re experiencing strange behavior such as blue screens or your system restarting, or you’re looking for more functionality such as the ability to add a larger hard drive to your system, then a BIOS update is definitely something you will need to consider.
Motherboard makers are constantly enhancing the BIOS firmware and the end result can be significantly improved performance, less buggy behavior, additional functionality, improved overclocking performance, and much more.
Unknown Flash Type
One of the more common issues that comes up when trying to upgrade your BIOS is the error message «Unknown Flash Type.»
There are several causes for this error. The most common is that there is write protection on the existing BIOS. To verify if this is the case, enter your CMOS setup and check for a setting labeled BIOS GUARDIAN or FLASH BIOS PROTECTION. This should be under the screen entitled ADVANCE BIOS FEATURES. If you are able to locate one of those settings, set it to disabled. Then save and exit your CMOS settings by choosing F10.
Another possibility is that you are using an old flash utility. Old flash utilities can produce and UNKNOWN FLASH TYPE error as well. You can replace the existing flash utilities with a newer one from our site here.
How to Clear a BIOS Password
One of the most common questions we get is how you clear a BIOS password. A BIOS password can prevent access to the BIOS Setup or even prevent a system from booting. Well, there are basically 3 ways to clear a password:
The most common is to open your computer and remove the lithium battery, wait a few seconds to clear the data from the well and put back CMOS battery. Normally this will erase the password and is not complicated. Some systems require the battery to be out longer. If possible take it out before going to bed and replace it in the morning.
In extreme cases, such as in the old 386, 486 and some other models that have the battery welded, the board does not contain jumpers. In these situations you can use certain programs that will allow you to clear the CMOS. There is one called CLRCMOS that can be run from DOS or Windows. CLRCMOS is available in the support section of our site here.
DEBUG. It runs under DOS and does not require any specific program; the first thing you have to do is start the computer with a DOS system disk. Once it is booted, run the DEBUG as follows:
C:> debug -> enter
— o 70 17 -> enter
— o 71 ff -> enter
— q -> enter
BIOSAgentPlus is a small FREE program that helps you quickly identify and update your BIOS.

Действия по обновлению драйверов Phoenix Bios вручную:
Базовые версии драйверов Phoenix Bios включены в %%os%% или путем установки последних обновлений Windows®. Использование этих встроенных драйверов Bios будет поддерживать базовые функциональные возможности.
Вот полное руководство по ручному обновлению этих драйверов устройств Phoenix.
Автоматическое обновление драйверов Phoenix Bios:
Рекомендация: Вы можете скачать такой инструмент, как DriverDoc [DriverDoc — Продукт от Solvusoft], — инструмент для обновления драйверов, который был разработан для пользователей Windows, не имеющих достаточного опыта в ручном обновлении драйверов Phoenix БИОС. Данный инструмент выполнит всю работу за вас. Он автоматически скачает и обновит драйверы Phoenix, предотвратив установку неправильных драйверов для вашей версии операционной системы.
Такое средство для обновления драйверов, как DriverDoc, позволяет обновлять не только драйверы БИОС, но и остальные драйверы вашего ПК. Благодаря обширной базе, насчитывающей более 2 150 000 драйверов (обновляется на ежедневной основе), вы можете быть уверены, что в ней всегда имеются необходимые драйверы для вашего устройства.
Установить необязательные продукты — DriverDoc (Solvusoft) | Лицензия | Политика защиты личных сведений | Условия | Удаление
![]()
Phoenix Часто задаваемые вопросы относительно обновления
Какова совместимость операционных систем для драйверов Phoenix?
Phoenix поддерживается Windows.
Почему пользователи не обновляют драйверы Phoenix?
Большинство людей не выполняют обновления драйверов Phoenix, потому что они могут столкнуться с ошибками или сбоями.
Можете ли вы объяснить, что делают драйверы БИОС Phoenix?
По сути, драйверы — это небольшие программные приложения, которые позволяют Phoenix вашего устройства «взаимодействовать» с операционной системой, а также являются залогом функциональности аппаратных средств.
Как обновить драйверы Phoenix?
Драйверы Phoenix можно обновить вручную с помощью Device Manager (Диспетчер устройства) или автоматически с помощью программного обеспечения для обновления драйверов.
Трудности, связанные с обслуживанием водителя
Ошибки Phoenix Bios можно связать с поврежденными драйверами ПК. Драйверы устройств могут работать в один прекрасный день, а затем перестать работать на следующий день из-за ряда причин. Лучшая часть заключается в том, что ваши драйверы БИОС всегда могут быть изменены для решения дилеммы ноутбука.
Поиск правильного драйвера БИОС непосредственно на веб-сайте производителя для вашего оборудования может показаться бесполезным. Несмотря на опыт поиска, установки и ручного обновления драйверов Phoenix Bios, задача будет занимать много времени и очень надоедлительной. Установка неправильных драйверов может негативно сказаться на функциональности оборудования или операционной системы.
Изменение драйверов — очень утомительный и сложный процесс, так почему бы не использовать программное обеспечение для обновления драйверов? Утилиты обновления драйверов гарантируют наличие правильных драйверов, совместимых с вашим оборудованием, а также гарантирует наличие резервной копии текущих драйверов перед внесением изменений в программное обеспечение/оборудование. Резервное копирование драйверов обеспечивает мгновенный и безопасный способ восстановления драйвера до более ранней конфигурации, если это необходимо.
Поиск по моделям Phoenix БИОС
- 4W4SBOXO.15A.0015.P10
- Award Modular BIOS v6.00PG
- inpiron 8200
- L7024298 E
- si54P AIO
Всего страниц: 1
Всего элементов: 5
Топ-драйверов, похожих на Phoenix БИОС


Установить необязательные продукты — DriverDoc (Solvusoft) | Лицензия | Политика защиты личных сведений | Условия | Удаление
Загрузить новые драйверы Phoenix БИОС (Обновление программного обеспечения)
Установить необязательные продукты — DriverDoc (Solvusoft) | Лицензия | Политика защиты личных сведений | Условия | Удаление
Содержание
- Способы обновить Phoenix BIOS или правильное обновление Phoenix биос!
- Уточнение номера платы
- Где скачать обновление BIOS Phoenix
- Как происходит обновление
- Как обновить биос phoenix
- Уточнение номера платы
- Где скачать обновление BIOS Phoenix
- Как происходит обновление
- Понятие
- Настройка
- Необходимость апдейта
- Процесс
- Everest
- Восстанавливаем систему
- updates provided by eSupport.com
- Update Tips
- Improve Your Boot Up Speed By Upgrading Your BIOS
- Improving Boot Speed Through BIOS Settings
- Overclocking Assistant
- Using Default BIOS Settings
- HDD S.M.A.R.T. Monitor
- Why Should I Update My BIOS?
- USB Legacy Support
- Virus Warning
- Quick Power On Self Test
- State After Power Fail
- Keep Unauthorized Users from Making Changes
- How to Enter the BIOS or CMOS Setup Screens
- When is it Time to Update My BIOS?
- Unknown Flash Type
- How to Clear a BIOS Password
Способы обновить Phoenix BIOS или правильное обновление Phoenix биос!
Периодически необходимо осуществлять обновление Phoenix BIOS. Это связывается с тем, что происходят улучшения, которые позволяют ускорить процесс загрузки операционной системы или добиться других преимуществ. В некоторых ситуациях процедура блокируется и это следует изменить в настройках. Опция называется «BIOS FLASH Protection». Она должна быть установлена в состояние «DISABLED».
Уточнение номера платы
Чтобы проводить обновление БИОС, надо сперва узнать, к какой именно модели относится материнская плата. Для этого можно использовать один из доступных способов.
- Требуется получить доступ к плате за счёт вскрытия системного блока. Номер имеет вид MS-XXXX и должен находиться между разъёмами PCI. Дополнительно, нужно узнать номер версии – он указывается здесь же.
- Уточнить информацию при загрузке системы. В процессе возникнет строка, где будет написано «W5252MS v2.1 133101» или другие сведения в аналогичном формате. Расшифровка является довольно простой и означает использование компьютером платы MS 5252 с версией 2.1.
- Можно установить специализированное ПО для определения подключенных устройств. Существует довольно большое количество доступных вариантов. Можно отметить программу Everest.
Как видно из скриншота, появляется возможность не только узнать модель и версию материнской платы, но и получить сведения о месте загрузки обновления БИОС (BIOS Phoenix). Что касается интерфейса, то он является максимально простым.
Где скачать обновление BIOS Phoenix
Когда имеются сведения о том, к какой модели относится материнская плата и какой версией она обладает, можно приступать к следующему этапу. Он предусматривает переход на сайт официального производителя и поиск там соответствующего файла. Следует отметить удобные формы и фильтры на большинстве ресурсов, позволявшие быстро найти интересующий документ.
Вовсе не обязательно выполнять подобную задачу самостоятельно. На просторах интернета можно найти специальные программы. Они позволяют найти обновления для БИОС или других подключённых устройств. Например, это BIOS Wizard, MSI Live Update и другие. Всегда учитывайте, кто является производителем материнской платы.
Как происходит обновление
Когда скачивание файла завершено, следует учитывать возможность выполнить поставленную задачу тремя способами:
- Обновление BIOS в среде DOS. Для этого следует использовать утилиту @BIOS. Она позволяет работать не только с продуктом Award, но и AMI.
- Обновление в среде Windows. Это наиболее простой и удобный вариант, который должен учитываться в процессе осуществления поставленных задач. Он предусматривает необходимость применения описанной ранее утилиты @BIOS.
- В Phoenix БИОС имеется встроенная программа Q-Flash. Она позволяет провести обновление непосредственно из данной среды. Никакими специальными навыками обладать не требуется, поскольку всё выполняется автоматически.
После завершения процедуры, произойдёт перезагрузка системы.
Источник
Как обновить биос phoenix
Периодически необходимо осуществлять обновление Phoenix BIOS. Это связывается с тем, что происходят улучшения, которые позволяют ускорить процесс загрузки операционной системы или добиться других преимуществ. В некоторых ситуациях процедура блокируется и это следует изменить в настройках. Опция называется «BIOS FLASH Protection». Она должна быть установлена в состояние «DISABLED».
Уточнение номера платы
Чтобы проводить обновление БИОС, надо сперва узнать, к какой именно модели относится материнская плата. Для этого можно использовать один из доступных способов.
- Требуется получить доступ к плате за счёт вскрытия системного блока. Номер имеет вид MS-XXXX и должен находиться между разъёмами PCI. Дополнительно, нужно узнать номер версии – он указывается здесь же.
- Уточнить информацию при загрузке системы. В процессе возникнет строка, где будет написано «W5252MS v2.1 133101» или другие сведения в аналогичном формате. Расшифровка является довольно простой и означает использование компьютером платы MS 5252 с версией 2.1.
- Можно установить специализированное ПО для определения подключенных устройств. Существует довольно большое количество доступных вариантов. Можно отметить программу Everest.
Как видно из скриншота, появляется возможность не только узнать модель и версию материнской платы, но и получить сведения о месте загрузки обновления БИОС (BIOS Phoenix). Что касается интерфейса, то он является максимально простым.
Где скачать обновление BIOS Phoenix
Когда имеются сведения о том, к какой модели относится материнская плата и какой версией она обладает, можно приступать к следующему этапу. Он предусматривает переход на сайт официального производителя и поиск там соответствующего файла. Следует отметить удобные формы и фильтры на большинстве ресурсов, позволявшие быстро найти интересующий документ.
Вовсе не обязательно выполнять подобную задачу самостоятельно. На просторах интернета можно найти специальные программы. Они позволяют найти обновления для БИОС или других подключённых устройств. Например, это BIOS Wizard, MSI Live Update и другие. Всегда учитывайте, кто является производителем материнской платы.
Как происходит обновление
Когда скачивание файла завершено, следует учитывать возможность выполнить поставленную задачу тремя способами:
- Обновление BIOS в среде DOS. Для этого следует использовать утилиту @BIOS. Она позволяет работать не только с продуктом Award, но и AMI.
- Обновление в среде Windows. Это наиболее простой и удобный вариант, который должен учитываться в процессе осуществления поставленных задач. Он предусматривает необходимость применения описанной ранее утилиты @BIOS.
- В Phoenix БИОС имеется встроенная программа Q-Flash. Она позволяет провести обновление непосредственно из данной среды. Никакими специальными навыками обладать не требуется, поскольку всё выполняется автоматически.
После завершения процедуры, произойдёт перезагрузка системы.
Что такое BIOS Phoenix? Каких видов он бывает и для чего предназначен? Не каждый пользователь представляет себе, с чего начинается запуск компьютера и из-за чего могут возникнуть различные ошибки.
Понятие
Что такое BIOS Phoenix и БИОС сам по себе? БСВВ- базовая система ввода-вывода, на английском языке звучащая, как Basic Input-Output System (BIOS), это совокупность небольших микропрограмм, являющихся частью обязательного программного обеспечения персонального компьютера. Обычно в русском языке используют не аббревиатуру БСВВ, а БИОС.
Системы БИОСа, в отличии от операционных систем, имеют разных производителей, которые выпускают их в виде микросхем, устанавливаемых на материнские платы. Они полностью совместимы с любой версией Windows до «семёрки» включительно. Наиболее известные марки BIOS: Phoenix, Award, AMI.
Настройка
Система БИОСа позволяет проводить первоначальную и основную настройку компьютера. Например, Phoenix BIOS, настройка которого позволяет управлять следующими параметрами персонального компьютера:
- Отладка старой периферии, использовавшейся до 2000 года.
- Возможность провести сброс до заводских настроек и изменить режим работы аппаратуры.
- Управление системным временем и датой.
- Возможность установки пароля на персональный компьютер.
- Включение и отключение встроенного в материнскую плату оборудования.
- Защита системы от копирования.
- Ускорение загрузки операционной системы.
- Установка очередности носителей для загрузки операционной системы.

При настройке БИОСа важно помнить, что эта микросхема имеет энергозависимую память. Поэтому, если вы удалите с материнской платы батарейку-таблетку хотя бы на секунду, все настройки сбросятся. Это, кстати, нехитрый способ обойти пароль, установленный с помощью БИОСа.
Необходимость апдейта
Иногда бывают такие ситуации, когда невозможно обойтись без обновления программного обеспечения персонального компьютера. Поскольку БИОС и, в частности, BIOS Phoenix — это набор контролирующих программ, то их обновление жизненно важно для вашего персонального компьютера. Необходимость в нем может быть обусловлена двумя основными причинами:
- По совету производителя. Этот вариант работает в тех случаях, когда выпускается новый продукт. У него может быть еще «сырое» программное обеспечение, требующее залатывания некоторых «дыр».
- Если вы решили обновить оборудование на вашем персональном компьютере. При покупке, например, нового процессора важно уточнить, поддерживают ли ваша материнская плата и БИОС его. Если нет, то вам необходимо зайти на сайт производителя ноутбука либо на сайт изготовителя материнской платы ПК (можно прочитать на самой материнской плате) и узнать, есть ли подходящие обновления.
В любом случае, пользователь должен осознавать риски самостоятельного обновления БИОСа. При неправильном обращении с утилитами обновления вы рискуете привести свою материнскую плату в полностью нерабочее состояние.
Процесс
Итак, если вы решились на самостоятельное обновление БИОСа, вам, в первую очередь, потребуется скачать обновления на компьютер. На сайте BIOS Phoenix, вы можете найти либо драйвера, либо специальную утилиту для обновления БИОСа. Эта программа устанавливается на ваш компьютер так же, как и любое другое приложение. Затем при запуске она предложит вам выбрать источник обновления. Это может быть либо уже скачанный вами файл, либо Интернет (указывается в качестве источника). В последнем случае программа сама определит и загрузит необходимые драйвера.
Другой вариант того, как обновить BIOS Phoenix, используется, если он установлен на ноутбуке. Дело в том, что производители ноутбуков не выпускают своих систем BIOS. Они устанавливают на гаджет готовые решения. Поэтому, если вы хотите обновить БИОС на ноутбуке, то просто заходите в него и находите предустановленное специальное приложение. Например, у ASUS это будет Easy Flash. После запуска вам потребуется найти файл прошивки, который предварительно необходимо скачать с сайта производителя.
Everest
Это специальная программа, приспособленная для работы с оборудованием, установленным на ваш персональный компьютер. С её помощью можно не только узнать версию вашего БИОСа, не вскрывая системный блок но и провести его обновление.
После установки программы в открывшемся окне слева выбираем подпункт «Суммарная информация». В правом окошке находим строчку «Материнская плата», нажимаем и в появившемся диалоговом окне выбираем обновление БИОСа.
Либо можно также в левом окне программы развернуть вкладку «Материнская плата», выбрать BIOS и уже справа в строке «Обновление БИОС» перейти на необходимый сайт.
Восстанавливаем систему
Иногда случается, что необходимо переустановить операционную систему, но у компьютера не имеется дисковода. В таком случае необходимо использовать загрузочную флешку. Для того чтобы компьютер мог с ней работать, необходимо проделать несколько простых операций:
- Вставляем нужную нам флешку в выключенный компьютер и запускаем его.
- Входим в Phoenix BIOS Setup utility, загрузка с флешки устанавливается во вкладке «Advanced» («Продвинутые»). Но перед тем как это сделать, может понадобиться еще кое-что.
- Включаем контроллер USB во вкладке «Peripherals» («Внешние устройства»). Причем активируем все возможные контроллеры, как обычные, так и 2.0. После этого может потребоваться перезагрузка. Не забудьте сохранить изменения.
- После перезагрузки можете выполнять пункт 2.
Что еще необходимо знать про Phoenix BIOS? У различных производителей ноутбуков могут быть назначены разные кнопки для входа в БИОС. Обычно это кнопки F1-F12, но могут встречаться и варианты с Esc и Del. Еси вы думаете, что на вашем компьютере установлен phoenix, а при входе в БИОС появляется надпись Phoenix-Award Bios, не пугайтесь. Дело в том, что компания Award была выкуплена Phoenix.
updates provided by eSupport.com
Update Tips
Improve Your Boot Up Speed By Upgrading Your BIOS
Does your system take a little too long to boot up? You can cut considerable time off of your boot time by tweaking the BIOS settings a bit. One of the ways is to adjust the QUICK POWER ON SELF TEST setting. This may also be called FAST BOOT, or QUICK BOOT.
Do you really want your system to test the RAM each time you boot up? Let me tell you that if you have more than 265MB, then no, you don’t, because the process can take minutes. Also, the RAM test won’t catch anything but the most catastrophic of RAM issues so it’s next to useless. So, to save time, leave the setting enabled.
Another way of improving your boot time is by simply updating the BIOS. Upgrading your BIOS can improve not only the boot up speed, but also significantly improve the overall performance of your computer as well.
Improving Boot Speed Through BIOS Settings
Tweaking your BIOS settings can be a good way to get your system to boot faster. Just a simple change of some of the key settings can make dramatic differences in how fast your system boots up.
Enable the «Quick Boot» Feature: Many newer PC’s have a special BIOS setting, usually called «Quick Boot» or «Quick Power On Self Test» that can be enabled to make the boot take less time. Try enabling this setting; this will cause the BIOS to skip some of the normal test routines that it performs at boot time, speeding up the boot process.
Remove the Boot Delay Setting: Some PC’s have a BIOS setting that you can use to intentionally delay the boot-up of the PC by several seconds. This setting is often called «Boot Delay» or «Power-on Delay». This can be useful when the BIOS is booting too quickly, causing hard disk drives to be booted before they are ready. However, it also slows the boot process down, so make sure that it is only enabled if it is needed.
Disable Floppy Drive Seek: Also called «Boot Up Floppy Seek.» Most PCs have a BIOS setting to disable floppy drive seeking, which is the short access the BIOS makes to the floppy disk just before it boots the system. This seek (unless disabled) is performed regardless of whether the system is being booted from the hard disk or floppy disk. Disabling the seek speeds up the boot process by a couple of seconds. This doesn’t really have any negative impact on the system, although if you are having problems with your floppy drive you will probably want to re-enable the seek as this makes troubleshooting some types of problems easier.
Overclocking Assistant
We are constantly asked about overclocking features and many new Intel BIOS contain a new feature called Overclocking Assistant.
Intel’s overclocking assistant in the BIOS makes Overclocking even easier if tweaking for performance and the BIOS options are a little much. By contrast, those who do tweak can use the tool to find some good baseline starting points for overclocking based on the data that Intel has acquired through its testing of the platform.
When set to Manual, the User must manually configure Performance questions.
When set to Automatic, all Performance questions (including those in subscreens) are grayed out except for Processor Speed (GHz), Internal Graphics Speed (GHz), Memory Speed (MHz); the following questions are set as follows:
- Failsafe Watchdog — Enable
- Host Clock Frequency (MHz) — 100
- Processor Voltage Override Type — None
- Intel® Turbo Boost Technology — Enable
- Sustained Mode Time (Seconds) — 1
- IGD Current Limit (Amps) — 64
- Active Core-Based Ratio Limits — Disable
Found in the performance section it allows you to quickly and simply choose processor speed (up to 4.6GHz) and memory speed, in excess of 2000MHz.
Using Default BIOS Settings
Are you having trouble with your computer? Do you have a suspicion that the issues may be BIOS related? Perhaps you are receiving BIOS or CMOS error messages, or Beep Codes at startup. Perhaps you are receiving hardware related errors in Windows, or even experiencing periodic Blue Screens in Windows. Maybe you have updated your BIOS and some things just don’t seem right.
These problems can be the result of a Windows Update, installation of new hardware, installation of new drivers, overclocking, configuration changes in the CMOS setup, or just a single change in your system’s configuration. The result is often configuration or compatibility issues stored in the CMOS Setup. If this is the case, these problems can often be resolved by resetting CMOS settings by loading either the default CMOS/BIOS settings, clearing the CMOS, or by upgrading the BIOS.
Always start with the simplest solution first. Enter the CMOS setup utility during the startup of your PC. Then load the defaults by selecting Load Fail-Safe Defaults, Load BIOS Defaults, or whatever your BIOS manufacturer has named this function in your particular type and version of BIOS. Be sure to save your changes before exiting the CMOS Setup.
If this has resolved your problem you can then start tweaking the CMOS settings again to optimize performance, or try loading the Optimized defaults from the CMOS setup. Continue tweaking the CMOS settings until you have configured your system to meet your requirements and preferences. If problems reoccur, repeat the process until you pinpoint the setting that is causing the problem and make the appropriate change.
If loading the defaults does not correct the problem clear the CMOS by powering off the system, unplugging it, and removing the CMOS battery for 8-10 hours. Then put the battery back, reconnect the power, and restart the PC. Note: You will need to enter the CMOS setup reset the date and time, and save the new date and time settings before exiting. Confirm if your problem is fixed, and again, proceed to tweaking the CMOS settings if desirable.
If you still suspect you have BIOS related issues after loading default CMOS/BIOS settings, or clearing your CMOS, you may need to upgrade your BIOS to support the latest system/configuration changes made to your PC. Visit your system manufacturer’s website, or use a program like BIOSAgentPlus (http://BIOSAgentPlus.com) to see if there is a newer BIOS available for your PC.
HDD S.M.A.R.T. Monitor
One of the settings you will find in your BIOS is something called HDD S.M.A.R.T. Capability. What is that setting and what does it do? Well S.M.A.R.T. is an acronym for Smart Monitoring Analysis and Reporting Technology.
S.M.A.R.T. is supported by all current hard disks and it allows the early prediction and warning of impending hard disk disasters. You should enable it if you want to use S.M.A.R.T.-aware utilities to monitor the hard disk’s condition. Enabling it also allows the monitoring of the hard disk’s condition over a network.
S.M.A.R.T. is useful in providing a modicum of data loss prevention by continuously monitoring hard disks for signs of impending failure. If you have critical or irreplaceable data, you should enable this BIOS feature and use an S.M.A.R.T.-aware hardware monitoring software. Just don’t rely completely on it. Back up your data on a CD or DVD!
Some of the newer BIOS now come with S.M.A.R.T. monitoring support built-in. When you enable HDD S.M.A.R.T. Capability, these new BIOS will automatically check the hard disk’s S.M.A.R.T. status at boot-up. However, such a feature has very limited utility as it can only tell you the status of the hard disk at boot-up. Therefore, it is still advisable for you to disable HDD S.M.A.R.T. Capability unless you use a proper S.M.A.R.T.-aware monitoring utility.
Why Should I Update My BIOS?
Even though updating your BIOS comes with a certain amount of risk, the potential rewards definitely make it worth it.
Motherboard manufacturers are constantly making enhancements to the BIOS firmware and the effects can significantly improve the performance of your system. It can also create additional functionality, make your system less buggy, and improve overclocking performance. BIOS updates can also be created to address something small but important, such as adding support for a higher frequency RAM or a new CPU.
It’s best to check periodically with BIOS Agent Plus to see if any new versions of your BIOS have been released.
USB Legacy Support
One issue that is very common with some of our customers is the failure of their USB keyboard to work in a DOS or pre-Windows environment. There is a setting in your BIOS that must be enabled in order for your USB keyboard to work in that situation. That setting is called USB Legacy Support.
This setting must be enabled if the PC has a USB Keyboard and the user wants to use this keyboard either in a DOS environment or before the operating system loads (in boot menus, for example). If this setting is disabled, then booting to a floppy disk or CD-ROM will render the keyboard useless. Also, ironically, trying to enter the PC’s BIOS may be impossible if this setting is disabled and a USB keyboard is connected. If the PC has a USB keyboard with a rectangular connector, then set this to Enabled . If it has a PS/2 keyboard (round connector), set this to Disabled . Be aware that enabling this feature may result in problems with the computer waking up from Standby or Hibernate mode, or cause the computer to not shut down properly. In other words, enable this only if you must.
Virus Warning
Many BIOS will have a setting called Virus Warning. This is different than any Anti-Virus software that you may have installed on your system. This is Boot Sector virus protection which protects the boot sector or partition table of your hard drive. When this function is enabled, if someone or something attempts to write to the boot sector or partition table of the hard drive, a warning message will appear on screen and an alarm will sound. When disabled, you will not get a warning message and no alarm will sound. This feature only protects the boot sector of the hard drive, it does not protect the entire drive. Your anti-virus program installed on your system will take care of the rest of the drive. Obviously, it is a very good idea to keep this option enabled in the BIOS.
Quick Power On Self Test
Last month we mentioned that we would be discussing different BIOS settings in this space in some issues. In this issue we are going to discuss the setting Quick Power On Self Test.
Enabling this setting allows the BIOS Power On Self Test to bypass some of its tests during the bootup. One of the key things this does is causes the POST to skip checking all of the extended memory for errors. This increases the boot time greatly.
One disadvantage of enabling this setting, however, is that you do increase the chances of the POST missing and error message. Luckily, the POST memory test is pretty much useless to detect transient memory errors. So once your system is up and running and stable, you can enable this setting without any worries that you are missing something.
The safest thing to do is to leave it disabled. Especially if you are someone who very rarely turns your system off. If you do turn your system off daily and have large amounts of RAM in your system, then enabling this option will improve your startup time significantly.
State After Power Fail
We get asked a lot of questions about what each setting in the BIOS does. Every so often we will review a setting in this space and explain what the setting does. In this issue we are going to discuss the setting State After Power Fail.
The setting State After Power Fail deals with the state of your system after the system loses power. In some systems it may be called Power On After Power Fail. In that case the setting is self explanatory. If you set Power On After Power Fail to YES, then when power resumes the system will power on. If you set it to NO, then the system will remain off when power resumes.
However with State After Power Fail, you will have several options.
The first option is a setting called Stay Off. This setting, when selected, will keep your computer off when the power is restored.
The second option is a setting called Last State. This setting, when selected, will put your system in the state it was in when power was lost.
The third option is a setting called Power On. This setting, when selected, will turn the system on when power is restored.
The Security section of the BIOS can be used to keep unauthorized people from making changes to the BIOS.
The option called Security Option can be set to either Setup or System. When it is set to SETUP the security is on the BIOS Setup screens. A user would need a password to be able to make changes to the BIOS Setup screens.
When the option SYSTEM is set, the user will need a password to even get the system to boot.
There are also settings for Supervisor Password and a User Password. If you choose to set the Security Option then you will need to set your Supervisor and User Password options. If you choose to select a Supervisor Password, a password will be required to enter the BIOS after you choose setup, as described above. If you choose SYSTEM as described above, then a password will be required for cold-booting as well.
With the User Password option, a different password assigned to users is required to boot the PC, and if a Supervisor Password has also been selected, permits the user to only adjust the date and time in the BIOS.
How to Enter the BIOS or CMOS Setup Screens
We still get asked quite often how to enter the BIOS or CMOS Setup screens. Thankfully, computers that have been manufactured in the last few years will allow you to enter the CMOS by pressing one of the below five keys during the boot. Usually it’s one of the first three.
A user will know when to press this key when they see a message similar to Press to enter BIOS setup as the computer is booting. Some older computers may also display a flashing block to indicate when to press the F1 or F2 keys.
If your computer is a new computer and you are unsure of what key to press when the computer is booting, try pressing and holding one or more keys on the keyboard. This will cause a stuck key error, which may allow you to enter the BIOS setup.
When is it Time to Update My BIOS?
We get a lot of people who ask, “How do I know when I should upgrade my BIOS?” It could be different for everyone, but usually there are some tell-tale signs.
If you’re experiencing strange behavior such as blue screens or your system restarting, or you’re looking for more functionality such as the ability to add a larger hard drive to your system, then a BIOS update is definitely something you will need to consider.
Motherboard makers are constantly enhancing the BIOS firmware and the end result can be significantly improved performance, less buggy behavior, additional functionality, improved overclocking performance, and much more.
Unknown Flash Type
One of the more common issues that comes up when trying to upgrade your BIOS is the error message «Unknown Flash Type.»
There are several causes for this error. The most common is that there is write protection on the existing BIOS. To verify if this is the case, enter your CMOS setup and check for a setting labeled BIOS GUARDIAN or FLASH BIOS PROTECTION. This should be under the screen entitled ADVANCE BIOS FEATURES. If you are able to locate one of those settings, set it to disabled. Then save and exit your CMOS settings by choosing F10.
Another possibility is that you are using an old flash utility. Old flash utilities can produce and UNKNOWN FLASH TYPE error as well. You can replace the existing flash utilities with a newer one from our site here.
How to Clear a BIOS Password
One of the most common questions we get is how you clear a BIOS password. A BIOS password can prevent access to the BIOS Setup or even prevent a system from booting. Well, there are basically 3 ways to clear a password:
The most common is to open your computer and remove the lithium battery, wait a few seconds to clear the data from the well and put back CMOS battery. Normally this will erase the password and is not complicated. Some systems require the battery to be out longer. If possible take it out before going to bed and replace it in the morning.
In extreme cases, such as in the old 386, 486 and some other models that have the battery welded, the board does not contain jumpers. In these situations you can use certain programs that will allow you to clear the CMOS. There is one called CLRCMOS that can be run from DOS or Windows. CLRCMOS is available in the support section of our site here.
DEBUG. It runs under DOS and does not require any specific program; the first thing you have to do is start the computer with a DOS system disk. Once it is booted, run the DEBUG as follows:
C:> debug -> enter
— o 70 17 -> enter
— o 71 ff -> enter
— q -> enter
BIOSAgentPlus is a small FREE program that helps you quickly identify and update your BIOS.
Источник
The following add-ons can be ordered to further tailor our products and services to the needs of your particular development cycle.
Phoenix SecureWipe™
Securely erase SSD, HDD and other mass storage devices.
SecureWipe™ is a BIOS firmware product that securely erases all data and partitions independent of the operating system and can be invoked locally via hotkey, or via remote control using OEM developed management solutions.

- Erases all data and partitions, no operating system required
- Invoke via hotkey, setup engine, or develop your own solution
- Supports a range of military and internationally recognized standards
- Protects sensitive data when recycling or disposing of a computing device
- No extra boot devices required to run specialized software
- Works on any x86 PC that uses Phoenix UEFI firmware
- Resides in the firmware and cannot be accidentally removed by users
- The erase utility can be invoked by a simple key press or a few mouse clicks
- Enterprise requirements can be easily met using custom remote management solutions
Technical Specifications and Packaging Options »
Phoenix PassKey™ (SecureKey)™
Phoenix PassKey™ / SecureKey™ combines BIOS-enforced protection with a physical authentication device (pass key) to provide resilient firmware anti-intrusion security for Windows-based PCs.
Computers are protected against unauthorized access as PassKey/SecureKey allows operating system start only when an authentication device has been detected and validated.
![]()
- Multi Factor Authentication in BIOS – PassKey/SecureKey is required for the PC to boot to the Operating System at Start or Hibernate
- FIDO/Bluetooth/USB PassKey(s) – Industry standard devices, like smartphones, FIDO compliant devices, BLE and USB sticks are commonly available and in use everyday by consumers, prosumers and Enterprises
- No Passwords – Brings Password-less protection down to the BIOS level for single or multi-factor Authentication using multiple PassKeys/SecureKeys
- Advantages – Enhanced security, PC and Data Protection using everyday devices | Enterprises can introduce specialized PassKey/SecureKey devices
- Stolen or lost PassKey/SecureKey – Enter a Passcode to boot the system
- Battery Savings – PC will shutdown if the pass key is not present after configurable time-out
Phoenix PassKey/SecureKey – Authentication Methods
- Bluetooth PassKey/SecureKey (2-factor Authentication using Smartphone or BLE device)
- Bluetooth RSSI controls allow users to manage distance by configuring proximity limits
- FIDO2 PassKey/SecureKey using industry standard FIDO2 devices that verify user presence and identity (Fingerprint sensor) in accordance with FIDO specifications
- USB PassKey/SecureKey (Authentication by using standard USB Flash)
- Passcode
- Enter an Alphanumeric string to boot system
for lost or stolen pass key(s) - Support for either unique or common Passcode setting when multiple pass keys are used
- Enter an Alphanumeric string to boot system
UEFI/BIOS Utilities Package
Included:
- Phoenix CoreArchitect™: The one tool you need for your entire firmware development cycle
- Extends Visual Studio’s IDE to integrate your firmware development build tools, editor, and debugger
- Supports multiple Visual Studio versions,
project types, and debug interfaces
- Flash Tools
- GUI Flash Tools
- UCWW Signing Tools
- BIOS Editor
Sold Separately:
- TDK Premium – Modify or build custom firmware tools
for multiple OS targets
Additional Information:
Contact Sales »

Периодически необходимо осуществлять обновление Phoenix BIOS. Это связывается с тем, что происходят улучшения, которые позволяют ускорить процесс загрузки операционной системы или добиться других преимуществ. В некоторых ситуациях процедура блокируется и это следует изменить в настройках. Опция называется «BIOS FLASH Protection». Она должна быть установлена в состояние «DISABLED».
Уточнение номера платы
Чтобы проводить обновление БИОС, надо сперва узнать, к какой именно модели относится материнская плата. Для этого можно использовать один из доступных способов.
- Требуется получить доступ к плате за счёт вскрытия системного блока. Номер имеет вид MS-XXXX и должен находиться между разъёмами PCI. Дополнительно, нужно узнать номер версии – он указывается здесь же.
- Уточнить информацию при загрузке системы. В процессе возникнет строка, где будет написано «W5252MS v2.1 133101» или другие сведения в аналогичном формате. Расшифровка является довольно простой и означает использование компьютером платы MS 5252 с версией 2.1.
- Можно установить специализированное ПО для определения подключенных устройств. Существует довольно большое количество доступных вариантов. Можно отметить программу Everest.
Как видно из скриншота, появляется возможность не только узнать модель и версию материнской платы, но и получить сведения о месте загрузки обновления БИОС (BIOS Phoenix). Что касается интерфейса, то он является максимально простым.
Где скачать обновление BIOS Phoenix
Когда имеются сведения о том, к какой модели относится материнская плата и какой версией она обладает, можно приступать к следующему этапу. Он предусматривает переход на сайт официального производителя и поиск там соответствующего файла. Следует отметить удобные формы и фильтры на большинстве ресурсов, позволявшие быстро найти интересующий документ.
Вовсе не обязательно выполнять подобную задачу самостоятельно. На просторах интернета можно найти специальные программы. Они позволяют найти обновления для БИОС или других подключённых устройств. Например, это BIOS Wizard, MSI Live Update и другие. Всегда учитывайте, кто является производителем материнской платы.
Как происходит обновление
Когда скачивание файла завершено, следует учитывать возможность выполнить поставленную задачу тремя способами:
- Обновление BIOS в среде DOS. Для этого следует использовать утилиту @BIOS. Она позволяет работать не только с продуктом Award, но и AMI.
- Обновление в среде Windows. Это наиболее простой и удобный вариант, который должен учитываться в процессе осуществления поставленных задач. Он предусматривает необходимость применения описанной ранее утилиты @BIOS.
- В Phoenix БИОС имеется встроенная программа Q-Flash. Она позволяет провести обновление непосредственно из данной среды. Никакими специальными навыками обладать не требуется, поскольку всё выполняется автоматически.
После завершения процедуры, произойдёт перезагрузка системы.
Настройка
- Microsoft Windows 2000
- Microsoft Windows XP
- Microsoft Windows Servers
- Microsoft Windows Vista
- Microsoft Windows 7
- Microsoft Windows 8
- Microsoft Windows 10
Полезная информация
- Синий экран смерти (BSOD)
- Коды ошибок
- Способы устранения
- Командная строка (CMD)
- Переменные
- Команды
- Примеры bat файлов
- Примеры Rundll32.exe
- Windows Script Host (WSH)
- Объект WshShell
- Объект FileSystemObject
- Объект RegExp
- Объект Dictionary
- Объект Shell
- Константы VBScript
- Функции VBScript
- Объект IE и WebBrowser
- Объект WScript
- Объект WshNetwork
- Basic In/Out System (BIOS)
- AMI bios
- AWARD bios
- Phoenix bios
- UEFI bios
- Реестр Windows
- Хитрости реестра Windows
- Скачать Live CD
- Полезные статьи
- Часто задаваемые вопросы
- Стоит ли переходить на Windows 10?
- Не открывается флешка на компьютере?
- Как разбить жесткий диск на разделы?
- Удалить баннер с рабочего стола
- Лучшие бесплатные антивирусы 2016-2017 года
- Не открывается Вконтакте и другие сайты
- Как убрать всплывающие сайты и рекламу в браузере