In this article, we will learn how to Install PyGame module of Python on Windows. PyGame is a library of python language. It is used to develop 2-D games and is a platform where you can set python modules to develop a game. It is a user-friendly platform that helps to build games quickly and easily.
Follow the steps given below for the successful installation of Pygame
Step 1: Check for Python Installation
In order to install Pygame, Python must be installed already in your system. To check whether Python is installed or not in your system, open the command prompt and give the command as shown below.
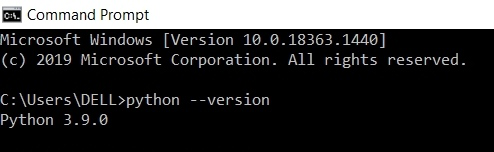
If this command runs successfully, and we are able to get a Python version then we are good to go. Otherwise, we have to install Python in our system, to do this refer How to install Python on Windows?
Step 2: Check for PIP installation
PIP is a tool that is used to install python packages. PIP is automatically installed with Python 2.7. 9+ and Python 3.4+. Open the command prompt and enter the command shown below to check whether pip is installed or not.
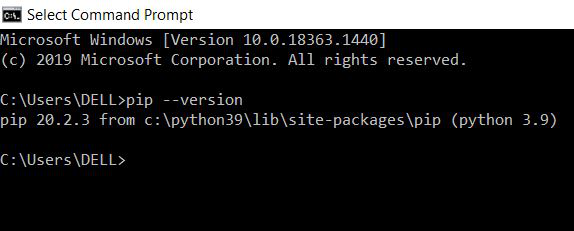
Note: Refer to How to install PIP on Windows ? for detailed information.
Step 3: Install Pygame
To install Pygame, open the command prompt and give the command as shown below:
pip install pygame

Pygame is successfully installed as shown in the image above.
Step 4: Check Whether PyGame is Working or not
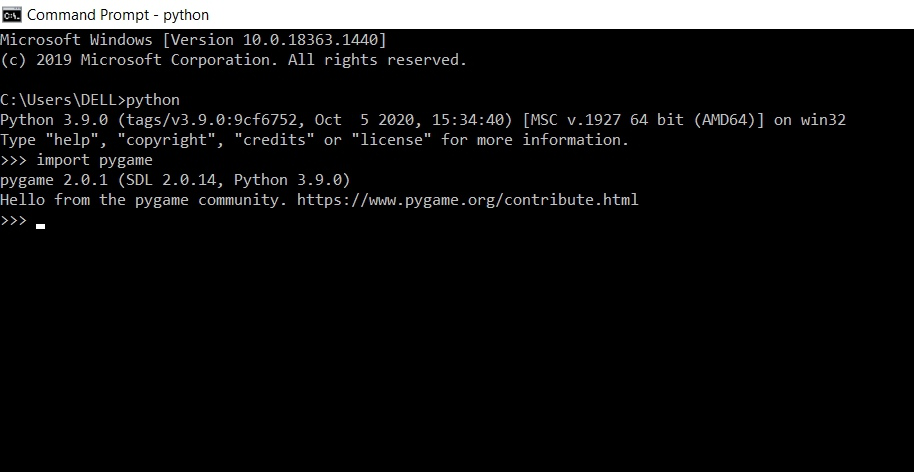
Now open a new terminal and import the Pygame library to see whether it is working fine or not in our system. The library is imported successfully means we got success.
In this way, we can install the pygame module in Python.

pygame is a free and open-source cross-platform library
for the development of multimedia applications like video games using Python.
It uses the Simple DirectMedia Layer library and several other
popular libraries to abstract the most common functions, making writing
these programs a more intuitive task.
We need your help to make pygame the best it can be!
New contributors are welcome.
Installation
pip install pygame
Help
If you are just getting started with pygame, you should be able to
get started fairly quickly. Pygame comes with many tutorials and
introductions. There is also full reference documentation for the
entire library. Browse the documentation on the docs page.
The online documentation stays up to date with the development version
of pygame on github. This may be a bit newer than the version of pygame
you are using. To upgrade to the latest full release, run
pip install pygame —upgrade in your terminal.
Best of all, the examples directory has many playable small programs
which can get you started playing with the code right away.
Building From Source
If you want to use features that are currently in development,
or you want to contribute to pygame, you will need to build pygame
locally from its source code, rather than pip installing it.
Installing from source is fairly automated. The most work will
involve compiling and installing all the pygame dependencies. Once
that is done, run the setup.py script which will attempt to
auto-configure, build, and install pygame.
Much more information about installing and compiling is available
on the Compilation wiki page.
Credits
Thanks to everyone who has helped contribute to this library.
Special thanks are also in order.
-
Marcus Von Appen: many changes, and fixes, 1.7.1+ freebsd maintainer
-
Lenard Lindstrom: the 1.8+ windows maintainer, many changes, and fixes
-
Brian Fisher for svn auto builder, bug tracker and many contributions
-
Rene Dudfield: many changes, and fixes, 1.7+ release manager/maintainer
-
Phil Hassey for his work on the pygame.org website
-
DR0ID for his work on the sprite module
-
Richard Goedeken for his smoothscale function
-
Ulf Ekström for his pixel perfect collision detection code
-
Pete Shinners: original author
-
David Clark for filling the right-hand-man position
-
Ed Boraas and Francis Irving: Debian packages
-
Maxim Sobolev: FreeBSD packaging
-
Bob Ippolito: MacOS and OS X porting (much work!)
-
Jan Ekhol, Ray Kelm, and Peter Nicolai: putting up with early design ideas
-
Nat Pryce for starting our unit tests
-
Dan Richter for documentation work
-
TheCorruptor for his incredible logos and graphics
-
Nicholas Dudfield: many test improvements
-
Alex Folkner for pygame-ctypes
Thanks to those sending in patches and fixes: Niki Spahiev, Gordon
Tyler, Nathaniel Pryce, Dave Wallace, John Popplewell, Michael Urman,
Andrew Straw, Michael Hudson, Ole Martin Bjoerndalen, Herve Cauwelier,
James Mazer, Lalo Martins, Timothy Stranex, Chad Lester, Matthias
Spiller, Bo Jangeborg, Dmitry Borisov, Campbell Barton, Diego Essaya,
Eyal Lotem, Regis Desgroppes, Emmanuel Hainry, Randy Kaelber
Matthew L Daniel, Nirav Patel, Forrest Voight, Charlie Nolan,
Frankie Robertson, John Krukoff, Lorenz Quack, Nick Irvine,
Michael George, Saul Spatz, Thomas Ibbotson, Tom Rothamel, Evan Kroske,
Cambell Barton.
And our bug hunters above and beyond: Angus, Guillaume Proux, Frank
Raiser, Austin Henry, Kaweh Kazemi, Arturo Aldama, Mike Mulcheck,
Michael Benfield, David Lau
There’s many more folks out there who’ve submitted helpful ideas, kept
this project going, and basically made our life easier. Thanks!
Many thank you’s for people making documentation comments, and adding to the
pygame.org wiki.
Also many thanks for people creating games and putting them on the
pygame.org website for others to learn from and enjoy.
Lots of thanks to James Paige for hosting the pygame bugzilla.
Also a big thanks to Roger Dingledine and the crew at SEUL.ORG for our
excellent hosting.
Dependencies
Pygame is obviously strongly dependent on SDL and Python. It also
links to and embeds several other smaller libraries. The font
module relies on SDL_ttf, which is dependent on freetype. The mixer
(and mixer.music) modules depend on SDL_mixer. The image module
depends on SDL_image, which also can use libjpeg and libpng. The
transform module has an embedded version of SDL_rotozoom for its
own rotozoom function. The surfarray module requires the Python
NumPy package for its multidimensional numeric arrays.
Dependency versions:
-
CPython >= 3.6 or PyPy3
-
SDL >= 2.0.0
-
SDL_mixer >= 2.0.0
-
SDL_image >= 2.0.0
-
SDL_ttf >= 2.0.11
-
SDL_gfx (optional, vendored in)
-
NumPy >= 1.6.2 (optional)
License
This library is distributed under GNU LGPL version 2.1, which can
be found in the file docs/LGPL.txt. We reserve the right to place
future versions of this library under a different license.
This basically means you can use pygame in any project you want,
but if you make any changes or additions to pygame itself, those
must be released with a compatible license (preferably submitted
back to the pygame project). Closed source and commercial games are fine.
The programs in the examples subdirectory are in the public domain.
See docs/licenses for licenses of dependencies.
-
Partition Wizard
-
Partition Manager
- How to Install PyGame on Windows 10? [A Full Guide]
How to Install PyGame on Windows 10? [A Full Guide] [Partition Manager]
By Vega | Follow |
Last Updated January 05, 2023
PyGame is a set of cross-platform modules in the Python programming language, which means you can install it on any operating system, and this article from MiniTool Partition Wizard tells you how to install PyGame on Windows 10.
PyGame depends on Python, which means you must install Python before installing PyGame. Here is the guide about installing PyGame on Windows 10.
Install Python on Windows 10
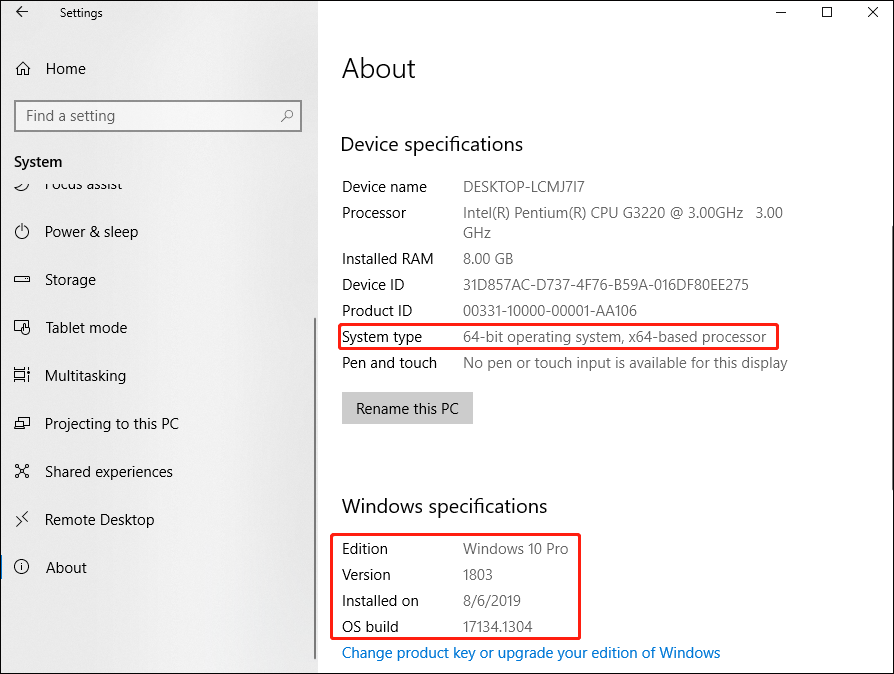
Note: Before downloading the Python, you need to check your computer version and system type by navigating the path: Settings > System > About. The latest version of Python is not applicable to Windows 7 or earlier. This means you can only use Python 3 on Windows 8 or later versions.
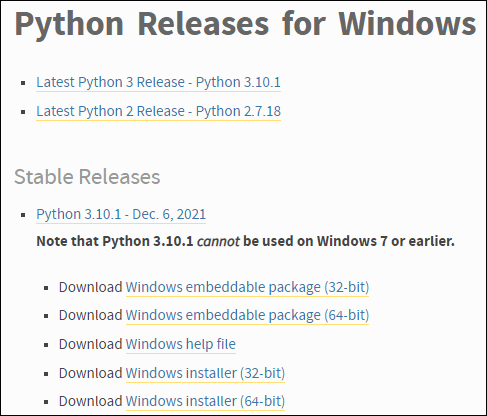
Step 1: Visit the Python website and download the latest version of Python 3. If you are using a 32-bit system, please select Windows installer (32-bit); if you are using a 64-bit system, please select the Windows installer (64-bit).
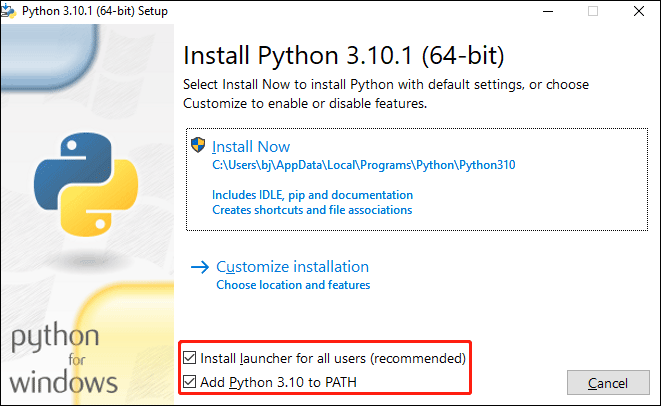
Step 2: Open the Python installer, check the Install launcher for all users (recommended) and Add Python 3.10 to PATH boxes. Then click Install Now.
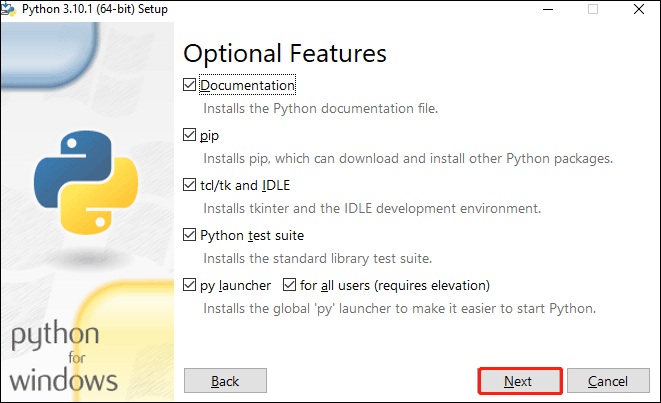
Or you can click the Customize Installation option and make sure the following boxes are checked: Documentation, pip, tcl/tk and IDLE, Python test suite, py launcher, for all users (requires elevation). Then click Next.
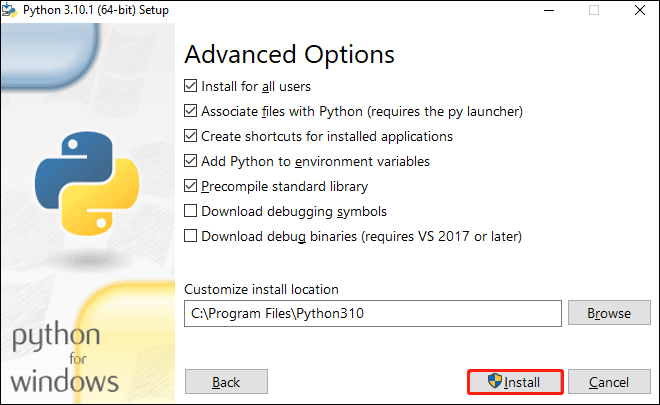
After entering the Advanced Options dialog box, you must also check the following boxes here: Install for all users, Add Python to the environment variables. Others you can choose according to your needs. Then click Install.
Install PyGame on Windows 10
Once finish Python setup on Windows 10, you can start to try installing PyGame on Windows 10.
Step 1: Locate the Python folder.
By default, the Python folder is located at C:Program Files. So, you can open the File Explorer and then go to the path to locate the Python folder.
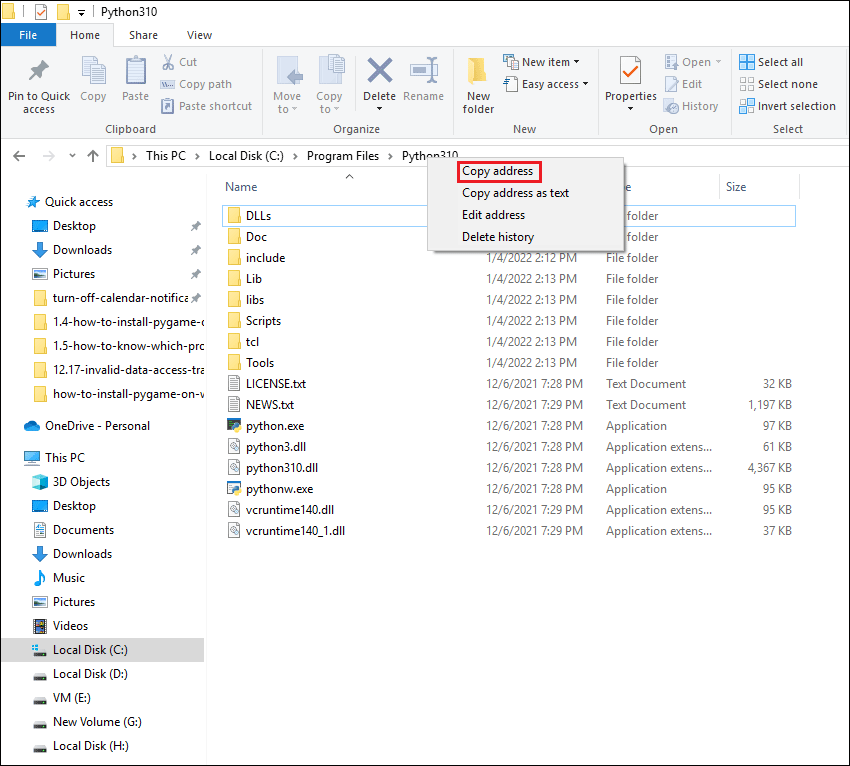
Step 2: Copy the path/address of the Python folder.
Right click the Python name at the top of the File Explorer screen, and then click Copy Address. The copied address looks like «C:Program FilesPython310».
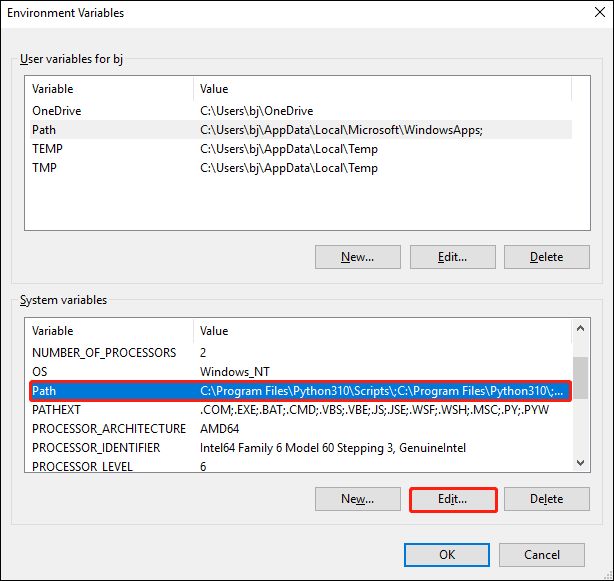
Step 3: Create the path.
After copying the address, you need to create a path in the environment variable.
- Open the Control Panel and navigate to the path: System and Security > System > Advanced System Settings > Environment Variables.
- Choose Path and click Edit > New, and then paste the path copied from the File Explorer into the empty text box generated on the environment variables panel.
- Click OK twice to save the changes.
Step 4: Open Command Prompt as an administrator.
- Open the Start menu and search for cmd in the search box.
- Right-clicking the search result and select Run as administrator.
Step 5: In the Command Prompt, type cd and a space, and then right-click in the Command Prompt to paste the path into Python. Then press Enter.
cd C:Program FilesPython310
Step 6: Type cd Scripts in the command prompt and press Enter.
Step 7: Type pip install pygame and press Enter to install Pygame.
Pygame should have been successfully installed on Windows 10. To verify this, type python and press Enter to start the Python interactive interpreter. Then type import pygame in the interpreter and press Enter.
If there is no error after typing import pygame in the interpreter, you have successfully installed Pygame on Windows. You can now use the Pygame library to write any graphics program you want.
Bottom Line
As you can see, a complete guide on how to install PyGame on Windows 10 is illustrated in the post. If you have any questions about this method, please leave them in the comment zone and we will try to answer them as soon as possible.
About The Author
Position: Columnist
Vega joined MiniTool as an editor after graduation. She enjoys helping people with computer problems, including disk management, data recovery, and more. She is constantly expanding her knowledge in related fields. And she will continue to bring more easy-to-understand professional articles to help people solve various problems on the PC.
In her daily life, Vega enjoys hanging out with friends, shopping online and listening to music. She is someone who knows how to enjoy life.
-
Partition Wizard
-
Partition Manager
- How to Install PyGame on Windows 10? [A Full Guide]
How to Install PyGame on Windows 10? [A Full Guide] [Partition Manager]
By Vega | Follow |
Last Updated January 05, 2023
PyGame is a set of cross-platform modules in the Python programming language, which means you can install it on any operating system, and this article from MiniTool Partition Wizard tells you how to install PyGame on Windows 10.
PyGame depends on Python, which means you must install Python before installing PyGame. Here is the guide about installing PyGame on Windows 10.
Install Python on Windows 10
Note: Before downloading the Python, you need to check your computer version and system type by navigating the path: Settings > System > About. The latest version of Python is not applicable to Windows 7 or earlier. This means you can only use Python 3 on Windows 8 or later versions.
Step 1: Visit the Python website and download the latest version of Python 3. If you are using a 32-bit system, please select Windows installer (32-bit); if you are using a 64-bit system, please select the Windows installer (64-bit).
Step 2: Open the Python installer, check the Install launcher for all users (recommended) and Add Python 3.10 to PATH boxes. Then click Install Now.
Or you can click the Customize Installation option and make sure the following boxes are checked: Documentation, pip, tcl/tk and IDLE, Python test suite, py launcher, for all users (requires elevation). Then click Next.
After entering the Advanced Options dialog box, you must also check the following boxes here: Install for all users, Add Python to the environment variables. Others you can choose according to your needs. Then click Install.
Install PyGame on Windows 10
Once finish Python setup on Windows 10, you can start to try installing PyGame on Windows 10.
Step 1: Locate the Python folder.
By default, the Python folder is located at C:Program Files. So, you can open the File Explorer and then go to the path to locate the Python folder.
Step 2: Copy the path/address of the Python folder.
Right click the Python name at the top of the File Explorer screen, and then click Copy Address. The copied address looks like «C:Program FilesPython310».
Step 3: Create the path.
After copying the address, you need to create a path in the environment variable.
- Open the Control Panel and navigate to the path: System and Security > System > Advanced System Settings > Environment Variables.
- Choose Path and click Edit > New, and then paste the path copied from the File Explorer into the empty text box generated on the environment variables panel.
- Click OK twice to save the changes.
Step 4: Open Command Prompt as an administrator.
- Open the Start menu and search for cmd in the search box.
- Right-clicking the search result and select Run as administrator.
Step 5: In the Command Prompt, type cd and a space, and then right-click in the Command Prompt to paste the path into Python. Then press Enter.
cd C:Program FilesPython310
Step 6: Type cd Scripts in the command prompt and press Enter.
Step 7: Type pip install pygame and press Enter to install Pygame.
Pygame should have been successfully installed on Windows 10. To verify this, type python and press Enter to start the Python interactive interpreter. Then type import pygame in the interpreter and press Enter.
If there is no error after typing import pygame in the interpreter, you have successfully installed Pygame on Windows. You can now use the Pygame library to write any graphics program you want.
Bottom Line
As you can see, a complete guide on how to install PyGame on Windows 10 is illustrated in the post. If you have any questions about this method, please leave them in the comment zone and we will try to answer them as soon as possible.
About The Author
Position: Columnist
Vega joined MiniTool as an editor after graduation. She enjoys helping people with computer problems, including disk management, data recovery, and more. She is constantly expanding her knowledge in related fields. And she will continue to bring more easy-to-understand professional articles to help people solve various problems on the PC.
In her daily life, Vega enjoys hanging out with friends, shopping online and listening to music. She is someone who knows how to enjoy life.
I just tried to install pygame for python 3.4 my windows computer, but apparently I need to extract the whl file? I have seen other questions like this one on stackoverflow and it says to write in commant prompt:
pip install package-name.whl
However, when I tried this, I got in return:
'pip' is not recognized as an internal of external command, operable program, or batch file.
Is this because I have Windows 10? Please help!
asked Aug 23, 2015 at 11:28
![]()
3
For me this command works.->py -m pip install -U pygame —user
But first, make sure you properly configure your environment variables.
This tutorial http://www.aaronstannard.com/how-to-setup-a-proper-python-environment-on-windows/ will help you how to setup environment variables for python, make sure you do it correctly only step 2 ,no need to do any other steps from this tutorial, now you can follow my steps that were listed below. I will assume that you have already installed python in your computer
Step1
Search for cmd and Right click on cmd and do run as administrator.
Step2
Run the command, py -m pip install -U pygame —user, but before you run this command first of all make sure you configure your environment variables properly.
Step3
Type python in command prompt, this will take you to the python command line which will look like this «>>>».If not then you have a problem with your system variables.
Step4
Make sure you are in python command line and then type import pygame,and after this press ctrl+z and enter that will take you out from python command line.
Step5
Make sure you are not in python command line and then run this command py -m pygame.examples.aliens,if the game starts then congrats you are done.
answered Mar 31, 2018 at 2:07
![]()
It can be possible that the pip/ wheel is not installed
follow this link to install pip link
If already installed maked sure it is updated if not
You can use this code to update: python –m ensurepip –-upgrade or pip install --upgrade pip
To install wheel pip install wheel or upgrade pip install wheel --upgrade
once this is done you are good to install pygame
At the command line, make sure you’re in the same directory as the .whl file and run
pip install package-name.whl
answered Aug 23, 2015 at 17:28
![]()
The issue is your pip isn’t working correctly. To make sure it works, go to this folder C:Python34Scripts in windows explorer, hold shift and then right click. press ‘open command prompt’ here and then try to run pip.
answered Aug 23, 2015 at 18:11
![]()
R21R21
3962 silver badges12 bronze badges
That error occurs when the command entered, pip in this case, isn’t found.
I just got pygame working on Windows 10 with these steps.
Download pygame-1.9.2a0-cp35-none-win32.whl from UCI.
Run the cmd shell and enter
> cd C:Users<me>AppDataLocalProgramsPythonPython35-32Scripts
> pip install C:Users<me>Downloadspygame-1.9.2a0-cp35-none-win32.whl
Start the Python 3.5 console. Therein enter
import pygame
dir(pygame)
No errors from either means that Pygame is ready for your command.
answered Mar 24, 2016 at 22:38
![]()
ghersongherson
1392 silver badges9 bronze badges
pip install pygame
that’s all you need, just remember to use it correctly in your code
![]()
csabinho
1,5851 gold badge17 silver badges28 bronze badges
answered Oct 19, 2019 at 0:10
![]()
assuming that you have pip installed. You can run:
pip install pygame
in command prompt or a simulated terminal.
If you don’t have pip already installed, please refer to this: (hope I helped!)
https://www.makeuseof.com/tag/install-pip-for-python/
answered Oct 21, 2019 at 5:47
![]()
I updated my pip, then ran the command prompt (cmd) as adminstrator, then I issued a python command:
-m pip install pygame
And it installed pygame.
![]()
answered Dec 13, 2019 at 9:02
![]()
Pygame is a free and open-source cross-platform library
for the development of multimedia applications like video games using Python.
It uses the Simple DirectMedia Layer library and several other
popular libraries to abstract the most common functions, making writing
these programs a more intuitive task.
We need your help to make pygame the best it can be!
New contributors are welcome.
Installation
pip install pygame
Help
If you are just getting started with pygame, you should be able to
get started fairly quickly. Pygame comes with many tutorials and
introductions. There is also full reference documentation for the
entire library. Browse the documentation on the docs page. You
can also browse the documentation locally by running
python -m pygame.docs in your terminal. If the docs aren’t found
locally, it’ll launch the online website instead.
The online documentation stays up to date with the development version
of pygame on github. This may be a bit newer than the version of pygame
you are using. To upgrade to the latest full release, run
pip install pygame --upgrade in your terminal.
Best of all, the examples directory has many playable small programs
which can get you started playing with the code right away.
Building From Source
If you want to use features that are currently in development,
or you want to contribute to pygame, you will need to build pygame
locally from its source code, rather than pip installing it.
Installing from source is fairly automated. The most work will
involve compiling and installing all the pygame dependencies. Once
that is done, run the setup.py script which will attempt to
auto-configure, build, and install pygame.
Much more information about installing and compiling is available
on the Compilation wiki page.
Credits
Thanks to everyone who has helped contribute to this library.
Special thanks are also in order.
- Marcus Von Appen: many changes, and fixes, 1.7.1+ freebsd maintainer
- Lenard Lindstrom: the 1.8+ windows maintainer, many changes, and fixes
- Brian Fisher for svn auto builder, bug tracker and many contributions
- Rene Dudfield: many changes, and fixes, 1.7+ release manager/maintainer
- Phil Hassey for his work on the pygame.org website
- DR0ID for his work on the sprite module
- Richard Goedeken for his smoothscale function
- Ulf Ekström for his pixel perfect collision detection code
- Pete Shinners: original author
- David Clark for filling the right-hand-man position
- Ed Boraas and Francis Irving: Debian packages
- Maxim Sobolev: FreeBSD packaging
- Bob Ippolito: MacOS and OS X porting (much work!)
- Jan Ekhol, Ray Kelm, and Peter Nicolai: putting up with early design ideas
- Nat Pryce for starting our unit tests
- Dan Richter for documentation work
- TheCorruptor for his incredible logos and graphics
- Nicholas Dudfield: many test improvements
- Alex Folkner for pygame-ctypes
Thanks to those sending in patches and fixes: Niki Spahiev, Gordon
Tyler, Nathaniel Pryce, Dave Wallace, John Popplewell, Michael Urman,
Andrew Straw, Michael Hudson, Ole Martin Bjoerndalen, Herve Cauwelier,
James Mazer, Lalo Martins, Timothy Stranex, Chad Lester, Matthias
Spiller, Bo Jangeborg, Dmitry Borisov, Campbell Barton, Diego Essaya,
Eyal Lotem, Regis Desgroppes, Emmanuel Hainry, Randy Kaelber
Matthew L Daniel, Nirav Patel, Forrest Voight, Charlie Nolan,
Frankie Robertson, John Krukoff, Lorenz Quack, Nick Irvine,
Michael George, Saul Spatz, Thomas Ibbotson, Tom Rothamel, Evan Kroske,
Cambell Barton.
And our bug hunters above and beyond: Angus, Guillaume Proux, Frank
Raiser, Austin Henry, Kaweh Kazemi, Arturo Aldama, Mike Mulcheck,
Michael Benfield, David Lau
There’s many more folks out there who’ve submitted helpful ideas, kept
this project going, and basically made our life easier. Thanks!
Many thank you’s for people making documentation comments, and adding to the
pygame.org wiki.
Also many thanks for people creating games and putting them on the
pygame.org website for others to learn from and enjoy.
Lots of thanks to James Paige for hosting the pygame bugzilla.
Also a big thanks to Roger Dingledine and the crew at SEUL.ORG for our
excellent hosting.
Dependencies
Pygame is obviously strongly dependent on SDL and Python. It also
links to and embeds several other smaller libraries. The font
module relies on SDL_ttf, which is dependent on freetype. The mixer
(and mixer.music) modules depend on SDL_mixer. The image module
depends on SDL_image, which also can use libjpeg and libpng. The
transform module has an embedded version of SDL_rotozoom for its
own rotozoom function. The surfarray module requires the Python
NumPy package for its multidimensional numeric arrays.
Dependency versions:
| CPython | >= 3.6 (Or use PyPy3) |
| SDL | >= 2.0.8 |
| SDL_mixer | >= 2.0.0 |
| SDL_image | >= 2.0.2 |
| SDL_ttf | >= 2.0.11 |
| SDL_gfx | (Optional, vendored in) |
| NumPy | >= 1.6.2 (Optional) |
License
This library is distributed under GNU LGPL version 2.1, which can
be found in the file docs/LGPL.txt. We reserve the right to place
future versions of this library under a different license.
This basically means you can use pygame in any project you want,
but if you make any changes or additions to pygame itself, those
must be released with a compatible license (preferably submitted
back to the pygame project). Closed source and commercial games are fine.
The programs in the examples subdirectory are in the public domain.
See docs/licenses for licenses of dependencies.
Python — самый популярный язык программирования нового поколения. Во всех новых областях компьютерных наук Python активно присутствует. Python имеет обширные библиотеки для различных областей, таких как машинное обучение (Numpy, Pandas, Matplotlib), искусственный интеллект (Pytorch, TensorFlow) и разработка игр (Pygame, Pyglet).

В этом уроке мы узнаем о разработке игр и рассмотрим возможности программирования с использованием Pygame (библиотека Python).
- Pygame в Python— это кроссплатформенный набор модулей Python, который используется для создания видеоигр.
- Он состоит из компьютерной графики и звуковых библиотек, предназначенных для использования с языком программирования Python.
- Pygame был официально написан Питом Шиннерсом для замены PySDL.
- Pygame подходит для создания клиентских приложений, которые потенциально могут быть упакованы в автономный исполняемый файл.
Прежде чем изучать pygame, нам нужно понять, какую игру мы хотим разработать. Чтобы изучить pygame, необходимо иметь базовые знания Python.
Установка pygame в Windows
Перед установкой Pygame в системе должен быть установлен Python, желательно версии 3.6.1 или выше, потому что она намного удобнее для новичков и, кроме того, работает быстрее. В основном есть два способа установить Pygame, которые приведены ниже:
1. Установка через pip. Хороший способ установить Pygame — использовать инструмент pip (применяется в Python для установки пакетов). Команда следующая:
py -m pip install -U pygame --user
2. Установка через IDE. Второй способ — установить его через IDE, и здесь мы используем Pycharm IDE. Установка pygame в pycharm проста. Мы можем установить его, выполнив указанную выше команду в терминале или выполнив следующие шаги:
- Откройте вкладку «Файл» и нажмите «Настройки».

- Выберите интерпретатор проекта и щелкните значок +.

- Он отобразит окно поиска. Найдите pygame и нажмите кнопку установки пакета.

Чтобы проверить, правильно ли установлен pygame, в интерпретаторе IDLE введите следующую команду и нажмите Enter:
import pygame
Если команда выполняется успешно без каких-либо ошибок, это означает, что мы успешно установили Pygame и нашли правильную версию IDLE для использования в программировании pygame.

Установка pygame на Mac
Чтобы установить pygame на Mac, выполните следующие действия.
- Посетите официальный сайт pygame pygame.org и в следующем окне загрузите pygame-1.9.1release-python.org-32bit-py2.7-macosx10.3.dmg:

Примечание. Если вы используете другую версию Python, загрузите последнюю ссылку.
- Дважды щелкните загруженный файл и разархивируйте его. Теперь дважды щелкните распакованный файл mpkg, чтобы запустить программу установки. Следуйте инструкциям по установке pygame.
- Запустите терминал (Cmd+Пробел, затем введите «терминал» в поле поиска). В терминале введите «python2.7» и нажмите Enter.
- Python должен запуститься, отобразить версию 2.7.2 (2.7.1 тоже подойдет) и выдать подсказку. В командной строке Python введите «import pygame». Если вы не получаете никаких ошибок, все работает нормально.
Простой пример pygame
Вот простая программа pygame, которая дает общее представление о синтаксисе.
import pygame

pygame.init()
screen = pygame.display.set_mode((400,500))
done = False

while not done:
    for event in pygame.event.get():
        if event.type == pygame.QUIT:
            done = True
    pygame.display.flip()
Выход:
После успешного выполнения он выдаст следующее окно в качестве вывода:

Давайте разберемся с основным синтаксисом приведенной выше программы построчно:
- import pygame — обеспечивает доступ к фреймворку pygame и импортирует все функции pygame.
- pygame.init() — используется для инициализации всех необходимых модулей pygame.
- pygame.display.set_mode((width, height)) — используется для отображения окна нужного размера. Возвращаемое значение — это объект Surface, который является объектом, в котором мы будем выполнять графические операции.
- pygame.event.get() — очищает очередиь событий. Если мы не назовем это, оконные сообщения начнут накапливаться, и игра перестанет отвечать на запросы операционной системы.
- pygame.QUIT — используется для завершения события, когда мы нажимаем кнопку закрытия в углу окна.
- pygame.display.flip() — Pygame использует двойную буферизацию, поэтому буферы смещаются. Очень важно вызвать эту функцию, чтобы сделать видимыми любые обновления, которые вы делаете на игровом экране.
Surface Pygame
Поверхность pygame используется для отображения любого изображения. Pygame имеет предустановленное разрешение и формат пикселей. Цвет поверхности по умолчанию черный. Его размер определяется передачей аргумента размера.
Поверхности могут иметь ряд дополнительных атрибутов, таких как альфа-плоскости, цветовые ключи, отсечение исходного прямоугольника и другие. Подпрограммы blit будут пытаться использовать аппаратное ускорение, когда это возможно; в противном случае они будут использовать усовершенствованные методы копирования программного обеспечения.
Pygame часы
Время представлено в миллисекундах (1/1000 секунды) в pygame. Часы Pygame используются для отслеживания времени. Время необходимо для создания движения, воспроизведения звука или реакции на любое событие. В общем, мы не считаем время в секундах. Считаем в миллисекундах. Часы также предоставляют различные функции, помогающие контролировать частоту кадров в игре. Имеют несколько функций:
- tick()
Эта функция используется для обновления часов. Синтаксис следующий:
tick(framerate=0)
Данный метод следует вызывать один раз за кадр. Он подсчитает, сколько миллисекунд прошло с момента предыдущего вызова. Аргумент частоты кадров является необязательным для передачи в функцию, и если он передается в качестве аргумента, функция будет делать задержку, чтобы игра работала медленнее, чем заданное количество тактов в секунду.
- tick_busy_loop()
Функция tick_busy_loop() аналогична функции tick(). При вызове Clock.tick_busy_loop(20) один раз за кадр программа никогда не будет работать со скоростью более 20 кадров в секунду. Синтаксис следующий:
tick_busy_loop()
- get_time()
get_time() используется для получения предыдущего тика. Число миллисекунд, которое isdra прошло между двумя последними вызовами в Clock.tick().
get_time()
Что такое Pygame Blit в Python?
Блиттинг pygame в Python — это процесс рендеринга игрового объекта на поверхность, и этот процесс называется блиттингом. Когда мы создаем игровой объект, нам нужно его визуализировать. Если мы не отрендерим игровые объекты и не запустим программу, то на выходе она выдаст черное окно.
Блиттинг — одна из самых медленных операций в любой игре, поэтому нам нужно быть осторожными, чтобы не сильно блитить на экране в каждом кадре. Основная функция, используемая в блиттинге, — это blit(), а именно:
blit(source,dest,area=None,special_flags=0)
Эта функция используется для вставки одного изображения в другое. Может быть размещена с аргументом dest. Аргумент dest может быть парой координат, представляющих левый верхний угол источника.
Добавление изображения
Чтобы добавить изображение в окно, сначала нам нужно создать пустую поверхность, вызвав конструктор Surface с кортежем ширины и высоты.
surface = pygame.Surface((100,100))
Приведенная выше строка создает пустое 24-битное изображение RGB размером 100*100 пикселей с черным цветом по умолчанию.
Для прозрачной инициализации Surface передайте аргумент SRCALPHA.
surface = pygame.Surface((100,100), pygame.SRCALPHA)
Рассмотрим следующий пример для отображения изображения на поверхности:
import pygame
pygame.init()
white =(255, 255, 255)
# assigning values to height and width variable
height = 400
width = 400
# creating the display surface object
# of specific dimension..e(X, Y).
display_surface = pygame.display.set_mode((height, width))

# set the pygame window name
pygame.display.set_caption('Image')

# creating a surface object, image is drawn on it.
image = pygame.image.load(r'C:UsersDEVANSH SHARMADesktopdownload.png')

# infinite loop
while True:
    display_surface.fill(white)
    display_surface.blit(image,(0, 0))

    for event in pygame.event.get():
        if event.type == pygame.QUIT:
            pygame.quit()
            # quit the program.
            quit()
        # Draws the surface object to the screen.
        pygame.display.update()
Выход:

Прямоугольник в Pygame
Rect используется для рисования прямоугольника в Pygame. Pygame использует объекты Rect для хранения прямоугольных областей и управления ими. Rect может быть сформирован из комбинации значений left, top, width и height. Его также можно создать из объектов Python, которые уже являются Rect или имеют атрибут с именем «rect».
Функция rect() используется для изменения положения или размера прямоугольника. Он возвращает новую копию Rect с затронутыми изменениями. Никаких изменений в исходном прямоугольнике не происходит.
Объект Rect имеет различные виртуальные атрибуты, которые можно использовать для перемещения и выравнивания:
x,y
top, left, right, bottom
topleft, bottomleft, topright, bottomright
midtop, midleft, midbottom, midright
center, centerx, centery
size, width, height
w,h
Размер прямоугольника можно изменить, задав размер, ширину или высоту. Все остальные присваивания перемещают прямоугольник без изменения его размера.
Если ширина или высота являются ненулевым значением Rect, то для ненулевого теста будет возвращено значение True. Некоторые методы возвращают Rect с размерами 0 для представления недопустимого прямоугольника.
Давайте создадим Rectangle в окне pygame, используя Rect:
import pygame

pygame.init()
screen = pygame.display.set_mode((400, 300))
done = False

while not done:
    for event in pygame.event.get():
        if event.type == pygame.QUIT:
            done = True
    pygame.draw.rect(screen,(0, 125, 255), pygame.Rect(30, 30, 60, 60))

    pygame.display.flip()
После выполнения приведенного выше кода он отобразит прямоугольник в окне pygame.

Клавиши Pygame
Pygame KEYDOWN и KEYUP обнаруживают событие, если клавиша физически нажата и отпущена. KEYDOWN определяет нажатие клавиши, KEYUP определяет ее отпускание. Оба события (нажатие клавиши и отпускание клавиши) имеют два следующих атрибута:
- key: ключ — это целочисленный идентификатор, который представляет каждый ключ в ключевом слове.
- mod: это битовая маска всех клавиш-модификаторов, которые были в нажатом состоянии, когда произошло событие.
Рассмотрим следующий пример нажатия и отпускания клавиши.
import pygame
pygame.init()
# sets the window title
pygame.display.set_caption(u'Keyboard events')
# sets the window size
pygame.display.set_mode((400, 400))

while True:
    # gets a single event from the event queue
    event = pygame.event.wait()
    # if the 'close' button of the window is pressed
    if event.type == pygame.QUIT:
        # stops the application
        break
    # Detects the 'KEYDOWN' and 'KEYUP' events
    if event.type in(pygame.KEYDOWN, pygame.KEYUP):
        # gets the key name
        key_name = pygame.key.name(event.key)
        # converts to uppercase the key name
        key_name = key_name.upper()
        # if any key is pressed
        if event.type == pygame.KEYDOWN:
            # prints on the console the key pressed
            print(u'"{}" key pressed'.format(key_name))
        # if any key is released
        elif event.type == pygame.KEYUP:
            # prints on the console the released key
            print(u'"{}" key released'.format(key_name))
Выход:

Давайте посмотрим на другой пример:
import pygame

pygame.init()
screen = pygame.display.set_mode((400, 300))
done = False
is_blue = True
x = 30
y = 30

while not done:
    for event in pygame.event.get():
        if event.type == pygame.QUIT:
            done = True
        if event.type == pygame.KEYDOWN and event.key == pygame.K_SPACE:
            is_blue = not is_blue

    pressed = pygame.key.get_pressed()
    if pressed[pygame.K_UP]: y -= 3
    if pressed[pygame.K_DOWN]: y += 3
    if pressed[pygame.K_LEFT]: x -= 3
    if pressed[pygame.K_RIGHT]: x += 3

    if is_blue:
        color =(0, 128, 255)
    else:
        color =(255, 100, 0)
    pygame.draw.rect(screen, color, pygame.Rect(x, y, 60, 60))

    pygame.display.flip()
В приведенном выше коде прямоугольник будет отображаться в окне pygame.

Когда мы нажимаем клавишу «Вниз», прямоугольник меняет форму вниз. Вывод следующий:

Pygame Draw
Pygame предоставляет функции геометрии для рисования простых фигур на поверхности. Эти функции будут работать для рендеринга в любой формат на поверхности. Большинство функций принимают аргумент ширины, чтобы обозначить размер толщины вокруг края фигуры. Если ширина передана 0, то форма будет сплошной (заполненной).
Все функции рисования принимают аргумент цвета, который может быть в одном из следующих форматов:
- Объекты pygame.Color
- Триплет(RGB)(кортеж/список)
- Четверка(RGBA)(кортеж/список)
- Целочисленное значение, сопоставленное с пиксельным форматом поверхности.
Рисование прямоугольника
Следующие функции используются для рисования прямоугольника на заданной поверхности.
pygame.draw.rect(surface, color, rect)
pygame.draw.rect(surface, color, rect, width=0)
Параметры:
- Surface — экран для рисования.
- color — этот аргумент используется для окрашивания заданной формы. Альфа-значение является необязательным, если мы используем кортеж.
- rect(Rect) – рисование прямоугольника, положение и размеры.
- width(int) — чтобы использовать толщину линии или указать, что прямоугольник заполнен, необязателен.
if width == 0,(default) fill the rectangle
if width > 0, used for line thickness
if width < 0, nothing will be drawn
Рисование многоугольника
Следующие функции используются для рисования многоугольника на заданной поверхности.
- pygame.draw.polygon(surface,color,points)
- pygame.draw.polygon(surface, color, points, width=0)
Параметры:
- Surface — экран для рисования.
- color — этот аргумент используется для окрашивания заданной формы. Альфа-значение является необязательным, если мы используем кортеж.
- points(tuple(coordinate) или list(coordinate)): последовательность из 3 или более(x, y) координат, составляющих вершины многоугольника. Каждая координата в последовательности должна быть кортежем/списком.
Примечание. – Если len(points) < 3 или точки не являются последовательностью или точки не содержат числовой пары, это вызовет ошибку значения.
Эллипс
Следующие функции используются для рисования эллипса на заданной поверхности.
pygame.draw.ellipse(surface, color, rect)
pygame.draw.ellipse(surface, color, rect, width=0)
Параметры:
- Surface — экран для рисования.
- color — этот аргумент используется для окрашивания заданной формы. Альфа-значение является необязательным, если мы используем кортеж.
- rect(Rect) – рисование прямоугольника, положение и размеры.
Прямая линия
Этот метод используется для рисования прямой линии на заданной поверхности. Концовок нет.
pygame.draw.line(surface,color,start_pos,end_pos,width)
pygame.draw.line(surface,color,start_pos,end_pos,width=1)
Параметры:
- Surface — экран для рисования.
- color — этот аргумент используется для окрашивания заданной формы. Альфа-значение является необязательным, если мы используем кортеж.
- start_pos — начальная позиция линии(x,y)
- end_pos — конечная позиция строки.
Круг
Ниже приведены функции, которые используются для рисования окружности на заданной поверхности.
- circle(surface, color, center, radius)
- circle(surface, color, center, radius, width=0)
Параметры:
- Surface — экран для рисования.
- color — этот аргумент используется для окрашивания заданной формы. Альфа-значение является необязательным, если мы используем кортеж.
- center – центральная точка круга как последовательность двух int/float, например(x,y)
- radius(int или float) – радиус окружности, отсчитываемый от параметра center, если радиус равен нулю, то будет отрисовываться только центральный пиксель.
Эллиптическая дуга
Следующие функции используются для рисования эллиптической дуги на заданной поверхности.
?  arc(surface, color, rect, start_angle, stop_angle)
?  arc(surface, color, rect, start_angle, stop_angle, width=1)
Параметры:
- Surface — экран для рисования.
- color — этот аргумент используется для окрашивания заданной формы. Альфа-значение является необязательным, если мы используем кортеж.
- rect(Rect) – рисование прямоугольника, его положение и размеры.
- start_angle — начальный угол дуги в радианах.
- stop_angle — конечный угол дуги в радианах.
Есть три условия для параметров start_angle и stop_angle:
- Если start_angle < stop_angle, то дуга будет нарисована против часовой стрелки от start_angle до end_angle.
- Если start_angle>stop_angle, то tau(tau=2*pi) будет добавлено к углу остановки.
- Если start_angle==stop_angle, ничего не будет нарисовано.
Рассмотрим пример:
import pygame
from math import pi
pygame.init()
# size variable is using for set screen size
size = [400, 300]
screen = pygame.display.set_mode(size)
pygame.display.set_caption("Example program to draw geometry")
# done variable is using as flag
done = False
clock = pygame.time.Clock()
while not done:
    # clock.tick() limits the while loop to a max of 10 times per second.
        clock.tick(10)

    for event in pygame.event.get():  # User did something
        if event.type == pygame.QUIT:  # If user clicked on close symbol
            done = True  # done variable that we are complete, so we exit this loop

    # All drawing code occurs after the for loop and but
    # inside the main while done==False loop.

    # Clear the default screen background and set the white screen background
    screen.fill((0, 0, 0))

    # Draw on the screen a green line which is 5 pixels wide.
    pygame.draw.line(screen,(0, 255, 0), [0, 0], [50, 30], 5)
    # Draw on the screen a green line which is 5 pixels wide.
    pygame.draw.lines(screen,(0, 0, 0), False, [[0, 80], [50, 90], [200, 80], [220, 30]], 5)

    # Draw a rectangle outline
    pygame.draw.rect(screen,(0, 0, 0), [75, 10, 50, 20], 2)

    # Draw a solid rectangle
    pygame.draw.rect(screen,(0, 0, 0), [150, 10, 50, 20])

    # This draw an ellipse outline, using a rectangle as the outside boundaries
    pygame.draw.ellipse(screen,(255, 0, 0), [225, 10, 50, 20], 2)

    # This draw a solid ellipse, using a rectangle as the outside boundaries
    pygame.draw.ellipse(screen,(255, 0, 0), [300, 10, 50, 20])

    # Draw a triangle using the polygon function
    pygame.draw.polygon(screen,(0, 0, 0), [[100, 100], [0, 200], [200, 200]], 5)

    # This draw a circle
    pygame.draw.circle(screen,(0, 0, 255), [60, 250], 40)

    # This draw an arc
    pygame.draw.arc(screen,(0, 0, 0), [210, 75, 150, 125], 0, pi / 2, 2)

    # This function must write after all the other drawing commands.
    pygame.display.flip()

# Quite the execution when clicking on close
pygame.quit()
Выход:

Текст и шрифт Pygame
Pygame также предоставляет средства для рендеринга шрифта и текста. Мы можем загружать шрифты из системы с помощью функции pygame.font.SysFont(). Pygame поставляется со встроенным шрифтом по умолчанию, доступ к которому можно получить, передав имя шрифта или None. Есть множество функций, помогающих работать со шрифтом.
Объекты шрифта создаются с помощью pygame.font.Font(). Фактические объекты шрифта выполняют большую часть работы, выполняемой со шрифтами. Объекты шрифта обычно используются для рендеринга текста в новые объекты Surface. Вот несколько важных функций шрифта:
- render()
Эта функция используется для рисования текста на новой поверхности. Pygame не имеет возможности рисовать текст на существующей поверхности. Это создает новую поверхность с указанным текстовым рендерингом на ней. Синтаксис следующий:
render(text, antialias, color, background=None)
- size()
Эта функция используется для определения количества пробелов или позиций, необходимых для отображения текста. Его также можно использовать для переноса слов и других эффектов макета. Синтаксис следующий:
size(bool)
- set_bold()
Эта функция используется для выделения текста жирным шрифтом. Синтаксис следующий:
set_bold(bool)
Рассмотрим следующий пример:
import pygame
pygame.init()
screen = pygame.display.set_mode((640, 480))
done = False

#load the fonts
font = pygame.font.SysFont("Times new Roman", 72)
# Render the text in new surface
text = font.render("Hello, Pygame", True,(158, 16, 16))
while not done:
    for event in pygame.event.get():
        if event.type == pygame.QUIT:
            done = True
        if event.type == pygame.KEYDOWN and event.key == pygame.K_ESCAPE:
            done = True
    screen.fill((255, 255, 255))
    #We will discuss blit() in the next topic
    screen.blit(text,(320 - text.get_width() // 2, 240 - text.get_height() // 2))

    pygame.display.flip()
Выход:

Примечание . Необходимо помнить, что определенный шрифт должен быть установлен на компьютере пользователя. Если вы не знаете, установлены шрифты или нет, у pygame есть следующая функция для перечисления всех доступных для пользователя шрифтов:
all_font = pygame.font.get_fonts()
Существует еще одна функция для создания экземпляра системного шрифта по умолчанию:
font = pygame.font.Font(None,size)
Используя любые вышеперечисленные функции, мы можем работать с привлекательным шрифтом в игре.
Pygame Sprite и обнаружение столкновений
Sprite pygame — это двумерное изображение, являющееся частью большой графической сцены. Обычно Sprite представляет собой какой-то объект на сцене.
Одним из самых важных преимуществ работы со Sprite является возможность работать с ними в группах. Мы можем легко перемещать и рисовать их одной командой, если они находятся в группе.
Модуль Sprite содержит различные простые классы для использования в играх. Необязательно использовать классы Sprite и различные групповые классы при использовании pygame.
Pygame предоставляет спрайты и группы, которые помогают обнаруживать столкновения. Обнаружение столкновений — это процесс, когда два объекта на экране сталкиваются друг с другом. Например, если в игрока попала вражеская пуля, то он может потерять жизнь или программе нужно знать, когда игрок касается монеты, чтобы она автоматически подбиралась.
Рассмотрим следующий пример:
import pygame
import sys
#Sprite class
class Sprite(pygame.sprite.Sprite):
    def __init__(self, pos):
        pygame.sprite.Sprite.__init__(self)
        self.image = pygame.Surface([20, 20])
        self.image.fill((255, 0, 255))
        self.rect = self.image.get_rect()
        self.rect.center = pos
def main():
    pygame.init()
    clock = pygame.time.Clock()
    fps = 50
    bg = [0, 0, 0]
    size =[300, 300]
    screen = pygame.display.set_mode(size)
    player = Sprite([40, 50])
    # Define keys for player movement
    player.move = [pygame.K_LEFT, pygame.K_RIGHT, pygame.K_UP, pygame.K_DOWN]
    player.vx = 5
    player.vy = 5

    wall = Sprite([100, 60])

    wall_group = pygame.sprite.Group()
    wall_group.add(wall)

    player_group = pygame.sprite.Group()
    player_group.add(player)

    while True:
        for event in pygame.event.get():
            if event.type == pygame.QUIT:
                return False
        key = pygame.key.get_pressed()
        for i in range(2):
            if key[player.move[i]]:
                player.rect.x += player.vx * [-1, 1][i]

        for i in range(2):
            if key[player.move[2:4][i]]:
                player.rect.y += player.vy * [-1, 1][i]
        screen.fill(bg)
        # first parameter takes a single sprite
        # second parameter takes sprite groups
        # third parameter is a kill command if true
        hit = pygame.sprite.spritecollide(player, wall_group, True)
        if hit:
        # if collision is detected call a function to destroy
            # rect
            player.image.fill((255, 255, 255))
        player_group.draw(screen)
        wall_group.draw(screen)
        pygame.display.update()
        clock.tick(fps)
    pygame.quit()
    sys.exit
if __name__ == '__main__':
Выход:
![]()
После нажатия клавиш со стрелками один прямоугольник столкнется с другим прямоугольником, после чего выводится:
![]()
Pyglet
Python предоставляет еще одну игровую библиотеку под названием pyglet, которая представляет собой кроссплатформенную библиотеку окон и мультимедиа для Python. Она используется для разработки игр и других визуально насыщенных приложений.
Pyglet поддерживает обработку событий пользовательского интерфейса, работу с окнами, графику OpenGL, загрузку изображений и видео, а также воспроизведение звуков и музыки.
Вот несколько особенностей pyglet:
- Никаких внешних требований к установке или зависимостей.
- Воспользуйтесь преимуществами нескольких окон и нескольких мониторов.
- Он может загружать изображения, звук, музыку и видео в любом формате.
- Pyglet предоставляется под лицензией BSD с открытым исходным кодом.
- Он поддерживает как Python 2, так и 3.
Установка pyglet проста; его можно установить, введя следующую команду.
pip install pyglet
Рассмотрим следующий пример.
import pyglet
window = pyglet.window.Window()
lable = pyglet.text.Label('Hello world', font_name='Times New Roman', font_size=36,
                          x= window.width//2,y=window.height//2,anchor_x='center', anchor_y='center')
@window.event
def on_draw():
    window.clear()
    lable.draw()
pyglet.app.run()
Выход:

Сравнение между Pygame и Pyglet
| Pyglet | Pygame |
|---|---|
| 3D поддержка
Поскольку pyglet так прочно слился с OpenGL, это позволяет поддерживать рисунок в 3D. |
Простой синтаксис Python
Pygame использует Python в качестве языка сценариев. Python считается одним из самых естественных языков для понимания даже новичками. |
| Кроссплатформенность
Он может работать с Windows, Linux и OS X. |
Использование API
API очень простой. |
| Написан на чистом Python
Его можно скомпилировать с помощью других интерпретаторов Python. |
Лучшая система рисования
Pygame предоставляет систему рисования, которая позволяет пользователю создавать и рисовать неограниченное количество холстов. |
| Меньше популярности
Pyglet менее популярен, потому что у него небольшая поддержка сообщества. |
Более популярный
Pygame более популярен, чем pyglet. |
В этом руководстве мы обсудили простой подход к программированию разработки игр, установив модуль pygame с открытым исходным кодом в среду программирования Python 3.


Изучаю Python вместе с вами, читаю, собираю и записываю информацию опытных программистов.
We will see in this tutorial how to install the pygame module on Windows or MAC using pip or the PyCharm editor.
Introduction
When you’re new to Python programming, the best way to improve your skills is to create mini-games. This allows you to have fun while learning the basics of programming. To develop a game in Python, there are several modules that make it easier to work with graphics (such as rectangles, circles, images, etc…) and sounds. Pygame is one of them.
Pygame is a Python wrapper for the SDL (Simple DirectMedia Layer) library. SDL provides cross-platform access to the underlying multimedia hardware components of your system, such as sound, video, mouse, keyboard and joystick. You can therefore program games and Python programs with Pygame that are supported on different platforms.
By default, Pygame is not installed on the Python programming environment. We will therefore see in this guide the best instructions for installing it on your system.
If you wish to deepen your knowledge in the Pygame Module, I invite you to read this book :
As an Amazon Associate I earn from qualifying purchases. If you purchase a product by using a link on this page, I’ll earn a small commission at no extra cost to you
Sale : -30% off!

How to install Pygame for Windows
Install Python
To run the Pygame module, we must have a version of Python on our machine. If you haven’t already done so, it is available here :
https://www.python.org/downloads/

Click on the version of Python you are interested in and press download. You can install the latest stable version of Python.
Once the download is complete, press the run button. Check the box ”Add Python 3.5 to PATH”.
Make sure the checkboxes for “Optional features” are checked. For the rest, you can leave them as they are. To finalize the installation, press the install button for your computer to complete the installation.
Install Module Pygame
You can get a version of Pygame via this link :
https://www.lfd.uci.edu/~gohlke/pythonlibs/#pygame
Take the latest version available and click on the link to download the .whl file to your computer.
pygame‑1.9.6‑cp39‑cp39‑win32.whl
You can choose between a 32bits or 64bits version (in this example, we will start with the win32 version).
To install the previously downloaded Pygame module, we need to access the Windows command line.
To access it, right-click on the started menu and click on Execute. Then type on the text box “cmd“.
Then go to the directory where you installed the Pygame module (by default in the Downloads folder).
Once you are in the right folder, type the following command prompt:
# use the cd command to move between folders

C:Usersamiradata> cd Downloads
C:UsersamiradataDownloads> pip install pygame‑1.9.6‑cp39‑cp39‑win32.whl
To check that the installation has worked, type the following command prompt:
# Execute python on command line and import Pygame

C:UsersnameDownloads> python
>>> import pygame
If you do not see any error messages, the installation went well.
How to install Pygame for OS X
The first step to do is to access the command line. To do so, click on the Spotlight icon and type “terminal” to find it.
We will install XCode (which is an Apple tool for creating Mac and iOS applications. Once the installation is complete, type the following command prompt:
Install Homebrew
Homebrew is a package manager for Mac that simplifies the installation of many different software or packages such as Git, Python or Pygame. Homebrew allows you to avoid possible security issues related to the use of the sudo command to install software like Node.
To install it, copy and paste this on the command prompt:
# Install Brew

$ ruby -e "$(curl -fsSL https://raw.githubusercontent.com/Homebrew/install/master/install)"
You will also need to install Homebrew Cask :
# instal HomeBrew Cask

$ brew install caskroom/cask/brew-cask
Install pygame and these Requirements
To install pygame, we must first install all the pygame dependencies. To do this, please run the following commands one at a time:
# Install all requirements

$ brew cask install xquartz
$ brew install python3
$ brew install python
$ brew linkapps python3
$ brew linkapps python
$ brew install git
$ brew install sdl sdl_image sdl_ttf portmidi libogg libvorbis
$ brew install sdl_mixer --with-libvorbis
$ brew tap homebrew/headonly
$ brew install smpeg
$ brew install mercurial
$ pip3 install hg+http://bitbucket.org/pygame/pygame
As you can see, we have installed python 3 and the pygame module. To check that the installation has been successful, type the following commands:
$ python3
>>> import pygame
If you don’t get any error messages, it means that the installation was successful.
PyCharm is an integrated development environment (IDE) used in computer programming, specifically for the Python language. PyCharm is cross-platform, with Windows, macOS and Linux versions.
To start opening Pycharm and create a new python project. Then create a python file by right-clicking on the project then New then Python file. Name your python file as you wish.
In your python file, type the following line :
# import module pygame

import pygame
You will see that the pygame is underlined in red. To install pygame, move the mouse over the red underlined area and click on “install package pygame“.
Wait for Pycharm to install pygame and that’s it !

Conclusion
In this tutorial, we have seen how to install pygame on Windows, OS X and using an IDE like PyCharm. Now it’s up to you to create your first 2D mini-game!
Here is an example of what you can do with Pygame :
Don’t hesitate to tell me in the comments if you have problems with the pygame installation. And also, I would be happy to see your future projects on pygame!
See you soon 🙂
Back to the python section
5 августа, 2017 12:09 пп
67 985 views
| Комментариев нет
Python
Библиотека pygame – это модуль Python с открытым исходным кодом для разработки игр и мультимедийных приложений. Основанный на портируемой библиотеке SDL, модуль pygame может работать на многих платформах и операционных системах.
С помощью pygame можно контролировать логику и графику игр, не беспокоясь о сложностях бэкэнда, связанных с работой видео и аудио.
Этот мануал поможет установить модуль pygame в среду разработки Python и создать шаблон для разработки игр в Python 3.
Требования
Для работы вам понадобится локальная или удаленная среда разработки Python 3.
Кроме того, нужно ознакомиться со следующими руководствами:
- Импорт модулей в Python 3
- Использование переменных в Python 3
- Циклы while в Python 3
- Циклы for в Python 3
- Условные операторы в Python 3
- Логические выражения в Python 3
Установка pygame
Разверните среду программирования Python 3:
$ . my_env/bin/activate
Теперь установите pygame:
pip install pygame

Collecting pygame

Using cached pygame-1.9.3-cp35-cp35m-manylinux1_x86_64.whl

Installing collected packages: pygame

Successfully installed pygame-1.9.3
Если вы установили pygame в систему с доступным видео и аудио, вы можете проверить установку с помощью команды, которая запустит макет игры и продемонстрирует, что pygame может делать с графикой и звуком:
python -m pygame.examples.aliens
Если вы не хотите запускать макет или в установке нет аудио/видео, можно открыть интерактивную консоль Python и попробовать импортировать модуль pygame. Чтобы запустить консоль, введите:
python
Теперь можно импортировать модуль:
import pygame
Если вы не получили ошибок после того как нажали Enter, значит, модуль pygame был успешно установлен. Вы можете выйти из интерактивной консоли Python с помощью команды quit().
Если во время импорта произошла ошибка, обратитесь к рекомендациям на сайте pygame.
Примечание: На последующих этапах для отображения графического интерфейса пользователя и проверки кода используется монитор.
Импортирование pygame
Создайте файл our_game.py.
nano our_game.py
Начиная работу над проектом pygame, нужно сначала импортировать модуль. Добавьте в начало файла строку:
import pygame
Также можно использовать еще один оператор import, чтобы добавить константы и функции pygame в глобальное пространство имен файла:
import pygame

from pygame.locals import *
Модуль pygame импортирован в файл проекта. Теперь можно создать шаблон игры.
Инициализация pygame
Затем нужно инициализировать pygame с помощью функции init().
import pygame

from pygame.locals import *

pygame.init()
Функция init() автоматически запустит все модули pygame, которые нужно инициализировать.
Также можно инициализировать каждый из модулей pygame по отдельности:
pygame.font.init()
Функция init() может возвращать кортежи. Кортеж будет сообщать о состоянии инициализации. Это можно сделать как в общем вызове init(), так и при инициализации определенных модулей (это позволит понять, доступны ли эти модули).
i = pygame.init()

print(i)

f = pygame.font.init()

print(f)
Запустив этот код, вы получите вывод:
(6, 0)

None
В данном случае переменная i вернула кортеж (6, 0): было выполнено 6 успешных инициализаций pygame и получено 0 ошибок. Переменная f вернула None, что значит, что модуль недоступен в этой среде.
Настройка отображения
Затем нужно настроить отображение игры. Используйте pygame.display.set_mode() для инициализации окна или экрана отображения и передайте функции переменную. В функции нужно передать аргумент разрешения экрана; это пара чисел, которые выражают ширину и высоту в кортеже. Добавьте функцию в программу:
import pygame

from pygame.locals import *

pygame.init()

game_display = pygame.display.set_mode((800, 600))
В качестве аргумента функции set_mode () был передан кортеж, который определяет высоту (600 пикселей) и ширину (800 пикселей). Обратите внимание: кортеж содержится в круглых скобках функции, поэтому в приведенной выше функции указаны двойные скобки.
Обычно для определения разрешения экрана игры используются целые числа, которые можно присвоить переменным, чтобы не вводить их вручную. Это упростит разработку программы.
Ширину экрана игры можно присвоить переменной display_width, а высоту – переменной display_height. Переменные можно передать функции set_mode().
import pygame

from pygame.locals import *

pygame.init()

display_width = 800

display_height = 600

game_display = pygame.display.set_mode((display_width, display_height))
Обновление экрана
Затем нам нужно использовать одну из двух доступных функций для обновления отображения поверхности игры.
По сути анимация – это просто смена кадров во времени. Хорошим примером тут будет кинеограф – сшитая в блокнот серия картинок, при быстром перелистывании которой получается анимированное изображение.
Для обновления поверхности игры можно использовать функцию flip(). Вызовите ее:
pygame.display.flip()
Эта функция обновляет всю поверхность отображения.
Чаще вместо flip() используется функция update(), которая обновляет только часть изображения, что экономит память.
Добавьте update() в конец файла our_game.py:
import pygame

from pygame.locals import *

pygame.init()

display_width = 800

display_height = 600

game_display = pygame.display.set_mode((display_width, display_height))

pygame.display.update()
Программа будет работать без ошибок, но экран игры просто откроется и сразу закроется.
Создание цикла игры
Теперь можно начать работу над основным циклом игры.
Создайте цикл while, который будет запускать игру. Цикл будет вызывать логическое значение True, потому он будет работать непрерывно, пока его не остановит пользователь.
В главном цикле игры нужно построить цикл for для итерации очереди пользовательских событий, которые будут вызваны функцией pygame.event.get().
На данный момент в цикле for ничего нет, но в него можно добавить оператор print() и убедиться, что программа работает правильно. Передать события для итерации можно как print(event).
Добавьте в файл циклы и print().
import pygame

from pygame.locals import *

pygame.init()

display_width = 800

display_height = 600

game_display = pygame.display.set_mode((display_width, display_height))

pygame.display.update()

while True:

for event in pygame.event.get():

print(event)
Теперь убедитесь, что код работает:
python our_game.py
После запуска файла на экране появится окно 800×600. Чтобы проверить события, вы можете навести курсор мыши на окно, щелкнуть по окну и нажать клавиши на клавиатуре. Эти события будут распечатываться в окне консоли.
Вывод выглядит примерно так:
<Event(4-MouseMotion {'rel': (616, 355), 'buttons': (0, 0, 0), 'pos': (616, 355)})>

<Event(5-MouseButtonDown {'button': 1, 'pos': (616, 355)})>

<Event(6-MouseButtonUp {'button': 1, 'pos': (616, 355)})>

<Event(2-KeyDown {'scancode': 3, 'key': 102, 'unicode': 'f', 'mod': 0})>

<Event(3-KeyUp {'scancode': 3, 'key': 102, 'mod': 0})>

...
Этот вывод отображает пользовательские события. Такие события будут контролировать игру, поскольку они генерируются пользователем. Всякий раз, когда вы запускаете функцию pygame.event.get (), код будет принимать эти события.
Остановите программу (CTRL + C).
На данном этапе print() можно удалить или закомментировать.
Читайте также: Написание комментариев в Python 3
Выход из игры
Чтобы выйти из программы pygame, можно сначала объявить соответствующие модули неинициализированными, а затем просто выйти из Python с помощью функции quit().
Поскольку пользователи контролируют работу и события в игре, pygame.QUIT отправляется в очередь событий, когда пользователь завершает работу программы, нажав на «X» в верхнем углу игрового окна.
Добавьте в цикл for выражение if.
import pygame

from pygame.locals import *

pygame.init()

display_width = 800

display_height = 600

game_display = pygame.display.set_mode((display_width, display_height))

pygame.display.update()

while True:

for event in pygame.event.get():

if event.type == QUIT:

pygame.quit()

quit()
Новый код говорит программе, что если пользователь нажал Х, программа должна прекратить работу с помощью функций pygame.quit() и quit().
Поскольку ранее мы импортировали pygame.locals, теперь можно использовать event.type и QUIT без «pygame.» в начале.
Также запрос на выход из программы могут вызывать другие пользовательские события, например, событие KEYDOWN и несколько ключей.
Событие KEYDOWN значит, что пользователь нажал клавишу на клавиатуре. К примеру, это может быть клавиша Q или ESC. Добавьте код в цикл for.
import pygame

from pygame.locals import *

pygame.init()

display_width = 800

display_height = 600

game_display = pygame.display.set_mode((display_width, display_height))

pygame.display.update()

while True:

for event in pygame.event.get():

if event.type == QUIT or (

event.type == KEYDOWN and (

event.key == K_ESCAPE or

event.key == K_q

)):

pygame.quit()

quit()
Логические операторы сообщат программе, что она должна прекратить работу, если пользователь нажимает «X» в верхнем углу игрового окна или клавиши Q или ESC.
На этом этапе можно протестировать функциональность игры и затем выйти из нее, либо с помощью значка Х, либо нажав Q или ESC.
Улучшение кода
Теперь у вас есть полностью рабочая программа, однако код еще можно усовершенствовать.
К примеру, код цикла while можно поместить в определение функции.
def event_handler():

for event in pygame.event.get():

if event.type == QUIT or (

event.type == KEYDOWN and (

event.key == K_ESCAPE or

event.key == K_q

)):

pygame.quit()

quit()
Это сократит цикл while, что особенно важно для удобочитаемости кода.
Также можно добавить заголовок окна (в настоящее время здесь указано pygame window). Для этого используйте:
pygame.display.set_caption('Our Game')
Функцию pygame.display.update() можно переместить в основной цикл игры.
В итоге код программы выглядит так:
import pygame

from pygame.locals import *

pygame.init()

display_width = 800

display_height = 600

game_display = pygame.display.set_mode((display_width, display_height))

pygame.display.set_caption('Our Game')

def event_handler():

for event in pygame.event.get():

if event.type == QUIT or (

event.type == KEYDOWN and (

event.key == K_ESCAPE or

event.key == K_q

)):

pygame.quit()

quit()

while True:

event_handler()

pygame.display.update()
Этот код еще можно улучшить, например, добавить оператор break.
Читайте также: Операторы break, continue и pass в циклах Python 3
Теперь вы можете приступать к изучению анимации, спрайтовой графики и управления кадрами. Больше информации о pygame можно найти в документации pygame.
Tags: pygame, Python, Python 3
Вступление
Библиотека pygame — это модуль с открытым исходным кодом для языка программирования Python, специально предназначенный для того, чтобы помочь вам создавать игры и другие мультимедийные приложения. Созданная на основе чрезвычайно переносимой библиотеки для разработки SDL (Simple DirectMedia Layer), pygame может работать на многих платформах и операционных системах.
Используя модуль pygame, вы можете управлять логикой и графикой ваших игр, не беспокоясь о сложностях бэкэнда, необходимых для работы с видео и аудио.
В этом руководстве сначала будет рассказано об установке pygame в среду программирования Python, а затем будет рассказано о создании шаблона для разработки игр с pygame и Python 3.
Установка Pygame
Давайте начнем с активации нашей среды программирования Python 3:
С этим активированным, вы можете установить pygame с pip:
После запуска этой команды вы должны увидеть вывод, который выглядит примерно так:
OutputCollecting pygame
 Using cached pygame-1.9.3-cp35-cp35m-manylinux1_x86_64.whl
Installing collected packages: pygame
Successfully installed pygame-1.9.3
Если вы установили pygame в систему с доступным видео и аудио, вы можете проверить свою установку, выполнив следующую команду, которая запустит пробную игру, демонстрирующую, что pygame может делать с графикой и звуком:
python -m pygame.examples.aliensЕсли вы не хотите открывать образец, или если у вас нет AV как часть вашей настройки, вы также можете войти в интерактивную консоль Python, чтобы убедиться, что вы можете импортировать модуль pygame. Сначала введите команду + python для запуска консоли:
Затем в консоли вы можете импортировать модуль:
Если вы не получите ошибок при нажатии клавиши + ENTER + после команды, вы будете знать, что pygame была успешно установлена. Вы можете выйти из интерактивной консоли Python с помощью команды + quit () +.
Если у вас возникли проблемы с установкой в командной строке, вы можете ознакомиться с GettingStarted wiki pygame.
На более поздних этапах мы будем предполагать использование монитора для отображения графического интерфейса пользователя как часть этого руководства для проверки нашего кода.
Импорт пигмеев
Чтобы познакомиться с pygame, давайте создадим файл с именем + our_game.py +, который мы можем создать с помощью текстового редактора nano, например:
При запуске проекта в Pygame вы начнете с оператора + import +, используемого для importing модулей. , который вы можете добавить вверху вашего файла:
our_game.py
our_game.py
С pygame, импортированным в наш программный файл, мы готовы использовать его для создания игрового шаблона.
Инициализация Pygame
Здесь мы инициализируем функциональные возможности pygame с помощью функции + init () +, что сокращенно означает «initialize».
our_game.py
import pygame
from pygame.locals import *
Функция + init () + автоматически запустит все модули pygame, которые вам нужно инициализировать.
Вы также можете инициализировать каждый из модулей Pygame по отдельности, например:
Функция + init () + вернет вам tuple, если хотите. Этот кортеж покажет успешную и неудачную инициализацию. Мы можем сделать это как для общего вызова + init () +, так и для инициализации определенных модулей (что покажет нам, доступны ли эти модули):
i = pygame.init()
print(i)

f = pygame.font.init()
print(f)
Если мы запустим код выше, мы получим вывод, подобный следующему:
В этом случае + i + variable вернул кортеж + (6, 0) + `, который показывает, что было 6 успешных инициализаций Pygame и 0 сбоев. Переменная `+ f + вернула + None +, указывая, что модуль недоступен в этой конкретной среде.
Настройка поверхности дисплея
Отсюда нам нужно настроить поверхность отображения игры. Мы будем использовать + pygame.display.set_mode () +, чтобы инициализировать окно или экран для отображения и передать его в переменную. В функцию мы передадим аргумент разрешения экрана, представляющий собой пару чисел, представляющих ширину и высоту в кортеже. Давайте добавим эту функцию в нашу программу:
our_game.py
import pygame
from pygame.locals import *


pygame.init()
Мы передали кортеж + (800, 600) + в качестве аргумента функции + set_mode () +, обозначая разрешение ширины (800 пикселей) и высоты (600 пикселей). Обратите внимание, что кортеж содержится в круглых скобках функции, поэтому в функции выше есть двойные скобки.
Скорее всего, вы будете использовать integers для разрешения своей игры, поэтому вам, вероятно, захочется назначить эти числа в переменные, а не использовать числа снова и снова. Это может упростить задачу, когда вам нужно изменить свою программу, поскольку вам нужно будет только изменить то, что передается переменным.
Мы будем использовать переменную + display_width для ширины отображения вашей игры и` + display height` для высоты, и передадим эти переменные в функцию + set_mode () +:
our_game.py
import pygame
from pygame.locals import *


pygame.init()


game_display = pygame.display.set_mode((, ))
На этом этапе игровая поверхность настраивается с разрешением по ширине и высоте.
Обновление дисплея
Далее нам потребуется использовать одну из двух доступных функций, чтобы обновить отображение игровой поверхности.
Анимации — это, как правило, изменения между кадрами с течением времени. Когда вы думаете об анимации, вы можете подумать о flip book, так как они состоят из серии изображений, которые постепенно меняются от одной страницы к следующей. Эти страницы дают имитацию движения, когда они быстро перелистываются, поскольку содержимое страницы кажется движущимся. В компьютерных играх используются рамки, а не страницы.
Из-за концепции перелистывания страниц или фреймов одна из функций, которые можно использовать для обновления отображения игровой поверхности, называется + flip () + и может быть вызвана в нашем файле выше, например:
Функция + flip () + обновляет всю поверхность экрана на экране.
Чаще всего вместо + flip () + используется функция + update () +, поскольку она обновляет только части экрана, а не всю область, экономя память.
Давайте добавим функцию + update () + в конец файла + our_game.py +:
our_game.py
import pygame
from pygame.locals import *


pygame.init()

display_width = 800
display_height = 600

game_display = pygame.display.set_mode((display_width, display_height))
На этом этапе вы можете запустить программу без каких-либо ошибок, но поверхность дисплея просто откроется и быстро закроется.
Создание игрового цикла
После импорта и инициализации pygame, отображения и обновления игровой поверхности мы можем начать работу над основным игровым циклом.
На данный момент у нас ничего нет в цикле + for +, но мы можем добавить оператор + print () +, чтобы показать, что код ведет себя так, как мы ожидаем. Мы передадим события внутри итерации в оператор как + print (event) +.
Давайте добавим эти два цикла и оператор + print () + в наш программный файл:
our_game.py
import pygame
from pygame.locals import *


pygame.init()

display_width = 800
display_height = 600

game_display = pygame.display.set_mode((display_width, display_height))

pygame.display.update()
Чтобы убедиться, что наш код работает, давайте запустим программу:
Когда мы запустим файл, появится окно 800×600. Чтобы проверить события, вы можете навести указатель мыши на окно, щелкнуть в нем и нажать клавиши на клавиатуре. Эти события будут распечатаны в вашем окне консоли.
Вывод, который вы получите, будет выглядеть примерно так:
Output<Event(4-MouseMotion {'rel': (616, 355), 'buttons': (0, 0, 0), 'pos': (616, 355)})>
<Event(5-MouseButtonDown {'button': 1, 'pos': (616, 355)})>
<Event(6-MouseButtonUp {'button': 1, 'pos': (616, 355)})>
<Event(2-KeyDown {'scancode': 3, 'key': 102, 'unicode': 'f', 'mod': 0})>
<Event(3-KeyUp {'scancode': 3, 'key': 102, 'mod': 0})>
...
Этот вывод показывает пользовательские события, которые происходят. Эти события будут тем, что будет контролировать игру, поскольку они генерируются пользователем. Всякий раз, когда вы запускаете функцию + pygame.event.get () +, ваш код будет принимать эти события.
Остановите запуск программы, нажав + CTRL + + + C + в окне терминала.
На этом этапе вы можете удалить или comment out оператор + print () +, как мы не нужно будет иметь все эти выходные данные терминала.
Отсюда мы можем работать над завершением нашего шаблона, изучая, как выйти из игры.
Бросить
Чтобы выйти из программы Pygame, мы можем сначала деинициализировать соответствующие модули, а затем выйти из Python как обычно.
Функция + pygame.quit () + неинициализирует все модули pygame, а функция Python + quit () + выйдет из программы.
Поскольку пользователи контролируют игровые функции и события, мы также должны знать, что + pygame.QUIT + отправляется в очередь событий, когда пользователь запросил завершение работы программы, нажав «X» в верхней части окна игры. угол.
Давайте начнем контролировать поток программы с помощью conditional + if + Statement внутри оператора цикл обработки событий + for +:
our_game.py
import pygame
from pygame.locals import *


pygame.init()

display_width = 800
display_height = 600

game_display = pygame.display.set_mode((display_width, display_height))

pygame.display.update()

while True:
   for event in pygame.event.get():
В приведенном выше коде мы говорим, что если пользователь запросил завершение программы, программа должна деинициализировать модули pygame с помощью + pygame.quit () + и выйти из программы с помощью + quit () +.
Поскольку мы импортировали + pygame.locals +, мы можем вызывать + event.type + и + QUIT + как есть (а не с + pygame. + Перед ними).
Хотя пользователи могут знать, что нужно щелкнуть «X» в верхнем углу игрового окна, мы можем захотеть, чтобы некоторые другие пользовательские события инициировали запрос на выход из программы. Мы можем сделать это с типом события + KEYDOWN + и одним или несколькими ключами.
Событие + KEYDOWN + означает, что пользователь нажимает клавишу на клавиатуре. В наших целях допустим, что клавиша + Q + (как в «quit») или клавиша «+ ESC » могут выйти из программы. Давайте добавим код, который означает это в нашем цикле ` for +`:
our_game.py
import pygame
from pygame.locals import *


pygame.init()

display_width = 800
display_height = 600

game_display = pygame.display.set_mode((display_width, display_height))

pygame.display.update()

while True:
   for event in pygame.event.get():
       if event.type == QUIT


           pygame.quit()
           quit()
Мы добавили Boolean логические операторы, чтобы программа могла выйти, если пользователь нажимает «X». ”В верхнем углу игрового окна, или если пользователь нажимает клавишу, которая является либо клавишей ESC, либо клавишей« + Q + »(обратите внимание, что она не чувствительна к регистру).
На этом этапе, если вы запустите программу с командой + python our_game.py +, вы сможете проверить работоспособность игры, а затем выйти из нее, либо выйдя из окна со значком «X», либо через нажатие клавиши + Q + или + ESC +.
Улучшения кода и дальнейшие действия
Хотя вышеприведенная программа является полностью функциональной, есть некоторые вещи, которые мы можем сделать, чтобы улучшить код.
Для начала, мы можем поместить код, который находится в цикле + while +, в определение f вместо:
def event_handler():
   for event in pygame.event.get():
       if event.type == QUIT or (
            event.type == KEYDOWN and (
             event.key == K_ESCAPE or
             event.key == K_q
            )):
           pygame.quit()
           quit()
Это сделает цикл + while + немного более четким и сжатым, особенно когда мы добавим больше функциональности в нашу игру.
Кроме того, чтобы сделать игру более изысканной, мы можем добавить заголовок к строке заголовка окна (которая в настоящее время читается как + окно пигмеев +). Это мы можем сделать с помощью следующей строки:
pygame.display.set_caption('')Мы можем установить строку + 'Our Game' + выше для того, что мы хотели бы назвать игрой.
Кроме того, мы можем переместить функцию + pygame.display.update () + в основной игровой цикл.
Теперь наш полный код выглядит так:
our_game.py
import pygame
from pygame.locals import *


pygame.init()

display_width = 800
display_height = 600

game_display = pygame.display.set_mode((display_width, display_height))
pygame.display.set_caption('Our Game')


def event_handler():
   for event in pygame.event.get():
       if event.type == QUIT or (
            event.type == KEYDOWN and (
             event.key == K_ESCAPE or
             event.key == K_q
            )):
           pygame.quit()
           quit()

while True:
   event_handler()

   pygame.display.update()
Отсюда вы захотите перейти к изучению того, как отображать изображения с помощью рисования и спрайтов, анимировать изображения и управлять частотой кадров и многое другое. Вы можете продолжить знакомство с разработкой игр для Pygame, прочитав официальную pygame документацию.
Заключение
Из этого туториала вы узнали, как установить модуль pygame с открытым исходным кодом в среду программирования Python 3, и как начать подходить к разработке игры, настроив шаблон, который вы можете использовать для управления основным циклом игры Python.
Чтобы заняться другими программными проектами, в которых используются модули Python, вы можете узнать «https://www.digitalocean.com/community/tutorials/how-to-create-a-twitterbot-with-python-3-and-the- tweepy-library [Как создать Twitterbot с помощью библиотеки Tweepy], или «https://www.digitalocean.com/community/tutorials/how-to-plot-data-in-python-3-using-matplotlib [ Как построить данные с помощью matplotlib]. »