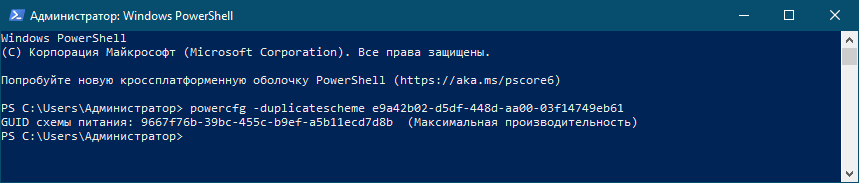
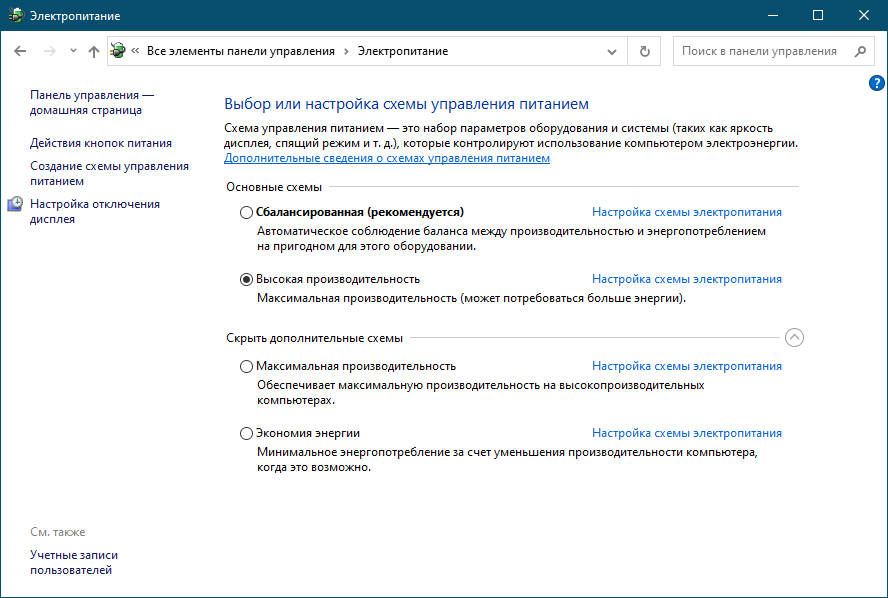
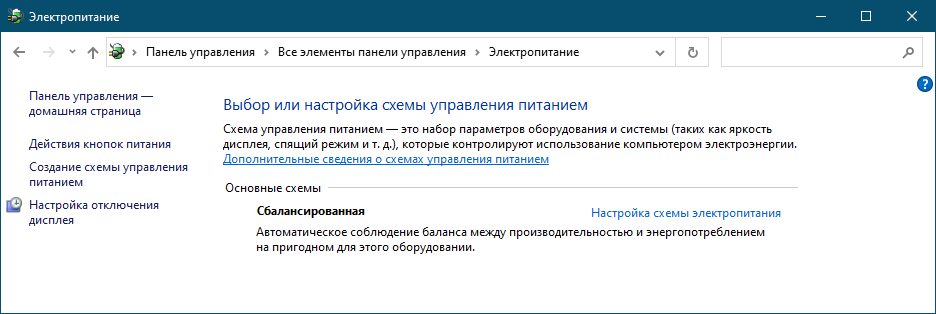
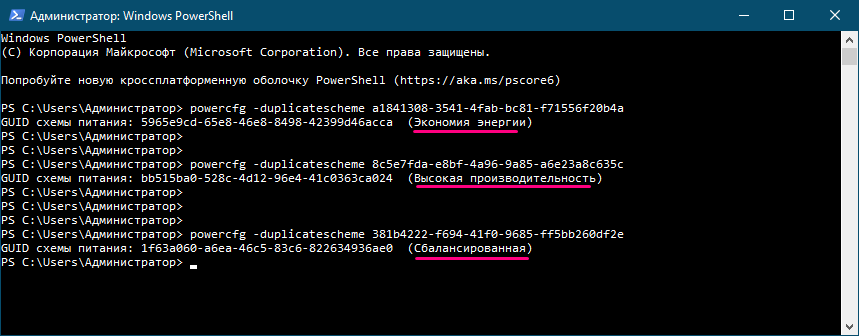
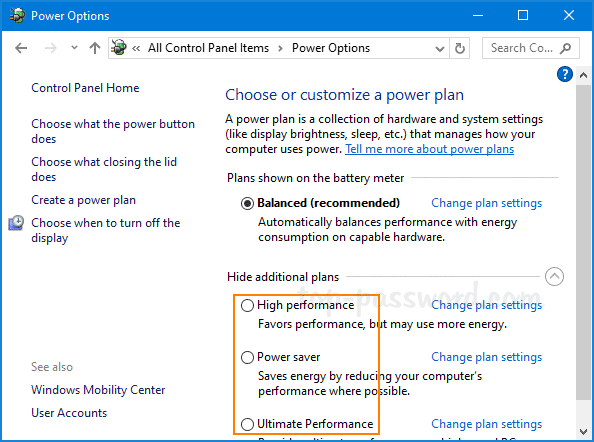
По умолчанию в Windows 8.1 и 10 доступны две основных и одна дополнительная схема электропитания. К основным относятся «Сбалансированная» и «Высокая производительность», к дополнительным — «Экономия энергии». Есть также скрытая схема «Максимальная производительность», включить показ которой можно командой powercfg -duplicatescheme e9a42b02-d5df-448d-aa00-03f14749eb61, выполненной в запущенной от имени администратора командной строке или консоли PowerShell.
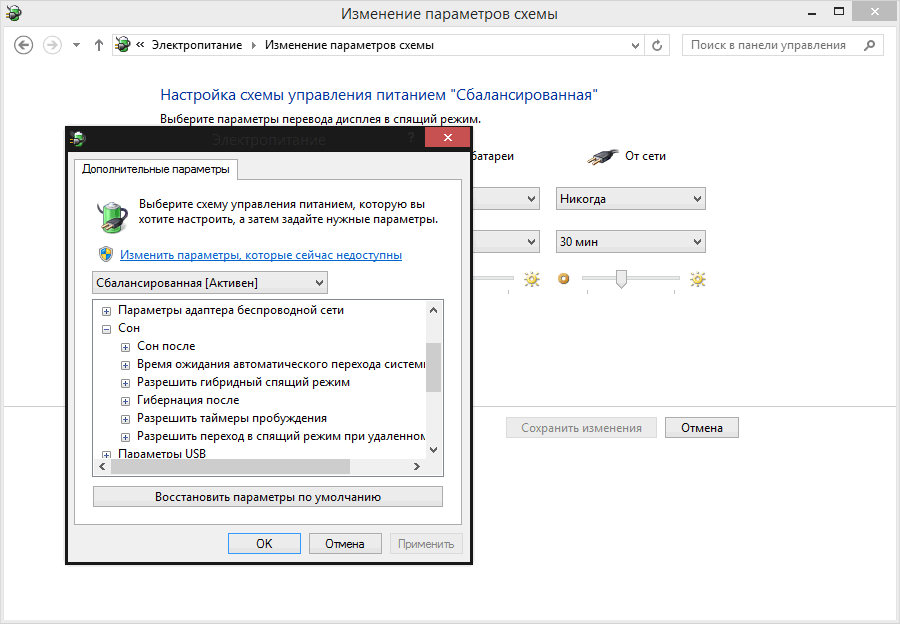
Каждую схему можно настроить, установив параметры яркости задав время, через которое компьютер должен переходить в спящий режим.
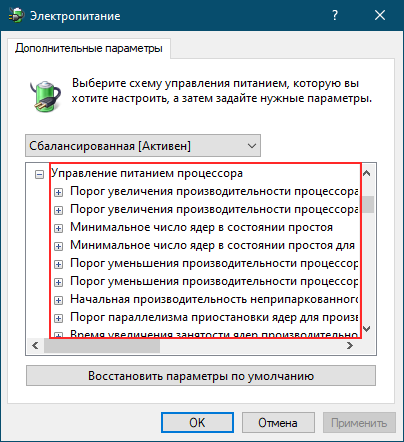
Но это так, куда больше в плане настройки плана предлагает опция изменения дополнительных параметров электропитания. В окошке дополнительных параметров вы можете установить время отключения разных устройств, включать и отключать разные функции, «программировать» действия при закрытии крышки ноутбука и нажатии кнопок питания и прочее, и прочее. Опций действительно много, но некоторые из них по умолчанию скрыты, таковыми, например, являются политики простоя устройств и настройки управления питанием процессора. Причина, по которой в Microsoft их решили скрыть проста — настройки эти являются по большей части специфическими, большинству рядовых пользователей неинтересными.
Для управления скрытыми настройками администраторы обычно используют консольную утилиту Powercfg, но это не очень удобный инструмент, было бы лучше, если бы изменять дополнительные параметры электропитания можно было из графического интерфейса, включив их отображение в окне дополнительных параметров питания с помощью нехитрых твиков реестра.
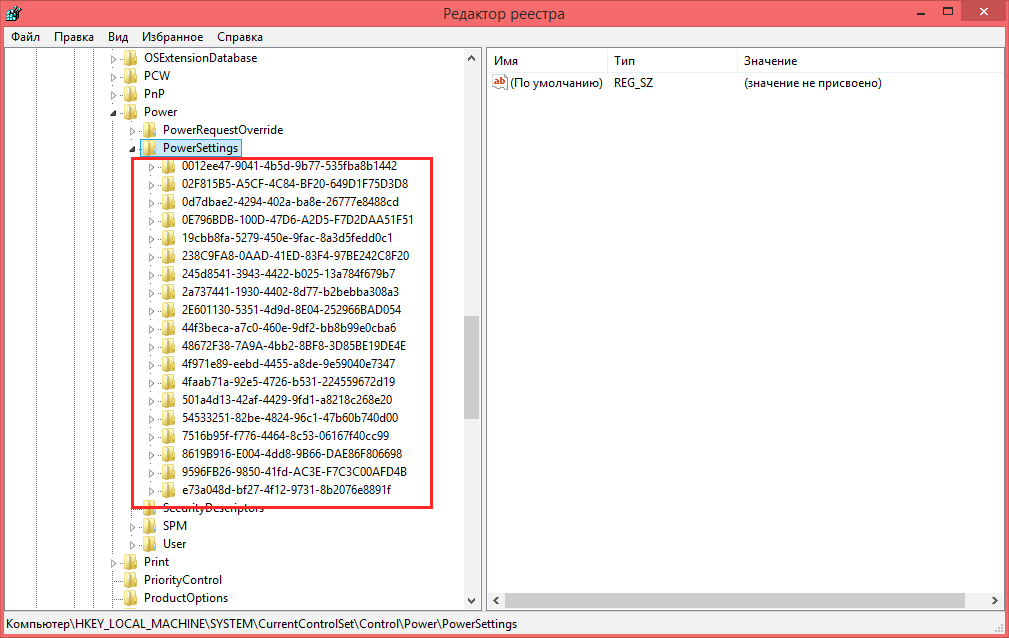
Настройки powercfg хранятся в ключе реестра HKLMSYSTEMCurrentControlSetControlPowerPowerSettings. Последний подраздел содержит пару десятков или около того каталогов с уникальными 32-значными именами, среди которых:

В свою очередь каждый из таких разделов содержит один, два, три или более вложенных папок, каждой из которых соответствует та или иная настройка.
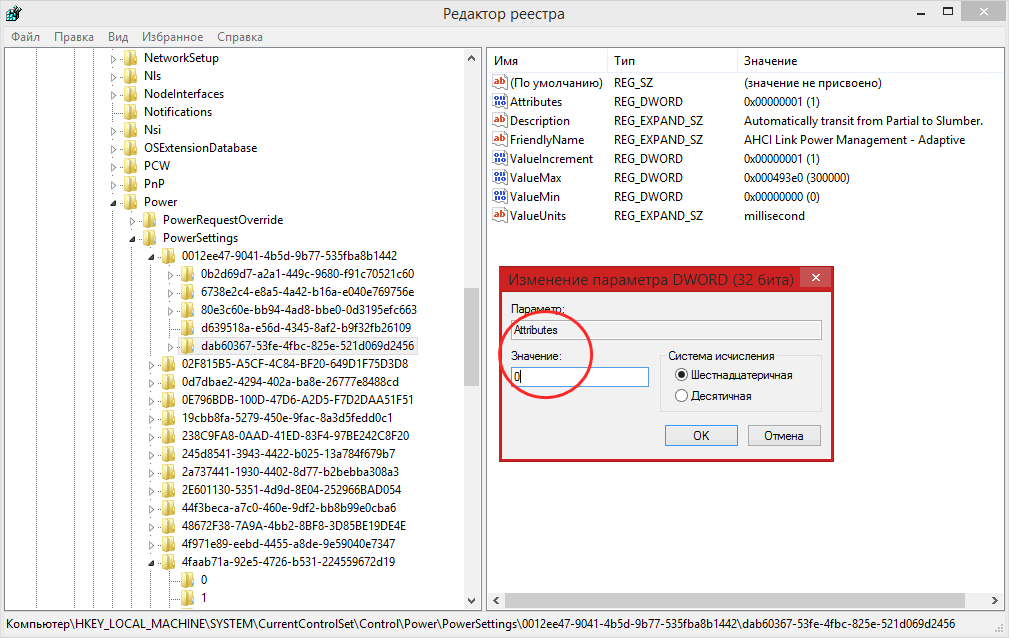
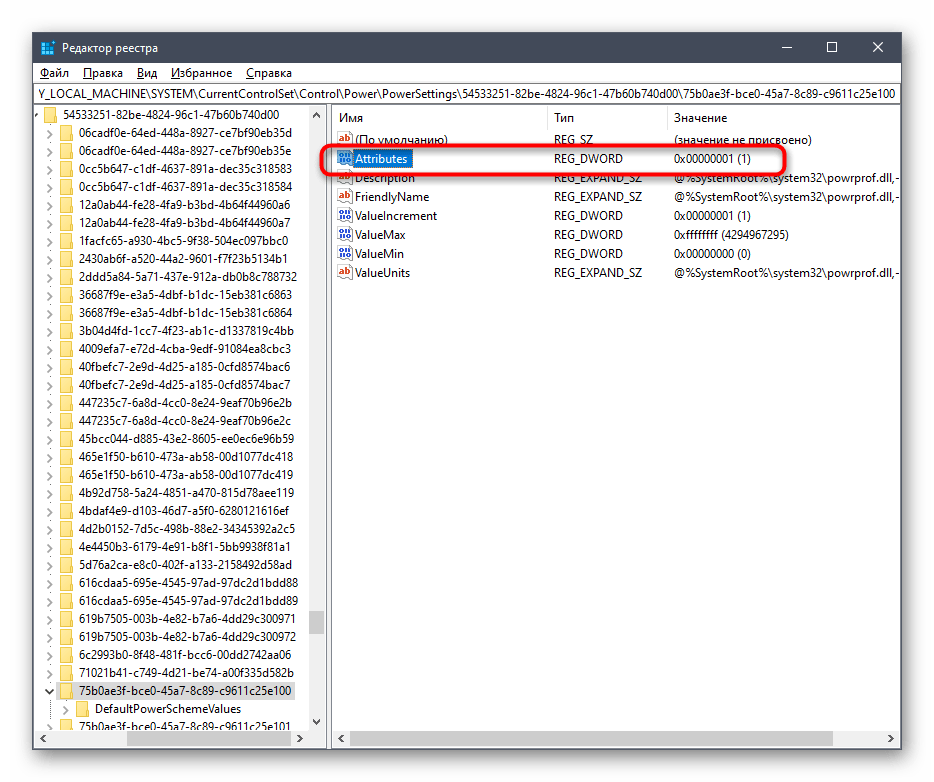
За отображение настройки в GUI отвечает параметр Attributes, расположенный в правой части окна редактора.
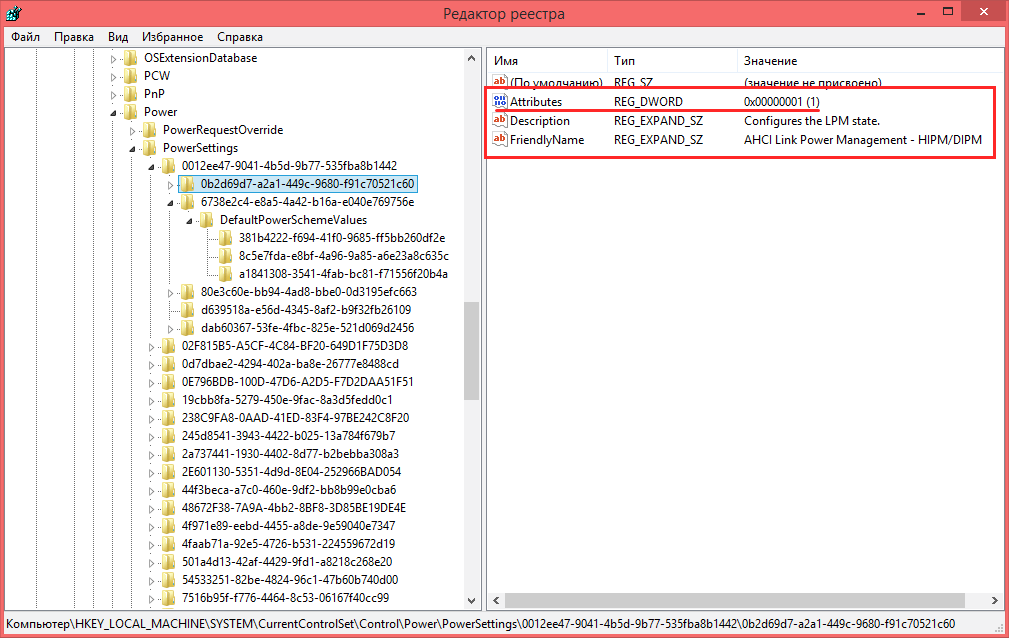
Единица в качестве этого параметра означает, что настройка скрыта, ноль — что настройка доступна через GUI окошка дополнительных параметров. Здесь же находится название настройки на английском (параметр FriendlyName) и ее описание (Desсription).
По ссылке disk.yandex.ru/d/UpmhEjMgJhsC5A вы можете скачать архив с твиками реестра, включающими отображение некоторых дополнительных параметров.
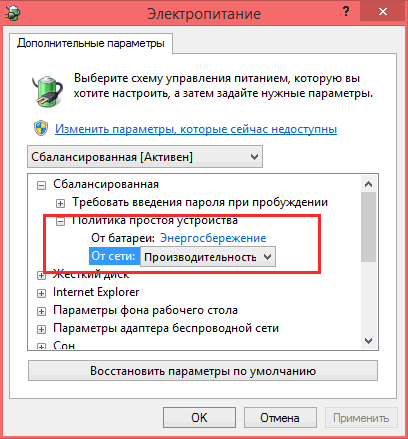
Политика простоя устройства
Одноименный твик включает отображения политик простоя устройства. Данная настройка пригодится владельцам портативных компьютеров — ноутбуков, нетбуков и планшетов. Она позволяет экономить заряд батареи, снижая потребление энергии во время простоя.
Хранится она в подразделе 4faab71a-92e5-4726-b531-224559672d19.
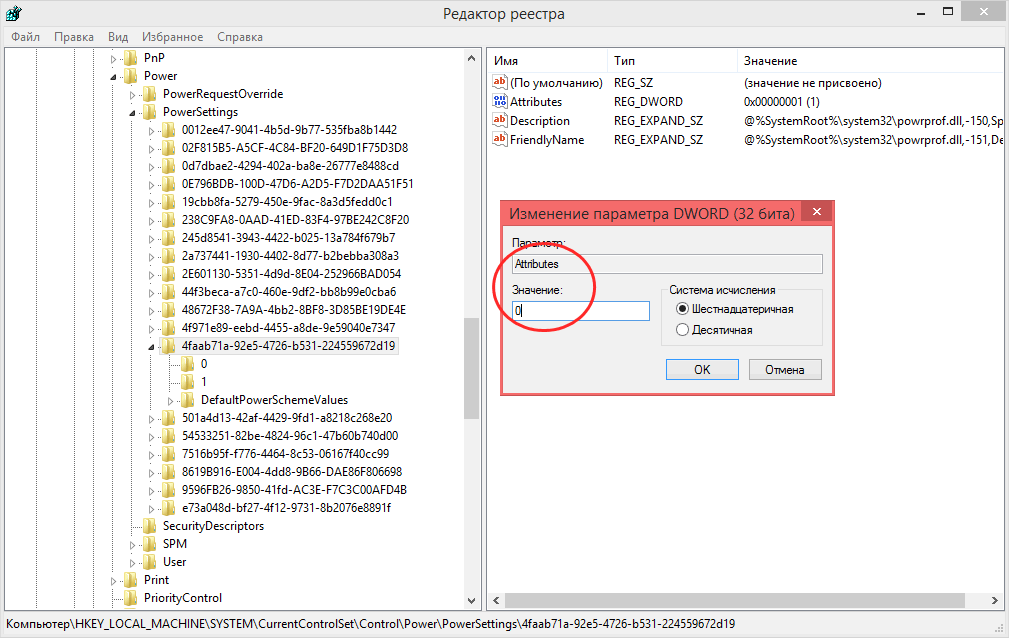
Твик меняет значение параметра Attributes на 0.
Дополнительные настройки параметров питания жесткого диска
Изменив значение параметра Атрибуты в подразделе dab60367-53fe-4fbc-825e-521d069d2456, можно включить настройку AHCI Link Power Management — Adaptive, регулирующую изменение время простоя канала AHCI, прежде чем он будет переведен в состояние слумбер, или режим минимального энергопотребления.
Изменение этого же параметра в подразделе 0b2d69d7-a2a1-449c-9680-f91c70521c60 включит отображение настройки AHCI Link Power Management — HIPM/DIPM.
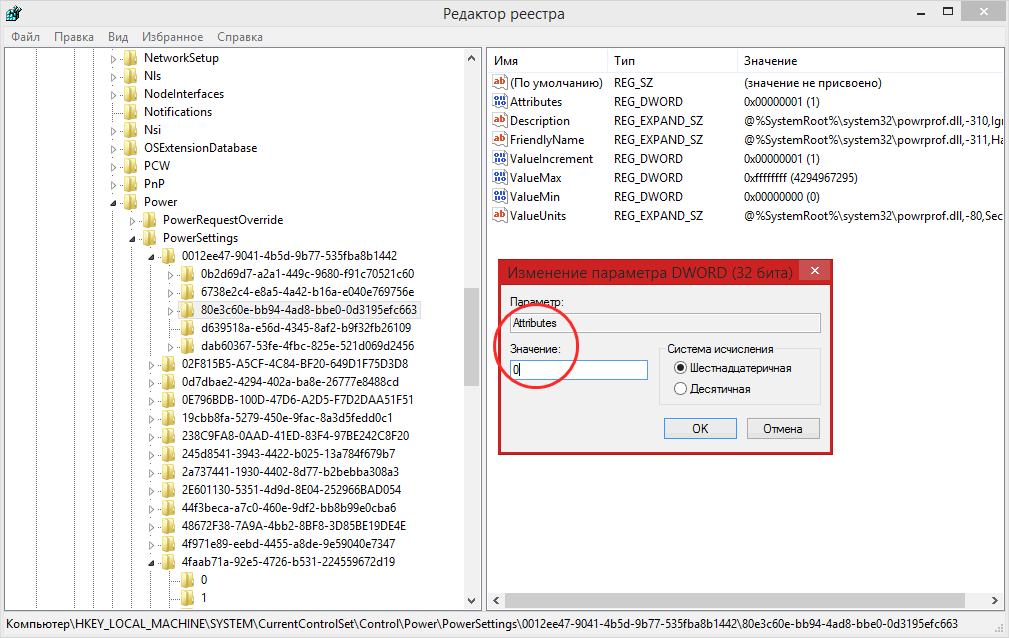
Настройка работает в связке с предыдущей настройкой Adaptive, когда в качестве значения указано HIPM или DIPM. Измените атрибуты в ключе 80e3c60e-bb94-4ad8-bbe0-0d3195efc663, и вы получите доступ еще к одной дополнительной хитрой настройке питания дисков «Длительность неучитывемых всплесков активности жесткого диска».

Дополнительные настройки спящего режима
За отображение дополнительных настроек режима сна отвечают ключи реестра, которые вы можете видеть на приложенном скриншоте.
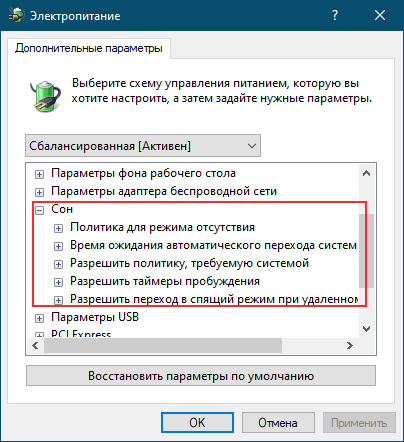
Здесь также найдутся интересные опции, например, время ожидания, по истечении которого разбуженный компьютер вновь погрузится в сон. Интерес представляет настройка, разрешающая компьютеру переходить в сон, если в открытые удаленно файлы не производилась запись в течении заданного времени.
Дополнительные параметры питания экрана
Твик включает отображение таких дополнительных настроек питания экрана как «Адаптивное отключение экрана», «Адаптивная регулировка яркости», «Время ожидания раздраженности пользователя» и так далее.
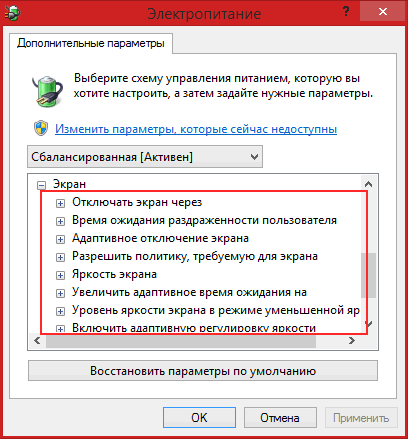
Примечательно, что в данном разделе также хранятся настройки параметров графического адаптера, но будут ли они доступны или нет, станет зависеть от драйвера.
Дополнительные настройки питания процессора
Это самый большой по объему раздел, хранящий более тридцати самых разных дополнительных настроек питания процессора.
Мы не будем их здесь разбирать, если вам интересно, можете применить соответствующий твик, а затем изучить список доступных опций. Именно изучить, а не применять сходу только ради того, чтобы посмотреть, что из этого выйдет, хотя изменение оных настроек не столь уже и критично. Если назначение настройки вам непонятно, то лучше оставить ее в покое.
![]() Загрузка…
Загрузка…
Работая за компьютером, мы не задумываемся о том, как именно функционируют установленные на материнской плате аппаратные компоненты и какие процессы протекают при этом в недрах операционной системы. Так и должно быть, нам не нужно об этом думать, поскольку инженеры и разработчики позаботились о том, чтобы система была как можно более эргономичной и максимально удобной для пользователя. Впрочем, это не означает, что пользователь может ограничиться умением нажимать кнопку включения и запускать браузер или какую иную программу. Операционная система имеет множество настроек, позволяющих улучшить её производительность, а значит сделать работу с ней ещё более комфортной.
Сегодня мы как раз коснёмся этих настроек, вернее, группы настроек, отвечающих за электропитание компонентов компьютера и, соответственно, влияющих на уровень потребления электроэнергии, что актуально для работающих от аккумулятора портативных девайсов. Начать следует с того, что в Windows имеется две основных и одна дополнительная схема электропитания. Существует ещё схема «Максимальная производительность», но она по умолчанию скрыта. Также пользователь может создавать собственные схемы с индивидуальными настройками.
Схема электропитания — это набор настроек, применяемый к группе функций и аппаратных компонентов, используемых для управления производительностью.
• Сбалансированная — используется по умолчанию, обеспечивает наилучшее соотношение между производительностью и расходом электроэнергии.
• Высокая производительность — обеспечивает максимальную производительность процессора даже если последний активно не используется. Активация этой схемы может оказаться полезной при подключении к ПК пассивных устройств, запуске программного обеспечения, предъявляющего повышенные требования к аппаратным ресурсам.
• Экономия энергии — эта схема доступна на ноутбуках, используется для экономии заряда аккумулятора.
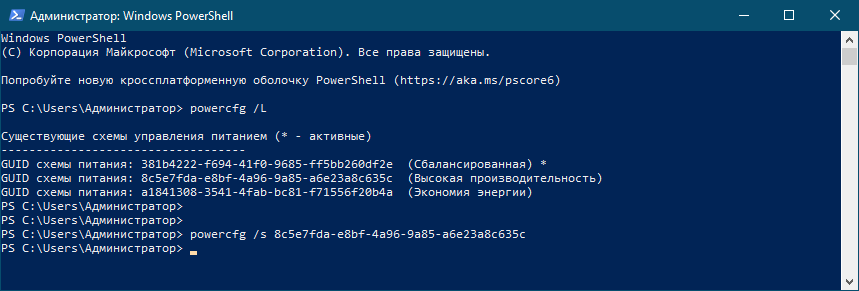
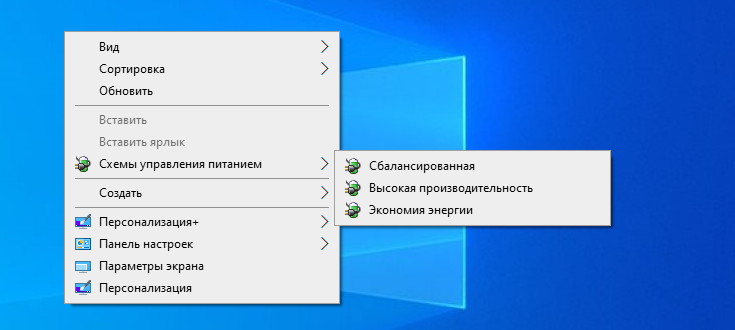
В Windows 7 и 8.1 получить доступ к схемам электропитания можно из панели управления, в Windows 10 – из приложения Параметры, также для этого можно использовать команду powercfg.cpl. Переключение между схемами осуществляется с помощью соответствующих радиокнопок, но есть и другие способы, например, переключение из командной строки командой powercfg /s с указанием идентификатора схемы, полученного другой командой powercfg /L. Можно также добавить пункты переключения между схемами электропитания в контекстное меню рабочего стола, воспользовавшись этим твиком реестра (1).
 В свою очередь, каждая из схем питания имеет свои настройки, перейти к которым можно кликом по одноименной ссылке напротив названия схемы. В общих настройках можно изменить параметры яркости дисплея, установить время отключения дисплея и перевода компьютера в спящий режим.
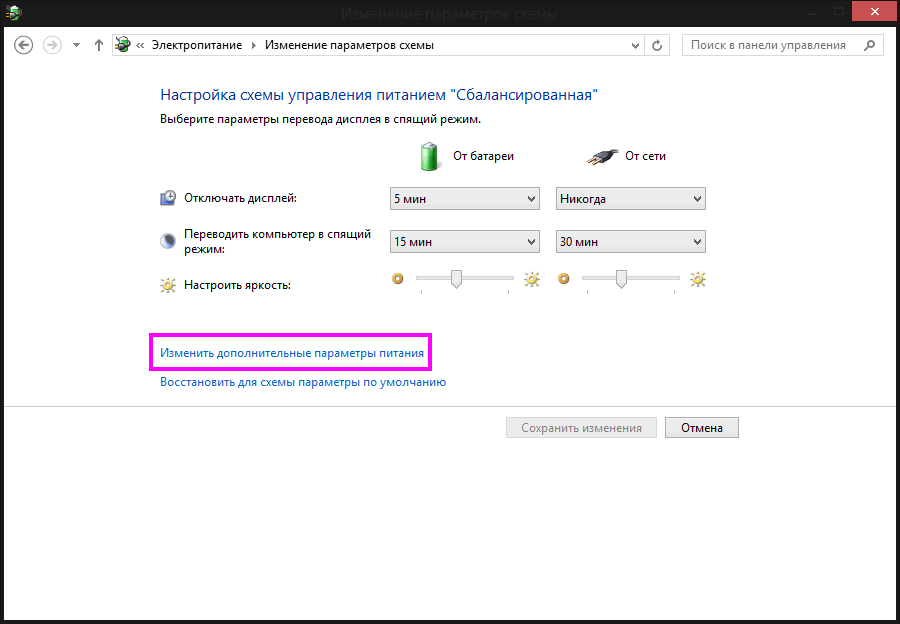 Дополнительных настроек схемы, открываемых кликом по одноименной ссылке или командой control.exe powercfg.cpl,,3, гораздо больше. В них можно настроить политику охлаждения, питание жёсткого диска, портов USB, центрального процессора и беспроводного адаптера, задать действия при нажатии кнопок питания и закрытия крышки ноутбука, включить адаптивную регулировку яркости, выбрать действие при падении заряда аккумулятора до критического уровня и так далее. Некоторые из дополнительных опций по умолчанию скрыты, например, управление режимом сна при использовании удалённого подключения.
 Чтобы отобразить все дополнительные настройки питания, нужно применить следующий твик реестра. Открыв редактор Regedit одноименной командой, разверните ветку HKLMSYSTEMCurrentControlSetControlPowerPowerSettings. Каждый вложенный в PowerSettings подраздел относится к определённой группе настроек, в свою очередь, в каждом подразделе имеются своя группа разделов, относящихся уже к определённой настройке. Описание этой настройки указано в параметре Description, видимость же её в графическом интерфейсе окошка дополнительных параметров электропитания задаётся значением параметра Attributes.
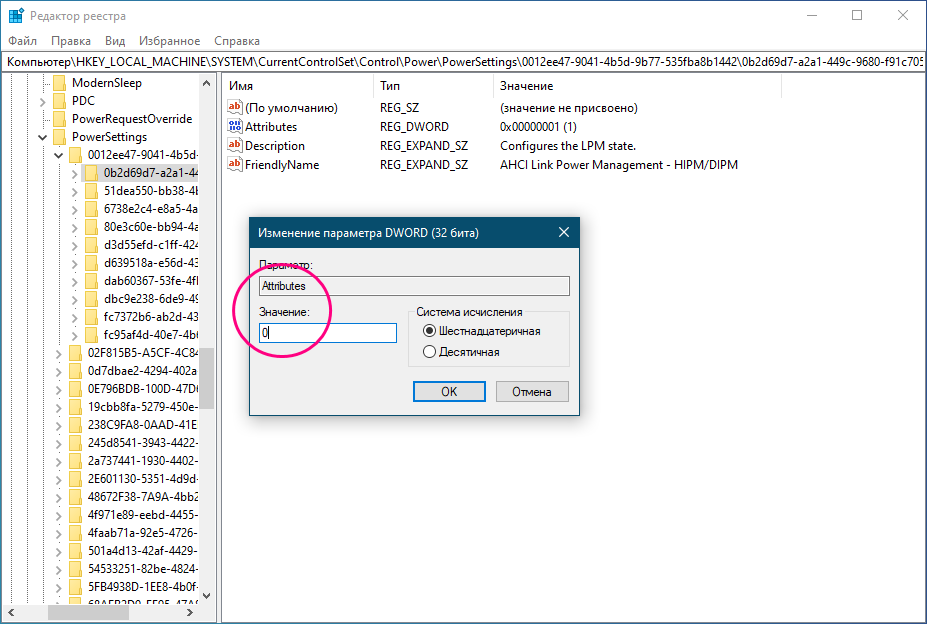 По умолчанию этот параметр имеет значение 1, чтобы включить принудительное отображение соответствующей ему настройки, нужно изменить его на 0. На досуге можете поэкспериментировать с параметрами реестра в указанном ключе, только не забудьте перед этим создать резервную копию ключа. Также вы можете воспользоваться готовым твиком реестра (2), который мы для вас специально подготовили.
Скрытыми могут быть не только дополнительные параметры электропитания, но и сами схемы. Мы уже упоминали о схеме «Максимальная производительность», появившееся в Windows 10 April 2018 Update и предназначенной для обеспечения максимальной производительности ЦП и других компонентов на мощных компьютерах. Чтобы её активировать, нужно выполнить в запущенной с повышенными правами командной строке команду powercfg -duplicatescheme e9a42b02-d5df-448d-aa00-03f14749eb61.
 В некоторых системах вы можете столкнуться с отсутствием не только дополнительных, но и основных схем электропитания. Это может быть связано с активной по умолчанию функцией «Подключённый режим ожидания», обеспечивающей быстрое включение/выключение компьютера по аналогии с мобильными устройствами. Если у вас доступна только одна схема, вы можете восстановить отсутствующие режимы с помощью показанных на скриншоте команд.
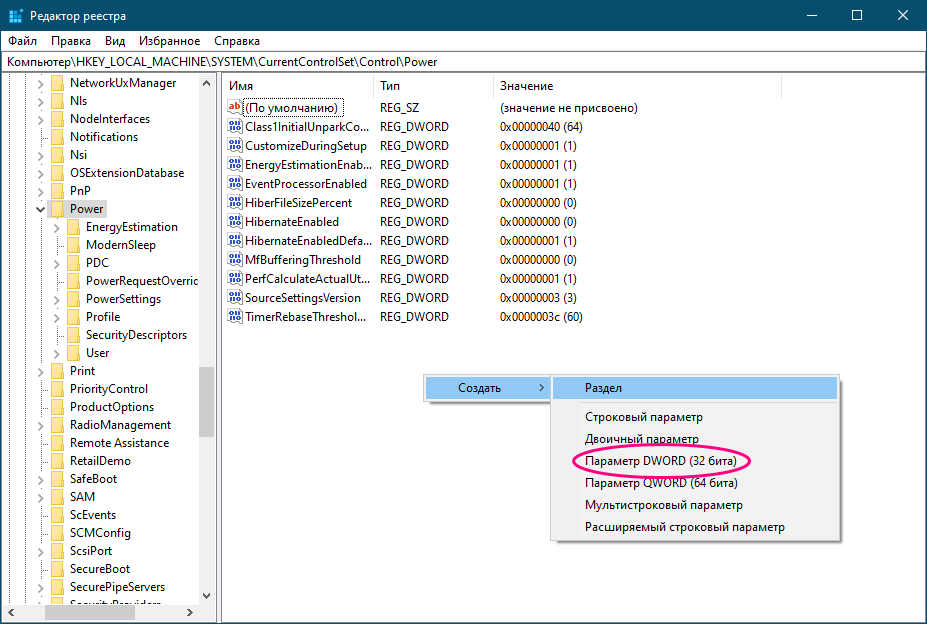
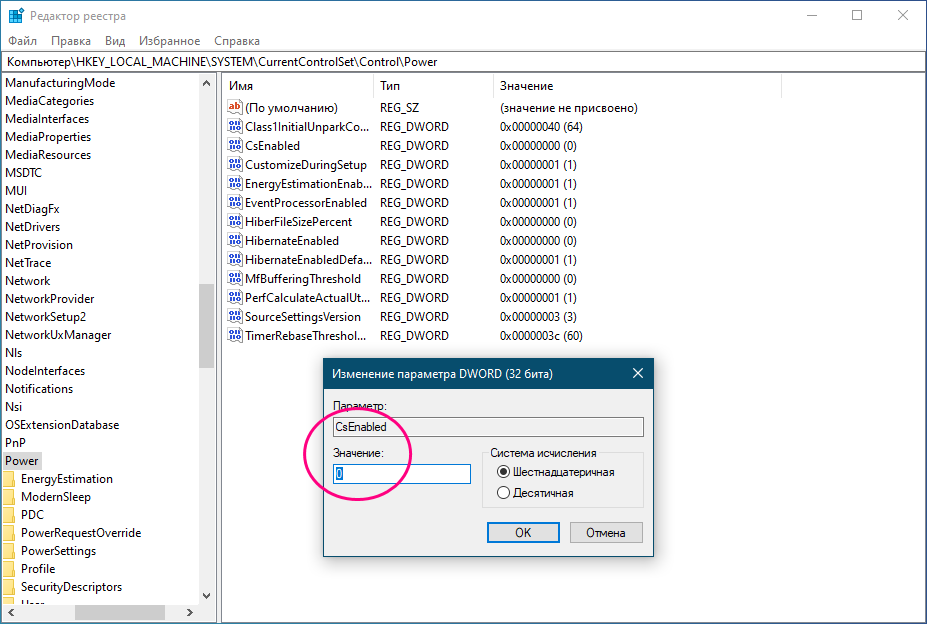
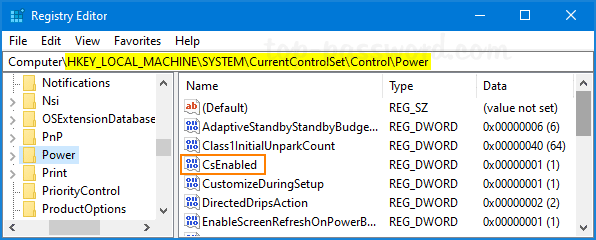
 Альтернативное решение — раскрыть в реестре ветку HKLMSYSTEMCurrentControlSetControlPower и создать/изменить в правой колонке DWORD-параметр CsEnabled, установив в качестве его значения 0 и перезагрузив компьютер.
 Если у вас новейшая модель компьютера с поддержкой технологии «S0 Low Power Standby», вам стоит зайти в BIOS UEFI, перейти в раздел Boot → Secure Boot и выставить для настройки OS Type значение «Other OS» (Другая операционная система). Это отключит редко используемую настройку «Безопасная загрузка» и сделает доступными все схемы электропитания.
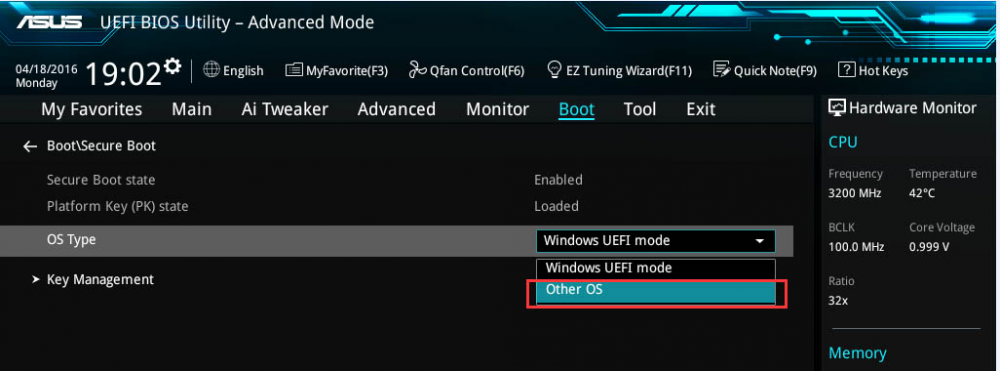

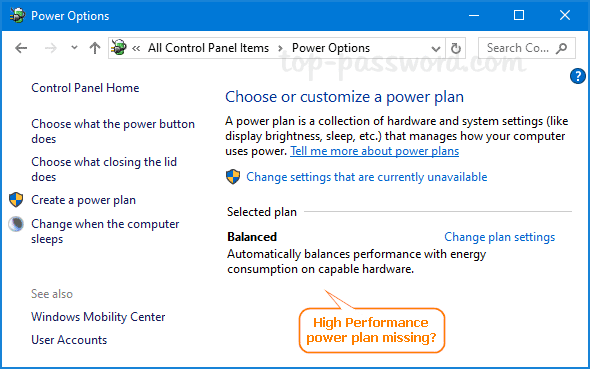
Высокопроизводительный план питания отсутствует после обновлений Windows 10? На вашем ноутбуке DELL Inspiron доступна только сбалансированная схема питания? По умолчанию каждая установка Windows должна поставляться с тремя предустановленными планами электропитания: энергосбережение, сбалансированный и высокая производительность. Если на вашем компьютере отсутствует какой-либо план питания, вот несколько простых способов его восстановления.
Метод 1: отключить подключенный режим ожидания
Подключенный режим ожидания — это новая функция, появившаяся в Windows 8 и обеспечивающая быстрый режим сна/пробуждения. По умолчанию подключенный режим ожидания включен, и он ограничивает доступные настройки или планы электропитания для пользователей. Чтобы восстановить отсутствующие планы электропитания, вам может потребоваться отключить подключенный режим ожидания с помощью этой настройки реестра:
- Откройте редактор реестра и перейдите по
HKEY_LOCAL_MACHINESYSTEMCurrentControlSetControlPower. На правой панели дважды щелкните DWORD CsEnabled, чтобы изменить его.

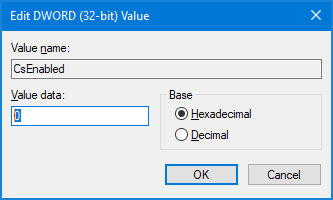
- Измените значение с 1 (включить) на 0 (отключить) и нажмите ОК.

- Закройте редактор реестра. После перезагрузки у вас должны быть планы по умолчанию.

Способ 2. Восстановление отсутствующих планов электропитания с помощью командной строки
- Откройте командную строку от имени администратора.
- Скопируйте и вставьте приведенную ниже команду для отсутствующего плана электропитания, который вы хотите восстановить, в командную строку и нажмите Enter.
- Энергосбережение:
powercfg -duplicatescheme a1841308-3541-4fab-bc81-f71556f20b4a
- Сбалансированный:
powercfg -duplicatescheme 381b4222-f694-41f0-9685-ff5bb260df2e
- Высокая производительность:
powercfg -duplicatescheme 8c5e7fda-e8bf-4a96-9a85-a6e23a8c635c
- Максимальная производительность (доступно с Windows 10 апреля 2018 года):
powercfg -duplicatescheme e9a42b02-d5df-448d-aa00-03f14749eb61
- Энергосбережение:
- Когда закончите, откройте параметры электропитания, и вы сразу же получите доступ к отсутствующим планам электропитания, которые вы только что добавили.
Заключение
Вышеуказанные методы должны работать на большинстве систем Windows 10/8. Если вы все еще не можете вернуть схемы питания, просто откройте панель управления и добавьте новый план питания для собственных целей.
Как восстановить настройки схемы электропитания по умолчанию в Windows 10
- Откройте панель управления и переключите режим просмотра по крупным значкам, а затем нажмите «Электропитание».
- Щелкните ссылку «Изменить параметры плана» справа от текущего плана электропитания.
- Нажмите Восстановить настройки по умолчанию для этого плана.
Как мне использовать предпочтительную схему управления питанием в реестре?
Как использовать реестр для установки предпочтительной схемы управления питанием. , введите regedit в поле «Начать поиск», а затем щелкните regedit.exe в списке программ. Если вам будет предложено ввести пароль администратора или подтверждение, введите свой пароль или нажмите «Продолжить». Щелкните правой кнопкой мыши PreferredPlan и выберите команду Изменить.
Как мне вернуть свои параметры питания?
В левой части окна вы должны увидеть несколько параметров, отображаемых друг под другом, поэтому щелкните параметр «Создать схему управления питанием». Вы должны увидеть окно Создать схему управления питанием и список вариантов. Установите переключатель на желаемый план электропитания. вернуть назад.
Почему я не могу изменить настройки питания в Windows 10?
Перейдите в [Конфигурация компьютера] -> [Административные шаблоны] -> [Система] -> [Управление питанием]. Дважды щелкните параметр «Указать настраиваемый активный план управления питанием». Установите значение Disabled. Щелкните Применить, затем ОК.
Как сбросить настройки электропитания Windows?
Как сбросить одиночный план управления питанием до настроек по умолчанию
- Откройте настройки Windows 10.
- Откройте Системные настройки.
- Откройте «Питание и сон» и там «Дополнительные настройки питания».
- Откройте настройки схемы электропитания. …
- Нажмите «Изменить дополнительные параметры питания».
- При необходимости смените выбранную схему электропитания. …
- Нажмите «Восстановить настройки плана по умолчанию».
Как изменить настройки сна в реестре?
Закройте редактор реестра. Отличная работа! Теперь перейдите к: Клавиша Win -> Тип электропитания -> Открыть параметры электропитания -> Выбранный план -> Изменить настройки плана -> Изменить дополнительные настройки электропитания. Нажмите «Изменить настройки, которые в настоящее время недоступны» -> «Спящий режим» -> «Тайм-аут автоматического отключения системы» -> «Задайте предпочтительные настройки».
Почему мой план управления питанием постоянно меняется?
Обычно система изменит вашу схему электропитания, если у вас нет правильных настроек. Например, вы можете настроить свои устройства на высокую производительность, и через некоторое время или после перезагрузки она автоматически переключится на режим энергосбережения. Это всего лишь один из сбоев, который может произойти в функции настроек схемы электропитания.
Установлены ли параметры питания Windows для каждого пользователя?
Привет, к сожалению, Вы не можете настроить разные схемы управления питанием для разных пользователей..
Как принудительно включить план управления питанием в Windows 10?
Как заставить Windows 10 использовать настраиваемую схему управления питанием
- Щелкните правой кнопкой мыши значок батареи или питания на панели задач и выберите Параметры питания. …
- В окне «Электропитание» щелкните ссылку «Создать схему электропитания» на левой панели.
- Теперь в окне «Создать схему управления питанием» выберите базовый план, дайте имя своему индивидуальному плану управления питанием и нажмите «Далее».
Как мне изменить настройки питания на моем компьютере?
Как изменить параметры питания на моем компьютере с Windows?
- Щелкните «Пуск».
- Щелкните «Панель управления».
- Нажмите «Параметры электропитания».
- Нажмите «Изменить настройки батареи».
- Выберите желаемый профиль мощности.
Содержание
- Изменение стандартных параметров плана электропитания
- Включение дополнительных параметров
- Использование командной строки
- Вопросы и ответы

В операционной системе Windows 10 имеется отдельное меню настроек, отвечающее за управление питанием. Особенно актуальна эта тема для обладателей ноутбуков, когда требуется оптимизировать потребление энергии при работе устройства от батареи. Однако и пользователи стационарных компьютеров тоже нередко сталкиваются с такой задачей. Основное влияние на потребление энергии оказывает процессор, поэтому для оптимизации или настройки максимальной производительности в первую очередь следует обращать внимание на питание именно этого комплектующего. Об этом и пойдет речь далее.
Изменение стандартных параметров плана электропитания
Для начала поговорим о стандартных параметрах планов электропитания. Как известно, в ОС можно настроить сразу несколько профилей, чтобы быстро переключаться между ними. Сейчас мы разберем только текущий план, а вы, отталкиваясь от увиденных инструкций, сможете точно так же настроить и другие профили, изменяя только значения пунктов, чтобы создать необходимое питание для процессора.
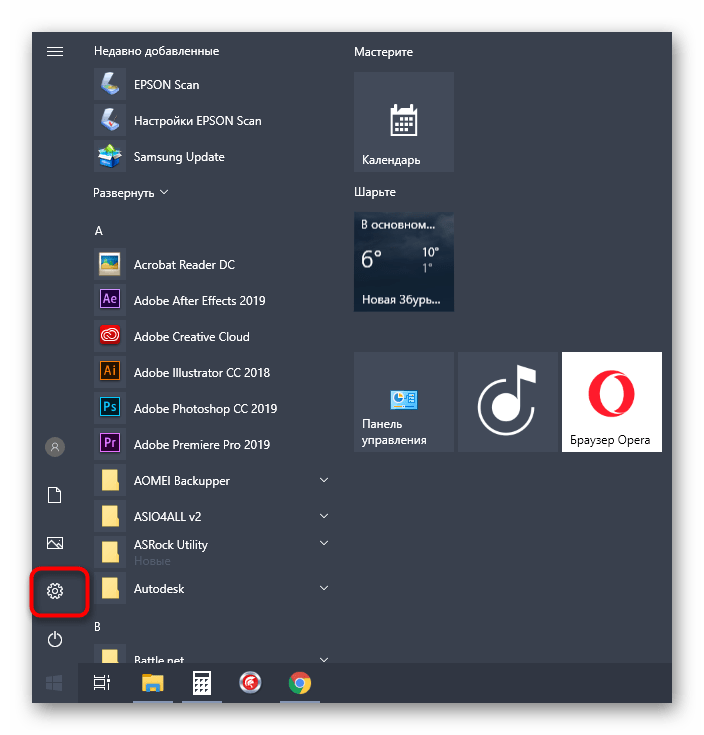
- Откройте меню «Пуск» и перейдите оттуда в «Параметры», щелкнув по значку в виде шестеренки.
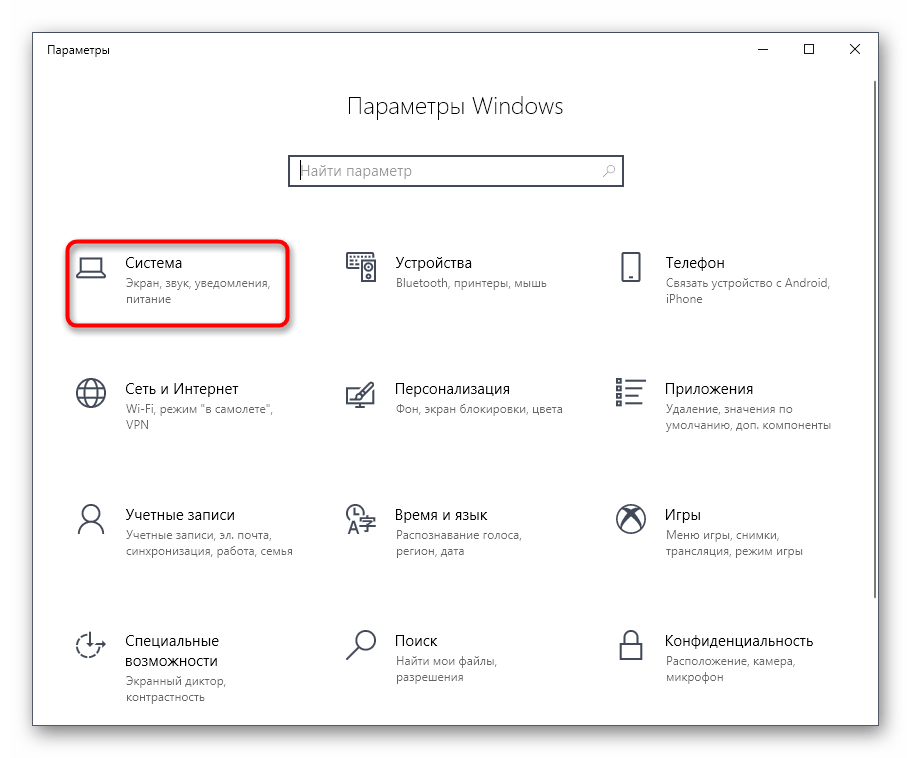
- Здесь вас интересует категория «Система».
- Через панель слева переместитесь в «Питание и спящий режим».
- Отыщите надпись «Дополнительные параметры питания» и кликните по ней левой кнопкой мыши.
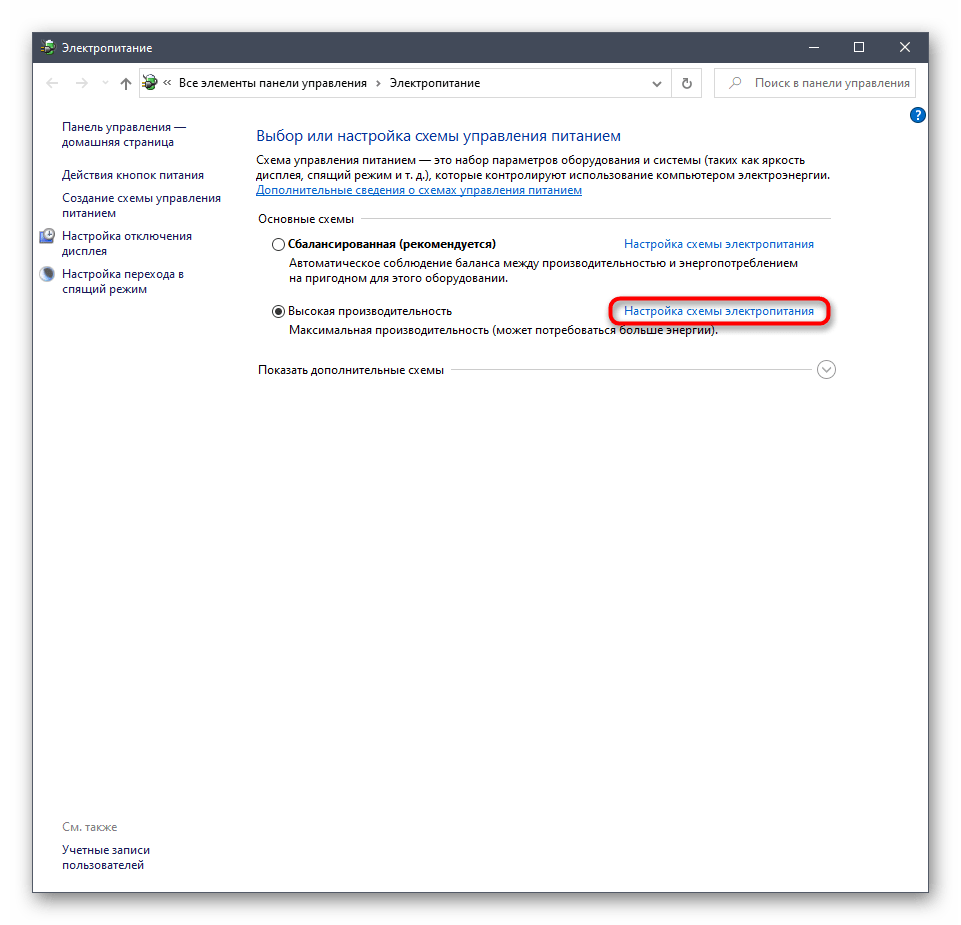
- Вы будете перемещены в соответствующий раздел Панели управления. В нем выберите необходимую схему и нажмите по кликабельной надписи «Настройка схемы электропитания».
- В открывшемся окне щелкните ЛКМ по «Изменить дополнительные параметры питания».
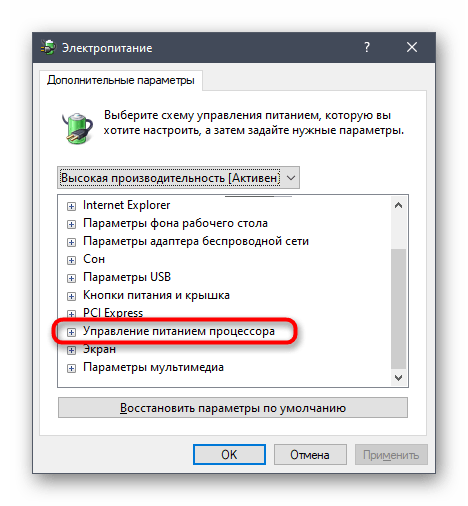
- Теперь в появившемся списке вам нужно выбрать раздел «Управление питанием процессора», развернув его.
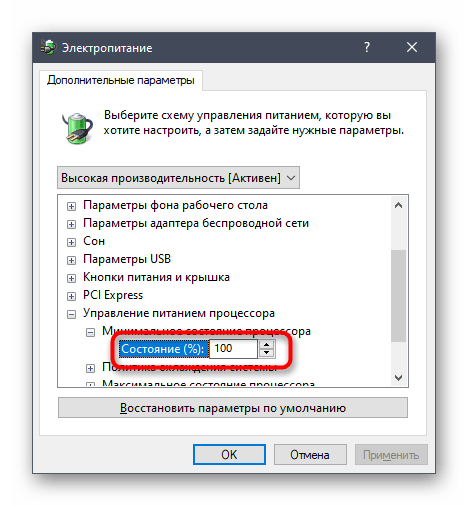
- Обратите внимание на находящиеся здесь три пункта «Минимальное состояние процессора», «Политика охлаждения системы» и «Максимальное состояние процессора». Первый параметр отвечает за минимальную производительность процессора в процентах. Например, если какое-то приложение будет запущено, то для него выделятся все мощности комплектующего, чтобы быстро выполнить задачу. Полной противоположностью является третий параметр, ведь в нем вы устанавливаете максимально допустимую нагрузку, ограничив тем самым производительность.
- Что касается изменения состояния, то вы самостоятельно задаете процентное значение, вписывая цифры в специально отведенное поле.
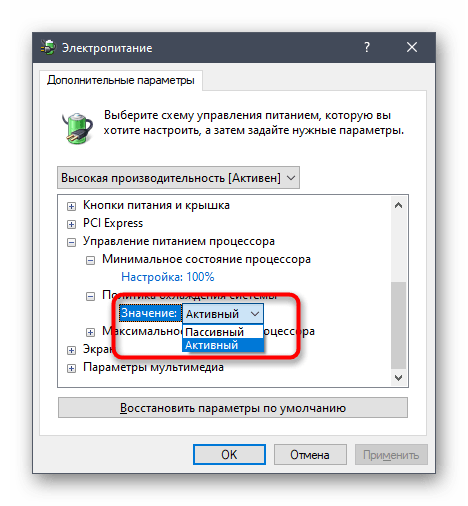
- Пункт «Политика охлаждения системы» позволит установить, будут ли вентиляторы ускорять свою работу при замедлении быстродействия центрального процессора.


Все остальные настройки плана электропитания в Windows 10 не имеют никакого отношения к процессору, поэтому мы их пропустим. Однако если вы хотите их изменить, сначала наведите курсор на пункт, чтобы отобразилась всплывающая подсказка. Там вы сможете узнать, за что отвечает конкретный параметр.
Включение дополнительных параметров
По умолчанию один важный параметр питания процессора в рассмотренном выше меню не отображается, хотя он может быть полезен ряду пользователей. Эта настройка отвечает за ограничение частот процессора, то есть если их понизить, потребление энергии значительно снизится, но вместе с этим упадет и производительность. В случае заинтересованности данным параметром выполните следующие действия:

- Откройте утилиту «Выполнить», зажав комбинацию клавиш Win + R. Введите там
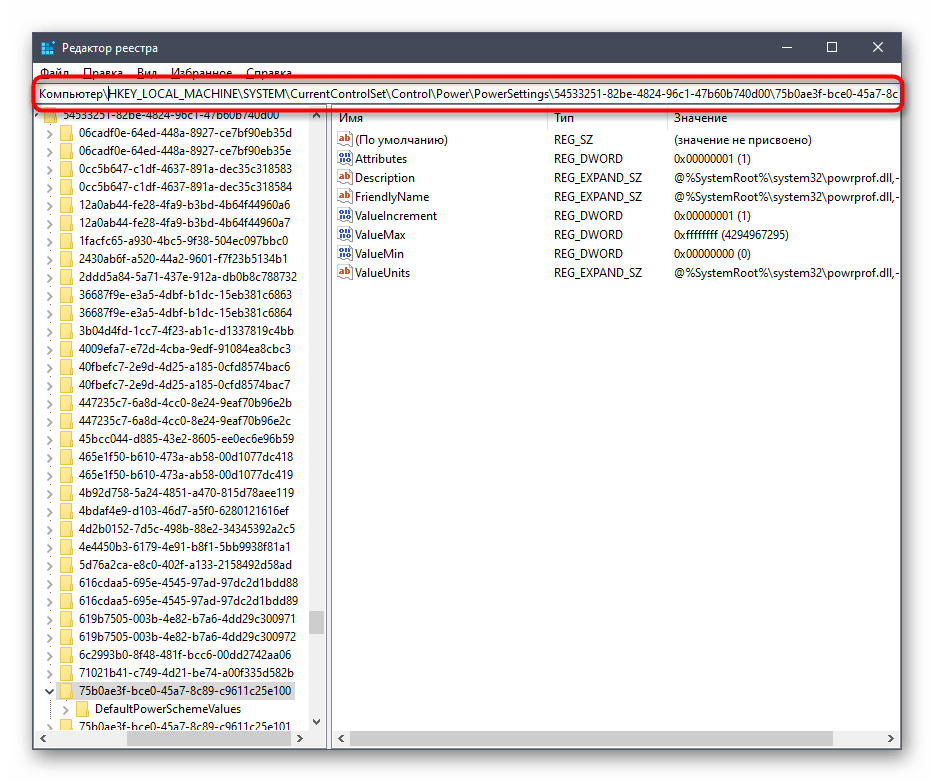
regeditи нажмите на Enter. - Перейдите к
HKEY_LOCAL_MACHINESYSTEMCurrentControlSetControlPowerPowerSettings54533251-82be-4824-96c1-47b60b740d0075b0ae3f-bce0-45a7-8c89-c9611c25e100, вставив этот путь в адресную строку. - В корне конечной директории отыщите параметр «Attributes» и дважды кликните по нему правой кнопкой мыши.
- Откроется окно свойств, где следует изменить значение на 2. После этого настройка будет применена автоматически, однако в некоторых случаях это происходит только после перезагрузки операционной системы.
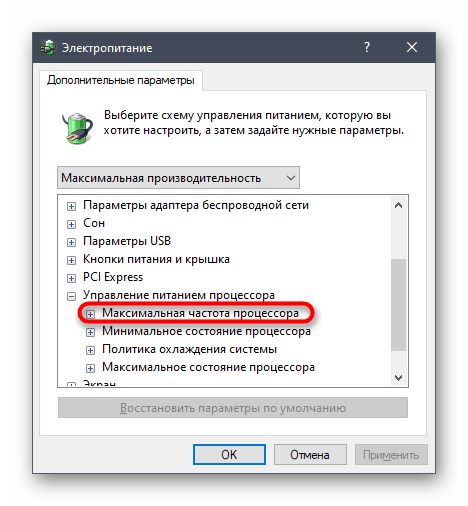
- Закончив с этим, снова перейдите к настройкам плана электропитания так, как это показано в предыдущей инструкции. Кликните по надписи «Изменить дополнительные параметры питания».
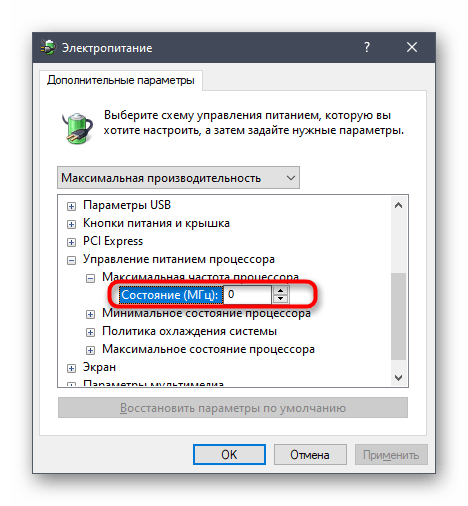
- Отыщите в «Управление питанием процессора» пункт «Максимальная частота процессора» и раскройте его для изменения значения.
- Выставьте необходимое ограничение. Учитывайте, что здесь оно вводится в МГц, а во всех программах и Диспетчере задач скорость отображается в ГГц. То есть вам необходимо прописать, например, 1500 МГц, чтобы установить ограничение до 1.5 ГГц.
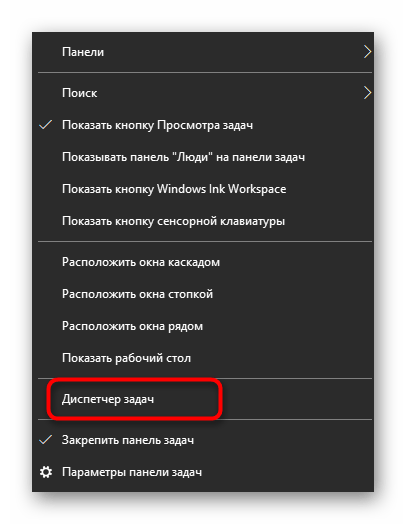
- После внесенных изменений предлагаем проверить их действенность. Щелкните ПКМ по пустому месту на панели задач и в появившемся контекстном меню выберите пункт «Диспетчер задач».
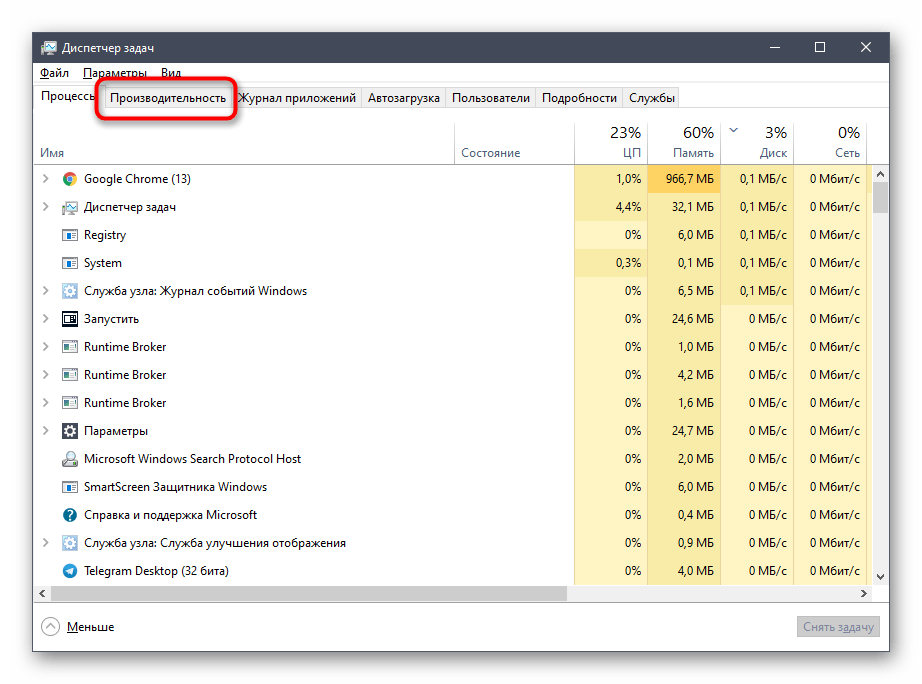
- Переместитесь на вкладку «Производительность».
- Обратите внимание на показатель скорости процесса, чтобы убедиться в том, что установленное ограничение работает.

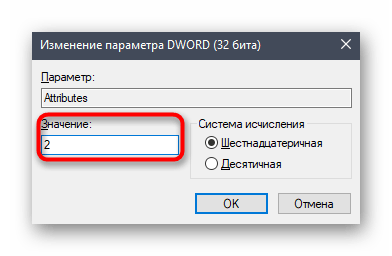


Если этот пункт в настройках плана электропитания вам больше не будет нужен, просто скройте его, установив значение 1 в рассмотренном только что параметре редактора реестра.
Использование командной строки
Некоторым пользователям проще управлять компьютером, вводя команды в консоли. Настроить питание процессора тоже можно в этом приложении. Для этого понадобится выполнить всего пару простых действий и освоить несколько команд.
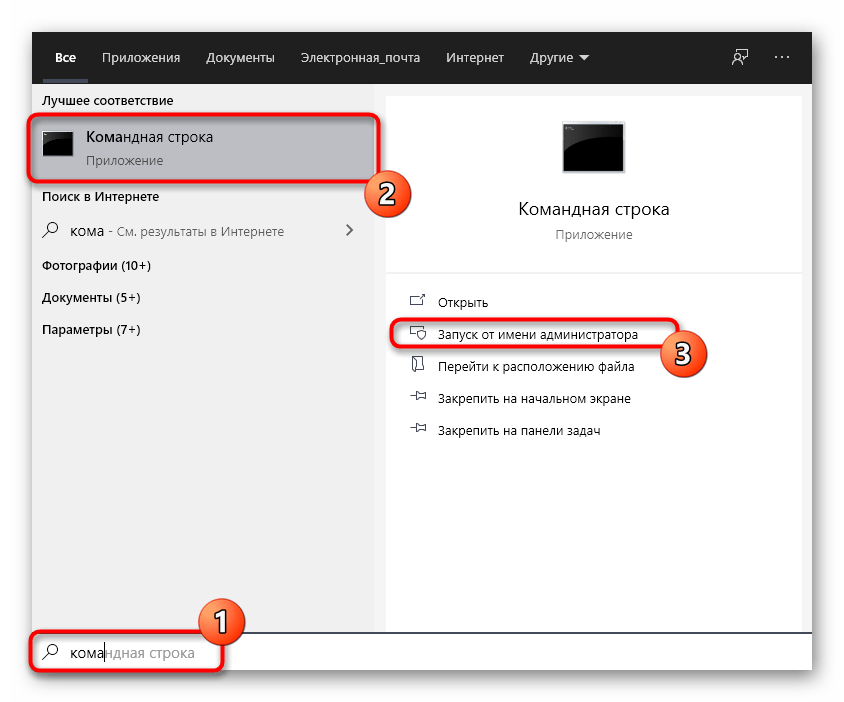
- Для начала запустите консоль от имени администратора. Сделать это можно, например, через меню «Пуск».
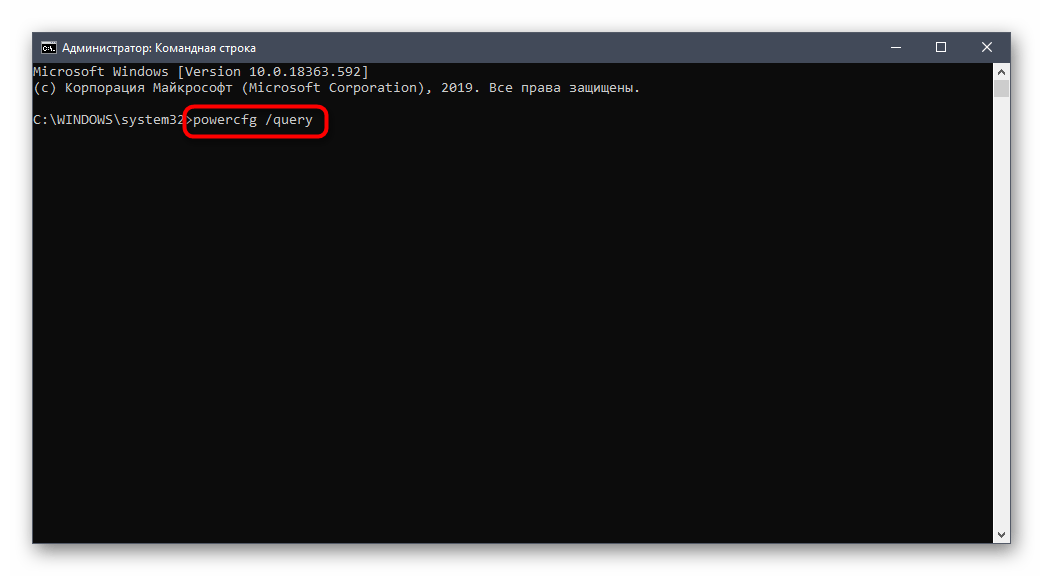
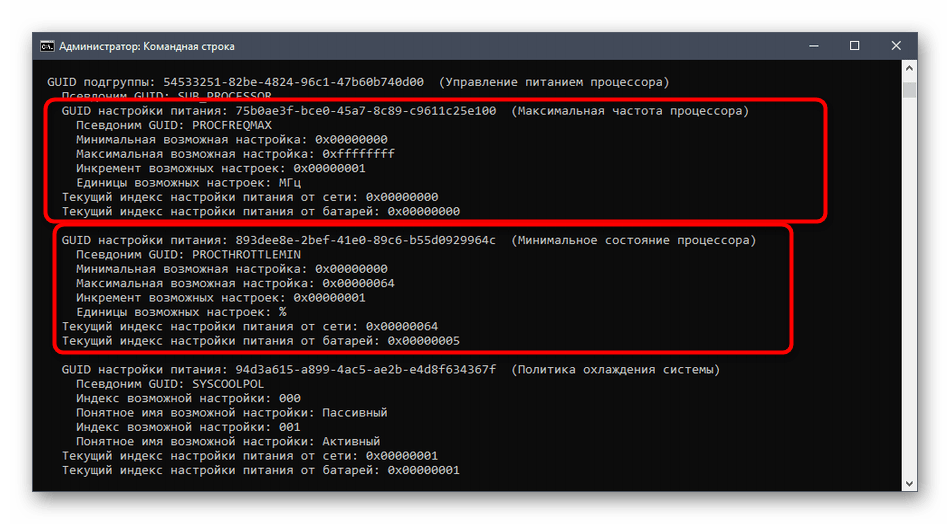
- Введите
powercfg /query, чтобы просмотреть все доступные настройки питания. - Обратите внимание на представленные строки — там указано название параметра, которое отображается в графическом меню. Здесь вам нужно запомнить «Псевдоним GUID» и «Текущий индекс настройки питания». По первому значению будет производиться изменение, а второй отвечает за текущую конфигурацию. 64 на конце означает 100%, а 00 — отсутствие ограничений.
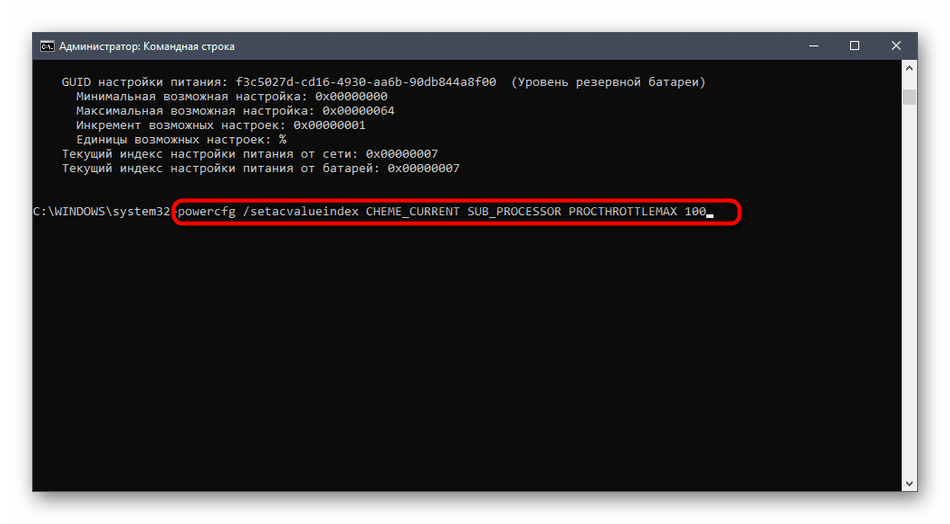
- Теперь осталось только ввести, например,
powercfg /query SCHEME_CURRENT SUB_PROCESSOR PROCTHROTTLEMAX 100, где SCHEME_CURRENT — текущий профиль электропитания, SUB_PROCESSOR — GUID раздела «Управление питанием процессора», а PROCTHROTTLEMAX — псевдоним самого параметра.
Меняйте все значения и псевдонимы на необходимые, чтобы успешно управлять значениями. Если вдруг при вводе команды возникнет какая-то ошибка, на экране отобразится отчет с рекомендациями по исправлению ситуации, что поможет разобраться с данной операцией даже начинающему пользователю.
Это были все сведения о настройке питания процессора в операционной системе Windows 10, о которых мы хотели рассказать. Не забывайте, что любые изменения как-то отражаются на быстродействии и энергопотреблении, поэтому производите конфигурацию с умом.
Еще статьи по данной теме:
Помогла ли Вам статья?
In today’s post, we will share how to configure various basic Power Options; you can try to improve power efficiency that impacts battery life and the overall performance of your Windows 11/10 device. Let’s delve in.
What are Power Options in Windows 11/10
Power Options is a setting in the Windows Control Panel, under the Hardware and Sound category, that allows the user to adjust their power plan and power settings on their computer. In a nutshell, these are pretty handy options that allow you to set up and enjoy just the right performance and battery balance on your computer. By tweaking them, you can favor performance over battery life and vice versa. In addition, they are what enables you to switch between power plans, choose what closing the lid, and pressing the power button to lead to, react to a critical battery level, etc.
The Power Options we will be configuring are:
- Processor performance decrease threshold
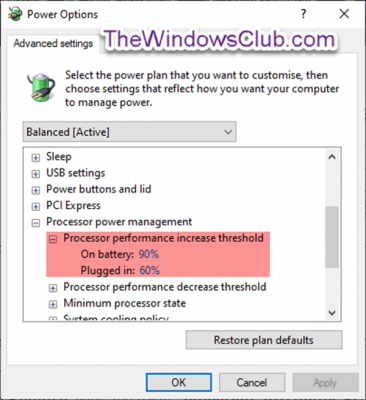
- Processor performance increase threshold
- Allow Away Mode Policy
- When sharing media
- Allow system required policy
- Allow sleep with remote opens
- System unattended sleep timeout
- USB 3 Link Power Management
- Hub Selective Suspend Timeout
- Allow display required policy
- Lid close action
- Lid open action
- AHCI Link Power Management – Adaptive
- Hard disk burst ignore time
- AHCI Link Power Management – HIPM/DIPM
- Video playback quality bias
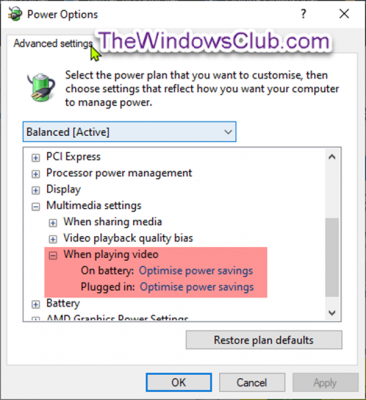
- When playing video
- Wireless Adapter Settings
- Networking connectivity in Standby
- Adaptive backlight
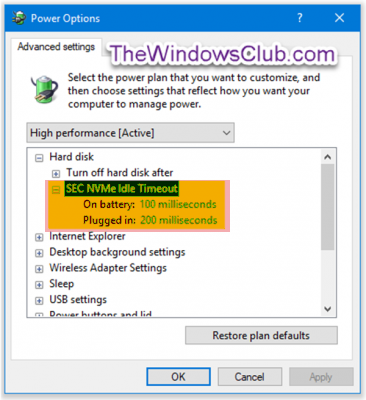
- SEC NVMe Idle Timeout
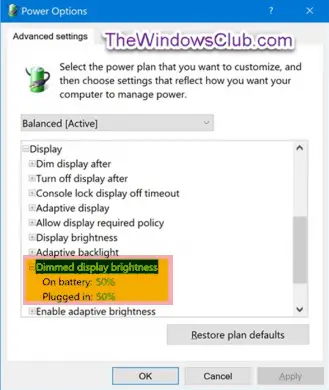
- Dimmed display brightness.
To access the Power Options for the Power Plan you wish to configure, right-click the battery icon on the notification area on the taskbar, select Power Options, on the window that pops up, click on Change plan settings for that Power Plan, then click Change advanced power settings.
Now let us see how to add or remove these Power Options in Windows 10.
1) Processor performance decrease threshold
The Processor performance decrease threshold setting in Power Options allows users to specify the lower busy threshold that must be met before decreasing the processor’s performance state (in percentage).

You must be signed in as an Administrator to add or remove this setting in Power Options.
Open an elevated command prompt and execute the following command:
To Add: Copy and paste the following and hit Enter:
- powercfg -attributes SUB_PROCESSOR 12a0ab44-fe28-4fa9-b3bd-4b64f44960a6 -ATTRIB_HIDE
To Remove: Copy and paste the following and hit Enter:
- powercfg -attributes SUB_PROCESSOR 12a0ab44-fe28-4fa9-b3bd-4b64f44960a6 +ATTRIB_HIDE
Exit the command prompt and restart your device.
2) Processor performance increase threshold
The Processor performance increase threshold setting in Power Options allows users to specify the lower busy threshold that must be met before increasing the processor’s performance state (in percentage).
Open an elevated command prompt and execute the following command:
To Add: Copy and paste the following and hit Enter:
- powercfg -attributes SUB_PROCESSOR 06cadf0e-64ed-448a-8927-ce7bf90eb35d -ATTRIB_HIDE
To Remove: Copy and paste the following and hit Enter:
- powercfg -attributes SUB_PROCESSOR 06cadf0e-64ed-448a-8927-ce7bf90eb35d +ATTRIB_HIDE
Exit command prompt and restart your device.
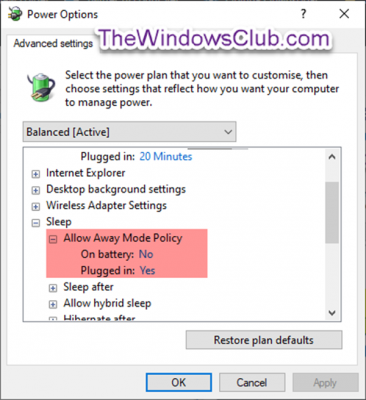
3) Allow Away Mode Policy
Away Mode does the following when invoked:
- Shuts down the video signal at the port.
- Mutes all system audio.
- Blocks HID and PS/2 input devices.
- Puts the CPU into “adaptive” mode, which may save power depending on what’s running.
- Notifies kernel-mode and user-mode components of the transition.
- Notifies the BIOS through an ACPI control method of the transition.
- Wakes back up when flash devices (USB FOB, Flash card) are inserted.
- Wakes back up when an optical disc is inserted in the drive.
The intention here is to provide a “user not present” state to the machine so you can walk away, knowing that your recording is going to happen (or not be interrupted) while not badgering the user with a screen, audio, etc. It is *not* intended to be a power management state.
The Allow Away Mode Policy setting in Power Options allows users to specify yes or no if away mode is to be enabled for your computer.
Open an elevated command prompt and execute the following command:
To Add: Copy and paste the following and hit Enter:
- powercfg -attributes SUB_SLEEP 25DFA149-5DD1-4736-B5AB-E8A37B5B8187 -ATTRIB_HIDE
To Remove: Copy and paste the following and hit Enter:
- powercfg -attributes SUB_SLEEP 25DFA149-5DD1-4736-B5AB-E8A37B5B8187 +ATTRIB_HIDE
Exit command prompt and restart your device.
Read: How to delete a Power Plan in Windows 10.
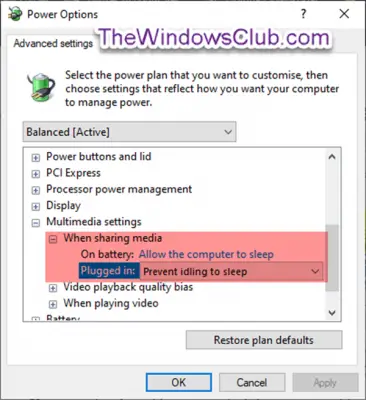
4) When sharing media
The When sharing media setting under Multimedia settings in Power Options allows users to specify what your computer does when a device or computer is playing media from your computer.
Users can specify the following actions below:
- Allow the computer to sleep = Devices and computers will not be able to play media from your computer while it sleeps.
- Prevent idling to sleep = Devices and computers will be able to play media from your computer unless you put it to sleep.
- Allow the computer to enter Away Mode = Devices and computers will be able to play media from your computer while it is in Away Mode.
Open an elevated command prompt and execute the following command:
To Add: Copy and paste the following and hit Enter:
- powercfg -attributes 9596FB26-9850-41fd-AC3E-F7C3C00AFD4B 03680956-93BC-4294-BBA6-4E0F09BB717F -ATTRIB_HIDE
To Remove: Copy and paste the following and hit Enter:
- powercfg -attributes 9596FB26-9850-41fd-AC3E-F7C3C00AFD4B 03680956-93BC-4294-BBA6-4E0F09BB717F +ATTRIB_HIDE
Exit command prompt and restart your computer.
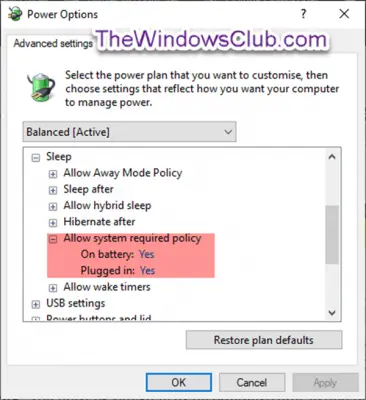
5) Allow system required policy
The Allow system required policy setting in Power Options allows users to specify yes (default) or no to allow programs to prevent the computer from going to sleep automatically.
Open an elevated command prompt and execute the following command:
To Add: Copy and paste the following and hit Enter:
- powercfg -attributes SUB_SLEEP A4B195F5-8225-47D8-8012-9D41369786E2 -ATTRIB_HIDE
To Remove: Copy and paste the following and hit Enter:
- powercfg -attributes SUB_SLEEP A4B195F5-8225-47D8-8012-9D41369786E2 +ATTRIB_HIDE
Exit command prompt and restart your computer.
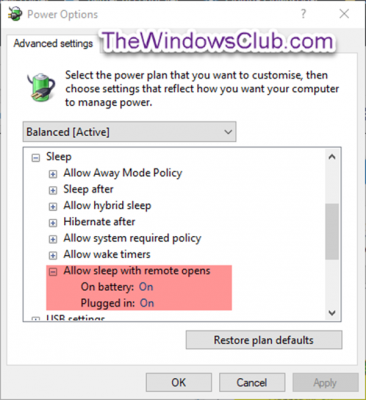
6) Allow sleep with remote opens
The Allow sleep with Remote Opens power setting configures the network file system to prevent the computer from automatically entering sleep when remote network files are open. This can allow your machine to go to sleep when files opened remotely have not been written to.
Allow sleep with remote opens is turned off and not available to change in Power Options by default in Windows.
Open an elevated command prompt and execute the following command:
To Add: Copy and paste the following and hit Enter:
- powercfg -attributes SUB_SLEEP d4c1d4c8-d5cc-43d3-b83e-fc51215cb04d -ATTRIB_HIDE
To Remove: Copy and paste the following and hit Enter:
- powercfg -attributes SUB_SLEEP d4c1d4c8-d5cc-43d3-b83e-fc51215cb04d +ATTRIB_HIDE
Exit command prompt and restart your computer.
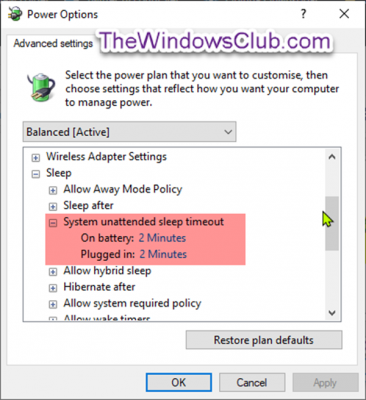
7) System unattended sleep timeout
The System unattended sleep timeout power setting is the idle timeout before the system returns to a low power sleep state after waking unattended.
System unattended sleep timeout is set to two minutes and not available to change in Power Options by default in Windows.
Open an elevated command prompt and execute the following command:
To Add: Copy and paste the following and hit Enter:
- powercfg -attributes SUB_SLEEP 7bc4a2f9-d8fc-4469-b07b-33eb785aaca0 -ATTRIB_HIDE
To Remove: Copy and paste the following and hit Enter:
- powercfg -attributes SUB_SLEEP 7bc4a2f9-d8fc-4469-b07b-33eb785aaca0 +ATTRIB_HIDE
Exit command prompt and restart your computer.
 USB 3 Link Power Management
 USB 3 Link Power Management
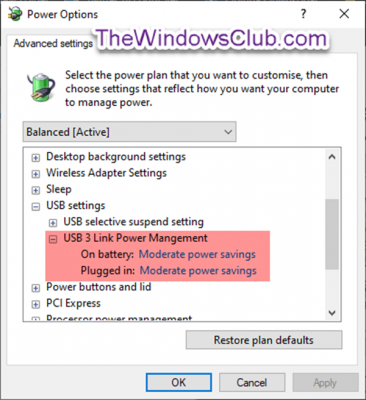
The USB 3 Link Power Management setting in Power Options allows users to specify the power management policy to use for USB 3 links when they are idle.
Users can specify one of the following policies:
- Off = Do not enable the U1 U2 states.
- Minimum power savings = Enable the U1 U2 states, but choose conservative timeout values to optimize for performance.
- Moderate power savings = Enable the U1 U2 states, and choose optimal timeout values to balance power and performance.
- Maximum power savings = Enable the U1 U2 states, and choose aggressive timeout values to optimize for power.
Open an elevated command prompt and execute the following command:
To Add: Copy and paste the following and hit Enter:
- powercfg -attributes 2a737441-1930-4402-8d77-b2bebba308a3 d4e98f31-5ffe-4ce1-be31-1b38b384c009 -ATTRIB_HIDE
To Remove: Copy and paste the following and hit Enter:
- powercfg -attributes 2a737441-1930-4402-8d77-b2bebba308a3 d4e98f31-5ffe-4ce1-be31-1b38b384c009 +ATTRIB_HIDE
Restart your computer.
9) USB Hub Selective Suspend Timeout
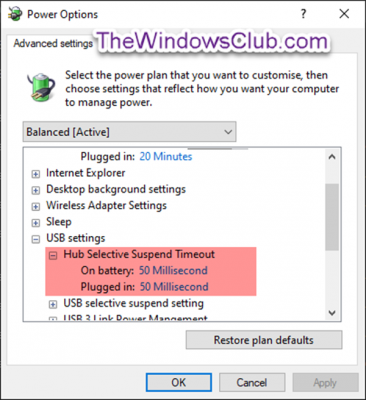
The USB Hub Selective Suspend Timeout setting in Power Options allows users to specify the idle timeouts in milliseconds for all USB hubs.
Open an elevated command prompt and execute the following command:
To Add: Copy and paste the following and hit Enter:
- powercfg -attributes 2a737441-1930-4402-8d77-b2bebba308a3 0853a681-27c8-4100-a2fd-82013e970683 -ATTRIB_HIDE
To Remove: Copy and paste the following and hit Enter:
- powercfg -attributes 2a737441-1930-4402-8d77-b2bebba308a3 0853a681-27c8-4100-a2fd-82013e970683 +ATTRIB_HIDE
Restart your computer.
10) Allow display required policy
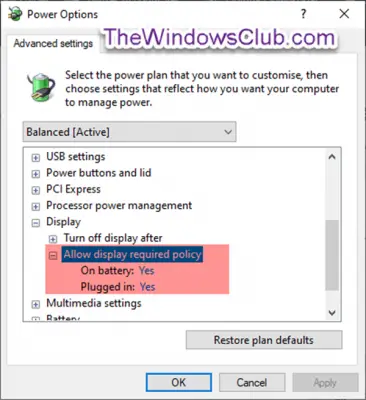
The Allow display required policy setting in Power Options allows users to specify whether Windows allows applications to temporarily prevent the display from automatically reducing brightness or turning off to save power.
Open an elevated command prompt and execute the following command:
To Add: Copy and paste the following and hit Enter:
- powercfg -attributes SUB_VIDEO A9CEB8DA-CD46-44FB-A98B-02AF69DE4623 -ATTRIB_HIDE
To Remove: Copy and paste the following and hit Enter:
- powercfg -attributes SUB_VIDEO A9CEB8DA-CD46-44FB-A98B-02AF69DE4623 +ATTRIB_HIDE
Restart your computer.
11) Lid close action
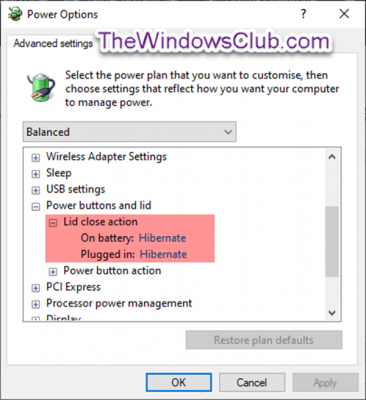
The Lid close action setting in Power Options lets users specify the default action to take when the laptop (system) lid is closed.
Users can specify one of the following actions to take:
- Do nothing
- Sleep
- Hibernate
- Shut down
This will not affect the When I close the lid setting in Power Options > Choose what the power buttons do (System Settings).
Open an elevated command prompt and execute the following command:
To Add: Copy and paste the following and hit Enter:
- powercfg -attributes SUB_BUTTONS 5ca83367-6e45-459f-a27b-476b1d01c936 -ATTRIB_HIDE
To Remove: Copy and paste the following and hit Enter:
- powercfg -attributes SUB_BUTTONS 5ca83367-6e45-459f-a27b-476b1d01c936 +ATTRIB_HIDE
Restart your computer.
12) Lid open action
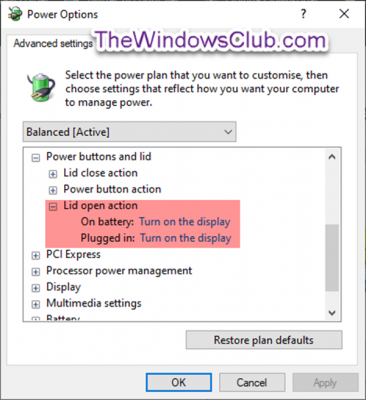
The Lid open action setting (if supported) in Power Options lets users specify the default action to take when the laptop (system) lid is opened.
Users can specify one of the following actions to take:
- Do nothing
- Turn on the display
Open an elevated command prompt and execute the following command:
To Add: Copy and paste the following and hit Enter:
- powercfg -attributes SUB_BUTTONS 99ff10e7-23b1-4c07-a9d1-5c3206d741b4 -ATTRIB_HIDE
To Remove: Copy and paste the following and hit Enter:
- powercfg -attributes SUB_BUTTONS 99ff10e7-23b1-4c07-a9d1-5c3206d741b4 +ATTRIB_HIDE
Restart your Windows computer.
13) AHCI Link Power Management – Adaptive
The AHCI Link Power Management – Adaptive setting in Power Options specifies the period of AHCI link idle time in milliseconds before the link is put into a Slumber state when Host-Initiated Power Management (HIPM) or Device-Initiated Power Management (DIPM) is enabled.
By default, AHCI Link Power Management – Adaptive is set to 0 (Only use partial state).

Open an elevated command prompt and execute the following command:
To Add: Copy and paste the following and hit Enter:
- powercfg -attributes SUB_DISK dab60367-53fe-4fbc-825e-521d069d2456 -ATTRIB_HIDE
To Remove: Copy and paste the following and hit Enter:
- powercfg -attributes SUB_DISK dab60367-53fe-4fbc-825e-521d069d2456 +ATTRIB_HIDE
Restart your Windows computer.
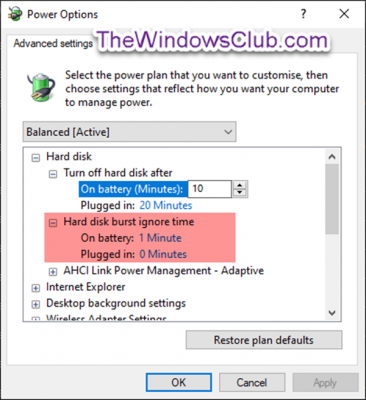
14) Hard disk burst ignore time
The Turn off hard disk after setting in Power Options lets users set to have hard disks (HDD) power down after a specified time of HDD inactivity is detected.
Having your HDDs automatically turned off after being idle can help save energy and extend a PC’s battery life.
Some Windows systems might exhibit very small amounts (bursts) of disk activity separated by relatively long amounts of disk idle time. This pattern of disk activity impacts system power savings because the disk is powered up periodically. The disk then remains in the spin-up state for at least the disk idle time out, even if the amount of disk activity that caused the disk to spin up is very small.
The Hard disk burst ignore time setting in Power Options lets users ignore this burst of disk activity up to a specified time when the Turn off hard disk after setting is determining if a hard disk is idle. By default, Hard disk burst ignore time is set to 0 (do not ignore disk burst activity).
Open an elevated command prompt and execute the following command:
To Add: Copy and paste the following and hit Enter:
- powercfg -attributes SUB_DISK 80e3c60e-bb94-4ad8-bbe0-0d3195efc663 -ATTRIB_HIDE
To Remove: Copy and paste the following and hit Enter:
- powercfg -attributes SUB_DISK 80e3c60e-bb94-4ad8-bbe0-0d3195efc663 +ATTRIB_HIDE
Restart your Windows computer.
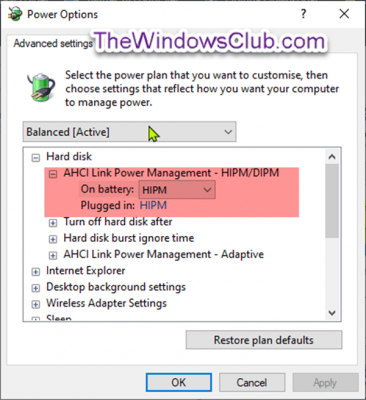
15) AHCI Link Power Management – HIPM/DIPM
The AHCI Link Power Management – HIPM/DIPM setting in Power Options allows users to configure the link power management mode for disk and storage devices that are attached to the system through an AHCI interface. AHCI Link Power Management is a technique where the SATA AHCI controller puts the SATA link to the internal HDD and SSD disk into a very low power mode when there.
You can use the following settings:
- Active = Neither HIPM or DIPM allowed. Link power management is not used.
- HIPM = HIPM (Host Initiated Link Power Management) only is allowed
- HIPM + DIPM = HIPM and DIPM are allowed
- DIPM = DIPM (Device Initiated Link Power Management) only is allowed
- Lowest = HIPM, DIPM, and DEVSLP (if DEVSLP is supported by the storage device) are allowed.
Open an elevated command prompt and execute the following command:
To Add: Copy and paste the following and hit Enter:
- powercfg -attributes SUB_DISK 0b2d69d7-a2a1-449c-9680-f91c70521c60 -ATTRIB_HIDE
To Remove: Copy and paste the following and hit Enter:
- powercfg -attributes SUB_DISK 0b2d69d7-a2a1-449c-9680-f91c70521c60 +ATTRIB_HIDE
Restart your Windows computer.
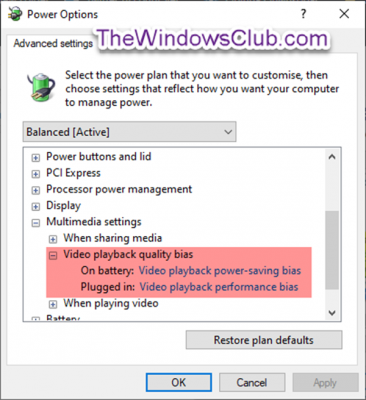
16) Video playback quality bias
The Video playback quality bias setting under Multimedia settings in Power Options allows users to specify the policy to bias video playback quality.
Users can specify the following policies below:
- Video playback power-saving bias = Video playback quality would be biased towards battery life.
- Video playback performance bias = Video playback quality would be biased towards performance.
Open an elevated command prompt and execute the following command:
To Add: Copy and paste the following and hit Enter:
- powercfg -attributes 9596FB26-9850-41fd-AC3E-F7C3C00AFD4B 10778347-1370-4ee0-8bbd-33bdacaade49 -ATTRIB_HIDE
To Remove: Copy and paste the following and hit Enter:
- powercfg -attributes 9596FB26-9850-41fd-AC3E-F7C3C00AFD4B 10778347-1370-4ee0-8bbd-33bdacaade49 +ATTRIB_HID
Restart your Windows computer.
17) When playing video
The When playing video setting under Multimedia settings in Power Options allows users to specify the power optimization mode used by your computer’s video playback pipeline.
Users can specify the following modes below:
- Optimize video quality = Gives the optimum video quality during playback.
- Balanced = A balance of video quality and power savings.
- Optimize power savings = Gives optimum power savings during playback.
Open an elevated command prompt and execute the following command:
To Add: Copy and paste the following and hit Enter:
- powercfg -attributes 9596FB26-9850-41fd-AC3E-F7C3C00AFD4B 34C7B99F-9A6D-4b3c-8DC7-B6693B78CEF4 -ATTRIB_HIDE
To Remove: Copy and paste the following and hit Enter:
- powercfg -attributes 9596FB26-9850-41fd-AC3E-F7C3C00AFD4B 34C7B99F-9A6D-4b3c-8DC7-B6693B78CEF4 +ATTRIB_HIDE
Restart your Windows computer.
18) Wireless Adapter Settings
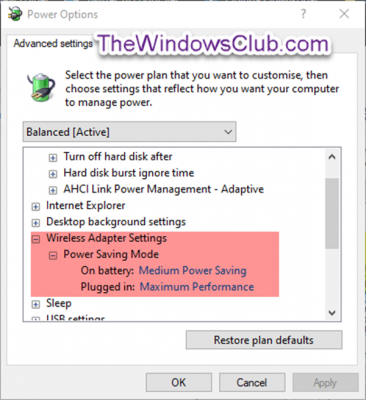
The Power Saving Mode setting under Wireless Adapter Settings in Power Options allows you to control the power-saving mode of wireless adapters.
The strength and performance of your wireless network will decrease as you increase power savings, but your battery life will increase.
There are four power saving modes available to select from:
- Maximum Performance = Achieve maximum wireless performance and no power savings.
- Low Power Saving = Achieve minimum power savings.
- Medium Power Saving = Balance between performance and power savings based on network traffic.
- Maximum Power Saving = Achieve maximum power savings.
Open an elevated command prompt and execute the following command:
To Add: Copy and paste the following and hit Enter:
- powercfg -attributes 19cbb8fa-5279-450e-9fac-8a3d5fedd0c1 12bbebe6-58d6-4636-95bb-3217ef867c1a -ATTRIB_HIDE
To Remove: Copy and paste the following and hit Enter:
- powercfg -attributes 19cbb8fa-5279-450e-9fac-8a3d5fedd0c1 12bbebe6-58d6-4636-95bb-3217ef867c1a +ATTRIB_HIDE
Restart your Windows computer.
19) Networking connectivity in Standby
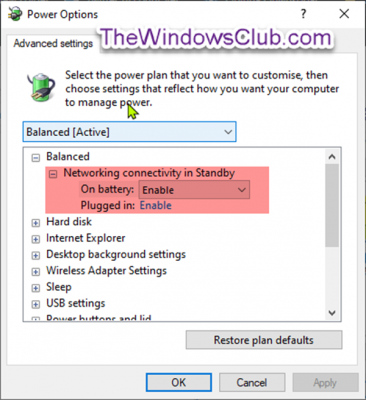
The Network connectivity in Standby setting in Power Options allows users to specify to enable (default), disable, or disable on lid close the network connection state in Standby.
Open an elevated command prompt and execute the following command:
To Add: Copy and paste the following and hit Enter:
- powercfg -attributes F15576E8-98B7-4186-B944-EAFA664402D9 -ATTRIB_HIDE
To Remove: Copy and paste the following and hit Enter:
- powercfg -attributes F15576E8-98B7-4186-B944-EAFA664402D9 +ATTRIB_HIDE
Restart your Windows computer.
20) Adaptive backlight
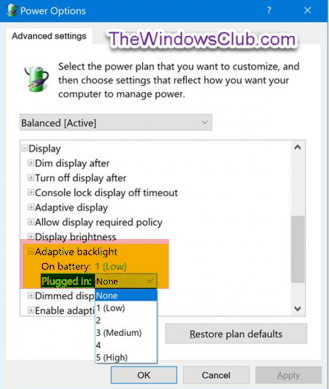
The Adaptive backlight setting in Power Options allows users to specify how to optimize the color and backlight of the display to extend battery life without affecting image brightness.
Open an elevated command prompt and execute the following command:
To Add: Copy and paste the following and hit Enter:
- powercfg -attributes SUB_VIDEO aded5e82-b909-4619-9949-f5d71dac0bcc -ATTRIB_HIDE
To Remove: Copy and paste the following and hit Enter:
- powercfg -attributes SUB_VIDEO aded5e82-b909-4619-9949-f5d71dac0bcc +ATTRIB_HIDE
Restart your computer.
21) SEC NVMe Idle Timeout
In the Windows 10 Creators Update version 1703 (build 15063) and later, the SEC NVMe Idle Timeout setting in Power Options lets users set to have NVMe devices power down after a specified time in milliseconds of inactivity is detected.
By default, SEC NVMe Idle Timeout is set to 100 milliseconds on battery, and 200 milliseconds plugged in.
Open an elevated command prompt and execute the following command:
To Add: Copy and paste the following and hit Enter:
- powercfg -attributes SUB_DISK 6b013a00-f775-4d61-9036-a62f7e7a6a5b -ATTRIB_HIDE
To Remove: Copy and paste the following and hit Enter:
- powercfg -attributes SUB_DISK 6b013a00-f775-4d61-9036-a62f7e7a6a5b +ATTRIB_HIDE
Restart your Windows computer.
22) Dimmed display brightness
The Dimmed display brightness setting in Power Options allows users to specify the brightness level in percentage for when your display is dimmed after the dim display after an idle timeout has been reached. This setting applies only to portable computers (e.g. laptop or tablet) that support Windows control of the brightness level of an integrated display device.
Open an elevated command prompt and execute the following command:
To Add: Copy and paste the following and hit Enter:
- powercfg -attributes SUB_VIDEO f1fbfde2-a960-4165-9f88-50667911ce96 -ATTRIB_HIDE
To Remove: Copy and paste the following and hit Enter:
- powercfg -attributes SUB_VIDEO f1fbfde2-a960-4165-9f88-50667911ce96 +ATTRIB_HIDE
Restart your computer.
I hope you’ll find these configurations useful.
In today’s post, we will share how to configure various basic Power Options; you can try to improve power efficiency that impacts battery life and the overall performance of your Windows 11/10 device. Let’s delve in.
What are Power Options in Windows 11/10
Power Options is a setting in the Windows Control Panel, under the Hardware and Sound category, that allows the user to adjust their power plan and power settings on their computer. In a nutshell, these are pretty handy options that allow you to set up and enjoy just the right performance and battery balance on your computer. By tweaking them, you can favor performance over battery life and vice versa. In addition, they are what enables you to switch between power plans, choose what closing the lid, and pressing the power button to lead to, react to a critical battery level, etc.
The Power Options we will be configuring are:
- Processor performance decrease threshold
- Processor performance increase threshold
- Allow Away Mode Policy
- When sharing media
- Allow system required policy
- Allow sleep with remote opens
- System unattended sleep timeout
- USB 3 Link Power Management
- Hub Selective Suspend Timeout
- Allow display required policy
- Lid close action
- Lid open action
- AHCI Link Power Management – Adaptive
- Hard disk burst ignore time
- AHCI Link Power Management – HIPM/DIPM
- Video playback quality bias
- When playing video
- Wireless Adapter Settings
- Networking connectivity in Standby
- Adaptive backlight
- SEC NVMe Idle Timeout
- Dimmed display brightness.
To access the Power Options for the Power Plan you wish to configure, right-click the battery icon on the notification area on the taskbar, select Power Options, on the window that pops up, click on Change plan settings for that Power Plan, then click Change advanced power settings.
Now let us see how to add or remove these Power Options in Windows 10.
1) Processor performance decrease threshold
The Processor performance decrease threshold setting in Power Options allows users to specify the lower busy threshold that must be met before decreasing the processor’s performance state (in percentage).
You must be signed in as an Administrator to add or remove this setting in Power Options.
Open an elevated command prompt and execute the following command:
To Add: Copy and paste the following and hit Enter:
- powercfg -attributes SUB_PROCESSOR 12a0ab44-fe28-4fa9-b3bd-4b64f44960a6 -ATTRIB_HIDE
To Remove: Copy and paste the following and hit Enter:
- powercfg -attributes SUB_PROCESSOR 12a0ab44-fe28-4fa9-b3bd-4b64f44960a6 +ATTRIB_HIDE
Exit the command prompt and restart your device.
2) Processor performance increase threshold
The Processor performance increase threshold setting in Power Options allows users to specify the lower busy threshold that must be met before increasing the processor’s performance state (in percentage).
Open an elevated command prompt and execute the following command:
To Add: Copy and paste the following and hit Enter:
- powercfg -attributes SUB_PROCESSOR 06cadf0e-64ed-448a-8927-ce7bf90eb35d -ATTRIB_HIDE
To Remove: Copy and paste the following and hit Enter:
- powercfg -attributes SUB_PROCESSOR 06cadf0e-64ed-448a-8927-ce7bf90eb35d +ATTRIB_HIDE
Exit command prompt and restart your device.
3) Allow Away Mode Policy
Away Mode does the following when invoked:
- Shuts down the video signal at the port.
- Mutes all system audio.
- Blocks HID and PS/2 input devices.
- Puts the CPU into “adaptive” mode, which may save power depending on what’s running.
- Notifies kernel-mode and user-mode components of the transition.
- Notifies the BIOS through an ACPI control method of the transition.
- Wakes back up when flash devices (USB FOB, Flash card) are inserted.
- Wakes back up when an optical disc is inserted in the drive.
The intention here is to provide a “user not present” state to the machine so you can walk away, knowing that your recording is going to happen (or not be interrupted) while not badgering the user with a screen, audio, etc. It is *not* intended to be a power management state.
The Allow Away Mode Policy setting in Power Options allows users to specify yes or no if away mode is to be enabled for your computer.
Open an elevated command prompt and execute the following command:
To Add: Copy and paste the following and hit Enter:
- powercfg -attributes SUB_SLEEP 25DFA149-5DD1-4736-B5AB-E8A37B5B8187 -ATTRIB_HIDE
To Remove: Copy and paste the following and hit Enter:
- powercfg -attributes SUB_SLEEP 25DFA149-5DD1-4736-B5AB-E8A37B5B8187 +ATTRIB_HIDE
Exit command prompt and restart your device.
Read: How to delete a Power Plan in Windows 10.
4) When sharing media
The When sharing media setting under Multimedia settings in Power Options allows users to specify what your computer does when a device or computer is playing media from your computer.
Users can specify the following actions below:
- Allow the computer to sleep = Devices and computers will not be able to play media from your computer while it sleeps.
- Prevent idling to sleep = Devices and computers will be able to play media from your computer unless you put it to sleep.
- Allow the computer to enter Away Mode = Devices and computers will be able to play media from your computer while it is in Away Mode.
Open an elevated command prompt and execute the following command:
To Add: Copy and paste the following and hit Enter:
- powercfg -attributes 9596FB26-9850-41fd-AC3E-F7C3C00AFD4B 03680956-93BC-4294-BBA6-4E0F09BB717F -ATTRIB_HIDE
To Remove: Copy and paste the following and hit Enter:
- powercfg -attributes 9596FB26-9850-41fd-AC3E-F7C3C00AFD4B 03680956-93BC-4294-BBA6-4E0F09BB717F +ATTRIB_HIDE
Exit command prompt and restart your computer.
5) Allow system required policy
The Allow system required policy setting in Power Options allows users to specify yes (default) or no to allow programs to prevent the computer from going to sleep automatically.
Open an elevated command prompt and execute the following command:
To Add: Copy and paste the following and hit Enter:
- powercfg -attributes SUB_SLEEP A4B195F5-8225-47D8-8012-9D41369786E2 -ATTRIB_HIDE
To Remove: Copy and paste the following and hit Enter:
- powercfg -attributes SUB_SLEEP A4B195F5-8225-47D8-8012-9D41369786E2 +ATTRIB_HIDE
Exit command prompt and restart your computer.
6) Allow sleep with remote opens
The Allow sleep with Remote Opens power setting configures the network file system to prevent the computer from automatically entering sleep when remote network files are open. This can allow your machine to go to sleep when files opened remotely have not been written to.
Allow sleep with remote opens is turned off and not available to change in Power Options by default in Windows.
Open an elevated command prompt and execute the following command:
To Add: Copy and paste the following and hit Enter:
- powercfg -attributes SUB_SLEEP d4c1d4c8-d5cc-43d3-b83e-fc51215cb04d -ATTRIB_HIDE
To Remove: Copy and paste the following and hit Enter:
- powercfg -attributes SUB_SLEEP d4c1d4c8-d5cc-43d3-b83e-fc51215cb04d +ATTRIB_HIDE
Exit command prompt and restart your computer.
7) System unattended sleep timeout
The System unattended sleep timeout power setting is the idle timeout before the system returns to a low power sleep state after waking unattended.
System unattended sleep timeout is set to two minutes and not available to change in Power Options by default in Windows.
Open an elevated command prompt and execute the following command:
To Add: Copy and paste the following and hit Enter:
- powercfg -attributes SUB_SLEEP 7bc4a2f9-d8fc-4469-b07b-33eb785aaca0 -ATTRIB_HIDE
To Remove: Copy and paste the following and hit Enter:
- powercfg -attributes SUB_SLEEP 7bc4a2f9-d8fc-4469-b07b-33eb785aaca0 +ATTRIB_HIDE
Exit command prompt and restart your computer.
USB 3 Link Power Management
The USB 3 Link Power Management setting in Power Options allows users to specify the power management policy to use for USB 3 links when they are idle.
Users can specify one of the following policies:
- Off = Do not enable the U1 U2 states.
- Minimum power savings = Enable the U1 U2 states, but choose conservative timeout values to optimize for performance.
- Moderate power savings = Enable the U1 U2 states, and choose optimal timeout values to balance power and performance.
- Maximum power savings = Enable the U1 U2 states, and choose aggressive timeout values to optimize for power.
Open an elevated command prompt and execute the following command:
To Add: Copy and paste the following and hit Enter:
- powercfg -attributes 2a737441-1930-4402-8d77-b2bebba308a3 d4e98f31-5ffe-4ce1-be31-1b38b384c009 -ATTRIB_HIDE
To Remove: Copy and paste the following and hit Enter:
- powercfg -attributes 2a737441-1930-4402-8d77-b2bebba308a3 d4e98f31-5ffe-4ce1-be31-1b38b384c009 +ATTRIB_HIDE
Restart your computer.
9) USB Hub Selective Suspend Timeout
The USB Hub Selective Suspend Timeout setting in Power Options allows users to specify the idle timeouts in milliseconds for all USB hubs.
Open an elevated command prompt and execute the following command:
To Add: Copy and paste the following and hit Enter:
- powercfg -attributes 2a737441-1930-4402-8d77-b2bebba308a3 0853a681-27c8-4100-a2fd-82013e970683 -ATTRIB_HIDE
To Remove: Copy and paste the following and hit Enter:
- powercfg -attributes 2a737441-1930-4402-8d77-b2bebba308a3 0853a681-27c8-4100-a2fd-82013e970683 +ATTRIB_HIDE
Restart your computer.
10) Allow display required policy
The Allow display required policy setting in Power Options allows users to specify whether Windows allows applications to temporarily prevent the display from automatically reducing brightness or turning off to save power.
Open an elevated command prompt and execute the following command:
To Add: Copy and paste the following and hit Enter:
- powercfg -attributes SUB_VIDEO A9CEB8DA-CD46-44FB-A98B-02AF69DE4623 -ATTRIB_HIDE
To Remove: Copy and paste the following and hit Enter:
- powercfg -attributes SUB_VIDEO A9CEB8DA-CD46-44FB-A98B-02AF69DE4623 +ATTRIB_HIDE
Restart your computer.
11) Lid close action
The Lid close action setting in Power Options lets users specify the default action to take when the laptop (system) lid is closed.
Users can specify one of the following actions to take:
- Do nothing
- Sleep
- Hibernate
- Shut down
This will not affect the When I close the lid setting in Power Options > Choose what the power buttons do (System Settings).
Open an elevated command prompt and execute the following command:
To Add: Copy and paste the following and hit Enter:
- powercfg -attributes SUB_BUTTONS 5ca83367-6e45-459f-a27b-476b1d01c936 -ATTRIB_HIDE
To Remove: Copy and paste the following and hit Enter:
- powercfg -attributes SUB_BUTTONS 5ca83367-6e45-459f-a27b-476b1d01c936 +ATTRIB_HIDE
Restart your computer.
12) Lid open action
The Lid open action setting (if supported) in Power Options lets users specify the default action to take when the laptop (system) lid is opened.
Users can specify one of the following actions to take:
- Do nothing
- Turn on the display
Open an elevated command prompt and execute the following command:
To Add: Copy and paste the following and hit Enter:
- powercfg -attributes SUB_BUTTONS 99ff10e7-23b1-4c07-a9d1-5c3206d741b4 -ATTRIB_HIDE
To Remove: Copy and paste the following and hit Enter:
- powercfg -attributes SUB_BUTTONS 99ff10e7-23b1-4c07-a9d1-5c3206d741b4 +ATTRIB_HIDE
Restart your Windows computer.
13) AHCI Link Power Management – Adaptive
The AHCI Link Power Management – Adaptive setting in Power Options specifies the period of AHCI link idle time in milliseconds before the link is put into a Slumber state when Host-Initiated Power Management (HIPM) or Device-Initiated Power Management (DIPM) is enabled.
By default, AHCI Link Power Management – Adaptive is set to 0 (Only use partial state).
Open an elevated command prompt and execute the following command:
To Add: Copy and paste the following and hit Enter:
- powercfg -attributes SUB_DISK dab60367-53fe-4fbc-825e-521d069d2456 -ATTRIB_HIDE
To Remove: Copy and paste the following and hit Enter:
- powercfg -attributes SUB_DISK dab60367-53fe-4fbc-825e-521d069d2456 +ATTRIB_HIDE
Restart your Windows computer.
14) Hard disk burst ignore time
The Turn off hard disk after setting in Power Options lets users set to have hard disks (HDD) power down after a specified time of HDD inactivity is detected.
Having your HDDs automatically turned off after being idle can help save energy and extend a PC’s battery life.
Some Windows systems might exhibit very small amounts (bursts) of disk activity separated by relatively long amounts of disk idle time. This pattern of disk activity impacts system power savings because the disk is powered up periodically. The disk then remains in the spin-up state for at least the disk idle time out, even if the amount of disk activity that caused the disk to spin up is very small.
The Hard disk burst ignore time setting in Power Options lets users ignore this burst of disk activity up to a specified time when the Turn off hard disk after setting is determining if a hard disk is idle. By default, Hard disk burst ignore time is set to 0 (do not ignore disk burst activity).
Open an elevated command prompt and execute the following command:
To Add: Copy and paste the following and hit Enter:
- powercfg -attributes SUB_DISK 80e3c60e-bb94-4ad8-bbe0-0d3195efc663 -ATTRIB_HIDE
To Remove: Copy and paste the following and hit Enter:
- powercfg -attributes SUB_DISK 80e3c60e-bb94-4ad8-bbe0-0d3195efc663 +ATTRIB_HIDE
Restart your Windows computer.
15) AHCI Link Power Management – HIPM/DIPM
The AHCI Link Power Management – HIPM/DIPM setting in Power Options allows users to configure the link power management mode for disk and storage devices that are attached to the system through an AHCI interface. AHCI Link Power Management is a technique where the SATA AHCI controller puts the SATA link to the internal HDD and SSD disk into a very low power mode when there.
You can use the following settings:
- Active = Neither HIPM or DIPM allowed. Link power management is not used.
- HIPM = HIPM (Host Initiated Link Power Management) only is allowed
- HIPM + DIPM = HIPM and DIPM are allowed
- DIPM = DIPM (Device Initiated Link Power Management) only is allowed
- Lowest = HIPM, DIPM, and DEVSLP (if DEVSLP is supported by the storage device) are allowed.
Open an elevated command prompt and execute the following command:
To Add: Copy and paste the following and hit Enter:
- powercfg -attributes SUB_DISK 0b2d69d7-a2a1-449c-9680-f91c70521c60 -ATTRIB_HIDE
To Remove: Copy and paste the following and hit Enter:
- powercfg -attributes SUB_DISK 0b2d69d7-a2a1-449c-9680-f91c70521c60 +ATTRIB_HIDE
Restart your Windows computer.
16) Video playback quality bias
The Video playback quality bias setting under Multimedia settings in Power Options allows users to specify the policy to bias video playback quality.
Users can specify the following policies below:
- Video playback power-saving bias = Video playback quality would be biased towards battery life.
- Video playback performance bias = Video playback quality would be biased towards performance.
Open an elevated command prompt and execute the following command:
To Add: Copy and paste the following and hit Enter:
- powercfg -attributes 9596FB26-9850-41fd-AC3E-F7C3C00AFD4B 10778347-1370-4ee0-8bbd-33bdacaade49 -ATTRIB_HIDE
To Remove: Copy and paste the following and hit Enter:
- powercfg -attributes 9596FB26-9850-41fd-AC3E-F7C3C00AFD4B 10778347-1370-4ee0-8bbd-33bdacaade49 +ATTRIB_HID
Restart your Windows computer.
17) When playing video
The When playing video setting under Multimedia settings in Power Options allows users to specify the power optimization mode used by your computer’s video playback pipeline.
Users can specify the following modes below:
- Optimize video quality = Gives the optimum video quality during playback.
- Balanced = A balance of video quality and power savings.
- Optimize power savings = Gives optimum power savings during playback.
Open an elevated command prompt and execute the following command:
To Add: Copy and paste the following and hit Enter:
- powercfg -attributes 9596FB26-9850-41fd-AC3E-F7C3C00AFD4B 34C7B99F-9A6D-4b3c-8DC7-B6693B78CEF4 -ATTRIB_HIDE
To Remove: Copy and paste the following and hit Enter:
- powercfg -attributes 9596FB26-9850-41fd-AC3E-F7C3C00AFD4B 34C7B99F-9A6D-4b3c-8DC7-B6693B78CEF4 +ATTRIB_HIDE
Restart your Windows computer.
18) Wireless Adapter Settings
The Power Saving Mode setting under Wireless Adapter Settings in Power Options allows you to control the power-saving mode of wireless adapters.
The strength and performance of your wireless network will decrease as you increase power savings, but your battery life will increase.
There are four power saving modes available to select from:
- Maximum Performance = Achieve maximum wireless performance and no power savings.
- Low Power Saving = Achieve minimum power savings.
- Medium Power Saving = Balance between performance and power savings based on network traffic.
- Maximum Power Saving = Achieve maximum power savings.
Open an elevated command prompt and execute the following command:
To Add: Copy and paste the following and hit Enter:
- powercfg -attributes 19cbb8fa-5279-450e-9fac-8a3d5fedd0c1 12bbebe6-58d6-4636-95bb-3217ef867c1a -ATTRIB_HIDE
To Remove: Copy and paste the following and hit Enter:
- powercfg -attributes 19cbb8fa-5279-450e-9fac-8a3d5fedd0c1 12bbebe6-58d6-4636-95bb-3217ef867c1a +ATTRIB_HIDE
Restart your Windows computer.
19) Networking connectivity in Standby
The Network connectivity in Standby setting in Power Options allows users to specify to enable (default), disable, or disable on lid close the network connection state in Standby.
Open an elevated command prompt and execute the following command:
To Add: Copy and paste the following and hit Enter:
- powercfg -attributes F15576E8-98B7-4186-B944-EAFA664402D9 -ATTRIB_HIDE
To Remove: Copy and paste the following and hit Enter:
- powercfg -attributes F15576E8-98B7-4186-B944-EAFA664402D9 +ATTRIB_HIDE
Restart your Windows computer.
20) Adaptive backlight
The Adaptive backlight setting in Power Options allows users to specify how to optimize the color and backlight of the display to extend battery life without affecting image brightness.
Open an elevated command prompt and execute the following command:
To Add: Copy and paste the following and hit Enter:
- powercfg -attributes SUB_VIDEO aded5e82-b909-4619-9949-f5d71dac0bcc -ATTRIB_HIDE
To Remove: Copy and paste the following and hit Enter:
- powercfg -attributes SUB_VIDEO aded5e82-b909-4619-9949-f5d71dac0bcc +ATTRIB_HIDE
Restart your computer.
21) SEC NVMe Idle Timeout
In the Windows 10 Creators Update version 1703 (build 15063) and later, the SEC NVMe Idle Timeout setting in Power Options lets users set to have NVMe devices power down after a specified time in milliseconds of inactivity is detected.
By default, SEC NVMe Idle Timeout is set to 100 milliseconds on battery, and 200 milliseconds plugged in.
Open an elevated command prompt and execute the following command:
To Add: Copy and paste the following and hit Enter:
- powercfg -attributes SUB_DISK 6b013a00-f775-4d61-9036-a62f7e7a6a5b -ATTRIB_HIDE
To Remove: Copy and paste the following and hit Enter:
- powercfg -attributes SUB_DISK 6b013a00-f775-4d61-9036-a62f7e7a6a5b +ATTRIB_HIDE
Restart your Windows computer.
22) Dimmed display brightness
The Dimmed display brightness setting in Power Options allows users to specify the brightness level in percentage for when your display is dimmed after the dim display after an idle timeout has been reached. This setting applies only to portable computers (e.g. laptop or tablet) that support Windows control of the brightness level of an integrated display device.
Open an elevated command prompt and execute the following command:
To Add: Copy and paste the following and hit Enter:
- powercfg -attributes SUB_VIDEO f1fbfde2-a960-4165-9f88-50667911ce96 -ATTRIB_HIDE
To Remove: Copy and paste the following and hit Enter:
- powercfg -attributes SUB_VIDEO f1fbfde2-a960-4165-9f88-50667911ce96 +ATTRIB_HIDE
Restart your computer.
I hope you’ll find these configurations useful.
На чтение 5 мин. Просмотров 8.1k. Опубликовано 03.09.2019
Содержание
- Исчезли планы электропитания Windows 10, как мне их вернуть?
- ИСПРАВЛЕНИЕ: планы электропитания Windows 10 не отображаются
- Используйте инструмент Powercfg
- Создать план питания
- Восстановление планов электропитания по умолчанию
- Импортировать план питания
- Проверьте настройки электропитания
- Запустите средство устранения неполадок питания
- Изменить настройки реестра
Исчезли планы электропитания Windows 10, как мне их вернуть?
- Используйте инструмент Powercfg
- Создать план питания
- Восстановление планов электропитания по умолчанию
- Импорт плана электропитания
- Проверьте настройки параметров питания
- Запустите средство устранения неполадок питания
- Изменить настройки реестра
В Windows план электропитания – это набор аппаратных и системных параметров, который определяет, как питание используется и сохраняется вашим устройством.
Три встроенных плана питания: Сбалансированный , Энергосбережение и Высокая производительность . Все они могут быть настроены для ваших систем, или вы можете создавать новые планы на основе существующих, или совершенно новый план электропитания с нуля.
Сбалансированный план обеспечивает полную производительность при необходимости и экономит электроэнергию, когда она вам не нужна. Энергосбережение, с другой стороны, экономит электроэнергию за счет снижения производительности и яркости экрана. Высокая производительность увеличивает яркость экрана и повышает производительность; он использует больше энергии.
Есть еще один план питания: максимальная производительность. Это доступно по умолчанию только в версии Windows 10 Pro для рабочих станций, начиная со сборки 17101, для максимальной производительности на компьютерах более высокого уровня.
Любые изменения, внесенные в параметры любой схемы электропитания, влияют на всех пользователей, которые выбрали тот же план, что и их схема электропитания по умолчанию.
В Windows 10 новый пользовательский интерфейс позволяет изменять параметры, связанные с питанием. Классическая панель управления теряет свои функции и может быть полностью заменена приложением «Настройки», которое уже имеет большинство настроек из панели управления.
Однако в настройках еще нет возможности удалить план электропитания, поэтому вы все еще застряли в панели управления.
- СВЯЗАННЫЕ: Как отключить Ultimate Performance Plan в Windows 10
Несмотря на то, что все это сказано и сделано, иногда, к большому разочарованию, вы можете заметить, что в параметрах электропитания один или несколько планов электропитания пропадают. Возможно, вы даже искали в Интернете решения, и ни одно из них не помогло восстановить планы электропитания.
Вот некоторые решения, которые вы можете попробовать, которые помогут вам вернуть отсутствующие схемы питания для Windows 10.
ИСПРАВЛЕНИЕ: планы электропитания Windows 10 не отображаются
Используйте инструмент Powercfg
- Откройте команду с повышенными правами или PowerShell.
- Нажмите клавишу Windows и найдите CMD или Windows PowerShell
- Если отображается какой-либо результат, щелкните правой кнопкой мыши и выберите «Запуск от имени администратора».

- Скачать файл PowerPlans.zip
- Извлеките планы на рабочий стол или загрузите папку. У вас будет папка «Планы электропитания» с тремя планами резервного копирования
- В приглашении с повышенными привилегиями используйте встроенный в Windows инструмент Powercfg для импорта отсутствующих планов электропитания Windows 10
- Используйте командную строку: powercfg -import «pathtopowerplan.pow для каждого плана следующим образом:
- powercfg -import «C: UsersUSERDesktopPowerplanHigh Performance.pow
- powercfg -import «C: UsersUSERDesktopPower PlanPower Power Power.pow
- powercfg -import «C: UsersUSERDesktopPowerplanBalanced.pow
- Возможно, вам не нужно перезагружать компьютер, поскольку все параметры питания могли быть сразу доступны, поэтому проверьте панель управления.
- Нажмите клавишу Windows и найдите Power Plan
- Выберите «Выбрать схему электропитания» в результатах поиска.
- Зайдите в настройки и убедитесь сами. Изменение планов электропитания сделано Microsoft специально. Импортированные планы не будут импортированы по умолчанию, и вы можете удалить их. Идея заключалась в том, чтобы импортировать планы с исходными настройками по умолчанию
Создать план питания
- Щелкните правой кнопкой мыши Пуск
- Выберите Параметры питания .

- Нажмите ссылку Дополнительные параметры питания в области Связанные настройки .

- Нажмите ссылку Создать план питания .
- Выберите Высокая производительность .
- Укажите название для вашего нового плана
-
Нажмите Далее :
Выберите тайм-ауты для спящего режима и выберите нужный режим. - Нажмите Создать . Новый план питания будет добавлен и активирован:
- Чтобы настроить его, нажмите ссылку Изменить настройки плана .
- Нажмите Изменить дополнительные параметры питания . В этом окне вы можете настроить все настройки, которые вам не нравятся, на значения по умолчанию.
- Нажмите OK
– СВЯЗАННО: ИСПРАВЛЕНИЕ: План электропитания постоянно меняется в Windows 10, 8, 7
Восстановление планов электропитания по умолчанию
- Откройте командную строку с повышенными правами

- Чтобы восстановить схему энергосбережения, используйте команду: powercfg.exe -duplicatescheme a1841308-3541-4fab-bc81-f71556f20b4a
- Чтобы восстановить сбалансированную схему, используйте команду: exe -duplicatescheme 381b4222-f694-41f0-9685-ff5bb260df2e
- Чтобы восстановить схему высокой производительности, используйте команду: exe -duplicatescheme 8c5e7fda-e8bf-4a96-9a85-a6e23a8c635c
- Чтобы восстановить схему высокой производительности, используйте команду: exe -duplicatescheme e9a42b02-d5df-448d-aa00-03f14749eb61
Импортировать план питания
- Откройте командную строку с повышенными правами
- Введите следующую команду: powercfg -import «Полный путь к вашему файлу .pow
- Укажите правильный путь к вашему *. Pow файлу .
- Выход из командной строки
Проверьте настройки электропитания
Если вы обнаружите, что в Windows 10 отсутствуют схемы электропитания, проверьте следующее:
- Нажмите Пуск
- Выберите Настройки .

- Выберите Система .
- Нажмите Power Options
Проверьте, есть ли ваши планы питания. Он включает в себя ссылку «Дополнительные параметры питания» в разделе «Связанные параметры».
– СВЯЗАННЫЕ: Исправлено: мы обнаружили одну или несколько настроек, которые могут повлиять на срок службы батареи
Запустите средство устранения неполадок питания
- Нажмите Пуск и введите Поиск неисправностей в поле поиска, нажмите Enter
- В окне устранения неполадок нажмите «Просмотреть все».
- Нажмите Power
- Нажмите Дополнительно
- Нажмите «Запуск от имени администратора».
- Нажмите Далее и следуйте инструкциям, чтобы завершить процесс
Изменить настройки реестра
- Щелкните правой кнопкой мыши Пуск
- Выберите Run
- Введите regedit и нажмите Enter, чтобы открыть редактор реестра
- Перейдите в папку HKEY_LOCAL_MACHINESYSTEMCurrentControlSetControlPower .
- Справа отметьте один из ключей с именем CsEnabled
- Нажмите на этот ключ
- Измените значение с 1 на 0
- Перезагрузите компьютер
- Проверьте, вернулись ли ваши планы питания
Помогло ли какое-либо из этих решений восстановить отсутствующие схемы электропитания в Windows 10? Дайте нам знать в поле для комментариев ниже.