
Microsoft попыталась продвинуть платформу UWP для приложений Windows, но настольные приложения остаются доминирующим типом приложений Windows 10. Такие приложения, как VLC player и Spotify, имеют как настольную версию, так и версию UWP. Microsoft не заставляла разработчиков выбирать UWP и отказываться от настольных приложений. Аналогичным образом, в Windows 11 все приложения, которые могут работать в Windows 10, 8 / 8.1 и 7, совместимы с новой ОС. Единственным исключением пока является VirtualBox от Oracle.
Oracle VritualBox — популярный бесплатный инструмент для виртуальных машин, который широко используется. Это мощно и намного лучше, чем многие платные альтернативы. К сожалению, большинство пользователей, которые пытаются запустить VirtualBox в Window 11, не могут запустить виртуальную машину. Само приложение отлично устанавливается в Windows 11, но когда дело доходит до загрузки и запуска виртуальной машины, машина не запускается.
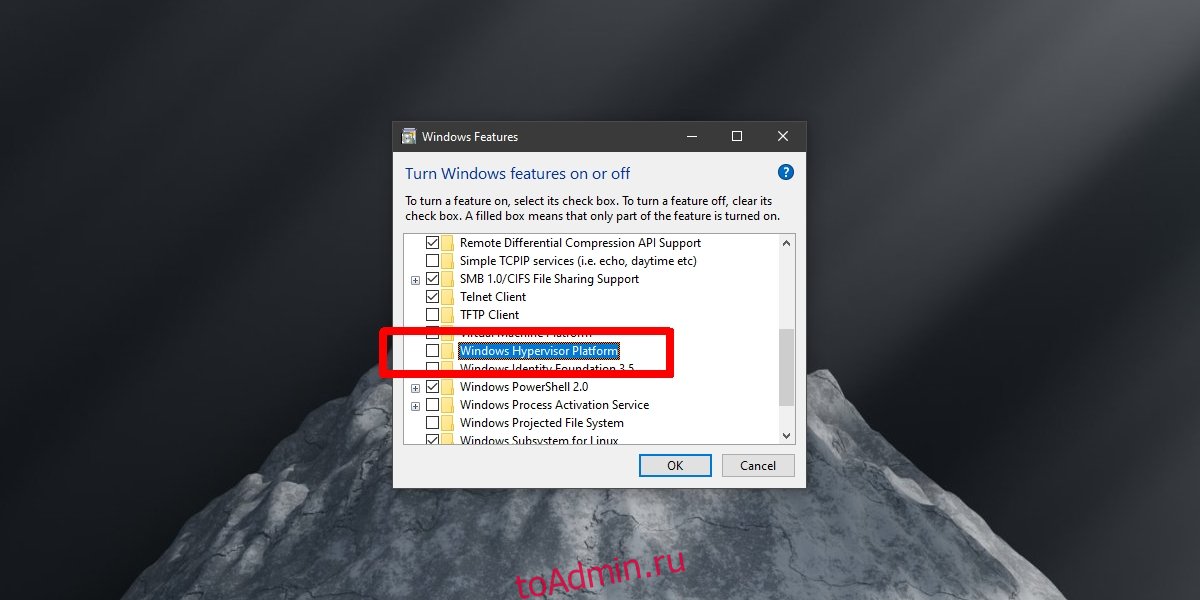
1. Отключите Hyper-V в Windows 11
Microsoft признала, что существует проблема с VirtualBox, работающим в Windows 11. Чтобы обойти ее, пользователям необходимо отключить Hyper-V в своей системе.
Чтобы отключить Hyper-V в Windows 11, выполните следующие действия.
Откройте Панель управления.
Зайдите в «Программы».
Выберите Включить или отключить функции Windows.
В списке функций снимите флажок Hyper-V.
Щелкните ОК.
Примечание. Если вы не видите Hyper-V, поищите вместо него платформу гипервизора Windows или песочницу Windows и отключите ее.
2. Дождитесь обновления VirtualBox.
Проблема совместимости VirtualBox находится на стороне Oracle. Это означает, что Oracle должна выпустить новую версию VirtualBox, и эта новая версия должна решить проблему совместимости. Oracle работает над обновлением, но на данный момент нет даты, когда это исправление будет выпущено.
Как только обновление станет доступным, только последующие версии будут работать в Windows 11, что означает, что вам может потребоваться обновить настройки ваших виртуальных машин, чтобы они могли работать в последней версии.
3. Удалите VirtualBox.
Если вы не используете VirtualBox, вы можете удалить приложение и перейти на Windows 11 без каких-либо проблем. Если вы нашли альтернативу VirtualBox, которая соответствует вашим потребностям, можно безопасно удалить приложение из вашей системы, а затем выполнить обновление. В настоящее время Microsoft блокирует обновление систем, на которых работает VirtualBox.
Откройте Панель управления.
Перейдите в «Программы»> «Удалить программу».
Выберите VirtualBox из списка установленных приложений.
Щелкните кнопку Удалить.
Разрешите приложению удалить.
Заключение
Microsoft не блокировала VirtualBox в Windows 11. Это простая проблема совместимости приложений. Это можно исправить при обновлении приложения, и это не требует внесения каких-либо радикальных изменений или следования новым правилам разработки. Oracle должна выпустить обновление в ближайшее время, учитывая, что пользователей Windows 11 не так много, компания может решить выпустить обновление позже, а не раньше.
Что вы думаете об этой статье?
Hyper-V — это собственная технология Microsoft, которая позволяет пользователям создавать виртуальные машины и управлять ими.
От создания и удаления виртуальных машин, резервного копирования, поддержания производительности и распределения ресурсов — этот чудесный инструмент делает все. Давайте посмотрим поближе.
Для чего используется Hyper-V?
- Переносимость. Виртуальные машины, работающие без физического компьютера, обеспечивают переносимость машин. Этот независимый характер гипервизора позволяет его пользователям работать с несколькими операционными системами на одном физическом компьютере и размещать приложения, подходящие для каждой операционной системы.
- Эффективность: несколько виртуальных машин могут работать только на одном физическом сервере, что снижает риск несоответствия аппаратных ресурсов требованиям приложений. Кроме того, было доказано, что это экономично и энергоэффективно.
- Скорость: Виртуальные машины создаются внезапно с такой легкостью, что максимально увеличивает фактор скорости.
- Масштабируемость. Инфраструктура с несколькими виртуальными машинами обеспечивает гибкость и повышает масштабируемость по сравнению с любой другой средой из-за ее склонности к работе с несколькими виртуальными машинами одновременно.
- Расширенная емкость хранилища: обеспечивает лучшее управление пространством и емкостью ресурсов хранения для пользователей виртуальных машин. Он обеспечивает емкость хранилища для приложений на виртуальных машинах.
- Простота восстановления. Одним из преимуществ гипервизора является то, что он восстанавливает центр обработки данных виртуальной машины в случае атаки. Виртуализация серверов обеспечивает максимальную непрерывность бизнеса более быстрым и быстрым способом.
Хотя его использование дает бесчисленное множество преимуществ, вы можете столкнуться с периодическими сбоями, такими как ошибка гипервизора Windows 11.
По словам пользователей, гипервизор вообще не работает или внезапно падает с кодом остановки BSOD. Но почему это происходит?
Что вызывает сбой гипервизора в Windows 11?
- Устаревшие драйверы
- Отсутствующие или неудачные обновления Windows
- Плохие сектора диска
- Поврежденные файлы
- Неправильные или конфликтующие настройки
Как исправить ошибку Hyper-V в Windows 11?
1. Проверьте, поддерживает ли ваш процессор виртуализацию, и включите ее в BIOS.
- Откройте приложение «Настройки» и перейдите в раздел «Система«.
- В разделе Спецификации устройства проверьте сведения, соответствующие вашему процессору .
- Затем перейдите на сайт производителя и проверьте, поддерживает ли ваш ЦП виртуализацию (используйте точные данные, полученные на предыдущем шаге).
- Если это так, вам нужно убедиться, что виртуализация включена в вашем BIOS.
- Для этого войдите в BIOS (если вам нужна помощь, вот как войти в BIOS на ПК с Windows).
- Нажмите «Расширенный режим«, затем перейдите на вкладку «Дополнительно».
- Выберите «Настройка/конфигурация ЦП» и установите для параметра « Технология виртуализации Intel R» ( для Intel ) или «Режим SVM» ( для AMD ) значение « Включено» .
- Убедитесь, что вы сохранили изменения перед выходом из этого экрана.
2. Обновите драйверы
Отсутствующие или иным образом неисправные драйверы являются печально известными подозреваемыми, когда дело доходит до системных ошибок. Поддержание их в хорошем состоянии важно независимо от версии Windows, которую вы используете в данный момент.
Теперь существует множество способов обновить драйверы в Windows 11, но мы считаем, что ничто не сравнится с автоматическим инструментом, который сделает эту работу за вас. Это быстрее, точнее и избавит вас от головной боли.
3. Перезапустите соответствующую службу
- Удерживайте Windows key и нажмите R, чтобы открыть диалоговое окно «Выполнить».
- Введите services.msc и нажмите Enter.
- В списке найдите Hyper-V Virtual Machine Management .
- Щелкните правой кнопкой мыши эту запись и, если она запущена, выберите «Стоп«.
- Наконец, перезапустите службу и убедитесь, что она помогла устранить ошибку гипервизора Windows 11.
4. Используйте командную строку
- Откройте командную строку с правами администратора.
- В новом окне введите следующую команду и нажмите Enter:
bcdedit /set hypervisorlaunchtype auto - Перезапустите и проверьте, правильно ли он работает.
5. Дополнительные методы, которые вы можете попробовать
- Переустановите функцию Hyper-V из компонентов Windows.
- Установите последние обновления Windows или, наоборот, удалите проблемные обновления, если после выполнения этой операции появилась ошибка гипервизора (Вот как легко удалить обновления в Windows 11)
- Обновите BIOS (если вам нужна помощь, мы подготовили пошаговое руководство, чтобы показать вам, как войти и обновить BIOS в Windows 11)
- Используйте встроенные инструменты для сканирования дисков на наличие признаков повреждения: chkdsk C: /f /r /x
- Используйте восстановление системы, чтобы вернуть Windows в предыдущее состояние, в котором работал гипервизор.
- Попробуйте стороннее решение, такое как WMware Workstation, и забудьте о том, что Hyper-V не работает в Windows 11.
Ну вот, теперь вы знаете, как поступать в случаях, когда Hyper-V не работает. Сообщите нам, какой из этих методов сработал для вас.
Hi there,
first of all, my Host and VM Setup
Host: Windows 11 Pro (fresh install, nothing except drivers), AMD Ryzen 7 4800H (8 Cores, 16 Threads) :: 64GB RAM
Guest: Windows 10 Enterprise (existing VM) 8 Cores :: 32GB RAM
I previously had Archlinux on my Host and with that, and VMware Workstation, the VM run at pretty much native speed. I could put it into Fullscreen and not even notice, its an VM. I could watch YouTube videos in 4K fluent, games worked fine, everything just fine.
But because there is no Unity Mode on Linux, i wanted to use Windows 11 on the Host so i could use the Unity Mode on Windows 10.
Now the Windows 11 Hosts works fine, everything is performing as it should but VMware is extremely slow. The application itself (opening the VM settings takes like 5 Seconds or so) but also the VM.
When i start the VM, it takes roughly 15 seconds until the BIOS shows up and another 30 Seconds until Windows is bootet.
For comparison, the whole boot process took 15 seconds in total on the Linux host.
I am using the exact same VM i used in Linux, when opening it he asked me if i copied it or moved it, i said moved and thats it.
And the VM itself is very slow. Moving windows around is lagging, watching YouTube videos is pretty much impossible and so on.
I read that some issues appear on Hyper-V enabled hosts, but this is not an Hyper-V Enabled host (Hyper-V is not installed)
I already changed the setting that VMware is putting the VM completely into RAM and not using the page file which helped a bit, but its still a much worse performance than on the Linux host.
Explore tested solutions to resolve OS freezes in no time
by Matthew Adams
Matthew is a freelancer who has produced a variety of articles on various topics related to technology. His main focus is the Windows OS and all the things… read more
Updated on January 26, 2023
Reviewed by
Vlad Turiceanu

Passionate about technology, Windows, and everything that has a power button, he spent most of his time developing new skills and learning more about the tech world. Coming… read more
- Windows 11 keeps freezing for some users because of graphical issues, limited system RAM, program conflicts, and corrupted system files.
- The first solution is to run the Windows built-in tools that will scan your system files and disk.
- Adjusting virtual memory allocation is another way you might be able to fix regular Windows 11 freezes.
XINSTALL BY CLICKING THE DOWNLOAD FILE
- Download Restoro PC Repair Tool that comes with Patented Technologies (patent available here).
- Click Start Scan to find Windows 11 issues that could be causing PC problems.
- Click Repair All to fix issues affecting your computer’s security and performance
- Restoro has been downloaded by 0 readers this month.
Microsoft released Windows 11 in October 2021. Since then, quite a few users have posted on support forums about Windows 11 randomly freezing.
Such Windows 11 freezes occur randomly on regular basis for those users. Some users have said their Windows 11’s PCs freeze three to six times a day. The more it happens, the more urgently users need to fix the issue.
Why is my PC freezing constantly?
There are a few potential causes that can trigger random Windows 11 freezing:
- Graphics issues – It can be a graphical issue for users utilizing PCs with limited GPUs. The freezing might occur because the screen resolution is set overly high for your PC’s graphics adapter.
- GPU driver incompatibility – If you’ve recently upgraded to Microsoft’s latest desktop platform, your graphics card might have an incompatible Windows 11 driver. In this case, you would need to update the GPU’s driver to a more compatible one.
- Limited RAM – Limited system RAM can be another factor behind random Windows 11 freezing. Insufficient system memory can result in such crashing on Windows 11 PCs with four GB RAM. Extending virtual memory allocation can resolve such issues.
- System file corruption – Running a system file scan will likely fix the issue for such a scenario. Resetting Windows 11 is a more drastic alternative resolution for repairing system files.
- Conflicting programs – Sonic Studio 3 is a conflicting program that’s known to clash with Windows 11. Some users have confirmed uninstalling that software can fix Windows 11 freezing. Maybe you should check if you have Sonic Studio 3 installed.
Besides this, there are different scenarios in which Windows 11 can freeze. The most common ones are the following:
- Windows 11 freezing after update – In this case, uninstalling the latest OS update is the best course of action.
- Windows 11 freezing when idle – Your computer files might be damaged due to various reasons. However, the most effective solution is to run system scans as we have shown below.
- Windows 11 freezing on login screen – Updating your GPU driver proved to be another effective solution when it comes to immediate Windows 11 freezing.
- Windows 11 freezing while gaming/during games – By reducing your monitor’s resolution as we have shown in the third solution below, will ensure that your games won’t be interrupted anymore.
- Windows 11 freezing when alt-tabbing – This has definitely something to do with your system files. Find out how to run DISM like a pro in order to fix all kinds of OS errors.
- Windows 11 freezing after sleep – Uninstalling Sonic Studio 3 will remove any miscommunications across your system, thus eliminating OS freezes.
- Windows 11 freezing on shutdown – RAM issues can affect your PC in many ways, including causing it to stop responding. Besides fixing any RAM problems, you might also want to clean and optimize it.
So, there’s more than one way you might be able to fix this issue. Follow along to find out how you can fix random freezing in Windows 11.
How can I fix Windows 11 freezing randomly?
- Why is my PC freezing constantly?
- How can I fix Windows 11 freezing randomly?
- 1. Reduce your monitor’s resolution setting
- 2. Run a system file scan
- 3. Run a disk scan
- 4. Check for RAM issues
- 5. Expand virtual memory allocation
- 6. Update your GPU’s driver
- 7. Uninstall Sonic Studio 3
- 8. Reset Windows 11 to factory defaults
- Can the same issue occur on other Windows platforms?
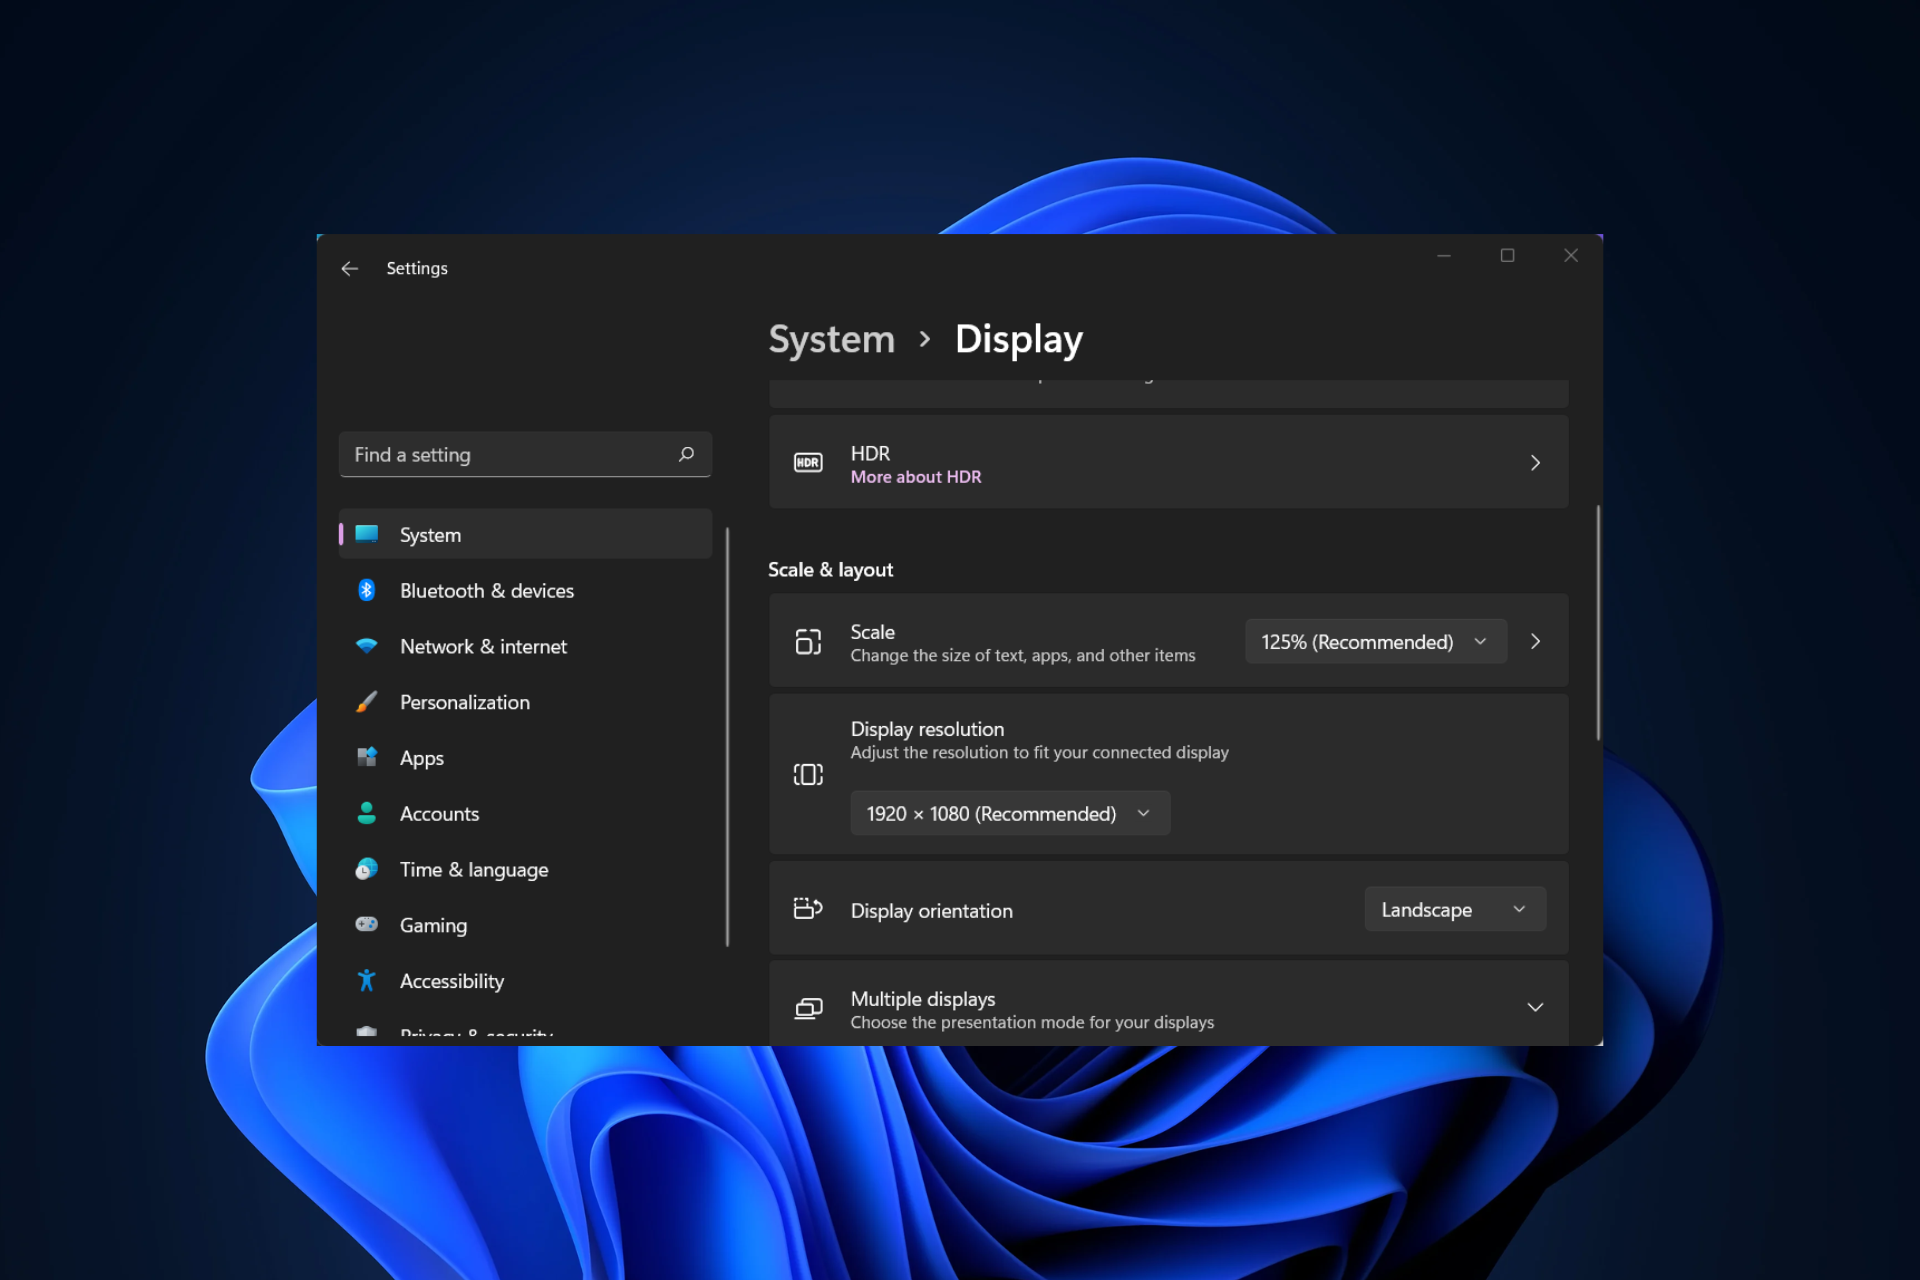
1. Reduce your monitor’s resolution setting
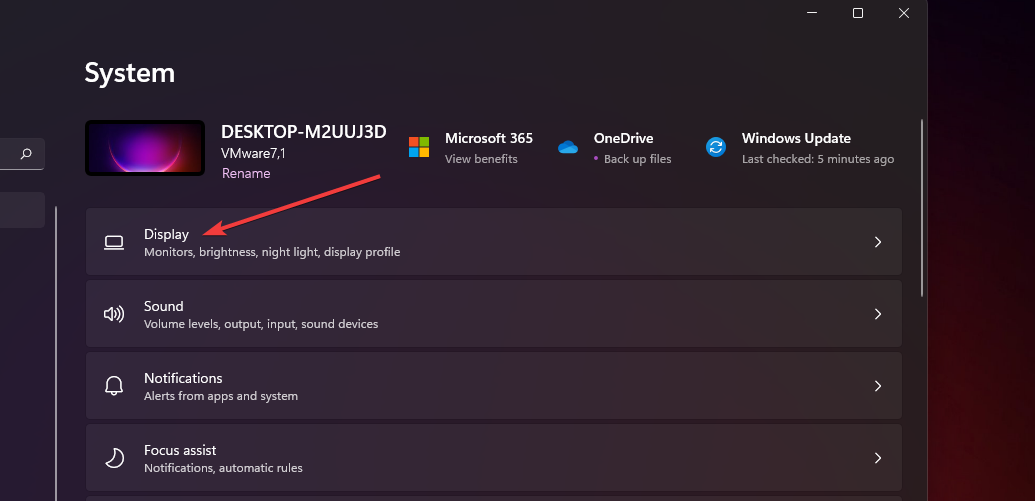
1. Click the Windows taskbar icon to bring up the Start menu, and select the pinned Settings app there.
2. Select the Display navigation option on the System tab.
3. Click the Display resolution option to open a drop-down menu with multiple resolutions to choose from.
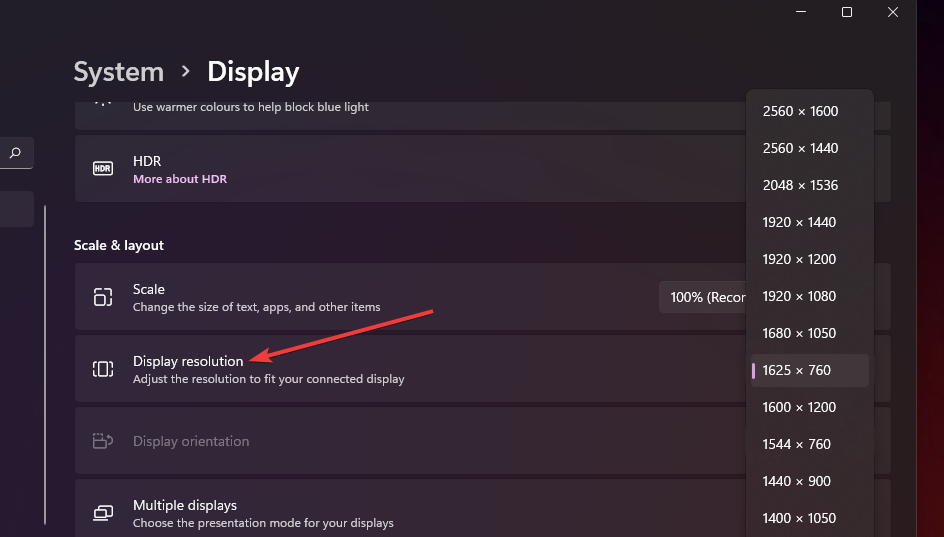
4. Select a resolution lower than the one you currently have.
5. Click on the Keep changes option on the dialog box prompt to confirm the modification.
Some PC issues are hard to tackle, especially when it comes to corrupted repositories or missing Windows files. If you are having troubles fixing an error, your system may be partially broken.
We recommend installing Restoro, a tool that will scan your machine and identify what the fault is.
Click here to download and start repairing.
If you encounter issues with your Windows 11 device freezing, it is likely that your GPU is causing it. Your screen resolution could be too high for your graphics adapter, thus resulting in issues.
The screen resolution can be easily changed using your device’s built-in Settings, on the Display tab.
2. Run a system file scan
- First, click the magnifying glass icon beside the Start menu on the taskbar.

- You’ll need to enter cmd in the to search box to find the Command Prompt.
- Make sure you open an elevated Prompt by right-clicking the Command Prompt search result and selecting Run as administrator.

- Enter this command and press Return:
DISM.exe /Online /Cleanup-image /Restorehealth
- Next, type in the following SFC command and hit Enter:
sfc /scannow
- Now wait for the System File Checker scan to finish and display an outcome within the Command Prompt’s window. The Windows 11 freezing randomly issue will be fixed.


In case that did not solve the issue, you can give a try to Restoro that will scan your PC and automatically repair any issues related to the system slowing down.
- 8 Easy Ways to Fix Apps Freezing in Windows 10
- Windows 10/11 freezes at login [FULL FIX]
- Computer Keeps Freezing and Restarting? Here Are 6 Fixes
3. Run a disk scan
- Open the Command Prompt as an administrator as covered within the first three steps of the previous resolution.
- Tap in this disk scan command and hit Enter:
chkdsk c: /f /r
- Now the check disk scan will be scheduled to run on reboot. Click the Start menu, press the Power button, and select Restart. This is another great fix for Windows 11 freezing.


4. Check for RAM issues
- Press the Windows and S keys both at the same time.
- Input Windows Memory Diagnostic within the search box that opens.

- Click Windows Memory Diagnostic to open it.
- Select the Restart now and check for problems option.


Thereafter, Windows will restart, Windows Memory Diagnostic will scan, and it should then display an outcome. If it doesn’t, however, you’ll need to check the scan result in Event Viewer as outlined within our Memory Diagnostic Tool mdsched.exe guide.

NOTE
You might need to replace faulty RAM modules if Windows Memory Diagnostic detects errors.
5. Expand virtual memory allocation
- Bring up the search utility with its taskbar button or Windows key + S hotkey. Enter the keyword performance of Windows within the search box.

- Then select the Adjust the appearance and performance of Windows search result to open the Visual Effects tab shown directly below.

- Click the Advanced tab. Then select the Change option there.

- Uncheck the Automatically manage paging file size for all drives checkbox, and select the primary C: drive partition.

- Then click the Custom size radio button.

- Type the recommended value specified within the Virtual Memory window in the Initial size (MB) text box.

- Input a bigger value than the recommended one within the Maximum size box.

- Click OK on the Virtual Memory window.


6. Update your GPU’s driver
- Open the manufacturer’s website (NVIDIA, Intel, AMD) for your graphics card. Then go to the driver download section of that website.

- Select your graphics card model and Windows platform on the driver download section’s menus. Click the Download option for the latest driver that’s compatible with your PC.

- Thereafter, bring up File Explorer by clicking the taskbar button shown directly below.

- Open the folder that includes the driver package you downloaded. Double-click the driver package to open its setup window. Then go through the setup wizard to install the driver.


You can also upgrade graphics card drivers with third-party driver updater software. DriverFix is one such utility with which you can scan your PC and automatically update drivers for devices with outdated ones.
7. Uninstall Sonic Studio 3
- Press the Windows + X key combination, and select the Run shortcut.

- Type this command in the Open box and click OK:
appwiz.cpl
- Select Sonic Studio 3 in Programs and Features, and click an Uninstall option for that software.

- Click Yes on any uninstall confirmation prompts that might pop up.


Some users might prefer to uninstall Sonic 3 with third-party uninstaller utilities like IObit Uninstaller. With IObit Uninstaller, you can also delete residual files and registry entries left behind from installed software.
8. Reset Windows 11 to factory defaults
- Press the Windows + I key combination.
- Select Recovery on the System tab in Settings.

- Click the Reset PC button shown directly below.

- Choose the Keep my files option.

- Then select either Cloud download or Local reinstall.

- Click Next > Reset to restore Windows 11 to its factory default.


NOTE
This method will uninstall all third-party software packages that weren’t pre-installed on your PC. So, you will need to reinstall the software after resetting Windows 11. Try applying this potential resolution as a last resort for fixing Windows 11 freezing.
Can the same issue occur on other Windows platforms?
Yes, users have also reported similar Windows 10 freezing in support forums. Interestingly, some users have said that freezing/crashing started after OS updates. Such issues can also occur on Windows XP, Vista, 7, and 8.
Some of the resolutions above might help fix similar freezing issues on different Windows platforms. However, our Windows 10 freezes randomly guide includes potential resolutions and instructions specifically for that platform.
We can’t guarantee the potential resolutions in this guide will fix random freezing in Windows 11 for all users. However, there’s a good chance that they’ll fix random and regular freezing on many Windows PCs. Try applying all those fixes in the order they’re specified.
The only other potential resolutions that might be worth a try are to reset or update the BIOS. Our how-to easily update your BIOS guide provides the full low-down on how to update BIOS.
You can also enter any questions you might have about fixing persistent Windows 11 freezing in the comments section below. Feel free to discuss this issue there.
Still having issues? Fix them with this tool:
SPONSORED
If the advices above haven’t solved your issue, your PC may experience deeper Windows problems. We recommend downloading this PC Repair tool (rated Great on TrustPilot.com) to easily address them. After installation, simply click the Start Scan button and then press on Repair All.
![]()
Newsletter
Explore tested solutions to resolve OS freezes in no time
by Matthew Adams
Matthew is a freelancer who has produced a variety of articles on various topics related to technology. His main focus is the Windows OS and all the things… read more
Updated on January 26, 2023
Reviewed by
Vlad Turiceanu
Passionate about technology, Windows, and everything that has a power button, he spent most of his time developing new skills and learning more about the tech world. Coming… read more
- Windows 11 keeps freezing for some users because of graphical issues, limited system RAM, program conflicts, and corrupted system files.
- The first solution is to run the Windows built-in tools that will scan your system files and disk.
- Adjusting virtual memory allocation is another way you might be able to fix regular Windows 11 freezes.
XINSTALL BY CLICKING THE DOWNLOAD FILE
- Download Restoro PC Repair Tool that comes with Patented Technologies (patent available here).
- Click Start Scan to find Windows 11 issues that could be causing PC problems.
- Click Repair All to fix issues affecting your computer’s security and performance
- Restoro has been downloaded by 0 readers this month.
Microsoft released Windows 11 in October 2021. Since then, quite a few users have posted on support forums about Windows 11 randomly freezing.
Such Windows 11 freezes occur randomly on regular basis for those users. Some users have said their Windows 11’s PCs freeze three to six times a day. The more it happens, the more urgently users need to fix the issue.
Why is my PC freezing constantly?
There are a few potential causes that can trigger random Windows 11 freezing:
- Graphics issues – It can be a graphical issue for users utilizing PCs with limited GPUs. The freezing might occur because the screen resolution is set overly high for your PC’s graphics adapter.
- GPU driver incompatibility – If you’ve recently upgraded to Microsoft’s latest desktop platform, your graphics card might have an incompatible Windows 11 driver. In this case, you would need to update the GPU’s driver to a more compatible one.
- Limited RAM – Limited system RAM can be another factor behind random Windows 11 freezing. Insufficient system memory can result in such crashing on Windows 11 PCs with four GB RAM. Extending virtual memory allocation can resolve such issues.
- System file corruption – Running a system file scan will likely fix the issue for such a scenario. Resetting Windows 11 is a more drastic alternative resolution for repairing system files.
- Conflicting programs – Sonic Studio 3 is a conflicting program that’s known to clash with Windows 11. Some users have confirmed uninstalling that software can fix Windows 11 freezing. Maybe you should check if you have Sonic Studio 3 installed.
Besides this, there are different scenarios in which Windows 11 can freeze. The most common ones are the following:
- Windows 11 freezing after update – In this case, uninstalling the latest OS update is the best course of action.
- Windows 11 freezing when idle – Your computer files might be damaged due to various reasons. However, the most effective solution is to run system scans as we have shown below.
- Windows 11 freezing on login screen – Updating your GPU driver proved to be another effective solution when it comes to immediate Windows 11 freezing.
- Windows 11 freezing while gaming/during games – By reducing your monitor’s resolution as we have shown in the third solution below, will ensure that your games won’t be interrupted anymore.
- Windows 11 freezing when alt-tabbing – This has definitely something to do with your system files. Find out how to run DISM like a pro in order to fix all kinds of OS errors.
- Windows 11 freezing after sleep – Uninstalling Sonic Studio 3 will remove any miscommunications across your system, thus eliminating OS freezes.
- Windows 11 freezing on shutdown – RAM issues can affect your PC in many ways, including causing it to stop responding. Besides fixing any RAM problems, you might also want to clean and optimize it.
So, there’s more than one way you might be able to fix this issue. Follow along to find out how you can fix random freezing in Windows 11.
How can I fix Windows 11 freezing randomly?
- Why is my PC freezing constantly?
- How can I fix Windows 11 freezing randomly?
- 1. Reduce your monitor’s resolution setting
- 2. Run a system file scan
- 3. Run a disk scan
- 4. Check for RAM issues
- 5. Expand virtual memory allocation
- 6. Update your GPU’s driver
- 7. Uninstall Sonic Studio 3
- 8. Reset Windows 11 to factory defaults
- Can the same issue occur on other Windows platforms?
1. Reduce your monitor’s resolution setting
1. Click the Windows taskbar icon to bring up the Start menu, and select the pinned Settings app there.
2. Select the Display navigation option on the System tab.
3. Click the Display resolution option to open a drop-down menu with multiple resolutions to choose from.
4. Select a resolution lower than the one you currently have.
5. Click on the Keep changes option on the dialog box prompt to confirm the modification.
Some PC issues are hard to tackle, especially when it comes to corrupted repositories or missing Windows files. If you are having troubles fixing an error, your system may be partially broken.
We recommend installing Restoro, a tool that will scan your machine and identify what the fault is.
Click here to download and start repairing.
If you encounter issues with your Windows 11 device freezing, it is likely that your GPU is causing it. Your screen resolution could be too high for your graphics adapter, thus resulting in issues.
The screen resolution can be easily changed using your device’s built-in Settings, on the Display tab.
2. Run a system file scan
- First, click the magnifying glass icon beside the Start menu on the taskbar.
- You’ll need to enter cmd in the to search box to find the Command Prompt.
- Make sure you open an elevated Prompt by right-clicking the Command Prompt search result and selecting Run as administrator.
- Enter this command and press Return:
DISM.exe /Online /Cleanup-image /Restorehealth - Next, type in the following SFC command and hit Enter:
sfc /scannow - Now wait for the System File Checker scan to finish and display an outcome within the Command Prompt’s window. The Windows 11 freezing randomly issue will be fixed.
In case that did not solve the issue, you can give a try to Restoro that will scan your PC and automatically repair any issues related to the system slowing down.
- 8 Easy Ways to Fix Apps Freezing in Windows 10
- Windows 10/11 freezes at login [FULL FIX]
- Computer Keeps Freezing and Restarting? Here Are 6 Fixes
3. Run a disk scan
- Open the Command Prompt as an administrator as covered within the first three steps of the previous resolution.
- Tap in this disk scan command and hit Enter:
chkdsk c: /f /r - Now the check disk scan will be scheduled to run on reboot. Click the Start menu, press the Power button, and select Restart. This is another great fix for Windows 11 freezing.
4. Check for RAM issues
- Press the Windows and S keys both at the same time.
- Input Windows Memory Diagnostic within the search box that opens.
- Click Windows Memory Diagnostic to open it.
- Select the Restart now and check for problems option.
Thereafter, Windows will restart, Windows Memory Diagnostic will scan, and it should then display an outcome. If it doesn’t, however, you’ll need to check the scan result in Event Viewer as outlined within our Memory Diagnostic Tool mdsched.exe guide.
NOTE
You might need to replace faulty RAM modules if Windows Memory Diagnostic detects errors.
5. Expand virtual memory allocation
- Bring up the search utility with its taskbar button or Windows key + S hotkey. Enter the keyword performance of Windows within the search box.
- Then select the Adjust the appearance and performance of Windows search result to open the Visual Effects tab shown directly below.
- Click the Advanced tab. Then select the Change option there.
- Uncheck the Automatically manage paging file size for all drives checkbox, and select the primary C: drive partition.
- Then click the Custom size radio button.
- Type the recommended value specified within the Virtual Memory window in the Initial size (MB) text box.
- Input a bigger value than the recommended one within the Maximum size box.
- Click OK on the Virtual Memory window.
6. Update your GPU’s driver
- Open the manufacturer’s website (NVIDIA, Intel, AMD) for your graphics card. Then go to the driver download section of that website.
- Select your graphics card model and Windows platform on the driver download section’s menus. Click the Download option for the latest driver that’s compatible with your PC.
- Thereafter, bring up File Explorer by clicking the taskbar button shown directly below.
- Open the folder that includes the driver package you downloaded. Double-click the driver package to open its setup window. Then go through the setup wizard to install the driver.
You can also upgrade graphics card drivers with third-party driver updater software. DriverFix is one such utility with which you can scan your PC and automatically update drivers for devices with outdated ones.
7. Uninstall Sonic Studio 3
- Press the Windows + X key combination, and select the Run shortcut.
- Type this command in the Open box and click OK:
appwiz.cpl - Select Sonic Studio 3 in Programs and Features, and click an Uninstall option for that software.
- Click Yes on any uninstall confirmation prompts that might pop up.
Some users might prefer to uninstall Sonic 3 with third-party uninstaller utilities like IObit Uninstaller. With IObit Uninstaller, you can also delete residual files and registry entries left behind from installed software.
8. Reset Windows 11 to factory defaults
- Press the Windows + I key combination.
- Select Recovery on the System tab in Settings.
- Click the Reset PC button shown directly below.
- Choose the Keep my files option.
- Then select either Cloud download or Local reinstall.
- Click Next > Reset to restore Windows 11 to its factory default.
NOTE
This method will uninstall all third-party software packages that weren’t pre-installed on your PC. So, you will need to reinstall the software after resetting Windows 11. Try applying this potential resolution as a last resort for fixing Windows 11 freezing.
Can the same issue occur on other Windows platforms?
Yes, users have also reported similar Windows 10 freezing in support forums. Interestingly, some users have said that freezing/crashing started after OS updates. Such issues can also occur on Windows XP, Vista, 7, and 8.
Some of the resolutions above might help fix similar freezing issues on different Windows platforms. However, our Windows 10 freezes randomly guide includes potential resolutions and instructions specifically for that platform.
We can’t guarantee the potential resolutions in this guide will fix random freezing in Windows 11 for all users. However, there’s a good chance that they’ll fix random and regular freezing on many Windows PCs. Try applying all those fixes in the order they’re specified.
The only other potential resolutions that might be worth a try are to reset or update the BIOS. Our how-to easily update your BIOS guide provides the full low-down on how to update BIOS.
You can also enter any questions you might have about fixing persistent Windows 11 freezing in the comments section below. Feel free to discuss this issue there.
Still having issues? Fix them with this tool:
SPONSORED
If the advices above haven’t solved your issue, your PC may experience deeper Windows problems. We recommend downloading this PC Repair tool (rated Great on TrustPilot.com) to easily address them. After installation, simply click the Start Scan button and then press on Repair All.
![]()
Newsletter
Использование виртуальных машин в последнее время резко возросло. Это естественно, если принять во внимание их преимущества. Hyper-V — это собственное программное обеспечение для виртуализации Windows, которое позволяет создавать виртуальные машины в вашей системе Windows. Хотя он не предоставляет столько функций по сравнению с VMware или VirtualBox, он по-прежнему используется довольно часто. Как и у любого другого программного обеспечения, у него есть свои проблемы. Одна из проблем, с которой часто сталкиваются различные пользователи, — это застревание виртуальной машины в состоянии остановки.
Виртуальная машина застряла в состоянии остановки
Когда это происходит, виртуальная машина отказывается останавливаться, и, следовательно, ее нельзя запустить, чего вы не хотите. Это может произойти по ряду причин, которые мы упомянем ниже. Однако прежде чем мы начнем, важно упомянуть, что иногда проблема просто вызвана устаревшим хост-компьютером Windows. Поэтому, прежде чем начать работу с этой статьей, убедитесь, что вы установили все доступные обновления Windows. С учетом сказанного, давайте начнем.
- Отказ хранилища. Как оказалось, в некоторых случаях проблема может быть вызвана отказом хранилища. Это происходит, когда диск сообщается как отсутствующий, и в этом случае вам нужно будет выключить хост, а также другие диски. Как только вы снова загрузите его, он должен распознать диск и, в случае каких-либо проблем, начать их ремонт, если у вас есть система RAID.
- Неверная конфигурация RRAS. Другой причиной проблемы может быть неправильная конфигурация службы маршрутизации и удаленного доступа. Это может произойти, когда интерфейс в вашей среде нарушает конфигурацию RRAS. В таком случае вам придется отключить службу, чтобы решить проблему.
- Параметры электропитания Windows — параметры электропитания вашего хост-компьютера Windows также могут вызвать такую проблему. Оказывается, если у вас есть экран, настроенный на отключение дисплея через определенное время, это может привести к зависанию виртуальной машины. В таком случае вам придется настроить его так, чтобы дисплей никогда не отключался.
Теперь, когда мы закончили с возможными причинами проблемы, давайте начнем с методов, с помощью которых вы можете снова восстановить свою виртуальную машину.
Метод 1: убить виртуальную машину
Убивая, мы не имеем в виду полностью избавиться от виртуальной машины. Скорее, это означает завершение процесса зависшей виртуальной машины, чтобы вы могли снова запустить ее в обычном режиме. Это довольно простой процесс, если у вас есть одна виртуальная машина, работающая на хост-машине. Если вы это сделаете, вы можете пропустить некоторые из шагов, которые мы собираемся перечислить ниже, которые помогают найти GUID проблемной виртуальной машины.
Если у вас несколько виртуальных машин, вы не можете просто убить рабочий процесс виртуальной машины или vmwp.exe, не зная GUID застрявшей виртуальной машины, поскольку процесс появляется несколько раз в диспетчере задач. Когда у вас есть GUID, вы можете найти процесс, соответствующий этому идентификатору, и убить его, не беспокоясь.
Для этого следуйте инструкциям ниже:
- Прежде всего, чтобы узнать GUID ваших виртуальных машин, откройте Powershell. Если у вас одна виртуальная машина, вы можете пропустить этот шаг и просто убить процесс. Точно так же, если вы знаете GUID машины, вы также можете пропустить этот шаг.
- После того, как вы откроете Powershell, введите следующую команду, где VMname — это имя проблемной виртуальной машины:
Get-VM «Имя ВМ» | fl *
- Запишите VMId, так как он вам понадобится, пока вы найдете правильный процесс для завершения.
Поиск VMId
- После этого откройте Диспетчер задач, щелкнув правой кнопкой мыши панель задач и выбрав Диспетчер задач в появившемся меню.
- Когда откроется диспетчер задач, переключитесь на вкладку «Подробности».
- Теперь найдите процесс vmpw.exe, нажав кнопку V. Вы обнаружите несколько процессов, если у вас работает несколько виртуальных машин.
Рабочий процесс виртуальной машины
- Используйте идентификатор, который вы нашли ранее, чтобы найти нужный процесс.
- Наконец, выделите процесс, имя пользователя которого соответствует идентификатору, и нажмите кнопку «Завершить задачу».
Метод 2: изменить параметры питания
Как оказалось, параметры питания вашей хост-машины с Windows также могут влиять на состояние ваших виртуальных машин Hyper-V. Один из столкнувшихся с той же проблемой сказал, что изменение дисплея, чтобы никогда не выключаться, решило проблему для них. Таким образом, выстрел стоит того. Вот как это сделать:
- Откройте меню «Пуск», нажав клавишу Windows, а затем найдите Power Plan.
- Нажмите Enter на показанном результате.
- Оттуда измените параметр Отключить отображение на Никогда в раскрывающемся меню.
Варианты схемы электропитания
- Наконец, нажмите кнопку Сохранить изменения.
Метод 3: отключить RRAS
Неправильно настроенная служба удаленного доступа также может стать причиной проблемы. Как мы уже упоминали ранее, ваш сетевой интерфейс может нарушать работу службы, что приводит к зависанию виртуальной машины. Таким образом, простой способ исправить это — отключить службу маршрутизации и удаленного доступа. Вот как это сделать:
- Прежде всего, откройте диалоговое окно «Выполнить», нажав клавиши Windows + R.
- В диалоговом окне «Выполнить» введите services.msc и нажмите клавишу ВВОД.
- В окне «Службы» найдите службу маршрутизации и удаленного доступа. Чтобы сделать это легко, нажмите кнопку R один раз, чтобы перейти к службам, начинающимся с буквы R.
- После обнаружения дважды щелкните службу, чтобы открыть окно свойств.
Служба RRAS
- Если служба запущена, остановите ее, нажав кнопку «Стоп».
- После остановки службы выберите Отключено в раскрывающемся меню Тип запуска.
- Перезагрузите систему.
Метод 4: перезагрузите хост-машину
В большинстве случаев проблему как таковую можно легко решить, просто повторно разместив хост-машину. После перезагрузки хост-машины виртуальная машина очистится и запустится нормально. Кроме того, убедитесь, что ваша система обновлена, поскольку проблема также может быть вызвана ошибкой Windows, которая часто исправляется в последующих обновлениях.
В этом руководстве мы покажем вам различные способы устранения проблемы с неработающим Hyper-V на вашем ПК с Windows 11. Hyper-V, разработанный Microsoft, представляет собой аппаратный гипервизор, который дает вам платформу для запуска нескольких экземпляров разных операционных систем на вашем ПК. Хотя в этом домене уже существует довольно много сторонних приложений. [such as VMWare and Virtual machine]так зачем нужна была эта?
Что ж, поскольку Hyper-V встроен в систему, он дает вам гораздо более оптимизированную и эффективную платформу для тестирования гостевой ОС, в которую входят Windows, Ubuntu и множество других дистрибутивов Linux. Однако, несмотря на все преимущества, которые он может предложить, он также не свободен от своей доли проблем.
В связи с этим с большинством проблем сталкиваются те пользователи, которые включили Hyper-V в своей версии Windows Home, используя обходной путь с пакетным файлом. В любом случае, независимо от версии Windows, если Hyper-V не работает и на вашем ПК с Windows 11, то это руководство познакомит вас с несколькими изящными обходными путями для решения этой проблемы. Следите за исправлениями.
Рекомендуется попробовать каждый из перечисленных ниже обходных путей, а затем посмотреть, какой из них принесет вам успех. Итак, имея это в виду, давайте начнем.
ИСПРАВЛЕНИЕ 1: автоматический перезапуск Hyper-V с помощью CMD
- Для начала запустите командную строку от имени администратора.
- Затем выполните приведенную ниже команду, чтобы перезапустить Hyper-Vbcdedit /set hypervisorlaunchtype auto.
- Проверьте, устраняет ли это проблему Hyper-V, которая не работает на вашем ПК с Windows 11.
ИСПРАВЛЕНИЕ 2. Перезапустите Hyper-V вручную из BIOS
- Для начала загрузите компьютер в BIOS.
- Затем перейдите на вкладку «Дополнительно/Производительность» и отключите Hyper-V.
- После этого подождите несколько секунд, а затем снова включите Hyper-V.
- Теперь сохраните изменения, выйдите из BIOS и загрузите компьютер в ОС.
- Затем откройте «Выполнить через Windows + R» и введите следующую команду: optionalfeatures
- Теперь снимите флажок Hyper-V и нажмите OK. Затем подождите несколько секунд, снова проверьте Hyper-V и нажмите OK.
- Наконец, перезагрузите компьютер с Windows 11 и проверьте, работает ли Hyper-V сейчас или нет.
ИСПРАВЛЕНИЕ 3. Перезапустите службу Hyper-V.
Если фоновая служба Hyper-V повреждена или не работает должным образом, Hyper-V столкнется с ее непосредственными последствиями. Поэтому вам следует рассмотреть возможность перезапуска его службы, чтобы решить эту проблему. Вот как это можно сделать:
- Откройте «Выполнить» через Windows + R и введите следующую команду: services.msc.
- Затем откройте службу управления виртуальными машинами Hyper-V.
- Теперь нажмите «Стоп», чтобы завершить эту службу. Затем подождите несколько секунд и нажмите «Пуск».
- Аналогичным образом перезапустите службу виртуализации удаленных рабочих столов Hyper-V. [if present].
- После этого перезагрузите компьютер. Основная проблема теперь будет решена.
Вот и все. Это были три разных метода, которые помогут вам решить проблему, из-за которой Hyper-V не работает на вашем ПК с Windows 11.