 Приветствую дорогие!
Ну что, будем разбираться с фирменным софтом от MSI?
Поехали!
Winki — не программа, а операционная система от MSI, при помощи которой можно зайти в интернет или выполнить другие задачи.
Основана на Линуксе.
Winki — что-то типа аналога ASUS Express Gate. Присутствует например на материнке MSI Z77A-G43. Один продвинутый юзер написал что Winki — обычный лайв убунты (то есть LiveCD).
Зачем нужно? Например у вас полетела ваша Windows, а вам срочно нужно в интернет. Вы запускаете Winki из биоса, она быстро загрузится и у вас будет возможность:
- Пойти в интернет при помощи Мозиллы.
- Кому-то позвонить при помощи Скайпа.
- Можно поискать какие-то фото на ПК, возможно другие файлы также можно искать.
- Есть еще мессенджер Pidgin, поддерживающий работу с многими аккаунтами, например MSN, ICQ, Yahoo.
- Присутствует файловый менеджер. Но набор софта зависит от версии, узнал что есть Winki 2.0.
Все это хорошо. Данная операционка появилась уже давно. Как сейчас обстоят дела — не знаю, но если она еще существует, то видимо спрос есть и MSI ее развивает. А значит набор программ так или иначе должен состоять из необходимых для обычного юзера, я к тому, что скорее всего и видео-плеер должен быть, аудио-плеер.. Может даже Хром есть. Это все я имею ввиду современные версии Winki, если проект не забросили.
Winki есть не во всех платах и ноутах. Как понимаю, присутствует на более дорогих, премиум-класса устройствах. Однако MSI, в отличии например от ASUS, не ставит заоблачные цены на свою премиум-продукцию.. я к тому что Winki может быть например даже на геймерских материнках за $150.. или даже дешевле..
Как точно работает я не понял, однако судя по сообщения на офф форуме MSI — нужно под виндой запустить установщик Winki-Installer.exe, который установит операционку на диск 2.5 гига, и потом эту операционку можно будет запустить из биоса. Диск 2.5 гига — непонятно либо откусывается от реального диска, то есть вашего, либо этот диск, или точнее флеш-память распаяна на материнке, или вообще в виде отдельного модуля подключенного к материнке.
Что еще странно — один юзер написал что скачать Winki тупо негде — на офф сайте MSI такой проги нет. Она обычно идет на диске к материнке, но версия там может быть нестабильная, глючная. Хотя на торрентах думаю есть, нужно просто поискать.
Основные плюсы
- Работает быстро, ибо оптимизировано все, да и это Линукс.
- Вирусов нет. Вернее почти, на 99%, ибо опять же — Линукс малораспространен в отличии от Windows, поэтому вирусов нет.
- Встроенный набор необходимого софта. Единственный минус — интернет, если он у вас работает по заранее созданному подключению в ПК (типа как VPN), то это же подключение нужно будет создать и в Winki. Также неизвестно, сохраняются ли вообще настройки Winki, или все сбивается после выключения.
Winki — внешний вид
Нашел картинку. Я так понимаю это и есть чип Winki:

И вижу что он сьемный. Возможно его можно купить отдельно? Но можно ли будет подключить.. ? Может внутри чипа и есть флеш-память на 2.5 гига, о которой писал выше.
Также нашел такую картинку, где видим какие могут быть проги в операционке Winki:

Кратко разберемся:
- OpenOffice — офисный пакет, бесплатный, популярный и реально неплохой, аналог обычного офиса. Был опыт использования, мое мнение — годнота, правда я пользовался версией под Windows. Важно — написано Winki 2.0 support (более новая версия Winki), а значит можно сделать вывод, что операционка от MSI развивается, что не может не радовать.
- System Rescue — точно неизвестно что это, переводится как спасательная система. Я так понимаю это инструмент который поможет восстановить или исправить какие-то проблемы с Windows или разделами диска. Также поддерживается в Winki 2.0.
- Free Phone Call — это значит что есть мессенджер для звонков, имеется ввиду Skype, но было бы неплохо чтобы и Вайбер был. Однако опять момент — сможет ли Winki определить веб-камеру? Для нее же дрова нужны..
- Web Browser — думаю понятно, браузер для просмотра сайтов. Надеюсь флеш-видео проигрывает, фильмы смотреть можно? Но опять же. Звук будет работать? Хм, думаю да.. Winki должна содержать дрова для материнки, собственно которая и поддерживает Winki.. логично..
- Instant Messaging — имеется ввиду мессенджер. Возможно именно тот Pidgin, который поддерживает много сервисов, в том числе и ICQ, правда.. им уже мало кто пользуется.
- Photo View — просмотрщик изображений.
Кстати нашел еще одну картинку, похожую, из которой видим что также есть прога для бекапа жесткого диска (HDD Backup), поддерживается много языков.. и есть даже Winki Installer — возможно имеется ввиду что можно прям из биоса установить Winki? Еще есть Wireless Networking — видимо для настройки вай фая:

Еще пример — запущенный Скайп в Winki:

На одном сайте узнал — чтобы попасть в Winki нужно в BIOS выбрать пункт Live Update или HDD Backup, после чего будет запущена соответствующая утилита без запуска интерфейса пользователя. Но чтобы вернуться в систему, достаточно будет просто нажать кнопку Winki.
Winki loader (based on SYSLINUX 3.72) — как понимаю загрузчик, где можно выбрать:
- Boot from first HDD — загрузиться с первого жесткого диска.
- Winki, start with Winki installer — видимо чтобы установить операционку.
- Winki, full-featured Winki — могу ошибаться, но кажется пункт нужен для запуска полнофункциональной операционки Winki.
- HDDBackup — беэкап жесткого диска (резервная копия). Полезная вещь, главное чтобы работало корректно.

И еще пару скриншотов.. вот запущенный OpenOffice:

Браузер Mozilla Firefox:

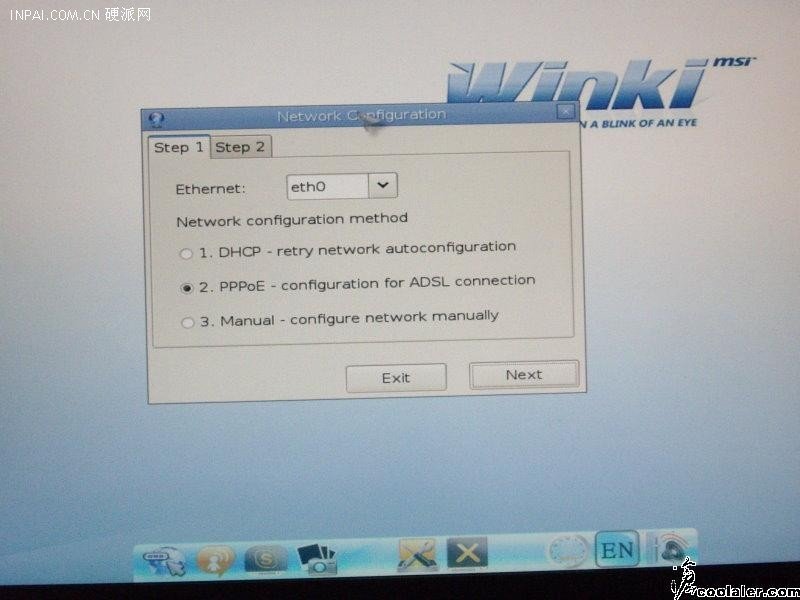
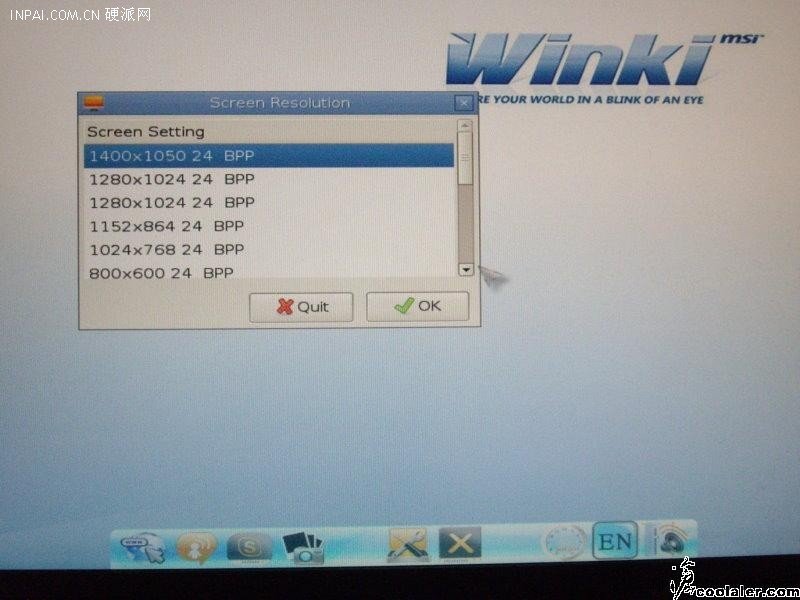
Настройки:

Здесь: изменение уровня громкости, разрешение экрана, настройки сети.. язык.. настройки клавиатуры.. все хорошо, но количество настроек зависит от версии Winki..
Кстати компания MSI презентовала Winki на какой-то выставке или конференции, там еще были вроде новые платы ее.. короче вот фотка оттуда:

Заключение
Ребята, мне кажется мы разобрались:
- Winki — операционка от MSI, но сделана на основе Linux, нужна чтобы можно было быстро получить доступ к интернету, а также к файлам компа.
- Есть на некоторых материнках и ноутбуках. Существует уже как бы давно.. лет десять точно.
- Работает шустро, запускается тоже быстро, кроме интернета еще содержит набор главного софта, в том числе и Скайп. Есть ли Вайбер — не знаю, но есть мессенджер поддерживающий ICQ, то есть некогда популярную аську, однако сейчас уже мало кто пользуется..
- Winki кажется развивается, правда не знаю какими темпами. Возможно в некоторых новых платах MSI версия Winki будет поновее, включающая новый софт, возможно даже Вайбер или Хром (если он вообще работает под Линуксом).
На этом все. Надеюсь информация пригодилась. Удачи и добра, до новых встреч господа!
На главную!
10.09.2019
Содержание
- Winki — что это за программа и нужна ли она? (MSI)
- Основные плюсы
- Winki — внешний вид
- Заключение
- MSI Winki — интернет без загрузки основной ОС
- Please install winki from msi driver disc in windows
Winki — что это за программа и нужна ли она? (MSI)
Приветствую дорогие!
Ну что, будем разбираться с фирменным софтом от MSI?
Winki — не программа, а операционная система от MSI, при помощи которой можно зайти в интернет или выполнить другие задачи.
Основана на Линуксе.
Winki — что-то типа аналога ASUS Express Gate. Присутствует например на материнке MSI Z77A-G43. Один продвинутый юзер написал что Winki — обычный лайв убунты (то есть LiveCD).
Зачем нужно? Например у вас полетела ваша Windows, а вам срочно нужно в интернет. Вы запускаете Winki из биоса, она быстро загрузится и у вас будет возможность:
- Пойти в интернет при помощи Мозиллы.
- Кому-то позвонить при помощи Скайпа.
- Можно поискать какие-то фото на ПК, возможно другие файлы также можно искать.
- Есть еще мессенджер Pidgin, поддерживающий работу с многими аккаунтами, например MSN, ICQ, Yahoo.
- Присутствует файловый менеджер. Но набор софта зависит от версии, узнал что есть Winki 2.0.
Все это хорошо. Данная операционка появилась уже давно. Как сейчас обстоят дела — не знаю, но если она еще существует, то видимо спрос есть и MSI ее развивает. А значит набор программ так или иначе должен состоять из необходимых для обычного юзера, я к тому, что скорее всего и видео-плеер должен быть, аудио-плеер.. Может даже Хром есть. Это все я имею ввиду современные версии Winki, если проект не забросили.
Winki есть не во всех платах и ноутах. Как понимаю, присутствует на более дорогих, премиум-класса устройствах. Однако MSI, в отличии например от ASUS, не ставит заоблачные цены на свою премиум-продукцию.. я к тому что Winki может быть например даже на геймерских материнках за $150.. или даже дешевле..
Как точно работает я не понял, однако судя по сообщения на офф форуме MSI — нужно под виндой запустить установщик Winki-Installer.exe, который установит операционку на диск 2.5 гига, и потом эту операционку можно будет запустить из биоса. Диск 2.5 гига — непонятно либо откусывается от реального диска, то есть вашего, либо этот диск, или точнее флеш-память распаяна на материнке, или вообще в виде отдельного модуля подключенного к материнке.
Что еще странно — один юзер написал что скачать Winki тупо негде — на офф сайте MSI такой проги нет. Она обычно идет на диске к материнке, но версия там может быть нестабильная, глючная. Хотя на торрентах думаю есть, нужно просто поискать.
Основные плюсы
- Работает быстро, ибо оптимизировано все, да и это Линукс.
- Вирусов нет. Вернее почти, на 99%, ибо опять же — Линукс малораспространен в отличии от Windows, поэтому вирусов нет.
- Встроенный набор необходимого софта. Единственный минус — интернет, если он у вас работает по заранее созданному подключению в ПК (типа как VPN), то это же подключение нужно будет создать и в Winki. Также неизвестно, сохраняются ли вообще настройки Winki, или все сбивается после выключения.
Winki — внешний вид
Нашел картинку. Я так понимаю это и есть чип Winki:
И вижу что он сьемный. Возможно его можно купить отдельно? Но можно ли будет подключить.. ? Может внутри чипа и есть флеш-память на 2.5 гига, о которой писал выше.
Также нашел такую картинку, где видим какие могут быть проги в операционке Winki:
- OpenOffice — офисный пакет, бесплатный, популярный и реально неплохой, аналог обычного офиса. Был опыт использования, мое мнение — годнота, правда я пользовался версией под Windows. Важно — написано Winki 2.0 support (более новая версия Winki), а значит можно сделать вывод, что операционка от MSI развивается, что не может не радовать.
- System Rescue — точно неизвестно что это, переводится как спасательная система. Я так понимаю это инструмент который поможет восстановить или исправить какие-то проблемы с Windows или разделами диска. Также поддерживается в Winki 2.0.
- Free Phone Call — это значит что есть мессенджер для звонков, имеется ввиду Skype, но было бы неплохо чтобы и Вайбер был. Однако опять момент — сможет ли Winki определить веб-камеру? Для нее же дрова нужны..
- Web Browser — думаю понятно, браузер для просмотра сайтов. Надеюсь флеш-видео проигрывает, фильмы смотреть можно? Но опять же. Звук будет работать? Хм, думаю да.. Winki должна содержать дрова для материнки, собственно которая и поддерживает Winki.. логично..
- Instant Messaging — имеется ввиду мессенджер. Возможно именно тот Pidgin, который поддерживает много сервисов, в том числе и ICQ, правда.. им уже мало кто пользуется.
- Photo View — просмотрщик изображений.
Кстати нашел еще одну картинку, похожую, из которой видим что также есть прога для бекапа жесткого диска (HDD Backup), поддерживается много языков.. и есть даже Winki Installer — возможно имеется ввиду что можно прям из биоса установить Winki? Еще есть Wireless Networking — видимо для настройки вай фая:
Еще пример — запущенный Скайп в Winki:
На одном сайте узнал — чтобы попасть в Winki нужно в BIOS выбрать пункт Live Update или HDD Backup, после чего будет запущена соответствующая утилита без запуска интерфейса пользователя. Но чтобы вернуться в систему, достаточно будет просто нажать кнопку Winki.
Winki loader (based on SYSLINUX 3.72) — как понимаю загрузчик, где можно выбрать:
- Boot from first HDD — загрузиться с первого жесткого диска.
- Winki, start with Winki installer — видимо чтобы установить операционку.
- Winki, full-featured Winki — могу ошибаться, но кажется пункт нужен для запуска полнофункциональной операционки Winki.
- HDDBackup — беэкап жесткого диска (резервная копия). Полезная вещь, главное чтобы работало корректно.
И еще пару скриншотов.. вот запущенный OpenOffice:
Браузер Mozilla Firefox:
Здесь: изменение уровня громкости, разрешение экрана, настройки сети.. язык.. настройки клавиатуры.. все хорошо, но количество настроек зависит от версии Winki..
Кстати компания MSI презентовала Winki на какой-то выставке или конференции, там еще были вроде новые платы ее.. короче вот фотка оттуда:
Заключение
Ребята, мне кажется мы разобрались:
- Winki — операционка от MSI, но сделана на основе Linux, нужна чтобы можно было быстро получить доступ к интернету, а также к файлам компа.
- Есть на некоторых материнках и ноутбуках. Существует уже как бы давно.. лет десять точно.
- Работает шустро, запускается тоже быстро, кроме интернета еще содержит набор главного софта, в том числе и Скайп. Есть ли Вайбер — не знаю, но есть мессенджер поддерживающий ICQ, то есть некогда популярную аську, однако сейчас уже мало кто пользуется..
- Winki кажется развивается, правда не знаю какими темпами. Возможно в некоторых новых платах MSI версия Winki будет поновее, включающая новый софт, возможно даже Вайбер или Хром (если он вообще работает под Линуксом).
На этом все. Надеюсь информация пригодилась. Удачи и добра, до новых встреч господа!
MSI Winki — интернет без загрузки основной ОС
Компания MSI на проходящей сейчас выставке CeBIT объявила о создании нового интерактивного устройства под названием Winki. Основанное на дистрибутиве Linux, оно позволяет мгновенно получить доступ в интернет без необходимости полностью загружать операционной системы. Само по себе устройство Winki похоже на небольшую USB-флешку и подключается напрямую к материнской плате MSI. После этого вы можете мгновенно загружать установленные на нем программы до того, как будет отправлен запрос на активацию жесткого диска и загрузки с него основной операционной системы. Как только ОС Winki загружена, на мониторе появляется изображение специального экрана, и вы можете приступать к работе с помощью встроенных в эту операционную систему функций. Среди них имеется веб-браузинг с применением Mozilla Firefox, VоIP-телефония с помощью Skype, поиск фотографий и другие обычные компьютерные возможности. «Мгновенная» ОС Winki также имеет IM-клиент под названием Pidgin, поддерживающий одновременную работу с 15 аккаунтами, включая системы мгновенного общения MSN, ICQ и Yahoo.
В настоящее время мгновенная операционная система Winki будет доступна лишь для отдельных материнских платах MSI, со временем она может появиться и в некоторых дорогих ноутбуках компании.
Winki, напомним, создан на базе Linux, и это новое устройство поможет изменить мнение его пользователей об этой программной платформе. Все инсталляции и настройки в ней сделаны простыми и понятными. Подключив устройство к USB на материнской плате и пройдя короткий этап установки системных параметров, вы можете начинать пользоваться преимуществами этого маленького удобного инструмента. Winki удобен и для применения в мировом масштабе благодаря встроенной поддержке 15 языков. Мгновенная операционная система Winki быстро начинает работу, потребляет меньше электричества и не подвержена опасностям, связанным с компьютерными вирусами. А самое главное, она не стоит своим пользователям ни копейки сверх того, что они заплатили за само устройство.
ferra.ru, 2021 г. 18+
Нашли опечатку? Выделите текст и нажмите Ctrl+Enter
Please install winki from msi driver disc in windows
Грамотный 
Группа: Пользователи
Сообщений: 254
Регистрация: 19.05.2005
Пользователь №: 15.524
Респектов: 21 
Предупреждений: 3 ![]()
Немного вступления и обо всем этом. Не нашел ни 1 статьи на тему это «OS» кроме как, вот MSI выпустили. Недавно таки увидел мамку от MSI Winky Edition и немного припухнув от цены стал искать позолоченые разьемы. Не увидев такого начал расматривать требуху кабелечки и др. не интересно, заинтересовал TPM http://ru.wikipedia.o. latform_Module модуль, который нельзя было взять для опытов и мааааленькая штучка в статическом пакетике, которую можно было взять для препарирования =)Оказалось вот такая штучка

Быстро прочитав статейку http://ru.msi.com/pro. ge.php?UID=992 на русском MSI стало понятно что пиражок и че с ним надо делать. Powered by Linux вообщем =)
Обьяснил манагерам что это за шаман машинкаи все сразу сказали «Давайте ее втыкнем!». Собирать на новой платформе тестовый стенд не хотелось посему запустили на первой ближайшей машинке. Как вы поняли это простейшая флешка с интефейсом USB распаяном на мамке. Внутри оказалось:
Флешка оказалось на 512Мб все дело занимало
400Mb. Многовато для такого ну да ладно. Делаем ребут. появляеться Заставочка в виде картинки, все охнули и сказали шепотом «Оно умеет так красиво показывать без дров». Появляеться курсор Ииииии. «Your MotherBoard. Not КАШЕРНО! Выключить навсегда.» (фраза примерная). Все растроились, а я заулыбался. Дайте 1 кружку чая и пиражок и я вам сделаю что оно будет вас радовать и без MSI мамки. Все скинулись и сытый, довольный начал ковырять.
Делаем дамп флешки. Монтируем winki.disk.
Дистр никаким образом не сжат =( печально. Монтируем /proc и делаем chroot
sudo mount -t proc none /mnt/папка_куда_подключено/proc
sudo chroot /mnt/папка_куда_подключено /bin/sh
сморим че есть из консоль прог и видим что НИЧЕГО нету. Делаем Exit.
После ковыряния выясняеться что это чудесный и Мастерский Дистрибутив производства SliTaz http://www.slitaz.org/en/ ]. Вот тока он еще больше порезан и весит в десятки раз больше. Ищем место где делаеться проверка мамки. Надеялся на хитрость MSI но такого не оказалось. Проверка делаеться через
if [ $ == «Unknown» ]; then
rm /etc/xdg/openbox/menu.xml 2> /dev/null
rm /etc/xdg/openbox/rc.xml 2> /dev/null
rm /conf/splash.conf 2> /dev/null
rm /etc/locale.conf 2> /dev/null
exec /usr/sbin/openbox & msilock «$@»
else
exec /usr/sbin/openbox & cairo-dock «$@»
fi
Удаляем все и оставляем
exec /usr/sbin/openbox & cairo-dock «$@»
Ну вот и все =) проверки нету. отключаем подключенный файл
заливаем все файлы на любую ФАТ32 флешку небольшие модификации и шаманства с syslinux и флешка готова к запуску.
Снова кучка растроенных людей и картинка с загрузкой появляеться панелька и курсор и все ахуют и просят потыкать кнопачки =) Загружаеться довольно быстро. Прог 4 штучки, даже файлового манагера нету и терминалки =)
В ИТОГЕ. Дистрибутив урезан до немогу и нет ни 1 упоминания о системе Linux даже на новости презентации в ru сегменте MSI статейка http://ru.msi.com/pro. ge.php?UID=992. Вообщем ничего нового оригинального и интересного нету. =)
Да и еще расмешила статья с THG http://www.thg.ru/tec. 04_181552.html об этом дистре =) смех и слезы.
Если кому надо могу скинуть готовую сборку со всеми модификациями. Но эт так просто посмореть =)
Интересно что скринтшоты с презентации не такие как в оргинале. Изменеа панель Dock неужели Apple FEAR сработал =)
Презентация
Оригинал: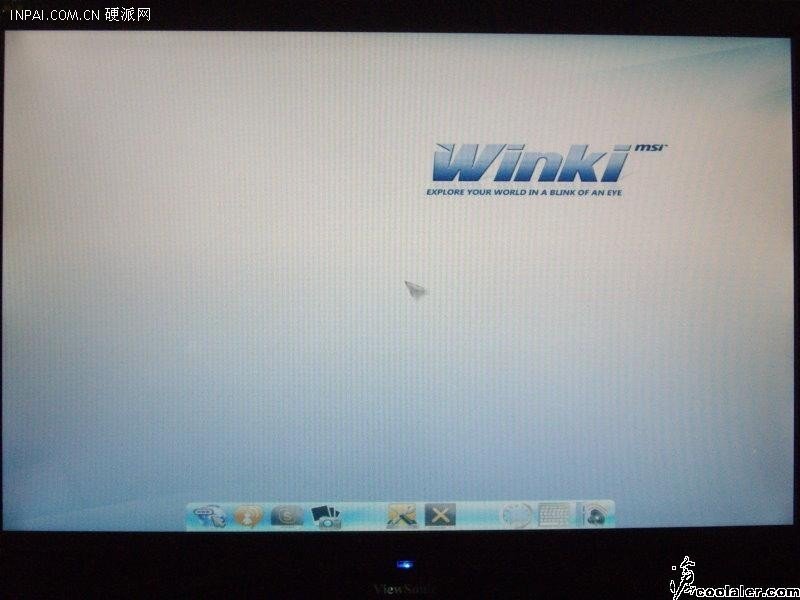
Не знал в какой раздел оформить тему, это оказался более подходящий по названию =)
Страницы: [1] Вниз
- Печать

Автор
Тема: как ключить Winki 3 (Прочитано 28735 раз)

Добрый день! Недавно купил мат плату MSI H67MA-E45 (MS-7678).В описании пишется о Winki 3. Как её октивировать.

Записан
через диск идущий в комплекте к матери загрузиться там будет…
Записан
Die große zeit ist jetzt angebrochen!
Записан
Подскажите пожалуйста где найти на Winki 3 описание, руководство и Winki 3 на русском есть.
Записан
Описание ПО Winki 3 есть только на английском языке в брошюре с описанием софта, идущего в комплекте к каждой материнской плате с Winki 3.
Сама Winki 3 предлагает для работы 7 основных языков: английский, немецкий, французский, два китайских, японский и корейский.
Интерфейс интуитивно понятный и не требующий перевода.
Записан
Всего доброго и успехов,
вебмастер Татьяна.
Добро пожаловать на форумы пользователей продукции MSI! Для официальной поддержки, пожалуйста, свяжитесь с нами напрямую — Контакты
Записан
Не может этого быть…
Диск с драйверами для материнки — загрузочный. Значит Вы делаете что-то не так 
Записан
Мы здесь, чтобы сделать IT-индустрию металом. Мы все сделаем металом. Черней чернейшей черноты бесконечности!
подскажите пожалуйста, как нужно делать. вставляю диск,загружаюсь с сд, открывается окно винки, там три пункта — загрузка с HDD, далее установка и ещё какаето хрень. Нажимаю установка, и всё черный экран. с третьего пункта то же самое. Может както на флешку надо ставить.
Записан
Ну я вот специально щас достал со шкафа пыльную коробку из под мамки 
Даже на ноуте заводится нормально. При старте три пункта:
1. boot from HDD — загрузка вашей обычной ОС с харда
2. start with installer — это установка на флэшку
2. full-featured — запуск винки с компакта
Попробуйте отключить все приблуды типа картридеров и прочей мультимедиа.
На ноуте загрузилась быстрее чем на X58 Pro-e (около 5минт).
Записан
Мы здесь, чтобы сделать IT-индустрию металом. Мы все сделаем металом. Черней чернейшей черноты бесконечности!
Отключил всё что можно, таже песня. Вспомнил в кладовке стоит древний комп, пентиум 3. Подсоединил к нему DVD и винки зта спокойно записалось на флешку. Вот так. Биос самый новый.1.7
Записан
Так-то она нахрен не нужна, но зацепило!
Записан
Записан
Добро пожаловать на форумы пользователей продукции MSI! Для официальной поддержки, пожалуйста, свяжитесь с нами напрямую — Контакты
Я установил Winki3 на флешку а теперь хочу удалить — чем можно ее удалить и объединить разделы.
И куда лучше поставить Winki3 на жестком диске(на основном или логическим разделе) а то когда я ставил Winki3 на флешку у меня вся информацию стерлась.
Записан
Записан
Подскажмте где можно скачать агрузочный диск от H67MA-E45 (B3)
Записан
Записан
Добро пожаловать на форумы пользователей продукции MSI! Для официальной поддержки, пожалуйста, свяжитесь с нами напрямую — Контакты
« Последнее редактирование: 22 Май 11, 19:09:48 от simon53 »
Записан
Записан
Всего доброго и успехов,
вебмастер Татьяна.
Добро пожаловать на форумы пользователей продукции MSI! Для официальной поддержки, пожалуйста, свяжитесь с нами напрямую — Контакты
Cчастливые обладатели мат плат P67A-C45 (B3) и H67MA-E45 (B3) , кто нибуть пользавался winki 3?
Записан
я пробовал,с 3-го пункта загрузки.Чёрный экран,через несколько сек.возникает логотип
winki на 0,2 сек. и опять чернота.Подозреваю,что надо нажать какую-то клавишу.Вопрос
как увеличить время загрузки.В БИОС такого пункта не нашёл.Мать
H67MA-E45
Записан
Логатип у меня висит сек 5, нажимал на все клавиши ни чего. Дело в том что на другом ком например асус , спокойно устанавливается на флешку. Конечно на асусе она не работает, пишет нужен MSI. Но и на MSI тоже не работает. Короче ни с диска ни с флешки.
Записан
OMG что за надуманные проблемы? Все прекрасно работает…
В биосе есть такой пункт — Quick booting.
Записан
Мы здесь, чтобы сделать IT-индустрию металом. Мы все сделаем металом. Черней чернейшей черноты бесконечности!
Если вас не затруднит,. подскажите где именно в биосе этот пункт.
Записан
У меня тоже «не запускается» Winki на z68A-GD55
думаю проблема в том, что у менря включен i-Mode, а дров под энто дело у Winki нет.
Лень переключать монитор проверить…если будет настроение.
Записан
- Печать
Страницы: [1] Вверх

Ru-36
MS-7752 Системная плата
чипсета.
Current CPU Core Voltage/ Current CPU I/O Core Voltage/ Current DRAM Voltage/
Current GPU Voltage
Эти пункты показывают текущее напряжение CPU/ CPU I/O/ DRAM/ GPU. Только
для чтения.
Overclockng Profiles
Нажмите <Enter> для входа в подменю.
Overclockng Profile 1/ 2/ 3/ 4/ 5/ 6
Нажмите <Enter> для входа в подменю.
Set Name for Overclockng Profile 1/ 2/ 3/ 4/ 5/ 6
Укажите имя в этом поле.
Save Overclockng Profile 1/ 2/ 3/ 4/ 5/ 6
Сохраните текущие настройки разгона для выбранного профиля на ПЗУ.
Load/ Clear Overclockng Profile 1/ 2/ 3/ 4/ 5/ 6
Сохранение/удаление настроек профиля разгона на ПЗУ.
OC Profile Save to USB
Сохранение текущих настроек разгона на привод USB.
OC Profile Load from USB
Загрузка сохраненных настроек с привода USB.
CPU Specficatons
Нажмите <Enter> для входа в подменю. В данном подменю содержатся все
ключевые функции CPU. Эта информация зависит от модели и предназначена
только для чтения. Для просмотра этой информации нажмите на [F4].
CPU Technology Support
Нажмите <Enter> для входа в подменю. В данном подменю отображаются
функции, установленные в процессоре. Только для чтения.
MEMORY-Z
Нажмите <Enter> для входа в подменю. В данном подменю отражены все
настройки и параметры синхронизации DIMM. Эта информация зависит от модели
и предназначена только для чтения. Для просмотра этой информации нажмите на
[F5].
DIMM1~4 Memory SPD
Нажмите <Enter> для входа в подменю. Это подменю показывает информацию
об установленных модулях памяти.
CPU Features
Нажмите <Enter> для входа в подменю.
Actve Processor Cores
Этот пункт позволяет задать число активных ядер процессора.
Lmt CPUID Maxmum
Данный параметр граничивает допустимую скорость процессора при
использовании старых версий ОС.
▶
▶
▶
▶
▶
▶
▶
▶
▶
▶
▶
▶
▶
▶
▶
-
- Nov 2, 2012
-
- 54
-
- 0
-
- 10,630
- 0
-
#1
I have MSI military class II
I saw this winki OS and I liked it but the problem is that I can’t get it
It has been 3 weeks since I am searching for download links for this winki
Please can any one tell me how to download it ?
thanks for reading

-
- Mar 19, 2013
-
- 2,715
-
- 0
-
- 13,960
- 404
-
#2
-
- Mar 19, 2013
-
- 2,715
-
- 0
-
- 13,960
- 404
-
#2
-
#3
Found it, heres a link with instructions: http://hydra.geht.net/tino/howto/uefi/winki/
And heres a link to the winki installation that was missing from my msi driver cd: http://faenl.msi.com/index.php?dir=Mainboard/Utilities/ (youll need one of the last 2 files starting with Winki on that page although im not sure which- probably dpeends on your motherboard)
-
- Jun 27, 2013
-
- 35
-
- 0
-
- 18,540
- 1
-
#4
Found it, heres a link with instructions: http://hydra.geht.net/tino/howto/uefi/winki/
And heres a link to the winki installation that was missing from my msi driver cd: http://faenl.msi.com/index.php?dir=Mainboard/Utilities/ (youll need one of the last 2 files starting with Winki on that page although im not sure which- probably dpeends on your motherboard)
How do you get it to work. I installed it on C: but it still wont’ work for bios. And that installation guide didn’t help.

-
- Nov 4, 2006
-
- 47
-
- 0
-
- 18,540
- 2
-
#5
Edit: Still downloading teh big files 2 c..")
P.S.
Trying to add a «Picture [Ctrl + P]», but the forum isn’t displaying it 4 me? o.0

-
- Nov 4, 2006
-
- 47
-
- 0
-
- 18,540
- 2
-
#6
Scrn @ s3.postimg.org/6931dufv7/3_2_126.png
*

Edit: Sorz, hadn’t realized that it’s a thread from 2013! New topic @ ‘MSI Winki (3)’, tnx! :-$
- Advertising
- Cookies Policies
- Privacy
- Term & Conditions
- Topics
 Loading…
![]()
Z68A-G43 (G3)/ Z68S-G43 (G3) series
MS-7750 (v1.x) Mainboard
G52-77501XB
Preface
Copyright Notice
The material in this document is the intellectual property of MICRO-STAR INTERNA — TIONAL.
 We take every care in the preparation of this document, but no guarantee is given as to the correctness of its contents. Our products are under continual improvement and we reserve the right to make changes without notice.
Trademarks
All trademarks in this manual are properties of their respective owners.
MSI® is registered trademark of Micro-Star Int’l Co.,Ltd.
NVIDIA® is registered trademark of NVIDIA Corporation.
ATI® is registered trademark of AMD Corporation.
AMD® is registered trademarks of AMD Corporation.
Intel® is registered trademarks of Intel Corporation.
Windows® is registered trademarks of Microsoft Corporation.
AMI® is registered trademark of American Megatrends Inc.
Award® is a registered trademark of Phoenix Technologies Ltd.
Sound Blaster® is registered trademark of Creative Technology Ltd.
Realtek® is registered trademark of Realtek Semiconductor Corporation.
JMicron® is registered trademark of JMicron Technology Corporation.
Netware® is a registered trademark of Novell, Inc.
Lucid® is trademarks of LucidLogix Technologies, Ltd.
VIA® is registered trademark of VIA Technologies, Inc.
ASMedia® is registered trademark of ASMedia Technology Inc.
iPad, iPhone, and iPod are trademarks of Apple Inc.
|
Revision |
History |
|
|
Revision |
Revision History |
Date |
|
V1.0 |
First release for PCB 1.X (Europe version) |
2011/ 06 |
|
V1.1 |
Update release for PCB 1.X (Europe version) |
2011/ 08 |
ii
MS-7750
Technical Support

 Support
If a problem arises with your system and no solution can be obtained from the user’s manual, please contact your place of purchase or local distributor. Alternatively, please try the following help resources for further guidance.
◙Visit the MSI website for technical guide, BIOS updates, driver updates, and other information: http://www.msi.com/service/download
◙Contact our technical staff at: http://support.msi.com
Safety Instructions

Always read the safety instructions carefully.
Keep this User’s Manual for future reference.
Keep this equipment away from humidity.
Lay this equipment on a reliable flat surface before setting it up.
The openings on the enclosure are for air convection hence protects the equipment from overheating. DO NOT COVER THE OPENINGS.
Make sure the voltage of the power source is at 110/220V before connecting the equipment to the power inlet.
Place the power cord such a way that people can not step on it. Do not place anything over the power cord.
Always Unplug the Power Cord before inserting any add-on card or module.
All cautions and warnings on the equipment should be noted.
Never pour any liquid into the opening that can cause damage or cause electrical shock.
If any of the following situations arises, get the equipment checked by service personnel:
The power cord or plug is damaged.
Liquid has penetrated into the equipment.
The equipment has been exposed to moisture.
The equipment does not work well or you can not get it work according to User’s Manual.
The equipment has been dropped and damaged.
The equipment has obvious sign of breakage.
DONOTLEAVETHISEQUIPMENTINANENVIRONMENTABOVE60oC(140oF), IT MAY DAMAGE THE EQUIPMENT.
Preface
iii
Preface
FCC
 -B Radio Frequency
 Interference
 Statement
This equipment has been tested and found to comply with the limits for a Class
B digital device, pursuant to Part 15 of the FCC Rules. These limits are designed
to provide reasonable protection against
harmful interference in a residential installation. This equipment generates, uses and can radiate radio frequency energy and, if not installed and used in accordance with the instructions, may cause harmful interference to radio communications. However, there is no guarantee that interference will not occur in a particular installation. If this equipment does cause harmful interference to radio or television reception, which can be determined by turning the equipment off and on, the user is encouraged to try to correct the interference by one or more of the measures listed below.
Reorient or relocate the receiving antenna.
Increase the separation between the equipment and receiver.
Connect the equipment into an outlet on a circuit different from that to which the receiver is connected.
Consult the dealer or an experienced radio/television technician for help.
Notice 1
The changes or modifications not expressly approved by the party responsible for compliance could void the user’s authority to operate the equipment.
Notice 2
Shielded interface cables and A.C. power cord, if any, must be used in order to comply with the emission limits.
VOIR LA NOTICE D’INSTALLATION AVANT DE RACCORDER AU RESEAU.
Micro-Star International
MS-7750
This device complies with Part 15 of the FCC Rules. Operation is subject to the following two conditions:
1)this device may not cause harmful interference, and
2)this device must accept any interference received, including interference that may cause undesired operation.
iv

MS-7750
Battery Information

European Union:
Batteries, battery packs, and accumulators should not be disposed of as unsorted household waste. Please use the public collection system to return, recycle, or treat them in compliance with the local regulations.
Taiwan:
For better environmental protection, waste batteries should be collected separately for recycling or special disposal.
California, USA:
The button cell battery may contain perchlorate material and requires special handling when recycled or disposed of in California.
For further information please visit: http://www.dtsc.ca.gov/hazardouswaste/perchlorate/
CAUTION: There is a risk of explosion, if battery is incorrectly replaced.
Replace only with the same or equivalent type recommended by the manufacturer.
Preface
Chemical Substances Information
 Substances Information
Incompliancewithchemicalsubstancesregulations,suchastheEUREACHRegulation (Regulation EC No. 1907/2006 of the European Parliament and the Council), MSI provides the information of chemical substances in products at:
http://www.msi.com/html/popup/csr/evmtprtt_pcm.html
BSMI EMI
EMI


:
使用者會被要求採取某些適當的對策。
Preface
WEEE (Waste Electrical and Electronic Equipment) Statement
 (Waste Electrical

 and Electronic
 Equipment)
 Statement
ENGLISH


To protect the global environment and as an environmentalist, MSI must remind you that…
Under the European Union (“EU”) Directive on Waste Electrical and Electronic Equipment, Directive 2002/96/EC, which takes effect on August 13, 2005, products of “electrical and electronic equipment” cannot be discarded
as municipal wastes anymore, and manufacturers of covered electronic equipment will be obligated to take back such products at the end of their useful life. MSI will comply with the product take back requirements at the end of life of MSI-branded products that are sold into the EU. You can return these products to local collection points.
DEUTSCH
Hinweis von MSI zur Erhaltung und Schutz unserer Umwelt
Gemäß der Richtlinie 2002/96/EG über Elektround Elektronik-Altgeräte dürfen Elektro- und Elektronik-Altgeräte nicht mehr als kommunale Abfälle entsorgt werden. MSI hat europaweit verschiedene Sammelund Recyclingunternehmen beauftragt, die in die Europäische Union in Verkehr gebrachten Produkte, am Ende seines Lebenszyklus zurückzunehmen. Bitte entsorgen Sie dieses Produkt zum gegebenen Zeitpunkt ausschliesslich an einer lokalen Altgerätesammelstelle in Ihrer Nähe.
FRANÇAIS

En tant qu’écologiste et afin de protéger l’environnement, MSI tient à rappeler ceci…
Au sujet de la directive européenne (EU) relative aux déchets des équipement électriques et électroniques, directive 2002/96/EC, prenant effet le 13 août 2005, que les produits électriques et électroniques ne peuvent être déposés dans les décharges ou tout simplement mis à la poubelle. Les fabricants de ces équipements seront obligés de récupérer certains produits en fin de vie. MSI prendra en compte cette exigence relative au retour des produits en fin de vie au sein de la communauté européenne. Par conséquent vous pouvez retourner localement ces matériels dans les points de collecte.
РУССКИЙ
Компания MSI предпринимает активные действия по защите окружающей среды, поэтому напоминаем вам, что….
В соответствии с директивой Европейского Союза (ЕС) по предотвращению загрязнения окружающей среды использованным электрическим и электронным оборудованием (директива WEEE 2002/96/EC), вступающей в силу 13
августа 2005 года, изделия, относящиеся к электрическому и электронному оборудованию, не могут рассматриваться как бытовой мусор, поэтому производители вышеперечисленного электронного оборудования обязаны принимать его для переработки по окончании срока службы. MSI обязуется соблюдать требования по приему продукции, проданной под маркой MSI на территории EC, в переработку по окончании срока службы. Вы можете вернуть эти изделия в специализированные пункты приема.
vi
MS-7750
ESPAÑOL


MSI como empresa comprometida con la protección del medio ambiente, recomienda:
Bajo la directiva 2002/96/EC de la Unión Europea en materia de desechos y/o equipos electrónicos, con fecha de rigor desde el 13 de agosto de 2005, los productos clasificados como “eléctricos y equipos electrónicos” no pueden ser depositados en los contenedores habituales de su municipio, los fabricantes de equipos electrónicos, están obligados a hacerse cargo de dichos productos al termino de su período de vida. MSI estará comprometido con los términos de recogida de sus productos vendidos en la Unión Europea al final de su periodo de vida. Usted debe depositar estos productos en el punto limpio establecido por el ayuntamiento de su localidad o entregar a una empresa autorizada para la recogida de estos residuos.
NEDERLANDS
Om het milieu te beschermen, wil MSI u eraan herinneren dat….
De richtlijn van de Europese Unie (EU) met betrekking tot Vervuiling van Electrische en Electronische producten (2002/96/EC), die op 13 Augustus 2005 in zal gaan kunnen niet meer beschouwd worden als vervuiling. Fabrikanten van dit soort producten worden verplicht om producten retour te nemen aan het eind van hun levenscyclus. MSI zal overeenkomstig de richtlijn handelen voor de producten die de merknaam MSI dragen en verkocht zijn in de EU. Deze goederen kunnen geretourneerd worden op lokale inzamelingspunten.
SRPSKI
Da bi zaštitili prirodnu sredinu, i kao preduzeće koje vodi računa o okolini i prirodnoj sredini, MSI mora da vas podesti da…
Po Direktivi Evropske unije (“EU”) o odbačenoj ekektronskoj i električnoj opremi, Direktiva 2002/96/EC, koja stupa na snagu od 13. Avgusta 2005, proizvodi koji spadaju pod “elektronsku i električnu opremu” ne mogu više biti odbačeni kao običan otpad i proizvođači ove opreme biće prinuđeni da uzmu natrag ove proizvode na kraju njihovog uobičajenog veka trajanja. MSI će poštovati zahtev o preuzimanju ovakvih proizvoda kojima je istekao vek trajanja, koji imaju MSI oznaku i koji su prodati u EU. Ove proizvode možete vratiti na lokalnim mestima za prikupljanje.
POLSKI
Aby chronić nasze środowisko naturalne oraz jako firma dbająca o ekologię, MSI przypomina, że…
Zgodnie z Dyrektywą Unii Europejskiej (“UE”) dotyczącą odpadów produktów elektrycznych i elektronicznych (Dyrektywa 2002/96/EC), która wchodzi w życie 13 sierpnia 2005, tzw. “produkty oraz wyposażenie elektryczne i elektroniczne “ nie mogą być traktowane jako śmieci komunalne, tak więc producenci tych produktów będą zobowiązani do odbierania ich w momencie gdy produkt jest wycofywany z użycia. MSI wypełni wymagania UE, przyjmując produkty (sprzedawane na terenie Unii Europejskiej) wycofywane z użycia. Produkty MSI będzie można zwracać w wyznaczonych punktach zbiorczych.
Preface
vii
Preface
TÜRKÇE

Çevreci özelliğiyle bilinen MSI dünyada çevreyi korumak için hatırlatır:
Avrupa Birliği (AB) Kararnamesi Elektrik ve Elektronik Malzeme Atığı, 2002/96/EC Kararnamesi altında 13 Ağustos 2005 tarihinden itibaren geçerli olmak üzere, elektrikli ve elektronik malzemeler diğer atıklar gibi çöpe atılamayacak ve bu elektonik cihazların üreticileri, cihazların kullanım süreleri bittikten sonra ürünleri geri toplamakla yükümlü olacaktır. Avrupa Birliği’ne satılan MSI markalı ürünlerin kullanım süreleri bittiğinde MSI ürünlerin geri alınması isteği ile işbirliği içerisinde olacaktır. Ürünlerinizi yerel toplama noktalarına bırakabilirsiniz.
ČESKY
Záleží nám na ochraně životního prostředí — společnost MSI upozorňuje…
Podle směrnice Evropské unie (“EU”) o likvidaci elektrických a elektronických výrobků 2002/96/EC platné od 13. srpna 2005 je zakázáno likvidovat “elektrické a elektronické výrobky” v běžném komunálním odpadu a výrobci elektronických výrobků, na které se tato směrnice vztahuje, budou povinni odebírat takové výrobky zpět po skončení jejich životnosti. Společnost MSI splní požadavky na odebírání výrobků značky MSI, prodávaných v zemích EU, po skončení jejich životnosti. Tyto výrobky můžete odevzdat v místních sběrnách.
MAGYAR
Annak érdekében, hogy környezetünket megvédjük, illetve környezetvédőként fellépve az MSI emlékezteti Önt, hogy …
Az Európai Unió („EU”) 2005. augusztus 13-án hatályba lépő, az elektromos és elektronikus berendezések hulladékairól szóló 2002/96/EK irányelve szerint az elektromos és elektronikus berendezések többé nem kezelhetőek lakossági hulladékként, és az ilyen elektronikus berendezések gyártói kötelessé válnak az ilyen termékek visszavételére azok hasznos élettartama végén. Az MSI betartja a termékvisszavétellel kapcsolatos követelményeket az MSI márkanév alatt az EU-n belül értékesített termékek esetében, azok élettartamának végén. Az ilyen termékeket a legközelebbi gyűjtőhelyre viheti.
ITALIANO

Per proteggere l’ambiente, MSI, da sempre amica della natura, ti ricorda che….
In base alla Direttiva dell’Unione Europea (EU) sullo Smaltimento dei Materiali Elettrici ed Elettronici, Direttiva 2002/96/EC in vigore dal 13 Agosto 2005, prodotti appartenenti alla categoria dei Materiali Elettrici ed Elettronici non possono più essere eliminati come rifiuti municipali: i produttori di detti materiali saranno obbligati a ritirare ogni prodotto alla fine del suo ciclo di vita. MSI si adeguerà a tale Direttiva ritirando tutti i prodotti marchiati MSI che sono stati venduti all’interno dell’Unione Europea alla fine del loro ciclo di vita. È possibile portare i prodotti nel più vicino punto di raccolta
viii
MS-7750
Contents
|
Copyright |
Notice |
ii |
|
Trademarks |
ii |
|
|
Revision |
History |
ii |
|
Technical |
Support |
iii |
|
Safety Instructions |
iii |
|
|
FCC-B Radio Frequency Interference Statement |
iv |
|
|
Battery Information |
v |
|
|
Chemical Substances Information |
v |
|
|
BSMI EMI |
v |
|
|
WEEE (Waste Electrical and Electronic Equipment) Statement |
vi |
|
|
English |
En-1 |
Mainboard Specifications En-2 Connectors Quick Guide En-4 Connectors Reference Guide En-5 Back Panel Quick Guide En-6 CPU (Central Processing Unit) En-8 Mounting Screw Holes En-12 Power Supply En-13 Memory En-14 Expansion Slots En-16 Video/ Graphics Cards En-17 Internal Connectors En-18 Jumper En-24 BIOS Setup En-25 Software Information En-34
Deutsch De-1
Spezifikationen De-2 Anschlussübersicht De-4 Übersicht der Mainboard-Anschlüsse De-5 Rücktafel-Übersicht De-6 CPU (Prozessor) De-8 Schraubenlöcher für die Montage De-12 Stromversorgung De-13 Speicher De-14 Erweiterungssteckplätze De-16
Preface
ix

Preface
Video/ Grafikkarten De-17 Interne Anschlüsse De-18 Steckbrücken De-24 BIOS Setup De-25 Software-Information De-36
Français Fr
Fr -1
-1
Spécifications Fr-2 Guide Rapide Des Connecteurs Fr-4 Guide référence des connecteurs Fr-5 Guide rapide du panneau arrière Fr-6 Trous Taraudés de Montage Fr-12 Connecteurs d’alimentation Fr-13 Mémoire Fr-14 Emplacements d’extension Fr-16 Cartes Vidéo/ Graphics Fr-17 Connecteurs internes Fr-18 Cavalier Fr-24 Réglage BIOS Fr-25 Information Logiciel Fr-34
Русский Ru-1
Характеристики системной платы Ru-2 Краткое руководство по разъемам Ru-4 Справочное руководство по разъемам Ru-5 Разъемы на задней панели Ru-6 CPU (Центральный процессор) Ru-8 Отверстия под установочные винты Ru-12 Электропитание Ru-13 Память Ru-14 Слоты расширения Ru-16 Видео/ Видеокарты Ru-17 Разъемы Ru-18 Перемычки Ru-24 Настройка BIOS Ru-25 Сведения о программном обеспечении Ru-36
![]()
Europe version

MS-7750 Mainboard
Mainboard Specifications
Processor Support
■Intel® CoreTM i7/ CoreTM i5 /CoreTM i3/ Pentium®/ Celeron® processors for the LGA1155 package
(For the latest information about CPU, please visit http://www.msi.com/service/cpu-support)
Chipset
■ Intel® Z68 (B3) chipset
Memory Support
■4x DDR3 DIMMs support DDR3 2133*(OC)/ 1866*(OC)/ 1600*(OC)/ 1333/ 1066 DRAM (32GB Max)
■Supports Dual-Channel mode
(*OC = OverClocking, for more information on compatible components, please visit http://www.msi.com/service/test-report)
LAN
■ Supports LAN 10/100/1000 Fast Ethernet by Realtek® RTL8111E
Audio
■Integrated HD audio codec by Realtek® ALC887
■8-channel audio with jack sensing
SATA
■2x SATA 6Gb/s ports (SATA1~2) by Intel® Z68
■4x SATA 3Gb/s ports (SATA3~6) by Intel® Z68
RAID
■SATA1~6 support Intel® Rapid Storage Technology (AHCI/ RAID 0/ 1/ 5/ 10) by Intel® Z68
■Supports SSD caching for system acceleration
USB 3.0 (Z68A-G43 (G3))
■ 2x USB 3.0 rear IO ports by NEC D720200
Multi -GPU
-GPU
■Supports ATI® CrossFireXTM Technology
■Supports Lucid® VIRTU Technology
En-2

Connectors
■Back panel
—1x PS/2 keyboard port
—1x PS/2 mouse port
— 2x USB 3.0 ports & 4x USB 2.0 ports (Z68A-G43 (G3))
—6x USB 2.0 ports (Z68S-G43 (G3))
—1x LAN port
—1x VGA port **
—1x DVI-D port **
—6x audio ports (Z68A-G43 (G3))
—3x audio ports (Z68S-G43 (G3))***
**(The VGA and DVI-D ports only work with the CPU’s Integrated Graphics Processor)
***(To reach the 8-channel sound effect, the 7th and 8th channels must be outputted from front panel.)
■On-Board
—4x USB 2.0 connectors
—1x Chassis Intrusion connector
—1x S/PDIF-Out connector
—1x Front Panel Audio connector
—1x TPM Module connector (optional)
—1x Parallel connector
—1x Serial connector
Slots
■1x PCIe 3.0 x16 slot (PCI_E2)
■1x PCIe 2.0 x16 slot (PCI_E4, it supports up to x4 speed)
■2x PCIe 2.0 x1 slots
—Only 1x PCIe x1 (PCI_E1 or PCI_E3) slot can be used at a time due to chipset bandwidth limitation. Using the PCI_E1 slot is recommended.
■3x PCI slots
Form
 Factor

■ ATX (22.0 cm X 30.5 cm)
Mounting Screw Holes
■ 6x mounting holes
If you need to purchase accessories and request the part numbers, you could search the product web page and find details on our web address http://www.msi.com/index. php
Engl shi
En-3
MS-7750 Mainboard
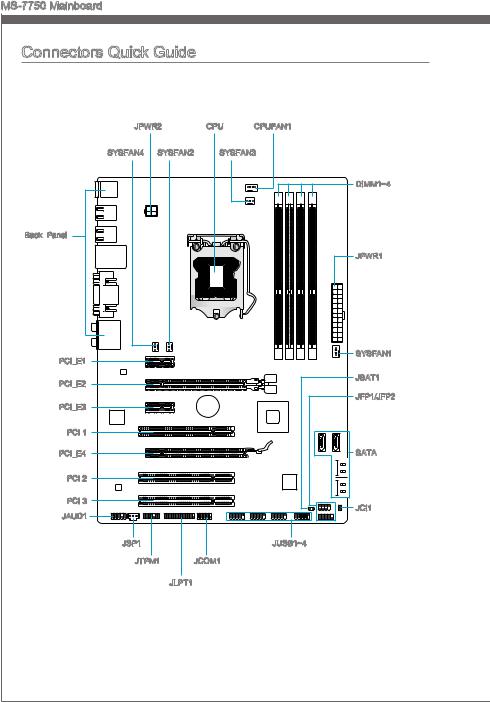
Connectors Quick Guide |
||||
|
JPWR2 |
CPU |
CPUFAN1 |
||
|
SYSFAN4 |
SYSFAN2 |
SYSFAN3 |
||
|
DIMM1~4 |
||||
|
Back Panel |
||||
|
JPWR1 |
||||
|
PCI_E1 |
SYSFAN1 |
|||
|
PCI_E2 |
JBAT1 |
|||
|
PCI_E3 |
JFP1/JFP2 |
|||
|
PCI 1 |
||||
|
PCI_E4 |
SATA |
|||
|
PCI 2 |
||||
|
PCI 3 |
JCI1 |
|||
|
JAUD1 |
||||
|
JSP1 |
JUSB1~4 |
|||
|
JTPM1 |
JCOM1 |
|||
|
JLPT1 |
||||
|
En-4 |

Connectors Reference Guide
|
Port Type |
Port Name |
Page |
|
LGA 1155 CPU Socket |
CPU |
En-8 |
|
ATX 24-pin Power Connector |
JPWR1 |
En-13 |
|
ATX 4-pin Power Connector |
JPWR2 |
En-13 |
|
DDR3 Memory Slots |
DIMM1~4 |
En-14 |
|
PCIe x16 Expansion Slots |
PCI_E2, 4 |
En-16 |
|
PCIe x1 Expansion Slots |
PCI_E1, 3 |
En-16 |
|
PCI Expansion Slots |
PCI 1, 2, 3 |
En-16 |
|
Serial ATA Connector |
SATA1~6 |
En-18 |
|
CPU Fan Power Connectors |
CPUFAN1 |
En-19 |
|
System Fan Power Connectors |
SYSFAN1~4 |
En-19 |
|
Front Panel Connectors |
JFP1, JFP2 |
En-20 |
|
Front Panel Audio Connector |
JAUD1 |
En-20 |
|
USB 2.0 Expansion Connectors |
JUSB1~4 |
En-21 |
|
S/PDIF-Out Expansion Connector |
JSP1 |
En-21 |
|
Chassis Intrusion Connector |
JCI1 |
En-22 |
|
TPM Module Connector |
JTPM1 |
En-22 |
|
Parallel Port Connector |
JLPT1 |
En-23 |
|
Serial Port Connector |
JCOM1 |
En-23 |
|
Clear CMOS Jumper |
JBAT1 |
En-24 |
Engl shi
En-5
 User Manual")
MS-7750 Mainboard
Back Panel Quick Guide
 Quick Guide
|
Z68A-G43 (G3) |
||||
|
Mouse |
LAN |
VGA Port |
||
|
USB 3.0 Port |
Line-In |
RS-Out |
||
|
Line-Out CS-Out |
||||
|
Mic |
SS-Out |
|||
|
Keyboard |
USB 2.0 Port |
USB 2.0 Port |
DVI-D Port |
|
Z68S-G43 (G3) |
|||
|
Mouse |
LAN |
VGA Port |
|
|
USB 2.0 Port |
Line-In |
||
|
Line-Out |
|||
|
Mic |
|||
|
Keyboard |
USB 2.0 Port |
USB 2.0 Port |
DVI-D Port |
Mouse/Keyboard
The standard PS/2® mouse/keyboard DIN connector is for a PS/2® mouse/keyboard.
USB 2.0 Port
The USB 2.0 port is for attaching USB 2.0 devices such as keyboard, mouse, or other USB 2.0-compatible devices.
USB 3.0 Port (optional)
USB 3.0 port is backward-compatible with USB 2.0 devices. It supports data transfer rate up to 5 Gbit/s (SuperSpeed).
Important
In order to use USB 3.0 devices, you must connect to a USB 3.0 port. If a USB cable is used, it must be USB 3.0 compliant.
En-6
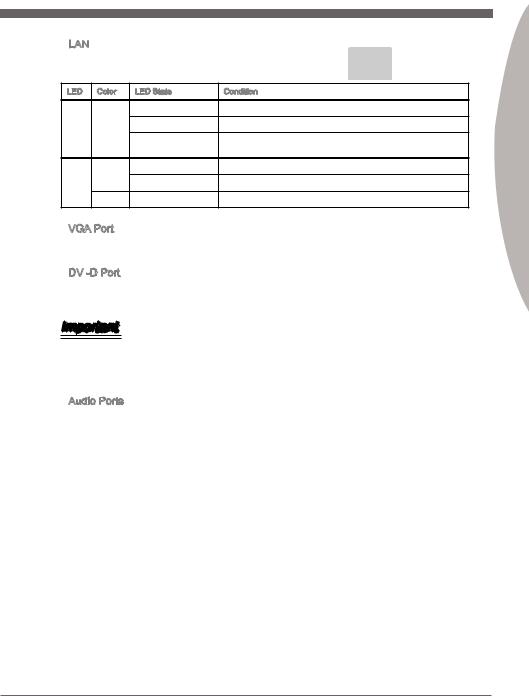
|
LAN |
||||
|
The standard RJ-45 LAN jack is for connecting to a Yellow |
Green/ Orange |
|||
|
Local Area Network (LAN). |
||||
|
LED |
Color |
LED State |
Condition |
|
|
Left |
Yellow |
Off |
LAN link is not established. |
|
|
On(Steady) |
LAN link is established. |
|||
|
On(flashing) |
The computer is communicating with another computer on the |
|||
|
network. |
||||
|
Right |
Green |
Off |
10 Mbits/sec data rate |
|
|
On |
100 Mbits/sec data rate |
|||
|
Orange |
On |
1000 Mbits/sec data rate |
VGA Port
The DB15-pin female connector is provided for monitor.
DVI -D Port
TheDVI-D(DigitalVisualInterface-Digital)connectorcanbeconnectedtoaLCDmonitor. To connect a monitor, please refer to the monitor’s manual for more information.
Important
The VGA and DVI-D display ports are designed to be used by the Integrated Graphics Processor (IGP). If the processor installed does not provide integrated graphics, these display ports will not function.
Audio Ports
These connectors are used for audio devices. The color of the jack refers to the function of the connector.
■Blue-Line in: Used for connecting external audio outputting devices.
■GreenLine out: Used as a connector for speakers or headphone.
■PinkMic: Used as a connector for a microphone.
■Black- RS-Out (optional): Rear surround sound line out in 4/ 5.1/ 7.1 channel mode.
■Orange- CS-Out (optional): Center/ subwoofer line out in 5.1/ 7.1 channel mode.
■Gray- SS-Out (optional): Side surround sound line out in 7.1 channel mode.
Engl shi
En-7
MS-7750 Mainboard
CPU (Central Processing Unit)
 Processing Unit)
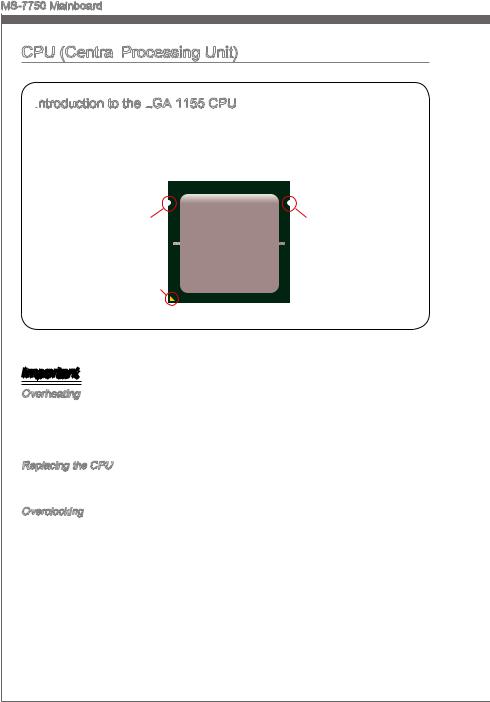
Introduction
 to the LGA
 1155 CPU
The surface of the LGA 1155 CPU has two alignment keys and a yellow triangle to assist in correctly lining up the CPU for motherboard placement. The yellow triangle is the Pin 1 indicator.
|
Alignment Key |
Alignment Key |
|
Yellow triangle is the |
|
|
Pin 1 indicator |
Important
Overheating
Overheating can seriously damage the CPU and motherboard. Always make sure the cooling fans work properly to protect the CPU from overheating. Be sure to apply an even layer of thermal paste (or thermal tape) between the CPU and the heatsink to enhance heat dissipation.
Replacing the CPU
When replacing the CPU, always turn off the system’s power supply and unplug the power supply’s power cord to ensure the safety of the CPU.
Overclocking
This motherboard is designed to support overclocking. Before attempting to overclock, please make sure that all other system components can tolerate overclocking. Any attempt to operate beyond product specifications is not recommend. MSI does not guarantee the damages or risks caused by inadequate operation beyond product specifications.
En-8
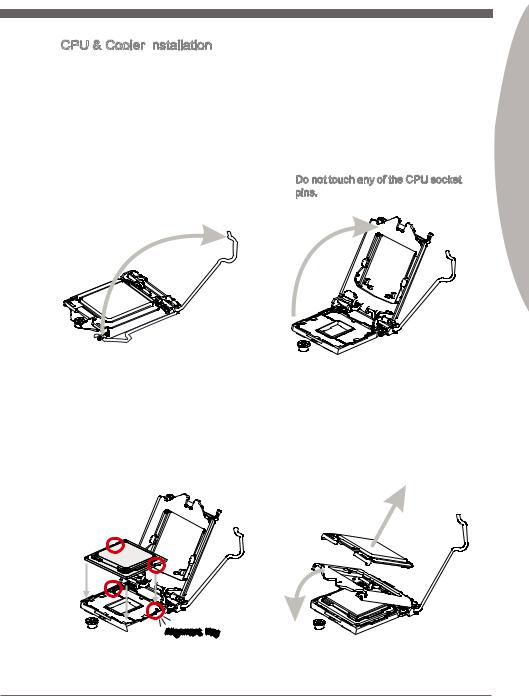
CPU & Cooler Installation
When installing a CPU, always remember to install a CPU cooler. A CPU cooler is necessary to prevent overheating and maintain system stability. Follow the steps below to ensure correct CPU and CPU cooler installation. Wrong installation can damage both the CPU and the motherboard.
|
1. Unhook and lift the loading lever to |
2. The loading plate should automati- |
|
the fully open position. |
cally lift up as the loading lever is |
|
pushed to the fully open position. |
|
|
Do not touch any of the CPU socket |
|
|
pins. |
Engl shi
3.Line up the CPU to fit the CPU socket. Be sure to hold the CPU by the base with the metal contacts facing downward. The alignment keys on the CPU will line up with the edges of the CPU socket to ensure a correct fit.
4.Close the loading plate and remove the plastic protective cap.

 Alignment Key
En-9
MS-7750 Mainboard
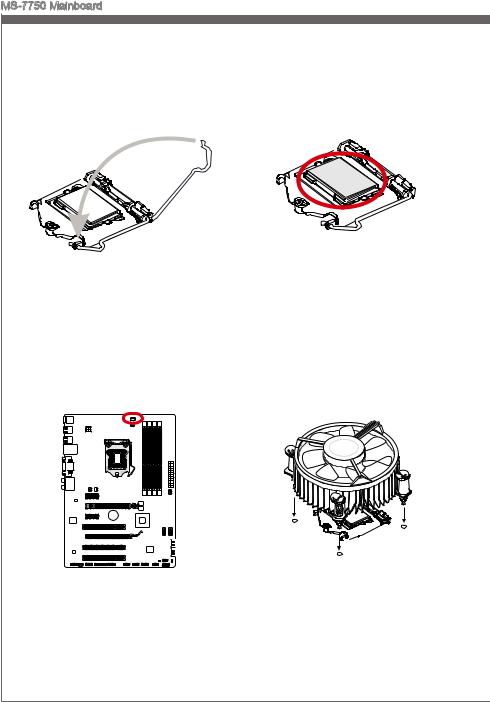
5.Inspect the CPU to check if it is properly seated in the socket. Press the loading lever down and lock it under the retention tab.
7.Locate the CPU fan connector on the motherboard.
6.Evenly spread a thin layer of thermal paste (or thermal tape) on the top of the CPU. This will help in heat dissipation and prevent CPU overheating.
8.Place the heatsink on the motherboard with the fan’s wires facing towards the fan connector and the hooks matching the holes on the motherboard.
En-10
![]()
9.Push down on the heatsink until the four clips get wedged into the holes on the motherboard. Press the four hooks down to fasten the cooler. As each hook locks into position a click should be heard.
10.Inspect the motherboard to ensure that the clip-ends have been properly locked in place.
Mainboard
Hook
Engl shi
11.Finally, attach the CPU fan cable to the CPU fan connector on the motherboard.
Important
•Do not touch the CPU socket pins.
•Confirm that the CPU cooler has formed a tight seal with the CPU before booting your system.
•Whenever the CPU is not installed, always protect the CPU socket pins by covering the socket with the plastic cap. (shown in Figure 1)
•Motherboard photos shown in this section are for demonstration purposes only. The appearance of your motherboard may vary depending on the model purchased.
•Please refer to the documentation in the CPU cooler package for more details about CPU cooler installation.
En-11
MS-7750 Mainboard
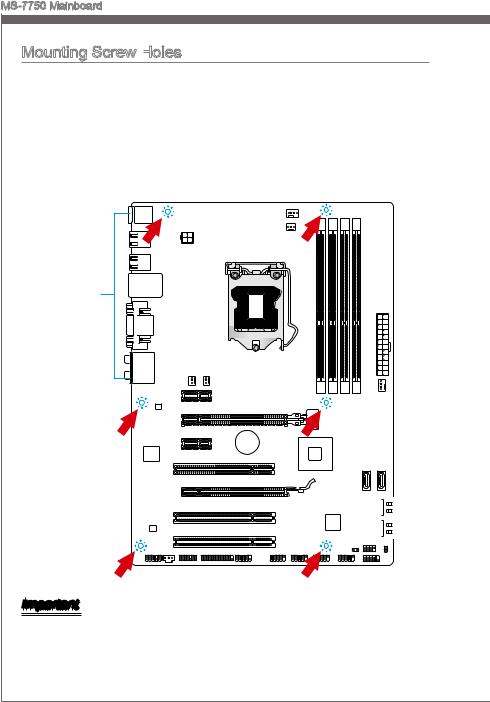
Mounting Screw Holes

When installing the mainboard, first install the necessary mounting stands required for a mainboard onngithe mounting plate in your computer case. If there is an I/O back plate
that came with the computer case, please replace it with the I/O backplate that came with the mainboardtoward package. The I/O backplate should snap easily into the computer case without the need for any screws. Align the mounting plate’s mounting stands with thi the screw holes on the mainboard and secure the mainboard with the screws provided
with yourthecomputer case. The locations of the screw holes on the mainboard are shown
|
below. For more information, please refer to the manual that came with the computer |
|||
|
case. |
holesnei |
||
|
thewonup |
|||
|
I/O |
the |
||
|
should |
I/OThe |
||
|
backplate |
the |
||
|
rear l |
|||
|
ports |
|||
|
of |
|||
|
. |
should |
||
|
computer |
|||
|
be |
|||
|
fac |
|||
|
They .case |
Important
•Install the mainboard on a flat surface free from unnecessary debris.
•To prevent damage to the mainboard, any contact between the mainboard circuitry and the computer case, except for the mounting stands, is prohibited.
•Please make sure there are no loose metal components on the mainboard or within the computer case that may cause a short circuit of the mainboard.
En-12
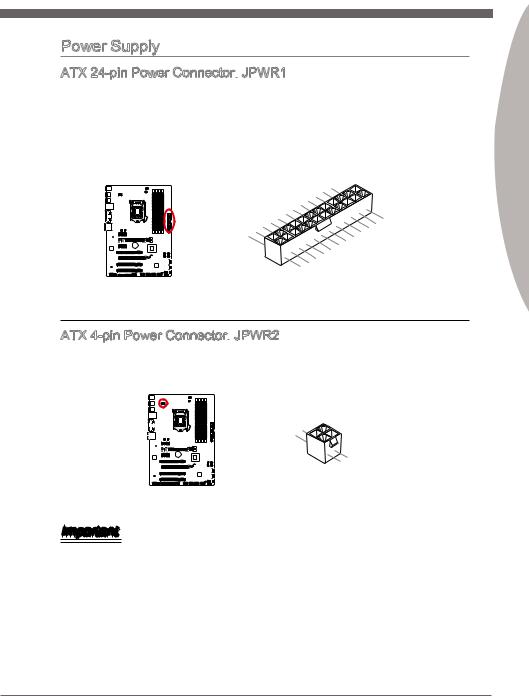
Power Supply
ATX 24-pin Power Connector:
 JPWR1
JPWR1
This connector allows you to connect an ATX 24-pin power supply. To connect the ATX 24-pin power supply, align the power supply cable with the connector and firmly press the cable into the connector. If done correctly, the clip on the power cable should be hooked on the mainboard’s power connector.
|
12 |
||||||||||||||||||||
|
11 |
. |
|||||||||||||||||||
|
7 |
10 |
. +3. |
||||||||||||||||||
|
+12V |
||||||||||||||||||||
|
9 . |
3 |
|||||||||||||||||||
|
8 |
. |
|||||||||||||||||||
|
V |
||||||||||||||||||||
|
6 . |
||||||||||||||||||||
|
5 . |
||||||||||||||||||||
|
1 |
4 |
. +5 |
||||||||||||||||||
|
3 . |
Ground |
|||||||||||||||||||
|
2 |
. +5 |
24 |
||||||||||||||||||
|
.GroundV |
||||||||||||||||||||
|
. |
V |
|||||||||||||||||||
|
. +3 |
3 |
|||||||||||||||||||
|
+3 |
||||||||||||||||||||
|
. |
23. |
|||||||||||||||||||
|
V |
||||||||||||||||||||
|
3 |
. |
|||||||||||||||||||
|
Ground |
||||||||||||||||||||
|
. +5 |
V |
|||||||||||||||||||
|
+5 |
||||||||||||||||||||
|
+5 |
V |
V |
||||||||||||||||||
|
.Ground |
||||||||||||||||||||
|
. |
— |
|||||||||||||||||||
|
13. |
— |
ON |
||||||||||||||||||
|
+3 12V |
# |
|||||||||||||||||||
|
3 |
||||||||||||||||||||
|
V |
ATX 4-pin Power Connector:
 JPWR2
JPWR2
This connector provides 12V power to the CPU.
|
1 |
|||||||||||||||
|
. |
|||||||||||||||
|
2 |
Ground |
||||||||||||||
|
. |
|||||||||||||||
|
Ground |
|||||||||||||||
|
3 |
||||
|
. |
||||
|
4 |
+12V |
|||
|
. |
||||
|
+12V |
||||
Important
Make sure that all the power cables are securely connected to a proper ATX power supply to ensure stable operation of the mainboard.
Engl shi
En-13
MS-7750 Mainboard
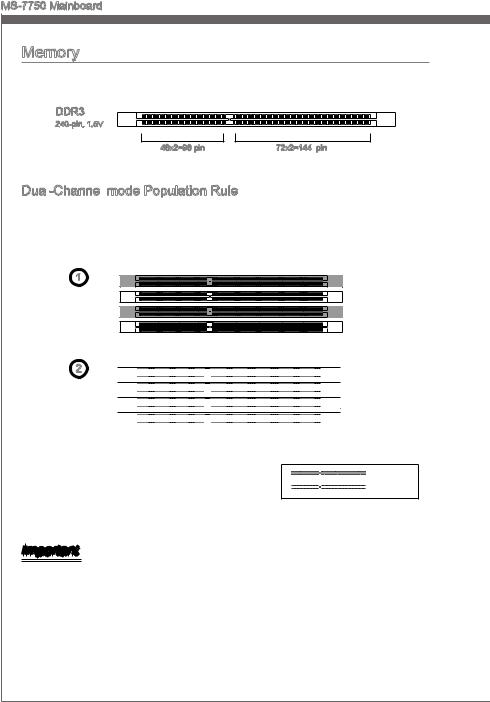
En-14

Installing Memory Modules
1.Unlock the DIMM slot by pushing the mounting clips to the side. Vertically insert the memory module into the DIMM slot. The memory module has an off-center notch on the bottom that will only allow it to fit one way into the DIMM slot.
2.Push the memory module deep into the DIMM slot. The plastic clips at each side of the DIMM slot will automatically close when the memory module is properly seated and an audible click should be heard.
3.Manually check if the memory module has been locked in place by the DIMM slot’s side clips.
Engl shi
En-15
MS-7750 Mainboard
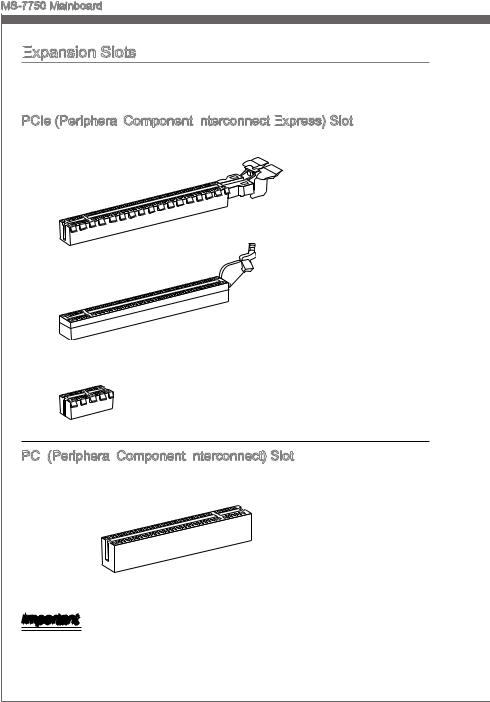
Expansion Slots

 Slots
SlotsThismainboardcontainsnumerousportsforexpansioncards,suchasdiscretegraphics or audio cards.
PCIe (Peripheral Component Interconnect
 Express)
 Slot
Slot
The PCIe slot supports the PCIe interface expansion card.
PCIe 3.0 x16 Slot
PCIe 2.0 x16 Slot
PCIe x1 Slot
PCI (Peripheral
 Component Interconnect)
 Slot
Slot
The PCI slot supports additional LAN, SCSI, USB, and other add-on cards that comply with PCI specifications.
32-bit PCI Slot
Important
When adding or removing expansion cards, always turn off the power supply and unplug the power supply power cable from the power outlet. Read the expansion card’s documentation to check for any necessary additional hardware or software changes.
En-16
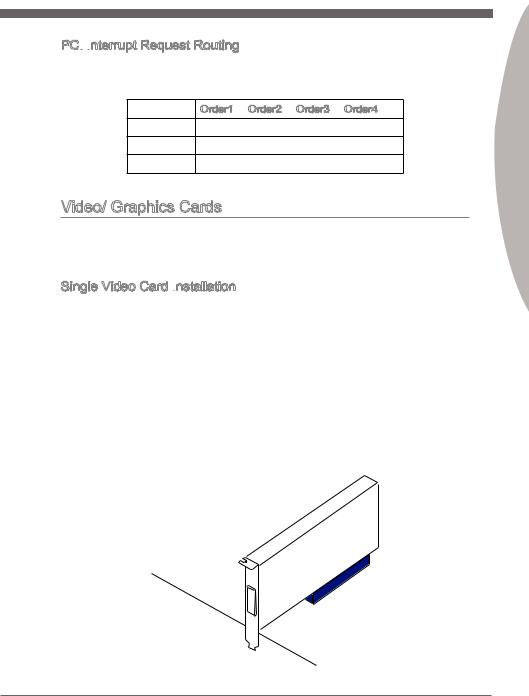
PCI
 Interrupt
 Request Routing
IRQ, or interrupt request lines, are hardware lines over which devices can send interrupt requests to the processor. The PCI IRQ pins are typically connected to the PCI bus pins as followed:
|
Order1 |
Order2 |
Order3 |
Order4 |
|
|
PCI Slot1 |
INT A# |
INT B# |
INT C# |
INT D# |
|
PCI Slot2 |
INT B# |
INT C# |
INT D# |
INT A# |
|
PCI Slot3 |
INT C# |
INT D# |
INT A# |
INT B# |
Video/ Graphics Cards
If available, this mainboard takes advantage of the CPU’s integrate graphics processor, but discrete video cards can be installed by way of the mainboard’s expansion slots. Addingononeormorediscretevideocardswillsignificantlyboostthesystem’sgraphics performance. For best compatibility, MSI graphics cards are recommended.
Single Video Card Installation
1.Determine what type of expansion slot(s) the video card will use. Locate the expansion slot(s) on the mainboard. Remove any protective expansion slot covers from the computer case.
2.Line up the video card on top of the expansion slot(s) with the display ports facing out of the computer case. For a single video card installation, using the PCI_E2 slot is recommended.
3.Push the video card into its expansion slot(s). Depending on the expansion slot(s) used, there should be clip(s) on the expansion slot(s) that will lock in place.
4.If needed, screw the edge of the graphics card to the computer case. Some video cards might require a power cable directly from the power supply.
5.Please consult your video card’s manual for further instructions regarding driver installation or other special settings.
Engl shi
En-17
MS-7750 Mainboard
Internal Connectors

 Connectors
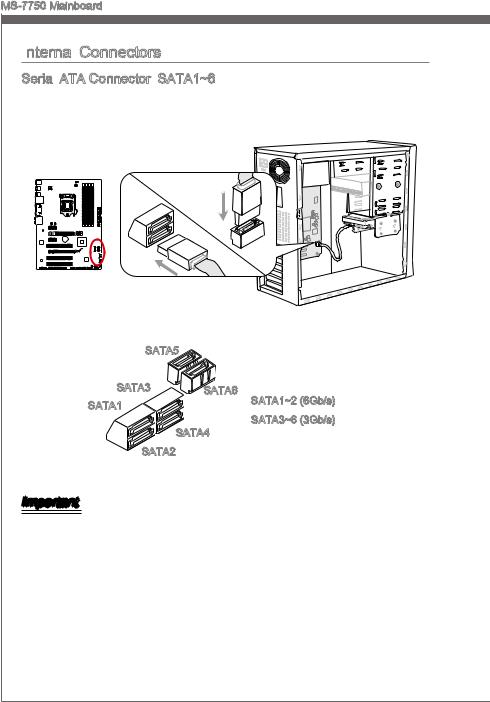
Serial ATA Connector:
 SATA1~6
This connector is a high-speed Serial ATA interface port. Each connector can connect to one Serial ATA device. Serial ATA devices include disk drives (HDD), solid state drives (SSD), and optical drives (CD/ DVD/ Blu-Ray).
|
* The MB layout in this figure is for reference only. |
|||
|
SATA5 |
|||
|
SATA3 |
SATA6 |
SATA1~2 (6Gb/s) |
|
|
SATA1 |
|||
|
SATA3~6 (3Gb/s) |
|||
|
SATA4 |
|||
|
SATA2 |
Important
•Many Serial ATA devices also need a power cable from the power supply. Such devices include disk drives (HDD), solid state drives (SSD), and optical drives (CD / DVD / Blu-Ray). Please refer to the device’s manual for further information.
•Many computer cases also require that large Serial ATA devices, such as HDDs, SSDs, and optical drives, be screwed down into the case. Refer to the manual that came with your computer case or your Serial ATA device for further installation instructions.
•Please do not fold the Serial ATA cable at a 90-degree angle. Data loss may result during transmission otherwise.
•SATA cables have identical plugs on either sides of the cable. However, it is recommended that the flat connector be connected to the mainboard for space saving purposes.
En-18
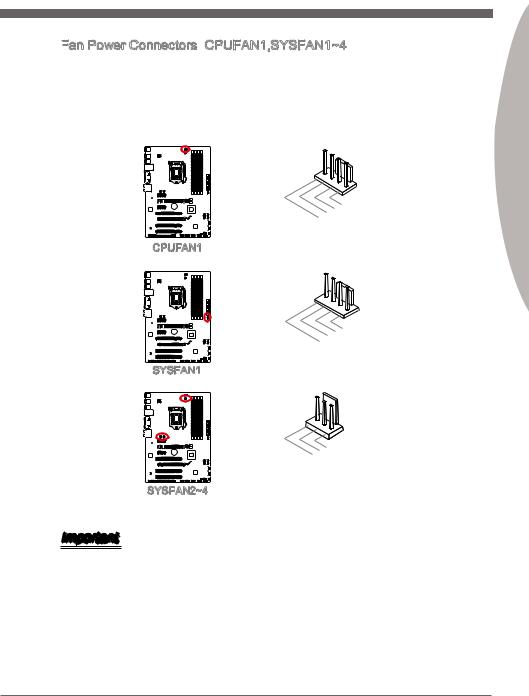
Fan Power Connectors:
 CPUFAN1,SYSFAN1~4
The fan power connectors support system cooling fans with +12V. If the mainboard has a System Hardware Monitor chipset on-board, you must use a specially designed fan with a speed sensor to take advantage of the CPU fan control. Remember to connect all system fans. Some system fans may not connect to the mainboard and will instead connect to the power supply directly. A system fan can be plugged into any available system fan connector.
|
1 |
||||||||
|
2 . |
||||||||
|
3 |
. G |
|||||||
|
+ r |
||||||||
|
4 |
. |
1 o |
||||||
|
S |
2 u |
|||||||
|
. |
e |
n |
||||||
|
C |
n V |
d |
||||||
|
o |
s |
|||||||
|
n |
o |
|||||||
|
t |
r |
|||||||
|
r |
||||||||
|
o |
||||||||
|
CPUFAN1 |
l |
|||||||
|
1 |
||
|
2 . |
||
|
+12VGround |
||
|
3 . |
||
|
4 . |
||
|
Sensor |
||
|
. |
||
|
No |
us |
|
|
SYSFAN1 |
e |
|
|
1 |
|
|
2 . |
|
|
. +12VGround |
|
|
3 . |
|
|
Sensor/ |
|
|
N |
|
|
SYSFAN2~4 |
o |
|
U |
|
|
se |
Important
•Please refer to your processor’s official website or consult your vendor to find recommended CPU cooling fans.
•TheCPUFAN1connectorsupportsSmartfancontrol.TheControlCenterutilitycanbe installed to automatically control the fan speed according to the CPU’s temperature.
•If there are not enough ports on the mainboard to connect all system fans, adapters are available to connect a fan directly to a power supply.
•Before first boot up, ensure that there are no cables impeding any fan blades.
Engl shi
En-19
MS-7750 Mainboard
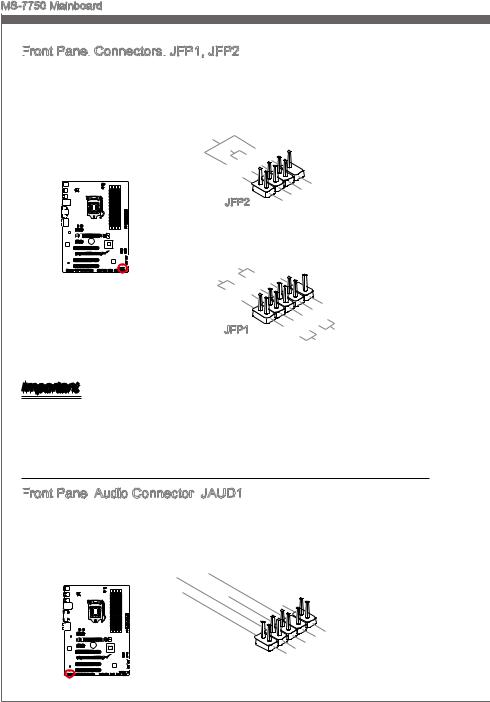
Front
 Panel
Panel
 Connectors:
 JFP1, JFP2
These connectors connect to the front panel switches and LEDs. The JFP1 connector is compliant with the Intel® Front Panel I/O Connectivity Design Guide. When installing the front panel connectors, please use the enclosed mConnectors to simplify installation. Plug all the wires from the computer case into the mConnectors and then plug the mConnectors into the mainboard.
|
Speaker |
6 |
+ |
|||||||||||||||||||||||||||
|
Buzzer |
|||||||||||||||||||||||||||||
|
8 |
|||||||||||||||||||||||||||||
|
4 |
. |
. |
|||||||||||||||||||||||||||
|
— |
|||||||||||||||||||||||||||||
|
2 |
. |
||||||||||||||||||||||||||||
|
+ |
|||||||||||||||||||||||||||||
|
. |
|||||||||||||||||||||||||||||
|
— |
|||||||||||||||||||||||||||||
|
7 |
|||||||||||||||||||||||||||||
|
3 |
5 . |
||||||||||||||||||||||||||||
|
. No |
|||||||||||||||||||||||||||||
|
JFP2 |
. |
Power |
n |
||||||||||||||||||||||||||
|
. |
Pi |
D |
|||||||||||||||||||||||||||
|
1 |
Suspend |
||||||||||||||||||||||||||||
|
Ground |
LE |
||||||||||||||||||||||||||||
|
LE |
|||||||||||||||||||||||||||||
|
P |
D |
||||||||||||||||||||||||||||
|
P |
ower |
S |
10 |
||||||||||||||||||||||||||
|
witch |
No |
||||||||||||||||||||||||||||
|
ower |
|||||||||||||||||||||||||||||
|
. |
Pi |
||||||||||||||||||||||||||||
|
LE |
|||||||||||||||||||||||||||||
|
D |
6 |
8 |
n |
||||||||||||||||||||||||||
|
— |
|||||||||||||||||||||||||||||
|
4 |
. |
. |
|||||||||||||||||||||||||||
|
+ |
|||||||||||||||||||||||||||||
|
2 |
. |
||||||||||||||||||||||||||||
|
— |
|||||||||||||||||||||||||||||
|
. |
|||||||||||||||||||||||||||||
|
+ |
9 |
||||||||||||||||||||||||||||
|
1 |
. |
||||||||||||||||||||||||||||
|
7 |
Reserve |
||||||||||||||||||||||||||||
|
5 |
. |
||||||||||||||||||||||||||||
|
+ |
|||||||||||||||||||||||||||||
|
3 |
. |
||||||||||||||||||||||||||||
|
— |
|||||||||||||||||||||||||||||
|
JFP1 |
. |
d |
|||||||||||||||||||||||||||
|
+ |
— |
||||||||||||||||||||||||||||
|
. |
Reset |
||||||||||||||||||||||||||||
|
S |
|||||||||||||||||||||||||||||
|
HDD |
LE |
||||||||||||||||||||||||||||
|
D |
witch |
||||||||||||||||||||||||||||
Important
•On the connectors coming from the case, pins marked by small triangles are positive wires. Please use the diagrams above and the writing on the mConnectors to determine correct connector orientation and placement.
•The majority of the computer case’s front panel connectors will primarily be plugged into JFP1.
Front Panel
Panel Audio Connector:
 JAUD1
JAUD1
This connector allows you to connect the front audio panel located on your computer case. This connector is compliant with the Intel® Front Panel I/O Connectivity Design Guide.
|
10 |
||||||||||||||||||
|
4 |
8 . |
|||||||||||||||||
|
. NoHead |
||||||||||||||||||
|
6 . |
P |
|||||||||||||||||
|
. MI |
Pi |
|||||||||||||||||
|
2 |
NC |
D |
hone |
|||||||||||||||
|
C n |
||||||||||||||||||
|
. |
||||||||||||||||||
|
Ground |
etection |
Detection |
||||||||||||||||
|
9 |
||||||||||
|
3 . |
. |
|||||||||
|
Head |
||||||||||
|
7 |
||||||||||
|
5 . |
||||||||||
|
. |
HeadSENSE |
P |
||||||||
|
. MI |
P |
hone |
||||||||
|
MI |
||||||||||
|
1 |
C |
_ |
||||||||
|
C |
R |
SEN |
||||||||
|
hone |
D |
|||||||||
|
L |
L |
|||||||||
|
R |
||||||||||
En-20
![]()
USB 2.0 Expansion
 Connectors:
 JUSB1~4
This connector is designed for connecting high-speed USB peripherals such as USB HDDs, digital cameras, MP3 players, printers, modems, and many others.
Engl shi
|
10 |
||||||
|
6 |
8 . |
|||||
|
. |
. NC |
|||||
|
USB1Ground |
||||||
|
4 |
. |
|||||
|
. |
+ |
|||||
|
VCUSB1 |
||||||
|
2 |
||||||
|
C |
— |
|
9 |
|||||||
|
5 |
. |
||||||
|
. No |
|||||||
|
7 |
|||||||
|
. |
USB0Ground |
||||||
|
Pin |
|||||||
|
3 . |
+ |
||||||
|
VCUSB0 |
|||||||
|
1 |
|||||||
|
. |
C |
||||||
|
— |
* The MB layout in this figure is for reference only.
USB Bracket (optional)
Important
Note that the VCC and GND pins must be connected correctly to avoid possible damage.
S/PDIF
 -Out Expansion
 Connector:
 JSP1
JSP1
This connector uses the S/PDIF (Sony & Phillips Digital Interconnect Format) interface for digital audio transmission.
|
1 |
||||||||||||||||||||||
|
2 . |
||||||||||||||||||||||
|
VC Ground |
||||||||||||||||||||||
|
. |
||||||||||||||||||||||
|
3 |
SPDIFC |
|||||||||||||||||||||
|
. |
||||||||||||||||||||||
* The MB layout in this figure is for reference only.
S/PDIF-Out Bracket (optional)
En-21

MS-7750 Mainboard
Chassis Intrusion
 Connector:
 JCI1
JCI1
This connector connects to the chassis intrusion switch cable. If the computer case is opened, the chassis intrusion mechanism will be activated. The system will record this intrusion and a warning message will flash on screen. To clear the warning, you must enter the BIOS utility and clear the record.
|
2 |
||||||||||||||||||||||||
|
. |
||||||||||||||||||||||||
|
1 |
G |
|||||||||||||||||||||||
|
. |
r |
|||||||||||||||||||||||
|
C |
o |
|||||||||||||||||||||||
|
I |
u |
|||||||||||||||||||||||
|
N |
n |
|||||||||||||||||||||||
|
T |
d |
|||||||||||||||||||||||
|
R |
||||||||||||||||||||||||
|
U |
||||||||||||||||||||||||
TPM Module Connector: JTPM1 (optional)
This connector connects to a TPM (Trusted Platform Module). Please refer to the TPM security platform manual for more details and usages.
TPM module is optional
|
14. |
|||||||||||||||||||||||||||||
|
1012. |
|||||||||||||||||||||||||||||
|
6 . |
No Ground |
||||||||||||||||||||||||||||
|
4 |
. 5V |
GroundP |
|||||||||||||||||||||||||||
|
. |
8 . |
||||||||||||||||||||||||||||
|
Serial |
|||||||||||||||||||||||||||||
|
. |
3V |
P in |
|||||||||||||||||||||||||||
|
Iower |
|||||||||||||||||||||||||||||
|
3 |
|||||||||||||||||||||||||||||
|
2 . |
|||||||||||||||||||||||||||||
|
3V St P |
RQ |
||||||||||||||||||||||||||||
|
ower |
|||||||||||||||||||||||||||||
|
andby |
p |
||||||||||||||||||||||||||||
|
ower |
|||||||||||||||||||||||||||||
|
13. |
||||||||||||||||||||||
|
5 |
911. |
LP |
F |
|||||||||||||||||||
|
. LP |
LPC |
|||||||||||||||||||||
|
1 |
7 . |
a |
C |
rame |
||||||||||||||||||
|
3 |
LP |
a |
||||||||||||||||||||
|
. |
Ca |
C |
a |
|||||||||||||||||||
|
. LP |
ddres |
|||||||||||||||||||||
|
. |
C |
ddres |
||||||||||||||||||||
|
LP |
C |
s |
d |
|||||||||||||||||||
|
C |
ddres |
s |
& |
|||||||||||||||||||
|
C |
R |
s |
& |
ata |
||||||||||||||||||
|
eset |
s |
& |
||||||||||||||||||||
|
lock |
& |
d |
ata |
p |
||||||||||||||||||
|
d |
at |
p |
in3 |
|||||||||||||||||||
|
at |
a |
|||||||||||||||||||||
|
a |
p in2 |
|||||||||||||||||||||
|
p in1 |
||||||||||||||||||||||
|
in0 |
* The MB layout in this figure is for reference only.
En-22

Parallel
 Port Connector:
 JLPT1
JLPT1
This connector is used to connect an optional parallel port bracket. The parallel port is a standard printer port that supports Enhanced Parallel Port (EPP) and Extended Capabilities Parallel Port (ECP) mode.
|
2 |
|||||||||||||||||||||||||||||||||||||||||||||||||||||||||||||||||||||||
|
6 |
|||||||||||||||||||||||||||||||||||||||||||||||||||||||||||||||||||||||
|
2 . |
|||||||||||||||||||||||||||||||||||||||||||||||||||||||||||||||||||||||
|
4 |
N |
||||||||||||||||||||||||||||||||||||||||||||||||||||||||||||||||||||||
|
2 . |
o |
||||||||||||||||||||||||||||||||||||||||||||||||||||||||||||||||||||||
|
2 |
2 |
G |
P |
||||||||||||||||||||||||||||||||||||||||||||||||||||||||||||||||||||
|
. |
r |
||||||||||||||||||||||||||||||||||||||||||||||||||||||||||||||||||||||
|
1 |
0 |
G |
o |
n |
|||||||||||||||||||||||||||||||||||||||||||||||||||||||||||||||||||
|
. |
r |
u |
|||||||||||||||||||||||||||||||||||||||||||||||||||||||||||||||||||||
|
1 |
8 |
G |
o |
n |
|||||||||||||||||||||||||||||||||||||||||||||||||||||||||||||||||||
|
. |
r |
u |
d |
||||||||||||||||||||||||||||||||||||||||||||||||||||||||||||||||||||
|
6 |
G |
o |
n |
||||||||||||||||||||||||||||||||||||||||||||||||||||||||||||||||||||
|
1 |
. |
r |
u |
d |
|||||||||||||||||||||||||||||||||||||||||||||||||||||||||||||||||||
|
G |
o |
n |
|||||||||||||||||||||||||||||||||||||||||||||||||||||||||||||||||||||
|
1 |
4 |
u |
|||||||||||||||||||||||||||||||||||||||||||||||||||||||||||||||||||||
|
. |
r |
n |
d |
||||||||||||||||||||||||||||||||||||||||||||||||||||||||||||||||||||
|
1 |
2 |
G |
o |
||||||||||||||||||||||||||||||||||||||||||||||||||||||||||||||||||||
|
. |
r |
u |
d |
||||||||||||||||||||||||||||||||||||||||||||||||||||||||||||||||||||
|
. G |
o |
n |
|||||||||||||||||||||||||||||||||||||||||||||||||||||||||||||||||||||
|
8 |
0 |
r |
|||||||||||||||||||||||||||||||||||||||||||||||||||||||||||||||||||||
|
G |
u |
d |
|||||||||||||||||||||||||||||||||||||||||||||||||||||||||||||||||||||
|
6 |
. |
o |
n |
||||||||||||||||||||||||||||||||||||||||||||||||||||||||||||||||||||
|
L |
o u |
d |
|||||||||||||||||||||||||||||||||||||||||||||||||||||||||||||||||||||
|
. |
P |
r |
n |
||||||||||||||||||||||||||||||||||||||||||||||||||||||||||||||||||||
|
4 |
u |
||||||||||||||||||||||||||||||||||||||||||||||||||||||||||||||||||||||
|
P |
T |
d |
|||||||||||||||||||||||||||||||||||||||||||||||||||||||||||||||||||||
|
. |
I |
_ |
n |
2 |
|||||||||||||||||||||||||||||||||||||||||||||||||||||||||||||||||||
|
E |
N |
d |
|||||||||||||||||||||||||||||||||||||||||||||||||||||||||||||||||||||
|
2 |
I |
S |
5 |
||||||||||||||||||||||||||||||||||||||||||||||||||||||||||||||||||||
|
. |
R |
T |
L |
2 |
S |
||||||||||||||||||||||||||||||||||||||||||||||||||||||||||||||||||
|
A |
R |
# |
I |
2 |
3 |
||||||||||||||||||||||||||||||||||||||||||||||||||||||||||||||||||
|
F |
# |
N |
. |
L |
|||||||||||||||||||||||||||||||||||||||||||||||||||||||||||||||||||
|
D |
# |
1 |
1 |
P |
C |
||||||||||||||||||||||||||||||||||||||||||||||||||||||||||||||||||
|
. |
E |
T |
|||||||||||||||||||||||||||||||||||||||||||||||||||||||||||||||||||||
|
# |
9 |
B |
|||||||||||||||||||||||||||||||||||||||||||||||||||||||||||||||||||||
|
1 . |
U |
||||||||||||||||||||||||||||||||||||||||||||||||||||||||||||||||||||||
|
7 |
A |
S |
|||||||||||||||||||||||||||||||||||||||||||||||||||||||||||||||||||||
|
1 . |
C |
||||||||||||||||||||||||||||||||||||||||||||||||||||||||||||||||||||||
|
1 |
5 |
P |
K |
Y |
|||||||||||||||||||||||||||||||||||||||||||||||||||||||||||||||||||
|
. |
R |
||||||||||||||||||||||||||||||||||||||||||||||||||||||||||||||||||||||
|
3 |
P |
# |
|||||||||||||||||||||||||||||||||||||||||||||||||||||||||||||||||||||
|
1 . |
R N |
||||||||||||||||||||||||||||||||||||||||||||||||||||||||||||||||||||||
|
1 |
P |
N |
D |
||||||||||||||||||||||||||||||||||||||||||||||||||||||||||||||||||||
|
9 . |
R |
7 |
|||||||||||||||||||||||||||||||||||||||||||||||||||||||||||||||||||||
|
7 |
. |
P |
N |
D |
|||||||||||||||||||||||||||||||||||||||||||||||||||||||||||||||||||
|
P |
R |
6 |
|||||||||||||||||||||||||||||||||||||||||||||||||||||||||||||||||||||
|
5 |
. |
R |
N |
D |
|||||||||||||||||||||||||||||||||||||||||||||||||||||||||||||||||||
|
P |
5 |
||||||||||||||||||||||||||||||||||||||||||||||||||||||||||||||||||||||
|
3 |
. |
R |
N |
D |
|||||||||||||||||||||||||||||||||||||||||||||||||||||||||||||||||||
|
P |
D |
4 |
|||||||||||||||||||||||||||||||||||||||||||||||||||||||||||||||||||||
|
1 |
. |
R |
N |
3 |
|||||||||||||||||||||||||||||||||||||||||||||||||||||||||||||||||||
|
P |
D |
||||||||||||||||||||||||||||||||||||||||||||||||||||||||||||||||||||||
|
. |
R |
N |
2 |
||||||||||||||||||||||||||||||||||||||||||||||||||||||||||||||||||||
|
R |
N |
D |
|||||||||||||||||||||||||||||||||||||||||||||||||||||||||||||||||||||
|
S |
D |
1 |
|||||||||||||||||||||||||||||||||||||||||||||||||||||||||||||||||||||
|
T |
|||||||||||||||||||||||||||||||||||||||||||||||||||||||||||||||||||||||
|
B |
0 |
||||||||||||||||||||||||||||||||||||||||||||||||||||||||||||||||||||||
|
# |
Serial
 Port Connector:
 JCOM1
JCOM1
This connector is a 16550A high speed communication port that sends/receives 16 bytes FIFOs. You can attach a serial device.
|
1 |
||||||||||
|
0 |
||||||||||
|
8 . |
||||||||||
|
6 |
. N |
|||||||||
|
C |
o |
|||||||||
|
. |
T |
P |
||||||||
|
4 |
D |
S |
i |
|||||||
|
S |
n |
|||||||||
|
2 |
. |
|||||||||
|
D |
R |
|||||||||
|
. |
T |
|||||||||
|
S |
R |
|||||||||
|
I |
||||||||||
|
N |
|
9 |
|||||||||
|
7 |
. |
||||||||
|
R |
|||||||||
|
5 |
. |
I |
|||||||
|
3 |
R |
||||||||
|
G |
T |
||||||||
|
. |
. |
r |
S |
||||||
|
1 |
|||||||||
|
S |
o |
||||||||
|
. |
O |
u |
|||||||
|
D |
U |
n |
|||||||
|
C |
d |
||||||||
|
T |
|||||||||
|
D |
Engl shi
En-23

MS-7750 Mainboard
Jumper
Clear CMOS Jumper:
 JBAT1
JBAT1
There is CMOS RAM onboard that is external powered from a battery located on the mainboard to save system configuration data. With the CMOS RAM, the system can automatically boot into the operating system (OS) every time it is turned on. If you want to clear the system configuration, set the jumpers to clear the CMOS RAM.
Important
YoucancleartheCMOSRAMbyshortingthisjumperwhilethesystemisoff.Afterwards, open the jumper . Do not clear the CMOS RAM while the system is on because it will damage the mainboard.
En-24

BIOS Setup
CLICK BIOS II is a revolutionary UEFI interface that allows you to setup and configure your system for optimum use. Using your mouse and keyboard, users can change BIOS settings, monitor CPU temperature, select the boot device priority and view system information such as the CPU name, DRAM capacity, the OS version and the BIOS version. Users can import and export parameter data for backup or for sharing with friends. By connecting to the Internet within CLICK BIOS II, users can browse webpages, check mail and use Live Update in your system.
Entering

Power on the computer and the system will start the Power On Self Test (POST) process. When the message below appears on the screen, please <DEL> key to enter CLICK BIOS II:
Press DEL key to enter Setup Menu, F11
 to enter Boot Menu
If the message disappears before you respond and you still need to enter CLICK BIOS II, restart the system by turning the computer OFF then back ON or pressing the RESET button. You may also restart the system by simultaneously pressing <Ctrl>, <Alt>, and <Delete> keys.
Important
The items under each BIOS category described in this chapter are under continuous update for better system performance. Therefore, the description may be slightly different from the latest BIOS and should be held for reference only.
Overview
After entering CLICK BIOS II, the following screen is displayed.
Temperature
monitor
Mode selection
BIOS menu selection
System information
Boot menu
Boot device priority bar
BIOS menu selection
Engl shi

MS-7750 Mainboard
Important
The pictures in this guide are for reference only and may vary from the product you purchased. Please refer to the actual screens of your system for detailed information.
Temperature monitor
This block shows the temperature of the processor and the mainboard.System information
This block shows the time, date, CPU name, CPU frequency, DRAM frequency, DRAM capacity and the BIOS version.
BIOS menu selection
The following options are available:
■SETTINGS — Use this menu to specify your settings for chipset features and boot devices.
■OC — This menu contains items of the frequency and voltage adjustments. Increasing the frequency can get better performance, however high frequency and heat can cause instability, we do not recommend general users to overclock.
■ECO
 — This menu is related to energy-saving settings.
■BROWSER — This feature is used to enter the MSI Winki web browser.
■UTILITIES — This menu contains utilities for backup and update.
■SECURITY — The security menu is used to keep unauthorized people from making any changes to the settings. You can use these security features to protect your system.
Boot device priority bar
You can move the device icons to change the boot priority.Boot menu
This button is used to open a boot menu. Click the item to boot the system from the device instantly.
Mode selection
This feature allows you to load presets of energy saving or overclocking.Menu display
This area provides BIOS settings and information to be configured.
Boot device priority bar
This bar shows the priority of the boot devices. The lighted icons indicate that the devices are available.
High priority  Low priority
Click and draw the icon to left or right to specify the boot priority.
En-26

Operation
CLICK BIOS II allows you to control BIOS settings with the mouse and the keyboard. The following table lists and describes the hot keys and the mouse operations.
|
Hot key |
Mouse |
Description |
|
<↑↓→← > |
Select Item |
|
|
Move the cursor |
||
|
<Enter> |
Select Icon/ Field |
|
|
Click/ Double- |
||
|
click the left |
||
|
button |
||
|
<Esc> |
Jump to the Exit menu or return to the previous from |
|
|
a submenu |
||
|
Click the right |
||
|
button |
||
|
<+> |
Increase the numeric value or make changes |
|
|
<-> |
Decrease the numeric value or make changes |
|
|
<F1> |
General Help |
|
|
<F4> |
CPU Specifications |
|
|
<F5> |
Enter Memory-Z |
|
|
<F6> |
Load optimized defaults |
|
|
<F10> |
Save Change and Reset |
|
|
<F12> |
Save a screenshot to a FAT/FAT32 USB drive |
Sub-Menu
If you find a point symbol to the left of certain fields, that means a sub-menu can be launched for additional options. You can use the arrow keys or mouse to highlight the field and press <Enter> or double-click the left mouse button to enter the sub-
menu. If you want to return to the previous menu, just press <Esc> or click the right mouse button.
General
 Help
Help

The General Help screen lists the appropriate keys to use for navigation. You can call up this screen from any menu by simply pressing <F1>. Press <Esc> to exit the Help screen.
En-27
Engl shi

MS-7750 Mainboard
OC Menu
This menu is for advanced users who want to overclock the mainboard.
Important
•Overclocking your PC manually is only recommended for advanced users.
•Overclocking is not guaranteed, and if done improperly, can void your warranty or severely damage your hardware.
•If you are unfamiliar with overclocking, we advise you to use OC Genie for easy overclocking.
Current CPU / DRAM Frequency

These items show the current clocks of CPU and Memory speed. Read-only.
CPU Base Frequency
 [10KHz]

Allows you to set the CPU Base clock (in 10KHz increments). You may overclock the CPU by adjusting this value. Please note that overclocking behavior and stability is not guaranteed.
Adjust CPU Ratio
Controls the multiplier that is used to determine internal clock speed of the processor. This feature can only be changed if the processor supports this function.
Adjusted CPU Frequency

It shows the adjusted CPU frequency. Read-only.
Adjust CPU Ratio in OS
OS
Enable this item to allow CPU ratio changes in the OS by using MSI Control Center.
Internal
 PLL Overvoltage
This item is used to adjust the PLL voltage.
En-28

EIST


Enhanced Intel SpeedStep technology allows you to set the performance level of the microprocessor whether the computer is running on battery or AC power. This field only appears with installed CPUs that support this technology.
Intel

 Turbo Boost
Enables or disables Intel Turbo Boost which automatically boosts CPU performance above rated specifications (when applications requests the highest performance state of the processor).
OC Genie Button Operation
This field is used to enable/ disable OC Genie function.
DRAM Frequency

This item allows you to adjust the DRAM frequency. Please note the overclocking behavior is not guaranteed.
Adjusted DRAM Frequency

It shows the adjusted DRAM frequency. Read-only.
DRAM Timing Mode
Select whether DRAM timing is controlled by the SPD (Serial Presence Detect) EEPROM on the DRAM module. Setting to [Auto] enables DRAM timings and the following “Advanced DRAM Configuration” sub-menu to be determined by BIOS based on the configurations on the SPD. Selecting [Link] or [Unlink] allows users to configure the DRAM timings for each channel and the following related “Advanced DRAM Configuration” sub-menu manually.
Advanced DRAM Configuration
Press <Enter> to enter the sub-menu.
Command Rate
This setting controls the DRAM command rate.
tCL
Controls CAS latency which determines the timing delay (in clock cycles) of starting a read command after receiving data.
tRCD
Determines the timing of the transition from RAS (row address strobe) to CAS (column address strobe). The less clock cycles, the faster the DRAM performance.
tRP
Controls number of cycles for RAS (row address strobe) to be allowed to pre-charge. If insufficient time is allowed for RAS to accumulate before DRAM refresh, the DRAM may fail to retain data. This item applies only when synchronous DRAM is installed in the system.
tRAS
Determines the time RAS (row address strobe) takes to read from and write to memory cell.
Engl shi
En-29

MS-7750 Mainboard
tRFC
This setting determines the time RFC takes to read from and write to a memory cell.
tWR
Determines minimum time interval between end of write data burst and the start of a pre-charge command. Allows sense amplifiers to restore data to cell.
tWTR
Determines minimum time interval between the end of write data burst and the start of a column-read command; allows I/O gating to overdrive sense amplifiers before read command starts.
tRRD
Specifies the active-to-active delay of different banks.
tRTP
Time interval between a read and a precharge command.
tFAW
This item is used to set the tFAW (four activate window delay) timing.tWCL
This item is used to set the tWCL (Write CAS Latency) timing.
tCKE
This item is used to set the Pulse Width for DRAM module.
tRTL
This item is used to set Round Trip Latency settings.
Advanced Channel
 1/ 2 Timing Configuration
Press <Enter> to enter the sub-menu. And you can set the advanced memory timing for each channel.
GT OverClocking
This item allows you to enable/ disable the overclocking of integrated graphics.
GT Ratio
Ratio
This setting controls the ratio of integrated graphics frequency to enable the integrated graphics to run at different frequency combinations.
Adjusted GT Frequency
It shows the adjusted integrated graphics frequency. Read-only.
Spread Spectrum
This function reduces the EMI (Electromagnetic Interference) generated by modulating clock generator pulses.
Important
•If you do not have any EMI problem, leave the setting at [Disabled] for optimal system stability and performance. But if you are plagued by EMI, select the value of Spread Spectrum for EMI reduction.
En-30
![]()
•The greater the Spread Spectrum value is, the greater the EMI is reduced, and the systemwillbecomelessstable.ForthemostsuitableSpreadSpectrumvalue, please consult your local EMI regulation.
•Remember to disable Spread Spectrum if you are overclocking because even a slight jitter can introduce a temporary boost in clock speed which may just cause your overclocked processor to lock up.
DRAM Voltage
This item is used to adjust the memory voltage.Overclocking Profiles
Press <Enter> to enter the sub-menu.
Overclocking Profile 1/ 2/ 3/ 4/ 5/ 6 Press <Enter> to enter the sub-menu.
Set Name for Overclocking Profile 1/ 2/ 3/ 4/ 5/ 6 Give a name by typing in this item.
Save Overclocking Profile 1/ 2/ 3/ 4/ 5/ 6
Save the current overclocking settings to ROM for selected profile.
Load/ Clear Overclocking Profile 1/ 2/ 3/ 4/ 5/ 6 Load/ Clear the stored profile settings from ROM.
Overclocking Profile Save
Save the current overclocking settings to USB drive.
Overclocking Profile Load
Load the stored settings from USB drive.CPU Specifications
Press <Enter> to enter the sub-menu. This sub-menu highlights all the key features of your CPU. The information will vary by model and is read-only. You can also access this information at any time by pressing [F4].
CPU Technology Support
Press <Enter> to enter the sub-menu. The sub-menu shows the installed CPU technologies. Read only.
MEMORY-Z
Press <Enter> to enter the sub-menu. This sub-menu highlights all the settings and timings of your DIMMs. This information will vary by model and is read-only. You can also access this information at any time by pressing [F5].
DIMM1~4 Memory SPD
Press <Enter> to enter the sub-menu. The sub-menu displays the informations of installed memory.
CPU Features

Press <Enter> to enter the sub-menu.
Active Processor Cores
This item allows you to select the number of active processor cores.
Engl shi
En-31

MS-7750 Mainboard
Limit CPUID Maximum
It is designed to limit the listed speed of the processor to older operating systems.
Execute
 Disable Bit
Can prevent certain classes of malicious “buffer overflow” attacks where worms can try to execute code to damage your system. It is recommended you keep this enabled always.
Intel
 Virtualization Tech
Enhances virtualization and allows the system to act as multiple virtual systems. See Intel’s official website for more information.
Intel
 VT
VT
 -D Tech
This item is used to enable/disable the Intel VT-D technology. For further information please refer to Intel’s official website.
Power Technology
This item allows you to select the Intel Dynamic Power technology mode.
C1E Support
Enable system to reduce CPU power consumption while idle. Not all processors support Enhanced Halt state (C1E).
OverSpeed Protection
Monitors current CPU draw as well as power consumption; if it exceeds a certain level, the processor automatically reduces its clock speed. For overclocking, it is recommended this feature is disabled.
Intel


 C-State
C-state is a power management state that detects when the system is idle and lowers power consumption accordingly.
Package C State limit

This field allows you to select a C-state mode.
Long
 duration power limit

 (W)
(W)
This field allows you to adjust the TDP power limit for the long duration.
Long
 duration maintained (ms)
This field allows you to adjust the maintaining time for long duration power limit.
Short duration power limit
 (W)
(W)
This field allows you to adjust the TDP power limit for the short duration.
Primary/ Secondary plane turbo power limit
 (W)
(W)
These fields allow you to adjust the TDP limit for the primary/ secondary plane turbo.
1/2/3/4-Core Ratio Limit

These fields show the 1/2/3/4 core ratio limit of CPU.
En-32

Updating the BIOS with Live
 Update
This section tells you how to update the BIOS by using the Live Update utility before entering Operating System. Live Update will update the BIOS automatically when connecting to the Internet. To update the BIOS with the Live Update utility:
|
1. Click Live Update button |
on the BIOS UTILITIES menu. (The Winki must be |
|
installed). |
2.Setup the connection by click the setting button if necessary.
3.Click the next button .
.
4.Live Update will automatically detect the version of BIOS and download the appropriate file.
5. Click the confirm button to update the BIOS.
Important
Do not unplug or shut off your system during BIOS Flash. Incorrect BIOS flashing can cause the motherboard to not POST. Please ensure you have the correct version and model of your motherboard BIOS before updating.
En-33
Engl shi

MS-7750 Mainboard
Software Information

Take out the Driver/Utility Disc that is included in the mainboard package, and place it into the optical drive. The installation will auto-run, simply click the driver or utility and follow the pop-up screen to complete the installation. The Driver/Utility Disc contains the:
—Driver menu : It provides available drivers. Install the driver by your desire and to activate the device.
—Utility menu : It allows you to install the available software applications.
—Service base menu : Through this menu to link the MSI officially website.
—Product info menu : It shows the newly information of MSI product.
—Security menu : It provides the useful antivirus program.
Important
Please visit the MSI officially website to get the latest drivers and BIOS for better system performance.
Installing
 Winki
Winki
BIOS BROWSER and UTILITIES request Winki, please install the «Winki» software application from MSI Driver Disc in Windows first. And then you can access these two features by clicking their respective buttons.
To install Winki, follow the steps below:
1.Power on your computer and enter Windows operating system.
2.Insert MSI Driver Disc into the optical drive. The setup screen will automatically appear.
3.Click Driver tab.
4.Click OTHERS button.
5.Select Winki to start installing.
6.When finished, restart your computer.
En-34

Europa Version