Почему так написано?
-
#

29 сентября 2008, 15:59
Недавно переустанавливал операционную систему Windows, и обратил внимание на одну фразу, появляющуюся в процессе установки: «Please wait while Windows sets up your computer…»
Вопрос:
1) Windows — множественное число. Почему тогда «sets»?
2) Почему используется время PS, а не PC? То есть «Windows are setting up»? -
#
Dimm
30 сентября 2008, 15:03Думаю,потому,что не «окна» установят,а «программа» установит. А Windows название программы. Насчет второго сказать не могу :))
-
#
Geos
1 октября 2008, 13:55Windows — не переводится в данном случае, это, так сказать, имя собственное.
А почему должно быть PC? -
#
Croners
1 октября 2008, 14:16PC — потому что это не постоянный процесс, а разовый и протекающий с настоящее время.
-
#
no matter
3 октября 2008, 11:04Нет. «Ждите пока Виндоуз установит…» — по смыслу получается отнесенность к будущему времени, а как известно в придаточных времени вместо Future Indefinite используется Present Simple.

27
На
чал
о
рабо
ты
4
Установка Windows.
Во время установки Windows для перемещения кур-
сора и выбора настроек используйте стилус.
( стр. 23)
A
Следуйте указаниям на экране.
После включения компьютера на экране появляется
надпись “Please wait while windows sets up your
computer ………” и затем на экране вращается не-
большой круг. Это продолжается несколько минут.
Установка Windows занимает около 20 минут.
Переходите к следующему шагу после подтвержде-
ния сообщений на дисплее.
Для некоторых языков обозначения символов на
клавиатуре и вводимые символы могут не соответс-
твовать друг другу. После завершения установки
правильно настройте клавиатуру. Затем установите
пароль.
ВНИМАНИЕ
Для имен пользователя и паролей нельзя исполь-
зовать следующие слова: CON, PRN, AUX,
CLOCK$, NUL, COM1 – COM9, LPT1 – LPT9.
После установки Windows вы можете изменить имя
пользователя, пароль, картинку и настройки безо-
пасности.
Запомните Ваш пароль. Если Вы забудете пароль,
Вы не сможете использовать Windows. Рекоменду-
ется заранее создать диск сброса пароля.
Фоновый рисунок рабочего стола при первом входе
пользователя уже установлен на этапе “4 Установка
Windows”.
При использовании компьютера на солнце, экран
будет лучше виден, если сменить фоновый рису-
нок рабочего стола на белый.
A
Правой кнопкой щелкните по рабочему столу,
затем щелкните [Personalize] — [Background].
B
Выберите [Solid Colors] под заголовком
[Location].
C
Выберите белый фоновый рисунок и щелкните
[OK].
На этапе настройки клавиатуры выберите тип
CF-U1_Vista_US(CPE02141ZA).indb 27
CF-U1_Vista_US(CPE02141ZA).indb 27
8/19/2009 10:05:51 AM
8/19/2009 10:05:51 AM
Windows installs, but hangs/BSOD when starting for first time.
-
Thread starteragrillo87
-
Start dateJun 23, 2017

-
- Apr 19, 2017
-
- 23
-
- 0
-
- 1,520
- 1
-
#1
Everything works, powers up, I load Windows Vista from usb formatted the HDD, when doing a clean oinstallation it goes through all the processes. Copies the files, expands the files, installs features, installs updates, completes installation. Reboots, after reboot it does the windows loading screen, then says please wait while windows sets up your computer. Then goes to a black screen with just the mouse on screen and sits, 10+ mins later it gives me a BSOD stop:0x000000f4 then restarts and says windows wasn’t shut down properly to start windows anyways or safe mode etc. It does this everytime I start the computer. I tried starting in safe mode and it does the same thing.
I’ve got an amd phenom ii x4 955 125w processor.
Asus HD6770 DirectCU Silent graphics card.
8gb 1333mhz ddr3 ram.
Thought maybe it was hardware so I pulled out the graphics card and used the integrated VGA, still did it.
I flash USB updated my bios thinking maybe it was the bios and that didn’t fix it either.
The biostar website says my PC is compatible with my ram, Vista OS, and processor. I assume it’s not my graphics card either being that it most likely wouldn’t work period or let me install Windows if it were an issue. I did notice when first running the PC before formatting and installing Windows when I selected the drive I wanted to install it had a caution symbol at the bottom left saying this drive may have compatibility issues. I formatted and installed anyways and here I am with issues.
My HDD is older, and my mobo is sata3 6gbs. And I’m pretty sure my HDD is sata2, being that it says it won’t excess 300gs.
If my mobo is sata3 and my HDD is sata2 would this cause the issue?
I’m seeing a lot of info about sata being backwards compatible and it shouldn’t cause an issue. I don’t know what to do..
Someone please help me!
-
- Apr 19, 2017
-
- 23
-
- 0
-
- 1,520
- 1
-
#2
-
- Apr 19, 2017
-
- 23
-
- 0
-
- 1,520
- 1
-
#2
- Advertising
- Cookies Policies
- Privacy
- Term & Conditions
- Topics
I’ve been skipping the template part in some cases, just deploying from a cold bare-bones VM (now with tools). The clone goes through it’s thing (takes about 15 minutes), Win2008 boots up, then reboots to start the sysprep process. I can see that the sysprep process makes it’s way through several steps in the sysprep process:
vmware image customization is in progress…
Please wait while windows sets up your computer
Please wait while Windows continues setting up your computer
windows could not parse or process unattend answer file [c:windowsPantherunattend.xml for pass . The settings specified in the answer file cannot be applied. The error was detected while processing settings for component .
The guest goes into a reboot cycle that is not easily recovered from.
So a clone just finished and the error is a little different:
«Windows could not parse or process the unattended answer file for pass . The settings specified in the answer file cannot be applied. The error was detected while processing settings for component .»
Goes into a nasty reboot loop after this. This particular message is in the vCenter release notes, I’m going to focus on that. Has a comment about a bogus license key but I’ve used 2 MAK keys so far…
Ben
☑️ Please Wait While Windows Setup… Stuck [Full Fix]
– Reviews News
- Users often complain that they cannot start MS Office software.
- A configuration window gives them a hard time.
- If you’re having trouble sending a command to the program, check out our fixes below.
XINSTALL BY CLICKING ON THE DOWNLOAD FILE
To fix various PC problems, we recommend Restoro PC Repair Tool:
This software will fix common computer errors, protect you against file loss, malware, hardware failure, and optimize your PC for maximum performance. Solve PC problems and remove viruses now in 3 easy steps:
- Download Restoro PC Repair Tool which is accompanied by patented technologies (patent available here).
-
Click start analysis to find Windows issues that could be causing problems for the PC.
-
Click fix everything to troubleshoot issues that affect the security and performance of your computer
- Restoro has been downloaded by 0 readers this month.
When you open the software, a settings window may sometimes open. However, some MS Office users are stuck with a settings dialog that opens every time they launch one of the applications in the suite.
The configuration window indicates Please wait while Windows configures Microsoft Office.
The software still opens, but the settings window still pops up whenever some Microsoft Office users launch the apps. As a result, applications do not start particularly quickly.
This settings dialog error affects multiple versions of Office. This is how you can get rid of this setup window if it keeps opening when you start MS Office software.
How can I fix Office update error, please wait a moment?
- Try Stellar Repair Toolkit
- Repair Microsoft Office via Control Panel
- Open the Microsoft Easy Fix 50780 tool
- Select the Windows search option
- Enter registry keys in Run
- Disable MS Office add-ons
1. Try Stellar Repair Toolkit
You are used to getting the most out of this family of software and client services developed by Microsoft. However, Microsoft Office configuration problems appear quite frequently.
Instead of imagining the worst case scenario, we suggest you waste no more time and download Stellar Repair Toolkit.
This handy multi-purpose utility is known to easily repair corrupt Microsoft Office documents: Word, Excel, PowerPoint and even PDF files.
It doesn’t matter if they get corrupted due to improper system shutdown, compression errors or virus attacks. The result is guaranteed and you will be able to run the applications in the suite again.
Stellar Repair Toolbox
Looking for a way to fix MS Office installation issues? There is no better option than Stellar Repair Toolkit!
2. Repair Microsoft Office via Control Panel
1. Press the button Windows + R keys at the same time.
2. The Run dialog box will open on the screen.
3. Enter appwiz.cpl Click Run and click OK.
4. Select the MS Office package from the list.
5. Press the button Change then click Yes to confirm.
6. Select the Repairs option and click Carry on.
7. For MS Office 2016, select the most complete online repair then click Repairs.
8. Wait for the repair process to complete.
9. Check if the problem persists.
Expert tip: Some PC issues are hard to fix, especially when it comes to corrupt repositories or missing Windows files. If you are having difficulty correcting an error, your system may be partially damaged. We recommend that you install Restoro, a tool that will analyze your machine and identify what is wrong.
Click here to download and start repairing.
Repairing corrupt MS Office installations may remove the setup dialog. To do this, you need to go to the Programs and Features menu and manually set up a repair process for the application.
3. Open the Microsoft Easy Fix 50780 tool
There is a Microsoft Easy Fix 50780 tool specifically designed to fix configuration windows that keep opening for MS Office 2010 applications.
This tool is probably not ideal for the latest versions of Office, but it can remove the settings window for Office 2010 applications.
Click on the Dump on this page Microsoft Easy Fix to register the tool in Windows. You can then open this tool’s easy repair wizard to fix the settings window.
4. Select Windows search option
- Open the Run in Windows accessory.
- Grab appwiz.cpl in the Run text box and click the Okay button.
- Click Turn Windows features on or off to open the window in the snapshot just below.
- Then select the window search option if it is not currently checked, and press the key Okay button. Note that the Windows Windows Features window in Windows 10 does not include these settings.
You may be running a 32-bit version of MS Office on a 64-bit platform. If so, a 64-bit Microsoft Office Components window appears when you launch the applications.
If it’s the settings dialog that opens, enable Windows Search in Windows 10 as described above.
5. Enter registry keys in Run
Some Microsoft Office users solved the Windows installation dialog error by adding new keys to the registry. You can do this with Run instead of Registry Editor.
So open Run with Windows key + R keyboard shortcut and separately enter the following registry keys in the Run text box:
- registry add HKCUSoftwareMicrosoftOffice15.0OutlookOptions /v NoReReg /t REG_DWORD /d 1
- registry add HKCUSoftwareMicrosoftOffice15.0WordOptions /v NoReReg /t REG_DWORD /d 1
- registry add HKCUSoftwareMicrosoftOffice15.0ExcelOptions /v NoReReg /t REG_DWORD /d 1
- registry add HKCUSoftwareMicrosoftOffice15.0PowerpointOptions /v NoReReg /t REG_DWORD /d 1
- registry add HKCUSoftwareMicrosoftOffice15.0AccessOptions /v NoReReg /t REG_DWORD /d 1
Each registration key corresponds to one of the five Office suites. Please note that the MS Office version number in the above registry keys (15.0) is for MS Office 2013.
You will need to change this number for alternate versions of the Office suite. For example, the version number of MS Office 2010 is 14.0.
So you will enter the following key for Word 2010: reg add HKCUSoftwareMicrosoftOffice14.0WordOptions /v NoReReg /t REG_DWORD /d 1
MS Office 2016 users will need to change the version number to 16.0.
6. Disable MS Office Plugins
- Open an MS Office application.
- Click Record and select Choice to open a configuration window.
- Select the Plugins tab to open a list of plugins.
- Select COM plugins in the drop-down menu.
- press the Let’s go to open the COM add-in window.
- Now deselect all selected plugins listed there.
- press the Okay in the COM add-in window.
- Close and reopen Microsoft Office.
The Windows Settings dialog box may keep opening due to third-party Office add-ins. To see if this is the case, deactivate all your MS Office plugins.
You can disable Office 2016 Add-ins as described above.
To learn more about similar issues, feel free to visit this Windows 10 troubleshooting section.
For a world-class experience, we also encourage you to bookmark our Microsoft Office Center.
Here are some resolutions that might remove a stuck Windows setup dialog for MS Office or help fix U problemUpdate desktop, wait a moment error.
The Office software should eventually start much faster. Let us know if this happened to you too in the comment box below.
Still having problems? Fix them with this tool:
- Download this PC Repair Tool rated Excellent on TrustPilot.com (download begins on this page).
- Click start analysis to find Windows issues that could be causing problems for the PC.
- Click fix everything to solve problems with patented technologies (exclusive discount for our readers).
Restoro has been downloaded by 0 readers this month.
SOURCE: Reviews News
Don’t forget to share our article on social networks to give us a solid boost. 🧐
5.2.1.7 Lab – Install Windows 7 or Vista (Answers)
Introduction
In this lab, you will install the Windows 7 or Vista operating system.
Recommended Equipment
- A computer with a blank hard disk drive
- Windows 7 or Vista installation DVD or USB flash drive
Part 1: Windows 7 Installation
Step 1: Starting the Installation Media
a. Insert the Windows 7 installation DVD into the DVD-ROM drive or plug the USB flash drive into a USB port.
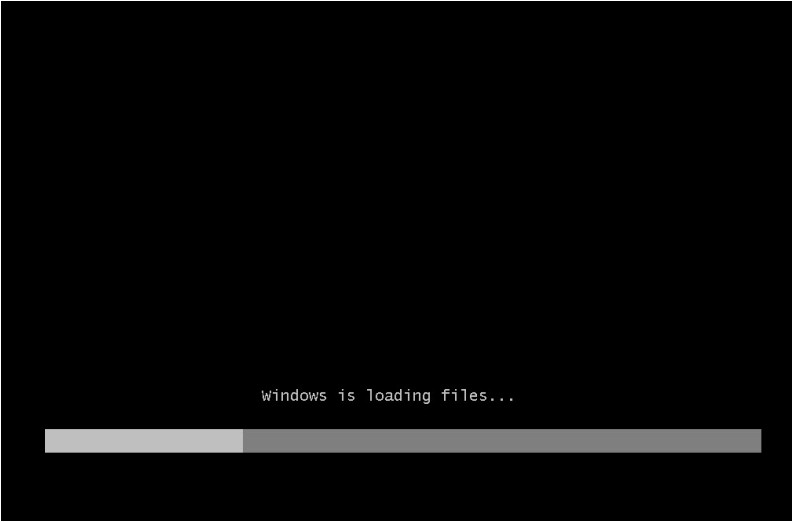
b. When the computer starts up, watch for the message Press any key to boot from CD or DVD. If the message appears, press any key on the keyboard to boot the computer from the DVD. If the press any key message does not appear, the computer automatically starts loading files from the DVD.

c. The computer starts loading files from the DVD or USB flash drive.
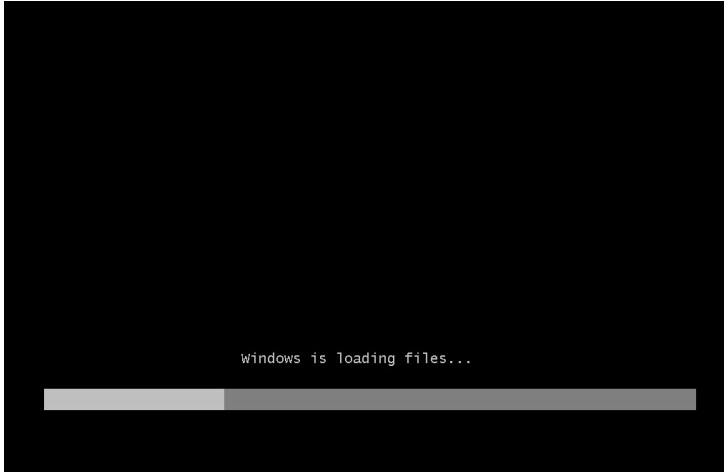
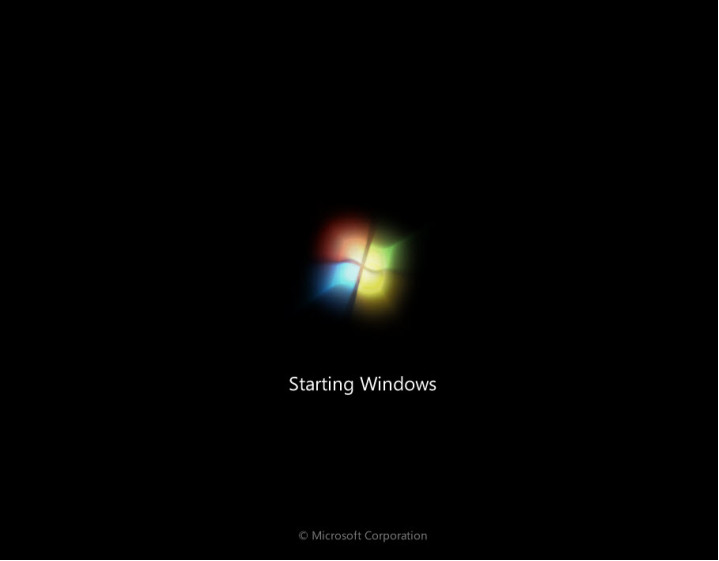
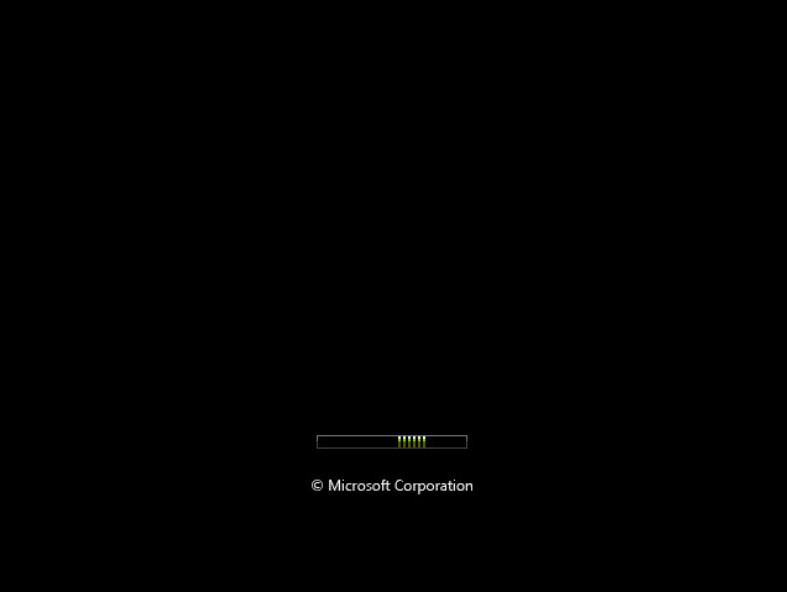
d. The Windows 7 boot screen appears.
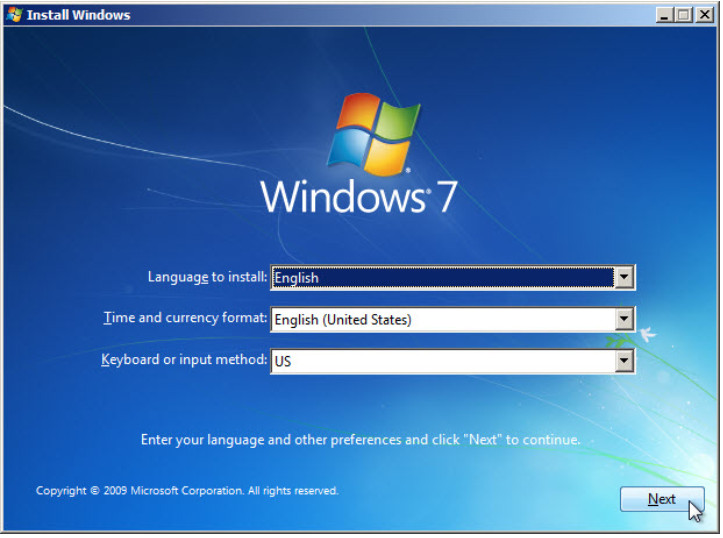
Step 2: Configuring Initial Settings
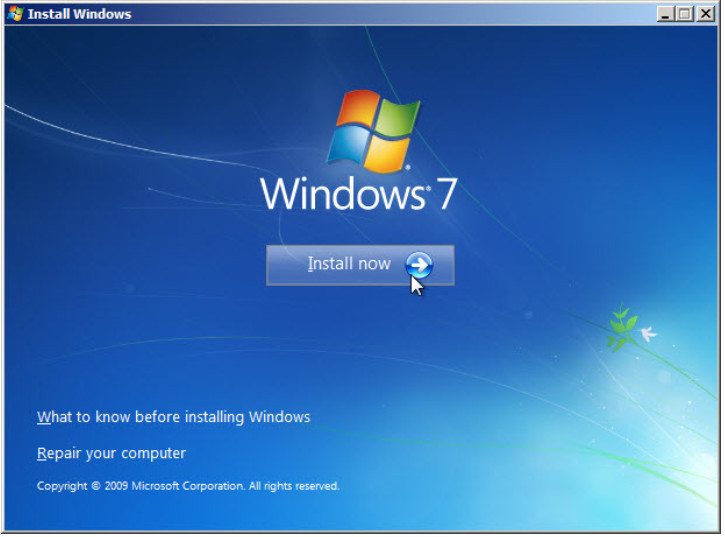
a. The Install Windows window opens. Press Next unless you need to change the default settings.
b. Press Install now to continue.
Step 3: Collecting Information
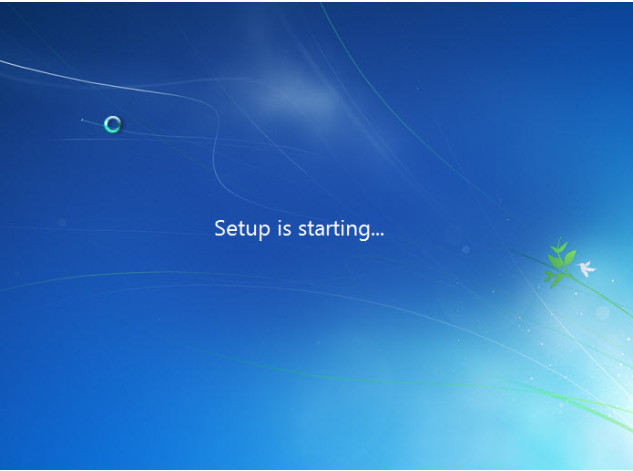
a. The Setup is starting… screen appears.
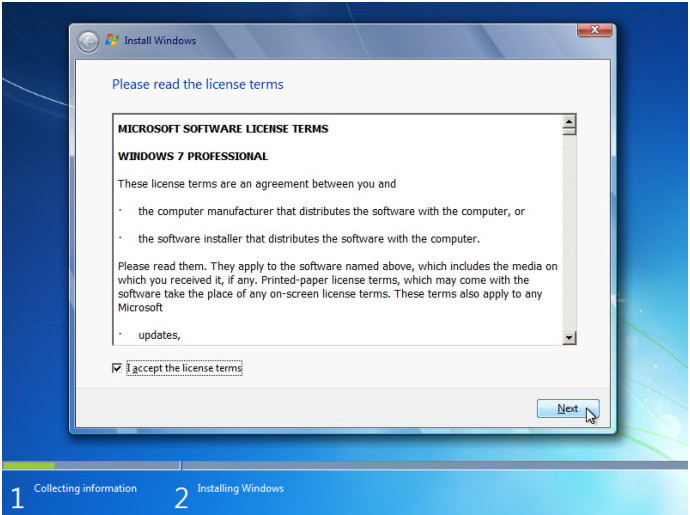
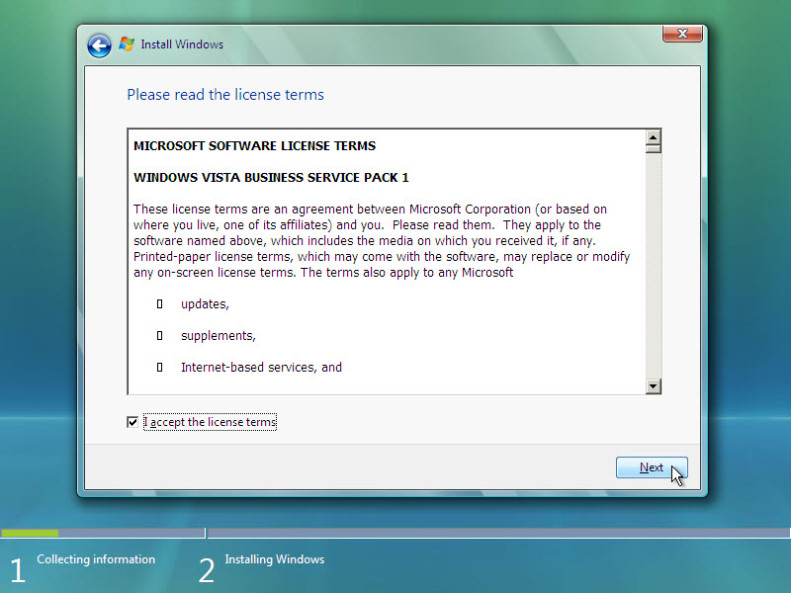
b. The Please read the license terms window opens. Read and confirm that you accept the license by selecting I accept the license terms. Click Next.
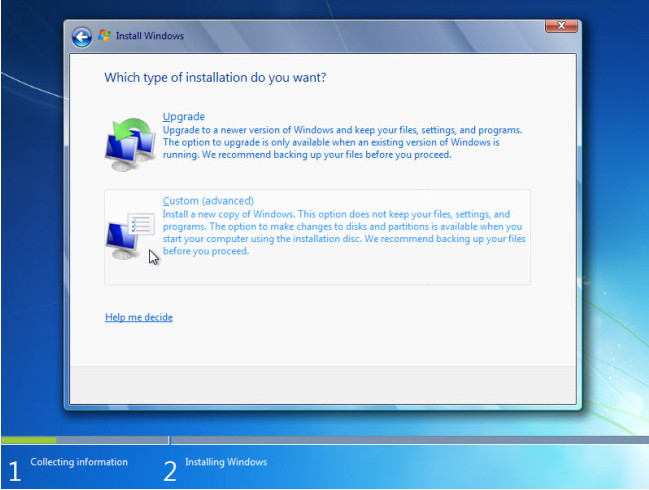
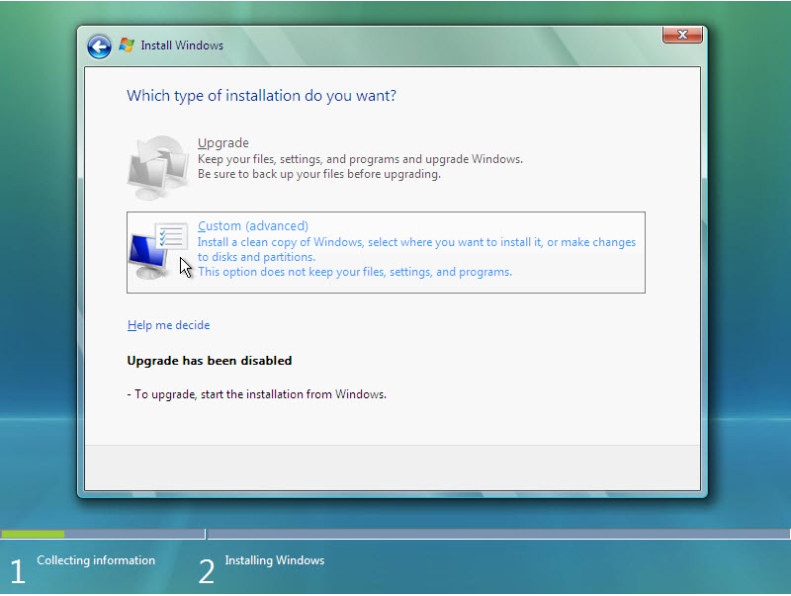
c. When the Which type of installation do you want? window opens, click Custom (advanced) to continue.
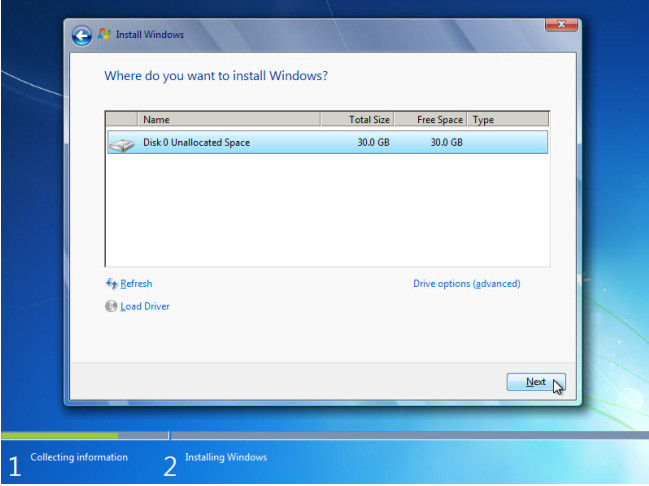
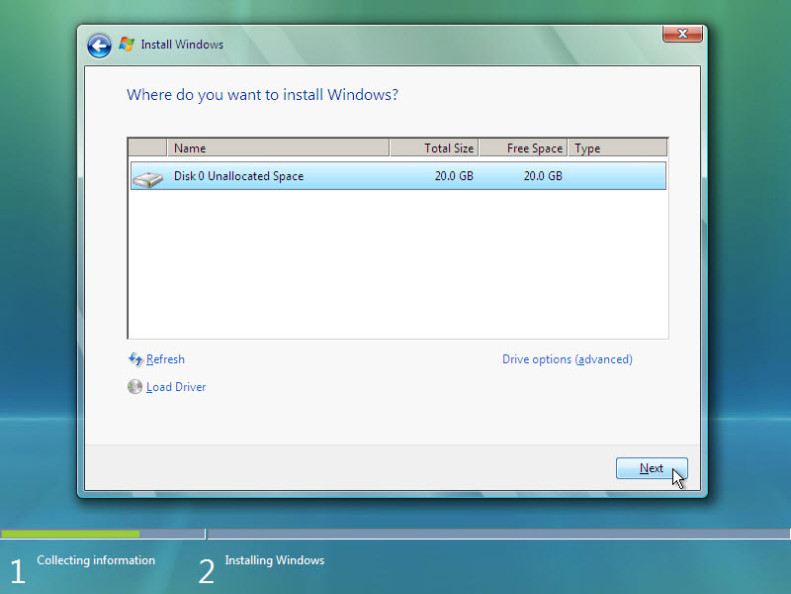
d. The Where do you want to install Windows? window opens. Select the hard drive or partition on which Windows 7 will be installed. Click Next to select Disk 0 Unallocated Space, which is the default setting.
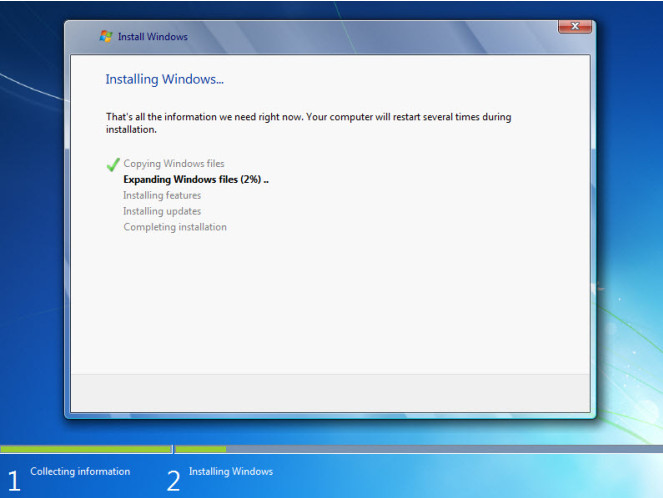
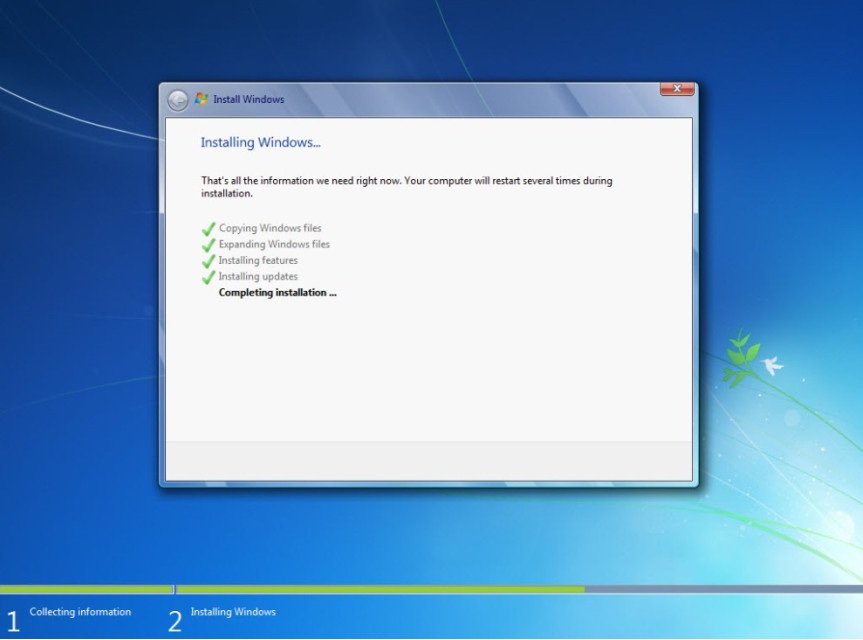
Step 4: Installing Windows
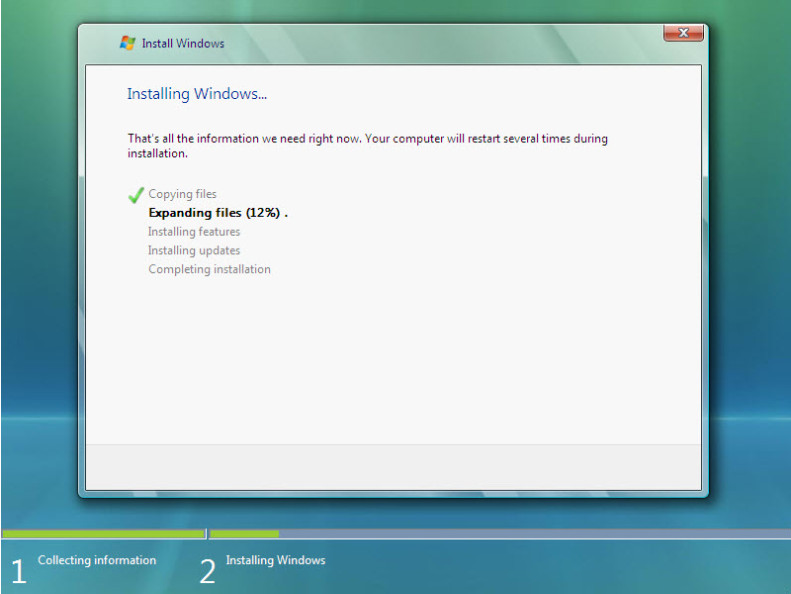
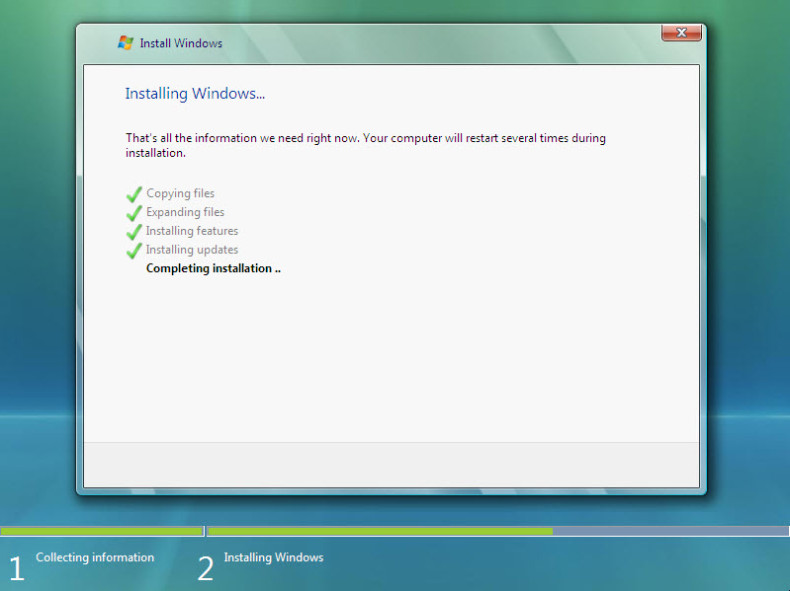
a. The Installing Windows… window opens. Windows 7 Setup may take up to 50 minutes to configure your computer.
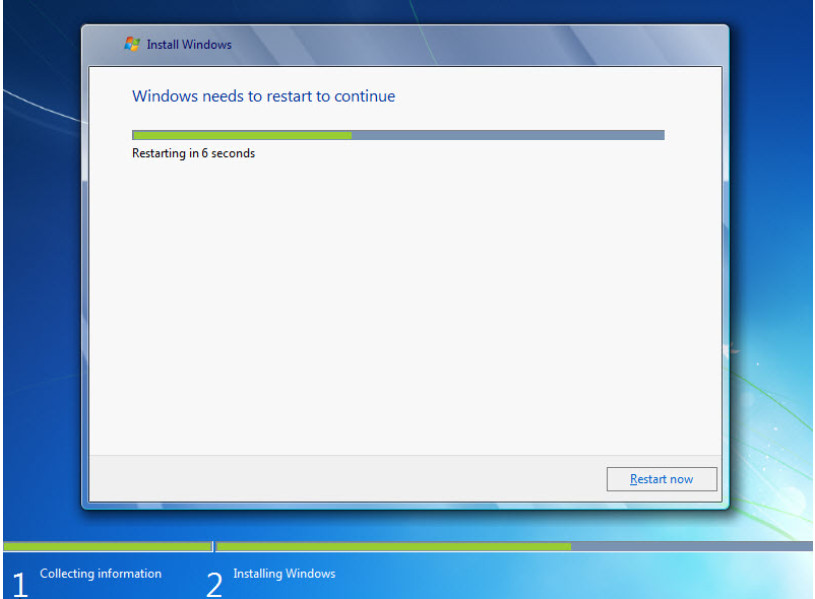
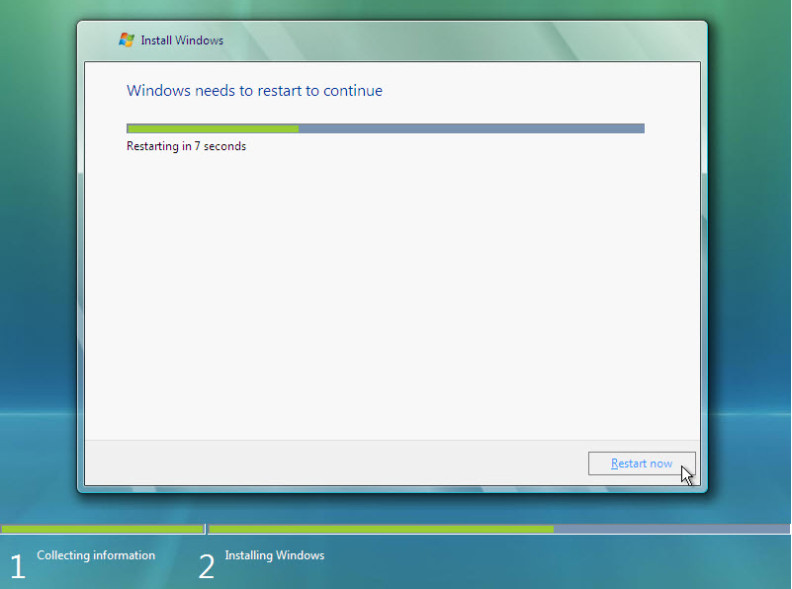
b. The Windows needs to restart to continue window opens. Your computer will automatically restart or you can click Restart now.
c. If you get the message Press any key to boot from CD or DVD…, do not press any key and Windows will boot from the hard disk to continue the installation.

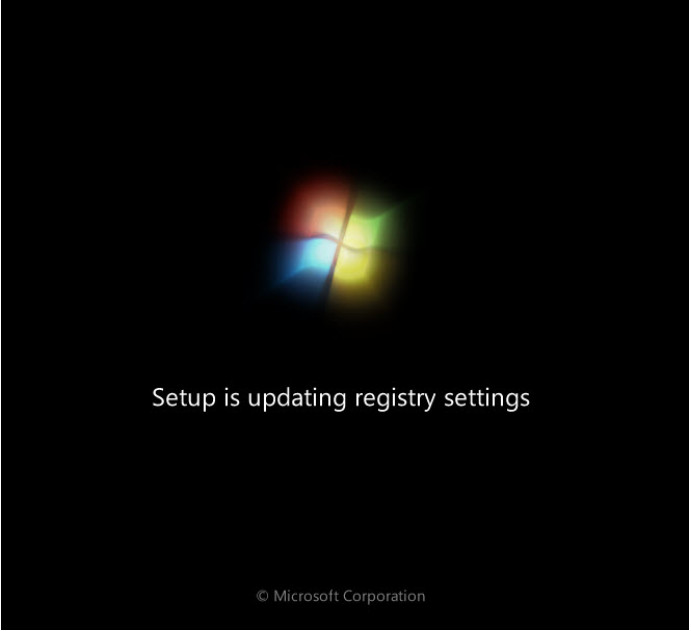
d. The Setup is updating registry settings screen appears.
e. The Setup is starting services screen appears.

f. The Installing Windows… window opens. Windows may reboot a few more times. This may take several minutes.
Step 5: Setting up Windows
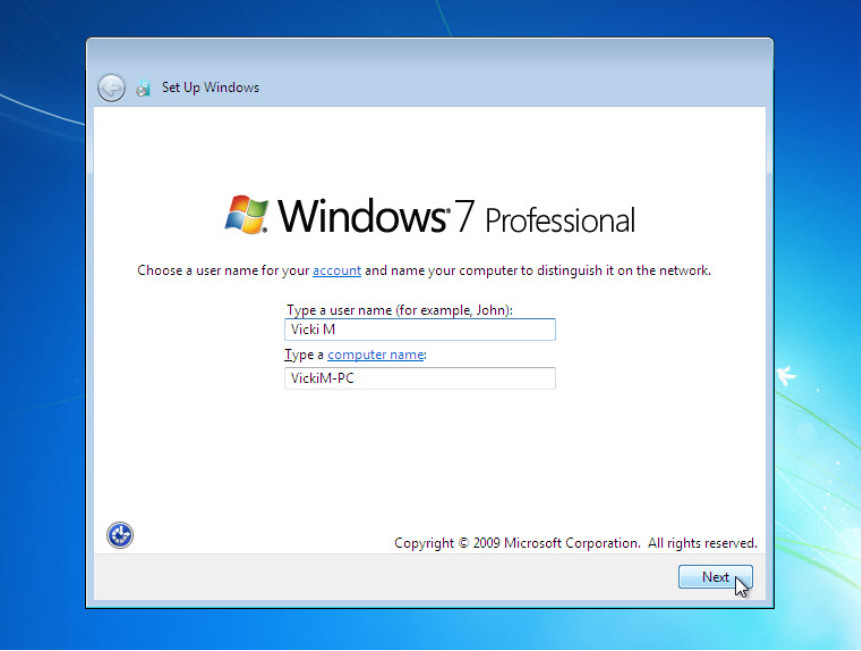
a. Type the user name and computer name provided by your instructor. Click Next.
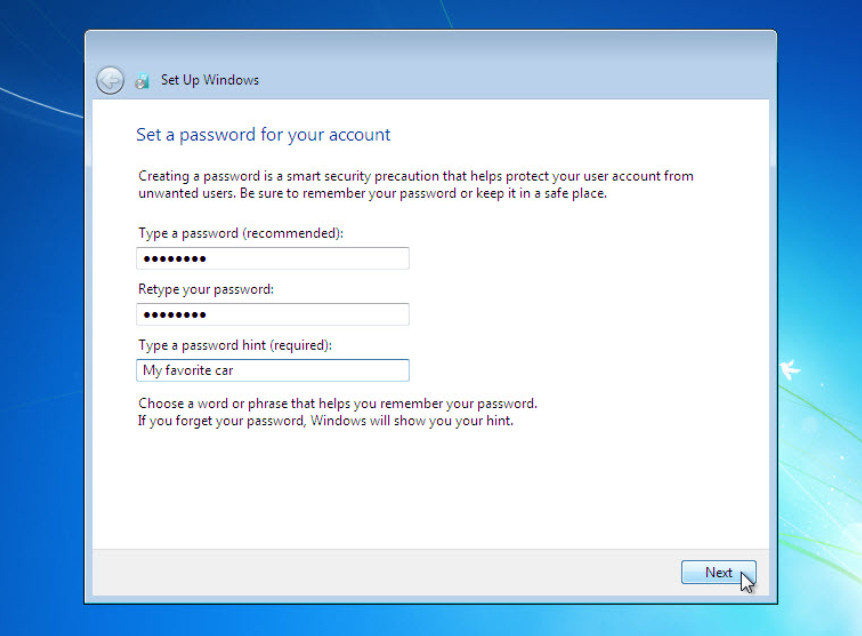
b. The Set a password for your account window opens. Type the password provided by your instructor. Retype the password and enter the password hint. Click Next.
c. The Type your Windows product key window opens. On this page, type your product key. Click Next.
Note: You can find the product key on the case or sleeve in which the Windows DVD was packaged, or you can get it from your instructor.
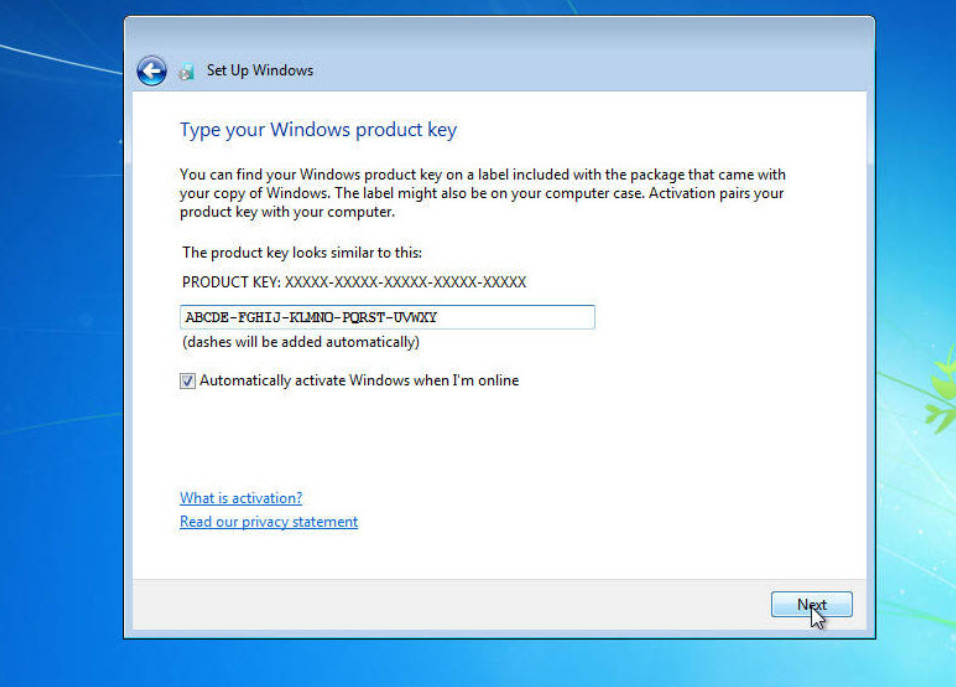
Note: If you entered your product key, Setup will not ask you the following:
Do you want to enter your product key now? If you were instructed not to enter a product key, click No.
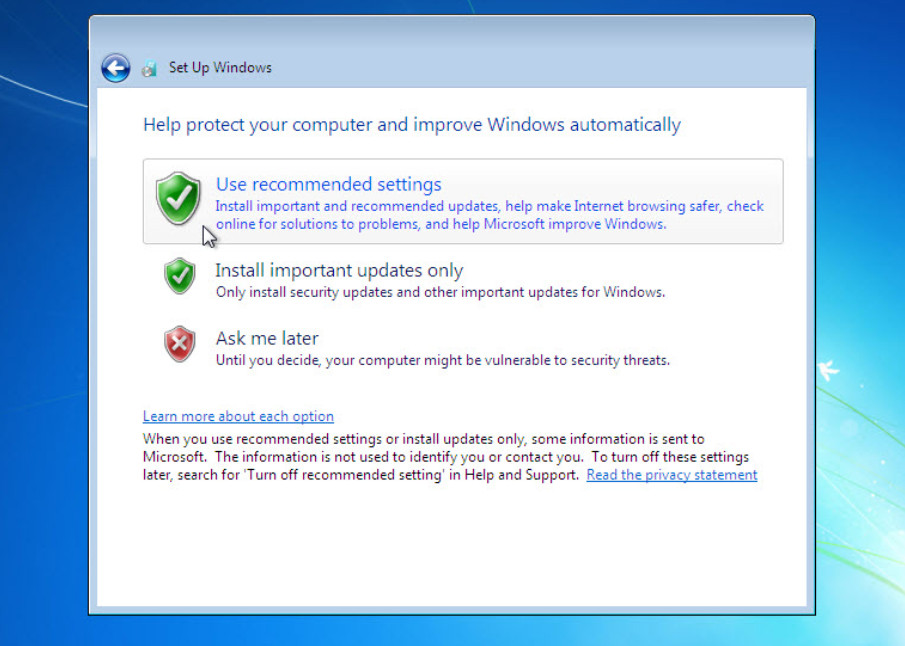
d. In the Help protect your computer and improve Windows automatically window, click Use recommended settings.
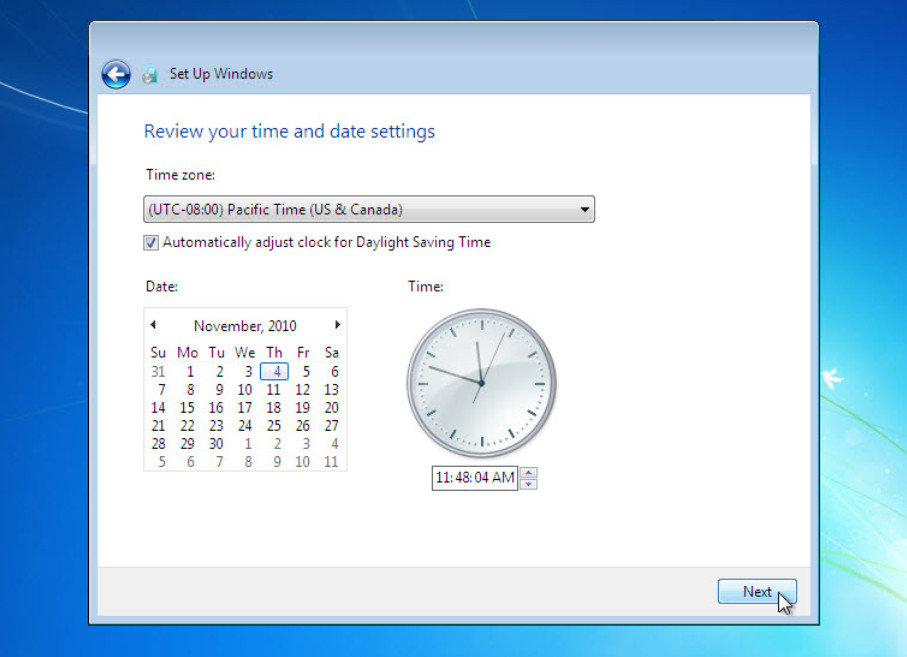
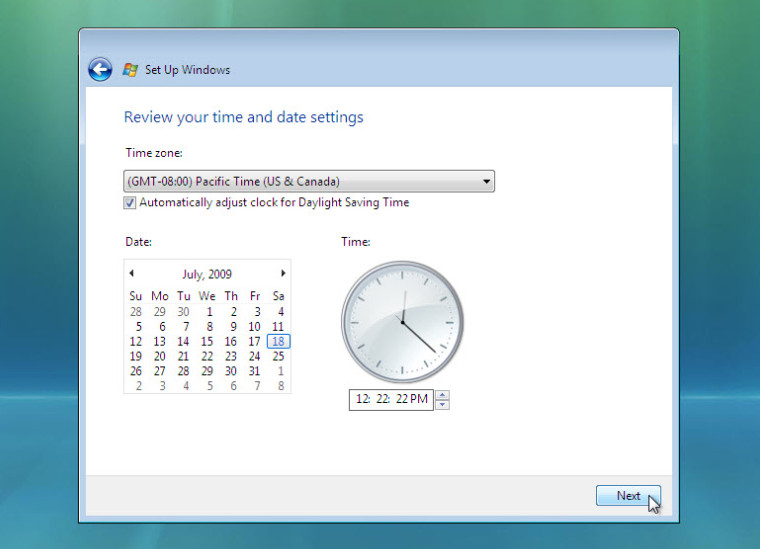
e. In the Review your time and date settings window, configure the computer clock to match your local date, time, and time zone. Click Next.
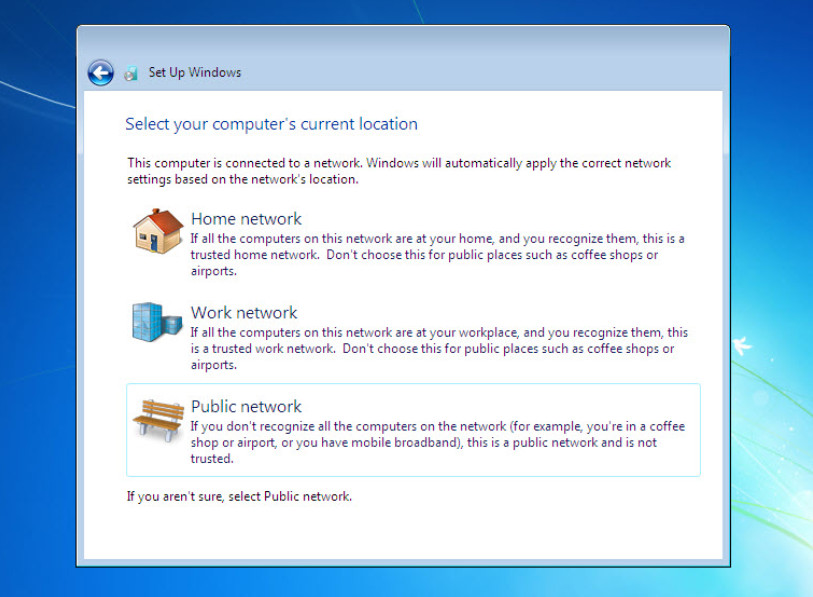
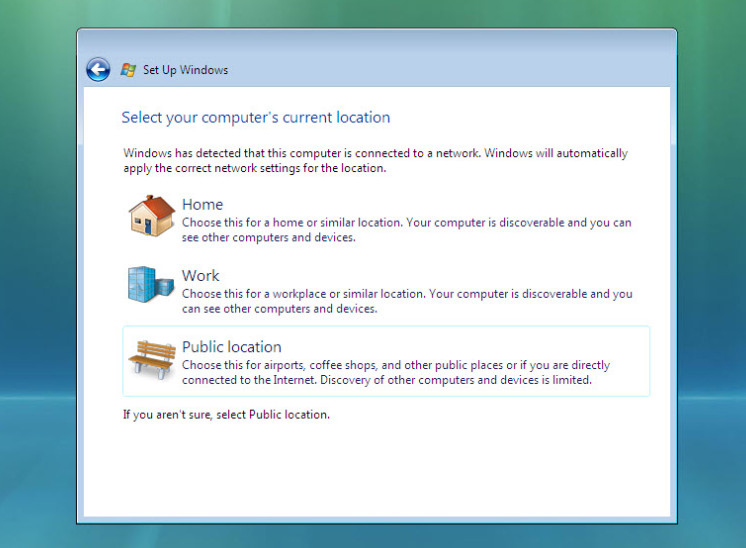
f. The Select your computer’s current location window opens. Select the option provided by your instructor.
Note: This window will not show up if the installation did not correctly install drivers for the network card.
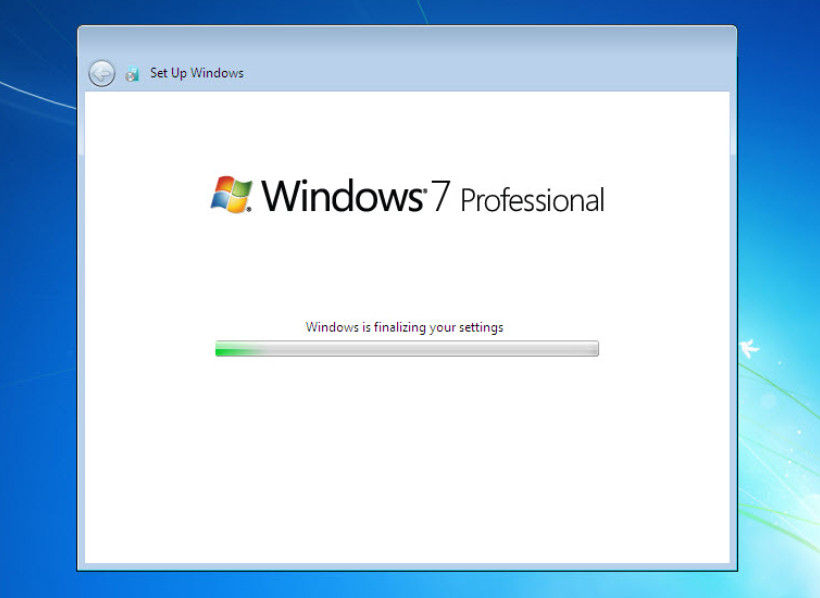
g. The Windows is finalizing your settings window opens.
Step 6: Logging into Windows
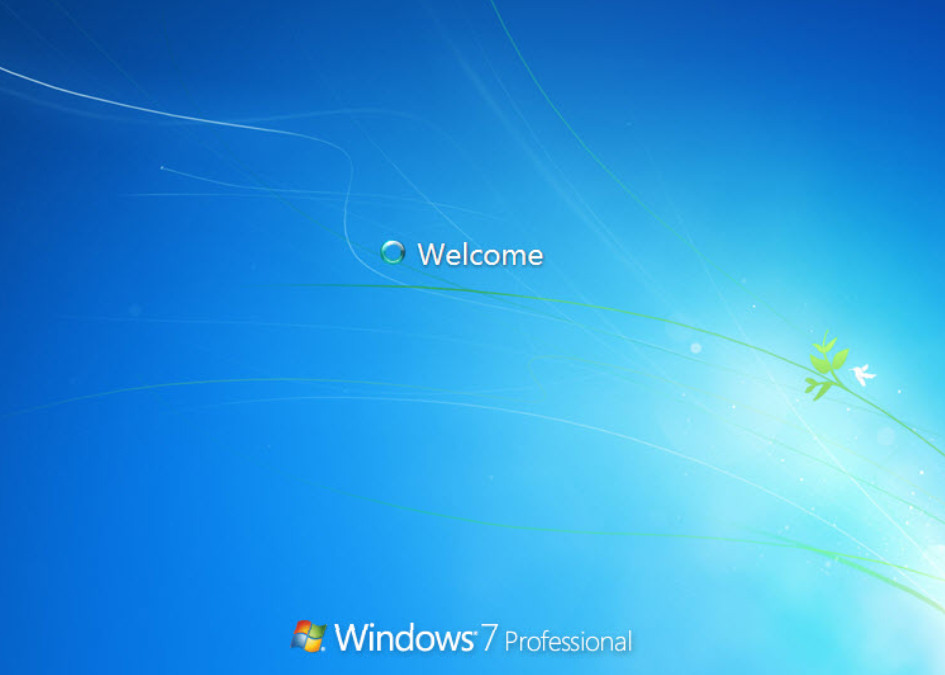
a. The Welcome screen appears.
b. The Preparing your desktop… screen appears.
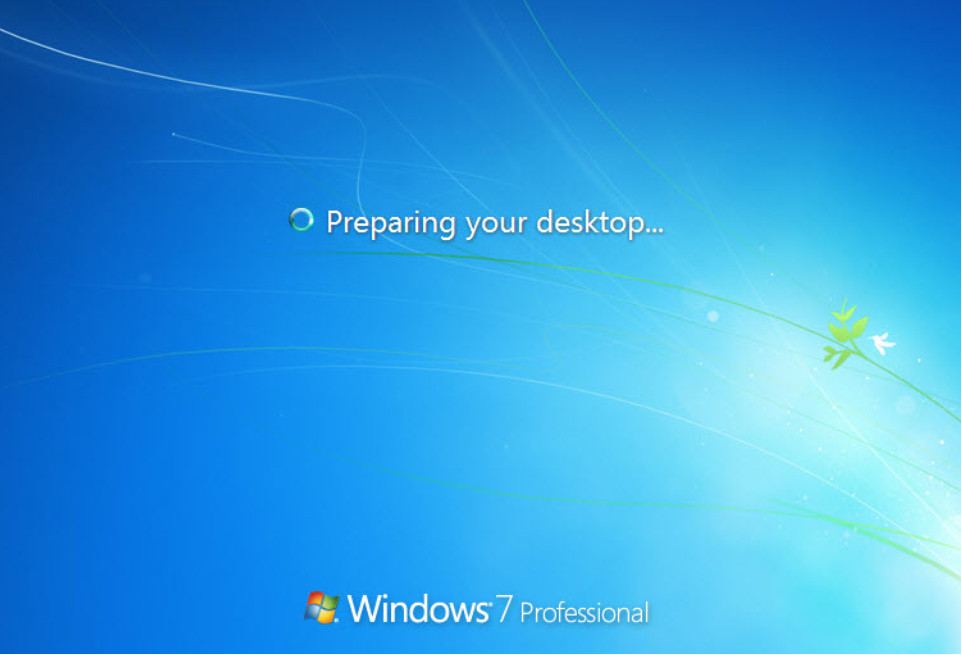
c. You are logged on to Windows 7 for the first time.
Part 2: Windows Vista Installation
Step 1: Starting the Installation Media
a. Insert the Windows Vista installation DVD into the DVD-ROM drive or plug the USB flash drive into a USB port.
b. When the computer starts up, watch for the message Press any key to boot from CD or DVD. Press any key to continue.
If the press any key message does not appear, the computer automatically starts loading files from the
DVD.

c. The computer starts loading files from the DVD or USB flash drive.
d. The Windows Vista boot screen appears.
Step 2: Configuring the Initial Settings
a. The Install Windows window opens. Press Next unless you need to change the default settings.
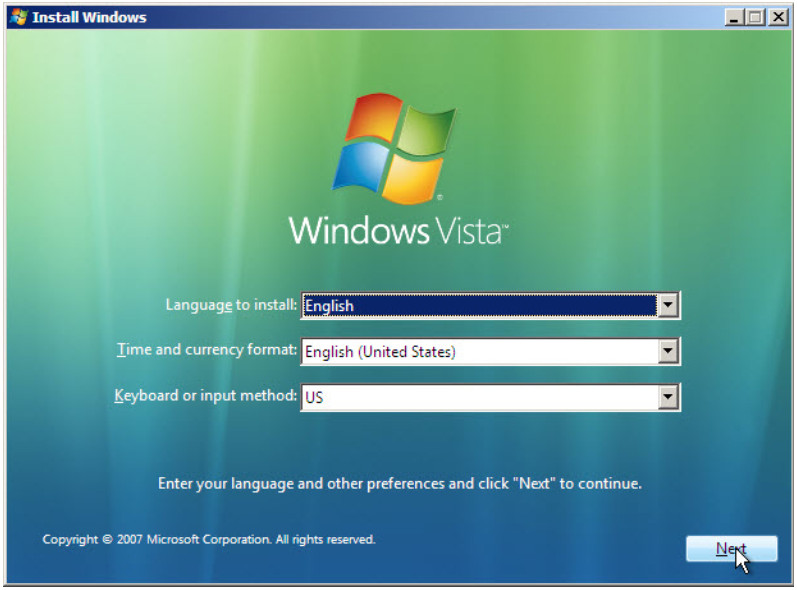
b. Click Install now to continue.

Step 3: Collecting Information
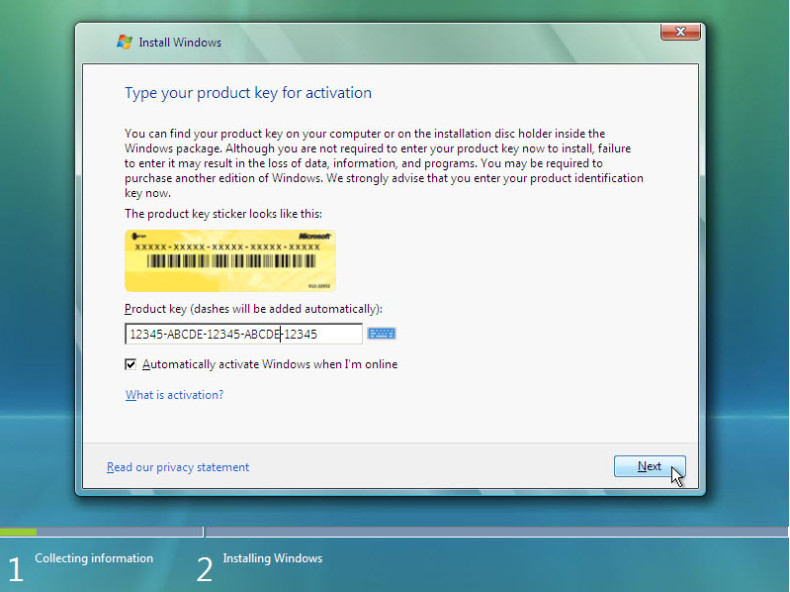
a. The Type your product key for activation screen appears. On this page, type your product key. Click Next.
Note: You can find the product key on the case or sleeve in which the Windows DVD was packaged, or
you can get it from your instructor.
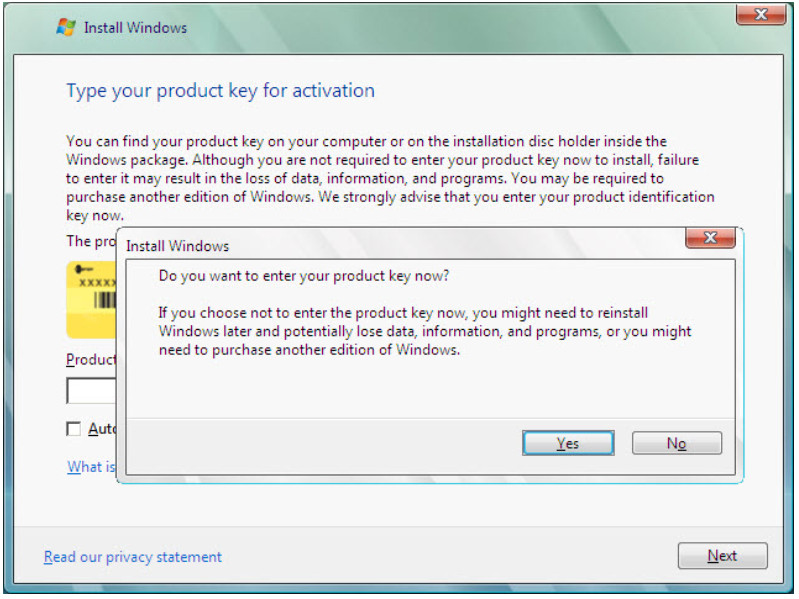
Note: If you entered your product key, Setup will determine the Vista product edition to install and will not display the next two screens. Skip to step d.
b. Because you have left the product key field blank, the Do you want to enter your product key now? window opens. If you were instructed not to enter a product key, click No.
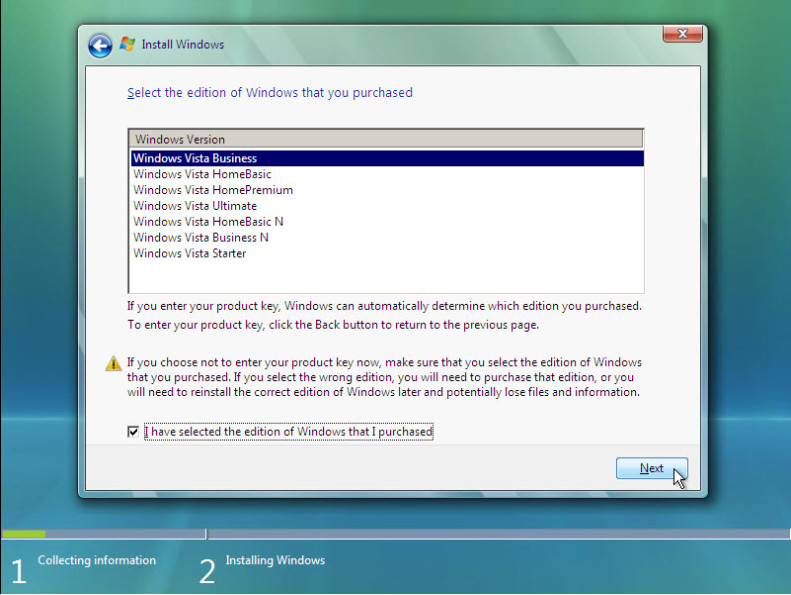
c. Setup now prompts you to select the Vista version you purchased. In general, you should choose the version you purchased, but note that you can install any Vista version listed and experiment with it for a limited time before product activation requires you to activate the version you purchased.
Note: Your product key will only activate the version of Vista you purchased.
d. Select the Windows Vista version that will be installed, check the item title I have selected the edition of Windows that I purchased, and then click Next.
e. The Please read the license terms window opens. Read and confirm that you accept the license by selecting the box I accept the license terms. Click Next to continue.
f. The Which type of installation do you want? window opens. Click Custom (advanced).
g. The Where do you want to install Windows? window opens. Select the hard drive or partition on which Windows Vista will be installed. Click Next to select Disk 0 Unallocated Space, which is the default setting.
Step 4: Installing Windows Vista
a. The Installing Windows … window opens. Windows Vista Setup may take up to 50 minutes to configure your computer.
b. The Windows needs to restart to continue window opens. Your computer will automatically restart or you can click Restart now.
c. If you get the message Press any key to boot from CD or DVD, do not press any key and Windows will boot from the hard disk to continue the installation.

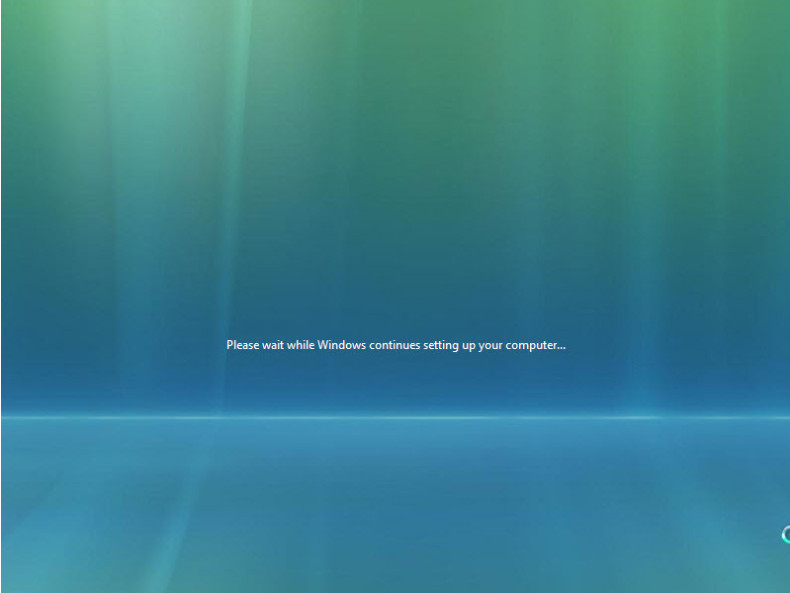
d. The Please wait while Windows continues setting up your computer … screen appears.
e. The Installing Windows … window opens. Windows may reboot a few more times. This may take several minutes.
Step 5: Setting up Windows
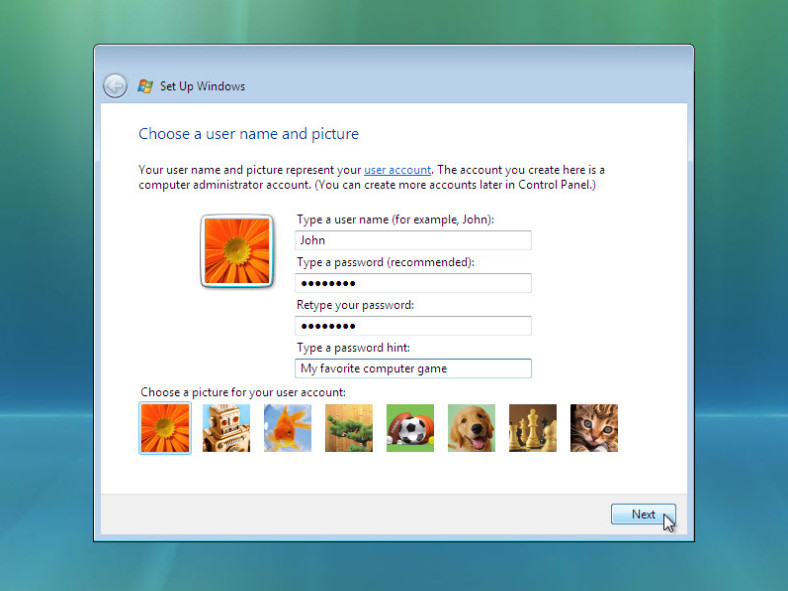
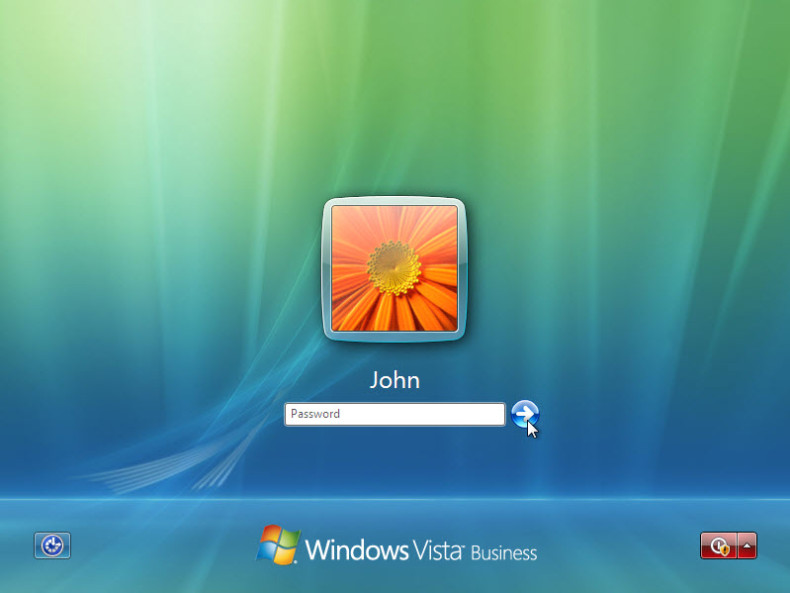
a. The Choose a user name and picture window opens. Type the name provided by your instructor. Type the Administrator password provided by your instructor. When you type in a password, two new fields will appear. Retype the password and the password hint. Click Next.
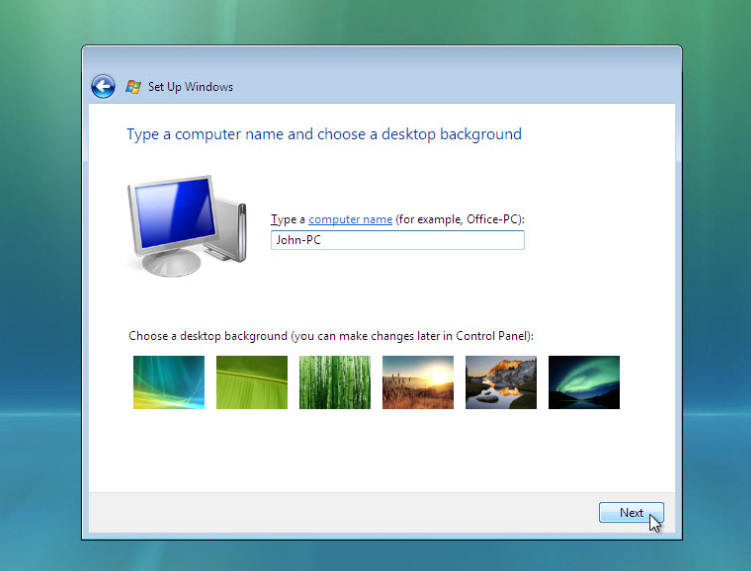
b. The Type a computer name and choose a desktop background window opens. Type the computer name provided by your instructor. Click Next.
c. In the Help protect Windows automatically window, click Use recommended setting.

d. In the Review your time and date settings window, configure the computer clock to match your local date, time, and time zone. Click Next.
e. The Select your computer’s current location window opens. Select the option provided by your instructor.
Note: This screen will not show up if the installation did not correctly install drivers for the network card.
f. In the Thank you window, click Start.
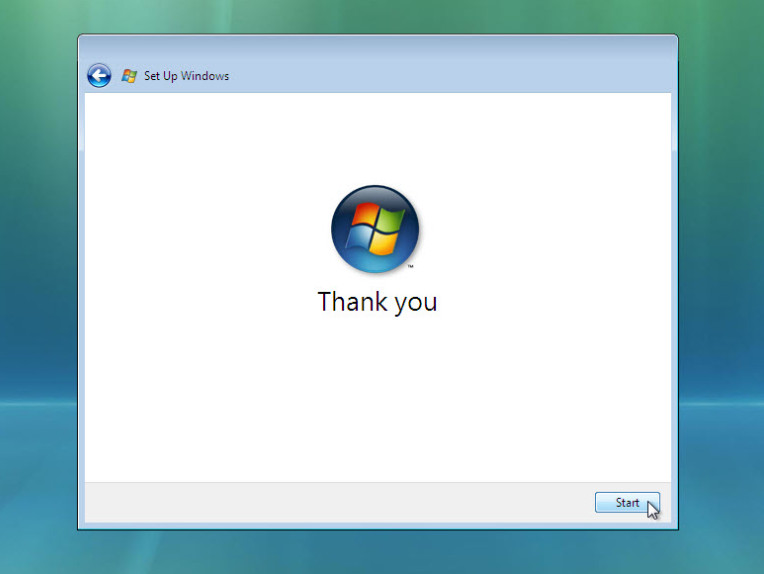
g. The Set Up Windows section is completed.
h. The Please wait while Windows checks your computer’s performance screen appears.

i. Windows Vista boots for the first time.

j. The login screen appears. Enter the password that you used during the install process and click the blue arrow to login.
k. The Preparing your desktop … screen appears. Your account profile is created and configured.
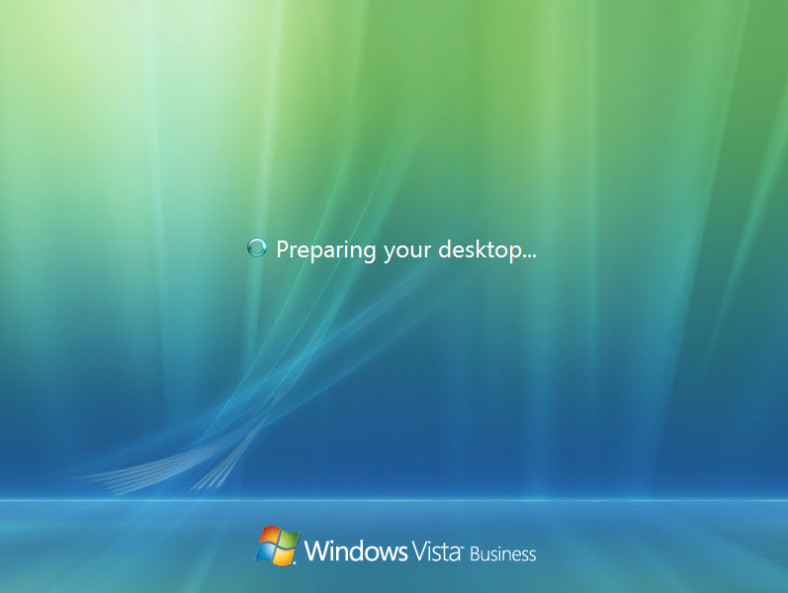
l. The Welcome screen appears. Windows Vista is now installed.

Download 5.2.1.7 Lab – Install Windows 7 or Vista .PDF file:
[sociallocker id=”54558″]
[/sociallocker]