Содержание
- Причина 1: Тачпад отключен при помощи клавиатуры
- Причина 2: Настройки операционной системы
- Меню «Параметры» (Windows 10)
- Настройки тачпада
- «Службы» Windows
- Причина 3: Тачпад отключен в BIOS
- Причина 4: Проблемы с драйвером
- Причина 5: Вирусная активность
- Причина 6: Аппаратная неполадка
- Вопросы и ответы

Причина 1: Тачпад отключен при помощи клавиатуры
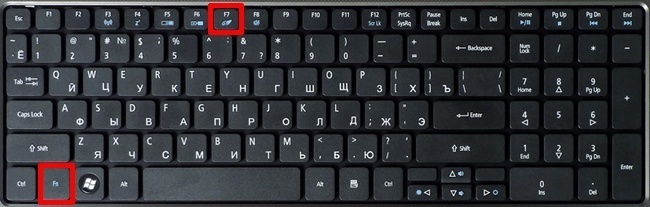
Самый простой вариант, с которым может столкнуться обладатель ноутбука Acer, — отключенный тачпад через клавиатуру. Обычно это происходит после нажатия клавиши из F-ряда, отвечающей за управление данным устройством. У Acer под это запрограммирована клавиша F7 или сочетание Fn + F7 (в зависимости от того, какой режим работы у F-клавиш).
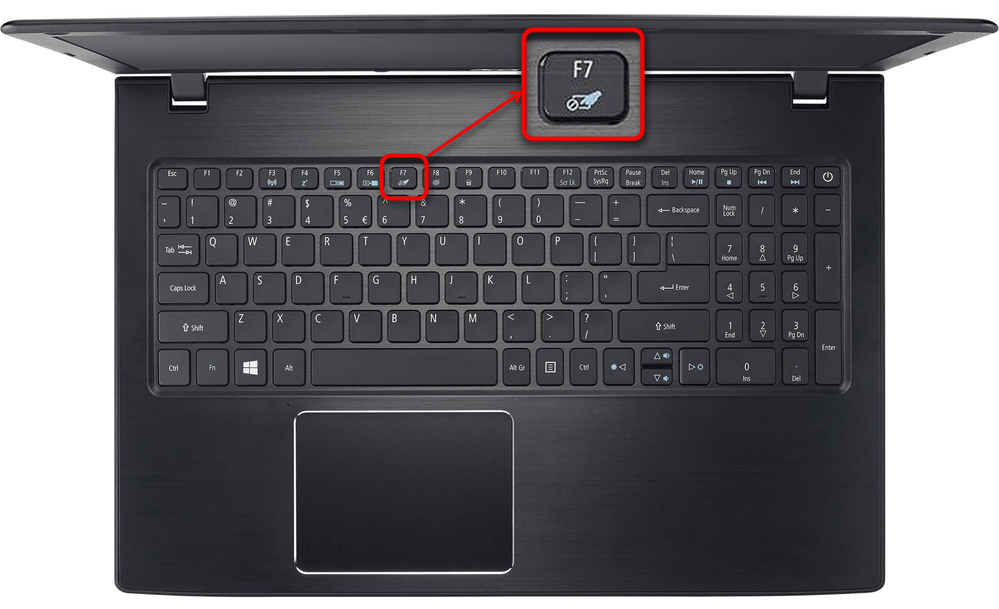
На некоторых старых моделях возможно наличие кнопки рядом с тачпадом, отвечающей за его включение или отключение. Если у вас такая есть, нажмите ее и проверьте, заработал ли тачпад.
Причина 2: Настройки операционной системы
В самой Windows есть несколько параметров, влияющих на работу сенсорной панели, и вам понадобится проверить каждый из них.
Меню «Параметры» (Windows 10)
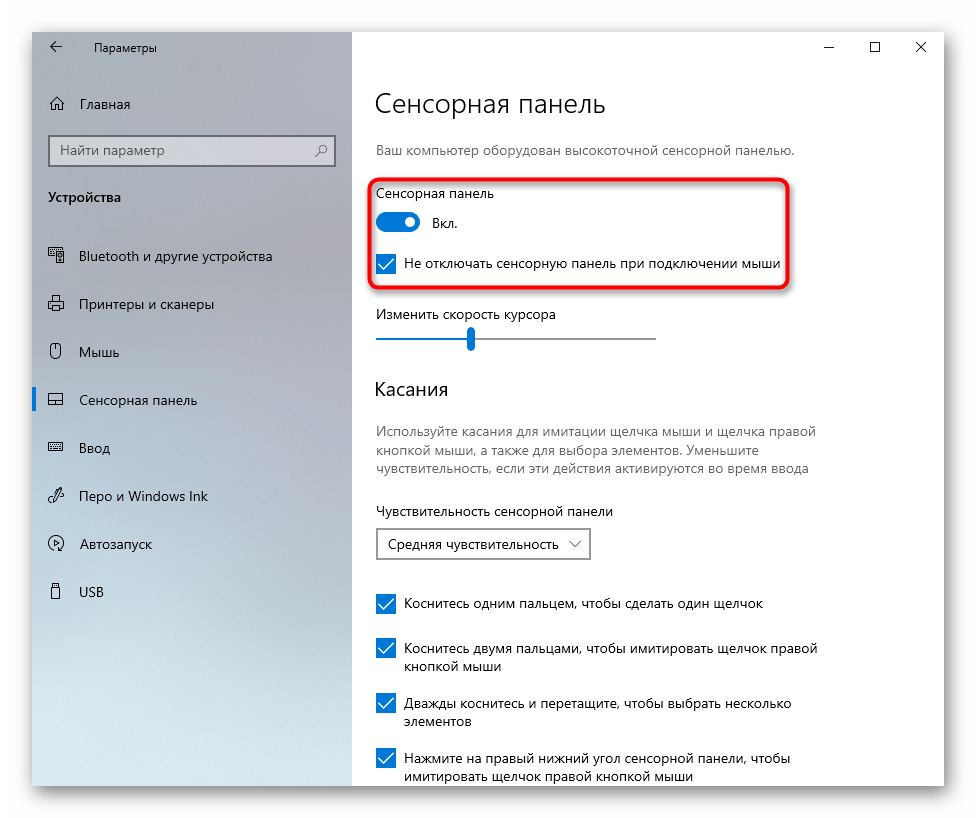
В Windows 10 можно управлять работой тачпада при помощи штатного приложения «Параметры». В первую очередь вам понадобится проверить, не отключен ли он, через это меню.
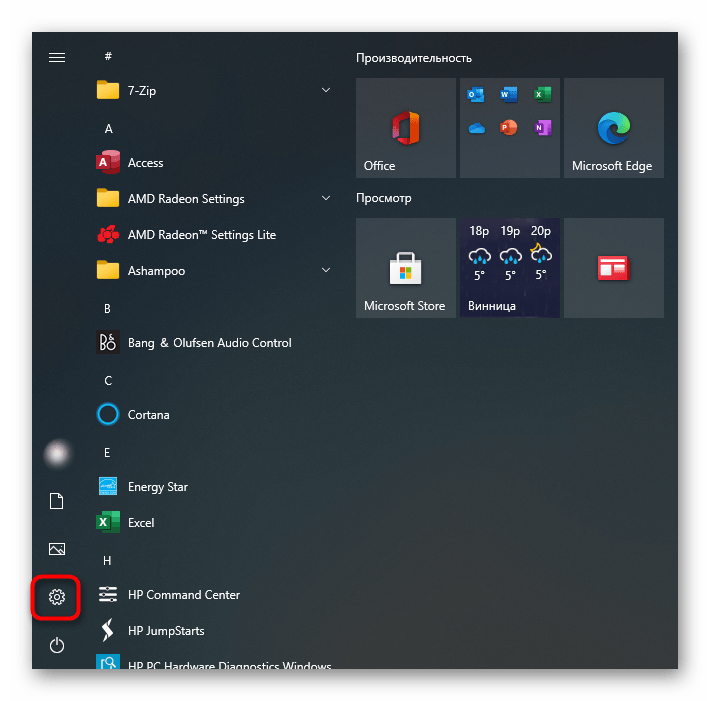
- Откройте «Пуск» и перейдите в «Параметры».
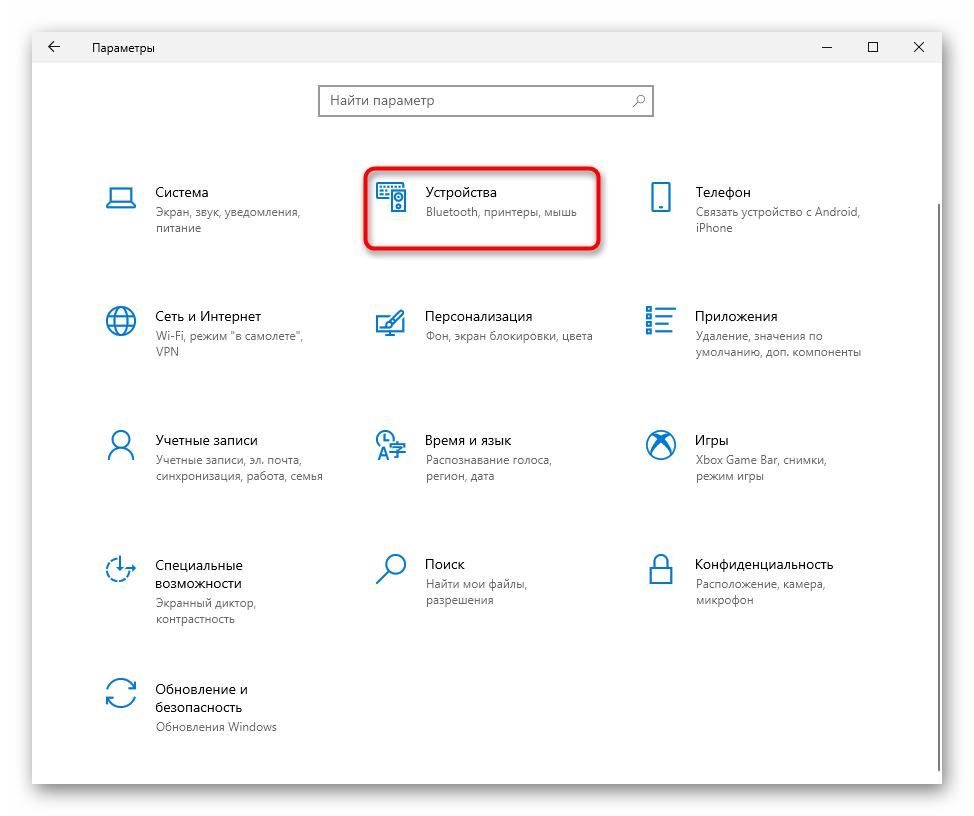
- Выберите плитку «Устройства».
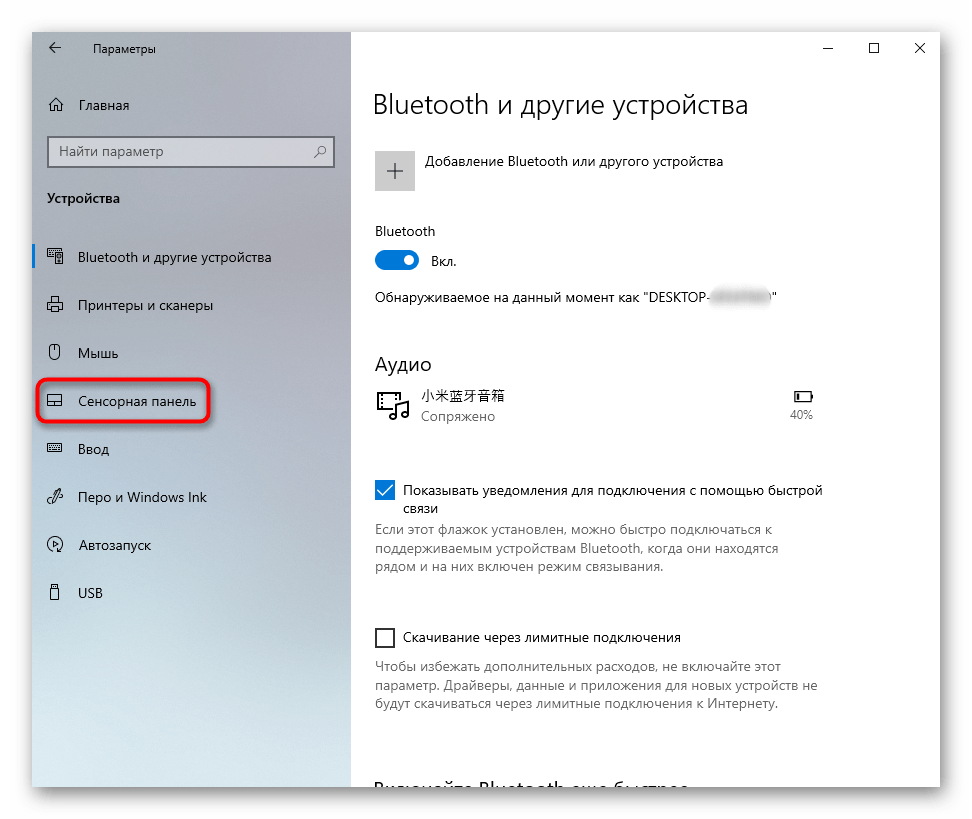
- Через левую панель переключитесь в раздел «Сенсорная панель».
- Удостоверьтесь, что переключатель у параметра «Сенсорная панель» находится в состоянии «Вкл». Обратите также внимание на пункт ниже — «Не отключать сенсорную панель при подключении мыши». Если тачпад у вас не работает конкретно после подключения мыши, возможно, все дело именно в этой настройке. Однако в редких случаях, несмотря на нее, происходит конфликт устройств, разобраться с которым крайне сложно и обычно проще всего отсоединять мышь при желании управлять тачпадом.
Настройки тачпада
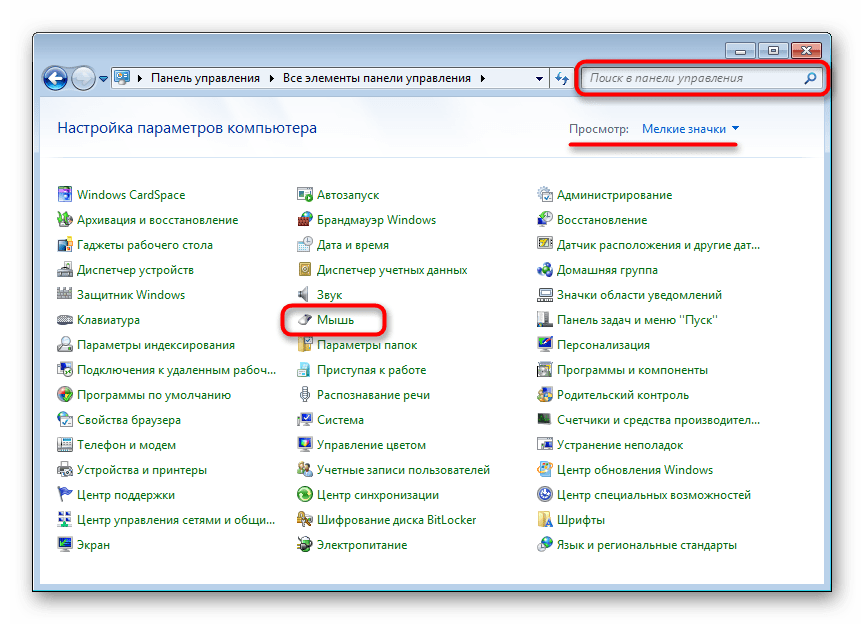
Если у вас установлена Windows 7 или 8 (впрочем, владельцам Windows 10 это тоже подходит), вместо меню «Параметры» понадобится воспользоваться «Панелью управления», через которую также можно настраивать это указывающее устройство.
- Через «Пуск» запустите «Панель управления» и найдите там категорию «Мышь». Быстрее всего это сделать, включив просмотр «Мелкие значки». Или можете найти этот раздел через поисковую строку.
- В новом окне вам нужна вкладка «Параметры устройства» или «ELAN» (название зависит от производителя драйвера). Если вдруг тачпад отключен, нажмите кнопку «Включить», а затем — «ОК».
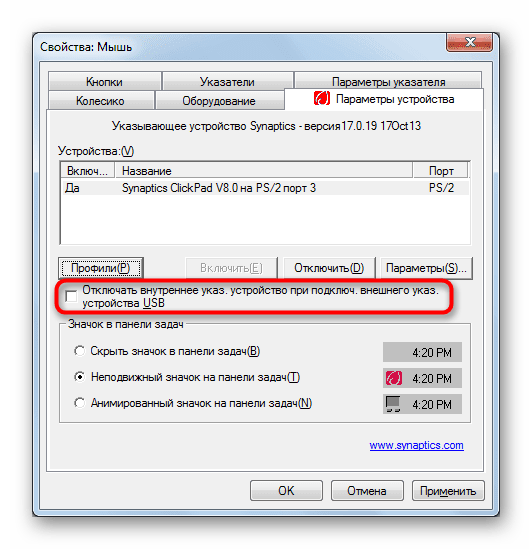
- Чтобы сенсорная панель работала и при подключении физической мыши, уберите галочку с пункта «Отключать внутреннее указ. устройство при подключ. внешнего указ. устройства USB» и сохраните внесенные изменения.
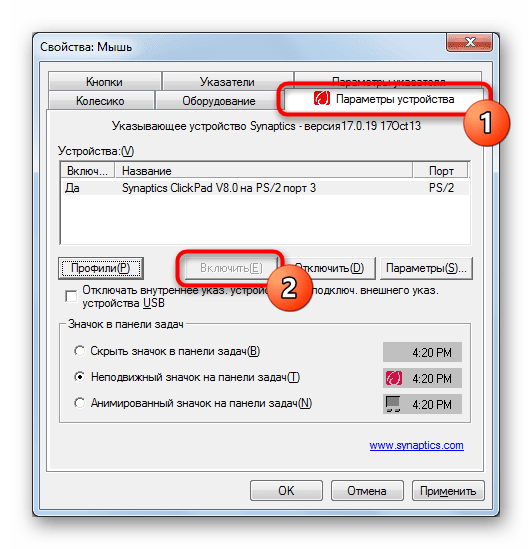
Когда в Windows отсутствует драйвер для тачпада, этой вкладки в окне свойств мыши, соответственно, не будет! Обратитесь к Причине 4 этой статьи, чтобы решить вероятные неполадки в работе драйвера или установить его впервые.
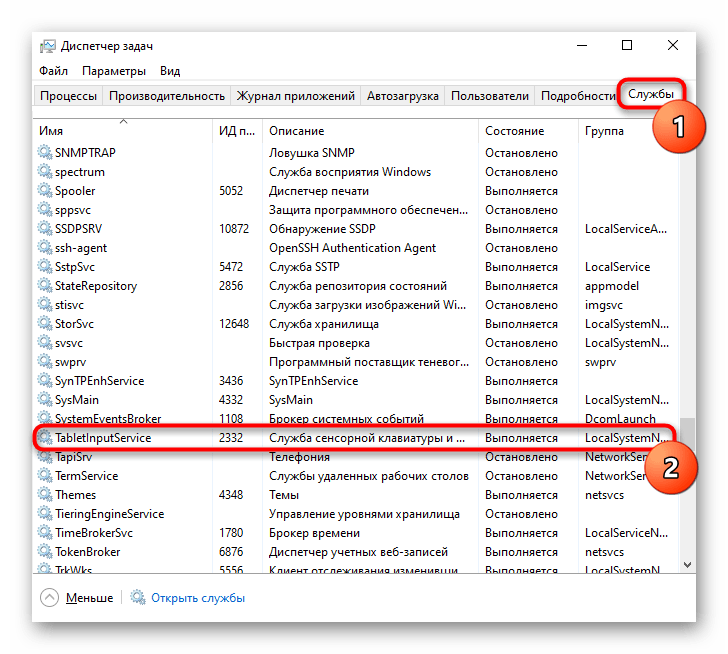
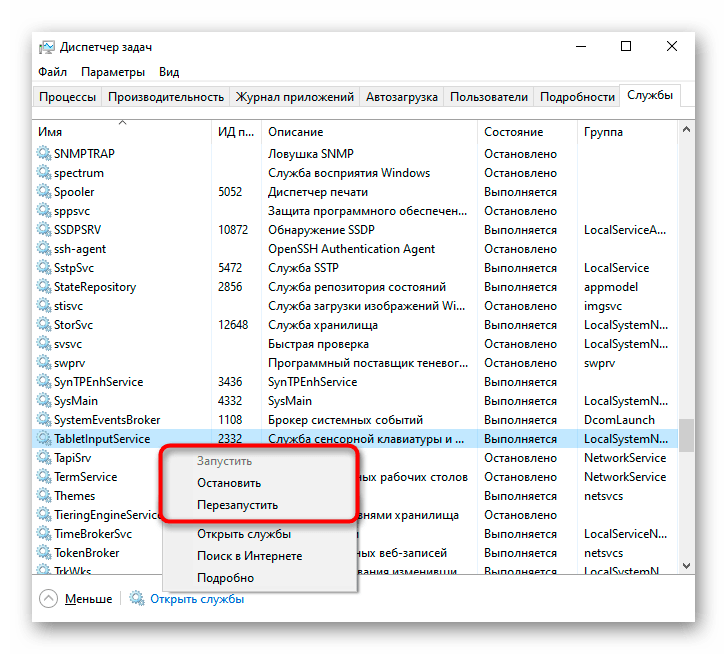
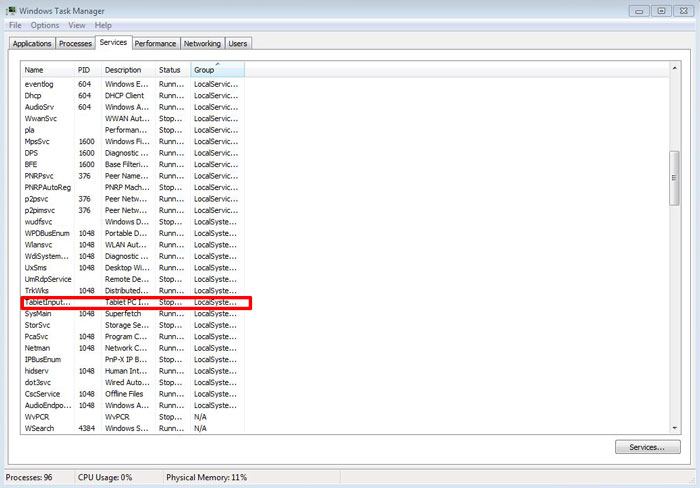
«Службы» Windows
У ноутбуков с сенсорным дисплеем, за который частично отвечает служба операционной системы, может произойти программный конфликт. Изредка функция, управляющая работой стилуса, мешает работать тачпаду, и если вы не пользуетесь специальным пером для ввода через дисплей, можете отключить данную службу, а если она нужна — попробовать перезапустить. Добавим, что сам сенсорный экран продолжит работать в любом случае.
- Сочетанием клавиш Ctrl + Shift + Esc запустите «Диспетчер задач» и перейдите на вкладку «Службы». В Windows 7 вместо запуска «Диспетчера задач» (у него отсутствует нужная вкладка) найдите приложение «Службы» через поиск в «Пуске».
- Найдите службу под названием «TabletInputService» и кликните по ней правой кнопкой мыши. Если та включена, отключите ее либо перезапустите. Можно попробовать и вариант с отключением, перезагрузкой ноутбука, и дальнейшим включением (если пользуетесь стилусом).

Причина 3: Тачпад отключен в BIOS
Еще одна причина неработающего тачпада — он отключен в BIOS. Редко такое происходит с новыми, только что купленными ноутбуками, чаще всего либо сам пользователь по незнанию отключает сенсорную панель, либо сбрасывает настройки БИОС. Изменить интересующий параметр очень просто:
- Включите или перезагрузите ноутбук, и на этапе отображения логотипа компании быстро нажимайте клавишу, ответственную за вход в BIOS. Если вы не знаете, какая это клавиша, прочитайте нашу отдельную статью.
Подробнее: Входим в BIOS на ноутбуке Acer
- При помощи стрелок на клавиатуре перейдите в раздел «Main» и найдите пункт «Touchpad» (иногда он называется «Internal Pointing Device»). Смените его значение на противоположное — с «Basic» на «Advanced» и наоборот, а если вместо них варианты «Disabled» и «Enabled», необходимо выбрать второй. Затем нажмите клавишу F10 для сохранения внесенных изменений и перезагрузки ноутбука.
- После загрузки Windows проверьте, была ли исправлена проблема.
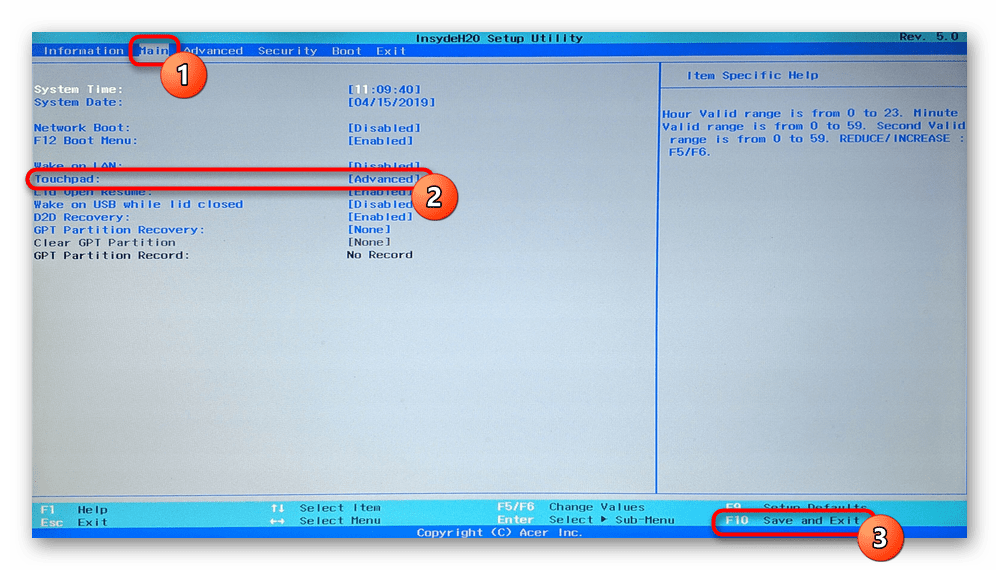
Уточним, что параметр в BIOS есть не у всех ноутбуков Acer. Поэтому если после попыток поиска в других разделах BIOS вы не нашли нужную опцию, просто переходите к другим методам устранения неполадки, поскольку в вашей модели производитель убрал возможность управления тачпадом.
Причина 4: Проблемы с драйвером
Отсутствие необходимого драйвера также может спровоцировать неработоспособность тачпада. Это бывает после переустановки операционной системы, некорректного обновления или неверной установки версии программного обеспечения. Подробнее о вариантах поиска и инсталляции драйвера для тачпада рассказано в другом нашем материале.
Редко именно последняя версия драйвера и вызывает неполадку с тачпадом, поэтому пользователю нужно самостоятельно искать одну из предыдущих версий.
Подробнее: Способы поиска и установки драйвера для тачпада ноутбука Acer
Иногда установить фирменное программное обеспечение не удается или это не решает проблему. Можно попробовать воспользоваться универсальным драйвером от Microsoft.
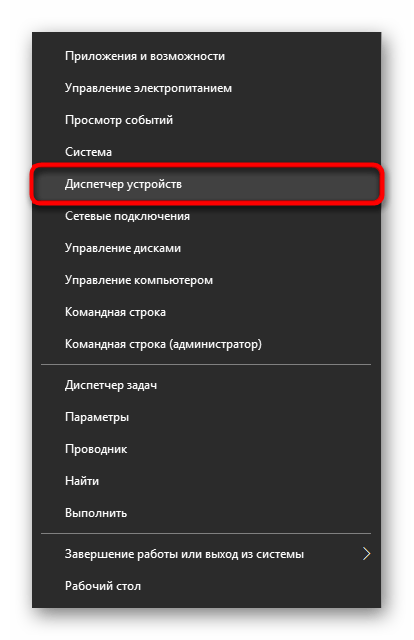
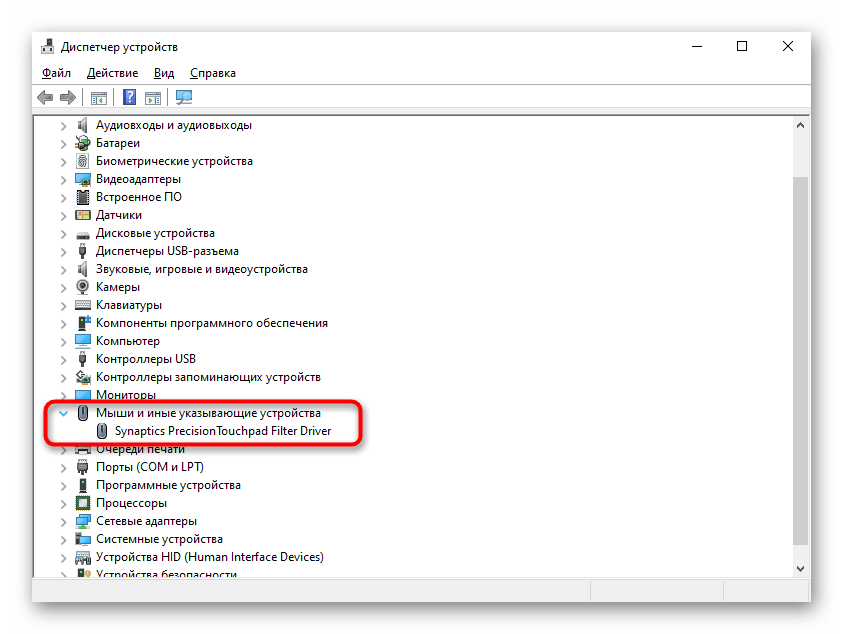
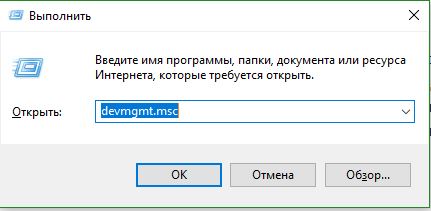
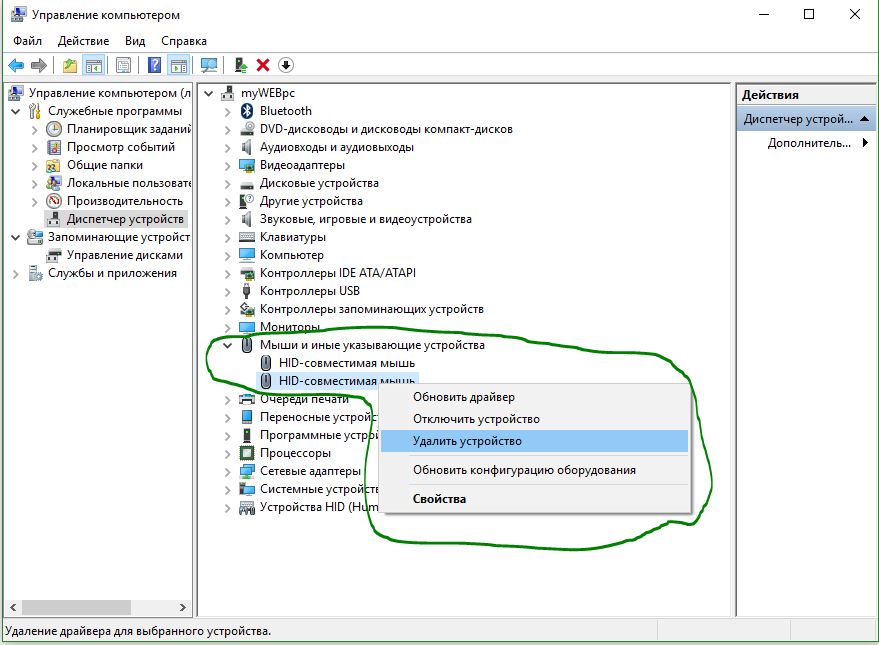
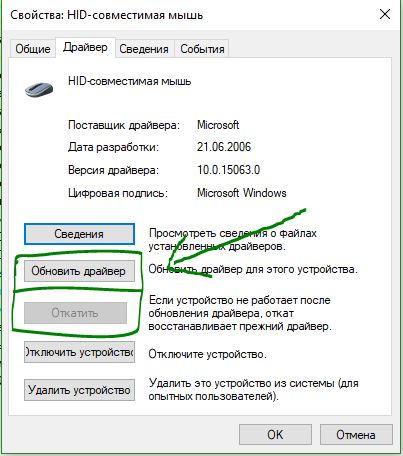
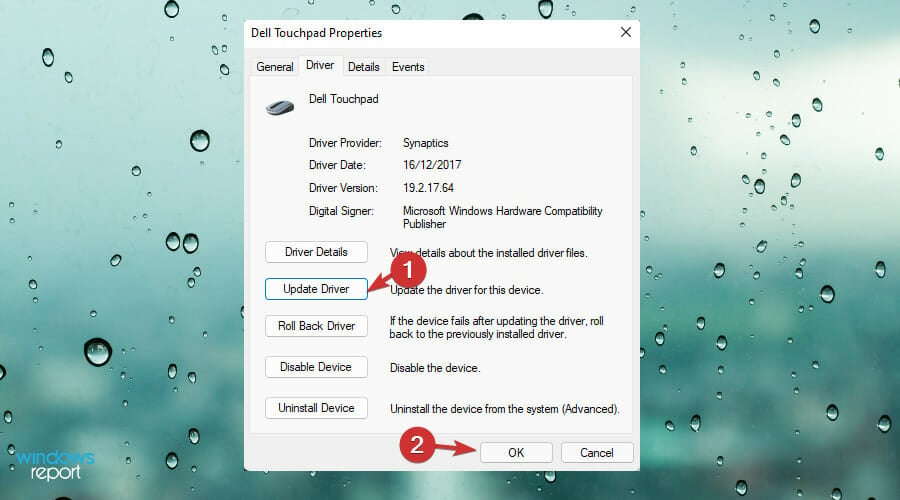
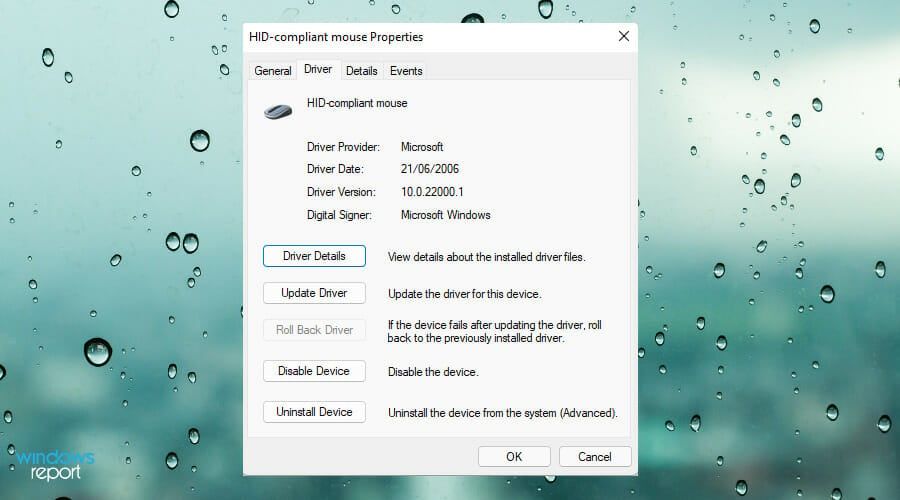
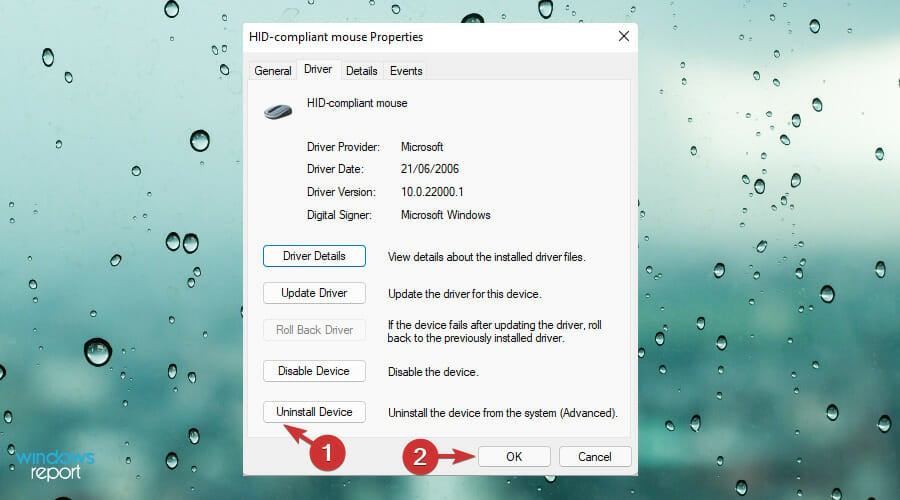
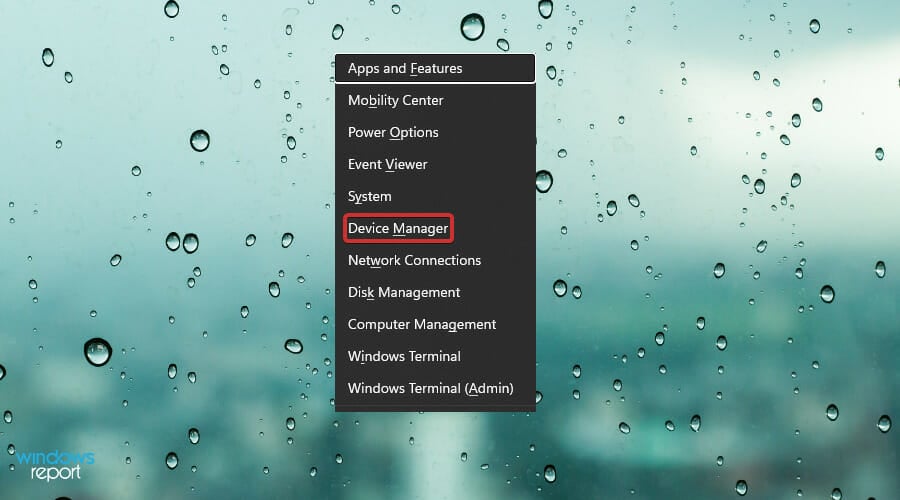
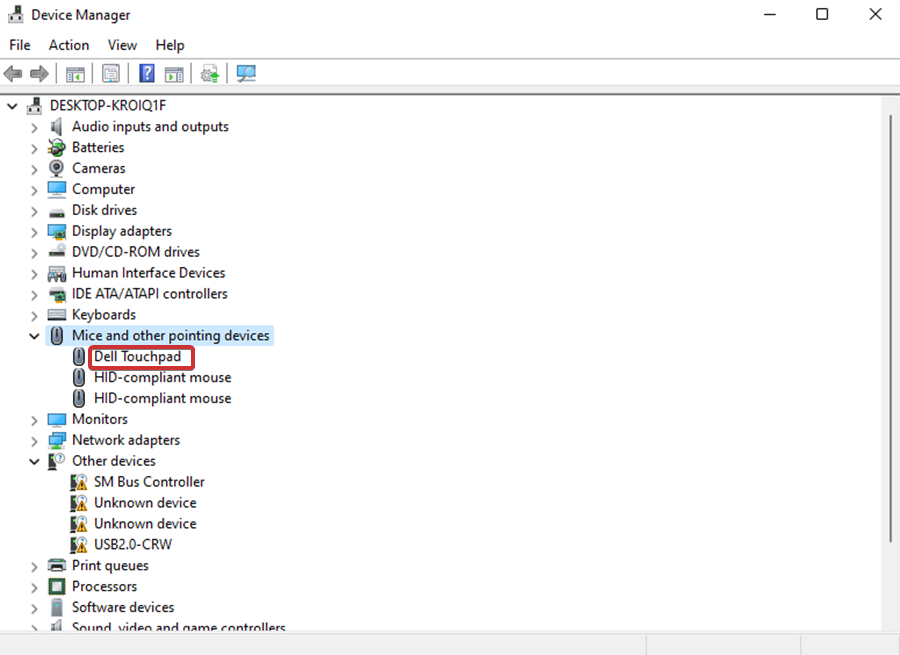
- Запустите «Диспетчер устройств», найдя его по названию в «Пуске». В «десятке» это так же можно сделать, вызвав альтернативное меню правым кликом мыши по кнопке «Пуск».
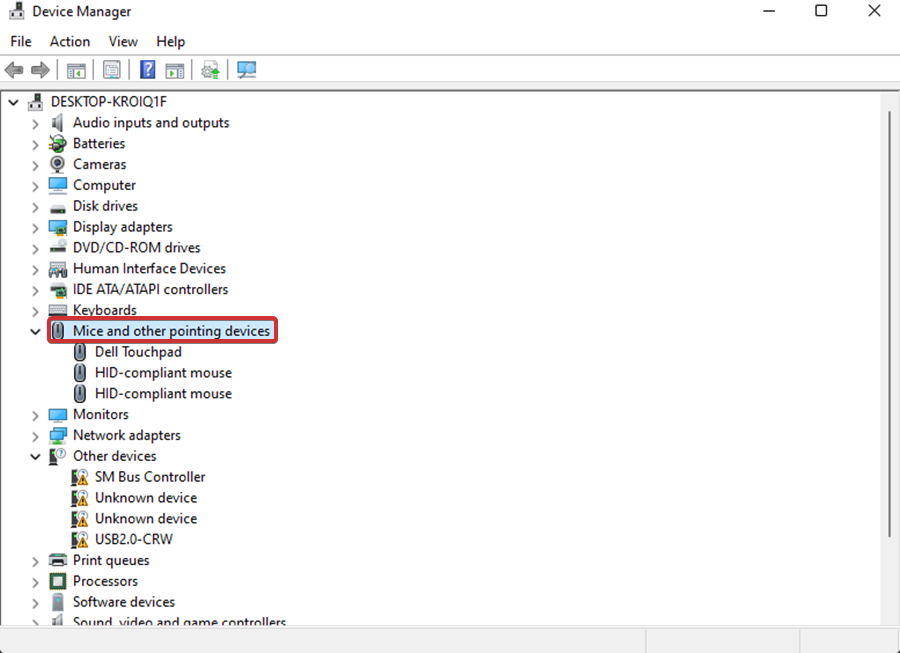
- Найдите и разверните раздел «Мыши и иные указывающие устройства». Здесь должно отображаться HID-устройство, если драйвер для тачпада не был установлен, или название указывающего устройства при наличии драйвера.
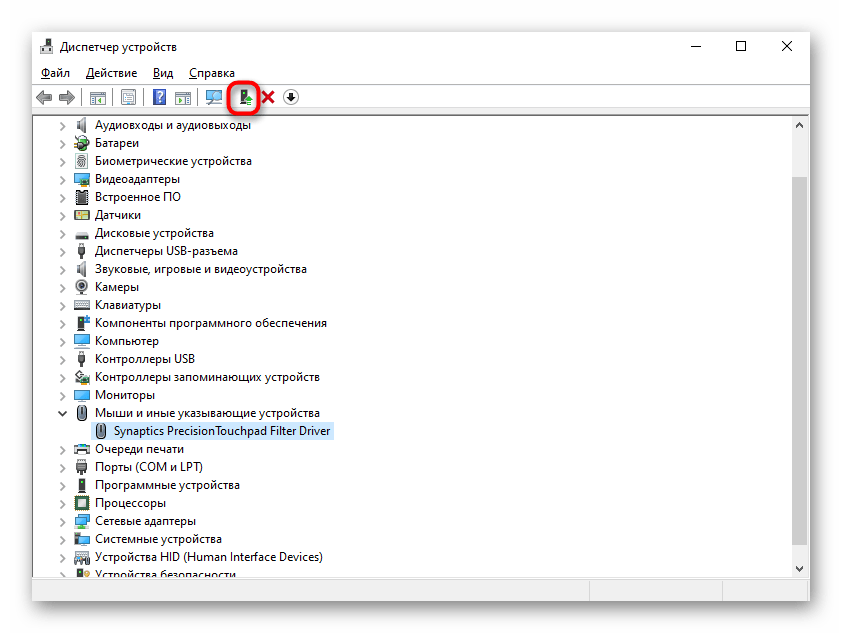
- Выделите эту строку и на панели инструментов нажмите кнопку, отвечающую за обновление драйверов.
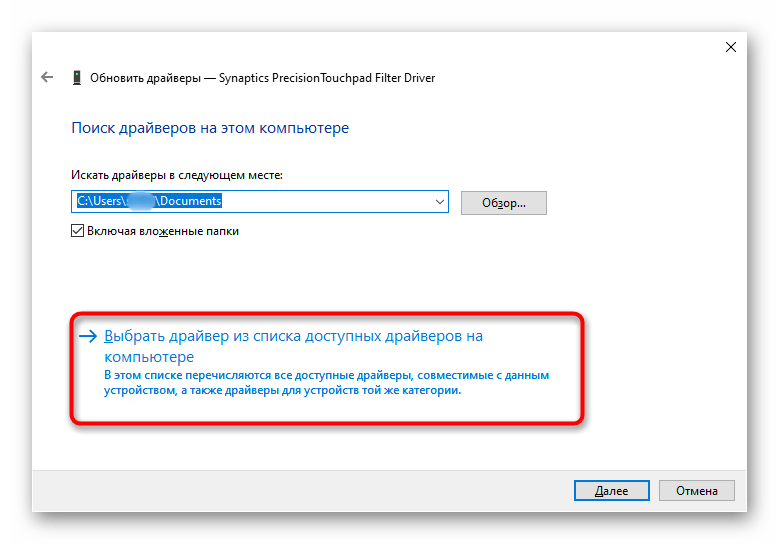
- Используйте пункт «Выбрать драйвер из списка доступных драйверов на компьютере».
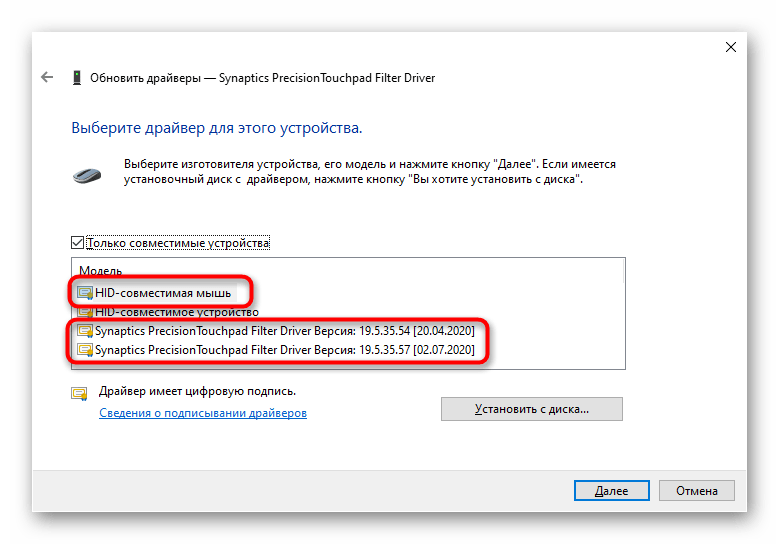
- Выберите пункт «HID-совместимая мышь». Может быть, система обнаружит и фирменный драйвер (на скриншоте ниже это строчки со словом Synaptics) — в такой ситуации попробуйте сперва установить его, а если это не принесет результата и после перезагрузки ноутбука сенсорная панель не заработает, переходите к установке драйвера с названием «HID-совместимая мышь».
Причина 5: Вирусная активность
Не стоит исключать и возможное воздействие вирусов на ноутбук. Вредоносное программное обеспечение может блокировать или частично нарушать работу любого компонента компьютера, поэтому при отсутствии программных проблем рекомендуется проверить операционную систему на присутствие опасного софта. Сделать это можно, подобрав качественный антивирус или сканер, не требующий установки.
Подробнее: Борьба с компьютерными вирусами
Причина 6: Аппаратная неполадка
Если никаким из способов не удается разобраться с возникшей неполадкой, вполне вероятно, что все дело в аппаратной части, и вариантов здесь может быть сразу несколько: отошел/повредился шлейф, повреждение электронных компонентов (например, после того, как на ноутбук была пролита жидкость, особенно в районе тачпада, или из-за естественного износа деталей), фиксатора разъема или даже материнской платы. Определить точно это сможет только специалист, к которому и следует обратиться в случае, когда тачпад необходим и использование мышки не станет заменой.
Опытные пользователи, умеющие разбирать ноутбук, могут самостоятельно проверить, нет ли проблем с подключением шлейфа, целостностью проводов и разъемов, окисления.
Если ничего не помогло, перед обращением к специалисту можете попробовать обесточить ноутбук, достать аккумулятор (если он съемный) и подождать минут 15. После этого соберите ноутбук, включите и проверьте сенсорную панель. Еще один вариант, который иногда помогает, — удерживание кнопки питания выключенного ноутбука (с извлеченной батареей) примерно 30 секунд для сброса всего напряжения в конденсаторах. Не забудьте и то, что работу тачпада может контролировать какое-либо приложение, не обязательно вредоносное. Подтвердить или опровергнуть эту догадку можно, запустив ноутбук в «Безопасном режиме», где никакого лишнего софта не стартует вместе с Windows. Возможно, в ходе такой загрузки вы обнаружите, что панель работает без проблем, соответственно, понадобится проанализировать все установленное программное обеспечение и найти виновника.
Подробнее: Вход в «Безопасный режим» в Windows 10 / Windows 7
Если ваша сенсорная панель не работает, причиной этому может быть отсутствующий или устаревший драйвер. Обновление или переустановка драйверов сенсорной панели в Диспетчере устройств может помочь устранить проблему.
Чтобы открыть диспетчер устройств, введите Диспетчер устройств в поиск на панели задач, а затем выберите Диспетчер устройств.
Обновление драйверов сенсорной панели
-
Откройте Диспетчер устройств.
-
Чтобы найти устройства с сенсорной панелью, выберите Устройства с интерфейсом пользователя или Мышии другие указывающие устройства , а затем щелкните правой кнопкой мыши устройство, которое вы хотите обновить.
-
Выберите Обновить драйвер.
Переустановка драйверов сенсорной панели
-
Откройте Диспетчер устройств.
-
Щелкните правой кнопкой мыши имя устройства и выберите удалить устройство.
-
Выберите Удалить и перезагрузите компьютер.
-
Windows попытается переустановить драйвер.
Если Windows не нашли новый драйвер и его переустановка не помогает, обратитесь за помощью к изготовителю компьютера.
Если ваша сенсорная панель не работает, причиной этому может быть отсутствующий или устаревший драйвер. Обновление или переустановка драйверов сенсорной панели в Диспетчере устройств может помочь устранить проблему.
Чтобы открыть диспетчер устройств, введите диспетчер устройств в поле поиска на панели задач, а затем выберите Диспетчер устройств.
Обновление драйверов сенсорной панели
-
Откройте Диспетчер устройств.
-
Чтобы найти устройства с сенсорной панелью, выберите Устройства с сенсорным интерфейсом или Мыши и другие указывающие устройства,а затем щелкните правой кнопкой мыши (или нажмите и удерживайте) устройство, которое вы хотите обновить.
-
Выберите Обновить драйвер.
Переустановка драйверов сенсорной панели
-
Откройте Диспетчер устройств.
-
Щелкните правой кнопкой мыши (или нажмите и удерживайте) имя устройства, а затем выберите Удалить устройство.
-
Выберите Удалить и перезагрузите компьютер.
-
Windows попытается переустановить драйвер.
Если Windows не нашли новый драйвер и его переустановка не помогает, обратитесь за помощью к изготовителю компьютера.
 Если после установки Windows 10 или обновления у вас не работает тачпад на ноутбуке, в этой инструкции — несколько способов исправить проблему и другая полезная информация, которая может помочь избежать повторного появления проблемы.
В большинстве случаев, проблема с нефункционирующим тачпадом бывает вызвана отсутствием драйверов или же наличием «неправильных» драйверов, которые может устанавливать и сама Windows 10. Однако, это не единственный возможный вариант. См. также: Как отключить тачпад на ноутбуке.
Примечание: прежде чем продолжать, обратите внимание на наличие на клавиатуре ноутбука клавиш для включения-отключения тачпада (на ней должно быть относительно понятное изображение, см. скриншот с примерами). Попробуйте нажать эту клавишу, либо её же в сочетании с клавишей Fn — возможно, уже это простое действие исправить проблему.
![]()
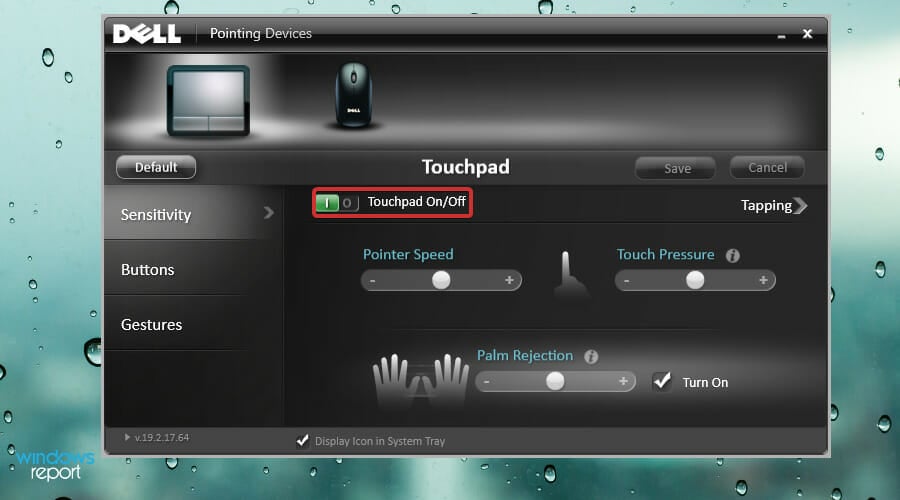
Также попробуйте зайти в панель управления — мышь. И посмотреть, а нет ли там опций включения и отключения тачпада ноутбука. Возможно, по какой-то причине он был отключен в настройках, такое встречается на тачпадах Elan и Synaptics. Еще одно расположение с параметрами тачпада: Пуск — Параметры — Устройства — Мышь и сенсорная панель (если в этом разделе отсутствуют пункты для управления сенсорной панелью, то либо она отключена, либо не установлены драйвера для нее).
Установка драйверов тачпада
Драйверы тачпада, а точнее их отсутствие — наиболее частая причина того, что он не работает. А их установка вручную — первое, что следует попробовать. При этом, даже если драйвер установлен (например, Synaptics, с которым это происходит чаще других), все равно попробуйте этот вариант, так как очень часто оказывается, что новые драйверы, устанавливаемые самой Windows 10, в отличие от «старых» официальных, не работают.
Для того, чтобы скачать необходимые драйверы, зайдите на официальный сайт производителя вашего ноутбука в раздел «Поддержка» (Support) и найдите там загрузки драйверов для вашей модели ноутбука. Еще проще ввести в поисковике фразу марка_и_модель_ноутбука support — и перейти по первому же результату.
Есть немалая вероятность того, что драйверов тачпада (Pointing Device) для Windows 10 там не найдется, в этом случае смело загружайте имеющиеся в наличии драйверы для Windows 8 или 7.
Установите загруженный драйвер (если загружались драйверы для предыдущих версий ОС, и они отказываются устанавливаться, используйте режим совместимости) и проверьте, была ли восстановлена работоспособность тачпада.
Примечание: замечено, что Windows 10 после установки вручную официальных драйверов Synaptics, Alps, Elan, может автоматически обновить их, что иногда приводит к тому, что тачпад снова не работает. В такой ситуации, после установки старых, но работающих драйверов тачпада, запретите их автоматическое обновление с помощью официальной утилиты Майкрософт, см. Как запретить автоматическое обновление драйверов Windows 10.
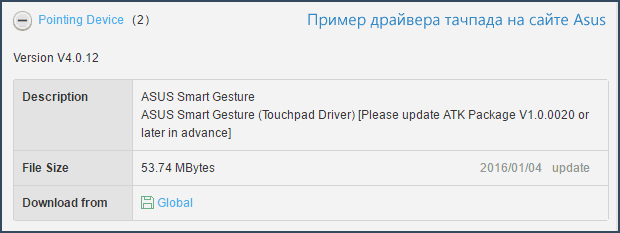
В некоторых случаях, тачпад может не работать при отсутствии необходимых драйверов чипсета ноутбука, таких как Intel management Engine Interface, ACPI, ATK, возможно, отдельных драйверов USB и дополнительных специфичных драйверов (которые часто бывают необходимы на ноутбуках).
Например, для ноутбуков ASUS, помимо установки Asus Smart Gesture необходимо наличие ATK Package. Вручную загрузите подобные драйверы с официального сайта производителя ноутбука и установите их.
Также проверьте в диспетчере устройств (правый клик по пуску — диспетчер устройств), нет ли там неизвестных, неработающих или отключенных устройств, особенно в разделах «Устройства HID», «Мыши и иные указывающие устройства», «Другие устройства». Для отключенных — можно кликнуть правой кнопкой мыши и выбрать пункт «Включить». Если есть неизвестные и неработающие устройства, попробуйте выяснить, что это за устройство и загрузить драйвер для него (см. Как установить драйвер неизвестного устройства).

Дополнительные способы включить тачпад
Если шаги, описанные выше, не помогли, вот еще некоторые варианты, которые могут сработать, если не работает тачпад ноутбука в Windows 10.
В начале инструкции упоминались функциональные клавиши ноутбука, позволяющие включать-отключать тачпад. Если эти клавиши не работают (причем не только для тачпада, но и для других задач — например, не переключают состояние Wi-Fi адаптера), можно предположить, что для них не установлено необходимое ПО от производителя, что в свою очередь, может и вызывать невозможность включить тачпад. Подробнее о том, что это за ПО — в конце инструкции Не работает регулировка яркости экрана Windows 10.
Еще один возможный вариант — тачпад был отключен в БИОС (UEFI) ноутбука (опция обычно находится где-то в разделе Peripherals или Advanced, имеет в названии слово Touchpad или Pointing Device). На всякий случай, проверьте — Как зайти в БИОС и UEFI Windows 10.
Примечание: если не работает тачпад на Macbook в Boot Camp, установите драйверы, которые при создании загрузочной флешки с Windows 10 в дисковой утилите загружаются на этот USB накопитель в папку Boot Camp.
Тачпад вековая особенность, давно заменил альтернативное управление мышкой. С помощью его мы можем полностью управлять нашим устройством, будь это ноутбук или гибридный планшет. Многие ноутбуки (Acer, Asus, HP, lenovo, Dell) имеют проблемы при работе тачпада. Что делать, если не работает тачпад на ноутбуке в Windows 10? Разберем 5 способов устранение этой проблемы.
1. Повторное включение сенсорной панели с помощью клавиши Fn
Со мной произошла одна история, когда я включал WiFi на ноутбуке и нечаянно отключил сенсорную панель тачпад. Долго я искал причину, сразу не сообразив, что случилось. Оказалось все просто, в ноутбуках есть кнопка дополнительных функций под названием Fn с лево снизу клавиатуры. Для включения какой-нибудь функции на ноутбуке, зажимают сочетание кнопок Fn и F1…F12. На этих же самых кнопках F1-F12, нарисованы картинки или символы для применения параметра. К примеру, чтобы включить тачпад, нужно нажать Fn+F7, на самой кнопке F7 будет изображение типо сенсорной панели. Можете нажать все кнопки по порядку Fn+F1…F12, но помните, что там есть функция отключения дисплея, нажмите повторно на те кнопки, на которых погас экран.
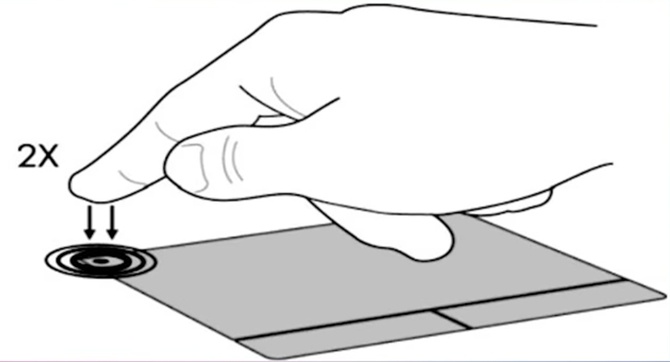
На некоторых ноутбуках марки HP, тачпад включается и выключается, двойным касанием по краю самой сенсорной панели. На марках asus и acer может быть отдельная кнопка рядом с сенсорной панелью. Если Тачпад по-прежнему не работает, то двигаемся дальше.
2. Удаление Других Драйверов Мыши
Бывают моменты, когда у вас в прошлом было подключено целая куча драйверов от разных устройств мыши и вы их никогда не удаляли. Некоторые драйвера от производителей мыши, сами автоматически отключают Тачпад. Перейдите в диспетчер устройств, нажав сочетание кнопок Win+R и введите в строке devmgmt.msc.

Найдите строку указывающую на мыши и иные указывающие устройства, нажмите на ярлычок, чтобы раздвинуть категорию и удалите по порядку все драйвера мыши, пока тачпад не начнет работать на вашем ноутбуке. Если не заработал, попробуйте после удаление всех драйверов перезагрузить систему. Не заработал тачпад? Двигаемся к следующему пункту.
3. Обновление или откат драйвера тачпада
Попробуйте обновить или откатить драйвер тачпада. Перейдите в тот же диспетчер устройств, как описывали выше. Найдите устройство Тачпад, обычно он называется, как и марка ноутбука (Dell TouchPad, Lenovo TouchPad, Synaptics, HP TouchPad, Acer TouchPad, Asus TouchPad.) Нажмите правой кнопкой мыши на вашем драйвере и выберите свойства. Далее нажмите Обновить, чтобы убедиться есть ли какие-нибудь полезные обновления для вашего тачпада.
Много людей сообщали на форумах Майкрософт, что Тачпад переставал работать именно после обновления Windows 10, для этого вам нужно выбрать откатить драйвер. Если у вас не горит выделенным кнопка Откатить, значит у вас нет предыдущей версии драйвера.
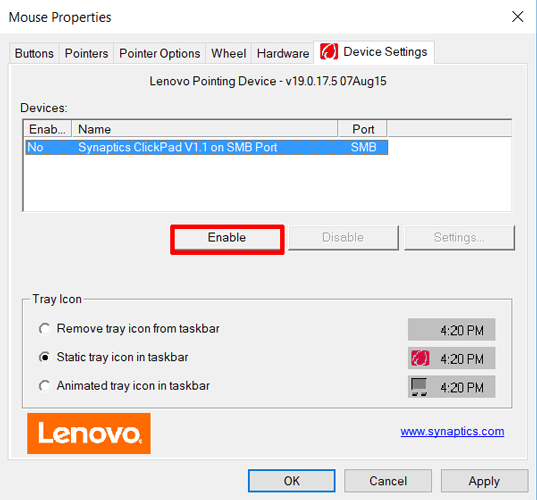
4. Включить тачпад в свойствах мыши
Во многих случаях диспетчер устройств не срабатывают для того, чтобы включить Тачпат на ноутбуке. Если ваш Тачпат по-прежнему не работает на ноутбуке в windows 10, то перейдите в свойства мышь.
- Наберите mouse в строке поиска windows и перейдите в Настройки Мыши.
- Нажмите Дополнительные параметры мыши, в открывшимся окне переходим Настройки устройства, вкладка Сенсорная панель или как на картинке.
- Найдите ваш Тачпад и нажмите «включить».
5. Отключить службу ввода сенсорного экрана для гибридных ноутбуков
Если ваш ноутбук является гибридным (ноутбук и планшет в одном с сенсорным дисплеем.) Есть вероятность, что служба ввода сенсорно экрана, которая контролирует функциональность стилуса, мешает вашей сенсорной панели.
Чтобы отключить службу нажмите win+R, затем введите services.msc и в списке служб найдите TabletInputService или Tablet PC Input Service. Щелкните на ней правой кнопкой мыши, затем отключить ее. Очень неудобное решение для кто пользуется сенсорным экраном и тачпадам, но вы дальше можете проявить смекалку и попробовать удалить драйвера, откатить, обновить и заново потом запустить службу.
Смотрите еще:
- Не работает клавиатура на экране блокировки windows 10
- Как создать Учетную Запись Майкрософт для Windows 10
- Как Сделать Резервную Копию Драйверов Windows 10
- Как исправить ошибки обновлений Windows 10
- Не работает поиск в Windows 10
[ Telegram | Поддержать ]
Ensure that your touchpad is up to date before trying other solutions
by Loredana Harsana
Loredana is a passionate writer with a keen interest in PC software and technology. She started off writing about mobile phones back when Samsung Galaxy S II was… read more
Updated on January 19, 2023
Reviewed by
Vlad Turiceanu

Passionate about technology, Windows, and everything that has a power button, he spent most of his time developing new skills and learning more about the tech world. Coming… read more
- If the touchpad is not working in Windows 11, this may be caused by the dust and debris that accumulate there.
- Having another mouse alongside the built-in touchpad on your laptop often creates a conflict with the integral touchpad driver, causing it to malfunction.
- To solve this issue, don’t hesitate to update your touchpad driver or simply reset the touchpad.

XINSTALL BY CLICKING THE DOWNLOAD FILE
This software will keep your drivers up and running, thus keeping you safe from common computer errors and hardware failure. Check all your drivers now in 3 easy steps:
- Download DriverFix (verified download file).
- Click Start Scan to find all problematic drivers.
- Click Update Drivers to get new versions and avoid system malfunctionings.
- DriverFix has been downloaded by 0 readers this month.
Nothing quite ruins your day like a malfunctioning touchpad. In recent times, Windows 11 users have had their fair share of challenges with their touchpads.
The problem is common among users with devices under the 8th generation Intel chip. Those with AMD CPUs also face a couple of compatibility issues, the major one revolving around the touchpad.
Windows 11 touchpad problems include delayed cursor response, the cursor jumping all over or not functioning completely. You may also be unable to scroll through your screen.
The incompatibility of drivers installed is the main reason why your touchpad may not be working. It has proven to be impossible for one to effectively use a laptop with a faulty touchpad.
There are a couple of measures that you could borrow from our guide on how to fix Lenovo E240 touchpad issues. Even though it talks about Windows 10, it also works perfectly for Windows 11.
For instance, using the external peripheral is one way to gain back the functionality of your touchpad.
Is my laptop’s touchpad worn out?
Most laptops come with a durable coating and this helps reduce the rate at which it wears and tears. This is not to say that it will not eventually wear out.
If you having trouble with your touchpad, check the touchpad’s properties settings. The problem might actually be program settings and not its physical condition.
What causes the touchpad to stop working in Windows 11?
You may have encountered a couple of challenges when using your laptop, specifically with your touchpad on Windows 11 laptops, tablets, and computers.
The problem commonly stems from the conflict between the drivers installed and the software. It may also be related to an outdated version of the operating system.
Even more, Windows 10 users often complain about touchpad driver missing issues in Device Manager. The problem further extends to Windows 11 too.
Changing vital settings in your device may also land you in the same predicament, and so will using faulty hardware. 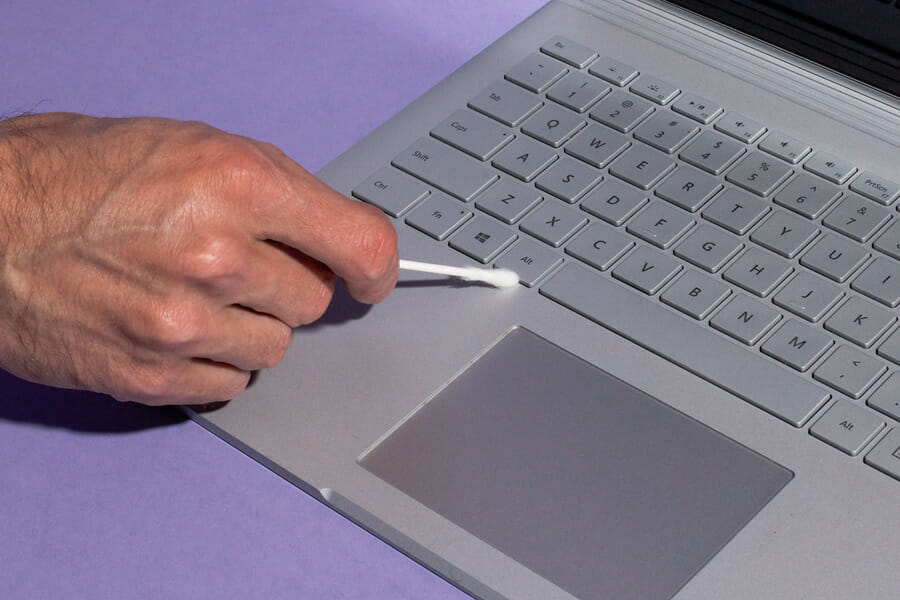
Despite these setbacks, you still need to equip yourself with all the relevant and necessary information that will help you fix the faulty touchpad.
Take a look at the above article (the Windows 10 tips are useful for Windows 11 users too) and get to learn how to solve this issue by following either one of the following solutions listed below.
We also have an article about what to do if your Touchpad click is not working, that you can check out.
What can I do if the touchpad is not working in Windows 11?
1. Restart your device
- Save your work first then close all windows.
- Press Ctrl + Alt + Delete keys simultaneously.
- Your shutdown menu will then appear.
- Using the keyboard arrow keys on your laptop, select the Restart option. Then, click on OK.

- Press Enter on your keyboard.
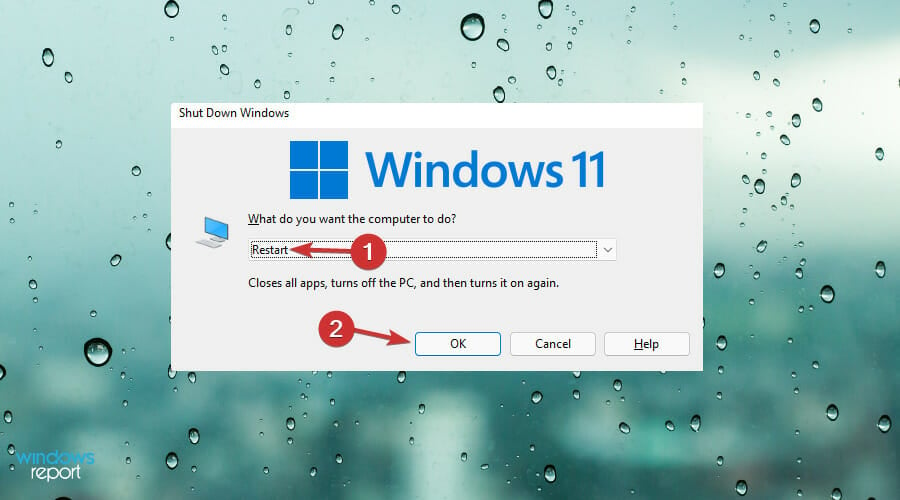
Wait till your laptop restarts, then check whether the issue has been resolved. Windows 11 OS is a bit glitchy sometimes, as a result, the touchpad stops working.
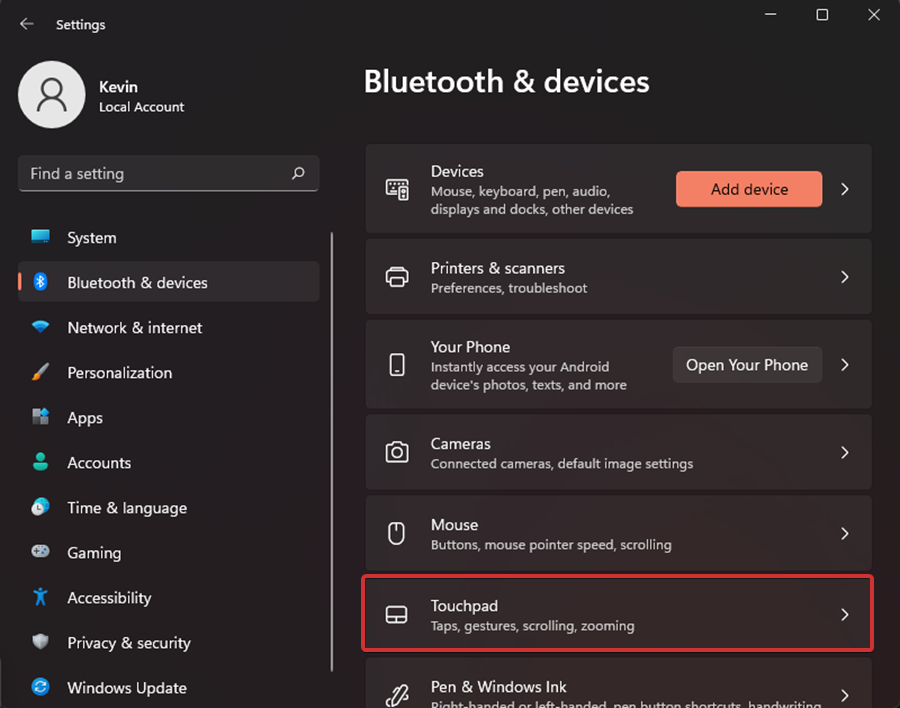
2. Enable your touchpad using Settings
- Press the Windows key + I.
- Click on Bluetooth and devices in the Settings app.

- Click on the touchpad on the right side.

- Switch on the toggle under the touchpad.

The Windows 11 touchpad not working often occurs after a user makes a Windows 11 update. The system might at times shut itself off during installation.
Confirm whether the touchpad turned itself off during the installation process. If the issue persists after turning it on, move to the next solution.
3. Update your touchpad driver
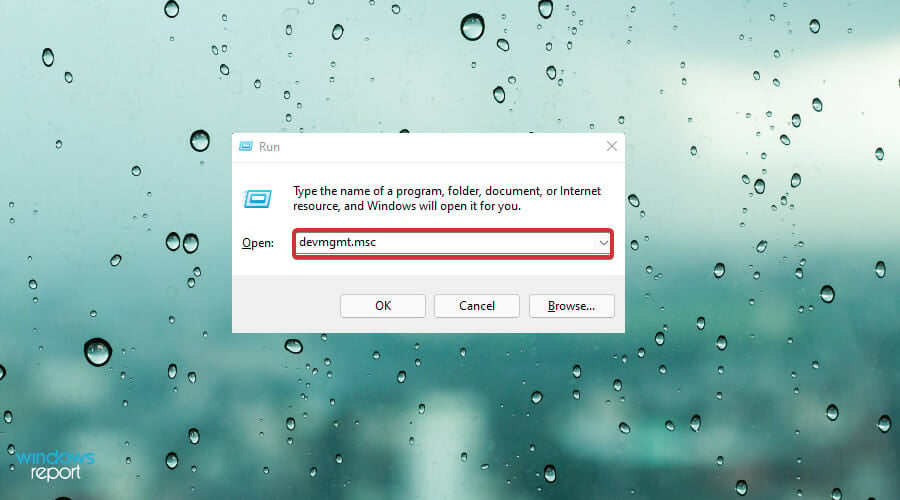
1. Press the Windows + R keyboard shortcut to open the Run dialog.
2. Type the following command in Run dialog box:devmgmt.msc
3. Click on OK.
4. The Device Manager menu will appear on the screen.
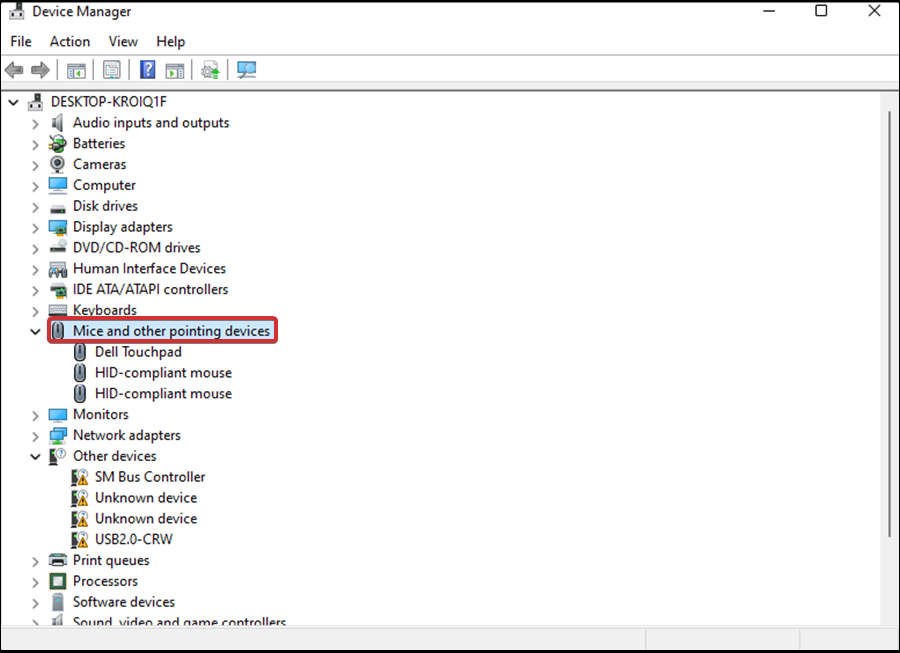
5. Scroll down to the Mice and other pointing devices section and double-click on it to expand the list.
Some PC issues are hard to tackle, especially when it comes to corrupted repositories or missing Windows files. If you are having troubles fixing an error, your system may be partially broken.
We recommend installing Restoro, a tool that will scan your machine and identify what the fault is.
Click here to download and start repairing.
6. Locate your touchpad driver in the list. If you cannot find it, click on Action from the menu.
7. Then, right-click on the touchpad driver on the list.

8. Select the Update driver option, then click OK.
9. Then, select search automatically for drivers. It is important to ensure that you have a stable Internet connection at this point. This will allow you to download the update file for the driver.
10. Use the on-screen steps until you successfully complete the process.
11. Finally, restart your device and check if your touchpad is functioning properly.
Whenever you have an issue with a device on your computer, you should try to update its driver to fix it. It could be that a faulty or outdated driver is causing your touchpad to not work, therefore you should ensure that your driver is up to date.
For automatic scans of missing or outdated drivers, do not hesitate to use a dedicated tool such as DriverFix.
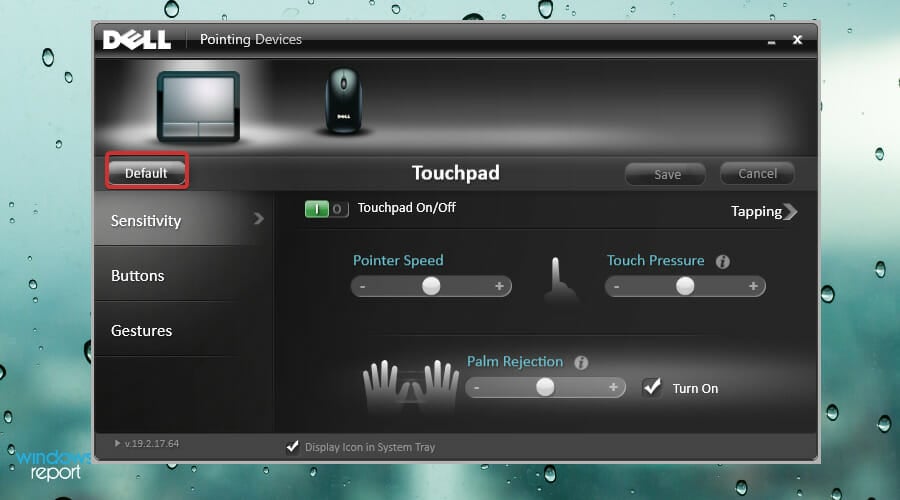
4. Reset your touchpad

Tip
Resetting your touchpad assists in regaining your original touchpad settings. Therefore, it reduces the chances of any problems occurring.
- Press the Windows key + I.
- Click on Bluetooth and devices in the Settings app.
- Click on the touchpad on the left side.
- Scroll to the bottom in the right.
- Click on Default to restore your previous settings.
5. Use keyboard shortcuts to enable your touchpad
Any laptop comes with a keyboard shortcut combination that will help you enable or disable its touchpad. This especially comes in handy for those who use an external mouse.
It helps you avoid conflict between the two, thus, ensuring that only one is active at any given time. Therefore, this enhances access to the hotkey combination.
In some instances, you may also find that you disable the touchpad using keyboard shortcuts.
Some of the Windows 11 compatible devices come with an Fn key when pressed in combination with any of the F1–F12 function keys, which turns the touchpad on or off. Press both of these function keys to find out which hotkeys work for your device.
Also, there are some laptops that come with a touchpad locking system. Ideally, yours will include with a lit square on the top right side of the touchpad. If the square on your touchpad is lit, then the touchpad is active and vice versa.
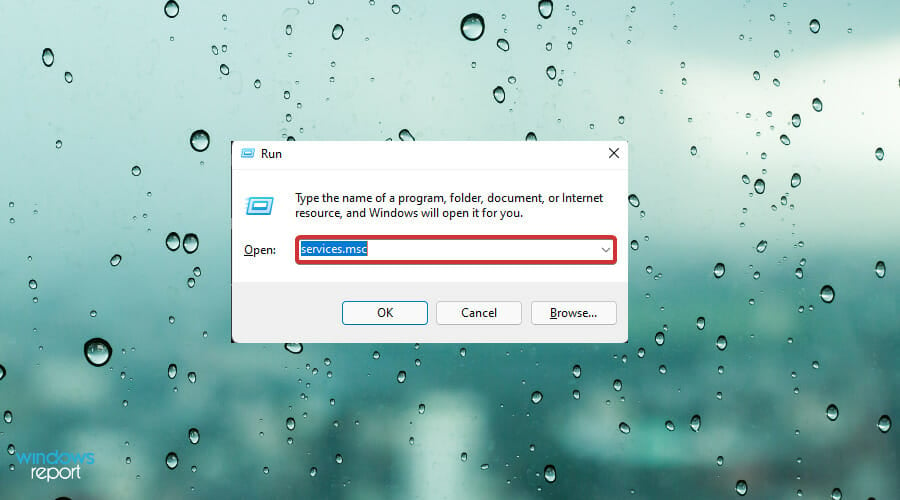
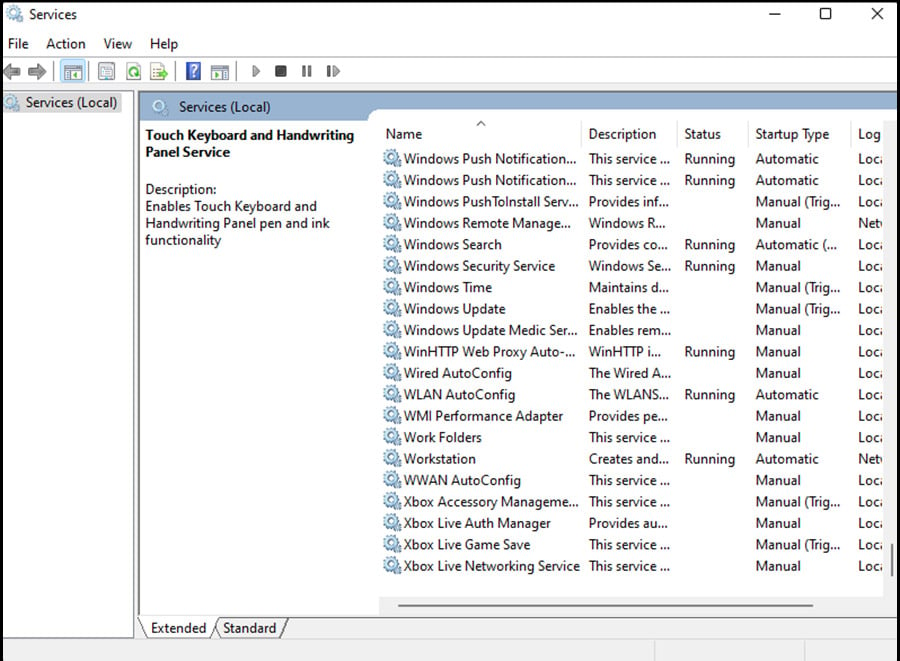
6. Disable the tablet input service
- Press the Windows key + R key, the Run dialog will appear.
- Key in the following command:
services.msc. - Then, click on OK.
- The Services app will then open, find the Tablet PC Input Service or TabletInputService.

- Right-click on the option, then select Stop.
- Restart your device.
- Check whether your touchpad has regained its normal functions. If the issue persists further, repeat the above steps but this time select Start to enable the service.
7. Uninstall your third-party antivirus

NOTE
When you install third-party programs such as antivirus, it alters the default settings in your device, ultimately affecting some of your hardware peripherals. This may be the reason why your touchpad is acting up.
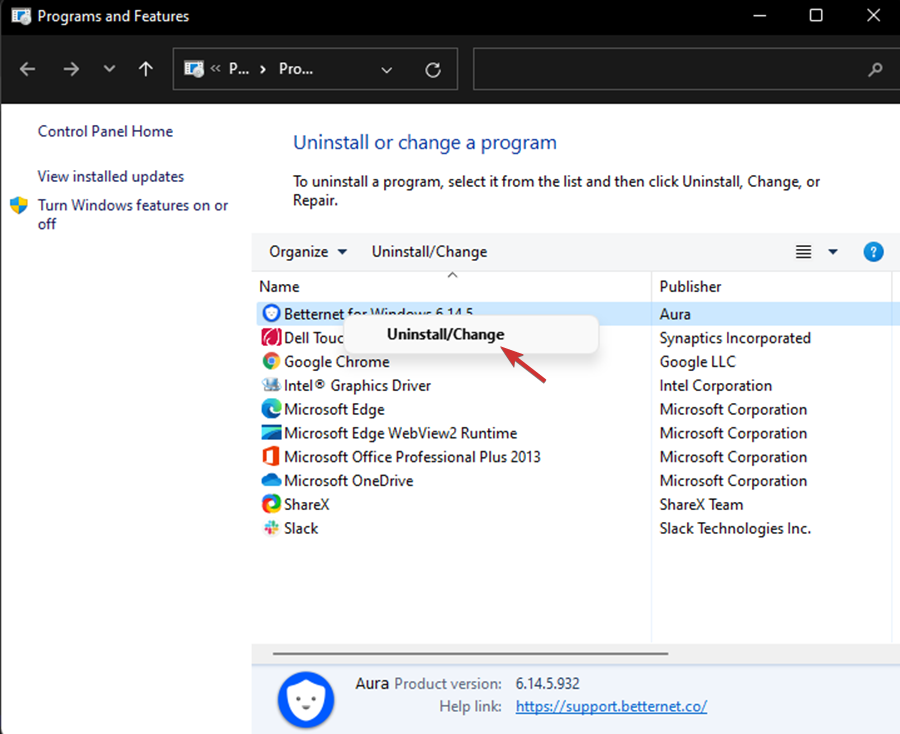
- Click on the Search icon on your taskbar.

- Key in the following command and then press Enter:
appwiz.cpl. - The Program and Features window will appear, scroll down to the third-party antivirus program you wish to uninstall.
- Right-click on the antivirus, then select Uninstall.

- Follow through the subsequent steps to complete the process.
- Finally, restart your device.
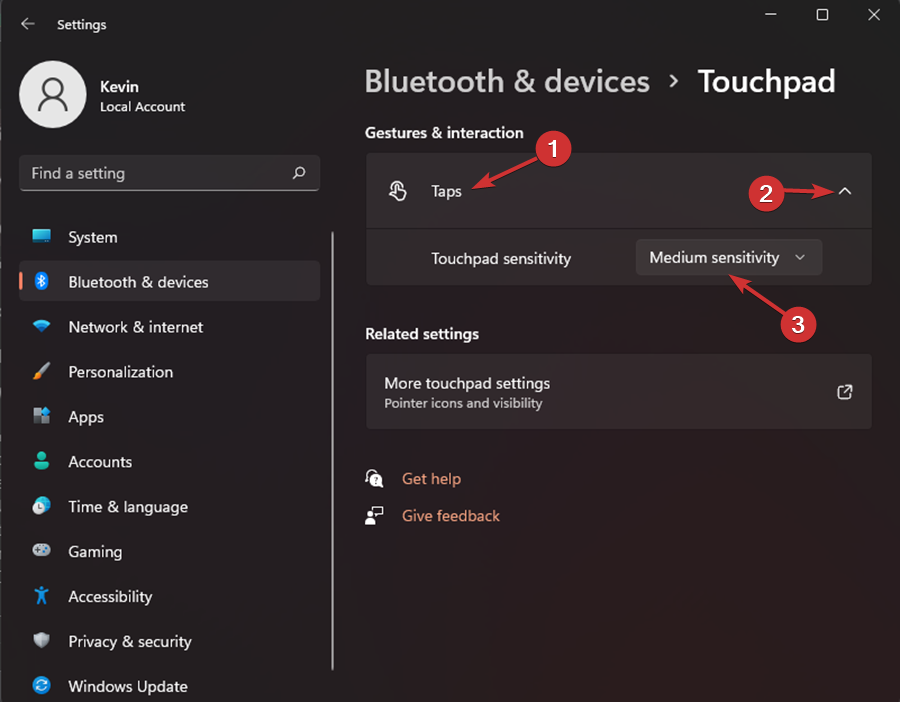
8. Change the sensitivity of your touchpad and the speed of the cursor
- Press the Windows key + I key, to open the Windows Settings app.
- Select Bluetooth and devices.
- Select on the Touchpad.
- When the next page pops up, select Taps.
- Click on the dropdown menu for Touchpad sensitivity, then set it to Medium sensitivity.

9. Uninstall the Windows Update
- Press the Windows + I keyboard shortcut.
- Select the Windows update.
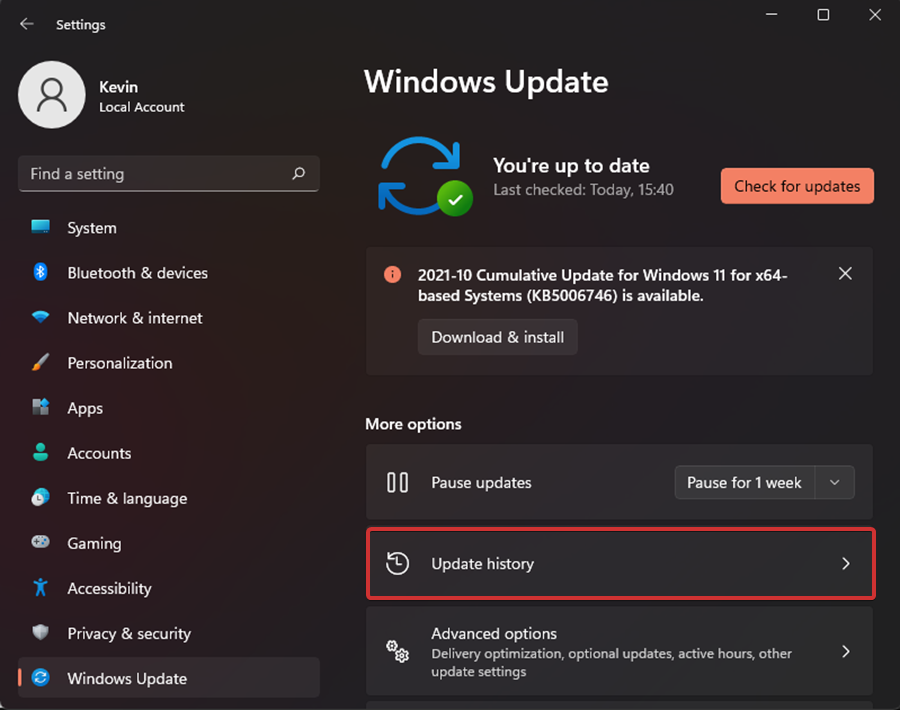
- The Settings page will appear, select the Update history.

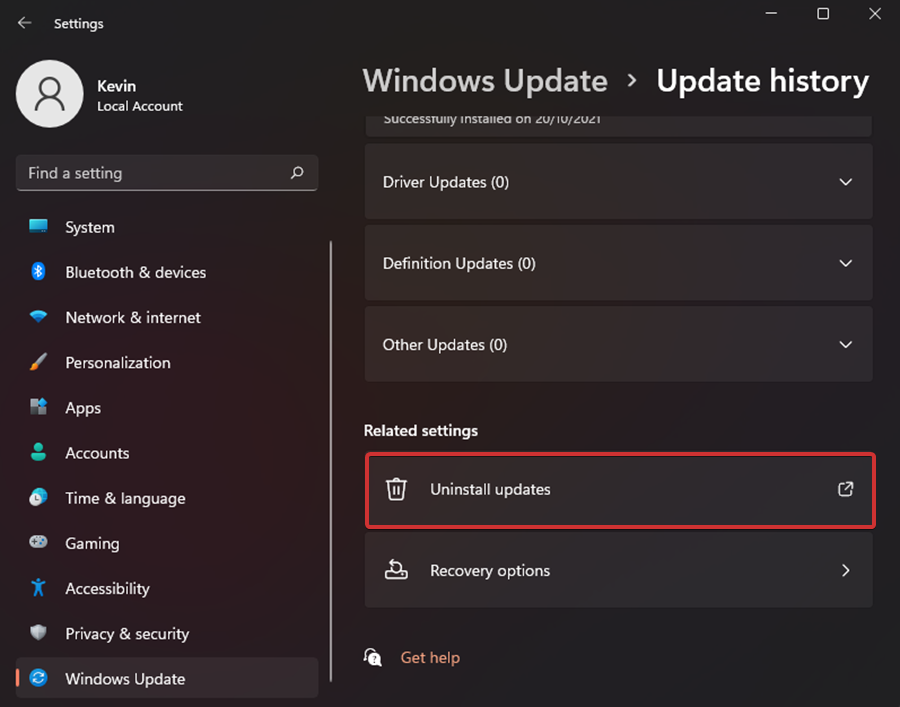
- Then click on Uninstall updates.

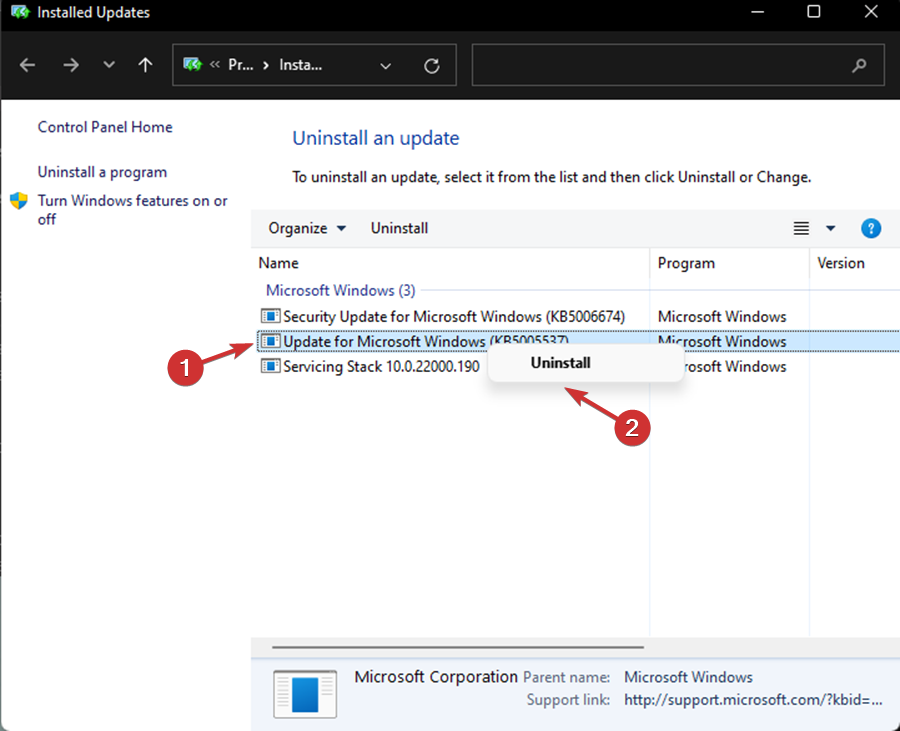
- Right-click on the update display in the form of KB, then select Uninstall.

- Follow through all the steps that pop up till you are able to uninstall the update.
- Restart your PC.
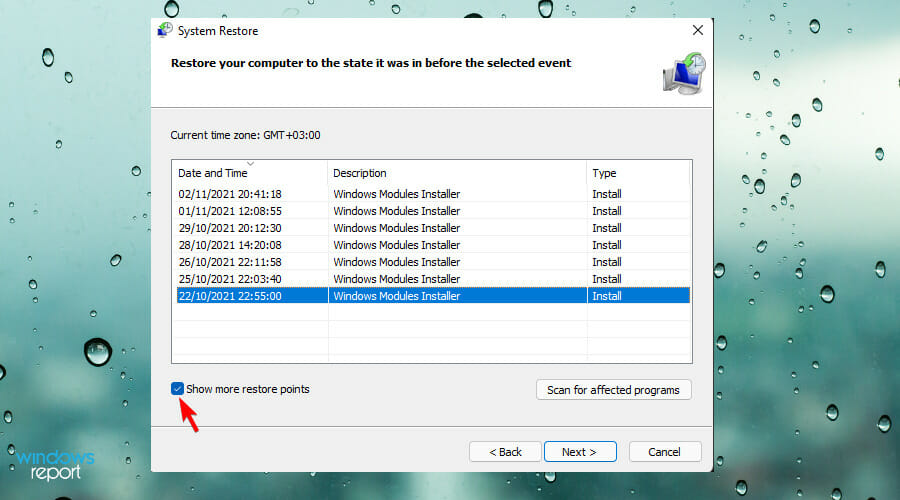
10. Perform a System restore
- Press the Windows key + R key to open the Run dialog.
- Key in the following command:
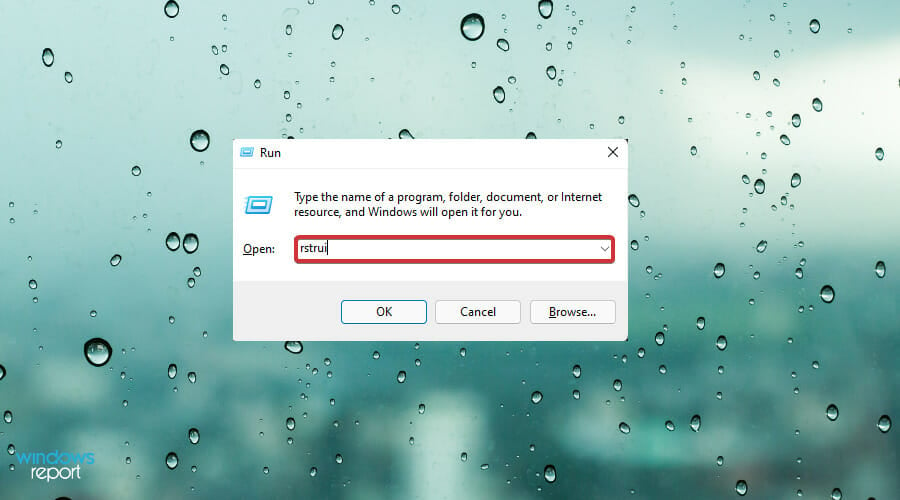
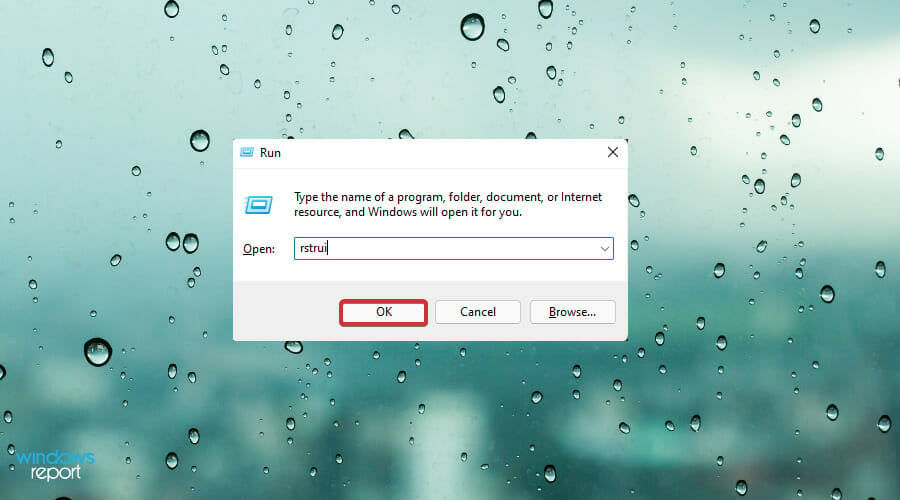
rstrui. - Click on OK.
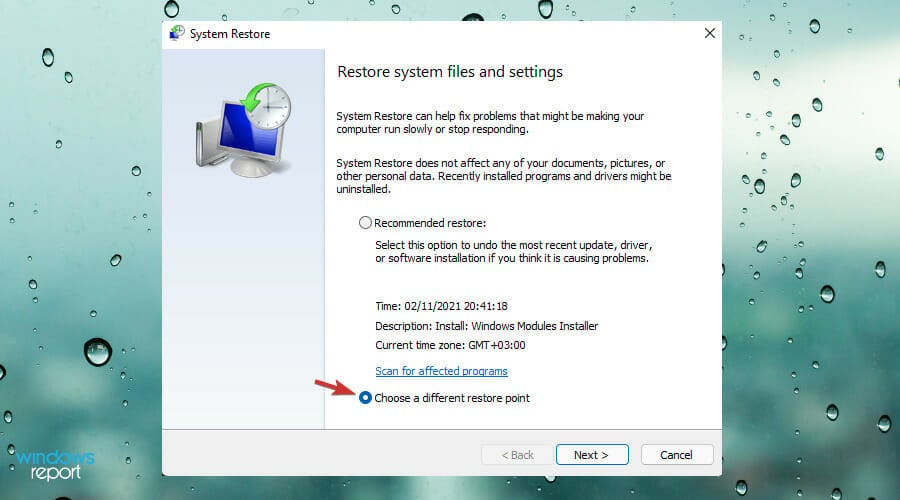
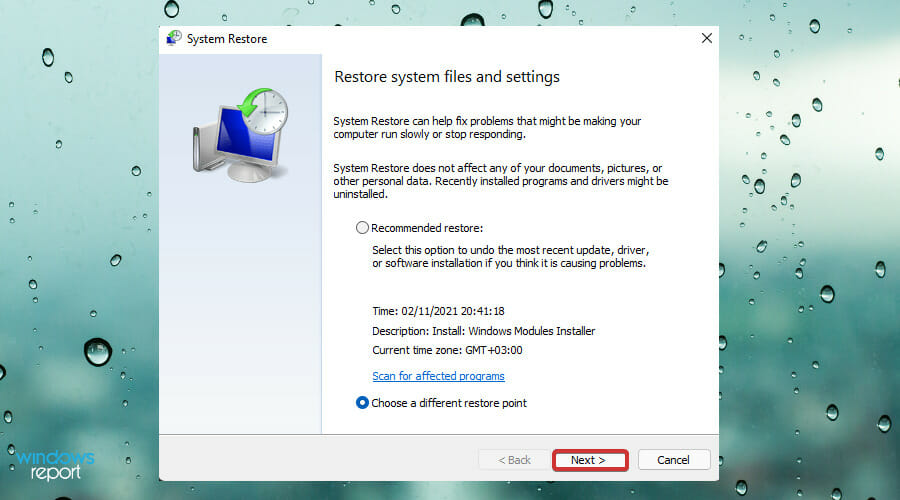
- The System Restore Wizard will open. Select the option Choose a different restore point.
- Click on Next.
- Check the box set before Show more restore points.
- Then, choose the most recently created restore point, click on Next.
- Click on Finish to initiate the restoring process.

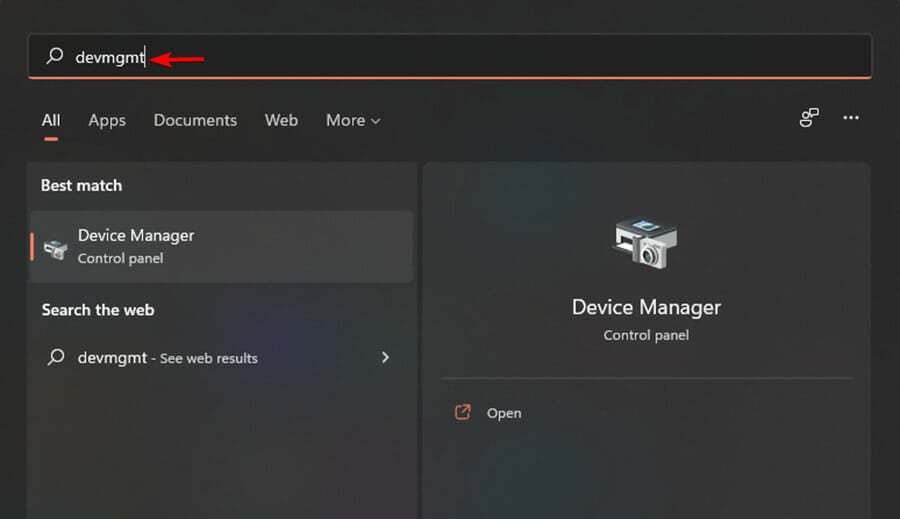
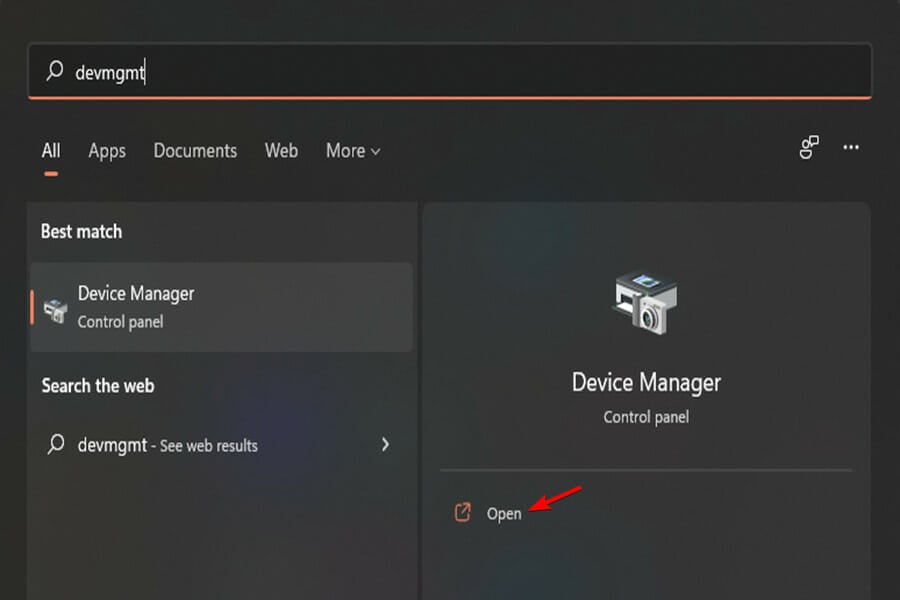
11. Uninstall additional mouse drivers
NOTE
Having an extra mouse along with the built-in touchpad on your laptop creates a conflict with the integral touchpad driver. This cause the Windows 11 touchpad to stop working.
- Press the Windows key + S key.
- Key in the following command:
devmgmt
- Click on Device Manager when it appears.

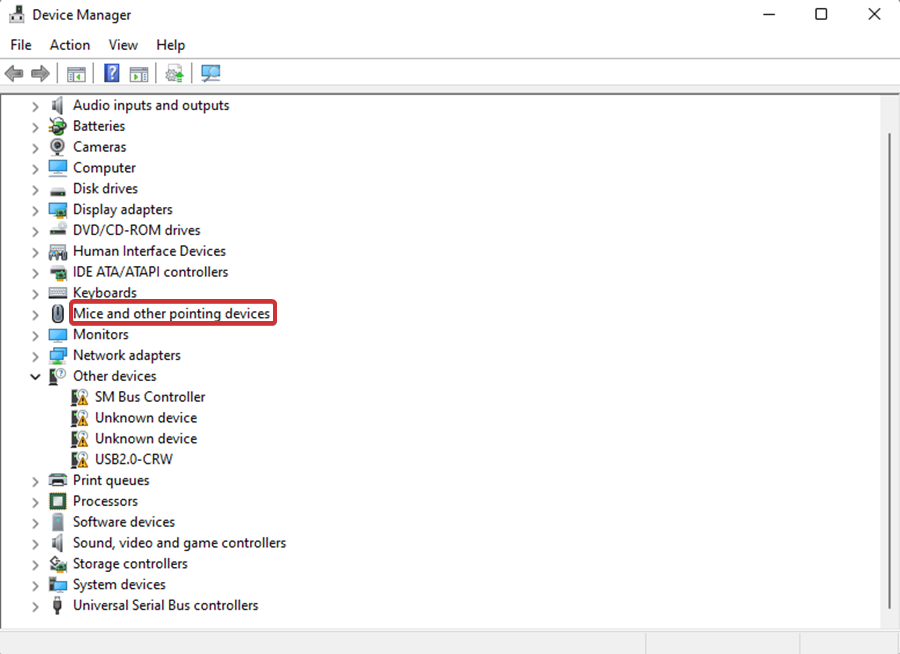
- Find the Mouse and pointing devices and click on it to expand the driver list.

- Right-click on the external mouse driver.
- Select the Uninstall device option.
- Click on Uninstall when the popup prompts.
- Check whether your touchpad is now active.
- Once the issue is fully resolved, Restart your Windows. Your system will automatically reinstall the external mouse driver.
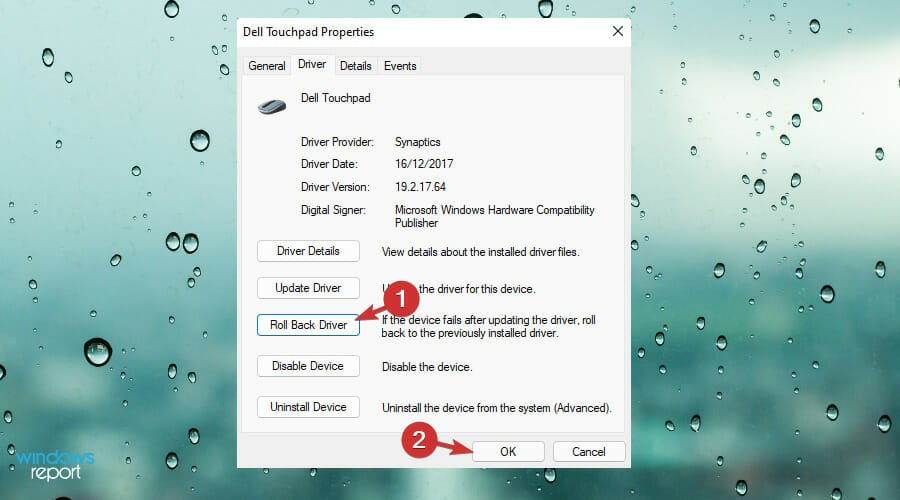
12. Reinstall your touchpad driver
- Press Windows + X keyboard shortcut.
- Select Device Manager.
- Then, find the Mice and pointing devices.

- Double-click on the option to expand the driver list.
- Find the touchpad driver and right-click on it.

- Select the Properties option.
- When the window pops up get on to the Driver tab.
- Select the Roll Back Driver button. This will allow you to get back to the previous version before the update.
- Once you successfully revert to the previous version, Restart Windows 11 and check whether the touchpad is back to normal.


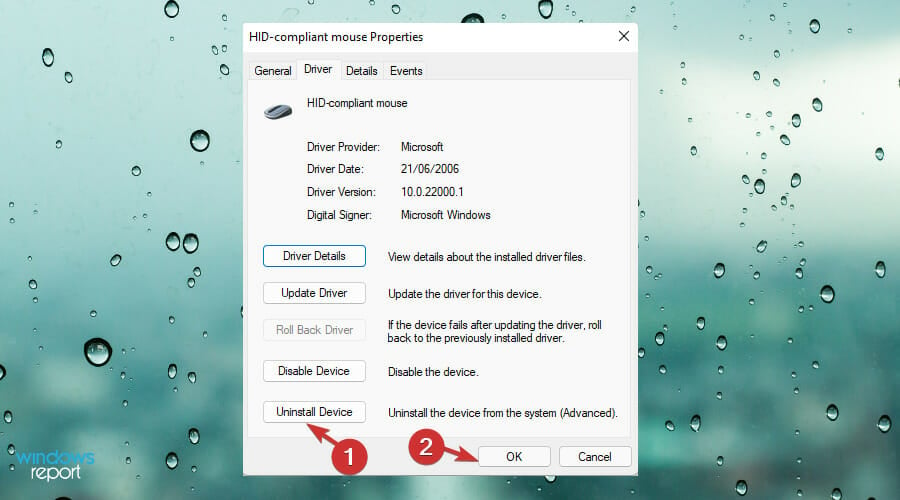
If this does not work for you, then uninstall it. You need to follow these steps:
- Once you get to the Driver tab, select the Uninstall Device. This will help you remove drivers’ files and the registry entry of the software.
- Then, restart the Windows device. The driver will get back to its default version.
13. Clean your touchpad
Over time, dirt deposits, skin oils, and grime accumulate on your touchpad. As a result, your touchpad stops functioning properly. The touchpad is less responsive and much slower because of the build-up.
Before trying anything else, clean up your touchpad using a soft piece of cloth. Preferably use a moist cloth to ensure that you get to clean it up properly.
After cleaning out all the build-up, try dragging your finger around the surface to check whether the issue has been resolved.
14. Use the laptop’s troubleshooter and run the Windows Hardware
NOTE
The Windows Hardware and Device troubleshooter is in place to help resolve hardware-related issues without necessarily having to use third-party software.
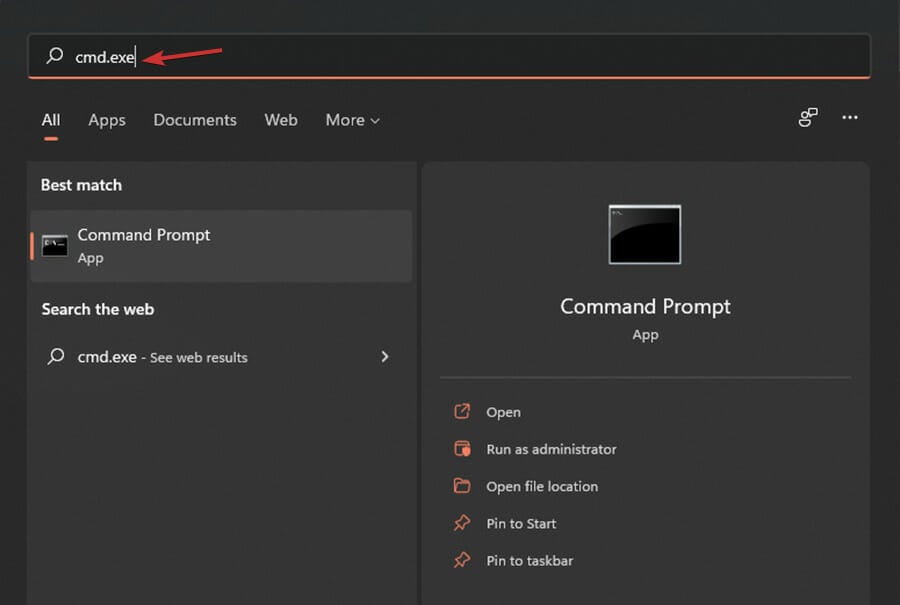
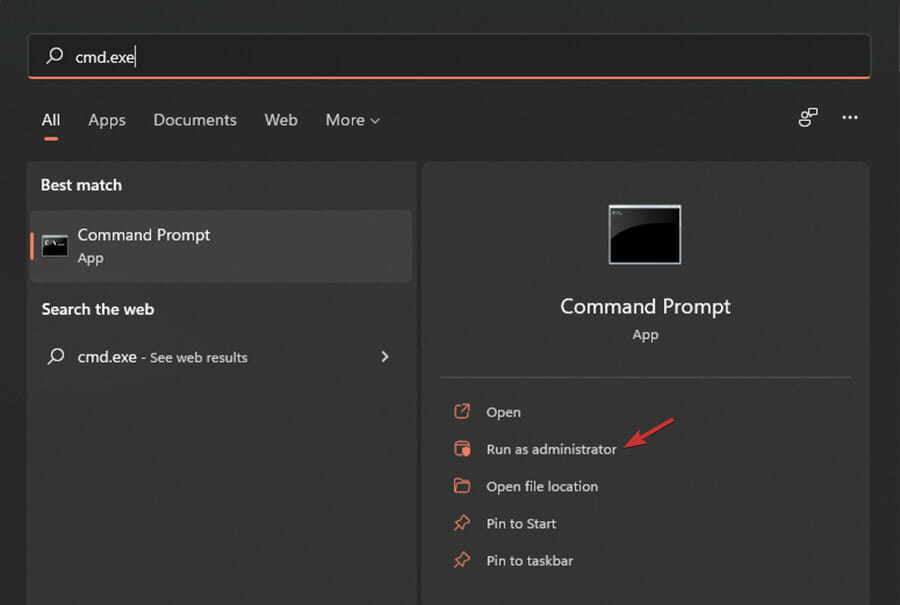
- Press the Windows key. Then, type cmd.exe.

- Right-click on the Command prompt, then select Run as administrator.
- Click on Yes to allow User Account Control.
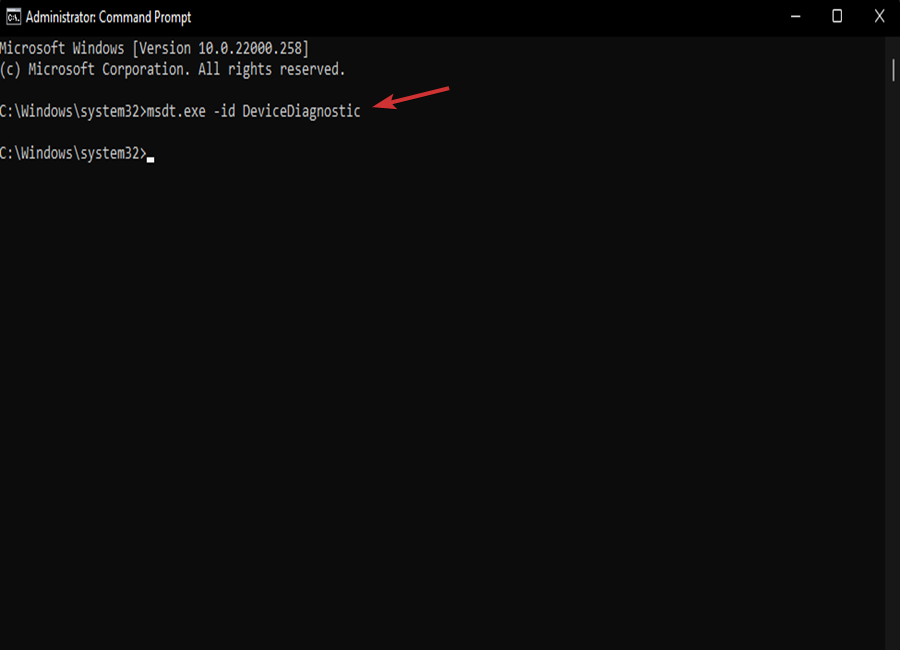
- Key in the following command:
msdt.exe -id DeviceDiagnostic
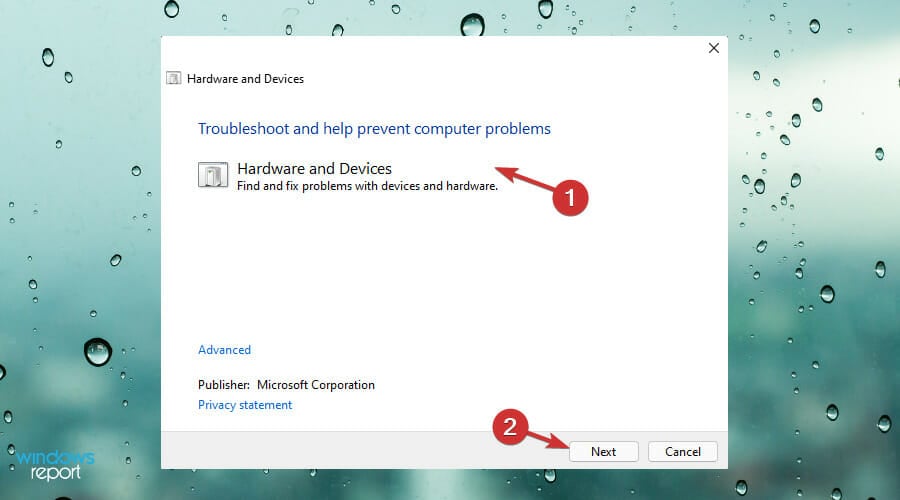
- The Hardware and Devices Troubleshooter will appear. Click on Next.
- If the automatic repair pops up, click on Apply this fix.
- Follow through the instructions to the end.
15. Adjust Windows Registry
NOTE
The update driver software may vary from one laptop to another, therefore, these instructions might vary as well. But, they should suffice for most of the parts.
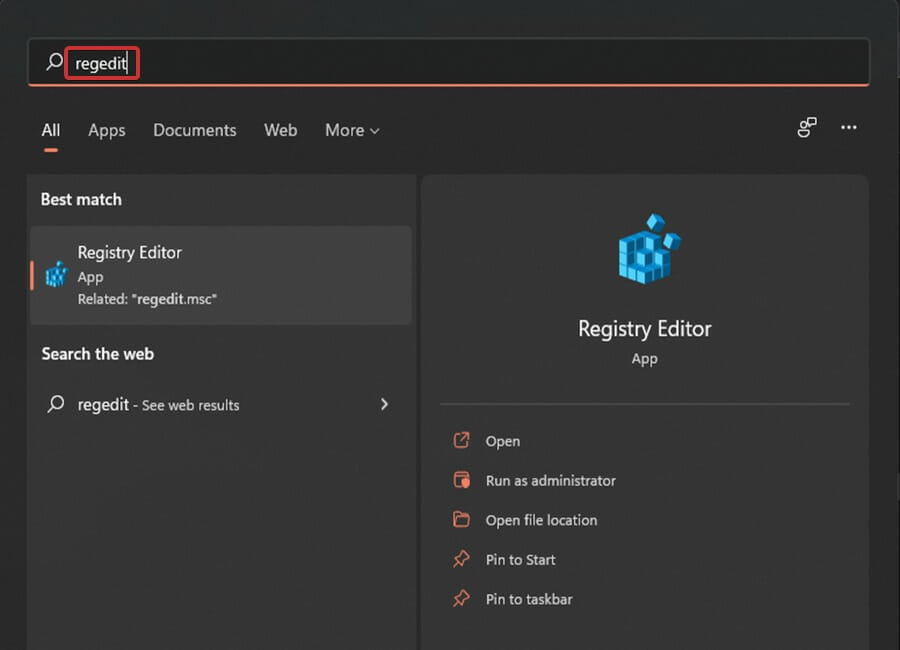
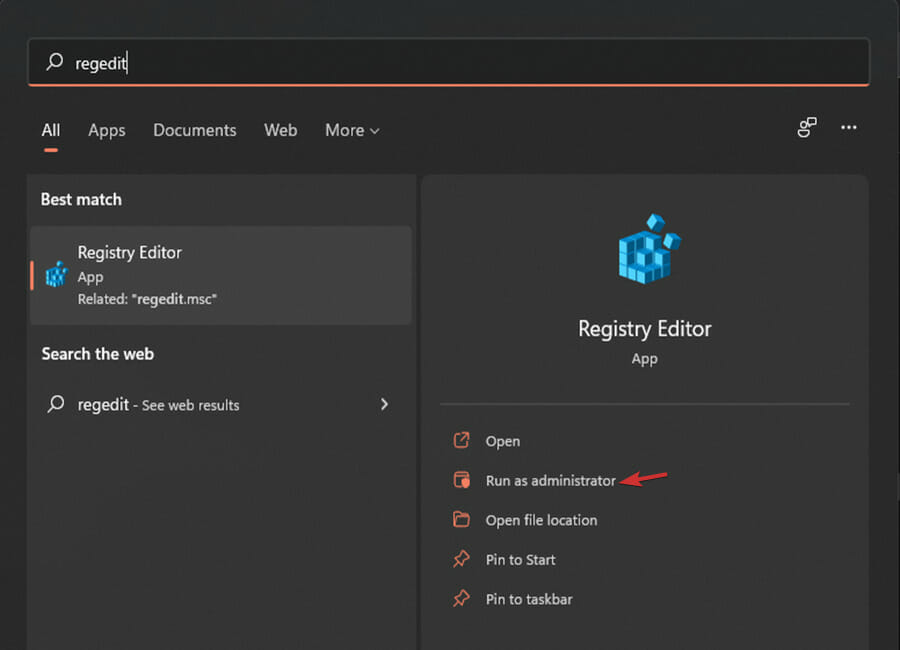
- Press Windows key + S key.
- When the search bar pops up, key in the following command:
regedit. - Press Enter key to open the Registry Editor.
- Select Yes on the User account control prompt.
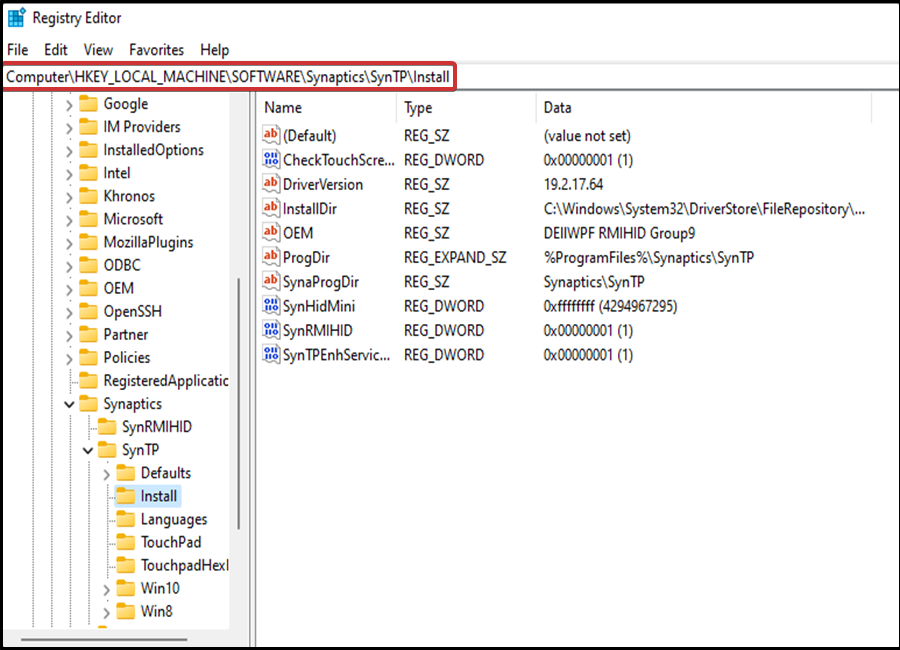
- Then Navigate through this code:
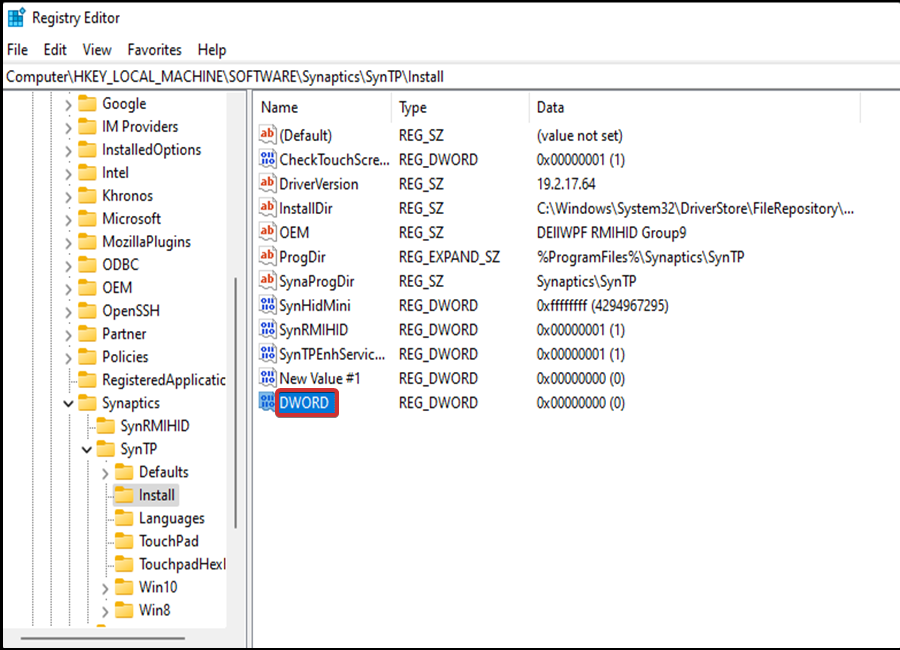
ComputerHKEY_LOCAL_MACHINESOFTWARESynapticsSynTPInstall - Double-click on DeleteUserSettingsOnUpgrade (DWORD) that is on the right-hand side panel.
- In the event, that the DWORD is not there, you can still create it manually by right-clicking on the empty space. Then select the new DWORD (32-bit) Value.
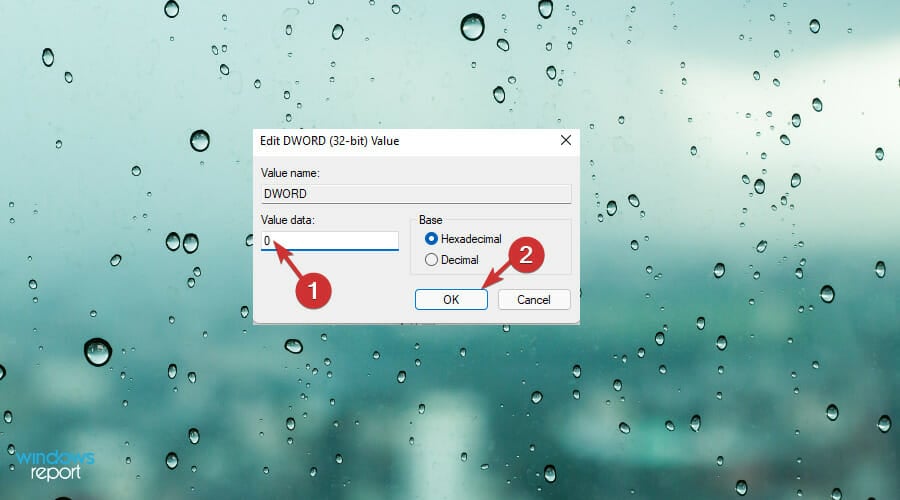
- Then, double-click the DWORD to reset the value data to 0.
- Click on OK to save the changes made.
Check whether your touch changes have been applied. Therefore, it is extremely important to ensure that your Windows is updated at all times. It is also essential to ensure that the hardware you install and use on your device is compatible.
Based on the solutions highlighted above, it is evident that fixing a faulty touchpad is no easy feat. You are better off picking up appropriate practices when it comes to using it.
How can I use the touchpad appropriately?
This will allow you to enhance its longevity. It is all about how you rest your hands on the laptop when using it. This measure will enhance and improve the touchpad’s responsiveness (though the guide is dedicated to Windows 10, it is applicable on Windows 11 too).
Touchpads come with an in-built palm detection technology. It is in place to distinguish your thumb from the pointer finger or palm.
Therefore, you are better off using your pointer fingers while scrolling using the touchpad. It enhances its longevity and at the same time promotes effectiveness and efficiency.
Don’t forget that the touchpad functionality requires specific attention. After solving the issue, don’t hesitate to learn how to set Touchpad Gestures in Windows 11.
Which of the above solutions worked for you? Share your thoughts with us in the comments section below.
Still having issues? Fix them with this tool:
SPONSORED
If the advices above haven’t solved your issue, your PC may experience deeper Windows problems. We recommend downloading this PC Repair tool (rated Great on TrustPilot.com) to easily address them. After installation, simply click the Start Scan button and then press on Repair All.
![]()
Newsletter
Ensure that your touchpad is up to date before trying other solutions
by Loredana Harsana
Loredana is a passionate writer with a keen interest in PC software and technology. She started off writing about mobile phones back when Samsung Galaxy S II was… read more
Updated on January 19, 2023
Reviewed by
Vlad Turiceanu
Passionate about technology, Windows, and everything that has a power button, he spent most of his time developing new skills and learning more about the tech world. Coming… read more
- If the touchpad is not working in Windows 11, this may be caused by the dust and debris that accumulate there.
- Having another mouse alongside the built-in touchpad on your laptop often creates a conflict with the integral touchpad driver, causing it to malfunction.
- To solve this issue, don’t hesitate to update your touchpad driver or simply reset the touchpad.
XINSTALL BY CLICKING THE DOWNLOAD FILE
This software will keep your drivers up and running, thus keeping you safe from common computer errors and hardware failure. Check all your drivers now in 3 easy steps:
- Download DriverFix (verified download file).
- Click Start Scan to find all problematic drivers.
- Click Update Drivers to get new versions and avoid system malfunctionings.
- DriverFix has been downloaded by 0 readers this month.
Nothing quite ruins your day like a malfunctioning touchpad. In recent times, Windows 11 users have had their fair share of challenges with their touchpads.
The problem is common among users with devices under the 8th generation Intel chip. Those with AMD CPUs also face a couple of compatibility issues, the major one revolving around the touchpad.
Windows 11 touchpad problems include delayed cursor response, the cursor jumping all over or not functioning completely. You may also be unable to scroll through your screen.
The incompatibility of drivers installed is the main reason why your touchpad may not be working. It has proven to be impossible for one to effectively use a laptop with a faulty touchpad.
There are a couple of measures that you could borrow from our guide on how to fix Lenovo E240 touchpad issues. Even though it talks about Windows 10, it also works perfectly for Windows 11.
For instance, using the external peripheral is one way to gain back the functionality of your touchpad.
Is my laptop’s touchpad worn out?
Most laptops come with a durable coating and this helps reduce the rate at which it wears and tears. This is not to say that it will not eventually wear out.
If you having trouble with your touchpad, check the touchpad’s properties settings. The problem might actually be program settings and not its physical condition.
What causes the touchpad to stop working in Windows 11?
You may have encountered a couple of challenges when using your laptop, specifically with your touchpad on Windows 11 laptops, tablets, and computers.
The problem commonly stems from the conflict between the drivers installed and the software. It may also be related to an outdated version of the operating system.
Even more, Windows 10 users often complain about touchpad driver missing issues in Device Manager. The problem further extends to Windows 11 too.
Changing vital settings in your device may also land you in the same predicament, and so will using faulty hardware.
Despite these setbacks, you still need to equip yourself with all the relevant and necessary information that will help you fix the faulty touchpad.
Take a look at the above article (the Windows 10 tips are useful for Windows 11 users too) and get to learn how to solve this issue by following either one of the following solutions listed below.
We also have an article about what to do if your Touchpad click is not working, that you can check out.
What can I do if the touchpad is not working in Windows 11?
1. Restart your device
- Save your work first then close all windows.
- Press Ctrl + Alt + Delete keys simultaneously.
- Your shutdown menu will then appear.
- Using the keyboard arrow keys on your laptop, select the Restart option. Then, click on OK.
- Press Enter on your keyboard.
Wait till your laptop restarts, then check whether the issue has been resolved. Windows 11 OS is a bit glitchy sometimes, as a result, the touchpad stops working.
2. Enable your touchpad using Settings
- Press the Windows key + I.
- Click on Bluetooth and devices in the Settings app.
- Click on the touchpad on the right side.
- Switch on the toggle under the touchpad.
The Windows 11 touchpad not working often occurs after a user makes a Windows 11 update. The system might at times shut itself off during installation.
Confirm whether the touchpad turned itself off during the installation process. If the issue persists after turning it on, move to the next solution.
3. Update your touchpad driver
1. Press the Windows + R keyboard shortcut to open the Run dialog.
2. Type the following command in Run dialog box:devmgmt.msc
3. Click on OK.
4. The Device Manager menu will appear on the screen.
5. Scroll down to the Mice and other pointing devices section and double-click on it to expand the list.
Some PC issues are hard to tackle, especially when it comes to corrupted repositories or missing Windows files. If you are having troubles fixing an error, your system may be partially broken.
We recommend installing Restoro, a tool that will scan your machine and identify what the fault is.
Click here to download and start repairing.
6. Locate your touchpad driver in the list. If you cannot find it, click on Action from the menu.
7. Then, right-click on the touchpad driver on the list.
8. Select the Update driver option, then click OK.
9. Then, select search automatically for drivers. It is important to ensure that you have a stable Internet connection at this point. This will allow you to download the update file for the driver.
10. Use the on-screen steps until you successfully complete the process.
11. Finally, restart your device and check if your touchpad is functioning properly.
Whenever you have an issue with a device on your computer, you should try to update its driver to fix it. It could be that a faulty or outdated driver is causing your touchpad to not work, therefore you should ensure that your driver is up to date.
For automatic scans of missing or outdated drivers, do not hesitate to use a dedicated tool such as DriverFix.
4. Reset your touchpad
Tip
Resetting your touchpad assists in regaining your original touchpad settings. Therefore, it reduces the chances of any problems occurring.
- Press the Windows key + I.
- Click on Bluetooth and devices in the Settings app.
- Click on the touchpad on the left side.
- Scroll to the bottom in the right.
- Click on Default to restore your previous settings.
5. Use keyboard shortcuts to enable your touchpad
Any laptop comes with a keyboard shortcut combination that will help you enable or disable its touchpad. This especially comes in handy for those who use an external mouse.
It helps you avoid conflict between the two, thus, ensuring that only one is active at any given time. Therefore, this enhances access to the hotkey combination.
In some instances, you may also find that you disable the touchpad using keyboard shortcuts.
Some of the Windows 11 compatible devices come with an Fn key when pressed in combination with any of the F1–F12 function keys, which turns the touchpad on or off. Press both of these function keys to find out which hotkeys work for your device.
Also, there are some laptops that come with a touchpad locking system. Ideally, yours will include with a lit square on the top right side of the touchpad. If the square on your touchpad is lit, then the touchpad is active and vice versa.
6. Disable the tablet input service
- Press the Windows key + R key, the Run dialog will appear.
- Key in the following command:
services.msc. - Then, click on OK.
- The Services app will then open, find the Tablet PC Input Service or TabletInputService.
- Right-click on the option, then select Stop.
- Restart your device.
- Check whether your touchpad has regained its normal functions. If the issue persists further, repeat the above steps but this time select Start to enable the service.
7. Uninstall your third-party antivirus
NOTE
When you install third-party programs such as antivirus, it alters the default settings in your device, ultimately affecting some of your hardware peripherals. This may be the reason why your touchpad is acting up.
- Click on the Search icon on your taskbar.
- Key in the following command and then press Enter:
appwiz.cpl. - The Program and Features window will appear, scroll down to the third-party antivirus program you wish to uninstall.
- Right-click on the antivirus, then select Uninstall.
- Follow through the subsequent steps to complete the process.
- Finally, restart your device.
8. Change the sensitivity of your touchpad and the speed of the cursor
- Press the Windows key + I key, to open the Windows Settings app.
- Select Bluetooth and devices.
- Select on the Touchpad.
- When the next page pops up, select Taps.
- Click on the dropdown menu for Touchpad sensitivity, then set it to Medium sensitivity.
9. Uninstall the Windows Update
- Press the Windows + I keyboard shortcut.
- Select the Windows update.
- The Settings page will appear, select the Update history.
- Then click on Uninstall updates.
- Right-click on the update display in the form of KB, then select Uninstall.
- Follow through all the steps that pop up till you are able to uninstall the update.
- Restart your PC.
10. Perform a System restore
- Press the Windows key + R key to open the Run dialog.
- Key in the following command:
rstrui. - Click on OK.
- The System Restore Wizard will open. Select the option Choose a different restore point.
- Click on Next.
- Check the box set before Show more restore points.
- Then, choose the most recently created restore point, click on Next.
- Click on Finish to initiate the restoring process.
11. Uninstall additional mouse drivers
NOTE
Having an extra mouse along with the built-in touchpad on your laptop creates a conflict with the integral touchpad driver. This cause the Windows 11 touchpad to stop working.
- Press the Windows key + S key.
- Key in the following command:
devmgmt - Click on Device Manager when it appears.
- Find the Mouse and pointing devices and click on it to expand the driver list.
- Right-click on the external mouse driver.
- Select the Uninstall device option.
- Click on Uninstall when the popup prompts.
- Check whether your touchpad is now active.
- Once the issue is fully resolved, Restart your Windows. Your system will automatically reinstall the external mouse driver.
12. Reinstall your touchpad driver
- Press Windows + X keyboard shortcut.
- Select Device Manager.
- Then, find the Mice and pointing devices.
- Double-click on the option to expand the driver list.
- Find the touchpad driver and right-click on it.
- Select the Properties option.
- When the window pops up get on to the Driver tab.
- Select the Roll Back Driver button. This will allow you to get back to the previous version before the update.
- Once you successfully revert to the previous version, Restart Windows 11 and check whether the touchpad is back to normal.
If this does not work for you, then uninstall it. You need to follow these steps:
- Once you get to the Driver tab, select the Uninstall Device. This will help you remove drivers’ files and the registry entry of the software.
- Then, restart the Windows device. The driver will get back to its default version.
13. Clean your touchpad
Over time, dirt deposits, skin oils, and grime accumulate on your touchpad. As a result, your touchpad stops functioning properly. The touchpad is less responsive and much slower because of the build-up.
Before trying anything else, clean up your touchpad using a soft piece of cloth. Preferably use a moist cloth to ensure that you get to clean it up properly.
After cleaning out all the build-up, try dragging your finger around the surface to check whether the issue has been resolved.
14. Use the laptop’s troubleshooter and run the Windows Hardware
NOTE
The Windows Hardware and Device troubleshooter is in place to help resolve hardware-related issues without necessarily having to use third-party software.
- Press the Windows key. Then, type cmd.exe.
- Right-click on the Command prompt, then select Run as administrator.
- Click on Yes to allow User Account Control.
- Key in the following command:
msdt.exe -id DeviceDiagnostic - The Hardware and Devices Troubleshooter will appear. Click on Next.
- If the automatic repair pops up, click on Apply this fix.
- Follow through the instructions to the end.
15. Adjust Windows Registry
NOTE
The update driver software may vary from one laptop to another, therefore, these instructions might vary as well. But, they should suffice for most of the parts.
- Press Windows key + S key.
- When the search bar pops up, key in the following command:
regedit. - Press Enter key to open the Registry Editor.
- Select Yes on the User account control prompt.
- Then Navigate through this code:
ComputerHKEY_LOCAL_MACHINESOFTWARESynapticsSynTPInstall - Double-click on DeleteUserSettingsOnUpgrade (DWORD) that is on the right-hand side panel.
- In the event, that the DWORD is not there, you can still create it manually by right-clicking on the empty space. Then select the new DWORD (32-bit) Value.
- Then, double-click the DWORD to reset the value data to 0.
- Click on OK to save the changes made.
Check whether your touch changes have been applied. Therefore, it is extremely important to ensure that your Windows is updated at all times. It is also essential to ensure that the hardware you install and use on your device is compatible.
Based on the solutions highlighted above, it is evident that fixing a faulty touchpad is no easy feat. You are better off picking up appropriate practices when it comes to using it.
How can I use the touchpad appropriately?
This will allow you to enhance its longevity. It is all about how you rest your hands on the laptop when using it. This measure will enhance and improve the touchpad’s responsiveness (though the guide is dedicated to Windows 10, it is applicable on Windows 11 too).
Touchpads come with an in-built palm detection technology. It is in place to distinguish your thumb from the pointer finger or palm.
Therefore, you are better off using your pointer fingers while scrolling using the touchpad. It enhances its longevity and at the same time promotes effectiveness and efficiency.
Don’t forget that the touchpad functionality requires specific attention. After solving the issue, don’t hesitate to learn how to set Touchpad Gestures in Windows 11.
Which of the above solutions worked for you? Share your thoughts with us in the comments section below.
Still having issues? Fix them with this tool:
SPONSORED
If the advices above haven’t solved your issue, your PC may experience deeper Windows problems. We recommend downloading this PC Repair tool (rated Great on TrustPilot.com) to easily address them. After installation, simply click the Start Scan button and then press on Repair All.
![]()
Newsletter

Не работает тачпад на ноутбуке? Это неприятная проблема, с которой часто сталкиваются пользователи. Причина неисправности кроется в программных сбоях, настройках BIOS и прочих аппаратных неполадках. Возьмите на вооружение решения, как действовать в случае нерабочей сенсорной панели.
Грязное устройство управления
Тачскрин — это сенсорная панель на ноутбуке. Она должна находиться в чистоте, чтобы ей всегда удавалось считывать касания пальцев.
Если тачпад, как и сам ноутбук, периодически не чистить от пыли и грязи, то со временем образуется слой, который будет мешать устройству нормально функционировать. В самых тяжелых случаях, когда на лэптоп проливают чай или другую жидкость, устройство может перестать отвечать на команды пользователя.
Если столкнулись с подобной проблемой, то поможет спирт и ватный тампон или салфетка. Смочите спиртосодержащей жидкостью ватный диск и протрите тачпад. Выполняйте эту процедуру на выключенном лэптопе.
Не работает тачпад на ноутбуке: программный сбой
Бывает так, что сразу после запуска лэптопа отключился тачпад. Это происходит из-за программного сбоя. Иногда решить проблему помогает перезапуск устройства либо отключение проводной или беспроводной мышки. Если подключено дополнительное периферийное приспособление, то система может автоматически отключить устройство управления портативного компьютера.
Еще одна программная причина, почему не работает сенсор на ноутбуке, — неправильный драйвер, который система автоматически установила, либо его некорректное функционирование.
Это специальное программное обеспечение, которое необходимо для работы всех устройств ноутбука как родных, так и сторонних. Иногда драйвер устаревает либо «слетает» после очередного обновления ОС.
В таком случае есть три выхода:
- отнести ноутбук в сервисный центр;
- установить ПО с загрузочного диска, который шел в комплекте с лэптопом;
- обновить драйвер через диспетчер устройств.

Подробнее рассмотрим третий вариант. Если ноутбук не видит тачпад, то подключите проводную или беспроводную мышку, а затем выполните такие действия:
- Через пусковое меню операционной системы откройте «Панель управления».
- В списке разделов найдите и войдите в «Диспетчер устройств». На десятой версии ОС для удобства воспользуйтесь поисковой строкой.
- Перейдите в пункт «Мыши и другие указывающие устройства».
- Раскроется список, найдите тачпад. Клацните по нему правой кнопкой мыши.
- Откройте вкладку с драйвером.
- Кликните по кнопке «Откатить». Если она не активная, то выберите «Обновить».
- Воспользуйтесь автоматическим подбором драйверов.
После этого рекомендуется выполнить перезагрузку, чтобы драйвер нормально заработал. Важное условие — лэптоп должен быть подключен к интернету.
Если это не исправило ситуацию и тачпад не работает, тогда выполните установку вручную. Предварительно скачайте его с официального сайта производителя ноутбука. Драйвер устанавливается таким же образом, как и обыкновенная программа.
Тачпад отключен
Почему не работает тачпад? Причина может быть банальной — сенсорная панель выключена.
Это происходит, потому что ее случайно деактивировали в настройках системы или горячими клавишами. Необходимо в первую очередь проверить, отключен ли тачпад по причине деактивации, а только после этого искать более серьезные источники проблемы.
Горячие клавиши
Когда не работает тачпад, первым делом проверьте его работоспособность комбинацией горячих клавиш. С их помощью сенсорная панель как включается, так и отключается.
Обычно одна из горячих кнопок обозначается как Fn и располагается на клавиатуре рядом с Shift, Ctrl, Win. На ноутбуках разных производителей эти комбинации отличаются. Вот самые распространенные из них:
- Asus — Fn + F9 / Fn + F7;
- Acer — Fn + F7;
- Lenovo — Fn + F8 / Fn + F5;
- Dell — Fn + F5 / Fn + F3;
- Samsung — Fn + F5;
- Sony — Fn + F1;
- Toshiba — Fn + F5.
Если в предложенном списке нет вашей модели ноутбука или ни одна из комбинаций не подходит, тогда внимательно изучите верхнюю панель клавиатуры устройства. На клавишах, которые начинаются с буквы F, будет нарисован значок перечеркнутого тачпада. Вот эту клавишу и нужно нажать вместе с Fn. Там найдете и другие функциональные команды.
Есть модели ноутбуков, в которых предусмотрена специальная кнопка для тачпада. Как правило, ее располагают рядом с сенсорной панелью. Например, на некоторых моделях ноутбуков HP выключатель находится на уголке тачпада. Его нужно дважды коснуться для включения или выключения тачскрина.

Настройки системы
Если кнопки не помогают, то проблему поищите в настройках операционной системы. Важно, чтобы соответствующая функция Windows была активной. Для этого выполните такие действия:
- Откройте параметры ОС через пусковое меню.
- Найдите и клацните по разделу с устройствами.
- Выберите «Сенсорная панель».
- Проверьте активность одноименного тумблера.
В этом разделе настройте, чтобы сенсорная панель работала вместе с подключенной проводной или беспроводной мышкой (при необходимости).
Настройки BIOS
Бывает так, что не работает тачскрин на ноутбуке после посещения BIOS. В нем что-то настраивали и могли случайно отключить сенсорную панель. После этого оборудование перестает быть активным, из-за чего система его не может обнаружить.
Что делать в таком случае? Первым делом перезапустите лэптоп, а дальше выполните такие действия:
- Во время включения ноутбука удерживайте горячие клавиши, пока не откроется BIOS. На разных моделях лэптопов горячие клавиши отличаются. Предварительно узнайте их, поскольку при включении у вас будет всего несколько секунд, чтобы их нажать.
- Перейдите в раздел «Advanced» или «Advanced Settings». Найдите «Internal Pointing Device». Сделаете стрелками на клавиатуре.
- Если напротив выбранного пункта стоит режим «Disabled», то переключите его в «Enabled».
- Сохраните изменения и перезапустите ноутбук. Для этого нажмите клавишу F10, а затем — Enter.
Аппаратная поломка
Тачпад может сломаться из-за падения ноутбука или разлитой на него жидкости. В таком случае поможет только обращение в сервисный центр.
Как правило, причина поломки — нарушение контакта шлейфа сенсорной панели, повреждение его разъема или окисление. В этом случае понадобится помощь специалистов, которые выполнят точную диагностику и ремонт.
Из статьи узнали основные причины, почему перестает функционировать сенсорная панель. При попытке обнаружить корень проблемы рекомендуем идти от самого простого решения к сложному. Иногда нажатие горячих клавиш или переустановка драйвера может исправить ситуацию.
Оригинал статьи: https://www.nur.kz/technologies/instructions/1713835-ne-rabotaet-tacpad-na-noutbuke-priciny/
- Главная
- Вопросы и ответы
- Не работает тачпад на ноутбуке Acer
Опубликован: 6 сентября в
16:34
5015
Ребята, здравствуйте. На моем ноутбуке Acer Aspire перестал работать тачпад. Насколько я знаю, на ноутбук ничего не проливалось. Да и сам я, обращался с ноутбуком осторожно, никогда не бил по нему и т.д. В общем грешу на операционку, если кто что знает, будьте добры, подскажите. Может есть какое нибудь решение проблемы с тачпадом. Надеюсь на вашу помощь в этом вопросе.

стив _бобс
6 сентябряв 16 :34
Похожие вопросы
Не коректно работает подсветка

Anonim Anonim
17 марта в 10:28
0