The third-party Git Credential Manager (GCM) can be used as alternative method of connecting to Bitbucket Cloud from the Git CLI. If you do not want to configure SSH access for your Bitbucket Cloud account, you can the GCM, which is installed by default with Git for Windows, or you can download and install it from Git Credential Manager on GitHub. Note that the GCM works over HTTPS, not SSH. Ensure your Git remotes are using HTTPS, such as:
git clone https://{username}@bitbucket.org/{workspace}/{repository}.git
The Secure Shell protocol (SSH) is used to create secure connections between your device and Bitbucket Cloud. The connection is authenticated using public SSH keys, which are derived from a private SSH key (also known as a private/public key pair). The secure (encrypted) connection is used to securely transmit your source code between your local device and Bitbucket Cloud. To set up your device for connecting Bitbucket Cloud using SSH, you need to:
-
Install OpenSSH on your device.
-
Start the SSH service.
-
Create an SSH key pair.
-
Add your key to the SSH agent.
-
Provide Bitbucket Cloud with your public key.
-
Check that your SSH authentication works.
Install OpenSSH on Microsoft Windows
There are 3 methods for installing OpenSSH on Microsoft Windows:
-
Download and run the Git for Windows installer.
-
Use winget to run the Git for Windows installer.
-
Install the Windows version of OpenSSH.
Download and install Git for Windows
-
Download and run the installer from https://gitforwindows.org/. The options at each step should be suitable. When you reach the step about choosing the SSH executable, ensure the bundled OpenSSH is selected.
-
Once the installation is complete, open Git Bash from the Start menu.
In the terminal, check that OpenSSH has been successfully installed by running the following command:
1
ssh -V
The output should show the installed version of OpenSSH.
Install Git for Windows with winget
To install OpenSSH as part of Git for Windows with the Windows package manager winget:
-
Check that winget is installed. Open PowerShell and run:
1
winget -v -
To install Git for Windows using winget install, run:
1
winget install --id Git.Git -e --source winget -
Once the installation is complete, open Git Bash from the Start menu.
In the terminal, check that OpenSSH has been successfully installed by running the following command:
1
ssh -V
The output should show the installed version of OpenSSH.
Install the Windows version of OpenSSH
This procedure assumes Git is already installed and accessible in PowerShell. If Git is installed and not accessible in PowerShell, you may need to add Git to the PATH environmental variable.
To install the Windows version of OpenSSH, follow the instructions in the Microsoft Docs Get Started with OpenSSH for Windows guide. Once OpenSSH is installed, you need to configure Git to use OpenSSH.
In PowerShell, check that OpenSSH has been successfully installed by running the following command:
1
ssh -V
The output should show the installed version of OpenSSH.
To find where ssh was installed, run Get-Command. For example:
1

2

3

4

5
> Get-Command ssh
CommandType Name Version Source
----------- ---- ------- ------
Application ssh.exe 8.1.0.1 C:WindowsSystem32OpenSSHssh.exe
To configure Git to use the Windows version of OpenSSH, update the SSH command with git config, such as:
1
git config --global core.sshCommand C:/Windows/System32/OpenSSH/ssh.exe
Start the SSH agent
To allow git to use your SSH key, an SSH agent needs to be running on your device. The method for starting the SSH agent depends on how OpenSSH was installed.
Git for Windows users (including Winget-based Git installations)
From a git bash terminal, check if the SSH agent is running using the ps command. If the ssh-agent is already running, it should appear in the output, such as:
1

2
$ ps -a | grep ssh-agent

tkelly      3291  0.0  0.0   6028   464 ?        Ss   07:29   0:00 ssh-agent
To start the agent:
1
eval $(ssh-agent)
You may need to add this command to your ~/.bashrc to ensure the agent starts when you open a Git Bash terminal.
Windows OpenSSH users
From a PowerShell, check if the SSH Agent is running using the Get-Service command. For example:
1

2

3

4

5
> Get-Service ssh-agent
Status Name DisplayName
------ ---- -----------
Stopped ssh-agent OpenSSH Authentication Agent
To start the agent:
1
> Start-Service ssh-agent
To configure the SSH agent to start each time the device is started, use the Set-Service command, such as:
1
> Set-Service -Name sshd -StartupType 'Automatic'
Create an SSH key pair
To create an SSH key pair:
-
Open a terminal and navigate to your home or user directory using cd, for example:
1
cd ~ -
Generate a SSH key pair using ssh-keygen, such as:
1
ssh-keygen -t ed25519 -b 4096 -C "{username@emaildomain.com}" -f {ssh-key-name}Where:
-
{username@emaildomain.com} is the email address associated with the Bitbucket Cloud account, such as your work email account.
-
{ssh-key-name} is the output filename for the keys. We recommend using a identifiable name such as bitbucket_work.
-
-
When prompted to Enter passphrase, you can either provide a password or leave the password empty. If you input a password, you will be prompted for this password each time SSH is used, such as using Git command that contact Bitbucket Cloud (such as git push, git pull, and git fetch). Providing a password will prevent other users with access to the device from using your keys.
Once complete, ssh-keygen will output two files:
-
{ssh-key-name} — the private key.
-
{ssh-key-name}.pub — the public key.
These files will be stored in your user folder, such as C:Users<username><ssh-key-name>.
Add your key to the SSH agent
To add the SSH key to your SSH agent (ssh-agent):
-
Run the following command, replacing the {ssh-key-name} with the name of the private key:
1
ssh-add ~/{ssh-key-name} -
To ensure the correct SSH key is used when connecting to Bitbucket, update or create your SSH configuration file (~/.ssh/config) with the following settings:
1

2

3
Host bitbucket.org

  AddKeysToAgent yes

  IdentityFile ~/.ssh/{ssh-key-name}
Where {ssh-key-name} is the location of the private key file once it has been added to the ssh-agent.
Provide Bitbucket Cloud with your public key
To add an SSH key to your user account:
-
At bitbucket.org, select your avatar (Your profile and settings) from the navigation bar at the top of the screen.
-
Under Settings, select Personal settings.
-
Under Security, select SSH keys.
-
Select Add key.
-
In the Add SSH key dialog, provide a Label to help you identify which key you are adding. For example, Work Laptop <Manufacturer> <Model>. A meaning full label will help you identify old or unwanted keys in the future.
-
Open the public SSH key file (public keys have the .pub file extension) in a text editor. The public key should be in the .ssh/ directory of your user (or home) directory. The contents will be similar to:
1
ssh-ed25529 LLoWYaPswHzVqQ7L7B07LzIJbntgmHqrE40t17nGXL71QX9IoFGKYoF5pJKUMvR+DZotTm user@example.com -
Copy the contents of the public key file and paste the key into the Key field of the Add SSH key dialog.
-
Select Add key.
-
If the key is added successfully, the dialog will close and the key will be listed on the SSH keys page.
-
If you receive the error That SSH key is invalid, check that you copied the entire contents of the public key (.pub file).
-
Check that your SSH authentication works
To test that the SSH key was added successfully, open a terminal on your device and run the following command:
1
ssh -T git@bitbucket.org
If SSH can successfully connect with Bitbucket using your SSH keys, the command will produce output similar to:
1

2

3
authenticated via ssh key.
You can use git to connect to Bitbucket. Shell access is disabled
-
Documentation
-
Resources
Cloud
Data Center and Server

Jira Software
-
Jira Service Management
-
Jira Work Management
-
Jira Align
-
Confluence
-
Trello
-
Bitbucket
-
Opsgenie
-
Statuspage
-
Atlas
-
Halp
-
Advanced Roadmaps for Jira
-
Team Calendars
-
Questions for Confluence
-
Atlassian Cloud
-
Atlassian Analytics (beta)
-
Compass (beta)
-
Jira Product Discovery (beta)
-
Get started with Bitbucket Cloud
New to Bitbucket Cloud? Check out our get started guides for new users.
-
Get started with Bitbucket Cloud
New to Bitbucket Cloud? Check out our get started guides for new users.
-
Join or create and manage workspaces in Bitbucket Cloud
A workspace contains projects and repositories. Learn how to join or create a workspace, control access, and more.
-
Set up and work on repositories in Bitbucket Cloud
Whether you have no files or many, you’ll want to create a repository. These topics will teach you everything about repositories.
-
Build, test, and deploy with Pipelines
Pipelines is an integrated CI/CD service built into Bitbucket. Learn how to build, test, and deploy code using Pipelines.
-
Manage your plans and settings in Bitbucket Cloud
Learn how to manage your plans and billing, update settings, and configure SSH and two-step verification.
-
Integrate Bitbucket Cloud with apps and other products
Learn how to integrate Bitbucket Cloud with Jira, Marketplace apps, and use the Atlassian for VS Code extension.
-
Build third-party apps with Bitbucket Cloud REST API
Learn everything you need to know about how to build third-party apps with Bitbucket Cloud REST API, as well as how to use OAuth.
-
Get advisories and other resources for Bitbucket Cloud
Access security advisories, end of support announcements for features and functionality, as well as common FAQs.
-
Tutorials
Become a member of our fictitious team when you try our tutorials on Git, Sourcetree, and pull requests.
-
Create and manage projects in Bitbucket Cloud
Projects makes it easier for members of a workspace to collaborate by organizing your repositories into projects.
-

Documentation
Usage and admin help
-
Community
Answers, support and inspiration
-
System Status
Cloud services health
-
Suggestions and bugs
Feature suggestions and bug reports
-
-
Billing & licensing
Frequently asked questions
Products
Get started
Documentation
Resources
Configure SSH and two-step verification
The third-party Git Credential Manager (GCM) can be used as alternative method of connecting to Bitbucket Cloud from the Git CLI. If you do not want to configure SSH access for your Bitbucket Cloud account, you can download and install the GCM from Git Credential Manager on GitHub. Note that the GCM works over HTTPS, not SSH. Ensure your Git remotes are using HTTPS, such as:
git clone https://{username}@bitbucket.org/{workspace}/{repository}.git
The URL you use to access a repository depends on the connection protocol (HTTPS or SSH) and the distributed version control system. You can find your repository-specific URLs from the repository Source page. The following table shows these URL formats:
|
HTTPS |
https://<repo_owner>@bitbucket.org/<accountname>/<reponame>.git |
|---|---|
|
SSH |
git@bitbucket.org:<repo_owner>/<reponame>.git or ssh://git@bitbucket.org/<repo_owner>/<reponame>.git |
Bitbucket supports four encryption algorithms for user keys: Ed25519, ECDSA, RSA, and DSA. For details, see Supported SSH key formats.
You may want to record Bitbucket’s public host key before connecting to it for the first time. Depending on the security protocols in your network, the system administrator may maintain a centrally located list of approved known hosts. The public key fingerprints for the Bitbucket server are:
SHA256 format
1

2
2048 SHA256:zzXQOXSRBEiUtuE8AikJYKwbHaxvSc0ojez9YXaGp1A bitbucket.org (RSA)

1024 SHA256:RezPkAnH1sowiJM0NQXH90IohWdzHc3fAisEp7L3O3o bitbucket.org (DSA)
md5 format
1

2
97:8c:1b:f2:6f:14:6b:5c:3b:ec:aa:46:46:74:7c:40 (RSA)

35:ee:d7:b8:ef:d7:79:e2:c6:43:9e:ab:40:6f:50:74 (DSA)
To get the format suitable for storage in the known hosts, you can use the following ssh-keyscan command:
1

2

3
ssh-keyscan -t rsa bitbucket.org

# bitbucket.org:22 SSH-2.0-conker_eda5298d7e 4a1d093dc00e

bitbucket.org ssh-rsa AAAAB3NzaC1yc2EAAAABIwAAAQEAubiN81eDcafrgMeLzaFPsw2kNvEcqTKl/VqLat/MaB33pZy0y3rJZtnqwR2qOOvbwKZYKiEO1O6VqNEBxKvJJelCq0dTXWT5pbO2gDXC6h6QDXCaHo6pOHGPUy+YBaGQRGuSusMEASYiWunYN0vCAI8QaXnWMXNMdFP3jHAJH0eDsoiGnLPBlBp4TNm6rYI74nMzgz3B9IikW4WVK+dc8KZJZWYjAuORU3jc1c/NPskD2ASinf8v3xnfXeukU0sJ5N6m5E8VLjObPEO+mN2t/FZTMZLiFqPWc/ALSqnMnnhwrNi2rbfg/rd/IpL8Le3pSBne8+seeFVBoGqzHM9yXw==
-
Set up personal SSH keys on macOS
How to set up SSH keys for connecting to Bitbucket Cloud through the Git CLI on macOS
-
Set up personal SSH keys on Windows
How to set up SSH keys for connecting to Bitbucket Cloud through the Git CLI on Windows
-
Set up personal SSH keys on Linux
How to set up SSH keys for connecting to Bitbucket Cloud through the Git CLI on Linux
-
Managing multiple Bitbucket user SSH keys on one device
How to connect to multiple Bitbucket accounts using SSH keys on the same device
-
Enable two-step verification
Set up the two-step verification to secure your account.
-
Supported SSH key formats
Lists the supported SSH key formats and minimum key sizes
-
Set up SSH with Sourcetree
How to set up SSH keys for connecting to Bitbucket Cloud through Sourcetree
Was this helpful?
It wasn’t accurate
It wasn’t clear
It wasn’t relevant
Additional Help
First, I am an absolute noob with git, repos and command line. I have repo on Bitbucket and I basically want to be able to push to the repository via gitbash without entering a password each time.
What I have:
- A repository on Bitbucket with the code already set up.
- A local directory where the repository is cloned.
- A public key and a private key generated via PuTTY.
- Public key added to Bitbucket via the Manage SSH keys page.
How do I now make it work so that I don’t have to enter the password each time I push from the gitbash terminal? I’m using Windows 10.
![]()
Alex
83513 silver badges23 bronze badges
asked Apr 23, 2016 at 15:10
![]()
2
Please follow the steps to add ssh key into bitbucket account to solve your issue.
- Open git bash terminal and enter the command ssh-keygen -t rsa -C «your email address»
- Enter passphrase (leave it blank) and enter
- Enter the same phrase again (leave it blank) and enter
- Copy the id_rsa.pub file content from where it is residing in your system (C:Usersusername.ssh)
- Login to bitbucket account and click top right most user icon ->bitbucket settings->ssh keys under security menu then paste into key field and save it.
6.Restart your git bash terminal and enter git init command and add ssh git repository location git@bitbucket.org:username/repository_name.git which is present in your bitbucket repository.
Enjoy!
![]()
answered Oct 20, 2016 at 15:04
![]()
2
There are two ways to load a remote git repository: using SSH and using HTTPS.
SSH will use a key pair, and requires the public key to be added to your BitBucket/GitHub profile.
HTTPS requires your BitBucket/GitHub username and password. You will be promoted for your password every time you interact with the remote server (clone, fetch, push, pull).
If you are currently being prompted for a password, that means the remote URL is currently set to use HTTPS. You can determine this be running git remote -v. To change to use SSH, you need to update the remote URL to the SSH URL by running git remote set-url <remote alias> <SSH URL>. If you only have one remote server, <remote alias> will be origin. You can find the SSH URL in BitBucket/GitHub under the clone option of the repository.
answered Mar 26, 2017 at 3:03
![]()
AndrewAndrew
1,2062 gold badges13 silver badges19 bronze badges
2
1) create .ssh folder under your home directory like:
mkdir C:UsersUSERNAME.ssh
2) Copy id_rsa and id_rsa.pub into directory from previous step
3) Close and open cmd (console window)
4) You need to clone the repository as SSH repository, like:
git clone ssh://git@bitbucket.test.com:USERNAME/repository.git
Then it should work.
answered Nov 2, 2016 at 14:19
![]()
vagovszkymvagovszkym
1,35210 silver badges16 bronze badges
Following this guide
I think you are missing that after you have generated the SSH keypair, you need to add the SSH private key to pageant, PuTTY’s key management tool.
First, run pageant, which can be found in the directory where you have installed PuTTY package (remember, by default: c:Program FilesPuTTY). You will see a small icon in your system tray (see the screenshot to the right), which indicates pageant is started. Click on the icon and in pageant window click “Add Keys”. Add the private key that was generated by puttygen in the previous step. The private key has extension .ppk, that is the easiest way to distinguish it from the public key you have created.
After you add the SSH key, you should see it in pageant key list.
answered Apr 23, 2016 at 15:20
![]()
AlexAlex
83513 silver badges23 bronze badges
13
Don’t use PuTTY to generate the key.
Create a new key with ssh-keygen in .ssh. Leave passwords blank.
Open that new key in PuTTY.
Copy and paste it into the Bitbucket Key field.
Save key with PuTTY and Bitbucket.
It should work.
answered Mar 25, 2019 at 3:57
![]()
if you need to update multiple putty sessions on windows via powershell:
set-Itemproperty -path HKCU:SoftwareSimonTathamPuTTYSessionssessionname -name PublicKeyFile -value «C:Usersusername.sshputty.ppk»
answered Sep 8, 2016 at 22:03
![]()
JaminJamin
1464 bronze badges
For Windows 7 users:
- Open Git Bash and type
ssh-keygen, and press Enter three times
(one for location, and two for empty passphrase). - Now, a
dir .sshshould list these two files: id_rsa id_rsa.pub - Add the public key to your Bitbucket settings, as described in Set
up an SSH key
,
Step 3. You basically copy paste the contents of file «id_rsa.pub»
to your profile in BitBucket via the web interface (no admin rights
required of course). - Restart Git Bash.
- Go the destination directory, where you would like to clone your repository
and do agit init - Get the ssh from the Clone of the repo, and then do
git clone ssh://git@bitbucket.test.com:YOURUSERNAME/myrepository.git
answered Jan 7, 2019 at 14:12
![]()
gsamarasgsamaras
71k42 gold badges184 silver badges293 bronze badges
Add SSH Key to Bitbucket / Github in Ubuntu 16.04
What does SSH Keys do in Github / Bitbucket?
Set up SSH to reduce the risk of exposing your username and password.
Some reasons you might want to use SSH key base authentication:
- Is more effective if you push and pull from Bitbucket many times a day.
- Removes the need to enter a password each time you connect.
Url formats of the repository differs from HTTPS to SSH:
HTTPS:	https://<repo_owner>@bitbucket.org/<accountname>/<reponame>.git
SSH:	git@bitbucket.org:<repo_owner>/<reponame>.git
	or
	ssh://git@bitbucket.org/<repo_owner>/<reponame>.git
Environment
- Operating System : Ubuntu 16.04 LTS (64-bit)
Add SSH Keys in Ubuntu 16.04
The following steps showed the step by step installation guideline.
Set up your default identity
From the terminal, enter ssh-keygen at the command line.
The command prompts you for a file to save the key in:
ssh-keygen
It will create two files; one public key file and one private key file.
Both file will have your given name.
Add Key files in local machine
Keep both of the files in ~/.ssh location.
Add the public key to your bitbucket settings
- In Bitbucket go to
Bitbucket settings>Account settings>SSH keys>Add key - Copy the contents of your public key file using the following command:
cat ~/.ssh/id_rsa.pub
N.B.: id_rsa is the name I have given when generating the key files. It might be something else for your case.
3. Copy and paste the public key in the key field in Bitbucket and include proper label. Click Save.
Ensure Bitbucket SSH connects successfully
Return to the terminal window and write:
ssh -T git@bitbucket.org
For github
ssh -T git@github.com
Give your passphrase which you have given when generating the key files.
If your connection is successful then you will get output like following:
logged in as YOUR BITBUCKET USERNAME.

You can use git or hg to connect to Bitbucket. Shell access is disabled.
For Github:
Hi YOUR GITHUB USERNAME! You've successfully authenticated, but GitHub does not provide shell access.
References
- Set up an SSH key: Bitbucket documentation
- Change existing folder remote url: Github documentation
Содержание
- Подключение к Git по SSH в Windows без PuttyGen на примере BitBucket
- Bitbucket Support
- Knowledge base
- Products
- Jira Software
- Jira Service Management
- Jira Core
- Confluence
- Bitbucket
- Resources
- Documentation
- Community
- Suggestions and bugs
- Marketplace
- Billing and licensing
- Viewport
- Confluence
- Using SSH keys to secure Git operations
- Controlling access to code
- On this page
- In this section
- Related content
- Still need help?
- Bitbucket Support
- Knowledge base
- Products
- Jira Software
- Jira Service Management
- Jira Core
- Confluence
- Bitbucket
- Resources
- Documentation
- Community
- Suggestions and bugs
- Marketplace
- Billing and licensing
- Viewport
- Confluence
- Creating SSH keys
- Using SSH keys to secure Git operations
- On this page
- Related content
- Still need help?
- Creating an SSH key on Windows
- 1. Check for existing SSH keys
- 2. Back up old SSH keys
- 3. Generate a new SSH key
- Creating an SSH key on Linux & macOS
- 1. Check for existing SSH keys
- 2. Back up old SSH keys
- 3. Generate a new key
- Bitbucket Support
- Knowledge base
- Products
- Jira Software
- Jira Service Management
- Jira Core
- Confluence
- Bitbucket
- Resources
- Documentation
- Community
- Suggestions and bugs
- Marketplace
- Billing and licensing
- Viewport
- Confluence
- Enabling SSH access to Git repositories in Bitbucket Server
- Administering Bitbucket Server
- On this page
- In this section
- Related content
- Still need help?
- Enabling SSH access
- SSH base URL
- When running Bitbucket Server behind a proxy
Подключение к Git по SSH в Windows без PuttyGen на примере BitBucket
Много статей (в том числе и на Хабре) посвящено подключению к Git по SSH-ключам. Почти во всех из них используется один из двух способов: либо с помощью puttygen.exe, либо командами ssh-keygen или ssh-add.
Вчера на одном из компьютеров у меня не получилось сделать это для msysgit ни одним из описанных в интернете способов, и я потратил несколько часов на попытки настроить SSH-доступ, так ни чего и не добившись.
Как я решил эту проблему — под катом.
BitBucket всё время ругался на то, что ему требуется подключение с помощью ключа:
Permission denied (publickey).
fatal: Could not read from remote repository.
Please make sure you have the correct access rights and the repository exists.
Мои попытки сгенерировать ключи, указать пути в переменных среды, привязать ключи к гиту были бесполезны. Либо гит ругался крякозябрами (в случае ssh-agent cmd.exe), либо просто игнорировал всё предложенное.
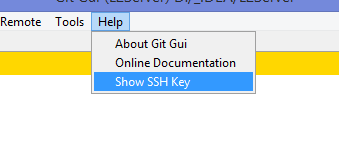
Решение оказалось куда удобнее и проще. Достаточно запустить в локальном репозитории GIT GUI Here, и в меню перейти в
Help -> Show SSH Key:

Если вы столкнулись с такой проблемой, то скорее всего у вас там ни чего не будет:
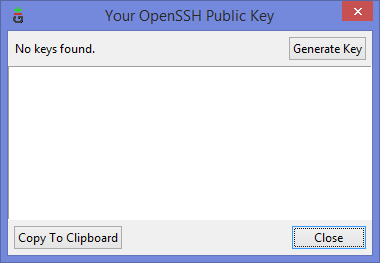
Ну а дальше читать будут, скорее всего, только самые педантичные… Жмём Generate key, видим окно запроса пароля (два раза) для приватного ключа:

И видим сгенерировавшийся публичный ключ:

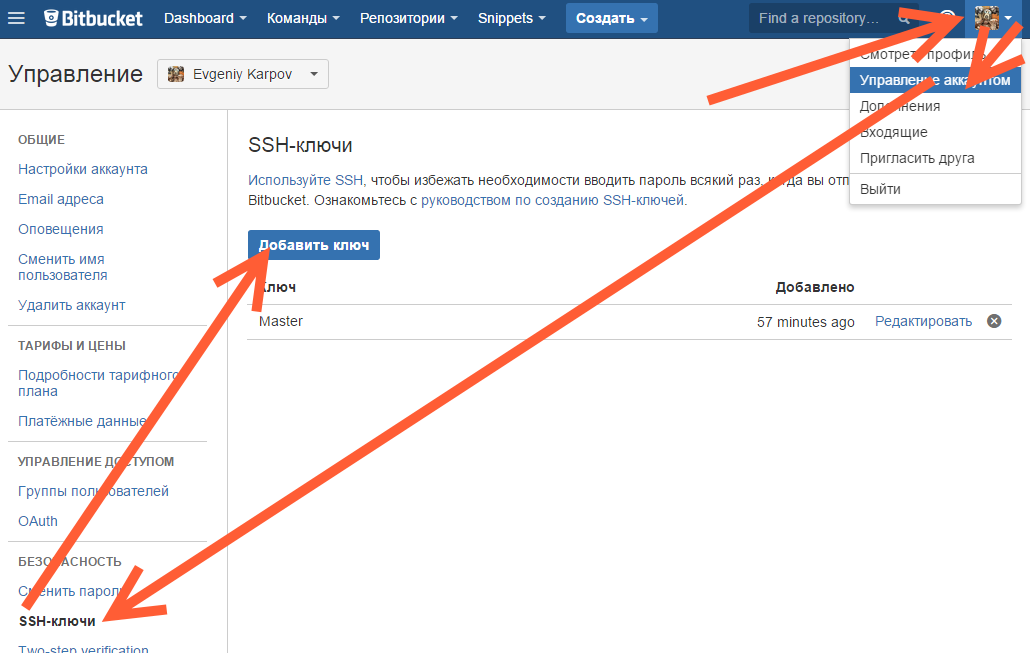
Копируем его, и добавляем вэб-морду ГИТа (в моём случае это BitBucket; ключи там можно добавить в двух местах — в настройках аккаунта и в настройках проекта, нам первый вариант, ибо второй — для деплоя проекта) [Аккаунт] — Управление аккаунтом — SSH-ключи — Добавить ключ:
Ну, а дальше — просто делаем что нужно — или пуш, или клон (предполагается, что git remote add вы уже сделали сами). Git спросит, можно ли добавить хост к доверенным, и запросит passphrase (пароль приватного ключа). Всё, можно работать.
PS: Большое спасибо за наводку на решение моему коллеге Ивану!
Источник
Bitbucket Support
Knowledge base
Products
Jira Software
Project and issue tracking
Jira Service Management
Service management and customer support
Jira Core
Manage any business project
Confluence
Bitbucket
Git code management
Resources
Documentation
Usage and admin help
Answers, support, and inspiration
Suggestions and bugs
Feature suggestions and bug reports
Marketplace
Billing and licensing
Frequently asked questions
Viewport
Confluence
Versions
Using SSH keys to secure Git operations
Controlling access to code
On this page
In this section
Related content
Still need help?
The Atlassian Community is here for you.
Bitbucket Server provides a simple way for user accounts and other systems to connect securely to Bitbucket Server repositories, using SSH keys, in order to perform Git operations. You can:
- add a personal key to a Bitbucket Server user account to allow a developer to easily authenticate when performing read operations from his or her local machine. A Bitbucket Server user can add any number of keys to their account. Read more at SSH user keys for personal use.
- add an access key to a Bitbucket Server project or repository to allow other systems, such as build servers like Atlassian’s Bamboo, to authenticate for either read-only (pull, clone) or read-write (push, merge) operations, without the need to store user credentials. Read more at SSH access keys for system use.
Related pages:
Before you can use SSH keys to secure a connection with Bitbucket Server the following must have already been done:
- your Bitbucket Server administrator must have already enabled SSH access in Bitbucket Server.
- you need an SSH key! See Creating SSH keys. Alternatively, you can use an existing key, if it isn’t already being used as a repository or project access key in Bitbucket Server.
- You can use the same SSH system access key for multiple repositories or projects.
- A Bitbucket Server user can add any number of keys to their account.
- Keys used for personal user accounts can’t be re-used as a project or repository access key, and keys used as a project or repository access key can’t be re-used for user accounts.
- Bitbucket Server supports DSA, RSA2, and Ed25519 key types – RSA1 is not supported.
Источник
Bitbucket Support
Knowledge base
Products
Jira Software
Project and issue tracking
Jira Service Management
Service management and customer support
Jira Core
Manage any business project
Confluence
Bitbucket
Git code management
Resources
Documentation
Usage and admin help
Answers, support, and inspiration
Suggestions and bugs
Feature suggestions and bug reports
Marketplace
Billing and licensing
Frequently asked questions
Viewport
Confluence
Versions
Creating SSH keys
Using SSH keys to secure Git operations
On this page
Related content
Still need help?
The Atlassian Community is here for you.
This page describes how to create SSH keys.
SSH keys can be used to establish a secure connection with Bitbucket Data Center and Server for:
- when you are performing Git operations from your local machine
- when another system or process needs access to repositories in Bitbucket (for example your build server)
The SSH key needs to be added to Bitbucket, and your Bitbucket administrator must have enabled SSH access to Git repositories before you can make use of the key.
You can use an existing SSH key with Bitbucket if you want, in which case you can go straight to either SSH user keys for personal use or SSH access keys for system use.
On this page:
Related pages:
Creating an SSH key on Windows
1. Check for existing SSH keys
You should check for existing SSH keys on your local computer. You can use an existing SSH key with Bitbucket if you want, in which case you can go straight to either SSH user keys for personal use or SSH access keys for system use.
Open a command prompt, and run:
If you see «No such file or directory», then there aren’t any existing keys: go to step 3.
Check to see if you have a key already:
If there are existing keys, you may want to use those: go to either SSH user keys for personal use or SSH access keys for system use.
2. Back up old SSH keys
If you have existing SSH keys, but you don’t want to use them when connecting to Bitbucket, you should back those up.
In a command prompt on your local computer, run:
3. Generate a new SSH key
If you don’t have an existing SSH key that you wish to use, generate one as follows:
- Log in to your local computer as an administrator.
In a command prompt, run:
Note: If you’re using a legacy system that doesn’t support the ED25519 algorithm, run:
Associating the key with your email address helps you to identify the key later on.
Note that the ssh-keygen command is only available if you have already installed Git (with Git Bash).
You’ll see a response similar to this:
Enter, and re-enter, a passphrase when prompted. The whole interaction will look similar to this:
Creating an SSH key on Linux & macOS
1. Check for existing SSH keys
You should check for existing SSH keys on your local computer. You can use an existing SSH key with Bitbucket if you want, in which case you can go straight to either SSH user keys for personal use or SSH access keys for system use.
Open a terminal and run the following:
- If you see «No such file or directory, then there aren’t any existing keys: go to step 3.
Check to see if you have a key already:
2. Back up old SSH keys
If you have existing SSH keys, but you don’t want to use them when connecting to Bitbucket, you should back those up.
Do this in a terminal on your local computer, by running:
3. Generate a new key
If you don’t have an existing SSH key that you wish to use, generate one as follows:
Open a terminal on your local computer and enter the following:
Note: If you’re using a legacy system that doesn’t support the ED25519 algorithm, use:
Associating the key with your email address helps you to identify the key later on.
You’ll see a response similar to this:
Enter, and re-enter, a passphrase when prompted.
The whole interaction will look similar to this:
Источник
Bitbucket Support
Knowledge base
Products
Jira Software
Project and issue tracking
Jira Service Management
Service management and customer support
Jira Core
Manage any business project
Confluence
Bitbucket
Git code management
Resources
Documentation
Usage and admin help
Answers, support, and inspiration
Suggestions and bugs
Feature suggestions and bug reports
Marketplace
Billing and licensing
Frequently asked questions
Viewport
Confluence
Versions
Enabling SSH access to Git repositories in Bitbucket Server
Administering Bitbucket Server
On this page
In this section
Related content
Still need help?
The Atlassian Community is here for you.
A Bitbucket Server administrator can enable SSH access to Git repositories in Bitbucket Server. This allows your Bitbucket Server users to:
- add their own SSH keys to Bitbucket Server
- use those SSH keys to secure Git operations between their computer and the Bitbucket Server instance.
Bitbucket Server users must each add their own SSH key pairs to their Bitbucket Server account to be able to use SSH access to repositories.
Supported key types are DSA, RSA2, and Ed25519. Note that RSA1 is not supported. We’ve tested key sizes of 768, 1024, 2048, 4096 and 8192 bytes.
On this page:
Related pages:
There are performance implications for Bitbucket Server when using SSH. When users connect to Bitbucket Server using SSH the encryption of data adds to overall CPU usage. See Scaling Bitbucket Server for more information.
To implement SSH authentication support, Bitbucket Server bundles a version of the Apache Mina SSHD server. Bitbucket Server’s SSH server is not integrated with the SSH server on the host Bitbucket Server is running on nor does it consider the users on the host when authenticating Bitbucket Server users. To prevent security issues, the embedded SSH server has been locked down to allow execution of a small set of commands for Git hosting. The only commands that are supported are git upload-pack , git receive-pack , git archive-pack and whoami (a custom whoami implemented in Bitbucket Server not the whoami command that exists on Linux). It is not possible to open an SSH shell using the embedded server to execute arbitrary commands on the server.
Enabling SSH access
To enable SSH access:
- Go to the Bitbucket Server administration area and click Server settings (under ‘Settings’).
- Under ‘SSH access’, check SSH enabled.
- Enter values for SSH port and SSH base URL, according to the information in the sections below.
- Click Save.
These options will only be available if the «Bitbucket Server — SSH» app is enabled. For instructions on how to enable this app on your instance, please refer to Disabling and enabling apps.
SSH base URL
The SSH base URL is the base URL with which users can access the SSH push/pull/clone functionality of Bitbucket Server.
This is the base URL that Bitbucket Server will use when displaying SSH URLs to users. If you do not set this, it will default to the host that is set in Bitbucket Server base URL, with the port that SSH is listening on. See Specifying the base URL for Bitbucket Server.
For example, if the SSH base URL is not set and the Bitbucket Server base URL is https://bitbucket.atlassian.com and the SSH port is 7999 , the SSH URL for the repository Jira in the project Atlassian will be ssh://git@bitbucket.atlassian.com:7999/ATLASSIAN/jira.git
If you set up port forwarding, you will need to set the SSH base URL to the machine and port that is being forwarded to Bitbucket Server. However, you do not need to specify the port portion of the URL if the default SSH port (port 22) is being forwarded to Bitbucket Server.
If the SSH base URL and SSH port configurations are modified in the global Server settings page, the configurations specified in the properties file will no longer be used.

| Port forwarding | SSH base URL | Bitbucket Server base URL | SSH port | Resulting SSH URL for a repo |
|---|---|---|---|---|
| Not set | https://bitbucket.atlassian.com | 7999 | ssh://git@bitbucket.atlassian.com:7999/ |
Port
https://bitbucket.atlassian.com https://bitbucket.atlassian.com 7999 ssh://git@bitbucket.atlassian.com/
When running Bitbucket Server behind a proxy
If you run Bitbucket Server behind a http proxy such as Apache (e.g. as per our instructions), and if Apache runs on a different host, SSH will not be available on that host. Instead, you will need to set the SSH base URL to the machine Bitbucket Server is actually running on (and the URL should include the SSH port Bitbucket Server is serving from).
For example, if the SSH base URL is set to ssh://bitbucket.backend.atlassian.com:7999 , the SSH URL for the repository Jira in the project Atlassian will be ssh://git@bitbucket.backend.atlassian.com:7999/ATLASSIAN/jira.git
If you set up port forwarding, you will need to set the SSH base URL to the proxy machine and port that is being forwarded to Bitbucket Server. However, you do not need to specify the port portion of the URL if the default SSH port (port 22) is being forwarded to Bitbucket Server.
Источник
Если попытка склонировать любой приватный репозиторий с bitbucket или github по ssh вызывает ошибку вида:
Permission denied (publickey).
fatal: The remote end hung up unexpectedly
То это значит, что вы не прошли авторизацию по ssh-ключам. Тут 2 варианта:
-
Клонировать через https схему, при этом будет запрошен имя пользователя и пароль от аккаунта. Минус тот, что при любом обращении к центральному серверу (пр.
git fetch,git pull) придётся снова вводить пароль. - Настроить ssh-ключи, чтобы git-аутентификация проходила автоматически без ввода паролей и т.д.
Если ключи у вас уже есть, то читайте сразу как добавить ssh ключ на github или добавить ssh ключ на bitbucket.
Рассмотрим подробнее как 1. создать ssh-ключи на linux (ubuntu) и добавить ssh ключи на 2. github и 3. bitbucket.
Генерация ssh-ключей
Для генерации ssh-ключа выполняем следующие команды:
cd ~/.ssh
ssh-keygen -t rsa
После этого будет предложено ввести имя файла с ключами, либо если имя файла не указать, ключи будут созданы в файле id_rsa. Задаём имя файла с ключами, например, как «git_rsa«. Таким образом мы будем знать, что этот ssh-ключ используется конкретно для git-авторизации. Хотя, никто не запрещает использовать один и тот же ключ id_rsa. Ключи будут храниться в домашней директории пользователя ~/.ssh/git_rsa и ~/.ssh/git_rsa.pub.
На запрос о установке пароля на связку ключей можно нажать enter, т.е. оставить пароль пустым (это безопасно). Теперь в каталоге ~/.ssh появились 2 файла ключа:
- git_rsa — приватный, который нельзя никому сообщать
- git_rsa.pub — публичный, который мы сообщим gitbucket и github
По умолчанию при подключении к серверу для ssh-авторизации используется ключ с именем id_rsa. Мы это обойдём. Чтобы не указывать имя нужного нам ключа (git_rsa) при каждом подключении к серверу, отредактируйте файл ~/.ssh/config (если файла ещё нет, создайте), добавьте содержимое для идентификации bitbucket-хоста и github:
Host bitbucket.org
 IdentityFile ~/.ssh/git_rsa

Host github.com
 IdentityFile ~/.ssh/git_rsa
Всё, на нашем комьютере или сервере (смотря где создавали ключи) нужные ключи созданы. Остаётся сообщить (добавить) наш публичный ключ туда, где мы будем проходить авторизацию, т.е. на github и bitbucket.
Добавление ssh-ключа на github
В своём профиле нажимаем Edit Profile -> SSH Keys -> Add SSH key.
В свежем интерфейсе github:
- кликаем на иконку профиля в правом верхнем углу, далее
- выбираем меню Settings
- в меню слева выбираем SSH and GPG keys
- Жмем кнопку New SSH key.

В форме добавления ключа указываем title (это название ключа, вводится для удобства, не на что не влияет) и key (это сам ключ, т.е. вставляем сюда всё содержимое файла ~/.ssh/git_rsa.pub). Нажимаем Add key.
Добавление ssh-ключа на bitbucket
Авторизуемся, заходим в свой аккаунт. Нажимаем SSH keys -> Add Key. После ввода ключа в попап окошке нажимаем кнопку Add key для сохранения ssh-ключа.

Теперь вы можете клонировать свои приватные репозитории по ssh (git@github) без ввода пароля.
На что стоит обратить внимание если ssh-авторизация по ключу все еще не работает:
- на ключ id_rsa не должно быть слишком много прав
- у вас создано несколько ssh-ключей и нужно дать понять какой из ключей использовать
Дата добавления:
8 лет назад
![]()
Просмотров: 1.6k
- Генерация SSH ключа
- Добавление SSH ключа в github
- Добавление SSH ключа в bitbucket
- Добавление репозитория и SSH ключа в SmartGit
Генерация SSH ключа
Пример будет реализована в ОС Windows, но команды и порядок действий для Linux и Mac будут такими же.
Открываем консоль (терминал) и вводим команду:
ssh-keygen -t rsa -b 4096 -C "yourEmail@example.com"
где yourEmail@example.com — адрес вашей электронной почты. Эта команда создаст новый SSH ключ, используя электронную почту в качестве метки.

Далее вам будет предложено «Введите файл в котором будет сохранен ключ», нажмите Enter (для сохранения расположения файла по умолчанию):
Enter a file in which to save the key (/d/openserver/.ssh/id_rsa): [Жмем enter]

После чего введите пароль (секретную фразу) и повторите его:
Enter passphrase (empty for no passphrase): [Вводим пароль и жмем enter]
Enter same passphrase again: [Повторяем пароль и жмем enter]

Все, ключ сгенерирован.

Теперь у нас есть 2 файла id_rsa и id_rsa.pub которые лежат по пути (в случае примера) D:/OpenServer/.ssh. Файл с расширением .pub — это ваш открытый ключ, а второй файл — ваш секретный ключ.
Добавление SSH ключа в github
Ключ сгенерирован, теперь необходимо добавить его на сайт github.com. Откройте https://github.com/ и авторизируйтесь. После чего зайдите в Настройки (https://github.com/settings/profile) => SSH (https://github.com/settings/ssh) и нажмите на кнопку «Add SSH key»:


Вводим название для ключа и сам ключ. Ключ это содержимое файла id_rsa.pub (D:/openserver/.ssh/id_rsa.pub), жмем кнопку «Add key»:

Готово, ключ добавлен в github.
Добавление SSH ключа в bitbucket
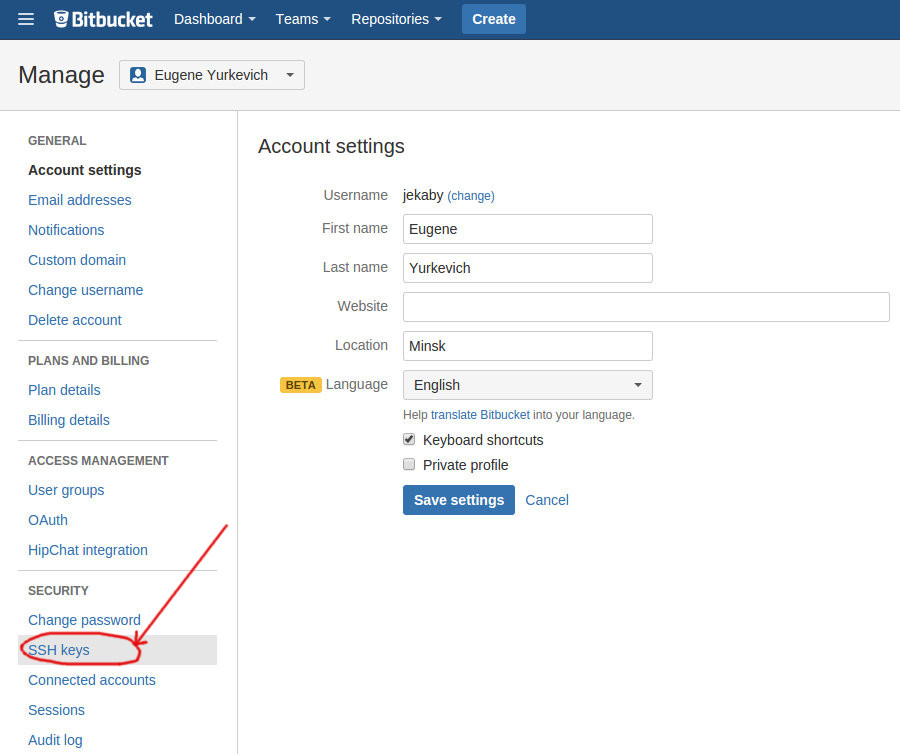
Откройте bitbucket.org и авторизируйтесь. После чего зайдите в Bitbucket settings (https://bitbucket.org/account/user/egorik/) => SECURITY => SSH keys (https://bitbucket.org/account/user/egorik/ssh-keys/) и нажмите на кнопку «Add key»:


Вводим название для ключа и сам ключ. Ключ это содержимое файла id_rsa.pub (D:/openserver/.ssh/id_rsa.pub), жмем кнопку «Add key»:

Готово, ключ добавлен в bitbucket.
Добавление репозитория и SSH ключа в SmartGit
Открываем SmartGit. И добавляем репозиторий (Repository => Add or create…) Ctrl + O:

Вставляем путь к папке, где будет храниться код:

Подтверждаем инициализацию репозитория:

Жмем на кнопку «Pull» или Ctrl + P, нам выдаст сообщение о том что репозиторий не найден и предложит добавить его, жмем на «Add Remote»:

Вставляем url откуда будем клонировать репозиторий и жмем на кнопку «Add»:

Так как мы указали не https url, то нам необходимо указать путь к файлу с секретным ключем (D:/OpenServer/.ssh/id_rsa) и пароль к ниму (который мы указали при создании этой пары ключей):

Все, ключ добавлен, дальше работайте с репозиторием как обычно. При обращении к любому из открытых для вас репозиториев пользователя этот ключ будет работать, добавлять его заново не нужно.