Для начала я расскажу вам небольшую историю и если она вам знакома то данная статья для вас. Одним прекрасным утром вы пришли на работу и ваш босс позвонил вам и рассказал, что он приобрел новый ноутбук, который нужно срочно подключить к сети и всем сетевым ресурсам. Вы пришли к нему и поняли, что босс купит Mac. Он хочет чтобы вы ввели его новый ноутбук в домен для доступа ко всем сетевым ресурсам без авторизации. Или может быть рассказ немного отличается. Ваша организация решила расширятся и появился новый департамент графического дизайна и маркетинга, и все сотрудники этого департамента будут использовать Mac.
Что же делать в подобной ситуации? Не волнуйтесь, вы можете присоединить Mac в Windows домен и сегодня я покажу вам как это делать. В данной статье мы будем подключать Snow Leopard к домену Windows Server 2008.
Настройка сети и аккаунта в Mac
Домен Windows полностью зависит от корректной настройки DNS поэтому первое что вам нужно сделать это установить корректный адрес DNS сервера, который в моем случаем является также контроллером домена. Для этого запустите System Preferences и нажмите Network для открытия сетевых настроек.


По умолчанию ваш сетевой адаптер получает настройки через DHCP. В зависимости от настроек вашей сети вы можете установить настройки вручную выбрав опцию Manually.
Мой контроллер домена имеет IP адрес 192.168.1.172, поэтому я указываю в секции DNS Server Это значение.

Вернитесь назад в System Preferences и выберите Accounts

Нажмите на замок внизу для возможности внесения изменений. Затем нажмите кнопку Join рядом с Network Account Server

Теперь нажмите кнопку Open Directory Utility

Находясь в Directory Utility опять нажмите замок внизу, выделите строку с Active Directory и нажмите иконку с карандашом для начала редактирования.

В данном разделе вам нужно ввести информацию о домене и ID компьютера. В данном примере мой домен имеет имя hq.test.us и ID компьютера Mac. ID компьютера является именем аккаунта компьютера Mac в Windows домене.

Нажмите стрелку для отображения дополнительных опций. Это даст вам 3 дополнительных опции для конфигурирования. Для упрощения я оставляю всё по умолчанию кроме секции Administrative. Нажмите на кнопку Administrative и введите IP адрес или полное доменное имя контроллера домена в секции Prefer this domain server. Также тут можно указать какие доменные группы будут иметь полномочия администратора в Mac.

Теперь нажмите кнопку Bind и введите данные доменного пользователя, который имеет право на ввод компьютеров в домен, затем нажмите OK.

Вы будете видеть прогресс ввода в домен, состоящий из 5 шагов.

В результате компьютер введен в домен и кнопка Bind переименуется в Unbind.

Нажмите OK и затем Apply в окне Directory Utility. Закройте Directory Utility. Вы должны вернутся в окно Accounts. Обратите внимание на зеленую точку и доменное имя в разделе Network account server.

Вход под учетной записью домена на ваш Mac
В настоящий момент вы уже можете входить в Mac под учетными записями домена Windows. В окне выбора аккаунта выберите Other.

Теперь введите данные учетной записи домена.

В результате вы авторизуетесь на компьютер. И что делать дальше? Возможен ли доступ к сетевым ресурсам?
Попробуем подключить сетевую шару. Из Finder нажмите Go а затем Connect to Server. Для использования SMB применяем следующий синтаксис :smb://servername/share и затем нажимаем Connect.

Обратите внимание что вам не нужно вводить данные для авторизации на сервере.
На этом все, это было не очень то сложно, не так ли?
Сергей Журавель
Источник: IT Blog
If you want to share files or peripheral devices between Windows and Mac computers, you can bind your Mac to a Windows domain. This is not a difficult procedure if you approach it systematically.
💡 Essentially, you need to configure your system so Active Directory accepts the IP address of your Mac. We have put together this guide to help you get this done with a minimum of stress.
What Do You Mean by a Windows Domain or an Active Directory Domain?
Windows Domain
Windows domains generally consist of a large number of PCs that are connected to the same local network. The domain controllers, made up of one or more servers, are responsible for controlling the authentication that allows access to the other computers on the same domain.
Even when the domain controllers are connected through a local network, they can also communicate with the domain controller via a VPN or an Internet connection. This makes Windows domains a great solution for large networks such as those found in schools, offices, or businesses.
The domain controllers handle all user accounts and passwords. The local user account is not used when logging into the domain. This feature allows you to log into any computer connected to the domain with the same credentials.
Active Directory Domain
An Active Directory domain is both a logical and a physical construct. It consists of either a single user, group of users, or a hardware component such as a printer or a computer within the Microsoft Active Directory Network.
The logical form of an Active Directory domain is based on a tree-like hierarchy. A group of Active Directory trees is known as a forest. This is the highest level of the hierarchy, with each Active Directory tree potentially having multiple branches that consist of child domains. Each child can have additional branches resulting in a complex hierarchical network topology.
Active Directory domains can be seen in the processes and services area of the Windows Server OS. The server running the Active Directory domain is known as the domain controller and its role is to control user access to the computers that comprise the domain.
The benefits of an Active Directory environment is that a single login enables an administrator to access all domain resources like servers, storage volumes, printers, and computer accounts.
When you connect a Mac to a Windows domain, the machine binds to an Active Directory domain. The Windows computers you want to access from the Mac also need to join the given domain.
Requirements for Binding a Mac to an Active Directory Domain
Some prerequisites need to be addressed before you can join a Mac to an Active Directory.
- The hardware selected must be compatible with Windows Server 2000-2012.
- Active Directory Domain Services (ADDS) needs to be configured on all computers connected to the domain to manage authentication.
- The Mac that is to be connected needs to be running Mac OS X 10.5 or a newer version of the operating system.
- A Domain Administrator-level account is required to join the Mac to Active Directory. This account can also be used to create other user accounts or modify permissions.
Steps Required to Join a Mac to a Windows Domain
Conclusion
Connecting a Mac to a Windows domain is not a trivial task and you may come across several issues such as joining the Mac to the local domain. As long as you follow the steps outlined above, you should be able to connect your Mac to the Windows domain.
Once that is accomplished, you can access files on your Windows machine from the Mac without the need to authenticate every time you log in.

on
December 6, 2013, 11:05 AM PST
Integrate Macs into a Windows Active Directory domain
Jesus Vigo takes a look at how to setup and configure Apple hardware running a modern version of OS X and get it communicating with a Windows Active Directory environment.

Market share in the enterprise is largely dominated by Microsoft — specifically, the reliance on the Windows Server family line to manage network
resources, align desktops with corporate
security policies, and maintain the flow of production amongst all the employees at
a given
organization. The process of administering all these systems — desktops and
servers alike — are relatively straight-forward in a homogeneous environment, but
what happens when OS X is
introduced to the enterprise in the form of a sleek, shiny new MacBook Air or
iMac?
Apple hasn’t made great inroads in this segment. However, comparing its
paltry 7%
market share in the desktop market to its almost 93% in the mobile device
market, there’s only a matter of time before more companies begin to choose Apple
products for its mobile and desktop
computing duties in lieu of the generic, stalwart PCs they’ve been cycling in
and out every three to five years. So, I ask you again, what do you do when your
organization decides to upgrade to iMacs? How do you manage those
nodes in addition to the existing Windows domain that’s already established?
Integrating Macs will initially be easier than you think! Even
with little to no prior OS X
knowledge, Macs will bind* to the domain with relative ease, since
directory services — the
underlying “file structure” of the network resources — are
standards-based and operate more or less about the same across operating systems.
Note*: Binding is the term associated with joining OS X to a
domain. It’s virtually identical to joining a Windows PC to a domain, complete
with checking domain credentials to verify the end user has the necessary rights
to add the
computer to the domain.
Minimum requirements:
- Server
hardware running Windows Server 2000-2012 Standard - Active
Directory Domain Services (ADDS) setup and configured - Domain
Administrator-level account - Apple
desktop or laptop running OS X 10.5+ - Switched
network
I. Bind OS X to a Windows domain (10.5-10.9)
Follow these steps to bind OS X to a Windows domain:
- On
the Mac, go to System Preferences, and click on the padlock to authenticate as
an Administrator (Figure A)
Figure A
- Enter
your admin-level credentials to authenticate when prompted - Next,
select Login Options, and then click the Join… button next to Network
Account Server (Figure B)
Figure B - In the Server drop-down menu, enter the fully-qualified
domain name (ex. domain.com) of the Windows domain
you wish to bind to the Mac, and click OK (Figure C)
Figure C - Next, you’ll need to enter your domain-level credentials in order to
proceed with the binding process (make sure that the computer name is unique and
formatted properly, because this is the name that will be created** for the
computer object in ADDS), and then click OK to process
the enrollment (Figure D)
Figure D - Upon
successful binding, the window will close and the Users & Groups preference
will remain open, but a
small green dot (along with the domain name) will appear next to Network Account Server to indicate connectivity to the
domain (Figure E)
Figure E


Note**: By default, Windows will automatically create the
computer object account in ADDS if one does not already exist. However, domain
or enterprise admins may (and often do) restrict this as a security feature to
curb random nodes from being joined to the domain. Additionally, Organizational Units (OU) may be created as a form to
compartmentalize ADDS objects by one or more classifications or departments.
Many enterprises will utilize OUs as a means to organize objects and accounts separately from the items created by default when a domain controller
is promoted and ADDS is created.
II. Modify Directory Services settings
Your next steps will be to modify the Directory Services settings. Here’s how:
- To
ensure the highest level of compatibility between OS X and the network
resources on the Windows network, certain changes must be made to the Active
Directory service with the Directory Utility — so, go to System Preferences | Users
& Groups, and click Login Options - Click
the Edit… button next to Network Account Server, then click Open
Directory
Utility… (Figure F)
Figure F - The Directory
Utility lists various services associated with network account directories (Figure G), and it allows you to modify settings as needed
Figure G - Double-click Active Directory to edit its configuration (Figure H)
Figure H - Click on
the arrow to unhide the Advanced Options, select User Experience, and check the following boxes:
a. Check Force local home directory on startup disk (Figure I), which will force the creation of a profile on the local HDD for all
users that
logon to the node (if you plan to serve profiles remotely from a server, leave
this
setting unchecked)
Figure I
b. Check Use UNC path from Active Directory to derive network home location (Figure J), and select the network protocol to be used: smb: (Note: This setting will switch the default protocol for network resource paths from
Apple’s afp: to the Windows’ friendly smb: — also known as Common Internet File System, or CIFS).
Figure J - Next,
select Mappings (Figure K), which pertains to specifying unique GUIDs for certain attributes used
within ADDS to identify a computer object account. OS X will generate these at
random by default when bound to the domain; however, you may wish to use a
particular set as generated by your enterprise admin.
Figure K - Finally,
select Administrative (Figure L), and configure the following three optional settings based on the ADDS
schema setup of the organization:
Figure L
a. Checking Prefer this domain server will perform two-way communication to/from the domain controller of your choosing
b. Checking Allow administration by will allow nodes to be managed by the administrator(s) who’s responsible for
overseeing systems, based on security group membership or user account(s)
c. Checking Allow authentication from any domain in the forest may or may not be necessary to ensure that the OS X computers
authenticate to the proper domain, as configured by the domain/enterprise
admin.


There you have it — a basic look at how to setup and configure Apple hardware running a modern version of OS X and get it communicating with a Windows Active Directory environment. I also threw in a few extra tips to help make a smooth transition and minimize errors.
One additional tip (and common best practice) is to host an Open Directory domain along with the Active Directory service. Multiple directory services will add to the burden of managing two distinct operating systems, but you’ll be surprised to find out that it may actually make administration of these systems easier! This dual-directory environment will allow Windows PCs to be maintained and managed solely through the Active Directory side, while Open Directory — when setup with OS X Server — can be used to maintain and manage the Apple computers.
Giving the Apple hardware the second directory binding to ADDS will allow them to seamlessly communicate with the Windows desktops and share file and printer resources from Windows servers and nodes, and vice-versa. This eliminates the need for costly 3rd-party software plugins. The Macs will receive much of their management directly from the domain controller hosting the Active Directory service, but it must “translate” the processes into commands that OS X will understand. Even then, it does introduce another variable when troubleshooting. And let’s be honest, the newly released OS X Server 3.0, which is only $20 in the Mac App Store, is a full-fledged server OS that’s as simplified and easy to use as OS X.
III. Additional resources
Here are some additional resources for more information:
- OS X Server: How to Setup OS X Server
- OS X Server: How to Setup Open Directory
- Apple Support KB Article – Active Directory Naming Considerations when Binding
- Apple Training PDF – Best Practices for Integrating OS X with Active Directory
-
Apple
-
Data Centers

Joining a Mac to Active Directory has continued to get more and more difficult over the years. High Sierra and Mojave now require a Active Directory functional level of Windows Server 2008 or later and are still pretty tricky to get to join it.
When I started researching the topic I saw a whole lot of advice to install third party software to join a Mac to Active Directory. In most corporate environments installing third party software is frowned upon due to licensing and security considerations so I was determined to get the native Mac OS X tools to work.
This guide will walk you through the basic steps to join Active Directory without having to resort to using third party software.
Configure DNS Settings
One of the big roadblocks to joining Active Directory is DNS settings. In many networks DHCP won’t populate everything you need. Windows can get away with this but when we are joining our Mac we need to make sure everything is populated.
The easiest way to get everything you need is to issue a ipconfig /all from the command prompt of a Windows machine already joined:
C:UsersJChambers>ipconfig /allWindows IP Configuration
Host Name . . . . . . . . . . . . : TESTMACHINE
Primary Dns Suffix . . . . . . . : example.test.domain.com
Node Type . . . . . . . . . . . . : Hybrid
IP Routing Enabled. . . . . . . . : No
WINS Proxy Enabled. . . . . . . . : No
DNS Suffix Search List. . . . . . : example.test.domain.com
test.domain.org
test3.test.comEthernet adapter Ethernet:
Connection-specific DNS Suffix . : example.test.domain.com
Description . . . . . . . . . . . : Intel(R) Ethernet Connection I217
Physical Address. . . . . . . . . : FF-FC-FF-3C-C1-F4
DHCP Enabled. . . . . . . . . . . : Yes
Autoconfiguration Enabled . . . . : Yes
IPv4 Address. . . . . . . . . . . : 211.211.77.112(Preferred)
Subnet Mask . . . . . . . . . . . : 255.255.254.0
Lease Obtained. . . . . . . . . . : Thursday, May 2, 2019 11:38:56 AM
Lease Expires . . . . . . . . . . : Thursday, May 2, 2019 7:40:38 PM
Default Gateway . . . . . . . . . : 211.211.76.1
DHCP Server . . . . . . . . . . . : 211.211.76.19
DNS Servers . . . . . . . . . . . : 172.1.2.233
172.1.2.231
172.1.26.7
NetBIOS over Tcpip. . . . . . . . : Enabled
I have bolded the important things you need to verify.
You want to make sure that all of the DNS Suffix Search List entries are listed in the “Search Domains” box pictured below:
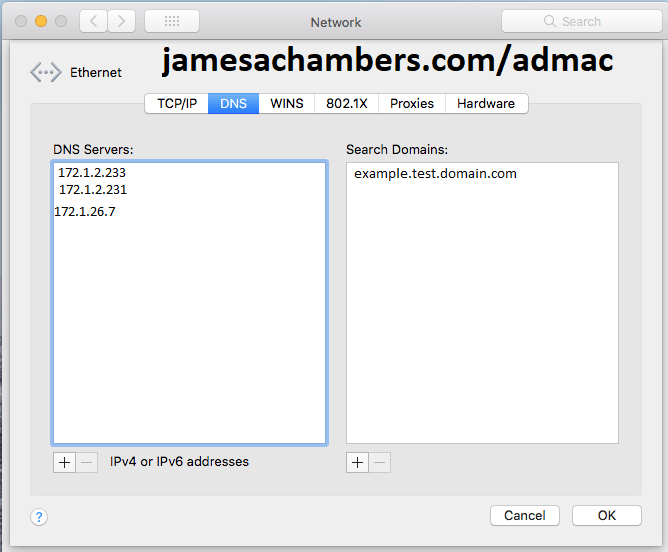
Next verify that all of the DNS servers coming up on your Windows machine are also put into the Mac DNS servers list. On my machine I got all of the DNS servers but only one of the search domains. Make sure it matches your already joined machine!
Configure Network “Sharing” Name
Go to the Settings app on your Mac again and choose “Sharing”.
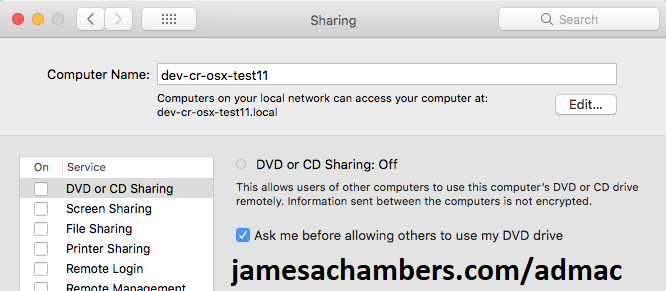
This part is easy. Set this to the computer name you are going to join the domain with. Usually the existing one will be something like “admin’s iMac”.
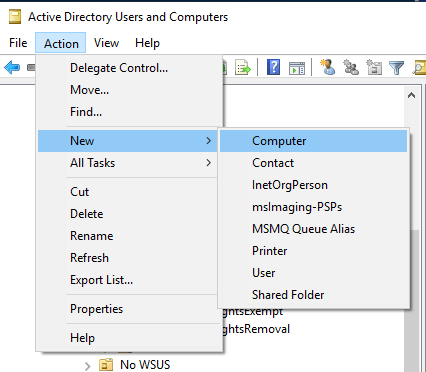
Prestaging AD Computer Account
Next open up Active Directory and create a new “Computer” account.
I strongly recommend keeping your Mac name to 15 characters or less. This is demonstrated in the screenshot below. If that isn’t possible then use the pre-Windows 2000 computer name when you join Active Directory or you will get an error (see Troubleshooting).
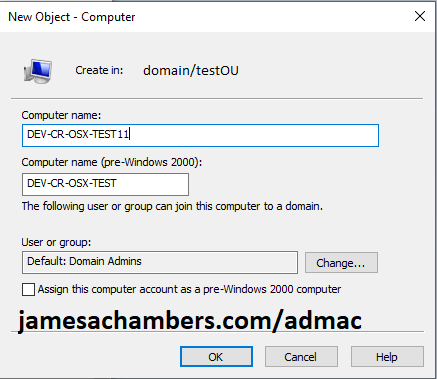
Press OK to create the Active Directory account. Now switch back to the Mac and let’s perform the bind.
Next go back to the Settings app and choose “Users and Groups”.
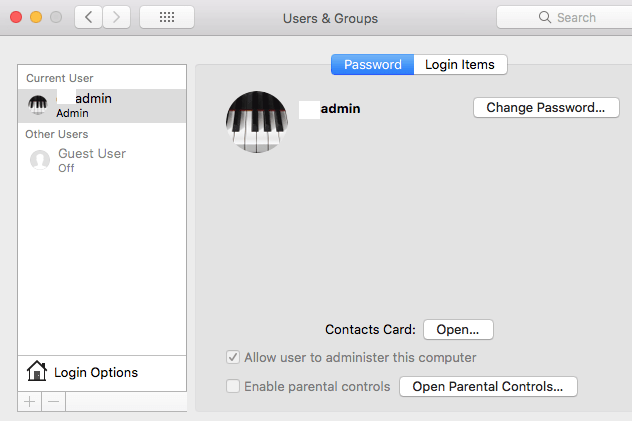
From here we are going to select “Login Options” in the bottom left hand of the screen. You will now see a “Network Account Server” with a Join button. Click join and fill everything out as follows:
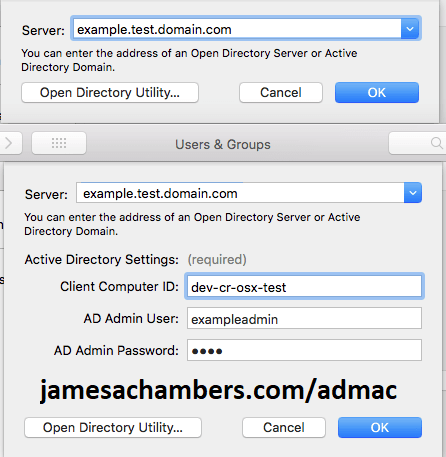
Use your fully qualified domain name (FQDN). This is usually the same as your “Primary DNS Suffix” we got from our Windows machine. This allows us to get around any DNS configuration shenanigans.
For the Active Directory settings put in the pre-Windows 2000 computer name from the above step. If you chose a name of 15 characters or less they will both be the same.
For your AD username don’t try to use anything like DOMAINuser or user@domain. We have already fully qualified our server in the server field so this is not necessary and will cause problems. Enter it as in the example above.
Now press OK and with any luck you will be met with a screen that looks like this:
Troubleshooting
Plugin Error 10001
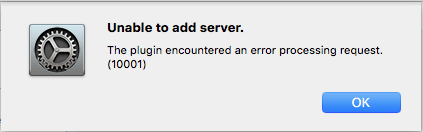
This is the most common error you will get when you try to join High Sierra or Mojave to Active Directory. There are a few reasons it can come up.
Apple states that your Active Directory needs to be at a functional level of Windows Server 2008 to work unless you enable “weak encryption” RC4 algorithm support in your forest. This would be a terrible idea as RC4 was broken many years ago and is a joke to crack.
However even with a functional level of 2008 I have yet to see it work regardless without prestaging the computer in Active Directory first and then attempting to join. Prestaging has fixed this error on all of the Macs I have joined to domains.
There are a few other requirements from Apple on the list that could be contributing but likely with prestaging you will be able to bind even without things like extended schema support, etc.
Plugin Error 5103
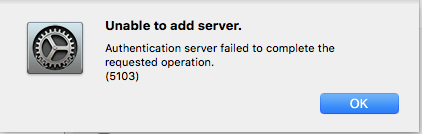
This error is frequently encountered if the name of your PC is too long. You should join the domain with the “pre-Windows 2000” computer name or even better choose a name for the Mac that is 15 characters or less.
My domain ends with .local
This is bad. Very bad. This has been a long standing issue with joining Macs to Active Directory as .local is what Apple’s own Bonjour uses by default. It used to be a matter of simply changing or disabling Bonjour but that has no longer proven effective.
Using .local has been against best practices for many years but not everyone has migrated their domains yet. If you are stuck in this situation and telling your sysadmins to get a grip and migrate their domain is not an option then you may have to consider a third party AD stack. Here’s a lengthy spiceworks discussion on this topic.
If you have been able to find a workaround for this issue in Mojave or High Sierra definitely drop a comment below so we can share it but I was not able to find an instance of anyone getting around this in the newer versions of OS X without going third party.
Conclusion
As long as you aren’t in a .local domain the native built-in tools should prove perfectly sufficient to join Mac OS X High Sierra and Mojave provided we use prestaging.
That being said I can only speak for the environments I have worked in. If you follow this guide and encounter additional problems definitely leave a comment below so we can get that information out there!
You should also check out Apple’s Active Directory integration guide as they cover some requirements that you may have ran into that I didn’t.
А что, если вы работаете в организации, достаточно крупной, в которой используются Windows Server и Active Directory, соответственно? А что, если у вас Мак? Как известно, обычные PC не умеют использовать Apple Open Directory, но зато ваш Mac умеет работать с Microsoft Active Directory и как его ввести в домен, я сейчас и расскажу. Ничего сложного в последовательности действий нет, хотя надо признать, что обычную машину на Windows ввести в AD немного проще.Пару дней назад, притащив свой MacBook на работу, решил ввести его в домен. Но не сразу сообразил куда же нужно зайти, чтобы увидеть настройки связанные с доменом. Попытка найти нужный пункт через поиск не дала результатов, хотя и выглядело все логично: работа с настройками домена должна быть в категории “Сеть”, но ее там не было.
Сначала, мне казалось, что я просто не вижу заветных иконок и пунктов. И как оказалось — их там и не было. А вот где я их нашел, раскрою секрет.
Для начала открываем меню “Системные настройки”. Нас интересует категория “Система” и в ней пункт “Пользователи и группы”.
Тут для нас припасен пункт “Параметры входа” — это именно то, что нам нужно и не нашлось в меню “Сеть”.
Снимаем замочек вводом пароля и выбираем заветную вкладку. Видите, в самом низу пункт “Сетевой сервер учетных записей”? Да, как раз его нам и нужно подключить одноименной кнопкой.
В появившемся окне вводим всю необходимую информацию: имя сервера (можно и ip), ID компьютера и связку логин-пароль для добавления машины в домен. Конечно же, у вас должны быть права в домене для такой операции.
Возвращаемся на предыдущее окно и обращаем внимание на пункт “Автоматический вход”. Если ваш Mac используется в личных целях дома, а на работе вы используете учетную запись из Active Directory, то советую выставить значение “Выкл.” этого параметра. Таким образом, при старте системы вы будете попадать на форму ввода логина с паролем, где сможете использовать данные доменной учетки. Также, на всякий случай, поставьте галочку напротив пункта «Показывать меню ввода в окне входа в систему».
Остальные пункты, кроме подсказок VoiceOver можете оставить по умолчанию.
На этом все. Даже перезагружаться не нужно (как это раздражает на Windows). Закрываем замочек, чтобы никто не смог поменять настройки без аутентификации.
Остается только только зайти в систему используя свои данные. В правом верхнем углу, рядом с часами, появилось новое меню с активной в данный момент учетной записью. Если вы решите зайти под доменной учеткой, достаточно нажать на имя пользователя и выбрать пункт “Окно входа”. Перед вами появится стандартная форма в которую нужно ввести данные вида domainnameuser и пароль (Не забывайте про имя домена!).
Переключаться между учетными записями можно в любой момент, вводя для каждой свой пароль. Переключение происходит очень быстро, а сеанс завершать не обязательно.
Все, настройка закончена. Добавлена ли наша машина, можно посмотреть в Acive Directory.
This tutorial explains how to bind or join a Mac OS X Mac (OS X 10.5 or OS X 10.6) computer to an Windows Server 2008 Active Directory domain.
Contents
- Mac OS X network configuration
- Add a Mac OS X computer to Active Directory
- For Further Study
Given Microsoft’s historically contentious relationship with Apple, it never ceases to amaze me at the relatively high degree of interoperability that does exist between a Mac OS X workstation and an Active Directory Domain Services (AD DS) domain.

For instance, a domain-joined Mac workstation allows users to enjoy the following privileges:
- Kerberos authentication and delegation, including Single Sign-On to local, AD, and Open Directory resources
- AD password policy enforcement
- Support for AD user and group accounts
- Windows home folders
Of course, Mac computers do not have a Windows Registry and so therefore cannot be managed by Group Policy (the password policy issue previously mentioned is a notable exception). If you desire an even tighter coupling between Mac workstations and Active Directory resources, then check out nifty third-party solutions like Centrify.
In this tutorial I will show you how to bind a Mac computer to a Windows Server 2008 R2 Active Directory domain. Specifically, I will assume that your Macs run either Mac OS X 10.5 Leopard or Mac OS X 10.6 Snow Leopard. Let’s get to work!
Mac OS X network configuration
Before attempting a domain join from a Mac computer, we need to make sure that we have our server- and client-side networking correctly configured. This means, in a nutshell, that our Macs have:
- An IP address and subnet mask
- A DNS hostname
- A connection to a Windows DNS server
You can specify a DNS hostname for your Mac either by using Terminal or by using the Sharing Preference Pane. Of course, a properly configured Windows Dynamic Host Configuration Protocol (DHCP) server will assign your Mac workstations a correct IP address, subnet mask, and preferred DNS server address.
Finally, and this should come as no surprise to Windows server administrators, you will need to perform the domain join either as a domain administrator, or as a user account that has been delegated the privilege to join workstations to the domain.
Add a Mac OS X computer to Active Directory
Without any further ado, let’s turn our attention to the specific steps required to accomplish our chosen task. The following procedure is essentially identical between Mac OS X Leopard and Mac OS X Snow Leopard systems; where there is a difference, I will note it.
1. Open the Directory Utility program. In Mac OS X 10.5 Leopard, run a Spotlight search for Directory and click Directory Utility.

NOTE: In Mac OS X Tiger and earlier, this utility is named Directory Access. Believe me, the renaming of Directory Access to Directory Utility in Leopard has caused many Mac administrators headaches!
The above single step is all that’s required to open Directory Utility on Leopard. Unfortunately, in Mac OS X 10.6 Snow Leopard, the same procedure is a little more cumbersome (the pane is not searchable via Spotlight, for instance).
To open Directory Utility on Snow Leopard, open System Preferences and then click Accounts from the System row.

In the Accounts prefpane, click Login Options. Then, next to Network Account Server:, click Edit….

2. Okay, now we are on the same page regardless of our recent version of Mac OS X. In Directory Utility, navigate to the Services tab. Next, select Enable for the Active Directory plug-in. Then click the Pencil icon.

3. At this point we really get down to business. At the very least, the two pieces of information that are required in order to join a Mac workstation to Active Directory are:
- Active Directory Domain: Use the DNS name of the domain, not the NetBIOS short name
- Computer ID: This is the DNS hostname of the workstation

Before you click Bind, let’s click the Show Advanced Options disclosure triangle to review some of the advanced binding options.
4. The most important choice in the User Experience panel is deciding whether or not you need to create a mobile account at the user’s first domain login.
In my experience, mobile accounts are necessary only when you manage Mac OS X laptop computers and need your users to be able to log in from work and from off-campus locations.

5. The Mappings panel enables us to optionally bind three key UNIX (and, by extension, Mac OS X) attributes to associated Active Directory schema attributes.

6. Finally, the Administrative panel allows us to specify a preferred Active Directory domain controller. Also, and this is important in most implementations, we can assign the Active Directory global groups that are allowed administrative access to the Mac workstation.

7. When you click Bind in Directory Utility you are prompted for Active Directory credentials with privilege to add computers to the domain. Verify also the location in AD where you want the Mac computer created. In the following screen capture, we are placing the host Macbox in the default Computers container in AD.

Verification and Login
1. You can verify that the Mac is successfully bound to the AD domain by reviewing the Directory Servers tab in Directory Utility. The window shows both graphically, by virtue of the colored circle icon, and in text the status of the binding.

2. Now it’s time to log in! At the Mac OS X login screen, simply select Other from the user list (this assumes that the computer is configured in this way; you can make these changes in the Accounts Preferences Pane).

Users can employ any of the standard username conventions supported by Active Directory. For instance, if the user Zoey wanted to log into the 4sysops.local AD domain, then she could use the following forms for her username:
zoey
4sysopszoey
zoey@4sysops.local
For Further Study
There is so much more to learn in the realm of Mac-Windows integration. Expect several more blog posts on this subject in the future. In the meantime, please have fun studying the following links to related resources:
- Apple White Paper: Best Practices: Integrating Mac OS X with Active Directory
- MacWindows.com
- Apple Seminar on Mac OS X-AD Integration
Editor’s note: When originally published this article said that by using dynamic user identification (UID) generation, users might be assigned a different UID number each time they logged onto a different Mac. We have confirmed with Apple that this is no longer the case; the story is corrected below.
Supporting Mac users can be a challenge to systems administrators in a Windows Active Directory environment. Although Apple has used Samba to make it easy for Macs to browse and access shares and printers hosted by Windows servers using Microsofts server message block (SMB) protocol, true Active Directory integration requires more than just access to resources.
For one thing, it requires support for an environment where users can rely on their Active Directory accounts for log-in to both Mac and Windows computers. Depending on your environment, you may also want to be able to implement security measures to limit what users may do while logged into a Mac or to manage the user experience as you would do with group policies for Windows machines.
There are a number of solutions and approaches that you can take for integrating Macs into your Active Directory infrastructure, and I’ll be talking about some of them here.
Apples Active Directory plug-in
The lowest-cost solution is to use Apples built-in Active Directory support. Beginning in Mac OS X Panther (10.3), Apple introduced a plug-in to its Directory Access utility that allows you to configure authentication against Active Directory. Apples Active Directory plug-in uses LDAP to query Active Directory.
The Active Directory plug-in works fairly well. It supports forests with multiple domains, domain controller fail-over and can automount a users home directory. It can also grant users administrator access to a Mac workstation based on their Active Directory group membership. You can also enable mobile accounts for portable computers and designate a preferred domain controller if needed.
The process of using the plug-in to join a Mac to an Active Directory domain is straightforward, and is similar to joining a Windows computer to a domain. Youll need an Active Directory account with permission to join the computer to the domain; if the account was not created in advance, youll need authority to create it. You will also need to configure the search path of available directories to include Active Directory using the Authentication tab in the Directory Access tool. Mac OS X can search multiple directory configurations in a specified path when a user attempts to log in.
Dynamic UID vs. static UID mapping
One of the hurdles to integrating Mac OS X with Active Directory is that their directory services schemas are significantly different. One of the key attributes in the Open Directory schema used by Mac OS X is the User ID number (UID). As in other Unix systems, the UID is used by the Mac OS X file system to designate file ownership and permissions both for local and remote files.
Each local or network user account used to log into Mac OS X requires a UID. But there is no directly correlating attribute in Active Directory.
Apple provides a choice of two methods to providing Active Directory users a UID attribute. The first and default option is to dynamically generate a UID for each user when they log in. When this option is used, Mac OS X generates a UID at login based on the GUID (Globally Unique Identifier) attribute from the users Active Directory account. The second option is to choose an attribute that is included in Active Directory as the users UID. You can map any attribute, be it one that is part of the default Active Directory schema or one that is part of a custom schema extension.
Using a static UID by mapping it to an attribute in Active Directory may prevent potential issues and it may be a solution that you have already implemented for other Unix systems in your network. However, it requires more effort. If you choose to map to an existing attribute, you will need to manually populate this number in each user account that will be used for Mac login. This can be a tedious process. If you choose to use an existing attribute rather than extend Active Directorys schema, youll lose the ability to use that attribute for another purpose.
Thursbys ADmitMac
ADmitMac by Thursby Software Systems offers several features that Apples Active Directory plug-in and Samba configuration do not. Like Apples solution, ADmitMac is based around a Directory Access plug-in.
Most notably, ADmitMac fully supports Kerberos under Active Directory as well as signed LDAP and SMB communication and NT LAN Manager, enabling much tighter security with Windows 2003 Server. As such, it doesnt require you to lower the default security settings of Windows 2003 Server. Apples solutions require unsigned LDAP and SMB communication.
In addition to enhanced security, ADmit Mac supports the Windows Distributed File System and long share names, and provides additional options for browsing a Windows Server network for shares and printers. A specialized version is also available with support for the Common Access Card smart card standard.
ADmit Mac also provides some other advantages. First, it offers an Active Directory management console for Mac OS X that allows administrators to reset user passwords, move users and computers and create or modify existing accounts much as they would using the Microsoft Management Console. Second, it offers more options than Apples solution for how network and local home directories are managed. Particularly helpful on this front is a tool that can be used to move a local Mac users home folder to a network location and associate it with an Active Directory account. This can make the transition to Active Directory integration much easier for end users.
Also, ADmitMac supports an Apple-managed client environment. Like group policies in Active Directory, Mac OS Xs managed client environment — sometimes referred to as MCX — allows administrators to restrict access to Mac OS X system components and to create a highly customized user experience. ADmit enables several of Apple’s client management features and does so using Mac OS X Servers Workgroup Manager.
To do so, ADmit Mac creates a file stored on a Windows share within the domain to hold all the MCX user information that would normally be stored in an Open Directory domain hosted by Mac OS X Server. However, Thursbys own documentation admits that its client management approach isnt perfect and that some actions may result in unexplained error messages or simply may not function without any indication of an error.
Centrifys Direct Control for Mac
Centrifys Direct Control is a series of solutions for integrating diverse platforms with Active Directory, including Mac OS X.
Direct Control installs as a Directory Access plug-in under Mac OS X. When the server-side solution is installed on Windows domain controllers, it adds a series of group policy objects (GPOs) that can be used to manage the Mac environment. Direct Control offers a range of GPOs for security and user experience settings — many of which mirror the options available using Mac OS X Servers Workgroup Manager tool. It does this by integrating a local registry file copied to the Mac with Apple’s MCX architecture. Direct Control also offers the ability to use smart cards for authentication.
Direct Control offers the simplest and most full-featured Active Directory integration solution for Mac OS X. Because it relies on Active Directorys group policy architecture, it functions more seamlessly for managing access than does Thursbys ADmitMac, particularly for systems administrators who are unfamiliar with Mac OS X.
Also impressive: It succeeds without modifying the Active Directory schema. It does not, however, offer the security of signed SMB connections, although it does support encrypted LDAP queries. It also works well with products such as Thursbys DAVE to enable signed SMB communication as well as with third-party server-side solutions that support Mac OS Xs Apple Filing Protocol, which offers greater security than unsigned SMB.
Using Mac OS X Server for additional client management
If you want to take full advantage of Apples client management architecture, the best solution is to implement Mac OS X Server in your Active Directory environment. This can be the most challenging method of adding support for Mac OS X because Active Directory and Open Directory, Mac OS X Servers native directory service, have very distinct schemas. They also share three matching attributes: username, password and home directory. This can make creating a fully integrated infrastructure a very big challenge because it requires extending the schema of one or both platforms.
There is a method of offering partial Mac client management and access to other Mac OS X Server services under Active Directory that doesnt require schema modification. The approach is twofold. First, join Mac servers and clients to Active Directory using Apples Active Directory plug-in. Second, create a directory search path on Mac servers and clients that searches both the Active Directory domain and an Open Directory domain hosted by one or more Mac servers.
This configuration allows you to create computer lists in the Open Directory domain that contain Mac computer accounts from Active Directory. Management settings can then be enforced on those computer lists using Mac OS X Servers Workgroup Manager with no further configuration.
The same approach can be extended to groups of users by creating group accounts in the Open Directory domain and populating them with user accounts from Active Directory. This method isnt perfect, and some client management functions may not respond properly, but it requires significantly less effort than modifying the Open Directory and/or Active Directory schemas. It can function as a temporary solution if you are planning to extend the schema but require an immediate solution while you do so.
What about Services for Mac?
Windows Server includes Services for Mac (SFM) — optional components that provide the ability to create and manage shares and print queues using the Apple Filing Protocol (AFP) and the defunct AppleTalk protocol. Services for Mac is a solution that was designed to work with the classic Mac OS versions — in other words, those before Mac OS X.
Its security options rely on a Microsoft user authentication module being installed on Mac clients, a version of which was never developed for Mac OS X. As such, the only way to support Mac OS X access to SFM shares and print queues is by using clear text passwords or the limited encryption of an older version of the AppleShare protocol.
Given Apples longstanding inclusion of Samba in Mac OS X and the security limitation, it has been quite some time since SFM was considered a terribly solid solution. SFM also suffers from performance issues because of its design and the fact that it relies on the outdated AppleTalk protocol.
That said, there are alternate third-party AFP servers for Windows Server, including the robust ExtremeZ IP by Group Logic and MacServerIP by Cyan Software.
These products offer enhanced security options but they also offer one other feature that can be important for some Mac users. Mac files contain a resource fork as part of their structure; this fork is not supported by either NTFS or FAT file systems. When working with SMB-mounted drives, Mac OS X typically performs a translation of the resource fork into a separate file to work around this issue.
For most applications, this functions very well. However, some applications encounter problems with this approach. In those situations, having an AFP server solution can result in a more seamless workflow.
Ryan Faas is a freelance writer and technology consultant specializing in Mac and multiplatform network issues. In addition to writing for Computerworld, he is a frequent contributor to InformIT.com. Ryan was also the co-author of O’Reilly’s «Essential Mac OS X Panther Server Administration.» You can find more information about Ryan, his consulting services and recently published work at www.ryanfaas.com and can e-mail him at ryan@ryanfaas.com.
Copyright © 2007 IDG Communications, Inc.