Table of Contents
- Introduction
- Creating connections
- Writing out code for connections.
- Dealing with secure connections
- Changing server and or initial catalog at runtime
- User interface consideration
- Changing server and or initial catalog in code
- TableAdapter example
- User interface example
- Helper methods
- Container classes
- Implementing in a Visual Studio solution
- Alternate method to change connections at runtime
- Summary
- See also
- Related resources
- Source code
Introduction


When working with SQL-Server databases in Windows Forms projects using conventional data providers like
System.Data. SqlClient to access tables a connection object is required with a well-formed
connection string which may be stored in a string variable or a
configuration file.
Depending on the developer, connection strings can be written directly in code, create a connection string using
SqlConnectionStringBuilder (there is an example in the accompanying source code) or create temporary project, use the Data wizard to generated a classes access via a TableAdapter or using Entity Framework 6 code first with an existing database.
This setup works well for personal use applications while distributing an application to friends, co-workers or customers or changing from a development environment to a production environment (and in many cases a test environment)
quickly causes using string variables useless and with configuration files when changes to the server name requires updating from the developer’s server name to another server name in the wild it’s best to have a method to change a connection string without
user intervention.
In this article these issues along with other common challenges with creating connections to server-based databases will be covered along with dynamically changing a connection string stored in an application configuration file
where connections are in Project.Settings.
Creating connections


Writing out code for connections.
When a developer first starts out writing code to access database data they usually will write the connection directly in a form as follows.
private
void
button5_Click(object
sender, EventArgs e)
{
SqlConnection cn =
new
SqlConnection();
cn.ConnectionString =
"Data Source=KARENS-PC;"
+
"Initial Catalog=NorthWind;"
+
"Integrated Security=True";
cn.Open();
}
In the code snippet above disregarding that all data operations should reside in a class when the Data Source (the name or network address of the instance of SQL Server to connect to) and Initial Catalog (The name of the database associated with the connection)
exists and the user at runtime has permissions to access the data there are no true issues.
Although the above connection works as a project grows in size with more operations needed to access data many developers tire of creating a connection each time it’s needed so this evolves into either a private connection object in a form or another class
and is generally scoped as globe. This means each time the connection is needed an assertion is required to see if the connection object state is open e.g.
if
(_connection.State != ConnectionState.Open)
{
_connection.Open();
}
Simply executing
Open or
OpenAsync method may not resolve why the connection is not open along with in general leading to more code than needed. The next step is to work with a
using statement as per below which will dispose of the connection once done with working data.
using
(var cn = new
SqlConnection())
{
cn.ConnectionString =
"Data Source=KARENS-PC;"
+
"Initial Catalog=NorthWind;"
+
"Integrated Security=True";
cn.Open();
}
A simple example for proper connection object which is in a button click event.
private
void
button5_Click(object
sender, EventArgs e)
{
using
(var cn = new
SqlConnection())
{
cn.ConnectionString =
"Data Source=KARENS-PC;"
+
"Initial Catalog=NorthWind;"
+
"Integrated Security=True";
var selectStatement =
"SELECT FirstName, LastName "
+
"FROM Customers "
+
"WHERE ID = @Identifier";
using
(var cmd = new
SqlCommand() {Connection = cn, CommandText = selectStatement})
{
cmd.Parameters.AddWithValue("@Identifier", 100);
cn.Open();
var reader = cmd.ExecuteReader();
if
(reader.HasRows)
{
reader.Read();
string
firstName = reader.GetString(0);
string
lastName = reader.GetString(1);
}
}
}
}
Unfortunately the code is only good for the event it resides in, a better idea is to place the code into a public class with a public method. First, since two values are needs let’s create a class named Customer.
public
class
Customer
{
public
int
Identifier { get;
set; }
public
string
FirstName { get;
set; }
public
string
LastName { get;
set; }
public
string
FullName => $"{FirstName} {LastName}";
public
override
stringToString()
{
return
$"{Identifier}";
}
}
Note there is a property to provide first and last name together and ToString is is overridden so when in a debug session the primary key will be displayed by default.
Below code was removed from the button click event and refactored into a method.
using
System.Data.SqlClient;
namespace
WindowsFormsApp1
{
public
class
CustomerOperations
{
public
Customer GetCustomerByPrimaryKey(int
identifier)
{
var customer =
new
Customer();
using
(var cn = new
SqlConnection())
{
cn.ConnectionString =
"Data Source=KARENS-PC;"
+
"Initial Catalog=NorthWind;"
+
"Integrated Security=True";
var selectStatement =
"SELECT FirstName, LastName "
+
"FROM Customers "
+
"WHERE ID = @Identifier";
using
(var cmd = new
SqlCommand() { Connection = cn })
{
cmd.CommandText = selectStatement;
cmd.Parameters.AddWithValue("@Identifier", identifier);
cn.Open();
var reader = cmd.ExecuteReader();
if
(reader.HasRows)
{
reader.Read();
customer.Identifier = identifier;
customer.FirstName = reader.GetString(0);
customer.LastName = reader.GetString(1);
}
}
}
return
customer;
}
}
}
Keeping with what has been covered, the connection string may also be stored in the project’s application configuration file which is done under project settings, settings, add a new setting as type ConnectionString. In the following example the connection
string name is NorthWind.
using
(var cn = new
SqlConnection())
{
cn.ConnectionString = Properties.Settings.Default.NorthWind;
cn.Open();
}
When working with TableAdapter approach to accessing data the wizard which generated data classes also generated a connection string within the current project’s configuration file which means the Framework knows how to connection to the underlying data. In
the designer file for the dataset is where the connection string is set by referencing a connection string set under project properties.
This is an example where a typed dataset gets it’s connection string.
[global::System.Diagnostics.DebuggerNonUserCodeAttribute()]
[global::System.CodeDom.Compiler.GeneratedCodeAttribute(
"System.Data.Design.TypedDataSetGenerator",
"15.0.0.0")]
private
void
InitConnection() {
this._connection =
new
global::System.Data.SqlClient.SqlConnection();
this._connection.ConnectionString = global::ConnectionStrings2.
Properties.Settings.Default.NorthWindAzureConnectionString;
}
Both in typed data sets and when using the first examples shown this is how a connection string is stored in app.config.
<?xml
version="1.0"
encoding="utf-8"
?>
<configuration>
<configSections>
</configSections>
<connectionStrings>
<add
name="ConnectionStrings2.Properties.Settings.NorthWindAzureConnectionString"
connectionString="Data Source=KARENS-PC;Initial Catalog=NorthWindAzure1;Integrated
Security=True;MultipleActiveResultSets=True;Application Name=EntityFramework"
providerName="System.Data.SqlClient"
/>
</connectionStrings>
<startup>
<supportedRuntime
version="v4.0"
sku=".NETFramework,Version=v4.7.2"
/>
</startup>
</configuration>
Normally an application requires one database but in more complex applications several connections may be needed and are stored as shown below.
<?xml
version="1.0"
encoding="utf-8"
?>
<configuration>
<configSections>
</configSections>
<connectionStrings>
<add
name="ConnectionStrings1.Properties.Settings.North1"
connectionString="Data Source=KARENS-PC;Initial Catalog=NorthWindAzure;Integrated Security=True"
/>
<add
name="ConnectionStrings1.Properties.Settings.SomeConnection"
connectionString="Data Source=KARENS-PC;Initial Catalog=NorthWindAzureForInserts;Integrated
Security=True"
providerName="System.Data.SqlClient"
/>
</connectionStrings>
</configuration>
Accessing North connection.
Properties.Settings.Default.North1;
Accessing SomeConnection.
Properties.Settings.Default.SomeConnection;
Dealing with secure connections
In the examples above connections are made with windows authentication, no user name or user password is needed, in this case encrypting the connection string within the configuration file is needed as per the following
Microsoft documentation. Moving up a level, configure an instance of
SqlCredential class to the connection which requires a fair amount of code which should be done when a user has been created in SQL-Server with appropriate permissions assigned to the user to access data. For a easy to following code sample see the following
TechNet article with full source code. Note, when using SqlCredential class it’s not possible to stored connection properties in the application configuration file when a user password expires as the algorithm used to encrypt the connection section of the
application configuration file will break, also it’s better to prompt users for name and password.
Changing server and or initial catalog at runtime
There are several reasons for changing connection strings stored in the application configuration file after the application has been installed.
The main reason, the customer has data for the application in a server with a different server name then the developer server or that a server is renamed is another reason and the user has no technical ability to change the configuration file.
The following works with Entity Framework 6 Code First, database exists when the connection string is stored in the application configuration file.
User interface consideration
Customers with some technical ability should still be shielded from making changes that may break an application. One option is to create a interface to shield them and the program from making incorrect changes.
An interface (and included in the article’s source code) is a basic template.

Dialog to change, in this case the server name.

To ensure a server exists from the server name entered methods shown below can assist to
- Ensure SQL-Server is currently running.
- The server name is available.
public
class
Helpers : BaseExceptionProperties
{
/// <summary>
/// Determine if a specific SQL-Server is available
/// </summary>
/// <param name="pServerName"></param>
/// <returns></returns>
public
async Task<bool> SqlServerIsAvailable(string
pServerName)
{
mHasException =
false;
bool
success = false;
try
{
await Task.Run(() =>
{
var sqlDataSourceEnumeratorInstance = SqlDataSourceEnumerator.Instance;
DataTable dt = sqlDataSourceEnumeratorInstance.GetDataSources();
// ReSharper disable once ConditionIsAlwaysTrueOrFalse
// ReSharper disable once InvertIf
if
(dt != null)
{
if
(dt.Rows.Count > 0)
{
var row = dt.AsEnumerable().FirstOrDefault(
dataRow =>
dataRow.Field<string>("ServerName")
== pServerName.ToUpper());
success = row !=
null;
}
else
{
success =
false;
}
}
});
}
catch
(Exception ex)
{
mHasException =
true;
mLastException = ex;
}
return
success;
}
public
async Task<List<string>> ServerNames()
{
mHasException =
false;
var serverNames =
new
List<string>();
try
{
await Task.Run(() =>
{
var sqlDataSourceEnumeratorInstance = SqlDataSourceEnumerator.Instance;
DataTable dt = sqlDataSourceEnumeratorInstance.GetDataSources();
// ReSharper disable once ConditionIsAlwaysTrueOrFalse
// ReSharper disable once InvertIf
if
(dt != null)
{
if
(dt.Rows.Count > 0)
{
foreach
(DataRow row in
dt.Rows)
{
serverNames.Add(row.Field<string>("ServerName"));
}
}
}
});
}
catch
(Exception ex)
{
mHasException =
true;
mLastException = ex;
}
return
serverNames;
}
/// <summary>
/// Determine if a specific service is running e.g.
/// SQL-Server: MSSQLServer
/// MSSQLSERVER
/// SQL Server Agent: SQLServerAgent
/// SQL Server Analysis Services: MSSQLServerOLAPService
/// SQL Server Browser: SQLBrowser
/// </summary>
/// <param name="serviceName">Service name to find</param>
/// <returns>True if found, false if not</returns>
public
static
boolIsWindowsServiceRunning(string
serviceName)
{
var isRunning =
false;
var services = ServiceController.GetServices().Where(sc => sc.ServiceName.Contains("SQL")).ToList();
foreach
(var service in
services)
{
if
(service.ServiceName == serviceName)
{
if
(service.Status == ServiceControllerStatus.Running)
{
isRunning =
true;
}
}
}
return
isRunning;
}
}
Example of calling SqlServerisAvailable from a button click event.
private
async void
ServerIsAvailableButton_Click(object
sender, EventArgs e)
{
var builder =
new
SqlConnectionStringBuilder
{
ConnectionString = Properties.Settings.Default.NorthWind
};
var ops =
new
Helpers();
var result = await ops.SqlServerIsAvailable(builder.DataSource).ConfigureAwait(true);
}
Changing server and or initial catalog in code
The following uses several classes provided in the accompanying source code which resides in class project which by adding these class projects to a Visual Studio solution make it easy to change connection strings stored in the application file.
TableAdapter example
In this example a single connection string is stored in the application configuration file.
<?xml
version="1.0"
encoding="utf-8"
?>
<configuration>
<configSections>
</configSections>
<connectionStrings>
<add
name="ConnectionStrings2.Properties.Settings.NorthWindAzureConnectionString"
connectionString="Data Source=KARENS-PC;Initial Catalog=NorthWindAzure1;Integrated
Security=True;MultipleActiveResultSets=True;Application Name=EntityFramework"
providerName="System.Data.SqlClient"
/>
</connectionStrings>
<startup>
<supportedRuntime
version="v4.0"
sku=".NETFramework,Version=v4.7.2"
/>
</startup>
</configuration>
Step 1 is to get a list of connections in the configuration file using the following method.
public
List<ProjectConnection> Connections => ConnectionStrings.Cast<ConnectionStringSettings>().Select((item) =>
new
ProjectConnection
{
Name = item.Name.Replace($"{this.GetType().Namespace}.Properties.Settings.",
""),
Provider = item.ProviderName,
ConnectionString = item.ConnectionString
}).ToList();
ProjectConnection class will store details about each connection in the list along with a method to assist populating a ListView
control.
Connections method is called in form load event of the form accessing data.
var ops =
new
ConnectionHelper();
_projectConnections = ops.Connections;
/*
* Get connection name
*/
var connectionName = DefaultConnectionPath(CurrentNamespace(), _projectConnections[1].RealName());
Since TableAdapter components create strong typed classes when changing the initial catalog both databases must have the same table with the same column definitions. One may be for test while the other development environment. In the following button click
event the code will toggle between two databases, display the current database, restart the app and load data from the selected database table.
private
void
ToggleCatalogButton_Click(object
sender, EventArgs e)
{
var ops =
new
ConnectionHelper();
_projectConnections = ops.Connections;
var connectionName = DefaultConnectionPath(CurrentNamespace(), _projectConnections[1].RealName());
/*
* Get connection properties for the current connection string in connectionName
*/
var properties = ops.Properties(connectionName);
/*
* Toggle between two databases - both must match for the TableAdapter classes
*/
ops.ChangeInitialCatalog(connectionName, properties.InitialCatalog ==
"NorthWindAzure1"
?
"NorthWindAzure3"
:
"NorthWindAzure1");
connectionName = DefaultConnectionPath(CurrentNamespace(), _projectConnections[1].RealName());
InitialCatalogLabel.Text = $"Current catalog '{ops.Properties(connectionName).InitialCatalog}'";
// restart app to use no catalog
Application.Restart();
}
User interface example
This example uses the example shown above with a listview with buttons which open a secondary form to obtain a server name. Step 1 is to create an instance of the class
ConnectionHelper. Next call
ChangeServer method with the connection string for the first parameter and the server name for the second parameter.
If both server name and initial catalog need to be changed, call the overload of
ChangeServer method. First parameter is the connection name, second parameter is the server name while the last parameter is the catalog name.
Helper methods
When working with connection strings stored in a Windows Form project and the modifications to that project’s configuration file are performed in a class project with a different namespace then the Windows Form project’s namespace conventional methods
to access and modify the connection string must keep this in consideration by using method which can get the Window Form project namespace and open it’s application configuration file rather than when using conventional methods which would attempt to access
connection strings in the class project configuration file.
The following method which resides in the class project gets the namespace of the calling Window Form project’s namespace.
[MethodImpl(MethodImplOptions.NoInlining)]
public
static
stringCurrentNamespace()
{
return
Assembly.GetCallingAssembly().EntryPoint.DeclaringType.Namespace;
}
The following method creates a string path to the connection string in the Windows Form project configuration file.
/// <summary>
/// Create path to specific setting in caller's configuration file
/// </summary>
/// <param name="projectNamespace">Namespace where configuration file resides</param>
/// <param name="sender"></param>
/// <returns></returns>
public
static
stringDefaultConnectionPath(string
projectNamespace,string
sender)
{
return
$"{projectNamespace}.Properties.Settings.{sender}";
}
The following method asserts if a specific connection string exists in the Windows Form project from the class project.
/// <summary>
/// Determine if a connection string exists
/// </summary>
/// <param name="value"></param>
/// <param name="key">ConnectionString name</param>
/// <returns>true if connection string exists, false if not found</returns>
/// <remarks>
/// Throws an exception if not found, we ignore this.
/// </remarks>
public
static
boolHasConnectionString(this
ConnectionStringSettingsCollection value, string
key)
{
try
{
var location = Assembly.GetEntryAssembly().Location;
return
value[$"{Path.GetFileNameWithoutExtension(location)}.Properties.Settings.{key}"].ConnectionString.Length > 0;
}
catch
{
return
false;
}
}
Container classes
The following class is responsible to store information for a connection string read from a application configuration file used in all examples provided.
using
System.Data.SqlClient;
namespace
DataConnectionLibrary
{
public
class
ConnectionProperties
{
/// <summary>
/// Server name
/// </summary>
public
string
DataSource { get;
set; }
/// <summary>
/// Database to access
/// </summary>
public
string
InitialCatalog { get;
set; }
/// <summary>
/// User id (not used)
/// </summary>
public
string
UserId { get;
set; }
/// <summary>
/// User password (not used)
/// </summary>
public
string
Password { get;
set; }
/// <summary>
/// Name of local database such as one stored for a database
/// stored in the application folder.
/// </summary>
public
string
AttachDbFilename { get;
set; }
/// <summary>
/// True if the database is an attached database, false if not
/// </summary>
public
bool
IsAttached => !string.IsNullOrWhiteSpace(AttachDbFilename);
/// <summary>
/// Describes the different SQL authentication methods that can be used
/// by a client connecting to Azure SQL Database.
/// </summary>
/// <remarks>
/// </remarks>
public
SqlAuthenticationMethod Authentication { get;
set; }
/// <summary>
/// True if integrated security is used, false if not
/// </summary>
public
bool
IntegratedSecurity { get;
set; }
/// <summary>
/// Indicates if the object is valid
/// </summary>
public
bool
IsValid { get;
set; }
}
}
Implementing in a Visual Studio solution
Add the class project DataConnectionLibrary to a Visual Studio solution followed by checking that the .NET Framework uses in projects which will use code in the DataConnectionLibrary class project match.
Add the following NuGet package
BaseConnectionLibrary to the solution when working with the
SqlServerUtilityLibrary where this library is optional
Alternate method to change connections at runtime
When creating a TableAdapter in Visual Studio the following dialog appears when a new connection is required. While there is no dialog in the Visual Studio toolbox the following will explain how to implement in a Windows Form project.
Important note: All code in the class projects are copyrighted to Microsoft while the form example project is not copyrighted to Microsoft.

For experience developers who are interested in modifying the code this is possible as the source code is available in the following
GitHub repository. In the following example a context menu has been added to insert a default server name.

The following method creates the dialog with a parameter passed in which will be the connection string to work with.
public
bool
GetConnection(ref
stringDataSource, bool
SaveConfiguration = false)
{
var success =
false;
var dcd =
new
DataConnectionDialog();
var dcs =
new
DataConnectionConfiguration(null);
dcs.LoadConfiguration(dcd);
if
(DataConnectionDialog.Show(dcd) == DialogResult.OK)
{
DbProviderFactory factory = DbProviderFactories.GetFactory(dcd.SelectedDataProvider.Name);
using
(var connection = factory.CreateConnection())
{
connection.ConnectionString = dcd.ConnectionString;
DataSource = connection.DataSource;
connection.Open();
var cmd = connection.CreateCommand();
cmd.CommandType = CommandType.Text;
cmd.CommandText =
"SELECT * FROM INFORMATION_SCHEMA.TABLES";
var dt =
new
DataTable();
dt.Load(cmd.ExecuteReader());
TableNames = dt.AsEnumerable()
.Select(row => row.Field<string>("table_name"))
.OrderBy(field => field)
.ToList();
}
var builder =
new
SqlConnectionStringBuilder() { ConnectionString = dcd.ConnectionString };
ServerName = builder.DataSource;
InitialCatalog = builder.InitialCatalog;
if
(SaveConfiguration)
{
dcs.SaveConfiguration(dcd);
}
if
(TableNames.Count > 0)
{
success =
true;
}
}
return
success;
}
When the method returns true the following properties will contain the server name and default catalog to create a connection string.
/// <summary>
/// SQL-Server name returned in GetConnection method
/// </summary>
public
string
ServerName { get;
set; }
/// <summary>
/// SQL-Server database returned in GetConnection method
/// </summary>
public
string
InitialCatalog { get;
set; }
Summary
In this article basics of setting up connection strings in code both using hard coded connections string and connection strings stored in an application configuration file. How to change connection strings stored in an application configuration file at
runtime using classes provided in the accompanying source code and finally the Microsoft Connection dialog to use in your projects.
TableAdapter component should only be used to get up and running for simple projects and should be avoided in general unless time is taken to completely learn the component and ramifications when working with a relation database.
See also
Related resources
Source code
Accessing Data from a database is one of the important aspects of any programming language. It is an absolute necessity for any programming language to have the ability to work with databases. C# is no different.
It can work with different types of databases. It can work with the most common databases such as Oracle and Microsoft SQL Server.
C# and .Net can work with a majority of databases, the most common being Oracle and Microsoft SQL Server. But with every database, the logic behind working with all of them is mostly the same.
In our examples, we will look at working the Microsoft SQL Server as our database. For learning purposes, one can download and use the Microsoft SQL Server Express Edition, which is a free database software provided by Microsoft.
In working with databases, the following are the concepts which are common to all databases.
- Database name or Data Source – The first important parameter is the database name to which the connection needs to be established. Each connection can only work with one database at a time.
- Credentials – The next important aspect is the username and password which needs to be used to establish a connection to the database. It ensures that the username and password have the necessary privileges to connect to the database.
- Optional parameters – For each database type, you can specify optional parameters to provide more information on how .net should handle the connection to the database. For example, one can specify a parameter for how long the connection should stay active. If no operation is performed for a specific period of time, then the parameter would determine if the connection has to be closed.
Ok, now that we have seen the theory of each operation, let’s jump into the further sections to look at how we can perform database operations in C#.
SQL Command in c#
SqlCommand in C# allow the user to query and send the commands to the database. SQL command is specified by the SQL connection object. Two methods are used, ExecuteReader method for results of query and ExecuteNonQuery for insert, Update, and delete commands. It is the method that is best for the different commands.
Let’s now look at the code, which needs to be kept in place to create a connection to a database. In our example, we will connect to a database which has the name of Demodb. The credentials used to connect to the database are given below
- Username – sa
- Password – demo123
We will see a simple Windows forms application to work with databases. We will have a simple button called “Connect” which will be used to connect to the database.
So let’s follow the below steps to achieve this
Step 1) The first step involves the creation of a new project in Visual Studio. After launching Visual Studio, you need to choose the menu option New->Project.

Step 2) The next step is to choose the project type as a Windows Forms application. Here, we also need to mention the name and location of our project.

- In the project dialog box, we can see various options for creating different types of projects in Visual Studio. Click the Windows option on the left-hand side.
- When we click the Windows options in the previous step, we will be able to see an option for Windows Forms Application. Click this option.
- We then give a name for the application which in our case is “DemoApplication”. We also need to provide a location to store our application.
- Finally, we click the ‘OK’ button to let Visual Studio to create our project.
Step 3) Now add a button from the toolbox to the Windows form. Put the text property of the Button as Connect. This is how it will look like

Step 4) Now double click the form so that an event handler is added to the code for the button click event. In the event handler, add the below code.

using System;
using System.Collections.Generic;
using System.ComponentModel;
using System.Data;
using System.Data.SqlClient;
using System.Drawing;
using System.Linq;
using System.Text;
using System.Threading.Tasks;
using System.Windows.Forms;

namespace DemoApplication1
{
 public partial class Form1 : Form
 {
  public Form1()
  {
   InitializeComponent();
  }

  private void button1_Click(object sender, EventArgs e)
  {
   string connetionString;
   SqlConnection cnn;
   connetionString = @"Data Source=WIN-50GP30FGO75;Initial Catalog=Demodb;User ID=sa;Password=demol23";
   cnn = new SqlConnection(connetionString);
   cnn.Open();
   MessageBox.Show("Connection Open  !");
   cnn.Close();
  }
 }
}
Code Explanation:-
- The first step is to create variables, which will be used to create the connection string and the connection to the SQL Server database.
- The next step is to create the connection string. The connecting string needs to be specified correctly for C# to understand the connection string. The connection string consists of the following parts
- Data Source – This is the name of the server on which the database resides. In our case, it resides on a machine called WIN- 50GP30FGO75.
- The Initial Catalog is used to specify the name of the database
- The UserID and Password are the credentials required to connect to the database.
- Next, we assign the connecting string to the variable cnn. The variable cnn, which is of type SqlConnection is used to establish the connection to the database.
- Next, we use the Open method of the cnn variable to open a connection to the database. We then just display a message to the user that the connection is established.
- Once the operation is completed successfully, we then close the connection to the database. It is always a good practice to close the connection to the database if nothing else is required to be done on the database.
When the above code is set, and the project is executed using Visual Studio, you will get the below output. Once the form is displayed, click the Connect button.
Output:-

When you click on “connect” button, from the output, you can see that the database connection was established. Hence, the message box was displayed.
Access data with the SqlDataReader
To showcase how data can be accessed using C#, let us assume that we have the following artifacts in our database.
- A table called demotb. This table will be used to store the ID and names of various Tutorials.
- The table will have 2 columns, one called “TutorialID” and the other called “TutorialName.”
- For the moment, the table will have 2 rows as shown below.
| TutorialID | TutorialName |
| 1 | C# |
| 2 | ASP.Net |
Let’s change the code in our form, so that we can query for this data and display the information via a Messagebox. Note that all the code entered below is a continuation of the code written for the data connection in the previous section.
Step 1) Let’s split the code into 2 parts so that it will be easy to understand for the user.
- The first will be to construct our “select” statement, which will be used to read the data from the database.
- We will then execute the “select” statement against the database and fetch all the table rows accordingly.

Code Explanation:-
- The first step is to create the following variables
- SQLCommand – The ‘SQLCommand’ is a class defined within C#. This class is used to perform operations of reading and writing into the database. Hence, the first step is to make sure that we create a variable type of this class. This variable will then be used in subsequent steps of reading data from our database.
- The DataReader object is used to get all the data specified by the SQL query. We can then read all the table rows one by one using the data reader.
- We then define 2 string variables, one is “SQL” to hold our SQL command string. The next is the “Output” which will contain all the table values.
- The next step is to define the SQL statement, which will be used against our database. In our case, it is “Select TutorialID, TutorialName from demotb”. This will fetch all the rows from the table demotb.
- Next, we create the command object which is used to execute the SQL statement against the database. In the SQL command, you have to pass the connection object and the SQL string.
- Next, we will execute the data reader command, which will fetch all the rows from the demotb table.
- Now that we have all the rows of the table with us, we need a mechanism to access the row one by one. For this, we will use the while statement. The while statement will be used to access the rows from the data reader one at a time. We then use the GetValue method to get the value of TutorialID and TutorialName.
Step 2) In the final step, we will just display the output to the user and close all the objects related to the database operation.

Code Explanation:-
- We will continue our code by displaying the value of the Output variable using the MessageBox. The Output variable will contain all the values from the demotb table.
- We finally close all the objects related to our database operation. Remember this is always a good practice.
When the above code is set, and the project is run using Visual Studio, you will get the below output. Once the form is displayed, click the Connect button.
Output:-

From the output, you can clearly see that the program was able to get the values from the database. The data is then displayed in the message box.
C# Insert Into Database
Just like Accessing data, C# has the ability to insert records into the database as well. To showcase how to insert records into our database, let’s take the same table structure which was used above.
| TutorialID | TutorialName |
| 1 | C# |
| 2 | ASP.Net |
Let’s change the code in our form, so that we can insert the following row into the table
| TutorialID | TutorialName |
| 3 | VB.Net |
So let’s add the following code to our program. The below code snippet will be used to insert an existing record in our database.

Code Explanation:-
- The first step is to create the following variables
- SQLCommand – This data type is used to define objects which are used to perform SQL operations against a database. This object will hold the SQL command which will run against our SQL Server database.
- The DataAdapter object is used to perform specific SQL operations such as insert, delete and update commands.
- We then define a string variable, which is “SQL” to hold our SQL command string.
- The next step is to actually define the SQL statement which will be used against our database. In our case, we are issuing an insert statement, which will insert the record of TutorialID=1 and TutorialName=VB.Net
- Next, we create the command object which is used to execute the SQL statement against the database. In the SQL command, you have to pass the connection object and the SQL string
- In our data adapter command, we now associate the insert SQL command to our adapter. We also then issue the ExecuteNonQuery method which is used to execute the Insert statement against our database. The ‘ExecuteNonQuery’ method is used in C# to issue any DML statements against the database. By DML statements, we mean the insert, delete, and update operation. In C# , if you want to issue any of these statements against a table, you need to use the ExecuteNonQuery method.
- We finally close all the objects related to our database operation. Remember this is always a good practice.
When the above code is set, and the project is executed using Visual Studio, you will get the below output. Once the form is displayed, click the Connect button.
Output:-

If you go to SQL Server Express and see the rows in the demotb table, you will see the row inserted as shown below

C# Update Database
Just like Accessing data, C# has the ability to update existing records from the database as well. To showcase how to update records into our database, let’s take the same table structure which was used above.
| TutorialID | TutorialName |
| 1 | C# |
| 2 | ASP.Net |
| 3 | VB.Net |
Let’s change the code in our form, so that we can update the following row. The old row value is TutorialID as “3” and Tutorial Name as “VB.Net”. Which we will update it to “VB.Net complete” while the row value for Tutorial ID will remain same.
Old row
| TutorialID | TutorialName |
| 3 | VB.Net |
New row
| TutorialID | TutorialName |
| 3 | VB.Net complete |
So let’s add the following code to our program. The below code snippet will be used to update an existing record in our database.

C# SqlCommand Example With Code Explanation:-
- The first step is to create the following variables
- SQLCommand – This data type is used to define objects which are used to perform SQL operations against a database. This object will hold the SQL command which will run against our SQL Server database.
- The dataadapter object is used to perform specific SQL operations such as insert, delete and update commands.
- We then define a string variable, which is SQL to hold our SQL command string.
- The next step is to define the SQL statement which will be used against our database. In our case we are issuing an update statement, this will update the Tutorial name to “VB.Net Complete” while the TutorialID is unchanged and kept as 3.
- Next, we will create the command object, which is used to execute the SQL statement against the database. In the SQL command, you have passed the connection object and the SQL string.
- In our data adapter command, we now associate the insert SQL command to our adapter. We also then issue the ExecuteNonQuery method which is used to execute the Update statement against our database.
- We finally close all the objects related to our database operation. Remember this is always a good practice.
When the above code is set, and the project is executed using Visual Studio, you will get the below output. Once the form is displayed, click the Connect button.
Output:-

If you actually go to SQL Server Express and see the rows in the demotb table, you will see the row was successfully updated as shown below.

Deleting Records
Just like Accessing data, C# has the ability to delete existing records from the database as well. To showcase how to delete records into our database, let’s take the same table structure which was used above.
| TutorialID | TutorialName |
| 1 | C# |
| 2 | ASP.Net |
| 3 | VB.Net complete |
Let’s change the code in our form, so that we can delete the following row
| TutorialID | TutorialName |
| 3 | VB.Net complete |
So let’s add the following code to our program. The below code snippet will be used to delete an existing record in our database.

Code Explanation:-
- The Key difference in this code is that we are now issuing the delete SQL statement. The delete statement is used to delete the row in the demotb table in which the TutorialID has a value of 3.
- In our data adapter command, we now associate the insert SQL command to our adapter. We also then issue the ExecuteNonQuery method which is used to execute the Delete statement against our database.
When the above code is set, and the project is executed using Visual Studio, you will get the below output. Once the form is displayed, click the Connect button.
Output:-

If you actually go to SQL Server Express and see the rows in the demotb table, you will see the row was successfully deleted as shown below.

Connecting Controls to Data
In the earlier sections, we have seen how to we can use C# commands such as SQLCommand and SQLReader to fetch data from a database. We also saw how we read each row of the table and use a messagebox to display the contents of a table to the user.
But obviously, users don’t want to see data sent via message boxes and would want better controls to display the data. Let’s take the below data structure in a table
| TutorialID | TutorialName |
| 1 | C# |
| 2 | ASP.Net |
| 3 | VB.Net complete |
From the above data structure, the user would ideally want to see the TutorialID and Tutorial Name displayed in a textbox. Secondly, they might want to have some sort of button control which could allow them to go to the next record or to the previous record in the table. This would require a bit of extra coding from the developer’s end.
The good news is that C# can reduce the additional coding effort by allowing binding of controls to data. What this means is that C# can automatically populate the value of the textbox as per a particular field of the table.
So, you can have 2 textboxes in a windows form. You can then link one text box to the TutorialID field and another textbox to the TutorialName field. This linking is done in the Visual Studio designer itself, and you don’t need to write extra code for this.
Visual Studio will ensure that it writes the code for you to ensure the linkage works. Then when you run your application, the textbox controls will automatically connect to the database, fetch the data and display it in the textbox controls. No coding is required from the developer’s end to achieve this.
Let’s look at a code example of how we can achieve binding of controls.
In our example, we are going to create 2 textboxes on the windows form. They are going to represent the Tutorial ID and Tutorial Name respectively. They will be bound to the Tutorial ID and TutorialName fields of the database accordingly.
Let’s follow the below-mentioned steps to achieve this.
Step 1) Construct the basic form. In the form drag and drop 2 components- labels and textboxes. Then carry out the following substeps
- Put the text value of the first label as TutorialID
- Put the text value of the second label as TutorialName
- Put the name property of the first textbox as txtID
- Put the name property of the second textbox as txtName
Below is the how the form would look like once the above-mentioned steps are performed.

Step 2) The next step is to add a binding Navigator to the form. The binding Navigator control can automatically navigate through each row of the table. To add the binding navigator, just go to the toolbox and drag it to the form.

Step 3) The next step is to add a binding to our database. This can be done by going to any of the Textbox control and clicking on the DataBindings->Text property. The Binding Navigator is used to establish a link from your application to a database.
When you perform this step, Visual Studio will automatically add the required code to the application to make sure the application is linked to the database. Normally the database in Visual Studio is referred to as a Project Data Source. So to ensure the connection is established between the application and the database, the first step is to create a project data source.
The following screen will show up. Click on the link- “Add Project Data Source”. When you click on the project data source, you will be presented with a wizard; this will allow you to define the database connection.

Step 4) Once you click on the Add Project Data Source link, you will be presented with a wizard which will be used to create a connection to the demotb database. The following steps show in detail what needs to be configured during each step of the wizard.
- In the screen which pops up , choose the Data Source type as Database and then click on next button.

- In the next screen, you need to start the creation of the connection string to the database. The connection string is required for the application to establish a connection to the database. It contains the parameters such as server name, database name, and the name of the driver.
- Click on the New connection button
- Choose the Data Source as Microsoft SQL Server
- Click the Continue button.

- Next, you need to add the credentials to connect to the database
- Choose the server name on which the SQL Server resides
- Enter the user id and password to connect to the database
- Choose the database as demotb
- Click the ‘ok’ button.

- In this screen, we will confirm all the settings which were carried on the previous screens.
- Choose the option “Yes” to include sensitive data in the connection string
- Click on the “Next” button.

- In the next screen, click on the “Next” button to confirm the creation of the connection string

- In this step,
- Choose the tables of Demotb, which will be shown in the next screen.
- This table will now become an available data source in the C# project

When you click the Finish button, Visual Studio will now ensure that the application can query all the rows in the table Demotb.
Step 5) Now that the data source is defined, we now need to connect the TutorialID and TutorialName textbox to the demotb table. When you click on the Text property of either the TutorialID or TutorialName textbox, you will now see that the binding source to Demotb is available.
For the first text box choose the Tutorial ID. Repeat this step for the second textbox and choose the field as TutorialName. The below steps shows how we can navigate to each control and change the binding accordingly.
- Click on the Tutorial ID control.

- In the Properties window, you will see the properties of the TutorialID textbox. Go to the text property and click on the down arrow button.

- When you click the down arrow button, you will see the demotbBinding Source option. And under this, you will see the options of TutorialName and TutorialID. Choose the Tutorial ID one.

Repeat the above 3 steps for the Tutorial Name text box.
- So click on the Tutorial Name text box
- Go to the properties window
- Choose the Text property
- Choose the TutorialName option under demotbBindingSource
Step 6) Next we need to change the Binding Source property of the BindingNavigator to point to our Demotb data source. The reason we do this is that the Binding Navigator also needs to know which table it needs to refer to.
The Binding Navigator is used to select the next or previous record in the table. So even though the data source is added to the project as a whole and to the text box control, we still need to ensure the Binding Navigator also has a link to our data source. In order to do this, we need to click the Binding navigator object, go to the Binding Source property and choose the one that is available

Next, we need to go to the Properties window so that we can make the change to Binding Source property.

When all of the above steps are executed successfully, you will get the below-mentioned output.
Output:-

Now when the project is launched, you can see that the textboxes automatically get the values from the table.

When you click the Next button on the Navigator, it automatically goes to the next record in the table. And the values of the next record automatically come in the text boxes
C# DataGridView
Data Grids are used to display data from a table in a grid-like format. When a user sees’s table data, they normally prefer seeing all the table rows in one shot. This can be achieved if we can display the data in a grid on the form.
C# and Visual Studio have inbuilt data grids, this can be used to display data. Let’s take a look at an example of this. In our example, we will have a data grid, which will be used to display the Tutorial ID and Tutorial Name values from the demotb table.
Step 1) Drag the DataGridView control from the toolbox to the Form in Visual Studio. The DataGridView control is used in Visual Studio to display the rows of a table in a grid-like format.

Step 2) In the next step, we need to connect our data grid to the database. In the last section, we had created a project data source. Let’s use the same data source in our example.
- First, you need to choose the grid and click on the arrow in the grid. This will bring up the grid configuration options.
- In the configuration options, just choose the data source as demotbBindingSource which was the data source created in the earlier section.

If all the above steps are executed as shown, you will get the below-mentioned output.
Output:-

From the output, you can see that the grid was populated by the values from the database.
Summary
- C# SQL can work with databases such as Oracle and Microsoft SQL Server.
- This C# database tutorial has all the commands which are required to work with databases. This involves establishing a connection to the database. You can perform operations such as select, update, insert and delete using the commands in C#.
- The DataReader object in C# is used to hold all the data returned by the database. The While loop in C# can be used to read the data rows one at a time.
- The data adapter object is used to perform SQL operations such as insert, delete, and update against the database.
- C# can bind controls to the various fields in a table. They are bound by defining a data source in C#. The data source is used to pull the data from the database and populate them in the controls.
- The binding navigator is used to automatically navigate through the rows in a table.
- The data grid in C# can connect to the database and display all the values from the table in a grid-like format.
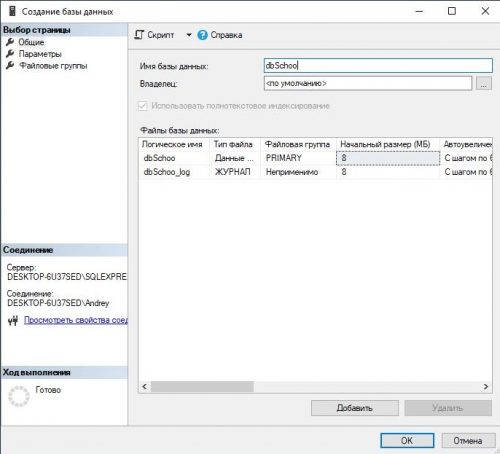
Приветствую всех, в этом примере я покажу как просто создать приложения позволяющее, изменять, обновлять и удалять запись в базе данных SQL.
Шаг 1: Откройте менеджер Sql Server, нажмите на новую базу данных . Дайте базе данных имя «dbSchool».
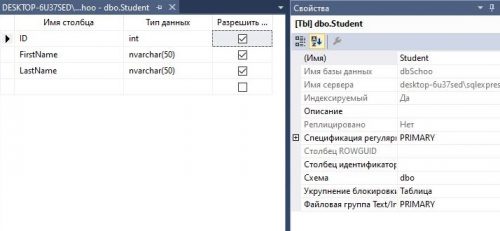
Шаг 2: Теперь создайте таблицу в базе данных, вы можете назвать таблицу как хотите, здесь я назвал его “Student”. Существует три столбца в таблице ID, FirstName и LastName, как показано ниже
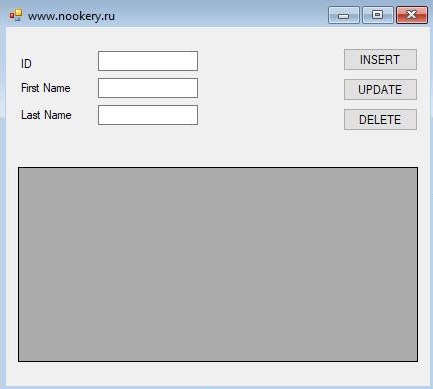
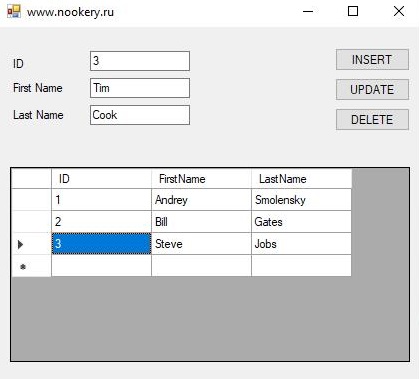
Дизайн Формы:
Код C# :
|
1 2 3 4 5 6 7 8 9 10 11 12 13 14 15 16 17 18 19 20 21 22 23 24 25 26 27 28 29 30 31 32 33 34 35 36 37 38 39 40 41 42 43 44 45 46 47 48 49 50 51 52 53 54 55 56 57 58 59 60 61 62 63 64 65 66 67 68 69 70 71 72 73 74 75 |
using System; using System.Collections.Generic; using System.ComponentModel; using System.Data; using System.Drawing; using System.Linq; using System.Text; using System.Threading.Tasks; using System.Windows.Forms; using System.Data.SqlClient; //For SQL Connection namespace Пример_SQL_Server_приложения { public partial class Form1 : Form //www.nookery.ru { public Form1() { InitializeComponent(); } SqlConnection con; SqlDataAdapter da; SqlCommand cmd; DataSet ds; void GetList() { con = new SqlConnection(@»Data Source=.SQLEXPRESS; Initial Catalog=dbSchool; Integrated Security=True»); da = new SqlDataAdapter(«Select *From Student», con); ds = new DataSet(); con.Open(); da.Fill(ds, «Student»); dataGridView1.DataSource = ds.Tables[«Student»]; con.Close(); } private void Form1_Load(object sender, EventArgs e) { GetList(); } private void button1_Click(object sender, EventArgs e) // Insert Button { cmd = new SqlCommand(); con.Open(); cmd.Connection = con; cmd.CommandText = «insert into Student(ID,FirstName,LastName) values (« + textBox1.Text + «,'» + textBox2.Text + «‘,'» + textBox3.Text + «‘)»; cmd.ExecuteNonQuery(); con.Close(); GetList(); } private void button2_Click(object sender, EventArgs e)//Update Button { cmd = new SqlCommand(); con.Open(); cmd.Connection = con; cmd.CommandText = «update Student set FirstName='» + textBox2.Text + «‘,LastName='» + textBox3.Text + «‘ where ID=» + textBox1.Text + «»; cmd.ExecuteNonQuery(); con.Close(); GetList(); } private void button3_Click(object sender, EventArgs e)//Delete Button { cmd = new SqlCommand(); con.Open(); cmd.Connection = con; cmd.CommandText = «delete from Student where ID=» + textBox1.Text + «»; cmd.ExecuteNonQuery(); con.Close(); GetList(); } } } |
Содержание
- Условие задачи
- Выполнение
- 1. Создать новый проект в MS Visual Studio как Windows Forms Application.
- 2. Создание нового представления (view) для отображения данных таблицы Student.
- 3. Размещение элемента управления DataGridView и настройка связи с базой данных.
- 4. Настройка вида элемента управления типа DataGridView.
- 5. Строка Connection String.
- 6. Создание новой формы для демонстрации команд манипулирования данными.
- 7. Добавление кнопок вызова команд манипулирования данными таблицы Student.
- 8. Программирование события клика на кнопке «Insert…«.
- 9. Программирование события клика на кнопке «Edit…«.
- 10. Программирование события клика на кнопке «Delete«.
- Связанные темы
Поиск на других ресурсах:
Условие задачи
Разработать приложение, которое демонстрирует основные операции над данными в базе данных типа MS SQL Server, а именно:
- подключение базы данных к приложению;
- отображение таблиц базы данных на форме;
- добавление новой записи в базу данных;
- редактирование записи;
- удаление записи.
За основу взята база данных Education.dbo, процесс создания которой подробно описывается здесь.
На рисунке 1 отображена структура базы данных Education.dbo. Как видно из рисунка, база данных называется:
sasha-pcsqlexpress.Education.dbo
Здесь «sasha-pc» – идентификатор компьютера в сети, «sqlexpress» – название сервера баз данных, «Education.dbo» – название базы данных.
. База данных Education.dbo")
Рис. 1. База данных Education.dbo
База данных содержит две таблицы: Student и Session. Структура таблиц следующая.
Таблица Student.

Таблица Session.

⇑
Выполнение
1. Создать новый проект в MS Visual Studio как Windows Forms Application.
Создать новый проект типа Windows Forms Application. Пример создания нового проекта подробно описывается здесь.
⇑
2. Создание нового представления (view) для отображения данных таблицы Student.
Чтобы отображать данные таблиц базы данных, можно использовать разные способы. Один из них – это создание представлений (views), которые формируются средствами MS Visual Studio.
В нашем случае данные таблиц будут отображаться на форме в элементе управления типа DataGridView. После создания представлений, очень удобно их связать с элементами DataGridView.
Для создания представления, нужно вызвать команду «Add New View» из контекстного меню, которое вызывается кликом правой кнопкой мышки на элементе «Views» базы данных Education.dbo (рисунок 2).

Рис. 2. Вызов команды добавления нового представления
В результате откроется окно «Add Table» (рисунок 3). В окне нужно выбрать таблицы, которые добавляются к представлению.

Рис. 3. Выбор таблиц, на которых будет базироваться новое представление
В нашем случае выбираем таблицу Student и подтверждаем свой выбор кликом на кнопке Add. Следующим шагом нужно закрыть окно выбором кнопки Close.
После выполненных действий будет сформировано окно, в котором нужно выбрать поля, которые должны отображаться в представлении (на форме). Выбираем все поля (рисунок 4).
При выборе полей, в верхней части рабочей области отображаются поля таблицы Student. С помощью «мышки» можно выбирать нужные поля для представления.
Соответственно, в средней области окна отображаются названия выбранных полей, таблица в которой они есть (см. рис. 4), возможность сортировки, фильтрование и прочее.
В нижней части области отображается соответствующий текст SQL-запроса, который используется для создания представления.

Рис. 4. Выбор полей таблицы Student для их отображения в представлении
После выбора команды
File->Save All
или
File->Save View1
откроется окно, в котором нужно указать имя представления. Задаем имя «View Student» (рисунок 5).

Рис. 5. Указание имени для представления
После выполненных действий, окно представления будет иметь вид как показано на рисунке 6.

Рис. 6. Представление View Student в базе данных
Теперь можно размещать элемент управления DataGridView и связывать его с представлением.
⇑
3. Размещение элемента управления DataGridView и настройка связи с базой данных.
Перед размещением элемента управления DataGridView нужно перейти в режим проектирования формы «Form1.cs [Design]«.
Элемент DataGridView представляет собой таблицу, которая может отображать данные. Данный элемент управления размещается в панели ToolBox. Сначала немного корректируем размеры формы, а потом размещаем на ней элемент управления DataGridView (рисунок 7). В результате будет создан экземпляр объекта с именем dataGridView1 по умолчанию.

Рис. 7. Элемент управления DataGridView и окно выбора источника данных
После размещения элемента управления типа DataGridView на форме в правом верхнем углу можно выбрать настройку источника данных. Соответственно откроется окно «DataGridView Tasks«. В этом окне нужно выбрать сплывающее меню «Choose Data Source«.
В открывшемся меню выбирается команда «Add Project Data Source…» (рис. 7). После этого открывается окно мастера, в котором последовательно выбирается источник данных.
На рисунке 8 показано окно «Data Source Configuration Wizard«, в котором выбирается тип источника данных. В нашем случае устанавливаем «Database«.

Рис. 8. Выбор типа источника данных
В следующем окне (Рисунок 9) выбирается модель источника данных. Нужно выбрать DataSet.

Рис. 9. Выбор модели источника данных
В окне, изображенном на рисунке 10, нужно задать соединение данных, которое нужно использовать для подключения к базе данных. В нашем случае нужно выбрать базу данных «sasha-pcsqlexpressEducation.dbo«.

Рис. 10. Выбор соединения данных
В следующем окне (рисунок 11) предлагается сохранить строку соединения Connection String в конфигурационный файл приложения. Оставляем все как есть и переходим к следующему окну.

Рис. 11. Предложение сохранения строки соединения с базой данных Connection String в конфигурационном файле приложения
После создания соединения с базой данных отображается множество объектов базы данных (рисунок 12). В нашем случае нужно выбрать представление «View Student» и все поля из него. Отмеченные поля будут отображаться в компоненте типа DataGridView.

Рис. 12. Выбор объектов базы данных, которые нужно отображать в DataGridView
После выбора кнопки Finish будут отображены выбранные объекты (представление View Student) базы данных Education.dbo (рисунок 13).

Рис. 13. Элемент управления типа DataGridView с выбранными полями представления View Student
Подобным образом можно настроить представления, которые содержат любые поля из любых таблиц базы данных. Также в одном представлении могут отображаться поля из разных таблиц.
⇑
4. Настройка вида элемента управления типа DataGridView.
Если запустить приложение на выполнение, то будут получены данные представления View Student, которое отвечает таблице Student базы данных (рисунок 14).
 Рис. 14. Запуск приложения на выполнение
Как видно из рисунка 14, данные в таблице dataGridView1 отображаются нормально, но оформление можно скорректировать.
Элемент управления типа DataGridView допускает корректирование вида полей, которые отображаются.
Для вызова команд редактирования полей, достаточно вызвать контекстное меню кликом правой кнопкой мышки на элементе управления dataGridView1.
В меню существуют различные полезные команды, которые разрешают управлять видом и работой DataGridView:
- команда блокирования элемента управления (Lock Controls);
- команда редактирования полей, которые отображаются в представлении (Edit Columns…);
- команда добавления новых полей, например вычисляемых (Add Column).
В нашем случае нужно выбрать команду «Edit Columns…» (рисунок 15).

Рис. 15. Команда «Edit Columns…» из контекстного меню
В результате откроется окно «Edit Columns«, в котором можно настроить вид полей представления по собственному вкусу (рисунок 16).
 Рис. 16. Окно настройки вида полей в представлении «View Student«
В окне на рисунке 16 для любого поля можно настроить название, выравнивание, ширину, возможность редактирования данных и т.п.
⇑
5. Строка Connection String
Для того, чтобы в базу данных вносить изменения, нужно получить строку соединения с базой данных Connection String.
Существуют разные способы получения строки соединения с базой данных. Один из них базируется на чтении этой строки в окне Properties базы данных Education.dbo (рис. 17).
 Рис. 17. Определение строки Connection String
Для сохранности строки в программе вводится внутренняя переменная типа string. С помощью буфера обмена копируем строку Connection String в описанную переменную типа string.
В тексте файла «Form1.cs» в начале описания класса Form1 надо описать переменную:
string conn_string = @"Data Source=(local)SQLEXPRESS;Initial Catalog=Education;Integrated Security=True;Pooling=False";
На данный момент текст класса Form1 следующий:
public partial class Form1 : Form
{
    string conn_string = @"Data Source=(local)SQLEXPRESS;Initial Catalog=Education;Integrated Security=True;Pooling=False";

    public Form1()
    {
        InitializeComponent();
    }

    private void Form1_Load(object sender, EventArgs e)
    {
        // TODO: This line of code loads data into the 'educationDataSet.View_Student' table. You can move, or remove it, as needed.
        this.view_StudentTableAdapter.Fill(this.educationDataSet.View_Student);
    }
}
⇑
6. Создание новой формы для демонстрации команд манипулирования данными.
Для того, чтобы иметь возможность обрабатывать данные текущей записи нужно создать новую форму. Процесс создания новой формы в MS Visual Studio — C# подробно описывается здесь.
Добавление новой формы осуществляется командой:
Project -> Add Windows Form...
В открывшемся окне «New Item» нужно выбрать элемент «Windows Form«.
Имя файла новой формы оставляем по умолчанию «Form2.cs«.
На рисунке 18 изображен вид новой формы.
Размещаем на форме элементы управления следующих типов:
- два элемента управления типа Button (кнопки OK и Cancel). Соответственно будет получено два объекта с именами button1 и button2;
- четыре элемента управления типа Label для создания информационных сообщений;
- четыре элемента управления типа TextBox для ввода данных в полях Num_book, Name, Group, Year.
Нужно настроить следующие свойства элементов управления:
- в элементе управления button1 свойство Text = «OK«;
- в элементе управления button2 свойство Text = «Cancel«;
- в элементе управления button1 свойство DialogResult = «OK«;
- в элементе управления button2 свойство DialogResult = «Cancel«;
- в элементе управления label1 свойство Text = «Num_book«;
- в элементе управления label2 свойство Text = «Name«;
- в элементе управления label3 свойство Text = «Group«;
- в элементе управления label4 свойство Text = «Year«.
Также настраиваем видимость элементов управления типа TextBox. Для этого во всех элементах управления textBox1, textBox2, textBox3, textBox4 значение свойства Modifiers = «public«.
 Рис. 18. Вид новосозданной формы
⇑
7. Добавление кнопок вызова команд манипулирования данными таблицы Student.
Для дальнейшей работы нужно с помощью мышки переключиться на главную форму Form1.
На главную форму приложения Form1 добавляем три кнопки (Button). Автоматически будет создано три переменных-объекта с именами button1, button2, button3. В каждой из этих кнопок вносим следующие настройки (окно Properties):
- в кнопке button1 свойство Text = «Insert …» (вставить запись);
- в кнопке button2 свойство Text = «Edit …» (изменить запись);
- в кнопке button3 свойство Text = «Delete«.
В результате внесенных изменений главная форма будет иметь вид как показано на рисунке 19.
 Рис. 19. Главная форма приложения
⇑
8. Программирование события клика на кнопке «Insert…«.
Обработчик события клика на кнопке «Insert…» имеет вид:
private void button1_Click_1(object sender, EventArgs e)
{
    string cmd_text;
    Form2 f2 = new Form2();
    if (f2.ShowDialog() == DialogResult.OK)
    {
        cmd_text = "INSERT INTO Student VALUES (" +
        "'" + f2.textBox1.Text + "' , '" +
        f2.textBox2.Text + "' , '" +
        f2.textBox3.Text + "' , " +
        f2.textBox4.Text + ")";

        // создать соединение с базой данных
        SqlConnection sql_conn = new SqlConnection(conn_string);

        // создать команду на языке SQL
        SqlCommand sql_comm = new SqlCommand(cmd_text, sql_conn);

        sql_conn.Open(); // открыть соединение
        sql_comm.ExecuteNonQuery(); // выполнить команду на языке SQL
        sql_conn.Close(); // закрыть соединение

        this.view_StudentTableAdapter.Fill(this.educationDataSet.View_Student);
    }

}
Сначала вызывается форма Form2. После получения результата «OK» (нажатие соответствующей кнопки), в форме Form2 заполненные поля в элементах типа TextBox включаются в строку SQL-запроса. SQL-запрос добавления новой строки имеет вид:
INSERT INTO Student
VALUES (value1, value2, value3, value4)
где value1 отвечает номеру зачетной книжки; value2 – фамилия студента; value3 – группа, в которой учится студент; value4 – год вступления.
Строка соединения с базой данных Connection String описывается в переменной conn_string (см. п. 5). Объект класса SqlConnection осуществляет соединение приложения с источниками данных. Кроме того, класс Connection решает задачи аутентификации пользователей, работу с сетями, идентификацию баз данных, буферизацию соединений и обработку транзакций.
Команда на языке SQL, добавляющая запись к таблице, инкапсулирована в классе SqlCommand. Конструктор класса SqlCommand принимает два параметра: строку запроса на языке SQL (переменная cmd_text) и объект класса SqlConnection.
Метод ExecuteNonQuery() реализован в интерфейсе IDBCommand. Метод реализует SQL-команды, которые не возвращают данные. К таким командам относятся команды INSERT, DELETE, UPDATE а также хранимые процедуры, которые не возвращают данных. Метод ExecuteNonQuery() возвращает количество задействованных ним записей.
⇑
9. Программирование события клика на кнопке «Edit…«.
Обработчик события клика на кнопке «Edit…» имеет вид:
private void button2_Click(object sender, EventArgs e)
{
    string cmd_text;
    Form2 f2 = new Form2();
    int index;
    string num_book;

    index = dataGridView1.CurrentRow.Index;
    num_book = Convert.ToString(dataGridView1[0, index].Value);

    f2.textBox1.Text = num_book;
    f2.textBox2.Text = Convert.ToString(dataGridView1[1, index].Value);
    f2.textBox3.Text = Convert.ToString(dataGridView1[2, index].Value);
    f2.textBox4.Text = Convert.ToString(dataGridView1[3, index].Value);

    if (f2.ShowDialog() == DialogResult.OK)
    {
        cmd_text = "UPDATE Student SET Num_book = '" + f2.textBox1.Text + "', " +
        "[Name] = '" + f2.textBox2.Text + "', " +
        "[Group] = '" + f2.textBox3.Text + "', " +
        "Year = " + f2.textBox4.Text +
        "WHERE Num_book = '" + num_book + "'";

        SqlConnection sql_conn = new SqlConnection(conn_string);
        SqlCommand sql_comm = new SqlCommand(cmd_text, sql_conn);

        sql_conn.Open();
        sql_comm.ExecuteNonQuery();
        sql_conn.Close();

        this.view_StudentTableAdapter.Fill(this.educationDataSet.View_Student);
    }
}
В этом обработчике выполняется SQL-команда UPDATE, которая изменяет текущее значение активной записи.
⇑
10. Программирование события клика на кнопке «Delete«.
Обработчик события клика на кнопке «Delete» имеет вид:
private void button3_Click(object sender, EventArgs e)
{
    string cmd_text = "DELETE FROM Student";
    int index;
    string num_book;

    index = dataGridView1.CurrentRow.Index;
    num_book = Convert.ToString(dataGridView1[0,index].Value);
    cmd_text = "DELETE FROM Student WHERE [Student].[Num_book] = '" + num_book + "'";

    SqlConnection sql_conn = new SqlConnection(conn_string);
    SqlCommand sql_comm = new SqlCommand(cmd_text, sql_conn);

    sql_conn.Open();
    sql_comm.ExecuteNonQuery();
    sql_conn.Close();

    this.view_StudentTableAdapter.Fill(this.educationDataSet.View_Student);
}
В этом обработчике выполняется SQL-команда удаления записи DELETE.
⇑
Связанные темы
- Вывод таблицы базы данных Microsoft Access в компоненте dataGridView
- Подключение к базе данных Microsoft Access в MS Visual Studio 2010
- Перевод базы данных Microsoft Access в формат Microsoft SQL Server
- C# (курсовая). Разработка приложения автоматизации диспетчера касс автовокзала
⇑
Post Views: 5,387
In this post we will see how we can create C# Windows form Login page with MS SQL Database. I’m using Visual studio 2012 and MS SQL 2014 for developing this login form.
C# Windows Form Creating Login form with SQL Database – DOWNLOAD SOURCE CODE
Step 1:
Create a new Windows form application in Visual studio 2012 with name “WindowsLogin”.
Step 2:
In the project you will have a default form created with name “Form1”, in this form take two Windows form Labels in a row and name it (change their IDs) as “lblWelcome” and “lblInfo” respectively. And change the Windows name to “Dashboard”. This window form will serve as Dashboard or Homepage for our windows form application after user successfully logins into our c# application with valid Login userid and password. 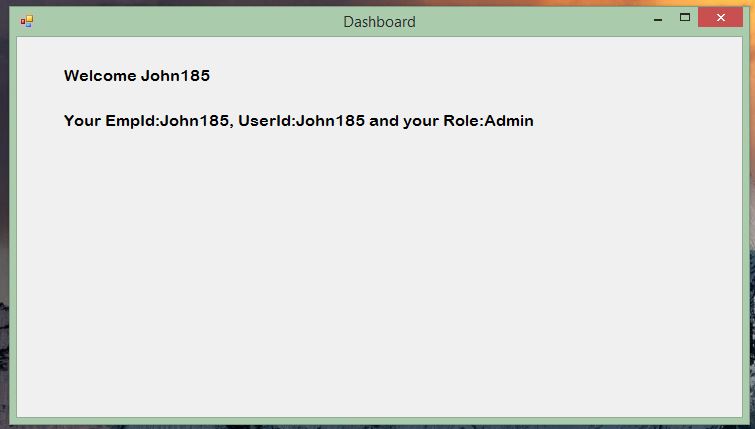
Open the code file and edit as below:
Form1.cs:
using System;
using System.Collections.Generic;
using System.ComponentModel;
using System.Data;
using System.Drawing;
using System.Linq;
using System.Text;
using System.Threading.Tasks;
using System.Windows.Forms;

namespace WindowsLogin
{
public partial class Form1 : Form
{
public Form1()
{
InitializeComponent();
}

private void Form1_Load(object sender, EventArgs e)
{
lblWelcome.Text = "Welcome " + UserInfo.userid;
lblInfo.Text = "Your EmpId:" + UserInfo.userid + ", UserId:" + UserInfo.userid + " and your Role:" + UserInfo.role;
}
}
}
Step 3:
Create a new class with name UserInfo.cs in our Windows form application and edit as below:
UserInfo.cs:
using System;
using System.Collections.Generic;
using System.Linq;
using System.Text;
using System.Threading.Tasks;

namespace WindowsLogin
{
public class UserInfo
{
public static string userid = "";
public static string empid = "";
public static string role = "";

}
}
This class will be used for setting or providing the logged in User details in our application to all other forms.
Step 4:
In Program.cs add a static Boolean variable “openDashboard” and edit it as below
Program.cs:
using System;
using System.Collections.Generic;
using System.Linq;
using System.Threading.Tasks;
using System.Windows.Forms;

namespace WindowsLogin
{
static class Program
{
/// <summary>
/// The main entry point for the application.
/// </summary>
///
public static Boolean openDashboard { get; set; }
[STAThread]
static void Main()
{
Application.EnableVisualStyles();
Application.SetCompatibleTextRenderingDefault(false);
Application.Run(new Login());

if (openDashboard)
{
Application.Run(new Form1());
}
}
}
}
We will use this variable to open another form after successful login process.
Step 5:
Create a new Window Form with name “Login” and make its design as below:
Login window:
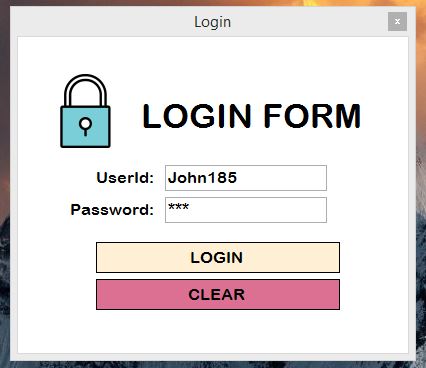
Login Lock Image:

In this form :
Two Windows form Textboxes with id : txtUserId and txtPassword
Two Windows form Buttons with id : btnLogin and btnClear
A Windows form PictureBox for displaying Login Lock Image and three windows form labels, one for LOGIN FORM and other two for UserId and Password.
Double click on btnLogin and btnClear button to generate their Click methods.
Login form cs code:
Login.cs:
using System;
using System.Collections.Generic;
using System.ComponentModel;
using System.Data;
using System.Drawing;
using System.Linq;
using System.Text;
using System.Threading.Tasks;
using System.Windows.Forms;
using System.Data.SqlClient;

namespace WindowsLogin
{
public partial class Login : Form
{
SqlConnection con;
SqlCommand cmd;
SqlDataReader reader;
public Login()
{
InitializeComponent();
}

private void btnLogin_Click(object sender, EventArgs e)
{
String result = "";
try
{
con = new SqlConnection(@"Data Source=192.168.0.192;Initial Catalog=Parallelcodes;User ID=sa;Password=789;Integrated Security=True");
cmd = new SqlCommand("select * from tblLogininfo where UserId=@uid and Password=@password", con);
con.Open();
cmd.Parameters.AddWithValue("@uid", txtUserId.Text.ToString());
cmd.Parameters.AddWithValue("@password", txtPassword.Text.ToString());
reader = cmd.ExecuteReader();
if (reader.Read())
{
if (reader["Password"].ToString().Equals(txtPassword.Text.ToString(), StringComparison.InvariantCulture))
{
UserInfo.empid = reader["EmpId"].ToString();
UserInfo.userid = reader["UserId"].ToString();
UserInfo.role = reader["UserRole"].ToString();
result = "1";
}
else
result = "Invalid credentials";
}
else
result = "Connection failed";

reader.Close();
cmd.Dispose();
con.Close();

}
catch (Exception ex)
{
result = ex.Message.ToString();
}

if (result == "1")
{
Program.openDashboard = true;
this.Close();
}
else
MessageBox.Show(result);
}

private void btnClear_Click(object sender, EventArgs e)
{
txtPassword.Text = "";
txtUserId.Text = "";
}
}
}
MS SQL Database script :
Create database ParallelCodes

USE [ParallelCodes]
GO

/****** Object: Table [dbo].[tblLoginInfo] Script Date: 1/12/2019 6:35:11 PM ******/
SET ANSI_NULLS ON
GO

SET QUOTED_IDENTIFIER ON
GO

CREATE TABLE [dbo].[tblLoginInfo](
[Id] [int] IDENTITY(1,1) NOT NULL,
[EmpId] [int] NOT NULL,
[UserId] [nvarchar](50) NOT NULL,
[Password] [nvarchar](50) NOT NULL,
[UserRole] [nvarchar](10) NOT NULL,
[OnDate] [datetime] NULL DEFAULT (getdate())
) ON [PRIMARY]

GO
DOWNLOAD SOURCE CODE
Also see :
WPF Login form with MS SQL Database
ASP.NET Login form using Cookies
ASP.NET Login form using Sessions