Эта большая инструкция посвящена особенностям установки, настройки и эксплуатации фермы терминальных серверов на базе роли Remote Desktop Services (RDS) в Windows Server. Статья поможет вам развернуть службы удаленных столов на Windows Server 2022, 2019 и 2016 в домене Active Directory.
Содержание:
- Компоненты Remote Desktop Services в Windows Server 2022/2016/2016/2012R2
- Создаем новую конфигурацию Remote Desktop Services в Windows Server
- Создаем коллекции Remote Desktop Services в Windows Server
- Публикация RemoteApp в Remote Desktop Services
- Настройка фермы Remote Desktop services с помощью PowerShell
Компоненты Remote Desktop Services в Windows Server 2022/2016/2016/2012R2
В состав роли RDS в Windows Server входя следующие компоненты:
- Remote Desktop Session Host (RDSH) – узлы сеансов RDS. Основные рабочие лошадки фермы RDS, на которых работают приложения пользователей;
- Remote Desktop Connection Broker (RDCB) – посредник RDS подключений. Используется для управления фермой RDS, распределения нагрузки, обеспечивает переподключение пользователей к своим сеансам, хранит коллекции RDS и опубликованные приложения RemoteApps;
- Remote Desktop Gateway (RDGW) – обеспечивает безопасный доступ к сервисам RDS из Интернета;
- RD Web Access (RDWA) – веб интерфейс для доступа к рабочим столам, программам RemoteApp;
- Remote Desktop Licensing (RD Licensing) — служба лицензирования, управляет RDS лицензиями (CAL) пользователей.
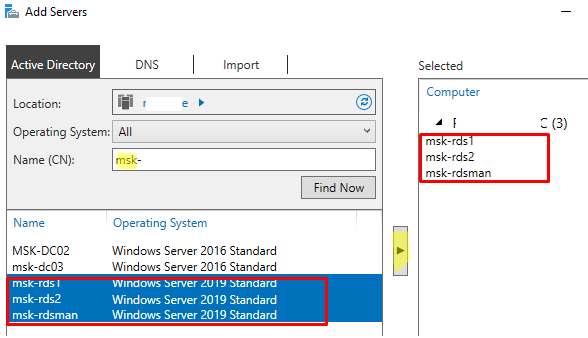
В нашем небольшом стенде будут всего три сервера со следующим распределением ролей
-
msk-rds1.winitpro.ru
— RDSH -
msk-rds2.winitpro.ru
– RDSH -
msk-rdsman.winitpro.ru
– RDSH, RDWA, RDCB, RD License
Предварительные требования, которые нужно выполнить перед созданием RDS фермы:
- Установите одинаковую версию Windows Server на все сервера, настроить их, и добавить в один домен AD;
- Откройте консоль ADUC (
dsa.msc
) и переместите все хосты с ролью RDSH в одну OU в AD. Так будет удобнее применять единые настройки через GPO; - Создайте в домене группу для RDSH серверов (например,
msk-rdsh
) и добавьте в нее все хосты; - Если вы хотите использовать диски User Profile Disk (UPD) для хранения профилей пользователей RDS (или перемещаемые профили), нужно создать на файловом сервере сетевой каталог, в котором они будут хранится (желательно расположить этот каталог на отказоустойчивом файловом кластере Windows Server). Предоставьте права Full Control на этот сетевой каталог для группы
msk-rdsh
.
Создаем новую конфигурацию Remote Desktop Services в Windows Server
Рассмотрим, как создать и настроить RDS конфигурацию с помощью графического интерфейса Server Manager.
Откройте Server Manager и добавьте все планируемые RDS сервера в консоль. Щелкните All Server -> Add servers.
Теперь в меню Server Manager выберите Add Roles and Features -> Remote Desktop Services installation -> Standard deployment –> Session-based deployment. 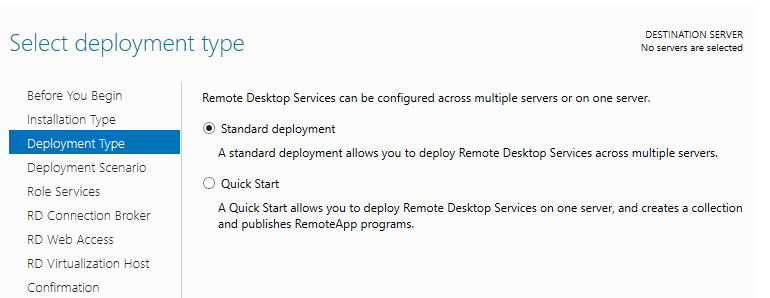
Режим Quick Start используется для развертывания всех компонентов RDS на одном сервере. В RDS ферме минимум может быть один сервер, который совмещает все роли RDS (RD Session Host, RD Web Access и RD Connection broker). Но такая конфигурация не обеспечивает отказоустойчивость и балансировку нагрузки в службах удаленных рабочей столов Windows Server.
Далее нужно указать, как вы хотите распределить роли RDS по вашим серверам. В мастере построения фермы RDS нужно выбрать сервера для соответствующих ролей. В моем случае я хочу построить такую конфигурацию:
- RD Connection Broker –
msk-rdsman - RD Web Access —
msk-rdsman - RD Session hosts —
msk-rdsman, msk-rds1, msk-rds2
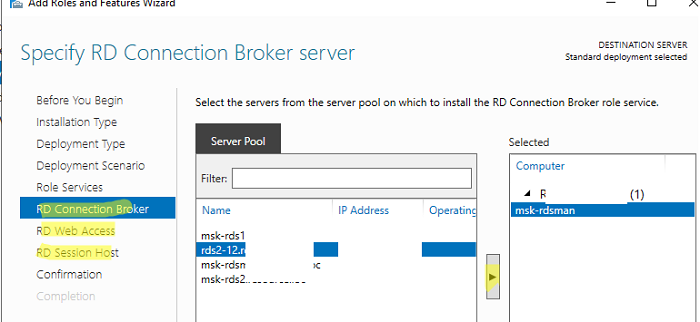
Вы можете распределить RDS роли по серверам в любой другой конфигурации.
Поставьте галку Restart destination server automatically if required и нажмите кнопку Deploy. Дождитесь установки ролей RDS на всех серверах.
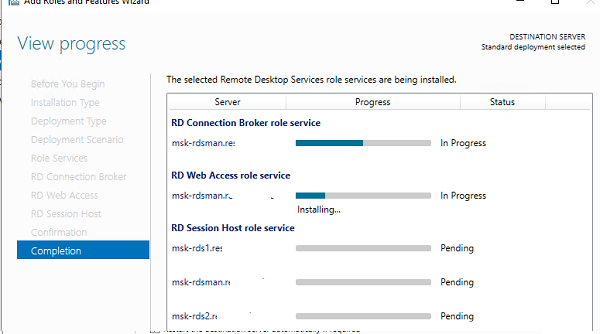
Итак, ваша ферма RDS создана.
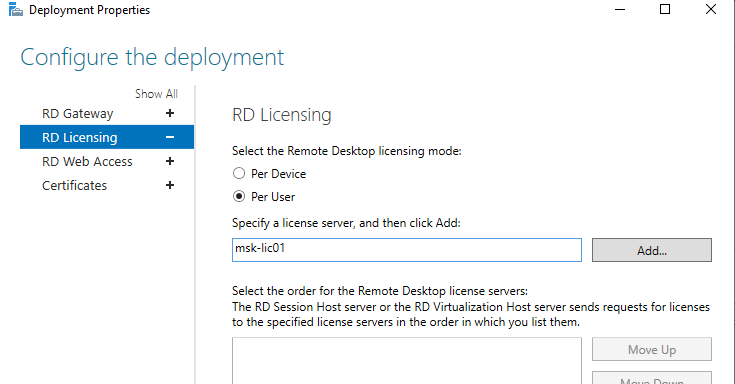
Следующий этап установка и настройка сервера лицензирования RDS. Вы можете установить роль RD Licensing на один из серверов в вашей ферме или использовать существующий в домене сервер лицензирования RDS. Подробная инструкция по установке, настройке и активации роли RD Licensing доступа по ссылке.
Для управления вашим развертыванием RDS нужно перейти в раздел Server Manager -> Remote Desktop Services. На вкладке Overview показана текущая конфигурация RDS фермы.
Чтобы изменить настройки RDS фермы выберите Tasks -> Edit Deployment Properties в разделе Deployment Overview.
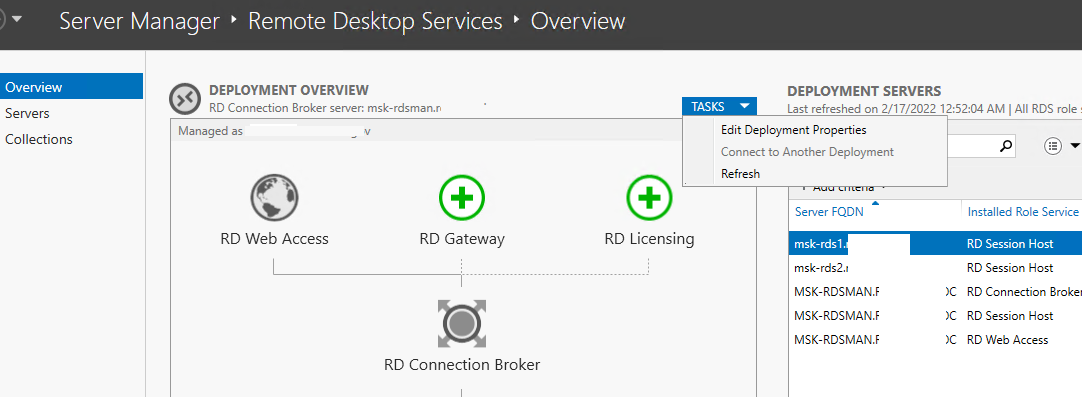
Здесь можно изменить:
- Параметры RD Gateway;
- Адрес сервер сервера лицензирования и тип пользовательских лицензий RDS CAL (per user/per device);
- Посмотреть URL адреса RD Web Access;
- Добавить SSL сертификаты для служб RDS (в инструкции мы пропустим этот пункт).
Для построения отказоустойчивой фермы Remote Desktop Services нужно обеспечить высокую доступность роли RD Connection Broker. Это достигается за счет запуска нескольких экземпляров RDCB (Active/Active) на разных серверах с общей базой данных SQL, в которой хранится конфигурация брокера подключений. Для обеспечения высокой доступности SQL базы RDCB ее можно размесить в группе высокой доступности SQL Server Always On. Ранее мы публиковали подробный гайд по настройке RDS Connection Broker с высокой доступностью.
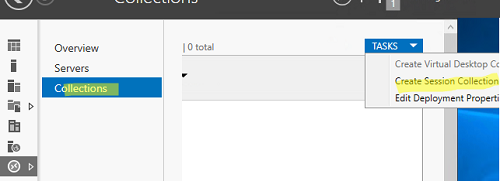
Создаем коллекции Remote Desktop Services в Windows Server
Следующий этап настройки – создание коллекций сеансов RDS. Коллекции Remote Desktop позволяют разделить хосты в ферме RDSH на отдельные группы или создать разный набор настроек и доступных приложений Remote App для разных групп пользователей.
Перейдите в раздел Collections, выберите Edit -> Create Session Collection.
Здесь нужно задать:
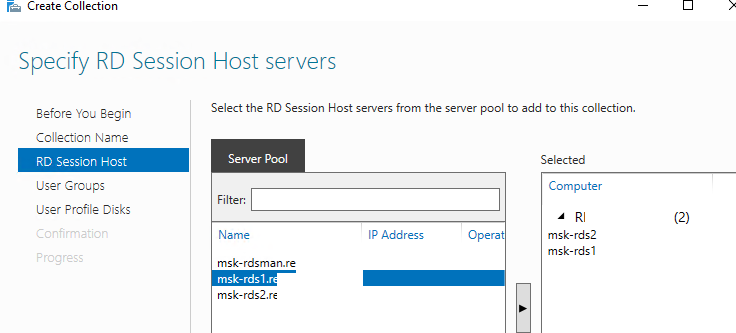
- Имя коллекции RDS:
rds-Msk-Managers - Выберите какие хосты RDSH будут обслуживать пользователей коллекции (один RDSH хост может находиться в одной коллекций; не рекомендуется объединять в одну коллекцию сервера с разными версиями Windows Server);

- На вкладке User Groups указываются группы пользователей, которым разрешено подключаться к коллекции. Уберите из групп Domain users и добавьте вашу группу (msk-Managers);
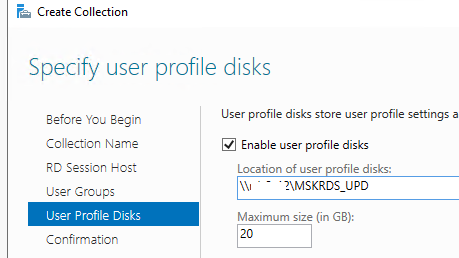
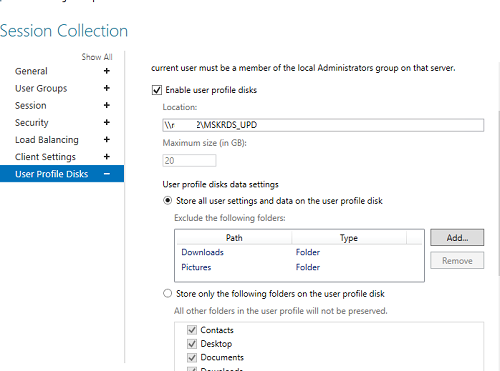
- На вкладке User Profile Disk нужно указать, хотите ли вы использовать формат UPD для хранения профилей пользователей (Enable user profile disks). В поле Location of user profile disks укажите UNC путь к сетевому каталогу(например,
\msk-fs01mskrds_upd
), в котором будут хранится профили пользователей в форматер UPD виртуальных дисков (в этом случае при входе на любой сервер коллекции RDS, пользователь будет всегда загружать свой профиль) и максимальный размер диска (20 Гб по умолчанию); - Нажмите Create чтобы создать новую RDS коллекцию;
- Убедитесь, что в указанном каталоге создался UPD файл с шаблоном профиля пользователя UVHD-template.vhdx.
Чтобы задать параметры коллекции RDS, выберите ее и нажмите Tasks -> Edit Properties.
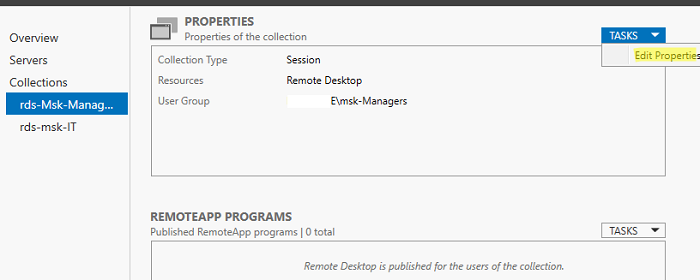
Здесь можно изменить базовые параметры коллекции (имя, описание, группы доступа) и ряд других важных настроек.
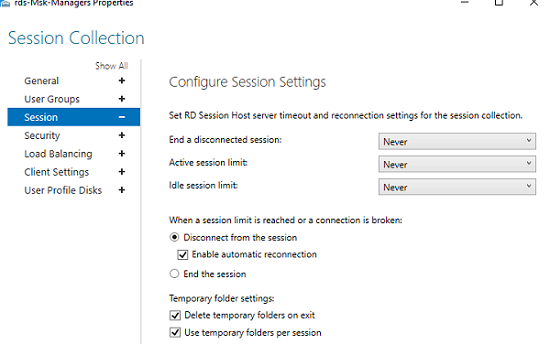
В разделе Session можно задать параметры переподключения/ автоматического отключения простаивающих RDP сессий (подробнее рассматривалось в статье Настройка таймаутов для RDP сессий).
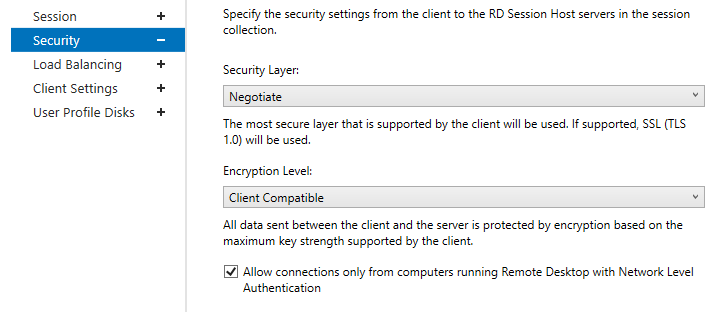
На вкладке Security можно выбрать настройки безопасности (Negotiate, RDP Security level или SSL/TLS) и шифрования (Low, High, Client compatible или FIPS compliant) для сессий RDP. Здесь также можно включить/отключить Network Level Authentication для RDP.
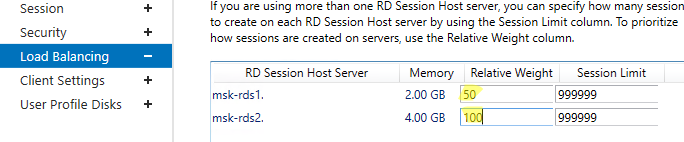
В секции Load Balancing можно изменить веса (
Relative Weight
) RDSH хостов в вашей ферме. Если характеристики серверов (RAM, CPU) в коллекции сильно отличаются, нужно задать меньший вес для менее производительных серверов. В этом случае RDCB будет распределять сессии пользователей по серверам в зависимости от их веса.
На вкладке Client Settings можно указать, какие устройства пользователям разрешено пробрасывать в RDP сессию. Например, вы можете разрешить/запретить пробрасывать с локального компьютера пользователя в RDS сеанс принтера, сетевые диски, аудио устройства, буфер обмена. 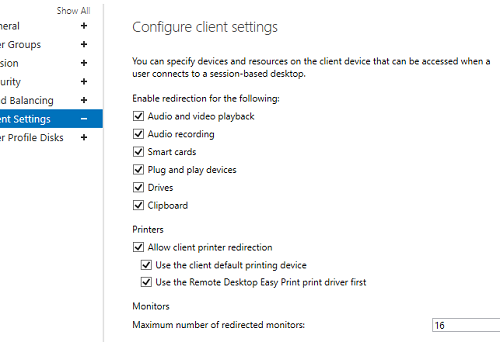
В разделе User Profile Disks можно более тонко настроить параметры UPD профилей пользователей. Можно исключить из синхронизации определенные папки или файлы. Это позволит уменьшить размер профиля UPD в сетевом каталоге и увеличить скорость загрузки профиля (не забывайте, что он загружается по сети из сетевой папки при входе пользователя).
Настройка и эксплуатация UPD обычно гораздо проще, чем использование перемещаемых профилей или folder redirection. Один UPD профиль не может использоваться в разных коллекциях RDS.
Для уменьшения размера UPD диска пользователя можно использовать стандартный PowerShell командлет
Resize-VHD
, используемый для изменения размеров виртуальных VHDX дисков Hyper-V.
В секции HOST SERVERS коллекции RDS можно перевести любой сервер фермы в режим обслуживания RDSH (Drain Mode). Для этого щелкните по нему и выберите Do not allow new connection. В результате Connection Broker не будет отправлять новые подключения пользователей на этот сервер. В таком режиме вы можете спокойно установить обновления Windows или обновлять на сервере приложения, не затрагивая пользователей.
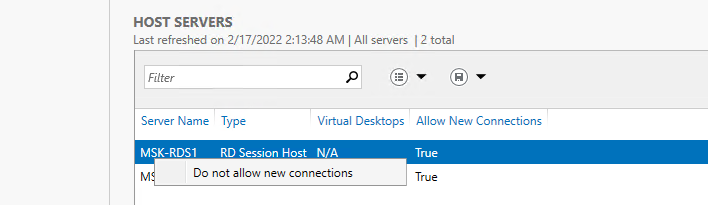
Здесь же можно добавить/удалить RDS Host из коллекции.
Если RDSH хост вышел из строя и не доступен, его можно корректно удалить из фермы Remote Desktop Services по этой инструкции.
Публикация RemoteApp в Remote Desktop Services
RemoteApps – это опубликованные для пользователей приложения на RDS серверах. Благодаря RemoteApp можно использовать приложения, установленные на терминальном RDSH сервере так, как будто оно запущено непосредственно на компьютере пользователя. Пользователь не видит всего рабочего стола Windows Server RDS и работает только с теми программами, которые опубликовал для него администратор. На компьютере пользователя будет отображаться только окно запущенной на RDS программы.
Если вы не создаете RemoteApp, пользователи будут работать непосредственно на собственных рабочих столах на Windows Server. Поэтому не забудьте скопировать все необходимые пользователю ярлыки приложений в папку C:UsersPublicDesktop. Файлы из этой папки будут отображаться на рабочем столе всех пользователей. Если вы устанавливаете на RDSH пакет MS Office 365, обратите внимание что Office нужно разворачивать в режиме SharedComputerLicensing.
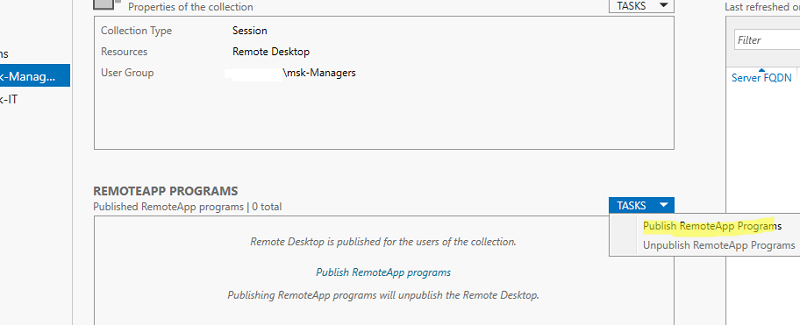
RemoteApp приложения создаются в настройках коллекций RDS. Выберите пункт Tasks -> Publish RemoteApp Programs в секции REMOTEAPP PROGRAMS.
Windows отобразит все приложения, установленные на текущем сервере. Можете выбрать одно из них. Если вашего приложения нет в списке, но оно установлено на других хостах RDS, нажмите кнопку Add и укажите полный путь к исполняемому файлу приложения (exe, bat, cmd и т.д.).
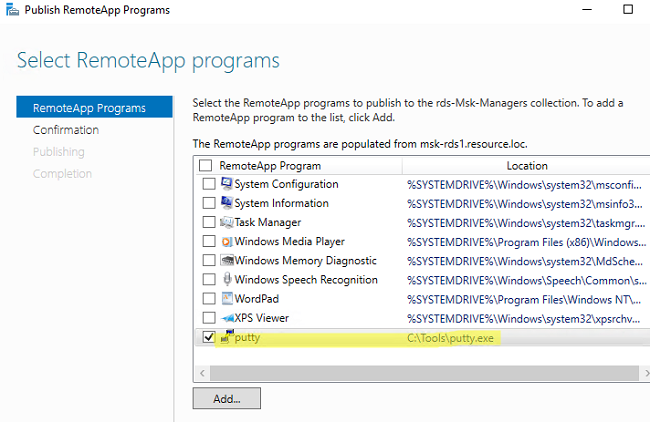
Опубликуйте приложение RemoteApp.
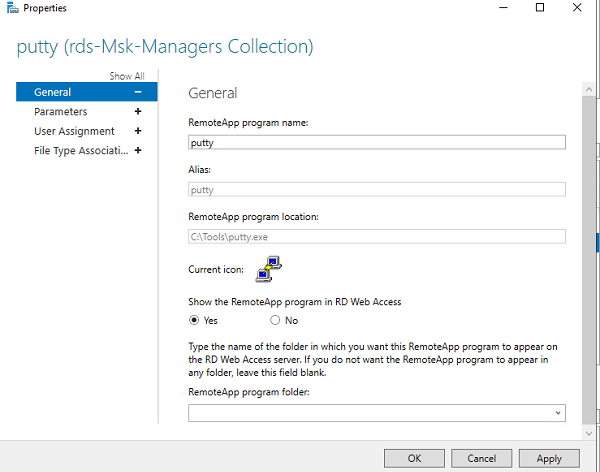
Затем в настройках RemoteApp можно указать дополнительные параметры приложения.
- Нужно ли показывать опубликованное RemoteApp приложение в веб интерфейсе RD Web Access;
- Задать параметры запуска (аргументы) приложения (Command-line Parameters -> Always use the following command-line parameters);
- На вкладке User Assignment можно дополнительно ограничить каким группам пользователей разрешено запускать приложение.
Если вы хотите изменить иконку опубликованного RemoteApp, нужно открыть следующую папку на сервере с ролью RDS Connection Broker:
C:WindowsRemotePackagesCPubFarmsrds-Msk-ManagersCPubRemoteApps
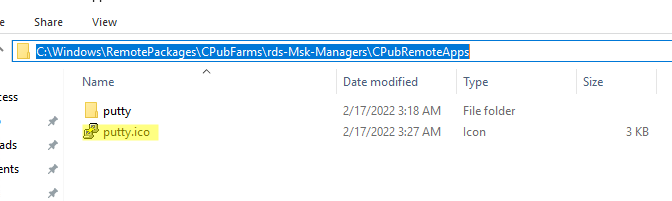
Замените иконку приложения другим ico файлом.
Теперь пользователь может запустить RemoteApp приложение из RD Web Access (
https://msk-rdsman.wintpro.ru/RDWeb
) или с помощью специального RDP файла.
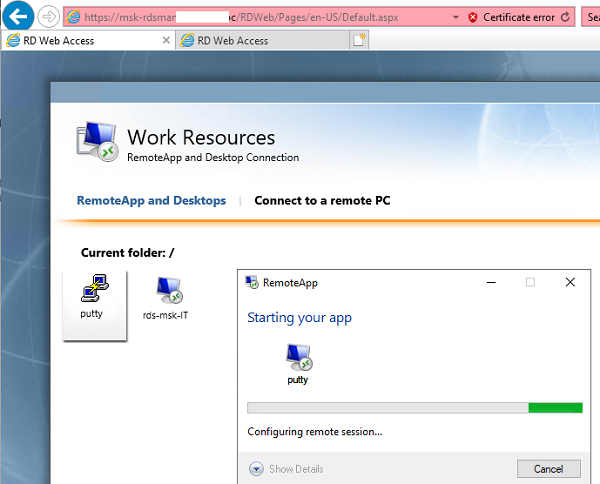
Для запуска опубликованного приложения RemoteApp, нужно добавить в RDP файл такие строки:
remoteapplicationmode:i:1
remoteapplicationname:s:putty
remoteapplicationprogram:s:"C:Toolsputty.exe"
disableremoteappcapscheck:i:1
alternate shell:s:rdpinit.exe
Несколько полезных мелочей для удобной эксплуатации фермы RDS:
- Для роли RDWeb можно настроить поддержку HTML5, это позволит пользователям подключаться к RDS серверам из любого браузера и ОС даже без клиента RDP;
- На веб сервере RD Web Access можно опубликовать ссылку на смену истекшего пароля пользователя (по умолчанию при включенном NLA вы не сможете аутентифицироваться на RDSH с истекшим паролем пользователя Active Directory);
- Инструкция для пользователей по смене пароля в RDP сессии;
- Администратор может использовать теневые подключения RD Session Shadow для подключения/просмотра рабочего стола сеанса пользователя на сервере RDS;
- Чтобы быстро найти, на каких RDS серверах есть сессии определенного пользователя, можно использовать PowerShell:
Import-Module RemoteDesktop
Get-RDUserSession -ConnectionBroker msk-rdsman.winitpro.ru | where {$_.UserName -eq "a.ivanov"} | Select HostServer - Вы можете использовать PowerShell скрипты для просмотра и анализа логов RDP подключений пользователей к серверам RDS;
- Для дополнительной защиты можно настроить двухфакторную аутентификацию (2FA) пользователей на RDS серверах Windows с помощью сторонних средств.
Настройка фермы Remote Desktop services с помощью PowerShell
Если вы четко представляете себе концепцию RDS фермы, вы можете быстро разворачивать RDS конфигурацию с помощью PowerShell.
Следующие PowerShell команды для создания RDS фермы лучше запускать с другого на другом сервера, т.к. управляемые RDS хосты придется перезагружать.
Задайте имена серверов в вашей ферме RDS. В этом примере я установлю роли RDCB и RDS Licensing на отдельный сервер (в дальнейшем рекомендуется настроить отказоустойчивую конфигурацию RDCB).
$RDSH1 = "msk-rds1.winitpro.ru"
$RDSH2 = "msk-rds2.winitpro.ru"
$RDSCB = "msk-rdcb.winitpro.ru"
$RDSGW = "msk-rdsgw.winitpro.ru"
Import-Module RemoteDesktop
Установите RDS роли на сервера:
Add-WindowsFeature –ComputerName $RDSH1, $RDSH2 -Name RDS-RD-Server –IncludeManagementTools
Add-WindowsFeature –ComputerName $RDSCB -Name RDS-Connection-Broker -IncludeManagementTools
Add-WindowsFeature –ComputerName $RDSGW -Name RDS-Web-Access, RDS-Gateway –IncludeManagementTools
Перезагрузите все хосты:
Restart-Computer -ComputerName $RDSH1,$RDSH2,$RDSCB,$RDSGW
Создайте новый инстанс RDSessionDeployment:
New-RDSessionDeployment -ConnectionBroker $RDSCB -SessionHost $RDSH1,$RDSH2 –Verbose
Добавить в ферму сервера RDWA и RDGW:
Add-RDServer -Server $RDSGW -Role RDS-WEB-ACCESS -ConnectionBroker $RDSCB
Add-RDServer -Server $RDSGW -Role RDS-GATEWAY -ConnectionBroker $RDSCB -GatewayExternalFqdn "rds.winitpro.ru"
Текущее распределение RDS ролей по серверам фермы можно вывести так:
Get-RDServer -ConnectionBroker $RDSGW
Установка роли лицензирования RDS:
Add-WindowsFeature –ComputerName $RDSCB -Name RDS-Licensing, RDS-Licensing-UI
Задайте режим лицензирования PerUser:
Invoke-Command -ComputerName $RDSCB -ScriptBlock {Set-RDLicenseConfiguration -Mode PerUser -LicenseServer $RDSCB -ConnectionBroker $RDSCB}
Add-RDServer -Server $RDSCB -Role RDS-LICENSING -ConnectionBroker $RDSCB
Добавить сервер лицензирования в доменную группу с помощью Add-ADGroupMember:
Add-ADGroupMember "Terminal Server License Servers" -Members "msk-rdcb$"
Если у вас есть сертификат для RDS можно его добавить в конфигурацию фермы (можно использовать бесплатный SSL сертификат Let’s Encrypt для вашего RDS хоста):
Path = "C:psRDSCert.pfx"
$Password = ConvertTo-SecureString -String "CertPAssddr0w11-" -AsPlainText -Force
Set-RDCertificate -Role RDGateway -ImportPath $Path -Password $Password -ConnectionBroker $RDSCB -Force
Set-RDCertificate -Role RDWebAccess -ImportPath $Path -Password $Password -ConnectionBroker $RDSCB -Force
Set-RDCertificate -Role RDPublishing -ImportPath $Path -Password $Password -ConnectionBroker $RDSCB -Force
Set-RDCertificate -Role RDRedirector -ImportPath $Path -Password $Password -ConnectionBroker $RDSCB -Force
Информацию об установленных SSL сертификатах можно получить так:
Get-RDCertificate
Теперь можно создать коллекции RDS:
$CollectionName = "DEVdept"
New-RDSessionCollection –CollectionName $CollectionName –SessionHost $RDSH1,$RDSH2 –ConnectionBroker $RDSCB –CollectionDescription “Develovers”
Разрешить доступ к RDS серверам для групп:
$UserGroup [email protected]("WINITPROmsk-developers","WINITPROmsk_devops")
Set-RDSessionCollectionConfiguration -CollectionName $CollectionName -UserGroup $UserGroup
Опубликовать приложение RemoteAPP:
New-RDRemoteapp -Alias GoogleChrome -DisplayName GoogleChrome -FilePath "C:Program Files (x86)GoogleChromeApplicationchrome.exe" -ShowInWebAccess 1 -CollectionName $CollectionName -ConnectionBroker $RDSCB
В статье мы рассмотрели, как установить и настроить ферму Remote Desktop Services на базе Windows Server 2019/2022 с помощью графического интерфейса Server Manager и с помощью PowerShell. За рамками статьи осталось более подробное описание ролей RD Web Access и RD Gateway. Мы рассмотрим настройку этих ролей отдельно в следующих статьях.
From Wikipedia, the free encyclopedia
| Other names | Terminal Services |
|---|---|
| Developer(s) | Microsoft |
| Operating system | Microsoft Windows |
| Service name | TermService |
| Type | Remote desktop software |
| Website | docs.microsoft.com/en-us/windows/win32/termserv/terminal-services-portal |
Remote Desktop Services (RDS), known as Terminal Services in Windows Server 2008 and earlier,[1] is one of the components of Microsoft Windows that allow a user to initiate and control an interactive session[2] on a remote computer or virtual machine over a network connection. RDS was first released in 1998 as Terminal Server in Windows NT 4.0 Terminal Server Edition, a stand-alone edition of Windows NT 4.0 Server that allowed users to log in remotely. Starting with Windows 2000, it was integrated under the name of Terminal Services as an optional component in the server editions of the Windows NT family of operating systems,[3] receiving updates and improvements with each version of Windows.[4] Terminal Services were then renamed to Remote Desktop Services with Windows Server 2008 R2[5] in 2009.
RDS is Microsoft’s implementation of thin client architecture, where Windows software, and the entire desktop of the computer running RDS, are made accessible to any remote client machine that supports Remote Desktop Protocol (RDP). User interfaces are displayed from the server onto the client system and input from the client system is transmitted to the server — where software execution takes place.[6] This is in contrast to application streaming systems, like Microsoft App-V, in which computer programs are streamed to the client on-demand and executed on the client machine.
RemoteFX was added to RDS as part of Windows Server 2008 R2 Service Pack 1.
Overview[edit]
Windows includes three client components that use RDS:
- Windows Remote Assistance – only Windows 10 and later
- Remote Desktop Connection (RDC)
- Fast user switching
The first two are individual utilities that allow a user to operate an interactive session on a remote computer over the network. In case of Remote Assistance, the remote user needs to receive an invitation and the control is cooperative. In case of RDC, however, the remote user opens a new session on the remote computer and has every power granted by its user account’s rights and restrictions.[6][7][8] Fast User Switching allows users to switch between user accounts on the local computer without quitting software and logging out. Fast User Switching is part of Winlogon and uses RDS to accomplish its switching feature.[9][10] Third-party developers have also created client software for RDS. For example, rdesktop supports Unix platforms.
Although RDS is shipped with most editions of all versions of Windows NT since Windows 2000,[3] its functionality differs in each version. Windows XP Home Edition does not accept any RDC connections at all, reserving RDS for Fast User Switching and Remote Assistance only. Other client versions of Windows only allow a maximum of one remote user to connect to the system at the cost of the user who has logged onto the console being disconnected. Windows Server allows two users to connect at the same time. This licensing scheme, called «Remote Desktop for Administration», facilitates administration of unattended or headless computers. Only by acquiring additional licenses (in addition to that of Windows) can a computer running Windows Server service multiple remote users at one time and achieve virtual desktop infrastructure.[5][9]
For an organization, RDS allows the IT department to install applications on a central server instead of multiple computers.[11] Remote users can log on and use those applications over the network. Such centralization can make maintenance and troubleshooting easier. RDS and Windows authentication systems prevent unauthorized users from accessing apps or data.
Microsoft has a long-standing agreement with Citrix to facilitate sharing of technologies and patent licensing between Microsoft Terminal Services and Citrix XenApp (formerly Citrix MetaFrame and Citrix Presentation Server). In this arrangement, Citrix has access to key source code for the Windows platform, enabling its developers to improve the security and performance of the Terminal Services platform. In late December 2004 the two companies announced a five-year renewal of this arrangement to cover Windows Vista.[12]
Server components[edit]
The key server component of RDS is Terminal Server (termdd.sys), which listens on TCP port 3389. When a Remote Desktop Protocol (RDP) client connects to this port, it is tagged with a unique SessionID and associated with a freshly spawned console session (Session 0, keyboard, mouse and character mode UI only). The login subsystem (winlogon.exe) and the GDI graphics subsystem is then initiated, which handles the job of authenticating the user and presenting the GUI. These executables are loaded in a new session, rather than the console session. When creating the new session, the graphics and keyboard/mouse device drivers are replaced with RDP-specific drivers: RdpDD.sys and RdpWD.sys. The RdpDD.sys is the device driver and it captures the UI rendering calls into a format that is transmittable over RDP. RdpWD.sys acts as keyboard and mouse driver; it receives keyboard and mouse input over the TCP connection and presents them as keyboard or mouse inputs. It also allows creation of virtual channels, which allow other devices, such as disc, audio, printers, and COM ports to be redirected, i.e., the channels act as replacement for these devices. The channels connect to the client over the TCP connection; as the channels are accessed for data, the client is informed of the request, which is then transferred over the TCP connection to the application. This entire procedure is done by the terminal server and the client, with the RDP mediating the correct transfer, and is entirely transparent to the applications.[13] RDP communications are encrypted using 128-bit RC4 encryption. Windows Server 2003 onwards, it can use a FIPS 140 compliant encryption schemes.[6]
Once a client initiates a connection and is informed of a successful invocation of the terminal services stack at the server, it loads up the device as well as the keyboard/mouse drivers. The UI data received over RDP is decoded and rendered as UI, whereas the keyboard and mouse inputs to the Window hosting the UI is intercepted by the drivers, and transmitted over RDP to the server. It also creates the other virtual channels and sets up the redirection. RDP communication can be encrypted; using either low, medium or high encryption. With low encryption, user input (outgoing data) is encrypted using a weak (40-bit RC4) cipher. With medium encryption, UI packets (incoming data) are encrypted using this weak cipher as well. The setting «High encryption (Non-export)» uses 128-bit RC4 encryption and «High encryption (Export)» uses 40-bit RC4 encryption.[14]
Terminal Server[edit]
Terminal Server is the server component of Terminal services. It handles the job of authenticating clients, as well as making the applications available remotely. It is also entrusted with the job of restricting the clients according to the level of access they have. The Terminal Server respects the configured software restriction policies, so as to restrict the availability of certain software to only a certain group of users. The remote session information is stored in specialized directories, called Session Directory which is stored at the server. Session directories are used to store state information about a session, and can be used to resume interrupted sessions. The terminal server also has to manage these directories. Terminal Servers can be used in a cluster as well.[6]
In Windows Server 2008, it has been significantly overhauled. While logging in, if the user logged on to the local system using a Windows Server Domain account, the credentials from the same sign-on can be used to authenticate the remote session. However, this requires Windows Server 2008 to be the terminal server OS, while the client OS is limited to Windows Server 2008, Windows Vista and Windows 7. In addition, the terminal server may be configured to allow connection to individual programs, rather than the entire desktop, by means of a feature named RemoteApp. Terminal Services Web Access (TS Web Access) makes a RemoteApp session invocable from the web browser. It includes the TS Web Access Web Part control which maintains the list of RemoteApps deployed on the server and keeps the list up to date. Terminal Server can also integrate with Windows System Resource Manager to throttle resource usage of remote applications.[4]
Terminal Server is managed by the Terminal Server Manager Microsoft Management Console snap-in. It can be used to configure the sign in requirements, as well as to enforce a single instance of remote session. It can also be configured by using Group Policy or Windows Management Instrumentation. It is, however, not available in client versions of Windows OS, where the server is pre-configured to allow only one session and enforce the rights of the user account on the remote session, without any customization.[6]
Remote Desktop Gateway[edit]
The Remote Desktop Gateway service component, also known as RD Gateway, can tunnel the RDP session using a HTTPS channel.[15] This increases the security of RDS by encapsulating the session with Transport Layer Security (TLS).[16] This also allows the option to use Internet Explorer as the RDP client. The official MS RDP client for macOS supports RD Gateway as of version 8. This is also available for iOS and Android.
This feature was introduced in the Windows Server 2008 and Windows Home Server products.
In October 2021, Thincast, the main contributor of the FreeRDP project, published the first Remote Desktop Gateway solution running natively on Linux.[17]
Remote Desktop HTML5 Web Client[edit]
In late 2018 Microsoft released the Remote Desktop HTML5 Web Client. The client allows users to connect to their remote apps or to their remote desktops without using an installed remote desktop client.[18][19] The web client uses the TLS secured port 443 and does not use the RD Gateway to transport traffic, instead relying solely on the remote desktop session host aspect of remote desktop services.[20][21]
Roles[edit]
- Remote Desktop Gateway
- Enables authorized users to connect to virtual desktops, Remote-App programs, and session-based desktops over a private network or the Internet.
- Remote Desktop Connection Broker Role
- Allows users to reconnect to their existing virtual desktop, RemoteApp programs, and session-based desktops. It enables even load distribution across RD Session Host servers in a session collection or across pooled virtual desktops in a pooled virtual desktop collection, and provides access to virtual desktops in a virtual desktop collection.
- Remote Desktop Session Host
- Enables a server to host RemoteApp programs as session-based desktops. Users can connect to RD Session Host servers in a session collection to run programs, save files, and use resources on those servers. Users can access Remote Desktop Session Host server by using the Remote Desktop Connection client or by using RemoteApp programs.
- Remote Desktop Virtualization Host
- Enables users to connect to virtual desktops by using RemoteApp and Desktop Connection.
- Remote Desktop Web Access
- Enables users to access RemoteApp and Desktop Connection through the Start Menu or through a web browser. RemoteApp and Desktop Connection provides users with a customized view of RemoteApp programs, session-based desktops, and virtual desktops.
- Remote Desktop Licensing
- Enables a server to manage RDS client access licenses (RDS CALs) that are required for each device or user to connect to a Remote Desktop Session Host server. RDS CALs are managed using the Remote Desktop Licensing Manager application.[22]
RemoteApp[edit]
RemoteApp (or TS RemoteApp) is a special mode of RDS, available in Windows Server 2008 R2 and later, where remote session configuration is integrated into the client operating system. The RDP 6.1 client ships with Windows XP SP3, KB952155 for Windows XP SP2 users,[23] Windows Vista SP1 and Windows Server 2008. The UI for the RemoteApp is rendered in a window over the local desktop, and is managed like any other window for local applications. The end result of this is that remote applications behave largely like local applications. The task of establishing the remote session, as well as redirecting local resources to the remote application, is transparent to the end user.[24] Multiple applications can be started in a single RemoteApp session, each with their own windows.[25]
A RemoteApp can be packaged either as a .rdp file or distributed via an .msi Windows Installer package. When packaged as an .rdp file (which contains the address of the RemoteApp server, authentication schemes to be used, and other settings), a RemoteApp can be launched by double clicking the file. It will invoke the Remote Desktop Connection client, which will connect to the server and render the UI. The RemoteApp can also be packaged in a Windows Installer database, installing which can register the RemoteApp in the Start menu as well as create shortcuts to launch it. A RemoteApp can also be registered as handler for file types or URIs. Opening a file registered with RemoteApp will first invoke Remote Desktop Connection, which will connect to the terminal server and then open the file. Any application which can be accessed over Remote Desktop can be served as a RemoteApp.[24]
Windows 7 includes built-in support for RemoteApp publishing, but it has to be enabled manually in registry, since there is no RemoteApp management console in client versions of Microsoft Windows.[26]
Windows Desktop Sharing[edit]
In Windows Vista onwards, Terminal Services also includes a multi-party desktop sharing capability known as Windows Desktop Sharing. Unlike Terminal Services, which creates a new user session for every RDP connection, Windows Desktop Sharing can host the remote session in the context of the currently logged in user without creating a new session, and make the Desktop, or a subset of it, available over RDP.[27] Windows Desktop Sharing can be used to share the entire desktop, a specific region, or a particular application.[28] Windows Desktop Sharing can also be used to share multi-monitor desktops. When sharing applications individually (rather than the entire desktop), the windows are managed (whether they are minimized or maximized) independently at the server and the client side.[28]
The functionality is only provided via a public API, which can be used by any application to provide screen sharing functionality. Windows Desktop Sharing API exposes two objects: RDPSession for the sharing session and RDPViewer for the viewer. Multiple viewer objects can be instantiated for one Session object. A viewer can either be a passive viewer, who is just able to watch the application like a screencast, or an interactive viewer, who is able to interact in real time with the remote application.[27] The RDPSession object contains all the shared applications, represented as Application objects, each with Window objects representing their on-screen windows. Per-application filters capture the application Windows and package them as Window objects.[29] A viewer must authenticate itself before it can connect to a sharing session. This is done by generating an Invitation using the RDPSession. It contains an authentication ticket and password. The object is serialized and sent to the viewers, who need to present the Invitation when connecting.[27][29]
Windows Desktop Sharing API is used by Windows Meeting Space and Windows Remote Assistance for providing application sharing functionality among network peers.[28]
Client software[edit]
Remote Desktop Connection[edit]

Remote Desktop Connection client on Windows 8 |
|
| Developer(s) | Microsoft |
|---|---|
| Operating system | Microsoft Windows |
| Type | Remote desktop software |
| Website | docs.microsoft.com/en-us/windows-server/remote/remote-desktop-services/welcome-to-rds |

Remote Desktop Connection client on macOS
Remote Desktop Connection (RDC, also called Remote Desktop or just RD,[30][31] formerly Microsoft Terminal Services Client, mstsc or tsclient)[32][33] is the client application for RDS. It allows a user to remotely log into a networked computer running the terminal services server. RDC presents the desktop interface (or application GUI) of the remote system, as if it were accessed locally.[6] In addition to regular username/password for authorizing for the remote session, RDC also supports using smart cards for authorization.[6] With RDC 6.0, the resolution of a remote session can be set independently of the settings at the remote computer.
With version 6.0, if the Desktop Experience component is plugged into the remote server, remote application user interface elements (e.g., application windows borders, Maximize, Minimize, and Close buttons etc.) will take on the same appearance of local applications. In this scenario, the remote applications will use the Aero theme if the user connects to the server from a Windows Vista machine running Aero.[4] Later versions of the protocol also support rendering the UI in full 32-bit color, as well as resource redirection for printers, COM ports, disk drives, mice and keyboards. With resource redirection, remote applications can use the resources of the local computer. Audio is also redirected, so that any sounds generated by a remote application are played back at the client system.[6][4] Moreover, a remote session can also span multiple monitors at the client system, independent of the multi-monitor settings at the server. RDC can also be used to connect to Windows Media Center (WMC) remote sessions; however, since WMC does not stream video using RDP, only the applications can be viewed this way, not any media.
RDC prioritizes UI data as well as keyboard and mouse inputs, as opposed to print jobs or file transfers. so as to make the applications more responsive. It redirects plug and play devices such as cameras, portable music players, and scanners, so that input from these devices can be used by the remote applications as well.[4] RDC can also be used to connect to computers which are exposed via Windows Home Server RDP Gateway over the Internet.[34] Finally, few shortcuts that will be handy
- To achieve Ctrl+Alt+Del effect on remote desktop, you can use the Ctrl+Alt+End key combination.
- To alternate between the full screen and window mode of remote desktop, you can use Ctrl+Alt+Break ( Ctrl+Fn+Alt+⇧ Shift on certain HP laptops).
Other clients[edit]
Microsoft produces an official client for a variety of non Windows platforms:
- Windows Mobile[35][36]
- MacOS: Microsoft Remote Desktop for Mac
- Android: Microsoft Remote Desktop
- iOS and iPadOS: Microsoft Remote Desktop
There have been numerous non-Microsoft implementations of clients that implement subsets of the Microsoft functionality for a range of platforms. The most common are:
- FreeRDP — Open Source under Apache license
- rdesktop for Linux/Unix and Microsoft Windows
- Remmina for Linux (based on FreeRDP)
- CoRD for macOS (Discontinued in April 2020)
- Thincast Client for Linux, macOS and Windows
See also[edit]
- BlueKeep (security vulnerability)
- Windows MultiPoint Server
- Microsoft NetMeeting, a discontinued Microsoft product also provides Shared-desktop feature, in the similar time-frame of Windows NT Terminal Services Edition
- Virtual Network Computing
References[edit]
- ^ «Windows Remote Desktop Services spotlight». Retrieved 2010-11-18.
- ^ QuinnRadich. «Remote Desktop Sessions — Win32 apps». docs.microsoft.com. Retrieved 2022-07-09.
- ^ a b «Remote Desktop Connection». PC World. IDG. 17 August 2011.
- ^ a b c d e «Whats new in Terminal Services in Windows Server 2008». Retrieved 2007-07-23.
- ^ a b Russel, Charlie; Zacker, Craig (2009). «4: Remote Desktop Services and VDI: Centralizing Desktop and Application Management» (PDF). Introducing Windows Server 2008 R2. Redmond, WA: Microsoft Press. Archived from the original (PDF) on 29 August 2017. Retrieved 11 January 2014.
- ^ a b c d e f g h «Technical Overview of Terminal Services in Windows Server 2003». Microsoft. Archived from the original on 2003-01-26. Retrieved 2007-07-23.
- ^
«How to change the listening port for Remote Desktop». Retrieved 2010-11-18. - ^
«Frequently Asked Questions about Remote Desktop». Microsoft. Retrieved 2007-07-23. - ^ a b
Russinovich, Mark; Solomon, David A.; Ionescu, Alex (2012). Windows Internals (6th ed.). Redmond, WA: Microsoft Press. pp. 20–21. ISBN 978-0-7356-4873-9. - ^
«Architecture of Fast User Switching». Support. Microsoft. 15 January 2006. Retrieved 11 January 2014. - ^ «Remote Services». Log me in 123.
- ^ «Citrix and Microsoft Sign Technology Collaboration and Licensing Agreement». Citrix. 2004-12-21. Archived from the original on 2011-07-05. Retrieved 2012-04-13.
- ^
«How Terminal Services Works». Microsoft. 2003-03-28. Retrieved 2007-07-23. - ^ «Connection Configuration in Terminal Server». Support (5.0 ed.). Microsoft. 22 June 2014.
- ^ «Terminal Services Gateway (TS Gateway)». Microsoft TechNet. Retrieved 2009-09-10.
- ^ «Remote Desktop Protocol». Microsoft Developer Network (MSDN). Retrieved 2009-09-10.
- ^ «RD Gateway Documentation». Thincast. Retrieved 2021-10-17.
- ^ Waggoner, Rob. «Microsoft Has Released the HTML5-Based RDP Web Client». blog.mycloudit.com. Retrieved 2020-05-10.
- ^ «Remote Desktop HTML5 client on Windows Server 2019». msfreaks. 2018-10-06. Retrieved 2020-05-10.
- ^ «RD Web Client (HTML5) – New Features In 1.0.11». www.rdsgurus.com. Retrieved 2020-05-10.
- ^ Berson, Freek (2018-01-12). «The Microsoft Platform: HTML5 client for Microsoft Remote Desktop Services 2016: Remote Desktop Web Client». The Microsoft Platform. Retrieved 2020-05-10.
- ^ TechNet: Remote Desktop Licensing
- ^ «Description of the Remote Desktop Connection 6.1 client update for Terminal Services in Windows XP Service Pack 2». Retrieved 2010-11-18.
- ^ a b «Terminal Services RemoteApp (TS RemoteApp)». Retrieved 2007-07-23.
- ^ «Terminal Services RemoteApp Session Termination Logic». Retrieved 2007-10-02.
- ^ «How to enable RemoteApp (via RDP 7.0) within VirtualBox or VMWare running Windows 7, Vista SP1+ or Windows XP SP3». Retrieved 2010-11-18.
- ^ a b c «Windows Desktop Sharing». Retrieved 2007-10-11.
- ^ a b c «Windows Desktop Sharing API». Retrieved 2007-10-11.
- ^ a b «About Windows Desktop Sharing». Retrieved 2007-10-11.
- ^ «Remote Desktop Services — Access from anywhere». Microsoft.
{{cite web}}: CS1 maint: url-status (link) - ^ «Get started with the Android client». Microsoft.
{{cite web}}: CS1 maint: url-status (link) - ^ «Why doesn’t the New Folder command work in the root of a redirected drive resource in a Remote Desktop session?». The Old New Thing. Microsoft. 17 December 2013. Retrieved 18 December 2013.
- ^ Savill, John (1 October 2008). The Complete Guide to Windows Server 2008. Pearson Education. p. 1752. ISBN 978-0-13-279758-0. Retrieved 1 June 2012.
Windows XP, Windows Server 2003, Windows Vista, and Windows Server 2008 all contain the RDC tool,
mstsc.exe[…] MSTSC in the filenamemstsc.exestands for Microsoft Terminal Services Client. - ^ «Remote Desktop Connection». Remote Support.
- ^ Drager, Dave (27 March 2008). «How to Remotely Control your Mobile Phone from Desktop». MakeUseOf. Retrieved 27 January 2022.
- ^ Miniman, Brandon (2009-03-16). «Tutorial: Setting up Remote Desktop in Windows Mobile». PocketNow. Archived from the original on 2009-08-01. Retrieved 27 January 2022.
External links[edit]
- Welcome to Remote Desktop Services
- Download Chrome Remote Desktop
From Wikipedia, the free encyclopedia
| Other names | Terminal Services |
|---|---|
| Developer(s) | Microsoft |
| Operating system | Microsoft Windows |
| Service name | TermService |
| Type | Remote desktop software |
| Website | docs.microsoft.com/en-us/windows/win32/termserv/terminal-services-portal |
Remote Desktop Services (RDS), known as Terminal Services in Windows Server 2008 and earlier,[1] is one of the components of Microsoft Windows that allow a user to initiate and control an interactive session[2] on a remote computer or virtual machine over a network connection. RDS was first released in 1998 as Terminal Server in Windows NT 4.0 Terminal Server Edition, a stand-alone edition of Windows NT 4.0 Server that allowed users to log in remotely. Starting with Windows 2000, it was integrated under the name of Terminal Services as an optional component in the server editions of the Windows NT family of operating systems,[3] receiving updates and improvements with each version of Windows.[4] Terminal Services were then renamed to Remote Desktop Services with Windows Server 2008 R2[5] in 2009.
RDS is Microsoft’s implementation of thin client architecture, where Windows software, and the entire desktop of the computer running RDS, are made accessible to any remote client machine that supports Remote Desktop Protocol (RDP). User interfaces are displayed from the server onto the client system and input from the client system is transmitted to the server — where software execution takes place.[6] This is in contrast to application streaming systems, like Microsoft App-V, in which computer programs are streamed to the client on-demand and executed on the client machine.
RemoteFX was added to RDS as part of Windows Server 2008 R2 Service Pack 1.
Overview[edit]
Windows includes three client components that use RDS:
- Windows Remote Assistance – only Windows 10 and later
- Remote Desktop Connection (RDC)
- Fast user switching
The first two are individual utilities that allow a user to operate an interactive session on a remote computer over the network. In case of Remote Assistance, the remote user needs to receive an invitation and the control is cooperative. In case of RDC, however, the remote user opens a new session on the remote computer and has every power granted by its user account’s rights and restrictions.[6][7][8] Fast User Switching allows users to switch between user accounts on the local computer without quitting software and logging out. Fast User Switching is part of Winlogon and uses RDS to accomplish its switching feature.[9][10] Third-party developers have also created client software for RDS. For example, rdesktop supports Unix platforms.
Although RDS is shipped with most editions of all versions of Windows NT since Windows 2000,[3] its functionality differs in each version. Windows XP Home Edition does not accept any RDC connections at all, reserving RDS for Fast User Switching and Remote Assistance only. Other client versions of Windows only allow a maximum of one remote user to connect to the system at the cost of the user who has logged onto the console being disconnected. Windows Server allows two users to connect at the same time. This licensing scheme, called «Remote Desktop for Administration», facilitates administration of unattended or headless computers. Only by acquiring additional licenses (in addition to that of Windows) can a computer running Windows Server service multiple remote users at one time and achieve virtual desktop infrastructure.[5][9]
For an organization, RDS allows the IT department to install applications on a central server instead of multiple computers.[11] Remote users can log on and use those applications over the network. Such centralization can make maintenance and troubleshooting easier. RDS and Windows authentication systems prevent unauthorized users from accessing apps or data.
Microsoft has a long-standing agreement with Citrix to facilitate sharing of technologies and patent licensing between Microsoft Terminal Services and Citrix XenApp (formerly Citrix MetaFrame and Citrix Presentation Server). In this arrangement, Citrix has access to key source code for the Windows platform, enabling its developers to improve the security and performance of the Terminal Services platform. In late December 2004 the two companies announced a five-year renewal of this arrangement to cover Windows Vista.[12]
Server components[edit]
The key server component of RDS is Terminal Server (termdd.sys), which listens on TCP port 3389. When a Remote Desktop Protocol (RDP) client connects to this port, it is tagged with a unique SessionID and associated with a freshly spawned console session (Session 0, keyboard, mouse and character mode UI only). The login subsystem (winlogon.exe) and the GDI graphics subsystem is then initiated, which handles the job of authenticating the user and presenting the GUI. These executables are loaded in a new session, rather than the console session. When creating the new session, the graphics and keyboard/mouse device drivers are replaced with RDP-specific drivers: RdpDD.sys and RdpWD.sys. The RdpDD.sys is the device driver and it captures the UI rendering calls into a format that is transmittable over RDP. RdpWD.sys acts as keyboard and mouse driver; it receives keyboard and mouse input over the TCP connection and presents them as keyboard or mouse inputs. It also allows creation of virtual channels, which allow other devices, such as disc, audio, printers, and COM ports to be redirected, i.e., the channels act as replacement for these devices. The channels connect to the client over the TCP connection; as the channels are accessed for data, the client is informed of the request, which is then transferred over the TCP connection to the application. This entire procedure is done by the terminal server and the client, with the RDP mediating the correct transfer, and is entirely transparent to the applications.[13] RDP communications are encrypted using 128-bit RC4 encryption. Windows Server 2003 onwards, it can use a FIPS 140 compliant encryption schemes.[6]
Once a client initiates a connection and is informed of a successful invocation of the terminal services stack at the server, it loads up the device as well as the keyboard/mouse drivers. The UI data received over RDP is decoded and rendered as UI, whereas the keyboard and mouse inputs to the Window hosting the UI is intercepted by the drivers, and transmitted over RDP to the server. It also creates the other virtual channels and sets up the redirection. RDP communication can be encrypted; using either low, medium or high encryption. With low encryption, user input (outgoing data) is encrypted using a weak (40-bit RC4) cipher. With medium encryption, UI packets (incoming data) are encrypted using this weak cipher as well. The setting «High encryption (Non-export)» uses 128-bit RC4 encryption and «High encryption (Export)» uses 40-bit RC4 encryption.[14]
Terminal Server[edit]
Terminal Server is the server component of Terminal services. It handles the job of authenticating clients, as well as making the applications available remotely. It is also entrusted with the job of restricting the clients according to the level of access they have. The Terminal Server respects the configured software restriction policies, so as to restrict the availability of certain software to only a certain group of users. The remote session information is stored in specialized directories, called Session Directory which is stored at the server. Session directories are used to store state information about a session, and can be used to resume interrupted sessions. The terminal server also has to manage these directories. Terminal Servers can be used in a cluster as well.[6]
In Windows Server 2008, it has been significantly overhauled. While logging in, if the user logged on to the local system using a Windows Server Domain account, the credentials from the same sign-on can be used to authenticate the remote session. However, this requires Windows Server 2008 to be the terminal server OS, while the client OS is limited to Windows Server 2008, Windows Vista and Windows 7. In addition, the terminal server may be configured to allow connection to individual programs, rather than the entire desktop, by means of a feature named RemoteApp. Terminal Services Web Access (TS Web Access) makes a RemoteApp session invocable from the web browser. It includes the TS Web Access Web Part control which maintains the list of RemoteApps deployed on the server and keeps the list up to date. Terminal Server can also integrate with Windows System Resource Manager to throttle resource usage of remote applications.[4]
Terminal Server is managed by the Terminal Server Manager Microsoft Management Console snap-in. It can be used to configure the sign in requirements, as well as to enforce a single instance of remote session. It can also be configured by using Group Policy or Windows Management Instrumentation. It is, however, not available in client versions of Windows OS, where the server is pre-configured to allow only one session and enforce the rights of the user account on the remote session, without any customization.[6]
Remote Desktop Gateway[edit]
The Remote Desktop Gateway service component, also known as RD Gateway, can tunnel the RDP session using a HTTPS channel.[15] This increases the security of RDS by encapsulating the session with Transport Layer Security (TLS).[16] This also allows the option to use Internet Explorer as the RDP client. The official MS RDP client for macOS supports RD Gateway as of version 8. This is also available for iOS and Android.
This feature was introduced in the Windows Server 2008 and Windows Home Server products.
In October 2021, Thincast, the main contributor of the FreeRDP project, published the first Remote Desktop Gateway solution running natively on Linux.[17]
Remote Desktop HTML5 Web Client[edit]
In late 2018 Microsoft released the Remote Desktop HTML5 Web Client. The client allows users to connect to their remote apps or to their remote desktops without using an installed remote desktop client.[18][19] The web client uses the TLS secured port 443 and does not use the RD Gateway to transport traffic, instead relying solely on the remote desktop session host aspect of remote desktop services.[20][21]
Roles[edit]
- Remote Desktop Gateway
- Enables authorized users to connect to virtual desktops, Remote-App programs, and session-based desktops over a private network or the Internet.
- Remote Desktop Connection Broker Role
- Allows users to reconnect to their existing virtual desktop, RemoteApp programs, and session-based desktops. It enables even load distribution across RD Session Host servers in a session collection or across pooled virtual desktops in a pooled virtual desktop collection, and provides access to virtual desktops in a virtual desktop collection.
- Remote Desktop Session Host
- Enables a server to host RemoteApp programs as session-based desktops. Users can connect to RD Session Host servers in a session collection to run programs, save files, and use resources on those servers. Users can access Remote Desktop Session Host server by using the Remote Desktop Connection client or by using RemoteApp programs.
- Remote Desktop Virtualization Host
- Enables users to connect to virtual desktops by using RemoteApp and Desktop Connection.
- Remote Desktop Web Access
- Enables users to access RemoteApp and Desktop Connection through the Start Menu or through a web browser. RemoteApp and Desktop Connection provides users with a customized view of RemoteApp programs, session-based desktops, and virtual desktops.
- Remote Desktop Licensing
- Enables a server to manage RDS client access licenses (RDS CALs) that are required for each device or user to connect to a Remote Desktop Session Host server. RDS CALs are managed using the Remote Desktop Licensing Manager application.[22]
RemoteApp[edit]
RemoteApp (or TS RemoteApp) is a special mode of RDS, available in Windows Server 2008 R2 and later, where remote session configuration is integrated into the client operating system. The RDP 6.1 client ships with Windows XP SP3, KB952155 for Windows XP SP2 users,[23] Windows Vista SP1 and Windows Server 2008. The UI for the RemoteApp is rendered in a window over the local desktop, and is managed like any other window for local applications. The end result of this is that remote applications behave largely like local applications. The task of establishing the remote session, as well as redirecting local resources to the remote application, is transparent to the end user.[24] Multiple applications can be started in a single RemoteApp session, each with their own windows.[25]
A RemoteApp can be packaged either as a .rdp file or distributed via an .msi Windows Installer package. When packaged as an .rdp file (which contains the address of the RemoteApp server, authentication schemes to be used, and other settings), a RemoteApp can be launched by double clicking the file. It will invoke the Remote Desktop Connection client, which will connect to the server and render the UI. The RemoteApp can also be packaged in a Windows Installer database, installing which can register the RemoteApp in the Start menu as well as create shortcuts to launch it. A RemoteApp can also be registered as handler for file types or URIs. Opening a file registered with RemoteApp will first invoke Remote Desktop Connection, which will connect to the terminal server and then open the file. Any application which can be accessed over Remote Desktop can be served as a RemoteApp.[24]
Windows 7 includes built-in support for RemoteApp publishing, but it has to be enabled manually in registry, since there is no RemoteApp management console in client versions of Microsoft Windows.[26]
Windows Desktop Sharing[edit]
In Windows Vista onwards, Terminal Services also includes a multi-party desktop sharing capability known as Windows Desktop Sharing. Unlike Terminal Services, which creates a new user session for every RDP connection, Windows Desktop Sharing can host the remote session in the context of the currently logged in user without creating a new session, and make the Desktop, or a subset of it, available over RDP.[27] Windows Desktop Sharing can be used to share the entire desktop, a specific region, or a particular application.[28] Windows Desktop Sharing can also be used to share multi-monitor desktops. When sharing applications individually (rather than the entire desktop), the windows are managed (whether they are minimized or maximized) independently at the server and the client side.[28]
The functionality is only provided via a public API, which can be used by any application to provide screen sharing functionality. Windows Desktop Sharing API exposes two objects: RDPSession for the sharing session and RDPViewer for the viewer. Multiple viewer objects can be instantiated for one Session object. A viewer can either be a passive viewer, who is just able to watch the application like a screencast, or an interactive viewer, who is able to interact in real time with the remote application.[27] The RDPSession object contains all the shared applications, represented as Application objects, each with Window objects representing their on-screen windows. Per-application filters capture the application Windows and package them as Window objects.[29] A viewer must authenticate itself before it can connect to a sharing session. This is done by generating an Invitation using the RDPSession. It contains an authentication ticket and password. The object is serialized and sent to the viewers, who need to present the Invitation when connecting.[27][29]
Windows Desktop Sharing API is used by Windows Meeting Space and Windows Remote Assistance for providing application sharing functionality among network peers.[28]
Client software[edit]
Remote Desktop Connection[edit]
|
Remote Desktop Connection client on Windows 8 |
|
| Developer(s) | Microsoft |
|---|---|
| Operating system | Microsoft Windows |
| Type | Remote desktop software |
| Website | docs.microsoft.com/en-us/windows-server/remote/remote-desktop-services/welcome-to-rds |
Remote Desktop Connection client on macOS
Remote Desktop Connection (RDC, also called Remote Desktop or just RD,[30][31] formerly Microsoft Terminal Services Client, mstsc or tsclient)[32][33] is the client application for RDS. It allows a user to remotely log into a networked computer running the terminal services server. RDC presents the desktop interface (or application GUI) of the remote system, as if it were accessed locally.[6] In addition to regular username/password for authorizing for the remote session, RDC also supports using smart cards for authorization.[6] With RDC 6.0, the resolution of a remote session can be set independently of the settings at the remote computer.
With version 6.0, if the Desktop Experience component is plugged into the remote server, remote application user interface elements (e.g., application windows borders, Maximize, Minimize, and Close buttons etc.) will take on the same appearance of local applications. In this scenario, the remote applications will use the Aero theme if the user connects to the server from a Windows Vista machine running Aero.[4] Later versions of the protocol also support rendering the UI in full 32-bit color, as well as resource redirection for printers, COM ports, disk drives, mice and keyboards. With resource redirection, remote applications can use the resources of the local computer. Audio is also redirected, so that any sounds generated by a remote application are played back at the client system.[6][4] Moreover, a remote session can also span multiple monitors at the client system, independent of the multi-monitor settings at the server. RDC can also be used to connect to Windows Media Center (WMC) remote sessions; however, since WMC does not stream video using RDP, only the applications can be viewed this way, not any media.
RDC prioritizes UI data as well as keyboard and mouse inputs, as opposed to print jobs or file transfers. so as to make the applications more responsive. It redirects plug and play devices such as cameras, portable music players, and scanners, so that input from these devices can be used by the remote applications as well.[4] RDC can also be used to connect to computers which are exposed via Windows Home Server RDP Gateway over the Internet.[34] Finally, few shortcuts that will be handy
- To achieve Ctrl+Alt+Del effect on remote desktop, you can use the Ctrl+Alt+End key combination.
- To alternate between the full screen and window mode of remote desktop, you can use Ctrl+Alt+Break ( Ctrl+Fn+Alt+⇧ Shift on certain HP laptops).
Other clients[edit]
Microsoft produces an official client for a variety of non Windows platforms:
- Windows Mobile[35][36]
- MacOS: Microsoft Remote Desktop for Mac
- Android: Microsoft Remote Desktop
- iOS and iPadOS: Microsoft Remote Desktop
There have been numerous non-Microsoft implementations of clients that implement subsets of the Microsoft functionality for a range of platforms. The most common are:
- FreeRDP — Open Source under Apache license
- rdesktop for Linux/Unix and Microsoft Windows
- Remmina for Linux (based on FreeRDP)
- CoRD for macOS (Discontinued in April 2020)
- Thincast Client for Linux, macOS and Windows
See also[edit]
- BlueKeep (security vulnerability)
- Windows MultiPoint Server
- Microsoft NetMeeting, a discontinued Microsoft product also provides Shared-desktop feature, in the similar time-frame of Windows NT Terminal Services Edition
- Virtual Network Computing
References[edit]
- ^ «Windows Remote Desktop Services spotlight». Retrieved 2010-11-18.
- ^ QuinnRadich. «Remote Desktop Sessions — Win32 apps». docs.microsoft.com. Retrieved 2022-07-09.
- ^ a b «Remote Desktop Connection». PC World. IDG. 17 August 2011.
- ^ a b c d e «Whats new in Terminal Services in Windows Server 2008». Retrieved 2007-07-23.
- ^ a b Russel, Charlie; Zacker, Craig (2009). «4: Remote Desktop Services and VDI: Centralizing Desktop and Application Management» (PDF). Introducing Windows Server 2008 R2. Redmond, WA: Microsoft Press. Archived from the original (PDF) on 29 August 2017. Retrieved 11 January 2014.
- ^ a b c d e f g h «Technical Overview of Terminal Services in Windows Server 2003». Microsoft. Archived from the original on 2003-01-26. Retrieved 2007-07-23.
- ^
«How to change the listening port for Remote Desktop». Retrieved 2010-11-18. - ^
«Frequently Asked Questions about Remote Desktop». Microsoft. Retrieved 2007-07-23. - ^ a b
Russinovich, Mark; Solomon, David A.; Ionescu, Alex (2012). Windows Internals (6th ed.). Redmond, WA: Microsoft Press. pp. 20–21. ISBN 978-0-7356-4873-9. - ^
«Architecture of Fast User Switching». Support. Microsoft. 15 January 2006. Retrieved 11 January 2014. - ^ «Remote Services». Log me in 123.
- ^ «Citrix and Microsoft Sign Technology Collaboration and Licensing Agreement». Citrix. 2004-12-21. Archived from the original on 2011-07-05. Retrieved 2012-04-13.
- ^
«How Terminal Services Works». Microsoft. 2003-03-28. Retrieved 2007-07-23. - ^ «Connection Configuration in Terminal Server». Support (5.0 ed.). Microsoft. 22 June 2014.
- ^ «Terminal Services Gateway (TS Gateway)». Microsoft TechNet. Retrieved 2009-09-10.
- ^ «Remote Desktop Protocol». Microsoft Developer Network (MSDN). Retrieved 2009-09-10.
- ^ «RD Gateway Documentation». Thincast. Retrieved 2021-10-17.
- ^ Waggoner, Rob. «Microsoft Has Released the HTML5-Based RDP Web Client». blog.mycloudit.com. Retrieved 2020-05-10.
- ^ «Remote Desktop HTML5 client on Windows Server 2019». msfreaks. 2018-10-06. Retrieved 2020-05-10.
- ^ «RD Web Client (HTML5) – New Features In 1.0.11». www.rdsgurus.com. Retrieved 2020-05-10.
- ^ Berson, Freek (2018-01-12). «The Microsoft Platform: HTML5 client for Microsoft Remote Desktop Services 2016: Remote Desktop Web Client». The Microsoft Platform. Retrieved 2020-05-10.
- ^ TechNet: Remote Desktop Licensing
- ^ «Description of the Remote Desktop Connection 6.1 client update for Terminal Services in Windows XP Service Pack 2». Retrieved 2010-11-18.
- ^ a b «Terminal Services RemoteApp (TS RemoteApp)». Retrieved 2007-07-23.
- ^ «Terminal Services RemoteApp Session Termination Logic». Retrieved 2007-10-02.
- ^ «How to enable RemoteApp (via RDP 7.0) within VirtualBox or VMWare running Windows 7, Vista SP1+ or Windows XP SP3». Retrieved 2010-11-18.
- ^ a b c «Windows Desktop Sharing». Retrieved 2007-10-11.
- ^ a b c «Windows Desktop Sharing API». Retrieved 2007-10-11.
- ^ a b «About Windows Desktop Sharing». Retrieved 2007-10-11.
- ^ «Remote Desktop Services — Access from anywhere». Microsoft.
{{cite web}}: CS1 maint: url-status (link) - ^ «Get started with the Android client». Microsoft.
{{cite web}}: CS1 maint: url-status (link) - ^ «Why doesn’t the New Folder command work in the root of a redirected drive resource in a Remote Desktop session?». The Old New Thing. Microsoft. 17 December 2013. Retrieved 18 December 2013.
- ^ Savill, John (1 October 2008). The Complete Guide to Windows Server 2008. Pearson Education. p. 1752. ISBN 978-0-13-279758-0. Retrieved 1 June 2012.
Windows XP, Windows Server 2003, Windows Vista, and Windows Server 2008 all contain the RDC tool,
mstsc.exe[…] MSTSC in the filenamemstsc.exestands for Microsoft Terminal Services Client. - ^ «Remote Desktop Connection». Remote Support.
- ^ Drager, Dave (27 March 2008). «How to Remotely Control your Mobile Phone from Desktop». MakeUseOf. Retrieved 27 January 2022.
- ^ Miniman, Brandon (2009-03-16). «Tutorial: Setting up Remote Desktop in Windows Mobile». PocketNow. Archived from the original on 2009-08-01. Retrieved 27 January 2022.
External links[edit]
- Welcome to Remote Desktop Services
- Download Chrome Remote Desktop
Эта
статья содержит рекомендации по установке и настройке службы
роли Узла сеансов удаленных рабочих столов (RDSH) на компьютере под управлением Windows Server 2012 без установки службы посредника подключений к удаленному рабочему столу (Remote Desktop Connection Broker).Такая конфигурация
должна быть использована только когда она является единственным доступным вариантом как рекомендуемая,и включает в себя Посредник подключений к удаленному рабочему столу для обеспечения доступа к полной функциональности Служб удаленного рабочего стола.
Если
на отдельном сервере
имеется контроллер домена, рекомендуется использовать стандартный мастер
развертывания Служб удаленного рабочего стола. Данная конфигурация подходит, когда есть только один сервер в сети.
Этот сервер может быть частью рабочей группы или может быть сконфигурирован как контроллер домена.
Эта
конфигурация будет предоставлять
сессии рабочего стола пользователям на основе количества клиентских лицензий (RDS CAL), установленных на сервере, но не будет предоставлять доступ к опубликованным приложениям RemoteApp или сайту RDWeb.
Рассмотрим установку
службы роли Узла
сеансов удаленных рабочих столов на компьютере под управлением
Windows Server 2012 без
службы Посредника подключений к удаленному рабочему столу.
Развертывание Узла
сеансов удаленных рабочих столов без
службы
Посредника подключений к удаленному рабочему столу
добавляет определенные требования и
соображения. Если не указано иное, шаги
относятся как к рабочей группе так и
контроллеру домена:
Если система должна быть
настроена как контроллер домена, установите
Службы роли Active Directory Domain
Services (AD DS) и повысьте сервер до
контроллера домена
Для более подробной информации о
том, как установить AD DS в
Windows Server 2012 посетите следующую
веб-страницу Microsoft:
http://technet.microsoft.com/en-us/library/hh472162
Установите службу удаленного
рабочего стола и лицензирования
Remote Desktop Session Host с использованием
следующих шагов:
Откройте Диспетчер сервера
Нажмите на Управление
и выберите Добавить роли
и компоненты
Выберите
установку на основе ролей
и компонентов
В разделе Службы удаленных рабочих столов, выберите
следующие службы ролей: Лицензирование
сеансов удаленных рабочих столов и
Узел сеансов удаленных рабочих столов.
Приступите к установке
Добавьте
сервер лицензий сервера терминалов в
группу серверов лицензий и перезапустите
сервис удаленного рабочего стола.
Вы можете добавить сервер
удаленных рабочих столов в группу
серверов лицензий, выполнив Licmgr.exe
и выбрав ссылку Обзор.
ИЛИ
Вы можете вручную добавить сервер в группу
серверов лицензий
(в случае контроллера домена это
встроенная группа)
Активируйте сервер лицензий
автоматически , используя графический интерфейс (Licmgr.exe)
Для получения дополнительной информации
о том, как активировать сервер лицензирования сеансов удаленных
рабочих столов:
http://technet.microsoft.com/en-us/library/cc771547.aspx
Установите соответствующие лицензии
RDSCAL.
Для получения дополнительной информации
по установке лицензий удаленных рабочих столов, посетите следующий
веб-страницы Microsoft:
http://technet.microsoft.com/en-us/library/cc725890.aspx
Если система является контроллером домена, добавьте
группу Domain Users
(или конкретный список
пользователей) в группу Разрешен
вход в систему через службу удаленных рабочих столов, используя
локальную групповую политику. Для редактирования
объектов групповой политики, выполните следующие действия:
- Откройте GPEDIT.MSC
- Откройте Конфигурацию компьютера, распахните Конфигурация Windows
, затем Параметры безопасности, затем Локальные политикиs и выберите
Назначение прав пользователя. - Дважды щелкните Разрешить вход через службу удаленных рабочих столов и затем
Добавить пользователя или группу. - Введите имя учетной записи, щелкните OK и снова OK
- Закройте Редактор локальной групповой политики.
Добавьте пользователей, для которых разрешены подключения, в группу Пользователей удаленного рабочего стола
Например: Пользователи домена. (в случае контроллера домена
это встроенная
группа)
Настройте Службу удаленных рабочих столов для использования локального сервера
Лицензирования сеансов удаленных рабочих столов.
Выполните следующие шаги:
Откройте окно Windows PowerShell с повышенными привилегиями
Введите следующую команду:
$obj = gwmi -namespace «Root/CIMV2/TerminalServices» Win32_TerminalServiceSetting
Выполните следующую команду для установки режима лицензирования:
Примечание: Значение 2 устанавливает лицензии для устройства,
4 для пользователя:
$obj.ChangeMode(value)
- Выполните следующую команду, чтобы заменить имя сервера с установленной ролью сервера лицензирования сеансов удаленных
рабочих столов:$obj.SetSpecifiedLicenseServerList(«LicServer»)
- Выполните следующую команду, чтобы проверить правильность выполнения шагов выше:
$obj.GetSpecifiedLicenseServerList()
В выводе команды должно отображаться имя сервера.
Установка и настройка терминального сервера на Windows Server
 Обновлено: 04.08.2019
Опубликовано: 19.09.2017
Что такое терминальный сервер.
Инструкция разбита на 6 шагов. Первых 3 представляют стандартные действия для настройки терминального сервера. Остальные являются профессиональными советами, которые помогут создать надежную и профессиональную инфраструктуру для сервера терминалов.
В качестве операционной системы используется Windows Server 2012 R2 / 2016.
Выбор оборудования и подготовка сервера
Установка Windows и базовая настройка
Установка и настройка терминального сервера
Подготовка системы
Установка роли и компонентов
Установка служб удаленных рабочих столов
Настройка лицензирования
Добавление лицензий
Тюнинг
Лимиты на сессии
Анализатор соответствия рекомендациям
Теневые копии
Ошибка 36888 (Source: schannel)
Средства обслуживания
Тестирование
Порт для подключения
Шаг 1. Выбор оборудования и подготовка сервера к работе
Выбор оборудования
Выбирая оборудование для данного типа серверов, необходимо опираться на требования приложений, которые будут запускаться пользователями и количество последних. Например, если устанавливается терминальный сервер для программы 1С, а количество одновременно работающих сотрудников равно 20, получим следующие характеристики (приблизительно):
- Процессор от Xeon E5.
- Памяти не менее 28 Гб (по 1 Гб на каждого пользователя + 4 для операционной системы + 4 запас — это чуть меньше 20%).
- Дисковую систему лучше построить на базе дисков SAS. Объем необходимо учесть индивидуально, так как это зависит от характера задач и методов их решения.
Также предлагаю для чтения статью Как выбрать сервер.
Подготовка сервера
Прежде чем начать установку операционной системы выполните следующее:
- Настройте отказоустойчивый RAID-массив (уровни 1, 5, 6 или 10, а также их комбинации). Данная настройка выполняется во встроенной утилите контроллера. Для ее запуска следуйте подсказкам на экране во время загрузки сервера.
- Подключите сервер к источнику бесперебойного питания (ИБП). Проверьте, что он работает. Отключите подачу питания на ИБП и убедитесь, что сервер продолжает работать.
Шаг 2. Установка Windows Server и базовая настройка системы
Установка системы
Во время установки системы важно учесть только один нюанс — дисковую систему необходимо разбить на два логических раздела. Первый (малый, 70 – 120 Гб) выделить для системных файлов, второй — под пользовательские данные.
На это есть две основные причины:
- Системный диск малого размера быстрее работает и обслуживается (проверка, дефрагментация, антивирусное сканирование и так далее)
- Пользователи не должны иметь возможность хранить свою информацию на системном разделе. В противно случае, возможно переполнение диска и, как результат, медленная и нестабильная работа сервера.
Базовая настройка Windows Server
- Проверяем правильность настройки времени и часового пояса;
- Задаем понятное имя для сервера и, при необходимости, вводим его в домен;
- Настраиваем статический IP-адрес;
- Если сервер не подключен напрямую к сети Интернет, стоит отключить брандмауэр;
- Для удаленного администрирования, включаем удаленный рабочий стол;
- Устанавливаем все обновления системы.
Шаг 3. Установка и настройка терминального сервера
Подготовка системы
Начиная с Windows 2012 терминальный сервер должен работать в среде Active Directory.
Если в вашей IT-среде есть контроллер домена, просто присоединяем к нему наш сервер. В противном случае, устанавливаем на наш сервер роль контроллера.
Установка роли и компонентов
В панели быстрого запуска открываем Диспетчер серверов:

Кликаем Управление — Добавить роли и компоненты:

Нажимаем Далее до «Выбор типа установки». Оставляем Установка ролей и компонентов и нажимаем Далее дважды:

В окне «Выбор ролей сервера» выбираем Службы удаленных рабочих столов:

Кликаем Далее, пока не появится окно «Выбор служб ролей» и выбираем следующие:
- Лицензирование удаленных рабочих столов
- Узел сеансов удаленных рабочих столов

* при появлении запроса на установку дополнительных компонентов соглашаемся.
При необходимости, также выставляем остальные галочки:
- Веб-доступ — возможность выбора терминальных приложений в браузере
- Посредник подключений — для кластера терминальных серверов посредник контролирует нагрузку каждой ноды и распределяет ее.
- Узел виртуализации — для виртуализации приложений и запуска их через терминал.
- Шлюз — центральный сервер для проверки подлинности подключения и шифрования трафика. Позволяет настроить RDP внутри HTTPS.
Нажимаем Далее и в следующем окне Установить. Дожидаемся окончания процесса установки и перезагружаем сервер.
Установка служб удаленных рабочих столов
После перезагрузки открываем Диспетчер серверов и нажимаем Управление — Добавить роли и компоненты:

В окне «Выбор типа установки» выбираем Установка служб удаленных рабочих столов и нажимаем Далее:

В окне «Выбор типа развертывания» выбираем Быстрый запуск и нажимаем Далее:

В «Выбор сценария развертывания» — Развертывание рабочих столов на основе сеансов — Далее:

Еще раз Далее — при необходимости, ставим галочку «Автоматически перезапускать конечный сервер, если это потребуется» и кликаем по Развернуть.
Настройка лицензирования удаленных рабочих столов
Для корректной работы сервера, необходимо настроить службу лицензирования. Для этого открываем диспетчер серверов и кликаем по Средства — Terminal Services — Диспетчер лицензирования удаленных рабочих столов:

В открывшемся окне кликаем правой кнопкой мыши по нашему серверу и выбираем Активировать сервер:

В открывшемся окне дважды кликаем Далее — заполняем форму — Далее — Далее — Снимаем галочку «Запустить мастер установки лицензий» — Готово.
Снова открываем диспетчер серверов и переходим в «Службы удаленных рабочих столов»:

В «Обзоре развертывания» кликаем по Задачи — Изменить свойства развертывания:

В открывшемся окне переходим в Лицензирование — Выбираем тип лицензий — прописываем имя сервера лицензирования (в данном случае локальный сервер) и наживаем Добавить:

Применяем настройки, нажав OK.
Добавление лицензий
Открываем диспетчер серверов и кликаем по Средства — Terminal Services — Диспетчер лицензирования удаленных рабочих столов:
В открывшемся окне кликаем правой кнопкой мыши по нашему серверу и выбираем Установить лицензии:
В открывшемся окне нажимаем Далее — выбираем программу, по которой куплены лицензии, например, Enterprise Agreement — Далее — вводим номер соглашения и данные лицензии — выбираем версию продукта, тип лицензии и их количество — Далее — Готово.
Проверить статус лицензирования можно в диспетчере серверов: Средства — Terminal Services — Средство диагностики лицензирования удаленных рабочих столов.
Шаг 4. Тюнинг терминального сервера
Ограничение сессий
По умолчанию, пользователи удаленных рабочих столов могут находиться в системе в активном состоянии без ограничения. Это может привести к зависаниям или проблемам при повторном подключении. Для решения возможных проблем установите ограничения на терминальные сессии.
Анализатор соответствия рекомендациям
Для некоторых серверных ролей Windows (в частности, терминальных) существует база успешных конфигураций. Придерживаясь советам данной базы можно повысить надежность и стабильность системы.
Для сервера удаленных рабочих столов, как правило, необходимо выполнить следующие рекомендации:
1. Файл Srv.sys должен быть настроен на запуск по требованию.
В командной строке от имени администратора вводим:
sc config srv start= demand
2. Создание коротких имен файлов должно быть отключено.
В командной строке от имени администратора вводим:
fsutil 8dot3name set 1
Теневые копии
Если подразумевается хранение ценной информации на терминальном сервере, стоит настроить возможность восстановления предыдущих версий файлов.
Как настроить и пользоваться данной возможностью, читайте подробнее в инструкции Как включить и настроить теневые копии.
Ошибка 36888 (Source: schannel)
В журнале Windows может появляться ошибка «Возникло следующее неустранимое предупреждение: 10. Внутреннее состояние ошибки: 1203.» от источника Schannel и кодом 36888. Ее причину, однозначно, определить мне не удалось. Во многих информационных источниках пишут, что это давно известная проблема и списывают на ошибку самой операционной системы.
Точного решения найти не удалось, но можно отключить ведение лога для Schannel. Для этого в редакторе реестра находим ветку HKLMSYSTEMCurrentControlSetControlSecurityProvidersSchannel — в ней параметр EventLogging и меняем его значение на 0. Команда для редактирования реестра:
reg add «HKLMSYSTEMCurrentControlSetControlSecurityProvidersSchannel» /v EventLogging /t REG_DWORD /d 0 /f
* данную команду необходимо выполнить из командной строки, запущенной от администратора.
Шаг 5. Настройка средств обслуживания
Основные средства, помогающие полноценно обслуживать сервер — мониторинг и резервное копирование.
Резервное копирование
Для терминального сервера необходимо резервировать все рабочие каталоги пользователей. Если на самом сервере организована общий каталог для обмена и хранения важной информации, копируем и его. Лучшим решением будет ежедневное копирование новых данных, и с определенной периодичностью (например, раз в месяц), создание полного архива.
Мониторинг
Мониторить стоит:
- Сетевую доступность сервера;
- Свободное дисковое пространство.
Шаг 6. Тестирование
Тестирование состоит из 3-х основных действий:
- Проверить журналы Windows и убедиться в отсутствие ошибок. В случае их обнаружения, необходимо устранить все проблемы.
- Выполнить действия анализатора соответствий рекомендациям.
- Провести живой тест работы сервиса с компьютера пользователя.
Особый порт для подключения
По умолчанию, для подключения к терминальному серверу по RDP используется порт 3389. Если необходимо, чтобы сервер слушал на другом порту, открываем реестр, и переходим в ветку:
HKEY_LOCAL_MACHINESystemCurrentControlSetControlTerminal ServerWinStationsRDP-Tcp
Находим ключ PortNumber и задаем ему значение в десятично представлении, равное нужному номеру порта:

Также можно применить команду:
reg add «HKLMSystemCurrentControlSetControlTerminal ServerWinStationsRDP-Tcp» /v PortNumber /t REG_DWORD /d 3388 /f
* где 3388 — номер порта, на котором будет принимать запросы терминальный сервер.
RDP (англ. Remote Desktop Protocol — протокол удалённого рабочего стола) — проприетарный протокол прикладного уровня, применяемый для организации удалённой работы пользователя с сервером, на котором запущен сервис терминальных подключений. Клиенты существуют практически для всех версий Windows (включая Windows CE, Phone и Mobile), Linux, FreeBSD, Mac OS X, iOS, Android, Symbian. Установка роли RDP на сервер Windows происходит в два этапа: вначале устанавливается служба удаленных рабочих столов, после этого определяем сервер лицензирования.
1. Установка службы удаленных рабочих столов
Запускаем Диспетчер серверов. Его можно запустить с ярлыка на панели задач, либо – выполнив команду servermanager.exe: для этого необходимо нажать комбинацию клавиш Win + R, в появившемся окне в поле «Открыть» (Open) написать имя команды и нажать «ОК»:

В меню, в верхнем правом углу, выбираем «Управление» (Manage) → «Добавить роли и компоненты» (Add Roles and Features):

Запустится «Мастер добавления ролей и компонентов» (Add Roles and Features Wizard). Нажимаем «Далее» (Next) на начальной странице:

Оставляем переключатель на «Установка ролей и компонентов» (Role-based or features-based installation) и снова жмем «Далее» (Next):

Выбираем тот сервер из пула серверов, на который будет установлена служба терминалов. В моем примере это данный локальный сервер. Нажимаем «Далее» (Next):

Отмечаем роль «Службы удаленных рабочих столов» (Remote Desktop Services) в списке ролей и жмем «Далее» (Next):

Компоненты оставляем в том виде, как они есть. Ничего не отмечая, жмем «Далее» (Next):

Читаем описание службы удаленных рабочих столов и нажимаем «Далее» (Next):

Теперь необходимо выбрать устанавливаемые службы ролей. Как минимум нам пригодится «Лицензирование удаленных рабочих столов» (Remote Desktop Licensing). Соглашаемся на установку дополнительных компонентов, нажав на «Добавить компоненты» (Add Features) в появившемся мастере:

Еще нам понадобится «Узел сеансов удаленных рабочих столов» (Remote Desktop Session Host) – опять соглашаемся на установку дополнительных компонентов, нажав на «Добавить компоненты» (Add Features) в открывшемся окне. Отметив необходимые службы ролей, нажимаем «Далее» (Next):

Все параметры установки роли определены. На последней странице установим флаг «Автоматический перезапуск конечного сервера, если требуется» (Restart the destination server automatically if required) , подтвердим выбор нажав «Да» (Yes) в появившемся окне и нажмем «Установить» (Install) для запуска установки службы:

Если все прошло хорошо, после перезагрузки, увидим сообщение об успешной установке всех выбранных служб и компонентов. Нажимаем «Закрыть» (Close) для завершения работы мастера:

2. Определение сервера лицензирования для службы удаленных рабочих столов
Теперь запустим «Средство диагностики лицензирования удаленных рабочих столов» (RD Licensing Diagnoser) . Сделать это можно из диспетчера серверов, выбрав в правом верхнем меню «Средства» (Tools) → «Terminal Services» → «Средство диагностики лицензирования удаленных рабочих столов» (RD Licensing Diagnoser):

Здесь мы видим, что доступных лицензий пока нет, поскольку не задан режим лицензирования для сервера узла сеансов удаленных рабочих столов:

Сервер лицензирования указывается теперь в локальных групповых политиках. Для запуска редактора выполним команду gpedit.msc:

Откроется редактор локальной групповой политики. В дереве слева раскроем вкладки:
- Конфигурация компьютера» (Computer Configuration) → «Административные шаблоны» (Administrative Templates) → «Компоненты Windows» (Windows Components) → «Службы удаленных рабочих столов» (Remote Desktop Services) → «Узел сеансов удаленных рабочих столов» (Remote Desktop Session Host) → «Лицензирование» (Licensing).
Откроем параметры «Использовать указанные серверы лицензирования удаленных рабочих столов» (Use the specified Remote Desktop license servers), кликнув дважды по соответствующей строке:

В окне редактирования параметров политики переставим переключатель в положение «Включено» (Enabled) . Затем необходимо определить сервер лицензирования для службы удаленных рабочих столов. В моем примере сервер лицензирования находится на этом же физическом сервере. Указываем сетевое имя или IP-адрес сервера лицензий и нажимаем «ОК»:

Далее меняем параметры политики «Задать режим лицензирования удаленных рабочих столов» (Set the Remote licensing mode) . Также устанавливаем переключатель в положение «Включено» (Enabled) и указываем режим лицензирования для сервера узла сеансов удаленных рабочих столов. Возможны 2 варианта:
- «На пользователя» (Per User)
- «На устройство» (Per Device)
Для того, чтобы разобраться, чем отличаются эти режимы, рассмотрим простой пример. Предположим, у вас есть 5 лицензий. При режиме «На устройство» вы можете создать неограниченное число пользователей на сервере, которые смогут подключаться через удаленный рабочий стол только с пяти компьютеров, на которых установлены эти лицензии. Если выбрать режим «На пользователя», то зайти на сервер смогут только пять выбранных пользователей, независимо от того, с какого устройства они подключаются.
Выбираем тот режим, который в большей степени соответствует вашим потребностям, и нажимаем «ОК»:

Изменив вышеперечисленные политики, закрываем редактор:

Возвращаемся в оснастку «Средство диагностики лицензирования удаленных рабочих столов» (RD Licensing Diagnoser) и видим новую ошибку, указывающую на то, что сервер лицензирования указан, но не включен:

Для запуска сервера лицензирования переходим в «Диспетчер лицензирования удаленных рабочих столов» (RD Licensing Manager). Найти его можно в диспетчере серверов, вкладка «Средства» (Tools) → «Terminal Services» → «Диспетчер лицензирования удаленных рабочих столов» (Remote Desktop Licensing Manager):

Здесь найдем наш сервер лицензирования со статусом «Не активирован» (Not Activated) . Для активации кликаем по нему правой кнопкой мыши и в контекстном меню выбираем «Активировать сервер» (Activate Server):

Запустится Мастер активации сервера. Жмем «Далее» (Next) на первой странице мастера:

Затем выбираем метод подключения («Авто» (Automatic connection) – по умолчанию) и жмем «Далее» (Next):

Вводим сведения об организации (эти поля обязательны для заполнения) после чего жмем «Далее» (Next):

Вводим дополнительные сведения об организации (необязательно) и снова нажимаем «Далее» (Next):

Сервер лицензирования активирован. Теперь следует установить лицензии. Для этого нажимаем «Далее» (Next), оставляя отметку в чекбоксе «Запустить мастер установки лицензий»:

3. Установка лицензий на сервер лицензирования службы удаленных рабочих столов
Нажимаем «Далее» (Next) на начальной странице Мастера установки лицензий:

Затем выбираем необходимую вам программу лицензирования. В нашем примере это «Соглашение «Enterprise Agreement». Жмем «Далее» (Next):

Вводим номер соглашения и нажимаем «Далее» (Next):
Указываем версию продукта, тип лицензии и количество лицензий в соответствии с вашей программой лицензирования. Жмем «Далее» (Next):

Дожидаемся завершения работы мастера установки лицензий с сообщением о том, что запрошенные лицензии успешно установлены:

В диспетчере лицензирования убеждаемся, что сервер работает, а также видим общее и доступное число установленных лицензий:

Наконец, возвращаемся в «Средства диагностики лицензирования удаленных рабочих столов» (RD Licensing Diagnoser) и видим, что ошибок нет, а число лицензий, доступных клиентам, соответствует тому, что мы вводили на предыдущем шаге:

На этом установка сервера терминалов в Windows Server 2012 завершена.
Также читайте
Previous
Next