Были ли сведения полезными?
(Чем больше вы сообщите нам, тем больше вероятность, что мы вам поможем.)
(Чем больше вы сообщите нам, тем больше вероятность, что мы вам поможем.)
Насколько вы удовлетворены качеством перевода?
Что повлияло на вашу оценку?
Моя проблема решена
Очистить инструкции
Понятно
Без профессиональной лексики
Полезные изображения
Качество перевода
Не соответствует интерфейсу
Неверные инструкции
Слишком техническая информация
Недостаточно информации
Недостаточно изображений
Качество перевода
Добавите что-нибудь? Это необязательно
Спасибо за ваш отзыв!
×
Статья обновлена: 13 июля 2022
ID: 3580
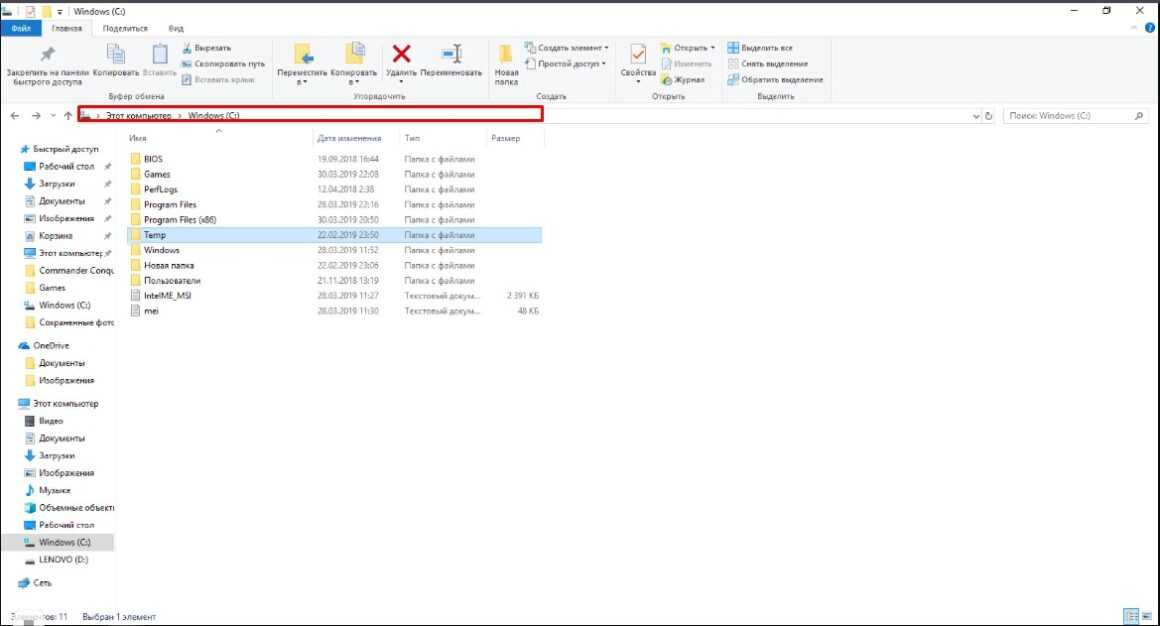
В некоторых случаях вам могут понадобиться файлы и папки, которые по соображениям безопасности могут быть скрыты от просмотра. Проверьте, включен ли на вашем компьютере режим отображения скрытых файлов и папок.
Windows 11
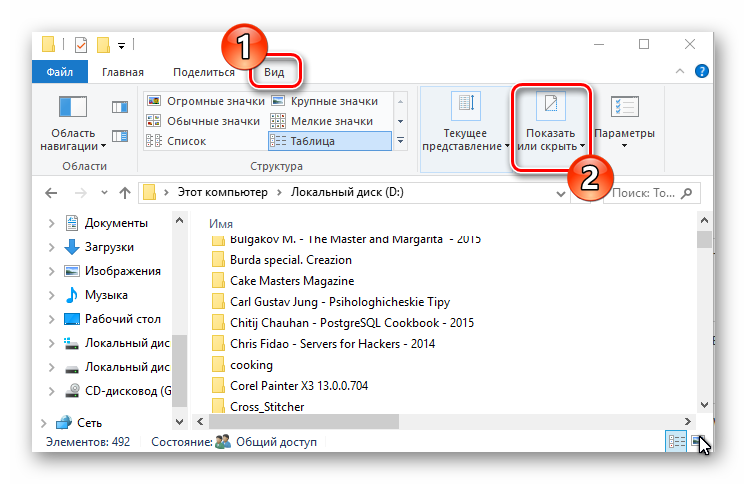
- Откройте любую папку на вашем компьютере.

- Нажмите Просмотреть → Показать → Скрытые элементы.

Скрытые элементы будут показаны.
Windows 10
- Откройте любую папку на вашем компьютере.

- Перейдите на вкладку Вид.
- Нажмите Показать или скрыть.
- Убедитесь, что установлен флажок Скрытые элементы.

Скрытые элементы будут показаны.
Windows 8, 8.1
- Откройте любую папку на вашем компьютере.

- Перейдите на вкладку Вид.
- Нажмите Показать или скрыть.
- Убедитесь, что установлен флажок Скрытые элементы.

Скрытые элементы будут показаны.
Windows 7
- Нажмите Пуск → Панель управления.

- В правом верхнем углу нажмите Категория и выберите Мелкие значки.

- Нажмите Параметры папок.

- Перейдите на вкладку Вид.
- Убедитесь, что выбран пункт Показывать скрытые файлы, папки и диски.
- Нажмите Применить.

Скрытые элементы будут показаны.
Windows Vista
- Нажмите Пуск → Панель управления.

- В левом верхнем углу выберите Классический вид.
- Нажмите Свойства папки.

- Перейдите на вкладку Вид.
- Убедитесь, что выбран пункт Показывать скрытые файлы и папки.
- Нажмите ОК.

Скрытые элементы будут показаны.
Windows XP
- Нажмите Пуск → Панель управления.

- Нажмите Сервис и выберите Свойства папки.
14-118602.gif "Переход в Свойства папки в Windows XP")
- Перейдите на вкладку Вид.
- Убедитесь, что выбран пункт Показывать скрытые файлы и папки.
- Нажмите ОК.
14-118603.gif "Настройка отображения скрытых элементов в Windows XP")
Скрытые элементы будут показаны.
Содержание
- Способы отображения скрытых файлов в Windows 10
- Способ 1: отображение скрытых объектов с помощью Total Commander
- Способ 2: отображение скрытых директорий штатными средствами ОС
- Способ 3: настройка скрытых элементов
- Вопросы и ответы
По умолчанию разработчики ОС Windows 10 сделали важные системные каталоги и файлы скрытыми, как это было и в более ранних версиях системы. Их, в отличии от обычных папок, нельзя увидеть в Проводнике. В первую очередь, это сделано для того, чтобы пользователи не удаляли элементов, необходимых для корректного функционирования Виндовс. Также скрытыми могут быть директории, которым установили соответствующий атрибут другие пользователи ПК. Поэтому иногда необходимо отобразить все скрытые объекты и получить к ним доступ.
Существует довольно много способов отображения скрытых каталогов и файлов. Среди них можно выделить способы, прибегающие к использованию специальных программ и способы, использующие встроенные инструменты ОС Windows. Давайте рассмотрим наиболее простые и популярные методы.
Способ 1: отображение скрытых объектов с помощью Total Commander
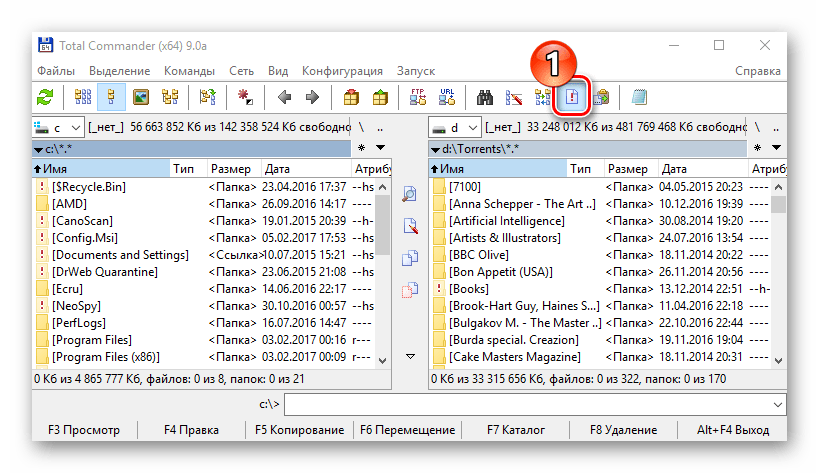
Total Commander — надежный и мощный файловый менеджер для ОС Windows, который к тому же позволяет увидеть все файлы. Для этого выполните следующий набор действий.
- Установите Total Commander с официального сайта и откройте это приложение.
- В главном меню программы нажмите иконку «Показ скрытых и системных файлов: вкл/выкл».
- Откройте Проводник.
- В верхней панели Проводника щелкните на вкладке «Вид», а потом на группе «Параметры».
- Нажмите «Изменить параметры папок и поиска».
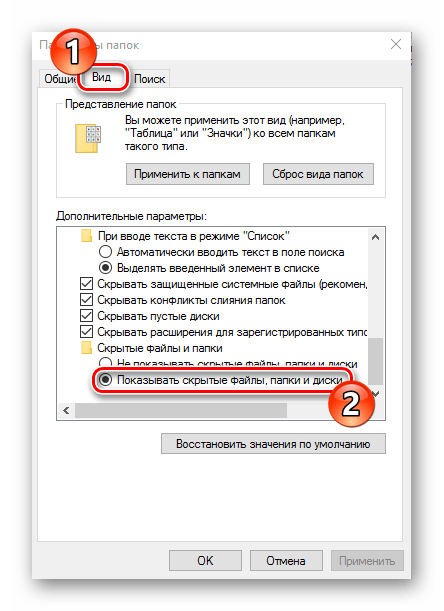
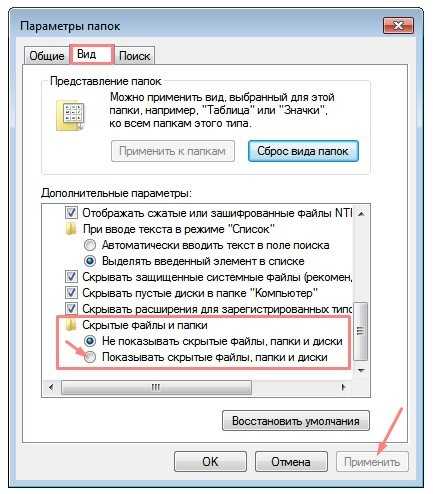
- В окне, которое появится, осуществите переход на вкладку «Вид». В разделе «Дополнительные параметры» обозначьте пункт «Показывать скрытые файлы, папки и диски». Также здесь при крайней необходимости можно снять отметку с графы «Скрывать защищенные системные файлы».
- Откройте Проводник.
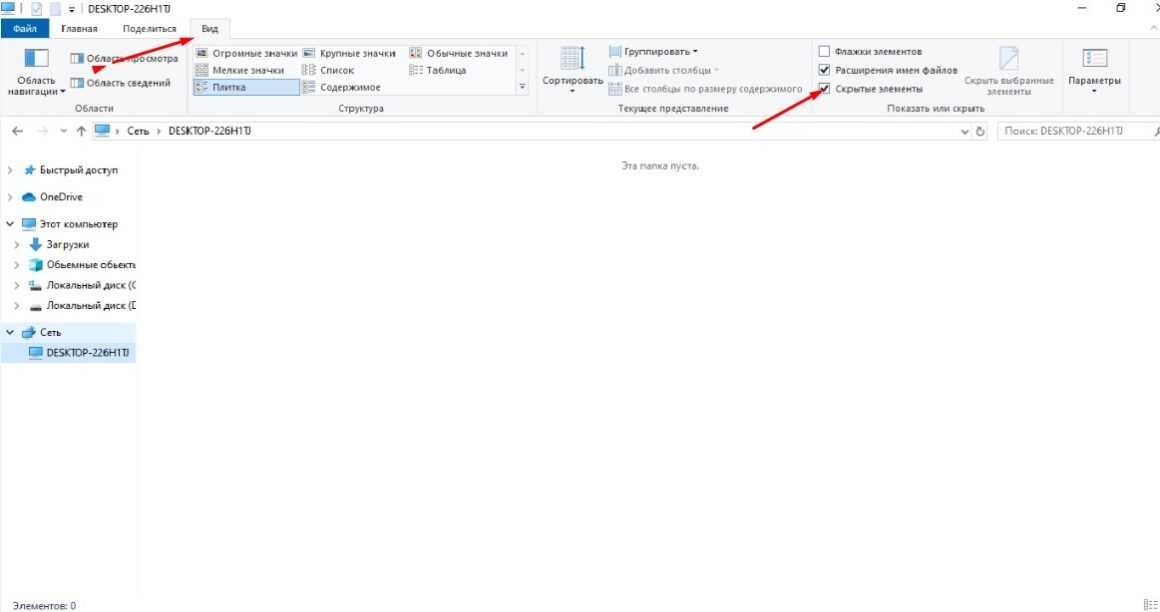
- В верхней панели Проводника осуществите переход на вкладку «Вид», а потом щелкните на элементе «Показать или скрыть».
- Поставьте отметку напротив графы «Скрытые элементы».
Если после установки Total Commander Вы не видите ни скрытых файлов, ни иконки, то следует нажать кнопку «Конфигурация», а затем «Настройка…» и в окне, что откроется, в группе «Содержимое панелей» поставьте отметку напротив графы «Показывать скрытые файлы». Более подробно об этом в статье o Total Commander.
Способ 2: отображение скрытых директорий штатными средствами ОС

Способ 3: настройка скрытых элементов
В результате этих действий можно сделать видимыми скрытые директории и файлы. Но стоит заметить, что с точки зрения безопасности — это делать не рекомендуется.
Еще статьи по данной теме:
Помогла ли Вам статья?
Обновлено 13.05.2022

Скрытые папки в Windows 10
Всем привет! Сегодня разберем скрытые папки в Windows 10, что это такое и для чего они нужны, как их посмотреть и создать, данное знание вам очень поможет в устранении таких проблема, как например лечение компьютера от вируса или трояна, или изменить какие то тонкие настройки утилиты установленной на вашем компьютере. Так, что присаживайтесь и читайте, будет интересно.
Что такое скрытые файлы
Скрытые файлы — это файлы или папки в Windows которые имеют атрибут H — hidden (скрытый). По умолчанию скрыты системные файлы и некоторая часть профиля пользователя. При желании вы можете сделать любую папку или файл в Windows 10 скрытым.
Как скрыть файлы windows
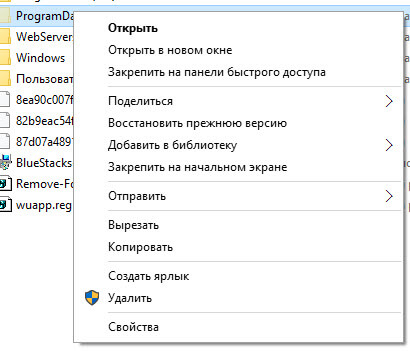
Для того, чтобы скрыть файлы windows нужно выбрать любой файл или папку и щелкнуть по ней правым кликом и выбрать из контекстного меню свойства.
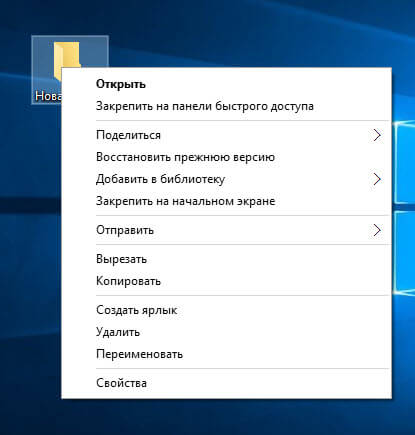
скрыть файлы windows
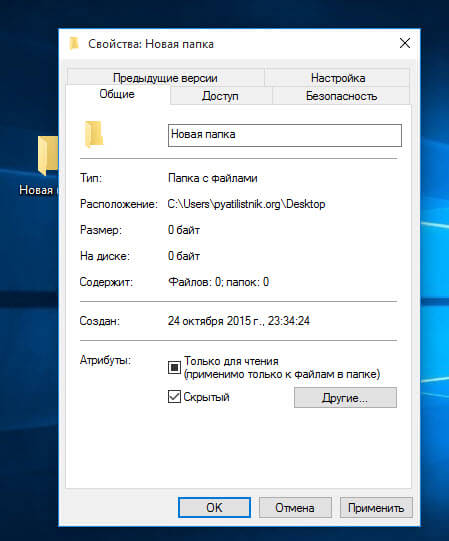
Далее чтобы например скрыть папку выбираем пункт Скрытый. В результате вы пометите папку атрибутом Hidden. В результате чего если не включено отображение скрытых файлов, она пропадет из поля видимости.
как скрыть папку
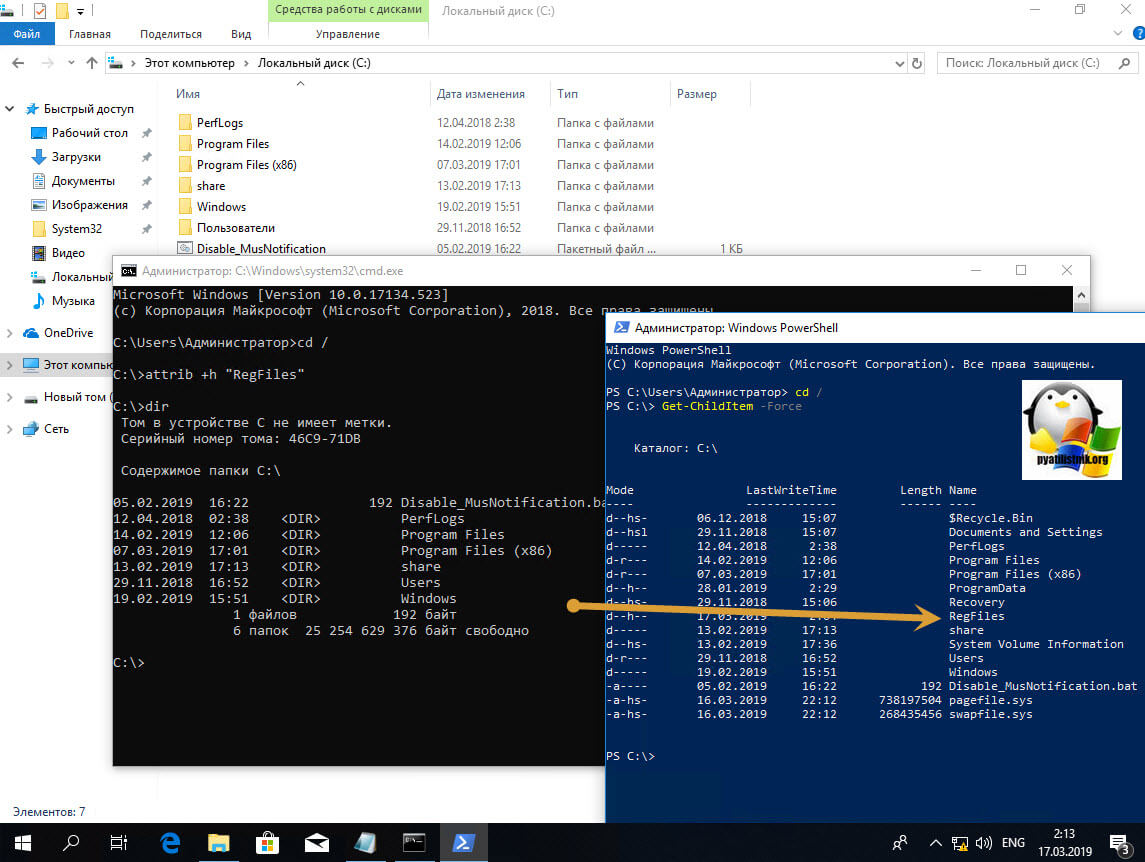
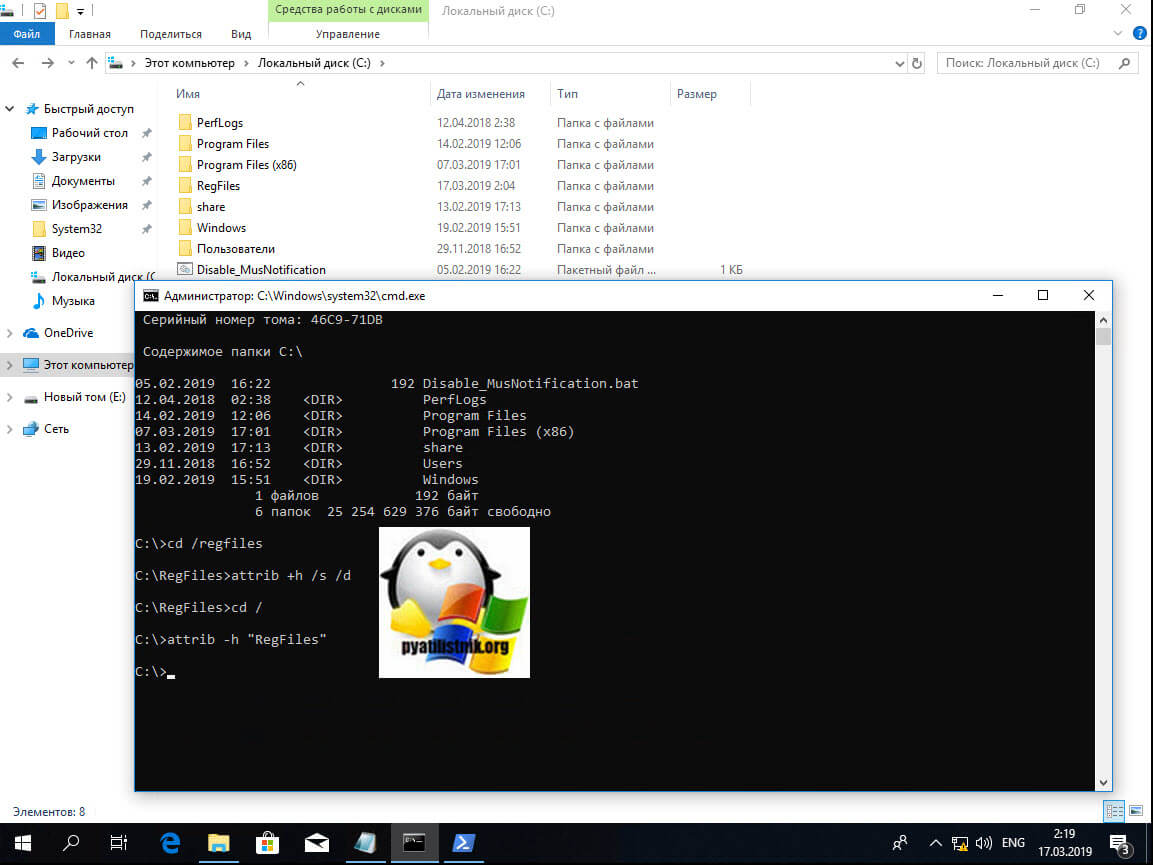
То же самое можно выполнить и из командной строки. Предположим, что я хочу сделать папку C:RegFiles скрытой. Для этого находясь в командной строке, желательно открытой от имени администратора, перейти в нужный каталог, где содержится нужный объект, напоминаю, что моя папка лежит в корне диска C:
cd / — перехожу в корень
attrib +h «Тут пишем имя вашей папки»
В итоге мы установили на папку атрибут «Скрытый»
Если вам необходимо поставить скрытый атрибут у всех папок и файлов в вашей папке, то нужно выполнить вот такую команду:
cd C:RegFiles — Переходим в вашу папку
attrib +h /s /d — устанавливаем атрибуты
Чтобы сделать папку видимой вам необходимо в командной строке выполнить:
cd / — перехожу в корень, так как у меня папка тут, у вас может быть другой путь
attrib -h «Имя вашей папки»
Введите следующую команду, чтобы удалить скрытый атрибут из всех файлов и папок внутри папки, и нажмите Enter :
cd C:RegFiles — у вас может быть другой путь
attrib -h /s /d
Методы показа скрытых папок в Windows 10
Если вы задались задачей по отображению скрытых файлов, то для этого существует ряд методов, о которых ниже пойдет речь:
- Использование проводника Windows
- Использование панели управления
- Через реестр Windows
- С помощью командлетов PowerShell
Включить отображение скрытых папок и файлов через проводник
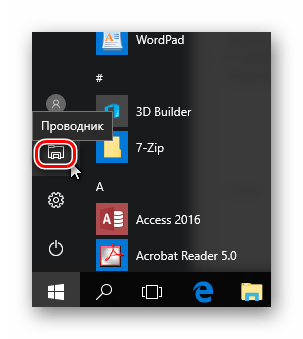
Для того чтобы разрешить просмотр скрытых элементов в windows 10 открываем «Этот компьютер», и выбираем пункт «Вид».

Открываем этот компьютер
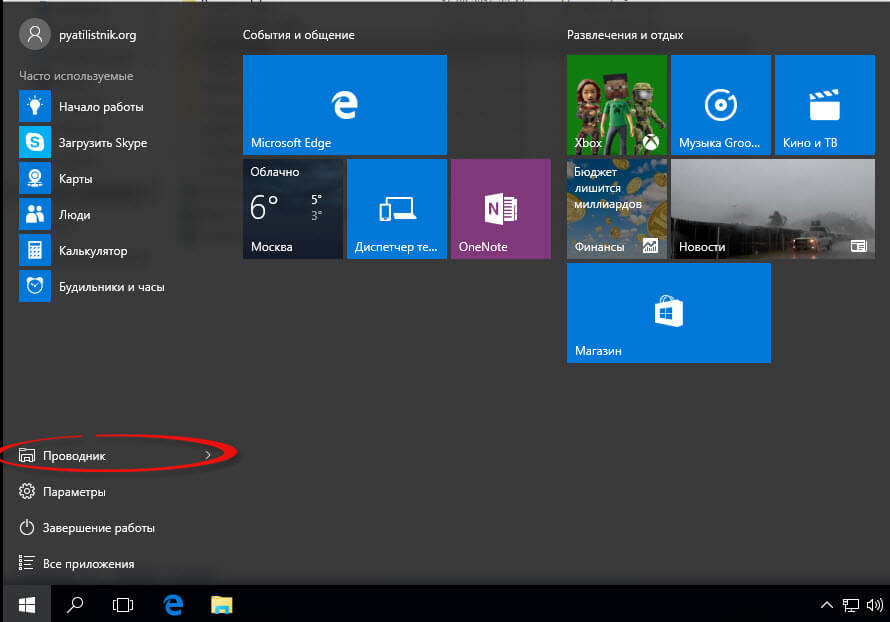
Либо кнопка пуск-Проводник
проводник Windows 10
Видим, что не стоит галка скрытые элементы, исправляем это.
скрытые элементы
Сразу можете заметить, что на диске С появились новые элементы, которых ранее не было.
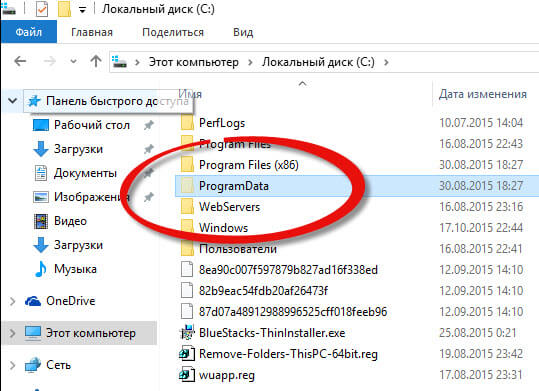
скрытые папки
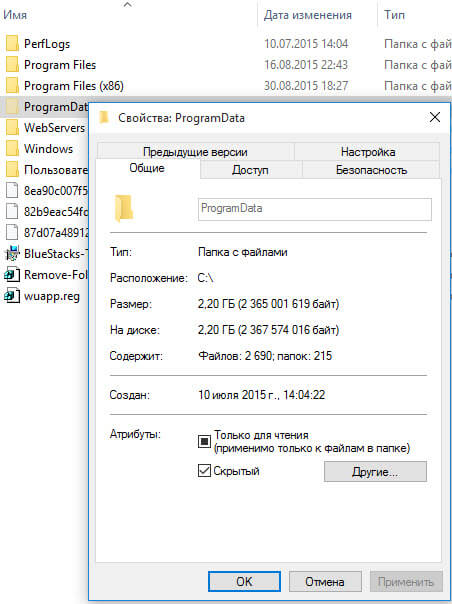
Посмотрим свойства данной папки
свойства скрытого элемента
Как можете заметить стоит атрибут hidden.
скрытые файлы windows
Windows 10 по умолчанию прячет такие системные папки для того, чтобы тот кто их хочет заменить и что либо сделать был человеком понимающим в этом деле, и если он включил скрытые папки, то точно знает что делает.
Как включить отображение системных файлов Windows 10
Тут тоже все очень просто, нажимаем клавиши Win+Q. В результате чего у вас откроется поисковая форма меню пуск.
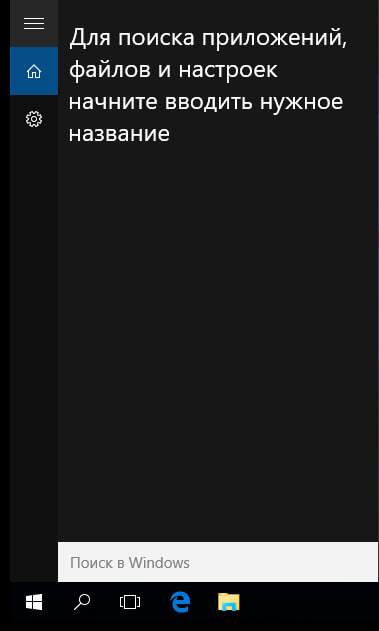
Поисковая форма Windows 10
В поисковой форме вводим параметры проводника
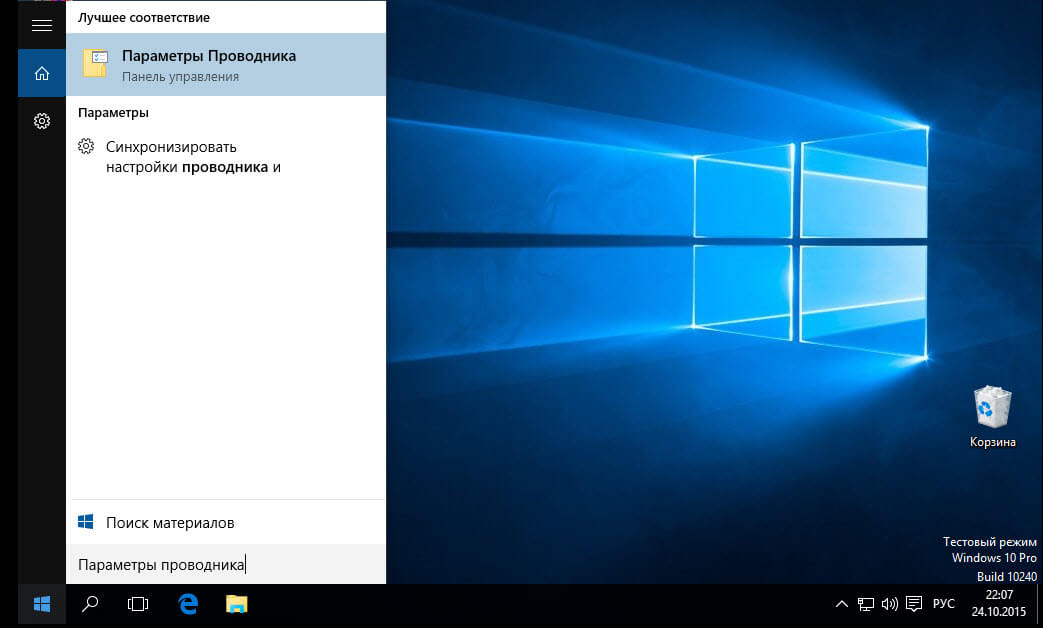
Параметры проводника Windows 10
Также параметры проводника можно открыть, через панель управления Windows 10, для этого щелкаем правым кликом по кнопке пуск
панель управления Windows 10
В панели управления выбираем Параметры проводника
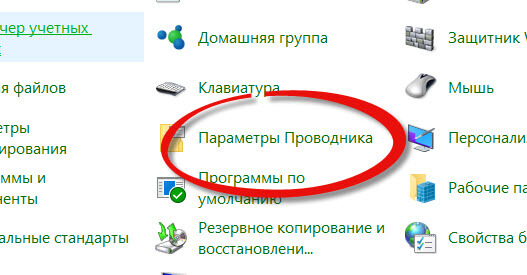
Параметры проводника
В открывшейся форме выбираем вкладку Вид.Обратите внимание что для отображения скрытых элементов нужно выставить галку Показывать скрытые файлы, папки и диски, а для системных файлов снимаем галку Скрывать защищенные системные файлы (рекомендуется), после чего они появятся, среди них например вы увидите файл подкачки.
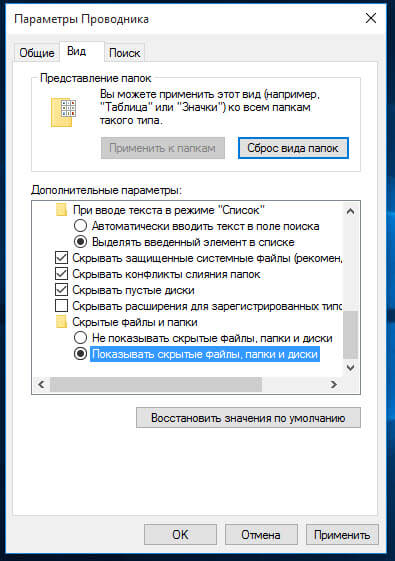
Вкладка вид
Когда будите снимать Скрывать защищенные системные файлы (рекомендуется), появится предупреждение, жмете Да.
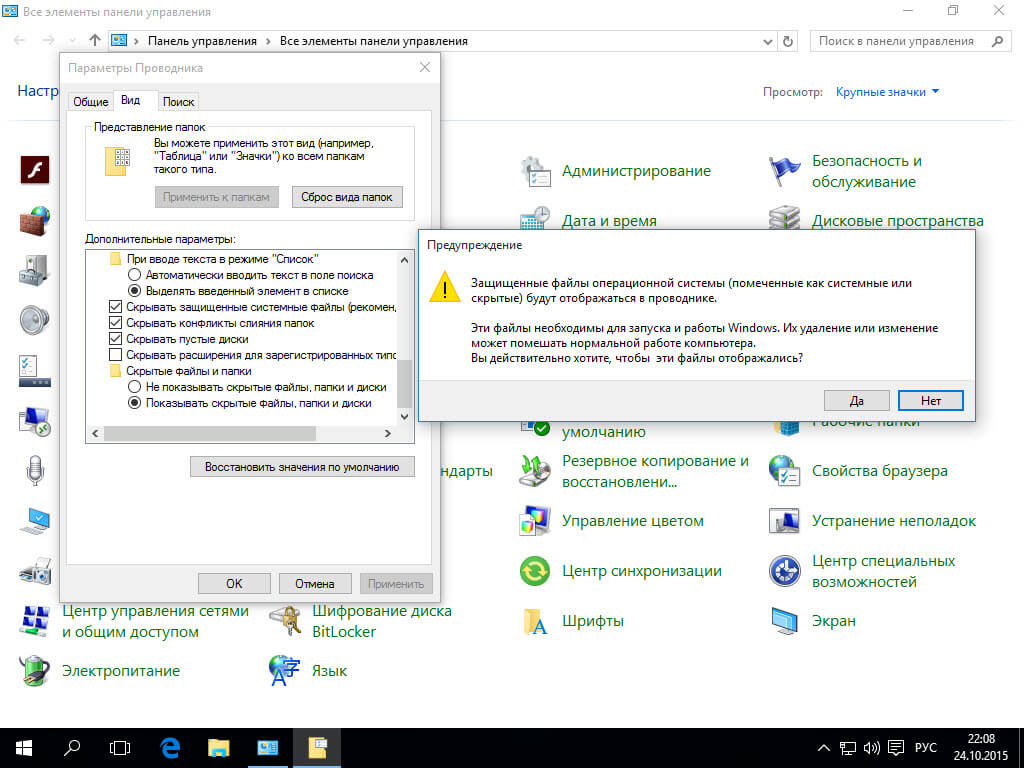
Скрывать защищенные системные файлы (рекомендуется)
У вас должно получиться вот такой вид

Если вы перейдете на рабочий стол то сразу можете заметить новые системные файлы.
рабочий стол windows 10
Управление скрытыми папками и файлами через параметры Windows
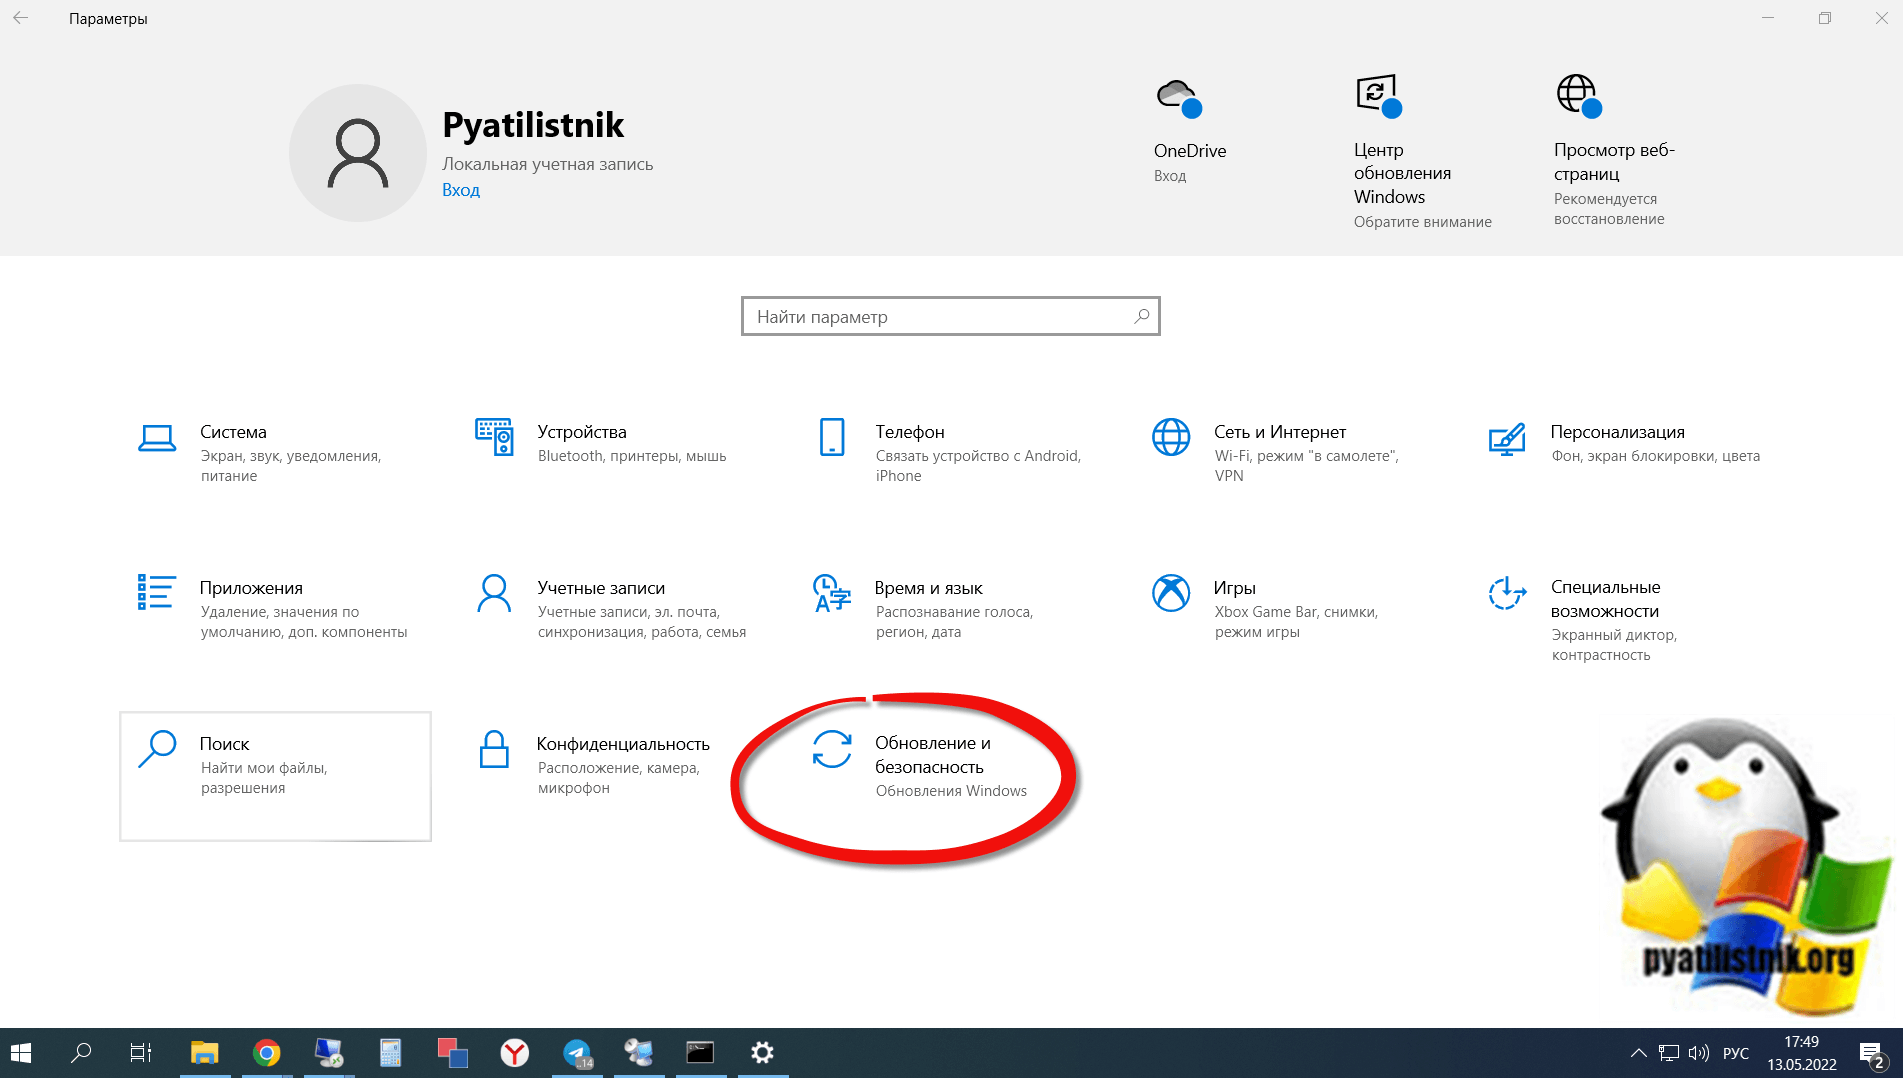
Откройте параметры Windows, через сочетание клавиш WIN и I. Далее вы должны пройти в раздел «Обновление и безопасность«.
В левой части находим меню «Для разработчиков» в ней есть область «Проводник«. Найдите пункт «Изменить параметры так, чтобы показать скрытые и системные файлы«
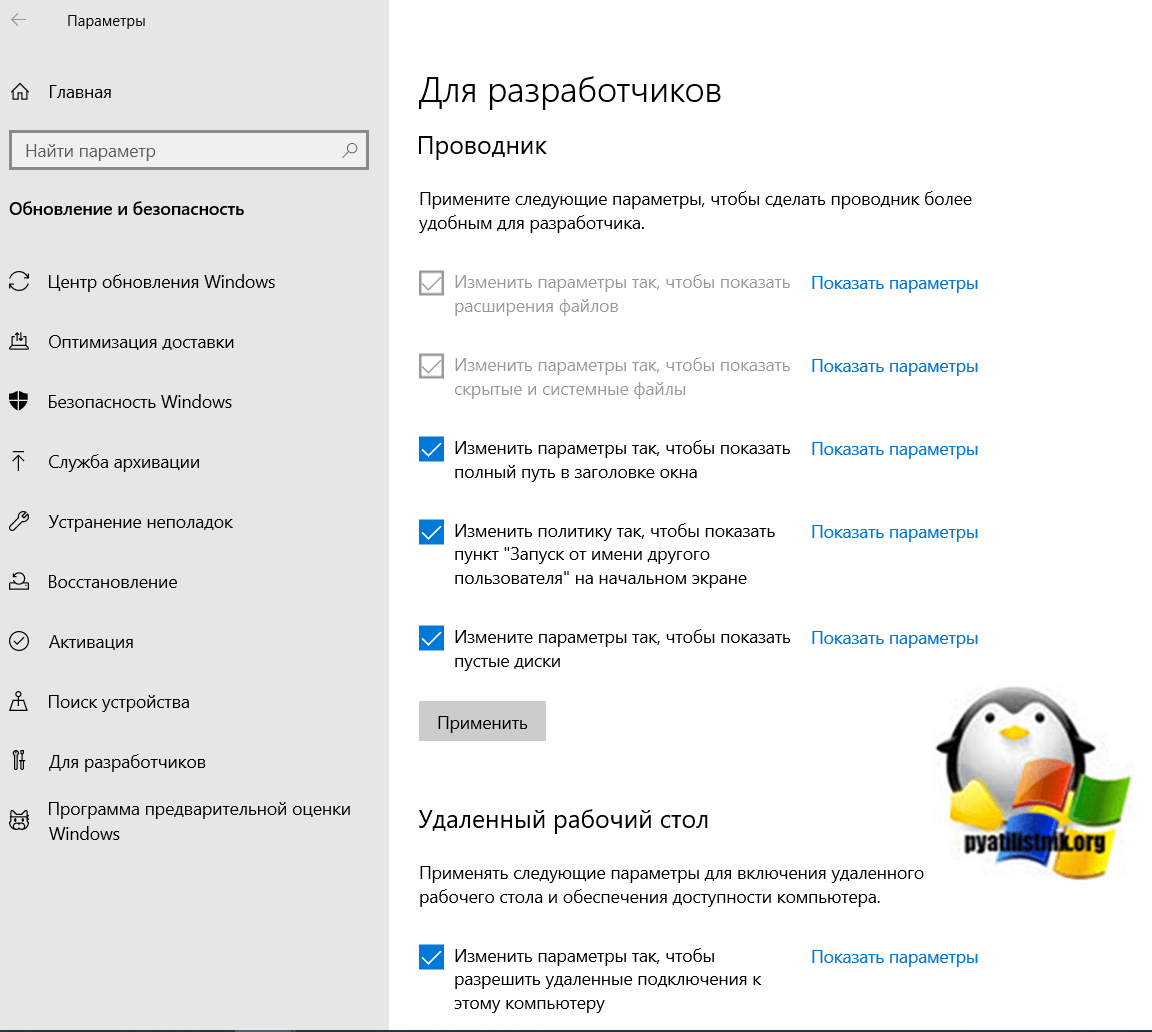
И, о чудо у вас откроется привычное окно параметром проводника
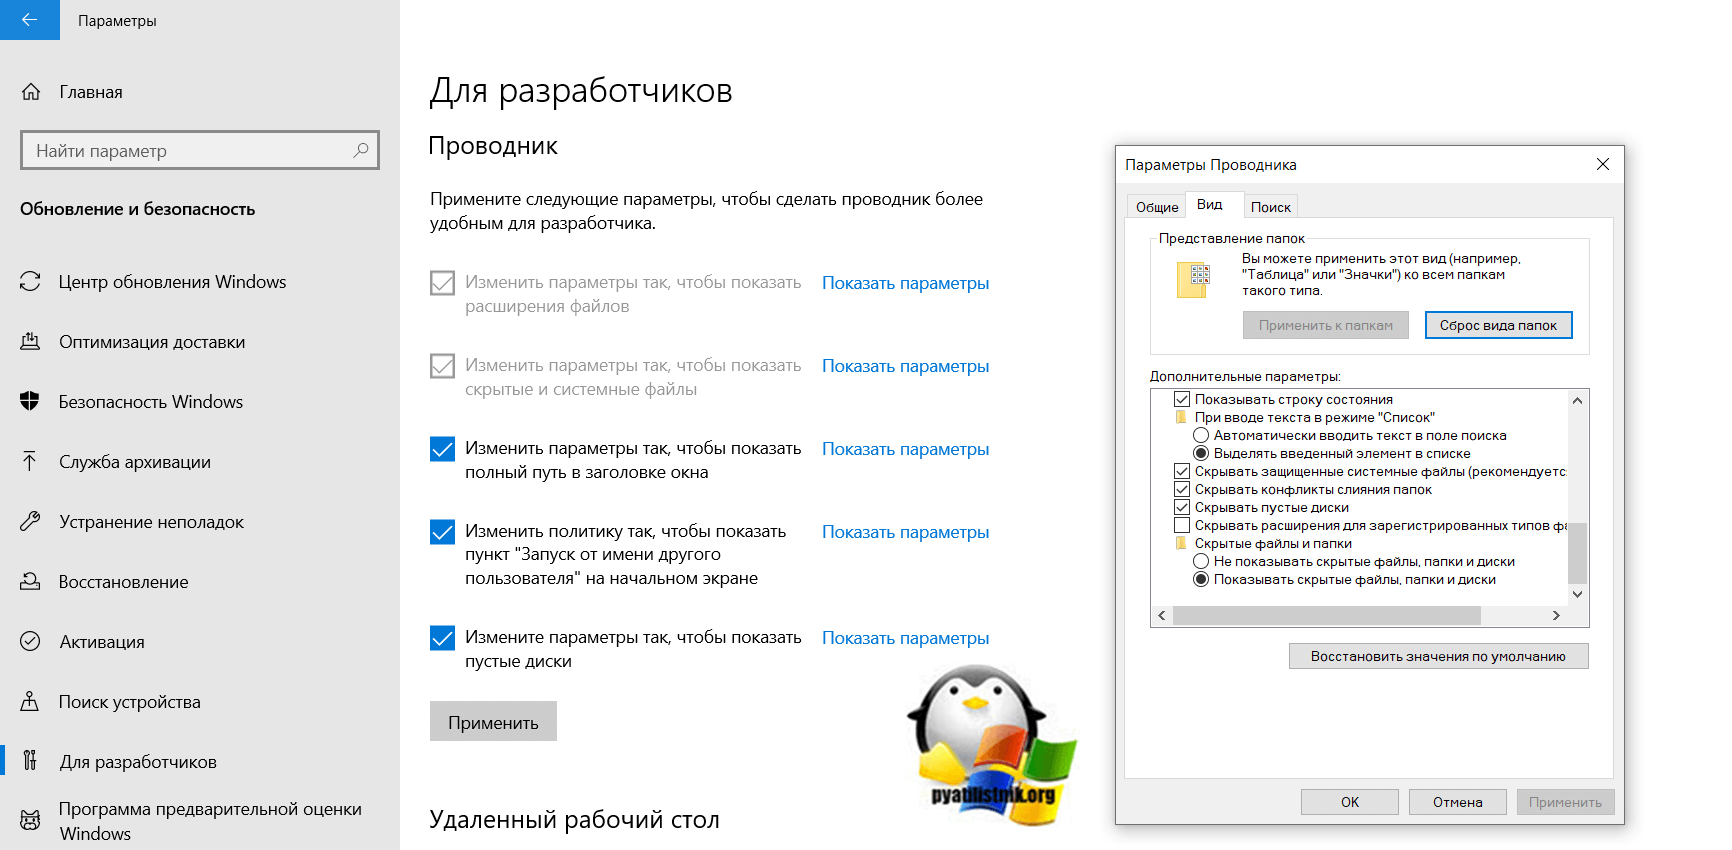
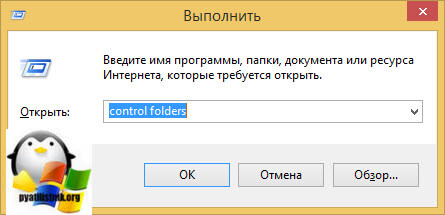
небольшой бонус, если в окне выполнить написать control folders, то вы получите все то же окно «Параметры проводника«, где сможете включить скрытые файлы и папки
Включить доступ к скрытым папкам в Windows 10 через реестр
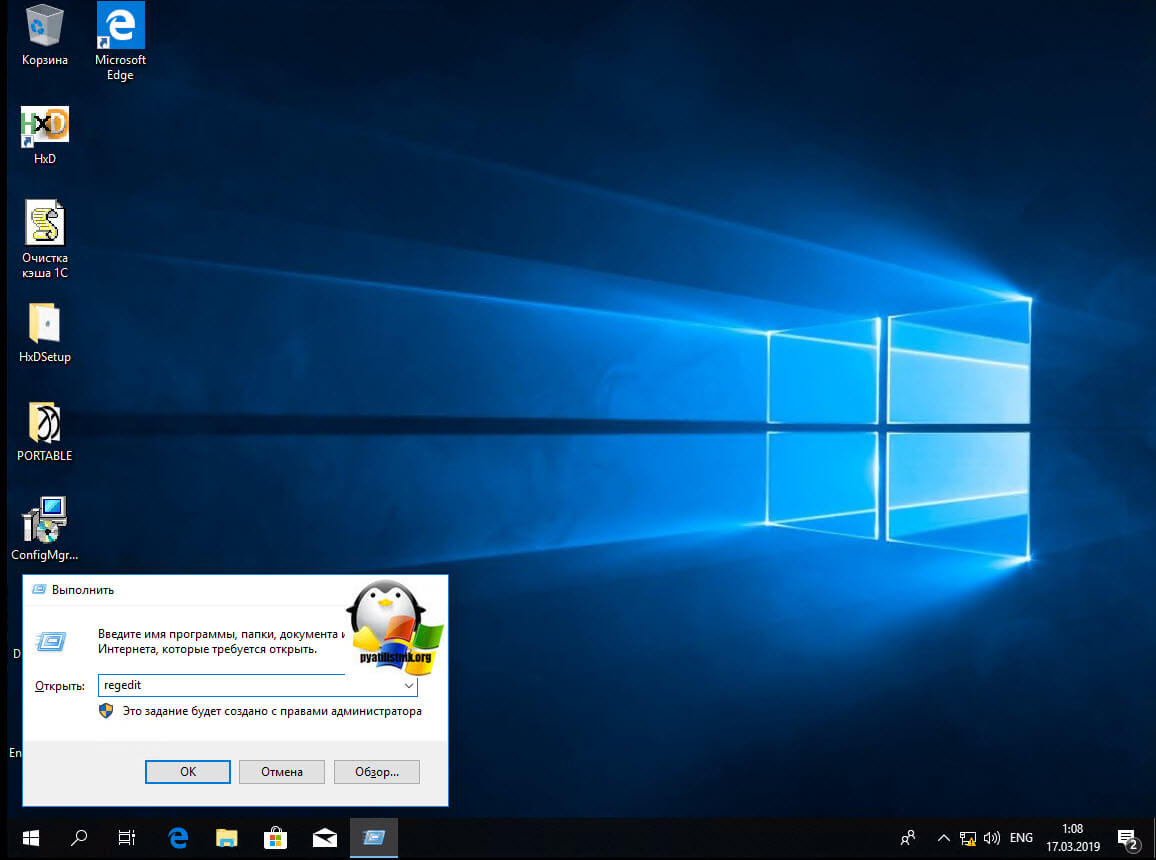
Если вы мой постоянный подписчик и читатель, то вы уже давно знаете, что все настройки, которые вы видите в своей операционной системе Windows 10, на самом деле располагаются в реестре Windows, это его сердце. Логично предположить, что вы можете изменить в нем нужный вам ключ, чтобы получить требуемый результат. И так, открываем редактор реестра Windows , напоминаю для этого нажмите WIN+R и введите regedit.
У редакторе реестра, вы можете включить скрытые папки, как для конкретного пользователя, так и для всех пользователей в рамках данного компьютера.
Включаем для конкретного пользователя
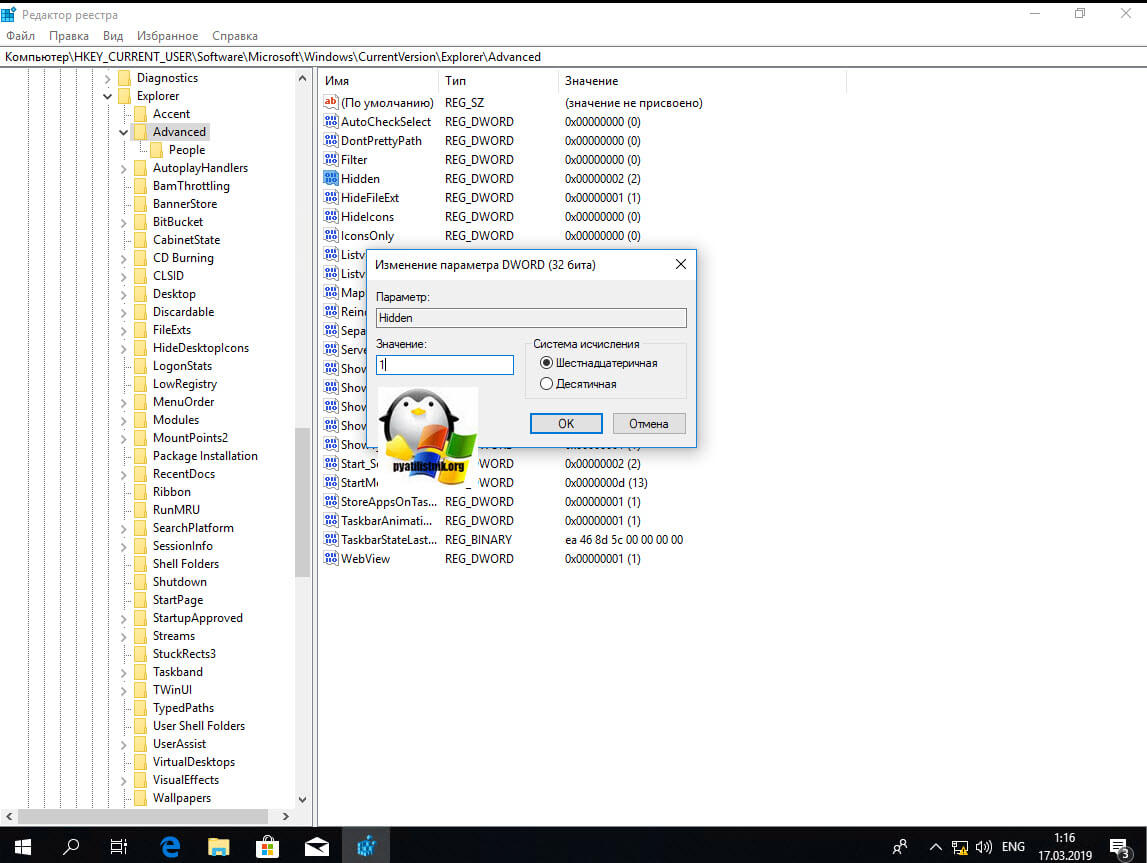
Для этого перейдите по адресу:
HKEY_CURRENT_USERSoftwareMicrosoftWindows CurrentVersion ExplorerAdvanced
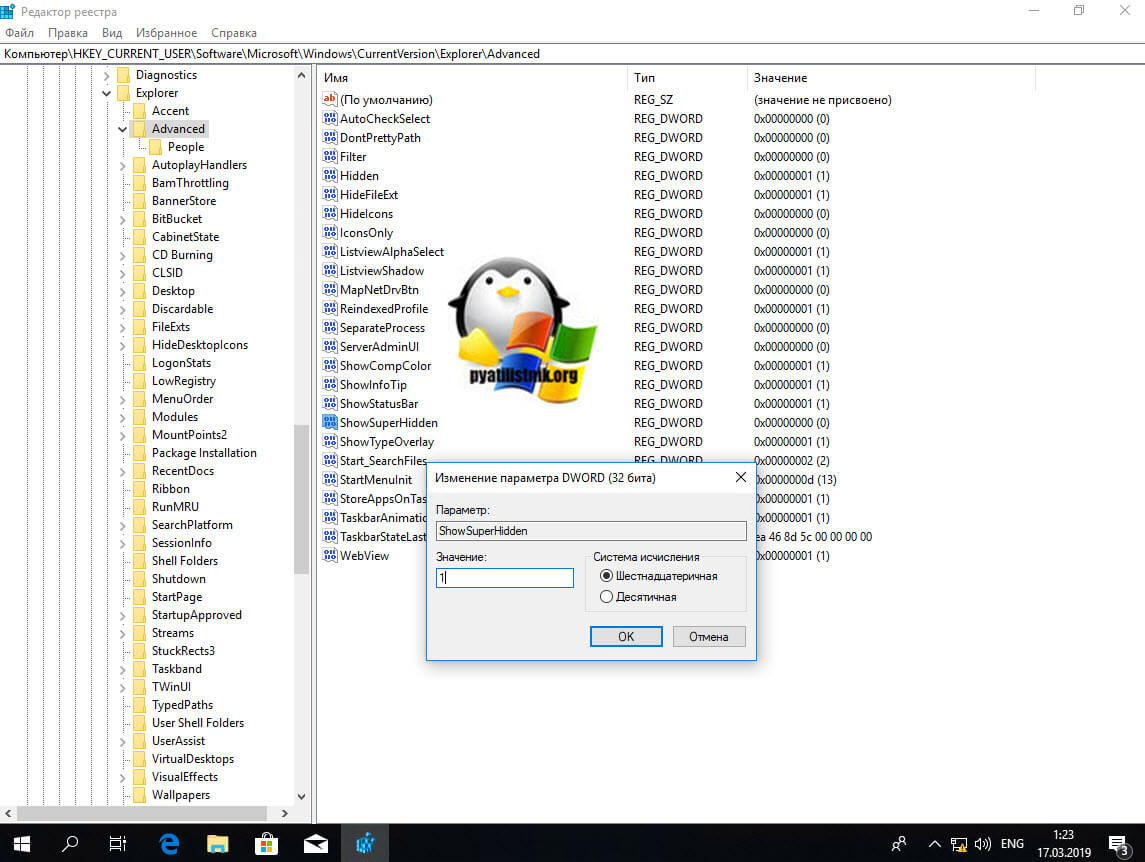
Найдите здесь ключ с именем «Hidden», что означает скрытый. Так как по умолчанию в Windows 10, запрещено отображение скрытых файлов и папок, то у данного ключа «Hidden» будет значение 2.
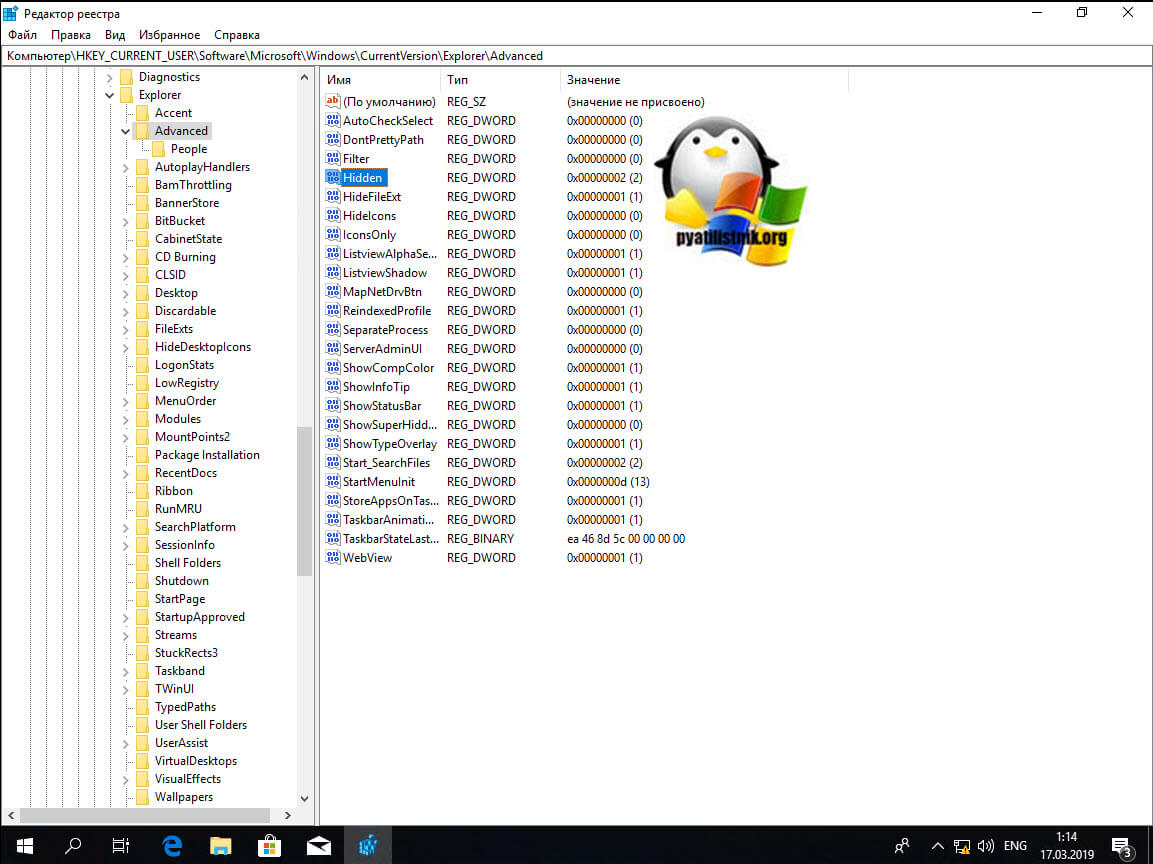
Щелкаем по нему и переходим в его свойства, меняем двойку на 1.
Если у вас не отобразятся в проводнике скрытые папки, то попробуйте нажать клавишу F5, чтобы обновить кэш. Установите для » ShowSuperHidden » значение » 1 », чтобы показать защищенные файлы операционной системы. Установите значение » 2 », чтобы не показывать защищенные файлы операционной системы.
Если не включается отображение срытых папок
Бывает ситуация, что вы поставили нужную галку, для отображения скрытых элементов Windows 10, а они не появляются, тут вероятнее всего проблема с действием вируса. Во первых проверьте вашу систему на наличие вредоносов. Когда удостоверитесь, что их нет, откройте реестр и перейдите по пути:
HKEY_LOCAL_MACHINESOFTWAREMicrosoftWindows CurrentVersion ExplorerAdvancedFolderHiddenSHOWALL
Убедитесь, что у вас есть ключ реестра «CheckedValue» и он имеет значение 1, то же самое сделайте в ветке пользователя по пути:
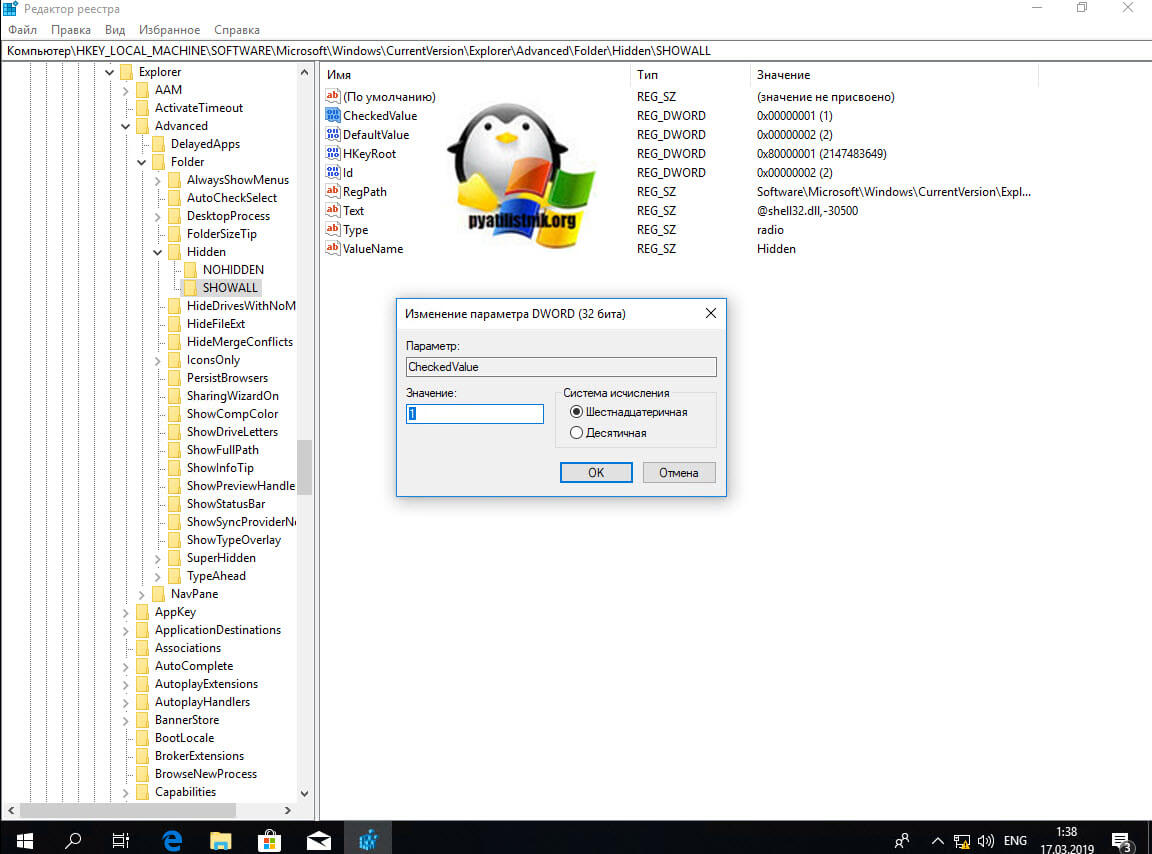
HKEY_CURRENT_USERSoftwareMicrosoftWindowsCurrentVersionExplorerAdvanced
После этого перезагрузитесь и все должно восстановиться.
Как посмотреть скрытые папки и файлы через PowerShell
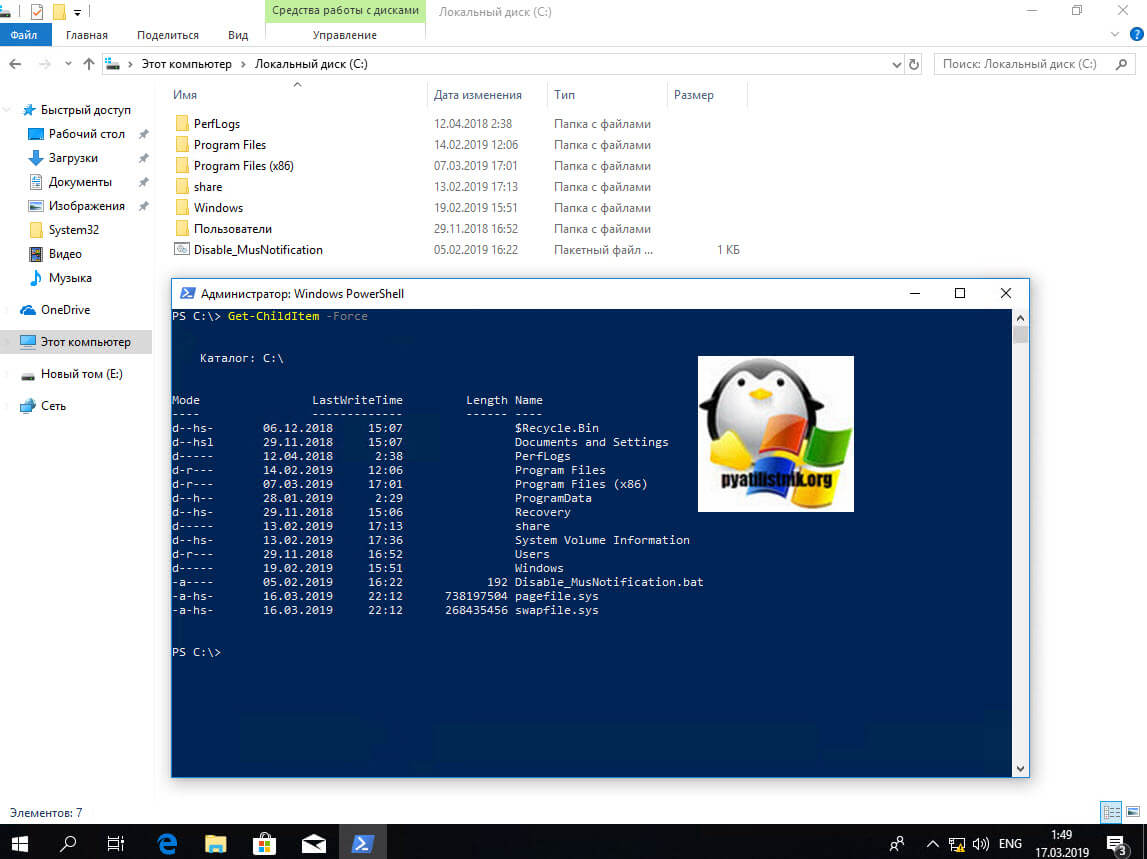
Чтобы показать скрытые папки в Windows 10, через PowerShell, вам нужно открыть оболочку, перейти в нужный каталог и выполнить команду:
В моем примере видно, что на диске C: в проводнике Windows мы не наблюдаем скрытых файлов и папок, а вот в оболочке PowerShell они есть, например:
- Recovery
- pagefiles.sys
- swapfile.sys
- ProgramData
Недавно мне нужно было получить список скрытых файлов в каталоге. PowerShell позволил довольно легко и быстро выбить список из списка, проверив, содержит ли атрибут «File» строку «Hidden»:
Get-ChildItem C:myfolder -Recurse -Force | Where { ($_.Attributes.ToString() -Split «, «) -Contains «Hidden» } | Select FullName
Вот так вот просто включить скрытые папки в windows 10. Надеюсь вы теперь понимаете назначение этих вещей и на один вопрос у вас стало меньше. Ниже представлена видео версия данной статьи. Если у вас есть вопросы по данной статье, то жду от вас их в комментариях. Материал сайта pyatilistnik.org
В Windows папки необходимы для хранения файлов. Также в них хранится важная системная информация, которая для большинства компьютерных пользователей не представляет никакой значимости. Но эти файлы лучше всего спрятать, поскольку удалив или изменив их, можно нарушить работу ОС. Такие файлы по умолчанию скрыты.
При желании пользователя скрыть можно любую личную информацию. Функционал Windows 10 позволяет делать невидимыми, а также отображать данные. Поэтому многих пользователей интересует, как открыть скрытые папки в Windows 10. В этой статье расскажем о возможных способах.
Содержание
- Как отобразить скрытую папку в Windows 10
- Как сделать папку видимой в Windows 10
- Как скрыть файлы и папку Windows 10
- Другие способы
- Программы для скрытых папок и файлов
- Выводы
Как отобразить скрытую папку в Windows 10
Важные системные файлы скрыты, сделано это с целью безопасности. Они не отображаются в проводнике, чтобы пользователь случайно не удалил их. В некоторых случаях возникает потребность отобразить все невидимые для глаз файлы.
Как сделать невидимые файлы видимыми — полезно знать и тем пользователям, которые хотят скрыть конфиденциальную информацию. Очевидно, что в будущем эти данные нужно будет вновь отобразить.

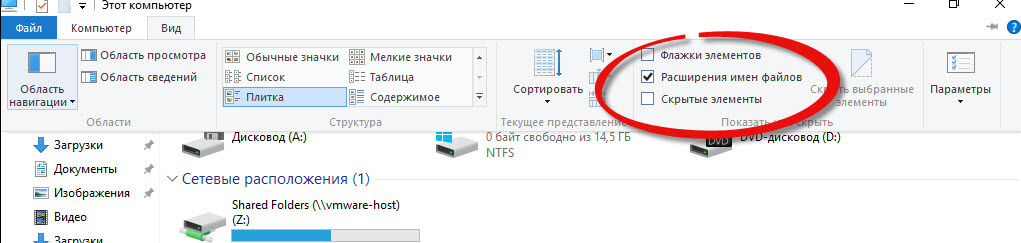
Можно не переходить в «Панель управления», а отобразить файлы прямо в проводнике. Для этого открываем проводник, жмем вкладку «Вид» > «Параметры».
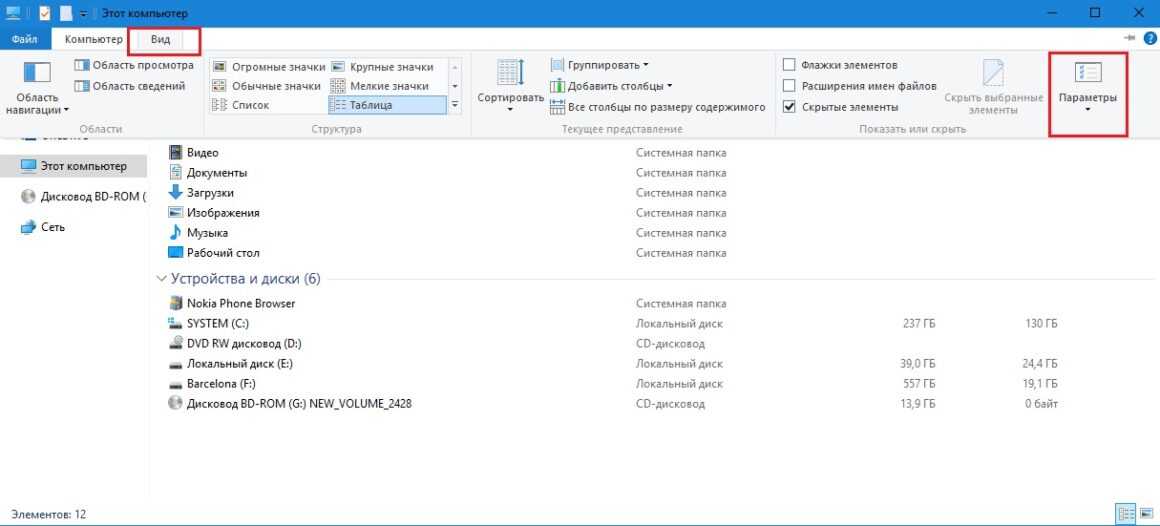
Откроется окно параметров, в котором следует выбрать раздел «Вид». В списке «Дополнительные параметры» находим в самом низу опцию «Показывать скрытые файлы, папки и диски». Отмечаем чекбокс.
Остается нажать две кнопки – «Применить» и «Ок».
Теперь вся ранее скрытая информация (текстовые документы, фотографии, музыкальные композиции, видео, системные файлы) станет видимой. Соблюдайте осторожность и случайно не удалите важное содержимое.
Как сделать папку видимой в Windows 10
Включать и отключать видимость папок и их содержимого с появлением Windows 10 стало еще проще, чем в предыдущих версиях системы. Дальше рассмотрим, как отобразить скрытые папки в Windows 10. Сделать это можно как привычным способом (через параметры проводника), так и новым, актуальным только для «десятки».
Открываем проводник и жмем комбинацию клавиш Ctrl+F1. Это приведет к открытию ленты в развернутом виде. Переходим во вкладку «Вид» и отмечаем чекбокс «Скрытые элементы».
Если все сделано правильно, на системном диске отобразится вся скрытая информация, включая файлы и папки. Теперь вы знаете, как включить скрытые папки в Windows 10. В этом нет ничего сложного.
Как скрыть файлы и папку Windows 10
Разобравшись с тем, как отобразить невидимое, поговорим о процессе самостоятельного скрытия лишних для глаз файлов и папок. Для этого нужно нажать правой кнопки мыши на выбранной папке, перейти в раздел «Общие» и установить отметку напротив опции «Скрытый».
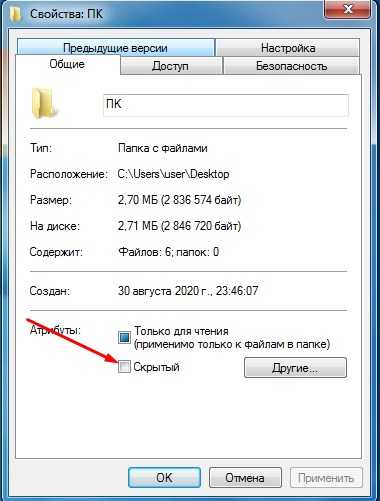
Теперь этот каталог не будет отображаться. Чтобы сделать папку видимой, вновь нажимаем по ней ПКМ и вместо «Скрытый» устанавливаем «Только для чтения». Не забудьте нажать «Применить» и «Ок». Это один из самых простых способов как скрыть папку в Windows 10.
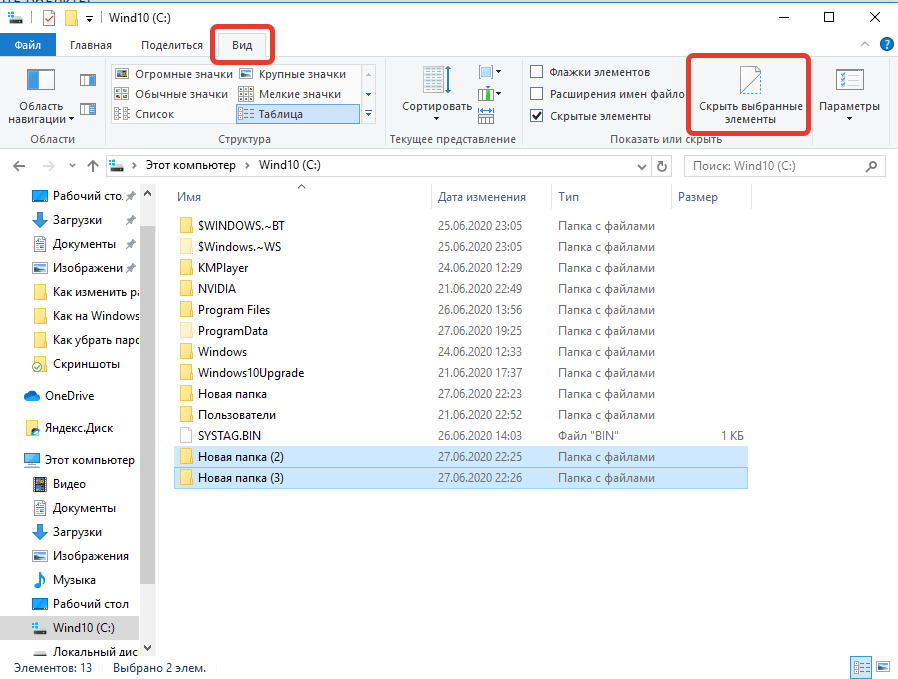
Если стоит задача скрыть сразу несколько объектов, то уже здесь лучше использовать проводник. Отмечаем несколько папок, дальше переходим во вкладку «Вид» и выбираем «Скрыть выбранные элементы».
Другие способы
Иногда возникают потребности открыть скрытую папку, отредактировать находящиеся в ней файлы, удалить или выполнить другие действия. Способ с проводником удобен, и в принципе он подходит для всех категорий компьютерных пользователей. Но опытные компьютерщики часто пользуются другой методикой – через конкретный путь к папке.
Если ввести в строку точный адрес к папке, все содержимое станет доступным — даже несмотря на то, что папка скрытая. Адрес выглядит примерно так: С:Program FilesUninstalInformation. Вбиваем адрес и нажимаем на клавиатуре Enter. Папка UninstalInformation невидимая, но её содержимое доступно к редактированию, поэтому вполне можно использовать такой способ.
Программы для скрытых папок и файлов
Сегодня в сети легко найти программы, при помощи которых можно выполнять все перечисленные выше действия в разы быстрей. Ведь программа освобождает от необходимости запускать проводник и разбираться в его настройках. Такие утилиты необходимы, чтобы держать все на своих местах, ведь еще они позволяют распределять скрытые файлы и папки.
Из достойных файловых менеджеров стоит отметить:
- ACDSee – бесплатная, работая со всеми версия операционной системы;
- Total Commander – легендарная утилита, файловый менеджером, о котором знают практически все;
- Secure Folders – небольшая достойная внимания утилита, позволяющая установить для всех файлов атрибут «Только для чтения»;
- Hide Folders – интересное приложение, дающее право управлять скрытыми папками удаленно.
Выводы
Мы рассмотрели все самые интересные и эффективные способы, как посмотреть скрытые папки на Windows 10. В заключении скажем, что есть еще один метод – при помощи командой строки. Вводим attrib +s +h «C:путь до папки», после чего будет создан объект, которые нельзя отобразить штатными методами.
Подписывайтесь на наш канал в Telegram, чтобы получать свежие статьи своевременно!
Как отобразить скрытые папки
Сделать это можно стандартными средствами операционной системы. Зайдите в проводник и выберите пункт «Вид» в верхнем меню. Поставьте галочку в пункте «Скрытые элементы».

У скрытых папок значки полупрозрачные
Также можно включить отображение через параметры папок. Этот способ, возможно, вам знаком по предыдущим версиям операционной системы. В проводнике выберите пункт «Вид», затем «Параметры». Откроется новое окно «параметры папок». Здесь нужно тоже перейти на вкладку «Вид» и в поле «Дополнительные параметры» пролистать до конца. Поставьте переключатель в положение «Показывать скрытые файлы, папки и диски».
Здесь же можно дополнительно скрыть или отобразить системные файлы. Рекомендуется оставить активным параметр «Скрывать защищенные системные файлы»
Кроме стандартных средств, можно воспользоваться и сторонними программами. К примеру, файловый менеджер Total Commander позволяет отображать и скрывать папки одним кликом на панели инструментов.

Как скрыть файлы и папки
Папки может скрывать не только система, но и пользователь. Можно скрыть определенные папки и файлы, которые не нужно видеть посторонним или они просто мешаются. Для этого кликните правой кнопкой мыши на объекте и выберите «Свойства». Поставьте галочку в пункте «Скрытый».

Попасть в такую скрытую папку можно и не заходя в настройки. Для этого нужно знать ее точный адрес. В нашем случае это C:GAMES. Папка скрытая, но ее содержимое нет. Если же и ее содержимое скрыто, то способ не сработает.
Это тоже интересно:
Во время загрузки произошла ошибка.
Хотите получать новости по теме?
Do you want to quickly show hidden files and folders on your computer or phone?
If you or any other users on your computer have ever hidden a file or folder, it can be easy to lose track of where that file has gone.
Thankfully, most operating systems have options to show these hidden files, provided you have the proper privileges.
Regardless of whether you’re a Windows, macOS, Linux, Android, or iOS user, we’ve got you covered. In this article, we’ll go over the quickest and easiest ways to show hidden files, no matter what your device is.
Let’s jump right in.
Prefer to watch the video version?
How Do I Show Hidden Files on My Windows Laptop?
In Windows 10, the easiest way to show hidden files or folders is to use the File Explorer’s View options.
First, open your File Explorer (WIN + E), and go to the folder you think has hidden files. Next, click the View tab, and then check the box next to the Hidden items text.

That should instantly show any hidden files in that folder. If you don’t see any hidden files, that means there aren’t any in that particular folder. You should note that hidden files are different from deleted files.
In older versions of Windows (and Windows 10), you can edit these settings in the Control Panel’s File Explorer Options.
Search for “folder” in the Windows toolbar and select the first result to get there. You can also search for “File Explorer Options” if “folder” doesn’t show you the option you need.

For versions older than Windows Vista with no search box, you can manually navigate to Folder Options under Appearance and Themes.
Next, navigate to the View tab and change the Hidden files and folders settings to Show.

Once you’ve checked the Show hidden files, folders, and drives radio button, you can see all hidden files.
Note: The vast majority of hidden files are Windows system files and software cache files, including browser cache files. Editing, moving, or deleting the wrong files can break your operating system. Make 100% sure you’re not in a system folder before you make any changes.
If you want to clear the cache of different programs, you can usually do that from within the program settings. You don’t need to look through them manually and delete the hidden files one by one.
Whether you’re a Windows, macOS, Linux, Android, or iOS user, finding hidden files just got a whole lot easier, thanks to this post 🗂 ✅Click to Tweet
What Is the Shortcut to Show Hidden Files in Windows?
Unfortunately, there’s no native keyboard shortcut for Windows to show hidden files. Even in the newest version of Windows 10, you’d need a custom script.
But on the flip side, it only takes a few seconds to show the files manually through the view settings.
First, press WIN + E to open the Windows File Explorer and navigate to the folder with the hidden files.
Then, click through to the View tab and check the Hidden items box.

It’s that easy.
If you’re a developer and want the ability to hide or display hidden files with a shortcut, you can easily create one with a custom AutoHotKey script.
How to Show Hidden Files in CMD
Windows Command Prompt (CMD) allows you to explore hidden files and directories differently. It’s similar to the Terminal tool found on Linux and related systems. You can use commands to single out only the hidden files and folders in a given directory.
To open CMD, you can either use the Windows Run tool by pressing WIN + R and then typing in CMD—or you can search for “CMD” in the Windows toolbar.
Then you can navigate to the folder of your choice by using the basic dir command.
That said, CMD also hides hidden files and folders by default. Because of that, it’s not enough to type in dir C:your-folder as this will only show visible files.
To show hidden files, you need to include the /a:h modifier in that command. So, dir /a:h C:your-folder will do the trick.

CMD also has specific commands for showing directories and folders.
/a:d shows all hidden directories, and /a shows hidden folders.
Note: Did you know that you can also use a command-line interface to work with your WordPress site? WP-CLI lets you manage all aspects from a similar terminal.
Use a Third-Party Software to Show Hidden and Deleted Files
The last option is to use a third-party file explorer or file recovery software to show hidden files. If you’re looking for files hidden using regular file options, this isn’t necessary.
But advanced recovery software can also get back files that aren’t just hidden, but deleted permanently. Some popular file recovery tools include:
- Recuva
- Remo
- EaseUS
- Disk Drill
When Windows File Explorer Won’t Be Enough
There are a few use cases where Windows File Explorer and CMD won’t help you.
Here are some examples:
- If another user has hidden the files from you specifically, and you don’t have administrator privileges.

- Suppose you’re looking for hidden malicious files and malware on an infected computer. To lower the risk of this happening, make sure your firewall and other security software and hardware are up to date.
- If the files are password-protected or encrypted and you forgot the password, provided you aren’t a system administrator.
How Do I Show Hidden Files on My Mac?
There are a few different ways you can show hidden files on a Mac, depending on how you’re browsing your files.
In the Mac Finder, the easiest way to toggle hidden files is with a keyboard shortcut. You can also show or hide files using the Terminal.
What is the Shortcut to Show Hidden Files on macOS?
You can use the CMD + SHIFT + PERIOD shortcut to show hidden files in a folder while using the Finder on any modern Apple computer.
Just open the Mac Finder (from the menu or press OPTION + CMD + SPACE), and navigate to the right place. Once there, you can use the hotkey mentioned above to display hidden files.

The hidden files and folders will stand out visually as semi-transparent entities.
Note: Like with Windows computers, you need to be careful with these hidden files. Please don’t make any changes to them unless you’re 100% sure that they aren’t system files.
How to Use the Terminal to Show Hidden Files
You can also use the Mac Terminal to find and show hidden files. The terminal is the command-line interface for all Mac computers (like CMD on Windows).
To open it, use the CMD + SPACE shortcut to open Spotlight Search. Once open, search for “terminal” and then click Enter.
Now you need to give Mac Terminal the command to show hidden files. Here are the steps:
- Type the following command:
defaults write com.apple.Finder AppleShowAllFiles true - Press Enter to execute it.
- Type
killall Finderand then press Enter again.

And you’re done! You can now explore the hidden files using either the Finder or the Terminal itself.
Use a Third-Party File Explorer to Show Hidden (and Deleted) Files
As with Windows, you can use third-party file explorers to show hidden files on your Mac, but it’s unnecessary.
Where you might find this type of software more useful is in finding files you have accidentally deleted—not items you have placed in the recycle bin, but the ones you’ve removed “permanently.”
The leading file recovery software options are mostly the same for Macs as for Windows machines:
- Disk Drill
- Recuva
- Remo
- EaseUS
When the Terminal or Finder Doesn’t Cut It
As in Windows, these default options aren’t universal, and in some cases, you’re better off relying on specialty software. Here’s a couple of examples:
- If a user hasn’t given you read permission, and you don’t have administrator privileges. If your user has “no access,” it doesn’t matter if you can see the folder.

- If you’re looking for hidden malicious files or viruses that you cannot unhide through standard methods.
How to Show Hidden Files in Linux
Do you have a computer or server running on Linux and want to show hidden files? You can accomplish this using the Linux Command Line or a GUI file explorer. For web servers, you can also use an FTP/SFTP client to reveal the hidden files.
Which option you use will depend on your exact Linux distro and use case. We’ve covered all the options below.
Using the Linux Command Line
If you’re not using a graphical user interface, which is common with most web servers, you can easily show hidden files with a single Linux command.
Using the -a modifier with the ls command will automatically display all files.

For example: $ ls -a /home/user/your-folder/
If you only want to show hidden files, you can use the special regex modifier below:
$ ls -dl .[^.]* /home/user/your-folder/With the File Explorer
You can easily show hidden files using the file explorer in Ubuntu-based Linux desktop environments (Gnome 3, Mate, etc.).
For the quickest option, you can show hidden files using the keyboard shortcut CTRL + H. You can also right-click anywhere in a folder and check the Show hidden files option at the bottom.

Whether or not the files are transparent depends on your specific installation of Linux.
With an FTP/SFTP Client (for Web Servers)
Sometimes, you may have to transfer hidden files or folders to and fro your web server (e.g. .htaccess file). It’s essential for troubleshooting WordPress errors.
In such a case, you can use an FTP/SFTP client like FileZilla to accomplish this task quickly. FileZilla is available for all major operating systems. We’ll be using its Mac variant for this demonstration.
First, click on the Server tab in FileZilla’s menu bar and enable the Force showing hidden files option.
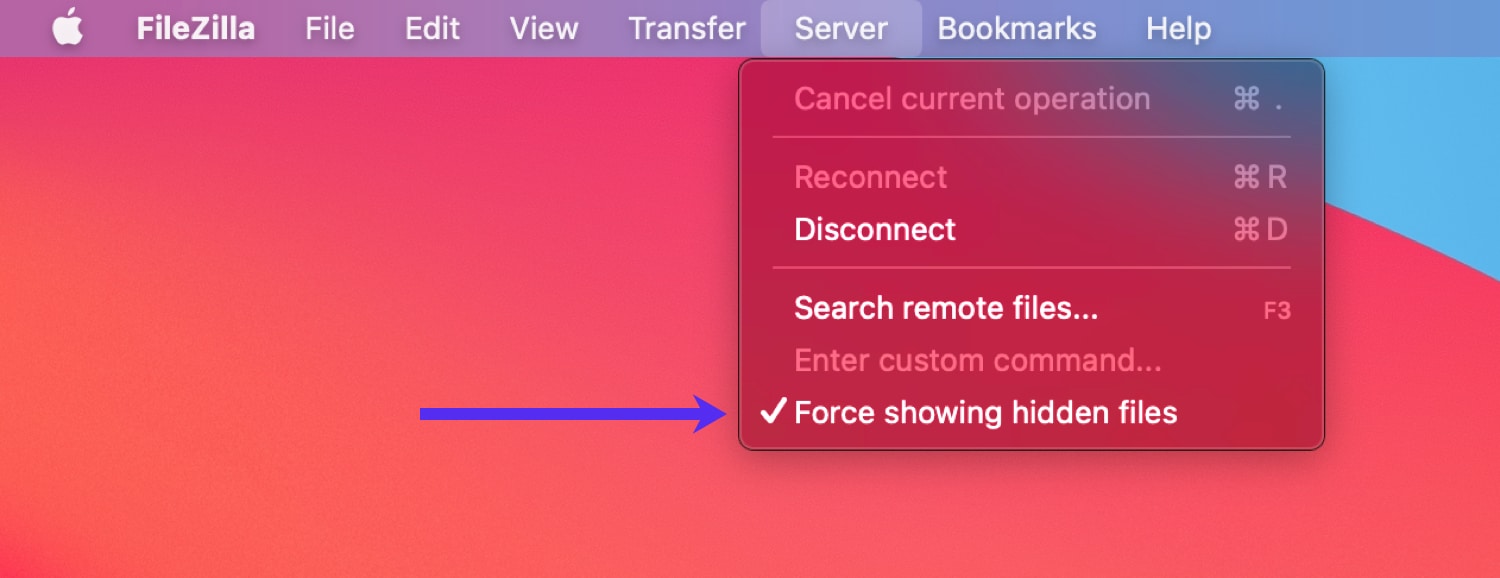
Now, connect to your web server via SFTP by entering the relevant details. You should now see all the hidden files and folders on your server.

In the above example, you can see two hidden files in the site’s ~/public folder: .hiddenfile and .htaccess.
As you can see, it’s a quick and straightforward process to reveal hidden files on your web server.
How to Show Hidden Files on a USB Stick
Another common question you might have is how to show hidden files on a USB flash drive. Unless it’s encrypted, you can use the same basic Windows Explorer or Mac Finder options to do so.
On a Windows PC
On a Windows computer, plug in the USB stick, and open a Windows Explorer window. It may happen automatically when you plug in the USB drive, depending on your settings.
Once the Explorer window is open, use it to navigate to the thumb drive directory. It’s typically located at the bottom of the expanded This PC menu.

Then, navigate to the View tab, and check the Hidden Items box to show all hidden folders and files.

As shown above, this immediately displays all the hidden folders in the base USB drive folder.
All hidden files within these folders will also now be visible.

And that’s all there is to it. You’ve successfully revealed all the hidden files on your USB drive.
On a Mac
On a Mac, it’s even more straightforward. Just plug in the USB, open the Mac Finder, and navigate to the USB directory. After you plug it in, it should show under the Devices menu.
Then you can immediately use the CMD + SHIFT + PERIOD keyboard shortcut to show the hidden files.

If the shortcut isn’t working, try triggering it again in a folder you’re 100% sure has hidden files. It may have started toggled on, which means that you’ll have just turned it off.
If that doesn’t work, check the language input settings. In some languages, the period key gets repurposed for extra letters not included in the English language.
What if the USB Is Encrypted?
If the whole thumb drive is encrypted using custom software like BitLocker or the default Mac USB encryption tools, and you no longer have the password, there’s no easy solution, but all is not necessarily lost.
The first thing you should do is search any physical (or digital) location where the password might be. Search as thoroughly as you can.
If you can’t find it, you can try a data recovery tool like RecoverIt or Disk Drill.
Only after you’re confident that you can’t find the password should you consult a professional data retrieval service. These can be pretty expensive, so be sure to exhaust all other efforts first.
How to Show Hidden Files in Google Chrome (for Both Mac and Windows)
If you don’t want to mess with the Terminal, CMD, or system settings, you can also use a browser to show hidden files.
If you use it as a file explorer for your computer, it’ll automatically show you all files, even if they’re set to “Hidden” in either the Mac Finder or Windows File Explorer.
Let’s check out a folder that includes a hidden file. The Windows File Explorer settings have the option to show hidden files unchecked:

That means you won’t see any of the hidden files in this folder using the File Explorer or the default CMD commands.
But with a web browser, you can immediately see all files in the folder, including the hidden ones:

This approach works on both Windows and Mac computers and other browsers. We chose to focus on Google Chrome because it’s the leader with over 77% of the global desktop browser market share.
How to Show Hidden Files on Your Smartphone
When it comes to files on your phone, you may not think you have the same kind of access as on your computer. But we’ll show you how you can show hidden files like photos, videos, and more on your iPhone or Android Phone.
For Android Phones
On Android phones, you can easily explore hidden files with the default Google Files app.
First, open the Files app (or another file manager), and go to the main settings menu by clicking the hamburger icon (≡).

Then all you need to do is scroll down until you see the Show hidden files option. Toggle this option on, and you’re good to go.

You can now explore all files on your phone.
Note: Most of the hidden files you can see are essential cache files for your different apps and Android system files (but not all). So unless you’re clearing out data from an uninstalled app, proceed with caution.
For iPhones
Unlike Android phones, iPhones don’t come with a default overall file manager. However, within the Photos application, you can hide photos and videos.
If you want to see these hidden photos and video files, you can follow these simple steps.
- Go to your Photos app and visit the Albums tab.
- Scroll down to the bottom until you see the Other Albums section and select the Hidden link.
- Here are displayed all the photos and videos hidden on your phone.
- To restore these files, you can select them one by one and then click the Unhide option.

If you want to explore hidden files used in apps and the OS itself, you’ll first need to jailbreak your phone. However, as it’s against the iOS end-user agreement to jailbreak your phone, this will void your warranty, so we don’t recommend it for the average user.
If you’re worried about hidden malicious files like malware or viruses, you’re much better off scanning your phone with anti-malware apps.
How to Use Anti-Malware Software to Find Hidden Malicious Files
If you suspect that you’ve gotten a virus or malware on your computer, manually checking for hidden files won’t help you.
The vast majority of hidden files are system files. There are hundreds of thousands of them out there. And you have no way of knowing which one doesn’t belong unless you know every single file in the operating system. You’ll also need to check the file size and usage patterns for irregularity.
The bottom line: it’s not realistic or even possible for anyone to do this manually. Instead, use up-to-date antivirus software to scan your computer for you.
Scan Your Computer With a Highly Trusted, Up-to-Date Antivirus Software
83% of all malware attacks in 2020 targeted Windows computers. So it’s safe to say that this step is most important if you’re a Windows user.
If you recently purchased your laptop, chances are you still have antivirus software with a valid license. For Windows computers, McAfee or Norton often come as part of the package.
If that’s the case, you can just run the scan without installing any new software. You can do so by opening the software itself and starting a scan.
Or you can right-click the folder you want to check in the file explorer and select the scan option.

You can also do this for a USB drive.
If you don’t have any antivirus software installed, you can download a free version or a free trial of software like Bitdefender or Malwarebytes.

Windows 10 also has a built-in security software called Microsoft Defender, and it’s good enough for most use cases. But it’s not perfect. So even for the latest Windows version, you should look into a highly trusted security suite.
Note: If you’re also worried about your website or business apps’ security, read our guide to cloud security. It includes a 10-step checklist to help you keep your data safe.
You Can Also Use a Mobile Phone App (Android Only)
Android phone users can install an antivirus app and scan their phones for malware regularly.
Note: iOS doesn’t allow third-party apps to scan your phone, so iOS mobile security apps only focus on blocking phishing sites and potential scammers.
Because of Android’s open nature, you may be concerned that some malicious apps or backdoors are running in the background. But this same openness also allows you to install third-party security applications that can do a full scan of all files on your mobile device—for example, Malwarebytes Security or any other reputable security app.

After installing your chosen app, you can quickly start a scan. You can also schedule ongoing regular scans to protect yourself moving forward.
iPhones are less likely to be the target of an attack, as its more restrictive iOS makes it much harder to download and install malicious software by accident.
But viruses aren’t the only things you should clean from your phone. If you’re also tired of constant pings and ads, learn how to turn off push notifications on your device.
Ever lost a file you swore you saved? 🔎🗂 If you or any other users on your computer have hidden files, this post has the solution to find them ✅Click to Tweet
Summary
Trying to find hidden files needn’t be challenging. If you’re trying to find files that you hid yourself or the ones hidden by default by your OS, it’s usually as easy as clicking a button or using a keyboard shortcut.
You can also use a browser as a file explorer to show hidden files on Windows and Mac computers.
If you want to see files hidden by other users, you may need to use specialized software (unless you have administrator privileges). For malware, viruses, and other malicious attacks, the best option is to use anti-malware software.
Are you still having trouble revealing the hidden files on your computer or smartphone? Let us know in the comments below.
Get all your applications, databases and WordPress sites online and under one roof. Our feature-packed, high-performance cloud platform includes:
- Easy setup and management in the MyKinsta dashboard
- 24/7 expert support
- The best Google Cloud Platform hardware and network, powered by Kubernetes for maximum scalability
- An enterprise-level Cloudflare integration for speed and security
- Global audience reach with up to 35 data centers and 275 PoPs worldwide
Test it yourself with $20 off your first month of Application Hosting or Database Hosting. Explore our plans or talk to sales to find your best fit.
Do you want to quickly show hidden files and folders on your computer or phone?
If you or any other users on your computer have ever hidden a file or folder, it can be easy to lose track of where that file has gone.
Thankfully, most operating systems have options to show these hidden files, provided you have the proper privileges.
Regardless of whether you’re a Windows, macOS, Linux, Android, or iOS user, we’ve got you covered. In this article, we’ll go over the quickest and easiest ways to show hidden files, no matter what your device is.
Let’s jump right in.
Prefer to watch the video version?
How Do I Show Hidden Files on My Windows Laptop?
In Windows 10, the easiest way to show hidden files or folders is to use the File Explorer’s View options.
First, open your File Explorer (WIN + E), and go to the folder you think has hidden files. Next, click the View tab, and then check the box next to the Hidden items text.
That should instantly show any hidden files in that folder. If you don’t see any hidden files, that means there aren’t any in that particular folder. You should note that hidden files are different from deleted files.
In older versions of Windows (and Windows 10), you can edit these settings in the Control Panel’s File Explorer Options.
Search for “folder” in the Windows toolbar and select the first result to get there. You can also search for “File Explorer Options” if “folder” doesn’t show you the option you need.
For versions older than Windows Vista with no search box, you can manually navigate to Folder Options under Appearance and Themes.
Next, navigate to the View tab and change the Hidden files and folders settings to Show.
Once you’ve checked the Show hidden files, folders, and drives radio button, you can see all hidden files.
Note: The vast majority of hidden files are Windows system files and software cache files, including browser cache files. Editing, moving, or deleting the wrong files can break your operating system. Make 100% sure you’re not in a system folder before you make any changes.
If you want to clear the cache of different programs, you can usually do that from within the program settings. You don’t need to look through them manually and delete the hidden files one by one.
Whether you’re a Windows, macOS, Linux, Android, or iOS user, finding hidden files just got a whole lot easier, thanks to this post 🗂 ✅Click to Tweet
What Is the Shortcut to Show Hidden Files in Windows?
Unfortunately, there’s no native keyboard shortcut for Windows to show hidden files. Even in the newest version of Windows 10, you’d need a custom script.
But on the flip side, it only takes a few seconds to show the files manually through the view settings.
First, press WIN + E to open the Windows File Explorer and navigate to the folder with the hidden files.
Then, click through to the View tab and check the Hidden items box.
It’s that easy.
If you’re a developer and want the ability to hide or display hidden files with a shortcut, you can easily create one with a custom AutoHotKey script.
How to Show Hidden Files in CMD
Windows Command Prompt (CMD) allows you to explore hidden files and directories differently. It’s similar to the Terminal tool found on Linux and related systems. You can use commands to single out only the hidden files and folders in a given directory.
To open CMD, you can either use the Windows Run tool by pressing WIN + R and then typing in CMD—or you can search for “CMD” in the Windows toolbar.
Then you can navigate to the folder of your choice by using the basic dir command.
That said, CMD also hides hidden files and folders by default. Because of that, it’s not enough to type in dir C:your-folder as this will only show visible files.
To show hidden files, you need to include the /a:h modifier in that command. So, dir /a:h C:your-folder will do the trick.
CMD also has specific commands for showing directories and folders.
/a:d shows all hidden directories, and /a shows hidden folders.
Note: Did you know that you can also use a command-line interface to work with your WordPress site? WP-CLI lets you manage all aspects from a similar terminal.
Use a Third-Party Software to Show Hidden and Deleted Files
The last option is to use a third-party file explorer or file recovery software to show hidden files. If you’re looking for files hidden using regular file options, this isn’t necessary.
But advanced recovery software can also get back files that aren’t just hidden, but deleted permanently. Some popular file recovery tools include:
- Recuva
- Remo
- EaseUS
- Disk Drill
When Windows File Explorer Won’t Be Enough
There are a few use cases where Windows File Explorer and CMD won’t help you.
Here are some examples:
- If another user has hidden the files from you specifically, and you don’t have administrator privileges.
- Suppose you’re looking for hidden malicious files and malware on an infected computer. To lower the risk of this happening, make sure your firewall and other security software and hardware are up to date.
- If the files are password-protected or encrypted and you forgot the password, provided you aren’t a system administrator.
How Do I Show Hidden Files on My Mac?
There are a few different ways you can show hidden files on a Mac, depending on how you’re browsing your files.
In the Mac Finder, the easiest way to toggle hidden files is with a keyboard shortcut. You can also show or hide files using the Terminal.
What is the Shortcut to Show Hidden Files on macOS?
You can use the CMD + SHIFT + PERIOD shortcut to show hidden files in a folder while using the Finder on any modern Apple computer.
Just open the Mac Finder (from the menu or press OPTION + CMD + SPACE), and navigate to the right place. Once there, you can use the hotkey mentioned above to display hidden files.
The hidden files and folders will stand out visually as semi-transparent entities.
Note: Like with Windows computers, you need to be careful with these hidden files. Please don’t make any changes to them unless you’re 100% sure that they aren’t system files.
How to Use the Terminal to Show Hidden Files
You can also use the Mac Terminal to find and show hidden files. The terminal is the command-line interface for all Mac computers (like CMD on Windows).
To open it, use the CMD + SPACE shortcut to open Spotlight Search. Once open, search for “terminal” and then click Enter.
Now you need to give Mac Terminal the command to show hidden files. Here are the steps:
- Type the following command:
defaults write com.apple.Finder AppleShowAllFiles true - Press Enter to execute it.
- Type
killall Finderand then press Enter again.
And you’re done! You can now explore the hidden files using either the Finder or the Terminal itself.
Use a Third-Party File Explorer to Show Hidden (and Deleted) Files
As with Windows, you can use third-party file explorers to show hidden files on your Mac, but it’s unnecessary.
Where you might find this type of software more useful is in finding files you have accidentally deleted—not items you have placed in the recycle bin, but the ones you’ve removed “permanently.”
The leading file recovery software options are mostly the same for Macs as for Windows machines:
- Disk Drill
- Recuva
- Remo
- EaseUS
When the Terminal or Finder Doesn’t Cut It
As in Windows, these default options aren’t universal, and in some cases, you’re better off relying on specialty software. Here’s a couple of examples:
- If a user hasn’t given you read permission, and you don’t have administrator privileges. If your user has “no access,” it doesn’t matter if you can see the folder.
- If you’re looking for hidden malicious files or viruses that you cannot unhide through standard methods.
How to Show Hidden Files in Linux
Do you have a computer or server running on Linux and want to show hidden files? You can accomplish this using the Linux Command Line or a GUI file explorer. For web servers, you can also use an FTP/SFTP client to reveal the hidden files.
Which option you use will depend on your exact Linux distro and use case. We’ve covered all the options below.
Using the Linux Command Line
If you’re not using a graphical user interface, which is common with most web servers, you can easily show hidden files with a single Linux command.
Using the -a modifier with the ls command will automatically display all files.
For example: $ ls -a /home/user/your-folder/
If you only want to show hidden files, you can use the special regex modifier below:
$ ls -dl .[^.]* /home/user/your-folder/With the File Explorer
You can easily show hidden files using the file explorer in Ubuntu-based Linux desktop environments (Gnome 3, Mate, etc.).
For the quickest option, you can show hidden files using the keyboard shortcut CTRL + H. You can also right-click anywhere in a folder and check the Show hidden files option at the bottom.
Whether or not the files are transparent depends on your specific installation of Linux.
With an FTP/SFTP Client (for Web Servers)
Sometimes, you may have to transfer hidden files or folders to and fro your web server (e.g. .htaccess file). It’s essential for troubleshooting WordPress errors.
In such a case, you can use an FTP/SFTP client like FileZilla to accomplish this task quickly. FileZilla is available for all major operating systems. We’ll be using its Mac variant for this demonstration.
First, click on the Server tab in FileZilla’s menu bar and enable the Force showing hidden files option.
Now, connect to your web server via SFTP by entering the relevant details. You should now see all the hidden files and folders on your server.
In the above example, you can see two hidden files in the site’s ~/public folder: .hiddenfile and .htaccess.
As you can see, it’s a quick and straightforward process to reveal hidden files on your web server.
How to Show Hidden Files on a USB Stick
Another common question you might have is how to show hidden files on a USB flash drive. Unless it’s encrypted, you can use the same basic Windows Explorer or Mac Finder options to do so.
On a Windows PC
On a Windows computer, plug in the USB stick, and open a Windows Explorer window. It may happen automatically when you plug in the USB drive, depending on your settings.
Once the Explorer window is open, use it to navigate to the thumb drive directory. It’s typically located at the bottom of the expanded This PC menu.
Then, navigate to the View tab, and check the Hidden Items box to show all hidden folders and files.
As shown above, this immediately displays all the hidden folders in the base USB drive folder.
All hidden files within these folders will also now be visible.
And that’s all there is to it. You’ve successfully revealed all the hidden files on your USB drive.
On a Mac
On a Mac, it’s even more straightforward. Just plug in the USB, open the Mac Finder, and navigate to the USB directory. After you plug it in, it should show under the Devices menu.
Then you can immediately use the CMD + SHIFT + PERIOD keyboard shortcut to show the hidden files.
If the shortcut isn’t working, try triggering it again in a folder you’re 100% sure has hidden files. It may have started toggled on, which means that you’ll have just turned it off.
If that doesn’t work, check the language input settings. In some languages, the period key gets repurposed for extra letters not included in the English language.
What if the USB Is Encrypted?
If the whole thumb drive is encrypted using custom software like BitLocker or the default Mac USB encryption tools, and you no longer have the password, there’s no easy solution, but all is not necessarily lost.
The first thing you should do is search any physical (or digital) location where the password might be. Search as thoroughly as you can.
If you can’t find it, you can try a data recovery tool like RecoverIt or Disk Drill.
Only after you’re confident that you can’t find the password should you consult a professional data retrieval service. These can be pretty expensive, so be sure to exhaust all other efforts first.
How to Show Hidden Files in Google Chrome (for Both Mac and Windows)
If you don’t want to mess with the Terminal, CMD, or system settings, you can also use a browser to show hidden files.
If you use it as a file explorer for your computer, it’ll automatically show you all files, even if they’re set to “Hidden” in either the Mac Finder or Windows File Explorer.
Let’s check out a folder that includes a hidden file. The Windows File Explorer settings have the option to show hidden files unchecked:
That means you won’t see any of the hidden files in this folder using the File Explorer or the default CMD commands.
But with a web browser, you can immediately see all files in the folder, including the hidden ones:
This approach works on both Windows and Mac computers and other browsers. We chose to focus on Google Chrome because it’s the leader with over 77% of the global desktop browser market share.
How to Show Hidden Files on Your Smartphone
When it comes to files on your phone, you may not think you have the same kind of access as on your computer. But we’ll show you how you can show hidden files like photos, videos, and more on your iPhone or Android Phone.
For Android Phones
On Android phones, you can easily explore hidden files with the default Google Files app.
First, open the Files app (or another file manager), and go to the main settings menu by clicking the hamburger icon (≡).
Then all you need to do is scroll down until you see the Show hidden files option. Toggle this option on, and you’re good to go.
You can now explore all files on your phone.
Note: Most of the hidden files you can see are essential cache files for your different apps and Android system files (but not all). So unless you’re clearing out data from an uninstalled app, proceed with caution.
For iPhones
Unlike Android phones, iPhones don’t come with a default overall file manager. However, within the Photos application, you can hide photos and videos.
If you want to see these hidden photos and video files, you can follow these simple steps.
- Go to your Photos app and visit the Albums tab.
- Scroll down to the bottom until you see the Other Albums section and select the Hidden link.
- Here are displayed all the photos and videos hidden on your phone.
- To restore these files, you can select them one by one and then click the Unhide option.
If you want to explore hidden files used in apps and the OS itself, you’ll first need to jailbreak your phone. However, as it’s against the iOS end-user agreement to jailbreak your phone, this will void your warranty, so we don’t recommend it for the average user.
If you’re worried about hidden malicious files like malware or viruses, you’re much better off scanning your phone with anti-malware apps.
How to Use Anti-Malware Software to Find Hidden Malicious Files
If you suspect that you’ve gotten a virus or malware on your computer, manually checking for hidden files won’t help you.
The vast majority of hidden files are system files. There are hundreds of thousands of them out there. And you have no way of knowing which one doesn’t belong unless you know every single file in the operating system. You’ll also need to check the file size and usage patterns for irregularity.
The bottom line: it’s not realistic or even possible for anyone to do this manually. Instead, use up-to-date antivirus software to scan your computer for you.
Scan Your Computer With a Highly Trusted, Up-to-Date Antivirus Software
83% of all malware attacks in 2020 targeted Windows computers. So it’s safe to say that this step is most important if you’re a Windows user.
If you recently purchased your laptop, chances are you still have antivirus software with a valid license. For Windows computers, McAfee or Norton often come as part of the package.
If that’s the case, you can just run the scan without installing any new software. You can do so by opening the software itself and starting a scan.
Or you can right-click the folder you want to check in the file explorer and select the scan option.
You can also do this for a USB drive.
If you don’t have any antivirus software installed, you can download a free version or a free trial of software like Bitdefender or Malwarebytes.
Windows 10 also has a built-in security software called Microsoft Defender, and it’s good enough for most use cases. But it’s not perfect. So even for the latest Windows version, you should look into a highly trusted security suite.
Note: If you’re also worried about your website or business apps’ security, read our guide to cloud security. It includes a 10-step checklist to help you keep your data safe.
You Can Also Use a Mobile Phone App (Android Only)
Android phone users can install an antivirus app and scan their phones for malware regularly.
Note: iOS doesn’t allow third-party apps to scan your phone, so iOS mobile security apps only focus on blocking phishing sites and potential scammers.
Because of Android’s open nature, you may be concerned that some malicious apps or backdoors are running in the background. But this same openness also allows you to install third-party security applications that can do a full scan of all files on your mobile device—for example, Malwarebytes Security or any other reputable security app.
After installing your chosen app, you can quickly start a scan. You can also schedule ongoing regular scans to protect yourself moving forward.
iPhones are less likely to be the target of an attack, as its more restrictive iOS makes it much harder to download and install malicious software by accident.
But viruses aren’t the only things you should clean from your phone. If you’re also tired of constant pings and ads, learn how to turn off push notifications on your device.
Ever lost a file you swore you saved? 🔎🗂 If you or any other users on your computer have hidden files, this post has the solution to find them ✅Click to Tweet
Summary
Trying to find hidden files needn’t be challenging. If you’re trying to find files that you hid yourself or the ones hidden by default by your OS, it’s usually as easy as clicking a button or using a keyboard shortcut.
You can also use a browser as a file explorer to show hidden files on Windows and Mac computers.
If you want to see files hidden by other users, you may need to use specialized software (unless you have administrator privileges). For malware, viruses, and other malicious attacks, the best option is to use anti-malware software.
Are you still having trouble revealing the hidden files on your computer or smartphone? Let us know in the comments below.
Get all your applications, databases and WordPress sites online and under one roof. Our feature-packed, high-performance cloud platform includes:
- Easy setup and management in the MyKinsta dashboard
- 24/7 expert support
- The best Google Cloud Platform hardware and network, powered by Kubernetes for maximum scalability
- An enterprise-level Cloudflare integration for speed and security
- Global audience reach with up to 35 data centers and 275 PoPs worldwide
Test it yourself with $20 off your first month of Application Hosting or Database Hosting. Explore our plans or talk to sales to find your best fit.
 В этой инструкции для начинающих поговорим о том, как показать и открыть скрытые папки в Windows 10, а также наоборот, снова скрыть скрытые папки и файлы, если они оказались видимыми без вашего участия и мешают. Заодно в статье присутствует информация о том, как скрыть папку или сделать ее видимой, не изменяя параметров отображения.
По сути, в этом плане с предыдущих версий ОС ничего особенно не изменилось и в Windows 10, однако, пользователи задают вопрос достаточно часто, а потому, думаю, имеет смысл осветить варианты действий. Также в конце руководства имеется видео, где все показано наглядно. На схожую тему: Как показать и скрыть системные файлы и папки Windows 10 (не то же самое, что скрытые).
Как показать скрытые папки Windows 10
Первый и самый простой случай — требуется включить показ скрытых папок Windows 10, потому что какую-то из них нужно открыть или удалить. Сделать это можно сразу несколькими способами.
Самый простой: открыть проводник (клавиши Win+E, или просто открыть любую папку или диск), после чего выбрать в главном меню (вверху) пункт «Вид», кликнуть по кнопке «Показать или скрыть» и отметить пункт «Скрытые элементы». Готово: скрытые папки и файлы сразу отобразятся.

Второй способ — зайти в панель управления (быстро сделать это можно через правый клик по кнопке Пуск), в панели управления включите Просмотр «Значки» (справа вверху, если у вас там установлено «Категории») и выберите пункт «Параметры проводника».
В параметрах откройте вкладку «Вид» и в разделе «Дополнительные параметры» пролистайте список до конца. Там вы найдете следующие пункты:

- Показывать скрытые файлы, папки и диски, который включает показ скрытых папок.
- Скрывать защищенные системные файлы. Если отключить этот пункт, то будут показаны даже те файлы, которые не видны при простом включении отображения скрытых элементов.
После выполнения настроек, примените их — скрытые папки будут отображаться в проводнике, на рабочем столе и в других местах.
Как скрыть скрытые папки
Такая задача возникает обычно из-за случайного включения показа скрытых элементов в проводнике. Выключить их отображение можно точно так же, как это было описано выше (любым из способов, только в обратном порядке). Самый простой вариант — в проводнике нажать «Вид» — «Показать или скрыть» (в зависимости от ширины окна отображается как кнопка или раздел меню) и убрать отметку со скрытых элементов.
Если при этом вы все еще видите некоторые скрытые файлы, то следует отключить показ системных файлов в параметрах проводника через панель управления Windows 10, как это описывалось выше.
Если же вы хотите скрыть папку, не являющуюся скрытой в данный момент, то вы можете кликнуть по ней правой кнопкой мыши и установить отметку «Скрытый», после чего нажать «Ок» (при этом, чтобы она не отображалась, нужно чтобы показ таких папок был выключен). 
Как скрыть или показать скрытые папки Windows 10 — видео
В завершение — видео инструкция, в которой показаны вещи, ранее описанные.
Дополнительная информация
Часто открыть скрытые папки требуется для того, чтобы получить доступ к их содержимому и что-либо там отредактировать, найти, удалить или выполнить иные действия.
Не всегда для этого нужно включать их отображение: если вы знаете путь к папке, просто введите его в «адресной строке» проводника. Например, C:UsersИмя_пользователяAppData и нажмите Enter, после чего вы попадете в указанное расположение, при этом, несмотря на то, что AppData — скрытая папка, ее содержимое уже не является скрытым.
Если после прочтения, какие-то из ваших вопросов по теме остались не отвеченными, задавайте их в комментариях: не всегда быстро, но я стараюсь помочь.