Содержание
- Полное удаление Citrix Receiver
- Не удается удалить Citrix?
- Как удалить Citrix?
- Как удалить программу, которая не удаляется?
- Как полностью удалить рабочую область Citrix?
- Как удалить Citrix из реестра?
- Что делает Citrix Receiver?
- Как принудительно удалить программу?
- Как удалить программу, которая не отображается в Панели управления?
- Как принудительно удалить файл?
- Следует ли мне удалить Citrix Receiver?
- Как очистить кеш Citrix?
- Как отключить рабочую область Citrix?
- Как принудительно удалить Citrix Receiver?
- Могу ли я удалить программу запуска Citrix Online?
- Как исправить мой Citrix Receiver?
- Как мне вручную сбросить мой профиль Citrix?
- Как мне сбросить мой профиль пользователя?
- Где хранятся профили Citrix?
- Как сбросить сеанс Citrix?
- Как разрешить временный профиль в Citrix?
- Как сбросить профиль по умолчанию в Windows 10?
- Как исправить поврежденный профиль пользователя в Windows 10?
- Как очистить мой профиль Citrix?
- Где хранятся перемещаемые профили?
- Как создать профиль Citrix?
- Что дает сброс Citrix Receiver?
- Как мне устранить неполадки в моем Citrix Receiver?
- Как сбросить настройки Citrix Receiver в Windows 10?
- Что вызывает повреждение профиля Citrix?
- Что такое служба телеметрии Citrix?
- CS Professional Suite®
- Help & How-To Center
- Uninstall, download, and install (or reinstall) Citrix Receiver
- Uninstall and reinstall
- First, uninstall Citrix Receiver
- Then download and reinstall Citrix Receiver
- Updates
- Can’t open applications?
- Any other issues
- Как мне вручную сбросить мой профиль Citrix?
- Как мне сбросить мой профиль пользователя?
- Где хранятся профили Citrix?
- Как сбросить сеанс Citrix?
- Как разрешить временный профиль в Citrix?
- Как сбросить профиль по умолчанию в Windows 10?
- Как исправить поврежденный профиль пользователя в Windows 10?
- Как очистить мой профиль Citrix?
- Где хранятся перемещаемые профили?
- Как создать профиль Citrix?
- Что дает сброс Citrix Receiver?
- Как мне устранить неполадки в моем Citrix Receiver?
- Как сбросить настройки Citrix Receiver в Windows 10?
- Что вызывает повреждение профиля Citrix?
- Что такое служба телеметрии Citrix?
Полное удаление Citrix Receiver
 Столкнулся я с такой проблемой, что запускаться клиент Citrix Receiver на машине с Dibian (на машине с ОС Windows тоже столкнулся с такой проблемой, но она решается легко, и решение описано в самом конце данной статьи). Что только не делал, переустановка не давала положительного результата. Пришлось методом «научного тыка» искать варианты полного удаления следов программы и повторной её установки.
1. Запуск консоли, и выполнение команды ниже
2. Вычистил «хвосты» от Citrix
3. Удалил libmotif3
ВАЖНО! Обязательно после этого перезагружаем ПК, если хотим повторно устанавливать Citrix Receiver
Алгоритм установки Citrix Receiver
1. скачал файл linuxx86-12.0.0.189834.tar.gz и распаковал
2. консоль, зашел в папку под root
3. Выбрал пункт установки 1
4. Выбрал папку не по умолчанию, и установил все
5. Установил libmotif3, и делаем ссылку на файл
Как результат — Все заработало!
В Операционной системе Windows сталкивался с подобной проблемой, но она решается намного проще 🙂 Достаточно скачать утилиту с оф. сайта, и запустить ее от имени Администратора. После удаления, можно повторно запустить установку клиента Citrix Receiver
Ниже указана ссылка, где можно скачать последнюю версию утилиты Receiver Clean-Up Utility, для полного удаления Citrix Receiver
Receiver Clean-Up Utility
Источник
Не удается удалить Citrix?
Как удалить Citrix?
Выберите Удалить приложение Citrix Workspace и следуйте инструкциям на экране. Файл. dmg — это файл, который загружается из Citrix при первой установке приложения Citrix Workspace для Mac. Если файла больше нет на вашем компьютере, загрузите файл еще раз из Citrix Downloads, чтобы удалить приложение.
Как удалить программу, которая не удаляется?
Все, что вам нужно сделать, это:
Как полностью удалить рабочую область Citrix?
Вы можете удалить приложение Citrix Workspace с помощью утилиты «Программы и компоненты» Windows («Установка и удаление программ»). Примечание. Во время установки приложения Citrix Workspace вы получите запрос на удаление пакета Citrix HDX RTME. Щелкните ОК, чтобы продолжить удаление.
Как удалить Citrix из реестра?
GUID можно найти в следующем разделе реестра: HKEY_LOCAL_MACHINE Software Microsoft Windows CurrentVersion Uninstall. Когда выбран ключ «Удалить», нажмите Ctrl + F и найдите термин Citrix. Подключ, содержащий запись клиента Citrix ICA, отображается как открытый (левая панель) и помечен идентификатором GUID.
Что делает Citrix Receiver?
Citrix Receiver — это клиентское программное обеспечение, необходимое для доступа к приложениям и полным рабочим столам, размещенным на серверах Citrix, с удаленного клиентского устройства. … Когда вы посещаете страницу загрузки Citrix Receiver, она автоматически определяет операционную систему и предлагает вам загрузить нужное клиентское программное обеспечение.
Как принудительно удалить программу?
Удалить папку в реестре Windows. Отображаемое имя реестра Windows. Удалите ключи, которые показывают имя вашей программы в DisplayName, щелкнув правой кнопкой мыши по элементам и выбрав Удалить. Теперь ваша программа не будет отображаться в списке «Установка и удаление программ».
Как удалить программу, которая не отображается в Панели управления?
Как удалить программы, не указанные в панели управления
Как принудительно удалить файл?
Для этого сначала откройте меню «Пуск» (клавиша Windows), введите «выполнить» и нажмите «Ввод». В появившемся диалоговом окне введите cmd и снова нажмите Enter. В открытой командной строке введите del / f имя_файла, где имя_файла — это имя файла или файлов (вы можете указать несколько файлов с помощью запятых), которые вы хотите удалить.
Следует ли мне удалить Citrix Receiver?
Однако оставление Citrix Receiver установленным на домашнем компьютере не вызывает никаких известных проблем с безопасностью. Если вы хотите оставить его в покое, это безопасно. Он не занимает много места и после отключения автоматического запуска не будет использовать память или процессор.
Как очистить кеш Citrix?
Как отключить рабочую область Citrix?
Все, что вам нужно сделать, это открыть диспетчер задач, щелкнув правой кнопкой мыши на панели задач или используя сочетание клавиш CTRL + SHIFT + ESC, нажав «Подробнее», переключившись на вкладку «Автозагрузка» и нажав кнопку «Отключить».
Как принудительно удалить Citrix Receiver?
Удалите Citrix Receiver из Windows
Войдите на устройство с правами администратора. Откройте Панель управления и выберите «Программы и компоненты». Приложение Citrix Receiver должно быть найдено в папке «Программы и компоненты», чтобы его можно было удалить. Щелкните приложение правой кнопкой мыши и выберите Удалить.
Могу ли я удалить программу запуска Citrix Online?
Windows: откройте «Программы и компоненты». Щелкните правой кнопкой мыши «Citrix Online Launcher». Выберите «Удалить», затем при появлении запроса нажмите «Да».
Как исправить мой Citrix Receiver?
Проблема с запуском Citrix Receiver может быть вызвана используемыми вами приложениями.
…
Как исправить ошибку запуска Citrix Receiver в Windows 10?
Источник
Как мне вручную сбросить мой профиль Citrix?
Как мне сбросить мой профиль пользователя?
Профиль пользователя — это набор файлов, используемых Windows для обеспечения рабочего стола пользователя при входе в систему на компьютере в сети.
…
Сброс профиля пользователя
Где хранятся профили Citrix?
Профили локальных пользователей хранятся на локальном сервере, к которому пользователь вошел в систему. Менеджер паролей сохраняет информацию реестра в кусте HKCU Software Citrix MetaFrame Password Manager в реестре пользователей, расположенном по адресу:% SystemDrive% Documents and Settings % username% NTUSER. DAT.
Как сбросить сеанс Citrix?
Как разрешить временный профиль в Citrix?
Как: как исправить учетные записи Citrix, которые создают временные профили
Как сбросить профиль по умолчанию в Windows 10?
5. Сбросить Windows 10.
Как исправить поврежденный профиль пользователя в Windows 10?
Исправить поврежденный профиль пользователя в Windows 8, 8.1 или Windows 10
Как очистить мой профиль Citrix?
Сбросить профиль пользователя
Где хранятся перемещаемые профили?
Перемещаемый профиль хранится на центральном сервере, к которому можно получить доступ со всех компьютеров домена. Это позволяет вам иметь одинаковые настройки среды на каждой машине, к которой вы входите. Ваш перемещаемый профиль копируется на компьютер при входе в систему и синхронизируется обратно на сервер при выходе из системы.
Как создать профиль Citrix?
Политика Citrix Studio
Что дает сброс Citrix Receiver?
При сбросе Receiver к заводским настройкам по умолчанию удаляются следующие элементы: Все учетные записи и магазины. Все приложения, предоставляемые подключаемым модулем самообслуживания, вместе с их значками и ключами реестра. … Параметры реестра для отдельных пользователей, которые являются пользовательскими предпочтениями, а для установок на уровне компьютера — все параметры реестра для конкретных пользователей.
Как мне устранить неполадки в моем Citrix Receiver?
Устранение проблем с пользователями
Как сбросить настройки Citrix Receiver в Windows 10?
Процедура сброса в ОС Windows:
Что вызывает повреждение профиля Citrix?
Наиболее заметной причиной подобных проблем является повреждение указанного файла, особенно если компьютер пользователя выключается до того, как будет записан файл DAT. Если файл только частично записывается через UPM, профиль будет поврежден и возникнут проблемы.
Что такое служба телеметрии Citrix?
Citrix Insight Services (CIS) — это платформа Citrix для инструментальных средств, телеметрии и анализа бизнес-информации. Возможности инструментария и телеметрии позволяют техническим пользователям (клиентам, партнерам и инженерам) самостоятельно диагностировать и устранять проблемы, а также оптимизировать свои среды.
Источник
CS Professional Suite®
Help & How-To Center
Uninstall, download, and install (or reinstall) Citrix Receiver
Reinstalling Citrix Receiver may be required during Citrix Receiver updates, Virtual Office CS / SaaS migrations, or as part of troubleshooting Citrix issues.
Uninstall and reinstall
First, uninstall Citrix Receiver
You’ll need to uninstall Citrix Receiver and delete all Citrix-related program files and folders. Watch the video or follow the written steps below.
Your browser does not support HTML5 video.
Note: This video covers uninstalling from Windows 10.
Note: The AppData folder is hidden by default. You may need to make hidden folders visible to gain access to it, or manually enter the path in the address bar in Windows Explorer.
Note: The AppData folder is hidden by default. You may need to make hidden folders visible on the PC to gain access to it, or manually enter the path in the address bar in Windows Explorer.
Then download and reinstall Citrix Receiver
Once Citrix Receiver is uninstalled and all Citrx-related files are removed, you can download and install a new copy. Watch the video or follow the written instructions below.
Your browser does not support HTML5 video.
Note: This video covers downloading and installing with Windows 10 and Chrome.
Note: If you don’t see this link, you don’t have access to applications through Virtual Client Office.

Windows 10 users will need to choose open in folder, then right click on the file and choose run as administrator.
If you experience any issues installing or running VOCitrixReceiver.exe, try running the installation as administrator, or disable the user account control (UAC) setting.
Windows 10 users will need to choose save file, then right click on the file and choose run as administrator.
Note: If you are prompted with an Open Executable File? dialog, click OK.
Windows 10 users will need to choose open in folder, then right click on the file and choose run as administrator.
Note: If you are also prompted with an Internet Explorer Security Warning dialog, click the Run button.
Updates
Some versions of Citrix Receiver will periodically check for updates. We recommend that you set your preferences to not check for updates. You can do this using the following steps.
If you do not see this option, you don’t need to turn off update notifications.
Can’t open applications?
Any other issues
Visit the Tips and troubleshooting section of the Citrix Receiver overview. You’ll also want to make sure you meet the requirements for using Citrix Receiver; there are some environmental settings like antivirus and firewall that can interfere with the installation and usage of Citrix. Sometimes these issues come to light during the uninstall / reinstall process.
Was this article helpful?
Great! Can you tell us why? (optional)
We’re sorry. Can you tell us why? (optional)
Thank you for the feedback!
Internal only
The Citrix Cleanup Utility is built into the Citrix install, therefore this tool should only be used as a last resort. This tool should be used by the firm’s qualified IT professional.
Источник
Как мне вручную сбросить мой профиль Citrix?
Как мне сбросить мой профиль пользователя?
Профиль пользователя — это набор файлов, используемых Windows для обеспечения рабочего стола пользователя при входе в систему на компьютере в сети.
…
Сброс профиля пользователя
Где хранятся профили Citrix?
Профили локальных пользователей хранятся на локальном сервере, к которому пользователь вошел в систему. Менеджер паролей сохраняет информацию реестра в кусте HKCU Software Citrix MetaFrame Password Manager в реестре пользователей, расположенном по адресу:% SystemDrive% Documents and Settings % username% NTUSER. DAT.
Как сбросить сеанс Citrix?
Как разрешить временный профиль в Citrix?
Как: как исправить учетные записи Citrix, которые создают временные профили
Как сбросить профиль по умолчанию в Windows 10?
5. Сбросить Windows 10.
Как исправить поврежденный профиль пользователя в Windows 10?
Исправить поврежденный профиль пользователя в Windows 8, 8.1 или Windows 10
Как очистить мой профиль Citrix?
Сбросить профиль пользователя
Где хранятся перемещаемые профили?
Перемещаемый профиль хранится на центральном сервере, к которому можно получить доступ со всех компьютеров домена. Это позволяет вам иметь одинаковые настройки среды на каждой машине, к которой вы входите. Ваш перемещаемый профиль копируется на компьютер при входе в систему и синхронизируется обратно на сервер при выходе из системы.
Как создать профиль Citrix?
Политика Citrix Studio
Что дает сброс Citrix Receiver?
При сбросе Receiver к заводским настройкам по умолчанию удаляются следующие элементы: Все учетные записи и магазины. Все приложения, предоставляемые подключаемым модулем самообслуживания, вместе с их значками и ключами реестра. … Параметры реестра для отдельных пользователей, которые являются пользовательскими предпочтениями, а для установок на уровне компьютера — все параметры реестра для конкретных пользователей.
Как мне устранить неполадки в моем Citrix Receiver?
Устранение проблем с пользователями
Как сбросить настройки Citrix Receiver в Windows 10?
Процедура сброса в ОС Windows:
Что вызывает повреждение профиля Citrix?
Наиболее заметной причиной подобных проблем является повреждение указанного файла, особенно если компьютер пользователя выключается до того, как будет записан файл DAT. Если файл только частично записывается через UPM, профиль будет поврежден и возникнут проблемы.
Что такое служба телеметрии Citrix?
Citrix Insight Services (CIS) — это платформа Citrix для инструментальных средств, телеметрии и анализа бизнес-информации. Возможности инструментария и телеметрии позволяют техническим пользователям (клиентам, партнерам и инженерам) самостоятельно диагностировать и устранять проблемы, а также оптимизировать свои среды.
Источник
Are you in need of uninstalling Citrix Receiver to fix some problems? Are you looking for an effective solution to completely uninstall it and thoroughly delete all of its files out of your PC? No worry! This page provides detailed instructions on how to completely uninstall Citrix Receiver.
Possible problems when you uninstall Citrix Receiver
* Citrix Receiver is not listed in Programs and Features.
* You do not have sufficient access to uninstall Citrix Receiver.
* A file required for this uninstallation to complete could not be run.
* An error has occurred. Not all of the files were successfully uninstalled.
* Another process that is using the file stops Citrix Receiver being uninstalled.
* Files and folders of Citrix Receiver can be found in the hard disk after the uninstallation.
Citrix Receiver cannot be uninstalled due to many other problems. An incomplete uninstallation of Citrix Receiver may also cause many problems. So, it’s really important to completely uninstall Citrix Receiver and remove all of its files.
How to Uninstall Citrix Receiver Completley?
Method 1: Uninstall Citrix Receiver via Programs and Features.
When a new piece of program is installed on your system, that program is added to the list in Programs and Features. When you want to uninstall the program, you can go to the Programs and Features to uninstall it. So when you want to uninstall Citrix Receiver, the first solution is to uninstall it via Programs and Features.
Steps:
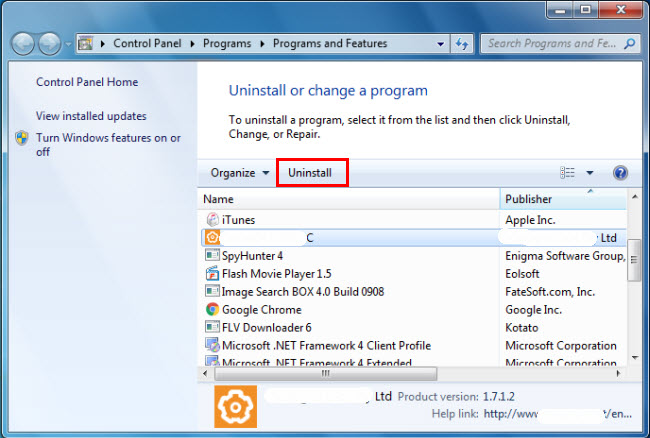
a. Open Programs and Features.
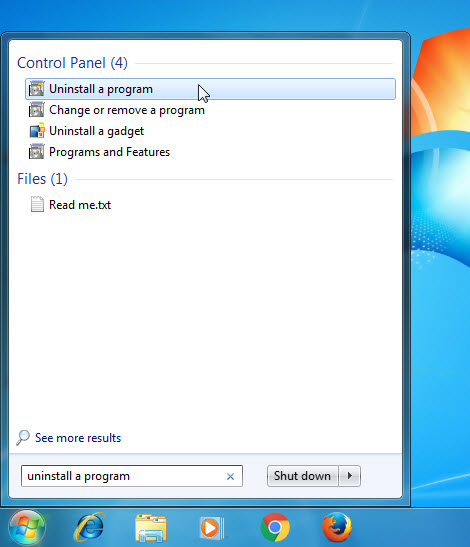
Windows Vista and Windows 7
Click Start, type uninstall a program in the Search programs and files box and then click the result.
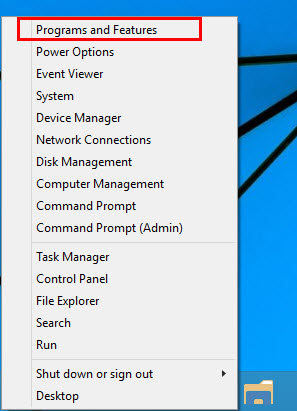
Windows 8, Windows 8.1 and Windows 10
Open WinX menu by holding Windows and X keys together, and then click Programs and Features.
b. Look for Citrix Receiver in the list, click on it and then click Uninstall to initiate the uninstallation.
Method 2: Uninstall Citrix Receiver with its uninstaller.exe.
Most of computer programs have an executable file named uninst000.exe or uninstall.exe or something along these lines. You can find this files in the installation folder of Citrix Receiver.
Steps:
a. Go to the installation folder of Citrix Receiver.
b. Find uninstall.exe or unins000.exe.
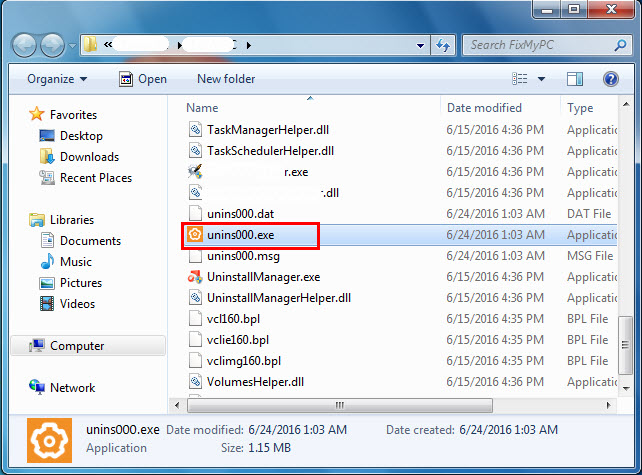
c. Double click on its uninstaller and follow the wizard to uninstall Citrix Receiver.
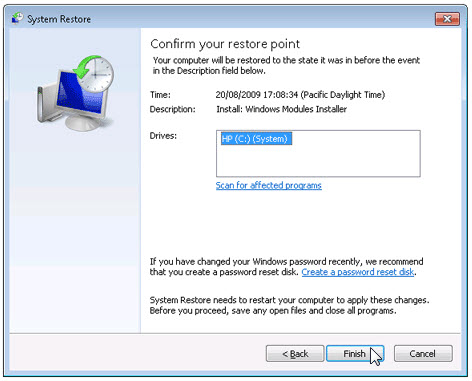
Method 3: Uninstall Citrix Receiver via System Restore.
System Restore is a utility which comes with Windows operating systems and helps computer users restore the system to a previous state and remove programs interfering with the operation of the computer. If you have created a system restore point prior to installing a program, then you can use System Restore to restore your system and completely eradicate the unwanted programs like Citrix Receiver. You should backup your personal files and data before doing a System Restore.
Steps:
a. Close all files and programs that are open.
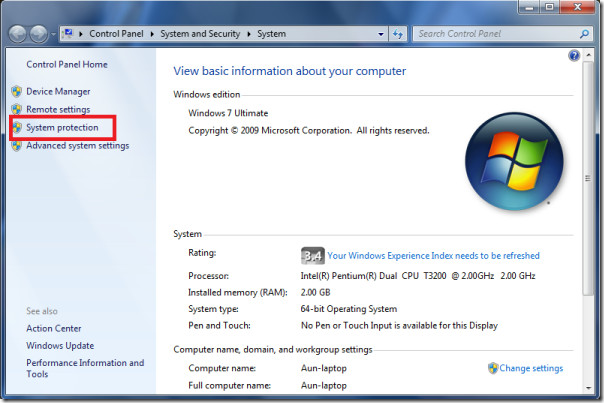
b. On the desktop, right click Computer and select Properties. The system window will display.
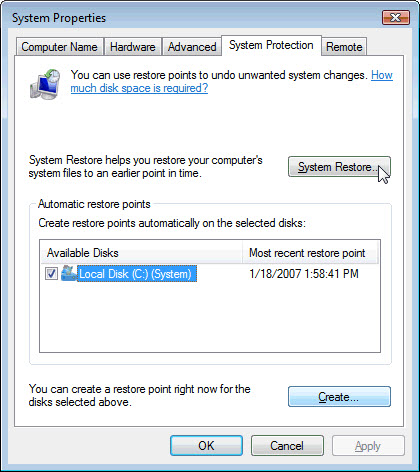
c. On the left side of the System window, click System protection. The System Properties window will display.
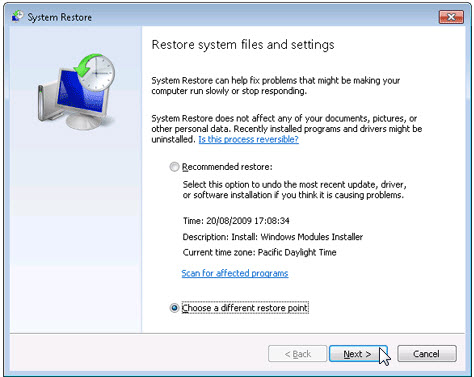
d. Click System Restore and the System Restore window will display.
e. Select Choose a different restore point and click Next.
f. Select a date and time from the list and then click Next. You should know that all programs and drivers installed after the selected date and time may not work properly and may need to be re-installed.
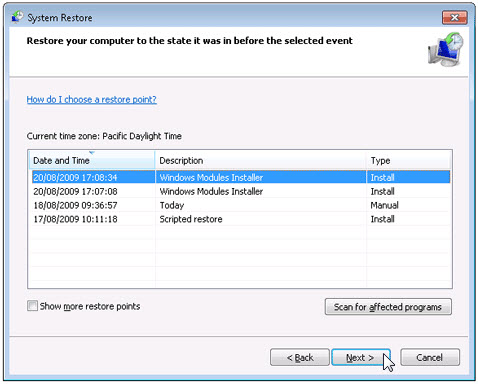
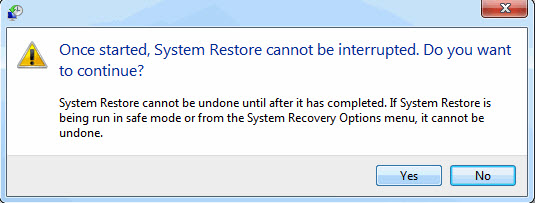
g. Click Finish when the «Confirm your restore point» window appears.
h. Click Yes to confirm again.
Method 4: Uninstall Citrix Receiver with Antivirus.
Nowadays, computer malware appear like common computer applications but they are much more difficult to remove from the computer. Such malware get into the computer with the help of Trojans and spyware. Other computer malware like adware programs or potentially unwanted programs are also very difficult to remove. They usually get installed on your system by bundling with freeware software like video recording, games or PDF convertors. They can easily bypass the detection of the antivirus programs on your system. If you cannot remove Citrix Receiver like other programs, then it’s worth checking whether it’s a malware or not. Click and download this malware detect tool for a free scan.
Method 5: Reinstall Citrix Receiver to Uninstall.
When the file required to uninstall Citrix Receiver is corrupted or missing, it will not be able to uninstall the program. In such circumstance, reinstalling Citrix Receiver may do the trick. Run the installer either in the original disk or the download file to reinstall the program again. Sometimes, the installer may allow you to repair or uninstall the program as well.
Method 6: Use the Uninstall Command Displayed in the Registry.
When a program is installed on the computer, Windows will save its settings and information in the registry, including the uninstall command to uninstall the program. You can try this method to uninstall Citrix Receiver. Please carefully edit the registry, because any mistake there may make your system crash.
Steps:
a. Hold Windows and R keys to open the Run command, type in regedit in the box and click OK.
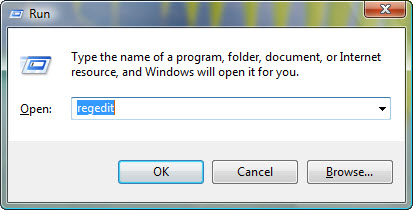
b. Navigate the following registry key and find the one of Citrix Receiver:
HKEY_LOCAL_MACHINESOFTWAREMicrosoftWindowsCurrentVersionUninstall
c. Double click on the UninstallString value, and copy its Value Data.
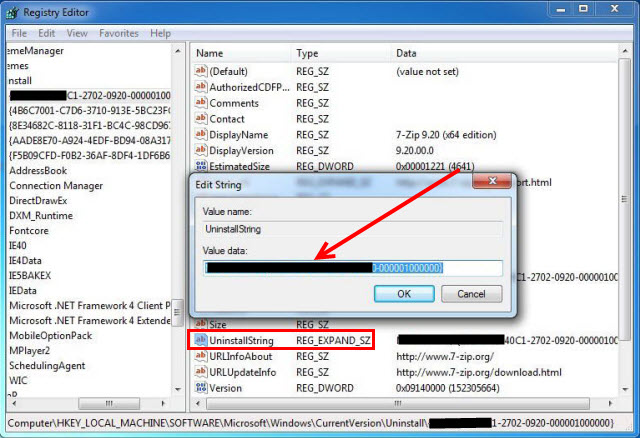
d. Hold Windows and R keys to open the Run command, paste the Value Data in the box and click OK.
e. Follow the wizard to uninstall Citrix Receiver.
Method 7: Uninstall Citrix Receiver with Third-party Uninstaller.
The manual uninstallation of Citrix Receiver requires computer know-how and patience to accomplish. And no one can promise the manual uninstallation will completely uninstall Citrix Receiver and remove all of its files. And an incomplete uninstallation will many useless and invalid items in the registry and affect your computer performance in a bad way. Too many useless files also occupy the free space of your hard disk and slow down your PC speed. So, it’s recommended that you uninstall Citrix Receiver with a trusted third-party uninstaller which can scan your system, identify all files of Citrix Receiver and completely remove them. Download this powerful third-party uninstaller below.
Доброго времени суток,
коллеги.
В данной статье
рассмотрим корректное обновление клиента Citrix Receiver, с полным вычищением пользовательских настроек.
По теории возможно
корректно удалить Citrix Receiver воспользовавшись утилитой Receiver Clean-Up Utility,
которая корректно не только удалит само приложение, но и вычистит все
пользовательские настройки Receiver’а, а потом спокойно установить новую версию
Receiver’a с необходимыми параметрами. Это идеальный случай, когда на данном
компьютере работает только один пользователь, обладающий правами локального
администратора. В реалии все бывает немного по-другому.
В данной статье
рассмотрим три случая обновления Citrix Receiver’а:
- Простое обновление Receiver используя CMD.
- Обновление Receiver с вычищением
настроек пользователей используя PowerShell. - Обновление Receiver с вычищением
настроек пользователей используя PowerShell запущенный под пользовательской учетной записью.
Необходимые требования:
- PowerShell
- Включенный параметр
«Set—ExecutionPolicy Unrestricted» разрешающий выполнение PowerShell скриптов.
1. Рассмотрим
простейший пример скрипта корректной установки Receiver,
используя командную строку CMD.
- Корректное удаление
предыдущего Ресивера посредством утилиты Receiver Clean—Up Utility - Установка Ресивера с
необходимыми нам параметрами
Поместим приложения Ресивер
«CitrixReceiver.exe» и «ReceiverCleanupUtility.exe» в одну папку, там же создадим файл CMD со следующим содержанием:
«%~dp0ReceiverCleanupUtility.exe» /silent
#где %~dp0 это путь к
текущей директории
«%~dp0CitrixReceiver.exe» /includeSSON
ENABLE_SSON=»Yes» /ALLOWADDSTORE=a
STORE0=»TEST;http://ven-tst-sf01/Citrix/PNAgent1/config.xml;on;»
/silent
Описание параметров можно
посмотреть тут.
Данный скрипт корректно
вычистит все параметры старого плагина Citrix и установит новый Citrix Receiver
с новыми необходимыми настройками.
2.Обновление Receiver с вычищением настроек пользователей используя PowerShell.
Если за данным
компьютером работают несколько пользователей, например, это компьютер кассиров,
операционистов и т.п., то данный скрипт вычистит все параметры только текущего
пользователя, а остальные пользователи, войдя в данный компьютер под своими
учетными данными увидят «удвоенные» учетные записи, фантомные ярлыки
приложений и т.п.
Для этого придется усовершенствовать
скрипт, используя PowerShell.
Логика скрипта:
- Узнаем количество
пользователей на локальном компьютере - Загружаем реестр каждого
пользователя, удаляем необходимые нам ветки реестра, выгружаем реестр. - Удаляем ресивер,
используя Receiver Clean-Up Utility. - Устанавливаем Citrix Receiver с необходимыми параметрами
- Удаляем настройки
пользователя текущего пользователя, не обладающего административными привилегиями.
Приведу листинг скрипта:
1. Узнаем количество
пользователей на локальном компьютере
#Используя класс «win32_userprofile»
наполняем переменную $Profile_Path
списком localPath пользователей. Шаблон C:Users%username%.
Подробнее тут (Тут https://msdn.microsoft.com/en—us/library/ee886409(v=vs.85).aspx)
$Profile_Path=gwmi win32_userprofile | select localpath
#Выводим значение переменной $Profile_Path
$Profile_Path
#Узнаем количество профилей на данном
компьютере и приравниваем переменной $NUM
$NUM=$Profile_Path.count
#Удаляем сервисные учетные записи Windows
$NUM -= 3
#Выводим значение переменной
$NUM
2. Запускаем цикл, который перебирает
каждого пользователя, вычищая старые настройки.
for
($i = 0; $i -lt $NUM; $i++)
{
$i
#Присваиваем переменной $username имя
пользователя соответствующее значению номера строки переменной
«$Profile_Path» взятое по столбцу «Name
$username=($Profile_Path[$i].Name)
#Присвоиваем переменной «$LAOD»
значение загрузки куста HKEY_USERS реестра пользователя
$LOAD = ‘»HKEY_USERS‘+$username+'» «‘+$Profile_Path[$i].localpath+’NTUSER.DAT«‘
#Присваиваем переменной «$DELETE_ST»
значение ветви реестра пользователя с настройками учетных записей Receiver,
которую нужно удалить
$DELETE_ST = ‘»HKEY_USERS‘+$username+’SoftwareCitrixDazzleSites«‘
#Присваиваем переменной «$DELETE_RS»
значение ветви реестра пользователя с настройками учетных записей Receiver,
которую нужно удалить
$DELETE_RS = ‘»HKEY_USERS‘+$username+’SoftwareCitrixReceiverRS«‘
#Присваиваем переменной «$DELETE_CS»
значение ветви реестра пользователя с настройками избранных приложений,
добавленных на рабочую панель Receiver’а, которую нужно удалить
$DELETE_CS = ‘»HKEY_USERS‘+$username+’SoftwareMicrosoftWindowsCurrentVersionUninstall«‘
#Выгружаем куст.
$UNLOAD
= ‘»HKEY_USERS‘+$username+'»‘
#Выполняем
Reg load $LOAD
$LOAD
Reg delete $DELETE_ST /f
$DELETE_ST
Reg delete $DELETE_RS /f
$DELETE_RS
Reg delete $DELETE_CS /f
$DELETE_CS
Reg unload $UNLOAD
$UNLOAD
}
Если установлена ОС ниже Windows Vista, можно использовать командлет «Get—ChildItem«, подробнее тут.
#Присваиваем переменной «$Profile_Path
» значения списка папок пользователей по пути «C:Users». Для
WinXP — «C:Documents and Settings»
$Profile_Path = Get-ChildItem -force «C:Users«
#Далее по аналогии
$Profile_Path | select Name
$NUM=$Profile_Path.count
$NUM
for
($i = 0;
$i -lt $NUM; $i++)
{
$i
$username=($Profile_Path[$i].Name)
$LOAD = ‘»HKEY_USERS‘+$username+'» «‘+$Profile_Path[$i].localpath+’NTUSER.DAT«‘
$DELETE = ‘»HKEY_USERS‘+$username+’SoftwareCitrixDazzleSites«‘
$DELETE_RS = ‘»HKEY_USERS‘+$username+’SoftwareCitrixReceiverRS«‘
$DELETE_CS = ‘»HKEY_USERS‘+$username+’SoftwareMicrosoftWindowsCurrentVersionUninstall«‘
$UNLOAD = ‘»HKEY_USERS‘+$username+'»‘
Reg load $LOAD
$LOAD
Reg delete $DELETE /f
$DELETE
Reg delete $DELETE_RS /f
$DELETE_RS
Reg delete $DELETE_CS /f
$DELETE_CS
Reg unload $UNLOAD
$UNLOAD
}
3. Удаляем ресивер, используя Clean-Up Utility.
#Присваиваем переменной «$Loc»
значение пути до текущей папки
$Loc = Get-Location
#Присваиваем переменной «$Location»
значение выборки переменной «$Loc» взятое по столбцу «path»
$Location
= $Loc.path
#Выводим строку ‘Uninstall Receiver’
$Log = ‘Uninstall Receiver‘
$Log
#Запускаем утилиту ReceiverCleanupUtility
$ClenUp
= $Location+’ReceiverCleanupUtility.exe‘
$ClenUp
$CleanUPArg = ‘/silent‘
& $ClenUp $CleanUPArg
4. Устанавливаем Receiver с определенными параметрами
$Log
= ‘Install Receiver‘
$Log
$Receiver = $Location+’CitrixReceiver.exe‘
$Receiver
$Receiverarg1 = ‘/includeSSON‘
$Receiverarg2 = ‘ENABLE_SSON=»Yes»‘
$Receiverarg3 = ‘/ALLOWADDSTORE=a‘
$Receiverarg4 = ‘STORE0=»TEST;
http://ven-tst-sf01/Citrix/PNAgent1/config.xml;on;«‘
$Receiverarg5 = ‘/silent’
& $Receiver $Receiverarg1 $Receiverarg2
$Receiverarg3 $Receiverarg4 $Receiverar5
Сохраним скрипт в файл под
именем «Install.ps1»
5. Для удаления и установки Receiver‘а требуются
административные права. Поэтому очень часто технические специалисты запускают
скрипты, находясь под окружением обычного пользователя, повышая его привилегию,
используя инструмент «Run As».
В этом случае настройки текущего пользователя не будут сброшены. Для очистки
настроек необходимо запустить еще один скрипт под правами текущего
пользователя:
#Убиваем процессы Receiver’а
Stop-Process -processname Receiver*
Stop-Process -processname SelfService*
Stop-Process -processname wfcrun32*
#Присваиваем переменной «$objUser» значение имени текущего
пользователя, используя параметр «Whoami»
$objUser = New—Object System.Security.Principal.NTAccount(whoami)
#Присваиваем переменной «$strSID» значение SID’а текущего
пользователя
$strSID = $objUser.Translate([System.Security.Principal.SecurityIdentifier])
#Присваиваем переменной «$UserSID»
значение SID‘а теущего пользователя по столбцу «Value«
$UserSID=$strSID.Value
$UserSID
#Удаляем Ветки реестра текущего пользователя
$DELETE = ‘»HKEY_USERS‘+$UserSID+’SoftwareCitrixDazzleSites«‘
$DELETE_Curr = ‘»HKEY_CURRENT_USERSoftwareCitrixDazzleSites«‘
$DELETE_Rec = ‘»HKEY_CURRENT_USERSoftwareCitrixReceiverSR«‘
$DELETE_sidrec = ‘»HKEY_USERS‘+$UserSID+’SoftwareCitrixReceiverSR«‘
$DELETE_cach = ‘»HKEY_USERS‘+$UserSID+’SoftwareMicrosoftWindowsCurrentVersionUninstall«‘
Reg delete $DELETE_cach /f
$DELETE_cach
Reg delete $DELETE_sidrec /f
$DELETE_sidrec
Reg delete $DELETE /f
$DELETE
Reg delete $DELETE_Rec /f
$DELETE_Rec
Reg delete $DELETE_Curr /f
$DELETE_Curr
3.
Упростим скрипт до одного исполняемого файла.
- Скрипт вычищает настройки Receiver текущего пользователя
- Повышает административные привилегия, запрашивая логин и пароль
- Под административными привилегиями запускается скрипт для удаления,
вычищения и установки Receiver
#Запуск скрипта от имени текущего пользователя
Stop-Process -processname Receiver*
Stop-Process -processname SelfService*
Stop-Process -processname wfcrun32*
$objUser = New-Object
System.Security.Principal.NTAccount(whoami)
$strSID = $objUser.Translate([System.Security.Principal.SecurityIdentifier])
$UserSID=$strSID.Value
$UserSID
$DELETE = ‘»HKEY_USERS‘+$UserSID+’SoftwareCitrixDazzleSites«‘
$DELETE_Curr = ‘»HKEY_CURRENT_USERSoftwareCitrixDazzleSites«‘
$DELETE_Rec = ‘»HKEY_CURRENT_USERSoftwareCitrixReceiverSR«‘
$DELETE_sidrec = ‘»HKEY_USERS‘+$UserSID+’SoftwareCitrixReceiverSR«‘
Reg delete $DELETE /f
$DELETE
Reg delete $DELETE_Curr /f
$DELETE_Curr
Reg delete $DELETE_Rec /f
$DELETE_Rec
Reg delete $DELETE_sidrec
/f
$DELETE_sidrec
#Запускаем PowerShell с
указанием пути до второго скрипта от имени введенных административных учетных
данных.
#Узнаем путь до текущей папки
#Присваиваем переменной
«$Loc» значение пути до текущей папки
$Loc = Get-Location
#Присваиваем переменной
«$Location» значение выборки переменной «$Loc» взятое по
столбцу «path»
$Location = $Loc.path
#Присваиваем переменной
«$inst» путь до скрипта «Install.ps1»
$inst
= ‘-File «‘+$Location+’Install.ps1«‘
$inst
#Присваиваем переменной
«$usr» значение учетных данных, введенных администратором.
$usr
= Get-Credential
#Запускаем консоль
PowerShell под учетными данными администратора
Start-Process
powershell.exe
-Credential $usr -ArgumentList
$inst -NoNewWindow
Скрипт «Install.ps1» приведён выше. Сохраним скрипт в файл под именем «CleanReg.ps1»
Теперь для простоты запуска создадим файл «Install.cmd» с содержанием:
powershell.exe -file .CleanReg.ps1
Итого, в папке должно находиться пять файлов:
«Install.cmd» — Файл запуска скрипта PowerShell
«CleanReg.ps1» — Скрипт, очищающий
настройки Receiver‘a текущего пользователя
«Install.ps1» — Скрипт, очищающий
настройки Receiver‘а всех пользователей на данном компьютере, удаление и установка Receiver‘а
«CitrixReceiver.exe» — Дистрибутив установки Citrix Receiver
«ReceiverCleanupUtility.exe»
— Дистрибутив удаления Citrix Receiver: Citrix CleanUp Utility
Архив можно скачать отсюда.
На этом предлагаю закончить.
Вопросы, замечания и предложения пишите в комментариях или на почту.
Удачного тестирования!
Attached are the info prompt from the system:
15:34:57: Information — CApp::InitializeLog(662) — * Version: 13.4.0.25
15:34:57: Information — CApp::InitializeLog(664) — * Build Date: Dec 14 2012
15:34:57: Information — CApp::InitializeLog(665) — * Build Time: 15:20:10
15:34:57: Information — CApp::InitializeLog(666) — * Command Line: /uninstall /cleanup
15:34:57: Information — CCommandLine::ParseParam(94) — Command Line Parameter: uninstall = true
15:34:57: Information — CCommandLine::ParseParam(94) — Command Line Parameter: cleanup = true
15:34:57: Information — CApp::InitializeResourceModule(770) — Processing Resource Module Path: C:ProgramDataCitrixCitrix Receiverenen-US
15:34:57: Information — CApp::InitializeResourceModule(781) — Resource Module Path 1: C:ProgramDataCitrixCitrix Receiverenen-USTrolleyExpressUI_en.dll
15:34:57: Information — CApp::InitializeResourceModule(782) — Resource Module Path 2: C:ProgramDataCitrixCitrix Receiverenen-USTrolleyExpressUI_en-US.dll
15:34:57: Information — CApp::InitializeResourceModule(770) — Processing Resource Module Path: C:ProgramDataCitrixCitrix Receiveren
15:34:57: Information — CApp::InitializeResourceModule(781) — Resource Module Path 1: C:ProgramDataCitrixCitrix ReceiverenTrolleyExpressUI_en.dll
15:34:57: Information — CApp::InitializeResourceModule(782) — Resource Module Path 2: C:ProgramDataCitrixCitrix ReceiverenTrolleyExpressUI_en-US.dll
15:34:57: Information — CApp::InitializeResourceModule(770) — Processing Resource Module Path: C:ProgramDataCitrixCitrix Receiver
15:34:57: Information — CApp::InitializeResourceModule(781) — Resource Module Path 1: C:ProgramDataCitrixCitrix ReceiverTrolleyExpressUI_en.dll
15:34:57: Information — CApp::InitializeResourceModule(782) — Resource Module Path 2: C:ProgramDataCitrixCitrix ReceiverTrolleyExpressUI_en-US.dll
15:34:57: Information — CApp::InitializeResourceModule(794) — Loaded Resource Module: C:ProgramDataCitrixCitrix ReceiverTrolleyExpressUI_en.dll
15:34:57: Information — CResourceManager::ProcessResources(188) — Processing Resources: C:ProgramDataCitrixCitrix Receiverenen-US
15:34:57: Information — CResourceManager::ProcessResources(188) — Processing Resources: C:ProgramDataCitrixCitrix Receiveren
15:34:57: Information — CResourceManager::ProcessResources(188) — Processing Resources: C:ProgramDataCitrixCitrix Receiverenen-US
15:34:57: Information — CResourceManager::ProcessResources(188) — Processing Resources: C:ProgramDataCitrixCitrix Receiveren
15:34:57: Information — CResourceManager::ProcessResources(188) — Processing Resources: C:ProgramDataCitrixCitrix Receiver
15:34:57: Information — CResourceManager::ProcessResources(227) — Resource: FileName = AuthManager.msi, FilePath = C:ProgramDataCitrixCitrix ReceiverAuthManager.msi
15:34:57: Information — CResourceManager::ProcessResources(227) — Resource: FileName = CitrixHDXMediaStreamForFlash-ClientInstall.msi, FilePath = C:ProgramDataCitrixCitrix ReceiverCitrixHDXMediaStreamForFlash-ClientInstall.msi
15:34:57: Information — CResourceManager::ProcessResources(227) — Resource: FileName = CitrixReceiverUpdater-User.msi, FilePath = C:ProgramDataCitrixCitrix ReceiverCitrixReceiverUpdater-User.msi
15:34:57: Information — CResourceManager::ProcessResources(227) — Resource: FileName = DesktopViewer.msi, FilePath = C:ProgramDataCitrixCitrix ReceiverDesktopViewer.msi
15:34:57: Information — CResourceManager::ProcessResources(227) — Resource: FileName = dualpk.cab, FilePath = C:ProgramDataCitrixCitrix Receiverdualpk.cab
15:34:57: Information — CResourceManager::ProcessResources(227) — Resource: FileName = EULA_de.rtf, FilePath = C:ProgramDataCitrixCitrix ReceiverEULA_de.rtf
15:34:57: Information — CResourceManager::ProcessResources(227) — Resource: FileName = EULA_en.rtf, FilePath = C:ProgramDataCitrixCitrix ReceiverEULA_en.rtf
15:34:57: Information — CResourceManager::ProcessResources(227) — Resource: FileName = EULA_es.rtf, FilePath = C:ProgramDataCitrixCitrix ReceiverEULA_es.rtf
15:34:57: Information — CResourceManager::ProcessResources(227) — Resource: FileName = EULA_fr.rtf, FilePath = C:ProgramDataCitrixCitrix ReceiverEULA_fr.rtf
15:34:57: Information — CResourceManager::ProcessResources(227) — Resource: FileName = EULA_ja.rtf, FilePath = C:ProgramDataCitrixCitrix ReceiverEULA_ja.rtf
15:34:57: Information — CResourceManager::ProcessResources(227) — Resource: FileName = EULA_ko.rtf, FilePath = C:ProgramDataCitrixCitrix ReceiverEULA_ko.rtf
15:34:57: Information — CResourceManager::ProcessResources(227) — Resource: FileName = EULA_ru.rtf, FilePath = C:ProgramDataCitrixCitrix ReceiverEULA_ru.rtf
15:34:57: Information — CResourceManager::ProcessResources(227) — Resource: FileName = EULA_zh-CN.rtf, FilePath = C:ProgramDataCitrixCitrix ReceiverEULA_zh-CN.rtf
15:34:57: Information — CResourceManager::ProcessResources(227) — Resource: FileName = EULA_zh-TW.rtf, FilePath = C:ProgramDataCitrixCitrix ReceiverEULA_zh-TW.rtf
15:34:57: Information — CResourceManager::ProcessResources(227) — Resource: FileName = GenericUSB.msi, FilePath = C:ProgramDataCitrixCitrix ReceiverGenericUSB.msi
15:34:57: Information — CResourceManager::ProcessResources(227) — Resource: FileName = Global.xml, FilePath = C:ProgramDataCitrixCitrix ReceiverGlobal.xml
15:34:57: Information — CResourceManager::ProcessResources(227) — Resource: FileName = HeaderLogo.bmp, FilePath = C:ProgramDataCitrixCitrix ReceiverHeaderLogo.bmp
15:34:57: Information — CResourceManager::ProcessResources(227) — Resource: FileName = ICAWebWrapper.msi, FilePath = C:ProgramDataCitrixCitrix ReceiverICAWebWrapper.msi
15:34:57: Information — CResourceManager::ProcessResources(227) — Resource: FileName = Localized_de.xml, FilePath = C:ProgramDataCitrixCitrix ReceiverLocalized_de.xml
15:34:57: Information — CResourceManager::ProcessResources(227) — Resource: FileName = Localized_en.xml, FilePath = C:ProgramDataCitrixCitrix ReceiverLocalized_en.xml
15:34:57: Information — CResourceManager::ProcessResources(227) — Resource: FileName = Localized_es.xml, FilePath = C:ProgramDataCitrixCitrix ReceiverLocalized_es.xml
15:34:57: Information — CResourceManager::ProcessResources(227) — Resource: FileName = Localized_fr.xml, FilePath = C:ProgramDataCitrixCitrix ReceiverLocalized_fr.xml
15:34:57: Information — CResourceManager::ProcessResources(227) — Resource: FileName = Localized_ja.xml, FilePath = C:ProgramDataCitrixCitrix ReceiverLocalized_ja.xml
15:34:57: Information — CResourceManager::ProcessResources(227) — Resource: FileName = Localized_ko.xml, FilePath = C:ProgramDataCitrixCitrix ReceiverLocalized_ko.xml
15:34:57: Information — CResourceManager::ProcessResources(227) — Resource: FileName = Localized_ru.xml, FilePath = C:ProgramDataCitrixCitrix ReceiverLocalized_ru.xml
15:34:57: Information — CResourceManager::ProcessResources(227) — Resource: FileName = Localized_zh-CN.xml, FilePath = C:ProgramDataCitrixCitrix ReceiverLocalized_zh-CN.xml
15:34:57: Information — CResourceManager::ProcessResources(227) — Resource: FileName = Localized_zh-TW.xml, FilePath = C:ProgramDataCitrixCitrix ReceiverLocalized_zh-TW.xml
15:34:57: Information — CResourceManager::ProcessResources(227) — Resource: FileName = RIInstaller.msi, FilePath = C:ProgramDataCitrixCitrix ReceiverRIInstaller.msi
15:34:57: Information — CResourceManager::ProcessResources(227) — Resource: FileName = SelfServicePlugin.msi, FilePath = C:ProgramDataCitrixCitrix ReceiverSelfServicePlugin.msi
15:34:57: Information — CResourceManager::ProcessResources(227) — Resource: FileName = SideBarBackground.bmp, FilePath = C:ProgramDataCitrixCitrix ReceiverSideBarBackground.bmp
15:34:57: Information — CResourceManager::ProcessResources(227) — Resource: FileName = SSONWrapper.msi, FilePath = C:ProgramDataCitrixCitrix ReceiverSSONWrapper.msi
15:34:57: Information — CResourceManager::ProcessResources(227) — Resource: FileName = TrolleyExpress.exe, FilePath = C:ProgramDataCitrixCitrix ReceiverTrolleyExpress.exe
15:34:57: Information — CResourceManager::ProcessResources(227) — Resource: FileName = TrolleyExpressUI_de.dll, FilePath = C:ProgramDataCitrixCitrix ReceiverTrolleyExpressUI_de.dll
15:34:57: Information — CResourceManager::ProcessResources(227) — Resource: FileName = TrolleyExpressUI_en.dll, FilePath = C:ProgramDataCitrixCitrix ReceiverTrolleyExpressUI_en.dll
15:34:57: Information — CResourceManager::ProcessResources(227) — Resource: FileName = TrolleyExpressUI_es.dll, FilePath = C:ProgramDataCitrixCitrix ReceiverTrolleyExpressUI_es.dll
15:34:57: Information — CResourceManager::ProcessResources(227) — Resource: FileName = TrolleyExpressUI_fr.dll, FilePath = C:ProgramDataCitrixCitrix ReceiverTrolleyExpressUI_fr.dll
15:34:57: Information — CResourceManager::ProcessResources(227) — Resource: FileName = TrolleyExpressUI_ja.dll, FilePath = C:ProgramDataCitrixCitrix ReceiverTrolleyExpressUI_ja.dll
15:34:57: Information — CResourceManager::ProcessResources(227) — Resource: FileName = TrolleyExpressUI_ko.dll, FilePath = C:ProgramDataCitrixCitrix ReceiverTrolleyExpressUI_ko.dll
15:34:57: Information — CResourceManager::ProcessResources(227) — Resource: FileName = TrolleyExpressUI_ru.dll, FilePath = C:ProgramDataCitrixCitrix ReceiverTrolleyExpressUI_ru.dll
15:34:57: Information — CResourceManager::ProcessResources(227) — Resource: FileName = TrolleyExpressUI_zh-CN.dll, FilePath = C:ProgramDataCitrixCitrix ReceiverTrolleyExpressUI_zh-CN.dll
15:34:57: Information — CResourceManager::ProcessResources(227) — Resource: FileName = TrolleyExpressUI_zh-TW.dll, FilePath = C:ProgramDataCitrixCitrix ReceiverTrolleyExpressUI_zh-TW.dll
15:34:57: Information — CResourceManager::ProcessResources(227) — Resource: FileName = Vd3dClient.msi, FilePath = C:ProgramDataCitrixCitrix ReceiverVd3dClient.msi
15:34:57: Information — CResourceManager::ProcessResources(188) — Processing Resources: C:ProgramDataCitrixCitrix Receiver
15:34:57: Information — CConfigurationManager::Create(20) — globalDocumentPath: C:ProgramDataCitrixCitrix ReceiverGlobal.xml
15:34:57: Information — CConfigurationManager::Create(21) — localizedDocumentPath: C:ProgramDataCitrixCitrix ReceiverLocalized_en.xml
15:34:57: Information — CConfigurationManager::LoadStrings(516) — String: Key = ProductVersion, Value = 13.4.0.25
15:34:57: Information — CConfigurationManager::LoadStrings(516) — String: Key = DUalMode, Value = Install
15:34:57: Information — CConfigurationManager::LoadStrings(516) — String: Key = ProductUninstallKey, Value = CitrixOnlinePluginPackWeb
15:34:57: Information — CConfigurationManager::LoadStrings(516) — String: Key = ProductPermission, Value = Permachine
15:34:57: Information — CConfigurationManager::LoadStrings(516) — String: Key = ProductName, Value = Citrix Receiver
15:34:57: Information — CConfigurationManager::LoadStrings(516) — String: Key = ApplicationTitle, Value = Citrix Receiver
15:34:57: Information — CConfigurationManager::LoadStrings(516) — String: Key = UninstallPrompt, Value = Are you sure you want to uninstall this software?
15:34:57: Information — CConfigurationManager::LoadStrings(516) — String: Key = Publisher, Value = Citrix Systems, Inc.
15:34:57: Information — CConfigurationManager::LoadStrings(516) — String: Key = Contact, Value = Citrix Systems, Inc.
15:34:57: Information — CConfigurationManager::LoadStrings(516) — String: Key = Telephone, Value = 1-800-424-8749
15:34:57: Information — CConfigurationManager::LoadStrings(516) — String: Key = UrlInfoAbout, Value = www.citrix.com
15:34:57: Information — CConfigurationManager::LoadStrings(516) — String: Key = NoModify, Value = Yes
15:34:57: Information — CConfigurationManager::LoadStrings(516) — String: Key = NoRepair, Value = Yes
15:34:57: Information — CConfigurationManager::LoadStrings(516) — String: Key = SSON-Pkg, Value = Citrix PNA Installation
15:34:57: Information — CConfigurationManager::LoadStrings(516) — String: Key = UsageText, Value = Supported parameters:
/help — Displays this usage information
/uninstall — Re
15:34:57: Information — CConfigurationManager::LoadImages(650) — Image: Key = HeaderLogo, Path = C:ProgramDataCitrixCitrix ReceiverHeaderLogo.bmp
15:34:57: Information — CConfigurationManager::LoadImages(650) — Image: Key = SideBarBackground, Path = C:ProgramDataCitrixCitrix ReceiverSideBarBackground.bmp
15:34:57: Information — CConfigurationManager::LoadGroup(977) — Group: ID = XenAppSuite, DisplayName = XenApp Plugin Suite, Description = These installations are shared for all products using the XenApp Plugin.
15:34:57: Information — CComponent::InitializeFromRegistry(592) — Found version of Component: XenAppSuiteReceiverInside = 3.4.0.29585
15:34:57: Information — CComponent::InitializeFromRegistry(612) — Read ProductCode from registry: {9D431014-9F90-4335-A58E-8A14B0BD77F1}
15:34:57: Warning — CComponent::InitializeFromMsi(410) — Cannot open package. Package Path =
15:34:57: Information — CConfigurationManager::LoadComponent(1202) — Component: ID = ReceiverInside, Name = , Family = , Version = 3.4.0.29585, GroupID = XenAppSuite, DisplayName = Receiver Inside, Description = These installations are specific to XenApp or
XenDesktop., ProductCode = {9D431014-9F90-4335-A58E-8A14B0BD77F1}, UserPermission = Permachine, InstalledClientProductCodePM = , InstalledClientProductCodePU = , PackagePath = , InstallOrder = 01, TransformPath = , RootFeature = Complete, LogFilePath = C:UsersCYCHEN~1AppDataLocalTempCtxInstall-RIInstaller.log,
Installed = True, CurrentVersionInstalled = True, InstalledVersion = 3.4.0.29585, Selected = True, InstallResult = -536866816, DebugInstallResult = -536866816, InstallSuccess = False, InstallRebootRequired = False, InstallSkipped = False
15:34:57: Information — CComponent::InitializeFromRegistry(592) — Found version of Component: XenAppSuiteReceiverUpdater = 3.4.0.29577
15:34:57: Information — CComponent::InitializeFromRegistry(612) — Read ProductCode from registry: {7468ACCE-6FA8-4794-90B9-C28BD9CC79DD}
15:34:57: Warning — CComponent::InitializeFromMsi(410) — Cannot open package. Package Path =
15:34:57: Information — CConfigurationManager::LoadComponent(1202) — Component: ID = ReceiverUpdater, Name = , Family = , Version = 3.4.0.29577, GroupID = XenAppSuite, DisplayName = Receiver, Description = These installations are specific to XenApp or XenDesktop.,
ProductCode = {7468ACCE-6FA8-4794-90B9-C28BD9CC79DD}, UserPermission = Permachine, InstalledClientProductCodePM = , InstalledClientProductCodePU = , PackagePath = , InstallOrder = 02, TransformPath = , RootFeature = Complete, LogFilePath = C:UsersCYCHEN~1AppDataLocalTempCtxInstall-CitrixReceiverUpdater-User.log,
Installed = True, CurrentVersionInstalled = True, InstalledVersion = 3.4.0.29577, Selected = True, InstallResult = -536866816, DebugInstallResult = -536866816, InstallSuccess = False, InstallRebootRequired = False, InstallSkipped = False
15:34:57: Information — CComponent::InitializeFromRegistry(592) — Found version of Component: XenAppSuiteICA_Client = 13.4.0.25
15:34:57: Information — CComponent::InitializeFromRegistry(612) — Read ProductCode from registry: {7BD3DC6D-A2BE-4345-B6EE-D146193DB18F}
15:34:57: Warning — CComponent::InitializeFromMsi(410) — Cannot open package. Package Path =
15:34:57: Information — CConfigurationManager::LoadComponent(1202) — Component: ID = ICA_Client, Name = , Family = , Version = 13.4.0.25, GroupID = XenAppSuite, DisplayName = XenApp Web Plugin, Description = These installations are specific to XenApp., ProductCode
= {7BD3DC6D-A2BE-4345-B6EE-D146193DB18F}, UserPermission = Permachine, InstalledClientProductCodePM = , InstalledClientProductCodePU = , PackagePath = , InstallOrder = 03, TransformPath = , RootFeature = Complete, LogFilePath = C:UsersCYCHEN~1AppDataLocalTempCtxInstall-ICAWebWrapper.log,
Installed = True, CurrentVersionInstalled = True, InstalledVersion = 13.4.0.25, Selected = True, InstallResult = -536866816, DebugInstallResult = -536866816, InstallSuccess = False, InstallRebootRequired = False, InstallSkipped = False
15:34:57: Information — CComponent::InitializeFromRegistry(592) — Found version of Component: XenAppSuiteUSB = 13.4.0.25
15:34:57: Information — CComponent::InitializeFromRegistry(612) — Read ProductCode from registry: {3068513C-3AAC-410B-BAE7-C7837FFF8DEB}
15:34:57: Warning — CComponent::InitializeFromMsi(410) — Cannot open package. Package Path =
15:34:57: Information — CConfigurationManager::LoadComponent(1202) — Component: ID = USB, Name = , Family = , Version = 13.4.0.25, GroupID = XenAppSuite, DisplayName = USB, Description = These installations are specific to XenApp., ProductCode = {3068513C-3AAC-410B-BAE7-C7837FFF8DEB},
UserPermission = Permachine, InstalledClientProductCodePM = , InstalledClientProductCodePU = , PackagePath = , InstallOrder = 04, TransformPath = , RootFeature = Complete, LogFilePath = C:UsersCYCHEN~1AppDataLocalTempCtxInstall-GenericUSB.log, Installed
= True, CurrentVersionInstalled = True, InstalledVersion = 13.4.0.25, Selected = True, InstallResult = -536866816, DebugInstallResult = -536866816, InstallSuccess = False, InstallRebootRequired = False, InstallSkipped = False
15:34:57: Information — CComponent::InitializeFromRegistry(592) — Found version of Component: XenAppSuiteDesktopViewer = 13.4.0.25
15:34:57: Information — CComponent::InitializeFromRegistry(612) — Read ProductCode from registry: {D29DDA9B-FE05-48F1-A9D1-F6346A0A301A}
15:34:57: Warning — CComponent::InitializeFromMsi(410) — Cannot open package. Package Path =
15:34:57: Information — CConfigurationManager::LoadComponent(1202) — Component: ID = DesktopViewer, Name = , Family = , Version = 13.4.0.25, GroupID = XenAppSuite, DisplayName = Citrix Receiver (DV), Description = These installations are specific to XenApp
or XenDesktop., ProductCode = {D29DDA9B-FE05-48F1-A9D1-F6346A0A301A}, UserPermission = Permachine, InstalledClientProductCodePM = , InstalledClientProductCodePU = , PackagePath = , InstallOrder = 05, TransformPath = , RootFeature = Complete, LogFilePath =
C:UsersCYCHEN~1AppDataLocalTempCtxInstall-DesktopViewer.log, Installed = True, CurrentVersionInstalled = True, InstalledVersion = 13.4.0.25, Selected = True, InstallResult = -536866816, DebugInstallResult = -536866816, InstallSuccess = False, InstallRebootRequired
= False, InstallSkipped = False
15:34:57: Information — CComponent::InitializeFromRegistry(592) — Found version of Component: XenAppSuiteFlash = 13.4.0.25
15:34:57: Information — CComponent::InitializeFromRegistry(612) — Read ProductCode from registry: {0E8DC723-F1CD-424A-96CC-12428E7A1B4B}
15:34:57: Warning — CComponent::InitializeFromMsi(410) — Cannot open package. Package Path =
15:34:57: Information — CConfigurationManager::LoadComponent(1202) — Component: ID = Flash, Name = , Family = , Version = 13.4.0.25, GroupID = XenAppSuite, DisplayName = HDX Flash, Description = These installations are specific to XenApp., ProductCode = {0E8DC723-F1CD-424A-96CC-12428E7A1B4B},
UserPermission = Permachine, InstalledClientProductCodePM = , InstalledClientProductCodePU = , PackagePath = , InstallOrder = 06, TransformPath = , RootFeature = Complete, LogFilePath = C:UsersCYCHEN~1AppDataLocalTempCtxInstall-CitrixHDXMediaStreamForFlash-ClientInstall.log,
Installed = True, CurrentVersionInstalled = True, InstalledVersion = 13.4.0.25, Selected = True, InstallResult = -536866816, DebugInstallResult = -536866816, InstallSuccess = False, InstallRebootRequired = False, InstallSkipped = False
15:34:57: Information — CComponent::InitializeFromRegistry(592) — Found version of Component: XenAppSuiteVd3d = 13.4.0.25
15:34:57: Information — CComponent::InitializeFromRegistry(612) — Read ProductCode from registry: {E3A60962-B768-4EA3-B0B6-DA671276B81A}
15:34:57: Warning — CComponent::InitializeFromMsi(410) — Cannot open package. Package Path =
15:34:57: Information — CConfigurationManager::LoadComponent(1202) — Component: ID = Vd3d, Name = , Family = , Version = 13.4.0.25, GroupID = XenAppSuite, DisplayName = HDX Aero, Description = These installations are specific to XenApp or XenDesktop., ProductCode
= {E3A60962-B768-4EA3-B0B6-DA671276B81A}, UserPermission = Permachine, InstalledClientProductCodePM = , InstalledClientProductCodePU = , PackagePath = , InstallOrder = 07, TransformPath = , RootFeature = Complete, LogFilePath = C:UsersCYCHEN~1AppDataLocalTempCtxInstall-Vd3dClient.log,
Installed = True, CurrentVersionInstalled = True, InstalledVersion = 13.4.0.25, Selected = True, InstallResult = -536866816, DebugInstallResult = -536866816, InstallSuccess = False, InstallRebootRequired = False, InstallSkipped = False
15:34:57: Information — CComponent::InitializeFromRegistry(592) — Found version of Component: XenAppSuiteAM = 4.0.0.53726
15:34:57: Information — CComponent::InitializeFromRegistry(612) — Read ProductCode from registry: {B92051A3-3ABB-4A26-A615-2298BE7CBC28}
15:34:57: Warning — CComponent::InitializeFromMsi(410) — Cannot open package. Package Path =
15:34:57: Information — CConfigurationManager::LoadComponent(1202) — Component: ID = AM, Name = , Family = , Version = 4.0.0.53726, GroupID = XenAppSuite, DisplayName = Authentication Manager, Description = These installations are specific to XenApp or XenDesktop.,
ProductCode = {B92051A3-3ABB-4A26-A615-2298BE7CBC28}, UserPermission = Permachine, InstalledClientProductCodePM = , InstalledClientProductCodePU = , PackagePath = , InstallOrder = 08, TransformPath = , RootFeature = Complete, LogFilePath = C:UsersCYCHEN~1AppDataLocalTempCtxInstall-AuthManager.log,
Installed = True, CurrentVersionInstalled = True, InstalledVersion = 4.0.0.53726, Selected = True, InstallResult = -536866816, DebugInstallResult = -536866816, InstallSuccess = False, InstallRebootRequired = False, InstallSkipped = False
15:34:57: Information — CComponent::ReadStoredRegString(526) — No existing package SOFTWARECitrixPluginPackagesXenAppSuiteSSON. (Key not present.)
15:34:57: Information — CComponent::ReadStoredRegString(526) — No existing package SOFTWARECitrixPluginPackagesXenAppSuiteSSON. (Key not present.)
15:34:57: Information — CComponent::ReadStoredRegString(526) — No existing package SOFTWARECitrixPluginPackagesXenAppSuiteSSON. (Key not present.)
15:34:57: Warning — CComponent::InitializeFromMsi(410) — Cannot open package. Package Path =
15:34:57: Information — CComponent::InitializeFromInstalledMsi(726) — Cache client version : 11.2.0.0
15:34:57: Information — CtxInstallHelpers::CInstalledClientPkg::FindInstalledClient(134) — No existing clients found with given upgrade code: {B8F4F4A9-24B8-4C77-8A59-202F515EC0B6}
15:34:57: Information — CtxInstallHelpers::CInstalledClientPkg::FindInstalledClient(134) — No existing clients found with given upgrade code: {FED202C4-EA51-490C-93A5-62B16AAD8563}
15:34:57: Information — CConfigurationManager::LoadComponent(1202) — Component: ID = SSON, Name = , Family = , Version = 1.0.0.0, GroupID = XenAppSuite, DisplayName = Single Sign on, Description = These installations are specific to XenApp or XenDesktop., ProductCode
= , UserPermission = Permachine, InstalledClientProductCodePM = , InstalledClientProductCodePU = , PackagePath = , InstallOrder = 09, TransformPath = , RootFeature = Complete, LogFilePath = C:UsersCYCHEN~1AppDataLocalTempCtxInstall-SSONWrapper.log, Installed
= False, CurrentVersionInstalled = False, InstalledVersion = 0.0.0.0, Selected = True, InstallResult = -536866816, DebugInstallResult = -536866816, InstallSuccess = False, InstallRebootRequired = False, InstallSkipped = False
15:34:57: Information — CComponent::InitializeFromRegistry(592) — Found version of Component: XenAppSuiteSELFSERVICE = 3.4.0.33684
15:34:57: Information — CComponent::InitializeFromRegistry(612) — Read ProductCode from registry: {EF269F8D-1DFE-4C3B-9CE9-09C5773C0CF9}
15:34:57: Warning — CComponent::InitializeFromMsi(410) — Cannot open package. Package Path =
15:34:57: Information — CConfigurationManager::LoadComponent(1202) — Component: ID = SELFSERVICE, Name = , Family = , Version = 3.4.0.33684, GroupID = XenAppSuite, DisplayName = Self Service Plug-in, Description = These installations are specific to XenApp
or XenDesktop., ProductCode = {EF269F8D-1DFE-4C3B-9CE9-09C5773C0CF9}, UserPermission = Permachine, InstalledClientProductCodePM = , InstalledClientProductCodePU = , PackagePath = , InstallOrder = 10, TransformPath = , RootFeature = Complete, LogFilePath =
C:UsersCYCHEN~1AppDataLocalTempCtxInstall-SelfServicePlugin.log, Installed = True, CurrentVersionInstalled = True, InstalledVersion = 3.4.0.33684, Selected = True, InstallResult = -536866816, DebugInstallResult = -536866816, InstallSuccess = False, InstallRebootRequired
= False, InstallSkipped = False
15:34:57: Information — CApp::CheckIsNonAdminRoamingProfile(2231) — Admin user.
15:34:57: Information — CApp::KillRunningCtxProcesses(2365) — KillRunningCtxProcesses
15:34:57: Information — CApp::ProcessIsElevated(2144) — Process is elevated.
15:34:57: Information — CApp::InitInstance(346) — CApp::Run(): Before DualModeSelection. This is an uninstall.
15:34:57: Information — CApp::DumpComponents(1636) — Component: ID = ReceiverInside, Name = , Family = , Version = 3.4.0.29585, GroupID = XenAppSuite, DisplayName = Receiver Inside, Description = These installations are specific to XenApp or XenDesktop., ProductCode
= {9D431014-9F90-4335-A58E-8A14B0BD77F1}, UserPermission = Permachine, InstalledClientProductCodePM = , InstalledClientProductCodePU = , PackagePath = , InstallOrder = 01, TransformPath = , RootFeature = Complete, LogFilePath = C:UsersCYCHEN~1AppDataLocalTempCtxInstall-RIInstaller.log,
Installed = True, CurrentVersionInstalled = True, InstalledVersion = 3.4.0.29585, Selected = True, InstallResult = -536866816, DebugInstallResult = -536866816, InstallSuccess = False, InstallRebootRequired = False, InstallSkipped = False
15:34:57: Information — CApp::DumpComponents(1636) — Component: ID = ReceiverUpdater, Name = , Family = , Version = 3.4.0.29577, GroupID = XenAppSuite, DisplayName = Receiver, Description = These installations are specific to XenApp or XenDesktop., ProductCode
= {7468ACCE-6FA8-4794-90B9-C28BD9CC79DD}, UserPermission = Permachine, InstalledClientProductCodePM = , InstalledClientProductCodePU = , PackagePath = , InstallOrder = 02, TransformPath = , RootFeature = Complete, LogFilePath = C:UsersCYCHEN~1AppDataLocalTempCtxInstall-CitrixReceiverUpdater-User.log,
Installed = True, CurrentVersionInstalled = True, InstalledVersion = 3.4.0.29577, Selected = True, InstallResult = -536866816, DebugInstallResult = -536866816, InstallSuccess = False, InstallRebootRequired = False, InstallSkipped = False
15:34:57: Information — CApp::DumpComponents(1636) — Component: ID = ICA_Client, Name = , Family = , Version = 13.4.0.25, GroupID = XenAppSuite, DisplayName = XenApp Web Plugin, Description = These installations are specific to XenApp., ProductCode = {7BD3DC6D-A2BE-4345-B6EE-D146193DB18F},
UserPermission = Permachine, InstalledClientProductCodePM = , InstalledClientProductCodePU = , PackagePath = , InstallOrder = 03, TransformPath = , RootFeature = Complete, LogFilePath = C:UsersCYCHEN~1AppDataLocalTempCtxInstall-ICAWebWrapper.log, Installed
= True, CurrentVersionInstalled = True, InstalledVersion = 13.4.0.25, Selected = True, InstallResult = -536866816, DebugInstallResult = -536866816, InstallSuccess = False, InstallRebootRequired = False, InstallSkipped = False
15:34:57: Information — CApp::DumpComponents(1636) — Component: ID = USB, Name = , Family = , Version = 13.4.0.25, GroupID = XenAppSuite, DisplayName = USB, Description = These installations are specific to XenApp., ProductCode = {3068513C-3AAC-410B-BAE7-C7837FFF8DEB},
UserPermission = Permachine, InstalledClientProductCodePM = , InstalledClientProductCodePU = , PackagePath = , InstallOrder = 04, TransformPath = , RootFeature = Complete, LogFilePath = C:UsersCYCHEN~1AppDataLocalTempCtxInstall-GenericUSB.log, Installed
= True, CurrentVersionInstalled = True, InstalledVersion = 13.4.0.25, Selected = True, InstallResult = -536866816, DebugInstallResult = -536866816, InstallSuccess = False, InstallRebootRequired = False, InstallSkipped = False
15:34:57: Information — CApp::DumpComponents(1636) — Component: ID = DesktopViewer, Name = , Family = , Version = 13.4.0.25, GroupID = XenAppSuite, DisplayName = Citrix Receiver (DV), Description = These installations are specific to XenApp or XenDesktop.,
ProductCode = {D29DDA9B-FE05-48F1-A9D1-F6346A0A301A}, UserPermission = Permachine, InstalledClientProductCodePM = , InstalledClientProductCodePU = , PackagePath = , InstallOrder = 05, TransformPath = , RootFeature = Complete, LogFilePath = C:UsersCYCHEN~1AppDataLocalTempCtxInstall-DesktopViewer.log,
Installed = True, CurrentVersionInstalled = True, InstalledVersion = 13.4.0.25, Selected = True, InstallResult = -536866816, DebugInstallResult = -536866816, InstallSuccess = False, InstallRebootRequired = False, InstallSkipped = False
15:34:57: Information — CApp::DumpComponents(1636) — Component: ID = Flash, Name = , Family = , Version = 13.4.0.25, GroupID = XenAppSuite, DisplayName = HDX Flash, Description = These installations are specific to XenApp., ProductCode = {0E8DC723-F1CD-424A-96CC-12428E7A1B4B},
UserPermission = Permachine, InstalledClientProductCodePM = , InstalledClientProductCodePU = , PackagePath = , InstallOrder = 06, TransformPath = , RootFeature = Complete, LogFilePath = C:UsersCYCHEN~1AppDataLocalTempCtxInstall-CitrixHDXMediaStreamForFlash-ClientInstall.log,
Installed = True, CurrentVersionInstalled = True, InstalledVersion = 13.4.0.25, Selected = True, InstallResult = -536866816, DebugInstallResult = -536866816, InstallSuccess = False, InstallRebootRequired = False, InstallSkipped = False
15:34:57: Information — CApp::DumpComponents(1636) — Component: ID = Vd3d, Name = , Family = , Version = 13.4.0.25, GroupID = XenAppSuite, DisplayName = HDX Aero, Description = These installations are specific to XenApp or XenDesktop., ProductCode = {E3A60962-B768-4EA3-B0B6-DA671276B81A},
UserPermission = Permachine, InstalledClientProductCodePM = , InstalledClientProductCodePU = , PackagePath = , InstallOrder = 07, TransformPath = , RootFeature = Complete, LogFilePath = C:UsersCYCHEN~1AppDataLocalTempCtxInstall-Vd3dClient.log, Installed
= True, CurrentVersionInstalled = True, InstalledVersion = 13.4.0.25, Selected = True, InstallResult = -536866816, DebugInstallResult = -536866816, InstallSuccess = False, InstallRebootRequired = False, InstallSkipped = False
15:34:57: Information — CApp::DumpComponents(1636) — Component: ID = AM, Name = , Family = , Version = 4.0.0.53726, GroupID = XenAppSuite, DisplayName = Authentication Manager, Description = These installations are specific to XenApp or XenDesktop., ProductCode
= {B92051A3-3ABB-4A26-A615-2298BE7CBC28}, UserPermission = Permachine, InstalledClientProductCodePM = , InstalledClientProductCodePU = , PackagePath = , InstallOrder = 08, TransformPath = , RootFeature = Complete, LogFilePath = C:UsersCYCHEN~1AppDataLocalTempCtxInstall-AuthManager.log,
Installed = True, CurrentVersionInstalled = True, InstalledVersion = 4.0.0.53726, Selected = True, InstallResult = -536866816, DebugInstallResult = -536866816, InstallSuccess = False, InstallRebootRequired = False, InstallSkipped = False
15:34:57: Information — CApp::DumpComponents(1636) — Component: ID = SSON, Name = , Family = , Version = 1.0.0.0, GroupID = XenAppSuite, DisplayName = Single Sign on, Description = These installations are specific to XenApp or XenDesktop., ProductCode = , UserPermission
= Permachine, InstalledClientProductCodePM = , InstalledClientProductCodePU = , PackagePath = , InstallOrder = 09, TransformPath = , RootFeature = Complete, LogFilePath = C:UsersCYCHEN~1AppDataLocalTempCtxInstall-SSONWrapper.log, Installed = False, CurrentVersionInstalled
= False, InstalledVersion = 0.0.0.0, Selected = True, InstallResult = -536866816, DebugInstallResult = -536866816, InstallSuccess = False, InstallRebootRequired = False, InstallSkipped = False
15:34:57: Information — CApp::DumpComponents(1636) — Component: ID = SELFSERVICE, Name = , Family = , Version = 3.4.0.33684, GroupID = XenAppSuite, DisplayName = Self Service Plug-in, Description = These installations are specific to XenApp or XenDesktop.,
ProductCode = {EF269F8D-1DFE-4C3B-9CE9-09C5773C0CF9}, UserPermission = Permachine, InstalledClientProductCodePM = , InstalledClientProductCodePU = , PackagePath = , InstallOrder = 10, TransformPath = , RootFeature = Complete, LogFilePath = C:UsersCYCHEN~1AppDataLocalTempCtxInstall-SelfServicePlugin.log,
Installed = True, CurrentVersionInstalled = True, InstalledVersion = 3.4.0.33684, Selected = True, InstallResult = -536866816, DebugInstallResult = -536866816, InstallSuccess = False, InstallRebootRequired = False, InstallSkipped = False
15:34:57: Information — CApp::DumpSelectedComponents(1760) — Selected Component: ID = SSON, Name = , Family = , Version = 1.0.0.0, GroupID = XenAppSuite, DisplayName = Single Sign on, Description = These installations are specific to XenApp or XenDesktop.,
ProductCode = , UserPermission = Permachine, InstalledClientProductCodePM = , InstalledClientProductCodePU = , PackagePath = , InstallOrder = 09, TransformPath = , RootFeature = Complete, LogFilePath = C:UsersCYCHEN~1AppDataLocalTempCtxInstall-SSONWrapper.log,
Installed = False, CurrentVersionInstalled = False, InstalledVersion = 0.0.0.0, Selected = True, InstallResult = -536866816, DebugInstallResult = -536866816, InstallSuccess = False, InstallRebootRequired = False, InstallSkipped = False
15:34:57: Information — CApp::DumpInstallComponents(1783) — Install Component: ID = SSON, Name = , Family = , Version = 1.0.0.0, GroupID = XenAppSuite, DisplayName = Single Sign on, Description = These installations are specific to XenApp or XenDesktop., ProductCode
= , UserPermission = Permachine, InstalledClientProductCodePM = , InstalledClientProductCodePU = , PackagePath = , InstallOrder = 09, TransformPath = , RootFeature = Complete, LogFilePath = C:UsersCYCHEN~1AppDataLocalTempCtxInstall-SSONWrapper.log, Installed
= False, CurrentVersionInstalled = False, InstalledVersion = 0.0.0.0, Selected = True, InstallResult = -536866816, DebugInstallResult = -536866816, InstallSuccess = False, InstallRebootRequired = False, InstallSkipped = False
15:34:57: Information — CApp::SpawnSelfCleaningUninstall(1806) — SelfCleaningUninstall invoked with /uninstall and /cleanup…
15:34:57: Information — CApp::SpawnSelfCleaningUninstall(1857) — Copying uninstaller from C:ProgramDataCitrixCitrix ReceiverTrolleyExpress.exe to C:UsersCYCHEN~1AppDataLocalTempCln8816.tmp
15:34:59: Information — CApp::SpawnSelfCleaningUninstall(1893) — Forked uninstall cleanup watcher: «C:UsersCYCHEN~1AppDataLocalTempCln8816.tmp» /processid=1016 /cleanup=»C:ProgramDataCitrixCitrix Receiver»
15:34:59: Information — CApp::Run(552) — IN CApp::Run().
15:34:59: Information — CApp::Run(560) — CApp::Run(): pre-mainDialog
15:34:59: Information — CMainDialog::CMainDialog(131) — Deleted the subkey ID Installer.
15:34:59: Information — CProgressDialog::OnInitDialog(60) — In CProgressDialog::OnInitDialog() Citrix Receiver
15:34:59: Information — CInstallationManager::Install(10) — Running core Install method.
15:34:59: Information — FixCacheOfflinePluginRedistForCPR227754(1391) — Checking the vcredist MSI name key…
15:34:59: Information — CInstallationManager::InstallComponents(238) — Evaluating deployment for 9 components…
15:34:59: Information — CInstallationManager::InstallComponents(241) — Just before entering the saving installdir location block. uninstall value : 1.
15:35:00: Information — CInstallationManager::InstallComponent(421) — Running InstallComponent method for: SELFSERVICE.
15:35:00: Information — CInstallationManager::InstallComponent(457) — Installing Component: ID = SELFSERVICE
15:35:00: Information — CInstallationManager::InstallComponent(561) — Component UnInstall Commandline: MSIRESTARTMANAGERCONTROL=0 REBOOTRETURNCODE=YES REBOOT=ReallySuppress
15:35:03: Information — CInstallationManager::InstallComponent(578) — Uninstall return code for component SELFSERVICE is 0
15:35:03: Information — CComponent::RemoveRegistryRecords(664) — Removing registry records for uninstall.
15:35:03: Warning — CComponent::DeleteComponentKey(653) — Cannot delete subkey XenAppSuite. (May not be empty.)
15:35:03: Information — CInstallationManager::InstallComponent(651) — Component Install Status: ID = SELFSERVICE, InstallMode = Uninstall, InstallResult = 0, InstallSuccess = True, InstallRebootRequired = False, InstallSuppressed = False
15:35:03: Information — CInstallationManager::InstallComponent(676) — InstallComponent complete for SELFSERVICE.
15:35:03: Information — CInstallationManager::InstallComponent(421) — Running InstallComponent method for: AM.
15:35:03: Information — CInstallationManager::InstallComponent(457) — Installing Component: ID = AM
15:35:03: Information — CInstallationManager::InstallComponent(561) — Component UnInstall Commandline: MSIRESTARTMANAGERCONTROL=0 REBOOTRETURNCODE=YES REBOOT=ReallySuppress
15:35:03: Information — CInstallationManager::InstallComponent(578) — Uninstall return code for component AM is 0
15:35:03: Information — CComponent::RemoveRegistryRecords(664) — Removing registry records for uninstall.
15:35:03: Warning — CComponent::DeleteComponentKey(653) — Cannot delete subkey XenAppSuite. (May not be empty.)
15:35:03: Information — CInstallationManager::InstallComponent(651) — Component Install Status: ID = AM, InstallMode = Uninstall, InstallResult = 0, InstallSuccess = True, InstallRebootRequired = False, InstallSuppressed = False
15:35:03: Information — CInstallationManager::InstallComponent(676) — InstallComponent complete for AM.
15:35:03: Information — CInstallationManager::InstallComponent(421) — Running InstallComponent method for: Vd3d.
15:35:03: Information — CInstallationManager::InstallComponent(457) — Installing Component: ID = Vd3d
15:35:03: Information — CInstallationManager::InstallComponent(561) — Component UnInstall Commandline: MSIRESTARTMANAGERCONTROL=0 REBOOTRETURNCODE=YES REBOOT=ReallySuppress
15:35:03: Information — CInstallationManager::InstallComponent(578) — Uninstall return code for component Vd3d is 0
15:35:03: Information — CComponent::RemoveRegistryRecords(664) — Removing registry records for uninstall.
15:35:03: Warning — CComponent::DeleteComponentKey(653) — Cannot delete subkey XenAppSuite. (May not be empty.)
15:35:03: Information — CInstallationManager::InstallComponent(651) — Component Install Status: ID = Vd3d, InstallMode = Uninstall, InstallResult = 0, InstallSuccess = True, InstallRebootRequired = False, InstallSuppressed = False
15:35:03: Information — CInstallationManager::InstallComponent(676) — InstallComponent complete for Vd3d.
15:35:03: Information — CInstallationManager::InstallComponent(421) — Running InstallComponent method for: Flash.
15:35:03: Information — CInstallationManager::InstallComponent(457) — Installing Component: ID = Flash
15:35:03: Information — CInstallationManager::InstallComponent(561) — Component UnInstall Commandline: MSIRESTARTMANAGERCONTROL=0 REBOOTRETURNCODE=YES REBOOT=ReallySuppress
15:35:04: Information — CInstallationManager::InstallComponent(578) — Uninstall return code for component Flash is 0
15:35:04: Information — CComponent::RemoveRegistryRecords(664) — Removing registry records for uninstall.
15:35:04: Warning — CComponent::DeleteComponentKey(653) — Cannot delete subkey XenAppSuite. (May not be empty.)
15:35:04: Information — CInstallationManager::InstallComponent(651) — Component Install Status: ID = Flash, InstallMode = Uninstall, InstallResult = 0, InstallSuccess = True, InstallRebootRequired = False, InstallSuppressed = False
15:35:04: Information — CInstallationManager::InstallComponent(676) — InstallComponent complete for Flash.
15:35:04: Information — CInstallationManager::InstallComponent(421) — Running InstallComponent method for: DesktopViewer.
15:35:04: Information — CInstallationManager::InstallComponent(457) — Installing Component: ID = DesktopViewer
15:35:04: Information — CInstallationManager::InstallComponent(561) — Component UnInstall Commandline: MSIRESTARTMANAGERCONTROL=0 REBOOTRETURNCODE=YES REBOOT=ReallySuppress
15:35:04: Information — CInstallationManager::InstallComponent(578) — Uninstall return code for component DesktopViewer is 0
15:35:04: Information — CComponent::RemoveRegistryRecords(664) — Removing registry records for uninstall.
15:35:04: Warning — CComponent::DeleteComponentKey(653) — Cannot delete subkey XenAppSuite. (May not be empty.)
15:35:04: Information — CInstallationManager::InstallComponent(651) — Component Install Status: ID = DesktopViewer, InstallMode = Uninstall, InstallResult = 0, InstallSuccess = True, InstallRebootRequired = False, InstallSuppressed = False
15:35:04: Information — CInstallationManager::InstallComponent(676) — InstallComponent complete for DesktopViewer.
15:35:04: Information — CInstallationManager::InstallComponent(421) — Running InstallComponent method for: USB.
15:35:04: Information — CInstallationManager::InstallComponent(457) — Installing Component: ID = USB
15:35:04: Information — CInstallationManager::InstallComponent(561) — Component UnInstall Commandline: MSIRESTARTMANAGERCONTROL=0 REBOOTRETURNCODE=YES REBOOT=ReallySuppress
15:35:07: Information — CInstallationManager::InstallComponent(578) — Uninstall return code for component USB is 1603
15:35:07: Information — CInstallationManager::InstallComponent(651) — Component Install Status: ID = USB, InstallMode = Uninstall, InstallResult = 1603, InstallSuccess = False, InstallRebootRequired = False, InstallSuppressed = False
15:35:07: Information — CInstallationManager::InstallComponent(676) — InstallComponent complete for USB.
15:35:07: Warning — CInstallationManager::InstallComponents(388) — Component result is false: 5
15:35:07: Warning — CInstallationManager::UpdateUninstallInfo(900) — Uninstall may have failed for a component. Not removing uninstall entries.
15:35:07: Information — CApp::SetExitCode(45) — Exit code is 1602 (called with 1602)
15:35:08: Information — CComponentManager::GetInstallStatus(505) — Component was Self Service Plug-in installed successfully.
15:35:08: Information — CComponentManager::GetInstallStatus(505) — Component was Authentication Manager installed successfully.
15:35:08: Information — CComponentManager::GetInstallStatus(505) — Component was HDX Aero installed successfully.
15:35:08: Information — CComponentManager::GetInstallStatus(505) — Component was HDX Flash installed successfully.
15:35:08: Information — CComponentManager::GetInstallStatus(505) — Component was Citrix Receiver (DV) installed successfully.
15:35:08: Error — CComponentManager::GetInstallStatus(493) — Installation NOT successful for ‘USB’, error: 1603.
15:35:08: Warning — CComponentManager::GetInstallStatus(498) — Installation NOT successful for ‘XenApp Web Plugin’, it never fully tried to install, possibly due to issues.
15:35:08: Warning — CComponentManager::GetInstallStatus(498) — Installation NOT successful for ‘Receiver’, it never fully tried to install, possibly due to issues.
15:35:08: Warning — CComponentManager::GetInstallStatus(498) — Installation NOT successful for ‘Receiver Inside’, it never fully tried to install, possibly due to issues.
15:35:08: Error — CMainDialog::CMainDialog(157) — GetComponentManager() returned FALSE on GetInstallStatus().
15:35:08: Information — CComponentManager::GetInstallStatus(505) — Component was Self Service Plug-in installed successfully.
15:35:08: Information — CComponentManager::GetInstallStatus(505) — Component was Authentication Manager installed successfully.
15:35:08: Information — CComponentManager::GetInstallStatus(505) — Component was HDX Aero installed successfully.
15:35:08: Information — CComponentManager::GetInstallStatus(505) — Component was HDX Flash installed successfully.
15:35:08: Information — CComponentManager::GetInstallStatus(505) — Component was Citrix Receiver (DV) installed successfully.
15:35:08: Error — CComponentManager::GetInstallStatus(493) — Installation NOT successful for ‘USB’, error: 1603.
15:35:08: Warning — CComponentManager::GetInstallStatus(498) — Installation NOT successful for ‘XenApp Web Plugin’, it never fully tried to install, possibly due to issues.
15:35:08: Warning — CComponentManager::GetInstallStatus(498) — Installation NOT successful for ‘Receiver’, it never fully tried to install, possibly due to issues.
15:35:08: Warning — CComponentManager::GetInstallStatus(498) — Installation NOT successful for ‘Receiver Inside’, it never fully tried to install, possibly due to issues.
15:35:08: Information — CFinishDialog::OnInitDialog(76) — app.LoadIcon return code. GetLastError: 0
15:35:08: Information — CFinishDialog::OnPaint(479) — draw icon return code. GetLastError: 0
15:35:08: Information — CFinishDialog::OnPaint(479) — draw icon return code. GetLastError: 0
15:35:20: Information — CFinishDialog::OnViewLogClicked(168) — OnViewLogClicked(): Entry.
15:36:03: Information — CFinishDialog::OnViewLogClicked(168) — OnViewLogClicked(): Entry.
Question
Issue: How to uninstall Citrix Receiver?
Hello, I want to uninstall the Citrix Receiver because I’m not happy with the issues that occur on the system. It should get updated to the Citrix Workspace app, but I came to the error while trying to uninstall the program. How to uninstall Citrix Receiver properly?
Solved Answer
Uninstalling Citrix Receiver is becoming an issue because people want to install the newer version, but cannot do that when the initial program is installed already. Users[1] complained about this issue a lot on various online platforms and forums.
Another issue regarding the Citrix Receiver is the additional files left behind after the successful uninstallation.[2] That means the application is no longer there or running, but leftover files make the new installation setup to think that there is no need to install the program since all files remain on the machine.
This is the common issue in regards to difficult processes of removing unwanted or useless, sometimes even malicious[3] software. To uninstall Citrix Receiver properly, you need to get rid of all the files related to Receiver because certain files or folders cause unexpected behavior and other issues.
 To uninstall Citrix Receiver completely, you should go through various files that may be left on the system and affect vital processes. The issue with Citrix Receiver uninstallation occurs on Windows devices and on macOS running machines, so you should go through all the methods below and try at least one method out of the few listed. In addition, this program can cause issues or pop-up errors that state about insufficient disk space on the system.
When you upgrade to a different version of the Receiver, the installation ends unsuccessfully due to disk space issues. You need to note that the upgrade takes up 206MB, and fresh installation needs 320MB (on Windows) free on the machine before Citrix Receiver installation can be launched.
 Various errors regarding the not fully uninstalled Citrix Receiver app.
It may seem impossible to fully uninstall Citrix Receiver yourself completely, so there are methods that involve automatic tools created for such file-related issues. System optimizers and cleaner utilities like ReimageMac Washing Machine X9 can find and locate affected files or the ones that got possibly damaged during various processes or even by malware. Damaged system files and folders can cause serious issues, so check the machine for these easily-repairable issues and then rely on manual techniques listed further.
Uninstall Citrix Receiver from Windows
Run command-line interface to uninstall Citrix Receiver
- Open the Command prompt and type the following and press Enter: CitrixReceiver.exe /uninstall and CitrixReceiver.exe \silent \uninstall
NOTE: The app creates registry keys that you should remove to avoid unexpected behavior. Entries remain in Software\Policies\Citrix\ICA Client directory under HKEY_LOCAL_MACHINE and HKEY_LOCAL_USER.
Uninstall Citrix Receiver from Mac
- Make sure to Quit Citrix Receiver process from the toolbar.
- Then go to Applications and delete the application from there. Make sure to login with the admin password if needed.
 Make sure to Quit the process of Citrix Receiver application before removing needed files and folders.
 - You need to find and delete service files, logs, caches, and other data.
- Press ⌘+⇧+G and type the following locations to find those files.
- You need to make sure that files and folders get removed manually if they still exist after an uninstallation.
- /Applications-
Citrix Receiver.app - /Library
– /Internet plug-ins/CitrixICAClientPlugIn.plugin
– /LaunchAgents/com.citrix.AuthManager_Mac.plist
– /LaunchAgents/com.citrix.ServiceRecords.plist - /Users/Shared
– /Citrix/Receiver Integration - ~/Library
– /Internet plug-ins/CitrixICAClientPlugIn.plugin
– /Application Support/Citrix Receiver
– CitrixID
– Config
– Module
– /Preferences/com.citrix.receiver.nomas.plist
– /Preferences/com.citrix.receiver.nomas.plist.lockfile
– /Preferences/com.citrix.ReceiverFTU.AccountRecords.plist (added in 11.6)
– /Preferences/com.citrix.ReceiverFTU.AccountRecords.plist.lockfile (added in 11.6) - /private/var/db/receipts
– com.citrix.ICAClient.bom
– com.citrix.ICAClient.plist - Empty the Trash to be sure that Citric Receiver got removed from your Mac completely.

NOTE: The ~ in front of the folder refers to the folder located within the user profile. Some items mentioned may not exist on your system depending on the Receivers’ version.
Get rid of programs with only one click
You can uninstall this program with the help of the step-by-step guide presented to you by ugetfix.com experts. To save your time, we have also selected tools that will help you carry out this task automatically. If you are in a hurry or if you feel that you are not experienced enough to uninstall the program by your own, feel free to use these solutions:
Reimage — a patented specialized Windows repair program. It will diagnose your damaged PC. It will scan all System Files, DLLs and Registry Keys that have been damaged by security threats.Reimage — a patented specialized Mac OS X repair program. It will diagnose your damaged computer. It will scan all System Files and Registry Keys that have been damaged by security threats.
This patented repair process uses a database of 25 million components that can replace any damaged or missing file on user’s computer.
To repair damaged system, you have to purchase the licensed version of Reimage malware removal tool.

A VPN is crucial when it comes to user privacy. Online trackers such as cookies can not only be used by social media platforms and other websites but also your Internet Service Provider and the government. Even if you apply the most secure settings via your web browser, you can still be tracked via apps that are connected to the internet. Besides, privacy-focused browsers like Tor is are not an optimal choice due to diminished connection speeds. The best solution for your ultimate privacy is Private Internet Access – be anonymous and secure online.
Data recovery software is one of the options that could help you recover your files. Once you delete a file, it does not vanish into thin air – it remains on your system as long as no new data is written on top of it. Data Recovery Pro is recovery software that searchers for working copies of deleted files within your hard drive. By using the tool, you can prevent loss of valuable documents, school work, personal pictures, and other crucial files.
Выберите Удалить приложение Citrix Workspace и следуйте инструкциям на экране. Файл. dmg — это файл, который загружается из Citrix при первой установке приложения Citrix Workspace для Mac. Если файла больше нет на вашем компьютере, загрузите файл еще раз из Citrix Downloads, чтобы удалить приложение.
Как удалить программу, которая не удаляется?
Все, что вам нужно сделать, это:
- Откройте меню «Пуск».
- Выполните поиск по запросу «добавить или удалить программы».
- Щелкните результат поиска под названием «Добавить или удалить программы».
- Просмотрите список программ, установленных на вашем компьютере, найдите и щелкните правой кнопкой мыши программу, которую хотите удалить.
- В появившемся контекстном меню нажмите Удалить.
Как полностью удалить рабочую область Citrix?
Вы можете удалить приложение Citrix Workspace с помощью утилиты «Программы и компоненты» Windows («Установка и удаление программ»). Примечание. Во время установки приложения Citrix Workspace вы получите запрос на удаление пакета Citrix HDX RTME. Щелкните ОК, чтобы продолжить удаление.
Как удалить Citrix из реестра?
GUID можно найти в следующем разделе реестра: HKEY_LOCAL_MACHINE Software Microsoft Windows CurrentVersion Uninstall. Когда выбран ключ «Удалить», нажмите Ctrl + F и найдите термин Citrix. Подключ, содержащий запись клиента Citrix ICA, отображается как открытый (левая панель) и помечен идентификатором GUID.
Что делает Citrix Receiver?
Citrix Receiver — это клиентское программное обеспечение, необходимое для доступа к приложениям и полным рабочим столам, размещенным на серверах Citrix, с удаленного клиентского устройства. … Когда вы посещаете страницу загрузки Citrix Receiver, она автоматически определяет операционную систему и предлагает вам загрузить нужное клиентское программное обеспечение.
Как принудительно удалить программу?
Удалить папку в реестре Windows. Отображаемое имя реестра Windows. Удалите ключи, которые показывают имя вашей программы в DisplayName, щелкнув правой кнопкой мыши по элементам и выбрав Удалить. Теперь ваша программа не будет отображаться в списке «Установка и удаление программ».
Как удалить программу, которая не отображается в Панели управления?
Как удалить программы, не указанные в панели управления
- Настройки Windows 10.
- Проверьте его деинсталлятор в папке «Программы».
- Повторно загрузите установщик и посмотрите, сможете ли вы удалить его.
- Удалите программы в Windows с помощью реестра.
- Сократите имя ключа реестра.
- Используйте стороннее программное обеспечение для удаления.
Как принудительно удалить файл?
Для этого сначала откройте меню «Пуск» (клавиша Windows), введите «выполнить» и нажмите «Ввод». В появившемся диалоговом окне введите cmd и снова нажмите Enter. В открытой командной строке введите del / f имя_файла, где имя_файла — это имя файла или файлов (вы можете указать несколько файлов с помощью запятых), которые вы хотите удалить.
Следует ли мне удалить Citrix Receiver?
Однако оставление Citrix Receiver установленным на домашнем компьютере не вызывает никаких известных проблем с безопасностью. Если вы хотите оставить его в покое, это безопасно. Он не занимает много места и после отключения автоматического запуска не будет использовать память или процессор.
Как очистить кеш Citrix?
- Откройте проводник Windows.
- Перейдите в C: Users % User% AppData Local Temp.
- Удалите файлы кэша значков (.ico). Дополнительные ресурсы.
Как отключить рабочую область Citrix?
Все, что вам нужно сделать, это открыть диспетчер задач, щелкнув правой кнопкой мыши на панели задач или используя сочетание клавиш CTRL + SHIFT + ESC, нажав «Подробнее», переключившись на вкладку «Автозагрузка» и нажав кнопку «Отключить».
Как принудительно удалить Citrix Receiver?
Удалите Citrix Receiver из Windows
Войдите на устройство с правами администратора. Откройте Панель управления и выберите «Программы и компоненты». Приложение Citrix Receiver должно быть найдено в папке «Программы и компоненты», чтобы его можно было удалить. Щелкните приложение правой кнопкой мыши и выберите Удалить.
Могу ли я удалить программу запуска Citrix Online?
Windows: откройте «Программы и компоненты». Щелкните правой кнопкой мыши «Citrix Online Launcher». Выберите «Удалить», затем при появлении запроса нажмите «Да».
Как исправить мой Citrix Receiver?
Проблема с запуском Citrix Receiver может быть вызвана используемыми вами приложениями.
…
Как исправить ошибку запуска Citrix Receiver в Windows 10?
Что такое Receiver.exe? Это безопасно или вирус? Как удалить или исправить это
Receiver.exe это исполняемый файл, который является частью Citrix Receiver Updater Программа, разработанная Citrix Systems, Inc., Программное обеспечение обычно о 27.05 MB по размеру.
Расширение .exe имени файла отображает исполняемый файл. В некоторых случаях исполняемые файлы могут повредить ваш компьютер. Пожалуйста, прочитайте следующее, чтобы решить для себя, является ли Receiver.exe Файл на вашем компьютере — это вирус или троянский конь, который вы должны удалить, или это действительный файл операционной системы Windows или надежное приложение.

Receiver.exe безопасный или это вирус или вредоносное ПО?
Первое, что поможет вам определить, является ли тот или иной файл законным процессом Windows или вирусом, это местоположение самого исполняемого файла. Например, такой процесс, как Receiver.exe, должен запускаться из, а не из другого места.
Для подтверждения откройте диспетчер задач, выберите «Просмотр» -> «Выбрать столбцы» и выберите «Имя пути к изображению», чтобы добавить столбец местоположения в диспетчер задач. Если вы обнаружите здесь подозрительный каталог, возможно, стоит дополнительно изучить этот процесс.
Еще один инструмент, который иногда может помочь вам обнаружить плохие процессы, — это Microsoft Process Explorer. Запустите программу (не требует установки) и активируйте «Проверить легенды» в разделе «Параметры». Теперь перейдите в View -> Select Columns и добавьте «Verified Signer» в качестве одного из столбцов.
Если статус процесса «Проверенная подписывающая сторона» указан как «Невозможно проверить», вам следует взглянуть на процесс. Не все хорошие процессы Windows имеют метку проверенной подписи, но ни один из плохих.
Наиболее важные факты о Receiver.exe:
- Находится в C: Program Files Citrix Receiver вложенная;
- Издатель: Citrix Systems, Inc.
- Полный путь:
- Файл справки:
- URL издателя: support.citrix.com/proddocs/topic/receiver/rec-receiver-updater-windows.html
- Известно, что до 27.05 MB по размеру на большинстве окон;
Если у вас возникли какие-либо трудности с этим исполняемым файлом, вам следует определить, заслуживает ли он доверия, прежде чем удалять Receiver.exe. Для этого найдите этот процесс в диспетчере задач.
Найдите его местоположение (оно должно быть в C: Program Files Citrix Receiver ) и сравните его размер с приведенными выше фактами.
Если вы подозреваете, что можете быть заражены вирусом, вы должны немедленно попытаться это исправить. Чтобы удалить вирус Receiver.exe, вам необходимо Загрузите и установите приложение полной безопасности, например Malwarebytes., Обратите внимание, что не все инструменты могут обнаружить все типы вредоносных программ, поэтому вам может потребоваться попробовать несколько вариантов, прежде чем вы добьетесь успеха.
Кроме того, функциональность вируса может сама влиять на удаление Receiver.exe. В этом случае вы должны включить Безопасный режим с загрузкой сетевых драйверов — безопасная среда, которая отключает большинство процессов и загружает только самые необходимые службы и драйверы. Когда вы можете запустить программу безопасности и полный анализ системы.
Могу ли я удалить или удалить Receiver.exe?
Не следует удалять безопасный исполняемый файл без уважительной причины, так как это может повлиять на производительность любых связанных программ, использующих этот файл. Не забывайте регулярно обновлять программное обеспечение и программы, чтобы избежать будущих проблем, вызванных поврежденными файлами. Что касается проблем с функциональностью программного обеспечения, проверяйте обновления драйверов и программного обеспечения чаще, чтобы избежать или вообще не возникало таких проблем.
Согласно различным источникам онлайн, 12% людей удаляют этот файл, поэтому он может быть безвредным, но рекомендуется проверить надежность этого исполняемого файла самостоятельно, чтобы определить, является ли он безопасным или вирусом. Лучшая диагностика для этих подозрительных файлов — полный системный анализ с Reimage, Если файл классифицирован как вредоносный, эти приложения также удалят Receiver.exe и избавятся от связанных вредоносных программ.
Однако, если это не вирус, и вам нужно удалить Receiver.exe, вы можете удалить Citrix Receiver Updater с вашего компьютера, используя его деинсталлятор, который должен находиться по адресу: MsiExec.exe / X . Если вы не можете найти его деинсталлятор, вам может понадобиться удалить Citrix Receiver Updater, чтобы полностью удалить Receiver.exe. Вы можете использовать функцию «Установка и удаление программ» на панели управления Windows.
- 1. в Меню Пуск (для Windows 8 щелкните правой кнопкой мыши в нижнем левом углу экрана), нажмите Панель управления, а затем под Программы:
o Windows Vista / 7 / 8.1 / 10: нажмите Удаление программы.
o Windows XP: нажмите Установка и удаление программ.
- 2. Когда вы найдете программу Citrix Receiver Updaterщелкните по нему, а затем:
o Windows Vista / 7 / 8.1 / 10: нажмите Удалить.
o Windows XP: нажмите Удалить or Изменить / Удалить вкладка (справа от программы).
- 3. Следуйте инструкциям по удалению Citrix Receiver Updater.
Распространенные сообщения об ошибках в Receiver.exe
Наиболее распространенные ошибки Receiver.exe, которые могут возникнуть:
• «Ошибка приложения Receiver.exe».
• «Ошибка Receiver.exe».
• «Receiver.exe столкнулся с проблемой и будет закрыт. Приносим извинения за неудобства».
• «Receiver.exe не является допустимым приложением Win32».
• «Receiver.exe не запущен».
• «Receiver.exe не найден».
• «Не удается найти Receiver.exe».
• «Ошибка запуска программы: Receiver.exe».
• «Неверный путь к приложению: Receiver.exe».
Эти сообщения об ошибках .exe могут появляться во время установки программы, во время выполнения связанной с ней программы Citrix Receiver Updater, во время запуска или завершения работы Windows или даже во время установки операционной системы Windows. Отслеживание момента появления ошибки Receiver.exe является важной информацией при устранении неполадок.
Как исправить Receiver.exe
Аккуратный и опрятный компьютер — это один из лучших способов избежать проблем с Citrix Receiver Updater. Это означает выполнение сканирования на наличие вредоносных программ, очистку жесткого диска cleanmgr и ПФС / SCANNOWудаление ненужных программ, мониторинг любых автозапускаемых программ (с помощью msconfig) и включение автоматических обновлений Windows. Не забывайте всегда делать регулярные резервные копии или хотя бы определять точки восстановления.
Если у вас возникла более серьезная проблема, постарайтесь запомнить последнее, что вы сделали, или последнее, что вы установили перед проблемой. Использовать resmon Команда для определения процессов, вызывающих вашу проблему. Даже в случае серьезных проблем вместо переустановки Windows вы должны попытаться восстановить вашу установку или, в случае Windows 8, выполнив команду DISM.exe / Online / Очистка-изображение / Восстановить здоровье, Это позволяет восстановить операционную систему без потери данных.
Чтобы помочь вам проанализировать процесс Receiver.exe на вашем компьютере, вам могут пригодиться следующие программы: Менеджер задач безопасности отображает все запущенные задачи Windows, включая встроенные скрытые процессы, такие как мониторинг клавиатуры и браузера или записи автозапуска. Единый рейтинг риска безопасности указывает на вероятность того, что это шпионское ПО, вредоносное ПО или потенциальный троянский конь. Это антивирус обнаруживает и удаляет со своего жесткого диска шпионское и рекламное ПО, трояны, кейлоггеры, вредоносное ПО и трекеры.
Обновлено Июнь 2022:
Мы рекомендуем вам попробовать это новое программное обеспечение, которое исправляет компьютерные ошибки, защищает их от вредоносных программ и оптимизирует производительность вашего ПК. Этот новый инструмент исправляет широкий спектр компьютерных ошибок, защищает от таких вещей, как потеря файлов, вредоносное ПО и сбои оборудования.
- Шаг 1: Скачать PC Repair & Optimizer Tool (Windows 10, 8, 7, XP, Vista — Microsoft Gold Certified).
- Шаг 2: Нажмите «Начать сканирование”, Чтобы найти проблемы реестра Windows, которые могут вызывать проблемы с ПК.
- Шаг 3: Нажмите «Починить все», Чтобы исправить все проблемы.

(опциональное предложение для Reimage — Cайт | Лицензионное соглашение | Персональные данные | Удалить)
How do you uninstall citrix receiver?
I am attempting to uninstall the citrix receiver from my computer. I had used it at a company a while back and recently started using the computer again. I keep getting an error reporting that the operation has failed and to contact the help desk. Other information says to use the received clean-up utility which is recommended for IT administrators.
How do I uninstall this program if I no longer work for the company, don’t have access to help desk, and I am not an IT administrator?