Вы можете использовать PowerShell модуль PSWindowsUpdate для управления обновлениями Windows из командной строки. Модуль PSWindowsUpdate не встроен в Windows и доступен для установки из репозитория PowerShell Gallery. PSWindowsUpdate позволяет администраторам удаленно проверять, устанавливать, удалять и скрывать обновления на рабочих станциях и серверах Windows. Модуль PSWindowsUpdate особо ценен при использовании для управления обновлениями в Core редакциях Windows Server (в которых отсутствуют графический интерфейс), а также при настройке образа Windows в режиме аудита.
Содержание:
- Установка модуля управления обновлениями PSWindowsUpdate
- Обзор команд модуля PSWindowsUpdate
- Управление обновлениями Windows на удаленных компьютерах через PowerShell
- Получить список доступных обновлений Windows из PowerShell
- Установка обновлений Windows с помощью Install-WindowsUpdate
- Просмотр истории установленных обновлений Windows (Get-WUHistory)
- Удаление обновлений в Windows с помощью Remove-WindowsUpdate
- Как скрыть ненужные обновления Windows с помощью PowerShell (Hide-WindowsUpdate)?
Установка модуля управления обновлениями PSWindowsUpdate
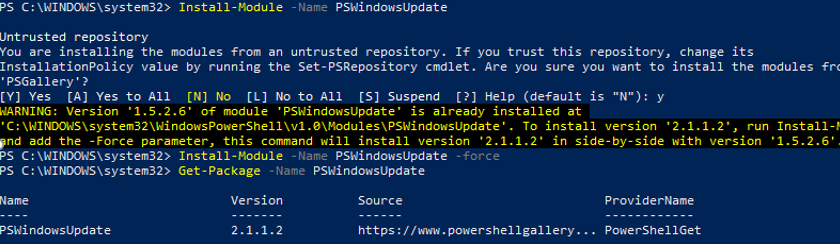
Если вы используете Windows 10/11 или Windows Server 2022/2019/2016, вы можете установить (обновить) модуль PSWindowsUpdate из онлайн репозитория через менеджер пакетов PackageManagement всего одной командой:
Install-Module -Name PSWindowsUpdate
После окончания установки нужно проверить наличие пакета:
Get-Package -Name PSWindowsUpdate
В старых версиях Windows 2012R2/Windows 8.1 и ниже при установке PowerShell модуля может появится ошибка:
Install-Module: Unable to download from URI.Unable to download the list of available providers. Check your internet connection.
Для установки модуля нужно использовать для подключения протокол TLS 1.2. Включите его:
[Net.ServicePointManager]::SecurityProtocol = [Net.SecurityProtocolType]::Tls12
Если у вас установлена более старая версия Windows (Windows 7/8.1/ Windows Server 2008 R2/ 2012 R2) или отсутствует прямой доступ в Интернет, вы можете установить модуль PSWindowsUpdate вручную (см. полную инструкцию по офлайн установке модулей PowerShell).
- Скачайте модуль PSWindowsUpdate на любой онлайн компьютер:
Save-Module –Name PSWindowsUpdate –Path C:ps
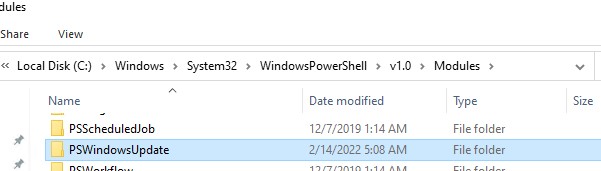
; - Скопируйте модуль на целевой компьютер, и поместите его в каталог
%WINDIR%System32WindowsPowerShellv1.0Modules
(при постоянном использовании модуля это лучший вариант); - Разрешите выполнение PowerShell скриптов:
Set-ExecutionPolicy –ExecutionPolicy RemoteSigned -force - Теперь вы можете импортировать модуль в свою сессию PowerShell:
Import-Module PSWindowsUpdate
Примечание. В Windows 7 / Server 2008 R2 при импорте модуля PSWindowsUpdate вы можете столкнутся с ошибкой вида:
Имя "Unblock-File" не распознано как имя командлета
. Дело в том, что в модуле используются некоторые функции, которые появились только в PowerShell 3.0. Для использования этих функций вам придется обновить PowerShell, либо вручную удалить строку | Unblock-File из файла PSWindowsUpdate.psm1.
После установки модуля PSWindowsUpdate на своем компьютере вы можете удаленно установить его на другие компьютеры или сервера с помощью командлета Update-WUModule. Например, чтобы скопировать PSWindowsUpdate модуль с вашего компьютера на два удаленных сервера, выполните команды (нужен доступ к удаленным серверам по протоколу WinRM):
$Targets = "Server1", "Server2"
Update-WUModule -ComputerName $Targets -local
Чтобы сохранить модуль в сетевой каталог для дальнейшего импорта модуля на других компьютерах, выполните:
Save-Module -Name PSWindowsUpdate –Path \fs01ps
Обзор команд модуля PSWindowsUpdate
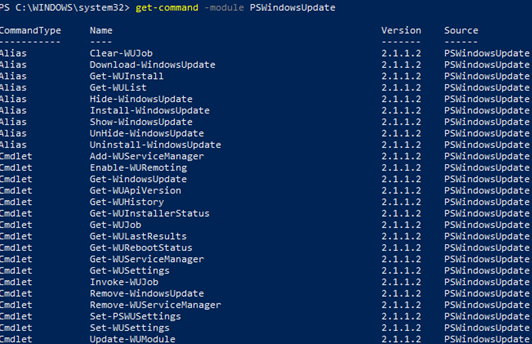
Список доступных командлетов модуля можно вывести так:
get-command -module PSWindowsUpdate
Вкратце опишем назначение команд модуля:
- Clear-WUJob – использовать Get-WUJob для вызова задания WUJob в планировщике;
- Download-WindowsUpdate (алиас для Get-WindowsUpdate –Download) — получить список обновлений и скачать их;
- Get-WUInstall, Install-WindowsUpdate (алиас для Get-WindowsUpdate –Install) – установить обвновления;
- Hide-WindowsUpdate (алиас для Get-WindowsUpdate -Hide:$false) – скрыть обновление;
- Uninstall-WindowsUpdate -удалить обновление с помощью Remove-WindowsUpdate;
- Add-WUServiceManager – регистрация сервера обновления (Windows Update Service Manager) на компьютере;
- Enable-WURemoting — включить правила Windows Defender файервола, разрешающие удаленное использование командлета PSWindowsUpdate;
- Get-WindowsUpdate (Get-WUList) — выводит список обновлений, соответствующим указанным критериям, позволяет найти и установить нужное обновление. Это основной командлет модуля PSWindowsUpdate. Позволяет скачать и установить обновления с сервера WSUS или Microsoft Update. Позволяет выбрать категории обновлений, конкретные обновления и указать правила перезагрузки компьютера при установке обновлений;
- Get-WUApiVersion – получить версию агента Windows Update Agent на компьютере;
- Get-WUHistory – вывести список установленных обновлений (история обновлений);
- Get-WUInstallerStatus — проверка состояния службы Windows Installer;
- Get-WUJob – запуска заданий обновления WUJob в Task Scheduler;
- Get-WULastResults — даты последнего поиска и установки обновлений (LastSearchSuccessDate и LastInstallationSuccessDate);
- Get-WURebootStatus — позволяет проверить, нужна ли перезагрузка для применения конкретного обновления;
- Get-WUServiceManager – вывод источников обновлений;
- Get-WUSettings – получить настройки клиента Windows Update;
- Invoke-WUJob – удаленное вызов заданий WUJobs в Task Schduler для немедленного выполнения заданий PSWindowsUpdate.
- Remove-WindowsUpdate – удалить обновление;
- Remove-WUServiceManager – отключить Windows Update Service Manager;
- Set-PSWUSettings – сохранить настройки модуля PSWindowsUpdate в XML файл;
- Set-WUSettings – настройка параметров клиента Windows Update;
- Update-WUModule – обновить модуль PSWindowsUpdate (можно обновить модуль на удаленном компьютере, скопировав его с текущего, или обновить из PSGallery);
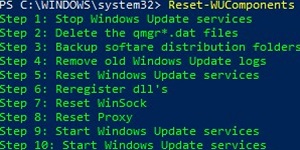
- Reset-WUComponents – позволяет сбросить настройка агента Windows Update на компьютере к настройкам по-умолчанию.
Чтобы проверить текущие настройки клиента Windows Update, выполните команду:
Get-WUSettings
ComputerName                                 : WKS22122
WUServer                                     : http://MS-WSUS:8530
WUStatusServer                               : http://MS-WSUS:8530
AcceptTrustedPublisherCerts                  : 1
ElevateNonAdmins                             : 1
DoNotConnectToWindowsUpdateInternetLocations : 1
TargetGroupEnabled                           : 1
TargetGroup                                  : WorkstationsProd
NoAutoUpdate                                 : 0
AUOptions                                    : 3 - Notify before installation
ScheduledInstallDay                          : 0 - Every Day
ScheduledInstallTime                         : 3
UseWUServer                                  : 1
AutoInstallMinorUpdates                      : 0
AlwaysAutoRebootAtScheduledTime              : 0
DetectionFrequencyEnabled                    : 1
DetectionFrequency                           : 4
В данном примере клиент Windows Update на компьютере настроен с помощью GPO на получение обновлений с локального сервера WSUS.
Команда
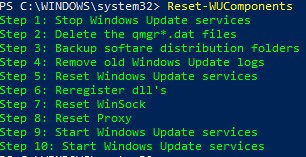
Reset-WUComponents –Verbose
позволяет сбросить все настройки агента Windows Update, перерегистрировать библиотеки и восстановить исходное состояние службы wususerv.
Управление обновлениями Windows на удаленных компьютерах через PowerShell
Практически все командлеты модуля PSWindowsUpdate позволяют управлять установкой обновлений на удаленных компьютерах. Для этого используется атрибут
-Computername Host1, Host2, Host3
. На удаленных компьютерах должен быть включен и настроен WinRM (вручную или через GPO).
Установите модуль PSWindowsUpdate на удаленных компьютерах и разрешите в файерволе доступ по динамическим RPC портам к процессу dllhost.exe. Можно использовать Invoke-Command для настройки модуля PSWindowsUpdate на удаленных компьютерах:
Invoke-Command -ComputerName $computer -ScriptBlock {Set-ExecutionPolicy RemoteSigned -force }
Invoke-Command -ComputerName $computer -ScriptBlock {Import-Module PSWindowsUpdate; Enable-WURemoting}
Модуль PSWindowsUpdate можно использовать для удаленного управлений обновлениями Windows как на компьютерах в домене AD, так и в рабочей группе (потребует определенной настройки PowerShell Remoting)
Для удаленного управления обновлениями компьютерах, нужно добавить имена компьютеров доверенных хостов winrm, или настроить удаленное управление PSRemoting через WinRM HTTPS:
winrm set winrm/config/client ‘@{TrustedHosts="HOST1,HOST2,…"}’
Или с помощью PowerShell:
Set-Item wsman:localhostclientTrustedHosts -Value wsk-w10BO1 -Force
Получить список доступных обновлений Windows из PowerShell
Вывести список обновлений, доступных для данного компьютера на сервере обновлений можно с помощью команд Get-WindowsUpdate или Get-WUList.
Чтобы проверить список доступных обновлений на удаленном компьютере, выполните:
Get-WUList –ComputerName server2
Вы можете проверить, откуда должна получать обновления ваша ОС Windows. Выполните команду:
Get-WUServiceManager
ServiceID IsManaged IsDefault Name
--------- --------- --------- ----
8b24b027-1dee-babb-9a95-3517dfb9c552 False False DCat Flighting Prod
855e8a7c-ecb4-4ca3-b045-1dfa50104289 False False Windows Store (DCat Prod)
3da21691-e39d-4da6-8a4b-b43877bcb1b7 True True Windows Server Update Service
9482f4b4-e343-43b6-b170-9a65bc822c77 False False Windows Update

Как вы видите, компьютер настроен на получение обновлений с локального сервера WSUS (Windows Server Update Service = True). В этом случае вы должны увидеть список обновлений, одобренных для вашего компьютера на WSUS.
Если вы хотите просканировать ваш компьютер на серверах Microsoft Update (кроме обновлений Windows на этих серверах содержатся обновления Office и других продуктов) в Интернете, выполните команду:
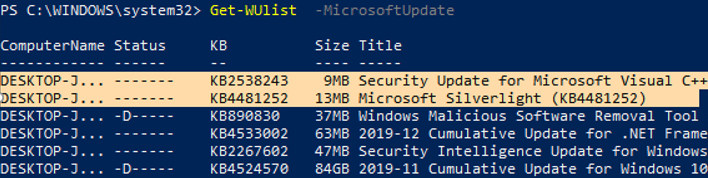
Get-WUlist -MicrosoftUpdate
Вы получаете предупреждение:
Get-WUlist : Service Windows Update was not found on computer
Чтобы разрешить сканирование на Microsoft Update, выполните команду:
Add-WUServiceManager -ServiceID "7971f918-a847-4430-9279-4a52d1efe18d" -AddServiceFlag 7
Теперь можете выполнить сканирование на Microsoft Update. Как вы видите, в данном случае были найдены дополнительные обновления для Microsoft Visual C++ 2008 и Microsoft Silverlight.

Чтобы проверить версию агента Windows Update на компьютере, выполните команду:
Get-WUApiVersion
ComputerName PSWindowsUpdate PSWUModuleDll ApiVersion WuapiDllVersion
------------ --------------- ------------- ---------- ---------------
FS01 2.2.0.2 2.2.0.2 8.0 10.0.19041.1320

Чтобы убрать определенные продукты или конкретные KB из списка обновлений, которые получает ваш компьютер, вы их можете исключить по:
- Категории (-NotCategory);
- Названию (-NotTitle);
- Номеру обновления (-NotKBArticleID).
Например, исключим из списка обновления драйверов, OneDrive и одну конкретную KB:
Get-WUlist -NotCategory "Drivers" -NotTitle OneDrive -NotKBArticleID KB4533002
Установка обновлений Windows с помощью Install-WindowsUpdate
Чтобы автоматически загрузить и установить все доступные обновления для вашей версии Windows с серверов Windows Update (вместо локального WSUS), выполните:
Install-WindowsUpdate -MicrosoftUpdate -AcceptAll -AutoReboot
Ключ AcceptAll включает одобрение установки для всех пакетов, а AutoReboot разрешает автоматическую перезагрузку Windows после установки обновлений.
Также можно использовать следующе параметры:
- IgnoreReboot – запретить автоматическую перезагрузку;
- ScheduleReboot – задать точное время перезагрузки компьютера.
Можете сохранить историю установки обновлений в лог файл (можно использовать вместо WindowsUpdate.log).
Install-WindowsUpdate -AcceptAll -Install -AutoReboot | Out-File "c:$(get-date -f yyyy-MM-dd)-WindowsUpdate.log" -force
Можно установить только конкретные обновления по номерам KB:
Get-WindowsUpdate -KBArticleID KB2267602, KB4533002 -Install

В данном случае нужно подтверждать установку каждого обновления вручную.
Если вы хотите исключить некоторые обновления из списка на установку, выполните:
Install-WindowsUpdate -NotCategory "Drivers" -NotTitle OneDrive -NotKBArticleID KB4011670 -AcceptAll -IgnoreReboot
Модуль позволяет удаленно запустить установку обновлений сразу на нескольких компьютерах или серверах (на компьютерах должен присутствовать модуль PSWindowsUpdate). Это особенно удобно, так как позволяет администратору не заходить вручную на все сервера во время плановой установки обновлений. Следующая команда установит все доступные обновление на трех удаленных серверах:
ServerNames = “server1, server2, server3”
Invoke-WUJob -ComputerName $ServerNames -Script {ipmo PSWindowsUpdate; Install-WindowsUpdate -AcceptAll | Out-File C:WindowsPSWindowsUpdate.log } -RunNow -Confirm:$false -Verbose -ErrorAction Ignore
Командлет Invoke-WUJob (ранее командлет назывался Invoke-WUInstall) создаст на удаленном компьютере задание планировщика, запускаемое от SYSTEM. Можно указать точное время для установки обновлений Windows:
Invoke-WUJob -ComputerName $ServerNames -Script {ipmo PSWindowsUpdate; Install-WindowsUpdate –AcceptAll -AutoReboot | Out-File C:WindowsPSWindowsUpdate.log } -Confirm:$false -TriggerDate (Get-Date -Hour 20 -Minute 0 -Second 0)
Можно установить обновления на удаленном компьютере и отправить email отчет администратору:
Install-WindowsUpdate -ComputerName server1 -MicrosoftUpdate -AcceptAll - IgnoreReboot -SendReport –PSWUSettings @{SmtpServer="smtp.winitpro.ru";From="[email protected]";To="[email protected]";Port=25} -Verbose
Проверить статус задания установки обновления можно с помощью Get-WUJob:
Get-WUJob -ComputerName $ServerNames
Если команда вернет пустой список, значит задача установки на всех компьютерах выполнена.
Просмотр истории установленных обновлений Windows (Get-WUHistory)
С помощью команды Get-WUHistory вы можете получить список обновлений, установленных на компьютере ранее автоматически или вручную.

Можно получить информацию о дате установки конкретного обновления:
Get-WUHistory| Where-Object {$_.Title -match "KB4517389"} | Select-Object *|ft

Чтобы получить информацию об наличии установленного обновления на нескольких удаленных компьютерах, можно воспользоваться таким кодом:
"server1","server2" | Get-WUHistory| Where-Object {$_.Title -match "KB4011634"} | Select-Object *|ft
Проверить, нужна ли перезагрузка компьютеру после установки обновления:
Get-WURebootStatus –ComputerName WKS80JT
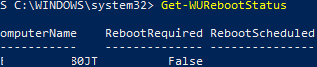
Проверьте значение атрибутов
RebootRequired
и
RebootScheduled
.
Получить дату последней установки обновлений на всех компьютерах в домене можно с помощью командлета Get-ADComputer из модуля AD PowerShell:
$Computers=Get-ADComputer -Filter {enabled -eq "true" -and OperatingSystem -Like '*Windows*' }
Foreach ($Computer in $Computers)
{
Get-WULastResults -ComputerName $Computer.Name|select ComputerName, LastSearchSuccessDate, LastInstallationSuccessDate
}
По аналогии можно найти компьютеры, которые не устаналивали обновления более 40 дней и вывести результат в графическую таблицу Out-GridView:
[email protected]()
Foreach ($Computer in $Computers) {
$result+= Get-WULastResults -ComputerName $Computer.Name
}
$result| Where-Object { $_.LastInstallationSuccessDate -lt ((Get-Date).AddDays(-30)) }| Out-GridView
Удаление обновлений в Windows с помощью Remove-WindowsUpdate
Для корректного удаления обновлений используется командлет Remove-WindowsUpdate. Вам достаточно указать номер KB в качестве аргумента параметра KBArticleID. Чтобы отложить автоматическую перезагрузку компьютера можно добавить ключ
–NoRestart
:
Remove-WindowsUpdate -KBArticleID KB4011634 -NoRestart
Как скрыть ненужные обновления Windows с помощью PowerShell (Hide-WindowsUpdate)?
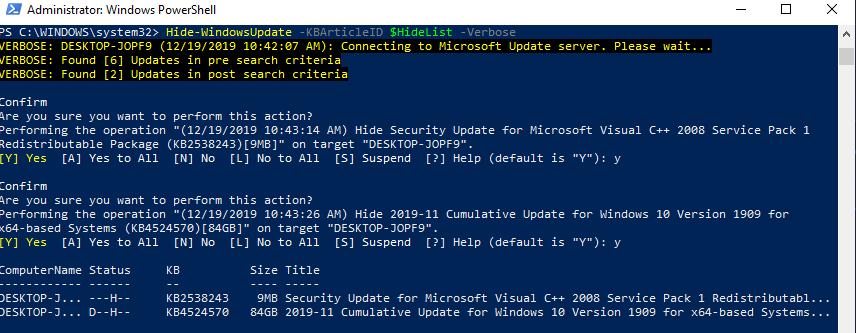
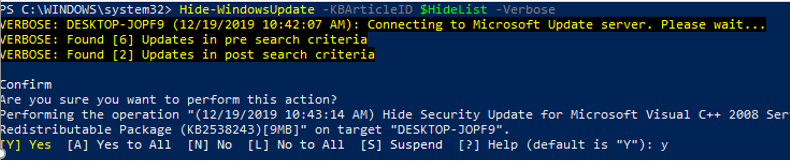
Вы можете скрыть определенные обновления, чтобы они никогда не устанавливались службой обновлений Windows Update на вашем компьютер (чаще всего скрывают обновления драйверов). Например, чтобы скрыть обновления KB2538243 и KB4524570, выполните такие команды:
$HideList = "KB2538243", "KB4524570"
Get-WindowsUpdate -KBArticleID $HideList -Hide
или используйте alias:
Hide-WindowsUpdate -KBArticleID $HideList -Verbose
Теперь при следующем сканировании обновлений с помощью команды
Get-WUlist
скрытые обновления не будут отображаться в списке доступных для установки патчей.
Вывести список обновлений, которые скрыты на данном компьютере можно так:
Get-WindowsUpdate –IsHidden
Обратите внимание, что в колонке Status у скрытых обновлений появился атрибут H (Hidden).

Отменить скрытие некоторых обновлений можно так:
Get-WindowsUpdate -KBArticleID $HideList -WithHidden -Hide:$false
или так:
Show-WindowsUpdate -KBArticleID $HideList
Для тех, кто себя некомфортно чувствует в консоли PowerShell, для управления обновлениями Windows 10 могу порекомендовать графическую утилиту Windows Update MiniTool.
-
Partition Wizard
-
Clone Disk
- Top 3 Ways to Get a List of Installed Windows 10 Updates
By Ariel | Follow |
Last Updated January 25, 2021
How to get a list of installed Windows 10 updates? MiniTool Solution will discuss the top 3 ways to view installed Windows 10 updates easily. Each method has its own advantages. You can choose whichever that is suitable for your specific needs.
Windows Updatesis a powerful tool in Windows, users can check for updates, change the active hour and other useful features. Here, let’s see how to get a list of installed Windows 10 updates step by step.
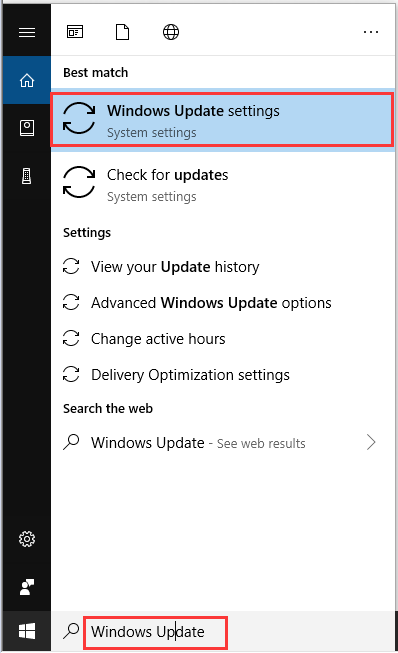
Step 1. Input Windows Update in Cortana and select Windows Update Settings.
Step 2. In the pop-up window, click on View installed update history. Then you can get a list of installed Windows 10 updates.
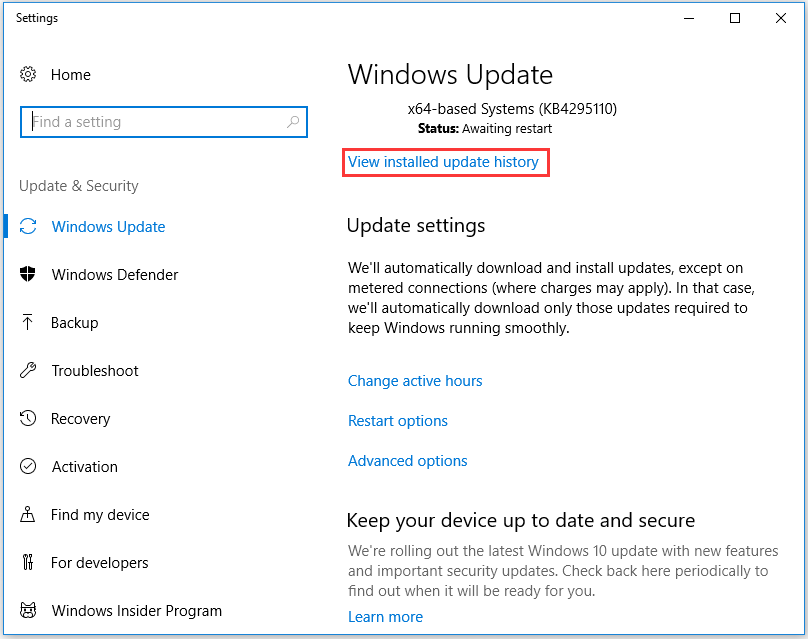
Then you will see all the updates installed in history on your Windows 10, including Feature Updates, Driver Updates, Quality Updates, and Other Updates.
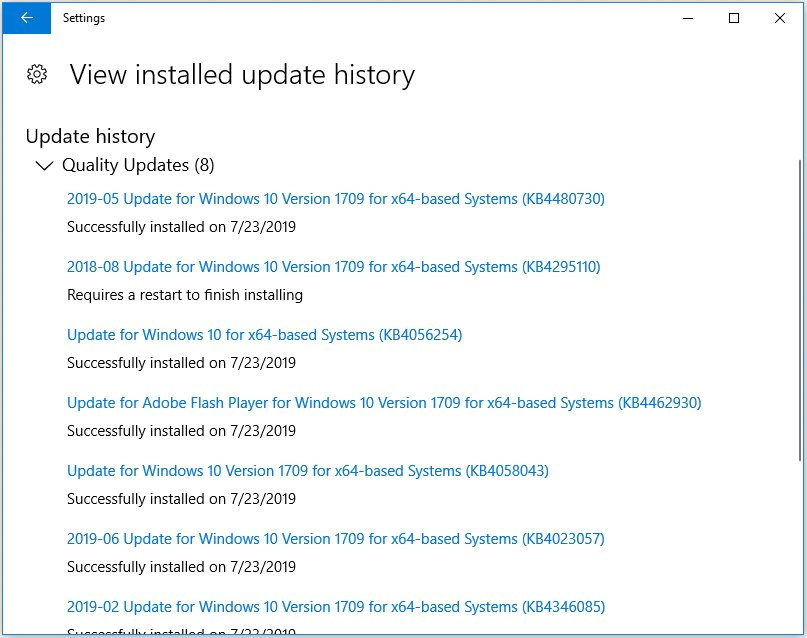
Tip: You need to go through the list of updates manually because you can’t search for a specific update by using this method.
In addition to this method, there are two simple ways about how to get a list of Windows 10 installed updates.
Using Command-Line Options
The list installed Windows 10 updates command line can be used to export the Windows 10 installed updates. Now, let’s see how to run them.
Option 1. WMIC Command to List Installed Windows Updates
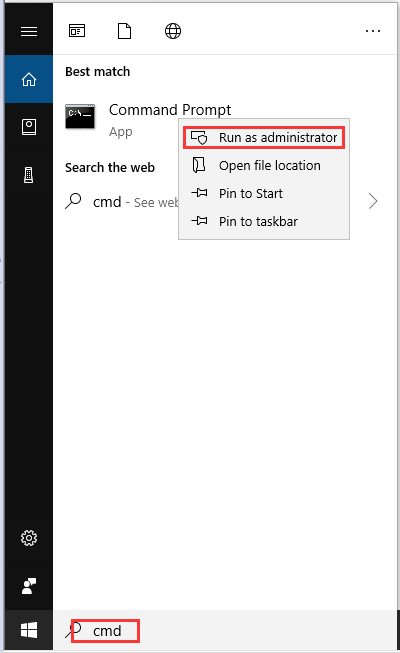
Step 1. Type cmd in the search box to open a command prompt and select as administrator.
Step 2. Type wmic qfe list full command to get all information about each hotfix installed on your computer.
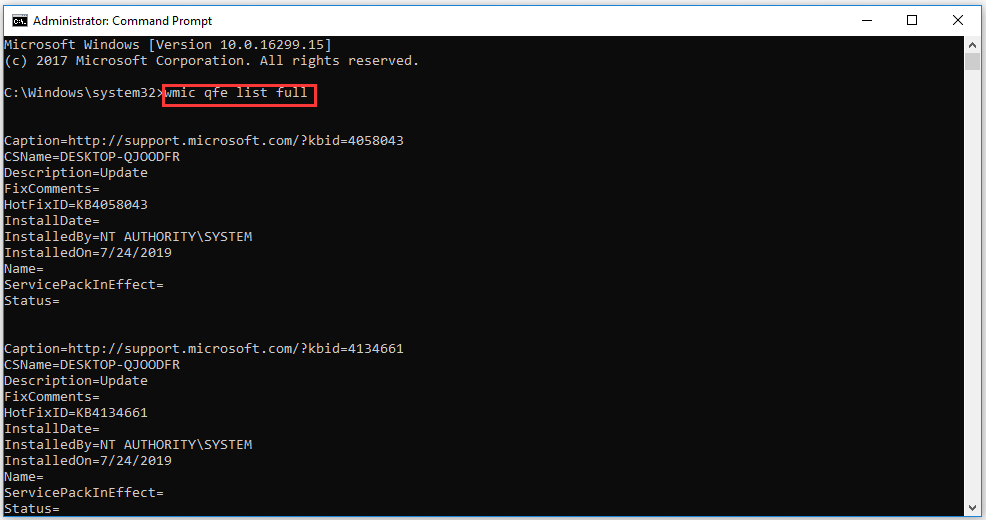
Then you can scroll up and down to view Windows 10 installed updates.
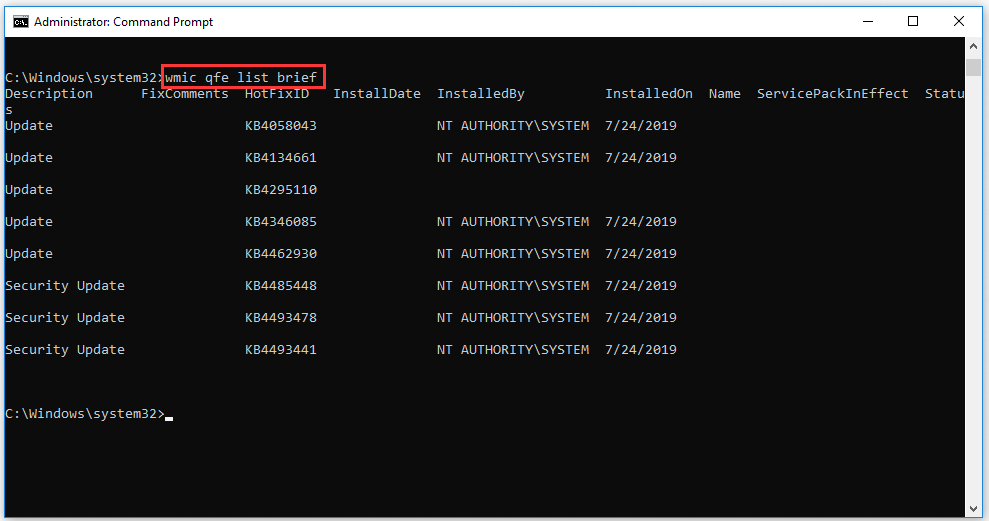
Or if the full information I not required, you can run wmic qfe list brief command.
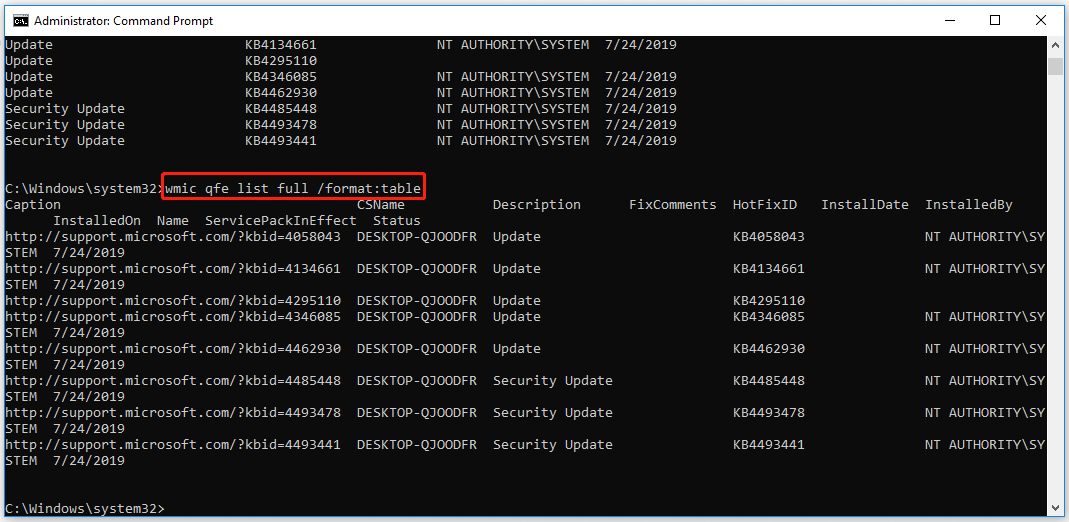
Type wmic qfe list full /format: table command to format the output as a table so that it is easy to read and comprehend.
Option 2. Run Systeminfo Command
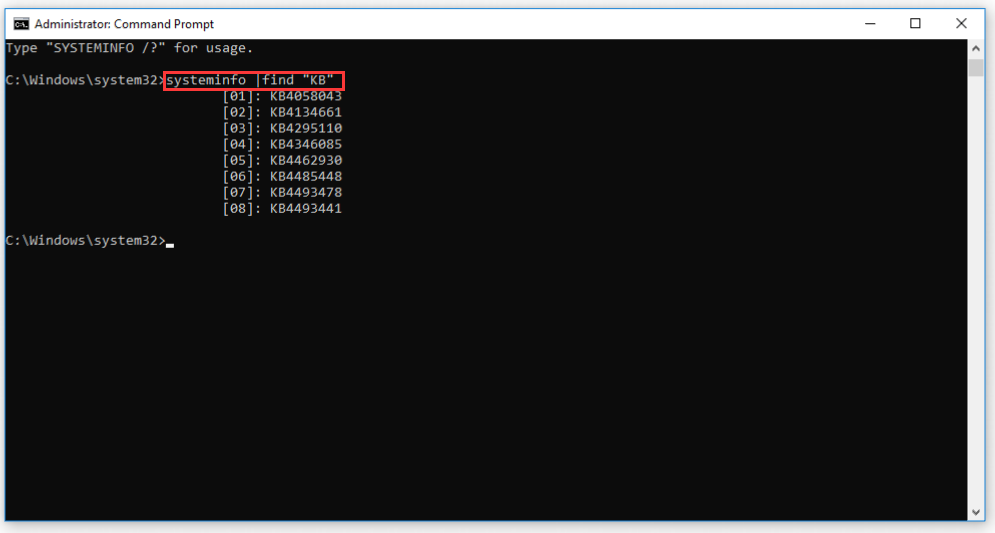
If you only want a list of knowledgebase updates numbers, then you can use the systeminfo command.
Step 1. Open command prompt window.
Step 2. Input systeminfo | find “KB” command and hit Enter button. Then you will see all Windows 10 knowledgebase updates number listed.
There is another easier way to export a list of installed Windows updates besides using the command line. Windows Powershell is a powerful tool that can be used to access various services an administrator in Windows.
Now, let see how to use this powerful tool to view Windows 10 installed updates.
Using Windows Powershell
The list installed Windows 10 updates Powershell also enables you to get a list of Windows installed updates. Here is how to do this.
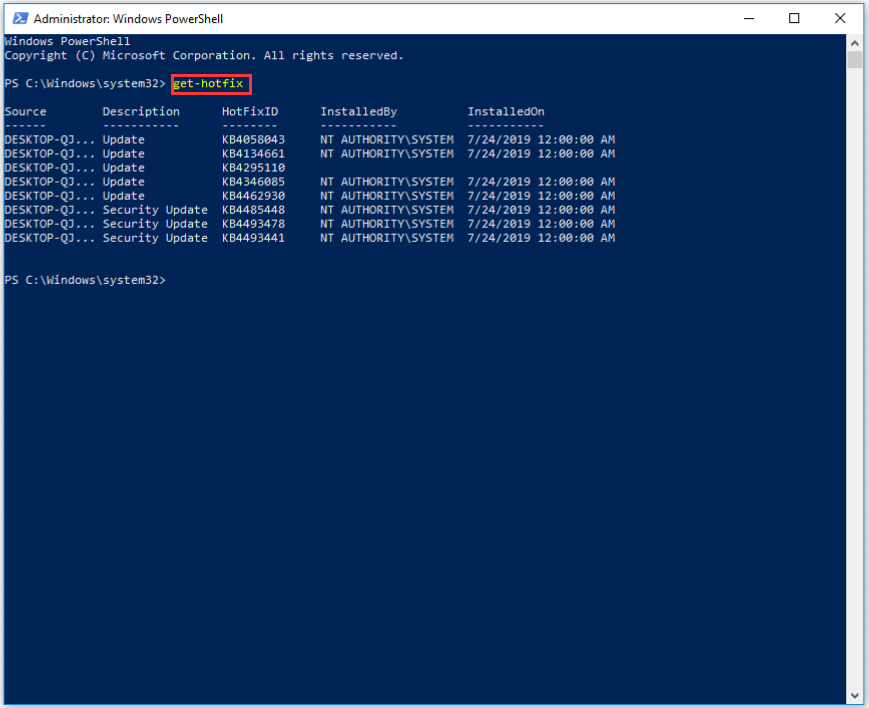
Step 1. Type Windows Powershell in the search box and right-click it to select Run as administrator.

Step 2. In the pop-up window, type get-hotfix command and hit the Enter button. Then all the hotfix installed files on your computer will be listed here and the installation date of each hotfix will also be shown.
Top 3 ways to get a list of installed Windows 10 updates are told to you. Now, it’s your turn to have a try.
About The Author

Position: Columnist
Ariel is an enthusiastic IT columnist focusing on partition management, data recovery, and Windows issues. She has helped users fix various problems like PS4 corrupted disk, unexpected store exception error, the green screen of death error, etc. If you are searching for methods to optimize your storage device and restore lost data from different storage devices, then Ariel can provide reliable solutions for these issues.
-
Partition Wizard
-
Clone Disk
- Top 3 Ways to Get a List of Installed Windows 10 Updates
By Ariel | Follow |
Last Updated January 25, 2021
How to get a list of installed Windows 10 updates? MiniTool Solution will discuss the top 3 ways to view installed Windows 10 updates easily. Each method has its own advantages. You can choose whichever that is suitable for your specific needs.
Windows Updatesis a powerful tool in Windows, users can check for updates, change the active hour and other useful features. Here, let’s see how to get a list of installed Windows 10 updates step by step.
Step 1. Input Windows Update in Cortana and select Windows Update Settings.
Step 2. In the pop-up window, click on View installed update history. Then you can get a list of installed Windows 10 updates.
Then you will see all the updates installed in history on your Windows 10, including Feature Updates, Driver Updates, Quality Updates, and Other Updates.
Tip: You need to go through the list of updates manually because you can’t search for a specific update by using this method.
In addition to this method, there are two simple ways about how to get a list of Windows 10 installed updates.
Using Command-Line Options
The list installed Windows 10 updates command line can be used to export the Windows 10 installed updates. Now, let’s see how to run them.
Option 1. WMIC Command to List Installed Windows Updates
Step 1. Type cmd in the search box to open a command prompt and select as administrator.
Step 2. Type wmic qfe list full command to get all information about each hotfix installed on your computer.
Then you can scroll up and down to view Windows 10 installed updates.
Or if the full information I not required, you can run wmic qfe list brief command.
Type wmic qfe list full /format: table command to format the output as a table so that it is easy to read and comprehend.
Option 2. Run Systeminfo Command
If you only want a list of knowledgebase updates numbers, then you can use the systeminfo command.
Step 1. Open command prompt window.
Step 2. Input systeminfo | find “KB” command and hit Enter button. Then you will see all Windows 10 knowledgebase updates number listed.
There is another easier way to export a list of installed Windows updates besides using the command line. Windows Powershell is a powerful tool that can be used to access various services an administrator in Windows.
Now, let see how to use this powerful tool to view Windows 10 installed updates.
Using Windows Powershell
The list installed Windows 10 updates Powershell also enables you to get a list of Windows installed updates. Here is how to do this.
Step 1. Type Windows Powershell in the search box and right-click it to select Run as administrator.
Step 2. In the pop-up window, type get-hotfix command and hit the Enter button. Then all the hotfix installed files on your computer will be listed here and the installation date of each hotfix will also be shown.
Top 3 ways to get a list of installed Windows 10 updates are told to you. Now, it’s your turn to have a try.
About The Author
Position: Columnist
Ariel is an enthusiastic IT columnist focusing on partition management, data recovery, and Windows issues. She has helped users fix various problems like PS4 corrupted disk, unexpected store exception error, the green screen of death error, etc. If you are searching for methods to optimize your storage device and restore lost data from different storage devices, then Ariel can provide reliable solutions for these issues.
14 Aug 2011 8:48 AM
I wondering why the hotfixes report i generated show difference InstalledOn(-1 day) compare to Installed updates date i refer from Control panel?
14 Aug 2011 9:13 AM
The data in WMI is stored in UTC format. And it is not translated into your local time when you use low-level tools such as Windows PowerShell or WMIC. In contrast, the Control Panel is an end-user friendly app that does the conversion for you.
From your profile it looks like you’re located in Singapore which means UTC+8 time zone. Effectively, if you installed something right now it would be 12 AM Aug 15 for you (as well as from the Control Panel point of view). But internally, in UTC, it would still be 4 PM Aug 14 (and this is what the WMI tools would show you).
Does this make sense?
14 Aug 2011 11:05 AM
Yes, it is acceptable and rational, this report extraction is useful to me. Is it means that manual process needed to correct the report or we can correct it in some other way when the report is generated? By the way, how to include «name» of each update.
14 Aug 2011 12:58 PM
Well, I believe we should always start with your end goals. What do you intend to achieve? Probably, scripting is not your best friend. Basically, an end user should be happy with the Control Panel applet since it is the most convenient and friendly way, yet providing very accurate results. On the flip side, an enterprise network admin is strongly encouraged go with some more robust tool like inventory features of ConfigMgr. With that said, I hope someone (probably myself) updates this article in the near future to address more use cases.
15 Aug 2011 5:36 AM
I am handling part of process patch management to ensure another enterprise updated their patch properly and generated a report for them monthly but i don’t support their infrastructure. The powershell script work for me, thanks 
I am using SCE and SCOM in company i supporting and i know it’s great tool to have.
16 Oct 2012 5:40 PM
Thank you.
20 Mar 2014 1:53 PM
Here’s an optimized script:
$Session = New-Object -ComObject «Microsoft.Update.Session»
$Searcher = $Session.CreateUpdateSearcher()
$historyCount = $Searcher.GetTotalHistoryCount()
$Searcher.QueryHistory(0, $historyCount) | Select-Object Date,
@{name=»Operation»; expression={switch($_.operation){
1 {«Installation»}; 2 {«Uninstallation»}; 3 {«Other»}}}},
@{name=»Status»; expression={switch($_.resultcode){
1 {«In Progress»}; 2 {«Succeeded»}; 3 {«Succeeded With Errors»};
4 {«Failed»}; 5 {«Aborted»}
}}}, Title | Export-Csv -NoType «$Env:userprofileDesktopWindows Updates.csv»
Also if you want to run scripts on Windows 8 or 2008 R2, you’ll need to right click on PowerShell and select «Run as administrator», execute the following and answer «y» pressing enter:
Set-ExecutionPolicy -ExecutionPolicy RemoteSigned
Info from: technet.microsoft.com/…/hh847748.aspx
9 Jun 2014 8:46 AM
I used the powershell method to extract all the updates to a file but I could not find update cumulative update KB2936068. I couldn’t find «2936068» in the registry either.
I’m running W7 Pro 32-bit with IE9. IE9 shows KB2953522 update (about IE) and I can find that KB in both the powershell output and in the registry. KB2953522 requires the cumulative update KB2936068 so KB2936068 must be installed, but why can’t I find KB2936068 on my machine?
15 Sep 2014 9:12 PM
Thanks for the $Searcher tip. I have adapted it to find some objective detail for a controversial update.
answers.microsoft.com/…/83352bfe-86df-4a3b-9886-24c1a9401b78
(No links alllowed?)
Installing Windows Updates manually can be a drag. Why not automate the entire process with PowerShell? Get started controlling Windows updates with the PSWindowsUpdate module in PowerShell!
In this tutorial, you will learn how to download and install updates on your Windows machine through PowerShell.
Prerequisites
This tutorial uses Windows 10 Build 19042 for demonstrations throughout this tutorial, but older ones, such as Windows 7 and 8.1, will work.
Installing the PSWindowsUpdate Module
The PSWindowsUpdate module is a third-party module available in PowerShell Gallery that lets you manage Windows updates from the PowerShell console. The PowerShell Gallery is the central repository where you can find and share PowerShell modules.
With the PSWindowsUpdate module, you can remotely check, install, update and remove updates on Windows servers and workstations. But first, you need to install the PSWindowsUpdate module on your machine.
1. Open PowerShell as administrator.
2. Run the Install-Module command to download and install the PSWindowUpdate module from the PowerShell gallery repository. The -Force parameter tells the command to ignore prompt messages and continue installing the module.
Install-Module -Name PSWindowsUpdate -ForceIf you’re on an older version of Windows, you can download the PSWindowsUpdate module manually.
3. Next, run the Import-Module command below to import the PSWindowsUpdate module to PowerShell’s current session. Once imported, you can then use the module to manage Windows updates on your machine.
You may run into an error importing the module for the first time saying “The specified module ‘PSWindowsUpdate’ was not loaded”. In that case, you must allow executing scripts on your machine.
Run the command
Set-ExecutionPolicy -ExecutionPolicy RemoteSignedto enable execute remote scripts on your computer. Now try importing thePSWindowsUpdatemodule again.
Import-Module PSWindowsUpdate4. Finally, run the command below to see all commands (Get-Command) available for the PSWindowsUpdate module. Some of these commands are what you will use to manage Windows updates on your machine. Get-Command -Module PSWindowsUpdate
Get-Command -Module PSWindowsUpdateChecking for Available Windows Updates
With the PSWindowsUpdate module installed, you can now run a command to list the updates available for your computer before installing them. Checking the list of updates is a good practice to avoid installing an update you don’t need.
Run the Get-WindowsUpdate command to list all the Windows updates
Below, you can see the list of available Windows updates along with their Knowledge-Base (KB) numbers. Take note of any KB number of a Windows update that you may want to prevent installing later, perhaps one that you deem not important.

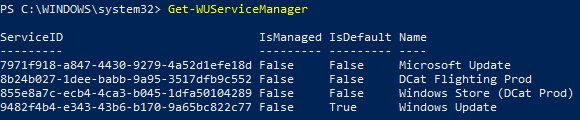
Perhaps you also want to check where Windows gets an update from to see if the source is trustworthy. If so, the Get-WUServiceManager command will do the trick.
Run the Get-WUServiceManager to show the list of available update services.
There’s no official documentation about the update the sources, but each is defined below:
- Microsoft Update – the standard update source
- DCat Flighting Prod – an alternative MS supdate ource for specific flighted update items (from previews, etc)
- Windows Store (DCat Prod) – normally just Windows Store, but has Dcat Prod when for insider preview PC
- Windows Update – an older update source for Windows Vista and older Windows OS.
Excluding Windows Updates from Installing
Now you’ve seen the Windows updates available, perhaps you prefer not to install some of them on your computer. In that case, you can choose not to install them by hiding them.
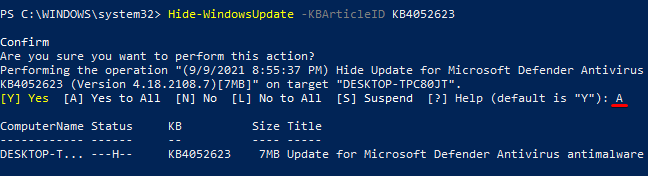
Run the Hide-WindowsUpdate command below to hide a Windows update tagged with the specified KB number (-KBArticleID KB4052623). You can specify the KB number you took note of in the “Checking for Available Windows Updates” section instead.
PowerShell will ask for your confirmation before executing the command. Confirm the command with the “A” key, then press Enter.
Hide-WindowsUpdate -KBArticleID KB4052623
If you change your mind and want to install the update in the future, you can show the update similar to how you hid the update. To show the update, run the
Show-WindowsUpdatecommand along with the update’s KB number, like this:Show-WindowsUpdate -KBArticleID KB4052623
Installing Windows Updates
Now that you can discover and exclude some updates from installing, let’s now check out how to install them.
But before installing updates, checking if updates require a system reboot is a good practice. Why? Knowing whether the Windows updates require a reboot beforehand tells you to save all your work and complete other ongoing installations before diving to the Windows update.
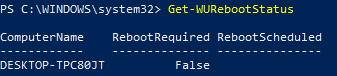
Now run the Get-WURebootStatus command to determine if any of the Windows updates require a reboot. The command returns either True or False value to indicate the reboot status
Below, you can see the command returned a False value, which indicates a reboot is not required. So go nuts and install the updates you deem are necessary.
Downloading and Installing All Available Updates
If you’re not picky when it comes to updates, running the Install-WindowsUpdate command on its own lets you install all available Windows updates. But perhaps, you want to install the updates without having to accept prompts. If so, you need to add the -AcceptAll parameter as shown below.
Run the Install-WindowsUpdate command below to install all available Windows updates. The -AcceptAll parameter tells the command to suppress prompts and continue installing all updates.
If you prefer to reboot your computer once the installation is completed automatically, add the -AutoReboot parameter.
Install-WindowsUpdate -AcceptAll -AutoReboot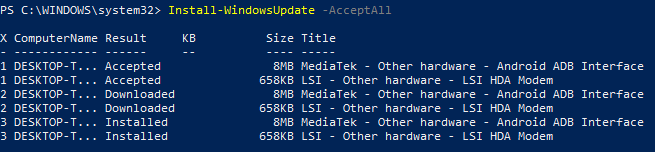
If you prefer to install selected updates only, add the
-KBArticleIDparameter in theInstall-WindowsUpdatecommand, followed by the update’s KB number, like this:Install-WindowsUpdate -KBArticleID KB2267602
Checking Windows Update History
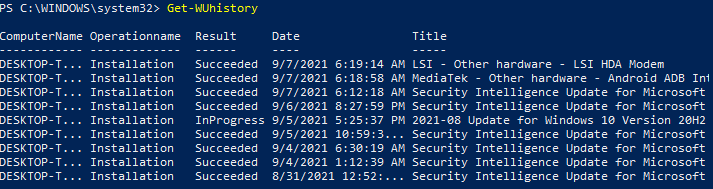
Now you have installed windows updates on your computer, but perhaps something has gone wrong during the installation. If so, you can check your update history using the Get-WUHistory command. The Get-WUHistory prints out all the installed updates to the console with their installation result.
Run the Get-WUHistory command below to check Windows update history.
Below, you can see that most of the updates have the Succeeded result status, while some have InProgress status.
Uninstalling Windows Updates
There are times when you install an update you don’t deem important at the moment, or there are updates you suspect of causing an issue on your system. In those times, you can properly uninstall the updates with the Remove-WindowsUpdate command.
Run the Remove-WindowsUpdate command below to uninstall a Windows update tagged with a specific KB number (-KBArticleID KB2267602).
PowerShell will require confirmation before executing the command. Press the “A” key and hit enter to confirm the command.
Remove-WindowsUpdate -KBArticleID KB2267602
Conclusion
Throughout this tutorial, you’ve learned about the PSWindowsUpdate Module. You’ve also gone through selectively installing and uninstalling Windows updates.
You’ve learned that you have full control over the Windows updates with PowerShell. Now, would you prefer installing updates in PowerShell over a GUI method? Perhaps learn more about building a Windows update report?
- 20 мая 2020
- 20 мая 2020
- 5917
Довольно быстрый способ проверки состояния обновлений или проверки на предмет установленного обновления, получения сведения о нем. Обычный сценарий просмотра информации об установленных обновлениях, это конечно же панель управления
Помочь в данном аспекте может командлет Get-Hotfix:
Можно посмотреть только Security обновления:
Get-HotFix -Description Security*
Иногда бывает полезно посмотреть какое обновление было установлено последним и когда:
(Get-HotFix | Sort-Object -Property InstalledOn)[-1]
Или отсортировать установленные обновления в порядке убывания по дате установки:
Get-HotFix | Sort-Object InstalledOn -Descending
Здесь же можно посмотреть информацию об отдельном KB:
По аналоги можно осуществить проверку на удаленном компьютере:
PS> Get-HotFix -ComputerName Server01, Server02 -Credential domainadminUserName
По сути этот командлет обертка над WMI классом Win32_QuickFixEngineering (здесь наглядно описано как работать с этим WMI классом). Официальная документация по Get-Hotfix или:
Done.
You can use the PSWindowsUpdate PowerShell module to manage Windows updates from the command line. The PSWindowsUpdate module is not built into Windows and is available for installation from the PowerShell Gallery repository. PSWindowsUpdate allows administrators to remotely check, install, remove, and hide updates on Windows servers and workstations. The PSWindowsUpdate module is especially valuable to manage updates on Windows Server Core or Hyper-V Server (which don’t have a GUI), and when configuring a Windows image in the audit mode.
Contents:
- Installing the PSWindowsUpdate Module
- PSWindowsUpdate Cmdlets List
- Scan and Download Windows Updates with PowerShell
- Installing Windows Updates with PowerShell (Install-WindowsUpdate)
- Install Windows Update on Remote Computers with PowerShell
- Check Windows Update History with PowerShell (Get-WUHistory)
- Uninstalling Windows Updates with PowerShell (Remove-WindowsUpdate)
- How to Hide Windows Updates with PowerShell?
Installing the PSWindowsUpdate Module
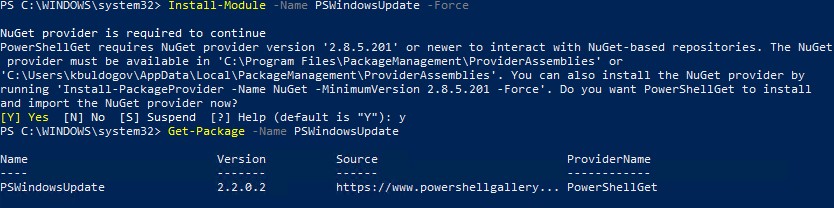
You can install the PSWindowsUpdate module on Windows 10/11 and Windows Server 2022/2019/2016 from the online repository (PSGallery) using the PackageManagement with a single command:
Install-Module -Name PSWindowsUpdate -Force
After the installation is complete, you need to check the package:
Get-Package -Name PSWindowsUpdate
When installing the PowerShell module on earlier versions of Windows 2012R2/Windows 8.1 and below, you may receive an error:
Install-Module: Unable to download from URI.Unable to download the list of available providers. Check your internet connection.
To install the module, you need to use the TLS 1.2 protocol for connection. Enable it for the current PowerShell session with the command:
[Net.ServicePointManager]::SecurityProtocol = [Net.SecurityProtocolType]::Tls12
PowerShell Install-Module Error: Unable to Download from URI
If you have an older Windows version (Windows 7/8.1/Windows Server 2008 R2/2012 R2) or you don’t have direct Internet access, you can install PSWindowsUpdate manually (check the guide “How to install PowerShell modules offline?”).
- Download the PSWindowsUpdate module to any online computer:
Save-Module –Name PSWindowsUpdate –Path C:ps; - Copy the module to the following folder on the target computer
%WINDIR%System32WindowsPowerShellv1.0Modules;
- Configure the PowerShell script execution policy:
Set-ExecutionPolicy –ExecutionPolicy RemoteSigned -force - You can now import the module into your PowerShell session:
Import-Module PSWindowsUpdate
Note. In Windows 7/Windows Server 2008 R2, when importing the PSWindowsUpdate module, the following error may appear: The term “Unblock-File” is not recognized as the name of a cmdlet. The cause is that the module uses some functions that appeared only in PowerShell 3.0. To use these functions, you will have either to update the PowerShell version or delete the | Unblock-File line from the PSWindowsUpdate.psm1 file manually.
After installing the PSWindowsUpdate module on your computer, you can remotely install it on other computers or servers using the Update-WUModule cmdlet. For example, to copy the PSWindowsUpdate module from your computer to two remote hosts, run the commands (you need access to the remote servers via the WinRM protocol):
$Targets = "lon-fs02", "lon-db01"

Update-WUModule -ComputerName $Targets –Local
To save (export) the PoSh module to a shared network folder for further importing on other computers, run:
Save-Module -Name PSWindowsUpdate –Path \lon-fs02psmodules
PSWindowsUpdate Cmdlets List
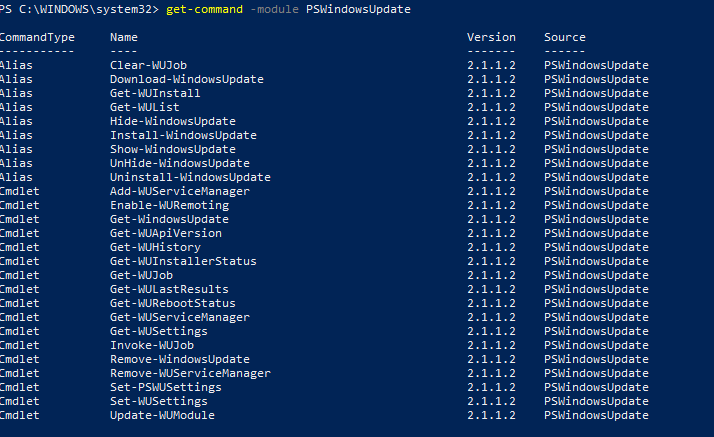
You can display the list of available cmdlets in the PSWindowsUpdate module as follows:
get-command -module PSWindowsUpdate
Let’s describe the usage of the module commands in brief:
- Clear-WUJob – use the Get-WUJob to clear the WUJob in Task Scheduler;
- Download-WindowsUpdate (alias for
Get-WindowsUpdate –Download) — get a list of updates and download them; - Get-WUInstall, Install-WindowsUpdate (alias for
Get-WindowsUpdate –Install) – install Windows updates; - Hide-WindowsUpdate (alias for
Get-WindowsUpdate -Hide:$false) – hide update; - Uninstall-WindowsUpdate – remove update using the Remove-WindowsUpdate;
- Add-WUServiceManager – register the update server (Windows Update Service Manager) on the computer;
- Enable-WURemoting — enable Windows Defender firewall rules to allow remote use of the PSWindowsUpdate cmdlets;
- Get-WindowsUpdate (Get-WUList) — displays a list of updates that match the specified criteria, allows you to find and install the updates. This is the main cmdlet of the PSWindowsUpdate module. Allows to download and install updates from a WSUS server or Microsoft Update. Allows you to select update categories, specific updates and set the rules of a computer restart when installing the updates;
- Get-WUApiVersion – get the Windows Update Agent version on the computer;
- Get-WUHistory – display a list of installed updates (update history);
- Get-WUInstallerStatus — check the Windows Installer service status;
- Get-WUJob – check for WUJob update tasks in the Task Scheduler;
- Get-WULastResults — dates of the last search and installation of updates (LastSearchSuccessDate and LastInstallationSuccessDate);
- Get-WURebootStatus — allows you to check whether a reboot is needed to apply a specific update;
- Get-WUServiceManager – list update sources;
- Get-WUSettings – get Windows Update client settings;
- Invoke-WUJob – remotely call WUJobs task in the Task Scheduler to immediately execute PSWindowsUpdate commands;
- Remove-WindowsUpdate – allows to uninstall an update by KB ID;
- Remove-WUServiceManager – disable Windows Update Service Manager;
- Set-PSWUSettings – save PSWindowsUpdate module settings to the XML file;
- Set-WUSettings – configure Windows Update client settings;
- Update-WUModule – update the PSWindowsUpdate module (you can update the module on a remote computer by copying it from the current one, or updating from PSGallery);
- Reset-WUComponents – allows you to reset the Windows Update agent on the computer to the default state.
To check the current Windows Update client settings, run the command:
Get-WUSettings
ComputerName                                 : WKS5S2N39S2
WUServer                                     : http://MN-WSUS:8530
WUStatusServer                               : http://MN-WSUS:8530
AcceptTrustedPublisherCerts                  : 1
ElevateNonAdmins                             : 1
DoNotConnectToWindowsUpdateInternetLocations : 1
TargetGroupEnabled                           : 1
TargetGroup                                  : ServersProd
NoAutoUpdate                                 : 0
AUOptions                                    : 3 - Notify before installation
ScheduledInstallDay                          : 0 - Every Day
ScheduledInstallTime                         : 3
UseWUServer                                  : 1
AutoInstallMinorUpdates                      : 0
AlwaysAutoRebootAtScheduledTime              : 0
DetectionFrequencyEnabled                    : 1
DetectionFrequency                         : 4
In this example, the Windows Update agent on the computer is configured with a GPO to receive updates from the local WSUS server.
The Reset-WUComponents -Verbose cmdlet allows you to reset all Windows Update Agent settings, re-register libraries, and restore the wususerv service to its default state.
Scan and Download Windows Updates with PowerShell
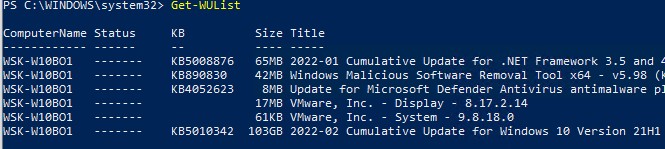
You can list the updates available for the current computer on the update server using the Get-WindowsUpdate or Get-WUList commands.

To check the list of available updates on a remote computer, run this command:
Get-WUList –ComputerName server2
You can check where your Windows should receive updates from. Run the following command:
Get-WUServiceManager
ServiceID IsManaged IsDefault Name
--------- --------- --------- ----
8b24b027-1dee-babb-9a95-3517dfb9c552 False False DCat Flighting Prod
855e8a7c-ecb4-4ca3-b045-1dfa50104289 False False Windows Store (DCat Prod)
3da21691-e39d-4da6-8a4b-b43877bcb1b7 True True Windows Server Update Service
9482f4b4-e343-43b6-b170-9a65bc822c77 False False Windows Update

As you can see, the computer is configured to receive updates from the local WSUS server (Windows Server Update Service = True). In this case, you should see a list of updates approved for your computer.
If you want to scan your computer against Microsoft Update servers on the Internet (in addition to Windows updates, these servers contain Office and other Microsoft product updates), run this command:
Get-WUlist -MicrosoftUpdate
You will get this warning:
Get-WUlist : Service Windows Update was not found on computer. Use Get-WUServiceManager to get registered service.
To allow scanning on Microsoft Update, run this command:
Add-WUServiceManager -ServiceID "7971f918-a847-4430-9279-4a52d1efe18d" -AddServiceFlag 7
You can now scan against Microsoft Update. In this case, additional updates were found for Microsoft Visual C ++ 2008 and Microsoft Silverlight.
To check the version of the Windows Update Agent on the computer, run the command:
Get-WUApiVersion
ComputerName PSWindowsUpdate PSWUModuleDll ApiVersion WuapiDllVersion
------------ --------------- ------------- ---------- ---------------
DESKTOP-J... 2.1.1.2 2.2.0.2 8.0 10.0.19041.1320

To remove specific products or KBs from the list of updates received by your computer, you can exclude them by:
- Category (
-NotCategory); - Title (
-NotCategory); - Update number (
-NotKBArticleID).
For example, let’s exclude OneDrive, driver updates, and the specific KB from the list:
Get-WUlist -NotCategory "Drivers" -NotTitle "OneDrive" -NotKBArticleID KB4489873
Installing Windows Updates with PowerShell (Install-WindowsUpdate)
To automatically download and install all available updates for your Windows device from Windows Update servers (instead of local WSUS), run the command:
Install-WindowsUpdate -MicrosoftUpdate -AcceptAll -AutoReboot
The AcceptAll parameter accepts the installation of all update packages, and AutoReboot allows Windows to automatically restart after the updates are installed.
You can also use the following options:
- IgnoreReboot – disable automatic reboot;
- ScheduleReboot – set the exact time to restart the computer.
You can save the update installation history to a log file (you can use it instead of WindowsUpdate.log file).
Install-WindowsUpdate -AcceptAll -Install -AutoReboot | Out-File "c:logs$(get-date -f yyyy-MM-dd)-WindowsUpdate.log" -force
You can install only the specific update packages by KB numbers:
Get-WindowsUpdate -KBArticleID KB2267602, KB4533002 -Install
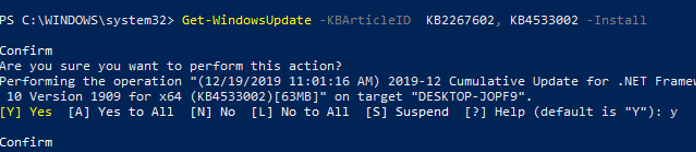
In this case, you need to confirm the installation of each update manually.
If you want to exclude certain updates from the installation list, run this command:
Install-WindowsUpdate -NotCategory "Drivers" -NotTitle OneDrive -NotKBArticleID KB4011670 -AcceptAll -IgnoreReboot
Install Windows Update on Remote Computers with PowerShell
The PSWindowsUpdate module allows you to install updates remotely on multiple workstations or servers at once (the PSWindowsUpdate must be installed/imported on these computers). This is very convenient because the administrator doesn’t have to manually log on to remote Windows hosts to install updates. WinRM must be enabled and configured on remote computers (manually or via GPO).
Almost all PSWindowsUpdate module cmdlets allow you to manage and install Windows updates on remote computers with the –Computername attribute.
Install the PSWindowsUpdate module on remote computers and allow access via dynamic RPC ports to the dllhost.exe process in the Windows Defender Firewall. You can use the Invoke-Command cmdlet to configure the PSWindowsUpdate module on remote computers:
$Targets = "lon-fs02", "lon-db01"

Invoke-Command -ComputerName $Target -ScriptBlock {Set-ExecutionPolicy RemoteSigned -force }

Invoke-Command -ComputerName $Target -ScriptBlock {Import-Module PSWindowsUpdate; Enable-WURemoting}
The PSWindowsUpdate module can be used to remotely manage Windows updates both on computers in an AD domain and in a workgroup (requires PowerShell Remoting configuration for workgroup environment).
In order to manage updates on remote computers, you need to add hostnames to your winrm trusted host list or configure PowerShell Remoting (WinRM) via HTTPS:
winrm set winrm/config/client '@{TrustedHosts="server1,server2,…"}'
Or with PowerShell :
Set-Item wsman:localhostclientTrustedHosts -Value server1 -Force
The following command will install all available updates on three remote Windows hosts:
$ServerNames = "server1, server2, server3"

Invoke-WUJob -ComputerName $ServerNames -Script {ipmo PSWindowsUpdate; Install-WindowsUpdate -AcceptAll | Out-File C:WindowsPSWindowsUpdate.log } -RunNow -Confirm:$false -Verbose -ErrorAction Ignore
The Invoke-WUJob cmdlet (previously called Invoke-WUInstall) will create a scheduler task on the remote computer that runs under a local SYSTEM account.
You can specify the exact time to install Windows updates:
Invoke-WUJob -ComputerName $ServerNames -Script {ipmo PSWindowsUpdate; Install-WindowsUpdate –AcceptAll -AutoReboot | Out-File C:WindowsPSWindowsUpdate.log } -Confirm:$false -TriggerDate (Get-Date -Hour 22 -Minute 0 -Second 0)
You can check the status of the update installation task using the Get-WUJob:
Get-WUJob -ComputerName $ServerNames
If the command returns an empty list, then the update installation task on all computers has been completed.
You can install updates on a remote computer and send an email report to the administrator:
Install-WindowsUpdate -ComputerName nysrv1 -MicrosoftUpdate -AcceptAll - IgnoreReboot -SendReport –PSWUSettings @{SmtpServer="smtp.woshub.com";From="update_alert@woshub.com";To="wsus_admin@woshub.com";Port=25} -Verbose
Check Windows Update History with PowerShell (Get-WUHistory)
Using the Get-WUHistory cmdlet, you can get the list of updates installed on a computer earlier automatically or manually.

You can get the information about the installation date of a specific update:
Get-WUHistory| Where-Object {$_.Title -match "KB4517389"} | Select-Object *|ft

To find out if the specific update has been installed on multiple remote computers, you can use this PowerShell code:
"server1","server2" | Get-WUHistory| Where-Object {$_.Title -match "KB4011634"} | Select-Object *|ft
Check if the computer needs to be restarted after installing the update (pending reboot):
Get-WURebootStatus –ComputerName WKS21TJS

Check the value of the RebootRequired and RebootScheduled attributes.
You can generate a report with the dates when updates were last installed on all computers in the domain using the Get-ADComputer cmdlet (from the Active Directory for PowerShell module):
$Computers=Get-ADComputer -Filter {enabled -eq "true" -and OperatingSystem -Like '*Windows*' }

Foreach ($Computer in $Computers)

{

Get-WULastResults -ComputerName $Computer.Name|select ComputerName, LastSearchSuccessDate, LastInstallationSuccessDate

}
By analogy, you can find computers that have not installed updates for more than 60 days and display the result in the Out-GridView interactive table:
$result=@()

Foreach ($Computer in $Computers) {

$result+= Get-WULastResults -ComputerName $Computer.Name

}

$result| Where-Object { $_.LastInstallationSuccessDate -lt ((Get-Date).AddDays(-60)) }| Out-GridView
Uninstalling Windows Updates with PowerShell (Remove-WindowsUpdate)
You can use the Remove-WindowsUpdate cmdlet to correctly uninstall the updates with PowerShell. Just specify the KB number as an argument of the KBArticleID parameter. To delay automatic computer restart, add the –NoRestart option:
Remove-WindowsUpdate -KBArticleID KB4489873 -NoRestart
How to Hide Windows Updates with PowerShell?
You can hide the specific updates so they will be never installed by the Windows Update service on your computer (most often you need to hide the driver updates). For example, to hide the KB4489873 and KB4489243 updates, run these commands:
$HideList = "KB4489873", "KB4489243"

Get-WindowsUpdate -KBArticleID $HideList –Hide
Now the next time you scan for updates using the Get-WUlist command, the hidden updates won’t be displayed in the list of updates available for installation.
This is how you can display the list of updates hidden on this computer:
Get-WindowsUpdate –IsHidden
Notice that the H (Hidden) attribute has appeared in the Status column of hidden updates.

To unhide some updates, run this command:
Get-WindowsUpdate -KBArticleID $HideList -WithHidden -Hide:$false
or:
Show-WindowsUpdate -KBArticleID $HideList
For those who feel uncomfortable in the PowerShell console, I would recommend a graphic Windows Update MiniTool to manage updates in Windows 10/11 and Windows Server 2022/2019.
Вы когда-нибудь задумывались, с помощью чего формируется список установленных обновлений Windows? А через какое API его достать? Ответы на эти и другие возникающие вопросы я постараюсь дать в своём небольшом исследовании.

Предыстория или с чего всё началось.
В нашей компании каждый год проходит конференция молодых специалистов, где каждый участник может решить проблему какого-либо отдела (список тем заранее предлагается).
Раньше на каждое «ТО» с помощью WSUS подтягивались все выпущенные обновления и распространялись на все машины. Также периодически выходили ТСБ (технические сервисные бюллетени), в которых указывалось, что требуется установить необходимые обновления в виде изолированных пакетов. В итоге у нас накапливаются обновления, которые в WSUS отследить нельзя, а можно было увидеть только через панель управления в разделе «Установленные обновления».
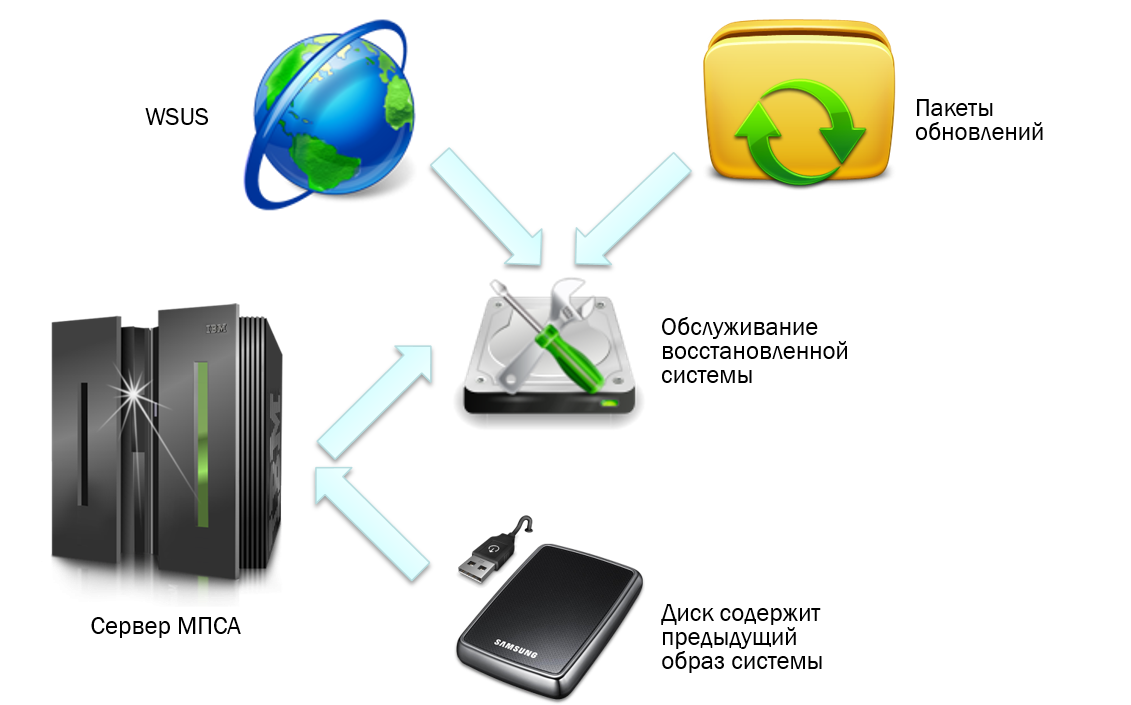
Бывают ситуации, когда АРМ или сервер «падает» и приходится его восстанавливать из образа, созданного некоторое время назад. При восстановлении из образа есть вероятность того, что мы можем потерять нужные нам обновления (которые пришли в виде изолированных пакетов), которые устанавливались до падения машины. Объяснил максимально подробно насколько мог, потому что уточнения будут уже коммерческой тайной.
Вот поэтому и возникла идея создать программу, которая бы могла извлечь этот список обновлений (желательно удаленно по локальной сети), записать в файл/базу, сравнить текущий перечень с неким шаблоном и выдать сообщение на SCADA систему через один из протоколов — SNMP, OPC.
Как вы могли догадаться из названия статьи, уже на выборе метода получения списка у меня возникла непростая задача. Я, как обычно, решил поискать нужное в поисковике, задал вопросы на профильных ресурсах (раз, два, на английском stackoverflow почему-то не понравился мой вопрос и его пришлось удалить), но все ответы не давали нужного результата. Поэтому пришлось разбираться самому, о чем и пойдет речь далее.
Консольные команды
Начнем с простого и воспользуемся тем, что предлагает нам Windows без использования сторонних средств. Это можно сделать с помощью следующих команд:
- wmic qfe list
- systeminfo
- dism /online /get-packages
- через PowerShell:
- Get-HotFix
- Get-SilWindowsUpdate (доступно только в серверных редакциях)
- Get-WmiObject -Class win32_quickfixengineering — через доступ к WMI классу win32_quickfixengineering (о WMI чуть позже)
Получить список через графический интерфейс можно через стандартный пункт Панели управления «Установка/удаление программ», но скопировать оттуда мы ничего не можем. Каждый инструмент панели управления представлен файлом .cpl в папке WindowsSystem. Файлы .cpl в системную папку Windows автоматически загружаются при запуске панели управления. За пункт Программы отвечает файл Appwiz.cpl. Его анализ ни к чему не привел.
Вывод консольной команды можно перенаправить в файл и дальше начать его парсить, но это неправильно, плюс вызов программы (по правилам СБ не пройдет) и об удаленном получении списка речь не идёт. Поэтому предлагаю вам просто вызвать команды, сравнить количество обновлений в каждом списке, со списком через Панель управления и продолжить наше расследование дальше.
Формально все методы получения списка обновлений можно разделить на две группы: локальные и сетевые.
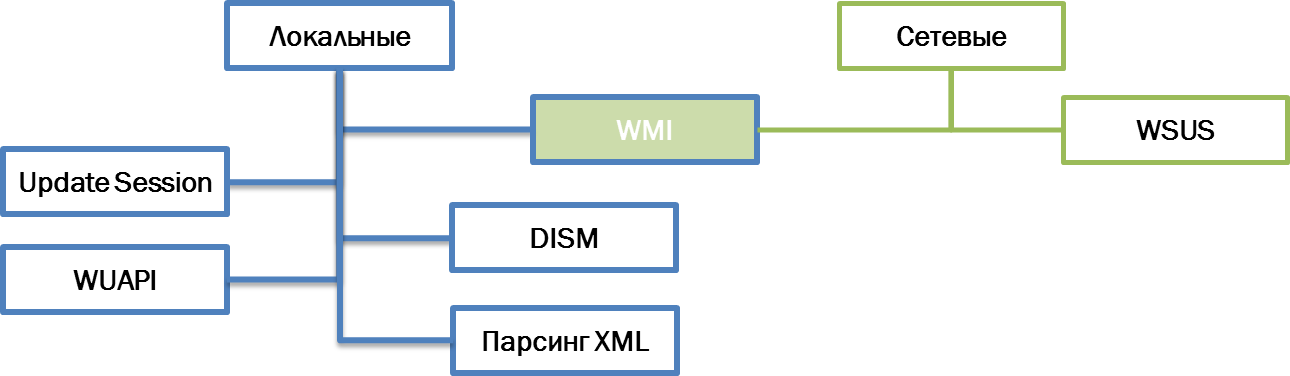
Все методы проверялись на чистых образах систем (Windows 7, 8, Server 2012 R2) с интегрированными обновлениями, после каждого обновления через Центр обновления с официальных серверов Microsoft проводилась дополнительная проверка. Остановимся на каждом из них подробнее.
WUA
WUApi (Windows Update Agent API) — использование API агента обновления Windows. Самый явный вариант, название которого говорит само за себя. Использовать для этого будем библиотеку Wuapi.dll.
Примечание: далее для своего удобства все результаты я буду вставлять в List. Это, возможно, не рационально, но тогда мне это казалось хорошей идеей.
Пример реализации
using WUApiLib;

public static List<string> listUpdateHistory()
{
	//WUApi
	List<string> result = new List<string>(200);

	try
	{
		UpdateSession uSession = new UpdateSession();
		IUpdateSearcher uSearcher = uSession.CreateUpdateSearcher();
		uSearcher.Online = false;
		ISearchResult sResult = uSearcher.Search("IsInstalled=1 And IsHidden=0");

		string sw = "Количество обновлений через WUApi: " + sResult.Updates.Count;
		result.Add(sw);
		foreach (WUApiLib.IUpdate update in sResult.Updates)
		{
			result.Add(update.Title);
		}
	}

	catch (Exception ex)
	{
		result.Add("Что-то пошло не так: " + ex.Message);
	}

	return result;
}
Есть и вторая вариация этого метода: Update Session — получение информации с помощью подключения к сессии обновления Windows Update Agent (в данном случае работаем не напрямую с библиотекой).
Пример реализации
public static List<string> Sessionlist(string pc)
{
	List<string> result = new List<string>(50); //не забудь изменить количество

	object sess = null;
	object search = null;
	object coll = null;

	try
	{
		sess = Activator.CreateInstance(Type.GetTypeFromProgID("Microsoft.Update.Session", pc));
		search = (sess as dynamic).CreateUpdateSearcher();

		int n = (search as dynamic).GetTotalHistoryCount();
		int kol = 0;
		//coll = (search as dynamic).QueryHistory(1, n);
		coll = (search as dynamic).QueryHistory(0, n);

		result.Add("Количество через Update.Session: " + n);
		foreach (dynamic item in coll as dynamic)
		{
			if (item.Operation == 1) result.Add(item.Title);
			kol++;
			//Console.WriteLine("Количество: " + kol);
		}
		result.Add("Количество в цикле: " + kol);
	}
	catch (Exception ex)
	{
		result.Add("Что-то пошло не так: " + ex.Message);
	}
	finally
	{
		if (sess != null) Marshal.ReleaseComObject(sess);
		if (search != null) Marshal.ReleaseComObject(search);
		if (coll != null) Marshal.ReleaseComObject(coll);
	}

	return result;
}
Microsoft подсказывает об удаленном использовании API.
Главный минусы этих двух методов — не позволяют найти исправления KB, которые не распространяются через Центр обновления Windows. Можно увидеть только то, что прошло через сам агент обновления, то есть данный вариант нас не устраивает.
DISM
Система обслуживания образов развертывания и управления ими (Deployment Image Servicing and Management) — это средство командной строки, которое может использоваться для обслуживания образа Windows или для подготовки образа среды предустановки Windows (Windows PE). Является заменой диспетчера пакетов (Pkgmgr.exe), PEimg и Intlcfg.
Данная утилита используется для интеграции обновлений, сервис паков в образ системы. Обновления Windows представляют собой отдельные модули, которые могут быть представлены в нескольких вариантах:
- .cab-файлы (Cabinet) — архивы. Предназначены для распространения и установки при помощи модулей Центра обновлений Windows в автоматизированном режиме;
- .msu-файлы (Microsoft Update Standalone Package) — исполняемые файлы. Предназначены для распространения и установки самими пользователями в ручном режиме через каталог обновлений Microsoft. Фактически представляют собой упакованный набор, состоящий из .cab-, .xml, .txt-файлов.
Ранее упомянутая команда dism /online /get-packages отображает основную информацию обо всех пакетах в wim образе/текущей системе. Microsoft позаботилась о нас и предоставляет NuGet packages для удобного использования API.
Пример реализации
using Microsoft.Dism;

public static List<string> DISMlist()
{
	List<string> result = new List<string>(220);

	try
	{
		DismApi.Initialize(DismLogLevel.LogErrors);
		var dismsession = DismApi.OpenOnlineSession();
		var listupdate = DismApi.GetPackages(dismsession);

		int ab = listupdate.Count;
		//Console.WriteLine("Количество обновлений через DISM: " + ab);
		string sw = "Количество обновлений через DISM: " + ab;
		result.Add(sw);

		foreach (DismPackage feature in listupdate)
		{
			result.Add(feature.PackageName);
			//result.Add($"[Имя пакета] {feature.PackageName}");
			//result.Add($"[Дата установки] {feature.InstallTime}");
			//result.Add($"[Тип обновления] {feature.ReleaseType}");
		}
	}

	catch (Exception ex)
	{
		result.Add("Что-то пошло не так: " + ex.Message);
	}

	return result;
}
Количество обновлений совпадало с количеством из списка Панели управления до первого апдейта через центр управления — после него количество обновлений стало меньше (было 214, стало 209), хотя по логике они должны были увеличиться. Примеры вывода До обновления, После обновления.
С чем это связано я могу только предполагать — возможно, какие-то обновления замещали предыдущие, следовательно, и количество стало меньше.
Чуть позже я наткнулся на утилиту от китайцев DISM++, которая основана не на DISM API или DISM Core API, но имеющиеся в ней библиотеки не имеют нужных мне открытых методов, поэтому я забросил эту идею и продолжил поиски дальше.
WSUS
Windows Server Update Services (WSUS) — сервер обновлений операционных систем и продуктов Microsoft. Сервер обновлений синхронизируется с сайтом Microsoft, скачивая обновления, которые могут быть распространены внутри корпоративной локальной сети. Опять же специальный инструмент, предназначенный для работы с обновлениями.
Распространяется только на серверных редакциях ОС Windows, поэтому был развернут следующий стенд:
- основная система – Windows Server 2016;
- а через систему виртуализации Hyper-V были развернуты две клиентские ОС:
- Windows 8.1
- Windows 7
Все системы соединены в единую виртуальную локальную сеть, но
без выхода в сеть Интернет
.
Немного советов
Чтобы не выделять раздел жесткого диска для новой системы я пользуюсь WinNTSetup и устанавливаю систему в VHD диски — загрузчик, начиная с Windows 7 (редакций Professional/Ultimate), прекрасно справляется с загрузкой с образа диска. Полученные таким образом диски можно спокойно использовать и в Hyper-V — убиваете сразу двоих зайцев. Не забудьте только сделать заранее копию хранилища BCD через команду bcdedit /export e:bcd_backup.bcd.
Настраивать AD для рассылки обновлений я не захотел, поэтому просто прописал в групповых политиках путь к WSUS серверу:
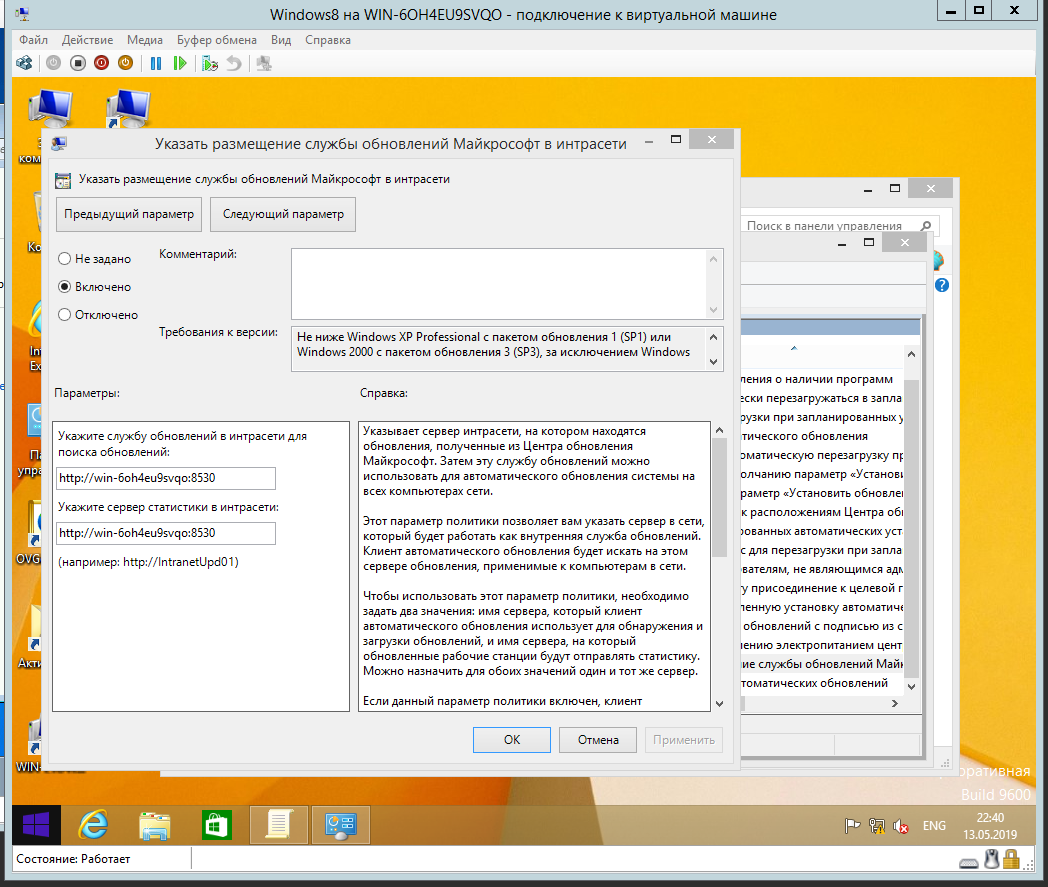
Обязательно уделите внимание на порт, я из-за опечатки (8350 вместо 8530) не мог получить обновления на клиентских машинах, хотя сделано было всё верно. Так же названия пунктов в групповых политиках на Windows 7 и Windows 8 различаются.
Для получения отчета средствами WSUS необходимо дополнительно установить пакет — система уведомит вас об этом.
А теперь немного кода
//не забудьте добавить ссылку на библиотеку
using Microsoft.UpdateServices.Administration;

public static List<string> GetWSUSlist(params string[] list)
{
	List<string> result = new List<string>(200); //не забудь изменить количество

	string namehost = list[0]; //имя Пк, на котором будем искать string  = "example1";
	string servername = list[1]; //имя сервера string  = "WIN-E1U41FA6E55";
	string Username = list[2];
	string Password = list[3];

	try
	{

		ComputerTargetScope scope = new ComputerTargetScope();
		IUpdateServer server = AdminProxy.GetUpdateServer(servername, false, 8530);
		ComputerTargetCollection targets = server.GetComputerTargets(scope);
		// Search
		targets = server.SearchComputerTargets(namehost);

		// To get only on server FindTarget method
		IComputerTarget target = FindTarget(targets, namehost);
		result.Add("Имя ПК: " + target.FullDomainName);

		IUpdateSummary summary = target.GetUpdateInstallationSummary();
		UpdateScope _updateScope = new UpdateScope();
		// See in UpdateInstallationStates all other properties criteria

		//_updateScope.IncludedInstallationStates = UpdateInstallationStates.Downloaded;
		UpdateInstallationInfoCollection updatesInfo = target.GetUpdateInstallationInfoPerUpdate(_updateScope);

		int updateCount = updatesInfo.Count;

		result.Add("Кол -во найденных обновлений - " + updateCount);

		foreach (IUpdateInstallationInfo updateInfo in updatesInfo)
		{
			result.Add(updateInfo.GetUpdate().Title);
		}

	}

	catch (Exception ex)
	{
		result.Add("Что-то пошло не так: " + ex.Message);
	}

	return result;
}


public static IComputerTarget FindTarget(ComputerTargetCollection coll, string computername)
{
	foreach (IComputerTarget target in coll)
	{
		if (target.FullDomainName.Contains(computername.ToLower()))
			return target;
	}
	return null;
}
Так как интернета нет, то ситуация с обновлениями выходит как на скриншоте ниже:
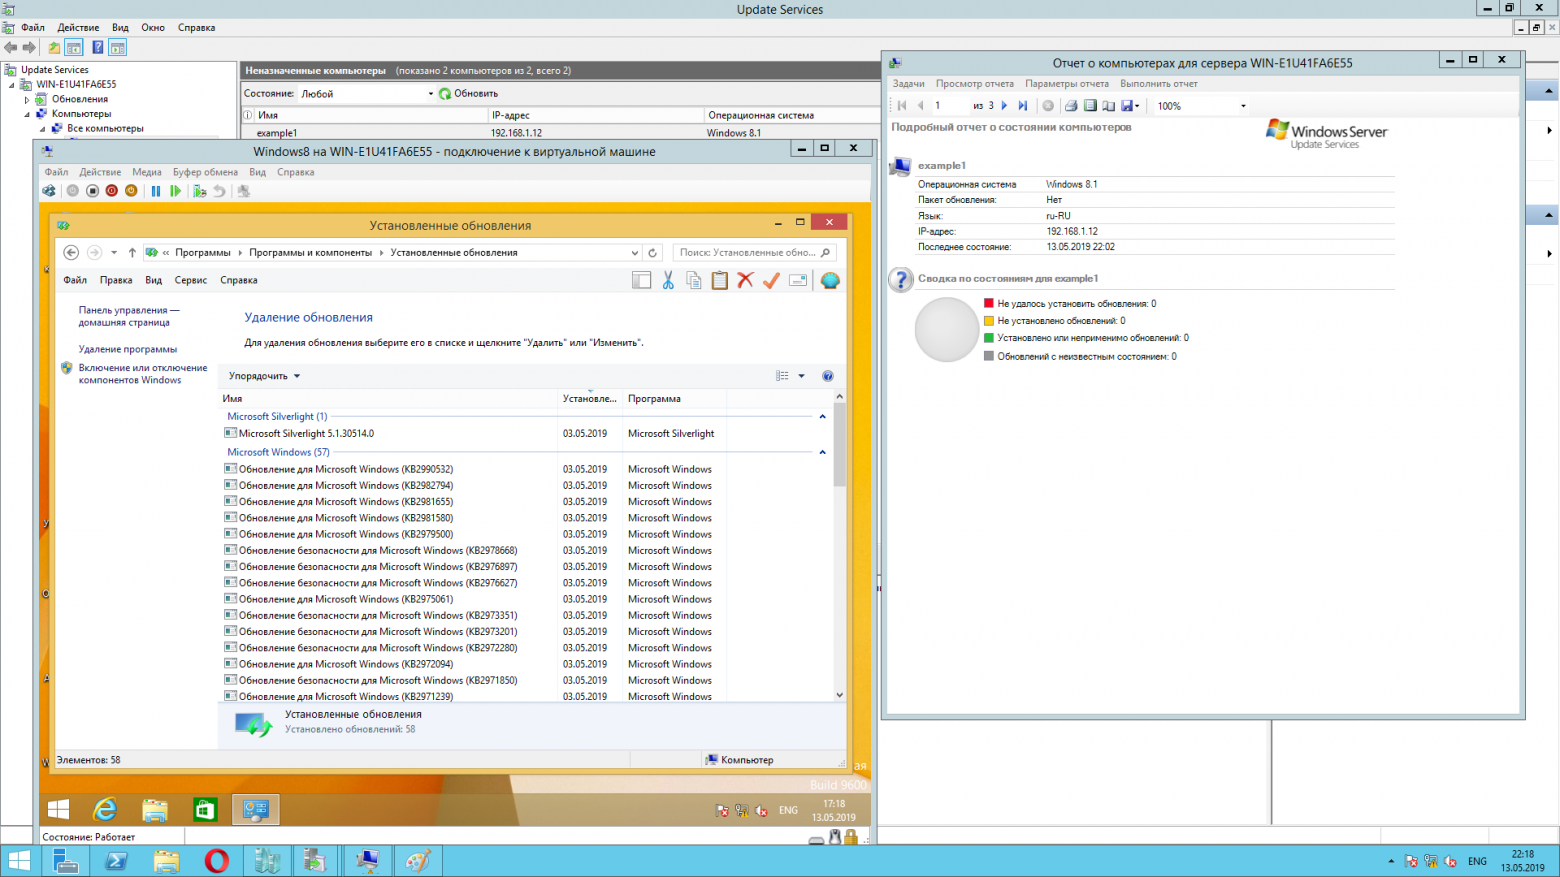
Поведение похоже на WUApi — если обновления не прошли через них, то они не знают об этом. Поэтому данный метод снова не подходит.
WMI
Windows Management Instrumentation (WMI) в дословном переводе — инструментарий управления Windows.
WMI — реализованный корпорацией Майкрософт стандарт управления предприятием
через Интернет
для централизованного администрирования и слежения за работой различных частей компьютерной инфраструктуры под управлением платформы Windows. WMI является открытой унифицированной системой интерфейсов доступа к любым параметрам операционной системы, устройствам и приложениям, которые функционируют в ней.
Данный метод позволяет получить данные как с локальной машины, так и удаленно в пределах локальной сети. Для обращения к объектам WMI используется специфический язык запросов WMI Query Language (WQL), который является одной из разновидностей SQL. Получать список мы будем через WMI класс win32_quickfixengineering.
Пример реализации
using System.Management;

public static List<string> GetWMIlist(params string[] list)
{
List<string> result = new List<string>(200); //не забудь изменить количество

ManagementScope Scope;

string ComputerName = list[0];
string Username = list[1];
string Password = list[2];

int kol = 0;

if (!ComputerName.Equals("localhost", StringComparison.OrdinalIgnoreCase))
{
	//     Возвращает или задает полномочия, которые используются для проверки подлинности
	//     указанного пользователя.
	ConnectionOptions Conn = new ConnectionOptions();
	Conn.Username = Username;
	Conn.Password = Password;
	//Если значение свойства начинается со строки «NTLMDOMAIN:» аутентификация NTLM будет использоваться, и свойство должно содержать доменное имя NTLM.
	Conn.Authority = "ntlmdomain:DOMAIN";
	Scope = new ManagementScope(String.Format("\\{0}\root\CIMV2", ComputerName), Conn);
}
else
	Scope = new ManagementScope(String.Format("\\{0}\root\CIMV2", ComputerName), null);

try
{
	Scope.Connect();
	ObjectQuery Query = new ObjectQuery("SELECT * FROM Win32_QuickFixEngineering");
	ManagementObjectSearcher Searcher = new ManagementObjectSearcher(Scope, Query);

	foreach (ManagementObject WmiObject in Searcher.Get())
	{
		result.Add(WmiObject["HotFixID"].ToString());
		//Console.WriteLine("{0,-35} {1,-40}", "HotFixID", WmiObject["HotFixID"]);// String
		//result.Add();
		/*result.Add("{0,-17} {1}", "Тип обновления: ", WmiObject["Description"]);
		result.Add("{0,-17} {1}", "Ссылка: ", WmiObject["Caption"]);
		result.Add("{0,-17} {1}", "Дата установки: ", WmiObject["InstalledOn"]);*/
		kol++;
	}
	result.Add("Количество равно " + kol);
}

catch (Exception ex)
{
	result.Add("Что-то пошло не так: " + ex.Message);
}

return result;
}
Количественно всё совпадает (даже после обновлений), поэтому было решено использовать этот метод. Для программного создания WMI запросов советую использовать следующую утилиту — WMI Delphi Code Creator. Благодаря ей я немного по другому взглянул на свой код и решил использовать заготовку из этой программы.
XML
Полученные данные методом WMI меня не остановили, и я решился на „поверхностный реверс-инжиниринг“. Воспользуемся утилитой Process Monitor из сборника программ Sysinternals Suite для выявления файлов и ветвей реестра, которые используются при вызове выше перечисленных консольных команд и обращению к пункту „Установленные обновления“ через Панель управления.
Моё внимание привлек файл wuindex.xml, расположенный в папке C:WindowsservicingPackages. Для его анализа была написана следующая программа:
Пример консольного приложения
using System;
using System.Collections.Generic;
using System.Linq;
using System.Text;
using System.Threading.Tasks;
using System.Xml;
using System.Text.RegularExpressions;
using System.IO;

namespace XMLviewer
{
    class Program
    {
        static void Main(string[] args)
        {
            string writePath = AppDomain.CurrentDomain.BaseDirectory + "XML Обновлений " + Environment.MachineName + ".txt";
            if (!File.Exists(writePath))
            {
                Console.WriteLine("Создаю пустой txt файл");
            }
            else
            {
                Console.WriteLine("Файл XML Обновлений.txt существует, он будет перезаписан");
                File.Delete(writePath);
            }

            //регулярное выражение для поиска по маске KB
            Regex regex = new Regex(@"KB[0-9]{6,7}");
            //Regex(@"(w{2}d{6,7}) ?");

            //SortedSet не поддерживает повторяющиеся элементы, поэтому повторяющиеся элементы мы "группируем" ещё на стадии добавления
            SortedSet<string> spisok = new SortedSet<string>();

            XmlDocument xDoc = new XmlDocument();
            string path = "C:\Windows\servicing\Packages\wuindex.xml"; //путь до нашего xml
            xDoc.Load(path);

            int kol = 0; //кол-во компонентов
            int total = 0; //кол-во дочерних элементов в xml
            int total2 = 0; //кол-во полученных обновлений

            XmlNodeList name = xDoc.GetElementsByTagName("Mappings");
            foreach (XmlNode xnode in name)
            {
                //Console.WriteLine(xnode.Name);
                kol++;
                XmlNode attr = xnode.Attributes.GetNamedItem("UpdateId");
                //Console.WriteLine(attr.Value);

                foreach (XmlNode childnode in xnode.ChildNodes)
                {
                    XmlNode childattr = childnode.Attributes.GetNamedItem("Package");
                    total++;
                    //Console.WriteLine(childattr.Value);

                    MatchCollection matches = regex.Matches(childattr.Value);
                    if (matches.Count > 0)
                    {
                        foreach (Match match in matches)
                            //Console.WriteLine(match.Value);
                            spisok.Add(match.Value);
                    }
                    else
                    {
                        //Console.WriteLine("Совпадений не найдено");
                    }
                }

            }

            try
            {
                StreamWriter sw = new StreamWriter(writePath);
                foreach (string element in spisok)
                {
                    //Console.WriteLine(element);
                    sw.WriteLine(element);
                    total2++;
                }
                sw.Close();
            }
            catch (Exception ex)
            {
                Console.WriteLine("Ошибка: " + ex.Message);
            }

            //Console.WriteLine("n");
            Console.WriteLine("Количество пакетов: " +kol);

            Console.WriteLine("Количество дочерних элементов в xml: " + total);

            Console.WriteLine("Количество KB обновлений: " + total2);

            Console.WriteLine("Нажмите любую клавишу для выхода.");
            Console.Read();
        }
    }
}
К сожалению, данный файл встречается не на всех системах и принцип его генерирования и обновления остался для меня загадкой. Поэтому снова данный метод нам не подходит.
CBS
Вот мы подошли к тому, с чем связаны все эти методы. Продолжая анализ логов Process Monitor я выявил следующие папки и файлы.
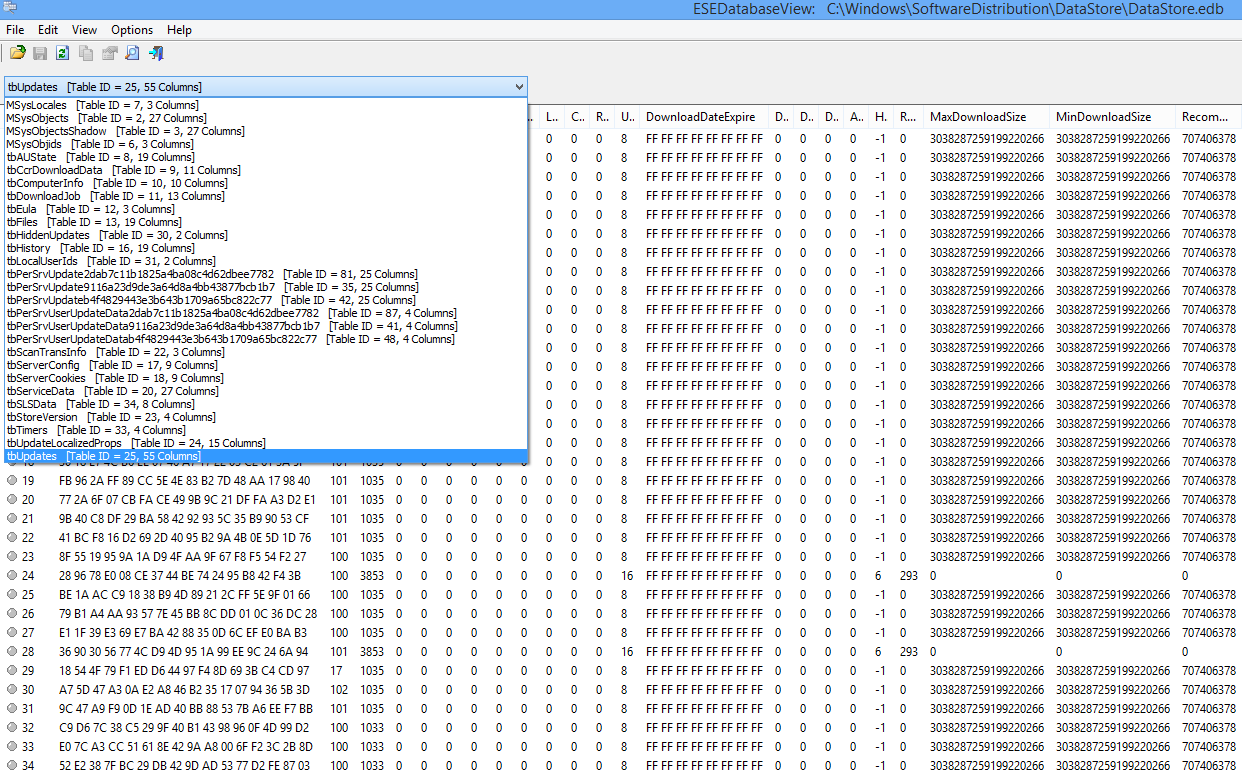
Файл DataStore.edb, расположенный в папке C:WindowsSoftwareDistributionDataStore. Это база данных, в которой содержится история всех обновлений установленной версии Windows, включая те обновления, которые только стоят в очереди.
Для анализа файла DataStore.edb использовалась программа ESEDatabaseView. В БД существует таблица tbUpdates, содержимое которой трудно интерпретировать.
После мое внимание привлек процесс TiWorker.exe, который вызывался каждый раз при открытии пункта в Панели управления. Он „ходил“ по многим папкам, одна из которых вывела меня на верный путь.
C:WindowsSoftwareDistribution — это папка, используемая службой обновления Windows для загрузки обновлений на компьютер с последующей их установкой, а также хранит сведения обо всех ранее установленных обновлениях.
Папка WinSxS, расположенная по адресу C:Windowswinsxs. Это служебная папка операционной системы Windows служащая для хранения ранее установленных версий системных компонентов. Благодаря ее наличию существует возможность отката к более старой версии обновления в случае необходимости.
C:Windowsservicing — основная составляющая всей системы, имя которой Component-Based Servicing (CBS).
CBS — обслуживание на основе компонентов, составляющая Windows, интегрированная с службой Windows Update. В противоположность обслуживанию на основе файлов File-Based Servicing (FBS) (для ОС, предшествующих Windows Vista), в котором файлы обновлялись прямо в системных директориях, в CBS появилась целая иерархия директорий и целое семейство (стек) модулей/библиотек обслуживания.
CbsApi.dll — основная библиотека поддержки технологии CBS. Не имеет открытых методов, поэтому напрямую использовать её я не смог. Microsoft использует TrustedInstaller.exe и TiWorker.exe для доступа к методам данной библиотеки и уже через эти процессы выводит нужные нам данные. Записи ведутся в C:WindowsLogsCBSCBS.log.
На момент создания прототипа программы (на скриншотах можете увидеть май 2019) русскоязычной информации о CBS не было, но в конце августа нашлась очень хорошая статья в блоге — http://datadump.ru/component-based-servicing. Очень интересная статья, которая подтвердила мой опыт и собрала в себе нужную информацию. И ещё по теме: http://www.outsidethebox.ms/17988/
Вывод
Microsoft слишком усложнила тривиальную задачу по получению списка обновлений и сделала этот процесс не совсем явным. Всё это сделано для безопасности, но не для простоты использования. Соглашусь с автором статьи — в получении обновлений стали отсутствовать предсказуемость и прозрачность.
В результате исследования была написана следующая программа, демонстрацию работы которой можно увидеть в данном видео:
В планах дописать:
- сравнение списка необходимых обновлений с полученным;
- передать результат по протоколу SNMP/OPC (если у кого есть опыт поделитесь в комментариях);
- организовать установку недостающих „офлайн“ обновлений из указанной папки.
Если вы знаете ещё методы получения списка не только обновлений, но и дополнительных компонентов (Adobe Flash, Acrobat Reader и т.д.) или у вас есть другие интересные предложения, напишите об этом в комментариях или в личные сообщения — буду рад любой обратной связи. И поучаствуйте в опросе к данной статье — так я буду знать, будет ли интересен мой опыт аудитории Habrahabr.
Только зарегистрированные пользователи могут участвовать в опросе. Войдите, пожалуйста.
Продолжить тему о том, как всем этим управлять через SNMP/OPC?
12.12%
Нет, не интересно
16
17.42%
Бессмысленное занятие, займись лучше другим
23
Проголосовали 132 пользователя.
Воздержались 50 пользователей.
Только зарегистрированные пользователи могут участвовать в опросе. Войдите, пожалуйста.
И пользуясь случаем ещё один опрос: рассказать про ЕГИССО — что это какое, как мучаются люди и что люди разрабатывают, чтобы с этим работать?
78.23%
Интересно прочитать про ужасы от Пенсионного фонда (Да)
97
21.77%
Спасение утопающих — дело рук самих утопающих (Нет)
27
Проголосовали 124 пользователя.
Воздержались 44 пользователя.