Во всех версиях Windows вы можете настроить перенаправление/проброс сетевых портов (порт форвардинг) без использования сторонних инструментов. С помощью правила форвардинга вы можете перенаправить входящее TCP соединение (IPv4 или IPv6) с локального TCP порта на любой другой номер порта или даже на порт удаленного компьютера. Перенаправление портов в Windows чаще всего используется для обхода файерволов или чтобы спрятать сервер или службу от внешней сети (NAT/PAT).
В Linux можно довольно просто настроить перенаправление портов довольно просто с помощью правил iptables или firewalld. На серверных системах Windows Server для настройки перенаправления портов можно использовать службу маршрутизации и удаленного доступа (RRAS). Однако есть более простой способ настройки проброса портов с помощью режима
portproxy
в
netsh
, который одинаково хорошо работает в любой версии Windows (начиная с Windows XP и заканчивая современными Windows 11 и Windows Server 2022).
Содержание:
- Включить перенаправления порта в Windows с помощью netsh portproxy
- Настройка правил файервола для режима перенаправления портов Windows
- Управление правилами проброса портов netsh в Windows
- Настройка перенаправления портов с помощью NAT на Hyper-V Server
Включить перенаправления порта в Windows с помощью netsh portproxy
Вы можете включить и настроить перенаправление портов в Windows из командой строки через режим Portproxy команды Netsh.
Синтаксис команды следующий:
netsh interface portproxy add v4tov4 listenaddress=localaddress listenport=localport connectaddress=destaddress connectport=destport
где,
- listenaddress – локальный IP адрес, на котором ожидается соединение (полезно, если у вас несколько сетевых карт в разных подсетях/VLAN или несколько IP адресов на одном интерфейсе);
- listenport – номер локального TCP порта, подключение к которому будет перенаправляться (на этом порту ожидается входящее соединение);
- connectaddress – локальный или удаленный IP-адрес или DNS-имя хоста, на который нужно перенаправить сетевое подключение;
- connectport – номер TCP порта, на который нужно перенаправить трафик с порта listenport.
С помощью опций
netsh interface portproxy add
v4tov6
/
v6tov4
/
v6tov6
можно создавать правила порт форвардинга между для IPv4 и IPv6 адресов илимежду ними.
Допустим наша задача, заставить службу RDP отвечать на нестандартном порту, например 3340 (этот порт, конечно, можно изменить в настройках самой службы, но мы используем именно RDP для упрощения демонстрации техники перенаправления и проброса портов). Для этого нам нужно перенаправить входящий трафик на TCP порт 3340 на другой локальный порт – 3389 (это номер стандартного порта RDP).
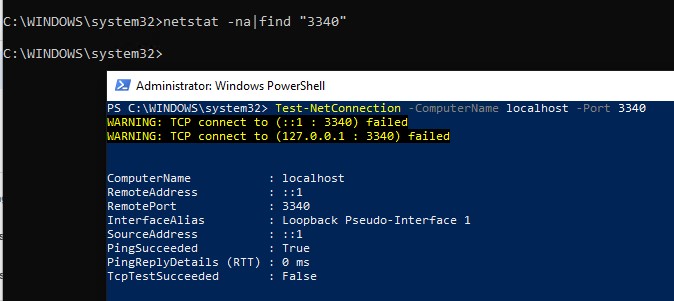
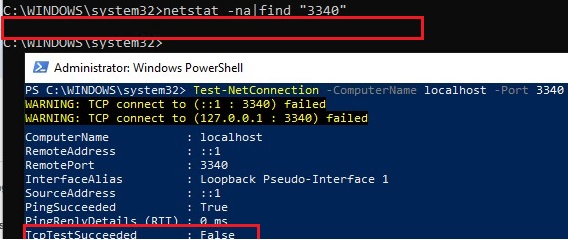
Примечание. Обратите внимание, что номер локального порта, который вы указали в listenport не должен быть занят (слушаться) другой службой. Проверьте, что номер порта свободен командой:
netstat -na|find "3340"
Либо вы можете проверить что порт не слушается локально с помощью PowerShell командлета Test-NetConnection:
Test-NetConnection -ComputerName localhost -Port 3340
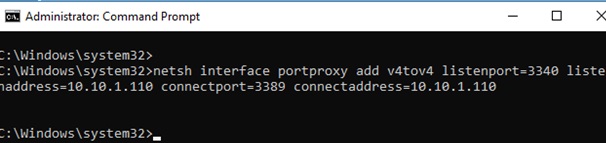
Чтобы создать правило перенаправления порта, запустите командную строку с правами администратора и выполните команду:
netsh interface portproxy add v4tov4 listenport=3340 listenaddress=10.10.1.110 connectport=3389 connectaddress=10.10.1.110
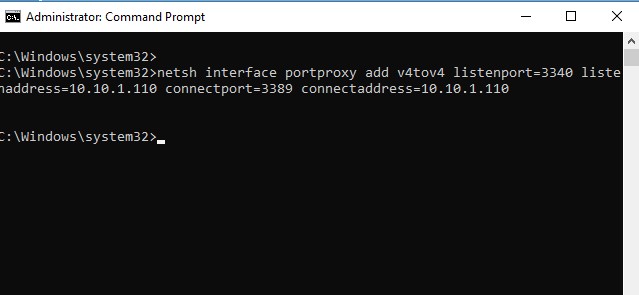
Где 10.10.1.110 – IP адрес вашего компьютера, на котором настраивается порт-форвардинг.
Теперь с помощью утилиты netstat проверьте, что в Windows теперь слушается локальный порт 3340:
netstat -ano | findstr :3340

Примечание. Если эта команда ничего не возвращает и перенаправление портов через netsh interface portproxy не работает, проверьте, что у вас в Windows включена служба iphlpsvc (IP Helper / Вспомогательная служба IP).
Проверьте состояние службу в консоли services.msc или с помощью команды PowerShell:
Get-Service iphlpsvc
![]()
Также на сетевом интерфейсе, для которого создается правило перенаправления портов должна быть включена поддержка протокола IPv6.
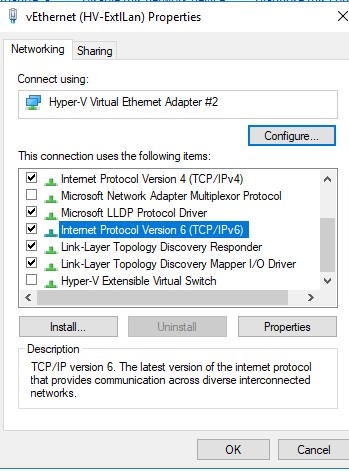
Это обязательные условия для корректной работы порт-форвардинга. Без службы IP Helper и без включенной поддержки IPv6 механизм перенаправления не работает.
В Windows Server 2003 / XP для работы перенаправления дополнительно нужно включить параметр реестра IPEnableRouter = 1 в ветке HKEY_LOCAL_MACHINE SystemCurrentControlSetservicesTcpipParameter. Можно включить этот параметр реестра с помощью PowerShell:
Set-ItemProperty -Path HKLM:systemCurrentControlSetservicesTcpipParameters -Name IpEnableRouter -Value 1
Этот параметр также позволяет включить маршрутизацию между разными подсетями в Hyper-V.
Вы можете определить процесс, который слушает указанный локальный порт по его PID (в нашем примере PID – 636):
tasklist | findstr 636

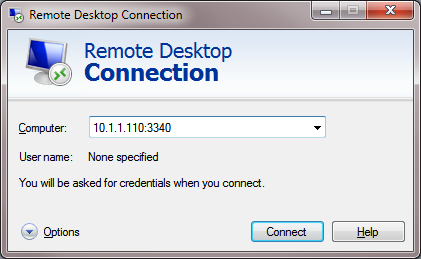
Теперь попробуйте подключиться на новый порт с удаленного компьютера при помощи любого RDP клиента. В качестве rdp-порта нужно указать 3340 (номер порта указывается после двоеточия после адреса rdp-сервера). Hапример, ,
10.10.1.110:3340
В этом примере порт 3340 нужно предварительно открыть в Windows Defender Firewall (см. следующий раздел статьи).

RDP подключение должно успешно установиться.
Правила проброса портов portproxy являются постоянными и не удаляются при перезагрузке Windows. Эти правила хранятся в реестре. Можно вывести список правил перенаправления netsh в реестре с помощью PowerShell:
Get-ItemProperty -Path HKLM:SYSTEMCurrentControlSetServicesPortProxyv4tov4tcp

Если нужно перенаправить входящее TCP соединение на удаленный компьютер, используйте такую команду:
netsh interface portproxy add v4tov4 listenport=3389 listenaddress=0.0.0.0 connectport=3389 connectaddress=192.168.1.100
Это правило перенаправит весь входящий RDP трафик (с локального порта TCP 3389) с этого компьютера на удаленный компьютер с IP-адресом 192.168.1.100.
Нужно отметить, что режим portproxy в Windows не поддерживает сохранения IP источника в перенаправленном сетевом пакете. Т.е. если вы пробросите 443 порт Windows компьютера на внутренний веб-сервер, то на целевом сервере все входящие соединения будут идти с одного и того же IP адреса (Windows компьютер с активным режимом netsh portproxy). Если вам нужно использовать переадресацию с сохранением IP источника, нужно использовать NAT на внешнем фаейволе или на Hyper-V (описано ниже).
Так же для проброса локального порта на удаленный сервер в Windows можно использовать технику SSH туннелей.
Настройка правил файервола для режима перенаправления портов Windows
Проверьте, что в настройках вашего файервола (брандмауэра Windows или стороннего межсетевого экрана, такие часто включаются в состав антивирусного ПО) разрешены входящие подключения на новый порт. Вы можете добавить новое разрешающее правило в Windows Defender Firewall командой:
netsh advfirewall firewall add rule name=”RDP_3340” protocol=TCP dir=in localip=10.10.1.110 localport=3340 action=allow
Или с помощью командлета PowerShell New-NetFirewallRule:
New-NetFirewallRule -DisplayName "RDP_3340" -Direction Inbound -Protocol TCP –LocalPort 3340 -Action Allow -Enabled True
При создании входящего правила файервола для порта 3340 через графический интерфейс Windows Defender, не нужно ассоциировать с правилом программу или процесс. Данный порт слушается исключительно сетевым драйвером.
Если вы отключаете правило portproxy, не забудьте удалить оставшиеся правила файервола так:
netsh advfirewall firewall del rule name="RDP_3340"
или с помощью PowerShell:
Remove-NetFirewallRule -Name RDP_3340
Управление правилами проброса портов netsh в Windows
Можно создать любое количество правил перенаправления локальных портов Windows. Все правила netsh interface portproxy являются постоянными и сохраняются в системе после перезагрузки Windows.
Несколько раз сталкивался со случаями, когда в Windows Server 2012 R2 правила перенаправления портов сбрасывались после перезагрузки сервера. В этом случае рекомендуется проверить нет ли периодических отключений на сетевом интерфейсе, и не меняется ли IP адрес при загрузке ОС (лучше использоваться статический IP, вместо динамического DHCP). В качестве обходного решения пришлось добавить в планировщик Windows скрипт с правилами
netsh interface portproxy
, который создает правило перенаправления порта при загрузке операционной системы.
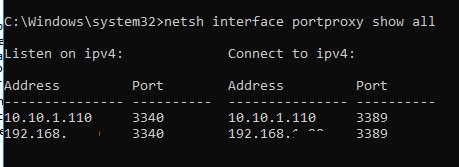
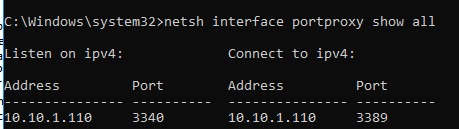
Чтобы вывести на экран список всех активных правил перенаправления TCP портов в Windows, выполните команду:
netsh interface portproxy show all
В нашем случае присутствует только одно правило форвардинга с локального порта 3340 на 3389:
Listen on ipv4:             Connect to ipv4:
Address         Port        Address         Port
--------------- ----------  --------------- ----------
10.10.1.110     3340        10.10.1.110     3389
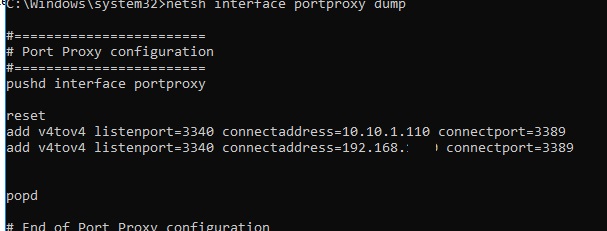
Совет. Также вы можете вывести вес правила перенаправления портов в режиме portproxy так:
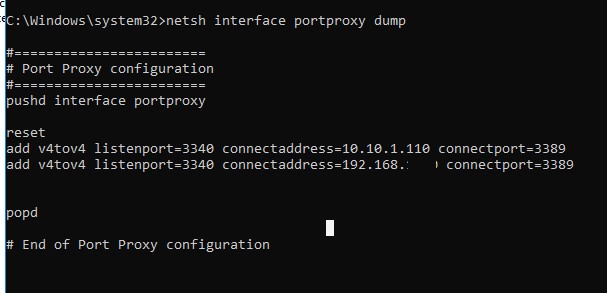
netsh interface portproxy dump
#========================
# Port Proxy configuration
#========================
pushd interface portproxy
reset
add v4tov4 listenport=3340 connectaddress=10.10.1.110 connectport=3389
popd
# End of Port Proxy configuration
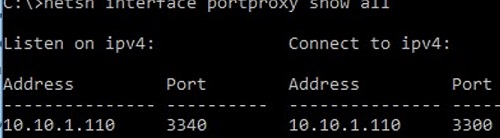
Если вам нужно изменить настройки имеющегося правила portproxy, используйте такую команду:
netsh interface portproxy set v4tov4 listenport=3340 listenaddress=10.10.1.110 connectport=3300 connectaddress=10.10.1.110
В этом примере мы изменили адрес целевого порта portproxy на 3300.

Чтобы удалить определенное правило перенаправления порта, выполните:
netsh interface portproxy delete v4tov4 listenport=3340 listenaddress=10.10.1.110
Чтобы удалить все имеющиеся правила перенаправления и полностью очистить таблицу с правилами порт-форвардинга:
netsh interface portproxy reset

Важно. Такая схема перенаправления работает только для TCP портов. Трафик по UDP портам нельзя перенаправить с помощью режима portproxy. Также нельзя использовать в качестве connectaddress адрес localhost 127.0.0.1.
Если вы хотите включить перенаправление UDP трафика, можно использовать Windows Server с ролью RRAS и NAT. Вы можете настроить перенаправление портов между интерфейсами компьютера с помощью графической оснастки (
rrasmgmt.msc
) или командой:
netsh routing ip nat add portmapping Ethernet udp 0.0.0.0 53 192.168.1.54 53
Список NAT правил перенаправления портов в Windows Server можно вывести так:
netsh routing ip nat show interface
Если у вас на компьютере развернут WSL (Windows Subsystem for Linux), вы можете создать простой PowerShell скрипт создания правила перенаправления порта внутрь виртуальной машины WSL 2 (у ВМ на WSL 2 есть собственный виртуальный адаптер ethernet с уникальным IP адресом):
wsl --shutdown;
netsh interface portproxy reset;
$wsl_ipaddr = wsl -d Ubuntu-20.04 hostname -I;
netsh interface portproxy add v4tov4 listenport=443 listenaddress=0.0.0.0 connectport=443 connectaddress=$wsl_ipaddr ;
netsh interface portproxy show all;
exit;
Еще одной неявной возможностью portproxy является возможность создать видимость локальной работы любого удаленного сетевого сервиса. Например, вы хотите перенаправить весь трафик с локального порта 9090 на
google.com:443
netsh interface portproxy add v4tov4 listenport=9090 listenaddress=127.0.0.1 connectaddress=142.250.74.46 connectport=443 protocol=tcp
Теперь, если в браузере перейди по адресу https://localhost:9090 (нужно игнорировать ошибки SSL_ERROR_BAD_CERT_DOMAIN), откроется поисковая страница Google. Т.е. несмотря на то, что браузер обращается к локальному компьютеру, в нем открывается страница с внешнего веб-сервера.

Перенаправление портов также можно использовать, чтобы пробросить порт с внешнего IP адреса сетевой карты на порт виртуальной машины, запущенной на этом же компьютере. В Hyper-V такой проброс порта можно настроить на виртуальном коммутатор (см. ниже).
Windows не умеет пробрасывать диапазон TCP портов. Если вам нужно пробросить несколько портов, придется вручную создавать несколько правил перенаправления.
Настройка перенаправления портов с помощью NAT на Hyper-V Server
При использовании на вашем компьютере роли Hyper-V (может быть установлена как на Windows 10/11, так и на Windows Server или в виде бесплатного Windows Hyper-V Server), вы можете настроит проброс портов DNAT с помощью PowerShell. Допустим, вы хотите перенаправить все https запросы, которые получает ваш хост Hyper-V на IP адрес запущенной на хосте виртуальной машины. Для этого используется команды Hyper-V StaticMapping.
Создайте виртуальный коммутатор Hyper-V:
New-VMSwitch -SwitchName «NAT_Switch» -SwitchType Internal

Задайте IP адрес для нового виртуального коммутатора:
New-NetIPAddress -IPAddress 192.168.10.1 -PrefixLength 24 -InterfaceAlias "vEthernet (NAT_Switch)"
Включите NAT для данной сети:
New-NetNat -Name NATNetwork -InternalIPInterfaceAddressPrefix 192.168.10.0/24
Подключите ВМ в ваш коммутатор NAT_Switch и задайте для нее статический IP адрес (например, 192.168.10.80). В качестве шлюза-по умолчанию нужно указать IP адрес виртуального коммутатора Hyper-V (192.168.10.1).
Теперь можно настроить перенаправление порта с хоста Hyper-V в виртуальную машину:
Add-NetNatStaticMapping -NatName NATNetwork443 -Protocol TCP -ExternalIPAddress 0.0.0.0/24 -ExternalPort 443 -InternalIPAddress 192.168.10.80 -InternalPort 443
После выполнения этих команд весь HTTPS трафик, который приходит на порт TCP/443 гипервизора будет переправлен на серый IP адрес виртуальной машины.
Если вы хотите перенаправить нестандартный порт, не забудьте открыть его в Windows Firewall:
New-NetFirewallRule -DisplayName "HyperV_Nat_443" -Direction Inbound -LocalPort 443 -Protocol TCP -Action Allow -Enabled True
Полный список правил NAT на хосте Hyper-V можно вывести так:
Get-NetNat
Webmasters can easily configure network port forwarding on Windows using netsh, without using any third-party tools.
As a part of our Server Management Services, we help our Customers with Windows related requests regularly.
Let us today discuss the steps to configure port forwarding on windows using netsh.
How to Configure Port Forwarding on Windows using Netsh Portproxy?
Using a port forwarding rule, we can redirect an incoming TCP connection (IPv4 or IPv6) from the local TCP port to any other port number, or even to a port on a remote computer.
We can configure port forwarding in Windows using the Portproxy mode of the Netsh command. The command takes the following syntax:
netsh interface portproxy add v4tov4 listenaddress=localaddress listenport=localport connectaddress=destaddress connectport=destportThe details of the parameters in the command:
- listenaddress – is a local IP address to listen for incoming connection (useful if we have multiple NICs or multiple IP addresses on one interface)
- listenport – local listening TCP port number (the connection is waiting on)
- connectaddress – is a local or remote IP address (or DNS name) to which we want to redirect incoming connection
- connectport – is a TCP port to which the connection from listenport is forwarded to.
A support request that we handled recently dealt with making RDP service to respond on a non-standard port – 3340.
First, we redirected incoming traffic from TCP port 3340 to another local port – 3389 which is the default RDP port number.
While using any other port, make sure that no other service or process listens on the local port number that we specified in listenport:
netstat -na|find "3340"Alternatively, we can also check that the port is not listening locally using the PowerShell cmdlet Test-NetConnection:
Test-NetConnection -ComputerName localhost -Port 3340Now, to create a port forwarding rule, run a command prompt as an administrator and run the following command:
netsh interface portproxy add v4tov4 listenport=3340 listenaddress=IP_address connectport=3389 connectaddress=IP_addressReplace IP_address with the current IP address of the server.
Now, use the netstat tool to check that Windows is now listening on local port 3340:
netstat -ano | findstr :3340

C:Windowssystem32>netstat -ano | findstr :3340
TCP IP_address:3340 0.0.0.0:0 LISTENING 636
IP forwarding may not work in cases where the iphlpsvc (IP Helper) service is not running or if IPv6 support is not enabled on the network interface for which the port forwarding rule is created.
To make port forwarding work on Windows Server 2003/XP, we must additionally set the IPEnableRouter parameter to 1 in the registry key HKLMSYSTEMControlSet001ServicesTcpipParameters.
Port forwarding with a remote system
We can find out what process is listening on the specified port using its PID (in our example, the PID is 636):
tasklist | findstr 636Let us try to connect to this port from a remote computer using any RDP client. Port 3340 should be specified as the RDP port number. It is specified after the colon following the RDP server address.
If we want to forward an incoming TCP connection to a remote computer, use the following command:
netsh interface portproxy add v4tov4 listenport=3389 listenaddress=IP_address1 connectport=3389 connectaddress=IP_address2This rule will redirect all incoming RDP traffic (from local TCP port 3389) from this computer to a remote host with an IP address IP_address2.
[Stuck while Configuring Port Forwarding on Windows ? Contact our Support Specialist now.]
Managing Port Forwarding Rules in Windows
Make sure that the firewall (Microsoft Windows Defender Firewall or a third-party firewall that are often included into an antivirus software) allows incoming connections to the new port. We can add a new allow rule to Windows Defender Firewall with the command:
netsh advfirewall firewall add rule name=”forwarded_RDPport_3340” protocol=TCP dir=in localip=IP_address localport=3340 action=allowOr using the New-NetFirewallRule PowerShell cmdlet:
New-NetFirewallRule -DisplayName "forwarder_RDP_3340" -Direction Inbound -Protocol TCP –LocalPort 3340 -Action AllowWe can create any number of Windows port forwarding rules. All netsh interface portproxy rules are persistent and the system stores it even after a Windows restart.
To display a list of all active TCP port forwarding rules on Windows, run the command:
netsh interface portproxy show allYou can also list port forwarding settings in portproxy as follows:
netsh interface portproxy dump

#========================
# Port Proxy configuration
#========================
pushd interface portproxy
reset
add v4tov4 listenport=3340 connectaddress=IP_address connectport=3389
popd
# End of Port Proxy configuration
To remove a specific port forwarding rule:
netsh interface portproxy delete v4tov4 listenport=3340 listenaddress=IP_addressTo remove all existing mapping rules and completely clear the port forwarding rules table:
netsh interface portproxy resetAnother portproxy feature is an opportunity to make it look like any remote network service is running locally.
For example, let us redirect the connection from the local port 5555 to a remote HTTP server with IP address 157.166.226.25 (CNN website):
netsh interface portproxy add v4tov4 listenport=5555 connectport=80 connectaddress= 157.166.226.25 protocol=tcpNow if we access http://localhost:5555/ in the browser, the CNN Start page will open. So despite the browser is accessing the local computer, it opens a page from an external web server.
[Need any further assistance to configure port forwarding in Windows? – We’re available 24*7]
Conclusion
In short, port forwarding rule helps us to redirect an incoming TCP connection from the local TCP port to any other port number. Today, we saw how our Support Engineers configure port forwarding on windows using netsh.
PREVENT YOUR SERVER FROM CRASHING!
Never again lose customers to poor server speed! Let us help you.
Our server experts will monitor & maintain your server 24/7 so that it remains lightning fast and secure.
GET STARTED
var google_conversion_label = «owonCMyG5nEQ0aD71QM»;
You can configure network port forwarding in all Windows versions without using third-party tools. Using a port forwarding rule, you can redirect an incoming TCP connection (IPv4 or IPv6) from a local TCP port to any other port number, or even to a port on a remote computer. Windows port forwarding is most commonly used to bypass firewalls or to hide an internal host or service from the external network (NAT/PAT).
In the Linux world, port forwarding is configured quite simply using iptables or firewalld rules. On Windows Server hosts, the Routing and Remote Access Service (RRAS) is typically used to configure port redirections. However, there is an easier way to enable port forwarding using netsh portproxy mode, which works on all versions of Windows from Win XP to current builds of Windows 11 and Windows Server 2022.
Contents:
- How to Enable Port Forwarding on Windows with Netsh Portproxy?
- Configuring Firewall Rules for Port Forwarding Mode in Windows
- Managing Netsh Port Forwarding Rules in Windows
- Port Forwarding with NAT Rules on Hyper-V Virtual Switch
How to Enable Port Forwarding on Windows with Netsh Portproxy?
You can configure port forwarding in Windows using the Portproxy mode of the Netsh command.
The command syntax is as follows:
netsh interface portproxy add v4tov4 listenaddress=localaddress listenport=localport connectaddress=destaddress connectport=destport
where
- listenaddress –is a local IP address to listen for incoming connection (useful if you have multiple NICs in different subnets/VLANs or multiple IP addresses on one interface);
- listenport – a local TCP port number to listen on (the connection is waiting on);
- connectaddress – is a local or remote IP address (or DNS name) to which you want to redirect the incoming connection;
- connectport – is a TCP port to which the connection from
listenportis forwarded to.
Using the netsh interface portproxy add v4tov6/v6tov4/v6tov6 options, you can create port forwarding rules between IPv4 and IPv6 addresses.
Let’s suppose your task is to make the RDP service respond on a non-standard port, for example 3340 (of course, this port number can be changed in the Windows settings, but we are using RDP to make it easier to demonstrate the port forwarding technique). To do this, we need to redirect incoming traffic from TCP port 3340 to another local port 3389 (this is the default RDP port number).
Please note that the local port number that you specified in listenport should not be listened (used) by another service or process. Check that the port number is not used:
netstat -na|find "3340"
Alternatively, you can check that the port is not listening locally using the PowerShell cmdlet Test-NetConnection:
Test-NetConnection -ComputerName localhost -Port 3340
To create a port forwarding rule on Windows, open a command prompt as an administrator and run the following command:
netsh interface portproxy add v4tov4 listenport=3340 listenaddress=10.1.1.110 connectport=3389 connectaddress=10.1.1.110
Where 10.10.1.110 – the current IP address of your computer on which port forwarding is configured.
Now, use the netstat tool to check that Windows is now listening on local port 3340:
netstat -ano | findstr :3340

Note. If this command returns nothing and port forwarding through the netsh interface portproxy doesn’t work, make sure that you have the iphlpsvc (IP Helper) service running on your Windows device.
Check the status of the service in the services.msc console or using the PowerShell command:
Get-Service iphlpsvc
![]()
IPv6 support must be enabled on the network interface for which the port forwarding rule is being created.

These are the prerequisites for the correct operation of port forwarding in Windows. Without the IP Helper service and without IPv6 support enabled, the port redirection won’t work.
To make port forwarding work on Windows Server 2003/XP, you must additionally set the IPEnableRouter parameter to 1 under the registry key HKEY_LOCAL_MACHINE SystemCurrentControlSetservicesTcpipParameter.
Set-ItemProperty -Path HKLM:systemCurrentControlSetservicesTcpipParameters -Name IpEnableRouter -Value 1
This option also allows you to enable routing between different subnets in Hyper-V.
You can identify the process that is listening on the specified port by its PID (in our example, the PID is 636):
tasklist | findstr 636
Now try to connect to the new port from a remote computer using any RDP client. You need to specify 3340 as the RDP port number. It is specified after the colon following the RDP host address. For example, 10.10.1.110:3340
In this example, port TCP/3340 must first be opened in Windows Defender Firewall (see the next section of the article).
The RDP connection should be established successfully.
Portproxy port forwarding rules are permanent and are not cleared when you restart Windows. These rules are stored in the registry. You can list the netsh forwarding rules in the registry using PowerShell:
Get-ItemProperty -Path HKLM:SYSTEMCurrentControlSetServicesPortProxyv4tov4tcp

If you want to forward an incoming TCP connection to a remote computer, use the following command:
netsh interface portproxy add v4tov4 listenport=3389 listenaddress=0.0.0.0 connectport=3389 connectaddress=192.168.100.101
This rule will redirect all incoming RDP traffic (from local TCP port 3389) from this computer to a remote host with an IP address 192.168.1.100.
Note that the portproxy mode in Windows doesn’t support saving the source IP in a forwarded network packet. Those, if you forward port 443 port from a Windows device to an internal web server, then all incoming connections will appear on the target server as coming from the same IP address (from your Windows host with netsh portproxy enabled). If you need to use source IP forwarding, you need to use NAT on an external firewall or on Hyper-V (described below).
Also, you can use the SSH tunnels in Windows to forward the local port to a remote server.
Configuring Firewall Rules for Port Forwarding Mode in Windows
Ensure that your firewall (Microsoft Windows Defender or a third-party firewall, which is often part of the anti-virus software) allows incoming connections to the new port. You can add a new allow rule to Windows Defender Firewall with the command:
netsh advfirewall firewall add rule name="forwarded_RDPport_3340" protocol=TCP dir=in localip=10.1.1.110 localport=3340 action=allow
Or using the New-NetFirewallRule PowerShell cmdlet:
New-NetFirewallRule -DisplayName "forwarder_RDP_3340" -Direction Inbound -Protocol TCP –LocalPort 3340 -Action Allow
When creating an inbound firewall rule for TCP/3340 port via Windows Defender Firewall graphical interface, you don’t need to associate a program or process with the rule. This port is only listened on by the network driver.
If you disable the portproxy rule, be sure to remove the remaining firewall rule as follows:
netsh advfirewall firewall del rule name="RDP_3340"
or remove firewall rule with PowerShell:
Remove-NetFirewallRule -Name RDP_3340
Managing Netsh Port Forwarding Rules in Windows
You can create any number of port forwarding rules in Windows. All netsh interface portproxy rules are persistent and remain after a Windows restart.
Several times I encountered cases when in Windows Server 2012 R2 the port forwarding rules were reset after the server was rebooted. In this case, you need to check whether there is a periodic disconnection on the network interface and whether the IP address changes when the OS boots (it is better to use a static IP instead of dynamic DHCP). As a workaround, I had to add a batch script with the netsh interface portproxy rules to the Windows Task Scheduler that run on the system startup.
To display a list of all enabled TCP port forwarding rules on Windows, run the command:
netsh interface portproxy show all
In our case, there is only one forwarding rule from local port 3340 to 3389:
Listen on ipv4:             Connect to ipv4:
Address         Port        Address         Port
--------------- ----------  --------------- ----------
10.1.1.110     3340        10.1.1.110     3389
Tip. You can also list all port forwarding rules in portproxy as follows:
netsh interface portproxy dump
#========================
# Port Proxy configuration
#========================
pushd interface portproxy
reset
add v4tov4 listenport=3340 connectaddress=10.1.1.110 connectport=3389
popd
# End of Port Proxy configuration
If you need to change the settings of an existing portproxy rule, use the following command:
netsh interface portproxy set v4tov4 listenport=3340 listenaddress=10.10.1.110 connectport=3300 connectaddress=10.10.1.110
In this example, we have changed the portproxy target port number to 3300.
To remove a specific port forwarding rule:
netsh interface portproxy delete v4tov4 listenport=3340 listenaddress=10.1.1.110
To remove all existing port mapping rules and completely clear the port forwarding rules table:
netsh interface portproxy reset
Important. This port forwarding scheme works only for TCP ports. You won’t be able to forward UDP ports this way. Also, you can’t use the loopback interface 127.0.0.1 (localhost) as the connectaddress.
You can use Windows Server with the RRAS (Routing and Remote Access Service and NAT) role installed to enable port forwarding for UDP traffic. You can configure port forwarding between server network interfaces using the graphical snap-in (rrasmgmt.msc) or with the command:
netsh routing ip nat add portmapping Ethernet1 udp 0.0.0.0 53 192.168.100.100 53
The list of NAT port forwarding rules in Windows Server can be listed as follows:
netsh routing ip nat show interface
If you have WSL (Windows Subsystem for Linux) installed on your computer, you can create a simple PowerShell script to create a port forwarding rule to the WSL 2 virtual machine (a WSL2 VM has its own virtual ethernet adapter with a unique IP address):
wsl --shutdown;

netsh interface portproxy reset;

$wsl_ipaddr = wsl -d Ubuntu-20.04 hostname -I;

netsh interface portproxy add v4tov4 listenport=443 listenaddress=0.0.0.0 connectport=443 connectaddress=$wsl_ipaddr ;

netsh interface portproxy show all;

exit;
Another implicit feature of portproxy is the ability to make any remote network service look like it runs locally. For example, you want to forward the connections from local port 9090 to a remote HTTPS server (google.com:443)
netsh interface portproxy add v4tov4 listenport=9090 connectport=443 connectaddress=google.com protocol=tcp
Now, the Google search page will open if you go to http://localhost:9090/ in your browser (you need to ignore SSL_ERROR_BAD_CERT_DOMAIN errors). So despite the browser accessing the local computer address, it opens a page from an external web server.

Windows cannot forward a range of TCP ports. If you need to forward multiple ports, you will have to manually create multiple portproxy redirecting rules.
Port forwarding rules can also be used to redirect a port from the external IP address of a physical NIC to a port of a virtual machine running on the same host. In Hyper-V, you can configure port forwarding on a Virtual Switch level (see below).
Port Forwarding with NAT Rules on Hyper-V Virtual Switch
When using the Hyper-V role on your computer (it can be installed on both Windows 10/11 and Windows Server, or as a free Hyper-V Server), you can configure DNAT port forwarding rules using PowerShell. Suppose you want to redirect all HTTPS traffic that your Hyper-V host receives to the IP address of the virtual machine running on the host. To do this, use the Hyper-V StaticMapping commands.
Create a Hyper-V virtual switch:
New-VMSwitch -SwitchName NAT_Switch -SwitchType Internal

Set the IP address for the new virtual switch:
New-NetIPAddress -IPAddress 192.168.100.1 -PrefixLength 24 -InterfaceAlias "vEthernet (NAT_Switch)"
Enable NAT for this network:
New-NetNat -Name NATNetwork -InternalIPInterfaceAddressPrefix 192.168.100.0/24
Connect the VM to your NAT_Switch and assign it a static IP address (for example, 192.168.10.80). Set the Hyper-V virtual switch IP address (192.168.100.1 in this case) as the default gateway for the virtual machine’s network connection.
You can now enable port forwarding from the Hyper-V host to the virtual machine:
Add-NetNatStaticMapping -NatName NATNetwork443 -Protocol TCP -ExternalIPAddress 0.0.0.0/24 -ExternalPort 443 -InternalIPAddress 192.168.10.80 -InternalPort 443
After executing these PowerShell commands, all HTTPS traffic that comes to the TCP/443 port of the Hyper-V host will be forwarded to the private IP address of the virtual machine.
If you want to create a port forwarding rule for a non-standard port, don’t forget to open it in Windows Firewall:
New-NetFirewallRule -DisplayName "HyperV_Nat_444" -Direction Inbound -LocalPort 444 -Protocol TCP -Action Allow -Enabled True
You can display a complete list of NAT/PAT port forwarding rules on a Hyper-V host like this:
Get-NetNat
 Необходимость проброса портов весьма часто встающая перед системным администратором задача. Обычно для этой цели используют службы маршрутизации и удаленного доступа (RRAS), но в ряде случаев использование данного инструмента избыточно. В тоже время немногие знают о такой службе как Portproxy, которая управляется из командной строки при помощи команд Netsh. Тем не менее данная служба позволяет справиться с поставленной задачей проще, быстрее и удобнее, чем инструменты графического интерфейса.
Научиться настраивать MikroTik с нуля или систематизировать уже имеющиеся знания можно на углубленном курсе по администрированию MikroTik. Автор курса, сертифицированный тренер MikroTik Дмитрий Скоромнов, лично проверяет лабораторные работы и контролирует прогресс каждого своего студента. В три раза больше информации, чем в вендорской программе MTCNA, более 20 часов практики и доступ навсегда.
Часто можно услышать совершенно неверное утверждение, что в части сетевых настроек операционные системы Windows значительно уступают своим конкурентам (Linux и BSD). Отчасти такие суждения опираются на опыт администрирования стандартных ролей полностью игнорируя возможности командной строки.
Начиная с Windows Server 2003 в состав системы был в введена команда Netsh, которая позволяет гибко управлять сетевыми настройками компьютера. Обзор всех возможностей этой утилиты займет не одну статью, поэтому мы остановимся на командах Netsh для интерфейса Portproxy, позволяющих непосредственно решить нашу задачу.
Данный набор команд позволяет перенаправлять приходящие пакеты с IPv4 и IPv6 портов на любые IPv4 и IPv6 порты компьютера назначения в любых комбинациях. Единственное ограничение — portproxy может работать только с протоколом TCP, но в большинстве случаев этого достаточно.
Для добавления перенаправления используется команда add v4tov4 (если требуется перенаправление с IPv4 в IPv6 используйте v4tov6 и т.д.), полный синтаксис будет такой:
netsh interface portproxy add v4tov4 listenaddress=xxx.xxx.xxx.xxx listenport=nnn connectaddress=xxx.xxx.xxx.xxx connectport=nnn где:
- listenaddress — локальный адрес на котором принимаются соединения
- listenport — локальный порт на котором принимаются соединения
- connectaddress — удаленный или локальный адрес на который перенаправляются соединения
- connectport — удаленный или локальный порт на который перенаправляются соединения
Для изменения уже существующего правила используется команда set v4tov4, которая имеет идентичный синтаксис, listenaddress и listenport — являются обязательными параметрами. Из необязательных параметров можно указывать только тот, который нужно изменить.
Для удаления правил используйте delete v4tov6 с указанием входящих адреса и порта:
netsh interface portproxy delete v4tov4 listenaddress=xxx.xxx.xxx.xxx listenport=nnnДля просмотра существующих правил введите:
netsh interface portproxy show allВместо all допустимо указывать v4tov4 или v6tov4 и т.п. для просмотра только соответствующих правил.
 Для сброса всех существующих правил используйте:
netsh interface portproxy resetЧтобы не быть голословными рассмотрим практический случай использования portproxy в одной довольно непростой ситуации.
У одного нашего клиента имеется две аффилированных (т.е. принадлежащих одному владельцу) организации, имеющие разный вид деятельности и между собой не взаимодействующие. Одна из них находится в городе и не испытывает проблем с внешними коммуникациями. Вторая в сельской местности где доступен только среднего качества интернет, а о выделенном IP-адресе не может быть и речи.
Поэтому, когда встал вопрос организации удаленного доступа к сети второй организации с административными и контрольными целями, то было принято решение использовать для этого ресурсы первой организации, при этом внутренние сети обоих компаний не должны видеть друг друга и вообще иметь какой-либо доступ к ресурсам другой организации.
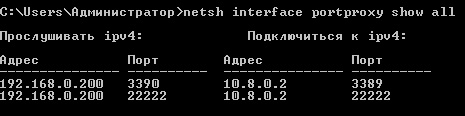
Кроме того, выяснилось, что обе сети имеют одинаковый диапазон IP-адресов, что делало маршрутизацию между ними в принципе крайне затруднительной. По условиям задачи требовалось обеспечить доступ к RDP (порт 3389) сервера SRV-2-1 и SSH (порт 22) сервера SRV-2-2 второй организации, для этого выделялся сервер SRV-1-1 первой компании, при этом, как можно увидеть из схемы ниже, сервера обоих компаний также имеют одинаковые внутренние адреса.
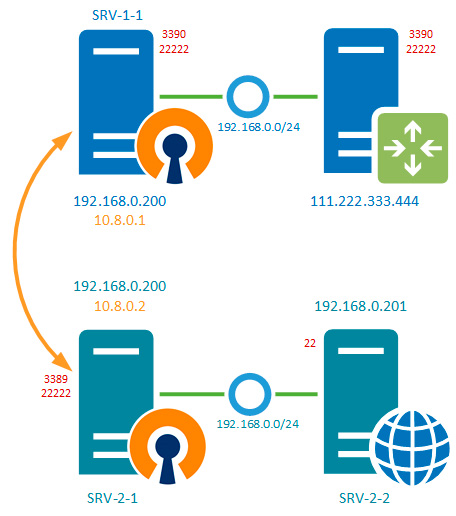 Между серверами был поднят VPN-туннель, и они видят друг друга по адресам VPN-сети (10.8.0.0), а дальше на выручку приходит portproxy. Так как порты 3389 и 22 соответствующие нужным службам уже использовались для целей администрирования первой компании, то мы выбрали для служб второй компании внешние порты 3390 и 22222, которые были проброшены с внешнего интерфейса роутера первой компании на сервер SRV-1-1 штатным образом.
Теперь нам надо перенаправить все соединения на эти порты в сеть второй компании, но там нам доступен только SRV-2-1 по VPN-адресу, поэтому направим пакеты туда, для чего создадим два правила:
netsh interface portproxy add v4tov4 listenport=3390 listenaddress=192.168.0.200 connectport=3389 connectaddress=10.8.0.2
netsh interface portproxy add v4tov4 listenport=22222 listenaddress=192.168.0.200 connectport=22222 connectaddress=10.8.0.2
Первое правило отправит все пакеты пришедшие на порт 3390 с адресом 192.168.0.200 (внутренний адрес SRV-1-1) в VPN-туннель серверу SRV-2-1, а так как он уже является целевым для службы RDP, то сразу меняем порт назначения на 3389. Первая часть задачи выполнена.
Второе правило отправит к SRV-2-1 все пакеты с порта 22222 (SSH), теперь нам надо научить этот сервер как правильно доставить их адресату. Для этого добавим уже этому серверу следующее правило:
netsh interface portproxy add v4tov4 listenport=22222 listenaddress=10.8.0.2 connectport=22 connectaddress=192.168.0.201Согласно которому сервер SRV-2-1 в сети второй компании будет слушать порт 22222 на интерфейсе VPN-сети и передавать все полученные пакеты на порт 22 (SSH) сервера SRV-2-2.
Как видим мы весьма просто реализовали довольно сложную схему, так пакет к серверу SRV-2-2 проходит три промежуточных узла, но при этом мы не настраивали никакой маршрутизации и не устанавливали никакого дополнительного ПО и вообще обошлись минимальным вмешательством в инфраструктуру.
Дополнительные материалы
- Команды Netsh для интерфейса Portproxy
Научиться настраивать MikroTik с нуля или систематизировать уже имеющиеся знания можно на углубленном курсе по администрированию MikroTik. Автор курса, сертифицированный тренер MikroTik Дмитрий Скоромнов, лично проверяет лабораторные работы и контролирует прогресс каждого своего студента. В три раза больше информации, чем в вендорской программе MTCNA, более 20 часов практики и доступ навсегда.
To totally unlock this section you need to Log-in
Login
Port Forwarding is a technique that allows remote computers, usually computers or systems on the Internet, to connect to a specific system or service within a private local-area network (LAN), so an internal network.
This kind of configuration, in a typical home network, needs an Internet access through a DSL or cable modem connected to a router or similar.
Internal network clients, on the private network (LAN), can be connected to an Ethernet switch (by using typical Ethernet cables) or communicate via a wireless LAN (Wi-Fi). The NAT device’s external interface (usually on a router) is configured with a public IP address. The computers behind the router, on the other hand, are invisible to hosts on the Internet as they each communicate only with a private IP address with the router, so only this device can be «viewed» and reached by remote systems.
When configuring port forwarding, the network administrator sets aside one port number on the gateway/router for the exclusive use of communicating with a service in the private network, located on a specific host (the internal client).
External (Internet) hosts must know this port number and the address of the gateway to communicate with the network-internal service. Often, the port numbers of well-known Internet services, such as port number 80 for web services (HTTP) or 443 for HTTPS, are used in port forwarding, so that common Internet services may be implemented on hosts within private networks.
Most of users have at least a Windows system available at home or at job; especially at home it could be useful, usually for gaming or set up a remote internal video camera control, to be able to reach a system from a remote position or letting another system to reach us from Internet. To do this, on Windows platforms, there have been, since Windows XP, and then on Windows 7, 8, 8.1 and 10, a command line utility, not only used for this purpose, called netsh, the give the ability to expert users to redirect any incoming TCP connection (not UDP) (IPv4 or IPv6), specified on a local port to another local port or even to a remote port opened on a remote computer. To do this ther is no need for the local system to have a service that listens to this local port.
As a quick reference, even on Linux, port forwarding can be configured quite simply by using a command line utility called iptables. On Windows Server systems port forwarding is managed using the Routing and Remote Access Service (RRAS) role. However, in this article we will see an easier way to configure the port forwarding, and this will work on any version of Windows.
Port forwarding in Windows can be enabled and configured by using netsh contest in portproxy mode. The syntax of this mode is as follows:
netsh interface portproxy add v4tov4 listenaddress=localaddress listenport=localport connectaddress=destaddress connectport=destport
Where the options specified above are:
- listenaddress : this is the local IP address waiting for a connection (usually this port is the same LAN address of the system).
- listenport : this parameter represents the local listening TCP port (the connection is waited on it).
- connectaddress : this is a local or remote IP address (can be used also the DNS name) to which the incoming connection will be redirected.
- connectport : this is a TCP port to which the connection from listenport is forwarded to.
As an example we will consider the need to make the local RDP service to respond on a non-standard port, for example 3340 (usually this port can be changed in the settings of the service, but we will use this protocol and service to demonstrate this port forwarding method). To do this, we will need to redirect incoming traffic from TCP port 3340 to another local port – 3389 (standard Remote Desktop protocol port).
Start the command prompt as an administrator and perform the following command:
netsh interface portproxy add v4tov4 listenport=3340 listenaddress=172.16.50.5 connectport=3389 connectaddress=172.16.50.5
Where 172.16.50.5 is our the current IP address of this example computer. To check if the portproxy as been enabled we will use netstat utility to make sure that port 3340 is listened now:
netstat -ano | findstr :3340
If this command will output a line with your IP address followed by the specified port, in this case 3340, we are good to go.
Note. If this command does not return anything and port forwarding via the netsh interface portproxy does not work, make sure that you have the iphlpsvc (IP Helper) service running on your system. You can check this by opening services.msc administrative console or by opening Services going in to Administrative Tools.
![]()
Even the IPv6 protocol must be enabled on the network interface for which the port forwarding rule is created.
The prerequisites for correct port-forwarding are the following: the iphlpsvc (IP Helper) serviceWithout the IP Helper service and IPv6 protocol support linked to the network interface on which we are working.
Now that we have configured the portproxy on port 3340 we can try to connect to this computer from another system/client by using Remote Desktop utility or any other RDP client. Port 3340 should be specified as the RDP port and It can be specified using colon after the RDP server address as shown in the following example (172.16.50.5:3340):
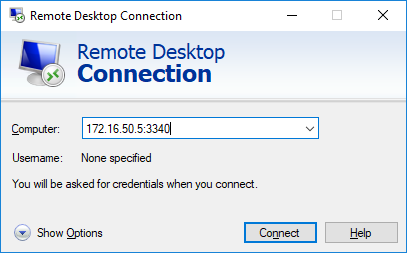
The connection should be established successfully.
IMPORTANT NOTE: make sure that your installed and enabled firewall (for example Windows Firewall, that is enabled by default on modern Windows OSes, or a third-party one that are often included into an antivirus software) allows incoming connections to the new specified port. If necessary, you can add a new Windows Firewall rule using this command:
netsh advfirewall firewall add rule name=”forwarded_RDPport_3340” protocol=TCP dir=in localip=172.16.50.5 localport=3340 action=allow
When creating an incoming firewall rule for port 3340 via Windows Firewall graphical interface, no program needs to be associated with it. This port is only listened by the network driver.
Windows allows you to create any number of port forwarding rules. All netsh interface portproxy rules are persistent and are stored in the system after a Windows restart.
To display the list of forwarding rules actually present in the system we will use the following coma:
netsh interface portproxy show all
This command will show two sections, side by side, that will show you, on the left, which is the listening port and related port (in this case will be 172.16.50.5 and port 3340), while on the right side there will be the «Connect to IPv4» section that will show the destination address and port to which traffice will be forwarded (in our case this will be 172.16.50.5 and port 3389).
Another way to check if on the system there are portproxy rules enabled is to use the following command:
netsh interface portproxy dump
Now let’s see how to remove a specific port forwarding rule, after we have added it:
netsh interface portproxy delete v4tov4 listenport=3340 listenaddress=172.16.50.5
Another quicker way to clear all current port forwarding rules is to use the following command, always in netsh context:
netsh interface portproxy reset
NOTE: as already said at the beginning of this article, take note that this forwarding method works only for TCP ports. So if you are thinking to use this method to forward UDP ports, like the one used by DNS service, you are wrong. Take note also that you can’t use even the loopback address 127.0.0.1 as connect address, so only actual static or DHCP released IP addresses of your network interface (NIC).
Let’s continue by seeing how to forward an incoming TCP connection to another computer, with the following command:
netsh interface portproxy add v4tov4 listenport=3389 listenaddress=0.0.0.0 connectport=3389 connectaddress=10.12.10.21
As you can see, we have defined an IPv4 forwarding rule that will redirect all incoming RDP requests (requested to TCP port 3389) from this computer to another computer with an IP address 10.12.10.21.
Another portproxy feature is the ability to make any remote network service like it is operating locally (forwarding proper public port). In the following example (take note that this method will not work with any service or website) we will forward the connection from the local port 3000 to the remote HTTPS address 2.17.204.204 (National Geographic website):
netsh interface portproxy add v4tov4 listenport=3000 connectport=443 connectaddress= 2.17.204.204 protocol=tcp
Now if you go to http://localhost:3000/ in your browser, National Geographic website page should open with a warning regarding SSL certificate (in this case the forwarding is working properly but the SSL/TLS certificate associated to National Geographic website is binded to a specific DNS name so there will be an error/warning displaying the website. However, with this method you will be able to open a remote website using a local address.
Finally, take note that portproxy, on some Windows editions, and port forwarding rules could works only until the system is rebooted, and after restart they are reset. If this is your case, check if there is a periodic disconnection on the network interface and also if the network interface is configured with a static IP instead of a DHCP one when the system is booting.
As a general workaround, to be sure the netsh interface portproxy rules are always enabled on system startup, you could create a simple script (in .bat or .cmd) and use it to create a startup scheduled task in Windows.
Router Mode on Windows XP
As a final note, if you are using older Windows Server 2003 / XP systems, you have to set the IPEnableRouter parameter to 1 in the registry key HKLMSYSTEMControlSet001ServicesTcpipParameters to use the «router mode» feature in these operating systems.
This key actually is not related to port forwarding, but to a router mode that will enable a Windows XP/2003 system to act as an internal router in LAN.
To do this we will need at least 3 network cards (NICs) with different IP addressing, like the following scheme:
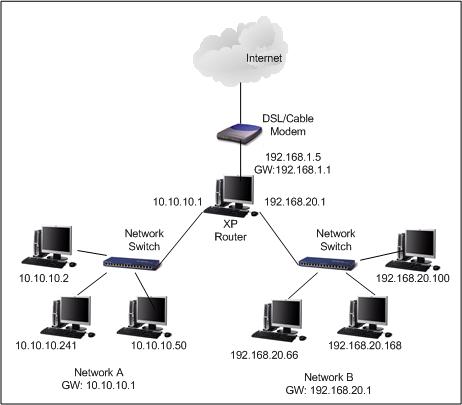
Network Card A (connect to network A):
IP: 10.10.10.1
Netmask: 255.255.255.0
Gateway (GW): [leave it blank]
Network Card B (connect to network B):
IP: 192.168.20.1
Netmask: 255.255.255.0
Gateway (GW): [leave it blank]
Network Card C (connect to Internet) :
This information will be based on the Internet connection service which you have subscribed and to the router to which the «XP router» will be connected.
IP: 192.168.1.1
Netmask: 255.255.255.0
Gateway (GW): 192.168.1.1
The last step will be to enable the Router Mode on Windows XP by locating the following key and finally restarting the Windows system:
HKEY_LOCAL_MACHINESYSTEMCurrentControlSetServicesTcpipParameters
Value Name: IPEnableRouter
Value Name: IPEnableRouter
Value type: REG_DWORD
Value Data: 1
Once the key has been configured, and after a system restart, the Windows XP/2003 will act as an internal router and the 2 subnets will be able to communicate and to go on Internet without issues.

Содержание
- Настройка port mapping в windows с помощью netsh
- О чём речь и зачем это нужно
- Как сделать port mapping (port forwarding) через netsh
- Проверка правильности настройки port mapping
- Удаление port mapping
- Изменение настроек port mapping через netsh
- Configuring Port Forwarding on Windows
- How to Configure Port Forwarding on Windows 10 using Netsh Portproxy?
- Managing Port Forwarding Rules in Windows
- Port Forwarding in Hyper-V Server
- Записки IT специалиста
- Настраиваем проброс портов в Windows при помощи командной строки и Portproxy
- Дополнительные материалы
- Настройка проброса сетевых портов (порт форвардинга) в Windows
- Как включить перенаправления портов в Windows 10 с помощью netsh portproxy?
- Управление правилами проброса портов в Windows
- Настройка перенаправления портов в Hyper-V Server
Настройка port mapping в windows с помощью netsh
О чём речь и зачем это нужно
В windows, начиная с версии Windows XP существует возможность настроить проброс портов (port forwarding или port mapping) без каких-либо внешних программ (и даже не используя встроенный брандмауэр!).
Зачем это может быть нужно? Например, для настройки еще одного (дополнительного) порта, на котором будет «висеть» служба. К примеру, вдобавок к порту 80 (на котором находится apache) можно вдобавок «открыть» порт 1580 или 65123, который будет фактически выполнять ту же роль, что и 80-й порт, но при этом он будет «секретным» портом.
Или же можно таким образом «прятать» фактические серверы: разрешать подключения на какой-либо локальный порт (на localhost, 127.0.0.1), а затем «пробрасывать» это подключение на другой сервер (и на другой порт).
Ограничение: данные перенаправления действуют только на TCP порты, UDP трафик таким образом перенаправить не удастся.
Как сделать port mapping (port forwarding) через netsh
netsh interface portproxy add v4tov4 listenport= <целое_число или имя_службы>listenaddress= connectport= <целое_число или имя_службы>connectaddress=
например:
netsh interface portproxy add v4tov4 listenport=5556 listenaddress=192.168.1.1 connectport=3389 connectaddress=192.168.1.10
В этом примере на компьютере с IP адресом 192.168.1.1 был открыт порт № 5556. При подключении к этому порту все пакеты, приходящие на порт, автоматически будут пересылаться на IP адрес 192.168.1.10, на порт 3389 (RDP).
Проверка правильности настройки port mapping
В первую очередь проверяем, появилось ли наше правило в списке правил netsh:
netsh interface portproxy show all
В случае возникновения проблем с подключением проверьте, что у Вас правильно настроен (или отключен) брандмауэр (который может блокировать подключения на открытый Вами порт).
Удаление port mapping
Для того, чтобы удалить все правила перенаправления (простейший случай) достаточно выполнить команду (напоминаю, командная строка должна быть запущена от имени администратора!):
netsh interface portproxy reset
После этого убедитесь, что все правила удалены: по команде
netsh interface portproxy show all
не должно ничего отображаться.
Если же Вы хотите удалить только одно правило перенаправления портов, команда будет немного сложнее:
netsh interface portproxy delete v4tov4 listenport= <целое_число или имя_службы>listenaddress=
например:
netsh interface portproxy delete v4tov4 listenport=5556
В этом примере мы удаляем port mapping, который был настроен на локальном компьютере, на порту 5556.
Изменение настроек port mapping через netsh
например:
netsh interface portproxy set v4tov4 listenport=5556 listenaddress=192.168.1.1 connectport=3300 connectaddress=192.168.1.10
В этом примере на компьютере с IP адресом 192.168.1.1 была изменена настройка порта № 5556: теперь при подключении к этому порту все пакеты, приходящие на порт, автоматически будут пересылаться на IP адрес 192.168.1.10, на порт 3300.
Примечание: Можно изменять любые значения параметров для существующей записи сервера portproxy. Если значения не заданы, изменения не производятся.
Источник
Configuring Port Forwarding on Windows
You can configure network ports forwarding in all Windows versions without using third-party tools. Using a port forwarding rule, you can redirect an incoming TCP connection (IPv4 or IPv6) from the local TCP port to any other port number, or even to a port on a remote computer. Moreover, it is not necessary for Windows to have a service that listens on a specific TCP port. Windows port forwarding is most commonly used to bypass firewalls or to hide an internal host or service from the external network (NAT/PAT).
In the Linux world, port forwarding is configured quite simply using iptables or firewalld. On Windows Server systems, the Routing and Remote Access Service (RRAS) is typically used to configure port redirections. However, there is an easier way to configure the port forwarding, which works well in any Windows version.
How to Configure Port Forwarding on Windows 10 using Netsh Portproxy?
You can configure port forwarding in Windows using the Portproxy mode of the Netsh command. The command syntax is as follows:
netsh interface portproxy add v4tov4 listenaddress=localaddress listenport=localport connectaddress=destaddress connectport=destport
where
Let’s suppose our task i is to make the RDP service to respond on a non-standard port, for example 3340 (the port can be changed in the settings of the Remote Desktop service, but we are using RDP to make it easier to demonstrate port forwarding). To do this, we need to redirect incoming traffic from TCP port 3340 to another local port – 3389 (this is the default RDP port number).
Alternatively, you can check that the port is not listening locally using the PowerShell cmdlet Test-NetConnection:

To create a port forwarding rule on Windows 10, run a command prompt as an administrator and run the following command:
netsh interface portproxy add v4tov4 listenport=3340 listenaddress=10.1.1.110 connectport=3389 connectaddress=10.1.1.110

Where 10.10.1.110 – the current IP address of this computer.
Now, use the netstat tool to check that Windows is now listening on local port 3340:


IPv6 support must be enabled on the network interface for which the port forwarding rule is created.

These are the prerequisites for the correct operation of port forwarding. Without the IP Helper service and without IPv6 support enabled, the port redirection won’t work.
To make port forwarding work on Windows Server 2003/XP, you must additionally set the IPEnableRouter parameter to 1 in the registry key HKLMSYSTEMControlSet001ServicesTcpipParameters.
You can find out what process is listening on the specified port using its PID (in our example, the PID is 636):
tasklist | findstr 636
Let’s try to connect to this port from a remote computer using any RDP client. Port 3340 should be specified as the RDP port number. It is specified after the colon following the RDP server address. For example, 10.10.1.110:3340

The RDP connection should be established successfully.
If you want to forward an incoming TCP connection to a remote computer, use the following command:
netsh interface portproxy add v4tov4 listenport=3389 listenaddress=0.0.0.0 connectport=3389 connectaddress=192.168.100.101
This rule will redirect all incoming RDP traffic (from local TCP port 3389) from this computer to a remote host with an IP address 192.168.1.100.
Managing Port Forwarding Rules in Windows
netsh advfirewall firewall add rule name=”forwarded_RDPport_3340” protocol=TCP dir=in localip=10.1.1.110 localport=3340 action=allow
When creating an incoming firewall rule for port 3340 via Windows Defender Firewall graphical interface, no program needs to be associated with it. This port is only listened by the network driver.
You can create any number of Windows port forwarding rules. All netsh interface portproxy rules are persistent and are stored in the system after a Windows restart.
To display a list of all active TCP port forwarding rules on Windows, run the command:
netsh interface portproxy show all
In our case there is only one forwarding rule from local port 3340 to 3389:

netsh interface portproxy dump

To remove a specific port forwarding rule:
netsh interface portproxy delete v4tov4 listenport=3340 listenaddress=10.1.1.110
To remove all existing mapping rules and completely clear the port forwarding rules table:
netsh interface portproxy reset
You can use Windows Server with the RRAS and NAT role installed to configure port forwarding for UDP traffic. You can configure port forwarding between server interfaces using the graphical snap-in ( rrasmgmt.msc ) or with the command:
netsh routing ip nat add portmapping Ethernet1 udp 0.0.0.0 53 192.168.100.100 53
Another portproxy feature is an opportunity to make it look like any remote network service is running locally.
For example, let’s redirect the connection from the local port 5555 to a remote HTTP server with IP address 157.166.226.25 (CNN website):
netsh interface portproxy add v4tov4 listenport=5555 connectport=80 connectaddress= 157.166.226.25 protocol=tcp
Now if you go to http://localhost:5555/ in your browser, the CNN Start page will open. So despite the browser is accessing the local computer, it opens a page from an external web server.

Port forwarding rules can also be used to forward a port from the external IP address of a physical NIC to a port of a virtual machine running on the same host. In Hyper-V, you can configure port forwarding on a Virtual Switch level (see below).
Windows cannot forward a range of TCP ports. If you need to forward multiple ports, you will have to manually create multiple portproxy forwarding rules. The easiest way is to generate a list of netsh interface portproxy add commands with different port numbers in notepad and then paste them into the command prompt for execution.
Port Forwarding in Hyper-V Server
When using the Hyper-V role on your computer (it can be installed on both Windows 10 and Windows Server, or as a free Hyper-V Server), you can configure DNAT port forwarding rules using PowerShell. Suppose you want to redirect all https traffic that your Hyper-V host receives to the IP address of the virtual machine running on the host. To do this, use the Hyper-V StaticMapping commands.
First you need to create a Virtual Switch with NAT:
Then you need to connect the necessary VM to the specified vswitch and enable the address translation rule for all virtual machines connected through this Hyper-V virtual switch:
After executing these PowerShell commands, all HTTPS traffic that comes to port 443 of the Hyper-V host will be forwarded to the private IP address of the virtual machine.
Источник
Записки IT специалиста
Технический блог специалистов ООО»Интерфейс»
Настраиваем проброс портов в Windows при помощи командной строки и Portproxy
Необходимость проброса портов весьма часто встающая перед системным администратором задача. Обычно для этой цели используют службы маршрутизации и удаленного доступа (RRAS), но в ряде случаев использование данного инструмента избыточно. В тоже время немногие знают о такой службе как Portproxy, которая управляется из командной строки при помощи команд Netsh. Тем не менее данная служба позволяет справиться с поставленной задачей проще, быстрее и удобнее, чем инструменты графического интерфейса.
Часто можно услышать совершенно неверное утверждение, что в части сетевых настроек операционные системы Windows значительно уступают своим конкурентам (Linux и BSD). Отчасти такие суждения опираются на опыт администрирования стандартных ролей полностью игнорируя возможности командной строки.
Начиная с Windows Server 2003 в состав системы был в введена команда Netsh, которая позволяет гибко управлять сетевыми настройками компьютера. Обзор всех возможностей этой утилиты займет не одну статью, поэтому мы остановимся на командах Netsh для интерфейса Portproxy, позволяющих непосредственно решить нашу задачу.
Для добавления перенаправления используется команда add v4tov4 (если требуется перенаправление с IPv4 в IPv6 используйте v4tov6 и т.д.), полный синтаксис будет такой:
Для удаления правил используйте delete v4tov6 с указанием входящих адреса и порта:
Для просмотра существующих правил введите:
Вместо all допустимо указывать v4tov4 или v6tov4 и т.п. для просмотра только соответствующих правил.
Для сброса всех существующих правил используйте:
Чтобы не быть голословными рассмотрим практический случай использования portproxy в одной довольно непростой ситуации.
У одного нашего клиента имеется две аффилированных (т.е. принадлежащих одному владельцу) организации, имеющие разный вид деятельности и между собой не взаимодействующие. Одна из них находится в городе и не испытывает проблем с внешними коммуникациями. Вторая в сельской местности где доступен только среднего качества интернет, а о выделенном IP-адресе не может быть и речи.
Поэтому, когда встал вопрос организации удаленного доступа к сети второй организации с административными и контрольными целями, то было принято решение использовать для этого ресурсы первой организации, при этом внутренние сети обоих компаний не должны видеть друг друга и вообще иметь какой-либо доступ к ресурсам другой организации.
Кроме того, выяснилось, что обе сети имеют одинаковый диапазон IP-адресов, что делало маршрутизацию между ними в принципе крайне затруднительной. По условиям задачи требовалось обеспечить доступ к RDP (порт 3389) сервера SRV-2-1 и SSH (порт 22) сервера SRV-2-2 второй организации, для этого выделялся сервер SRV-1-1 первой компании, при этом, как можно увидеть из схемы ниже, сервера обоих компаний также имеют одинаковые внутренние адреса.
Между серверами был поднят VPN-туннель, и они видят друг друга по адресам VPN-сети (10.8.0.0), а дальше на выручку приходит portproxy. Так как порты 3389 и 22 соответствующие нужным службам уже использовались для целей администрирования первой компании, то мы выбрали для служб второй компании внешние порты 3390 и 22222, которые были проброшены с внешнего интерфейса роутера первой компании на сервер SRV-1-1 штатным образом.
Теперь нам надо перенаправить все соединения на эти порты в сеть второй компании, но там нам доступен только SRV-2-1 по VPN-адресу, поэтому направим пакеты туда, для чего создадим два правила:
Первое правило отправит все пакеты пришедшие на порт 3390 с адресом 192.168.0.200 (внутренний адрес SRV-1-1) в VPN-туннель серверу SRV-2-1, а так как он уже является целевым для службы RDP, то сразу меняем порт назначения на 3389. Первая часть задачи выполнена.
Второе правило отправит к SRV-2-1 все пакеты с порта 22222 (SSH), теперь нам надо научить этот сервер как правильно доставить их адресату. Для этого добавим уже этому серверу следующее правило:
Согласно которому сервер SRV-2-1 в сети второй компании будет слушать порт 22222 на интерфейсе VPN-сети и передавать все полученные пакеты на порт 22 (SSH) сервера SRV-2-2.
Как видим мы весьма просто реализовали довольно сложную схему, так пакет к серверу SRV-2-2 проходит три промежуточных узла, но при этом мы не настраивали никакой маршрутизации и не устанавливали никакого дополнительного ПО и вообще обошлись минимальным вмешательством в инфраструктуру.
Дополнительные материалы
Помогла статья? Поддержи автора и новые статьи будут выходить чаще:

Или подпишись на наш Телеграм-канал: 
Источник
Настройка проброса сетевых портов (порт форвардинга) в Windows
Во всех версиях Windows вы можете настроить перенаправление/проброс сетевых портов (порт форвардинг) без использования сторонних инструментов. С помощью правила форвардинга вы можете перенаправить входящее TCP соединение (IPv4 или IPv6) с локального TCP порта на любой другой номер порта или даже на порт удаленного компьютера. Причем не обязательно, чтобы в Windows был сервис, слушающий данный TCP порт. Перенаправление портов в Windows чаще всего используется для обхода файерволов или чтобы спрятать внутренний сервер или службу от внешней сети (NAT/PAT).
В Linux перенаправление портов настраивается довольно просто с помощью iptables. На серверных системах Windows Server для настройки перенаправления портов, как правило используется служба маршрутизации и удаленного доступа (RRAS). Однако есть более простой способ настройки проброса портов, который одинаково хорошо работает в любой версии Windows.
Как включить перенаправления портов в Windows 10 с помощью netsh portproxy?
Настройка перенаправления портов в Windows выполняется из командой строки через режим Portproxy команды Netsh. Синтаксис команды следующий:
netsh interface portproxy add v4tov4 listenaddress=localaddress listenport=localport connectaddress=destaddress connectport=destport
где,
Допустим наша задача, заставить службу RDP отвечать на нестандартном порту, например 3340 (этот порт, конечно, можно изменить в настройках самой службы, но мы используем именно RDP для упрощения демонстрации техники перенаправления и проброса портов). Для этого нам нужно перенаправить входящий трафик на TCP порт 3340 на другой локальный порт – 3389 (это номер стандартного порта RDP).
Либо вы можете проверить что порт не слушается локально с помощью PowerShell командлета Test-NetConnection:
Чтобы создать правило перенаправления порта, запустите командную строку с правами администратора и выполните команду:
netsh interface portproxy add v4tov4 listenport=3340 listenaddress=10.10.1.110 connectport=3389 connectaddress=10.10.1.110
Где 10.10.1.110 – текущий IP адрес данного компьютера

А на сетевом интерфейсе, для которого создается правило перенаправления портов должна быть включена поддержка IPv6.
Это обязательные условия для корректной работы порт-форвардинга. Без службы IP Helper и без включенной поддержки IPv6 механизм перенаправления не работает.
В Windows Server 2003 / XP для работы перенаправления дополнительно нужно включить параметр реестра IPEnableRouter = 1 в ветке HKEY_LOCAL_MACHINESYSTEMControlSet001ServicesTcpipParameters.
Вы можете определить процесс, который слушает указанный локальный порт с помощью его PID (в нашем примере PID – 636):
tasklist | findstr 636
Теперь попробуем подключиться на данный порт с удаленного компьютера при помощи любого RDP клиента. В качестве rdp-порта нужно указать 3340 (номер порта указывается после двоеточия после адреса rdp-сервера), например, 10.10.1.110:3340
RDP подключение должно успешно установиться.
Если нужно перенаправить входящее TCP соединение на удаленный компьютер, используете такую команду:
netsh interface portproxy add v4tov4 listenport=3389 listenaddress=0.0.0.0 connectport=3389 connectaddress=192.168.1.100
Это правило перенаправит весь входящий RDP трафик (с локального порта TCP 3389) с этого компьютера на удаленный компьютер с IP-адресом 192.168.1.100.
Управление правилами проброса портов в Windows
При создании входящего правила файервола через графический интерфейс для порта 3340 не нужно ассоциировать никакую программу, т.к. данный порт слушается исключительно сетевым драйвером.
Можно создать любое количество правил перенаправления локальных портов Windows. Все правила netsh interface portproxy являются постоянными и сохраняются в системе после перезагрузки Windows.
Чтобы вывести на экран список всех активных правил перенаправления TCP портов в Windows, выполните команду:
netsh interface portproxy show all
В нашем случае присутствует только одно правило форвардинга с локального порта 3340 на 3389:
Чтобы удалить все имеющиеся правила перенаправления и полностью очистить таблицу с правилами порт-форвардинга:
netsh interface portproxy reset
Для настройки перенаправления UDP трафика можно использовать Windows Server с ролью RRAS и NAT. Вы можете настроить перенаправление портов между интерфейсами компьютера с помощью графической оснастки (rrasmgmt.msc) или командой:
netsh routing ip nat add portmapping Ethernet udp 0.0.0.0 53 192.168.1.54 53
Еще одной неявной возможностью portproxy является возможность создать видимость локальной работы любого удаленного сетевого сервиса.
Например, создадим такое перенаправление с локального порта 8888 на удаленный адрес 213.180.204.3:
Перенаправление портов также можно использовать, чтобы пробросить порт с внешнего IP адреса сетевой карты на порт виртуальной машины, запущенной на этом же компьютере. В Hyper-V такой проброс порта можно настроить на виртуальном коммутатор (см. ниже).
Windows не умеет пробрасывать диапазон TCP портов. Если вам нужно пробросить несколько портов, придется вручную создавать несколько правил перенаправления. Проще всего сформировать список команд netsh interface portproxy add с разными портами в блокноте и затем вставить в командную строку для выполнения.
Настройка перенаправления портов в Hyper-V Server
При использовании на вашем компьютере роли Hyper-V (может быть установлена как на Windows 10, так и на Windows Server или в виде бесплатного Windows Hyper-V Server), вы можете настроит проброс портов DNAT с помощью PowerShell. Допустим, вы хотите перенаправить все https запросы, которые получает ваш хост Hyper-V на IP адрес запущенной на хосте виртуальной машины. Для этого используется команды Hyper-V StaticMapping.
Сначала нужно создать виртуальный коммутатор с NAT:
Затем нужно подключить нужную ВМ в указанный коммутатор и включить правило трансляции адресов для всех виртуальных машин, подключенных через данный виртуальный коммутатор Hyper-V:
После выполнения этих команд весь HTTPS трафик, который приходит на 443 порт гипервизора будет переправлен на серый IP адрес виртуальной машины.
Источник
A while back, I set up Team Foundation Server for Tourney Logic’s source control. It was anything but straightforward, so I figured I would share some of my headaches and how I got around them.
First, a note about my ISP. TL1 (Tourney Logic’s development server) is hosted in The Dungeon, and I’m on a cable modem. Certain ports are blocked for inbound traffic — 80, 25 (in and out), and 8080. If you’ve ever used TFS, having port 8080 blocked is an issue if you want remote access. TFS runs on port 8080, and while I’m sure it’s possible to change that (CodePlex appears to work over 443), I couldn’t find any good documentation that worked reliably.
This probably could have been solved by a better router or VPN, but my router will not forward traffic from one port to another and, having tried VPN in the past, it’s slow and unreliable. In my router, I can forward a port to a particular machine, but not on another port, so that wouldn’t work for me either — and I’m too scared I might brick my router by installing DD-WRT — Internet access at my house is key for survival!
So, having no choice but to run TFS on port 8080, I started digging into Windows 2003 to determine if there was a way to make it think that one port was really another one. Turns out there is, and it’s available through «Routing and Remote Access». Under the machine, you can manage the IP routing. Under that, you select «NAT/Basic Firewall»:
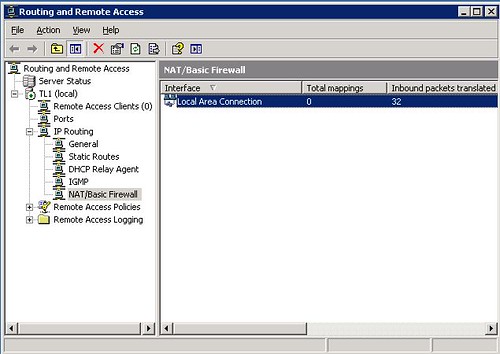
You should have an entry for each NIC in your machine. I just have one, so I select that, and go to the «Services and Ports» tab.
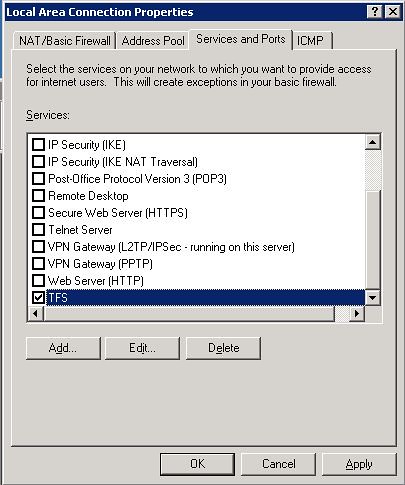
I created my own called TFS, and in it, I set up my firewall to forward all incoming traffic on port 8083 to port 8080.
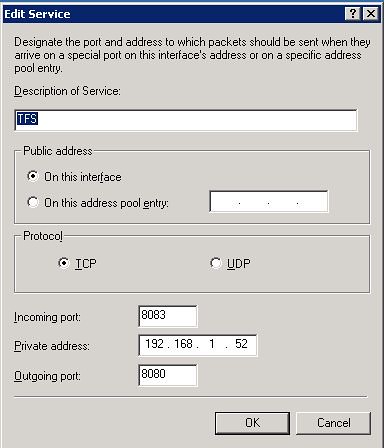
Note that I have a static IP address set up internally for all of my servers, and the entered IP address is the machine’s IP address.
I think the original intent of this process is if you are using your server as a firewall and have other machines sitting behind it, so you can specify which machines handle which services, but it can just as easily route traffic to itself, and do it over a different port. Once I added this entry, I was able to use my public address over port 8083 to interact with my TFS server and it works perfectly.
For those sysadmins reading this thinking to themselves, «Well, duh!» you apparently aren’t the ones installing TFS in environments where certain ports are off limits, because I saw this issue over and over in forums, blogs, etc., and no one had a good solution.
Записки IT специалиста
Технический блог специалистов ООО»Интерфейс»
Windows Server. Настравиваем форвардинг портов через RRAS.

Будем считать, что роутер настроен и функционирует. Подробнее о его настройке вы можете прочитать здесь. В нашей тестовой лаборатории мы собрали следующую схему:
 В тестовой сети имеется роутер с внутренним адресом 10.0.0.2 и терминальный сервер с адресом 10.0.0.5, к которому мы будем организовывать доступ. Внешний адрес условно принят нами как 192.168.64.203. Оба сервера работают под управлением Windows Server 2008 R2.
Настроить форвардинг портов в Windows Server не просто, а очень просто. Откроем Пуск — Администрирование — Маршрутизация и удаленный доступ.
 Последовательно разворачивая пункты, находим Преобразование сетевых адресов (NAT), в окне справа выбираем внешний интерфейс и, щелкнув на него правой кнопкой мыши, заходим в его Свойства.
 За форвардинг портов отвечает отдельная закладка Службы и порты, на которой уже созданы шаблоны для наиболее часто встречающихся задач.

Достаточно выбрать нужную службу и указать ее адрес во внутренней сети, все остальные параметры имеют стандартные значения и изменению не подлежат.
 Подтверждаем изменения и пробуем подключиться с удаленного ПК. Все должно работать без перезапуска сервера и службы RRAS.
Поставим более сложную задачу. Нам необходимо подключаться из внешней сети к удаленному рабочему столу роутера для административных целей и в тоже время обеспечить удаленным клиентам доступ к терминальному серверу. Оба сервера используют для удаленных подключений порт 3389 и пробросив его для сервера 10.0.0.5 как указано выше, мы лишимся возможности удаленно подключаться к серверу 10.0.0.2. Как быть? Ответ прост: использовать другой порт. Для сервера 10.0.0.5 мы будем использовать порт 3390, в то время как подключение на 3389 даст нам возможность управлять роутером.
На закладке Службы и порты нажимаем Добавить и в открывшемся окне указываем имя службы, входящий порт (порт на который будут подключаться из внешней сети), адрес службы во внутренней сети и исходящий порт (на котором служба работает во внутренней сети). В нашем примере исходящим портом будет 3389, а входящим 3390. Данное правило перенаправит все запросы на порт 3390 внешнего интерфейса роутера на порт 3389 терминального сервера во внутренней сети.
 Для подключения в строке адреса необходимо указать также порт подключения через двоеточие:
 Как видим служба RRAS предоставляет в руки администратора мощный и в то же время простой инструментарий для управления перенаправлением портов, позволяя легко публиковать внутренние службы во внешней сети.
Источник
Записки IT специалиста
Технический блог специалистов ООО»Интерфейс»
- Главная
- Настраиваем проброс портов в Windows при помощи командной строки и Portproxy
Настраиваем проброс портов в Windows при помощи командной строки и Portproxy
Необходимость проброса портов весьма часто встающая перед системным администратором задача. Обычно для этой цели используют службы маршрутизации и удаленного доступа (RRAS), но в ряде случаев использование данного инструмента избыточно. В тоже время немногие знают о такой службе как Portproxy, которая управляется из командной строки при помощи команд Netsh. Тем не менее данная служба позволяет справиться с поставленной задачей проще, быстрее и удобнее, чем инструменты графического интерфейса.
Часто можно услышать совершенно неверное утверждение, что в части сетевых настроек операционные системы Windows значительно уступают своим конкурентам (Linux и BSD). Отчасти такие суждения опираются на опыт администрирования стандартных ролей полностью игнорируя возможности командной строки.
Начиная с Windows Server 2003 в состав системы был в введена команда Netsh, которая позволяет гибко управлять сетевыми настройками компьютера. Обзор всех возможностей этой утилиты займет не одну статью, поэтому мы остановимся на командах Netsh для интерфейса Portproxy, позволяющих непосредственно решить нашу задачу.
Данный набор команд позволяет перенаправлять приходящие пакеты с IPv4 и IPv6 портов на любые IPv4 и IPv6 порты компьютера назначения в любых комбинациях. Единственное ограничение — portproxy может работать только с протоколом TCP, но в большинстве случаев этого достаточно.
Для добавления перенаправления используется команда add v4tov4 (если требуется перенаправление с IPv4 в IPv6 используйте v4tov6 и т.д.), полный синтаксис будет такой:
- listenaddress — локальный адрес на котором принимаются соединения
- listenport — локальный порт на котором принимаются соединения
- connectaddress — удаленный или локальный адрес на который перенаправляются соединения
- connectport — удаленный или локальный порт на который перенаправляются соединения
Для изменения уже существующего правила используется команда set v4tov4, которая имеет идентичный синтаксис, listenaddress и listenport — являются обязательными параметрами. Из необязательных параметров можно указывать только тот, который нужно изменить.
Для удаления правил используйте delete v4tov6 с указанием входящих адреса и порта:
Для просмотра существующих правил введите:
Вместо all допустимо указывать v4tov4 или v6tov4 и т.п. для просмотра только соответствующих правил.
Для сброса всех существующих правил используйте:
Чтобы не быть голословными рассмотрим практический случай использования portproxy в одной довольно непростой ситуации.
У одного нашего клиента имеется две аффилированных (т.е. принадлежащих одному владельцу) организации, имеющие разный вид деятельности и между собой не взаимодействующие. Одна из них находится в городе и не испытывает проблем с внешними коммуникациями. Вторая в сельской местности где доступен только среднего качества интернет, а о выделенном IP-адресе не может быть и речи.
Поэтому, когда встал вопрос организации удаленного доступа к сети второй организации с административными и контрольными целями, то было принято решение использовать для этого ресурсы первой организации, при этом внутренние сети обоих компаний не должны видеть друг друга и вообще иметь какой-либо доступ к ресурсам другой организации.
Кроме того, выяснилось, что обе сети имеют одинаковый диапазон IP-адресов, что делало маршрутизацию между ними в принципе крайне затруднительной. По условиям задачи требовалось обеспечить доступ к RDP (порт 3389) сервера SRV-2-1 и SSH (порт 22) сервера SRV-2-2 второй организации, для этого выделялся сервер SRV-1-1 первой компании, при этом, как можно увидеть из схемы ниже, сервера обоих компаний также имеют одинаковые внутренние адреса.
Между серверами был поднят VPN-туннель, и они видят друг друга по адресам VPN-сети (10.8.0.0), а дальше на выручку приходит portproxy. Так как порты 3389 и 22 соответствующие нужным службам уже использовались для целей администрирования первой компании, то мы выбрали для служб второй компании внешние порты 3390 и 22222, которые были проброшены с внешнего интерфейса роутера первой компании на сервер SRV-1-1 штатным образом.
Теперь нам надо перенаправить все соединения на эти порты в сеть второй компании, но там нам доступен только SRV-2-1 по VPN-адресу, поэтому направим пакеты туда, для чего создадим два правила:
Первое правило отправит все пакеты пришедшие на порт 3390 с адресом 192.168.0.200 (внутренний адрес SRV-1-1) в VPN-туннель серверу SRV-2-1, а так как он уже является целевым для службы RDP, то сразу меняем порт назначения на 3389. Первая часть задачи выполнена.
Второе правило отправит к SRV-2-1 все пакеты с порта 22222 (SSH), теперь нам надо научить этот сервер как правильно доставить их адресату. Для этого добавим уже этому серверу следующее правило:
Согласно которому сервер SRV-2-1 в сети второй компании будет слушать порт 22222 на интерфейсе VPN-сети и передавать все полученные пакеты на порт 22 (SSH) сервера SRV-2-2.
Как видим мы весьма просто реализовали довольно сложную схему, так пакет к серверу SRV-2-2 проходит три промежуточных узла, но при этом мы не настраивали никакой маршрутизации и не устанавливали никакого дополнительного ПО и вообще обошлись минимальным вмешательством в инфраструктуру.
Источник
Adblock
detector