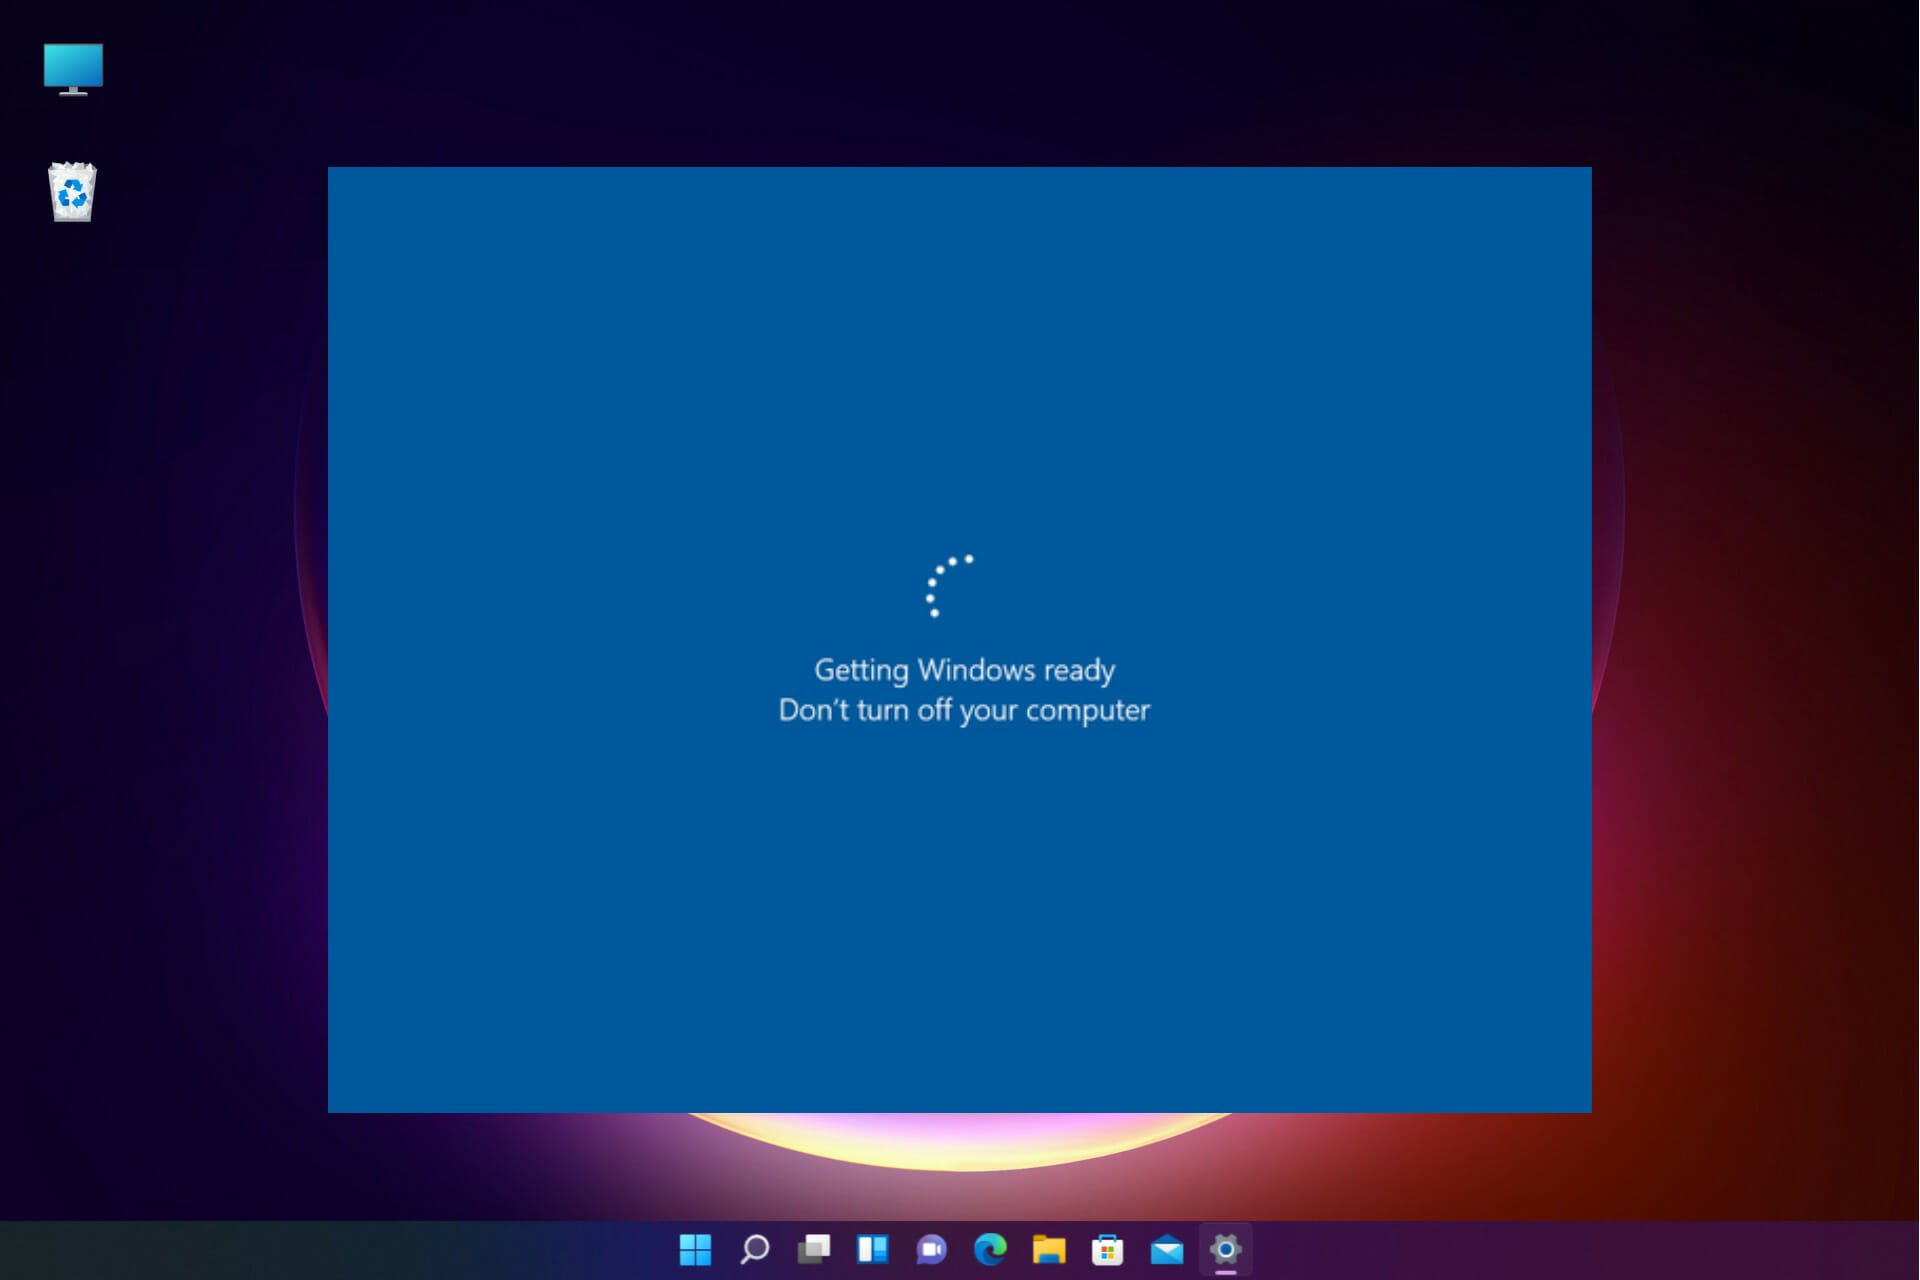
Время от времени Microsoft выпускает крупное обновление Windows, установить которое можно как через Центр обновлений, так и непосредственно со смонтированного ISO-образа с новой версией операционной системы. В среднем эта процедура занимает час-два, но иногда апдейт может принести вам неприятный сюрприз. На одном из этапов обновления, когда на экране наблюдается сообщение «Подготовка Windows. Не выключайте компьютер», у пользователя может возникнуть ощущение, что процесс попросту завис. Проходит час, два, три, пять или десять, а просьба подождать продолжает висеть на экране. Неудивительно, что многие теряют терпение и выключают компьютер, в результате чего система откатывается к старой версии, причём не всегда благополучно.
Что делать, если на экране долго висит сообщение «Подготовка Windows. Не выключайте компьютер»
Зависание или аномально медленный процесс обновления
Сразу отметим, что сталкиваться с описанной проблемой чаще всего приходится пользователям слабых компьютеров, особенно с жёсткими дисками HDD. На форуме Microsoft встречаются сообщения юзеров, у которых процедура обновления занимала более суток. Вот уж где пример выдержки и терпения! Если у вас слабый компьютер, возможно, вам тоже стоит набраться терпения и дать установщику сделать своё дело. Мажорное обновление Windows — процесс сам по себе довольно трудоёмкий.
Распаковка загруженных пакетов, замена старых файлов новыми, создание папки Windows.old с резервными копиями файлов старой версии — всё это занимает немало времени, но хуже всего то, что в Microsoft не додумались снабдить экран обновления индикатором, по которому пользователь мог бы судить о продвижении процесса или его зависании. Исключать последнее нельзя, процесс действительно может зависнуть вследствие ошибки в самом обновлении, ошибки на жёстком диске или аппаратной несовместимости. Так как же понять, продолжает ли система обновляться или процедура и впрямь зависла?
Первым делом смотрим на анимацию вращающегося кружка, если он замер и это положение не меняется более 20 минут, скорее всего, процесс действительно завис. Косвенно на зависание обновления также станет указывать отсутствие индикации жёсткого диска. Подождите ещё немного и, если ничего не изменится, приступайте к внеплановому решению проблемы.
Прервите процесс обновления нажатием Ctrl + Alt + Del
Для начала можно попробовать прервать процедуру обновления нажатием комбинации Ctrl + Alt + Del, правда, этот способ срабатывает далеко не всегда. Тут всё зависит от того, какой именно в данный момент компонент обновляется. В удачном случае вы попадёте на экран входа в учётную запись, войдите в неё и попробуйте установить пакет обновления повторно.
Принудительная перезагрузка
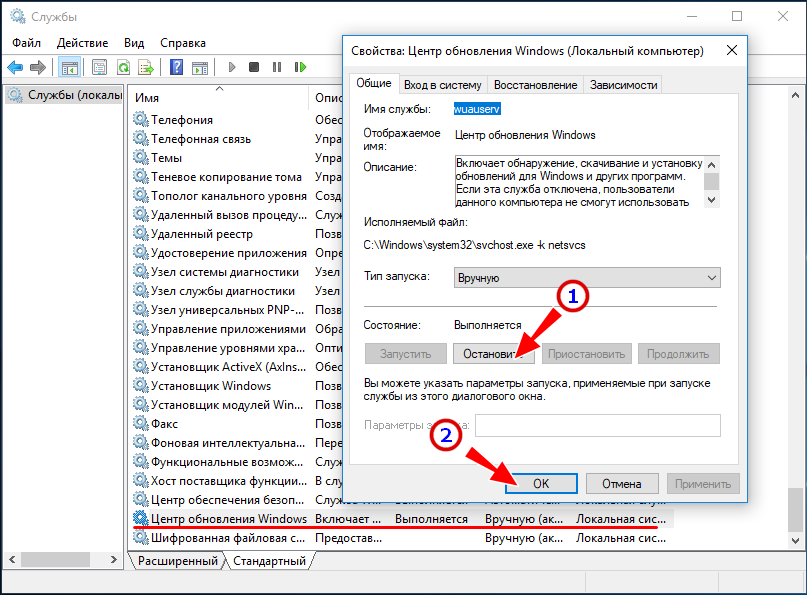
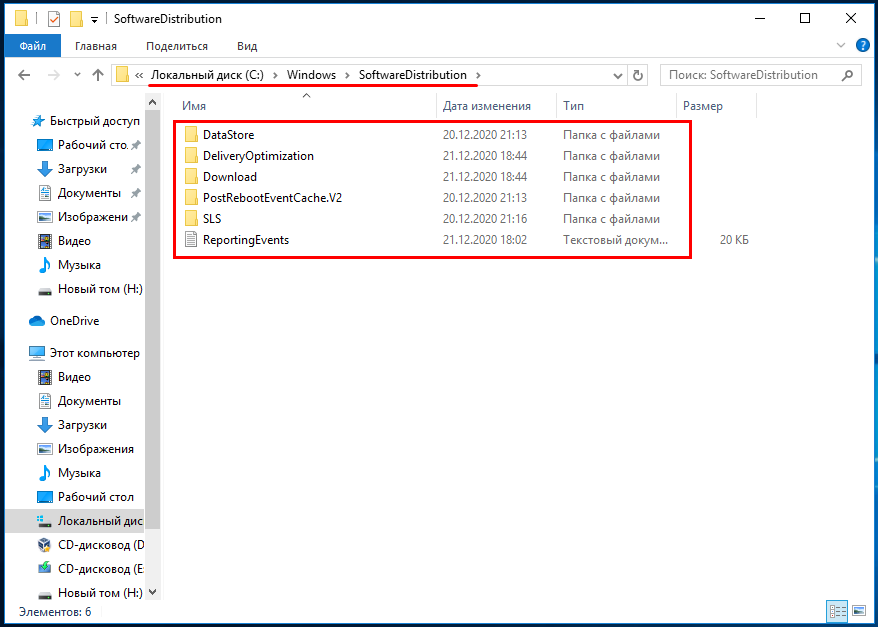
Если Ctrl + Alt + Del не помогает, зависшую установку обновлений можно прервать в принудительном режиме, нажав Reset или кнопку питания (на ноутбуке). При следующей загрузке просьба подождать может появиться вновь, но уже ненадолго, и в скором времени вы должны будете попасть на экран входа в систему. Войдя в учётную запись, удалите содержимое папки C:WindowsSoftwareDistribution, в которую Центр обновления загружает пакеты обновления и попробуйте выполнить апдейт повторно. Если система не позволяет очистить этот каталог, остановите на время службу обновления из оснастки управления службами.
Перезагрузитесь с использованием безопасного режима
Вполне допускаем, что кому-то из пользователей придёт в голову мысль обновить Windows в безопасном режиме, но делать этого не следует по той причине, что в процессе обновления мастер-установщик проверяет активность устройств и компонентов, а так как в безопасном режиме некоторые из них отключены, мастер не сможет правильно опознать компоненты, требующие обновления, что чревато возникновением ошибок.
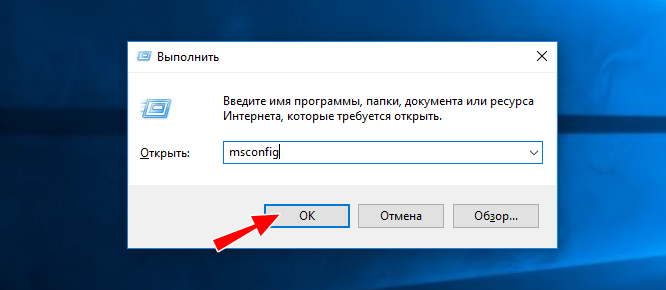
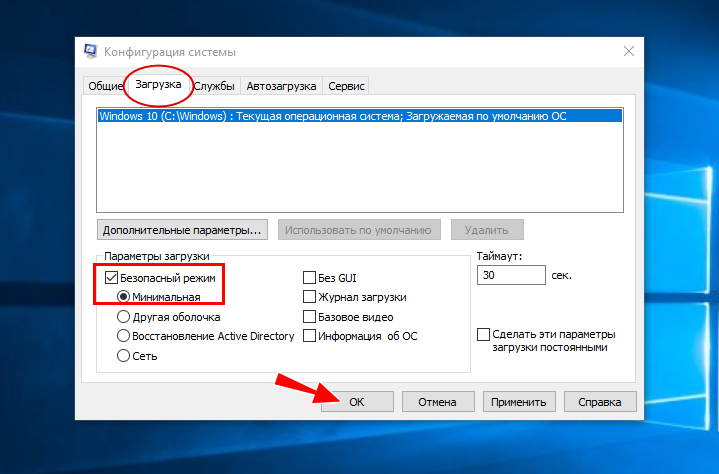
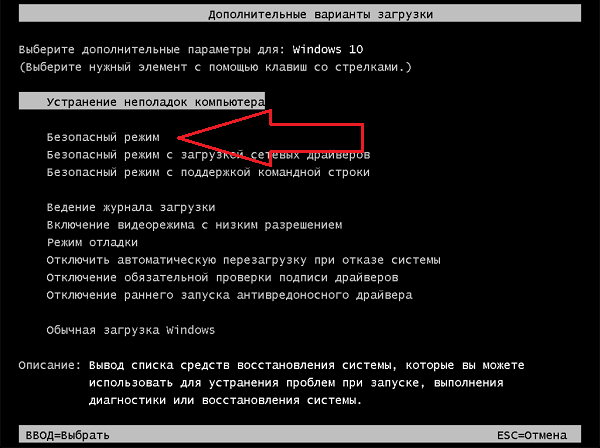
Другое дело — загрузка в безопасном режиме с последующей перезагрузкой в режиме обычном и повторной установкой обновлений. Выключив компьютер принудительно, нажмите F8 при его включении, чтобы попасть в меню загрузки и выберите «Безопасный режим». Однако, если у вас включён быстрый запуск, клавиша F8 не сработает (в Windows 10 с этой опцией вообще проблемы) и грузиться в безопасном режиме придётся из интерфейса msconfig в работающей системе.
Восстановление системных файлов
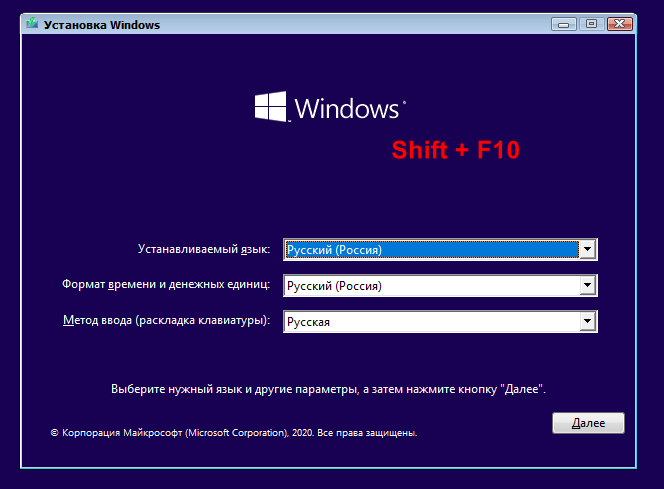
Исключите повреждение системных файлов, для чего загрузите компьютер с установочного диска, а когда на экране появится окно мастера-установщика, нажмите Shift + F10 и выполните в открывшейся командной строке sfc /scannow и дождитесь завершения процедуры сканирования. Эту же проверку можно выполнить и в работающей системе.
Откат и восстановление системы
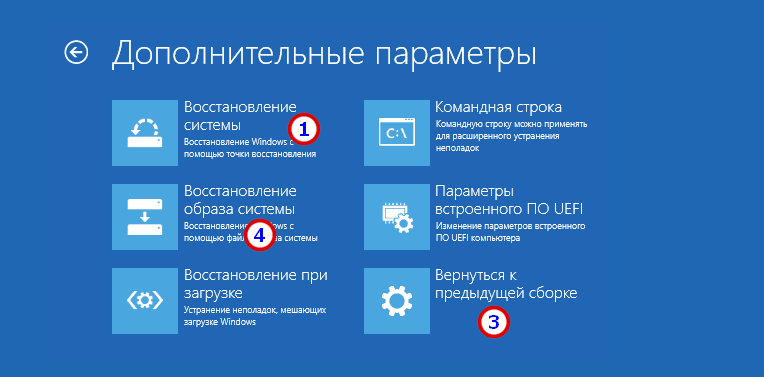
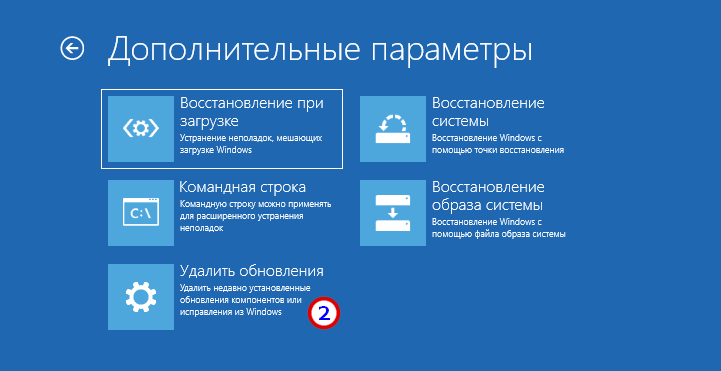
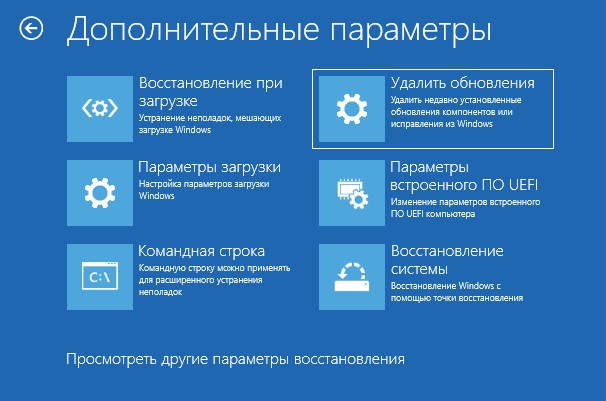
Коли дела уж совсем плохи, и после прерывания процедуры обновления система отказывается загружаться, sfc /scannow не работает, придётся прибегнуть к восстановлению системы. Загрузившись с установочного диска, перейдите по цепочке Восстановление системы → Поиск и исправление неисправностей и выберите одну из опций:
1. Восстановление системы — выполняет откат к предыдущей системной точке восстановления.
2. Удалить обновления — удаляет последнее установленное исправление или обновление.
3. Вернуться к предыдущей сборке — опция будет доступна, если в процессе обновления сформировался набор файлов предыдущей сборки.
4. Восстановление образа системы — воспользоваться этой опцией смогут только те, кто заранее позаботился о создании резервной копии системного раздела.
Полезные советы
И напоследок позвольте дать вам пару советов, которые минимизируют появление проблем с обновлением системы
• Поскольку Microsoft уже не раз выпускала апдейты с багами, чтобы затем их выискивать и исправлять, не спешите устанавливать обновления. Лучше отложите их или даже отключите, к тому же вам ничто не мешает взять процесс обновления под свой контроль с помощью специальных утилит, в коих сегодня нет недостатка.
• Перед тем как приступать к обновлению, создайте на всякий случай полную резервную копию системного раздела средствами Windows или сторонних программ-бэкаперов, такая копия выручит вас даже тогда, когда все прочие инструменты окажутся бессильны.
При выключении ОС Виндовс 10 пользователь может столкнуться с сообщением об ошибке на синем фоне. Оно может висеть на экране монитора часами, без каких-либо видимых подвижек. Давайте разберёмся, почему сообщение «Подготовка Windows. Не выключайте компьютер» очень долго висит на мониторе в ОС Windows 10. А также что можно предпринять для исправления ситуации.
- Причина сообщения «Подготовка Windows. Не выключайте компьютер»
- Убедитесь, что ваш компьютер действительно завис
- Использование Ctrl+Alt+Del, если компьютер долго висит
- Перезагрузка ПК при ошибке о подготовке Windows 10
- Загрузка системы в безопасном режиме
- Восстановление системных файлов компьютера
- Тестирование системной памяти при ошибке «Подготовка Windows. Не выключайте компьютер»
- Откат Windows 10 до стабильной ранней версии
- Заключение
Причина сообщения «Подготовка Windows. Не выключайте компьютер»
Как известно, функционал ОС Windows 10 позволяет в автоматическом режиме устанавливать все необходимые обновления. Обычно обновления загружаются в систему в фоновом режиме, а потом, при выключении-включении ПК, автоматически устанавливаются в системе.
При установке указанных апдейтов система может испытывать различные виды проблем – остановки, зависания, сбои, глюки и другие дисфункции. Одной из таких проблем является зависание системы на неопределённое время, сопровождающееся сообщением «Подготовка Windows….».
Причины дисфункции могут быть следующими:
- Программный конфликт при установке обновлений;
- В системе пользователя существует проблема, препятствующая установке конкретных обновлений;
- Нестабильное обновление от Майкрософт;
- Нестабильная работы службы обновления Виндовс;
- Наличие на ПК пользователя вирусных зловредов;
- Проблемы с жёстким диском ПК (плохие сектора, «осыпание» диска и др.)
Давайте разберёмся, что делать если такое сообщение очень долго висит на вашем экране на Windows 10.
Читайте также: Как исправить код ошибки INET_E_RESOURCE_NOT_FOUND в Windows 10.
Убедитесь, что ваш компьютер действительно завис
Для установки некоторых апдейтов ОС Виндовс может понадобиться довольно длительное время. Потому, если у вас зависло сообщение «Не выключайте компьютер», не спешите бить в набат, и пытаться что-то исправить. Иначе вместо решения проблемы вы создадите другую проблему самостоятельно.
Говорить о наличии проблемы можно не ранее, нежели через 3 часа с момента появления рассматриваемого нами сообщения. И это при условии, что вы не наблюдаете активности вашего ПК, а индикатор винчестера или вовсе не светится, или светится регулярно, но очень короткими включениями.
Если же проблеме уже более трёх часов, а никаких изменений не наблюдается, тогда идём дальше.
Использование Ctrl+Alt+Del, если компьютер долго висит
Установку некоторых апдейтов ОС Windows 10 можно прекратить с помощью нажатия на клавиши Ctrl-Alt-Del на клавиатуре вашего ПК. Особенно это актуально во время загрузки компьютера, когда после нажатия на указанное сочетание клавиш вы попадёте на экран выбора учётной записи. Войдите в систему обычным путём, и попробуйте вновь установить нужный апдейт.
Нажмите на ctrl+alt+del для устранения зависания
Перезагрузка ПК при ошибке о подготовке Windows 10
Если Ctrl-Alt-Del не срабатывает, и с момента запуска процесса обновления прошло более 3 часов, рекомендуем сбросить процесс обновлений, нажав на кнопку «reset» вашего ПК. Загрузитесь в обычном режиме, и попробуйте установить апдейт заново.
Загрузка системы в безопасном режиме
Использование безопасного режима полезно для диагностики дисфункции, позволяя использовать ОС с минимумом рабочих драйверов и служб. В нашем случае это позволит разгрузить систему от конфликтных программ, и установить в системе все необходимые апдейты.
Порядок действий:
- При включении системы и начале загрузки Windows быстро периодически жмите на клавишу F8.
- При появлении системного меню выберите опцию «Безопасный режим» и дождитесь загрузки системы.
- После окончания загрузки перезагрузите ПК в стандартном режиме. Это поможет устранить зависание надписи «Не выключайте компьютер» в Виндовс 10.
Восстановление системных файлов компьютера
Системное восстановление – хороший инструмент, позволяющий устранить проблему зависания сообщения «Не выключайте компьютер» в Windows 10. Для этого нам понадобится флешка с установленной на ней инсталляционной версией ОС.
Порядок действий:
- Загрузитесь с данного USB-носителя.
- Выберите на базовом экране язык и систему.
- Затем нажмите внизу слева на надпись «Восстановление системы».
- Далее выберите опцию «Поиск и устранение неисправностей».
- Далее «Дополнительные параметры» и затем «Командная строка».
- Далее наберите там:
- Нажмите ввод. Дождитесь окончания процесса и перезагрузите ваш ПК. Проблема может быть решена.
Узнайте, как исправить ошибку: «На вашем ПК возникла проблема» на Виндовс 10».
Тестирование системной памяти при ошибке «Подготовка Windows. Не выключайте компьютер»
Многие проблемы возникают из-за нестабильной работы планок памяти. Рекомендуем провести тест вашей памяти с программами уровня «MemTest86», с целью определения вышедших из строя планок памяти.
Используйте программы уровня «MemTest86» для проверки планок памяти ПК
Откат Windows 10 до стабильной ранней версии
Откат системы до стабильной версии может послужить удобным инструментом для решения возникшей проблемы.
Для этого выполните следующее:
- Загрузитесь в безопасном режиме, как указано выше;
- Нажмите на Win+R, и введите в появившейся рамке rstrui и нажмите ввод;
- Появится окно для восстановления системы;
- Среди перечня доступных для восстановления ранних дат выберите ту, при которой проблем с системой не наблюдалось (подойдёт любая ранняя дата);
- Выполните процедуру восстановления, после которой перезагрузите ваш ПК. Проблема может быть решена.
Заключение
Зависание рассматриваемого сообщения на синем экране обычно сигнализирует о проблемах с установкой апдейтов в пользовательской системе. Для решения возникших проблем рекомендуем подождать какое-то время (до 3 часов). Если ничего не поменялось, тогда выполните весь комплекс перечисленных нами советов. Это позволит устранить дисфункцию «Подготовка Windows. Не выключайте компьютер» на вашем PC с Виндовс 10, если он долго висит.
В процессе обновления, операционная система Windows может показывать вам экран с надписью «Подготовка Windows. Не выключайте компьютер». Как правило, данный экран показывается при крупных обновлениях Windows. На современном компьютере данный процесс не может быть долгим, а пользователи устаревших ПК могут такую надпись наблюдать достаточно длительно (до 2-х часов).
Что происходит когда на компьютере идет подготовка Windows?
Содержание
- Что происходит когда на компьютере идет подготовка Windows?
- Что делать, если подготовка Windows зависла?
- Что делать если не помогло?
Система уже загрузила необходимые файлы для обновлений и готовит систему для дальнейшего процесса. В этот момент происходит распаковка файлов и создание резервной копии на случай, если произойдет непредвиденный сбой или отключится питание. На скорость данного процесса влияет жесткий диск — пользователям с классическим HDD придется ждать дольше, чем владельцам компьютера с SSD.
Что делать, если подготовка Windows зависла?
Данный процесс не может занимать больше 30 минут, если у вас современный компьютер. Если прошло больше времени, то, скорее всего, компьютер завис. К сожалению, у данного процесса нет визуального прогресс бара, который бы показывал процесс выполнения задачи, поэтому сложно понять, завис компьютер или нет.
Косвенный признак, что компьютер не завис — мигание светодиода жесткого диска. Однако, если он мигает равномерно, то это не может говорить о нормальной работе ПК, возможно главный процесс завис, а с жестким диском работает иная служба Windows.
Что делать в данном случае? Можно попробовать нажимать различные клавиши на клавиатуре, пошевелить мышь и нажать на кнопки. Возможно, система развиснет. Если манипуляции не помогли, то выход только один — перезагрузка компьютера.
Не забудьте подписаться на наш Дзен
Пробуем сделать мягкий рестарт с помощью комбинации клавиш Ctrl + Alt + Del. Если это не помогает, то нужно найти на корпусе ПК кнопку «Reset» (Сброс) и нажать на нее.
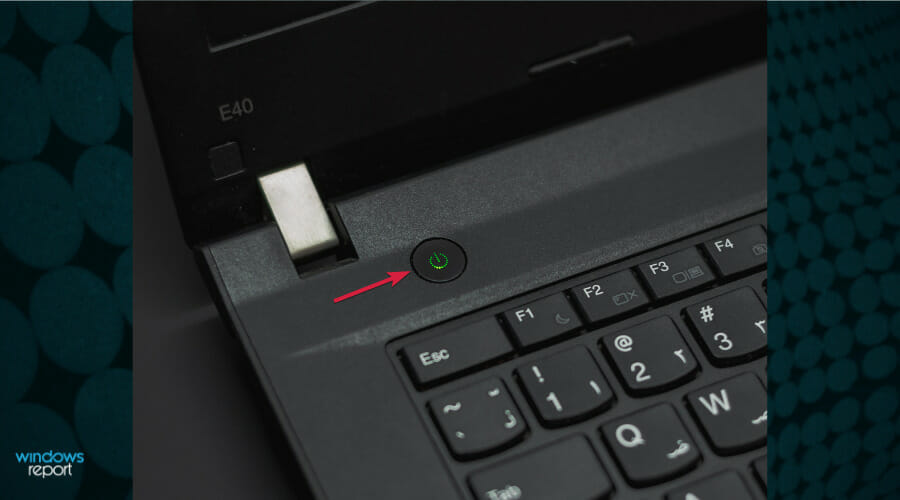
Если нет кнопки (на ноутбуках), нужно нажать клавишу питания и подержать до тех пор, пока компьютер не отключится. После включения или перезагрузки система должна продолжить работу с обновлениями — в 99% случаев все проходит нормально и компьютер более не зависает.
Что делать если не помогло?
Такое бывает очень редко — во время обновлений система делает многоступенчатый бэкап. Если после перезагрузки компьютер вновь зависает, то с большой вероятностью имеются проблемы с жестким диском или оперативной памятью.
Чтобы принудительно убрать процесс обновления нужно загрузиться с установочного диска и выбрать пункт «Удалить обновления». В случае, если и это не помогло, то нужно делать откат до последней контрольной точки.

Распространенная ошибка, когда Windows 10 зависла на подготовке после крупного обновления или первоначальной чистой установке системы. По большей части вам ничего ненужно делать, а всего лишь дождаться окончание процесса, когда система обновиться и установит нужные пакеты обновлений. Это может занять примерно 2-3 часа, но на форуме microsoft у некоторых пользователей время ожидания доходило до 26 часов. Скорее всего был медленный интернет и слабый ноутбук.
Понятное дело, что это может случиться и на работе, которая будет парализована из-за долго ожидания надписи «Подготовка Windows не выключайте компьютер» на синем экране. В этом случае, можно попробовать решение, но прежде всего вы должны определить, крутиться ли анимированный кружочек, мигает ли светодиодный индикатор диска на корпусе. Если да, то лучше дождаться окончание процесса. Если нет, и вы не хотите ждать ни при каких обстоятельствах, то разберем, как исправить долгую подготовку Windows.
Что делать, когда подготовка Windows долго висит?
Рекомендую дождаться окончание процесса, которое может занять до 3 часов. Если вы используете ноутбук, то вы должны понимать, что на нем включен режим энергопотребления при подключении WiFi. Ноутбук будет все время входить в спящий режим, что будет нарушать работу установки обновления.
1. Мини-сброс ПК
- Выключите систему.
- Отсоедините все USB провода с портов как принтер, флешки и т.п.
- Отсоедините кабель питания (220В) от ПК или ноутбука.
- Отсоедините провод Интернета от ПК, если это ноутбук, то нужно отключить WiFi на роутере или сделать его не в зоне досягаемости.
- Далее нажмите на кнопку выключения на самом ПК и удерживайте секунд 40, чтобы разрядить конденсаторы. Если ноутбук, то извлеките батарею и потом удерживайте кнопку выключения.
- Включите всё обратно и загрузитесь.
2. Удалить проблемные файлы
Шаг 1. Выключите 3-5 раз компьютер, доходя до пункта подготовки Windows, физической кнопкой на корпусе. Вас должно перебросить дополнительные параметры загрузки, где вы должны запустить командную строку. В командной строке введите следующую команду:
C: cd WindowsSystem32LogFilesSrt. SrtTrail.txt
Шаг 2. Если появится после введенной выше команды сообщение, что файл vsock.sys поврежден, то вводим ниже команды, чтобы его удалить. Если никаких сообщений нет, то пропускаете данный способ.
cd C:WindowsSystem32drivers— переходим в корень папки drivers.del vsrock.sys— удаляем файл vsock.sys.
3. Восстановление при загрузке
В дополнительных параметрах выберите «Восстановление при загрузке«, после чего проверьте подготовку Windows. Желательно подождать немного, чтобы обвноелния всё таки установились. Если не помогло, то в тех же дополнительных параметрах вы можете «Удалить обновления».
4. Сброс папок Sf.Distribution и catroot2
Папки SoftwareDistribution и catroot2 отвечают за обновления в системе. И если в этих папках будут повреждены каким-либо образом файлы обнволния, то будут различные ошибки, в том числе, когда подготовка Windoiws зависла. Запустите командную строку через дополнительные параметры и введите две команды по очереди, после чего перезагрузитесь:
ren C:WindowsSoftwareDistribution SoftwareDistribution.mwpren C:WindowsSystem32catroot2 catroot2.mwp
Смотрите еще:
- 9 Причин Почему Компьютер с Windows Зависает
- Как исправить Черный Экран после обновления Windows 10
- Как установить вручную определенный патч обновления Windows 10
- Как исправить ошибки центра обновлений Windows 10
- Как удалить старые обновления Windows 10
[ Telegram | Поддержать ]
This process shouldn’t take too long, but if it does, try out our solutions
by Ivan Jenic
Passionate about all elements related to Windows and combined with his innate curiosity, Ivan has delved deep into understanding this operating system, with a specialization in drivers and… read more
Updated on January 4, 2023
Reviewed by
Vlad Turiceanu
Passionate about technology, Windows, and everything that has a power button, he spent most of his time developing new skills and learning more about the tech world. Coming… read more
- When you are stuck on a Getting Windows ready. Don’t turn off your PC screen, you should wait for a couple of minutes.
- This issue can occur after performing updates or after a restart and for some, it also triggers a reboot loop.
- A startup repair or accessing the Safe Mode can also help you fix the problem in no time.
XINSTALL BY CLICKING THE DOWNLOAD FILE
This software will repair common computer errors, protect you from file loss, malware, hardware failure and optimize your PC for maximum performance. Fix PC issues and remove viruses now in 3 easy steps:
- Download Restoro PC Repair Tool that comes with Patented Technologies (patent available here).
- Click Start Scan to find Windows issues that could be causing PC problems.
- Click Repair All to fix issues affecting your computer’s security and performance
- Restoro has been downloaded by 0 readers this month.
One of the problems that troubled a lot of PC users is that the screen gets stuck on the following message: Getting Windows ready. Don’t turn off your computer.
The message is displayed so you understand that some optimization and configuration processes are working and you shouldn’t disrupt them by turning off your machine.
If your computer is stuck on getting Windows ready, then read on to find out how long to wait for and when to take action and fix the issue.
- Getting Windows ready — how long to wait for?
- Why is my computer stuck at the Getting Windows ready screen?
- How can I fix Getting Windows Ready stuck?
- 1. Hard shut down your PC
- 2. Perform a Startup Repair
- 3. Perform a clean reinstallation
- 4. Uninstall recently installed software
- How to fix Getting Windows ready restarting loop?
Getting Windows ready – how long to wait for?
Note that the estimated waiting time is around 5 minutes or so. However, some users were waiting for ages, and it seems that this issue is more prone to HP, DELL, and Lenovo PC and laptop users.
You can usually figure out if the process is stuck if there is no animation on the Getting Windows ready screen.
Why is my computer stuck at the Getting Windows ready screen?
There are various issues that can occur with Windows updates, and in this article, we’re going to focus on the following problems:
- Getting Windows ready infinite loop/ update loop/ boot loop/ restarting loop – Many users reported that they are stuck in a restart loop that prevents them from accessing Windows
- Getting Windows ready after a restart – This issue is most likely caused by an incomplete update, and Windows will try to finish its installation every time you restart your PC
- Getting Windows ready working on updates – This is a variation of this message that appears usually after a major Windows update. To fix this problem, be sure to try some of the solutions from this article
- Getting Windows ready stuck after update – In certain cases, this can appear after installing an update; sometimes the installation process isn’t finished and that causes this message to show up
It’s hard to address this issue, though, since you’re unable to reach your system and perform troubleshooting. Here are some workarounds you can try out below.
How can I fix Getting Windows Ready stuck?
1. Hard shut down your PC
After some time, you should hard shut down your PC. Keep in mind that this isn’t as dangerous as some would say. The procedure may be finished after a while, but the screen will remain in an idle state.
The best way to determine the right time for the hard restart/shutdown is to look at the HDD activity lamp. If the lamp isn’t blinking, that means that the procedure is over, and you should shut down your PC.
If the system starts as intended, you should be good to go. If that’s not the case, your only viable option is to start the reinstallation procedure from scratch.
But this time we advise you to perform a clean reinstall. There’s a grave danger that your system won’t perform like it’s supposed to after this kind of failure.
2. Perform a Startup Repair
- Hold the Shift key down and press the Power button at the same time.
- Continue holding the Shift key, while the machine is powering on.
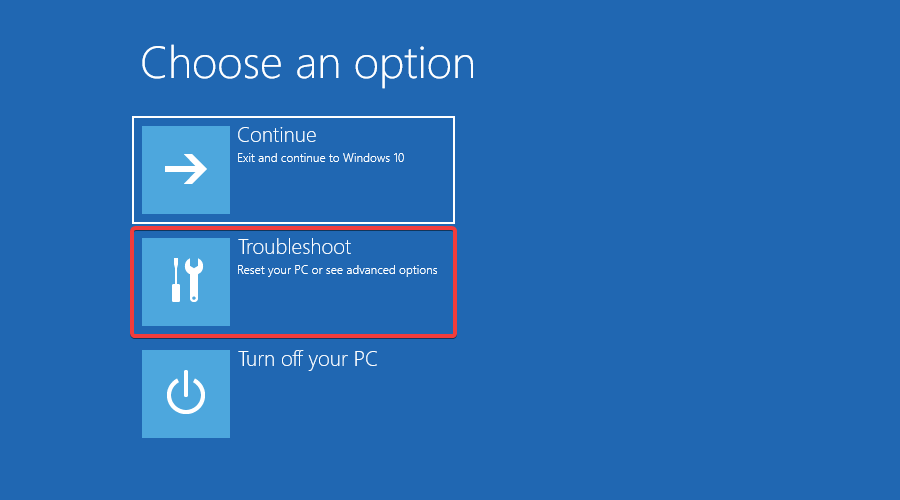
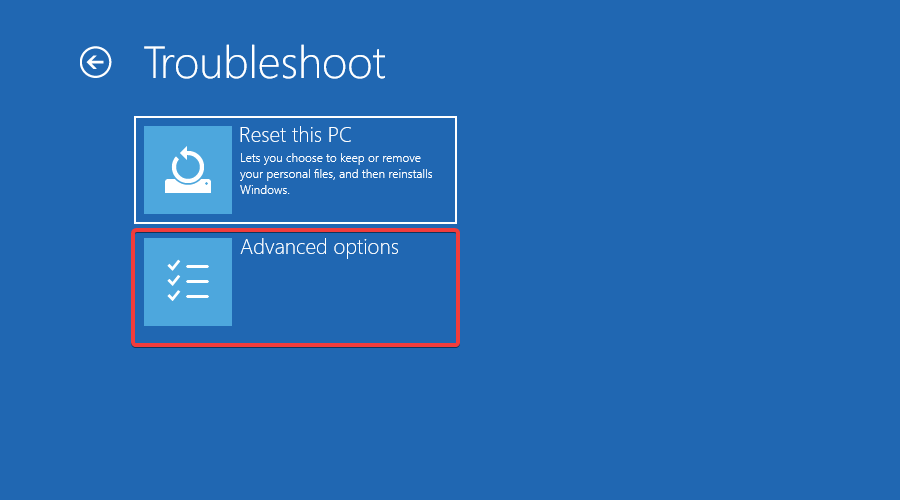
- When the PC restarts, you’ll see a screen with a few options. Click Troubleshoot.
- Click on Advanced options.
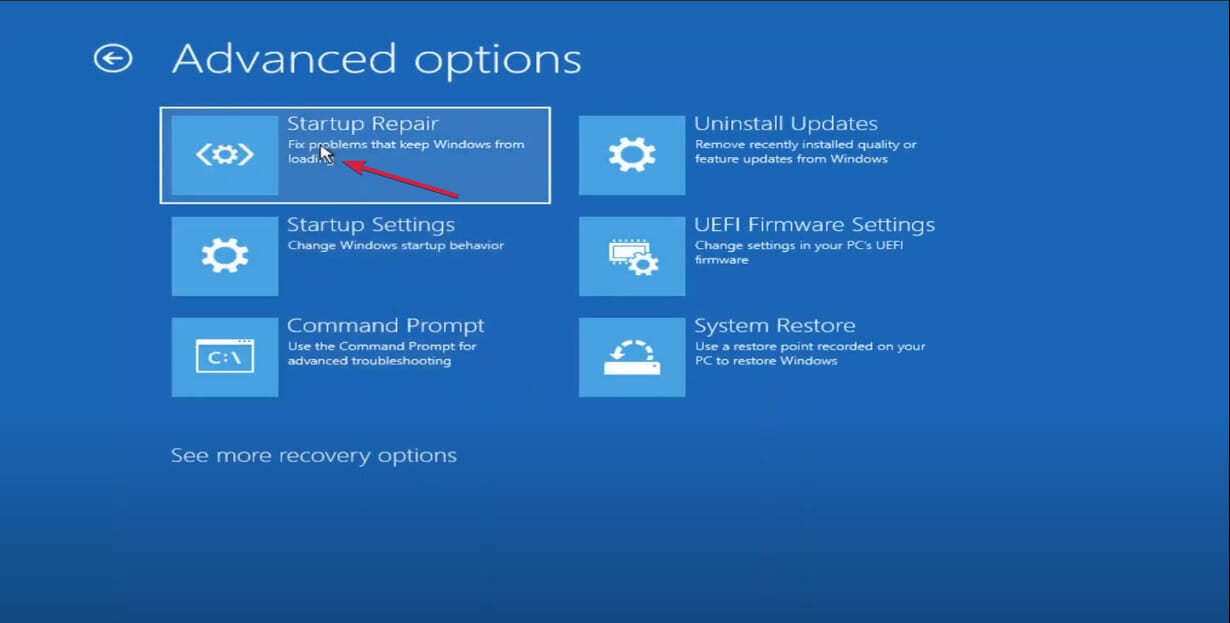
- In the Advanced options menu, choose Startup Repair.
- In the Startup Repair screen, choose an account. You’ll need an account with Administrator privileges to continue.
- After entering the password, click Continue.
- Wait for the process to finish and restart your PC afterward.
3. Perform a clean reinstallation
A clean reinstallation should get you going and fix the Getting Windows Ready stuck issue. Make sure you back up sensitive data from the system partition and have your license key ready because otherwise, you’ll be in a lot of trouble.
Moreover, the reinstallation process is not as lengthy and you should be able to finish it in less than one hour or so, including driver check-up and customization of the system to your liking.
To perform a clean installation of Windows 10, you’ll need to create a Windows 10 installation media using the Media Creation Tool. Since you can’t access your PC, you’ll have to create installation media on another PC. After doing that you need to follow these steps:
- Connect the Windows 10 installation media to your PC and boot from it. Keep in mind that you might have to press the appropriate key or change your boot priority in BIOS in order to boot from Windows 10 installation media.
- Choose the desired language and click on Next.
- Click on Install Now and follow the instructions on your screen. Keep in mind that clean install will remove all files from the selected drive, so be sure to back up important files beforehand.
In addition, you must select the correct drive in order to perform a clean install. If you accidentally select the wrong drive, you’ll remove all files from that drive, so be extra cautious.
After the setup process is completed, the problem should be completely resolved. For more information, our guide on how to perform a clean reinstallation will provide you with a detailed explanation.
- Windows Update is not working in Windows 10/11
- How to fix Windows Update errors
- Windows Update Service is not running
Some PC issues are hard to tackle, especially when it comes to corrupted repositories or missing Windows files. If you are having troubles fixing an error, your system may be partially broken.
We recommend installing Restoro, a tool that will scan your machine and identify what the fault is.
Click here to download and start repairing.
Since clean install can be a complicated procedure, many users are suggesting resetting Windows 10 instead.
To do that, you need to do the following:
- Follow Steps 1 and 2 from above.
- Now click on Repair your computer.
- Select Troubleshoot, then Reset this PC, and finally click on Remove everything.
- Select your Windows installation and choose Only the drive where Windows is installed, then Just remove my files.
- Now click on the Reset button to start resetting your Windows 10 installation.
Both reset and clean install will remove all files from your system drive and reinstall Windows 10, so feel free to use any of these methods.
If you need more details, we have a complete guide on how to reset your PC that will help you all through the process.
4. Uninstall recently installed software
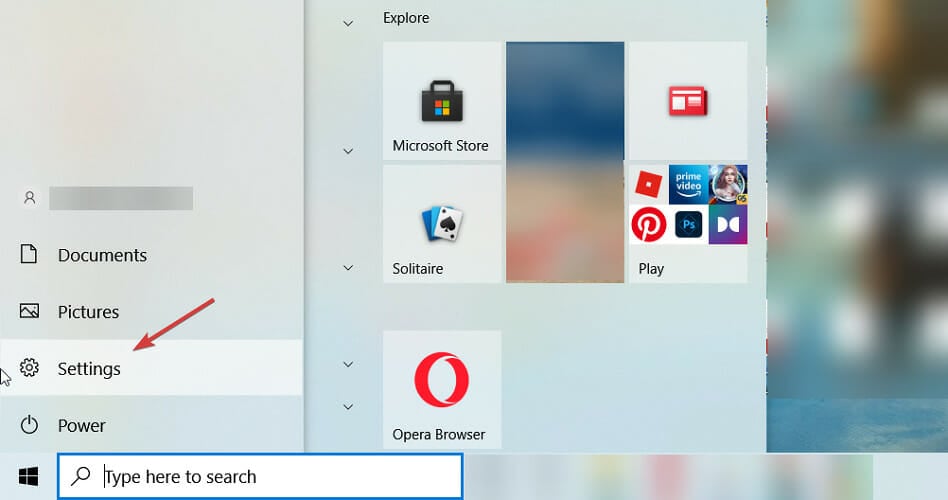
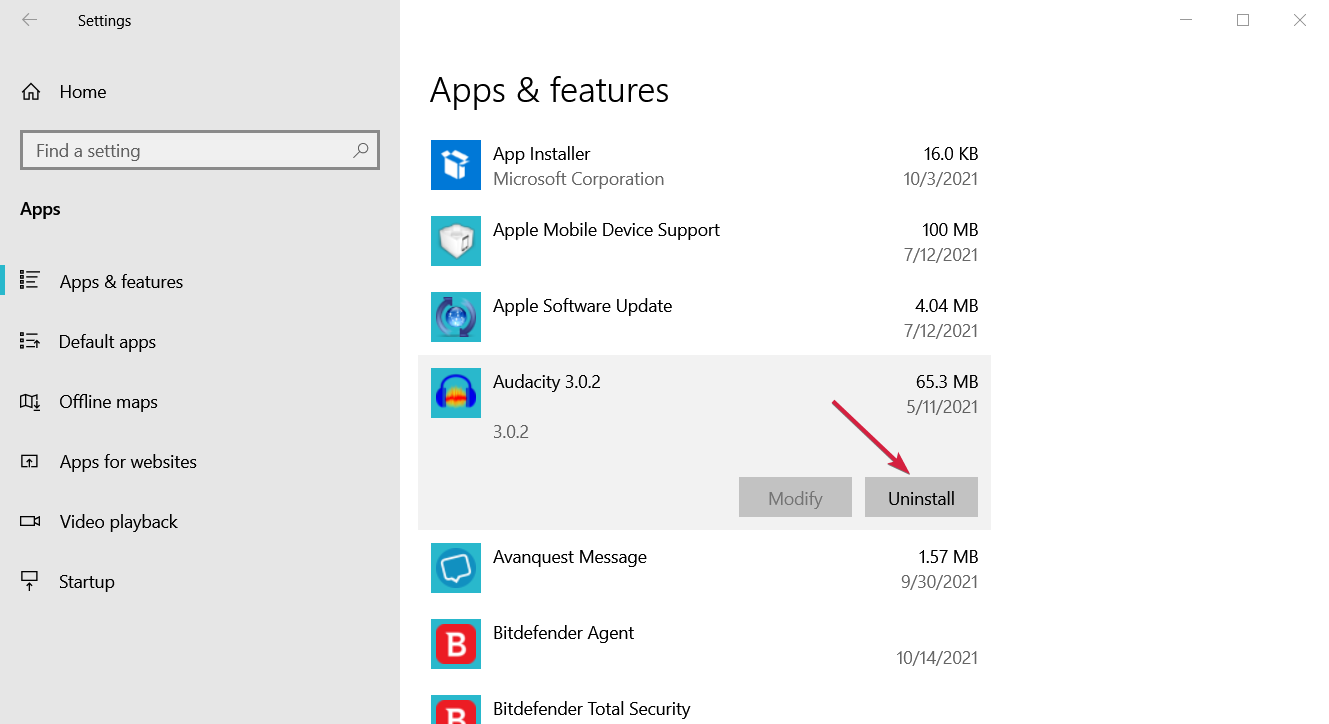
- Click the Start button and select Settings.
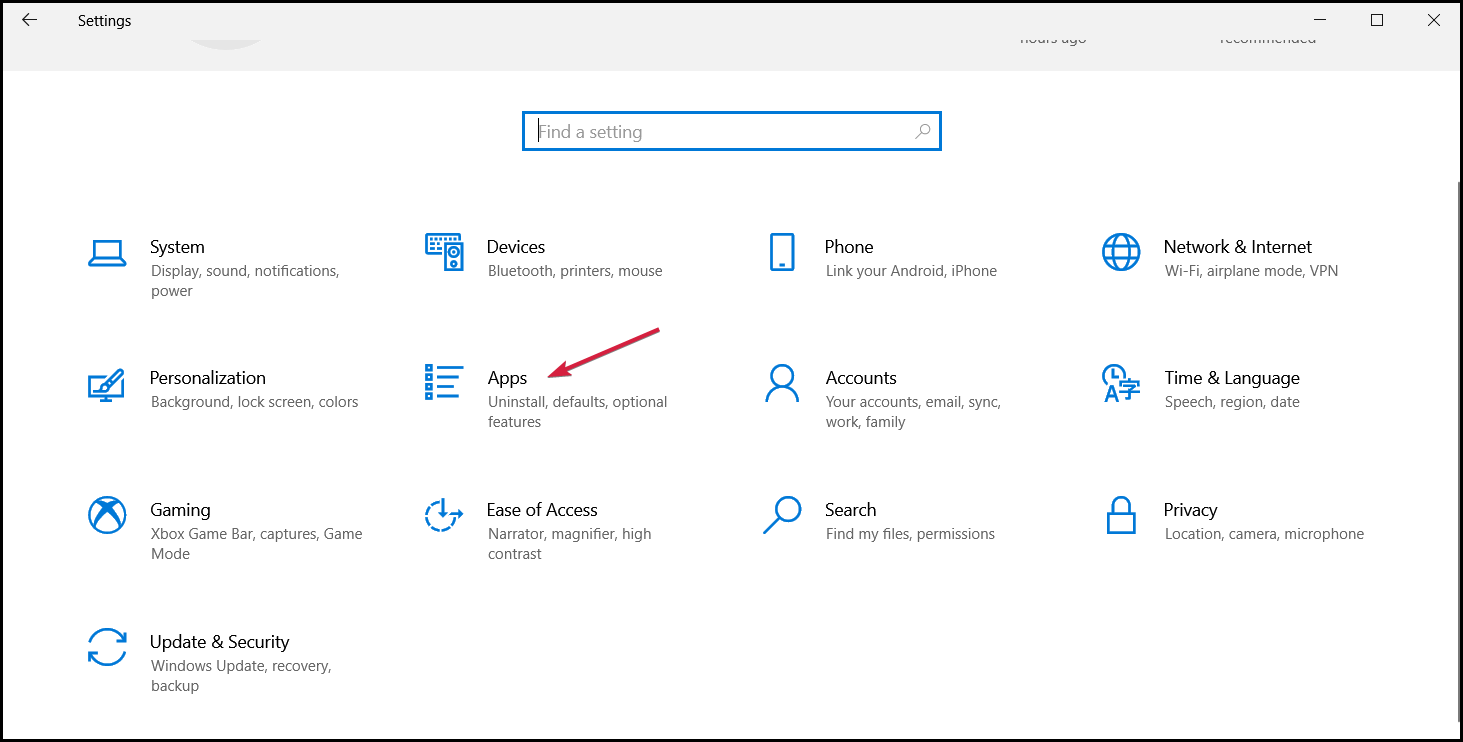
- Now click on Apps.
- Just select the recently installed app and select Uninstall.
If your Windows update process went smoothly prior to installing particular software on your computer, then we may have found the culprit.
That means that probably, the respective software solutions are not fully compatible with the latest Windows 10 OS version, you may encounter update errors.
So, before downloading any software on your PC, make sure it’s fully compatible with your OS.
In this case, use the Power button to turn off your computer, power it back on, and uninstall any recently installed apps and programs. Then restart your machine and check for updates again.
- Failed to Determine Source Edition Type: 5 Ways to Fix It
- Windows Update Error 80200053: 4 Quick Fixes
- Windows Update Error 0x80073701 [SOLVED]
- Windows Update Error 0x80070424: 7 Simple Solutions to Apply
How to fix Getting Windows ready restarting loop?
Some of our readers experienced a boot loop with the Getting Windows ready window every time and that can be extremely frustrating.
However, the solution to this problem is to start the PC in Safe Mode and then use some of the troubleshooting methode described above.
We actually have an extensive guide on what to do if your PC is stuck into a boot loop and you will find a lot more information.
The installation process of Windows gradually becomes easier with every new system introduction. Most of us remember the lengthy installation procedure of XP, with all the buzz about drivers and initial setup. Luckily, that’s not the case with Windows 10.
But there’s good reasoning why users detest oversimplified installation processes. Firstly, most of your drivers are auto installed through the setup.
Secondly, there’s something that may go wrong with the installation. And when that happens, you may run back to Windows 7 or even good old Windows XP.
Another common issue encountered by users is Preparing Windows is Stuck. Learn to fix it by following our solutions in the dedicated guide.
We certainly hope this will help you upgrade to the latest Windows edition and unblock the computer stuck on Getting Windows ready.
If you have any comments or questions about your Getting Windows Ready stuck issue experience, make sure to post them below.
Still having issues? Fix them with this tool:
SPONSORED
If the advices above haven’t solved your issue, your PC may experience deeper Windows problems. We recommend downloading this PC Repair tool (rated Great on TrustPilot.com) to easily address them. After installation, simply click the Start Scan button and then press on Repair All.
Newsletter
This process shouldn’t take too long, but if it does, try out our solutions
by Ivan Jenic
Passionate about all elements related to Windows and combined with his innate curiosity, Ivan has delved deep into understanding this operating system, with a specialization in drivers and… read more
Updated on January 4, 2023
Reviewed by
Vlad Turiceanu
Passionate about technology, Windows, and everything that has a power button, he spent most of his time developing new skills and learning more about the tech world. Coming… read more
- When you are stuck on a Getting Windows ready. Don’t turn off your PC screen, you should wait for a couple of minutes.
- This issue can occur after performing updates or after a restart and for some, it also triggers a reboot loop.
- A startup repair or accessing the Safe Mode can also help you fix the problem in no time.
XINSTALL BY CLICKING THE DOWNLOAD FILE
This software will repair common computer errors, protect you from file loss, malware, hardware failure and optimize your PC for maximum performance. Fix PC issues and remove viruses now in 3 easy steps:
- Download Restoro PC Repair Tool that comes with Patented Technologies (patent available here).
- Click Start Scan to find Windows issues that could be causing PC problems.
- Click Repair All to fix issues affecting your computer’s security and performance
- Restoro has been downloaded by 0 readers this month.
One of the problems that troubled a lot of PC users is that the screen gets stuck on the following message: Getting Windows ready. Don’t turn off your computer.
The message is displayed so you understand that some optimization and configuration processes are working and you shouldn’t disrupt them by turning off your machine.
If your computer is stuck on getting Windows ready, then read on to find out how long to wait for and when to take action and fix the issue.
- Getting Windows ready — how long to wait for?
- Why is my computer stuck at the Getting Windows ready screen?
- How can I fix Getting Windows Ready stuck?
- 1. Hard shut down your PC
- 2. Perform a Startup Repair
- 3. Perform a clean reinstallation
- 4. Uninstall recently installed software
- How to fix Getting Windows ready restarting loop?
Getting Windows ready – how long to wait for?
Note that the estimated waiting time is around 5 minutes or so. However, some users were waiting for ages, and it seems that this issue is more prone to HP, DELL, and Lenovo PC and laptop users.
You can usually figure out if the process is stuck if there is no animation on the Getting Windows ready screen.
Why is my computer stuck at the Getting Windows ready screen?
There are various issues that can occur with Windows updates, and in this article, we’re going to focus on the following problems:
- Getting Windows ready infinite loop/ update loop/ boot loop/ restarting loop – Many users reported that they are stuck in a restart loop that prevents them from accessing Windows
- Getting Windows ready after a restart – This issue is most likely caused by an incomplete update, and Windows will try to finish its installation every time you restart your PC
- Getting Windows ready working on updates – This is a variation of this message that appears usually after a major Windows update. To fix this problem, be sure to try some of the solutions from this article
- Getting Windows ready stuck after update – In certain cases, this can appear after installing an update; sometimes the installation process isn’t finished and that causes this message to show up
It’s hard to address this issue, though, since you’re unable to reach your system and perform troubleshooting. Here are some workarounds you can try out below.
How can I fix Getting Windows Ready stuck?
1. Hard shut down your PC
After some time, you should hard shut down your PC. Keep in mind that this isn’t as dangerous as some would say. The procedure may be finished after a while, but the screen will remain in an idle state.
The best way to determine the right time for the hard restart/shutdown is to look at the HDD activity lamp. If the lamp isn’t blinking, that means that the procedure is over, and you should shut down your PC.
If the system starts as intended, you should be good to go. If that’s not the case, your only viable option is to start the reinstallation procedure from scratch.
But this time we advise you to perform a clean reinstall. There’s a grave danger that your system won’t perform like it’s supposed to after this kind of failure.
2. Perform a Startup Repair
- Hold the Shift key down and press the Power button at the same time.
- Continue holding the Shift key, while the machine is powering on.
- When the PC restarts, you’ll see a screen with a few options. Click Troubleshoot.
- Click on Advanced options.
- In the Advanced options menu, choose Startup Repair.
- In the Startup Repair screen, choose an account. You’ll need an account with Administrator privileges to continue.
- After entering the password, click Continue.
- Wait for the process to finish and restart your PC afterward.
3. Perform a clean reinstallation
A clean reinstallation should get you going and fix the Getting Windows Ready stuck issue. Make sure you back up sensitive data from the system partition and have your license key ready because otherwise, you’ll be in a lot of trouble.
Moreover, the reinstallation process is not as lengthy and you should be able to finish it in less than one hour or so, including driver check-up and customization of the system to your liking.
To perform a clean installation of Windows 10, you’ll need to create a Windows 10 installation media using the Media Creation Tool. Since you can’t access your PC, you’ll have to create installation media on another PC. After doing that you need to follow these steps:
- Connect the Windows 10 installation media to your PC and boot from it. Keep in mind that you might have to press the appropriate key or change your boot priority in BIOS in order to boot from Windows 10 installation media.
- Choose the desired language and click on Next.
- Click on Install Now and follow the instructions on your screen. Keep in mind that clean install will remove all files from the selected drive, so be sure to back up important files beforehand.
In addition, you must select the correct drive in order to perform a clean install. If you accidentally select the wrong drive, you’ll remove all files from that drive, so be extra cautious.
After the setup process is completed, the problem should be completely resolved. For more information, our guide on how to perform a clean reinstallation will provide you with a detailed explanation.
- Windows Update is not working in Windows 10/11
- How to fix Windows Update errors
- Windows Update Service is not running
Some PC issues are hard to tackle, especially when it comes to corrupted repositories or missing Windows files. If you are having troubles fixing an error, your system may be partially broken.
We recommend installing Restoro, a tool that will scan your machine and identify what the fault is.
Click here to download and start repairing.
Since clean install can be a complicated procedure, many users are suggesting resetting Windows 10 instead.
To do that, you need to do the following:
- Follow Steps 1 and 2 from above.
- Now click on Repair your computer.
- Select Troubleshoot, then Reset this PC, and finally click on Remove everything.
- Select your Windows installation and choose Only the drive where Windows is installed, then Just remove my files.
- Now click on the Reset button to start resetting your Windows 10 installation.
Both reset and clean install will remove all files from your system drive and reinstall Windows 10, so feel free to use any of these methods.
If you need more details, we have a complete guide on how to reset your PC that will help you all through the process.
4. Uninstall recently installed software
- Click the Start button and select Settings.
- Now click on Apps.
- Just select the recently installed app and select Uninstall.
If your Windows update process went smoothly prior to installing particular software on your computer, then we may have found the culprit.
That means that probably, the respective software solutions are not fully compatible with the latest Windows 10 OS version, you may encounter update errors.
So, before downloading any software on your PC, make sure it’s fully compatible with your OS.
In this case, use the Power button to turn off your computer, power it back on, and uninstall any recently installed apps and programs. Then restart your machine and check for updates again.
- Failed to Determine Source Edition Type: 5 Ways to Fix It
- Windows Update Error 80200053: 4 Quick Fixes
- Windows Update Error 0x80073701 [SOLVED]
- Windows Update Error 0x80070424: 7 Simple Solutions to Apply
How to fix Getting Windows ready restarting loop?
Some of our readers experienced a boot loop with the Getting Windows ready window every time and that can be extremely frustrating.
However, the solution to this problem is to start the PC in Safe Mode and then use some of the troubleshooting methode described above.
We actually have an extensive guide on what to do if your PC is stuck into a boot loop and you will find a lot more information.
The installation process of Windows gradually becomes easier with every new system introduction. Most of us remember the lengthy installation procedure of XP, with all the buzz about drivers and initial setup. Luckily, that’s not the case with Windows 10.
But there’s good reasoning why users detest oversimplified installation processes. Firstly, most of your drivers are auto installed through the setup.
Secondly, there’s something that may go wrong with the installation. And when that happens, you may run back to Windows 7 or even good old Windows XP.
Another common issue encountered by users is Preparing Windows is Stuck. Learn to fix it by following our solutions in the dedicated guide.
We certainly hope this will help you upgrade to the latest Windows edition and unblock the computer stuck on Getting Windows ready.
If you have any comments or questions about your Getting Windows Ready stuck issue experience, make sure to post them below.
Still having issues? Fix them with this tool:
SPONSORED
If the advices above haven’t solved your issue, your PC may experience deeper Windows problems. We recommend downloading this PC Repair tool (rated Great on TrustPilot.com) to easily address them. After installation, simply click the Start Scan button and then press on Repair All.


