-
- Sep 15, 2018
-
- 13
-
- 0
-
- 10
- 0

-
#1
System specs-
intel core i7 8700K
ASUS Z370F Gaming
2*2 TB sata HDD
1*500gb SSD
Intel optane MEMPEK1W016GA 16GB
windows 10 pro 64bit with latest updates
-
- May 28, 2014
-
- 13
-
- 0
-
- 4,510
- 1
-
#6
If Windows does not let you do that for some reasons in its very basic «Disk Manager» (limitations in the possible configurations recognized, or stupid restrictions in its UI that does not support any «advanced mode», not even with some warnings), you can do that with free tools like «Minitool Partition Wizard» (which is a lot simpler to use that the builting Disk Management in Windows, and that even blocks you for performing some changes that are still supported by the kernel and filesystem drivers, or that does not offer options only available with complex options using command line tools like Diskpart or Powershell commands).
Note that the free version of «Minitool Partition Wizard» is usable for almost all options, except a few ones mostly used on servers (like dynamic disks, or changing the cluster size, or changing some attributes, or advanced options for RAID arrays and SAN disks), or for some recovery options, for which you need to buy the «Pro» version (though it’s not expensive); but it is not intrusive, and won’t constantly popup you with ads; and unlike other commercial third party disk management tools, it also has no time limitations, or limitations on volume sizes or number of partitions.
You can also do these changes using some bootable Linux Live CD or USB (note that when you change the boot order, or if you enable CSM, the current TPM automatic boot will be disabled, and the next time you boot Windows in secure mode, it will enter into TPM recovery mode requiring the existing TPM or password/pin recovery or external USB: this is normal behavior which also occurs if ever you have unplugged and replugged in the TPM module. (Microsoft explain the conditions under which such revalidation will occur: don’t loose your TPM recovery backups! If you are not connected to a Windows domain, Microsoft also proposes to recover your Bitlocker encryption keys from your online Microsoft account using 2-factor authentication, but this requires you to register your administrator account on the PC with a Microsoft live account and not jsut using local account; in enterprise domains, you can recover your Bitlocker encryption keys also by using Active Directory but you need to contact your domain admin to reauthorize your PC and allow it to boot again in secure mode).
One difficulty wit hthe new stricter requirements is that they not only want you to boot in secure mode, and with UEFI, but CSM mode must be disabled in BIOS: this has the effect of disabling many devices in BIOS, including some external storages (including some hardware RAID adapters), or display adapters, whose option ROM offers no EFI driver for secure boot: these devices must not be needed to boot your systeml but can be used with Windows drivers after booting Windows successfully: you need recent drivers for these devices that don’t need any BIOS EFI support. This can be a problem with some devices that use third party dus drivers: make sure you also update the bus drivers for your motherboard and that you have flashed the latest BIOS versions with proper EFI boot support that do not enable any «legacy devices».
This includes notably SATA controlers, USB controlers, and sometimes you’ll need to select the correct display driver as your primary display for boot (check which display board is usable: the motherboard’s discrete GPU or the third party display board and note that many legacy third party display boards don’t even have EFI support in their BIOS and will only display at boot time in legacy SVGA mode, without acceleration support!). You may also need to disable audio devices in BIOS (they will only be enabled after boot using drivers for Windows): you normally don’t need to enable and enumerate all devices at boot time, just a basic display, one keyboard, and the disks required for booting the system, their SATA and USB controlers (the various «*HCI»), and a network adapter (Ethernet or Wifi) for your primary internet connection (or LAN connection if you’re in a domain). Moderns BIOSes for EFI actually do not disable devices, they just preconfigure the BIOS without initializing these devices (that will be intialized later by the OS using its own drivers after boot), you configure just the minimum that allows the OS to be loaded and then the modern OS will no longer use the BIOS and will use its own drivers instead.

-
- Jan 4, 2016
-
- 26,485
-
- 2,791
-
- 98,390
-
- 4,201
-
#2
To change boot mode from legacy/CSM to UEFI, you’ll have to convert your OS drive from MBR to GPT.
You can use mbr2gpt utility to do this.
Converts a disk from MBR to GPT partitioning without modifying or deleting data on the disk.MBR2GPT.exe /validate|convert [/disk:<diskNumber>] [/logs:<logDirectory>] [/map:<source>=<destination>] [/allowFullOS]
Where:
/validate
— Validates that the selected disk can be converted
without performing the actual conversion./convert
— Validates that the selected disk can be converted
and performs the actual conversion./disk:<diskNumber>
— Specifies the disk number of the disk to be processed.
If not specified, the system disk is processed./logs:<logDirectory>
— Specifies the directory for logging. By default logs
are created in the %windir% directory./map:<source>=<destination>
— Specifies the GPT partition type to be used for a
given MBR partition type not recognized by Windows.
Multiple /map switches are allowed./allowFullOS
— Allows the tool to be used from the full Windows
environment. By default, this tool can only be used
from the Windows Preinstallation Environment.
-
- Sep 15, 2018
-
- 13
-
- 0
-
- 10
-
- 0
-
#3
To change boot mode from legacy/CSM to UEFI, you’ll have to convert your OS drive from MBR to GPT.
You can use mbr2gpt utility to do this.
Converts a disk from MBR to GPT partitioning without modifying or deleting data on the disk.MBR2GPT.exe /validate|convert [/disk:<diskNumber>] [/logs:<logDirectory>] [/map:<source>=<destination>] [/allowFullOS]
Where:
/validate
— Validates that the selected disk can be converted
without performing the actual conversion./convert
— Validates that the selected disk can be converted
and performs the actual conversion./disk:<diskNumber>
— Specifies the disk number of the disk to be processed.
If not specified, the system disk is processed./logs:<logDirectory>
— Specifies the directory for logging. By default logs
are created in the %windir% directory./map:<source>=<destination>
— Specifies the GPT partition type to be used for a
given MBR partition type not recognized by Windows.
Multiple /map switches are allowed./allowFullOS
— Allows the tool to be used from the full Windows
environment. By default, this tool can only be used
from the Windows Preinstallation Environment.
My windows is running on Legacy first I have to change it to UEFI than I can change MBR to GPT is there any way to perform this without reinstalling windows?
-
- Jan 4, 2016
-
- 26,485
-
- 2,791
-
- 98,390
- 4,201
-
#4
Not exactly.
You:
- run mbr2gpt command first,
reboot into BIOS,
change boot mode from legacy/CSM to UEFI,
change boot order, so windows boot manager is first,
boot into windows.
You run mbr2gpt command this way:
(replace X with Disk number of your OS drive. Check Disk number in Disk Management)
- first check, if there are any issues
mbr2gpt /validate /disk:X /allowFullOS
then perform conversion
mbr2gpt /convert /disk:X /allowFullOS
If you can’t determine correct Disk number, then post screenshot from Disk Management.
-
- Sep 15, 2018
-
- 13
-
- 0
-
- 10
- 0
-
#5
Not exactly.
You:
- run mbr2gpt command first,
reboot into BIOS,
change boot mode from legacy/CSM to UEFI,
change boot order, so windows boot manager is first,
boot into windows.
You run mbr2gpt command this way:
(replace X with Disk number of your OS drive. Check Disk number in Disk Management)
- first check, if there are any issues
mbr2gpt /validate /disk:X /allowFullOS
then perform conversion
mbr2gpt /convert /disk:X /allowFullOS
If you can’t determine correct Disk number, then post screenshot from Disk Management.
Stuck with some new problem after rebooting cmd prompt is asking for a password which I never setup tried login pin of account and password of Microsoft account linked with my system but cannot bypass that tried solutions from this thread but no solution.
https://answers.microsoft.com/en-us/windows/forum/windows_10-security/windows-10-asks-for-administrator-password/df02b05b-f081-451f-8ee7-36c73ed2ba1a
-
- May 28, 2014
-
- 13
-
- 0
-
- 4,510
- 1
-
#6
If Windows does not let you do that for some reasons in its very basic «Disk Manager» (limitations in the possible configurations recognized, or stupid restrictions in its UI that does not support any «advanced mode», not even with some warnings), you can do that with free tools like «Minitool Partition Wizard» (which is a lot simpler to use that the builting Disk Management in Windows, and that even blocks you for performing some changes that are still supported by the kernel and filesystem drivers, or that does not offer options only available with complex options using command line tools like Diskpart or Powershell commands).
Note that the free version of «Minitool Partition Wizard» is usable for almost all options, except a few ones mostly used on servers (like dynamic disks, or changing the cluster size, or changing some attributes, or advanced options for RAID arrays and SAN disks), or for some recovery options, for which you need to buy the «Pro» version (though it’s not expensive); but it is not intrusive, and won’t constantly popup you with ads; and unlike other commercial third party disk management tools, it also has no time limitations, or limitations on volume sizes or number of partitions.
You can also do these changes using some bootable Linux Live CD or USB (note that when you change the boot order, or if you enable CSM, the current TPM automatic boot will be disabled, and the next time you boot Windows in secure mode, it will enter into TPM recovery mode requiring the existing TPM or password/pin recovery or external USB: this is normal behavior which also occurs if ever you have unplugged and replugged in the TPM module. (Microsoft explain the conditions under which such revalidation will occur: don’t loose your TPM recovery backups! If you are not connected to a Windows domain, Microsoft also proposes to recover your Bitlocker encryption keys from your online Microsoft account using 2-factor authentication, but this requires you to register your administrator account on the PC with a Microsoft live account and not jsut using local account; in enterprise domains, you can recover your Bitlocker encryption keys also by using Active Directory but you need to contact your domain admin to reauthorize your PC and allow it to boot again in secure mode).
One difficulty wit hthe new stricter requirements is that they not only want you to boot in secure mode, and with UEFI, but CSM mode must be disabled in BIOS: this has the effect of disabling many devices in BIOS, including some external storages (including some hardware RAID adapters), or display adapters, whose option ROM offers no EFI driver for secure boot: these devices must not be needed to boot your systeml but can be used with Windows drivers after booting Windows successfully: you need recent drivers for these devices that don’t need any BIOS EFI support. This can be a problem with some devices that use third party dus drivers: make sure you also update the bus drivers for your motherboard and that you have flashed the latest BIOS versions with proper EFI boot support that do not enable any «legacy devices».
This includes notably SATA controlers, USB controlers, and sometimes you’ll need to select the correct display driver as your primary display for boot (check which display board is usable: the motherboard’s discrete GPU or the third party display board and note that many legacy third party display boards don’t even have EFI support in their BIOS and will only display at boot time in legacy SVGA mode, without acceleration support!). You may also need to disable audio devices in BIOS (they will only be enabled after boot using drivers for Windows): you normally don’t need to enable and enumerate all devices at boot time, just a basic display, one keyboard, and the disks required for booting the system, their SATA and USB controlers (the various «*HCI»), and a network adapter (Ethernet or Wifi) for your primary internet connection (or LAN connection if you’re in a domain). Moderns BIOSes for EFI actually do not disable devices, they just preconfigure the BIOS without initializing these devices (that will be intialized later by the OS using its own drivers after boot), you configure just the minimum that allows the OS to be loaded and then the modern OS will no longer use the BIOS and will use its own drivers instead.
| Thread starter | Similar threads | Forum | Replies | Date |
|---|---|---|---|---|
|
A
|
Question Boot failure: C drive & win 10 missing, 2nd HD reports empty | Motherboards | 7 | Jan 13, 2023 |
|
R
|
Question MB Splashscreen not showing, Windows not booting but PC is powered normally | Motherboards | 5 | Jan 10, 2023 |
|
|
Question Pc won’t boot into bios after secure boot is enabled. Windows 10. Gigabyte MB | Motherboards | 2 | Jan 2, 2023 |
|
D
|
Question ASRock B360 Pro4 failed to POST after Secure Boot was enabled ? | Motherboards | 2 | Dec 10, 2022 |
|
C
|
Question Windows and Ubuntu crash while booting | Motherboards | 2 | Dec 10, 2022 |
|
K
|
Question Gigabyte X570 Gaming X boot-loops Windows among other things ? | Motherboards | 2 | Dec 1, 2022 |
|
|
Question Gigabyte Z790 Gaming X AX won’t boot to Windows ? | Motherboards | 1 | Nov 29, 2022 |
|
K
|
Question Missing fTPM on ASUS TUF B450-Plus Gaming | Ryzen 5 2600X | Motherboards | 6 | Nov 19, 2022 |
|
M
|
Question How to enable security boot on Gigabyte Z390 Aorus Xtreme before upgrading to Windows 11? | Motherboards | 13 | Nov 10, 2022 |
|
B
|
Question Boot drive ssd invisible in bios, visible via cmd; and other box shows it in bios and boots to it | Motherboards | 6 | Oct 31, 2022 |


- Advertising
- Cookies Policies
- Privacy
- Term & Conditions
- Topics
-
- Sep 15, 2018
-
- 13
-
- 0
-
- 10
- 0
-
#1
System specs-
intel core i7 8700K
ASUS Z370F Gaming
2*2 TB sata HDD
1*500gb SSD
Intel optane MEMPEK1W016GA 16GB
windows 10 pro 64bit with latest updates
-
- May 28, 2014
-
- 13
-
- 0
-
- 4,510
- 1
-
#6
If Windows does not let you do that for some reasons in its very basic «Disk Manager» (limitations in the possible configurations recognized, or stupid restrictions in its UI that does not support any «advanced mode», not even with some warnings), you can do that with free tools like «Minitool Partition Wizard» (which is a lot simpler to use that the builting Disk Management in Windows, and that even blocks you for performing some changes that are still supported by the kernel and filesystem drivers, or that does not offer options only available with complex options using command line tools like Diskpart or Powershell commands).
Note that the free version of «Minitool Partition Wizard» is usable for almost all options, except a few ones mostly used on servers (like dynamic disks, or changing the cluster size, or changing some attributes, or advanced options for RAID arrays and SAN disks), or for some recovery options, for which you need to buy the «Pro» version (though it’s not expensive); but it is not intrusive, and won’t constantly popup you with ads; and unlike other commercial third party disk management tools, it also has no time limitations, or limitations on volume sizes or number of partitions.
You can also do these changes using some bootable Linux Live CD or USB (note that when you change the boot order, or if you enable CSM, the current TPM automatic boot will be disabled, and the next time you boot Windows in secure mode, it will enter into TPM recovery mode requiring the existing TPM or password/pin recovery or external USB: this is normal behavior which also occurs if ever you have unplugged and replugged in the TPM module. (Microsoft explain the conditions under which such revalidation will occur: don’t loose your TPM recovery backups! If you are not connected to a Windows domain, Microsoft also proposes to recover your Bitlocker encryption keys from your online Microsoft account using 2-factor authentication, but this requires you to register your administrator account on the PC with a Microsoft live account and not jsut using local account; in enterprise domains, you can recover your Bitlocker encryption keys also by using Active Directory but you need to contact your domain admin to reauthorize your PC and allow it to boot again in secure mode).
One difficulty wit hthe new stricter requirements is that they not only want you to boot in secure mode, and with UEFI, but CSM mode must be disabled in BIOS: this has the effect of disabling many devices in BIOS, including some external storages (including some hardware RAID adapters), or display adapters, whose option ROM offers no EFI driver for secure boot: these devices must not be needed to boot your systeml but can be used with Windows drivers after booting Windows successfully: you need recent drivers for these devices that don’t need any BIOS EFI support. This can be a problem with some devices that use third party dus drivers: make sure you also update the bus drivers for your motherboard and that you have flashed the latest BIOS versions with proper EFI boot support that do not enable any «legacy devices».
This includes notably SATA controlers, USB controlers, and sometimes you’ll need to select the correct display driver as your primary display for boot (check which display board is usable: the motherboard’s discrete GPU or the third party display board and note that many legacy third party display boards don’t even have EFI support in their BIOS and will only display at boot time in legacy SVGA mode, without acceleration support!). You may also need to disable audio devices in BIOS (they will only be enabled after boot using drivers for Windows): you normally don’t need to enable and enumerate all devices at boot time, just a basic display, one keyboard, and the disks required for booting the system, their SATA and USB controlers (the various «*HCI»), and a network adapter (Ethernet or Wifi) for your primary internet connection (or LAN connection if you’re in a domain). Moderns BIOSes for EFI actually do not disable devices, they just preconfigure the BIOS without initializing these devices (that will be intialized later by the OS using its own drivers after boot), you configure just the minimum that allows the OS to be loaded and then the modern OS will no longer use the BIOS and will use its own drivers instead.
-
- Jan 4, 2016
-
- 26,485
-
- 2,791
-
- 98,390
- 4,201
-
#2
To change boot mode from legacy/CSM to UEFI, you’ll have to convert your OS drive from MBR to GPT.
You can use mbr2gpt utility to do this.
Converts a disk from MBR to GPT partitioning without modifying or deleting data on the disk.MBR2GPT.exe /validate|convert [/disk:<diskNumber>] [/logs:<logDirectory>] [/map:<source>=<destination>] [/allowFullOS]
Where:
/validate
— Validates that the selected disk can be converted
without performing the actual conversion./convert
— Validates that the selected disk can be converted
and performs the actual conversion./disk:<diskNumber>
— Specifies the disk number of the disk to be processed.
If not specified, the system disk is processed./logs:<logDirectory>
— Specifies the directory for logging. By default logs
are created in the %windir% directory./map:<source>=<destination>
— Specifies the GPT partition type to be used for a
given MBR partition type not recognized by Windows.
Multiple /map switches are allowed./allowFullOS
— Allows the tool to be used from the full Windows
environment. By default, this tool can only be used
from the Windows Preinstallation Environment.
-
- Sep 15, 2018
-
- 13
-
- 0
-
- 10
- 0
-
#3
To change boot mode from legacy/CSM to UEFI, you’ll have to convert your OS drive from MBR to GPT.
You can use mbr2gpt utility to do this.
Converts a disk from MBR to GPT partitioning without modifying or deleting data on the disk.MBR2GPT.exe /validate|convert [/disk:<diskNumber>] [/logs:<logDirectory>] [/map:<source>=<destination>] [/allowFullOS]
Where:
/validate
— Validates that the selected disk can be converted
without performing the actual conversion./convert
— Validates that the selected disk can be converted
and performs the actual conversion./disk:<diskNumber>
— Specifies the disk number of the disk to be processed.
If not specified, the system disk is processed./logs:<logDirectory>
— Specifies the directory for logging. By default logs
are created in the %windir% directory./map:<source>=<destination>
— Specifies the GPT partition type to be used for a
given MBR partition type not recognized by Windows.
Multiple /map switches are allowed./allowFullOS
— Allows the tool to be used from the full Windows
environment. By default, this tool can only be used
from the Windows Preinstallation Environment.
My windows is running on Legacy first I have to change it to UEFI than I can change MBR to GPT is there any way to perform this without reinstalling windows?
-
- Jan 4, 2016
-
- 26,485
-
- 2,791
-
- 98,390
- 4,201
-
#4
Not exactly.
You:
- run mbr2gpt command first,
reboot into BIOS,
change boot mode from legacy/CSM to UEFI,
change boot order, so windows boot manager is first,
boot into windows.
You run mbr2gpt command this way:
(replace X with Disk number of your OS drive. Check Disk number in Disk Management)
- first check, if there are any issues
mbr2gpt /validate /disk:X /allowFullOS
then perform conversion
mbr2gpt /convert /disk:X /allowFullOS
If you can’t determine correct Disk number, then post screenshot from Disk Management.
-
- Sep 15, 2018
-
- 13
-
- 0
-
- 10
- 0
-
#5
Not exactly.
You:
- run mbr2gpt command first,
reboot into BIOS,
change boot mode from legacy/CSM to UEFI,
change boot order, so windows boot manager is first,
boot into windows.
You run mbr2gpt command this way:
(replace X with Disk number of your OS drive. Check Disk number in Disk Management)
- first check, if there are any issues
mbr2gpt /validate /disk:X /allowFullOS
then perform conversion
mbr2gpt /convert /disk:X /allowFullOS
If you can’t determine correct Disk number, then post screenshot from Disk Management.
Stuck with some new problem after rebooting cmd prompt is asking for a password which I never setup tried login pin of account and password of Microsoft account linked with my system but cannot bypass that tried solutions from this thread but no solution.
https://answers.microsoft.com/en-us/windows/forum/windows_10-security/windows-10-asks-for-administrator-password/df02b05b-f081-451f-8ee7-36c73ed2ba1a
-
- May 28, 2014
-
- 13
-
- 0
-
- 4,510
- 1
-
#6
If Windows does not let you do that for some reasons in its very basic «Disk Manager» (limitations in the possible configurations recognized, or stupid restrictions in its UI that does not support any «advanced mode», not even with some warnings), you can do that with free tools like «Minitool Partition Wizard» (which is a lot simpler to use that the builting Disk Management in Windows, and that even blocks you for performing some changes that are still supported by the kernel and filesystem drivers, or that does not offer options only available with complex options using command line tools like Diskpart or Powershell commands).
Note that the free version of «Minitool Partition Wizard» is usable for almost all options, except a few ones mostly used on servers (like dynamic disks, or changing the cluster size, or changing some attributes, or advanced options for RAID arrays and SAN disks), or for some recovery options, for which you need to buy the «Pro» version (though it’s not expensive); but it is not intrusive, and won’t constantly popup you with ads; and unlike other commercial third party disk management tools, it also has no time limitations, or limitations on volume sizes or number of partitions.
You can also do these changes using some bootable Linux Live CD or USB (note that when you change the boot order, or if you enable CSM, the current TPM automatic boot will be disabled, and the next time you boot Windows in secure mode, it will enter into TPM recovery mode requiring the existing TPM or password/pin recovery or external USB: this is normal behavior which also occurs if ever you have unplugged and replugged in the TPM module. (Microsoft explain the conditions under which such revalidation will occur: don’t loose your TPM recovery backups! If you are not connected to a Windows domain, Microsoft also proposes to recover your Bitlocker encryption keys from your online Microsoft account using 2-factor authentication, but this requires you to register your administrator account on the PC with a Microsoft live account and not jsut using local account; in enterprise domains, you can recover your Bitlocker encryption keys also by using Active Directory but you need to contact your domain admin to reauthorize your PC and allow it to boot again in secure mode).
One difficulty wit hthe new stricter requirements is that they not only want you to boot in secure mode, and with UEFI, but CSM mode must be disabled in BIOS: this has the effect of disabling many devices in BIOS, including some external storages (including some hardware RAID adapters), or display adapters, whose option ROM offers no EFI driver for secure boot: these devices must not be needed to boot your systeml but can be used with Windows drivers after booting Windows successfully: you need recent drivers for these devices that don’t need any BIOS EFI support. This can be a problem with some devices that use third party dus drivers: make sure you also update the bus drivers for your motherboard and that you have flashed the latest BIOS versions with proper EFI boot support that do not enable any «legacy devices».
This includes notably SATA controlers, USB controlers, and sometimes you’ll need to select the correct display driver as your primary display for boot (check which display board is usable: the motherboard’s discrete GPU or the third party display board and note that many legacy third party display boards don’t even have EFI support in their BIOS and will only display at boot time in legacy SVGA mode, without acceleration support!). You may also need to disable audio devices in BIOS (they will only be enabled after boot using drivers for Windows): you normally don’t need to enable and enumerate all devices at boot time, just a basic display, one keyboard, and the disks required for booting the system, their SATA and USB controlers (the various «*HCI»), and a network adapter (Ethernet or Wifi) for your primary internet connection (or LAN connection if you’re in a domain). Moderns BIOSes for EFI actually do not disable devices, they just preconfigure the BIOS without initializing these devices (that will be intialized later by the OS using its own drivers after boot), you configure just the minimum that allows the OS to be loaded and then the modern OS will no longer use the BIOS and will use its own drivers instead.
| Thread starter | Similar threads | Forum | Replies | Date |
|---|---|---|---|---|
|
A
|
Question Boot failure: C drive & win 10 missing, 2nd HD reports empty | Motherboards | 7 | Jan 13, 2023 |
|
R
|
Question MB Splashscreen not showing, Windows not booting but PC is powered normally | Motherboards | 5 | Jan 10, 2023 |
|
|
Question Pc won’t boot into bios after secure boot is enabled. Windows 10. Gigabyte MB | Motherboards | 2 | Jan 2, 2023 |
|
D
|
Question ASRock B360 Pro4 failed to POST after Secure Boot was enabled ? | Motherboards | 2 | Dec 10, 2022 |
|
C
|
Question Windows and Ubuntu crash while booting | Motherboards | 2 | Dec 10, 2022 |
|
K
|
Question Gigabyte X570 Gaming X boot-loops Windows among other things ? | Motherboards | 2 | Dec 1, 2022 |
|
|
Question Gigabyte Z790 Gaming X AX won’t boot to Windows ? | Motherboards | 1 | Nov 29, 2022 |
|
K
|
Question Missing fTPM on ASUS TUF B450-Plus Gaming | Ryzen 5 2600X | Motherboards | 6 | Nov 19, 2022 |
|
M
|
Question How to enable security boot on Gigabyte Z390 Aorus Xtreme before upgrading to Windows 11? | Motherboards | 13 | Nov 10, 2022 |
|
B
|
Question Boot drive ssd invisible in bios, visible via cmd; and other box shows it in bios and boots to it | Motherboards | 6 | Oct 31, 2022 |
- Advertising
- Cookies Policies
- Privacy
- Term & Conditions
- Topics
|
0 / 0 / 0 Регистрация: 03.08.2019 Сообщений: 16 |
|
|
1 |
|
|
27.10.2021, 20:05. Показов 5899. Ответов 13
Доброго времени суток. В общем, вся суть проблемы в заголовке. Хочу подготовить пк для перехода к 11 винде, на всякий. Там требует безопасную загрузку, а та в свою очередь требует UEFI, который у меня и так стоит, но включен модуль поддержки устаревших систем CSM. При его отключении пк просто заново грузит биос.
__________________
0 |

|
595 / 445 / 69 Регистрация: 29.04.2019 Сообщений: 2,160 |
|
|
27.10.2021, 21:09 |
2 |
|
Perepe, когда будете ставить 11, отключите в биосе csm, и поставьте винду с заранне подготовленной загрузочной флешки с виндой 11. зачем её ставить из-под винды? ещё и в безопасном режиме?
0 |
|
0 / 0 / 0 Регистрация: 03.08.2019 Сообщений: 16 |
|
|
27.10.2021, 21:20 [ТС] |
3 |
|
Их приложунька, «Проверка работоспособности ПК Windows», просит безопасную загрузку. Я могу ее включить в биосе. Но в сведениях о системе, пишет что биос устаревший и безопасная загрузка не поддерживается. Погуглил и сказали, что для этого нужно отключить CSM. А когда его отключаешь, загружается только биос. Миниатюры
0 |

|
595 / 445 / 69 Регистрация: 29.04.2019 Сообщений: 2,160 |
|
|
27.10.2021, 21:34 |
4 |
|
Их приложунька м-да, их приложулька лучше всех знает, подходит ли ваш комп к 11 винде. Лучше посмотрите , есть ли драйвера на вин11 на офиц сайтах вашей материнской платы и видеокарты.
0 |

|
0 / 0 / 0 Регистрация: 03.08.2019 Сообщений: 16 |
|
|
27.10.2021, 22:21 [ТС] |
5 |
|
и что из этого точно нужно? Мать у меня asrock b450m-hdv. вот все доступные дрова на офф сайте Миниатюры
0 |
|
6080 / 3579 / 305 Регистрация: 13.02.2014 Сообщений: 13,374 |
|
|
28.10.2021, 07:43 |
6 |
|
А когда его отключаешь, загружается только биос. Ну правильно. Винда поставлена под CSM и грузиться без него не будет.
3 |
|
0 / 0 / 0 Регистрация: 03.08.2019 Сообщений: 16 |
|
|
28.10.2021, 10:25 [ТС] |
7 |
|
На чистую? Это как? Ryzen 5 3600 должен подойти.
0 |
|
6080 / 3579 / 305 Регистрация: 13.02.2014 Сообщений: 13,374 |
|
|
28.10.2021, 10:43 |
8 |
|
На чистую? Это как? Загружаешься с флешки и ставишь на чистый раздел
2 |
|
0 / 0 / 0 Регистрация: 03.08.2019 Сообщений: 16 |
|
|
28.10.2021, 14:48 [ТС] |
9 |
|
Да я хотел чисто пк подготовить, чтоб потом не страдать. Заранее, так сказать.
0 |
|
Дивананалитикаиксперд 11739 / 8847 / 849 Регистрация: 08.01.2013 Сообщений: 32,625 |
|
|
28.10.2021, 15:05 |
10 |
|
чтоб потом не страдать. Хочешь страдать сейчас
1 |

|
Дивананалитикаиксперд 11739 / 8847 / 849 Регистрация: 08.01.2013 Сообщений: 32,625 |
|
|
28.10.2021, 15:08 |
11 |
|
Поржать Миниатюры
1 |
|
Модератор
20522 / 12410 / 2187 Регистрация: 23.11.2016 Сообщений: 62,050 Записей в блоге: 22 |
|
|
28.10.2021, 16:25 |
12 |
|
Поржать кстати, я об этом слышал у бригмана на канале. По его информации, майки вроде бы собираются это как-то допиливать, но не сразу. Поэтому лично я — тоже за то, чтобы ставить винду с нуля.
0 |
|
Дивананалитикаиксперд 11739 / 8847 / 849 Регистрация: 08.01.2013 Сообщений: 32,625 |
|
|
28.10.2021, 21:13 |
13 |
|
я — тоже за то, чтобы ставить винду с нуля. У многих есть куча настроенных программ и проходить весь путь с ноля очень геморно.
0 |
|
Модератор
20522 / 12410 / 2187 Регистрация: 23.11.2016 Сообщений: 62,050 Записей в блоге: 22 |
|
|
28.10.2021, 21:17 |
14 |
|
K2K, значит им придётся ждать пока майки это допилят
0 |
 Если установщик Windows 11, а возможно и какая-то программа или игра (такое тоже возможно) сообщает о том, что его не устраивает состояние безопасной загрузки и её необходимо включить — сделать это сравнительно легко, но возможны нюансы.
В этой инструкции подробно о способах включить безопасную загрузку на вашем компьютере или ноутбуке, при условии, что это возможно. Обратите внимание, если задача — установка Windows 11, существуют возможности запуска установки и без включенной безопасной загрузки (Secure Boot), например — создание загрузочной флешки в Rufus с отключением проверки совместимости при чистой установке, или обновление с обходом требований для установки.
Проверка состояния безопасной загрузки, особенности работы после включения
Прежде чем начать, о том, где вы можете проверить текущее состояние безопасной загрузки в Windows 11 или Windows 10:
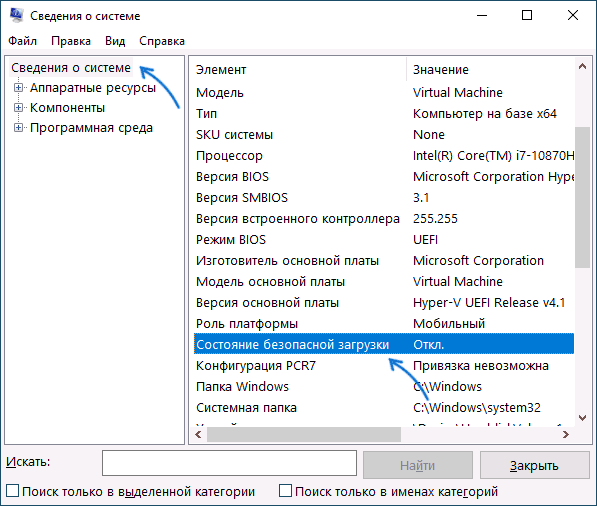
- Нажмите правой кнопкой мыши по кнопке «Пуск», выберите пункт «Выполнить», введите msinfo32 и нажмите Enter. В разделе «Сведения о системе» вы увидите пункт «Состояние безопасной загрузки» с её текущим статусом.

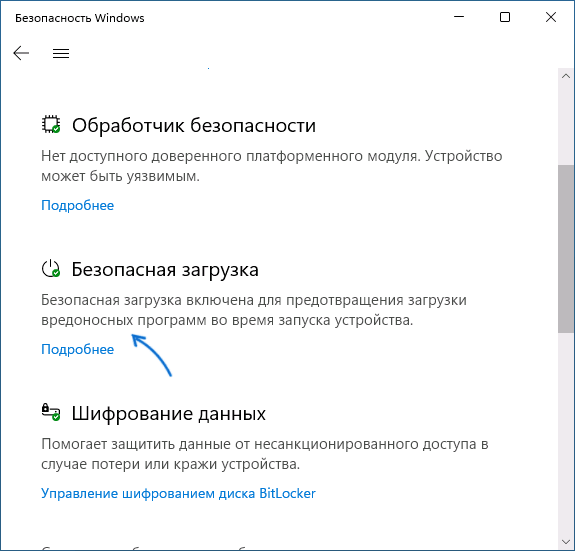
- Можно зайти в окно «Безопасность Windows», например, с помощью значка в области уведомлений и открыть раздел «Безопасность устройства». Если вы наблюдаете там пункт «Безопасная загрузка» с зеленой отметкой, она включена. Иначе — нет.

Ещё один важный момент: загрузка с включенной безопасной загрузкой возможна только для систем, установленных в UEFI-режиме на GPT диск.
Если, к примеру, у вас Windows 10 и установлена в Legacy-режиме на диск MBR, после включения Secure Boot она перестанет загружаться. Возможные варианты действий: конвертировать диск в GPT с помощью mbr2gpt.exe и включить UEFI-загрузку, либо использовать вариант с чистой установкой с флешки и обходом требований Windows 11, как было указано в начале статьи.
Включение безопасной загрузки Secure Boot в БИОС/UEFI
Само включение безопасной загрузки или Secure Boot выполняется не в Windows 11/10, а в БИОС/UEFI вашего компьютера или ноутбука. Для того, чтобы включить её, необходимо:
- Зайти в БИОС при включении/перезагрузке устройства. На ноутбуках для этого обычно используется клавиша F2 (или сочетание Fn+F2), которую необходимо ритмично нажимать сразу после появления заставки производителя (но бывают и другие варианты клавиши), на ПК как правило используется клавиша Delete. Более подробно: Как зайти в БИОС/UEFI на компьютере или ноутбуке.
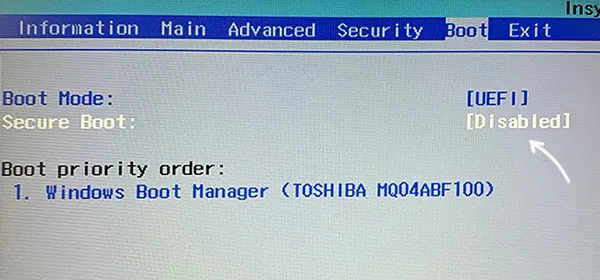
- Найти раздел БИОС, на котором доступна опция включения (установка в Enabled) функции Secure Boot. Учитывайте, что на очень старых компьютерах такой настройки может и не быть. Как правило, она располагается где-то в разделе Security, Boot, System Configuration, иногда — Advanced Settings. Несколько примеров расположения будут приведены далее.
- Сменить состояние Secure Boot на Enabled (если ранее выполнялась очистка ключей Secure Boot, восстановить их), сохранить настройки БИОС/UEFI (обычно выполняется клавишей F10 или на вкладке Exit) и перезагрузиться обратно в систему.
Примеры расположения опции для включения безопасной загрузки (Secure Boot)
Ниже — несколько примеров, где можно найти опцию включения безопасной загрузки на разных материнских платах и ноутбуках. У вас может отличаться, но логика везде одна и та же.
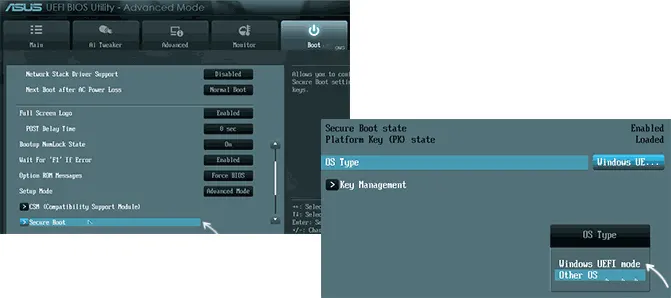
Ещё раз отмечу: включить безопасную загрузку можно только в случае, если у вас включен режим загрузки UEFI, а режим Legacy/CSM отключен, иначе опция будет недоступна. В некоторых вариантах БИОС переключение в режим загрузки UEFI выполняется путем выбора типа операционной системы (OS Type) между Windows 11/10/8 и «Other OS» (нужно выбрать Windows).
ASUS
На разных версиях материнских плат и ноутбуков включение Secure Boot реализовано слегка по-разному. Обычно пункт «Secure Boot» можно найти на вкладке «Boot» или «Security». При этом для OS Type может потребоваться выставить Windows UEFI Mode (параметр может и отсутствовать).
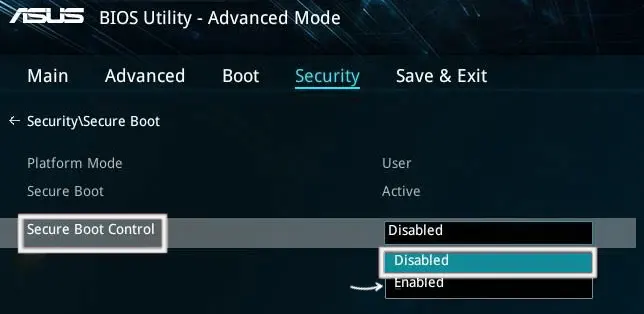
Также, для доступности пункта настройки безопасной загрузки в БИОС может потребоваться перейти в Advanced Mode, обычно — по клавише F7.
В некоторых случаях может потребоваться восстановление ключей безопасной загрузки, обычно выполняется следующим образом: в Advanced Mode в BIOS на вкладке Boot или в Secure Boot — Key Management выбираем Load Default PK и подтверждаем загрузку ключей по умолчанию.
AsRock
Настройка для включения безопасной загрузки на материнских платах AsRock обычно находится в разделе «Security».

Зайдя в раздел необходимо будет установить значение Secure Boot в Enabled, а если выбор недоступен, включить стандартный Secure Boot Mode и установить ключи по умолчанию (Install default Secure Boot keys).

Acer
Как правило, опция включения Secure Boot на ноутбуках Acer находится либо в разделе Advanced — System Configuration, либо в Boot или Authentication.
Также помните, о том, что должен быть включен режим загрузки UEFI, а не Legacy/CSM для возможности изменения состояния безопасной загрузки на Enabled.
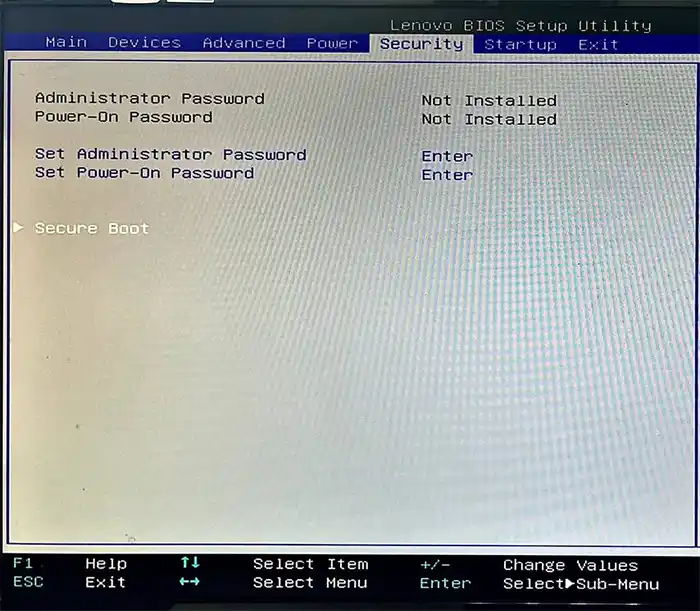
Lenovo
ПК и ноутбуки Lenovo имеют разные варианты интерфейса БИОС, но обычно нужная опция находится на вкладке Security, как на фото ниже:

Ещё один пример с ноутбука Lenovo:
Gigabyte
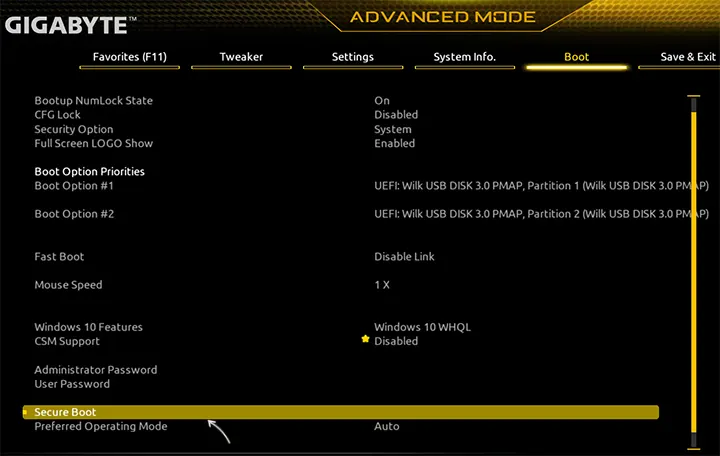
Варианты отключения Secure Boot на материнских платах и ноутбуках Gigabyte могут отличаться, обычно порядок действий следующий:
- На вкладке Boot или BIOS отключить CSM Support, и выбрать тип операционной системы или установить пункт Windows 8/10 Features в, соответственно, Windows 8/10, а не Other OS.
- После этого должен появиться пункт Secure Boot, в который необходимо зайти, чтобы включить безопасную загрузку.
Несколько дополнительных мест расположения опции включения Secure Boot (устанавливаем в Enabled) на старых Dell, Gigabyte, HP:

Также, если в вашем интерфейсе БИОС предусмотрен поиск, можно использовать его:

В случае, если вы не нашли способа включить безопасную загрузку на вашей материнской плате, либо её не удается перевести в Enabled, укажите её марку и модель в комментариях, я постараюсь подсказать, где именно требуется включать этот параметр. Кстати, часто достаточно просто сбросить настройки БИОС (Load Defaults на вкладке Exit), чтобы включить безопасную загрузку, так как на большинстве современных материнских плат она по умолчанию включена.
Ilya_Kiselev, Процессор Ryzen 5 2600, к сожалению встроенного видео нет.
Материнка у меня ASRock Fatal1ty X470 Gaming K4, написано, что есть поддержка ASRock Instant Flash, но я там посмотрел, там пункты придется выбирать, значит нужен работающий экран. Аварийной перепрошивки вроде нет.
В инструкции материнки для моего кода ошибки d6, решение проблемы описано так: «Не удалось распознать VGA. Очистите CMOS и попробуйте переустановить карту VGA. Если проблема все еще существует, попробуйте установить карту VGA в другие слоты или использовать другие карты VGA.»
Я очищал CMOS через замыкание перемычки ClrCMOS. Но это не помогло. Тогда я вытащил видеокарту и снова сбросил биос через ClrCMOS, пробовал после этого вставить видеокарту во второй PCI слот, но это тоже не помогло, ну и пробовал после сброса вообще без видеокарты запускать, соответственно результат такой же.
Я думаю попробовать другую видеокарту вставить, но есть подозрения, что это ничего не даст. Биос то сброшен был, по логике моя видеокарта должна нормально заработать, но этого не происходит. Я вот не уверен, но сама видеокарта не может себе куда-нибудь в память что-то записать и из-за этого она уже в этом режиме не работает и помогла бы перепрошивка самой видеокарты? Или это невозможно? Просто сейчас стоит вопрос так, либо нести весь системник в ремонт, а машины сейчас под рукой нет, либо просто купить дешевую видеокарту и с нее зайти, тогда может заработает старая если перепрошить биос, например.