На чтение 6 мин. Просмотров 21.6k. Опубликовано 03.09.2019
Несмотря на то, что трудно вызвать критические неисправности ПК без физического повреждения, это действительно возможно. Два слова: обновление BIOS. Перепрограммирование BIOS является благодатной почвой для критических системных ошибок, и некоторые из них могут привести к остановке загрузки.
Кроме того, наихудший сценарий включает в себя кирпич вашей материнской платы, что является результатом, которого никто не хочет.
Существует несколько причин, по которым обновление BIOS препятствует загрузке Windows:
- Вы перепрошили BIOS с неподдерживаемой версией.
- Для выполнения этой процедуры вы использовали неподдерживаемое стороннее программное обеспечение.
- Или вы прервали процедуру перепрошивки.
Все 3 могут принести много неприятностей и повлиять на ваш компьютер. Сегодня мы попытаемся предложить вам несколько решений в надежде, что хотя бы одно из них поможет вам сохранить или спасти ваш ПК.
Если вы не уверены, что делать, обязательно ознакомьтесь с приведенными ниже инструкциями, и мы начнем с этого.
Содержание
- Как исправить ошибку загрузки системы после ошибочного обновления BIOS в 6 шагов:
- 1. Сброс CMOS
- 2. Попробуйте загрузиться в безопасном режиме
- 3. Настроить настройки BIOS
- 4. Снова прошить BIOS
- 5. Переустановите систему
- 6. Замените материнскую плату
Как исправить ошибку загрузки системы после ошибочного обновления BIOS в 6 шагов:
- Сброс CMOS
- Попробуйте загрузиться в безопасном режиме
- Настроить настройки BIOS
- Прошить BIOS снова
- Переустановите систему
- Замените свою материнскую плату
1. Сброс CMOS
Это серьезная проблема, которая требует осторожного подхода. Кроме того, вам нужно испачкать руки и выполнить простую аппаратную настройку, чтобы вручную сбросить настройки BIOS.
После извлечения батареи CMOS и укорачивания контактов материнской платы настройки BIOS должны быть перезапущены.
Надеюсь, после этого вы сможете загружаться так же, как и раньше. Если вы не уверены, как это сделать, мы подготовили инструкции ниже.
Кроме того, мы советуем вам найти точную материнскую плату и найти подробное объяснение для конкретной модели в Интернете. В любом случае, действуйте осторожно:
- Выключите ваш компьютер полностью.
- Отключите шнур питания и извлеките аккумулятор , если это ноутбук.
- Удерживайте кнопку питания в течение 60 секунд, чтобы полностью разрядить компьютер.
- Откройте корпус ПК и дотроньтесь до металлической поверхности, чтобы снять статическое электричество.
-
Извлеките батарею CMOS , которая должна быть стандартной плоской батареей наручных часов на 3 В.

- Подождите несколько минут и аккуратно разместите его снова.
- Включите компьютер и ищите изменения.

С другой стороны, если вы не можете получить доступ к батарее CMOS и получить к ней доступ, вы можете сбросить настройки BIOS, временно удалив перемычки материнской платы и снова подключив их.
Кроме того, после повторной загрузки обязательно установите правильное время BIOS в настройках загрузки. Без этого вы не сможете загрузиться в Windows 10.
2. Попробуйте загрузиться в безопасном режиме
Несмотря на то, что это обходной путь, он может помочь вам, тем не менее. В большинстве случаев вам потребуется выполнить вышеупомянутый сброс настроек BIOS, чтобы в первую очередь получить доступ к безопасному режиму.
После этого перезагрузите компьютер и попробуйте безопасный режим.
К сожалению, получить доступ к безопасному режиму не так просто, как раньше. Для этого вам понадобится загрузочный носитель с системной установкой или какой-нибудь диск восстановления.
В любом случае вам понадобится загрузочный диск для доступа к параметрам восстановления и безопасному режиму соответственно. Вы можете создать его на любом другом компьютере с помощью инструмента «Создание медиа» или создателей дисков восстановления в настройках Windows 10.
Следуйте инструкциям ниже, чтобы попытаться загрузиться в безопасном режиме:
- Подключите или вставьте загрузочный диск (флэш-накопитель USB или DVD) и перезагрузите компьютер.
- Откройте меню загрузки и выберите диск в качестве основного загрузочного устройства . Вы также можете сделать это в настройках BIOS.
- Процесс загрузки установочного файла должен начаться.
- Выберите свои предпочтения и нажмите кнопку Далее .
- В следующем диалоговом окне выберите «Восстановить компьютер» в левом нижнем углу.
- Open Troubleshoot .
-
Выберите Дополнительные параметры .
- Выберите Настройки запуска .
- Выберите Перезагрузить.
-
После перезагрузки компьютера нажмите F4, F5 или F6 для загрузки в различных параметрах безопасного режима.
- Безопасный режим – F4
- Безопасный режим с поддержкой сети – F5
- и безопасный режим с командной строкой – F6.
- Когда/если система наконец загрузится в Windows 10, вы можете перезагрузить компьютер и запустить систему стандартным способом.

Многие пользователи сообщали, что каким-то образом безопасный режим «заставлял» систему загружаться и, следовательно, устранял остановку, вызванную ошибкой перепрошивки.
Если вы хотите узнать, как создать установочный носитель Windows 10, выполните действия, описанные в этом простом руководстве.
Безопасный режим не работает в Windows 10? Не паникуйте, это руководство поможет вам преодолеть проблемы с загрузкой.
3. Настроить настройки BIOS
Теперь это сугубо индивидуально и сильно зависит от конфигурации вашего ПК и модели материнской платы. Для этого мы советуем вам заглянуть в вашу материнскую плату и найти нужные настройки.
Излишне объяснять, что вам нужно изменить, поскольку сами варианты довольно разнообразны.
Если вы не уверены на 100%, не вмешивайтесь в настройки BIOS. Вам следует либо обратиться в официальную службу поддержки, либо попытаться объяснить свою проблему знающим людям или любителям ПК.
Это самая безопасная ставка для настройки параметров BIOS и получения полной функциональности.
Доступ к BIOS кажется слишком сложной задачей? Давайте поможем вам с помощью этого удивительного руководства!
4. Снова прошить BIOS
Ты один раз прошил BIOS, и ад вырвался на свободу. Кажется смешным делать это снова, но это может просто решить ваши проблемы. А именно, вы, вероятно, установили неправильную версию или прервали перепрошивку и перевернули вашу материнскую плату.
К счастью, некоторые пользователи, которым удалось преодолеть начальный экран загрузки (и застрял в анимации Windows 10), решили проблему, перепрошив BIOS с верной версией.
Тем не менее, на этот раз мы советуем вам не торопиться и делать каждый шаг осторожно. Чтобы помочь вам решить эту проблему, мы рекомендуем прочитать статью ниже с подробным объяснением перепрошивки.
Обязательно проверьте это, прежде чем перейти к перепрошивке.
Обновление BIOS кажется пугающим? С помощью этого удобного руководства упростите задачу.
5. Переустановите систему
Некоторые пользователи сообщили, что проблема может быть решена путем полной переустановки системы. Кажется, что неудачная процедура перепрошивки влияет на жесткий диск каким-то образом, и, следовательно, заставляет вас начать с нуля.
И в «Плохой шкале» это только «Умеренно плохо», если принять во внимание, что вам может потребоваться замена материнской платы.

Процедура переустановки Windows 10 не так сложна, как на некоторых старых итерациях Windows, в те времена.
Тем не менее, для начинающего пользователя это может привести к длительным трудностям. Чтобы избежать этого, обязательно прочитайте полные инструкции, собранные в статье ниже.
Epic Guide alert! Переустановите Windows 10 с помощью нескольких быстрых шагов. Все, что вам нужно знать, прямо здесь!
6. Замените материнскую плату
Наконец, если ни один из предыдущих шагов не помог вам, извините, но вам понадобится другая материнская плата. Кроме того, вы можете запросить ремонт, который также возможен, но это далеко, и шансы не в вашу пользу.
Это должно завершить это. Если у вас есть какие-либо вопросы или альтернативные решения, обязательно поделитесь ими с нами. Вы можете сделать это в разделе комментариев ниже.
You may be wondering “Do I need to update my BIOS” since it is more dangerous to update motherboard BIOS than updating drive-based software. Sometimes, your PC will refuse to boot after you updated the BIOS. At this time, how can you recover data from the PC not turning on? How to fix the computer that won’t start?
Basically speaking, BIOS update refers to the update of the motherboard BIOS on a computer. Unlike other types of updates, the BIOS update will not bring us the system performance improvement.
Yet, it also causes problems:
- Black screen after BIOS update: computer won’t boot up and shows a black screen after you updated BIOS.
- No display after BIOS update: computer turns on but there is no display on the monitor, so you can’t access the system.
- Infinite loop/Endless loop: PC keeps restarting after BIOS update.
Once something goes wrong during the update process, your PC may become completely unbootable. Therefore, you’ll lose access to your system and all the files stored on the internal hard drive.
So what are you going to do when finding PC not booting after BIOS update?
Actually, you can recover data from hard disk without OS and bring the PC back to life when updated BIOS leads to a black screen. But how? Let’s just dive into this PC boot failure problem.
Issue: PC Not Booting after BIOS Update
Are you stuck with the computer not powering on problem after a BIOS update? manuntd7 said yes to this question.
Laptop Not Boot after BIOS Update
So I noticed that there was a BIOS update on my laptop and thought I’d update it. After flashing, the laptop was no longer booting in the OS and was simply launching the BIOS every time I turned it on. In the BIOS, when I select boot options, it states that there are no bootable devices but it detects my SSD. I tried reverting back to the old BIOS firmware but no luck. My laptop is an Asus F556UAK— manuntd7 posted in Tom’s Hardware Forum, waiting to get help.
The user manuntd7 described his personal experience in this post: he chose to update the BIOS after he had noticed the update push in the system. But after the work had been done, he discovered that his laptop won’t boot after BIOS update.
In fact, PC won’t boot after BIOS update has long been a hot topic on various forums. No matter you’d like to update BIOS in Windows 10 or other operating systems, PC not boot may become your worries.
Why the computer not booting after bios screen draws so much attention?
There are mainly two reasons:
- All the data can’t be accessed when a computer doesn’t boot after BIOS update.
- Ordinary computer users don’t know an effective way to fix when the PC doesn’t boot up.
Taking all these factors into account, I plan to share the practical recovery & repair solutions with you after the update of Windows BIOS failed.
How Can You Recover Lost Files After Windows Update?
Recovery: How to Access Data When BIOS Update Failed
In this part, I’ll tell you how to do the data recovery job when Windows 10 PC won’t boot after BIOS update, from two aspects (if Windows 7 won’t boot after BIOS update, the recovery solutions are roughly the same).
Recover Data from Unbootable Windows 10
Backup is important.
People often say that backup is very important, but very few of them really realize its importance. Only a small number of people form the habit of backing up useful data, let alone keep the backup updating from time to time. This is how you get yourself into the dilemma of data loss.
Data recovery from unbootable PC is possible.
Yet, the good news is PC data recovery is possible.
- If you do have a backup, please resort to it directly.
- If you don’t have one, please rescue your data by using Data Recovery of MiniTool Partition Wizard – a safe and reliable program.
Which version to choose?
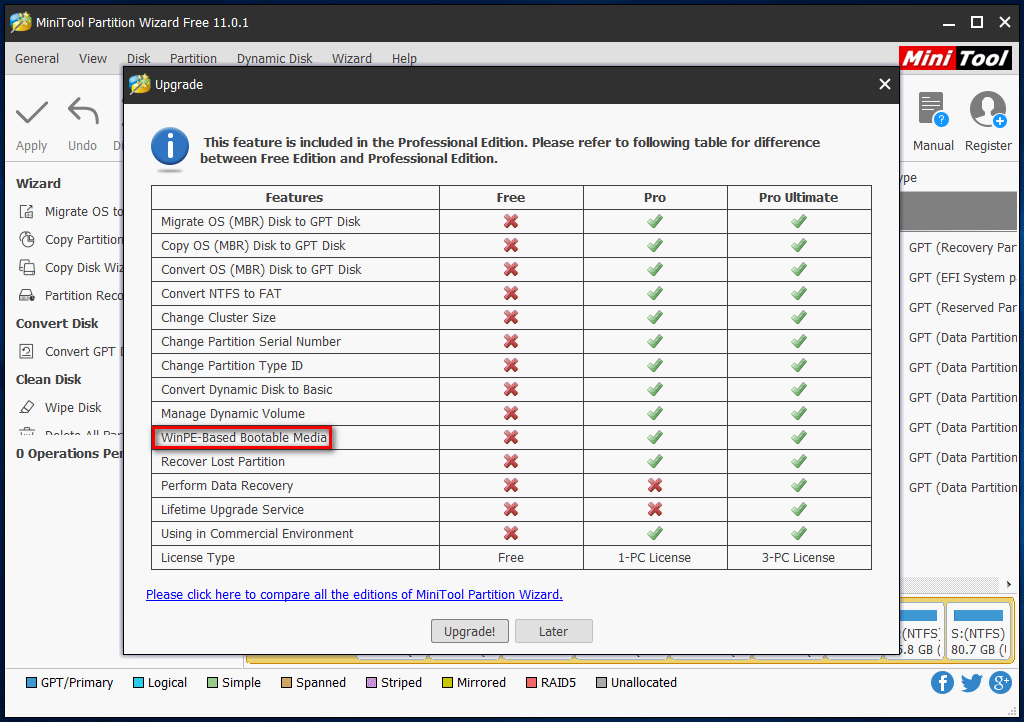
Can all versions help you recover all data from a PC this can’t boot? Of course not! You should choose a version that contains the WinPE-Based Bootable Media (click to know more about the bootable disc). I suggest a Pro Ultimate license since it allows you to recover data.
Buy Now
Tip: You can also get MiniTool Power Data Recovery – the professional data recovery software for Windows 10 – to recover data.
How to recover data from PC not turning on?
Step 1: stop doing anything on the PC that refuses to boot.
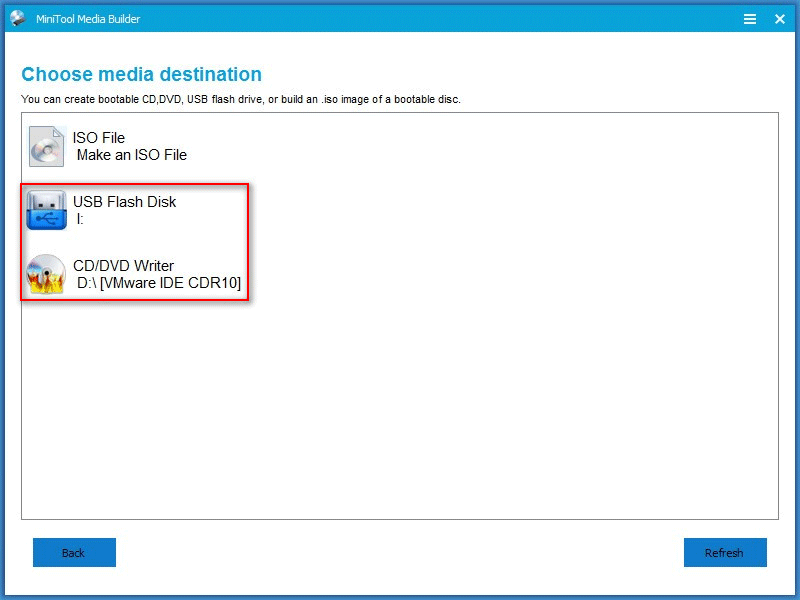
Step 2: find another computer that works fine to build a MiniTool Boot Disk on a USB flash drive or CD/DVD disc.
Tip: Please see How to Build MiniTool Power Data Recovery Boot Disk talked about in part 2 of Operating System Not Found Error Appears, How To Recover Data.
Step 3: remove the boot disk you have made safely from another computer and then connect it properly to your PC that doesn’t boot.
Step 4: restart your computer and enter BIOS by pressing the corresponding button. After that, change the old boot order to make the boot disk the first boot device.
Step 5: exit BIOS and click to save changes.
Step 6: be ready to launch the software.
- Let the computer restart.
- Click on the OK button when you see the screen resolution setting window.
- Click on the OK button when you see the software launching window.

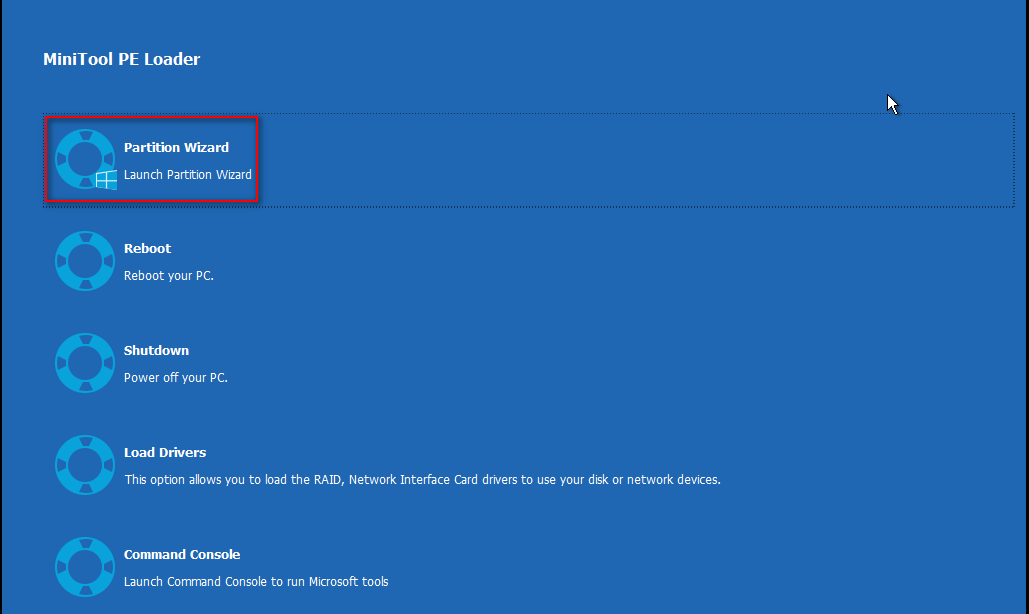
Step 7: afterward, you’ll see the MiniTool PE Loader window, in which you should choose the first option – Partition Wizard.
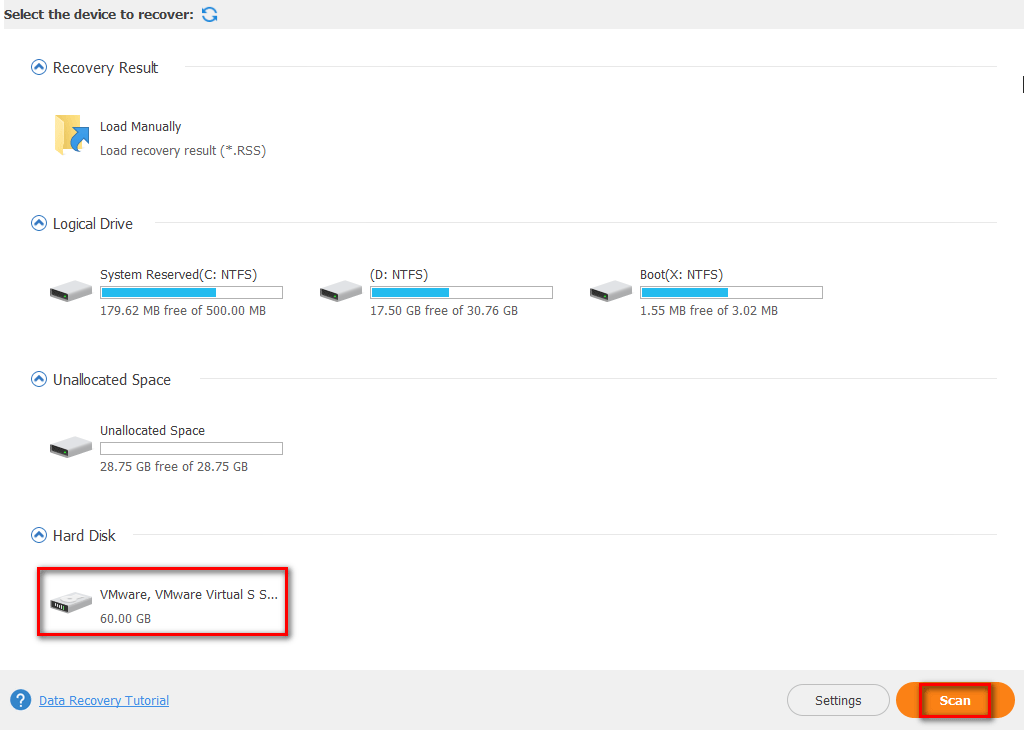
Step 8: choose Data Recovery from the following software interface.

Step 9: scan the disk.
- Choose the disk containing needed files.
- Click on the Scan button in the lower right corner.
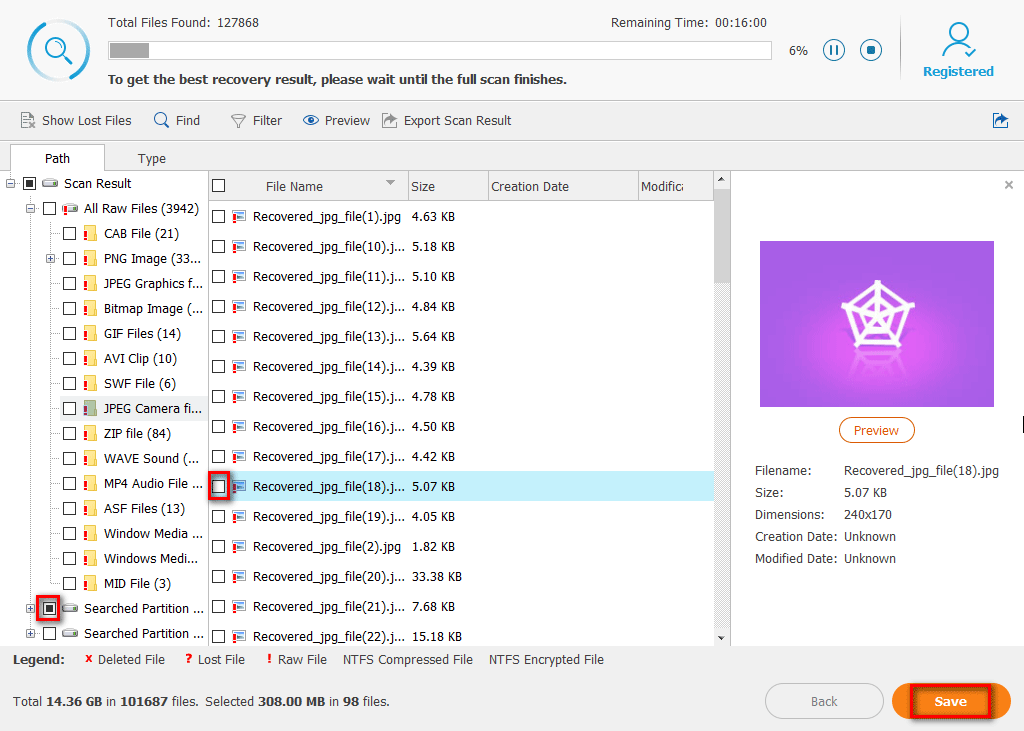
Step 10: choose files to recover.
- Browse the found files.
- Confirm which files are needed.
- Click on the Save button to set a storage location.
- Click on the OK button to confirm your selection.
This is how to perform data recovery when the PC doesn’t boot up.
When you have found back all the files you need, you can do a data backup immediately for security reasons.
Click to Tweet
There’s how to flash BIOS when computer won’t boot
Repair: Computer Won’t Boot Windows 10
As for how to fix the computer startup problems in a Windows 10 system, I’ll give my suggestions in this part.
Method 1: Rebuild MBR
To rebuild MBR, you have 2 choices.
Choice one: rebuild with third-party software.
Step 1: create a bootable disk.
- Also, you need to create a bootable USB/CD/DVD disk on another computer.
- Then, repeat step 3 ~ step 7 mentioned in the Recover Data from Unbootable Windows 10 part.
Step 2: choose Launch Application.
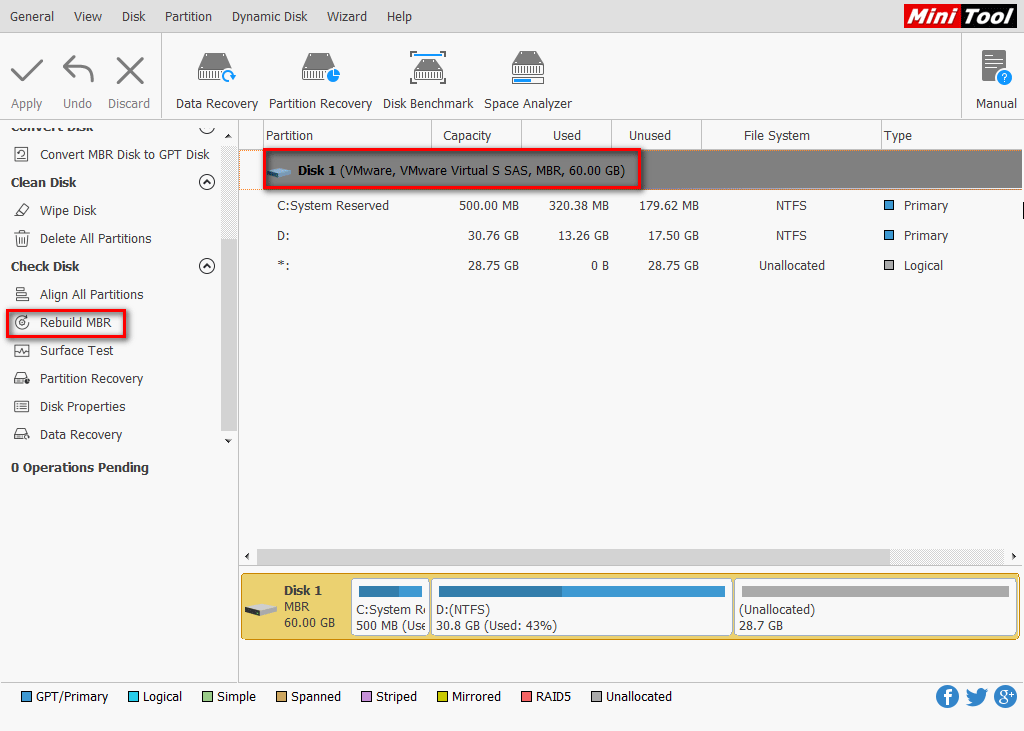
Step 3: select disk to Rebuild MBR.
- Select the boot disk.
- Click on Rebuild MBR from left action panel.
- Click on Apply button to execute the pending operation.
- Choose Yes in the pop-up window to confirm changes.
This is how to use MiniTool Partition Wizard to try to fix the problem when the computer won’t boot up after a BIOS update.
Choice two: repair with Command Prompt.
Also, you can use other tools, like Command Prompt, to repair MBR (Master Boot Record) for your non-bootable computer.
Main steps are:
- Enter the Windows Boot Options menu. If you can’t see this menu, please create a Windows installation disk and then boot your computer from it so as to access the menu.
- Select Troubleshoot, Advanced Options, and Command Prompt one by one.
- Type bootrec /fixmbr and press Enter.
- Type bootrec /fixboot and press Enter.
- Type bootrec /rebuildbcd and press Enter.

Method 2: Check & Fix Hard Drive
You can check and fix a hard drive by using the Command Prompt.
- You should enter the Windows Boot Options menu.
- Select Troubleshoot.
- Select Advanced Options.
- Select Command Prompt.
- Type chkdsk c: /r /x and press Enter in the keyboard.
- Now, just wait for the automatic completion of the operation.
CHKDSK Deletes Your Data? Now Recover Them In Two Ways.
Method 3: Use Startup Repair
Two situations are involved in this method.
Situation one: you have the installation disc.
- Please set your PC to boot from the installation disc firstly and wait for loading files.
- In the Windows Setup interface, you should select the language, time and currency format, keyboard or input method and then click on the Next button.
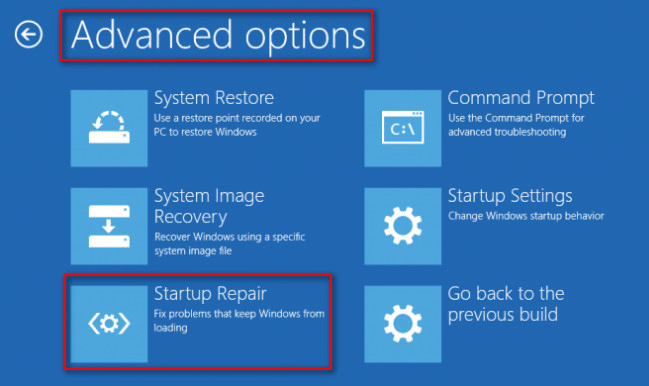
- Then, select Repair your computer, Troubleshoot, Advanced options, and Startup Repair one by one.
- Finally, choose a target operating system to repair and let Windows diagnose & fix the problem for you.
Situation two: you don’t have the installation disc.
- Please access the recovery environment by turning your computer on and off three times.
- After that, Win 10 will boot into the diagnostics mode.
- Now, you should click on Advanced options on the recovery screen.
- Then, choose Troubleshoot, Advanced options and Startup Repair in order.
- Choose the operating system to repair.
Method 4: Roll Back to the Previous Build
The previous few steps are the same as those mentioned in method 3.
The difference lies in:
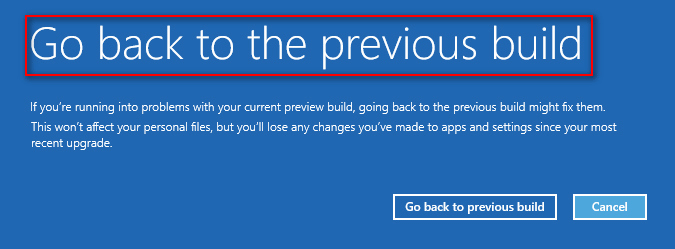
After selecting Troubleshoot and Advanced options in order, you should choose Go back to the previous build (instead of Startup Repair).
Method 5: Make Use of System Restore
Also, the previous few steps are the same as those mentioned in method 3.
The difference lies in:
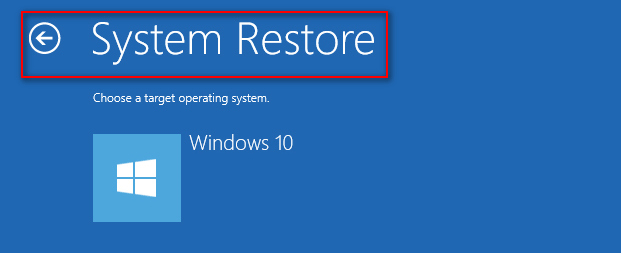
After selecting Troubleshoot and Advanced options in order, you should click on System Restore in the Advanced options window.
Method 6: Uninstall the Windows Update
- Start your Windows 10 computer in Safe Mode.
- Navigate to Programs and Features.
- Choose View installed updates from the left pane.
- Select the problematic update from the list carefully and then click on the Uninstall
Method 7: Reset BIOS to Default
- As I mentioned in the recovery part, you should restart your computer and press corresponding button (varies from computer to computer) to enter the BIOS at first.
- Then, find the Setup Defaults option (which may also be called Reset to Default, Factory Default, or something else).
- Select this option by using the arrow keys or pressing the corresponding button.
- Finally, save the changes and exit BIOS.
Method 8: Do a Clean Install or Custom Install
If all the above methods failed, you still have another choice which has always been useful – perform a clean install or a custom install.
The difference between them is that:
- The clean install will erase everything saved on your computer.
- The custom install will only erase some of the files.
That’s all the mainstream solutions to fixing Windows 10 not booting after BIOS update.
Click to Tweet
Questions about Updating BIOS
If you’re not so familiar with BIOS and the updating process of it, you tend to make mistakes that will finally result in Windows startup problems. Considering this, I think it’s necessary to explain the functions and preparations of BIOS update.
Do I Need to Update My BIOS
There’re four main reasons to update BIOS:
- Make motherboard recognize and support new types of CPUs.
- Correct the original error or bugs found in BIOS.
- Improve the compatibility of BIOS with internal storage, graphics card, hard drive, and other hardware.
- Obtain new features and functions.
What to Do before Updating Windows BIOS
- Make sure to remove the BIOS write protection.
- Backup the BIOS data in case of update failure. Besides, you can restore the BIOS data easily if you find something wrong in the new BIOS.
- Please make sure the execution programs and BIOS data files used in the update process match the motherboard model. In addition, check the integrity and reliability of the files.
- Confirm that the power is stable and continuous so that there is no power failure that will affect the update.
Note: If the update fails in the real sense, the easiest and most direct way to recover is to contact your motherboard manufacturer or motherboard retailer to get a new BIOS chip. Then, replace the old BIOS chip with the new one by hiring experts or doing it under professional guidance. Besides, if the BIOS chip is attacked by virus, changing a new chip is a better fix than rewriting BIOS.
Conclusion
- As a general rule, BIOS update is an exciting thing since it could bring us some benefits.
- But, on the other hand, people may get into trouble due to wrong operations or unexpected accidents happened during the update.
PC not booting after BIOS update is a common problem. You’d better read the corresponding recovery and repair solutions mentioned here. The content is very useful no matter you’re suffering from PC boot failure caused by BIOS update at this moment or not.
If you still have other doubts or questions, please feel free to leave a message below or contact our Tech Support Team. Thanks for your time!
You may be wondering “Do I need to update my BIOS” since it is more dangerous to update motherboard BIOS than updating drive-based software. Sometimes, your PC will refuse to boot after you updated the BIOS. At this time, how can you recover data from the PC not turning on? How to fix the computer that won’t start?
Basically speaking, BIOS update refers to the update of the motherboard BIOS on a computer. Unlike other types of updates, the BIOS update will not bring us the system performance improvement.
Yet, it also causes problems:
- Black screen after BIOS update: computer won’t boot up and shows a black screen after you updated BIOS.
- No display after BIOS update: computer turns on but there is no display on the monitor, so you can’t access the system.
- Infinite loop/Endless loop: PC keeps restarting after BIOS update.
Once something goes wrong during the update process, your PC may become completely unbootable. Therefore, you’ll lose access to your system and all the files stored on the internal hard drive.
So what are you going to do when finding PC not booting after BIOS update?
Actually, you can recover data from hard disk without OS and bring the PC back to life when updated BIOS leads to a black screen. But how? Let’s just dive into this PC boot failure problem.
Issue: PC Not Booting after BIOS Update
Are you stuck with the computer not powering on problem after a BIOS update? manuntd7 said yes to this question.
Laptop Not Boot after BIOS Update
So I noticed that there was a BIOS update on my laptop and thought I’d update it. After flashing, the laptop was no longer booting in the OS and was simply launching the BIOS every time I turned it on. In the BIOS, when I select boot options, it states that there are no bootable devices but it detects my SSD. I tried reverting back to the old BIOS firmware but no luck. My laptop is an Asus F556UAK— manuntd7 posted in Tom’s Hardware Forum, waiting to get help.
The user manuntd7 described his personal experience in this post: he chose to update the BIOS after he had noticed the update push in the system. But after the work had been done, he discovered that his laptop won’t boot after BIOS update.
In fact, PC won’t boot after BIOS update has long been a hot topic on various forums. No matter you’d like to update BIOS in Windows 10 or other operating systems, PC not boot may become your worries.
Why the computer not booting after bios screen draws so much attention?
There are mainly two reasons:
- All the data can’t be accessed when a computer doesn’t boot after BIOS update.
- Ordinary computer users don’t know an effective way to fix when the PC doesn’t boot up.
Taking all these factors into account, I plan to share the practical recovery & repair solutions with you after the update of Windows BIOS failed.
How Can You Recover Lost Files After Windows Update?
Recovery: How to Access Data When BIOS Update Failed
In this part, I’ll tell you how to do the data recovery job when Windows 10 PC won’t boot after BIOS update, from two aspects (if Windows 7 won’t boot after BIOS update, the recovery solutions are roughly the same).
Recover Data from Unbootable Windows 10
Backup is important.
People often say that backup is very important, but very few of them really realize its importance. Only a small number of people form the habit of backing up useful data, let alone keep the backup updating from time to time. This is how you get yourself into the dilemma of data loss.
Data recovery from unbootable PC is possible.
Yet, the good news is PC data recovery is possible.
- If you do have a backup, please resort to it directly.
- If you don’t have one, please rescue your data by using Data Recovery of MiniTool Partition Wizard – a safe and reliable program.
Which version to choose?
Can all versions help you recover all data from a PC this can’t boot? Of course not! You should choose a version that contains the WinPE-Based Bootable Media (click to know more about the bootable disc). I suggest a Pro Ultimate license since it allows you to recover data.
Buy Now
Tip: You can also get MiniTool Power Data Recovery – the professional data recovery software for Windows 10 – to recover data.
How to recover data from PC not turning on?
Step 1: stop doing anything on the PC that refuses to boot.
Step 2: find another computer that works fine to build a MiniTool Boot Disk on a USB flash drive or CD/DVD disc.
Tip: Please see How to Build MiniTool Power Data Recovery Boot Disk talked about in part 2 of Operating System Not Found Error Appears, How To Recover Data.
Step 3: remove the boot disk you have made safely from another computer and then connect it properly to your PC that doesn’t boot.
Step 4: restart your computer and enter BIOS by pressing the corresponding button. After that, change the old boot order to make the boot disk the first boot device.
Step 5: exit BIOS and click to save changes.
Step 6: be ready to launch the software.
- Let the computer restart.
- Click on the OK button when you see the screen resolution setting window.
- Click on the OK button when you see the software launching window.
Step 7: afterward, you’ll see the MiniTool PE Loader window, in which you should choose the first option – Partition Wizard.
Step 8: choose Data Recovery from the following software interface.
Step 9: scan the disk.
- Choose the disk containing needed files.
- Click on the Scan button in the lower right corner.
Step 10: choose files to recover.
- Browse the found files.
- Confirm which files are needed.
- Click on the Save button to set a storage location.
- Click on the OK button to confirm your selection.
This is how to perform data recovery when the PC doesn’t boot up.
When you have found back all the files you need, you can do a data backup immediately for security reasons.
Click to Tweet
There’s how to flash BIOS when computer won’t boot
Repair: Computer Won’t Boot Windows 10
As for how to fix the computer startup problems in a Windows 10 system, I’ll give my suggestions in this part.
Method 1: Rebuild MBR
To rebuild MBR, you have 2 choices.
Choice one: rebuild with third-party software.
Step 1: create a bootable disk.
- Also, you need to create a bootable USB/CD/DVD disk on another computer.
- Then, repeat step 3 ~ step 7 mentioned in the Recover Data from Unbootable Windows 10 part.
Step 2: choose Launch Application.
Step 3: select disk to Rebuild MBR.
- Select the boot disk.
- Click on Rebuild MBR from left action panel.
- Click on Apply button to execute the pending operation.
- Choose Yes in the pop-up window to confirm changes.
This is how to use MiniTool Partition Wizard to try to fix the problem when the computer won’t boot up after a BIOS update.
Choice two: repair with Command Prompt.
Also, you can use other tools, like Command Prompt, to repair MBR (Master Boot Record) for your non-bootable computer.
Main steps are:
- Enter the Windows Boot Options menu. If you can’t see this menu, please create a Windows installation disk and then boot your computer from it so as to access the menu.
- Select Troubleshoot, Advanced Options, and Command Prompt one by one.
- Type bootrec /fixmbr and press Enter.
- Type bootrec /fixboot and press Enter.
- Type bootrec /rebuildbcd and press Enter.
Method 2: Check & Fix Hard Drive
You can check and fix a hard drive by using the Command Prompt.
- You should enter the Windows Boot Options menu.
- Select Troubleshoot.
- Select Advanced Options.
- Select Command Prompt.
- Type chkdsk c: /r /x and press Enter in the keyboard.
- Now, just wait for the automatic completion of the operation.
CHKDSK Deletes Your Data? Now Recover Them In Two Ways.
Method 3: Use Startup Repair
Two situations are involved in this method.
Situation one: you have the installation disc.
- Please set your PC to boot from the installation disc firstly and wait for loading files.
- In the Windows Setup interface, you should select the language, time and currency format, keyboard or input method and then click on the Next button.
- Then, select Repair your computer, Troubleshoot, Advanced options, and Startup Repair one by one.
- Finally, choose a target operating system to repair and let Windows diagnose & fix the problem for you.
Situation two: you don’t have the installation disc.
- Please access the recovery environment by turning your computer on and off three times.
- After that, Win 10 will boot into the diagnostics mode.
- Now, you should click on Advanced options on the recovery screen.
- Then, choose Troubleshoot, Advanced options and Startup Repair in order.
- Choose the operating system to repair.
Method 4: Roll Back to the Previous Build
The previous few steps are the same as those mentioned in method 3.
The difference lies in:
After selecting Troubleshoot and Advanced options in order, you should choose Go back to the previous build (instead of Startup Repair).
Method 5: Make Use of System Restore
Also, the previous few steps are the same as those mentioned in method 3.
The difference lies in:
After selecting Troubleshoot and Advanced options in order, you should click on System Restore in the Advanced options window.
Method 6: Uninstall the Windows Update
- Start your Windows 10 computer in Safe Mode.
- Navigate to Programs and Features.
- Choose View installed updates from the left pane.
- Select the problematic update from the list carefully and then click on the Uninstall
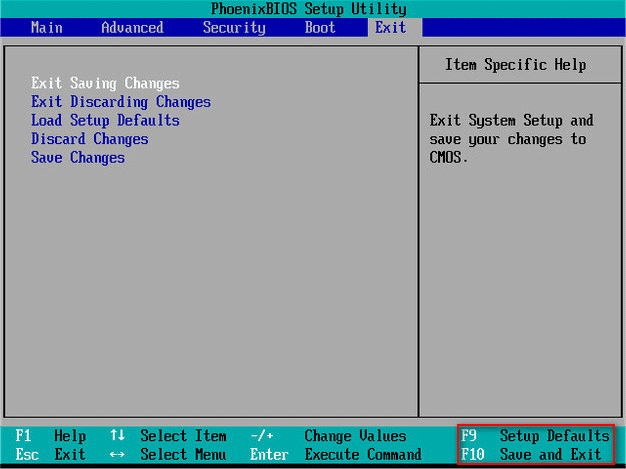
Method 7: Reset BIOS to Default
- As I mentioned in the recovery part, you should restart your computer and press corresponding button (varies from computer to computer) to enter the BIOS at first.
- Then, find the Setup Defaults option (which may also be called Reset to Default, Factory Default, or something else).
- Select this option by using the arrow keys or pressing the corresponding button.
- Finally, save the changes and exit BIOS.
Method 8: Do a Clean Install or Custom Install
If all the above methods failed, you still have another choice which has always been useful – perform a clean install or a custom install.
The difference between them is that:
- The clean install will erase everything saved on your computer.
- The custom install will only erase some of the files.
That’s all the mainstream solutions to fixing Windows 10 not booting after BIOS update.
Click to Tweet
Questions about Updating BIOS
If you’re not so familiar with BIOS and the updating process of it, you tend to make mistakes that will finally result in Windows startup problems. Considering this, I think it’s necessary to explain the functions and preparations of BIOS update.
Do I Need to Update My BIOS
There’re four main reasons to update BIOS:
- Make motherboard recognize and support new types of CPUs.
- Correct the original error or bugs found in BIOS.
- Improve the compatibility of BIOS with internal storage, graphics card, hard drive, and other hardware.
- Obtain new features and functions.
What to Do before Updating Windows BIOS
- Make sure to remove the BIOS write protection.
- Backup the BIOS data in case of update failure. Besides, you can restore the BIOS data easily if you find something wrong in the new BIOS.
- Please make sure the execution programs and BIOS data files used in the update process match the motherboard model. In addition, check the integrity and reliability of the files.
- Confirm that the power is stable and continuous so that there is no power failure that will affect the update.
Note: If the update fails in the real sense, the easiest and most direct way to recover is to contact your motherboard manufacturer or motherboard retailer to get a new BIOS chip. Then, replace the old BIOS chip with the new one by hiring experts or doing it under professional guidance. Besides, if the BIOS chip is attacked by virus, changing a new chip is a better fix than rewriting BIOS.
Conclusion
- As a general rule, BIOS update is an exciting thing since it could bring us some benefits.
- But, on the other hand, people may get into trouble due to wrong operations or unexpected accidents happened during the update.
PC not booting after BIOS update is a common problem. You’d better read the corresponding recovery and repair solutions mentioned here. The content is very useful no matter you’re suffering from PC boot failure caused by BIOS update at this moment or not.
If you still have other doubts or questions, please feel free to leave a message below or contact our Tech Support Team. Thanks for your time!
FAQ
Если Ваш компьютер не может войти в операционную систему Windows из-за сбоя обновления BIOS (например, принудительного выключения) в процессе обновления BIOS, Вы можете выполнить следующие шаги, чтобы процесс обновления BIOS возобновился, и система Windows загрузила Рабочий Стол после завершения обновления BIOS.
Примечание: Убедитесь, что адаптер переменного тока подключен во время процесса обновления BIOS на Вашем устройстве. Кроме того, пожалуйста, не отключайте приложение принудительно во время процесса обновления, чтобы избежать проблем.
Чтобы получить более подробную инструкцию, Вы также можете перейти по ссылке на видео Youtube ниже. Вы сможете узнать больше о решении проблемы, когда на ноутбуке появляется черный экран и процесс обновления BIOS прерывается.
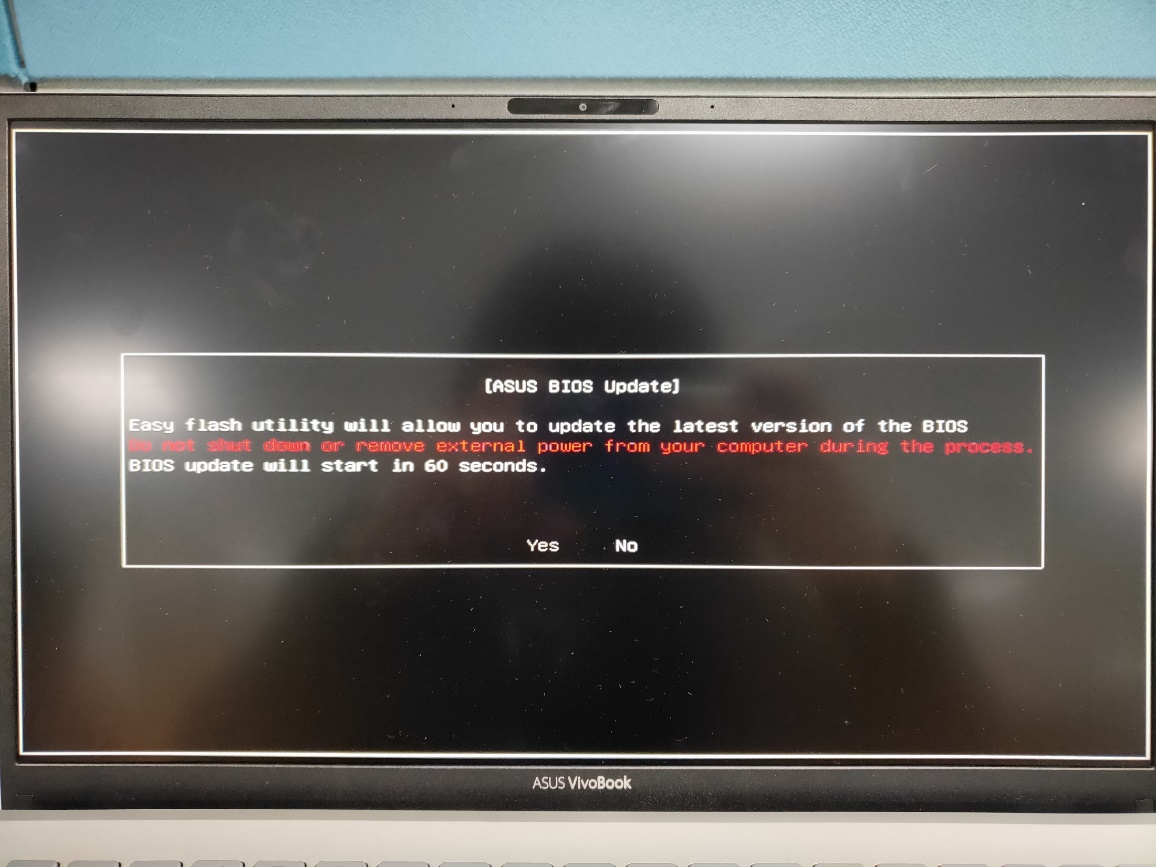
Сценарий 1: Если Вы заметили, что после загрузки ноутбука отображается следующее изображение, подождите 60 секунд или выберите «Да» на экране, после чего Ваш компьютер начнет автоматически возобновлять обновление BIOS (убедитесь, что адаптер переменного тока подключен).
Сценарий 2: Если Вы столкнулись с тем, что ноутбук загружается, а после сбоя процесса обновления BIOS отображается следующее изображение, то выполните указанные ниже действия, чтобы успешно завершить обновление BIOS.
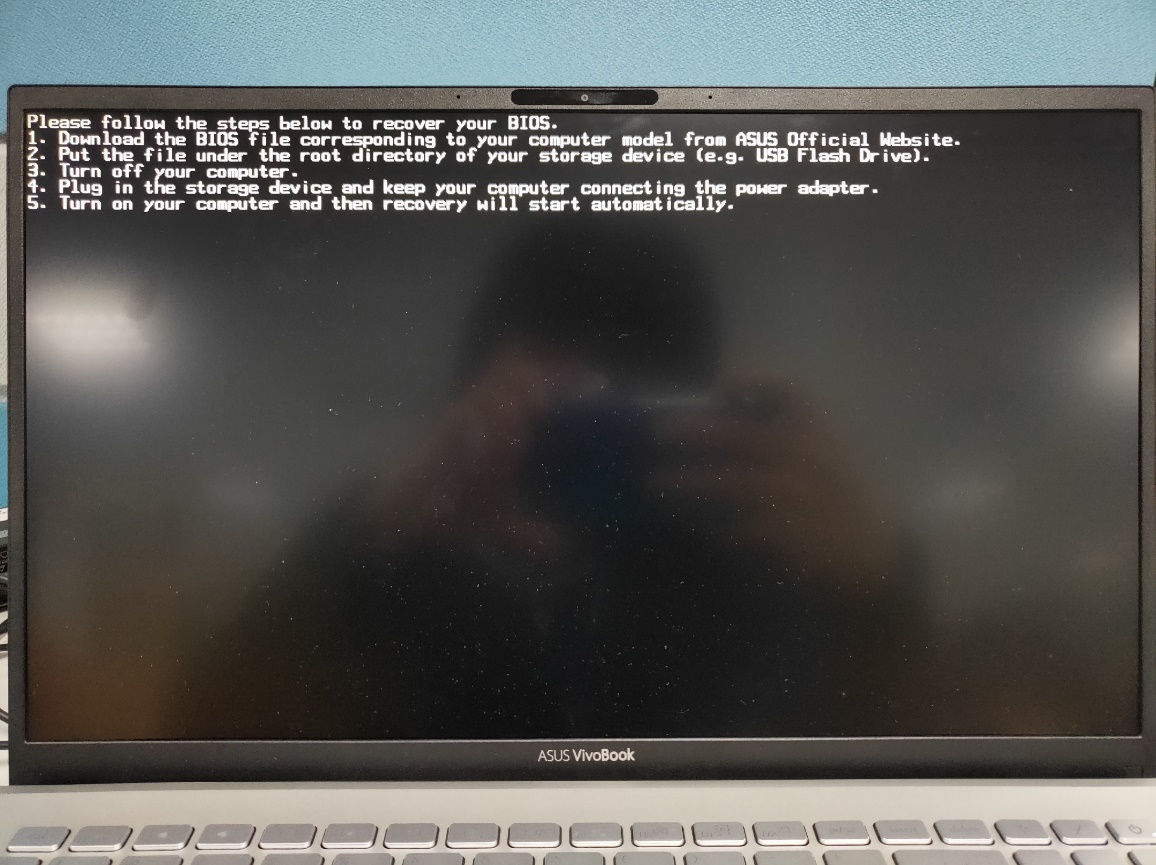
- Обратитесь, пожалуйста, к статье как обновить BIOS с помощью EZ Flash. Далее с помощью другого ПК перейдите на сайт поддержки ASUS, чтобы загрузить файл BIOS, соответствующий модели компьютера с которым возникла проблема обновления, а затем поместите этот файл BIOS в корневой каталог USB-накопителя (тип отформатированного USB-накопителя должен быть FAT32). Эти шаги аналогичны подготовке перед запуском обновления BIOS вручную с помощью EZ Flash. Примечание: если на экране отображается рекомендуемая версия восстановления BIOS, загрузите эту версию. Если нет, загрузите последнюю версию BIOS.
- Выключите компьютер при появлении вышеуказанного симптома, затем нажмите и удерживайте кнопку питания в течение 15 секунд, пока индикатор питания не погаснет.
- Подключите USB-накопитель с файлом BIOS к этому компьютеру и убедитесь, что адаптер переменного тока подключен.
- Включите компьютер, и он автоматически возобновит обновление BIOS.
Сценарий 3: Если после сбоя обновления BIOS ноутбук включается и загружается с черным экраном (индикатор питания горит, но на экране ничего не отображается), попробуйте выполнить следующие действия, чтобы узнать, можно ли решить проблему:
- Сначала извлеките адаптер переменного тока и аккумулятор (для моделей со съемным аккумулятором), затем нажмите и удерживайте кнопку питания в течение 40 секунд.
Примечание: Не отсоединяйте адаптер переменного тока для моделей ноутбуков ASUS TP420IA и UX425IA (для этих моделей необходимо подключить адаптер переменного тока для выполнения процесса аппаратного сброса)
- Снова подключите адаптер переменного тока и аккумулятор, затем включите компьютер. После этого Ваш компьютер должен автоматически запуститься, чтобы возобновить обновление BIOS. Не отключайте адаптер переменного тока и не прерывайте процесс, пока не завершится обновление BIOS, затем компьютер перезагрузится.
- После завершения обновления BIOS мы рекомендуем Вам загрузить настройки BIOS по умолчанию на этом устройстве. Здесь Вы можете узнать больше о том, как сбросить параметры BIOS
Если Ваша проблема не решена с помощью вышеуказанных рекомендаций, обратитесь в центр обслуживания клиентов ASUS для получения дополнительной информации.
-
Категория
BIOS/ Прошивка -
Тип
Product Knowledge
Эта информация была полезной?
Yes
No
- Приведенная выше информация может быть частично или полностью процитирована с внешних веб-сайтов или источников. Пожалуйста, обратитесь к информации на основе источника, который мы отметили. Пожалуйста, свяжитесь напрямую или спросите у источников, если есть какие-либо дополнительные вопросы, и обратите внимание, что ASUS не имеет отношения к данному контенту / услуге и не несет ответственности за него.
- Эта информация может не подходить для всех продуктов из той же категории / серии. Некоторые снимки экрана и операции могут отличаться от версий программного обеспечения.
- ASUS предоставляет вышеуказанную информацию только для справки. Если у вас есть какие-либо вопросы о содержании, пожалуйста, свяжитесь напрямую с поставщиком вышеуказанного продукта. Обратите внимание, что ASUS не несет ответственности за контент или услуги, предоставляемые вышеуказанным поставщиком продукта.
На чтение 6 мин Просмотров 1.5к. Опубликовано 29.09.2021

Существует несколько причин, по которым компьютер не загружается после обновления BIOS. Две наиболее распространенные из них: Версия BIOS несовместима с материнской платой и процедура прошивки BIOS не была завершена или была прервана. Подробнее о том, как загрузиться в безопасный режим, если компьютер не загружается после обновления BIOS, читайте в этой статье.
Если вы успешно вошли в безопасный режим, перезагрузите компьютер и посмотрите, сохраняется ли проблема.
Содержание
- Сброс настроек BIOS
- Выберите правильную прошивку BIOS
- Восстановление BIOS с USB-накопителя
- Windows 10 не запускается после обновления
- Восстановление загрузки
- Автоматическое восстановление системы
- Удаление обновлений Windows 10
- Загрузка в безопасном режиме
- Исправление системных файлов
Сброс настроек BIOS
Если компьютер не загружается после обновления BIOS, вам может потребоваться сброс настроек BIOS. Найдите опцию «Reset to default» или «Restore factory settings» в последнем разделе настроек BIOS, примените ее, сохраните настройки и перезагрузите компьютер. Если после обновления BIOS компьютер вообще не включается, есть еще один способ сбросить настройки CMOS. Для этого полностью выключите компьютер, откройте корпус, если у вас настольный компьютер, и осторожно извлеките батарейку CMOS из гнезда на материнской плате, подождите несколько минут и вставьте ее обратно.
Выберите правильную прошивку BIOS

Иногда компьютер может не загрузиться после обновления BIOS, если версия BIOS не совместима с вашей материнской платой. Убедитесь, что у вас установлена правильная версия, проверьте официальный сайт марки материнской платы или название ноутбука. Версии BIOS и утилиты для правильной прошивки обычно можно найти на официальных сайтах. Если процедура прошивки BIOS не была завершена или была прервана, это может привести к тому, что компьютер не включится после обновления BIOS. Попробуйте перепрошить BIOS до правильной версии.
Если у вас ноутбук, выключите его, отключите от сети, отсоедините батарею, подержите его так в течение минуты, несколько раз нажмите на кнопку питания. Теперь настройки CMOS сброшены. Перезагрузите компьютер и посмотрите, сохраняется ли проблема, когда компьютер не включается после обновления BIOS.
Восстановление BIOS с USB-накопителя
Загрузите файл Recovery BIOS и восстановите файл (*.BIO) на USB. Вставьте флэш-накопитель USB в компьютер. Выключите компьютер и выньте вилку из розетки. Откройте корпус и снимите перемычку BIOS. Включите компьютер и дождитесь завершения обновления. После завершения обновления компьютер либо выключится сам, либо вам будет предложено выключить его. Отключите USB и установите перемычку обратно, затем перезагрузите компьютер. В случае невозможности восстановления BIOS рекомендуется обратиться в сервисный центр для переустановки программного обеспечения. Windows 10 обновляется несколько раз в год, и после первого бесплатного обновления у многих пользователей возникли проблемы с компьютером.
Windows 10 не запускается после обновления

В этой статье мы попытаемся решить проблему, когда Windows 10 не запускается после обновления. Первое, что нужно сделать, если Windows 10 не запускается после обновления — сохранить данные компьютера. Нужные вам файлы, фотографии, документы, видео могут быть удалены, если у вас нет резервной копии. Для передачи файлов необходимо подключить любое программное обеспечение Live CD, которое можно бесплатно загрузить из Интернета. Перезагрузите компьютер и запустите Live CD, найдите свои файлы и перенесите их на внешний диск. Ваши данные будут сохранены.
Восстановление загрузки
Если Windows 10 не загружается после обновления, можно запустить восстановление загрузки, для этого вам понадобится установочный диск Windows 10. Вставьте установочный диск Windows 10 или загрузочный USB-накопитель и загрузите компьютер. На экране «Установка Windows» нажмите «Восстановление компьютера», затем выберите «Устранение неполадок», затем «Дополнительные параметры» и «Восстановление при запуске» Затем выберите Windows 10 и перезагрузите компьютер. Если у вас нет загрузочного диска, вы можете сделать это, нажав кнопку питания на несколько секунд, после чего компьютер выключится. Вы также можете несколько раз перезагрузить компьютер с помощью кнопки перезагрузки, если она имеется. После этого на экране появится меню Автоматическое восстановление компьютера.
Автоматическое восстановление системы

Еще один способ восстановления, когда Windows 10 не загружается после обновления — запустить автоматическое восстановление системы. Это поможет вам сбросить настройки на дату, когда Windows 10 работала нормально. В окне Дополнительные параметры выберите Восстановление системы. Затем вы увидите меню, в котором будет два варианта на выбор. Если выбрать «Сохранить файлы», файлы не будут удалены, если выбрать «Удалить все», система удалит файлы и перезагрузится.
Удаление обновлений Windows 10
Если Windows 10 не запускается после обновления, проблема может заключаться в самом обновлении. Попробуйте удалить их. Чтобы удалить обновления с экрана расширенных настроек, нажмите «Удалить обновления». На экране удаления будет два варианта, первый — «Удалить последний патч», второй — «Удалить последнее обновление компонента». Выберите второй вариант и следуйте инструкциям, затем перезагрузите компьютер.
Загрузка в безопасном режиме
Лучший способ решить проблему отсутствия загрузки Windows 10 после обновления — переключиться в безопасный режим. Это можно сделать в меню Дополнительные параметры, выбрав раздел параметры загрузки. Еще один не очень желательный способ попасть в безопасный режим — заставить компьютер выключиться 4 раза, удерживая кнопку питания.
Если Windows 10 загружается в безопасном режиме, значит, проблема не в конфигурации или драйверах.
Исправление системных файлов

В некоторых ситуациях компьютер не включается после обновления из-за поврежденных системных файлов. Вы можете проверить файлы с помощью инструментов SFC и DISM. Вы можете запустить проверку из командной строки. В окне Дополнительные параметры выберите раздел командная строка, далее запустить SFC (Проверка системных файлов). В командной строке после C : windowsystem32> введите sfc /scannow и нажмите Enter. После этого начнется сканирование и замена поврежденных файлов. Перезагрузите компьютер. Запуск DISM (Image Maintenance System) Команда DISM запускается так же, как и команда SFC, с единственным отличием: в строке после C : windowsystem32> введите dism /online /cleanup-image /restorehealth DISM проверит и восстановит поврежденную систему. После завершения процесса перезагрузите компьютер. Исправить главную загрузочную запись MBR Иногда компьютер не загружается после обновления из-за ошибки главной загрузочной записи MBR. Чтобы исправить это, вызовите командную строку, как описано выше. По очереди введите команды bootrec / fixmbr, bootrec / fixboot, bootrec / rebuildbcd, нажимая клавишу Enter после каждой команды. Затем введите Exit и перезагрузите компьютер. Если ни один из этих вариантов не помог решить проблему с тем, что компьютер не загружается после обновления, скорее всего, вам потребуется переустановить Windows 10. Мы рекомендуем сохранять данные на Live CD или аналогичный носитель, так как при чистой установке файлы будут удалены.

Стационарный ПК с активированной Win7 был куплен более 5-ти лет назад (с материнкой ASRosk H61M-GE). Добавил 2-й HDD? апгредил видеокарту (до ASUS GTX660) и ОЗУ (к 2х2Гб Hynex добавил 2х4Гб Kingstone). В начале августа прошлого года (по предложению Майкрософт) обновился до Win10. С сентября компьютер не эксплуатировался, а подключив его неделю назад снова, он обновился и после этого несколько раз «вылетал» черный экран с мигающим курсором в левом верхнем углу. Перезагружал систему принудительно. Вынимая планки из 2 и 4 слота и меняя разъем для монитора на видеокарте, через раз загружался. В уведомлениях предлагалось установить еще обновления, но при перезагрузке ничего не менялось. Периодически вылетала сеть (подключенная к роутеру через кабель), ПК еще что-то писал про несовместимые устройства или драйвера.
Решил обновить БИОС, (через саму программу) после обновления которого до UEFI (версия 2.0, какая была изначально, не знаю), компьютер перестал загружать ОС, находясь в циклической перезагрузке. При этом выдает:
В БИОС (вернее, UEFI) зайти могу, пробовал менять настройки — не помогает. Через загрузочную флешку могу попасть в «настройки» WIN:
Но, ни «Восстановление системы» (нет точек), ни «Восстановление при загрузке», ни «Возврат к предыдущей сборке» (не находит ее) не помогает. При «Восстановлении из образа» находит одну дату, но следующим шагом опять «отрезает»:
Командная строка запускается, но «перепробовав» различные варианты команд с сайтов, ничего из этого не вышло, хотя на диске «С» находит 4 раздела.
Что еще можно предпринять или только переустановка «поможет». Останется ли при этом активация ОС?
P.S. Звонил в службу поддержки Майкрософт, сказали — обращайтесь к производителю материнки. Переустановка WIN на изменение настроек БИОС никак не повлияет.
__________________
Помощь в написании контрольных, курсовых и дипломных работ, диссертаций здесь