This guide has been updated for the latest Windows versions Windows 11 and Windows Server 2022. You’ll learn how to install the Active Directory (AD) module for PowerShell Core 6.0, PowerShell 7 and Windows PowerShell. For Windows PowerShell, the tutorial describes how to install the AD module for Windows 7, Windows 8, Windows 8.1, Windows 10, Windows 11 Windows Server 2008 R2, Windows Server 2012 R2, and Windows Server 2016, Windows Server 2010 and Windows Server 2022. You’ll also learn how to work with the AD module on other systems such as macOS or Linux with the help of PowerShell remoting.
Contents
- Windows 7
- Windows Server 2008 R2
- Windows 8, Windows 8.1
- Windows 10
- Windows 11
- On Windows 11 with PowerShell
- Windows Server 2012, Windows Server 2012 R2, Windows Server 2016, Windows Server 2019, Windows Server 2022
- Install the AD module on PowerShell Core 6.x on a Windows computer
- Use the Active Directory module on Linux and macOS
- All versions: Import the ActiveDirectory module remotely
- Create an interactive remote session
- Import the AD module from a remote session
- Export the remote AD module to a local module
- PowerShell Core and Windows PowerShell modules
- Conclusion
- Author
- Recent Posts

Michael Pietroforte is the founder and editor in chief of 4sysops. He has more than 35 years of experience in IT management and system administration.
Also read: How to install the PowerShell 7 Active Directory module.
The installation of the AD module varies significantly for the different Windows and PowerShell versions. At the time of this writing, the AD module that comes with RAST does not work with PowerShell Core 6.0. However, this guide explains how you can manage Active Directory from PowerShell Core even on macOS and Linux.
Windows 7
On a Windows 7 computer, you can follow this procedure to install the Active Directory module:
- Download the Remote Server Administration Tools (RSAT) for Windows 7.
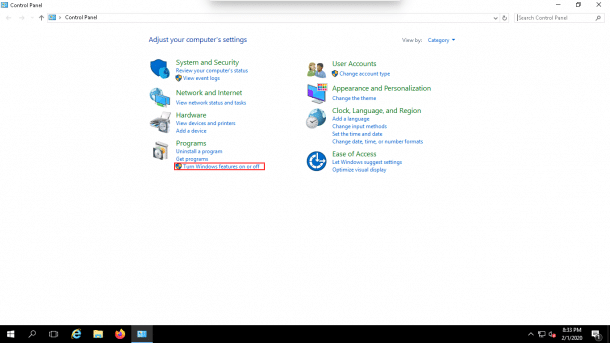
- Open the Control Panel, start typing features, and then click Turn Windows features on or off.
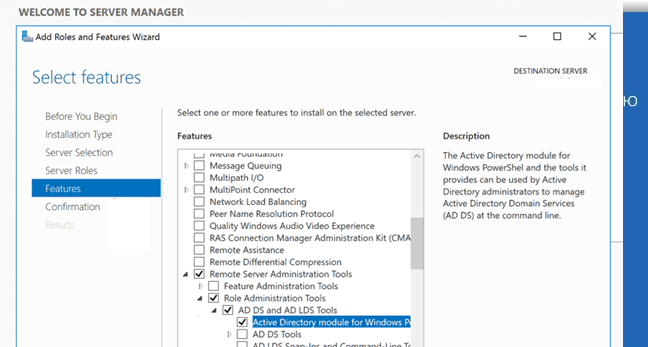
- Scroll down to Remote Server Administration Tools and enable the Active Directory Module for Windows PowerShell in Remote Server Administration Tools > Role Administration Tools > AD DS and AD LDS Tools.
- Run Import-Module ActiveDirectory on a PowerShell console.
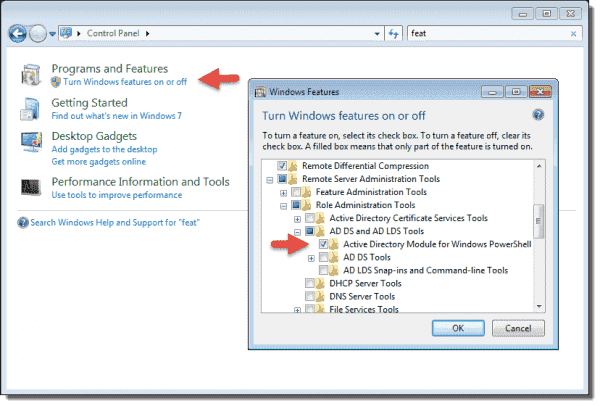
Active Directory Module for Windows PowerShell on Windows 7
If the Windows 7 machine only has PowerShell 2.0 installed, you have to add the Import-Module ActiveDirectory command to your profile because PowerShell doesn’t load modules automatically. For instance, you can import the module in %UserProfile%My DocumentsWindowsPowerShellprofile.ps1. Makes sure you’ve set your execution policy to either RemoteSigned or Unrestricted: Set-ExecutionPolicy RemoteSigned.
Another option is to open the module from the Administrative Tools folder in the Control Panel.
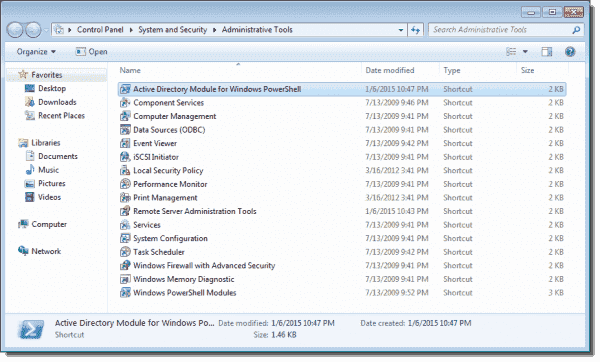
Active Directory Module in Administrative Tools
Windows Server 2008 R2
If your Windows Server 2008 R2 machine is a domain controller, the PowerShell Active Directory Module is already installed. You only have to install the module on member servers. The procedure on Windows Server 2008 R2 is similar to that on Windows 7. (Note that the module is not available for Windows Server 2008.)
One difference is that you don’t have to download RSAT because the tools are already available on Windows Server 2008 R2.
- In Server Manager, click Add features, and then:
- Select Active Directory module for Windows PowerShell in Remote Server Administration Tools > Role Administration Tools > AD DS and AD LDS Tools.
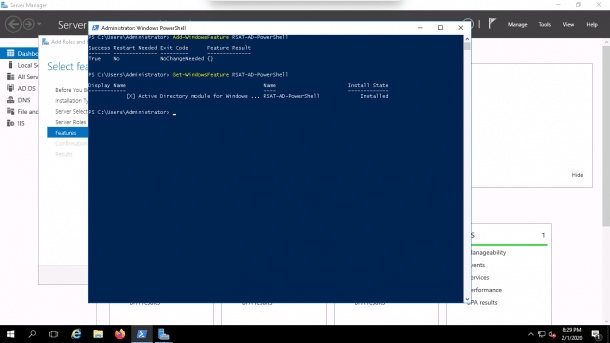
Alternatively, you can install the module from a PowerShell console:
Import-Module ServerManagerAdd-WindowsFeature RSAT-AD-PowerShell
After copying the module to your computer, you have to import it:
Import-Module ActiveDirectory
Or you can right-click the PowerShell icon on the taskbar and select Import system modules.

Import system modules
As on Windows 7, if you want to make the import permanent, you have to add the above import command to your PowerShell profile. Notice this description assumes you haven’t updated PowerShell 2 on your Windows Server 2008 R2 machine (see the description about Windows 7).
Windows 8, Windows 8.1
Things are a lot easier in Windows 8, Windows 8.1, and Windows 10. All you have to do is download and install RSAT (Windows 8, Windows 8.1, Windows 10). The installation enables all tools by default, and you also don’t have to import the module. You can use the AD module right away after you install RSAT.
Windows 10
Since Windows 10, the RSAT tools were shifted from being a standalone package to being a feature on demand in Windows 10. Click the menu and then search for «features» and then navigate to App and Features > Optional Features > Add a feature. Type RSAT in the search field and select the second option—RSAT: Active Directory Domain Services and Lightweight Directory Services Tools.
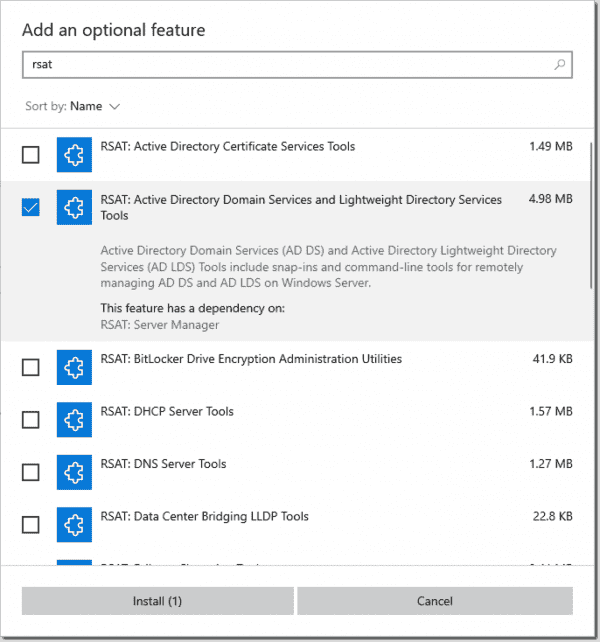
Install the AD module in Windows 10
Windows 11
In Windows 11, click the Start, type «Settings» in the Search field.
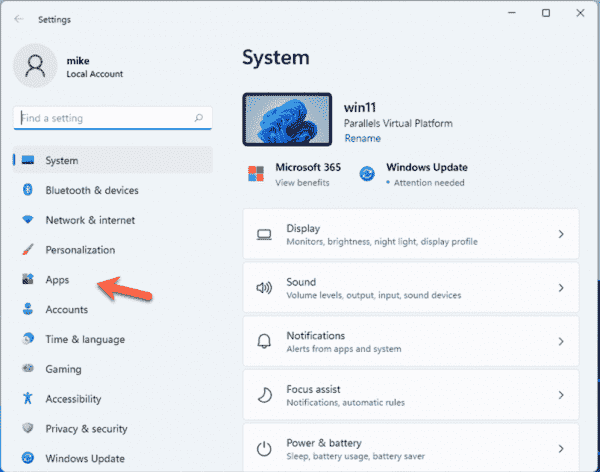
Apps in Windows 11
Now click Apps > Optional Features > View features.

Optinal Features in Windows 11

Add an optional feature in Windows 11
Then type «RSAT» and select RSAT: Active Directory Domain Services and Lightweight Directory Services Tools and click Next and then Install.
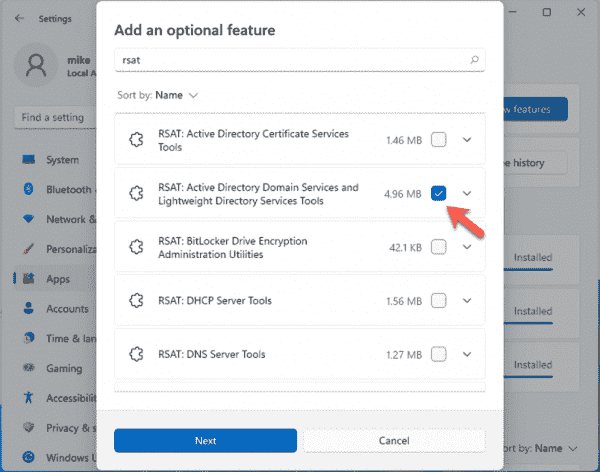
Install RSAT on Windows 11
To verify that RSAT has been installed launch a PowerShell console with Administrator privileges and then type this command:
Get-WindowsCapability -Name RSAT* -Online | Select-Object -Property DisplayName, State

Verfiying that RSAT is installed with PowerShell
On Windows 11 with PowerShell
If you don’t want to avoid all this clicking you can install all the RSAT tools in one go with this PowerShell command below. Make sure that you are working on an elevated PowerShell console.
Get-WindowsCapability -Name RSAT* -Online | Add-WindowsCapability -Online
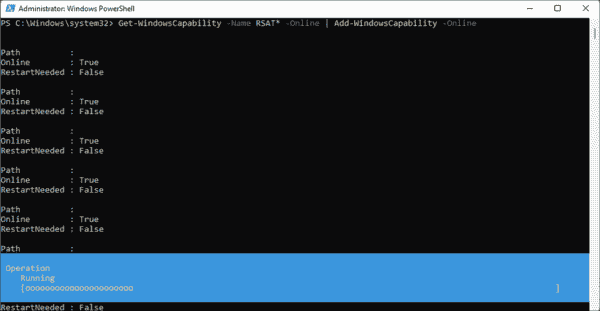
Intstall RSAT with PowerShell
Windows Server 2012, Windows Server 2012 R2, Windows Server 2016, Windows Server 2019, Windows Server 2022
As on Windows Server 2008 R2, the AD module is already installed on domain controllers on Windows Server 2012, Windows Server 2012 R2, and Windows Server 2016. On member servers, you can add the module as a feature in Server Manager.
- Start Server Manager.
- Click Manage > Add Roles and Features.
- Click Next until you reach Features.
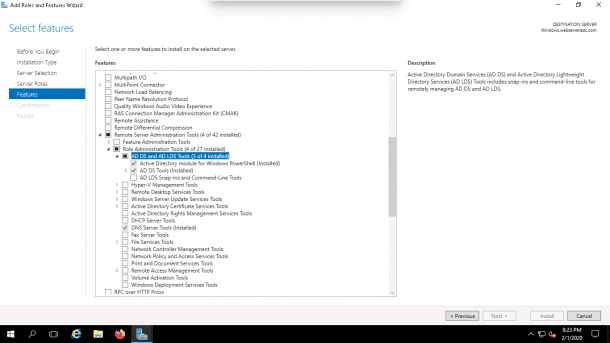
- Enable Active Directory module for Windows PowerShell in Remote Server Administration Tools > Role Administration Tools > AD DS and AD LDS Tools.

Install the AD module on Windows Server 2016
Alternatively, you can install the module from a PowerShell console:
Install-WindowsFeature RSAT-AD-PowerShell

Installing the AD module on Windows Server 2012 with PowerShell
There’s no need to import the Server Manager module first, as on Windows Server 2008 R2. You also don’t have to import the AD module after the installation.
If you want to verify the successful installation of the module, you can just run the Get-ADuser cmdlet.
Install the AD module on PowerShell Core 6.x on a Windows computer
- Install RSAT with the method matching to your operating system (see sections above).
- Install the WindowsCompatibility module.
Install-Module -Name WindowsCompatibility
- Load the WindowsCompatibility module like usual with the Import-Module cmdlet
Import-Module -Name WindowsCompatibility
- Load the ActiveDirectory module with the Import-WinModule cmdlet
Import-WinModule -Name ActiveDirectory
Use the Active Directory module on Linux and macOS
On Linux and macOS you can’t install Active Directory module. However, you use PowerShell remoting to connect to a Windows server with Active Directory and then work with the AD module in remoting session. Read ahead to learn how to use remoting with the AD module.
All versions: Import the ActiveDirectory module remotely
Create an interactive remote session
The simplest option is to create an interactive remote session to your domain controller with the Enter-PSsession cmdlet:
Enter-PSsession MyDomainConroller
You can then work right away with the AD cmdlets. This option is good if you only occasionally manage AD on a PowerShell console and if you don’t have to execute local scripts.

Managing Active Directory on PowerShell Core in an interactive remote session
Import the AD module from a remote session
The second option uses implicit remoting and allows you to run the AD cmdlets from a local session. However, you execute the AD cmdlets remotely on a domain controller. In practice, you won’t notice much of difference in locally installed cmdlets. To import the AD module on PowerShell Core 6.0, execute these commands:
$S = New-PSSession -ComputerName MyDomainConroller
Import-Module -PSsession $S -Name ActiveDirectory
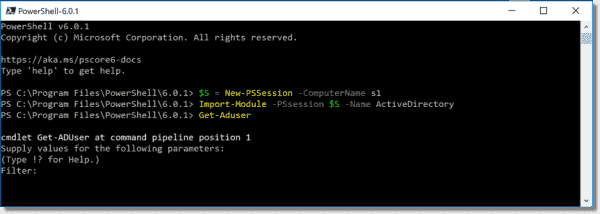
Import the AD module on PowerShell Core 6.0
The first command creates a PowerShell session (PSsession) on the domain controller (replace MyDomainController with the name of your DC) and establishes a persistent connection. Next, we import the ActiveDirectory module from this remote PSsession into our local session.
You can now use all AD module cmdlets on your local PowerShell Core console. Just keep in mind the commands always execute remotely.
If you often work with AD, you can add the above commands to your profile, for instance in DocumentsPowerShellProfile.ps1.
Export the remote AD module to a local module
Alternatively, you can export the AD cmdlets from a remote session to a local module:
$S = New-PSSession -ComputerName MyDomainController
Export-PSsession -Session $S -Module ActiveDirectory -OutputModule RemoteAD
Remove-PSSession -Session $S
Import-Module RemoteAD

Exporting the Active Directory module to a local module
These commands will create a local module in your Documents folder under PowerShellModulesRemoteAD. However, like with the above solution, you will be working with implicit remoting, and all cmdlets will execute remotely. The local RemoteAD module only links to the cmdlets on the domain controller. If you want to use the RemoteAD module on other machines with PowerShell Core, simply copy the RemoteAD folder to the PowerShell Core module folder on the second machine.
The difference with the «import solution» is that in the «export solution,» PowerShell only establishes a connection to the domain controller when you use an AD cmdlet the first time. You also don’t have to add the above commands to your profile because PowerShell will load the local RemoteAD module automatically. However, the downside to this option is you might have to repeat the procedure after updating the AD module on the domain controller.
PowerShell Core and Windows PowerShell modules
Note that you can use Windows PowerShell together with PowerShell Core on the same machine and work with the different AD modules in both shells. If you installed RSAT, the AD module for Windows PowerShell will reside in this folder:
$env:windir/System32/WindowsPowerShell/v1.0/Modules/ActiveDirectory
If you used the export solution, the RemoteAD module will be in this folder:
$env:userprofile/Documents/PowerShell/Modules/RemoteAD
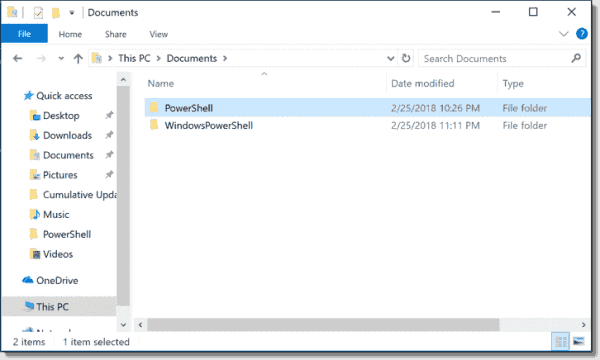
PowerShell Core and Windows PowerShell use different folders
PowerShell Core does not import modules in WindowsPowerShell folders, and Windows PowerShell does not load PowerShell Core modules, which are always in PowerShell folders. Thus, you don’t have to worry about conflicts between the different AD modules in PowerShell Core and Windows PowerShell.
Conclusion
Using the Active Directory module has become simpler with each PowerShell version up to Microsoft’s release of PowerShell Core 6.0. However, working with implicit remoting and remote sessions has various advantages. One advantage is that you can use disconnected remote sessions. This allows you to start a script, shut down your client computer, and retrieve the results from the remote machine later. If you often work with remote sessions, you should become familiar with the different ways you can use PowerShell remote sessions. Once you get used to working with remoting, you probably won’t miss the local AD module for PowerShell Core.
Windows Server 2008 R2 and Windows 7 both ship with PowerShell 2.0 installed by default, a fact which begins to demonstrate how important a consistent command line interface is becoming to Microsoft products. Which is why you as a sysadmin should be aware that, in order to excel as a Windows administrator in the 21st Century you will need to get to grips with PowerShell. Starting with products like Exchange Server 2007 and System Center Virtual Machine Manager (SCVMM), moving into the core OS with Windows 2008 R2 and Windows 7, other product groups are now providing PowerShell support with their latest releases.
Active Directory Domain Services in Windows Server 2008 R2 ships with PowerShell support via cmdlets and a provider; in addition the new Active Directory Administrative Center is built on top of Windows PowerShell technology. In this article we will look at how you can use these new tools to more effectively manage your environment.
Active Directory Scripting
When responsible for an Active Directory environment the larger it becomes the more likely it is you are going to want to use some kind of automation tool to manage it effectively rather than be constantly clicking through a GUI interface to complete the same repetitive tasks. Even in environments of 100 users if you were tasked to provision 10 new users last thing on a Friday night ready for a Monday morning would you really want to click through the New User Wizard 10 times and could you guarantee you wouldn’t make any typing mistakes? Prior to the release of 2008 R2 some of the typical options for automating Active Directory with scripting were:
- VBScript. There are hundreds of examples on the Internet, one of the best resources being the Microsoft Script Center.
- PowerShell using ADSI, similar to how the VBScript examples are put together.
- PowerShell using .NET Directory Services Classes.
- PowerShell using Quest’s Active Directory cmdlets.
Each approach had its good and bad points, but going forward using the PowerShell cmdlets which ship as part of Active Directory in Windows Server 2008 R2 will be the route to take given that will be Microsoft’s focus for administrators compared to the above examples.
Active Directory Web Services
Introduced natively as part of Active Directory in Windows Server 2008 R2 is a new service, Active Directory Web Services. This technology permits remote management of any local directory service instance using web service protocols, which by default uses TCP port 9389. This service is included as part of an Active Directory Domain Services (or Active Directory Lightweight Directory Services) installation and is configured to run as an automatic service alongside the main ADDS service.
The Active Directory PowerShell cmdlets and provider which ship with Windows Server 2008 R2 are included as part of a module (modules are essentially the evolution of snapins from version 1 of PowerShell) and use this Web Service to manage Active Directory.
The good news for organisations who will not be immediately upgrading their Active Directory environments to Windows Server 2008 R2 and are currently running either Windows Server 2003 SP2 (or R2 SP2) or Windows Server 2008, with or without SP2, is that this Web Service has been made available as a Release To Web update. This means that you can have the same automation experience today with your current environment without going through the upgrade process for Active Directory which typically for most organisations involves significant planning and quite possibly cost.
There are some system requirements for this downlevel release which you should be aware of before you go diving straight in:
- .NET Framework 3.5 with SP1 must be installed on the Windows Server 2003 or 2008 Domain Controller.
- PowerShell 2.0 for Windows Server 2003 or 2008 must be installed, it’s available from Knowledge Base (KB) article 968929.
- For Windows Server 2003 and 2008 based Domain Controllers, you must download and install the hotfix that is described in KB article 969166.
- For Windows Server 2003& based Domain Controllers, you must download and install the hotfix that is described in KB article 969429.
- For Windows Server 2008 based Domain Controllers without SP2, you must download and install the hotfix that is described in KB article 967574.
Note that it is not possible to install the Active Directory module on these downlevel servers and you will instead require a Windows Server 2008 R2 or Windows 7 instance to remotely manage these systems with the Active Directory module. Whilst not a requirement that you install the Web Service on every single downlevel Domain Controller, you may run into issues if you do not give enough coverage across your Domain Controllers. The majority of the Active Directory cmdlets though do include a Server parameter which allows you to specify a particular Domain Controller to connect to.
Getting Started
Once you have the Active Directory Web Service installed, either as part of a native Windows Server 2008 R2 installation or using one of the downlevel versions as described above, you can start to manage Active Directory with the PowerShell module. To use this module you can either Remote Desktop to connect to a Domain Controller in your environment or more typically, and also better practise, use tools on your management workstation.
To do this from a Windows 7 based workstation you obviously already have PowerShell 2.0 installed by default, you should also install the Microsoft Remote Server Administration Tools for Windows 7 (RSAT). Amongst the many tools available in this package for remotely managing Windows Server is the Active Directory PowerShell module. After installation of RSAT the feature can be turned on by navigating to Control Panel, Programs and Features, Turn Windows Features On or Off.
The next step is to open a PowerShell session and use the Import-Module cmdlet to enable the use of the ActiveDirectory module. If this is something you would regularly use on your management workstation then it would be well worth your while adding this line to your PowerShell profile so that this module is available to you in every session without having to type this command.
Import-Module ActiveDirectory
Active Directory Provider
Windows PowerShell 1.0 shipped with a number of providers which gave you access to navigate and update data stores, such the file system or the registry in the Windows OS. Some other products also lend themselves to the concept of a provider and in Windows Server 2008 R2 the Active Directory module ships with a provider. This provider allows you to traverse and update Active Directory just like you were using the old style command prompt to navigate the Windows file system.
After importing the ActiveDirectory module, running the below cmdlet:
Get-PSProvider
will display the list of providers available to you on the system.
To begin you can use the familiar cd (which is an alias in PowerShell for Set-Location) to change your location to that of the Active Directory hierarchical navigation system.
You can use other familiar commands to navigate your way around and make changes. We can use the well known dir to show us what is available. Then cd ‘DC=test,DC=local’ to start exploring the domain and then dir again will give a well-known view to that seen when first opening the Active Directory Users and Computers GUI tool.
If we then drill down further into the Users OU below the Sales OU we can observe some user accounts again by using dir.
This time we would like to update the Description field for the Joe Bloggs user account to read ‘Marketing Manager’. To do that we can use the Set-ItemProperty cmdlet with the path to the object we wish to change and the values we wish to set:
Set-ItemProperty -Path “CN=Joe Bloggs” -Name Description -value “Marketing Manager”
We can then read this property back with the Get-ItemProperty cmdlet:
Get-ItemProperty -Path “CN=Joe Bloggs” -Name Description
Or in a GUI view:
Active Directory Cmdlets
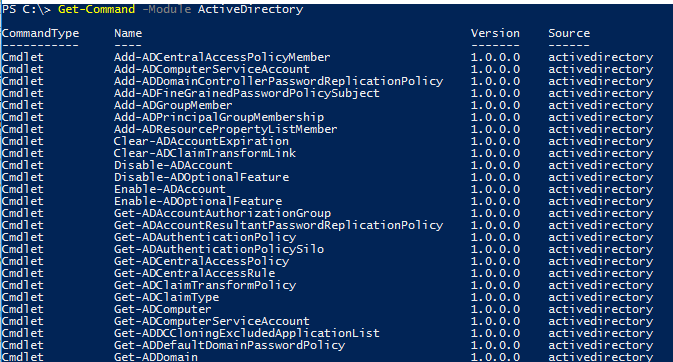
There are 76 cmdlets which make up the Active Directory module in Windows Server 2008 R2. You can view details of them via the Get-Command cmdlet and specifying the module of interest:
Get-Command -Module ActiveDirectory
The best way to learn about what each one does is to check them out in your test environment and also use the built-in PowerShell help documentation via the Get-Help cmdlet. For example:
Get-Help Get-ADUser -Full
This will give you detailed information about the cmdlet and how you should go about using it. Tip: I often find using the -Examples parameter of the Get-Help cmdlet to be a great kick start to learning how a cmdlet works; rather than wade through the text help you can instantly see how you might use it via some examples.
So let’s check out some of these cmdlets.
Creating User Accounts
Earlier in the article we talked about how when creating even a small number of users, repeatedly working through an individual wizard for each one could be a dull task and prone to consistency mistakes. Let’s say the HR department supplies you with a CSV file containing information about 10 new users and needs you to create these accounts ASAP before Monday.
For simplicity’s sake we’ll keep it to a few basic properties like Name and Description, of course you could and normally would have significantly more. Let’s also say to make your life easier you’ve added a few extra columns of you own like the SamAccountName and the Path (OU) where you would like the account to be created.
We can take of advantage of a standard PowerShell cmdlet Import-CSV which will read in a standard CSV file and create a set of objects based on the data inside the file. We can then send the results of this cmdlet down the pipeline to the New-ADUser cmdlet from the ActiveDirectory module and create the 10 accounts in a matter of seconds.
Import-CSV C:scriptsusers.csv | New-ADUser
It really is as simple as that and now you also can leave early on that Friday night like everyone else! Some of the results of those commands are shown below, nicely created in the OU specified in the CSV file.
You might be wondering how we made the leap from the information specified in the CSV to the New-ADUser cmdlet without having to specify any parameters with this cmdlet. In fact you could create a new user account with something like this:
New-ADUser -Name “John Smith” -SamAccountName “john.smith” -Description “Sales Manager” -Department “Sales” -EmployeeID “45896” -Path “ou=users,ou=sales,dc=test,dc=local” -Enabled $true
We have actually taken advantage of something known as ‘Pipeline Parameter Binding’. Since we gave the columns in the CSV file the same names as the parameters of the New-ADUser cmdlet and these parameters ‘Accept Pipeline Input ByPropertyName’ PowerShell is clever enough to match them up and use them. It’s almost like someone has thought to try and make your administrator life just that little bit easier.
Administering Groups
Another frequent maintenance task for the Active Directory administrator is the upkeep of groups and in particular membership of them. Let’s take the scenario of the newly created Marketing user accounts and a request to add all of them to the ‘Marketing Application’ group which is used to provide access to one of their main tools.
Again you could do that through Active Directory Users and Computers, edit the membership of the ‘Marketing Application’ group and manually enter all of their names to add them to the group. Or you could be smart, use the Get-ADUser cmdlet with a filter to select those users, pipe the results to the standard PowerShell cmdlet ForEach-Object and then use the Add-ADGroupMember cmdlet to populate the group. OK it might not make that big a difference for only five users, but imagine if that was five thousand.
Get-ADUser -filter * -SearchBase “ou=users,ou=marketing,dc=test,dc=local” | ForEach-Object {Add-ADGroupMember -Identity ‘Marketing Application’ -Members $_}
Note: the $_ at the end of that command refers to the ‘current object in the pipeline’, i.e. imagine it cycling through each of those users in the filter and substituting that user account for $_ each time.
The results of those cmdlets displayed in the GUI view of the group.
Fine-Grained Password Policies
You may be aware that in Windows Server 2008 a new feature was introduced whereby you were able to add multiple password policies into a single domain. In previous versions of Windows Server there was a restriction of a single password policy in a domain and consequently many organisations ended up deploying multiple domains just for that reason.
So a great new feature, but unfortunately the management tool for configuring these new password policies was wait for it……ADSI Edit! Whilst there were a number of freeware tools available around the time 2008 shipped which made this easier for the administrator, there are now out of the box PowerShell cmdlets with Windows Server 2008 R2 to help you manage these policies.
The first cmdlet deals with the Default Domain Password Policy Get-ADDefaultDomainPasswordPolicy, this will retrieve information about the policy which will apply to all users if there are no Fine-Grained polices.
There’s an equivalent Set-ADDefaultDomainPasswordPolicy which will allow you to make changes to any of the above settings.
You could though have done all of this through Group Policy Editor. The real gains come from being able to create and manage a Fine-Grained Password Policy. Use:
New-ADFineGrainedPasswordPolicy -Name “Standard Users PSO” -Precedence 500 -ComplexityEnabled $true -Description “Standard Users Password Policy” -DisplayName “Standard Users PSO” -LockoutDuration “0.00:12:00” -LockoutObservationWindow “0.00:15:00” -LockoutThreshold 10
to create a new Fine-Grained Password Policy called ‘Standard Users PSO’ and policy settings defined as per the parameter values.
In the above example the Lockout parameters should be specified in the format Day.Hour:Minutes:Seconds, i.e. LockoutDuration has been set to 12 minutes.
Fine-Grained Password Polices are applied to Users or Groups, so to apply the Standard Users PSO policy to the Marketing Users group the Add-ADFineGrainedPasswordPolicySubject cmdlet is available to you. Use:
Add-ADFineGrainedPasswordPolicySubject ‘Standard Users PSO’ -Subjects ‘Marketing Users’
to make this change.
Of course you may now have more than one Fine-Grained Password policy. To view details of them all use:
Get-ADFineGrainedPasswordPolicy -Filter {name -like “*”}
and you will see results similar to the below so that you can compare them.
Consequently some users may have more than one policy applied to them, so how do you tell which policy will be effective on them?
- If a user is directly linked to a particular policy then that policy wins. (Generally it is bad practise to link a policy directly to a user; groups should be used for more effective management.)
- If a user is a member of different groups which each have different policies applied to them then the policy with the lowest Precedence value will win.
- If there are no Fine-Grained polices created then the Default Domain Policy will apply.
The best way to determine what policy will be applied to a user is to use the Get-ADUserResultantPasswordPolicy cmdlet.
For example, George Maker is in the Marketing Users and High Security Users groups, both of which have different Fine-Grained Password Policies applied to them. By running the command:
Get-ADUserResultantPasswordPolicy -Identity ‘George.Maker’
we will be given the resulting answer of which password policy will be applied to him. In this case it’s the ‘High Security Users PSO’ which is applied because it had the lowest precedence value.
FSMO Roles
In an Active Directory environment all Domain Controllers are equal, although some are more equal than others. There are five roles known as Flexible Single Master Operation roles which typically will live on different domain controllers.
- Domain Naming Master
- Schema Master
- Infrastructure Master
- PDCEmulator
- RID Master
You can use the Get-ADForest and Get-ADDomain cmdlets to determine which Domain Controllers are holding these roles. (In my test environment there is only one DC, but you get the idea)
Whilst you could use the Netdom.exe command line tool to obtain the same information, you would need to use an alternative command line tool Ntdsutil.exe, with a different style and syntax, to transfer a FSMO role between Domain Controllers. Consequently by using the Move-ADDirectoryServerOperationMasterRole cmdlet to transfer FSMO roles between Domain Controllers, the administrator using the PowerShell module benefits from a consistent command line experience.
|
Move—ADDirectoryServerOperationMasterRole —Identity «2008R2DC2« —OperationMasterRole PDCEmulator,RIDMaster |
Further Information
If you want to know more the best place to look is the Active Directory PowerShell Blog maintained by the team who put the module together. Also, I have made an Active Directory PowerShell Quick Reference Guide which you might find useful for getting started or a handy reference to keep by your desk.
Summary
Windows Server 2008 R2 ships with both PowerShell 2.0 and an Active Directory module containing a provider and cmdlets to enable you to manage Active Directory from the command line. This module has also now been made available for downlevel versions of Windows Server making it more readily accessible to those who might not be in a position to upgrade their Active Directory environments just yet.
It is highly worth spending some time with this module, even if it just getting to grips with the basics; it will help make you a better and more effective administrator of Active Directory.
Когда Windows PowerShell только появился, многие стали спрашивать, можно ли управлять Active Directory (AD) с использованием PowerShell. В те времена ответ Microsoft был не таким, какой хотелось бы услышать большинству администраторов. В PowerShell имелся встроенный «акселератор типов» Active Directory Service Interfaces (ADSI) для доступа к объектам AD, но пользователю приходилось в основном самостоятельно выяснять, как применить PowerShell для решения задач администрирования AD. Значительные изменения произошли с выпуском Windows Server 2008 R2, в котором появился модуль PowerShell для Active Directory. В модуль AD входит набор команд для управления AD, а также AD Provider, с помощью которого можно перемещаться по AD, как по диску с символьным обозначением. В этой статье я покажу, как установить модуль AD, и подробно опишу его функционирование
Когда Windows PowerShell только появился, многие стали спрашивать, можно ли управлять Active Directory (AD) с использованием PowerShell. В те времена ответ Microsoft был не таким, какой хотелось бы услышать большинству администраторов. В PowerShell имелся встроенный «акселератор типов» Active Directory Service Interfaces (ADSI) для доступа к объектам AD, но пользователю приходилось в основном самостоятельно выяснять, как применить PowerShell для решения задач администрирования AD. Спустя некоторое время компания Quest Software предоставила бесплатный набор команд для административных задач AD, в том числе создания, изменения и удаления объектов AD, и поиска объектов в AD. В течение длительного периода состояние PowerShell и управления AD было таким.
Значительные изменения произошли с выпуском Windows Server 2008 R2, в котором появился модуль PowerShell для Active Directory. В модуль AD входит набор команд для управления AD, а также AD Provider, с помощью которого можно перемещаться по AD, как по диску с символьным обозначением. В этой статье я покажу, как установить модуль AD, и подробно опишу его функционирование.
Установка Active Directory Module
В отличие от предыдущих инструментов, в которых для связи с AD применялся протокол LDAP, модуль AD использует протоколы Active Directory Web Services (ADWS) для обмена данными с контроллером домена (DC) AD. Эти протоколы подробно описаны в блоге MSDN «Active Directory Web Services Overview», но достаточно отметить, что команды PowerShell в модуле AD и Active Directory Administrative Center (ADAC) используют ADWS для связи и получения информации из AD.
При установке контроллеров домена Windows Server 2012 или Server 2008 R2 в домене AD протокол ADWS устанавливается и запускается по умолчанию на каждом из них. Если ваш домен состоит целиком из контроллеров домена Windows Server 2008 или Windows Server 2003, необходимо установить ADWS отдельно. Microsoft бесплатно предоставляет пакет Active Directory Management Gateway Service для этой цели. Если установить пакет по крайней мере на одном контроллере домена AD Server 2008 или Server 2003, то можно использовать модуль AD для PowerShell наряду с ADAC.
Собственно модуль AD устанавливается по умолчанию на любом DC с операционной системой Server 2012 или Server 2008 R2. На компьютерах Windows 8 и Windows 7 (или любом компьютере, кроме DC, работающем с Server 2012 или Server 2008 R2), необходимо установить средства удаленного администрирования сервера Remote Server Administration Tools из центра загрузки Microsoft.
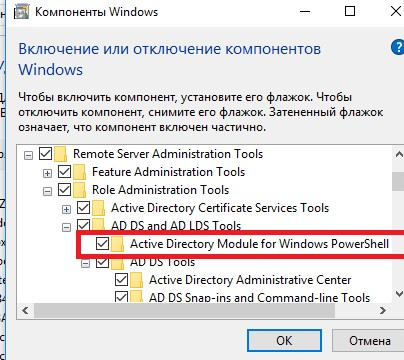
Независимо от того, установлены Remote Server Administration Tools на компьютере заранее или отдельно, следующий шаг — открыть раздел установки и удаления программ Add/Remove Programs в панели управления и выбрать пункт включения или отключения компонентов Windows — Turn Windows features on or off — в меню слева. Прокрутите диалоговое окно компонентов Windows Feature вниз до раздела Remote Server Administration Tools. Найдите флажок Active Directory Module for Windows PowerShell в папке Remote Server Administration ToolsRole Administration ToolsAD DS and AD LDS Tools, как показано на экране 1. Установите флажок и нажмите кнопку OK, чтобы установить модуль.
 |
| Экран 1. Установка модуля AD для PowerShell |
После этого вы должны увидеть ярлык Active Directory Module for Windows PowerShell в разделе Administrative Tools меню Start. Щелкните этот ярлык, чтобы запустить PowerShell с загруженным модулем AD. Если вы уже работаете в PowerShell и хотите просто загрузить модуль, чтобы он стал доступным для использования, можно ввести следующую команду и получить доступ к командам AD и AD Provider:
Import-Module ActiveDirectory
Теперь посмотрим, как перемещаться по AD с помощью AD Provider.
Использование Active Directory Provider
В PowerShell реализована концепция дисков PowerShell, которые я буду называть просто дисками PS. Упрощенно можно назвать диск PS представлением ресурса, такого как пригодная для навигации файловая система, состоящая из папок и конечных элементов. Не каждый ресурс можно представить таким образом, но многие (в том числе AD и реестр) хорошо вписываются в эту модель. Модуль AD содержит провайдера для диска PS AD. Соответственно, можно перемещаться и даже изменять AD, как будто это файловая система.
Как же перемещаться по AD, используя AD Provider? Предполагается, что PowerShell открыт и модуль AD загружен. В этом случае первый шаг — запустить команду Set-Location, которая имеет несколько псевдонимов, в том числе sl и cd:
Set-Location AD:
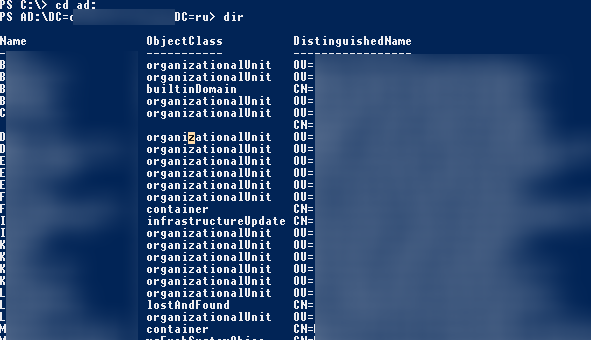
Эта команда изменяет текущее рабочее положение диска PS AD. В результате приглашение PowerShell покажет AD: вместо C:. Затем, чтобы увидеть элементы в диске PS AD, можно применить команду Get-ChildItem с псевдонимом dir:
Get-ChildItem
На экране 2 показан пример результата на моем компьютере.
|
|
| Экран 2. Список разделов домена, доступных в PS-диске AD |
Как мы видим, команда возвращает список всех доступных разделов домена. Самый интересный, на мой взгляд, — раздел домена с именем cpandl, который содержит имена пользователей и компьютеров. Чтобы изменить этот домен, достаточно ввести команду:
Set-Location «dc=cpandl,dc=com»
Обратите внимание, что используется команда Set-Location с различающимся именем (DN) моего домена AD. Это требуется для корректной навигации. После перехода в каталог домена (на что указывает приглашение AD:dc=cpandl,dc=com в PowerShell), можно использовать команду Get-ChildItem, чтобы увидеть структуру AD верхнего уровня (экран 3).
|
|
| Экран 3. Просмотр верхнего уровня иерархии AD |
Если нужно взглянуть на пользователей в организационной единице (OU) SDM, то для перехода в эту OU достаточно ввести:
Set-Location «OU=SDM»
Командная строка PowerShell будет иметь вид AD:ou=SDM,dc=cpandl,dc=com. На данном этапе можно использовать команду Get-ChildItem, чтобы увидеть все объекты пользователя в этом OU. Если нужно изменить свойство Description на объекте пользователя, представляющем мою учетную запись пользователя Darren Mar-Elia. Для этого есть команда! Команда Set-ItemProperty позволяет изменить свойство в объекте AD. Если нужно изменить описание учетной записи пользователя на Chief Techie, следует выполнить команду:
Set-ItemProperty -Path '.CN=Darren Mar-Elia' `
-Name «Description» -Value «Chief Techie»
Как мы видим, здесь используется параметр –Path для указания моей учетной записи пользователя в текущем каталоге. Я также использую параметр -Name, дабы указать, что нужно изменить свойство Description, и параметр –Value, для указания описания Chief Techie.
Обратите внимание, что если нужно найти все объекты с определенным значением свойства, можно задействовать Get-ItemProperty. Если требуется просто получить ссылку на объект AD, используйте Get-Item.
Как видите, работать с AD таким образом довольно просто. Механизм вряд ли подходит для массовых изменений, однако он удобен для работы с AD как с файловой системой. При этом, как я выяснил, большинство администраторов использует команды вместо диска PS AD для управления AD. Посмотрим, как действуют некоторые из этих команд.
Применение команд Active Directory
Модуль для AD, поставляемый с Windows 7, содержит 76 команд для управления AD. Их можно использовать почти для любых целей, в том числе поиска объектов AD, создания и удаления объектов AD и манипуляций с информацией о настройках AD (например, режим леса и детальная политика паролей). Обычно команды группируются по глаголам, таким как Add-, Remove-, Get- и Set-. Обратите внимание, что не каждая команда Get- имеет соответствующую команду Set- и наоборот, поэтому иногда приходится потратить усилия, чтобы найти нужную команду для задачи. Например, можно установить уровень функциональности леса AD с использованием Set-ADForestMode, но чтобы выяснить текущий уровень функциональности леса, необходимо задействовать команду Get-ADForest и посмотреть свойство ForestMode на возвращенном объекте.
Рассмотрим несколько типовых задач, которые можно выполнить с помощью команд AD. В частности, далее будет показано, как добавить учетные записи пользователя, управлять членством в группе, сбросить пароли учетных записей пользователя и выполнять поиск объектов AD.
Добавление учетных записей пользователя
Команда New-ADUser обеспечивает простой способ добавлять учетные записи пользователя в AD. Если нужно добавить новую учетную запись пользователя с именем Bill Smith в организационную единицу SDM, то в самом простом случае можно создать учетную запись нового пользователя с помощью команды:
New-ADUser -Name «Bill Smith» -SamAccountName «bsmith» `
-GivenName «Bill» -Surname «Smith» `
-DisplayName «Bill Smith» -Path «OU=SDM,DC=cpandl,DC=com»
В этой команде вводится основная информация об учетной записи пользователя. В частности, параметр -SamAccountName служит для предоставления имени учетной записи SAM, необходимой для создания объекта пользователя. Также применяется параметр –Path, чтобы сообщить команде место, куда следует поместить объект — в данном случае в организационную единицу SDM в домене cpandl.com. Кроме того, указано имя пользователя (параметр -GivenName), фамилия (параметр -Surname) и отображаемое имя (параметр -DisplayName).
Выполнение этой команды приведет к созданию учетной записи пользователя, но есть две проблемы. Во-первых, учетная запись будет отключена. Во-вторых, с учетной записью не будет связан пароль, что требуется в большинстве доменов.
Чтобы избежать необходимости активировать учетную запись и назначать пароль отдельно, можно изменить команду New-ADUser. New-ADUser автоматически активирует учетную запись, если указать параметр -Enabled $true в команде. Для активирования требуется пароль, поэтому необходимо также указать его в команде.
Чтобы предоставить пароль, можно использовать параметр –AccountPassword. Однако нельзя ввести пароль простым текстом в командной строке. Этот параметр требует, чтобы пароль был введен в защищенной строке (то есть имел тип данных SecureString). Существует два способа преобразовать пароль в защищенную строку, и в обоих случаях используется переменная.
В первом методе применяется команда ConvertTo-SecureString, которая преобразует строки простого текста в защищенные строки. Например, если нужно преобразовать пароль P@ssw0rd12 в защищенную строку и назначить его переменной $pwd, следует выполнить команду:
$pwd = ConvertTo-SecureString -string «P@ssw0rd12» `
-AsPlainText –force
Это не самый безопасный метод назначения пароля, так как кто-то может заглянуть вам через плечо при вводе команды. Более надежный способ, если команда New-ADUser запросит пароль и будет скрывать вводимые символы. Это можно сделать с помощью команды Read-Hostcmdlet с параметром –AsSecureString:
$pwd = Read-Host -AsSecureString
После выполнения этой команды вы увидите на экране знакомый символ «*» при вводе пароля. Завершив ввод, нажмите клавишу Enter.
После того, как пароль сохранен в переменной $pwd, можно передать его в команду New-ADUser:
New-ADUser -Name»Bill Smith«-SamAccountName»bsmith«`
-GivenName»Bill«-Surname»Smith«`
-DisplayName»Bill Smith«`
-Path»OU=SDM,DC=cpandl,DC=com«`
-Enabled $true -AccountPassword $pwd
Как мы видим, команда содержит параметры -Enabled и –AccountPassword, которые активируют учетную запись и безопасно назначают ей пароль.
Создание пользовательских учетных записей по одной — аккуратный способ, но иногда требуется создать несколько учетных записей одновременно. PowerShell прекрасно подходит для этой цели. Например, если нужно создать три учетных записи пользователя, то можно подготовить файл с разделением запятыми (CSV), который содержит информацию об учетной записи, а затем использовать команду Import-CSV для передачи этой информации в New-ADUser.
На экране 4 показан файл CSV с именем userlist.csv.
|
|
| Экран 4. Применение CSV-файла для создания нескольких пользовательских учетных записей одновременно |
Обратите внимание, что в этом файле заголовки столбцов соответствуют именам параметров, предоставленных в предыдущей команде New-ADUser. Это сделано специально. Когда данные CSV передаются в New-ADUser, команда выберет эти имена параметров из конвейера PowerShell и их не придется указывать в самой команде. Вот команда, применявшаяся для создания трех учетных записей пользователя:
Import-CSV -Path C:datauserlist.csv |
New-ADUser -Enabled $true -AccountPassword $pwd
Как можно заметить, выходные строки команды Import-CSV поступают в команду New-ADUser. Конвейер распознает, что заголовки столбца в CSV-файле представляют собой имена параметров, а остальные строки содержат значения, поэтому нужно лишь предоставить параметры -Enabled и –AccountPassword. Это превосходная возможность конвейера. Благодаря ей удается гораздо эффективнее использовать PowerShell для задач автоматизации такого типа.
Управление членством в группах
Добавление учетных записей пользователей и компьютеров — типичная задача управления AD. С помощью модуля AD выполнить ее сравнительно несложно. Используя команду Add-ADGroupMember, можно добавить в группу одну или несколько учетных записей. Например, если нужно добавить трех новых пользователей в группу Marketing Users. Самый простой способ — использовать команду:
Add-ADGroupMember -Identity»Marketing Users«`
-Members jadams,tthumb,mtwain
В этой команде параметр -Identity служит для того, чтобы предоставить имя группы. Также применяется параметр -Members для предоставления имен учетных записей SAM пользователей. Если имеется несколько имен учетных записей SAM, то их следует указать в файле с разделителями в виде запятых.
Можно объединить операции создания трех учетных записей и их добавления в группу Marketing Users в одной команде, чтобы решить задачу одним действием. Однако команда Add-ADGroupMember не поддерживает передачу имен членов группы в конвейер. Поэтому необходимо использовать команду Add-ADPrincipalGroupMembership, если требуется задействовать конвейер. Эта команда может принимать объекты пользователя, компьютера или группы как входные из конвейера и добавлять эти объекты в указанную группу.
Соединить операцию создания пользователей с операцией добавления новых пользователей в группу Marketing Users в одной команде можно следующим образом:
Import-CSV -Path C:datauserlist.csv |
New-ADUser -Enabled $true -AccountPassword $pass `
-PassThru | Add-ADPrincipalGroupMembership `
-MemberOf»Marketing Users«
Обратите внимание, что к части New-ADUser команды добавлен параметр –PassThru. Этот параметр указывает New-ADUser, что нужно передать созданные объекты пользователя в конвейер. Если данный параметр не указан, то выполнение команды Add-ADPrincipalGroupMembership завершится неудачей.
Также примечательно, что используется только параметр -MemberOf для указания имени группы в разделе Add-ADPrincipalGroupMembership команды. Конвейер обеспечивает остальное, добавляя каждого из трех пользователей в группу Marketing Users.
Итак, с помощью одной команды PowerShell было создано три новых пользователя, они были размещены в OU, получили пароли и были добавлены в группу Marketing Users. Теперь рассмотрим некоторые другие типичные задачи обслуживания AD, которые можно автоматизировать с использованием PowerShell и модуля AD.
Сброс паролей учетных записей пользователя
Иногда пользователям требуется сбросить пароль учетной записи. Эту задачу легко автоматизировать с помощью команды Set-ADAccountPassword, изменив или сбросив пароль учетной записи. Чтобы изменить пароль, необходимо знать старый пароль и ввести новый. Чтобы сбросить пароль, достаточно предоставить новый пароль. Однако необходимо разрешение Reset Password на объект пользователя в AD, чтобы выполнить сброс пароля.
Как и параметр -AccountPassword команды New-ADUser, команда Set-ADAccountPassword использует тип данных SecureString для паролей, поэтому необходимо задействовать один из методов преобразования простых текстовых паролей в защищенные строки. Например, если нужно сбросить пароль для учетной записи пользователя Tom Thumb, то после сохранения нового пароля как защищенной строки в переменной $pass можно выполнить команду:
Set-ADAccountPassword -Identity»tthumb«`
-NewPassword $pass –Reset
В этой команде я использую параметр –Identity, чтобы назначить имя учетной записи SAM для учетной записи пользователя Tom Thumb. Я также ввожу параметр -NewPassword с переменной $pass, чтобы предоставить новый пароль. Наконец, задается параметр –Reset, дабы указать, что выполняется сброс, а не изменение пароля.
Еще одна дополнительная задача: переключить флаг учетной записи пользователя Tom Thumb, чтобы заставить его изменить пароль при следующей регистрации. Это обычный прием, когда нужно сбросить пароль пользователя. Данную задачу можно выполнить с помощью команды Set-ADUser, присвоив параметру -ChangePasswordAtLogon значение $true:
Set-ADUser -Identity tthumb -ChangePasswordAtLogon $true
Возникает вопрос, почему не был использован конвейер для передачи вывода команды Set-ADAccountPassword в команду Set-ADUser, чтобы выполнить обе операции в одной команде PowerShell. Я попробовал этот подход, он не работает. Вероятно, в команде Set-ADAccountPassword есть какое-то ограничение, не позволяющее успешно выполнить единую команду. В любом случае, достаточно просто переключить флаг с использованием команды Set-ADUser, как показано выше.
Поиск объектов Active Directory
Другая типичная задача AD — поиск объектов AD, соответствующих определенным критериям. Например, можно найти все компьютеры с определенной версией операционной системы Windows в домене AD. Команда Get-ADObject — самая удобная для поиска LDAP. Например, чтобы найти компьютеры Server 2008 R2 в домене cpandl.com, была применена команда:
Get-ADObject -LDAPFilter `
»(&(operatingSystem=Windows Server 2008 R2 Enterprise)`
(objectClass=computer))«-SearchBase»dc=cpandl,dc=com«`
-SearchScope Subtree
Эта команда использует три параметра для выполнения задачи: -LDAPFilter, -SearchBase и -SearchScope. Параметр -LDAPFilter принимает в качестве входного стандартный запрос LDAP. В этом примере запрашиваются все объекты компьютера, у которых атрибут OperatingSystem имеет значение Windows Server 2008 R2 Enterprise. Параметр -SearchBase указывает команде, где начать поиск в иерархии AD. В данном случае выполняется поиск из корневого каталога домена AD, но не составляет труда ограничить поиск определенной OU. Параметр –SearchScope указывает команде, следует ли обходить все контейнеры под базой поиска, обнаруживая указанные объекты. В этом случае используется параметр Subtree, чтобы команда проверяла все нижележащие контейнеры.
При запуске команды отображаются объекты, соответствующие критерию. Или же можно направить результаты в другую команду для обработки найденных объектов.
Обратите внимание, что для масштабных поисков полезно задействовать параметр –ResultPageSize, чтобы управлять разбиением результатов поиска на страницы. Обычно я присваиваю этому параметру значение 1000, и команда Get-ADObject возвращает 1000 объектов за один раз. В противном случае можно не получить ожидаемый результат, так как число возвращаемых объектов превышает максимально предусмотренное политикой, установленной для одного запроса поиска.
Другая команда для поиска, предоставленная компанией Microsoft, — Search-ADAccount. Эта команда особенно полезна для поиска с различными заранее заданными условиями, например отключенных учетных записей, учетных записей с просроченными паролями и блокированных учетных записей. Так, следующая команда отыскивает все учетные записи пользователя с просроченными паролями в OU SDM:
Search-ADAccount -PasswordExpired -UsersOnly `
-SearchBase»OU=sdm,dc=cpandl,dc=com«`
-SearchScope OneLevel
Search-ADAccount -PasswordExpired -UsersOnly `
-SearchBase»OU=sdm,dc=cpandl,dc=com" `
-SearchScope OneLevel
В этой команде используется параметр –PasswordExpired, указывающий, что нужны учетные записи с просроченными паролями. Параметр -UsersOnly указывает, что нужно искать только объекты пользователя (то есть исключить объекты «компьютер»). Как в предыдущем примере, используются параметры -SearchBase и –SearchScope, чтобы указать область поиска. Но в данном случае я использую параметр OneLevel для поиска только в ближайшем OU (то есть исключая любые дочерние организационные единицы).
Это лишь поверхностный рассказ о модуле AD, но надеюсь, вы получили представление о заложенных в нем возможностях. Как отмечалось выше, в модуле более 70 команд. Среди тем, которые не были затронуты в статье, — удаление объектов с использованием команды Remove-, восстановление удаленных объектов с помощью команды Restore-ADObject и удаление свойств UAC на объектах пользователя посредством команды Set-ADAccountControl. Существуют команды почти для любых административных задач AD.

- Remove From My Forums
-
Вопрос
-
Dear Team,
please help us to install powershell active directory module for windows server 2008.
Regards, Pradhap P
Все ответы
-
Hello!
The Active Directory PowerShell module requires Windows Server 2008 R2 or later.
You can install the Active Directory PowerShell module from the Server Manager or with
PowerShell.Install via Server Manager
1. In Server Manager, click Add features.
2. Select Active Directory module for Windows PowerShell in
Remote Server Administration Tools > Role Administration Tools > AD DS and AD LDS Tools.Install via PowerShell
Import-Module ServerManagerAdd-WindowsFeature RSAT-AD-PowerShell
Best regards,
Leon
Blog:

https://thesystemcenterblog.com LinkedIn:
-
Изменено
30 ноября 2018 г. 6:42
-
Предложено в качестве ответа
LeeSeenLiMicrosoft contingent staff
4 декабря 2018 г. 8:22
-
Изменено
-
Hi,
Was your issue resolved?
If you resolved it using our solution, please «mark it as answer» to help other community members find the helpful reply quickly.
If you resolve it using your own solution, please share your experience and solution here. It will be very beneficial for other community members who have similar questions.
If no, please reply and tell us the current situation in order to provide further help.
Best Regards,
Lee
Just do it.
Windows PowerShell Active Directory Module is most commonly used by system administrators to simplify the day-to-day tasks.
You can use the cmdlets of this module to manage domain users, groups, computers and perform some Active Directory management tasks. This tool also allows you can also manage the Active Directory from the member servers.
In this tutorial, we will show you how to install PowerShell Active Directory module on Windows 7, Windows 8, Windows 8.1, Windows 10, Windows Server 2012, Windows Server 2012 R2 and Windows Server 2016.
Install the PowerShell Module on Windows 8, 8.1 and 10
The PowerShell module is a part of the Remote Server Administration Tools (RSAT) in all Windows Desktop operating systems. This tool includes all the required command line utilities and Windows PowerShell modules to manage a Windows server.
Installing the PowerShell Module on Windows 8, 8.1 and 10 is easier than other Windows versions. You just need to download and install RSAT module from the following links:
PowerShell Module for Windows 8
PowerShell Module for Windows 8.1
PowerShell Module for Windows 10
After installing the RSAT tool, you shouldn’t need to do anything else, as the installation process will enable all tools by default.
You can follow the below steps to install the PowerShell Module on Windows 7 machine, although Windows 7 is no longer supported, we’ll leave this section below for historical purposes – we all know there will be Windows 7 systems still in production due to upgrade issues.
1. Click here to download the RSAT tools for Windows 7 from Microsoft official website and then run the install.
2. Open the Control Panel => Programs and Features and click Turn Windows features on or off.
3. Click on the Remote Server Administration Tools > Role Administration Tools > AD DS and AD LDS Tools and enable the Active Directory Module for Windows PowerShell checkbox as seen in the image below.

4. Now Open PowerShell cmd prompt and run the following command to import the module:
Import-Module ActiveDirectory
Install the PowerShell Module on Windows Server 2012, 2012 R2 and 2016
The PowerShell module is installed as a separate feature in the Windows Server operating system. You can install the PowerShell Module from the Server Manager graphical console using the following steps below:
1. Open the Server Manager.
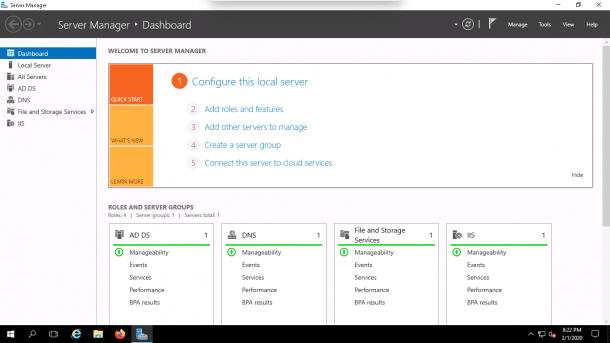
2. Click on the Add Roles and Features.
3. Click Next until you reach Features.
4. Click on the Remote Server Administration Tools > Role Administration Tools > AD DS and AD LDS Tools then enable the checkbox for Active Directory module for Windows PowerShell as seen in the image below.
5. Click on the Install button to install the PowerShell module.
Install via Powershell Command
You can also install the PowerShell module for Active Directory using the PowerShell command as shown below:
Add-WindowsFeature RSAT-AD-PowerShell
Then you can verify it with the Get-WindowsFeature cmdlet.
Get-WindowsFeature -Name RSAT-AD-PowerShell
Install the PowerShell Module on Windows Server 2008 R2
In Windows Server 2008 R2, the Active Directory module for Windows PowerShell is automatically installed on the Windows Server after you installed Active Directory Domain Services.
If you want to install the module on member servers follow the below steps:
1. Open the Server Manager.
2. Click on the Add Roles and Features.
3. Click Next until you reach Features.
4. Click on the Remote Server Administration Tools > Role Administration Tools > AD DS and AD LDS Tools then enable the checkbox for the Active Directory module for Windows PowerShell.
5. Click on the Install button to install the PowerShell module.
You can also install the module using the PowerShell Windows Server 2008 R2 as shown below:
Import-Module ServerManagerAdd-WindowsFeature RSAT-AD-PowerShell

Import-Module ActiveDirectory
Install the PowerShell Active Directory module on PowerShell Core 6.x
You can install the PowerShell Active Directory module on PowerShell Core 6.x on Windows by following the below steps:
1. Install RSAT tool in your Windows Operating system.
2. Install the WindowsCompatibility module in the PowerShell interface using the following command:
Install-Module -Name WindowsCompatibility
3. Import the WindowsCompatibility module using the following command:
Import-Module -Name WindowsCompatibility
4. Import the ActiveDirectory module using the following command:
Import-WinModule -Name ActiveDirectory
Conclusion
In the above tutorial, you’ve learned how to install the Active Directory PowerShell module on different Windows operating systems, including Windows 7, 8, Server 2008, 2012 & 2016. We hope this will help simplify your Active Directory management tasks using Powershell and its powerful scripting features!
Сегодня я покажу, как установить и использовать модуль администрирования Active Directory для Windows PowerShell. Командлеты этого модуля можно использовать для получения информации и управлением различными объектами и параметрами AD. Данный модуль в серверных ОС устанавливается в виде отдельного компонента. На десктопные ОС (Windows 10, 8.1, 7) придется установить пакет Remote Server Administration Tools (RSAT) в состав которого входит модуль для взаимодействия с AD из PowerShell. Кроме этого модуля в состав RSAT входят все необходимые графические оснастки управления, утилиты командной строки и модули Windows PowerShell для администрирования Windows и AD. Данный пакет для вашей версии ОС нужно самостоятельно скачать с сайта Microsoft.
- Установка модуля Active Directory для Windows PowerShell
- Импорт и использование модуля PowerShell для Active Directory
Содержание:
Установка модуля Active Directory для Windows PowerShell
Модуль Active Directory для Windows PowerShell впервые появился в Windows Server 2008 R2. Он автоматически устанавливается на контроллерах домена при их установке на них роли ADDS. Для использования комадлетов PowerShell из модуля AD в домене должен быть хотя бы один контроллер с Windows Server 2008 R2 или выше. Если в вашей сети имеются DC только с Windows Server 2003 и 2008, необходимо скачать и установить Active Directory Management Gateway Service. Командлеты PowerShell из модуля Active Directory взаимодействуют с веб-сервисом, который является частью контролера домена с ролью ADDS.
Вы можете установить модуль Active Directory для Windows PowerShell не только на контроллер домена, но и на любой рядовой сервер домена или рабочую станцию. В Windows Server 2016 установить модуль Active Directory для Windows PowerShell можно из графической консоли Server Manager с помощью мастера добавления ролей и компонентов. Достаточно запустить мастер и на этапе выбора компонентов нужно выбрать пункт Средства удаленного администрирования сервера -> Средства администрирования ролей -> Средства AD DS и AD LDS -> Модуль Active Directory для Windows PowerShell (Remote Server Administration Tools > Role Administration Tools > AD DS and AD LDS Tools ->Active Directory module for Windows PowerShell).
Данный модуль можно установит и с помощью PowerShell. Откройте консоль PowerShell с правами администратора и выполните команды:
Import-Module ServerManager
Add-WindowsFeature -Name "RSAT-AD-PowerShell" –IncludeAllSubFeature

В Windows 10, Windows 8.1 и Windows 10 для установки модуля RSAT-AD-PowerShell нужно сначала установить соответствующую версию RSAT, после этого модуль нужно включить в Панели управления (Панель управления -> Программы ->Программы и компоненты и нажмите «Включить компоненты Windows» -> Remote Server Administration Tools -> Role Administration Tools -> AD DS and AD LDS Tools -> включите компонент Active Directory Module for Windows POwerShell.
Либо можно установить модуль с помощью PowerShell:
Enable-WindowsOptionalFeature -Online -FeatureName RSATClient-Roles-AD-Powershell
Импорт и использование модуля PowerShell для Active Directory
В Windows 7 и Windows Server 2008 R2, на которых установлен PowerShell 2.0, чтобы начать пользоваться модулем AD необходимо импортировать его в сессию PowerShell командой:
Import-Module activedirectory

Кроме того, вы можете экспортировать модуль с удаленной машины, где он уже установлен и импортировать его в свою сессию PowerShell:
$MySession = New-PSSession -ComputerName MyDomainController
Export-PSsession -Session $MySession -Module ActiveDirectory -OutputModule RemoteADPosh
Remove-PSSession -Session $MySession
Import-Module RemoteADPosh
В Windows Server 2012 R2/ 2016 и Windows 8.1 / Windows 10 модуль (если он установлен) импортируется в сессию автоматически.
Если компьютер включен в домен, по умолчанию создается диск по имени AD:..Вы можете перейти на этот диск командой CD и использовать привычные команды работы с файловой системой для навигации по этому диску. Пути представлены в формате X500.
PS C:> cd AD:PS AD:> dir
…
PS AD:> cd "DC=vmblog,DC=ru"
Вывести список доступных командлетов модуля для работы с Active Directory можно так:
Get-Command -Module ActiveDirectory
В различных версия Windows доступно разное количество командлетов:
- Windows Server 2008 R2 — 76 командлетов.
- Windows Server 2012 — 135 командлетов
- Windows Server 2012 R2 / 2016 — 147 командлетов.
Итак, теперь вы можете использовать командлеты PowerShell для администрирования AD. На нашем сайты вы можете познакомиться с использованием следующих командлетов из модуля AD для PowerShell: Get-ADGroupMember , Add-ADGroupMember , Move-ADDirectoryServerOperationMasterRole, New-ADGroup.
First published on TechNet on Sep 14, 2009
Hello it’s LaNae again. Now that Windows 2008 R2 is available we get to use the coolness of PowerShell with AD LDS. When you install the AD LDS role on a Windows 2008 R2 server it will also install the AD PowerShell module.
Unfortunately the documentation in the help files for each cmdlet does not give an example of what the syntax would be for AD LDS. You can find a list of the cmdlets in the “What’s New in AD DS: Active Directory Module for Windows PowerShell” located at
http://technet.microsoft.com/en-us/library/dd378783(WS.10).aspx
Active Directory Cmdlets used with AD LDS
Below you will find a list of Active Directory cmdlets as well as the syntax that can be used to manage AD LDS instances.
Enable-ADOptionalFeature
: Enable an optional feature.
Example:
Enable-ADOptionalFeature “Recycle Bin Feature” –server
servername:port –scope
ForestorConfigurationSet –target “CN=Configuration,CN={GUID}”
Get-ADObject
: Gets one or more AD LDS objects.
Example
: Get-ADObject -filter ‘objectclass -eq «user»’ -searchbase
‘partition DN’
-server servername:port — properties DistinguishedName | FT Name, DistinguishedName –A

Get-ADOrganizationalUnit
: Gets one or more AD LDS OUs
Example
: Get-ADOrganizationalUnit -Filter {Name -Like ‘*’} -searchbase »
partition DN
» -server ‘servername:port’ — AuthType Negotiate | FT Name, DistinguishedName –A

Get-ADUser
: Gets one or more AD LDS users
Example
: Get-ADUser -Filter ‘Name -like «*»‘ -searchbase
«partition DN”
-server ‘servername:port’

Get-ADGroup
: Gets one or more AD LDS groups
Example
: Get-ADGroup’ -Filter ‘Name -like «*»‘ -searchbase «DN of partition to search» -server ‘servername:port’

Get-ADGroupMember
: Gets the members of an AD LDS group
Example
: Get-ADGroupMember -identity ‘DN of group’ -server ‘servername:port’ -partition «DN of partition where group resides» | FT Name,DistinguishedName -A

New-ADGroup
: Creates a new AD LDS group
Example
: New-ADGroup -Name «groupname» -server ‘servername:port’ -GroupCategory Security -GroupScope Global -DisplayName «group display name» -path «DN where new group will reside»

New-ADUser
: Creates a new AD LDS user
Example
: New-ADUser -name «username» -Displayname «Display Name» -server ‘servername:port’ -path «DN of where the new user will reside»

ADD-ADGroupMember
: Adds an AD LDS user to a group
Example
: Add-ADGroupMember -identity «DN of group» -member «DN of user» -partition «DN of partition where group resides»

New-ADOrganizationalUnit
: Creates a new AD LDS OU
Example
: New-ADOrganizationalUnit -name «OU Name» -server ‘servername:port’ -path «DN of OU location»

Remove-ADGroup
: Removes an AD LDS group
Example
: Remove-ADGroup ‘SID of Group’ -server ‘servername:portnumber’ -partition «partition where group resides»

Remove-ADGroupMember
: Removes an AD LDS user from a group.
Example
: Remove-ADGroupMember -identity «DN of group» -member «DN of user» -server ‘servername:port’ -partition «DN of partition where group resides»

Remove-ADOrganizationalUnit
: Deletes an OU in AD LDS
Example
: Remove-ADOrganizationalUnit -identity «DN of OU» -recursive -server ‘servername:port’ -partition «DN of partition where OU resides»

Remove-ADUser
: Deletes a user from AD LDS
Example
: Remove-ADUser -identity «DN of user» -server ‘servername:port’ -partition «DN of partition where user resides»

-LaNae Wade
With the release of PowerShell 2.0, we now have a PowerShell module that we can use to administer Active Directory. The Active Directory Module for Windows PowerShell runs on Windows Server 2008 R2 and on Windows 7 and relies on a web service that is hosted on one or more domain controllers in your environment. In this post I’ll go over what you need in order to install and use the Active Directory Module for PowerShell, also known as AD PowerShell.
Setting up your Domain Controllers
In order to use the Active Directory Module for Windows PowerShell on 2008 R2 and Windows 7, you first need to be running Active Directory Web Services (ADWS) on at least one Domain Controller. To install Active Directory Web Services (ADWS) you’ll need one of the following:
1. Windows Server 2008 R2 AD DS
You can load Active Directory Web Services (ADWS) on a Windows Server 2008 R2 Domain Controller when you install the AD DS role. The AD PowerShell module will also be installed during this process. Active Directory Web Services (ADWS) will be enabled when you promote the server to a DC using DCPromo.
2. Active Directory Management Gateway Service
If you cannot run Windows Server 2008 R2 Domain Controllers, you can install the Active Directory Management Gateway Service. Installing this will allow you to run the same Active Directory web service that runs on Windows Server 2008 R2 DC’s. You can download the Active Directory Management Gateway Service here. Make sure you read the instructions carefully, there are several hotfixes that need to be applied depending on the version of Windows you are running. You can install the Active Directory Management Gateway Service on DC’s running the following operating systems:
- Windows Server 2003 R2 with Service Pack 2
- Windows Server 2003 SP2
- Windows Server 2008
- Windows Server 2008 SP2
Note: You can also use AD PowerShell to manage AD LDS instances on Windows Server 2008 R2. If you plan on using AD LDS, Active Directory web services will be installed with the AD LDS role, the AD PowerShell module will also be installed during this process. The ADWS service will be enabled when your LDS instance is created.
Once you’ve got Active Directory web services up and running on your Domain Controller(s), you’ll notice you now have an ADWS service as shown here:

At this point, you should be ready to install the AD PowerShell module. You can run AD PowerShell on all versions of Windows Server 2008 R2 (except the Web Edition) and on Windows 7.
Installing the Active Directory Module for Windows PowerShell on 2008 R2 member servers
You can install the Active Directory Module on Windows 2008 R2 member servers by adding the RSAT-AD-PowerShell feature using the Server Manager. I usually use the ServerManager module to do this because it is quick and easy. To install the feature using the ServerManager module, launch PowerShell and run the following commands:
Import-Module ServerManager
Add-WindowsFeature RSAT-AD-PowerShell

Remember, this only needs to be done on Windows Server 2008 R2 member servers. The RSAT-AD-PowerShell feature will be added to 2008 R2 DC’s during the DCPromo process.
Installing the Remote Server Administration Tools (RSAT) feature on Windows 7
In order to install the Active Directory Module for Windows PowerShell you need to download the RSAT tools for Windows 7 here. Once this is installed you are still not finished, you need to enable the Active Directory module. Navigate to Control Panel > Programs and Features > Turn Windows Features On or Off and select Active Directory Module for Windows PowerShell as show here:

Once you have Active Directory web services running on at least one domain controller and the AD PowerShell module is installed, you are ready to run the AD PowerShell module. You can do this in one of two ways. First, you can access the “Active Directory Module for Windows PowerShell” shortcut in Administrative Tools as shown here:

Right click the shortcut and select “Run as administrator” in order to start PowerShell with elevated permissions.
You can also simply import the AD PowerShell module in your existing PowerShell session. Just use the Import-Module ActiveDirectory command:
Import-Module ActiveDirectory
![]()
That’s all that needs to be done to get up and running…I will get into using the AD PowerShell cmldets in future posts so keep an eye out for that.
Today we’ll show you how to install and use the Windows PowerShell Active Directory Module. PowerShell AD Module is a part of the Remote Server Administration Tools (RSAT). RSAT includes all necessary management tools, command-line utilities, and Windows PowerShell modules to manage Windows Server infrastructure. You can use the RSAT-AD-PowerShell cmdlets to perform basic AD management tasks and get different information on domain users, computers, groups, and other objects. You can install RSAT-AD-PowerShell on Windows Server hosts and workstations running desktop OS versions (Windows 11, 10, 8.1, and 7).
Install PowerShell Active Directory Module on Windows Server
The Active Directory module for Windows PowerShell first appeared on Windows Server 2008 R2. It is automatically deployed on Windows Server after you installed the ADDS role (Active Directory Domain Services) when promoting a server to the domain controller. You can install this module manually on any member Windows server or workstation.
You can install the Active Directory module for Windows PowerShell on Windows Server 2019/2016/2012 R2 using the Add Roles and Features Wizard from the Server Manager. It is enough to start the wizard and at the step when selecting features, you need to select the item Remote Server Administration Tools > Role Administration Tools > AD DS and AD LDS Tools > Active Directory module for Windows PowerShell;

You can also install this module using PowerShell. Open the PowerShell console as an administrator and run the following commands:
Import-Module ServerManager

Add-WindowsFeature -Name "RSAT-AD-PowerShell" –IncludeAllSubFeature

You can also use DISM to install the AD PowerShell module on Windows:
DISM /online /enable-feature /featurename:RSATClient-Roles-AD

DISM /online /enable-feature /featurename:RSATClient-Roles-AD-DS

DISM /online /enable-feature /featurename:RSATClient-Roles-AD-DS-SnapIns
To check the installation status of a module, use the command:
Get-WindowsFeature RSAT-AD-PowerShell

Hint. If you are using the PowerShell Core 7.x (pwsh.exe), keep in mind that the Active Directory module is fully natively compatible with this version of PoSh. But first, you need to install the WindowsCompatibility module:
Install-Module -Name WindowsCompatibility
Hint. A different PowerShell module is used to manage objects in the Azure Active Directory — Azure Active Directory Module for Windows PowerShell.
Installing the AD PowerShell Module on Windows 10 and 11
In Windows 11, Windows 10, Windows 8.1, and Windows 7, to install the RSAT-AD-PowerShell module, first you must install the appropriate version of RSAT. RSAT is available for installation for Professional, Education, and Enterprise Windows editions (Windows Home or Single Language are not supported).
On modern Windows 10 builds (1809 and newer) the RSAT became a part of Features on Demand (FoD). You can install AD RSAT Tools from the Settings menu (Settings > Apps > Manage Optional Features > Add features > RSAT: Active Directory Domain Services and Lightweight Directory Tools > Install).
Or from the PowerShell console:
Add-WindowsCapability –online –Name “Rsat.ActiveDirectory.DS-LDS.Tools~~~~0.0.1.0”

You will need to make sure that your security policies, firewalls, and proxies are allowed to access Microsoft Update servers on the Internet to download and install FOD components.
On Windows 11, you can install the Active Directory RSAT package from Settings > Apps > Optional Features > Add an optional feature > type Active Directory in the search box and select the RSAT: Active Directory Domain Services and Lightweight Directory Tools feature > Next > Install.

Or you can install the module from the elevated PowerShell console:
Get-WindowsCapability -Name Rsat.ActiveDirectory.DS-LDS.Tools~~~~0.0.1.0 -Online | Add-WindowsCapability -Online

You don’t have to reboot Windows after installing RSAT.
In order to RSAT module on Windows 7, 8.1, and Windows 10 (up to build 1803) you need to download and install a special MSU package See how to install Remote Server Administration Tools on Windows.
Then you need to enable the module (Control Panel > Programs > Turn Windows Features On or Off > Remote Server Administration Tools > Role Administration Tools > AD DS and AD LDS Tools > Active Directory module for Windows PowerShell).
Or using PowerShell:
Enable-WindowsOptionalFeature -Online -FeatureName RSATClient-Roles-AD-Powershell

Importing PowerShell Active Directory Module on Windows
The RSAT-AD-PowerShell module is automatically imported into your PowerShell session. However, on legacy versions of Windows (Windows 7 and Windows Server 2008 R2), you may get an error when running any cmdlet from the Active Directory PowerShell module:
Get-ADComputer: The ‘Get-ADComputer’ command was found in the module ‘ActiveDirectory’, but the module could not be loaded. For more information, run ‘Import-Module ActiveDirectory’.
In this case, you need to manually import the module into the PowerShell session with the command:
Import-Module activedirectory

Also, you can import the module from a remote computer/server (with installed RSAT-AD-PowerShell module) and import it into your PowerShell session (using the PSRemoting):
$S = New-PSSession -ComputerName MyDomainController

Export-PSsession -Session $S -Module ActiveDirectory -OutputModule RemoteAD

Import-Module RemoteAD -Force
Now you can use all cmdlets of the RSAT-AD-PowerShell module from a remote computer as if you had it installed locally. However, implicit remoting will actually work here, and all PowerShell cmdlets will be executed remotely.
The session will be active until you close the PowerShell console. You can also close the session (Disconnect-PSSession -Session $S) or remove it (Remove-PSSession -Session $S).
Now you can use the Active Directory module remotely without installing it on your computer.
To confirm the AD PoSh module is installed and imported to the PowerShell session on Windows, run the command:
Get-Module ActiveDirectory

You can display the list of available AD PowerShell module cmdlets for interacting with Active Directory as follows:
Get-Command -Module ActiveDirectory

Different versions of Windows (RSAT) have a different number of cmdlets available:
get-command -Module activedirectory|measure
- Windows Server 2008 R2 — 76 cmdlets;
- Windows Server 2012 — 135 cmdlets;
- Windows Server 2012 R2/2016/2019/2022 — 147 cmdlets.
The following is a complete list of AD PowerShell Module cmdlets in Windows Server 2019:
Add-ADCentralAccessPolicyMember

Add-ADComputerServiceAccount

Add-ADDomainControllerPasswordReplicationPolicy

Add-ADFineGrainedPasswordPolicySubject

Add-ADGroupMember

Add-ADPrincipalGroupMembership

Add-ADResourcePropertyListMember

Clear-ADAccountExpiration

Clear-ADClaimTransformLink

Disable-ADAccount

Disable-ADOptionalFeature

Enable-ADAccount

Enable-ADOptionalFeature

Get-ADAccountAuthorizationGroup

Get-ADAccountResultantPasswordReplicationPolicy

Get-ADAuthenticationPolicy

Get-ADAuthenticationPolicySilo

Get-ADCentralAccessPolicy

Get-ADCentralAccessRule

Get-ADClaimTransformPolicy

Get-ADClaimType

Get-ADComputer

Get-ADComputerServiceAccount

Get-ADDCCloningExcludedApplicationList

Get-ADDefaultDomainPasswordPolicy

Get-ADDomain

Get-ADDomainController

Get-ADDomainControllerPasswordReplicationPolicy

Get-ADDomainControllerPasswordReplicationPolicyUsage

Get-ADFineGrainedPasswordPolicy

Get-ADFineGrainedPasswordPolicySubject

Get-ADForest

Get-ADGroup

Get-ADGroupMember

Get-ADObject

Get-ADOptionalFeature

Get-ADOrganizationalUnit

Get-ADPrincipalGroupMembership

Get-ADReplicationAttributeMetadata

Get-ADReplicationConnection

Get-ADReplicationFailure

Get-ADReplicationPartnerMetadata

Get-ADReplicationQueueOperation

Get-ADReplicationSite

Get-ADReplicationSiteLink

Get-ADReplicationSiteLinkBridge

Get-ADReplicationSubnet

Get-ADReplicationUpToDatenessVectorTable

Get-ADResourceProperty

Get-ADResourcePropertyList

Get-ADResourcePropertyValueType

Get-ADRootDSE

Get-ADServiceAccount

Get-ADTrust

Get-ADUser

Get-ADUserResultantPasswordPolicy

Grant-ADAuthenticationPolicySiloAccess

Install-ADServiceAccount

Move-ADDirectoryServer

Move-ADDirectoryServerOperationMasterRole

Move-ADObject

New-ADAuthenticationPolicy

New-ADAuthenticationPolicySilo

New-ADCentralAccessPolicy

New-ADCentralAccessRule

New-ADClaimTransformPolicy

New-ADClaimType

New-ADComputer

New-ADDCCloneConfigFile

New-ADFineGrainedPasswordPolicy

New-ADGroup

New-ADObject

New-ADOrganizationalUnit

New-ADReplicationSite

New-ADReplicationSiteLink

New-ADReplicationSiteLinkBridge

New-ADReplicationSubnet

New-ADResourceProperty

New-ADResourcePropertyList

New-ADServiceAccount

New-ADUser

Remove-ADAuthenticationPolicy

Remove-ADAuthenticationPolicySilo

Remove-ADCentralAccessPolicy

Remove-ADCentralAccessPolicyMember

Remove-ADCentralAccessRule

Remove-ADClaimTransformPolicy

Remove-ADClaimType

Remove-ADComputer

Remove-ADComputerServiceAccount

Remove-ADDomainControllerPasswordReplicationPolicy

Remove-ADFineGrainedPasswordPolicy

Remove-ADFineGrainedPasswordPolicySubject

Remove-ADGroup

Remove-ADGroupMember

Remove-ADObject

Remove-ADOrganizationalUnit

Remove-ADPrincipalGroupMembership

Remove-ADReplicationSite

Remove-ADReplicationSiteLink

Remove-ADReplicationSiteLinkBridge

Remove-ADReplicationSubnet

Remove-ADResourceProperty

Remove-ADResourcePropertyList

Remove-ADResourcePropertyListMember

Remove-ADServiceAccount

Remove-ADUser

Rename-ADObject

Reset-ADServiceAccountPassword

Restore-ADObject

Revoke-ADAuthenticationPolicySiloAccess

Search-ADAccount

Set-ADAccountAuthenticationPolicySilo

Set-ADAccountControl

Set-ADAccountExpiration

Set-ADAccountPassword

Set-ADAuthenticationPolicy

Set-ADAuthenticationPolicySilo

Set-ADCentralAccessPolicy

Set-ADCentralAccessRule

Set-ADClaimTransformLink

Set-ADClaimTransformPolicy

Set-ADClaimType

Set-ADComputer

Set-ADDefaultDomainPasswordPolicy

Set-ADDomain

Set-ADDomainMode

Set-ADFineGrainedPasswordPolicy

Set-ADForest

Set-ADForestMode

Set-ADGroup

Set-ADObject

Set-ADOrganizationalUnit

Set-ADReplicationConnection

Set-ADReplicationSite

Set-ADReplicationSiteLink

Set-ADReplicationSiteLinkBridge

Set-ADReplicationSubnet

Set-ADResourceProperty

Set-ADResourcePropertyList

Set-ADServiceAccount

Set-ADUser

Show-ADAuthenticationPolicyExpression

Sync-ADObject

Test-ADServiceAccount

Uninstall-ADServiceAccount

Unlock-ADAccount
Using RSAT-AD-PowerShell Module
The PowerShell AD module provides an administrator with many opportunities for interacting with Active Directory objects and automating tasks (this is especially useful when performing bulk actions aimed at a large number of AD objects). You can perform all the basic operations with the AD directory:
- Get all AD properties and object attributes;
- Change object properties;
- Manage AD groups;
- Create new directory objects, etc.
The cmdlets from the Active Directory module interact with Active Directory Web Services (ADWS) on the domain controller. This role is installed on a domain controller during the promotion from a domain member server to a domain controller. The module accesses the Active Directory Web Services via TCP port 9389 (check that this port is open on the firewall).
Hint. Check if the ADWS service is running on the domain controller and is responding on port 9389 (Test-NetConnection DC01 -port 9389). Learn more about the Unable to find a default server with Active Directory Web Services running error.
If your computer is joined to an AD domain, the AD PowerShell cmdlets find the nearest domain controller to connect to based on the LogonServer environment variable. However, you can connect to any other domain controller using the -Server parameter (available on most cmdlets). For example:
Get-ADUser a.smith -Server nydc01.theitbros.com
Let’s look at a few examples of using the cmdlets of the RSAT-AD-PowerShell module.
- To get the list of AD domain controllers, run the command:
Get-ADDomainController –filter *| format-table

- You can create several AD users at once, you can import AD users from CSV. Use it together with the New-ADUser cmdlet.
To get information about an AD user, use the Get-ADUser cmdlet:Get-ADUser –identity t.muller –properties *
A similar cmdlet to display all computer attributes in AD:
Get-ADComputer –identity dc01 –properties *

- Use the New-ADGroup cmdlet to create an Active Directory group. For example, to create a new group named ItalyUsers in the specific OU, run the command:
New-ADGroup -Path "OU=Groups,OU=Italy,DC=theitbros,DC=com" -Name "ItalyUsers" -GroupScope Global -GroupCategory Distribution
- To get the AD group info, use the Get-ADGroup cmdlet:
Get-ADGroup ItalyUsers
- If you want to add a user or computer to an AD group, use the Add-ADGroupMember cmdlet:
Add-ADGroupMember –Identity ‘NY_Managers’ -Members s.adams,d.thumb,p.muller
- Use the New-ADOrganizationalUnit cmdlet to create an Active Directory OU:
New-ADOrganizationalUnit -Name "France" - Use the Unlock-ADAccount cmdlet to unlock account in Active Directory domain:
Get-ADUser -Identity bjackson | Unlock-ADAccount
- Or you can use the Set-ADAccountPassword to change domain user password or reset it:
$newPass=Read-Host "Enter the new user password" –AsSecureString

Set-ADAccountPassword bjackson -NewPassword $newPass
- Check AD replication status for all domain controllers in the specific Active Directory site:
Get-ADReplicationFailure -scope SITE -target London | Format-Table Server, FirstFailureTime, FailureClount, LastError, Partner
- Find and disable AD accounts that have not logged in to the domain for more than 120 days:
Search-ADAccount -AccountInactive -TimeSpan 120 –UsersOnly| Disable-ADAccount
- For detailed help on any cmdlet from the AD-PoSh module, use the Get-Help command:
get-help set-aduser

If the computer is not a part of the Active Directory domain, the following warning appears when you try importing the AD-PoSh module:
WARNING: Error initializing default drive: ‘Unable to find a default server with Active Directory Web Services running’.
In this case, you need to specify the AD domain controller and user credentials to connect to it.
First of all, you need to get the user’s credentials to access the domain. Any authenticated domain user can view almost all AD objects properties (excluding protected Active Directory attributes).
$cred = Get-Credential

For example, to get the user’s info from the DC named TOR-DC01 under saved credentials, use the command:
get-aduser postfixsrv –server nydc01 -Credential $cred

As you can see, you have received the AD account info.
So now you can use the PowerShell cmdlets to manage and query Active Directory.
- About
- Latest Posts

I enjoy technology and developing websites. Since 2012 I’m running a few of my own websites, and share useful content on gadgets, PC administration and website promotion.