Центр обновления Windows не всегда ведёт себя так, как хочется системному администратору. Такое поведение центра обновления Windows знакомо нашим инженерам.
Если обновления через графический установщик не идут — это не причина для беспокойства. Процесс обновления в принципе небыстрый так как при установке обновлений сверяется очень много цифровых подписей. Во время проверки этого метода, система обнаружила обновления через примерно 15 минут, затем стала скачивать, а после этого стала устанавливать после моего согласия.
Процесс очень простой:
1. Заходите сюда: https://gallery.technet.microsoft.com/scriptcenter/2d191bcd-3308-4edd-9de2-88dff796b0bc
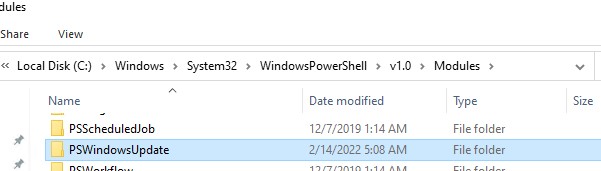
2. Скачиваете архив, распаковываете его. Внутри архива папка PSWindowsUpdate. Эту папку кладёте в C:Windowssystem32WindowsPowerShellv1.0Modules
3. Открываете PowerShell и запускаете обновление командой get-wuinstall -verbose
Ключ -verbose позволит вывести много информации о процессе обновления в консоль. Это очень пригодится. После предложения установить обновления отвечаете A. В конце процесса покажется сообщение о необходимости перезагрузить машину. При ответах на вопросы в PowerShell регистр не имеет значения, кроме случаев, когда это отдельно указано.

Вы можете использовать PowerShell модуль PSWindowsUpdate для управления обновлениями Windows из командной строки. Модуль PSWindowsUpdate не встроен в Windows и доступен для установки из репозитория PowerShell Gallery. PSWindowsUpdate позволяет администраторам удаленно проверять, устанавливать, удалять и скрывать обновления на рабочих станциях и серверах Windows. Модуль PSWindowsUpdate особо ценен при использовании для управления обновлениями в Core редакциях Windows Server (в которых отсутствуют графический интерфейс), а также при настройке образа Windows в режиме аудита.
Содержание:
- Установка модуля управления обновлениями PSWindowsUpdate
- Обзор команд модуля PSWindowsUpdate
- Управление обновлениями Windows на удаленных компьютерах через PowerShell
- Получить список доступных обновлений Windows из PowerShell
- Установка обновлений Windows с помощью Install-WindowsUpdate
- Просмотр истории установленных обновлений Windows (Get-WUHistory)
- Удаление обновлений в Windows с помощью Remove-WindowsUpdate
- Как скрыть ненужные обновления Windows с помощью PowerShell (Hide-WindowsUpdate)?
Установка модуля управления обновлениями PSWindowsUpdate
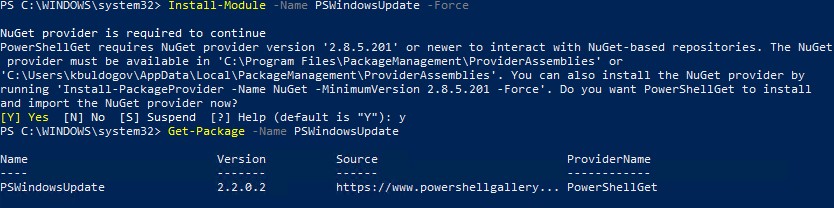
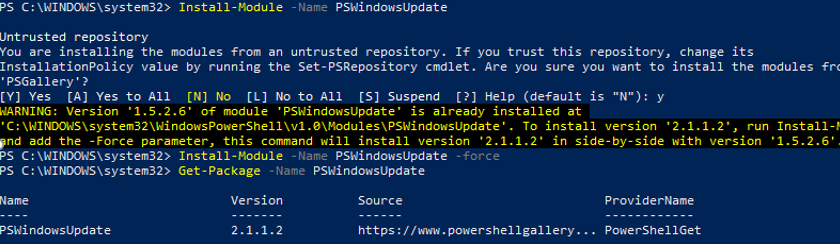
Если вы используете Windows 10/11 или Windows Server 2022/2019/2016, вы можете установить (обновить) модуль PSWindowsUpdate из онлайн репозитория через менеджер пакетов PackageManagement всего одной командой:
Install-Module -Name PSWindowsUpdate
После окончания установки нужно проверить наличие пакета:
Get-Package -Name PSWindowsUpdate
В старых версиях Windows 2012R2/Windows 8.1 и ниже при установке PowerShell модуля может появится ошибка:
Install-Module: Unable to download from URI.Unable to download the list of available providers. Check your internet connection.
Для установки модуля нужно использовать для подключения протокол TLS 1.2. Включите его:
[Net.ServicePointManager]::SecurityProtocol = [Net.SecurityProtocolType]::Tls12
Если у вас установлена более старая версия Windows (Windows 7/8.1/ Windows Server 2008 R2/ 2012 R2) или отсутствует прямой доступ в Интернет, вы можете установить модуль PSWindowsUpdate вручную (см. полную инструкцию по офлайн установке модулей PowerShell).
- Скачайте модуль PSWindowsUpdate на любой онлайн компьютер:
Save-Module –Name PSWindowsUpdate –Path C:ps
; - Скопируйте модуль на целевой компьютер, и поместите его в каталог
%WINDIR%System32WindowsPowerShellv1.0Modules
(при постоянном использовании модуля это лучший вариант); - Разрешите выполнение PowerShell скриптов:
Set-ExecutionPolicy –ExecutionPolicy RemoteSigned -force - Теперь вы можете импортировать модуль в свою сессию PowerShell:
Import-Module PSWindowsUpdate
Примечание. В Windows 7 / Server 2008 R2 при импорте модуля PSWindowsUpdate вы можете столкнутся с ошибкой вида:
Имя "Unblock-File" не распознано как имя командлета
. Дело в том, что в модуле используются некоторые функции, которые появились только в PowerShell 3.0. Для использования этих функций вам придется обновить PowerShell, либо вручную удалить строку | Unblock-File из файла PSWindowsUpdate.psm1.
После установки модуля PSWindowsUpdate на своем компьютере вы можете удаленно установить его на другие компьютеры или сервера с помощью командлета Update-WUModule. Например, чтобы скопировать PSWindowsUpdate модуль с вашего компьютера на два удаленных сервера, выполните команды (нужен доступ к удаленным серверам по протоколу WinRM):
$Targets = "Server1", "Server2"
Update-WUModule -ComputerName $Targets -local
Чтобы сохранить модуль в сетевой каталог для дальнейшего импорта модуля на других компьютерах, выполните:
Save-Module -Name PSWindowsUpdate –Path \fs01ps
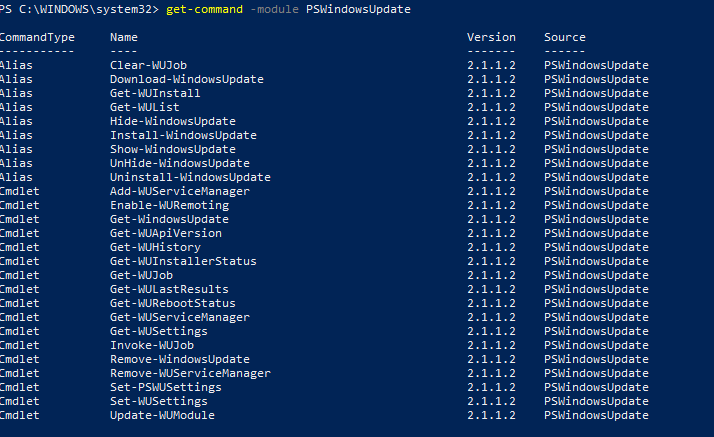
Обзор команд модуля PSWindowsUpdate
Список доступных командлетов модуля можно вывести так:
get-command -module PSWindowsUpdate
Вкратце опишем назначение команд модуля:
- Clear-WUJob – использовать Get-WUJob для вызова задания WUJob в планировщике;
- Download-WindowsUpdate (алиас для Get-WindowsUpdate –Download) — получить список обновлений и скачать их;
- Get-WUInstall, Install-WindowsUpdate (алиас для Get-WindowsUpdate –Install) – установить обвновления;
- Hide-WindowsUpdate (алиас для Get-WindowsUpdate -Hide:$false) – скрыть обновление;
- Uninstall-WindowsUpdate -удалить обновление с помощью Remove-WindowsUpdate;
- Add-WUServiceManager – регистрация сервера обновления (Windows Update Service Manager) на компьютере;
- Enable-WURemoting — включить правила Windows Defender файервола, разрешающие удаленное использование командлета PSWindowsUpdate;
- Get-WindowsUpdate (Get-WUList) — выводит список обновлений, соответствующим указанным критериям, позволяет найти и установить нужное обновление. Это основной командлет модуля PSWindowsUpdate. Позволяет скачать и установить обновления с сервера WSUS или Microsoft Update. Позволяет выбрать категории обновлений, конкретные обновления и указать правила перезагрузки компьютера при установке обновлений;
- Get-WUApiVersion – получить версию агента Windows Update Agent на компьютере;
- Get-WUHistory – вывести список установленных обновлений (история обновлений);
- Get-WUInstallerStatus — проверка состояния службы Windows Installer;
- Get-WUJob – запуска заданий обновления WUJob в Task Scheduler;
- Get-WULastResults — даты последнего поиска и установки обновлений (LastSearchSuccessDate и LastInstallationSuccessDate);
- Get-WURebootStatus — позволяет проверить, нужна ли перезагрузка для применения конкретного обновления;
- Get-WUServiceManager – вывод источников обновлений;
- Get-WUSettings – получить настройки клиента Windows Update;
- Invoke-WUJob – удаленное вызов заданий WUJobs в Task Schduler для немедленного выполнения заданий PSWindowsUpdate.
- Remove-WindowsUpdate – удалить обновление;
- Remove-WUServiceManager – отключить Windows Update Service Manager;
- Set-PSWUSettings – сохранить настройки модуля PSWindowsUpdate в XML файл;
- Set-WUSettings – настройка параметров клиента Windows Update;
- Update-WUModule – обновить модуль PSWindowsUpdate (можно обновить модуль на удаленном компьютере, скопировав его с текущего, или обновить из PSGallery);
- Reset-WUComponents – позволяет сбросить настройка агента Windows Update на компьютере к настройкам по-умолчанию.
Чтобы проверить текущие настройки клиента Windows Update, выполните команду:
Get-WUSettings
ComputerName                                 : WKS22122
WUServer                                     : http://MS-WSUS:8530
WUStatusServer                               : http://MS-WSUS:8530
AcceptTrustedPublisherCerts                  : 1
ElevateNonAdmins                             : 1
DoNotConnectToWindowsUpdateInternetLocations : 1
TargetGroupEnabled                           : 1
TargetGroup                                  : WorkstationsProd
NoAutoUpdate                                 : 0
AUOptions                                    : 3 - Notify before installation
ScheduledInstallDay                          : 0 - Every Day
ScheduledInstallTime                         : 3
UseWUServer                                  : 1
AutoInstallMinorUpdates                      : 0
AlwaysAutoRebootAtScheduledTime              : 0
DetectionFrequencyEnabled                    : 1
DetectionFrequency                           : 4
В данном примере клиент Windows Update на компьютере настроен с помощью GPO на получение обновлений с локального сервера WSUS.
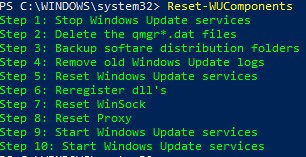
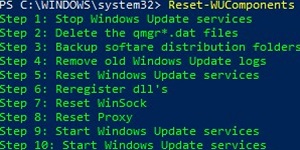
Команда
Reset-WUComponents –Verbose
позволяет сбросить все настройки агента Windows Update, перерегистрировать библиотеки и восстановить исходное состояние службы wususerv.
Управление обновлениями Windows на удаленных компьютерах через PowerShell
Практически все командлеты модуля PSWindowsUpdate позволяют управлять установкой обновлений на удаленных компьютерах. Для этого используется атрибут
-Computername Host1, Host2, Host3
. На удаленных компьютерах должен быть включен и настроен WinRM (вручную или через GPO).
Установите модуль PSWindowsUpdate на удаленных компьютерах и разрешите в файерволе доступ по динамическим RPC портам к процессу dllhost.exe. Можно использовать Invoke-Command для настройки модуля PSWindowsUpdate на удаленных компьютерах:
Invoke-Command -ComputerName $computer -ScriptBlock {Set-ExecutionPolicy RemoteSigned -force }
Invoke-Command -ComputerName $computer -ScriptBlock {Import-Module PSWindowsUpdate; Enable-WURemoting}
Модуль PSWindowsUpdate можно использовать для удаленного управлений обновлениями Windows как на компьютерах в домене AD, так и в рабочей группе (потребует определенной настройки PowerShell Remoting)
Для удаленного управления обновлениями компьютерах, нужно добавить имена компьютеров доверенных хостов winrm, или настроить удаленное управление PSRemoting через WinRM HTTPS:
winrm set winrm/config/client ‘@{TrustedHosts="HOST1,HOST2,…"}’
Или с помощью PowerShell:
Set-Item wsman:localhostclientTrustedHosts -Value wsk-w10BO1 -Force
Получить список доступных обновлений Windows из PowerShell
Вывести список обновлений, доступных для данного компьютера на сервере обновлений можно с помощью команд Get-WindowsUpdate или Get-WUList.
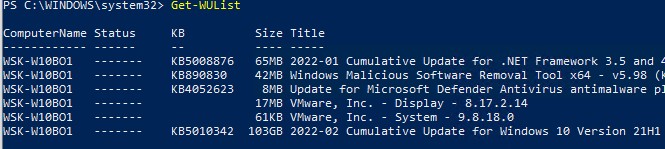
Чтобы проверить список доступных обновлений на удаленном компьютере, выполните:
Get-WUList –ComputerName server2
Вы можете проверить, откуда должна получать обновления ваша ОС Windows. Выполните команду:
Get-WUServiceManager
ServiceID IsManaged IsDefault Name
--------- --------- --------- ----
8b24b027-1dee-babb-9a95-3517dfb9c552 False False DCat Flighting Prod
855e8a7c-ecb4-4ca3-b045-1dfa50104289 False False Windows Store (DCat Prod)
3da21691-e39d-4da6-8a4b-b43877bcb1b7 True True Windows Server Update Service
9482f4b4-e343-43b6-b170-9a65bc822c77 False False Windows Update

Как вы видите, компьютер настроен на получение обновлений с локального сервера WSUS (Windows Server Update Service = True). В этом случае вы должны увидеть список обновлений, одобренных для вашего компьютера на WSUS.
Если вы хотите просканировать ваш компьютер на серверах Microsoft Update (кроме обновлений Windows на этих серверах содержатся обновления Office и других продуктов) в Интернете, выполните команду:
Get-WUlist -MicrosoftUpdate
Вы получаете предупреждение:
Get-WUlist : Service Windows Update was not found on computer
Чтобы разрешить сканирование на Microsoft Update, выполните команду:
Add-WUServiceManager -ServiceID "7971f918-a847-4430-9279-4a52d1efe18d" -AddServiceFlag 7
Теперь можете выполнить сканирование на Microsoft Update. Как вы видите, в данном случае были найдены дополнительные обновления для Microsoft Visual C++ 2008 и Microsoft Silverlight.

Чтобы проверить версию агента Windows Update на компьютере, выполните команду:
Get-WUApiVersion
ComputerName PSWindowsUpdate PSWUModuleDll ApiVersion WuapiDllVersion
------------ --------------- ------------- ---------- ---------------
FS01 2.2.0.2 2.2.0.2 8.0 10.0.19041.1320

Чтобы убрать определенные продукты или конкретные KB из списка обновлений, которые получает ваш компьютер, вы их можете исключить по:
- Категории (-NotCategory);
- Названию (-NotTitle);
- Номеру обновления (-NotKBArticleID).
Например, исключим из списка обновления драйверов, OneDrive и одну конкретную KB:
Get-WUlist -NotCategory "Drivers" -NotTitle OneDrive -NotKBArticleID KB4533002
Установка обновлений Windows с помощью Install-WindowsUpdate
Чтобы автоматически загрузить и установить все доступные обновления для вашей версии Windows с серверов Windows Update (вместо локального WSUS), выполните:
Install-WindowsUpdate -MicrosoftUpdate -AcceptAll -AutoReboot
Ключ AcceptAll включает одобрение установки для всех пакетов, а AutoReboot разрешает автоматическую перезагрузку Windows после установки обновлений.
Также можно использовать следующе параметры:
- IgnoreReboot – запретить автоматическую перезагрузку;
- ScheduleReboot – задать точное время перезагрузки компьютера.
Можете сохранить историю установки обновлений в лог файл (можно использовать вместо WindowsUpdate.log).
Install-WindowsUpdate -AcceptAll -Install -AutoReboot | Out-File "c:$(get-date -f yyyy-MM-dd)-WindowsUpdate.log" -force
Можно установить только конкретные обновления по номерам KB:
Get-WindowsUpdate -KBArticleID KB2267602, KB4533002 -Install

В данном случае нужно подтверждать установку каждого обновления вручную.
Если вы хотите исключить некоторые обновления из списка на установку, выполните:
Install-WindowsUpdate -NotCategory "Drivers" -NotTitle OneDrive -NotKBArticleID KB4011670 -AcceptAll -IgnoreReboot
Модуль позволяет удаленно запустить установку обновлений сразу на нескольких компьютерах или серверах (на компьютерах должен присутствовать модуль PSWindowsUpdate). Это особенно удобно, так как позволяет администратору не заходить вручную на все сервера во время плановой установки обновлений. Следующая команда установит все доступные обновление на трех удаленных серверах:
ServerNames = “server1, server2, server3”
Invoke-WUJob -ComputerName $ServerNames -Script {ipmo PSWindowsUpdate; Install-WindowsUpdate -AcceptAll | Out-File C:WindowsPSWindowsUpdate.log } -RunNow -Confirm:$false -Verbose -ErrorAction Ignore
Командлет Invoke-WUJob (ранее командлет назывался Invoke-WUInstall) создаст на удаленном компьютере задание планировщика, запускаемое от SYSTEM. Можно указать точное время для установки обновлений Windows:
Invoke-WUJob -ComputerName $ServerNames -Script {ipmo PSWindowsUpdate; Install-WindowsUpdate –AcceptAll -AutoReboot | Out-File C:WindowsPSWindowsUpdate.log } -Confirm:$false -TriggerDate (Get-Date -Hour 20 -Minute 0 -Second 0)
Можно установить обновления на удаленном компьютере и отправить email отчет администратору:
Install-WindowsUpdate -ComputerName server1 -MicrosoftUpdate -AcceptAll - IgnoreReboot -SendReport –PSWUSettings @{SmtpServer="smtp.winitpro.ru";From="[email protected]";To="[email protected]";Port=25} -Verbose
Проверить статус задания установки обновления можно с помощью Get-WUJob:
Get-WUJob -ComputerName $ServerNames
Если команда вернет пустой список, значит задача установки на всех компьютерах выполнена.
Просмотр истории установленных обновлений Windows (Get-WUHistory)
С помощью команды Get-WUHistory вы можете получить список обновлений, установленных на компьютере ранее автоматически или вручную.

Можно получить информацию о дате установки конкретного обновления:
Get-WUHistory| Where-Object {$_.Title -match "KB4517389"} | Select-Object *|ft

Чтобы получить информацию об наличии установленного обновления на нескольких удаленных компьютерах, можно воспользоваться таким кодом:
"server1","server2" | Get-WUHistory| Where-Object {$_.Title -match "KB4011634"} | Select-Object *|ft
Проверить, нужна ли перезагрузка компьютеру после установки обновления:
Get-WURebootStatus –ComputerName WKS80JT
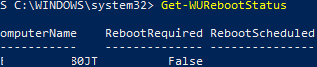
Проверьте значение атрибутов
RebootRequired
и
RebootScheduled
.
Получить дату последней установки обновлений на всех компьютерах в домене можно с помощью командлета Get-ADComputer из модуля AD PowerShell:
$Computers=Get-ADComputer -Filter {enabled -eq "true" -and OperatingSystem -Like '*Windows*' }
Foreach ($Computer in $Computers)
{
Get-WULastResults -ComputerName $Computer.Name|select ComputerName, LastSearchSuccessDate, LastInstallationSuccessDate
}
По аналогии можно найти компьютеры, которые не устаналивали обновления более 40 дней и вывести результат в графическую таблицу Out-GridView:
[email protected]()
Foreach ($Computer in $Computers) {
$result+= Get-WULastResults -ComputerName $Computer.Name
}
$result| Where-Object { $_.LastInstallationSuccessDate -lt ((Get-Date).AddDays(-30)) }| Out-GridView
Удаление обновлений в Windows с помощью Remove-WindowsUpdate
Для корректного удаления обновлений используется командлет Remove-WindowsUpdate. Вам достаточно указать номер KB в качестве аргумента параметра KBArticleID. Чтобы отложить автоматическую перезагрузку компьютера можно добавить ключ
–NoRestart
:
Remove-WindowsUpdate -KBArticleID KB4011634 -NoRestart
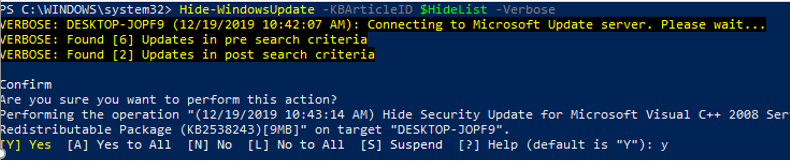
Как скрыть ненужные обновления Windows с помощью PowerShell (Hide-WindowsUpdate)?
Вы можете скрыть определенные обновления, чтобы они никогда не устанавливались службой обновлений Windows Update на вашем компьютер (чаще всего скрывают обновления драйверов). Например, чтобы скрыть обновления KB2538243 и KB4524570, выполните такие команды:
$HideList = "KB2538243", "KB4524570"
Get-WindowsUpdate -KBArticleID $HideList -Hide
или используйте alias:
Hide-WindowsUpdate -KBArticleID $HideList -Verbose
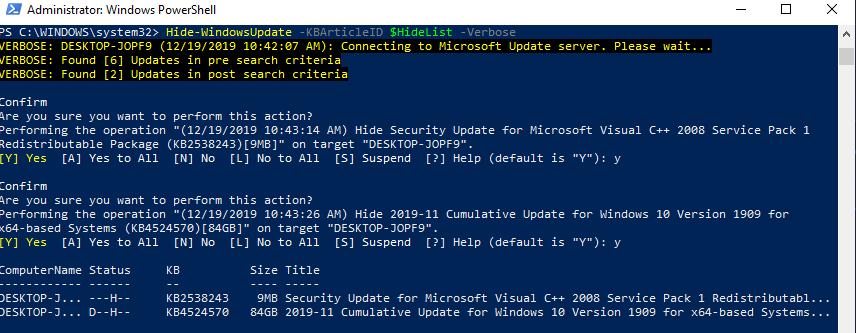
Теперь при следующем сканировании обновлений с помощью команды
Get-WUlist
скрытые обновления не будут отображаться в списке доступных для установки патчей.
Вывести список обновлений, которые скрыты на данном компьютере можно так:
Get-WindowsUpdate –IsHidden
Обратите внимание, что в колонке Status у скрытых обновлений появился атрибут H (Hidden).

Отменить скрытие некоторых обновлений можно так:
Get-WindowsUpdate -KBArticleID $HideList -WithHidden -Hide:$false
или так:
Show-WindowsUpdate -KBArticleID $HideList
Для тех, кто себя некомфортно чувствует в консоли PowerShell, для управления обновлениями Windows 10 могу порекомендовать графическую утилиту Windows Update MiniTool.
In this article, I’ll explain how to install Windows Server Update Services (WSUS) on Windows Server 2012 with PowerShell, discuss the initial configuration, and show you how to configure clients using Group Policy.
Contents
- Install WSUS with PowerShell
- Configure the download location
- Use a SQL Server database
- Starting the WSUS console
- Connecting to WSUS
- Setting up Group Policy
- Author
- Recent Posts

Kyle Beckman works as a systems administrator in Atlanta, GA supporting Office 365 in higher education. He has 17+ years of systems administration experience.
In Windows Server 2012, WSUS is now available as a server role and doesn’t require a separate download like in previous versions of Windows Server. If you’re just starting to get into Server 2012, WSUS is a great service to start with for two reasons: First, WSUS isn’t a service that end users will see, hence, end user impact is minimal. Second, WSUS hasn’t changed significantly since Server 2008 R2. Thus, admin impact is going to be minimal also.
Install WSUS with PowerShell
Installing WSUS in Windows Server 2012 is actually quite easy with PowerShell. Before we start, you’ll need to know whether you want to use the WID (Windows Internal Database) or a full SQL Server. My experience has been that most people use WID, but if you need a load-balanced WSUS install or want SQL access to the data in WSUS, you’ll have to use SQL Server.
To use WID, from a PowerShell prompt with Admin rights, run the following:
Install-WindowsFeature -Name UpdateServices -IncludeManagementTools

Install WSUS on Server 2012
Configure the download location
After installing WSUS, you’ll need to point the application to a location to store downloads. Change to the “C:Program FilesUpdate ServicesTools” folder in your PowerShell window and run the following:
WsusUtil.exe PostInstall CONTENT_DIR=C:WSUS

WsusUtil.exe
Use a SQL Server database
To use a SQL Server, we’ll need to alter the WSUS installation. From a PowerShell prompt with admin rights, run the following:
Install-WindowsFeature -Name UpdateServices-Services,UpdateServices-DB –IncludeManagementTools

SQL Server as WSUS database
After installing WSUS and the bits necessary for SQL Server, you’ll need to point the application to your SQL server and a location to store downloads. Change to the “C:Program FilesUpdate ServicesTools” folder in your PowerShell window and run the following:
WsusUtil.exe PostInstall SQL_INSTANCE_NAME="WSUS1SQL2012" CONTENT_DIR=C:WSUS

Connect to WSUS to SQL Server
Starting the WSUS console
If you’re using Server 2012 with a GUI, you’ll have an icon on your Start Screen that you can use to access WSUS for the first time. If you’re using Server Core, you’ll need to set up an admin station to manage WSUS.

Starting WSUS
In Windows 8, the administrative tool to administer WSUS are part of the Remote Server Administration Tools (RSAT) for Windows 8. The WSUS console will automatically install as part of the RSAT and will be in the Administrative Tools.
In Windows 7, you’ll need to download Windows Server Update Services 3.0 SP2 (and install the administration console. Once the console is installed, you’ll also need to install KB2734608 to add support for Windows 8 and Server 2012.
The last thing you’ll need to install (regardless of OS) is the Microsoft Report Viewer Redistributable 2008.
Connecting to WSUS
Server 2012 with a GUI will automatically connect to WSUS when you run the admin tool. If you’re connecting from Windows 7 or Windows 8, you’ll need to manually specify the WSUS server name when run the tool for the first time. You can do this by clicking on the «Connect to Server» option and then specifying the server name and port. Once you’re done, click «Connect» and you’ll be able to manage WSUS on your admin station.

Connect to WSUS
If you’re using Server 2012 or Windows 8, the Configuration Wizard will start automatically. (In Windows 7, you’ll need go to Options, WSUS Server Configuration Wizard.) The Configuration Wizard is going to be mostly clicking next; but, you’ll want to specifically look out for Classifications and Sync Schedule. In Classifications, you’ll most likely want to add Service Packs, Update Rollups, and Updates. Adding Feature Packs and Tools is up to you, but I definitely recommend avoiding distributing Drivers from WSUS.

Classifications and Updates
For some reason, “synchronize manually” is the default option in WSUS. You’ll want to set it to “synchronize automatically” and then determine how often you’ll want WSUS to check in with Microsoft. For the synchronizations per day option, you should set the option to at least 2 and possibly higher. Microsoft releases multiple antivirus and Defender definitions each day and WSUS will require multiple daily synchronizations to get those updates.

Set Sync Schedule
Setting up Group Policy
By default, Windows clients will check in with the public Microsoft update services. To get your computers to check in with your WSUS server, you’ll need to set the server name in Group Policy. In a GPO that applies to your computers, go to Computer Configuration > Policies > Administrative Templates > Windows Components > Windows Update > Specify intranet Microsoft update service location. When entering your WSUS server name, remember that WSUS now connects to port 8530 by default. Once Group Policy has updated on your clients, they’ll start checking in to your new WSUS server.

Setting up Group Policy
You can use the PSWindowsUpdate PowerShell module to manage Windows updates from the command line. The PSWindowsUpdate module is not built into Windows and is available for installation from the PowerShell Gallery repository. PSWindowsUpdate allows administrators to remotely check, install, remove, and hide updates on Windows servers and workstations. The PSWindowsUpdate module is especially valuable to manage updates on Windows Server Core or Hyper-V Server (which don’t have a GUI), and when configuring a Windows image in the audit mode.
Contents:
- Installing the PSWindowsUpdate Module
- PSWindowsUpdate Cmdlets List
- Scan and Download Windows Updates with PowerShell
- Installing Windows Updates with PowerShell (Install-WindowsUpdate)
- Install Windows Update on Remote Computers with PowerShell
- Check Windows Update History with PowerShell (Get-WUHistory)
- Uninstalling Windows Updates with PowerShell (Remove-WindowsUpdate)
- How to Hide Windows Updates with PowerShell?
Installing the PSWindowsUpdate Module
You can install the PSWindowsUpdate module on Windows 10/11 and Windows Server 2022/2019/2016 from the online repository (PSGallery) using the PackageManagement with a single command:
Install-Module -Name PSWindowsUpdate -Force
After the installation is complete, you need to check the package:
Get-Package -Name PSWindowsUpdate
When installing the PowerShell module on earlier versions of Windows 2012R2/Windows 8.1 and below, you may receive an error:
Install-Module: Unable to download from URI.Unable to download the list of available providers. Check your internet connection.
To install the module, you need to use the TLS 1.2 protocol for connection. Enable it for the current PowerShell session with the command:
[Net.ServicePointManager]::SecurityProtocol = [Net.SecurityProtocolType]::Tls12
PowerShell Install-Module Error: Unable to Download from URI
If you have an older Windows version (Windows 7/8.1/Windows Server 2008 R2/2012 R2) or you don’t have direct Internet access, you can install PSWindowsUpdate manually (check the guide “How to install PowerShell modules offline?”).
- Download the PSWindowsUpdate module to any online computer:
Save-Module –Name PSWindowsUpdate –Path C:ps; - Copy the module to the following folder on the target computer
%WINDIR%System32WindowsPowerShellv1.0Modules;
- Configure the PowerShell script execution policy:
Set-ExecutionPolicy –ExecutionPolicy RemoteSigned -force - You can now import the module into your PowerShell session:
Import-Module PSWindowsUpdate
Note. In Windows 7/Windows Server 2008 R2, when importing the PSWindowsUpdate module, the following error may appear: The term “Unblock-File” is not recognized as the name of a cmdlet. The cause is that the module uses some functions that appeared only in PowerShell 3.0. To use these functions, you will have either to update the PowerShell version or delete the | Unblock-File line from the PSWindowsUpdate.psm1 file manually.
After installing the PSWindowsUpdate module on your computer, you can remotely install it on other computers or servers using the Update-WUModule cmdlet. For example, to copy the PSWindowsUpdate module from your computer to two remote hosts, run the commands (you need access to the remote servers via the WinRM protocol):
$Targets = "lon-fs02", "lon-db01"

Update-WUModule -ComputerName $Targets –Local
To save (export) the PoSh module to a shared network folder for further importing on other computers, run:
Save-Module -Name PSWindowsUpdate –Path \lon-fs02psmodules
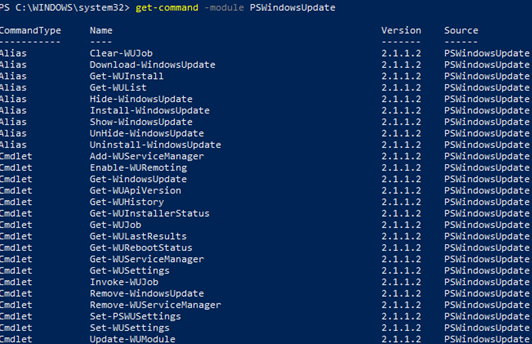
PSWindowsUpdate Cmdlets List
You can display the list of available cmdlets in the PSWindowsUpdate module as follows:
get-command -module PSWindowsUpdate
Let’s describe the usage of the module commands in brief:
- Clear-WUJob – use the Get-WUJob to clear the WUJob in Task Scheduler;
- Download-WindowsUpdate (alias for
Get-WindowsUpdate –Download) — get a list of updates and download them; - Get-WUInstall, Install-WindowsUpdate (alias for
Get-WindowsUpdate –Install) – install Windows updates; - Hide-WindowsUpdate (alias for
Get-WindowsUpdate -Hide:$false) – hide update; - Uninstall-WindowsUpdate – remove update using the Remove-WindowsUpdate;
- Add-WUServiceManager – register the update server (Windows Update Service Manager) on the computer;
- Enable-WURemoting — enable Windows Defender firewall rules to allow remote use of the PSWindowsUpdate cmdlets;
- Get-WindowsUpdate (Get-WUList) — displays a list of updates that match the specified criteria, allows you to find and install the updates. This is the main cmdlet of the PSWindowsUpdate module. Allows to download and install updates from a WSUS server or Microsoft Update. Allows you to select update categories, specific updates and set the rules of a computer restart when installing the updates;
- Get-WUApiVersion – get the Windows Update Agent version on the computer;
- Get-WUHistory – display a list of installed updates (update history);
- Get-WUInstallerStatus — check the Windows Installer service status;
- Get-WUJob – check for WUJob update tasks in the Task Scheduler;
- Get-WULastResults — dates of the last search and installation of updates (LastSearchSuccessDate and LastInstallationSuccessDate);
- Get-WURebootStatus — allows you to check whether a reboot is needed to apply a specific update;
- Get-WUServiceManager – list update sources;
- Get-WUSettings – get Windows Update client settings;
- Invoke-WUJob – remotely call WUJobs task in the Task Scheduler to immediately execute PSWindowsUpdate commands;
- Remove-WindowsUpdate – allows to uninstall an update by KB ID;
- Remove-WUServiceManager – disable Windows Update Service Manager;
- Set-PSWUSettings – save PSWindowsUpdate module settings to the XML file;
- Set-WUSettings – configure Windows Update client settings;
- Update-WUModule – update the PSWindowsUpdate module (you can update the module on a remote computer by copying it from the current one, or updating from PSGallery);
- Reset-WUComponents – allows you to reset the Windows Update agent on the computer to the default state.
To check the current Windows Update client settings, run the command:
Get-WUSettings
ComputerName                                 : WKS5S2N39S2
WUServer                                     : http://MN-WSUS:8530
WUStatusServer                               : http://MN-WSUS:8530
AcceptTrustedPublisherCerts                  : 1
ElevateNonAdmins                             : 1
DoNotConnectToWindowsUpdateInternetLocations : 1
TargetGroupEnabled                           : 1
TargetGroup                                  : ServersProd
NoAutoUpdate                                 : 0
AUOptions                                    : 3 - Notify before installation
ScheduledInstallDay                          : 0 - Every Day
ScheduledInstallTime                         : 3
UseWUServer                                  : 1
AutoInstallMinorUpdates                      : 0
AlwaysAutoRebootAtScheduledTime              : 0
DetectionFrequencyEnabled                    : 1
DetectionFrequency                         : 4
In this example, the Windows Update agent on the computer is configured with a GPO to receive updates from the local WSUS server.
The Reset-WUComponents -Verbose cmdlet allows you to reset all Windows Update Agent settings, re-register libraries, and restore the wususerv service to its default state.
Scan and Download Windows Updates with PowerShell
You can list the updates available for the current computer on the update server using the Get-WindowsUpdate or Get-WUList commands.

To check the list of available updates on a remote computer, run this command:
Get-WUList –ComputerName server2
You can check where your Windows should receive updates from. Run the following command:
Get-WUServiceManager
ServiceID IsManaged IsDefault Name
--------- --------- --------- ----
8b24b027-1dee-babb-9a95-3517dfb9c552 False False DCat Flighting Prod
855e8a7c-ecb4-4ca3-b045-1dfa50104289 False False Windows Store (DCat Prod)
3da21691-e39d-4da6-8a4b-b43877bcb1b7 True True Windows Server Update Service
9482f4b4-e343-43b6-b170-9a65bc822c77 False False Windows Update

As you can see, the computer is configured to receive updates from the local WSUS server (Windows Server Update Service = True). In this case, you should see a list of updates approved for your computer.
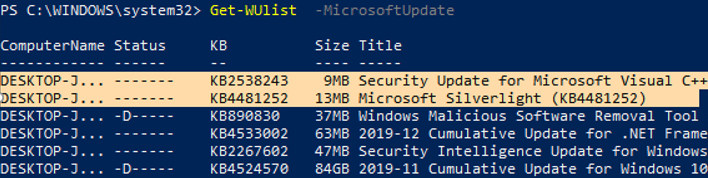
If you want to scan your computer against Microsoft Update servers on the Internet (in addition to Windows updates, these servers contain Office and other Microsoft product updates), run this command:
Get-WUlist -MicrosoftUpdate
You will get this warning:
Get-WUlist : Service Windows Update was not found on computer. Use Get-WUServiceManager to get registered service.
To allow scanning on Microsoft Update, run this command:
Add-WUServiceManager -ServiceID "7971f918-a847-4430-9279-4a52d1efe18d" -AddServiceFlag 7
You can now scan against Microsoft Update. In this case, additional updates were found for Microsoft Visual C ++ 2008 and Microsoft Silverlight.
To check the version of the Windows Update Agent on the computer, run the command:
Get-WUApiVersion
ComputerName PSWindowsUpdate PSWUModuleDll ApiVersion WuapiDllVersion
------------ --------------- ------------- ---------- ---------------
DESKTOP-J... 2.1.1.2 2.2.0.2 8.0 10.0.19041.1320

To remove specific products or KBs from the list of updates received by your computer, you can exclude them by:
- Category (
-NotCategory); - Title (
-NotCategory); - Update number (
-NotKBArticleID).
For example, let’s exclude OneDrive, driver updates, and the specific KB from the list:
Get-WUlist -NotCategory "Drivers" -NotTitle "OneDrive" -NotKBArticleID KB4489873
Installing Windows Updates with PowerShell (Install-WindowsUpdate)
To automatically download and install all available updates for your Windows device from Windows Update servers (instead of local WSUS), run the command:
Install-WindowsUpdate -MicrosoftUpdate -AcceptAll -AutoReboot
The AcceptAll parameter accepts the installation of all update packages, and AutoReboot allows Windows to automatically restart after the updates are installed.
You can also use the following options:
- IgnoreReboot – disable automatic reboot;
- ScheduleReboot – set the exact time to restart the computer.
You can save the update installation history to a log file (you can use it instead of WindowsUpdate.log file).
Install-WindowsUpdate -AcceptAll -Install -AutoReboot | Out-File "c:logs$(get-date -f yyyy-MM-dd)-WindowsUpdate.log" -force
You can install only the specific update packages by KB numbers:
Get-WindowsUpdate -KBArticleID KB2267602, KB4533002 -Install
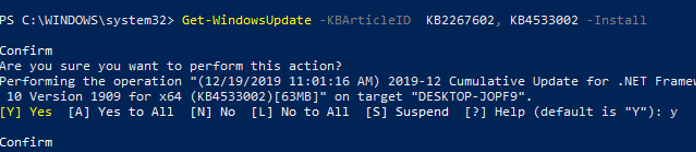
In this case, you need to confirm the installation of each update manually.
If you want to exclude certain updates from the installation list, run this command:
Install-WindowsUpdate -NotCategory "Drivers" -NotTitle OneDrive -NotKBArticleID KB4011670 -AcceptAll -IgnoreReboot
Install Windows Update on Remote Computers with PowerShell
The PSWindowsUpdate module allows you to install updates remotely on multiple workstations or servers at once (the PSWindowsUpdate must be installed/imported on these computers). This is very convenient because the administrator doesn’t have to manually log on to remote Windows hosts to install updates. WinRM must be enabled and configured on remote computers (manually or via GPO).
Almost all PSWindowsUpdate module cmdlets allow you to manage and install Windows updates on remote computers with the –Computername attribute.
Install the PSWindowsUpdate module on remote computers and allow access via dynamic RPC ports to the dllhost.exe process in the Windows Defender Firewall. You can use the Invoke-Command cmdlet to configure the PSWindowsUpdate module on remote computers:
$Targets = "lon-fs02", "lon-db01"

Invoke-Command -ComputerName $Target -ScriptBlock {Set-ExecutionPolicy RemoteSigned -force }

Invoke-Command -ComputerName $Target -ScriptBlock {Import-Module PSWindowsUpdate; Enable-WURemoting}
The PSWindowsUpdate module can be used to remotely manage Windows updates both on computers in an AD domain and in a workgroup (requires PowerShell Remoting configuration for workgroup environment).
In order to manage updates on remote computers, you need to add hostnames to your winrm trusted host list or configure PowerShell Remoting (WinRM) via HTTPS:
winrm set winrm/config/client '@{TrustedHosts="server1,server2,…"}'
Or with PowerShell :
Set-Item wsman:localhostclientTrustedHosts -Value server1 -Force
The following command will install all available updates on three remote Windows hosts:
$ServerNames = "server1, server2, server3"

Invoke-WUJob -ComputerName $ServerNames -Script {ipmo PSWindowsUpdate; Install-WindowsUpdate -AcceptAll | Out-File C:WindowsPSWindowsUpdate.log } -RunNow -Confirm:$false -Verbose -ErrorAction Ignore
The Invoke-WUJob cmdlet (previously called Invoke-WUInstall) will create a scheduler task on the remote computer that runs under a local SYSTEM account.
You can specify the exact time to install Windows updates:
Invoke-WUJob -ComputerName $ServerNames -Script {ipmo PSWindowsUpdate; Install-WindowsUpdate –AcceptAll -AutoReboot | Out-File C:WindowsPSWindowsUpdate.log } -Confirm:$false -TriggerDate (Get-Date -Hour 22 -Minute 0 -Second 0)
You can check the status of the update installation task using the Get-WUJob:
Get-WUJob -ComputerName $ServerNames
If the command returns an empty list, then the update installation task on all computers has been completed.
You can install updates on a remote computer and send an email report to the administrator:
Install-WindowsUpdate -ComputerName nysrv1 -MicrosoftUpdate -AcceptAll - IgnoreReboot -SendReport –PSWUSettings @{SmtpServer="smtp.woshub.com";From="update_alert@woshub.com";To="wsus_admin@woshub.com";Port=25} -Verbose
Check Windows Update History with PowerShell (Get-WUHistory)
Using the Get-WUHistory cmdlet, you can get the list of updates installed on a computer earlier automatically or manually.

You can get the information about the installation date of a specific update:
Get-WUHistory| Where-Object {$_.Title -match "KB4517389"} | Select-Object *|ft

To find out if the specific update has been installed on multiple remote computers, you can use this PowerShell code:
"server1","server2" | Get-WUHistory| Where-Object {$_.Title -match "KB4011634"} | Select-Object *|ft
Check if the computer needs to be restarted after installing the update (pending reboot):
Get-WURebootStatus –ComputerName WKS21TJS

Check the value of the RebootRequired and RebootScheduled attributes.
You can generate a report with the dates when updates were last installed on all computers in the domain using the Get-ADComputer cmdlet (from the Active Directory for PowerShell module):
$Computers=Get-ADComputer -Filter {enabled -eq "true" -and OperatingSystem -Like '*Windows*' }

Foreach ($Computer in $Computers)

{

Get-WULastResults -ComputerName $Computer.Name|select ComputerName, LastSearchSuccessDate, LastInstallationSuccessDate

}
By analogy, you can find computers that have not installed updates for more than 60 days and display the result in the Out-GridView interactive table:
$result=@()

Foreach ($Computer in $Computers) {

$result+= Get-WULastResults -ComputerName $Computer.Name

}

$result| Where-Object { $_.LastInstallationSuccessDate -lt ((Get-Date).AddDays(-60)) }| Out-GridView
Uninstalling Windows Updates with PowerShell (Remove-WindowsUpdate)
You can use the Remove-WindowsUpdate cmdlet to correctly uninstall the updates with PowerShell. Just specify the KB number as an argument of the KBArticleID parameter. To delay automatic computer restart, add the –NoRestart option:
Remove-WindowsUpdate -KBArticleID KB4489873 -NoRestart
How to Hide Windows Updates with PowerShell?
You can hide the specific updates so they will be never installed by the Windows Update service on your computer (most often you need to hide the driver updates). For example, to hide the KB4489873 and KB4489243 updates, run these commands:
$HideList = "KB4489873", "KB4489243"

Get-WindowsUpdate -KBArticleID $HideList –Hide
Now the next time you scan for updates using the Get-WUlist command, the hidden updates won’t be displayed in the list of updates available for installation.
This is how you can display the list of updates hidden on this computer:
Get-WindowsUpdate –IsHidden
Notice that the H (Hidden) attribute has appeared in the Status column of hidden updates.

To unhide some updates, run this command:
Get-WindowsUpdate -KBArticleID $HideList -WithHidden -Hide:$false
or:
Show-WindowsUpdate -KBArticleID $HideList
For those who feel uncomfortable in the PowerShell console, I would recommend a graphic Windows Update MiniTool to manage updates in Windows 10/11 and Windows Server 2022/2019.
| external help file | Module Name | online version | schema |
|---|---|---|---|
|
WSUS_Cmdlets.xml |
UpdateServices |
https://learn.microsoft.com/powershell/module/updateservices/get-wsusupdate?view=windowsserver2012-ps&wt.mc_id=ps-gethelp |
2.0.0 |
SYNOPSIS
Gets the Windows Server Update Services (WSUS) update object with details about the update.
SYNTAX
UNNAMED_PARAMETER_SET_1
Get-WsusUpdate [-Approval <WsusApprovedState>] [-Classification <WsusUpdateClassifications>]
 [-Status <WsusUpdateInstallationState>] [-UpdateServer <IUpdateServer>]
UNNAMED_PARAMETER_SET_2
Get-WsusUpdate [-RevisionNumber <Int32>] [-UpdateServer <IUpdateServer>] -UpdateId <Guid>
DESCRIPTION
The Get-WsusUpdate cmdlet gets the Windows Server Update Services (WSUS) update object with details about the update.
This cmdlet requires the update unique identifier (GUID) or a set of filter criteria such as classification, approval and status as parameter.
The Get-WsusUpdate cmdlet can be called in two ways:
— Passing in the Update ID (GUID) and RevisionNumber.
This cmdlet will return a single update matching the specified Update ID and revision number.
— Passing in filter parameters.
These parameters include Classification, Approval, and Status.
One or more updates matching the specified criteria will be returned.
EXAMPLES
EXAMPLE 1
PS C:> Get-WsusUpdate -Classification All -Approval Unapproved -Status FailedOrNeeded
This example gets allunapproved updates with a status of failed or needed.
EXAMPLE 2
PS C:> Get-WsusUpdate -Classification Critical -Approval Unapproved -Status Any
Title                         Classification                    Installed/Not Applicable  Approved
Percentage
-----                         --------------                ----------------------------- --------
Windows XP Update Package,    Critical Updates                                            NotApproved
October 25, 2001
This example gets allcriticalunapproved updates.
PARAMETERS
-Approval
Specifies the approved state of the one or more updates to be returned.
The acceptable values for this parameter are:
— Unapproved
— Declined
— Approved
— AnyExceptDeclined
Type: WsusApprovedState
Parameter Sets: UNNAMED_PARAMETER_SET_1
Aliases:

Required: False
Position: Named
Default value: None
Accept pipeline input: False
Accept wildcard characters: False
-Classification
Specifies the classification of updates for which you want to get updates.
The acceptable values for this parameter are:
— All
— Critical
— Security
— WSUS
Type: WsusUpdateClassifications
Parameter Sets: UNNAMED_PARAMETER_SET_1
Aliases:

Required: False
Position: Named
Default value: WUUpdateClassification.All
Accept pipeline input: False
Accept wildcard characters: False
-RevisionNumber
Specifies the revision number of a specific revision of an update.
To specify the latest revision, set to zero.
Type: Int32
Parameter Sets: UNNAMED_PARAMETER_SET_2
Aliases:

Required: False
Position: Named
Default value: 0
Accept pipeline input: False
Accept wildcard characters: False
-Status
Specifies the installation status for which to search.
An update will be included only if it has at least one computer with the specified status.
The acceptable values for this parameter are:
— Needed
— FailedOrNeeded
— InstalledOrNotApplicableOrNoStatus
— Failed
— InstalledOrNotApplicable
— NoStatus
— Any
Type: WsusUpdateInstallationState
Parameter Sets: UNNAMED_PARAMETER_SET_1
Aliases:

Required: False
Position: Named
Default value: None
Accept pipeline input: False
Accept wildcard characters: False
-UpdateId
Specifies the update by its GUID.
The GUID uniquely identifies the Group Policy Object (GPO).
Type: Guid
Parameter Sets: UNNAMED_PARAMETER_SET_2
Aliases:

Required: True
Position: Named
Default value: None
Accept pipeline input: False
Accept wildcard characters: False
-UpdateServer
Specifies the object that contains the WSUS server.
This value is obtained by calling the Get-WsusServer cmdlet and piping the resulting IUpdateServer object into this cmdlet.
Type: IUpdateServer
Parameter Sets: (All)
Aliases:

Required: False
Position: Named
Default value: None
Accept pipeline input: True (ByValue)
Accept wildcard characters: False
INPUTS
None
OUTPUTS
Microsoft.UpdateServices.Commands.WsusUpdate
WsusUpdate
NOTES
RELATED LINKS
Get-WsusServer
Welcome back to our series on Windows Server Update Services 2012 (WSUS) in Windows Server 2012! In part one, I went over the installation of WSUS 2012 and its prerequisites. In part two, I looked at how to configure computers to use WSUS, create WSUS groups to target updates and how to approve updates for distribution. In this third article, I’ll cover how to get WSUS reporting working. I’ll also cover how manage WSUS using PowerShell cmdlets.
Install WSUS Reporting
There are a few additional steps you need to take to get reporting working after installing the WSUS role in Windows Server 2012. If you try to run a report from the WSUS management console after installing the WSUS role, you’ll get a message saying that you must install the Microsoft Report Viewer 2008 Redistributable.
- Log on to Windows Server 2012 WSUS as a local administrator.
- Download Microsoft Report Viewer 2008 SP1 Redistributable (using the link) and save it.
- Start Server Manager from the icon on the desktop Taskbar or Start screen.
- On the Server Manager Dashboard, click Add roles and features under Welcome to Server Manager.
- In the left pane of the Add Roles and Features Wizard, click Server Selection.
- Again in the left pane, click Features.
- Under Features in the right pane, check .NET Framework 3.5 Features and click Next.
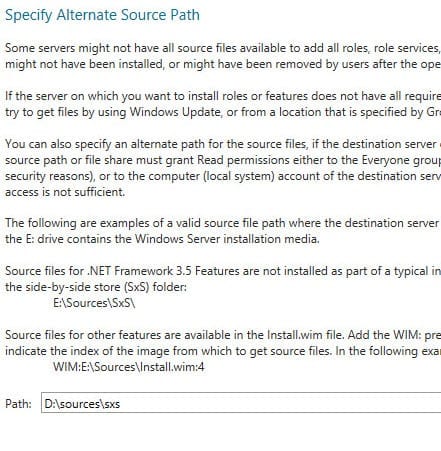
- On the Confirmation screen, click Specify an alternate source path.
On a standard installation of Windows Server 2012, the binaries for .NET Framework 3.5 (and 2.0) are not present by default, so you will need to point the Add Roles and Features Wizard to your original installation media. In this example, I’ve simply inserted the Windows Server 2012 media into the local DVD drive (D:).
- In the pop-up dialog, enter the source path (d:sourcessxs) for the .NET Framework 3.5 installation files in the Path: box and click OK.
- Back on the Confirmation screen, click Install.
- Once installation has completed successfully, click Close in the Add Roles and Features Wizard.
- Now run and install the Report Viewer executable downloaded earlier.
Running WSUS Reports
Once Report Viewer is installed, you will be able to run the built-in reports from the WSUS management console (MMC).
- Open Server Manager from the icon on the desktop Taskbar or Start screen.
- Select Windows Update Server Services from the Tools menu.
- In the WSUS MMC, select Reports in the left pane.
In the central pane of the WSUS MMC, you’ll see there are a variety of built-in reports that can be run, divided into update, computer and synchronization reports.
- Click on Update Status Summary in the center pane.
- A new window will open giving you the option to customize the report. Let’s leave the default settings and click Run Report on the menu.

After a few moments, the first page of the report will be displayed. You can scroll through the report using the arrows at the top of the report window or by expanding the report navigation in the left pane to jump directly to any page. Notice that you are also able to approve updates by clicking the links in the report window. For example, if I wanted to approve an update for the All Computers group, I would click the Not approved link and approve the update in the pop-up dialog.

Manage WSUS Using PowerShell
The most common task that administrators carry out with Windows Server Update Services is the approval of updates. Open the PowerShell window from the icon on the desktop Taskbar and let’s try out some of the new PowerShell commands.
Display Approve Updates
To display all unapproved WSUS updates, run the following command in the PowerShell window:
Get-WsusUpdate -Classification All -Approval Unapproved -Status Any
The command could generate quite a big list. We can filter the results by changing the value of the –Classification parameter to Critical and –Status to FailedOrNeeded.
Get-WsusUpdate -Classification Critical -Approval Unapproved -Status FailedOrNeeded
The Approve-WsusUpdate command can be used to approve updates. However, you need to pipe the results of the Get-WsusUpdate cmdlet to Approve-WsusUpdate. For example, if I wanted to approve all critical updates for the WSUS Testing group, I would use the following command:
Get-WsusUpdate -Classification Critical -Approval Unapproved -Status FailedOrNeeded | Approve-WsusUpdate -Action Install -TargetGroupName “Testing”
Add a Product to WSUS
Adding a product category to WSUS using PowerShell requires a couple of cmdlets. The Get-WsusProduct cmdlet lists all the WSUS product categories and their relevant GUIDs. To add a product category to WSUS for synchronization, you filter the results of the Get-WsusProduct cmdlet and pipe the results to Set-WsusProduct. For example, to set WSUS to synchronize updates for Windows XP, run the command below:
Get-WsusProduct | Where-Object –FilterScript {$_.product.title -Eq “Windows XP”} | Set-WsusProduct
Click here to see a list of all available WSUS PowerShell cmdlets in Windows Server 2012.
Created OnApril 17, 2020
Last Updated OnApril 17, 2020
- Main
- Microsoft
- Manage Windows Update with PowerShell
Refer to the tutorial below on how to manage Windows Update with PowerShell to ensure that all Windows Servers are installed with latest updates
Windows Update with PowerShell – PSWindowsUpdate
Install PSWindowsUpdate Module on all Windows Servers to manage the Windows Update Client
Download and install PSWindowsUpdate on Windows Machines with PowerShell 5.1
Install-Module -Name PSWindowsUpdate
Copy the PSWindowsUpdate Module manually to PowerShell Module on Windows Machines with PowerShell 4.0
$PSv4_Path = "C:WindowsSystem32WindowsPowerShellv1.0Modules"
New-Item -ItemType Directory -Path $PSv4_Path -Name "PSWindowsUpdate"

$PSWU = "C:Program FilesWindowsPowerShellModulesPSWindowsUpdate2.1.1.2"
Copy-Item $PSWU -Recurse -Destination "C:WindowsSystem32WindowsPowerShellv1.0ModulesPSWindowsUpdate"
Import PSWindowsUpdate Module
#Import PSWindowsUpdate Module
Import-Module PSWindowsUpdate
Get-Command -Module PSWindowsUpdate

CommandType     Name                                               Version    Source
-----------     ----                                               -------    ------
Alias           Clear-WUJob                                        2.1.1.2    PSWindowsUpdate
Alias           Download-WindowsUpdate                             2.1.1.2    PSWindowsUpdate
Alias           Get-WUInstall                                      2.1.1.2    PSWindowsUpdate
Alias           Get-WUList                                         2.1.1.2    PSWindowsUpdate
Alias           Hide-WindowsUpdate                                 2.1.1.2    PSWindowsUpdate
Alias           Install-WindowsUpdate                              2.1.1.2    PSWindowsUpdate
Alias           Show-WindowsUpdate                                 2.1.1.2    PSWindowsUpdate
Alias           UnHide-WindowsUpdate                               2.1.1.2    PSWindowsUpdate
Alias           Uninstall-WindowsUpdate                            2.1.1.2    PSWindowsUpdate
Cmdlet          Add-WUServiceManager                               2.1.1.2    PSWindowsUpdate
Cmdlet          Enable-WURemoting                                  2.1.1.2    PSWindowsUpdate
Cmdlet          Get-WindowsUpdate                                  2.1.1.2    PSWindowsUpdate
Cmdlet          Get-WUApiVersion                                   2.1.1.2    PSWindowsUpdate
Cmdlet          Get-WUHistory                                      2.1.1.2    PSWindowsUpdate
Cmdlet          Get-WUInstallerStatus                              2.1.1.2    PSWindowsUpdate
Cmdlet          Get-WUJob                                          2.1.1.2    PSWindowsUpdate
Cmdlet          Get-WULastResults                                  2.1.1.2    PSWindowsUpdate
Cmdlet          Get-WURebootStatus                                 2.1.1.2    PSWindowsUpdate
Cmdlet          Get-WUServiceManager                               2.1.1.2    PSWindowsUpdate
Cmdlet          Get-WUSettings                                     2.1.1.2    PSWindowsUpdate
Cmdlet          Invoke-WUJob                                       2.1.1.2    PSWindowsUpdate
Cmdlet          Remove-WindowsUpdate                               2.1.1.2    PSWindowsUpdate
Cmdlet          Remove-WUServiceManager                            2.1.1.2    PSWindowsUpdate
Cmdlet          Set-PSWUSettings                                   2.1.1.2    PSWindowsUpdate
Cmdlet          Set-WUSettings                                     2.1.1.2    PSWindowsUpdate
Cmdlet          Update-WUModule                                    2.1.1.2    PSWindowsUpdate
Version of Windows Update Client
Check the version of Windows Update Client installed
Get-WUApiVersion

ComputerName PSWindowsUpdate PSWUModuleDll   ApiVersion WuapiDllVersion
------------ --------------- -------------   ---------- ---------------
YONG-WIN10   2.1.1.2         2.0.6995.28496  8.0        10.0.18362.387
Settings of Windows Update Client
Verify the Windows Update Client is configured to point to WSUS Server
PS C:windowssystem32driversetc> Get-WUSettings

ComputerName                                 : IB-WSUS
WUServer                                     : http://IB-WSUS:8530
WUStatusServer                               : http://IB-WSUS:8530
AcceptTrustedPublisherCerts                  : 1
ElevateNonAdmins                             : 1
DoNotConnectToWindowsUpdateInternetLocations : 1
TargetGroupEnabled                           : 1
TargetGroup                                  : Servers
NoAutoUpdate                                 : 0
AUOptions                                    : 3 - Notify before installation
ScheduledInstallDay                          : 0 - Every Day
ScheduledInstallTime                         : 3
UseWUServer                                  : 1
AutoInstallMinorUpdates                      : 0
AlwaysAutoRebootAtScheduledTime              : 0
DetectionFrequencyEnabled                    : 1
DetectionFrequency                           : 22
Check Available Updates
Check available updates from WSUS Server
Get-WindowsUpdate

ComputerName Status     KB          Size Title
------------ ------     --          ---- -----
GRP-DC02     -------    KB4550970   32MB 2020-04 Security Only Quality Update for Windows Server 2012 R2 for x64-based Systems (KB4550970)
Install Updates
Install all available Windows Updates
Install-WindowsUpdate -AcceptAll
Check Update History
List the latest 5 updates installed
Get-WUHistory -Last 5 | Select Date,Title, Result

Date                  Title                                                                                          Result
----                  -----                                                                                          ------
17/4/2020 1:43:19 AM  Security Intelligence Update for Windows Defender Antivirus - KB2267602 (Version 1.313.1687.0) Succeeded
15/4/2020 8:36:07 PM  2020-04 Cumulative Update for Windows 10 Version 1909 for x64-based Systems (KB4549951)        Succeeded
15/4/2020 10:45:09 AM Security Intelligence Update for Windows Defender Antivirus - KB2267602 (Version 1.313.1554.0) Succeeded
15/4/2020 2:17:38 AM  Security Intelligence Update for Windows Defender Antivirus - KB2267602 (Version 1.313.1528.0) Succeeded
14/4/2020 12:57:13 PM Security Intelligence Update for Windows Defender Antivirus - KB2267602 (Version 1.313.1478.0) Succeeded
Status of Windows Update of Remote Computers
Generate a Report contains the most recently 5 updates installed on remote computers
$Computers = @('IB-CAS01','IB-CAS02','IB-MBX01','IB-MBX02','IB-MBXRP')

foreach ($Computer in $Computers) {
    Get-WUHistory -ComputerName $Computer -Last 5 | Select Date, ComputerName, Result, Title | Export-Csv C:TempApril2020-ExchangeServers.csv -NoTypeInformation -Append }
Others
Check the last result
Get-WULastResults

ComputerName LastSearchSuccessDate LastInstallationSuccessDate
------------ --------------------- ---------------------------
YONG-WIN10   16/4/2020 5:52:09 PM  15/4/2020 12:36:07 PM
Check whether reboot is required
 Get-WURebootStatus

ComputerName RebootRequired RebootScheduled
------------ -------------- ---------------
YONG-WIN10            False
You can install Servicing Stack Updates (SSU) for Windows Server 2012R2, 2016 and Windows Server 2019 using PowerShell, without downtime. Because they must be installed prior to your normal Windows Server security updates, you can install them anytime you want to during the day. Here’s a small PowerShell example to do so.
Keeping the servicing stack updated is crucial for the security of your Windows-based infrastructure. Unfortunately, it’s also becoming more of a challenge. This post helps you installing Windows servicing stack updates prior to Windows Updates, using PowerShell, and streamlines your workflow a bit.
But first, what exactly are Servicing stack updates, or SSU’s? Microsoft writes:
Servicing stack updates provide fixes to the servicing stack, the component that installs Windows updates. Additionally, it contains the “component-based servicing stack” (CBS), which is a key underlying component for several elements of Windows deployment, such as DISM, SFC, changing Windows features or roles, and repairing components. The CBS is a small component that typically does not have updates released every month.
Servicing stack updates – Microsoft Docs
I mentioned Windows Component-Based Servicing and CBS log files in my blog post with 5 ways to clean up files and free up disk space in Windows Server.
In my monthly Windows Updates routine, mostly using WSUS, I use the following PowerShell snippets to install Servicing Stack Updates manually in a loop.
Check WSUS client servers for downloaded SSU update files
First I approve all updates available and wait a moment for the updates to be downloaded to the WSUS client servers. In that moment of waiting, I write down the KB numbers for Server 2016 and Server 2019 Servicing Stack Updates (this month: KB4503537 for Server 2016 and KB4504369 for Server 2019.
Using PowerShell, loop through your servers’ file system to check if SSU updates files have been downloaded. Server 2019 as an example, adjust to your needs.
Code language: PHP (php)
foreach( $server in (Get-ADComputer -Filter {(enabled -eq $True) -and (OperatingSystem -like "Windows Server 2019*")}).DNSHostName ) { invoke-command -computername $server -scriptblock { Try { $update = ((Get-ChildItem -Recurse C:WindowsSoftwareDistributionDownload | Where-Object { $_.PSPath -like "*KB4504369*" }) | Select-Object Name,DirectoryName) if(Test-Path($update.DirectoryName)) { write-output "KB4566425 found on server $using:server" } } Catch { write-output "KB4566425 not found on server $using:server" } } }
The Try Catch block prevent ugly PowerShell error messages like “Cannot bind argument to parameter ‘Path’ because it is null.” when no update file has been found yet. The file wasn’t downloaded yet.
Ever wondered why Windows Server Update Services (WSUS) offers Flash updates for Windows Server? Here is how to uninstall and remove Adobe Flash Player in Windows Server.
Continue when all servers have downloaded the SSU update files.
Install Servicing Stack Updates in Windows Server using PowerShell
Next, my PowerShell script takes a KB number as input, and uses Get-ChildItem cmdlet to search for the update .cab file. If that file is found, it is installed using DISM.exe to install the SSU .cab file.
Code language: PHP (php)
[CmdletBinding()] Param( [Parameter(Mandatory = $true, Position = 0, HelpMessage="Windows Server OS version (2019, 2016, 2012)")] [string]$serveros, [Parameter(Mandatory = $true, Position = 0, HelpMessage="Servicing Stack Update KB number")] [ValidateScript({ if (!($_ -match "KB")) { Throw "[!!] the letters KB are missing" } else { $true } })] [string]$ssukb ) function install_SSU($servername, $kb) { invoke-command -computername $servername -scriptblock { $update = ((Get-ChildItem -Recurse C:WindowsSoftwareDistributionDownload | Where-Object { $_.PSPath -like "*${using:kb}*" }) | Select-Object Name,DirectoryName) if(Test-Path("$($update.DirectoryName)")) { $process = Start-Process -NoNewWindow "c:windowssystem32DISM.exe" -argument "/Online /Add-Package /PackagePath:$($update.DirectoryName)$($update.Name)" -PassThru -Wait if($process.ExitCode -ne 0) { $a = "Installation process returned error code $($process.ExitCode) on ${Using:servername}" return $a } else { $a = "true, update {$Using:kb} installed on ${Using:servername}" return $a } } else { $a = "$($update.DirectoryName)$($update.Name) not found on ${Using:servername}" return $a } } } function restart_WindowsUpdate($servername, $os) { invoke-command -computername $servername -scriptblock { &net stop wuauserv &net start wuauserv if($os -eq "2019" -or $os -eq "2016") { Start-Process -NoNewWindow "c:windowssystem32UsoClient.exe" -argument "startscan" -Wait Start-Process -NoNewWindow "c:windowssystem32UsoClient.exe" -argument "RefreshSettings" -Wait } else { Start-Process -NoNewWindow "c:windowssystem32wuauclt.exe" -argument "/resetauthorization /DetectNow" -Wait Start-Process -NoNewWindow "c:windowssystem32wuauclt.exe" -argument "/ReportNow" -Wait } } } if(($serveros -eq "2016") -or ($serveros -eq "2019")) { $serverversion = "Windows Server " + $serveros + "*" foreach($server in (Get-ADComputer -Filter "OperatingSystem -like '${serverversion}' -and enabled -eq '$true'").DNSHostName) { $b = install_SSU -servername "${server}" -kb "${ssukb}" $b restart_WindowsUpdate -server "${server}" -os "${serveros}" } } if($serveros -eq "2012") { foreach($server in (Get-ADComputer -Filter {(enabled -eq $True) -and (OperatingSystem -like "Windows Server 2012*")}).DNSHostName) { $b = install_SSU -servername "${server}" -kb "${ssukb}" $b restart_WindowsUpdate -server "${server}" -os "${serveros}" } }
It may not be perfect but works for my situation. You can execute it for your Windows Server operating system versions like:
Code language: CSS (css)
.install-SSU.ps1 -serveros 2019 -ssukb KB4539571 .install-SSU.ps1 -serveros 2016 -ssukb KB4540723 .install-SSU.ps1 -serveros 2012 -ssukb KB4540725
The regular Windows Updates are installed using WSUS and PowerShell module PSWindowsUpdate. You can install this with NuGet:
Code language: JavaScript (javascript)
Install-PackageProvider -Name NuGet -MinimumVersion 2.8.5.201 -Confirm:$false -Force Install-Module -Name PSWindowsUpdate -Confirm:$false -Force
I have a Dutch article about PSWindowsUpdate at ITFAQ.nl.
There are times when you would want to setup a WSUS server in your Lab quickly.
As you might have already guessed this is going to be a 2 Part series, In this post will show you how to Install, Configure WSUS on Windows Server 2012 R2 using Powershell. I will break the script into parts to explain what we are getting done and will post the complete script at the end.
Alright then if you want to follow along this is what you would need, A Windows Server 2012 R2 machine with Internet.We are going to Install WSUS with Windows Internal Database. (Will write some thing later on how to set it up using SQL).
First let us Install Windows Update Services with Windows Internal Database (WID) and also Include Management Tools by running the below line.
Install-WindowsFeature -Name UpdateServices -IncludeManagementTools -Verbose
 Wait for the Installation to complete. You can see, we have a message stating some additional configuration may be required before our WSUS server can be up and running. We still need to configure a location for the update files to be stored.This is where wsusutil.exe will come into play. This executable is located at C:Program FilesUpdate ServicesTools. In wsusutil.exe there is a set of parameters that become available when you use the /PostInstall argument for specifying where to store the content. I don’t want all of the updates on my system drive, so I will create the folder on my E: drive and store them there.
 Wait for the Installation to complete. You can see, we have a message stating some additional configuration may be required before our WSUS server can be up and running. We still need to configure a location for the update files to be stored.This is where wsusutil.exe will come into play. This executable is located at C:Program FilesUpdate ServicesTools. In wsusutil.exe there is a set of parameters that become available when you use the /PostInstall argument for specifying where to store the content. I don’t want all of the updates on my system drive, so I will create the folder on my E: drive and store them there.
New-Item -Name WSUS -Path E: -ItemType Directory
Set-Location $env:ProgramFiles'Update ServicesTools'
.WsusUtil.exe postinstall CONTENT_DIR='E:WSUS'

We have now configured the content directory on E drive to save the update files under WSUS Folder.
Now lets configure the language pack, In this case we only want to enable English language pack for updates. We will next set that in the WSUS Server Configuration and Subscription Information.
#Get WSUS Server Name
$WSUS = Get-WSUSServer
#Get WSUS Server Configuration and Subscription Information
$WSUSConfig = $WSUS.GetConfiguration()
$WSUSSubScrip = $WSUS.GetSubscription()
#Set Update Language to English and save configuration settings
$WSUSConfig.AllUpdateLanguagesEnabled = $false
$WSUSConfig.AllUpdateLanguagesDssEnabled = $false
$WSUSConfig.SetEnabledUpdateLanguages("en")
$WSUSConfig.Save()
Next we will tell our server where we want to synchronize from, In this case we want to sync up with Microsoft Updates.
#Set WSUS to download from Microsoft Updates
Set-WsusServerSynchronization -SyncFromMU

By Default a list of Products and Classifications are enabled, Lets first disable All of them. We will enable just the ones we want later.
# Disable All Products and Classifications
Get-WsusClassification | Set-WsusClassification -Disable -Verbose
Get-WsusProduct | Set-WsusProduct -Disable -Verbose

Now that we have set our server to synchronize from Microsoft. We will Run the initial Synchronization For Category.
# Run the Initial Synchronization For Category
$WSUSSubScrip = $WSUS.GetSubscription()
$WSUSSubScrip.StartSynchronizationForCategoryOnly()
Write-Verbose "Sync Inprogress.." -Verbose
While($WSUSSubScrip.GetSynchronizationStatus() -ne 'NotProcessing')
   {
   $WsusProd = (Get-WsusProduct).count
   Write-Verbose "Synchronized $WsusProd Products" -Verbose
   Start-Sleep -Seconds 10
   }
Write-Verbose "Synchronization Completed !!" -Verbose
Initial Synchronization For Category takes some time, So ahead and grab a coffee..

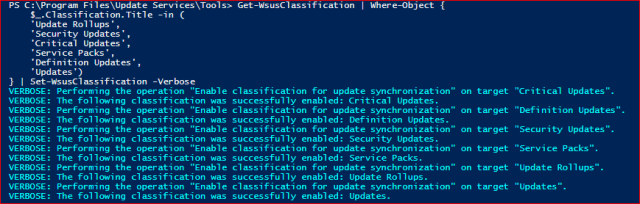
Synchronization For Category has successfully completed. Next lets us Configure the Classifications, I usually select Update Rollups, Security Updates, Critical Updates, Service Packs, Definition Updates and Updates.
You could run Get-WsusClassification to get the list of available Classifications.
Get-WsusClassification | Where-Object {
   $_.Classification.Title -in (
   'Update Rollups',
   'Security Updates',
   'Critical Updates',
   'Service Packs',
   'Definition Updates',
   'Updates')
} | Set-WsusClassification -Verbose
Next we will configure the Products, I only have Windows Server 2008 R2 & Windows Server 2012 R2 in my lab so will only enable them.
You might run Get-WsusProduct to get the list of available Products and add the products you want for you environment.
Get-WsusProduct | where-Object {
   $_.Product.Title -in (
   'Windows Server 2008 R2',
   'Windows Server 2012 R2')
} | Set-WsusProduct -Verbose

Finally lets kick-off a synchronization of the Classifications & Products.
$WSUSSubScrip.StartSynchronization()
While($WSUSSubScrip.GetSynchronizationStatus() -ne 'NotProcessing')
{
   Start-Sleep -Seconds 10
   $Total = $WSUSSubScrip.GetSynchronizationProgress() | Select-Object -ExpandProperty TotalItems
   $Processed = $WSUSSubScrip.GetSynchronizationProgress() | Select-Object -ExpandProperty ProcessedItems
   $Phases = $WSUSSubScrip.GetSynchronizationProgress() | Select-Object -ExpandProperty Phase
   Write-Verbose "Synchronized $Processed of $Total $Phases" -Verbose
   Start-Sleep -Seconds 10
}
Write-Verbose "Synchronization Completed !!" -Verbose

It may take a while to complete the synchronization depending on the speed of your Internet.
That is all for today’s blog about Install, Configure WSUS on Windows Server 2012 R2. In Part2 of this blog I will deal with Creating Computer Target Group and approve or decline updates.
!! Preenesh