
- Remove From My Forums
-
Вопрос
-
In my WinForm apps, the compiler generated code places the following lines for the Form-Generated code:
Code Snippet
#pragma region Windows Form Designer generated code
…
#pragma endregion
What do those do??
Ответы
-
Off-topic: please look-up in MSDN next time before rushing to ask a question. Things are more valuable when you find them by yourself.
Все ответы
-
_Zero,
Code Snippet
#pragma region Windows Form Designer generated code
#pragma region lets you specify a block of code that you can expand or collapse when using the outlining feature of the Visual Studio Code Editor.
#pragma endregion
Reference this link: http://msdn2.microsoft.com/en-us/library/d9x1s805.aspx
This explains the different types of token-strings… Pretty interesting stuff.
Obake(Ghost)
-
Off-topic: please look-up in MSDN next time before rushing to ask a question. Things are more valuable when you find them by yourself.
|
rar14 29 / 23 / 2 Регистрация: 14.04.2009 Сообщений: 448 |
||||
|
1 |
||||
|
01.08.2009, 17:22. Показов 3854. Ответов 5 Метки нет (Все метки)
Что делает этот оператор и что происходит внутри этого блока?
__________________
0 |

|
Maniac
1462 / 963 / 160 Регистрация: 02.01.2009 Сообщений: 2,817 Записей в блоге: 1 |
|
|
01.08.2009, 17:24 |
2 |
|
1 |
|
29 / 23 / 2 Регистрация: 14.04.2009 Сообщений: 448 |
|
|
01.08.2009, 17:57 [ТС] |
3 |
|
А то что после #region идет, это типа поясняющего текста, что ли?
0 |
|
Maniac
1462 / 963 / 160 Регистрация: 02.01.2009 Сообщений: 2,817 Записей в блоге: 1 |
|
|
01.08.2009, 18:04 |
4 |
|
А то что после #region идет, это типа поясняющего текста, что ли? типа да.
1 |

|
M128K145
8376 / 3598 / 419 Регистрация: 03.07.2009 Сообщений: 10,708 |
||||
|
01.08.2009, 18:21 |
5 |
|||
Это находится в файле дизайнера, а текст говорит о том, что код, находящийся в этом регионе автоматически генерируется средой(это не сложно проверить добавив компонент на форму и посмотреть как изменится код)
1 |
|
2095 / 1260 / 170 Регистрация: 01.02.2009 Сообщений: 2,842 |
|
|
03.08.2009, 09:48 |
6 |
|
#region Windows Form Designer generated code Можно использовать #region и в собственном коде, тем самым разграничивая отдельные методы и т.п.
0 |
|
36 |
Часть I. Microsoft Visual C++ 2010 |
Вычисленные значения процентной ставки и величины дохода выводятся в поле label3 путем присваивания значения свойству Text. Для преобразования дробного числа в строку (свойство Text строкового типа) используется функция (метод) ToString. Параметр метода ToString задает формат строкирезультата: «с» — финансовый (от англ. currency); «n» — числовой (от англ. number). Следует обратить внимание, при использовании финансового формата после числового значения выводится обозначение денежной единицы (в соответствии с настройкой операционной системы). В табл. 2.11 приведены возможные форматы представления числовой информации.
Таблица 2.11. Форматы представления чисел
|
Параметр |
||
|
функции |
Формат |
Пример |
|
ToString |
||
|
c, C |
Currency — финансовый (денежный). Используется для |
55 055,28 р. |
|
представления денежных величин. Обозначение денежной |
||
|
единицы, разделитель групп разрядов, способ отображения |
||
|
отрицательных чисел определяют соответствующие на- |
||
|
стройки операционной системы |
||
|
e, E |
Scientific (exponential) — научный. Используется для |
5,50528+E004 |
|
представления очень маленьких или очень больших чисел. |
||
|
Разделитель целой и дробной частей числа задается в на- |
||
|
стройках операционной системы |
||
|
f, F |
Fixed — число с фиксированной точкой. Используется для |
55 055,28 |
|
представления дробных чисел. Количество цифр дробной |
||
|
части, способ отображения отрицательных чисел опреде- |
||
|
ляют соответствующие настройки операционной системы |
||
|
n, N |
Number — числовой. Используется для представления |
55 055,28 |
|
дробных чисел. Количество цифр дробной части, символ- |
||
|
разделитель групп разрядов, способ отображения отрица- |
||
|
тельных чисел определяют соответствующие настройки |
||
|
операционной системы |
||
|
g, G |
General — универсальный формат. Похож на Number, но |
55 055,275 |
|
разряды не разделены на группы |
||
|
r, R |
Roundtrip — без округления. В отличие от формата N, этот |
55 055,2775 |
|
формат не выполняет округления (количество цифр дроб- |
||
|
ной части зависит от значения числа) |
||
Структура проекта
Проект представляет собой совокупность файлов, которые компилятор использует для создания выполняемого файла. Структура проекта отображается в окне Solution Explorer (рис. 2.22).

|
Глава 2. Первый проект |
37 |
|
Рис. 2.22. Структура проекта отображается в окне Solution Explorer
Основными элементами проекта являются:
главный модуль приложения (cpp-файл);
модуль формы (h-файл).
Главный модуль
В главном модуле находится функция main, с которой начинается выполнение программы. Функция main обеспечивает запуск приложения — создает главную (стартовую) форму. Главный модуль программы «Доход» приведен в листинге 2.2.
Листинг 2.2. Главный модуль программы «Доход» (profit.cpp)
// profit.cpp : main project file.
#include «stdafx.h» #include «Form1.h»
using namespace profit;
[STAThreadAttribute]
int main(array<System::String ^> ^args)

|
38 |
Часть I. Microsoft Visual C++ 2010 |
{
//Enabling Windows XP visual effects before any controls are created
Application::EnableVisualStyles(); Application::SetCompatibleTextRenderingDefault(false);
//Create the main window and run it
Application::Run(gcnew Form1()); return 0;
}
Модуль формы
Модуль формы (листинг 2.3) содержит объявление класса формы. Здесь находятся конструктор и деструктор формы, созданные программистом функции обработки событий. Большую часть модуля формы формирует среда разработки. Следует обратить внимание на секцию Windows Form Designer generated code (секция — фрагмент кода, находящийся между директивами
#pragma region и #pragma endregion). В ней находится функция
InitializeComponent, обеспечивающая непосредственно создание и инициализацию формы и компонентов.
Листинг 2.3. Модуль формы программы «Доход» (Form1.h)
#pragma once
namespace profit {
using namespace System;
using namespace System::ComponentModel; using namespace System::Collections; using namespace System::Windows::Forms; using namespace System::Data;
using namespace System::Drawing;
///<summary>
///Summary for Form1
///</summary>
public ref class Form1 : public System::Windows::Forms::Form
{
public: Form1(void)
{
InitializeComponent();
|
Глава 2. Первый проект |
39 |
//
//TODO: Add the constructor code here
//
button1->Enabled = false;
}
protected:
///<summary>
///Clean up any resources being used.
///</summary>
~Form1()
{
if (components)
{
delete components;
}
}
private: System::Windows::Forms::TextBox^ textBox1; protected:
private: System::Windows::Forms::TextBox^ textBox2; private: System::Windows::Forms::Label^ label1; private: System::Windows::Forms::Label^ label2; private: System::Windows::Forms::Button^ button1; private: System::Windows::Forms::Label^ label3;
private:
///<summary>
///Required designer variable.
///</summary> System::ComponentModel::Container ^components;
#pragma region Windows Form Designer generated code
///<summary>
///Required method for Designer support — do not modify
///the contents of this method with the code editor.
///</summary>
void InitializeComponent(void)
{
System::ComponentModel::ComponentResourceManager^ resources = (gcnew System::ComponentModel::ComponentResourceManager(Form1::typeid));
this->textBox1 = (gcnew System::Windows::Forms::TextBox()); this->textBox2 = (gcnew System::Windows::Forms::TextBox()); this->label1 = (gcnew System::Windows::Forms::Label());
|
40 |
Часть I. Microsoft Visual C++ 2010 |
this->label2 = (gcnew System::Windows::Forms::Label()); this->button1 = (gcnew System::Windows::Forms::Button()); this->label3 = (gcnew System::Windows::Forms::Label()); this->SuspendLayout();
//
//textBox1
this->textBox1->Location = System::Drawing::Point(107, 16); this->textBox1->Name = L»textBox1″;
this->textBox1->Size = System::Drawing::Size(100, 23); this->textBox1->TabIndex = 0;
this->textBox1->TextChanged +=
gcnew System::EventHandler(this, &Form1::textBox1_TextChanged); this->textBox1->KeyPress +=
gcnew System::Windows::Forms::KeyPressEventHandler(this, &Form1::textBox1_KeyPress);
//textBox2
//
this->textBox2->Location = System::Drawing::Point(107, 45); this->textBox2->Name = L»textBox2″;
this->textBox2->Size = System::Drawing::Size(57, 23); this->textBox2->TabIndex = 1; this->textBox2->TextChanged +=
gcnew System::EventHandler(this, &Form1::textBox1_TextChanged); this->textBox2->KeyPress +=
gcnew System::Windows::Forms::KeyPressEventHandler(this, &Form1::textBox2_KeyPress);
//
//label1
this->label1->Location = System::Drawing::Point(13, 19); this->label1->Name = L»label1″;
this->label1->Size = System::Drawing::Size(88, 20); this->label1->TabIndex = 2;
this->label1->Text = L»Сумма (руб.):»; this->label1->TextAlign =
System::Drawing::ContentAlignment::MiddleRight;
//label2
//
this->label2->Location = System::Drawing::Point(13, 45); this->label2->Name = L»label2″;
|
Глава 2. Первый проект |
41 |
this->label2->Size = System::Drawing::Size(88, 20); this->label2->TabIndex = 3;
this->label2->Text = L»Срок (мес.):»; this->label2->TextAlign =
System::Drawing::ContentAlignment::MiddleRight;
//
//button1
this->button1->Location = System::Drawing::Point(26, 84); this->button1->Name = L»button1″;
this->button1->Size = System::Drawing::Size(75, 23); this->button1->TabIndex = 4;
this->button1->Text = L»Расчет»; this->button1->UseVisualStyleBackColor = true;
this->button1->Click +=
gcnew System::EventHandler(this, &Form1::button1_Click);
//label3
//
this->label3->Location = System::Drawing::Point(23, 122); this->label3->Name = L»label3″;
this->label3->Size = System::Drawing::Size(299, 58); this->label3->TabIndex = 5;
//
// Form1
//
this->AutoScaleDimensions = System::Drawing::SizeF(7, 16); this->AutoScaleMode = System::Windows::Forms::AutoScaleMode::Font; this->ClientSize = System::Drawing::Size(359, 198); this->Controls->Add(this->label3); this->Controls->Add(this->button1); this->Controls->Add(this->label2); this->Controls->Add(this->label1); this->Controls->Add(this->textBox2); this->Controls->Add(this->textBox1);
this->Font = (gcnew System::Drawing::Font(L»Tahoma», 9.75F, System::Drawing::FontStyle::Regular, System::Drawing::GraphicsUnit::Point, static_cast<System::Byte>(204)));
this->FormBorderStyle = System::Windows::Forms::FormBorderStyle::FixedSingle;
this->Margin = System::Windows::Forms::Padding(3, 4, 3, 4); this->MaximizeBox = false;
this->Name = L»Form1″;
|
42 |
Часть I. Microsoft Visual C++ 2010 |
this->StartPosition = System::Windows::Forms::FormStartPosition::CenterScreen;
this->Text = L»Доход»; this->ResumeLayout(false); this->PerformLayout();
}
#pragma endregion
// щелчок на кнопке Расчет
private: System::Void button1_Click(System::Object^ sender, System::EventArgs^ e)
{
|
double |
sum; |
// |
сумма |
|
int |
period; |
// |
срок |
double percent; // процентная ставка double profit; // доход
sum = System::Convert::ToDouble(textBox1->Text); period = System::Convert::ToInt32(textBox2->Text);
if (sum < 10000) percent = 8.5;
else
percent = 12;
profit = sum * (percent/100/12) * period;
label3->Text =
«Процентная ставка: » + percent.ToString(«n») + «%n» +
«Доход: » + profit.ToString(«c»);
}
// нажатие клавиши в поле Сумма
private: System::Void textBox1_KeyPress(System::Object^ sender, System::Windows::Forms::KeyPressEventArgs^ e)
{
if ((e->KeyChar >= ‘0’) && (e->KeyChar <= ‘9’))
// цифра return;
//«Правильный» десятичный разделитель — запятая.
//Заменим точку на запятую
if (e->KeyChar == ‘.’) e->KeyChar = ‘,’;
|
Глава 2. Первый проект |
43 |
if (e->KeyChar == ‘,’)
{
//Нажата запятая.
//Проверим, может быть, запятая уже есть в поле редактирования if ((textBox1->Text->IndexOf(‘,’) != -1) ||
(textBox1->Text->Length == 0))
{
//Запятая уже есть.
//Запретить ввод еще одной e->Handled = true;
}
return;
}
if (Char::IsControl(e->KeyChar))
{
if (e->KeyChar == (char)Keys::Enter)
{
//Нажата клавиша <Enter>.
//Переместить курсор в поле Срок textBox2->Focus();
}
return;
}
// остальные символы запрещены e->Handled = true;
}
// Нажатие клавиши в поле Срок
private: System::Void textBox2_KeyPress(System::Object^ sender, System::Windows::Forms::KeyPressEventArgs^ e)
{
// в поле Срок можно ввести только целое число if ((e->KeyChar >= ‘0’) && (e->KeyChar <= ‘9’))
// цифра return;
if (Char::IsControl(e->KeyChar))
{
if (e->KeyChar == (char)Keys::Enter)
{
// Нажата клавиша <Enter>.
I am creating an application where the front end has to be a Windows Form using C++/CLI. The form is used for login purpose.
In my form, I have a register button. On click of this button, a new form should open ( closing the login form ). I was able to achieve this by the following code:
Form^ rgForm = gcnew RegisterForm;
rgForm->Show();
this->Hide(); // using this->Close() was closing the application
Now I want to have a cancel button on the register form, whose click should open the login form again and close the register form. How do I achieve that?
( I am confused with the use of this->Hide(), does it mean that the form exists, we just did not show it, and so even after the register form visibility, the login form still exists? )
Update : Now current form handle is passed into register form constructor ( storing it as a private variable with the name loginForm in RegisterForm class ).
Following is the code for cancel button click:
// RegisterForm class constructor

RegisterForm(System::Windows::Forms::Form^ f)
{
    loginForm = f;
}

// Cancel button click

private: System::Void BtnCancel_Click(System::Object^  sender, System::EventArgs^  e)
{
     loginForm->Show();
     this->Hide();
}
On cancel button click I am getting the exception : «object not set to instance».
Can someone please help me.
Thanks.
- Sample solution demonstrating different IDisposable-behavior of components with different constructors — 15.6 Kb
Introduction
A couple of days ago, I’ve got an email from a fellow developer with a rather interesting question concerning the Visual Studio .NET Windows Forms designer. The guy asked about the meaning of the components member generated by the designer and why it is not used in most of the Forms he designed.
The components member is generated as part of the «Windows Forms Designer generated code» region, which is part of every Form created and managed by means of the Visual Studio .NET Windows Forms designer:
#Region " Windows Form Designer generated code "
 ..

  Protected Overloads Overrides Sub Dispose(ByVal disposing As Boolean)

    If disposing Then
      If Not (components Is Nothing) Then
        components.Dispose()
      End If
    End If
    MyBase.Dispose(disposing)
  End Sub


  Private components As System.ComponentModel.IContainer
...
#End Region
The code and the comments indicate that the components member is used by the Form to hold the list of components in order to be able to dispose the components as part of the Form.Dispose call.
I’ve checked the designer-generated code in all my .NET Windows Forms projects and I’ve realized that the components member is actually used only when a component having a specific constructor is placed onto a Form.
You might recall that a component is a class that implements the System.ComponentModel.IComponent interface (either directly or by deriving from a class that already implements the interface, such as System.ComponentModel.Component). If the component exposes a constructor with the specific signature Public Sub New(ByVal c As IContainer), then the components Form member is instantiated and passed to the component’s constructor:
#Region " Windows Form Designer generated code "
 ..
<System.Diagnostics.DebuggerStepThrough()> _
Private Sub InitializeComponent()
  Me.components = New System.ComponentModel.Container
  ...
  Me.ImageList1 = _
    New System.Windows.Forms.ImageList(Me.components)
...
#End Region
Within the New(ByVal c As IContainer) constructor, the component adds itself to the container by calling the IContainer.Add method. Within the Form.Dispose method, the components.Dispose method is called ensuring that all the resources held by the Form‘s components are correctly released.
At this point, it started to make sense, although I still wondered how are components without the New(IContainer) constructor disposed off? I’ve found several such components in the System.Windows.Forms namespace having only the default (parameterless) constructor, for example:
System.Windows.Forms.ColumnHeader
System.Windows.Forms.DataGridTableStyle
System.Windows.Forms.ColorDialog
System.Windows.Forms.FontDialog
System.Windows.Forms.OpenFileDialog
System.Windows.Forms.SaveFileDialog
...
Regarding their «dispose» behavior, the classes can be roughly divided into two groups:
The classes in the first group are always contained within a parent component (or control), so they are disposed along with their container. For instance, System.Windows.Forms.ColumnHeader instances are contained within the System.Windows.Forms.ListView.Columns collection. The System.Windows.Forms.DataGridTableStyle instances are contained within the System.Windows.Forms.DataGrid.TableStyles collection.
The classes in the second group (represented by the System.Windows.Forms.*Dialog classes above) are NOT disposed as part of their owning Form disposal. I can only guess that the classes either don’t hold onto any unmanaged resources during their lifetime, or there are some other mechanisms for releasing their resources (Windows messages come to mind, for example).
In order to verify the above-mentioned disposable behavior, I’ve created a Windows Application project implementing two components (you can download the solution here). The SimpleComponent class was created WITHOUT the New(IContainer) constructor. The ContainedComponent class was created WITH the New(IContainer) constructor:
Public Class SimpleComponent
  Inherits System.ComponentModel.Component

  Public Sub New()
    MyBase.New()
  End Sub

  Protected Overloads Overrides Sub Dispose(ByVal disposing As Boolean)
    Debug.WriteLine(String.Format("{0}({1})", _
                 Me.GetType().FullName, disposing))
    MyBase.Dispose(disposing)
  End Sub

End Class


Public Class ContainedComponent
  Inherits System.ComponentModel.Component

  Public Sub New()
    MyBase.New()
  End Sub

  Public Sub New(ByVal Container As System.ComponentModel.IContainer)
    Me.New()
    Container.Add(Me)
  End Sub

  Protected Overloads Overrides Sub Dispose( _
    ByVal disposing As Boolean)

    Debug.WriteLine(String.Format("{0}({1})", _
                Me.GetType().FullName, disposing))
    MyBase.Dispose(disposing)
  End Sub

End Class
After recompiling the solution, I was able to add the two components to the Visual Studio .NET toolbox and I’ve dropped both of the components onto a DialogForm form class. Here is the instantiation code that the Windows Forms designer generated for the two components:
#Region " Windows Form Designer generated code "
 ..
  Me.components = New System.ComponentModel.Container
  Me.SimpleComponent1 = New DisposableComponents.SimpleComponent
  Me.ContainedComponent2 = _
    New DisposableComponents.ContainedComponent(Me.components)
...
#End Region
Because the ContainedComponent class exposes the New(IContainer) constructor, the designer generated code to call this constructor instead of the default one. In the constructor, the ContainedComponent instance adds itself to the Form.components container, so it is automatically disposed when the Form‘s Dispose(Boolean) method is called.
In contrast, the SimpleComponent instance does not really know when the owning Form is disposed, so it remains alive until it becomes garbage-collected eventually.
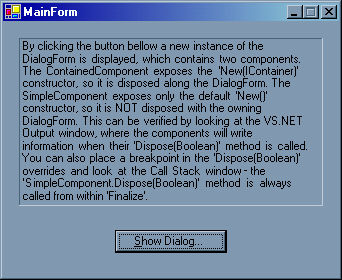
In the application’s main form, the following code is used to display the DialogForm containing the two components:
Private Sub ShowDialogButton_Click(...)
  Dim Dialog As DialogForm
  Try
    Dialog = New DialogForm
    Dialog.ShowDialog(Me)
  Catch ex As Exception
    Trace.WriteLine(ex.ToString())
    MsgBox(ex.Message, MsgBoxStyle.Exclamation)
  Finally
    If Not Dialog Is Nothing Then
      Dialog.Dispose()
    End If
  End Try
End Sub
When you run the application and click the ShowDialogButton button, the DialogForm instance is displayed. If you dismiss the dialog, the DialogForm.Dispose method is called and you’ll see in the Output window that the ContainedComponent.Dispose method has been called as well.
In contrast, the SimpleComponent instance is NOT disposed until after the application is ended or until garbage collection takes place. (It might happen if you create and destroy several instances of the DialogForm so enough memory is allocated that a threshold for the garbage collection is reached. Just press and hold the ENTER key and you’ll reach the threshold quickly.)
After looking at how the Windows Forms designer handles components, I think it might be useful to have a quick look at how Controls are handled with regards to IDisposable.
Every Windows Forms control derives from the System.Windows.Forms.Control base class, which exposes the Controls property:
Public ReadOnly Property Controls() As ControlCollection
The implementation of the Control.Dispose(Boolean) is overridden in such a way that it iterates through the Controls collection calling the Dispose method for each member of the collection. The Windows Forms Designer «knows» this and the code it generates for Control-derived classes always adds controls to the Control.Controls collection that the Form class inherits from the Control class:
#Region " Windows Form Designer generated code "
 ..
<System.Diagnostics.DebuggerStepThrough()> Private Sub InitializeComponent()
  Me.TextBox1 = New System.Windows.Forms.TextBox
  ...
  Me.Controls.Add(Me.TextBox1)
End Sub
...
#End Region
This way, when the Form is being disposed, the contained controls are disposed automatically as well.
I don’t really know why the Component containment support is not built into the Form class just like the Control containment represented by the Form.Controls collection. It would have been more consistent and also it would make the generated code smaller and more elegant. For example, it wouldn’t have been necessary to neither generate the components member declaration, nor the Dispose(Boolean) method override. If someone is able to explain the reasoning behind this inconsistency, please let me know — I’m really curious about that.
This leads me to an important recommendation:
If you’ve been designing a component that allocates UNMANAGED resources, please double check that you:
- Implement the specific
Public New(IContainer)constructor and add your component instance to the container by calling theIContainer.Add(Me)method in the constructor. (If you create your component using the Visual Studio .NET ‘Component Class’ template, it generates the specific constructor for you properly.) - Implement the
IDisposabledesign pattern properly meaning that you do release the unmanaged resources and also that you do that exactly once.
Please, take a look here if you’d like to see an alternate IDisposable design pattern — more robust and elegant than its .NET counterpart, IMHO.
History
February 1, 2004
Published.
I live in Slovakia with my wife, two sons and two daughters. I’ve been doing Microsoft Windows development since 1988; primarily in VB. I’m a big fan of the MS .NET framework, publisher of the www.vbinfozine.com ezine and the author of components found at www.lamarvin.com.