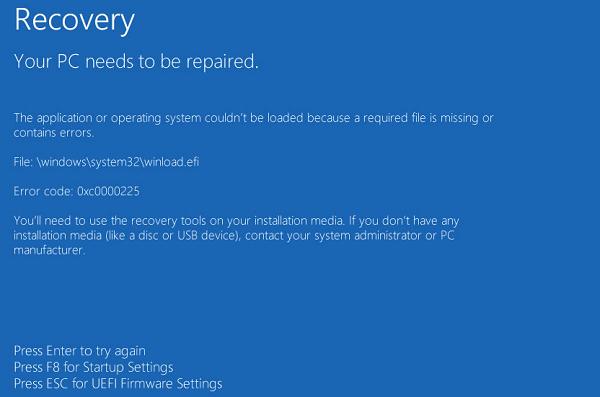
Рассмотрим еще одну распространенную ошибку загрузки Windows 10, вызванную повреждением или отсутствием файла winload.efi. Проблема проявляется следующим образом: Windows 10 перестает загружаться с ошибкой BSOD и следующим сообщением на экране загрузки:
Recovery
Your PC needs to be repaired
The application or operating system couldn’t be loaded because a required file is missing or contains errors.
File: Windowssystem32winload.efi
Error code: 0xc000000f
You’ll need to use the recovery tools on your installation media. If you don’t have any installation media (like a disc or USB device), contact your system administrator or PC manufacturer.
Press Enter to try again
Press F8 for Startup Settings
Press ESC for UEFI Firmware Settings
Примечание. Код ошибки может быть и таким: Error code: 0xc0000225 или 0xc0000001.
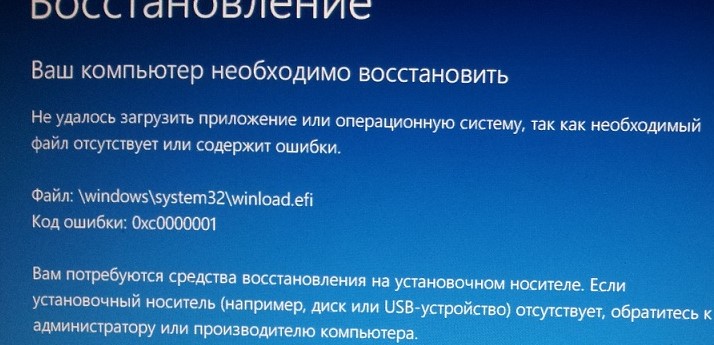
В русской версии Windows ошибка выглядит так:
Ваш компьютер необходимо восстановить
Не удалось загрузить приложение или операционную системы, так как необходимый файл отсутствует или содержит ошибки
Файл Windowssystem32winload.efi
Код ошибки 0xc0000225
Вам потребуется средства восстановления на установочном носителе. Если установочный носитель (например, диск или USB-устройство) отсутствует, обратиться к администратору или производителю компьютера.
Данная проблема связана с отсутствием или повреждением файла загрузчика windowssystem32winload.efi. Эта проблема появляется чаще всего после некорректного обновления системы, при повреждении диска или файловой системы, при переразбивке диска сторонними утилитами, обновлении антивируса, после переноса (клонирования) установленного образа Windows на новый диск, замене материнской платы компьютера и прочими вмешательствами.
Файл Winload.efi – это исполняемый файл среды EFI, который инициализирует окружение и запускает загрузку Windows.Если этот файл поврежден, отсутствует или в конфигурации загрузки BCD указан путь к несуществующему тому с файлом winload.efi, Windows не сможет загрузиться.
Решение проблемы зависит от того, использовался ли у вас режим загрузки UEFI или Legacy до возникновения проблемы. Далее рассмотрим основные шаги, которые помогут исправить данную ошибку и корректно загрузить Windows 10/Windows Server 2016.
Содержание:
- Включите режим совместимости CSM и отключите Secure Boot
- Автоматическое восстановление загрузчика Windows
- Отключите функцию защиты ELAM
- Выполните проверку дисков на ошибки и целостность системных файлов
- Восстановление BCD загрузчика и файла winload.efi для UEFI системы
- Пересоздание загрузочных записей в хранилище BCD с помощью bootrec и bcdedit
Включите режим совместимости CSM и отключите Secure Boot
Большинство компьютеров с поддержкой UEFI могут загружаться как с дисков с таблицей разделов GPT, так и с MBR дисков старого формата в режиме совместимости (Legacy).
Перезагрузите компьютер и войдите в меню настройки UEFI. Клавиша входа в меню UEFI зависит от производителя компьютера, как правило, это клавиши F2, F8, Del или Esc. Либо на нажмите кнопку ESC прямо на экране с ошибкой.

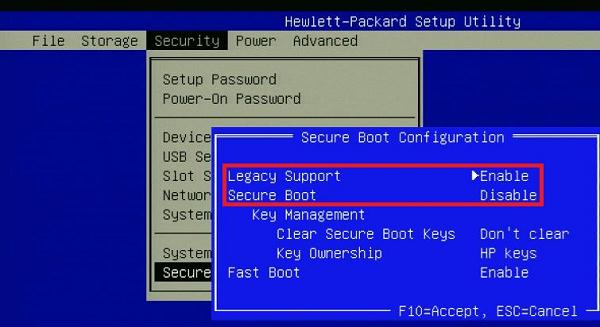
- Попробуйте в настройках UEFI включить режим совместимости CSM Boot (в некоторых версиях прошивок UEFI он может называться Legacy Boot);
- В настройках UEFI найдите и отключите режим Secure Boot. Местоположение данной настройки зависит от производителя прошивки UEFI. Как правило, ее стоит поискать в разделах Security, Authentication или Boot. На ноутбуке HP, например, пункт Secure Boot находится в разделе Security. Измените режим Secure Boot на Disabled или Off;

Совет. Ранее мы уже рассказывали, что такое UEFI и для чего нужен режим Secure Boot. Велика вероятность, что проблема с недоступностью файла winload.efi при загрузке системы исчезнет после отключения режима Secure Boot в настройках UEFI.
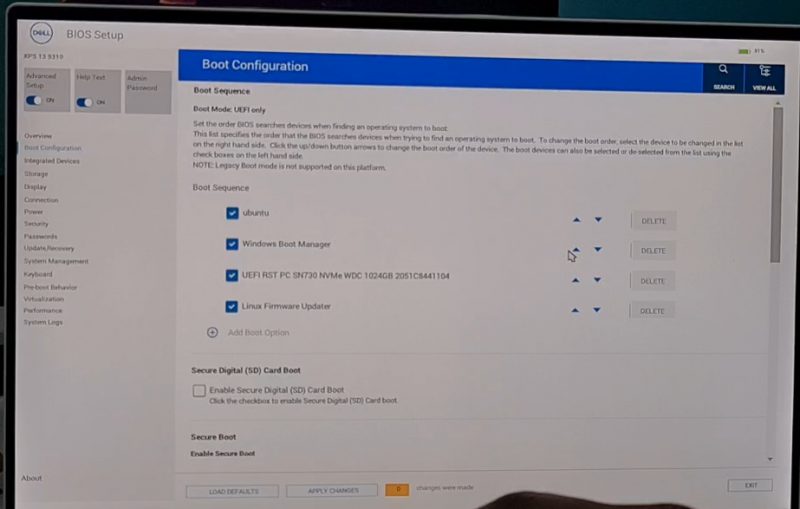
- Проверьте приоритет загрузки дисков. Убедитесь, что в качестве первичного устройства загрузки в настройках UEFI выбран ваш жесткий диск с Windows;
- Не забудьте сохранить изменения и перезагрузите устройство;
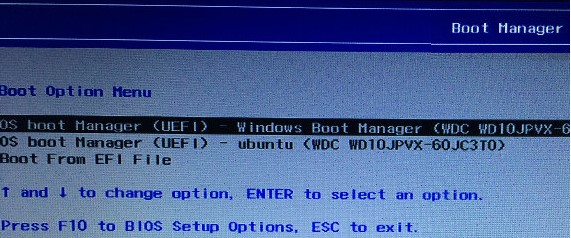
- Если при загрузке компьютера доступно UEFI Boot меню, попробуйте вручную выбрать запись OS Boot Manager (UEFI) – Windows Boot Manager.

Автоматическое восстановление загрузчика Windows
Попробуйте исправить ошибку с помощью средства автоматического восстановления системы. Для этого:
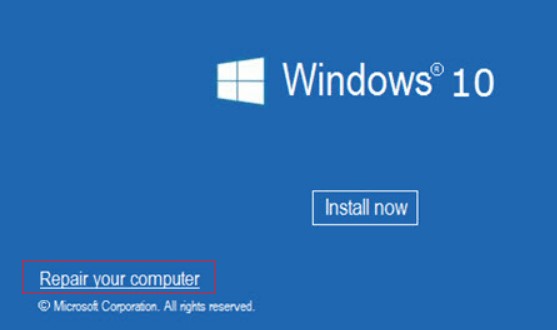
- Загрузитесь с установочного DVD диска (или загрузочной UEFI флешки) с Windows 10;
- Нажмите кнопку Repair your computer (Восстановить ваш компьютер) или клавишу R;

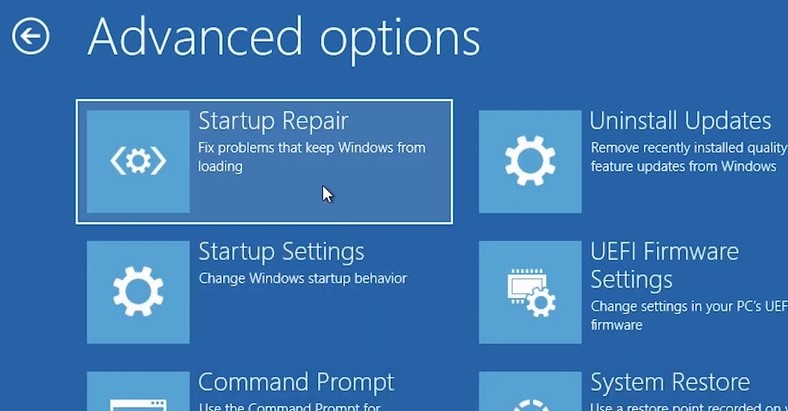
- Перейдите в раздел Troubleshoot-> Advanced options -> Startup repair (Диагностика -> Дополнительные параметры -> Восстановление системы);

- Запустится мастер восстановления. Далее следуйте его инструкциям.
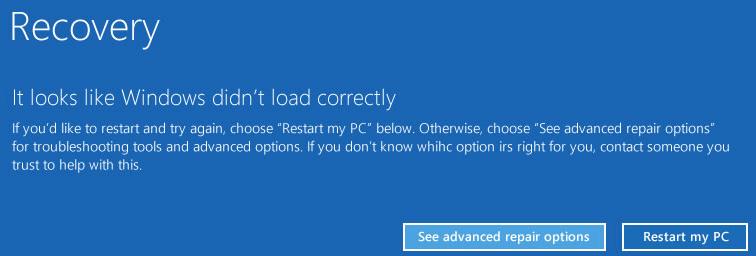
Если установочного диска с Windows под рукой нет, следует три раза перезагрузить компьютер нажатием на кнопку питания (Power) до тех пор, пока не появится экран консоли восстановления WinRe. Выберите пункт See advanced repair options (Дополнительные варианты восстановления). Далее все аналогично.
Отключите функцию защиты ELAM
Если предыдущие методы не исправили ошибку с загрузкой winload.efi, попробуйте отключить технологию ранней защиты от вредоносного ПО — ELAM (Early-launch Anti-Malware), которая по умолчанию активна для загрузчика Windows.
Примечание. Технология ELAM – позволяет сертифицированным антивирусам загружаться до запуска всего стороннего ПО. Антивирус в этом случае может выполнять раннюю антивирусную проверку и контролировать запуск драйверов и загружаемого ПО.
Для этого:
- Выполните шаги 1-2 из 2 способа;
- Перейдите в раздел Troubleshoot-> Advanced options -> Startup settings (Диагностика -> Дополнительные параметры -> Восстановление при загрузке);
- Перезагрузите компьютер, нажав кнопку Restart;
- После следующей загрузки, система автоматически откроет меню настройки параметров загрузки — Startup Setting / Параметры загрузки (кстати, именно отсюда можно Windows 10 в безопасном режиме);
- Нажмите F8 чтобы выбрать пункт
 Disable early launch anti-malware protection / Отключить автоматическую перезагрузки при сбое системы.
 Disable early launch anti-malware protection / Отключить автоматическую перезагрузки при сбое системы.
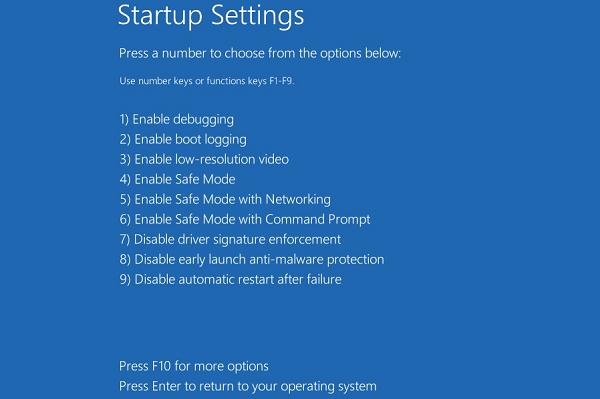
Выполните проверку дисков на ошибки и целостность системных файлов
Проверьте свои диски на наличие ошибок, возможно имеются ошибки диска или файловой системы на разделе с файлом winload.efi. Чтобы проверить все диски на наличие ошибок и исправить их, выполните команду:
chkdsk /f /r
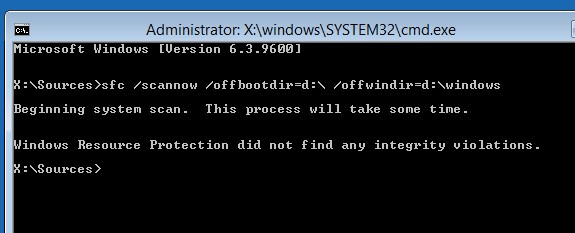
После этого желательно проверить целостность системных файлов с помощью утилиты sfc. Для использования утилиты sfc в офлайн режиме, нужно указать путь к системному диску и папке Windows. Вы можете определить букву диска, назначенную разделу Windows с помощью команды:
Bcdedit /enum | find "osdevice"
Предположим, в вашем случае это диск D:. Команда проверки системных файлов будет выглядеть так:
sfc /scannow /offboot=d: /offwindir=d:windows
Также нужно выполнить офлайн проверку хранилища компонентов Windows с помощью DISM. Нужно сравнить ваш образ с оригинальным установочным wim файлом вашего билда Windows 10 (предположим, оригинальный wim образ лежите на диске E:):
Dism /image:D: /Cleanup-Image /RestoreHealth /Source:E:sourcesinstall.wim
Совет. Чтобы разобраться с буквами дисков в среде WinPe, выполните команды
Diskpart
List vol
По меткам и размерам диска можно определить букву раздела на диске, на котором у вас хранится установленная Windows.
Восстановление BCD загрузчика и файла winload.efi для UEFI системы
Если ваша Windows 10 была установлена в нативном UEFI режиме на GPT диске, мы рекомендуем вам воспользуетесь инструкцией по пересозданию EFI загрузчика Windows 10 на устройствах с UEFI . Рекомендую воспользоваться статьей по ссылке, там все описано довольно подробно. Здесь оставлю короткий гайд:
Загрузитесь с загрузочного диска и запустите командную строку:
- Выполните команду:
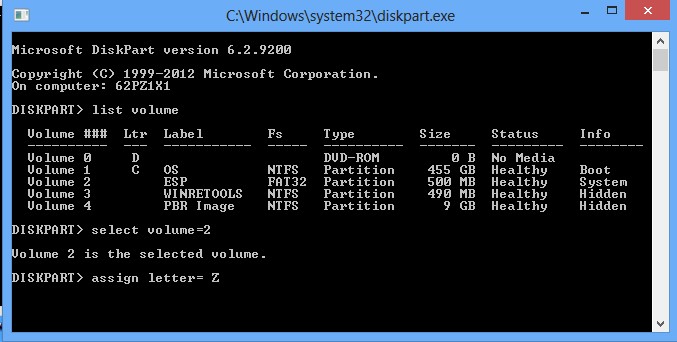
diskpart - Выведите список разделов на дисках:
list volume - айдите раздел с меткой ESP или EFI размером 500 мб (размер и название раздела может отличаться в зависимости от версии Windows, но главное – его файловая система всегда должна быть FAT32). Запомните его номер. Если EFI раздел был случайно удален, его можно восстановить так;

- Выберите этот раздел:
select volume 2 - Назначьте разделу букву диска:
assign letter=Z - Выйдите из diskpart:
exit - Теперь нужно пересоздать загрузчик, скопировать загрузочные файлы из каталога Windows:
bcdboot c:Windows /s Z: /f ALL
(замените c: на букву диска, на котором у вас находится ОС); Если вы все сделали правильно, появится надпись
Boot files successfully created
; - Перезагрузите компьютер и проверьте, исправлена ли проблема.
Пересоздание загрузочных записей в хранилище BCD с помощью bootrec и bcdedit
Если у вас система установлена не в режиме UEFI, тогда вы можете восстановить пересоздать загрузочные записи и сам MBR загрузчик Windows с помощью утилиты bootrec.
- Выполните шаги 1-2 из 2 способа;
- Перейдите в раздел Troubleshoot > Command Prompt (Диагностика – Командная строка).
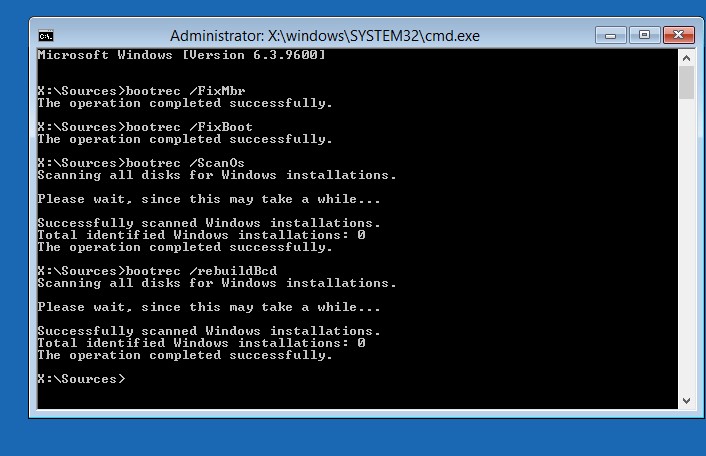
- В открывшемся окне командной строки выполните последовательно команды:
bootrec /FixMbr
(запись основной загрузочной записи в системный раздел)
bootrec /FixBoot
(перезапись нового загрузочного сектора в системном разделе)
bootrec /ScanOs
(сканирование дисков на предмет наличия установленных ОС)
bootrec /RebuildBcd
(пересоздание конфигурации загрузчика) - Закройте командную строку командой:
exit - Перезагрузите компьютер.

Если предбудущий способ не помог, нужно пересоздать файл конфигурации загрузки для MBR в командной строке консоли восстановления или загрузочного диска:
bcdedit /set {bootmgr} device boot
bcdedit /set {default} device boot
bcdedit /set {default} osdevice boot
bcdedit /set {default} device partition=c:
bcdedit /set {default} osdevice partition=c:
bcdedit /set {default} path windowssystem32winload.efi
Перезагрузите компьютер и проверьте, исправлена ли проблема.
Changing the boot order, booting from USB or fixing possible boot issues. There could be a number of reasons why you would want to access the UEFI settings.
In this tutorial, I’ll show you three ways to access the UEFI settings in Windows 10:
- Using the designated key at boot time
- Using the UEFI settings from within Windows 10 (requires reboot as well)
Before you see the steps, please verify if your system is using UEFI or BIOS.
Method 1: Use F2/F10 or F12 keys at boot time to access UEFi settings
This is the classic method of accessing UEFI or the BIOS system.
Turn on your system. At the screen that shows the logo of your system manufacturer, press the F2 or F10 or F12 key. You may try pressing all of them one by one if you are not sure. But be quick when you do that otherwise it will boot into the operating system.
This key is different for different brand of computers. Some may even use Esc or Del keys for this purpose.
If it works, you should see the familiar BIOS screen. UEFI is underlying mechanism and it adds a few options in the boot settings. But the boot settings interface looks the same as the legacy BIOS system in many computers.

I have seen some newer computers have a totally different boot settings interface. This could differ from system to system.
This should work on your system but if it keeps on booting to Windows, no need to be disappointed. You may access the UEFI settings from within Windows as well. The next method shows the steps.
Method 2: Access UEFI firmware settings from within Windows 10
Windows 10 provides a way to access the UEFI settings from within Windows itself. Please bear in mind that while you may opt to access UEFI this way, your system will be restarted and boots into the BIOS/UEFI.
Follow the steps below for accessing UEFI settings in Windows 10.
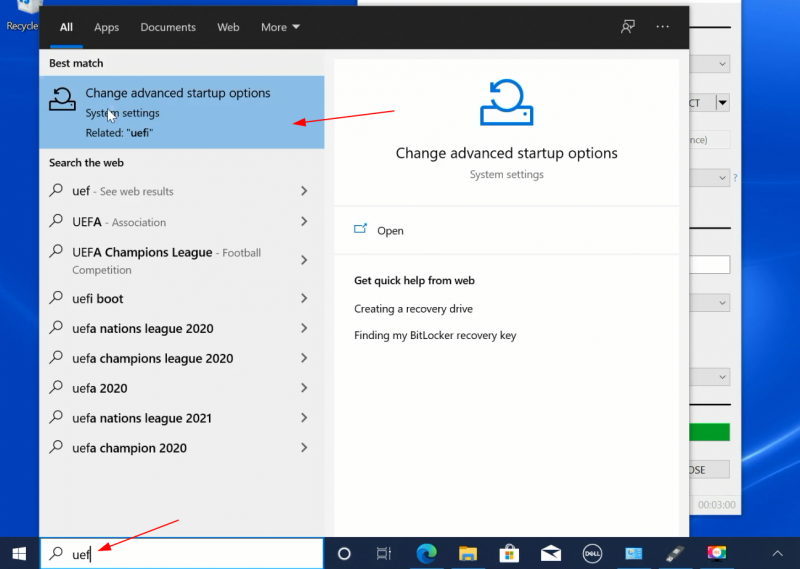
Step 1: Login to Windows and click on Menu. Search for UEFI and go to Change advanced startup options:
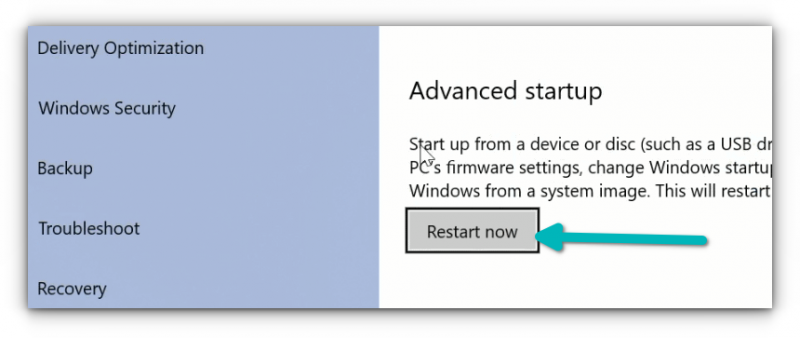
Step 2: In here, click on the Restart now button under Advanced startup option.
What you did just above can be achieved with an alternative way. You may click on the Windows menu, hit the power icon to display Shutdown, Restart and Sleep option. Press and hold the shift key and click restart at the same time. This will have the same effect as going to the ‘advanced startup option’ and clicking the ‘restart now’ button.
It will not restart your system immediately. Instead, you should see a blue screen with ‘Please wait’ displayed.

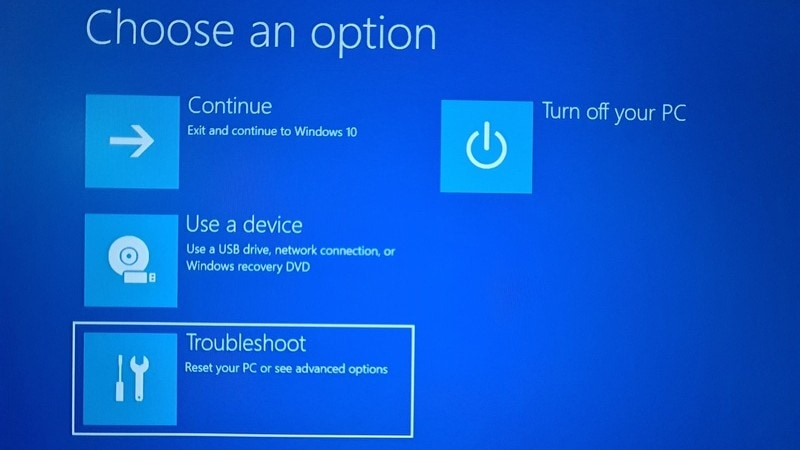
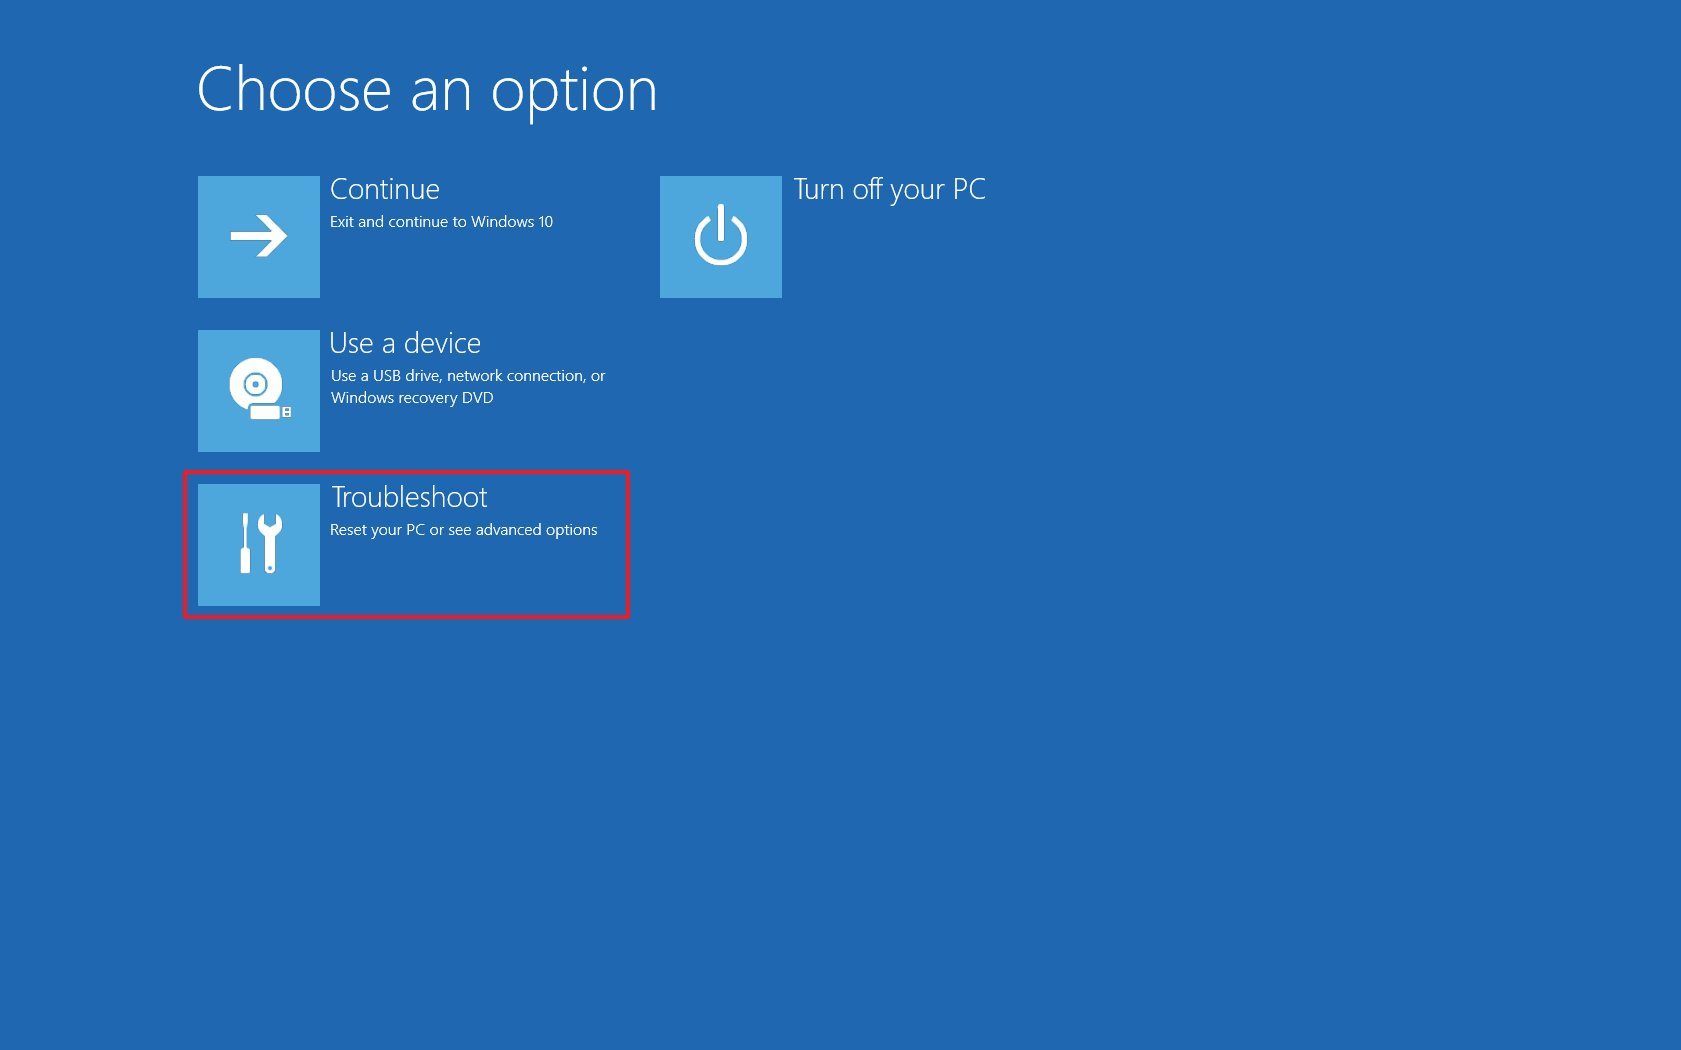
After a few seconds, you should see a blue screen with a few options to choose from. At this screen, you can choose to:
- Exit and continue using Windows 10 without restarting your system
- Turn off your system
- Boot into a USB device
- Access the Troubleshoot option for more advanced settings
You have to click on Troubleshoot option.
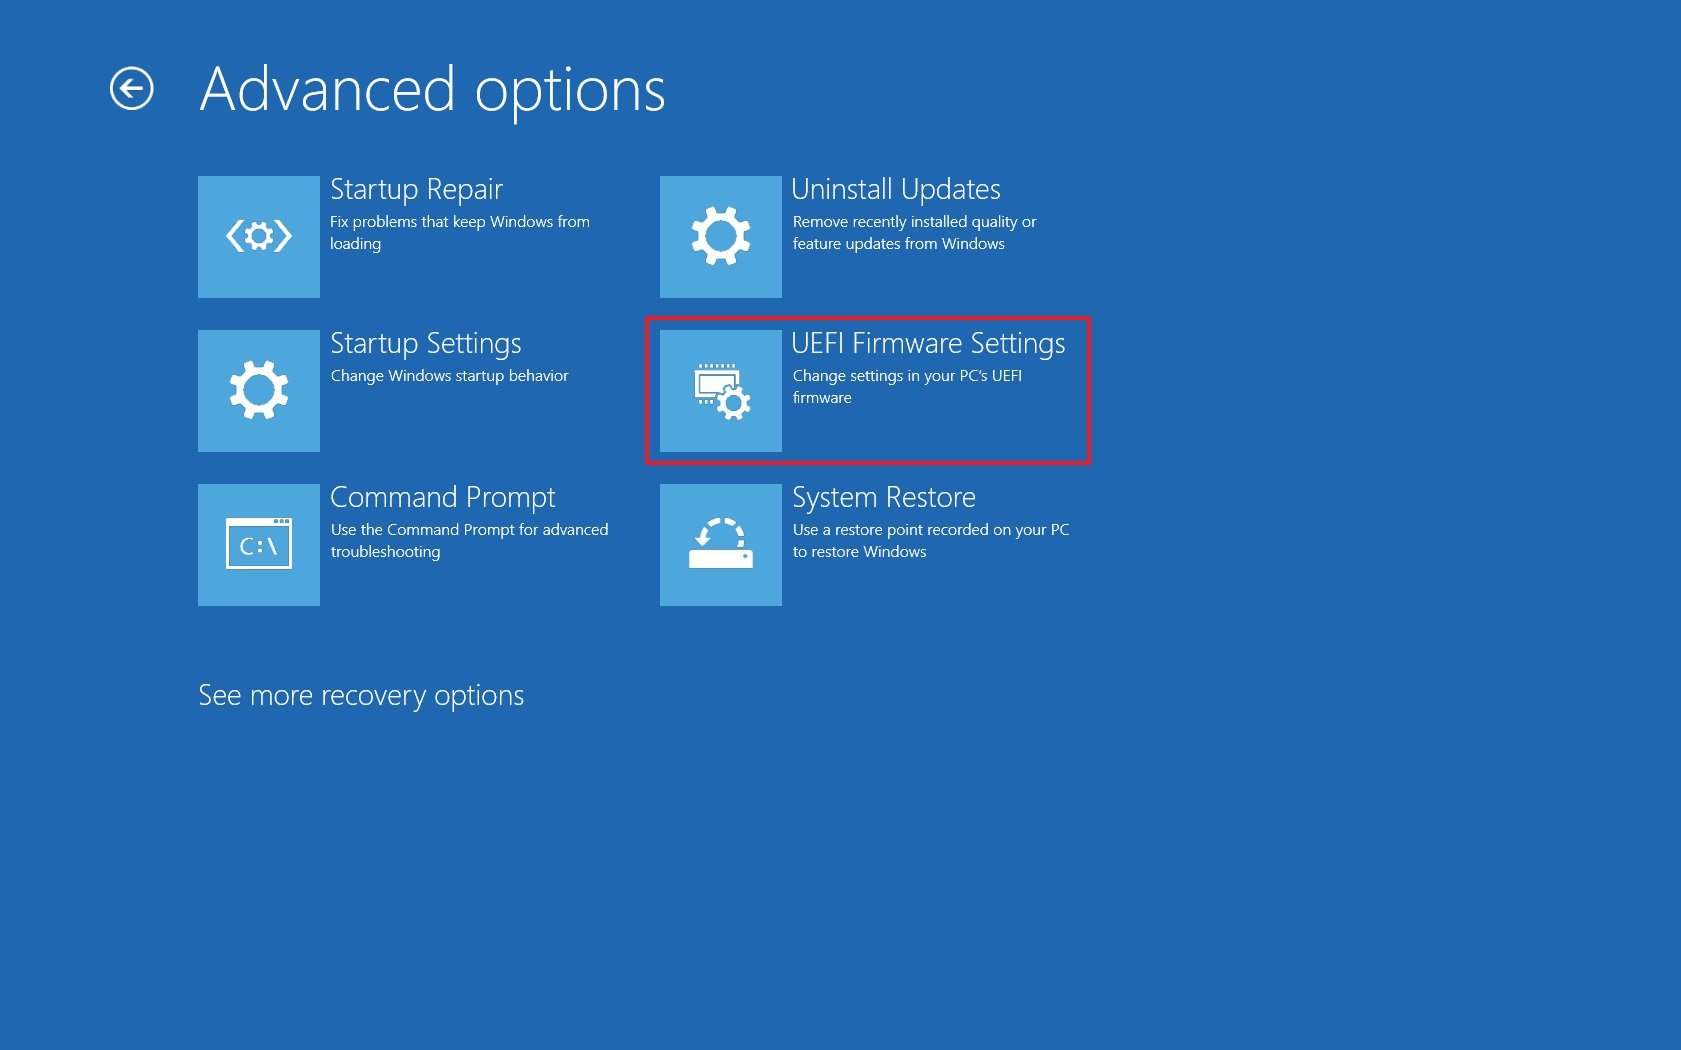
Now, some systems will give you the UEFI Firmware Settings on this screen. Some system may require you to choose an Advanced options.
If you see the UEFI Firmware Settings option, well, click on it. Otherwise, click the Advanced options.
When you see the UEFI Firmware Settings, click on it.

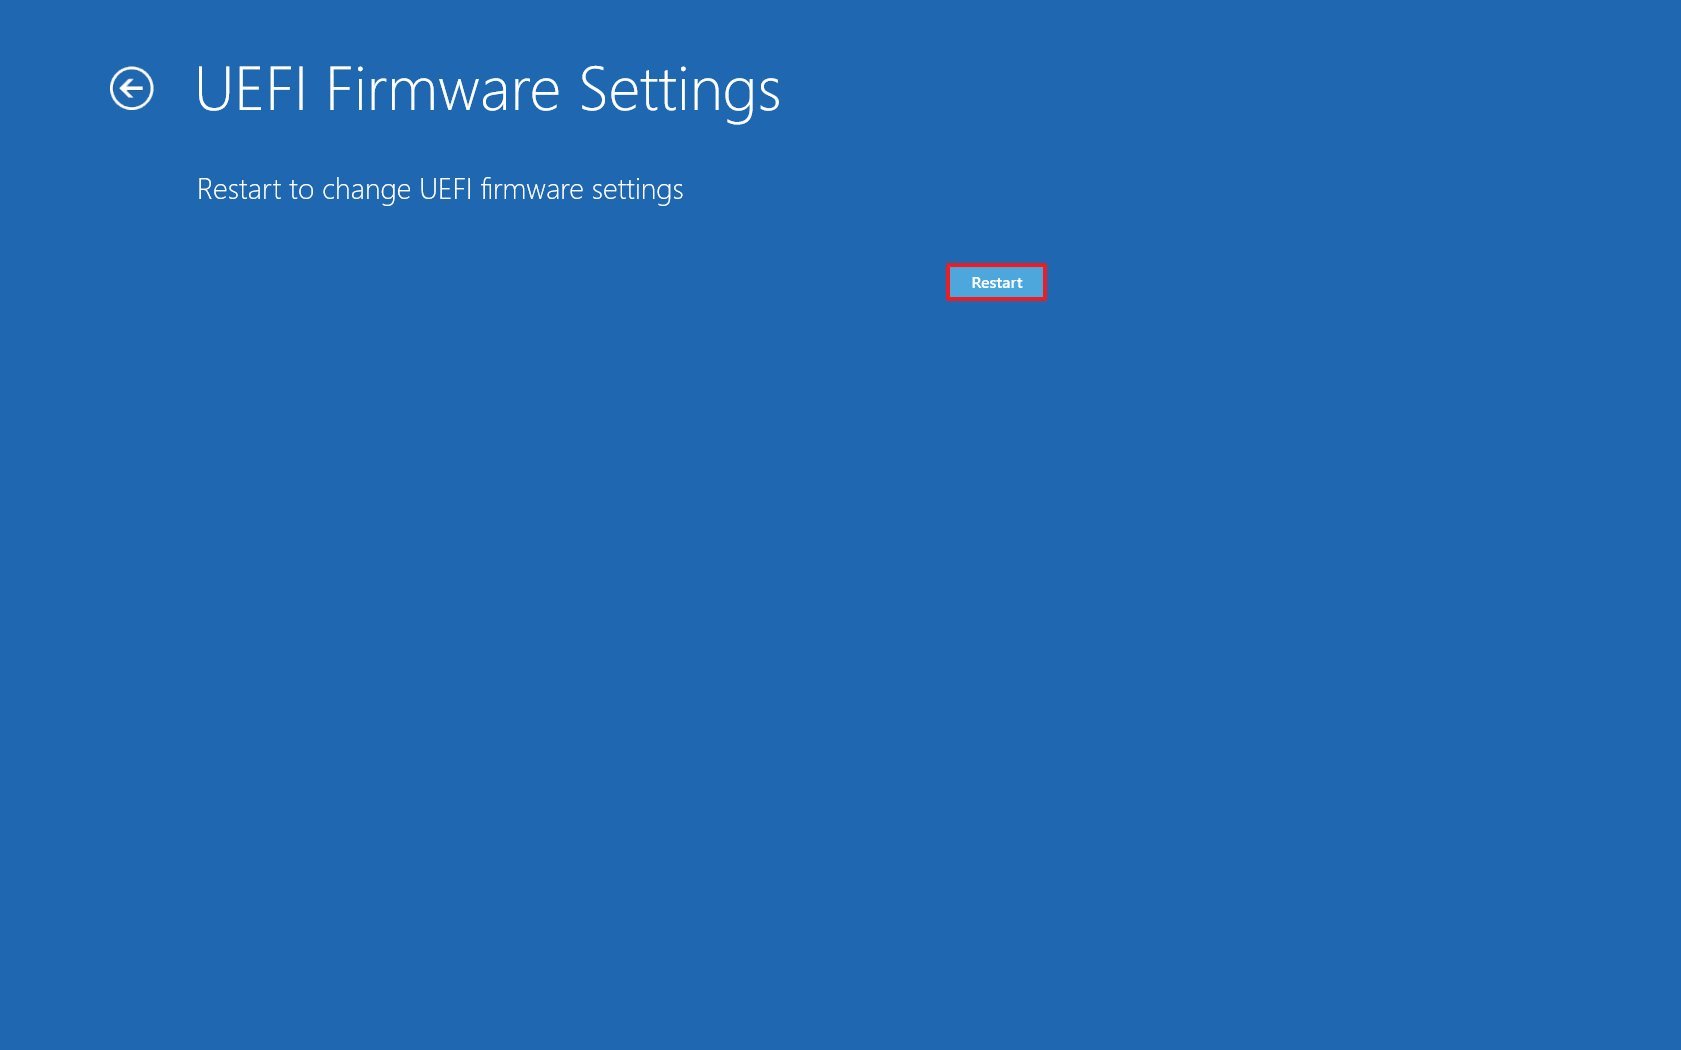
It will notify that you’ll have to restart in order to change any UEFI firmware settings (or UEFI settings in short). Click on the Restart button.

Your system will restart now and when it boots again, you’ll find yourself in the BIOS/UEFI settings interface.
That’s it. This is what you needed to do to access UEFI firmware settings in Windows 10. Whenever I dual boot Linux and Windows, I use this method for using the live USB of Linux.
I hope you find this tutorial helpful. Any questions or suggestions? Please feel free to leave a comment below.
(Image credit: Windows Central)
On Computers, the Basic Input Output System (BIOS) is an essential low-level software that sits on one of the chips of the motherboard, and it’s responsible for basic operations, such as booting and configuring hardware (mouse, keyboard, memory, processor, etc.). The Unified Extensible Firmware Interface (UEFI) is a modern software designed to replace the legacy BIOS with additional benefits, such as improved security, faster boot times, large capacity hard drive support, and more.
Although these are different technologies, modern devices now use UEFI, but to avoid confusion, sometimes you’ll continue to hear the term «BIOS» to refer to «UEFI.»
If you use a Windows 10 device, usually, the firmware works automatically. However, sometimes you may still need to enter the motherboard BIOS to troubleshoot problems, enable or disable features (such as virtualization, RAID array, and secure boot), adjust memory and processor advanced settings, and more.
The only caveat is that the BIOS is a startup environment, which means that you can’t access it when Windows 10 is running. However, if you have to change some system settings, there are multiple methods to access the motherboard firmware.
In this Windows 10 guide, we’ll walk you through the steps to enter the BIOS/UEFI on your computer to change advanced system settings.
- How to access UEFI (BIOS) using Settings
- How to access UEFI (BIOS) using boot key option
How to access UEFI (BIOS) using Settings
To enter the UEFI firmware from Windows 10, use these steps:
Warning: Changing the wrong firmware settings can prevent your computer from starting correctly. You should only access the motherboard firmware when you have an excellent reason. It’s assumed that you know what you’re doing.
- Open Settings.
- Click on Update & Security.
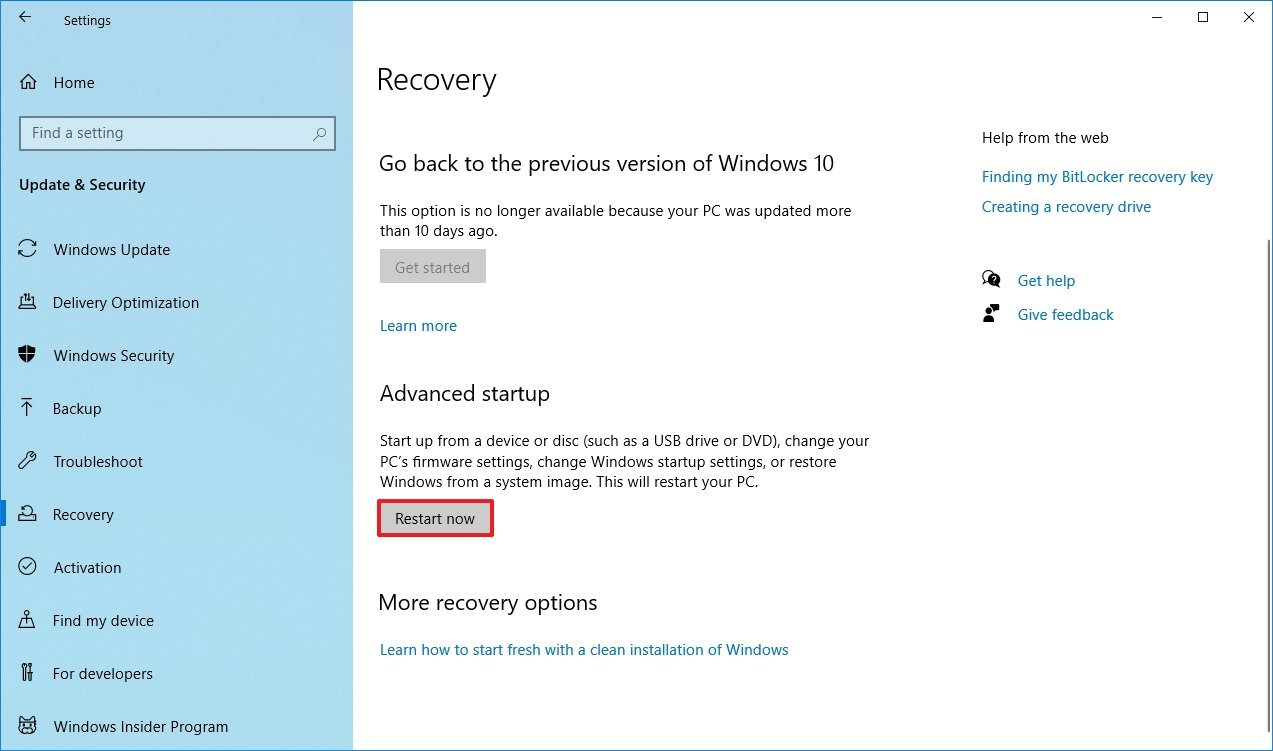
- Click on Recovery.
- Under the «Advanced startup» section, click the Restart now button.
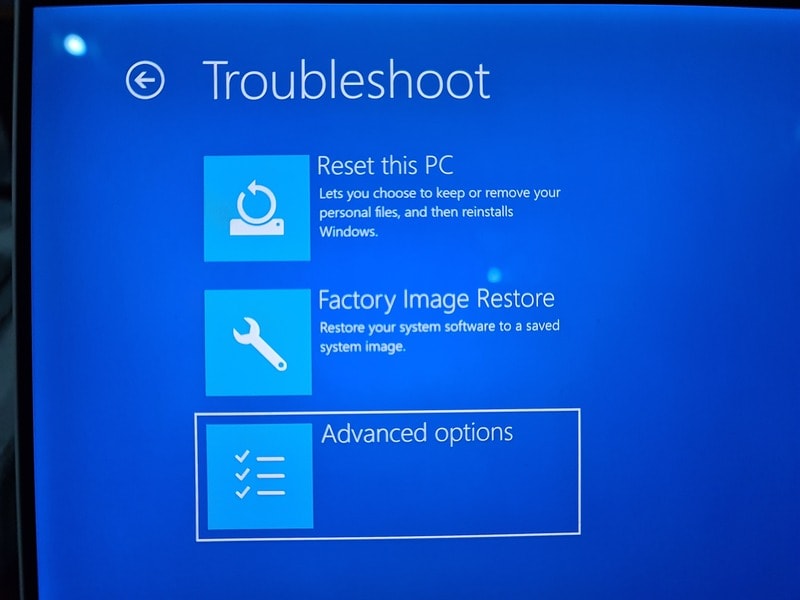
- Click on Troubleshoot.
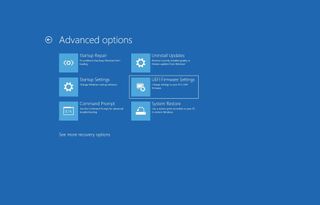
- Click on Advanced options.

- Click the UEFI Firmware settings option.
- Click the Restart button.
Once you complete the steps, the device will restart and boot into the UEFI firmware allowing you to change advanced settings, such as to disable or enable secure boot, change boot order, set up a hardware RAID array, enable virtualization, and other settings depending on the motherboard support.
How to access UEFI (BIOS) using boot key option
If you don’t have access to the Windows 10 desktop or you’re using a device with a legacy BIOS, then you can still access the firmware during boot.
To enter the UEFI or legacy BIOS during boot, use these steps:
- Press the Power button.
- See the screen splash to identify the key you must press to enter the firmware (if applicable).
- Press the required key repeatedly until you enter the setup mode. Usually, you need to press the ESC, Delete, or one of the Function keys (F1, F2, F10, etc.).
After you complete the steps, the device will access the BIOS or UEFI firmware, depending on the motherboard support. If you don’t see the information on the screen or the device boots too fast, restart the device again, and as soon as the boot starts, press the required key multiple times quickly.
If you can’t make the computer to access the firmware using the keyboard, you may need to check your device manufacturer to find out the key that you need to press during boot.
Here are some computer brands and their respective keys to access the motherboard firmware:
- Dell: F2 or F12.
- HP: ESC or F10.
- Acer: F2 or Delete.
- ASUS: F2 or Delete.
- Lenovo: F1 or F2.
- MSI: Delete.
- Toshiba: F2.
- Samsung: F2.
- Surface: Press and hold volume up button.
In the case that your device is using a UEFI firmware, and you can’t seem to access it during startup, then it’s recommended to use the Settings option from within Windows 10.
Get the best of Windows Central in in your inbox, every day!
Mauro Huculak is technical writer for WindowsCentral.com. His primary focus is to write comprehensive how-tos to help users get the most out of Windows 10 and its many related technologies. He has an IT background with professional certifications from Microsoft, Cisco, and CompTIA, and he’s a recognized member of the Microsoft MVP community.
The UEFI BIOS is a special software program that connects your computer’s firmware to its operating system (OS). In fact, it’s the first program that runs when you turn on your PC. It checks to see what hardware components your PC has, wakes the components up, and hands them over to the OS.
But while trying to open the UEFI BIOS menu, you might find that you’re unable to access the UEFI Firmware Settings. This could hinder you from fixing several system issues.
Now, if you can’t find the UEFI Firmware Settings on your PC, we’ll show you how to bring them back.
Why Are the UEFI Firmware Settings Missing?

Depending on your PC’s manufacturer, you can access the UEFI BIOS settings in various ways. But if you can’t locate them, you’re probably wondering, «why are the UEFI Firmware Settings not showing?»
Now, if you can’t find UEFI Firmware Settings in the BIOS menu, here are some common reasons for this issue:
- Your PC’s motherboard doesn’t support UEFI.
- The Fast Startup function is disabling access to the UEFI Firmware Settings menu.
- Windows 10 was installed in Legacy Mode.
So, here are some solutions for the «Windows 10 no UEFI Firmware Settings» issue.
1. Verify That Your PC Is Equipped With UEFI
Before attempting any other potential fix, you need to verify that your PC’s motherboard is equipped to support UEFI. If your PC is an older model, the chances are that the UEFI Firmware Settings are unavailable.
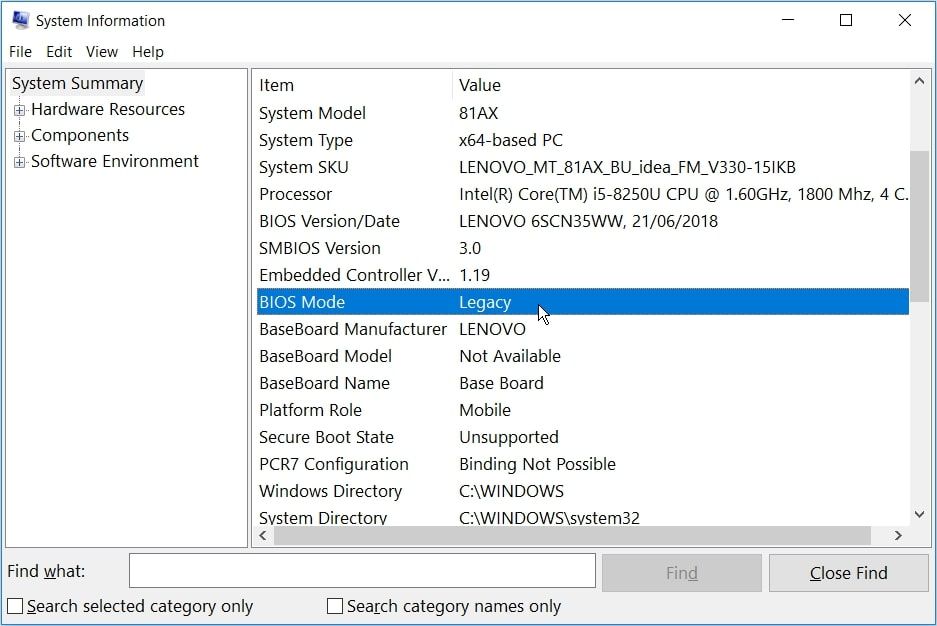
Otherwise, here’s how you can check your PC’s BIOS Mode:
- Press the Win + R to open the Run command dialog box.
- Type msinfo32 and press Enter to open the System Information screen.
- Select System Summary on the left-hand side pane.
- Scroll down on the right-hand side pane and locate the BIOS Mode option. Its value should either be UEFI or Legacy. If it’s Legacy, then you don’t have UEFI Firmware Settings on your PC.
2. Bypass the Fast Startup Function
The Fast Startup function allows you to boot up your PC quickly. When enabled, the feature could cut off the delay in loading some UEFI BIOS menu options. For this reason, it could prevent you from accessing the UEFI Firmware Settings.
So, bypassing the Fast Startup function could help resolve the «UEFI Firmware Settings missing Windows 10» issue.
- To get started, open the Windows Start Menu and select the Power icon.
- Hold the Shift key and then select Shut down from the power options. This will bypass Windows 10 fast startup and shut down your PC completely.
- Finally, power on your computer again and start pressing the dedicated BIOS Setup key.
If this helps, you might consider disabling the Fast Startup feature to make the UEFI Firmware Settings easily accessible. However, bear in mind that this will mean slightly longer boot-up times.
3. Create a Boot-to-UEFI Firmware Settings Desktop Shortcut

Alternatively, create a Desktop shortcut that forces your PC to boot directly into the UEFI Firmware Settings menu.
Here’s how you can do this:
- Right-click on a blank space on your Desktop, select New, and then select Shortcut.
- On the next screen, type shutdown /r /fw and click the Next button.
- Pick a suitable name for the shortcut and then click Finish.
- Right-click on the shortcut, select Properties, and then select the Advanced button.
- On the next screen, check the Run as administrator box and hit OK.
- Select Apply > OK to apply these changes.
- To use the shortcut, simply double-click on it. This should restart your PC directly into the UEFI Firmware Settings menu.
4. Change the BIOS From Legacy to UEFI by Converting MBR Disk to GPT Disk
Your Windows PC either uses a Master Boot Record (MBR) or a GUID Partition Table (GPT) disk. Even if your motherboard is equipped with UEFI capabilities, UEFI Firmware Settings won’t be accessible if your drive is equipped with an MBR disk. In this instance, you’ll need to switch the BIOS from Legacy to UEFI by converting the MBR disk to a GPT disk.
Considering that you are converting a system disk, it’s best to create a system image to back up your system. In fact, it’s highly advisable to consider backing up your system first since there’s the potential for data loss during this process.
If you already know that your partition is the MBR-type and your system is capable of booting from UEFI, you’re ready. You can go ahead with converting your drive to GPT format.
Otherwise, here’s how you can check whether your PC is equipped with an MBR or GPT disk:
- Press the Win + R to open the Run command dialog box.
- Type diskmgmt.msc and click Enter to open the Disk Management window.
- Right-click on Disk 0 (or the disk that contains the Windows installation) and select Properties.
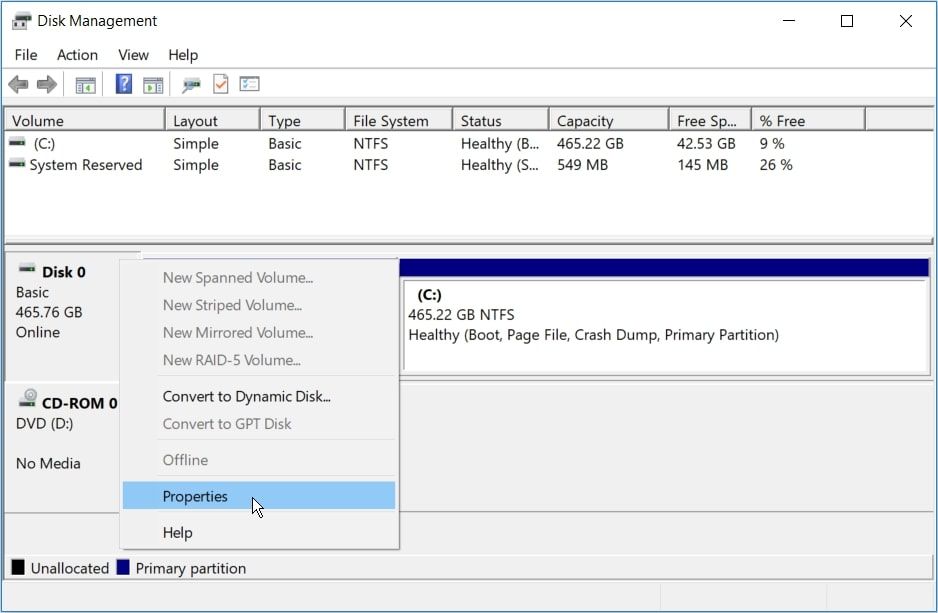
Click the Volumes tab in the Properties screen. Next, look for the Partition style option under Disk Information.
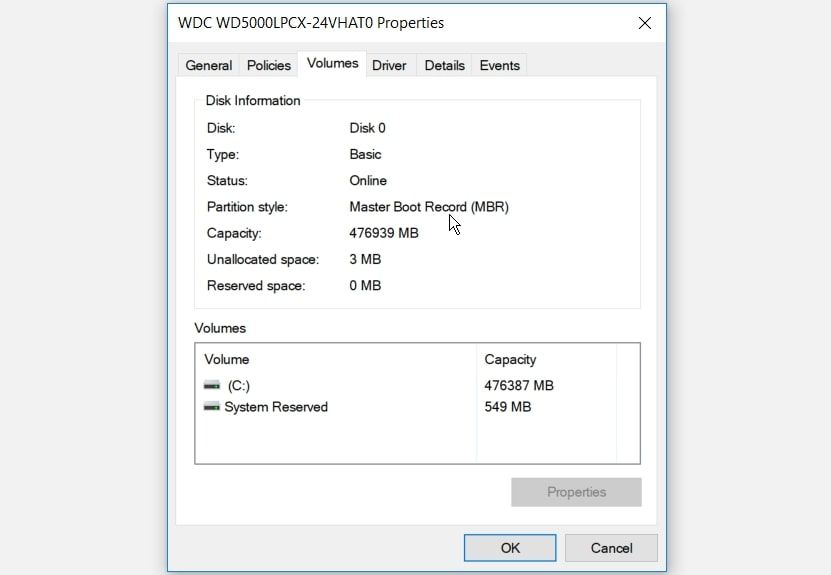
If the partition style is GUID Partition Table (GPT), then there’s no need to continue with the MBR-to-GPT disk conversion.
5. Clear the CMOS Settings to Restore the Default BIOS Settings
Are you still struggling to resolve the «No UEFI Firmware Settings Windows 10» issue? As a last resort, you can reset the CMOS settings from your PC’s motherboard. This will help restore your computer to its default BIOS settings.
Here’s how you can get started with this:
- Turn off your computer and unplug it from the power source.
- Remove the bottom cover of your PC and look for the CMOS battery and jumpers on the motherboard.
- To easily locate the CMOS jumpers, look for a “CLR CMOS” reading on the motherboard.
- Next, locate the jumpers. Usually, you’d find three pins where the CMOS jumpers are located.
- The jumpers will be located on only two of the three pins. If they’re on the first and second pins, temporarily shift them to the second and third pins. If your motherboard has only two pins, the jumpers will likely be plugged into one pin. In this case, temporarily plug them on both pins.
- Next, remove the CMOS battery from its slot. From there, wait for about 15 seconds and then put it back on.
- Move the CMOS jumpers back to their original pins.
- Finally, put the computer cover back on, plug in your computer, and power it on. This should resolve the «no UEFI Firmware Settings» error.
On more advanced motherboards, you’ll find a designated button for resetting the CMOS settings. This will be labeled “CMOS,” “CMOS_SW,” or something similar. You can reset the CMOS settings by pressing this button and holding it down for a few seconds.
If you struggle to find any hardware components on your PC, check your motherboard manual for assistance. Alternatively, you can find out more about your PC’s hardware online.
Missing UEFI Firmware Settings? Not Anymore
The UEFI Firmware Settings are helpful when it comes to troubleshooting various Windows system issues. So, if you encounter the «missing UEFI Firmware Settings in Windows 10» issue, try any of the solutions we’ve covered.
If your motherboard doesn’t support these settings, then it’s time to consider an upgrade.