Содержание
- Настройка «Локальной политики безопасности» в Windows 10
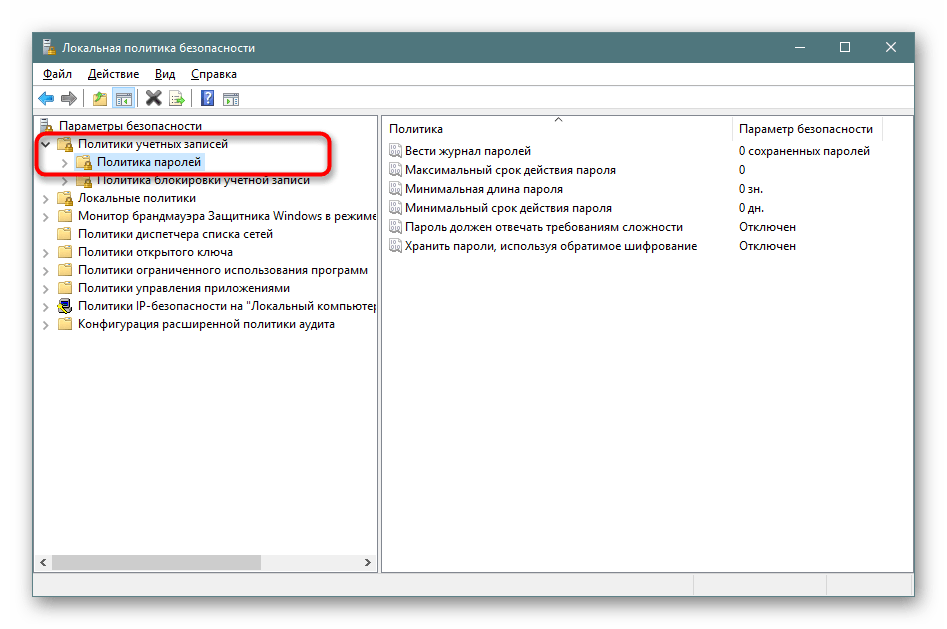
- Политики учетных записей
- Локальные политики
- Монитор брандмауэра Защитника Windows в режиме повышенной безопасности
- Политики диспетчера списка сетей
- Политики открытого ключа
- Политики управления приложениями
- Политики IP-безопасности на «Локальный компьютер»
- Конфигурация расширенной политики аудита
- Вопросы и ответы
В операционных системах семейства Windows присутствует множество оснасток и политик, представляющих собой набор параметров для настройки различных функциональных составляющих ОС. Среди них находится оснастка под названием «Локальная политика безопасности» и отвечает она за редактирование защитных механизмов Виндовс. В рамках сегодняшней статьи мы обсудим компоненты упомянутого инструмента и расскажем о их влиянии на взаимодействие с системой.
Как вы уже знаете из предыдущего абзаца, упомянутая политика состоит из нескольких компонентов, каждый из которых собрал в себе параметры по регулированию защищенности самой ОС, пользователей и сетей при обмене данными. Логично будет уделить время каждому разделу, поэтому давайте сразу же начнем детальный разбор.
Запускается «Локальная политика безопасности» одним из четырех способов, каждый будет максимально полезен определенным юзерам. В статье по следующей ссылке вы можете ознакомиться с каждым методом и выбрать подходящий. Однако хотим обратить ваше внимание, что все приведенные сегодня скриншоты сделаны в самом окне инструмента, а не в редакторе локальных групповых политик, из-за чего следует учитывать особенности интерфейсов.
Подробнее: Расположение локальной политики безопасности в Windows 10
Политики учетных записей
Начнем с первой категории под названием «Политики учетных записей». Разверните ее и откройте раздел «Политика паролей». Справа вы видите перечень параметров, каждый из которых отвечает за ограничения или выполнение действий. Например, в пункте «Минимальная длина пароля» вы самостоятельно указываете количество знаков, а в «Минимальный срок действия пароля» — количество дней на блокировку его изменения.
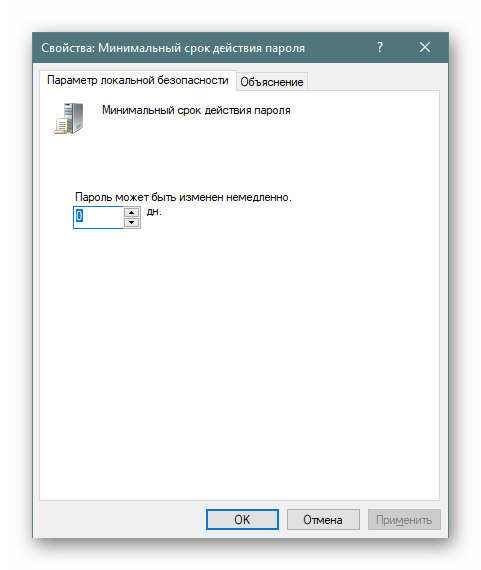
Дважды щелкните на одном из параметров, чтобы открыть отдельное окно с его свойствами. Как правило, здесь присутствует ограниченное количество кнопок и настроек. Например, в «Минимальный срок действия пароля» вы только выставляете количество дней.
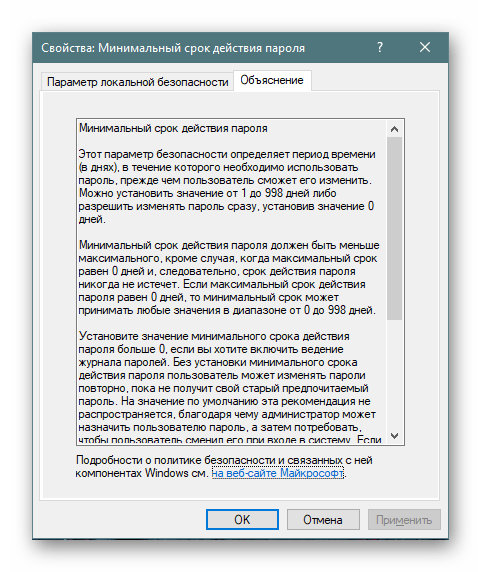
Во вкладке «Объяснение» находится детальное описание каждого параметра от разработчиков. Обычно оно расписано достаточно широко, но большая часть информации является бесполезной или же очевидной, поэтому ее можно опустить, выделив только основные моменты лично для себя.
Во второй папке «Политика блокировки учетной записи» присутствует три политики. Здесь доступна установка времени до сброса счетчика блокировки, пороговое значение блокировки (количество ошибок ввода пароля при входе в систему) и продолжительность блокировки профиля пользователя. О том, как устанавливаются каждые параметры, вы уже узнали из информации выше.

Локальные политики
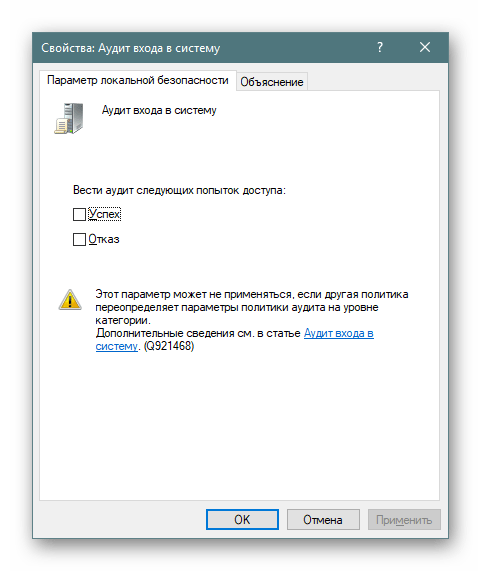
В разделе «Локальные политики» собрано сразу несколько групп параметров, разделенных по директориям. Первая имеет название «Политика аудита». Если говорить просто, аудит — процедура слежения за действиями юзера с дальнейшим занесением их в журнал событий и безопасности. Справа вы видите несколько пунктов. Их названия говорят сами за себя, поэтому отдельно останавливаться на каждом нет никакого смысла.
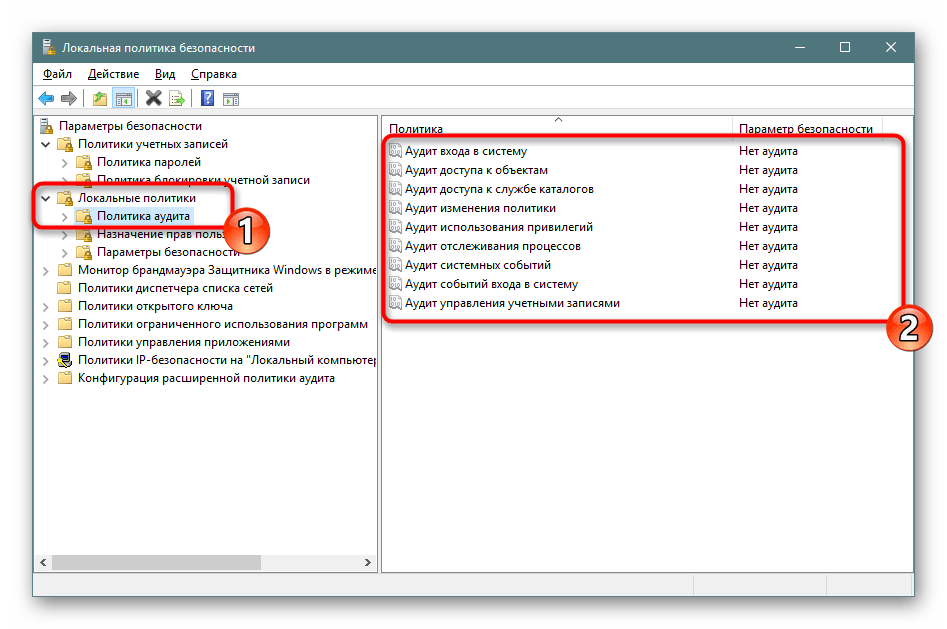

Если значение установлено «Нет аудита», действия отслеживаться не будут. В свойствах же на выбор предоставляется два варианта — «Отказ» и «Успех». Поставьте галочку на одном из них или сразу на обоих, чтобы сохранять успешные и прерванные действия.
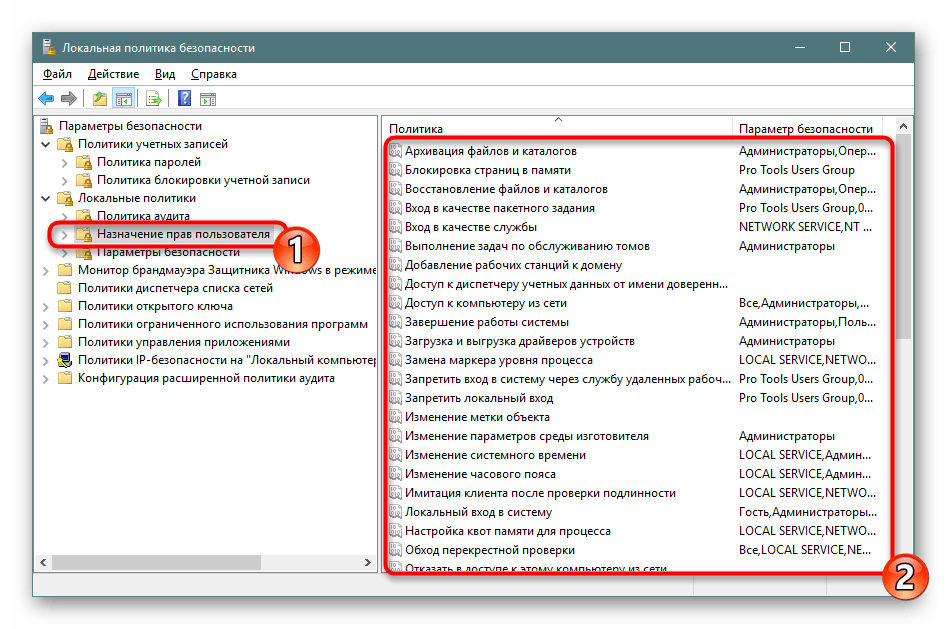
В папке «Назначение прав пользователя» собраны настройки, позволяющие предоставить группам юзеров доступ для выполнения определенных процессов, например, вход в качестве службы, возможность подключения к интернету, установка или удаление драйверов устройств и многое другое. Ознакомьтесь со всеми пунктами и их описанием самостоятельно, в этом нет ничего сложного.
В «Свойства» вы видите перечень групп пользователей, которым разрешено осуществление заданного действия.

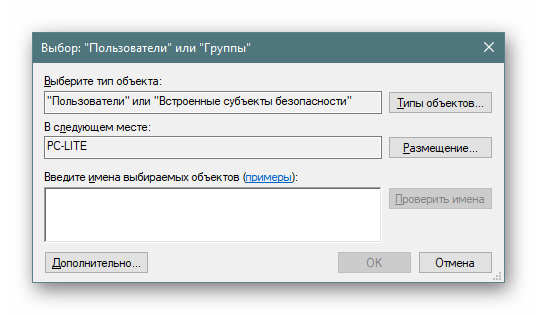
В отдельном окне происходит добавление групп юзеров или только некоторых учетных записей из локальных компьютеров. От вас требуется лишь указать тип объекта и его размещение, а после перезагрузки компьютера все изменения вступят в силу.
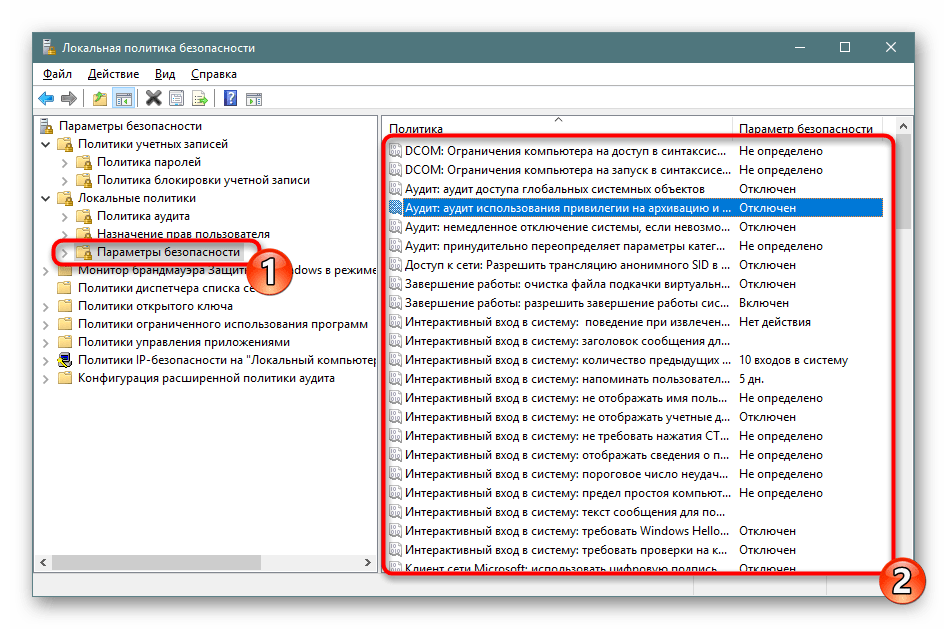
Раздел «Параметры безопасности» посвящен обеспечению защищенности двух предыдущих политик. То есть здесь вы можете настроить аудит, который будет отключать систему при невозможности добавления соответствующей записи аудита в журнал, либо же установить ограничение на количество попыток ввода пароля. Параметров здесь насчитывается более тридцати. Условно их можно разделить на группы — аудиты, интерактивный вход в систему, контроль учетных записей, сетевой доступ, устройства и сетевая безопасность. В свойствах вам разрешено активировать или отключать каждую из этих настроек.
Монитор брандмауэра Защитника Windows в режиме повышенной безопасности
«Монитор брандмауэра Защитника Windows в режиме повышенной безопасности» — один из самых сложных разделов «Локальной политики безопасности». Разработчики попытались упростить процесс наладки входящих и исходящих подключений с помощью добавления Мастера настройки, однако начинающие пользователи все равно с трудом разберутся со всеми пунктами, но эти параметры и крайне редко нужны такой группе юзеров. Здесь доступно создание правил для программ, портов или предопределенных соединений. Вы блокируете либо разрешаете подключение, выбрав при этом сеть и группу.
В этом же разделе происходит определение типа безопасности подключения — изоляция, сервер-сервер, туннель или освобождение от проверки подлинности. Останавливаться на всех настройках нет смысла, ведь это пригодится только опытным администраторам, а они в состоянии самостоятельно обеспечить надежность входящих и исходящих соединений.
Политики диспетчера списка сетей
Обратите внимание на отдельную директорию «Политики диспетчера списка сетей». Количество отображаемых здесь параметров зависит от активных и доступных интернет-соединений. Например, пункт «Неопознанные сети» или «Идентификация сетей» будет присутствовать всегда, а «Сеть 1», «Сеть 2» и так далее — в зависимости от реализации вашего окружения.
В свойствах вы можете указать имя сети, добавить разрешения для пользователей, установить собственный значок или задать расположение. Все это доступно для каждого параметра и должно применяться отдельно. После выполнения изменений не забывайте их применять и перезагружать компьютер, чтобы они вступали в силу. Иногда может потребоваться и перезагрузка роутера.
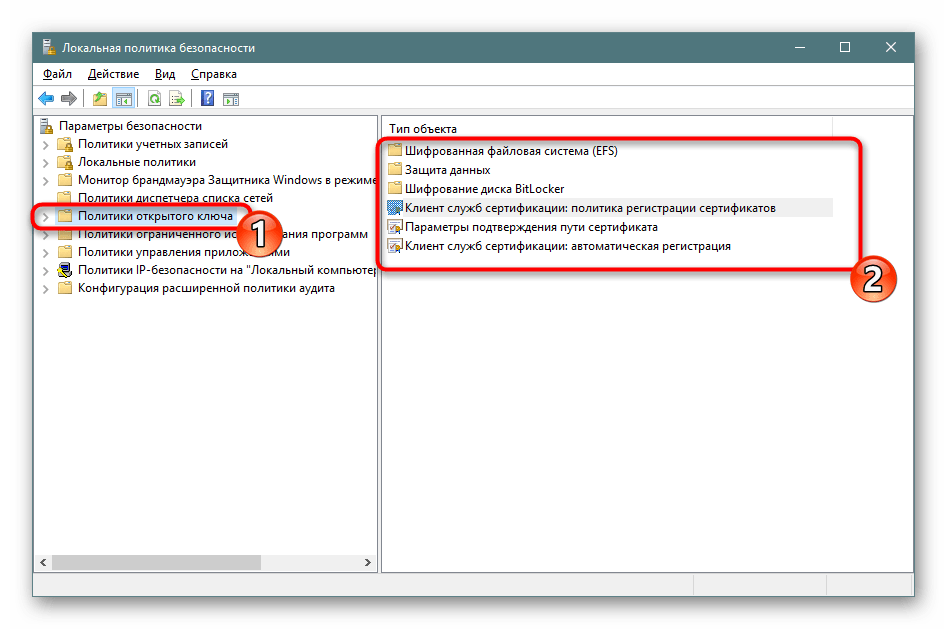
Политики открытого ключа
Полезным раздел «Политики открытого ключа» будет только для тех, кто использует компьютеры на предприятии, где для осуществления криптографических операций или других защищенных манипуляций задействованы открытые ключи и центры спецификаций. Все это позволяет гибко производить контроль доверительных отношений между устройствами, обеспечив стабильную и безопасную сеть. Внесения изменений зависят от активного на предприятии центра доверенности.
Политики управления приложениями
В «Политики управления приложениями» находится инструмент «AppLocker». Он включает в себя множество самых разнообразных функций и настроек, позволяющих регулировать работу с программами на ПК. Например, он позволяет создать правило, ограничивающее запуск всех приложений, кроме указанных, либо установить ограничение на изменение файлов программами, задав отдельные аргументы и исключения. Полную информацию по поводу упомянутого инструмента вы можете получить в официальной документации компании Microsoft, там все расписано максимально детально, с объяснением каждого пункта.
AppLocker в операционной системе Windows
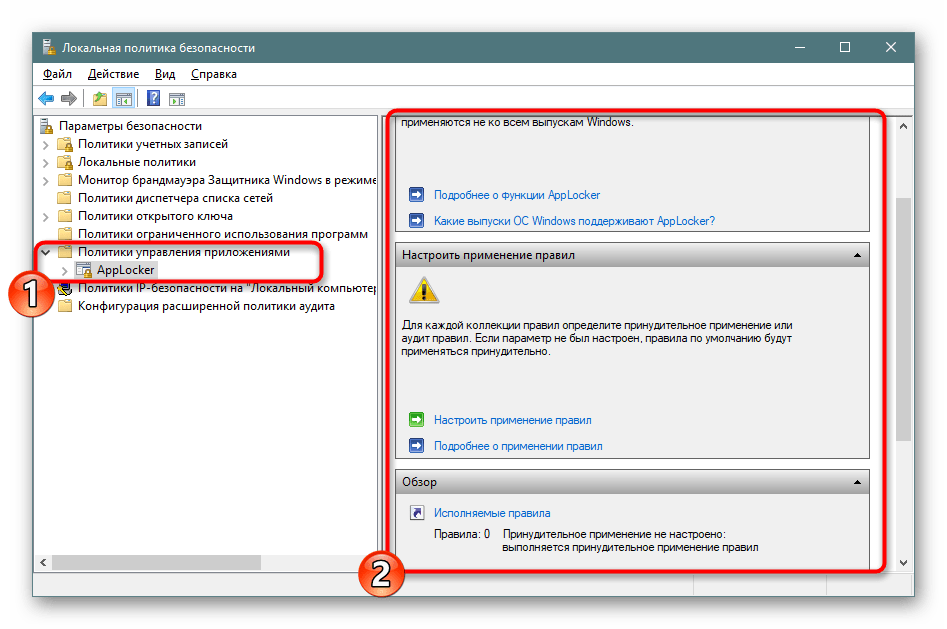
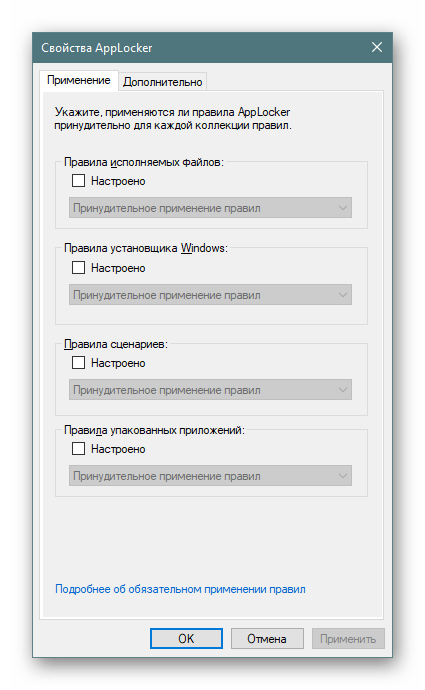
Что же касается меню «Свойства», то здесь применение правил настраивается для коллекций, например, исполняемые файлы, установщик Windows, сценарии и упакованные приложения. Каждое значение может применяться принудительно, в обход другим ограничениям «Локальной политики безопасности».
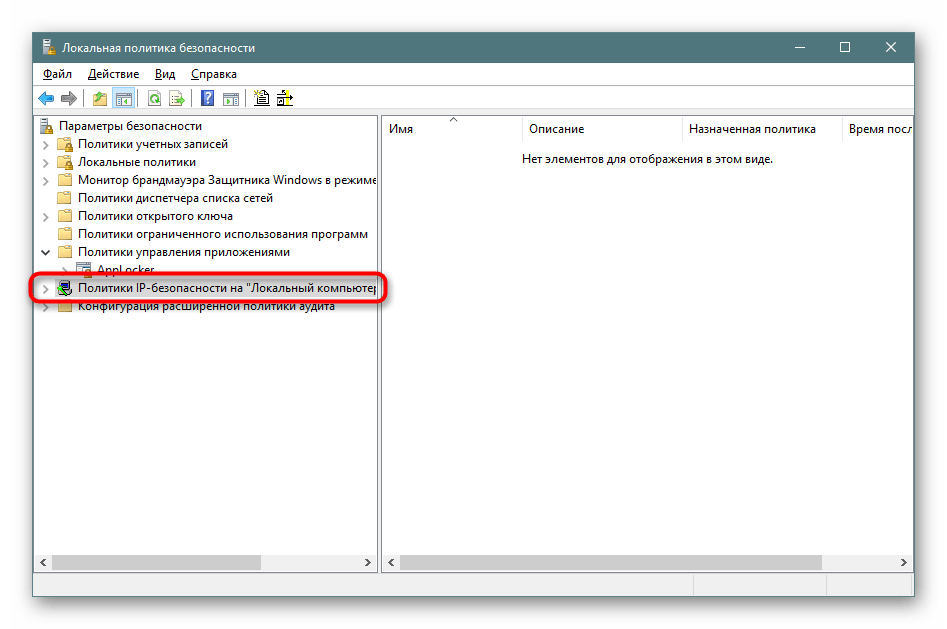
Политики IP-безопасности на «Локальный компьютер»
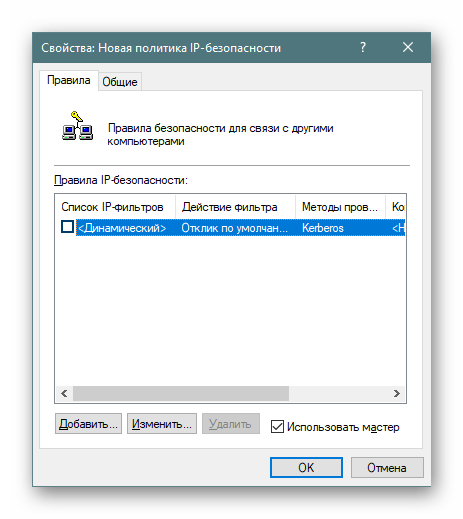
Настройки в разделе «Политики IP-безопасности на «Локальный компьютер»» имеют некое сходство с теми, что доступны в веб-интерфейсе роутера, например, включение шифрования трафика либо его фильтрация. Пользователь сам создает неограниченное количество правил через встроенный Мастер создания указывает там методы шифрования, ограничения на передачу и прием трафика, а также активирует фильтрацию по IP-адресам (разрешение или запрет на подключение к сети).
На скриншоте ниже вы видите пример одного из таких правил связи с другими компьютерами. Здесь присутствует список IP-фильтров, их действие, методы проверки, конечная точка и тип подключения. Все это задается пользователем вручную, исходя из его потребностей в обеспечении фильтрации передачи и приема трафика с определенных источников.
Конфигурация расширенной политики аудита
В одной из предыдущих частей сегодняшней статьи вы уже были ознакомлены с аудитами и их настройкой, однако существуют еще дополнительные параметры, которые вынесены в отдельный раздел. Здесь уже вы видите более обширное действие аудитов — создание/завершение процессов, изменение файловой системы, реестра, политик, управление группами учетных записей пользователей, приложений и многое другое, с чем можете ознакомиться самостоятельно.
Корректировка правил осуществляется точно так же — нужно лишь отметить галочкой «Успех», «Отказ», чтобы запустить процедуру слежения и записи в журнал безопасности.
На этом ознакомление с «Локальной политикой безопасности» в Windows 10 завершено. Как видите, здесь присутствует множество самых полезных параметров, позволяющих организовать хорошую защиту системы. Мы настоятельно советуем перед внесением определенных изменений внимательно изучить описание самого параметра, чтобы понять его принцип работы. Редактирование некоторых правил иногда приводит к серьезным проблемам работы ОС, поэтому делайте все крайне осторожно.
Содержание
- Расположение локальной политики безопасности в Windows 10
- Открываем «Локальную политику безопасности» в Windows 10
- Способ 1: Меню «Пуск»
- Способ 2: Утилита «Выполнить»
- Способ 3: «Панель управления»
- Способ 4: Консоль управления Microsoft
- Настройка параметров политики безопасности
- Настройка параметра с помощью консоли Local Security Policy
- Настройка параметра политики безопасности с помощью консоли Редактор локальной групповой политики
- Настройка параметра контроллера домена
- Основы работы с редактором локальной групповой политики в ОС Windows 10
- Содержание
- Структура редактора групповой политики
- Пример последовательности действий при редактировании определенной политики
- Последовательность действий при добавлении объектов групповой политики через консоль управления (Microsoft Management Console, MMC)
- Добавление объекта групповой политики первого уровня
- Добавление объекта групповой политики второго уровня
- Добавление объекта групповой политики третьего уровня
- Локальная политика безопасности в Windows 10
- Настройка «Локальной политики безопасности» в Windows 10
- Политики учетных записей
- Локальные политики
- Монитор брандмауэра Защитника Windows в режиме повышенной безопасности
- Политики диспетчера списка сетей
- Политики открытого ключа
- Политики управления приложениями
- Политики IP-безопасности на «Локальный компьютер»
- Конфигурация расширенной политики аудита
Расположение локальной политики безопасности в Windows 10

Каждый пользователь должен заботиться о безопасности своего компьютера. Многие прибегают к включению брандмауэра Windows, устанавливают антивирус и другие защитные инструменты, но этого не всегда хватает. Встроенное средство операционной системы «Локальная политика безопасности» позволит каждому вручную оптимизировать работу учетных записей, сетей, редактировать открытые ключи и производить другие действия, связанные с наладкой защищенного функционирования ПК.
Открываем «Локальную политику безопасности» в Windows 10
Сегодня мы бы хотели обсудить процедуру запуска упомянутой выше оснастки на примере ОС Windows 10. Существуют разные методы запуска, которые станут наиболее подходящими при возникновении определенных ситуаций, поэтому целесообразным будет детальное рассмотрения каждого из них. Начнем с самого простого.
Для запуска этой оснастки версия Windows 10 должна быть Профессиональная (Professional) или Корпоративная (Enterprise)! В версии Домашняя (Home), установленной преимущественно на множестве ноутбуков, ее нет.
Способ 1: Меню «Пуск»
Меню «Пуск» активно задействует каждый пользователь на протяжении всего взаимодействия с ПК. Этот инструмент позволяет осуществлять переход в различные директории, находить файлы и программы. Придет на помощь он и при необходимости запуска сегодняшнего инструмента. Вам достаточно просто открыть само меню, ввести в поиске «Локальная политика безопасности» и запустить классическое приложение.

Как видите, отображается сразу несколько кнопок, например «Запуск от имени администратора» или «Перейти к расположению файла». Обратите внимание и на эти функции, ведь они однажды могут пригодиться. Вам также доступно закрепление значка политики на начальном экране или на панели задач, что значительно ускорит процесс ее открытия в дальнейшем.
Способ 2: Утилита «Выполнить»
Стандартная утилита ОС Виндовс под названием «Выполнить» предназначена для быстрого перехода к определенным параметрам, директориям или приложениям путем указания соответствующей ссылки или установленного кода. У каждого объекта имеется уникальная команда, в том числе и у «Локальной политики безопасности». Ее запуск происходит так:


Способ 3: «Панель управления»
Хоть разработчики операционной системы Виндовс постепенно и отказываются от «Панели управления», перемещая или добавляя многие функции только в меню «Параметры», это классическое приложение все еще нормально работает. Через него тоже доступен переход к «Локальной политике безопасности», однако для этого понадобится выполнить такие шаги:


Способ 4: Консоль управления Microsoft
В Консоли управления Майкрософт происходит взаимодействие со всеми возможными в системе оснастками. Каждая из них предназначена для максимально детальной настройки компьютера и применения дополнительных параметров, связанных с ограничениями доступа к папкам, добавлением или удалением определенных элементов рабочего стола и многим другим. Среди всех политик присутствует и «Локальная политика безопасности», но ее еще нужно отдельно добавить.


Приведенный выше способ будет максимально полезен тем юзерам, кто активно использует редактор групповых политик, настраивая там необходимые ему параметры. Если вас интересуют другие оснастки и политики, советуем перейти к отдельной нашей статье по этой теме, воспользовавшись указанной ниже ссылкой. Там вы ознакомитесь с основными моментами взаимодействия с упомянутым инструментом.
Что же касается настройки «Локальной политики безопасности», производится она каждым пользователем индивидуально — им подбираются оптимальные значения всех параметров, но при этом существуют и главные аспекты конфигурации. Детальнее о выполнении этой процедуры читайте далее.
Теперь вы знакомы с четырьмя различными методами открытия рассмотренной оснастки. Вам осталось только подобрать подходящий и воспользоваться им.
Помимо этой статьи, на сайте еще 12357 инструкций.
Добавьте сайт Lumpics.ru в закладки (CTRL+D) и мы точно еще пригодимся вам.
Отблагодарите автора, поделитесь статьей в социальных сетях.
Источник
Настройка параметров политики безопасности
Область применения
Описывает действия по настройке параметра политики безопасности на локальном устройстве, на устройстве, соединяемом с доменом, и на контроллере домена.
Для выполнения этих процедур необходимо иметь права администраторов на локальном устройстве или иметь соответствующие разрешения на обновление объекта групповой политики (GPO) на контроллере домена.
Если локальный параметр недоступен, это указывает на то, что GPO в настоящее время контролирует этот параметр.
Настройка параметра с помощью консоли Local Security Policy
Чтобы открыть локализованную политику безопасности на экране Начните, введите secpol.mscи нажмите кнопку ENTER.
В Параметры панели безопасности консоли сделайте одно из следующих:
При нажатии параметра политики в области сведений дважды щелкните политику безопасности, которую необходимо изменить.
Измените параметр политики безопасности и нажмите кнопку ОК.
Настройка параметра политики безопасности с помощью консоли Редактор локальной групповой политики
Для выполнения этих процедур необходимо иметь соответствующие разрешения на установку и использование консоли управления Microsoft (MMC) и обновление объекта групповой политики (GPO) на контроллере домена.
Откройте редактор локальной групповой политики (gpedit.msc).
В дереве консоли нажмите кнопку Конфигурациякомпьютера, нажмите кнопку Windows Параметрыи нажмите кнопку Безопасность Параметры.
Выполните одно из следующих действий.
В области сведений дважды щелкните параметр политики безопасности, который необходимо изменить.
Если эта политика безопасности еще не определена, выберите поле Определение этих параметров политики.
Измените параметр политики безопасности и нажмите кнопку ОК.
Если вы хотите настроить параметры безопасности для многих устройств в сети, вы можете использовать консоль управления групповой политикой.
Настройка параметра контроллера домена
Следующая процедура описывает настройку параметра политики безопасности только для контроллера домена (от контроллера домена).
Чтобы открыть политику безопасности контроллера домена в дереве консоли, найдите GroupPolicyObject [ComputerName] Политика, щелкните Конфигурация компьютера, нажмите кнопку Windows Параметры, а затем нажмите кнопку Параметры .
Выполните одно из следующих действий.
В области сведений дважды щелкните политику безопасности, которую необходимо изменить.
Если эта политика безопасности еще не определена, выберите поле Определение этих параметров политики.
Измените параметр политики безопасности и нажмите кнопку ОК.
Источник
Основы работы с редактором локальной групповой политики в ОС Windows 10
Групповые политики — это параметры, управляющие функционированием системы. Групповая политика упрощает администрирование, предоставляя администраторам централизованный контроль над привилегиями, правами и возможностями пользователей и компьютеров.
Изменять групповые политики можно с помощью Редактора локальной групповой политики.
В редакциях операционной системы Windows 7 Starter, Home Basic и Home Premium редактор локальной групповой политики недоступен. Также он недоступен в редакциях Home Windows 8 и 10.
Групповые политики в Windows 10 позволяют управлять различными штатными средствами системы:
Для настройки параметров в операционной системе MS Windows 10 используется оснастка Редактор локальной групповой политики. Данная оснастка служит для просмотра и редактирования объектов групповой политики (Group Policy Object, GPO), в которых хранятся параметры локальных политик для компьютера и пользователей.
Оснастку Редактор объектов групповой политики можно запустить, например, введя в окне Выполнить, либо в поисковой строке gpedit.msc.

Рис.1 Окно Выполнить
Оснастка Локальная политика безопасности входит в состав оснастки Редактор

Рис.2 Создание ярлыка для оснастки Редактор локальной групповой политики
Чтобы работать с объектами локальной групповой политики, необходимо войти в систему с учетной записью администратора.
Содержание
Структура редактора групповой политики
Оснастка Редактор локальной групповой политики позволяет изменять политики, распространяющиеся как на компьютеры, так и на пользователей.
В панели пространства имен оснастки Редактор локальной групповой политики представлено два узла: Конфигурация компьютера и Конфигурация пользователя.
Узел Конфигурация компьютера содержит параметры политик, определяющих работу компьютера. Эти политики регулируют функционирование операционной системы, определяют права пользователей в системе, работу системных служб и средств безопасности и т. д.
Узел Конфигурация пользователя содержит параметры политик, определяющих работу пользователей.

Рис.3 Редактор локальной групповой политики
Изменение в групповых политиках по умолчанию в операционной системе Windows применяются через полтора часа (90 мин.). За данную настройку опять же отвечает отдельная политика. Частота обновления определяется политикой Интервал обновления групповой политики для компьютеров, которая расположена в узле Конфигурация компьютера > Административные шаблоны > Система > Групповая политика. Интервал указывается в минутах и определяет, как часто компьютер будет предпринимать попытку обновления политик. Рационально уменьшать интервал обновления групповой политики при частом применении изменений.

Рис.4 Настройка частоты обновления политик

Рис.5 Настройка частоты обновления политик
Если необходимо чтобы изменения групповых политик вступили в силу немедленно, можно принудительно применить измененные параметры, которые были внесены в редакторе локальной групповой политики несколькими способами:

Рис.6 Обновление политик в командной строке
С использованием параметра /target можно указать, будет ли это обновление параметров применяться только для пользователя или только для компьютера. Если не указано, обновляются параметры обеих политик.

Рис.7 Обновление политик для пользователя в командной строке
Пример последовательности действий при редактировании определенной политики
Чтобы на примере рассмотреть настройку политик, в данной статье будет описан механизм скрытия всех апплетов Панели управления, кроме определенных. При администрировании рабочей станции иногда бывает целесообразно скрыть для неопытного пользователя большую часть апплетов Панели управления, оставив только необходимые. Для этого:

Рис.8 Редактирование параметра политики Отображать только указанные объекты панели управления

Рис.9 Редактирование параметра политики Отображать только указанные объекты панели управления

Рис.10 Список разрешенных элементов панели управления

Рис.11 Список элементов панели управления до изменения параметра локальной групповой политики

Рис.12 Список элементов панели управления после изменения параметра локальной групповой политики
Изменения, которые вносятся через редактор локальной групповой политики, будут применены для всех учетных записей, зарегистрированных в системе, включая учетную запись администратора, который инициировал изменения.
Чтобы настраивать политики для конкретных пользователей, в операционной системе Windows применяется многоуровневая локальная групповая политика:
Последовательность действий при добавлении объектов групповой политики через консоль управления (Microsoft Management Console, MMC)
Добавление объекта групповой политики первого уровня

Рис.13 Добавление оснастки через консоль управления

Рис.14 Диалоговое окно Добавление и удаление оснасток

Рис.15 Диалоговое окно выбора объекта групповой политики
Добавление объекта групповой политики второго уровня

Рис.16 Настройка объекта групповой политики второго уровня
Добавление объекта групповой политики третьего уровня

Рис.17 Консоль управления
Теперь, используя данную консоль, можно настраивать политики для определенных пользователей.
Источник
Локальная политика безопасности в Windows 10
В операционных системах семейства Windows присутствует множество оснасток и политик, представляющих собой набор параметров для настройки различных функциональных составляющих ОС. Среди них находится оснастка под названием «Локальная политика безопасности» и отвечает она за редактирование защитных механизмов Виндовс. В рамках сегодняшней статьи мы обсудим компоненты упомянутого инструмента и расскажем о их влиянии на взаимодействие с системой.
Настройка «Локальной политики безопасности» в Windows 10
Как вы уже знаете из предыдущего абзаца, упомянутая политика состоит из нескольких компонентов, каждый из которых собрал в себе параметры по регулированию защищенности самой ОС, пользователей и сетей при обмене данными. Логично будет уделить время каждому разделу, поэтому давайте сразу же начнем детальный разбор.
Запускается «Локальная политика безопасности» одним из четырех способов, каждый будет максимально полезен определенным юзерам. В статье по следующей ссылке вы можете ознакомиться с каждым методом и выбрать подходящий. Однако хотим обратить ваше внимание, что все приведенные сегодня скриншоты сделаны в самом окне инструмента, а не в редакторе локальных групповых политик, из-за чего следует учитывать особенности интерфейсов.
Политики учетных записей
Начнем с первой категории под названием «Политики учетных записей». Разверните ее и откройте раздел «Политика паролей». Справа вы видите перечень параметров, каждый из которых отвечает за ограничения или выполнение действий. Например, в пункте «Минимальная длина пароля» вы самостоятельно указываете количество знаков, а в «Минимальный срок действия пароля» — количество дней на блокировку его изменения.
Дважды щелкните на одном из параметров, чтобы открыть отдельное окно с его свойствами. Как правило, здесь присутствует ограниченное количество кнопок и настроек. Например, в «Минимальный срок действия пароля» вы только выставляете количество дней.
Во вкладке «Объяснение» находится детальное описание каждого параметра от разработчиков. Обычно оно расписано достаточно широко, но большая часть информации является бесполезной или же очевидной, поэтому ее можно опустить, выделив только основные моменты лично для себя.
Во второй папке «Политика блокировки учетной записи» присутствует три политики. Здесь доступна установка времени до сброса счетчика блокировки, пороговое значение блокировки (количество ошибок ввода пароля при входе в систему) и продолжительность блокировки профиля пользователя. О том, как устанавливаются каждые параметры, вы уже узнали из информации выше.
Локальные политики
В разделе «Локальные политики» собрано сразу несколько групп параметров, разделенных по директориям. Первая имеет название «Политика аудита». Если говорить просто, аудит — процедура слежения за действиями юзера с дальнейшим занесением их в журнал событий и безопасности. Справа вы видите несколько пунктов. Их названия говорят сами за себя, поэтому отдельно останавливаться на каждом нет никакого смысла.
Если значение установлено «Нет аудита», действия отслеживаться не будут. В свойствах же на выбор предоставляется два варианта — «Отказ» и «Успех». Поставьте галочку на одном из них или сразу на обоих, чтобы сохранять успешные и прерванные действия.
В папке «Назначение прав пользователя» собраны настройки, позволяющие предоставить группам юзеров доступ для выполнения определенных процессов, например, вход в качестве службы, возможность подключения к интернету, установка или удаление драйверов устройств и многое другое. Ознакомьтесь со всеми пунктами и их описанием самостоятельно, в этом нет ничего сложного.
В «Свойства» вы видите перечень групп пользователей, которым разрешено осуществление заданного действия.
В отдельном окне происходит добавление групп юзеров или только некоторых учетных записей из локальных компьютеров. От вас требуется лишь указать тип объекта и его размещение, а после перезагрузки компьютера все изменения вступят в силу.
Раздел «Параметры безопасности» посвящен обеспечению защищенности двух предыдущих политик. То есть здесь вы можете настроить аудит, который будет отключать систему при невозможности добавления соответствующей записи аудита в журнал, либо же установить ограничение на количество попыток ввода пароля. Параметров здесь насчитывается более тридцати. Условно их можно разделить на группы — аудиты, интерактивный вход в систему, контроль учетных записей, сетевой доступ, устройства и сетевая безопасность. В свойствах вам разрешено активировать или отключать каждую из этих настроек.
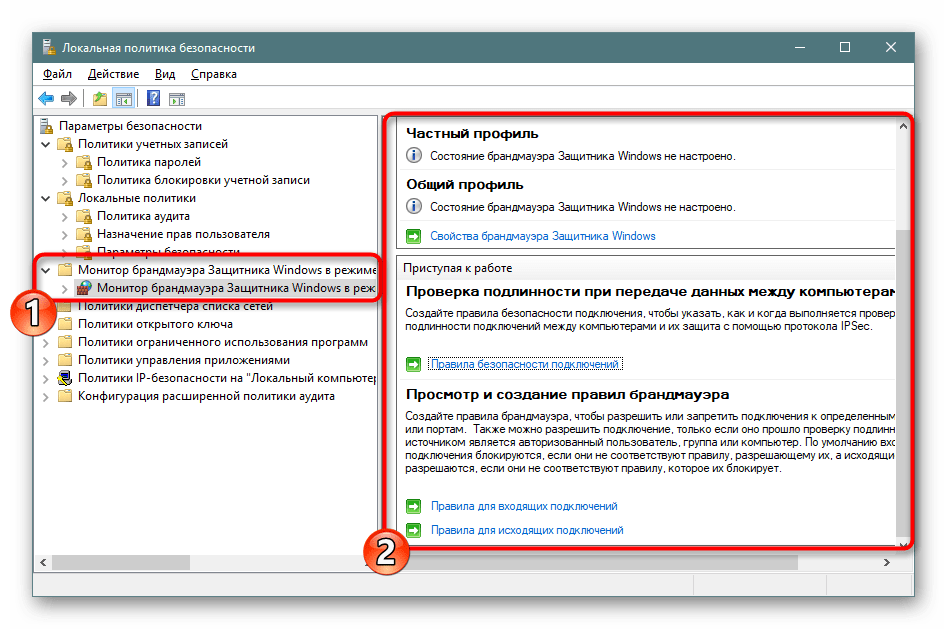
Монитор брандмауэра Защитника Windows в режиме повышенной безопасности
«Монитор брандмауэра Защитника Windows в режиме повышенной безопасности» — один из самых сложных разделов «Локальной политики безопасности». Разработчики попытались упростить процесс наладки входящих и исходящих подключений с помощью добавления Мастера настройки, однако начинающие пользователи все равно с трудом разберутся со всеми пунктами, но эти параметры и крайне редко нужны такой группе юзеров. Здесь доступно создание правил для программ, портов или предопределенных соединений. Вы блокируете либо разрешаете подключение, выбрав при этом сеть и группу.
В этом же разделе происходит определение типа безопасности подключения — изоляция, сервер-сервер, туннель или освобождение от проверки подлинности. Останавливаться на всех настройках нет смысла, ведь это пригодится только опытным администраторам, а они в состоянии самостоятельно обеспечить надежность входящих и исходящих соединений.
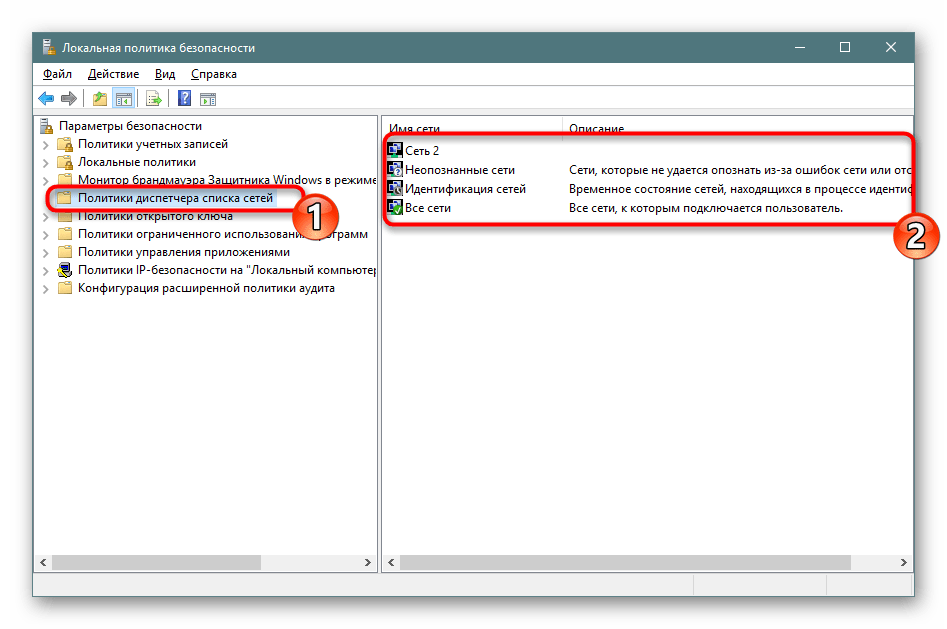
Политики диспетчера списка сетей
Обратите внимание на отдельную директорию «Политики диспетчера списка сетей». Количество отображаемых здесь параметров зависит от активных и доступных интернет-соединений. Например, пункт «Неопознанные сети» или «Идентификация сетей» будет присутствовать всегда, а «Сеть 1», «Сеть 2» и так далее — в зависимости от реализации вашего окружения.
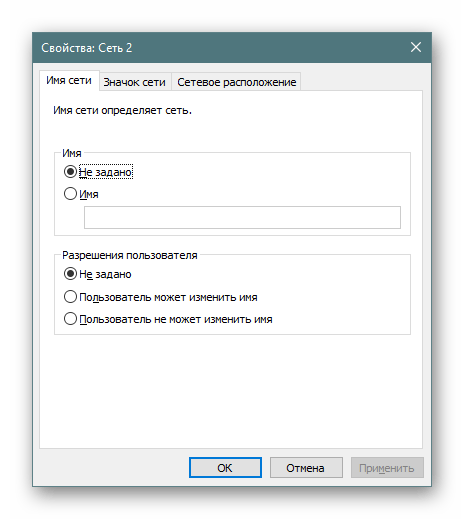
В свойствах вы можете указать имя сети, добавить разрешения для пользователей, установить собственный значок или задать расположение. Все это доступно для каждого параметра и должно применяться отдельно. После выполнения изменений не забывайте их применять и перезагружать компьютер, чтобы они вступали в силу. Иногда может потребоваться и перезагрузка роутера.
Политики открытого ключа
Полезным раздел «Политики открытого ключа» будет только для тех, кто использует компьютеры на предприятии, где для осуществления криптографических операций или других защищенных манипуляций задействованы открытые ключи и центры спецификаций. Все это позволяет гибко производить контроль доверительных отношений между устройствами, обеспечив стабильную и безопасную сеть. Внесения изменений зависят от активного на предприятии центра доверенности.
Политики управления приложениями
В «Политики управления приложениями» находится инструмент «AppLocker». Он включает в себя множество самых разнообразных функций и настроек, позволяющих регулировать работу с программами на ПК. Например, он позволяет создать правило, ограничивающее запуск всех приложений, кроме указанных, либо установить ограничение на изменение файлов программами, задав отдельные аргументы и исключения. Полную информацию по поводу упомянутого инструмента вы можете получить в официальной документации компании Microsoft, там все расписано максимально детально, с объяснением каждого пункта.
Что же касается меню «Свойства», то здесь применение правил настраивается для коллекций, например, исполняемые файлы, установщик Windows, сценарии и упакованные приложения. Каждое значение может применяться принудительно, в обход другим ограничениям «Локальной политики безопасности».
Политики IP-безопасности на «Локальный компьютер»
Настройки в разделе «Политики IP-безопасности на «Локальный компьютер»» имеют некое сходство с теми, что доступны в веб-интерфейсе роутера, например, включение шифрования трафика либо его фильтрация. Пользователь сам создает неограниченное количество правил через встроенный Мастер создания указывает там методы шифрования, ограничения на передачу и прием трафика, а также активирует фильтрацию по IP-адресам (разрешение или запрет на подключение к сети).
На скриншоте ниже вы видите пример одного из таких правил связи с другими компьютерами. Здесь присутствует список IP-фильтров, их действие, методы проверки, конечная точка и тип подключения. Все это задается пользователем вручную, исходя из его потребностей в обеспечении фильтрации передачи и приема трафика с определенных источников.
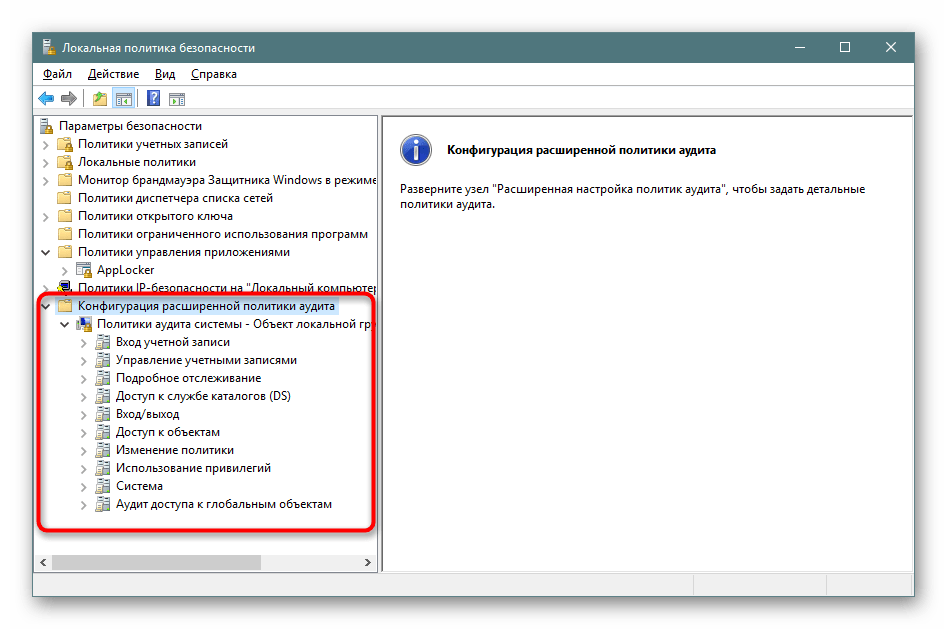
Конфигурация расширенной политики аудита
В одной из предыдущих частей сегодняшней статьи вы уже были ознакомлены с аудитами и их настройкой, однако существуют еще дополнительные параметры, которые вынесены в отдельный раздел. Здесь уже вы видите более обширное действие аудитов — создание/завершение процессов, изменение файловой системы, реестра, политик, управление группами учетных записей пользователей, приложений и многое другое, с чем можете ознакомиться самостоятельно.
Корректировка правил осуществляется точно так же — нужно лишь отметить галочкой «Успех», «Отказ», чтобы запустить процедуру слежения и записи в журнал безопасности.
На этом ознакомление с «Локальной политикой безопасности» в Windows 10 завершено. Как видите, здесь присутствует множество самых полезных параметров, позволяющих организовать хорошую защиту системы. Мы настоятельно советуем перед внесением определенных изменений внимательно изучить описание самого параметра, чтобы понять его принцип работы. Редактирование некоторых правил иногда приводит к серьезным проблемам работы ОС, поэтому делайте все крайне осторожно.
Помимо этой статьи, на сайте еще 12357 инструкций.
Добавьте сайт Lumpics.ru в закладки (CTRL+D) и мы точно еще пригодимся вам.
Отблагодарите автора, поделитесь статьей в социальных сетях.
Источник
| title | description | ms.assetid | ms.reviewer | ms.author | ms.prod | ms.mktglfcycl | ms.sitesec | ms.pagetype | ms.localizationpriority | author | manager | audience | ms.collection | ms.topic | ms.date | ms.technology |
|---|---|---|---|---|---|---|---|---|---|---|---|---|---|---|---|---|
|
Security policy settings (Windows 10) |
This reference topic describes the common scenarios, architecture, and processes for security settings. |
e7ac5204-7f6c-4708-a9f6-6af712ca43b9 |
vinpa |
windows-client |
deploy |
library |
security |
medium |
vinaypamnani-msft |
aaroncz |
ITPro |
highpri |
conceptual |
04/19/2017 |
itpro-security |
Security policy settings
Applies to
- Windows 10
- Windows 11
This reference topic describes the common scenarios, architecture, and processes for security settings.
Security policy settings are rules that administrators configure on a computer or multiple devices for protecting resources on a device or network. The Security Settings extension of the Local Group Policy Editor snap-in allows you to define security configurations as part of a Group Policy Object (GPO). The GPOs are linked to Active Directory containers such as sites, domains, or organizational units, and they enable you to manage security settings for multiple devices from any device joined to the domain. Security settings policies are used as part of your overall security implementation to help secure domain controllers, servers, clients, and other resources in your organization.
Security settings can control:
- User authentication to a network or device.
- The resources that users are permitted to access.
- Whether to record a user’s or group’s actions in the event log.
- Membership in a group.
To manage security configurations for multiple devices, you can use one of the following options:
- Edit specific security settings in a GPO.
- Use the Security Templates snap-in to create a security template that contains the security policies you want to apply, and then import the security template into a Group Policy Object. A security template is a file that represents a security configuration, and it can be imported to a GPO, applied to a local device, or used to analyze security.
For more info about managing security configurations, see Administer security policy settings.
The Security Settings extension of the Local Group Policy Editor includes the following types of security policies:
-
Account Policies. These policies are defined on devices; they affect how user accounts can interact with the computer or domain. Account policies include the following types of policies:
- Password Policy. These policies determine settings for passwords, such as enforcement and lifetimes. Password policies are used for domain accounts.
- Account Lockout Policy. These policies determine the conditions and length of time that an account will be locked out of the system. Account lockout policies are used for domain or local user accounts.
- Kerberos Policy. These policies are used for domain user accounts; they determine Kerberos-related settings, such as ticket lifetimes and enforcement.
-
Local Policies. These policies apply to a computer and include the following types of policy settings:
-
Audit Policy. Specify security settings that control the logging of security events into the Security log on the computer, and specifies what types of security events to log (success, failure, or both).
[!NOTE]
For devices running Windows 7 and later, we recommend to use the settings under Advanced Audit Policy Configuration rather than the Audit Policy settings under Local Policies. -
User Rights Assignment. Specify the users or groups that have sign-in rights or privileges on a device
-
Security Options. Specify security settings for the computer, such as Administrator and Guest Account names; access to floppy disk drives and CD-ROM drives; installation of drivers; sign-in prompts; and so on.
-
-
Windows Firewall with Advanced Security. Specify settings to protect the device on your network by using a stateful firewall that allows you to determine which network traffic is permitted to pass between your device and the network.
-
Network List Manager Policies. Specify settings that you can use to configure different aspects of how networks are listed and displayed on one device or on many devices.
-
Public Key Policies. Specify settings to control Encrypting File System, Data Protection, and BitLocker Drive Encryption in addition to certain certificate paths and services settings.
-
Software Restriction Policies. Specify settings to identify software and to control its ability to run on your local device, organizational unit, domain, or site.
-
Application Control Policies. Specify settings to control which users or groups can run particular applications in your organization based on unique identities of files.
-
IP Security Policies on Local Computer. Specify settings to ensure private, secure communications over IP networks by using cryptographic security services. IPsec establishes trust and security from a source IP address to a destination IP address.
-
Advanced Audit Policy Configuration. Specify settings that control the logging of security events into the security log on the device. The settings under Advanced Audit Policy Configuration provide finer control over which activities to monitor as opposed to the Audit Policy settings under Local Policies.
Policy-based security settings management
The Security Settings extension to Group Policy provides an integrated policy-based management infrastructure to help you manage and enforce your security policies.
You can define and apply security settings policies to users, groups, and network servers and clients through Group Policy and Active Directory Domain Services (AD DS). A group of servers with the same functionality can be created (for example, a Microsoft Web (IIS) server), and then Group Policy Objects can be used to apply common security settings to the group. If more servers are added to this group later, many of the common security settings are automatically applied, reducing deployment and administrative labor.
Common scenarios for using security settings policies
Security settings policies are used to manage the following aspects of security: accounts policy, local policy, user rights assignment, registry values, file and registry Access Control Lists (ACLs), service startup modes, and more.
As part of your security strategy, you can create GPOs with security settings policies configured specifically for the various roles in your organization, such as domain controllers, file servers, member servers, clients, and so on.
You can create an organizational unit (OU) structure that groups devices according to their roles. Using OUs is the best method for separating specific security requirements for the different roles in your network. This approach also allows you to apply customized security templates to each class of server or computer. After creating the security templates, you create a new GPO for each of the OUs, and then import the security template (.inf file) into the new GPO.
Importing a security template to a GPO ensures that any accounts to which the GPO is applied automatically receive the template’s security settings when the Group Policy settings are refreshed. On a workstation or server, the security settings are refreshed at regular intervals (with a random offset of at most 30 minutes), and, on a domain controller, this process occurs every few minutes if changes have occurred in any of the GPO settings that apply. The settings are also refreshed every 16 hours, whether or not any changes have occurred.
[!NOTE]
These refresh settings vary between versions of the operating system and can be configured.
By using Group Policy−based security configurations in conjunction with the delegation of administration, you can ensure that specific security settings, rights, and behavior are applied to all servers and computers within an OU. This approach makes it simple to update many servers with any other changes required in the future.
Dependencies on other operating system technologies
For devices that are members of a Windows Server 2008 or later domain, security settings policies depend on the following technologies:
-
Active Directory Domain Services (AD DS)
The Windows-based directory service, AD DS, stores information about objects on a network and makes this information available to administrators and users. By using AD DS, you can view and manage network objects on the network from a single location, and users can access permitted network resources by using a single sign in.
-
Group Policy
The infrastructure within AD DS that enables directory-based configuration management of user and computer settings on devices running Windows Server. By using Group Policy, you can define configurations for groups of users and computers, including policy settings, registry-based policies, software installation, scripts, folder redirection, Remote Installation Services, Internet Explorer maintenance, and security.
-
Domain Name System (DNS)
A hierarchical naming system used for locating domain names on the Internet and on private TCP/IP networks. DNS provides a service for mapping DNS domain names to IP addresses, and IP addresses to domain names. This service allows users, computers, and applications to query DNS to specify remote systems by fully qualified domain names rather than by IP addresses.
-
Winlogon
A part of the Windows operating system that provides interactive logon support. Winlogon is designed around an interactive logon model that consists of three components: the Winlogon executable, a credential provider, and any number of network providers.
-
Setup
Security configuration interacts with the operating system setup process during a clean installation or upgrade from earlier versions of Windows Server.
-
Security Accounts Manager (SAM)
A Windows service used during the sign-in process. SAM maintains user account information, including groups to which a user belongs.
-
Local Security Authority (LSA)
A protected subsystem that authenticates and signs in users to the local system. LSA also maintains information about all aspects of local security on a system, collectively known as the Local Security Policy of the system.
-
Windows Management Instrumentation (WMI)
A feature of the Microsoft Windows operating system, WMI is the Microsoft implementation of Web-Based Enterprise Management (WBEM), which is an industry initiative to develop a standard technology for accessing management information in an enterprise environment. WMI provides access to information about objects in a managed environment. Through WMI and the WMI application programming interface (API), applications can query for and make changes to static information in the Common Information Model (CIM) repository and dynamic information maintained by the various types of providers.
-
Resultant Set of Policy (RSoP)
An enhanced Group Policy infrastructure that uses WMI in order to make it easier to plan and debug policy settings. RSoP provides public methods that expose what an extension to Group Policy would do in a what-if situation, and what the extension has done in an actual situation. These public methods allow administrators to easily determine the combination of policy settings that apply to, or will apply to, a user or device.
-
Service Control Manager (SCM)
Used for configuration of service startup modes and security.
-
Registry
Used for configuration of registry values and security.
-
File system
Used for configuration of security.
-
File system conversions
Security is set when an administrator converts a file system from FAT to NTFS.
-
Microsoft Management Console (MMC)
The user interface for the Security Settings tool is an extension of the Local Group Policy Editor MMC snap-in.
Security settings policies and Group Policy
The Security Settings extension of the Local Group Policy Editor is part of the Security Configuration Manager tool set. The following components are associated with Security Settings: a configuration engine; an analysis engine; a template and database interface layer; setup integration logic; and the secedit.exe command-line tool. The security configuration engine is responsible for handling security configuration editor-related security requests for the system on which it runs. The analysis engine analyzes system security for a given configuration and saves the result. The template and database interface layer handles reading and writing requests from and to the template or database (for internal storage). The Security Settings extension of the Local Group Policy Editor handles Group Policy from a domain-based or local device. The security configuration logic integrates with setup and manages system security for a clean installation or upgrade to a more recent Windows operating system. Security information is stored in templates (.inf files) or in the Secedit.sdb database.
The following diagram shows Security Settings and related features.
Security Settings Policies and Related Features

-
Scesrv.dll
Provides the core security engine functionality.
-
Scecli.dll
Provides the client-side interfaces to the security configuration engine and provides data to Resultant Set of Policy (RSoP).
-
Wsecedit.dll
The Security Settings extension of Local Group Policy Editor. scecli.dll is loaded into wsecedit.dll to support the Security Settings user interface.
-
Gpedit.dll
The Local Group Policy Editor MMC snap-in.
Security Settings extension architecture
The Security Settings extension of the Local Group Policy Editor is part of the Security Configuration Manager tools, as shown in the following diagram.
Security Settings Architecture

The security settings configuration and analysis tools include a security configuration engine, which provides local computer (non-domain member) and Group Policy−based configuration and analysis of security settings policies. The security configuration engine also supports the creation of security policy files. The primary features of the security configuration engine are scecli.dll and scesrv.dll.
The following list describes these primary features of the security configuration engine and other Security Settings−related features.
-
scesrv.dll
This .dll file is hosted in services.exe and runs under local system context. scesrv.dll provides core Security Configuration Manager functionality, such as import, configure, analyze, and policy propagation.
Scesrv.dll performs configuration and analysis of various security-related system parameters by calling corresponding system APIs, including LSA, SAM, and the registry.
Scesrv.dll exposes APIs such as import, export, configure, and analyze. It checks that the request is made over LRPC (Windows XP) and fails the call if it isn’t.
Communication between parts of the Security Settings extension occurs by using the following methods:
- Component Object Model (COM) calls
- Local Remote Procedure Call (LRPC)
- Lightweight Directory Access Protocol (LDAP)
- Active Directory Service Interfaces (ADSI)
- Server Message Block (SMB)
- Win32 APIs
- Windows Management Instrumentation (WMI) calls
On domain controllers, scesrv.dll receives notifications of changes made to SAM and the LSA that need to be synchronized across domain controllers. Scesrv.dll incorporates those changes into the Default Domain Controller Policy GPO by using in-process scecli.dll template modification APIs.
Scesrv.dll also performs configuration and analysis operations. -
Scecli.dll
This Scecli.dll is the client-side interface or wrapper to scesrv.dll. scecli.dll is loaded into Wsecedit.dll to support MMC snap-ins. It’s used by Setup to configure default system security and security of files, registry keys, and services installed by the Setup API .inf files.
The command-line version of the security configuration and analysis user interfaces, secedit.exe, uses scecli.dll.
Scecli.dll implements the client-side extension for Group Policy.
Scesrv.dll uses scecli.dll to download applicable Group Policy files from SYSVOL in order to apply Group Policy security settings to the local device.
Scecli.dll logs application of security policy into WMI (RSoP).
Scesrv.dll policy filter uses scecli.dll to update Default Domain Controller Policy GPO when changes are made to SAM and LSA.
-
Wsecedit.dll
The Security Settings extension of the Group Policy Object Editor snap-in. You use this tool to configure security settings in a Group Policy Object for a site, domain, or organizational unit. You can also use Security Settings to import security templates to a GPO.
-
Secedit.sdb
This Secedit.sdb is a permanent system database used for policy propagation including a table of persistent settings for rollback purposes.
-
User databases
A user database is any database other than the system database created by administrators for the purposes of configuration or analysis of security.
-
.Inf Templates
These templates are text files that contain declarative security settings. They’re loaded into a database before configuration or analysis. Group Policy security policies are stored in .inf files on the SYSVOL folder of domain controllers, where they’re downloaded (by using file copy) and merged into the system database during policy propagation.
Security settings policy processes and interactions
For a domain-joined device, where Group Policy is administered, security settings are processed in conjunction with Group Policy. Not all settings are configurable.
Group Policy processing
When a computer starts and a user signs in, computer policy and user policy are applied according to the following sequence:
-
The network starts. Remote Procedure Call System Service (RPCSS) and Multiple Universal Naming Convention Provider (MUP) start.
-
An ordered list of Group Policy Objects is obtained for the device. The list might depend on these factors:
- Whether the device is part of a domain and, therefore, subject to Group Policy through Active Directory.
- The location of the device in Active Directory.
- Whether the list of Group Policy Objects has changed. If the list of Group Policy Objects hasn’t changed, no processing is done.
-
Computer policy is applied. These settings are the ones under Computer Configuration from the gathered list. This process is a synchronous one by default and occurs in the following order: local, site, domain, organizational unit, child organizational unit, and so on. No user interface appears while computer policies are processed.
-
Startup scripts run. These scripts are hidden and synchronous by default; each script must complete or time out before the next one starts. The default time-out is 600 seconds. You can use several policy settings to modify this behavior.
-
The user presses CTRL+ALT+DEL to sign in.
-
After the user is validated, the user profile loads; it’s governed by the policy settings that are in effect.
-
An ordered list of Group Policy Objects is obtained for the user. The list might depend on these factors:
- Whether the user is part of a domain and, therefore, subject to Group Policy through Active Directory.
- Whether loopback policy processing is enabled, and if so, the state (Merge or Replace) of the loopback policy setting.
- The location of the user in Active Directory.
- Whether the list of Group Policy Objects has changed. If the list of Group Policy Objects hasn’t changed, no processing is done.
-
User policy is applied. These settings are the ones under User Configuration from the gathered list. These settings are synchronous by default and in the following order: local, site, domain, organizational unit, child organizational unit, and so on. No user interface appears while user policies are processed.
-
Logon scripts run. Group Policy−based logon scripts are hidden and asynchronous by default. The user object script runs last.
-
The operating system user interface that is prescribed by Group Policy appears.
Group Policy Objects storage
A Group Policy Object (GPO) is a virtual object that is identified by a Globally Unique Identifier (GUID) and stored at the domain level. The policy setting information of a GPO is stored in the following two locations:
-
Group Policy containers in Active Directory.
The Group Policy container is an Active Directory container that contains GPO properties, such as version information, GPO status, plus a list of other component settings.
-
Group Policy templates in a domain’s system volume folder (SYSVOL).
The Group Policy template is a file system folder that includes policy data specified by .admx files, security settings, script files, and information about applications that are available for installation. The Group Policy template is located in the SYSVOL folder in the <domain>Policies subfolder.
The GROUP_POLICY_OBJECT structure provides information about a GPO in a GPO list, including the version number of the GPO, a pointer to a string that indicates the Active Directory portion of the GPO, and a pointer to a string that specifies the path to the file system portion of the GPO.
Group Policy processing order
Group Policy settings are processed in the following order:
-
Local Group Policy Object.
Each device running a Windows operating system beginning with Windows XP has exactly one Group Policy Object that is stored locally.
-
Site.
Any Group Policy Objects that have been linked to the site are processed next. Processing is synchronous and in an order that you specify.
-
Domain.
Processing of multiple domain-linked Group Policy Objects is synchronous and in an order you specify.
-
Organizational units.
Group Policy Objects that are linked to the organizational unit that is highest in the Active Directory hierarchy are processed first, then Group Policy Objects that are linked to its child organizational unit, and so on. Finally, the Group Policy Objects that are linked to the organizational unit that contains the user or device are processed.
At the level of each organizational unit in the Active Directory hierarchy, one, many, or no Group Policy Objects can be linked. If several Group Policy Objects are linked to an organizational unit, their processing is synchronous and in an order that you specify.
This order means that the local Group Policy Object is processed first, and Group Policy Objects that are linked to the organizational unit of which the computer or user is a direct member are processed last, which overwrites the earlier Group Policy Objects.
This order is the default processing order and administrators can specify exceptions to this order. A Group Policy Object that is linked to a site, domain, or organizational unit (not a local Group Policy Object) can be set to Enforced with respect to that site, domain, or organizational unit, so that none of its policy settings can be overridden. At any site, domain, or organizational unit, you can mark Group Policy inheritance selectively as Block Inheritance. Group Policy Object links that are set to Enforced are always applied, however, and they can’t be blocked. For more information, see Group Policy Basics – Part 2: Understanding Which GPOs to Apply.
Security settings policy processing
In the context of Group Policy processing, security settings policy is processed in the following order.
-
During Group Policy processing, the Group Policy engine determines which security settings policies to apply.
-
If security settings policies exist in a GPO, Group Policy invokes the Security Settings client-side extension.
-
The Security Settings extension downloads the policy from the appropriate location such as a specific domain controller.
-
The Security Settings extension merges all security settings policies according to precedence rules. The processing is according to the Group Policy processing order of local, site, domain, and organizational unit (OU), as described earlier in the «Group Policy processing order» section. If multiple GPOs are in effect for a given device and there are no conflicting policies, then the policies are cumulative and are merged.
This example uses the Active Directory structure shown in the following figure. A given computer is a member of OU2, to which the GroupMembershipPolGPO GPO is linked. This computer is also subject to the UserRightsPolGPO GPO, which is linked to OU1, higher in the hierarchy. In this case, no conflicting policies exist so the device receives all of the policies contained in both the UserRightsPolGPO and the GroupMembershipPolGPO GPOs.
Multiple GPOs and Merging of Security Policy

-
The resultant security policies are stored in secedit.sdb, the security settings database. The security engine gets the security template files and imports them to secedit.sdb.
-
The security settings policies are applied to devices.
The following figure illustrates the security settings policy processing.

Security Settings Policy Processing

Merging of security policies on domain controllers
Password policies, Kerberos, and some security options are only merged from GPOs that are linked at the root level on the domain. This merging is done to keep those settings synchronized across all domain controllers in the domain. The following security options are merged:
- Network Security: Force sign out when sign-in hours expire
- Accounts: Administrator account status
- Accounts: Guest account status
- Accounts: Rename administrator account
- Accounts: Rename guest account
Another mechanism exists that allows security policy changes made by administrators by using net accounts to be merged into the Default Domain Policy GPO. User rights changes that are made by using Local Security Authority (LSA) APIs are filtered into the Default Domain Controllers Policy GPO.
Special considerations for domain controllers
If an application is installed on a primary domain controller (PDC) with operations master role (also known as flexible single master operations or FSMO) and the application makes changes to user rights or password policy, these changes must be communicated to ensure that synchronization across domain controllers occurs. Scesrv.dll receives a notification of any changes made to the security account manager (SAM) and LSA that need to be synchronized across domain controllers and then incorporates the changes into the Default Domain Controller Policy GPO by using scecli.dll template modification APIs.
When security settings are applied
After you’ve edited the security settings policies, the settings are refreshed on the computers in the organizational unit linked to your Group Policy Object in the following instances:
- When a device is restarted.
- Every 90 minutes on a workstation or server and every 5 minutes on a domain controller. This refresh interval is configurable.
- By default, Security policy settings delivered by Group Policy are also applied every 16 hours (960 minutes) even if a GPO hasn’t changed.
Persistence of security settings policy
Security settings can persist even if a setting is no longer defined in the policy that originally applied it.
Security settings might persist in the following cases:
- The setting hasn’t been previously defined for the device.
- The setting is for a registry security object.
- The settings are for a file system security object.
All settings applied through local policy or through a Group Policy Object are stored in a local database on your computer. Whenever a security setting is modified, the computer saves the security setting value to the local database, which retains a history of all the settings that have been applied to the computer. If a policy first defines a security setting and then no longer defines that setting, then the setting takes on the previous value in the database. If a previous value doesn’t exist in the database, then the setting doesn’t revert to anything and remains defined as is.
This behavior is sometimes referred to as «tattooing».
Registry and file security settings will maintain the values applied through Group Policy until that setting is set to other values.
Permissions required for policy to apply
Both Apply Group Policy and Read permissions are required to have the settings from a Group Policy Object apply to users or groups, and computers.
Filtering security policy
By default, all GPOs have Read and Apply Group Policy both Allowed for the Authenticated Users group. The Authenticated Users group includes both users and computers. Security settings policies are computer-based. To specify which client computers will or won’t have a Group Policy Object applied to them, you can deny them either the Apply Group Policy or Read permission on that Group Policy Object. Changing these permissions allows you to limit the scope of the GPO to a specific set of computers within a site, domain, or OU.
[!NOTE]
Do not use security policy filtering on a domain controller as this would prevent security policy from applying to it.
Migration of GPOs containing security settings
In some situations, you might want to migrate GPOs from one domain environment to another environment. The two most common scenarios are test-to-production migration, and production-to-production migration. The GPO copying process has implications for some types of security settings.
Data for a single GPO is stored in multiple locations and in various formats; some data is contained in Active Directory and other data is stored on the SYSVOL share on the domain controllers. Certain policy data might be valid in one domain but might be invalid in the domain to which the GPO is being copied. For example, Security Identifiers (SIDs) stored in security policy settings are often domain-specific. So copying GPOs isn’t as simple as taking a folder and copying it from one device to another.
The following security policies can contain security principals and might require some more work to successfully move them from one domain to another.
- User rights assignment
- Restricted groups
- Services
- File system
- Registry
- The GPO DACL, if you choose to preserve it during a copy operation
To ensure that data is copied correctly, you can use Group Policy Management Console (GPMC). When there’s a migration of a GPO from one domain to another, GPMC ensures that all relevant data is properly copied. GPMC also offers migration tables, which can be used to update domain-specific data to new values as part of the migration process. GPMC hides much of the complexity involved in the migrating GPO operations, and it provides simple and reliable mechanisms for performing operations such as copy and backup of GPOs.
In this section
| Topic | Description |
|---|---|
| Administer security policy settings | This article discusses different methods to administer security policy settings on a local device or throughout a small- or medium-sized organization. |
| Configure security policy settings | Describes steps to configure a security policy setting on the local device, on a domain-joined device, and on a domain controller. |
| Security policy settings reference | This reference of security settings provides information about how to implement and manage security policies, including setting options and security considerations. |
| title | description | ms.assetid | ms.reviewer | ms.author | ms.prod | ms.mktglfcycl | ms.sitesec | ms.pagetype | ms.localizationpriority | author | manager | audience | ms.collection | ms.topic | ms.date | ms.technology |
|---|---|---|---|---|---|---|---|---|---|---|---|---|---|---|---|---|
|
Security policy settings (Windows 10) |
This reference topic describes the common scenarios, architecture, and processes for security settings. |
e7ac5204-7f6c-4708-a9f6-6af712ca43b9 |
vinpa |
windows-client |
deploy |
library |
security |
medium |
vinaypamnani-msft |
aaroncz |
ITPro |
highpri |
conceptual |
04/19/2017 |
itpro-security |
Security policy settings
Applies to
- Windows 10
- Windows 11
This reference topic describes the common scenarios, architecture, and processes for security settings.
Security policy settings are rules that administrators configure on a computer or multiple devices for protecting resources on a device or network. The Security Settings extension of the Local Group Policy Editor snap-in allows you to define security configurations as part of a Group Policy Object (GPO). The GPOs are linked to Active Directory containers such as sites, domains, or organizational units, and they enable you to manage security settings for multiple devices from any device joined to the domain. Security settings policies are used as part of your overall security implementation to help secure domain controllers, servers, clients, and other resources in your organization.
Security settings can control:
- User authentication to a network or device.
- The resources that users are permitted to access.
- Whether to record a user’s or group’s actions in the event log.
- Membership in a group.
To manage security configurations for multiple devices, you can use one of the following options:
- Edit specific security settings in a GPO.
- Use the Security Templates snap-in to create a security template that contains the security policies you want to apply, and then import the security template into a Group Policy Object. A security template is a file that represents a security configuration, and it can be imported to a GPO, applied to a local device, or used to analyze security.
For more info about managing security configurations, see Administer security policy settings.
The Security Settings extension of the Local Group Policy Editor includes the following types of security policies:
-
Account Policies. These policies are defined on devices; they affect how user accounts can interact with the computer or domain. Account policies include the following types of policies:
- Password Policy. These policies determine settings for passwords, such as enforcement and lifetimes. Password policies are used for domain accounts.
- Account Lockout Policy. These policies determine the conditions and length of time that an account will be locked out of the system. Account lockout policies are used for domain or local user accounts.
- Kerberos Policy. These policies are used for domain user accounts; they determine Kerberos-related settings, such as ticket lifetimes and enforcement.
-
Local Policies. These policies apply to a computer and include the following types of policy settings:
-
Audit Policy. Specify security settings that control the logging of security events into the Security log on the computer, and specifies what types of security events to log (success, failure, or both).
[!NOTE]
For devices running Windows 7 and later, we recommend to use the settings under Advanced Audit Policy Configuration rather than the Audit Policy settings under Local Policies. -
User Rights Assignment. Specify the users or groups that have sign-in rights or privileges on a device
-
Security Options. Specify security settings for the computer, such as Administrator and Guest Account names; access to floppy disk drives and CD-ROM drives; installation of drivers; sign-in prompts; and so on.
-
-
Windows Firewall with Advanced Security. Specify settings to protect the device on your network by using a stateful firewall that allows you to determine which network traffic is permitted to pass between your device and the network.
-
Network List Manager Policies. Specify settings that you can use to configure different aspects of how networks are listed and displayed on one device or on many devices.
-
Public Key Policies. Specify settings to control Encrypting File System, Data Protection, and BitLocker Drive Encryption in addition to certain certificate paths and services settings.
-
Software Restriction Policies. Specify settings to identify software and to control its ability to run on your local device, organizational unit, domain, or site.
-
Application Control Policies. Specify settings to control which users or groups can run particular applications in your organization based on unique identities of files.
-
IP Security Policies on Local Computer. Specify settings to ensure private, secure communications over IP networks by using cryptographic security services. IPsec establishes trust and security from a source IP address to a destination IP address.
-
Advanced Audit Policy Configuration. Specify settings that control the logging of security events into the security log on the device. The settings under Advanced Audit Policy Configuration provide finer control over which activities to monitor as opposed to the Audit Policy settings under Local Policies.
Policy-based security settings management
The Security Settings extension to Group Policy provides an integrated policy-based management infrastructure to help you manage and enforce your security policies.
You can define and apply security settings policies to users, groups, and network servers and clients through Group Policy and Active Directory Domain Services (AD DS). A group of servers with the same functionality can be created (for example, a Microsoft Web (IIS) server), and then Group Policy Objects can be used to apply common security settings to the group. If more servers are added to this group later, many of the common security settings are automatically applied, reducing deployment and administrative labor.
Common scenarios for using security settings policies
Security settings policies are used to manage the following aspects of security: accounts policy, local policy, user rights assignment, registry values, file and registry Access Control Lists (ACLs), service startup modes, and more.
As part of your security strategy, you can create GPOs with security settings policies configured specifically for the various roles in your organization, such as domain controllers, file servers, member servers, clients, and so on.
You can create an organizational unit (OU) structure that groups devices according to their roles. Using OUs is the best method for separating specific security requirements for the different roles in your network. This approach also allows you to apply customized security templates to each class of server or computer. After creating the security templates, you create a new GPO for each of the OUs, and then import the security template (.inf file) into the new GPO.
Importing a security template to a GPO ensures that any accounts to which the GPO is applied automatically receive the template’s security settings when the Group Policy settings are refreshed. On a workstation or server, the security settings are refreshed at regular intervals (with a random offset of at most 30 minutes), and, on a domain controller, this process occurs every few minutes if changes have occurred in any of the GPO settings that apply. The settings are also refreshed every 16 hours, whether or not any changes have occurred.
[!NOTE]
These refresh settings vary between versions of the operating system and can be configured.
By using Group Policy−based security configurations in conjunction with the delegation of administration, you can ensure that specific security settings, rights, and behavior are applied to all servers and computers within an OU. This approach makes it simple to update many servers with any other changes required in the future.
Dependencies on other operating system technologies
For devices that are members of a Windows Server 2008 or later domain, security settings policies depend on the following technologies:
-
Active Directory Domain Services (AD DS)
The Windows-based directory service, AD DS, stores information about objects on a network and makes this information available to administrators and users. By using AD DS, you can view and manage network objects on the network from a single location, and users can access permitted network resources by using a single sign in.
-
Group Policy
The infrastructure within AD DS that enables directory-based configuration management of user and computer settings on devices running Windows Server. By using Group Policy, you can define configurations for groups of users and computers, including policy settings, registry-based policies, software installation, scripts, folder redirection, Remote Installation Services, Internet Explorer maintenance, and security.
-
Domain Name System (DNS)
A hierarchical naming system used for locating domain names on the Internet and on private TCP/IP networks. DNS provides a service for mapping DNS domain names to IP addresses, and IP addresses to domain names. This service allows users, computers, and applications to query DNS to specify remote systems by fully qualified domain names rather than by IP addresses.
-
Winlogon
A part of the Windows operating system that provides interactive logon support. Winlogon is designed around an interactive logon model that consists of three components: the Winlogon executable, a credential provider, and any number of network providers.
-
Setup
Security configuration interacts with the operating system setup process during a clean installation or upgrade from earlier versions of Windows Server.
-
Security Accounts Manager (SAM)
A Windows service used during the sign-in process. SAM maintains user account information, including groups to which a user belongs.
-
Local Security Authority (LSA)
A protected subsystem that authenticates and signs in users to the local system. LSA also maintains information about all aspects of local security on a system, collectively known as the Local Security Policy of the system.
-
Windows Management Instrumentation (WMI)
A feature of the Microsoft Windows operating system, WMI is the Microsoft implementation of Web-Based Enterprise Management (WBEM), which is an industry initiative to develop a standard technology for accessing management information in an enterprise environment. WMI provides access to information about objects in a managed environment. Through WMI and the WMI application programming interface (API), applications can query for and make changes to static information in the Common Information Model (CIM) repository and dynamic information maintained by the various types of providers.
-
Resultant Set of Policy (RSoP)
An enhanced Group Policy infrastructure that uses WMI in order to make it easier to plan and debug policy settings. RSoP provides public methods that expose what an extension to Group Policy would do in a what-if situation, and what the extension has done in an actual situation. These public methods allow administrators to easily determine the combination of policy settings that apply to, or will apply to, a user or device.
-
Service Control Manager (SCM)
Used for configuration of service startup modes and security.
-
Registry
Used for configuration of registry values and security.
-
File system
Used for configuration of security.
-
File system conversions
Security is set when an administrator converts a file system from FAT to NTFS.
-
Microsoft Management Console (MMC)
The user interface for the Security Settings tool is an extension of the Local Group Policy Editor MMC snap-in.
Security settings policies and Group Policy
The Security Settings extension of the Local Group Policy Editor is part of the Security Configuration Manager tool set. The following components are associated with Security Settings: a configuration engine; an analysis engine; a template and database interface layer; setup integration logic; and the secedit.exe command-line tool. The security configuration engine is responsible for handling security configuration editor-related security requests for the system on which it runs. The analysis engine analyzes system security for a given configuration and saves the result. The template and database interface layer handles reading and writing requests from and to the template or database (for internal storage). The Security Settings extension of the Local Group Policy Editor handles Group Policy from a domain-based or local device. The security configuration logic integrates with setup and manages system security for a clean installation or upgrade to a more recent Windows operating system. Security information is stored in templates (.inf files) or in the Secedit.sdb database.
The following diagram shows Security Settings and related features.
Security Settings Policies and Related Features
-
Scesrv.dll
Provides the core security engine functionality.
-
Scecli.dll
Provides the client-side interfaces to the security configuration engine and provides data to Resultant Set of Policy (RSoP).
-
Wsecedit.dll
The Security Settings extension of Local Group Policy Editor. scecli.dll is loaded into wsecedit.dll to support the Security Settings user interface.
-
Gpedit.dll
The Local Group Policy Editor MMC snap-in.
Security Settings extension architecture
The Security Settings extension of the Local Group Policy Editor is part of the Security Configuration Manager tools, as shown in the following diagram.
Security Settings Architecture
The security settings configuration and analysis tools include a security configuration engine, which provides local computer (non-domain member) and Group Policy−based configuration and analysis of security settings policies. The security configuration engine also supports the creation of security policy files. The primary features of the security configuration engine are scecli.dll and scesrv.dll.
The following list describes these primary features of the security configuration engine and other Security Settings−related features.
-
scesrv.dll
This .dll file is hosted in services.exe and runs under local system context. scesrv.dll provides core Security Configuration Manager functionality, such as import, configure, analyze, and policy propagation.
Scesrv.dll performs configuration and analysis of various security-related system parameters by calling corresponding system APIs, including LSA, SAM, and the registry.
Scesrv.dll exposes APIs such as import, export, configure, and analyze. It checks that the request is made over LRPC (Windows XP) and fails the call if it isn’t.
Communication between parts of the Security Settings extension occurs by using the following methods:
- Component Object Model (COM) calls
- Local Remote Procedure Call (LRPC)
- Lightweight Directory Access Protocol (LDAP)
- Active Directory Service Interfaces (ADSI)
- Server Message Block (SMB)
- Win32 APIs
- Windows Management Instrumentation (WMI) calls
On domain controllers, scesrv.dll receives notifications of changes made to SAM and the LSA that need to be synchronized across domain controllers. Scesrv.dll incorporates those changes into the Default Domain Controller Policy GPO by using in-process scecli.dll template modification APIs.
Scesrv.dll also performs configuration and analysis operations. -
Scecli.dll
This Scecli.dll is the client-side interface or wrapper to scesrv.dll. scecli.dll is loaded into Wsecedit.dll to support MMC snap-ins. It’s used by Setup to configure default system security and security of files, registry keys, and services installed by the Setup API .inf files.
The command-line version of the security configuration and analysis user interfaces, secedit.exe, uses scecli.dll.
Scecli.dll implements the client-side extension for Group Policy.
Scesrv.dll uses scecli.dll to download applicable Group Policy files from SYSVOL in order to apply Group Policy security settings to the local device.
Scecli.dll logs application of security policy into WMI (RSoP).
Scesrv.dll policy filter uses scecli.dll to update Default Domain Controller Policy GPO when changes are made to SAM and LSA.
-
Wsecedit.dll
The Security Settings extension of the Group Policy Object Editor snap-in. You use this tool to configure security settings in a Group Policy Object for a site, domain, or organizational unit. You can also use Security Settings to import security templates to a GPO.
-
Secedit.sdb
This Secedit.sdb is a permanent system database used for policy propagation including a table of persistent settings for rollback purposes.
-
User databases
A user database is any database other than the system database created by administrators for the purposes of configuration or analysis of security.
-
.Inf Templates
These templates are text files that contain declarative security settings. They’re loaded into a database before configuration or analysis. Group Policy security policies are stored in .inf files on the SYSVOL folder of domain controllers, where they’re downloaded (by using file copy) and merged into the system database during policy propagation.
Security settings policy processes and interactions
For a domain-joined device, where Group Policy is administered, security settings are processed in conjunction with Group Policy. Not all settings are configurable.
Group Policy processing
When a computer starts and a user signs in, computer policy and user policy are applied according to the following sequence:
-
The network starts. Remote Procedure Call System Service (RPCSS) and Multiple Universal Naming Convention Provider (MUP) start.
-
An ordered list of Group Policy Objects is obtained for the device. The list might depend on these factors:
- Whether the device is part of a domain and, therefore, subject to Group Policy through Active Directory.
- The location of the device in Active Directory.
- Whether the list of Group Policy Objects has changed. If the list of Group Policy Objects hasn’t changed, no processing is done.
-
Computer policy is applied. These settings are the ones under Computer Configuration from the gathered list. This process is a synchronous one by default and occurs in the following order: local, site, domain, organizational unit, child organizational unit, and so on. No user interface appears while computer policies are processed.
-
Startup scripts run. These scripts are hidden and synchronous by default; each script must complete or time out before the next one starts. The default time-out is 600 seconds. You can use several policy settings to modify this behavior.
-
The user presses CTRL+ALT+DEL to sign in.
-
After the user is validated, the user profile loads; it’s governed by the policy settings that are in effect.
-
An ordered list of Group Policy Objects is obtained for the user. The list might depend on these factors:
- Whether the user is part of a domain and, therefore, subject to Group Policy through Active Directory.
- Whether loopback policy processing is enabled, and if so, the state (Merge or Replace) of the loopback policy setting.
- The location of the user in Active Directory.
- Whether the list of Group Policy Objects has changed. If the list of Group Policy Objects hasn’t changed, no processing is done.
-
User policy is applied. These settings are the ones under User Configuration from the gathered list. These settings are synchronous by default and in the following order: local, site, domain, organizational unit, child organizational unit, and so on. No user interface appears while user policies are processed.
-
Logon scripts run. Group Policy−based logon scripts are hidden and asynchronous by default. The user object script runs last.
-
The operating system user interface that is prescribed by Group Policy appears.
Group Policy Objects storage
A Group Policy Object (GPO) is a virtual object that is identified by a Globally Unique Identifier (GUID) and stored at the domain level. The policy setting information of a GPO is stored in the following two locations:
-
Group Policy containers in Active Directory.
The Group Policy container is an Active Directory container that contains GPO properties, such as version information, GPO status, plus a list of other component settings.
-
Group Policy templates in a domain’s system volume folder (SYSVOL).
The Group Policy template is a file system folder that includes policy data specified by .admx files, security settings, script files, and information about applications that are available for installation. The Group Policy template is located in the SYSVOL folder in the <domain>Policies subfolder.
The GROUP_POLICY_OBJECT structure provides information about a GPO in a GPO list, including the version number of the GPO, a pointer to a string that indicates the Active Directory portion of the GPO, and a pointer to a string that specifies the path to the file system portion of the GPO.
Group Policy processing order
Group Policy settings are processed in the following order:
-
Local Group Policy Object.
Each device running a Windows operating system beginning with Windows XP has exactly one Group Policy Object that is stored locally.
-
Site.
Any Group Policy Objects that have been linked to the site are processed next. Processing is synchronous and in an order that you specify.
-
Domain.
Processing of multiple domain-linked Group Policy Objects is synchronous and in an order you specify.
-
Organizational units.
Group Policy Objects that are linked to the organizational unit that is highest in the Active Directory hierarchy are processed first, then Group Policy Objects that are linked to its child organizational unit, and so on. Finally, the Group Policy Objects that are linked to the organizational unit that contains the user or device are processed.
At the level of each organizational unit in the Active Directory hierarchy, one, many, or no Group Policy Objects can be linked. If several Group Policy Objects are linked to an organizational unit, their processing is synchronous and in an order that you specify.
This order means that the local Group Policy Object is processed first, and Group Policy Objects that are linked to the organizational unit of which the computer or user is a direct member are processed last, which overwrites the earlier Group Policy Objects.
This order is the default processing order and administrators can specify exceptions to this order. A Group Policy Object that is linked to a site, domain, or organizational unit (not a local Group Policy Object) can be set to Enforced with respect to that site, domain, or organizational unit, so that none of its policy settings can be overridden. At any site, domain, or organizational unit, you can mark Group Policy inheritance selectively as Block Inheritance. Group Policy Object links that are set to Enforced are always applied, however, and they can’t be blocked. For more information, see Group Policy Basics – Part 2: Understanding Which GPOs to Apply.
Security settings policy processing
In the context of Group Policy processing, security settings policy is processed in the following order.
-
During Group Policy processing, the Group Policy engine determines which security settings policies to apply.
-
If security settings policies exist in a GPO, Group Policy invokes the Security Settings client-side extension.
-
The Security Settings extension downloads the policy from the appropriate location such as a specific domain controller.
-
The Security Settings extension merges all security settings policies according to precedence rules. The processing is according to the Group Policy processing order of local, site, domain, and organizational unit (OU), as described earlier in the «Group Policy processing order» section. If multiple GPOs are in effect for a given device and there are no conflicting policies, then the policies are cumulative and are merged.
This example uses the Active Directory structure shown in the following figure. A given computer is a member of OU2, to which the GroupMembershipPolGPO GPO is linked. This computer is also subject to the UserRightsPolGPO GPO, which is linked to OU1, higher in the hierarchy. In this case, no conflicting policies exist so the device receives all of the policies contained in both the UserRightsPolGPO and the GroupMembershipPolGPO GPOs.
Multiple GPOs and Merging of Security Policy
-
The resultant security policies are stored in secedit.sdb, the security settings database. The security engine gets the security template files and imports them to secedit.sdb.
-
The security settings policies are applied to devices.
The following figure illustrates the security settings policy processing.
Security Settings Policy Processing
Merging of security policies on domain controllers
Password policies, Kerberos, and some security options are only merged from GPOs that are linked at the root level on the domain. This merging is done to keep those settings synchronized across all domain controllers in the domain. The following security options are merged:
- Network Security: Force sign out when sign-in hours expire
- Accounts: Administrator account status
- Accounts: Guest account status
- Accounts: Rename administrator account
- Accounts: Rename guest account
Another mechanism exists that allows security policy changes made by administrators by using net accounts to be merged into the Default Domain Policy GPO. User rights changes that are made by using Local Security Authority (LSA) APIs are filtered into the Default Domain Controllers Policy GPO.
Special considerations for domain controllers
If an application is installed on a primary domain controller (PDC) with operations master role (also known as flexible single master operations or FSMO) and the application makes changes to user rights or password policy, these changes must be communicated to ensure that synchronization across domain controllers occurs. Scesrv.dll receives a notification of any changes made to the security account manager (SAM) and LSA that need to be synchronized across domain controllers and then incorporates the changes into the Default Domain Controller Policy GPO by using scecli.dll template modification APIs.
When security settings are applied
After you’ve edited the security settings policies, the settings are refreshed on the computers in the organizational unit linked to your Group Policy Object in the following instances:
- When a device is restarted.
- Every 90 minutes on a workstation or server and every 5 minutes on a domain controller. This refresh interval is configurable.
- By default, Security policy settings delivered by Group Policy are also applied every 16 hours (960 minutes) even if a GPO hasn’t changed.
Persistence of security settings policy
Security settings can persist even if a setting is no longer defined in the policy that originally applied it.
Security settings might persist in the following cases:
- The setting hasn’t been previously defined for the device.
- The setting is for a registry security object.
- The settings are for a file system security object.
All settings applied through local policy or through a Group Policy Object are stored in a local database on your computer. Whenever a security setting is modified, the computer saves the security setting value to the local database, which retains a history of all the settings that have been applied to the computer. If a policy first defines a security setting and then no longer defines that setting, then the setting takes on the previous value in the database. If a previous value doesn’t exist in the database, then the setting doesn’t revert to anything and remains defined as is.
This behavior is sometimes referred to as «tattooing».
Registry and file security settings will maintain the values applied through Group Policy until that setting is set to other values.
Permissions required for policy to apply
Both Apply Group Policy and Read permissions are required to have the settings from a Group Policy Object apply to users or groups, and computers.
Filtering security policy
By default, all GPOs have Read and Apply Group Policy both Allowed for the Authenticated Users group. The Authenticated Users group includes both users and computers. Security settings policies are computer-based. To specify which client computers will or won’t have a Group Policy Object applied to them, you can deny them either the Apply Group Policy or Read permission on that Group Policy Object. Changing these permissions allows you to limit the scope of the GPO to a specific set of computers within a site, domain, or OU.
[!NOTE]
Do not use security policy filtering on a domain controller as this would prevent security policy from applying to it.
Migration of GPOs containing security settings
In some situations, you might want to migrate GPOs from one domain environment to another environment. The two most common scenarios are test-to-production migration, and production-to-production migration. The GPO copying process has implications for some types of security settings.
Data for a single GPO is stored in multiple locations and in various formats; some data is contained in Active Directory and other data is stored on the SYSVOL share on the domain controllers. Certain policy data might be valid in one domain but might be invalid in the domain to which the GPO is being copied. For example, Security Identifiers (SIDs) stored in security policy settings are often domain-specific. So copying GPOs isn’t as simple as taking a folder and copying it from one device to another.
The following security policies can contain security principals and might require some more work to successfully move them from one domain to another.
- User rights assignment
- Restricted groups
- Services
- File system
- Registry
- The GPO DACL, if you choose to preserve it during a copy operation
To ensure that data is copied correctly, you can use Group Policy Management Console (GPMC). When there’s a migration of a GPO from one domain to another, GPMC ensures that all relevant data is properly copied. GPMC also offers migration tables, which can be used to update domain-specific data to new values as part of the migration process. GPMC hides much of the complexity involved in the migrating GPO operations, and it provides simple and reliable mechanisms for performing operations such as copy and backup of GPOs.
In this section
| Topic | Description |
|---|---|
| Administer security policy settings | This article discusses different methods to administer security policy settings on a local device or throughout a small- or medium-sized organization. |
| Configure security policy settings | Describes steps to configure a security policy setting on the local device, on a domain-joined device, and on a domain controller. |
| Security policy settings reference | This reference of security settings provides information about how to implement and manage security policies, including setting options and security considerations. |
Локальная политика безопасности (Local Security Policy) — мощный инструмент, который позволяет контролировать различные параметры безопасности на вашем компьютере в операционной системе Windows. Локальная политика безопасности Windows позволяет ограничить использование некоторых функций или разрешить доступ к ним только определенным пользователям.
Вы можете использовать функции локальной политики безопасности для повышения безопасности своего локального компьютера с операционной системой Windows. Оснастка «Локальная политика безопасности» позволяет пользователю управлять политиками паролей, учетных записей, прав пользователей, аудита, управления приложениями и так далее.
Содержание:
- Как открыть локальную политику безопасности через поиск Windows
- Запуск локальной политики безопасности с помощью команды «Выполнить»
- Открытие локальной политики безопасности с помощью меню «Пуск»
- Вход в локальную политику безопасности через Панель управления
- Как открыть локальную политику безопасности с помощью Диспетчера задач
- Переход к локальной политики безопасности из адресной строки Проводника
- Как запустить локальную политику безопасности из системной папки Windows
- Как запустить утилиту локальная политика безопасности с помощью командной строки или PowerShell
- Запуск локальной политику безопасности с помощью редактора локальной групповой политики
- Как закрепить локальною политику безопасности на панели задач
- Выводы статьи
- Как открыть локальную политику безопасности Windows (видео)
Перед пользователем встает вопрос, где находится локальная политика безопасности, чтобы воспользоваться функциями этого инструмента. Существует несколько способов для получения доступа к политикам безопасности локального компьютера.
Вы можете столкнуться с тем, что локальная политика безопасности отсутствует на вашем компьютере. В этом случае непонятно, где локальные политики безопасности находятся на данном ПК.
Необходимо учитывать, что локальная политика безопасности используется только в старших версиях операционной системы Windows: Корпоративной, Профессиональной и для образовательных учреждений. В Домашних версиях Windows этого инструмента нет, поэтому вы не сможете войти в управление локальными политиками безопасности.
Для выполнения настройки локальных политик безопасности необходимо войти в Windows с учетной записью администратора или у вас должны быть права администратора.
В этом руководстве перечислены способы открыть локальную политику безопасности в Windows 10 или Windows 11, используя разные методы системного средства.
Как открыть локальную политику безопасности через поиск Windows
Панель поиска Windows помогает найти нужные файлы, папки и приложения на вашем устройстве, в том числе и системные инструменты.
Выполните следующие действия:
- Щелкните по значку поиска на панели задач, чтобы открыть поиск Windows.
- В строке поиска ведите выражение «локальная политика безопасности».
- Откройте локальную политику безопасности.

- На экране вашего компьютера откроется редактор локальной политики безопасности, в котором вносятся необходимые изменения в параметрах безопасности компьютера.

Запуск локальной политики безопасности с помощью команды «Выполнить»
С помощью выполнения команд в окне «Выполнить» вы можете быстро открывать программы или системные средства на вашем компьютере. Вызывает приложение «Локальная политика безопасности» команда «secpol.msc», которую мы будем использовать в разных методах из этой статьи.
Проделайте следующее:
- Нажмите на клавиатуре «Win» + «R».
- В диалоговое окно «Выполнить» введите команду «msc», а затем нажмите «Enter».

Это действие запустит локальную политику безопасности.
Открытие локальной политики безопасности с помощью меню «Пуск»
В меню «Пуск» в Windows вы можете найти большинство программ на вашем компьютере, включая системные средства Windows.
Локальная политика безопасности Windows 11 запускается следующим образом:
- Откройте меню «Пуск», нажмите на кнопку «Все приложения» в правом верхнем углу.
- Прокрутите страницу вниз, а затем щелкните по «Инструменты Windows».
- В окне «Инструменты Windows» найдите «Локальная политика безопасности» и дважды щелкните по ней.

Локальная политика безопасности Windows 10 открывается из меню «Пуск» таким способом:
- Войдите в меню «Пуск».
- В списке программ найдите папку «Средства администрирования Windows».
- Щелкните по значку «Локальная политика безопасности».

Вход в локальную политику безопасности через Панель управления
Панель управления Windows обеспечивает доступ к различным системным инструментам и настройкам операционной системы.
Сделайте следующее:
- Нажимайте на клавиши «Win» + «R»,
- Введите «control panel» в диалоговом окне «Выполнить» и нажмите кнопку «ОК».
- В окне «Все элементы панели управления» выберите представление для просмотра крупными или мелкими значками.
- Нажмите на «Инструменты Windows».

- В окне «Инструменты Windows» дважды щелкните по значку «Локальная политика безопасности».
Как открыть локальную политику безопасности с помощью Диспетчера задач
Диспетчер задач Windows предоставляет сведения об активных процессах и программах, запущенных на компьютере, другую полезную информацию. Этот инструмент можно использовать не только для завершения или остановки процессов и служб, но и для запуска программ на вашем компьютере.
Воспользуйтесь этими рекомендациями:
- Щелкните правой кнопкой мыши по меню «Пуск».
- В контекстном меню выберите «Диспетчер задач».
- Во вкладке «Процессы» нажмите «Запустить новую задачу» на верхней панели в Windows В Windows 10 откройте меню «Файл», а там кликните «Запустить новую задачу».
- В открывшемся окне, в поле «Открыть:» введите «secpol.msc».
- Нажмите «ОК».

Переход к локальной политики безопасности из адресной строки Проводника
Проводник Windows имеет адресную строку, которую можно использовать для доступа к локальной политике безопасности.
Выполните инструкцию:
- Откройте Проводник Windows.
- Щелкните по адресной строке, введите «secpol.msc».
- Нажмите «Enter» или на стрелку справа от адресной строки.

Как запустить локальную политику безопасности из системной папки Windows
Вы можете запустить локальную политика безопасности непосредственно из папки «Windows», в которой располагается операционная система на компьютере.
Пройдите шаги:
- Откройте окно Проводника.
- Перейдите в следующую папку:
C:WindowsSystem32
- Найдите и дважды щелкните по файлу «secpol» для запуска системного средства.

Как запустить утилиту локальная политика безопасности с помощью командной строки или PowerShell
Если вам более удобно, вы можете применить методы командной строки для запуска локальной политики безопасности на своем ПК. С этой целью можно использовать командную строку или Windows PowerShell, в обоих средствах выполняется одинаковая команда.
Выполните следующее:
- В поле поиска Windows введите «cmd» или «powershell».
- Откройте командную строку или Windows PowerShell.
- В окне системного средства введите «secpol», а затем нажмите на «Enter».

На экране вашего компьютера появится окно «Локальная политика безопасности».
Запуск локальной политику безопасности с помощью редактора локальной групповой политики
Вы можете использовать редактор локальной групповой политики для запуска локальной политики безопасности.
Пройдите следующие шаги:
- В поле поиска Windows введите «gpedit.msc».
- Откройте окно «Редактор локальной групповой политики».
- Перейдите по пути:
Конфигурация компьютера → Конфигурация Windows → Параметры безопасности
- Здесь вы найдете все модули локальной политики безопасности.

Как закрепить локальною политику безопасности на панели задач
Вы можете открыть локальную политику безопасности, используя любой из перечисленных выше методов. Намного проще получить доступ к политикам безопасности прямо из панели задач. Для этого значок инструмента локальной политики безопасности необходимо закрепить на панели задач.
Необходимо выполнить следующее:
- Нажмите на клавиши «Win» + «S».
- В поле поиска введите «локальная политика безопасности».
- В результатах поиска отобразится нужное приложение, выберите «Закрепить на панели задач».

Теперь вы можете запускать локальную политику безопасности непосредственно с панели задач Windows.
Потом можно открепить этот значок от панели задач, если вам больше не нужно, чтобы локальная политика безопасности находилась на этом элементе интерфейса системы.
Выводы статьи
В операционной системе Windows используется локальная политика безопасности, с помощью которой пользователь может управлять некоторыми параметрами безопасности компьютера. Этот инструмент доступен в версиях Windows Корпоративная, Профессиональная и для образовательных учреждений. Вы можете воспользоваться несколькими способами, чтобы открыть локальную политику безопасности на своем компьютере.
Как открыть локальную политику безопасности Windows (видео)
Похожие публикации:
- Как установить пароль на папку в Windows — 3 способа
- Как перенести панель задач Windows 11 — 2 способа
- Как включить и использовать сенсорную клавиатуру Windows 11
- Как в Windows 11 вернуть меню «Пуск» Windows 10
- Исправление ошибки восстановления системы 0x81000203 в Windows

Зараженность ПК с различными версиями ОС Windows
Эти данные нормализованы: уровень заражения для каждой версии Windows рассчитывается сравнением равного числа компьютеров на версию (например, 1 000 компьютеров с Windows XP SP3 с 1 000 компьютеров с Windows 7 RTM).
3
Управление политикой безопасности в Windows
4
Управление политикой безопасности
•Редактор объектов групповой политики
(локальный вариант оснастки – Локальная политика безопасности (Панель управления | Администрирование);
•Шаблоны безопасности (устанавливается в изолированной консоли);
•Анализ и настройка безопасности
(устанавливается в изолированной консоли).
5
2 подхода к настройке политики безопасности
•Использование оснастки Редактор объектов групповой политики. С ее помощью Вы можете корректировать свою политику безопасности, устанавливая соответствующие параметры.
•Две другие оснастки используются совместно. Вы можете создать некий шаблон безопасности с помощью оснастки Шаблоны безопасности
(это некоторая политика – образец), а затем произвести сравнение с политикой безопасности вашего компьютера, а при необходимости внедрить созданный шаблон в качестве своей политики безопасности.
6

Окно оснастки «Редактор объектов групповой политики»
7
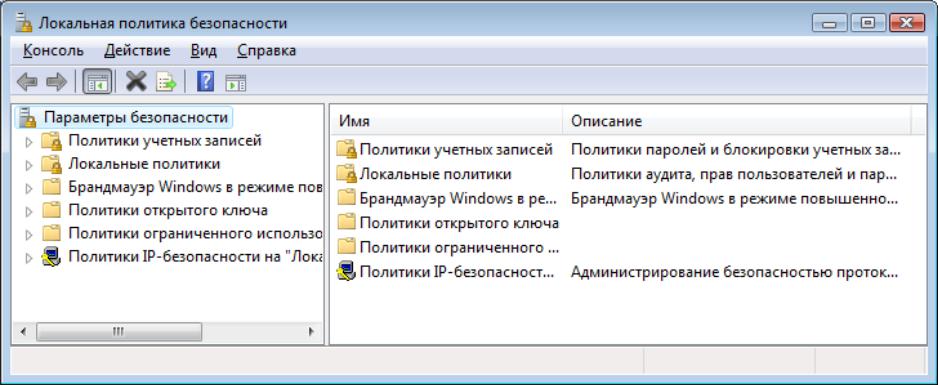
Окно оснастки «Локальная политика безопасности» (Панель управления | Администрирование)
8

Политика учетных записей (политика паролей)
|
Наименование правила |
Описание |
||
|
политики |
|||
|
Максимальный срок |
Максимальный |
период, по |
окончании |
|
действия пароля |
которого пароль нужно изменять. Если |
||
|
пользователь долго не меняет своего пароля, |
|||
|
защищенность |
системы |
от |
|
|
несанкционированного |
доступа |
заметно |
|
|
снижается. |
|
Минимальная длина |
Администратор системы должен определить в |
|||
|
пароля |
политике |
ведения |
учетных |
записей |
|
минимальную длину пароля. Если пользователь |
||||
|
будет изменять свой пароль после регистрации |
||||
|
системы, |
он сможет ввести пароль только |
|||
|
согласно правилам учетных записей. |
9

Политика учетных записей (политика паролей)
Продолжение таблицы
|
Наименование |
Описание |
|
правила политики |
|
|
Минимальный срок |
Ограничивает минимальное время, через которое |
|
действия пароля |
пользователь может изменять свой пароль. |
|
Сменив по истечении срока действия пароль, |
|
|
пользователь может захотеть вернуться к |
|
|
прежнему. Так как это ослабит защищенность |
|
|
системы, принудительная задержка не позволит |
|
|
этого сделать. |
|
|
Требовать |
Позволяет хранить историю паролей. Пока не |
|
неповторяемости |
будет использовано указанное число паролей, ни |
|
паролей |
один из них повторно задействовать нельзя. |
|
Эффективно при обязательной смене паролей |
|
|
через определенный срок и запрете смены пароля |
|
|
в течение другого срока. |
10
![]()
|
Политика учетных записей |
|
|
(политика паролей) |
|
|
Продолжение таблицы |
|
|
Наименование |
Описание |
|
правила политики |
|
|
Пароли должны |
Windows позволяет добавлять в систему модули, |
|
отвечать |
проверяющие сложность пароля. Разрешив данное |
|
требованиям |
правило, вы снимете с себя тяжкое бремя слежения |
|
сложности |
за паролями пользователей и разъяснения им того, |
|
что в качестве пароля нельзя использовать свое имя, |
|
|
год рождения, имена родственников и т.д. Система |
|
|
посредством установленного фильтра сама |
|
|
позаботится о том, чтобы пароль содержал минимум |
|
|
3 из перечисленных типов символов: |
11
Соседние файлы в папке Операционные системы_1
- #
- #
- #
- #
- #
- #
- #
- #
- #
- #
- #