Аннотация: Подсистема защиты данных является одной из наиболее важных. В центре системы безопасности ОС Windows находится система контроля доступа. Реализованные модели дискреционного и ролевого доступа являются удобными и широко распространены, однако не позволяют формально обосновать безопасность приложений в ряде случаев, представляющих практический интерес. С каждым процессом или потоком, то есть активным компонентом (субъектом), связан маркер доступа, а у каждого защищаемого объекта (например, файла) имеется дескриптор защиты. Проверка прав доступа обычно осуществляется в момент открытия объекта и заключается в сопоставлении прав субъекта списку прав доступа, который хранится в составе дескриптора защиты объекта
Введение
Известно, что одним из важнейших компонентов системы безопасности ОС Windows является система контроля и управления дискреционным доступом. Для ее описания принято использовать формальные модели. Хотя применение формальных моделей защищенности не позволяет строго обосновать безопасность информационных систем (ИС) для ряда наиболее интересных случаев, они формируют полезный понятийный аппарат, который может быть применен для декомпозиции и анализа исследуемой системы.
Для построения формальных моделей безопасности принято представлять ИС в виде совокупности взаимодействующих сущностей — субъектов (s) и объектов (o).
Защищаемые объекты Windows включают: файлы, устройства, каналы, события, мьютексы, семафоры, разделы общей памяти, разделы реестра ряд других. Сущность, от которой нужно защищать объекты, называется «субъектом». Субъектами в Windows являются процессы и потоки, запускаемые конкретными пользователями. Субъект безопасности — активная системная составляющая, а объект — пассивная.
Помимо дискреционного доступа Windows поддерживает управление привилегированным доступом. Это означает, что в системе имеется пользователь-администратор с неограниченными правами. Кроме того, для упрощения администрирования (а также для соответствия стандарту POSIX) пользователи Windows объединены в группы. Принадлежность к группе связана с определенными привилегиями, например, привилегия выключать компьютер. Пользователь, как член группы, облекается, таким образом, набором полномочий, необходимых для его деятельности, и играет определенную роль. Подобная стратегия называется управление ролевым доступом.
Для того чтобы выяснить, в какой мере комбинация в виде управления дискреционным и ролевым доступом служит гарантией защиты для выполняемых программ, желательно иметь представление о формальных моделях, используемых при построении системы безопасности ОС Windows. Возможности формальных моделей проанализированы в приложении.
Основной вывод из анализа применяемых в ОС Windows моделей контроля доступа (комбинация дискреционной и ролевой): нельзя формально обосновать безопасность ИС в случаях, представляющих практический интерес. Необходимо обосновывать безопасность конкретной системы путем ее активного исследования.
Ключевая цель системы защиты Windows — следить за тем, кто и к каким объектам осуществляет доступ. Система защиты хранит информацию, относящуюся к безопасности для каждого пользователя, группы пользователей и объекта. Модель защиты ОС Windows требует, чтобы субъект на этапе открытия объекта указывал, какие операции он собирается выполнять в отношении этого объекта. Единообразие контроля доступа к различным объектам (процессам, файлам, семафорам и др.) обеспечивается тем, что с каждым процессом (потоком) связан маркер доступа, а с каждым объектом — дескриптор защиты. Маркер доступа в качестве параметра имеет идентификатор пользователя, а дескриптор защиты — списки прав доступа. ОС может контролировать попытки доступа, которые прямо или косвенно производятся процессами и потоками, инициированными пользователем.
ОС Windows отслеживает и контролирует доступ к разнообразным объектам системы (файлы, принтеры, процессы, именованные каналы и т.д.). Помимо разрешающих записей, списки прав доступа содержат и запрещающие записи, чтобы пользователь, которому доступ к объекту запрещен, не смог получить его как член какой-либо группы, которой этот доступ предоставлен.
Пользователи системы для упрощения администрирования (а также для соответствия стандарту POSIX) объединены в группы. Пользователей и группы иногда называют участниками безопасности. Пользователи посредством порождаемых ими субъектов (процессов, потоков) осуществляют доступ к объектам (файлам, устройствам и др.). Изучение модели контроля доступа ОС Windows целесообразно начать с анализа характеристик субъектов и объектов, которые существенны для организации дискреционного доступа.
Инструментальные средства управления безопасностью
Прежде чем начать изучение API системы, имеет смысл сказать несколько слов об имеющихся полезных утилитах и инструментальных средствах.
Для управления системой безопасности в ОС Windows имеются разнообразные и удобные инструментальные средства. В частности, в рамках данной темы потребуется умение управлять учетными записями пользователей при помощи панели «Пользователи и пароли». Кроме того понадобится контролировать привилегии пользователей при помощи панели «Назначение прав пользователям». Рекомендуется также освоить работу с утилитой просмотра данных маркера доступа процесса WhoAmI.exe, утилитами просмотра и редактирования списков контроля доступа (cacls.exe, ShowACLs.exe, SubInACL,exe, SvcACL.exe), утилитой просмотра маркера доступа процесса PuList.exe и рядом других.
Обилие интерактивных средств не устраняет необходимости программного управления различными объектами в среде ОС Windows. Применение API системы позволяет лучше изучить ее особенности и создавать приложения, соответствующие сложным требованиям защиты. Примером могут служить различные сценарии ограничения доступа (применение ограниченных маркеров доступа, перевоплощение, создание объектов, не связанных с конкретным пользователем, и т.д.). Тем не менее, встроенные инструментальные возможности системы будут активно использоваться в качестве вспомогательных средств при разработке разнообразных программных приложений.
Пользователи и группы пользователей
Каждый пользователь (и каждая группа пользователей) системы должен иметь учетную запись (account) в базе данных системы безопасности. Учетные записи идентифицируются именем пользователя и хранятся в базе данных SAM (Security Account Manager) в разделе HKLM/SAM реестра.
Учетная запись пользователя содержат набор сведений о пользователе, такие, как имя, пароль (или реквизиты), комментарии и адрес. Наиболее важными элементами учетной записи пользователя являются: список привилегий пользователя в отношении данной системы, список групп, в которых состоит пользователь, и идентификатор безопасности SID (Security IDentifier). Идентификаторы безопасности генерируются при создании учетной записи. Они (а не имена пользователей, которые могут не быть уникальными) служат основой для идентификации субъектов внутренними процессами ОС Windows.
Учетные записи групп, созданные для упрощения администрирования, содержат список учетных записей пользователей, а также включают сведения, аналогичные сведениям учетной записи пользователя (SID группы, привилегии члена группы и др.).
Создание учетной записи пользователя
Основным средством создания учетной записи пользователя служит Win32-функция NetUserAdd, принадлежащая семейству сетевых ( Net ) функций ОС Windows, подробное описание которой имеется в MSDN. При помощи Net -функций можно управлять учетными записями пользователей, как на локальной, так и на удаленной системе (более подробно об использовании Net -функций можно прочитать в
[
Рихтер
]
,
[
Рихтер, Кларк
]
).
Для успешного применения Net -функций достаточно знать следующее. Во-первых, Net -функции входят в состав библиотеки NetApi32.Lib, которую нужно явным образом добавить в проект, а прототипы функций объявлены в заголовочном файле Lm.h. Во-вторых, Net -функции поддерживают строки только в формате Unicode (см.
«Разработка Win32 приложений. Инструментальные средства изучения системы»
). Наконец, информацию об учетной записи Net -функции нужно передавать с помощью специализированных структур, наименее сложная из которых структура USER_INFO_1.
Прогон программы создания новой учетной записи
Для иллюстрации рассмотрим несложную программу, задача которой — создать новую учетную запись для пользователя «ExpUser».
#ifndef UNICODE
#define UNICODE
#endif

#include <stdio.h>
#include <windows.h>
#include <lm.h>


BOOL CreateUser(PWSTR pszName, PWSTR pszPassword) {
  USER_INFO_1 ui = {0};
  NET_API_STATUS nStatus;
  ui.usri1_name = pszName;              // имя пользователя
  ui.usri1_password = pszPassword;      // пароль пользователя
  ui.usri1_priv = USER_PRIV_USER;       // обычный пользователь

  nStatus = NetUserAdd(NULL, 1, (LPBYTE)&ui, NULL);
  return (nStatus == NERR_Success);
}


void main() {
   if(!CreateUser(L"ExpUser", L"123"))
      printf("A system error has occurred");
   }
Результат работы программы — создание нового пользователя — можно проконтролировать при помощи апплета панели управления «Локальные пользователи». После создания пользователя целесообразно наделить его минимальным набором прав, например, правом входа в систему. Самое разумное — включить пользователя в какую-либо группу, например, в группу обычных пользователей. В этом случае вновь созданный пользователь получит привилегии члена данной группы. Это можно сделать при помощи того же апплета. О том, как обеспечить пользователя необходимыми привилегиями программным образом, будет рассказано ниже.
Для удаления учетной записи пользователя используется функция NetUserDel.
Написание, компиляция и прогон программы, удаляющей из системы учетную запись
На основе предыдущей программы рекомендуется написать программу удаления учетной записи конкретного пользователя.
В заключение данного раздела хотелось бы еще раз подчеркнуть, что, хотя Net -функции позволяют работать с именами учетных записей, остальная часть системы для идентификации учетной записи использует идентификатор безопасности SID.
Идентификатор безопасности SID
Структура идентификатора безопасности
SID пользователя (и группы) является уникальным внутренним идентификатором и представляют собой структуру переменной длины с коротким заголовком, за которым следует длинное случайное число. Это числовое значение формируется из ряда параметров, причем утверждается
[
Руссинович
]
, что вероятность появления двух одинаковых SID практически равна нулю. В частности, если удалить пользователя в системе, а затем создать его под тем же именем, то SID вновь созданного пользователя будет уже другим.
Узнать свой идентификатор безопасности пользователь легко может при помощи утилит whoami или getsid из ресурсов Windows. Например, так:
При помощи команды whoami /all можно получить всю информацию из маркера доступа процесса, см. следующие разделы.
Задание
Выполните следующую последовательность действий.
- Создайте учетную запись пользователя при помощи инструментальных средств ОС Windows
- Выясните значение его SID’а.
- Затем удалите эту учетную запись и вновь создайте под тем же именем.
- Сравните SID нового пользователя с предыдущим значением SID’а.
Общая характеристика
Система управления доступом в ОС Windows
NT отличается высокой степенью гибкости,
которая достигается за счет большого
разнообразия субъектов и объектов
доступа, а также детализации операций
доступа.
Для разделяемых ресурсов в Windows NT
применяется общая модель объекта,
который содержит такие характеристики
безопасности, как набор допустимых
операций, идентификатор владельца,
список управления доступом. Объекты в
Windows NT создаются для любых ресурсов в
том случае, когда они являются или
становятся разделяемыми — файлов,
каталогов, устройств, секций памяти,
процессов. Характеристики объектов в
Windows NT делятся на две части — общую
часть, состав которой не зависит от типа
объекта, и индивидуальную, определяемую
типом объекта.
Все объекты хранятся в древовидных
иерархических структурах, элементами
которых являются объекты-ветви (каталоги)
и объекты-листья (файлы). Для объектов
файловой системы такая схема отношений
является прямым отражением иерархии
каталогов и файлов. Для объектов других
типов иерархическая схема отношений
имеет свое содержание, например, для
процессов она отражает связи
«родитель-потомок», а для устройств
отражает принадлежность к определенному
типу устройств и связи устройства с
другими устройствами, например
SCSI-контроллера с дисками.
Проверка прав доступа для объектов
любого типа выполняется централизованно
с помощью монитора безопасности (Security
Reference Monitor), работающего в привилегированном
режиме. Централизация функций контроля
доступа повышает надежность средств
защиты информации операционной системы
по сравнению с распределенной реализацией,
когда в различных модулях ОС имеются
свои процедуры проверки прав доступа
и вероятность ошибки программиста от
этого возрастает.
Для системы безопасности Windows NT характерно
наличие большого количества различных
предопределенных (встроенных) субъектов
доступа — как отдельных пользователей,
так и групп. Так, в системе всегда имеются
такие пользователи, как Administrator, System и
Guest, а также группы Users, Administrators, Account
Operators, Server Operators, Everyone и другие. Смысл
этих встроенных пользователей и групп
состоит в том, что они наделены некоторыми
правами, облегчая администратору работу
по созданию эффективной системы
разграничения доступа. При добавлении
нового пользователя администратору
остается только решить, к какой группе
или группам отнести этого пользователя.
Конечно, администратор может создавать
новые группы, а также добавлять права
к встроенным группам для реализации
собственной политики безопасности, но
во многих случаях встроенных групп
оказывается вполне достаточно.
Windows NT поддерживает три класса операций
доступа, которые отличаются типом
субъектов и объектов, участвующих в
этих операциях.
-
Разрешения
(permissions) — это множество операций,
которые могут быть определены для
субъектов всех типов по отношению к
объектам любого типа: файлам, каталогам,
принтерам, секциям памяти и т. д.
Разрешения по своему назначению
соответствуют правам доступа к файлам
и каталогам в ОС UNIX. -
Права
(user rights) — определяются для субъектов
типа группа на выполнение некоторых
системных операций: установку системного
времени, архивирование файлов, выключение
компьютера и т. п. В этих операциях
участвует особый объект доступа —
операционная система в целом. В основном
именно права, а не разрешения отличают
одну встроенную группу пользователей
от другой. Некоторые права у встроенной
группы являются также встроенными —
их у данной группы нельзя удалить.
Остальные права встроенной группы
можно удалять (или добавлять из общего
списка прав). -
Возможности
пользователей (user abilities) определяются
для отдельных пользователей на выполнение
действий, связанных с формированием
их операционной среды, например изменение
состава главного меню программ,
возможность пользоваться пунктом меню
Run (выполнить) и т. п. За счет уменьшения
набора возможностей (которые по умолчанию
доступны пользователю) администратор
может «заставить» пользователя работать
с той операционной средой, которую
администратор считает наиболее
подходящей и ограждающей пользователя
от возможных ошибок.
Права и разрешения, данные группе,
автоматически предоставляются ее
членам, позволяя администратору
рассматривать большое количество
пользователей как единицу учетной
информации и минимизировать свои
действия.
Проверка разрешений доступа процесса
к объекту производится в Windows NT в основном
в соответствии с общей схемой доступа,
представленной на рис. 7.29.
При входе пользователя в систему для
него создается так называемый токен
доступа (access token), включающий идентификатор
пользователя и идентификаторы всех
групп, в которые входит пользователь.
В токене также имеются: список управления
доступом (ACL) по умолчанию, который
состоит из разрешений и применяется к
создаваемым процессом объектам; список
прав пользователя на выполнение системных
действий.
Все объекты, включая файлы, потоки,
события, даже токены доступа, когда они
создаются, снабжаются дескриптором
безопасности. Дескриптор безопасности
содержит список управления доступом —
ACL. Владелец объекта, обычно пользователь,
который его создал, обладает правом
избирательного управления доступом к
объекту и может изменять ACL объекта,
чтобы позволить или не позволить другим
осуществлять доступ к объекту. Встроенный
администратор Windows NT в отличие от
суперпользователя UNIX может не иметь
некоторых разрешений на доступ к объекту.
Для реализации этой возможности
идентификаторы администратора и группы
администраторов могут входить в ACL, как
и идентификаторы рядовых пользователей.
Однако администратор все же имеет
возможность выполнить любые операции
с любыми объектами, так как он всегда
может стать владельцем объекта, а затем
уже как владелец получить полный набор
разрешений. Однако вернуть владение
предыдущему владельцу объекта
администратор не может, поэтому
пользователь всегда может узнать о том,
что с его файлом или принтером работал
администратор.
При запросе процессом некоторой операции
доступа к объекту в Windows NT управление
всегда передается монитору безопасности,
который сравнивает идентификаторы
пользователя и групп пользователей из
токена доступа с идентификаторами,
хранящимися в элементах ACL объекта. В
отличие от UNIX в элементах ACL Windows NT могут
существовать как списки разрешенных,
так и списки запрещенных для пользователя
операций.
Система безопасности могла бы осуществлять
проверку разрешений каждый раз, когда
процесс использует объект. Но список
ACL состоит из многих элементов, процесс
в течение своего существования может
иметь доступ ко многим объектам, и
количество активных процессов в каждый
момент времени также велико. Поэтому
проверка выполняется только при каждом
открытии, а не при каждом использовании
объекта.
Для смены в некоторых ситуациях процессом
своих идентификаторов в Windows NT используется
механизм олицетворения (impersonation). В
Windows NT существуют простые субъекты и
субъекты-серверы. Простой субъект —
это процесс, которому не разрешается
смена токена доступа и соответственно
смена идентификаторов. Субъект-сервер
— это процесс, который работает в
качестве сервера и обслуживает процессы
своих клиентов (например, процесс
файлового сервера). Поэтому такому
процессу разрешается получить токен
доступа у процесса-клиента, запросившего
у сервера выполнения некоторого действия,
и использовать его при доступе к объектам.
В Windows NT однозначно определены правила,
по которым вновь создаваемому объекту
назначается список ACL. Если вызывающий
код во время создания объекта явно
задает все права доступа к вновь
создаваемому объекту, то система
безопасности приписывает этот ACL объекту.
Если же вызывающий код не снабжает
объект списком ACL, а объект имеет имя,
то применяется принцип наследования
разрешений. Система безопасности
просматривает ACL того каталога объектов,
в котором хранится имя нового объекта.
Некоторые из входов ACL каталога объектов
могут быть помечены как наследуемые.
Это означает, что они могут быть приписаны
новым объектам, создаваемым в этом
каталоге.
В том случае, когда процесс не задал
явно список ACL для создаваемого объекта
и объект-каталог не имеет наследуемых
элементов ACL, используется список ACL по
умолчанию из токена доступа процесса.
Наследование разрешений употребляется
наиболее часто при создании нового
объекта. Особенно оно эффективно при
создании файлов, так как эта операция
выполняется в системе наиболее часто.
Соседние файлы в предмете [НЕСОРТИРОВАННОЕ]
- #
- #
- #
- #
- #
- #
- #
- #
- #
- #
- #
Главная / Безопасность /
Общие вопросы технической защиты информации / Тест 8
Общие вопросы технической защиты информации — тест 8
Упражнение 1:
Номер 1
Как называется совокупность информационных ресурсов, средств и систем информатизации, используемых в соответствии с заданной информационной технологией, и систем связи вместе с помещениями (транспортными средствами), в которых они установлены?
Ответ:
(1) объект защиты информации
(2) объект информатизации
(3) локальная вычислительная сеть
(4) автоматизированная система
Номер 2
Как называется информация или носитель информации, или информационный процесс, которые необходимо защищать в соответствии с поставленной целью защиты информации?
Ответ:
(1) объект защиты информации
(2) объект информатизации
(3) локальная вычислительная сеть
(4) автоматизированная система

Номер 3
Какой термин использует ФСТЭК для автоматизированных систем различного уровня и назначения, систем связи, отображения и размножения вместе с помещениями, в которых они установлены, предназначенные для обработки и передачи информации, подлежащей защите, а также самих помещений, предназначенных для ведения конфиденциальных переговоров?
Ответ:
(1) объект защиты информации
(2) объект информатизации
(3) локальная вычислительная сеть
(4) автоматизированная система
Упражнение 2:
Номер 1
Информация в соответствии с ФЗ “Об информации, информационных технологиях и защите информации” делится на:
Ответ:
(1) конфиденциальную и общедоступную
(2) государственную тайну и общедоступную
(3) общедоступную и ограниченного доступа
(4) конфиденциальную и государственную тайну
Номер 2
Информация ограниченного доступа делится на:
Ответ:
(1) конфиденциальную и общедоступную
(2) государственную тайну и общедоступную
(3) общедоступную и общеизвестную
(4) конфиденциальную и государственную тайну
Номер 3
В соответствии с каким документом осуществляется отнесение информации к государственной тайне?
Ответ:
(1) ФЗ “Об информации, информационных технологиях и о защите информации”
(2) ФЗ “О техническом регулировании”
(3) ФЗ “О государственной тайне”
(4) Перечень сведений конфиденциального характера, опубликованный в Указе Президента РФ от 6.03.97 г. № 188 «Об утверждении перечня сведений конфиденциального характера»
Упражнение 3:
Номер 1
Сколько степеней секретности выделяет законодательство для информации, содержащей государственную тайну?
Ответ:
(1) 2
(2) 3
(3) 4
(4) 10
Номер 2
Информация о состоянии окружающей среды относится к :
Ответ:
(1) конфиденциальной информации
(2) государственной тайне
(3) общедоступной информации
(4) информации ограниченного доступа
Номер 3
Если автор статьи опубликовал ее в Интернете на сайте со свободным доступом, информацию из этой статьи можно отнести к:
Ответ:
(1) конфиденциальной информации
(2) государственной тайне
(3) общедоступной информации
(4) информации ограниченного доступа
Упражнение 4:
Номер 1
Нормативные правовые акты, затрагивающие права, свободы и обязанности человека относятся к:
Ответ:
(1) конфиденциальной информации
(2) государственной тайне
(3) общедоступной информации
(4) информации ограниченного доступа
Номер 2
Персональные данные относятся к :
Ответ:
(1) конфиденциальной информации
(2) государственной тайне
(3) общедоступной информации
(4) информации, доступ к которой нельзя ограничить
Номер 3
Юрист в процессе своей служебной деятельности узнал цену недвижимости некоего известного человека. К какой категории информации относятся данные сведения?
Ответ:
(1) конфиденциальной информации
(2) государственной тайне
(3) общедоступной информации
(4) информации, доступ к которой нельзя ограничить
Упражнение 5:
Номер 1
Информация, содержащая ФИО, адрес и уровень дохода гражданина, относится к:
Ответ:
(1) служебной тайне
(2) коммерческой тайне
(3) государственной тайне
(4) персональным данным
Номер 2
Врач в процессе своей врачебной деятельности узнал о том, что известный человек серьезно болен. Эту информацию можно отнести к:
Ответ:
(1) служебной тайне
(2) коммерческой тайне
(3) государственной тайне
(4) профессиональной тайне
Номер 3
Компания N разработала стратегию для конкурентной борьбы с компанией A. Информация о сущности разработанной стратегии относится к:
Ответ:
(1) служебной тайне
(2) коммерческой тайне
(3) государственной тайне
(4) профессиональной тайне
(5) общедоступным сведениям
Упражнение 6:
Номер 1
В соответствии с каким документом классифицируются АС, обрабатывающие конфиденциальную информацию?
Ответ:
(1) ФЗ “Автоматизированные системы”
(2) РД Гостехкомиссии России “ Автоматизированные системы. Защита от НСД к информации. Классификация АС и требования по защите информации”
(3) ФЗ “Об информации, информационных технологиях и о защите информации”
(4) РД Гостехкомиссии России “Защита информации. Специальные защитные знаки. Классификация и общие требования”
Номер 2
Сколько классов защищенности от НСД существует для АС?
Ответ:
(1) 3
(2) 5
(3) 9
(4) 15
Номер 3
На сколько групп подразделяются классы защищенности АС?
Ответ:
(1) 2
(2) 3
(3) 5
(4) 9
Упражнение 7:
Номер 1
Если в АС работает один пользователь, который допущен ко всей информации и эта информация размещена на носителях одного уровня конфиденциальности, такая АС относится к:
Ответ:
(1) 1 группе
(2) 2 группе
(3) 3 группе
(4) 4 группе
Номер 2
К какой группе относится АС, если ее пользователи имеют одинаковые права доступа ко всей информации, хранящейся на носителях различного уровня?
Ответ:
(1) 1 группе
(2) 2 группе
(3) 3 группе
(4) 4 группе
Номер 3
К какой группе относится АС, в которой обрабатывается и хранится информация разных уровней конфиденциальности и не все пользователи имеют доступ ко всей информации?
Ответ:
(1) 1 группе
(2) 2 группе
(3) 3 группе
(4) 4 группе
Упражнение 8:
Номер 1
Какие подсистемы в составе АС выделяет РД “ Автоматизированные системы. Защита от НСД к информации. Классификация АС и требования по защите информации”?
Ответ:
(1) управления доступом
(2) антивирусная защиты
(3) регистрация и учет
(4) обеспечение целостности
(5) обеспечение доступности
(6) криптографическая
Номер 2
Для каких классов АС необходимо использование аттестованных (сертифицированных) криптографических средств?
Ответ:
(1) ЗБ
(2) 3А
(3) 2Б
(4) 2А
(5) 1Д
(6) 1Г
(7) 1В
(8) 1Б
(9) 1А
Номер 3
Для каких классов защищенности АС необходимо обеспечивать целостность программных средств и обрабатываемой информации?
Ответ:
(1) классов первой группы
(2) классов второй группы
(3) классов третьей группы
(4) всех классов
Упражнение 9:
Номер 1
Если АС с классом защищенности 1Б объединяется с АС с классом защищенности 2А без использования межсетевого экрана, то интегрированная АС будет иметь класс защищенности:
Ответ:
(1) 1Б
(2) 2А
(3) 3А
(4) 1Г
Номер 2
Если объединяются три АС с классами защищенности 1В, 2 Б и 3А без использования межсетевого экрана, то интегрированная АС будет иметь класс защищенности:
Ответ:
(1) 1А
(2) 1В
(3) 2Б
(4) 3А
Номер 3
Если две АС с классами защищенности 2Б и 2А объединяются с помощью межсетевого экрана, то:
Ответ:
(1) интегрированная АС будет иметь класс защищенности 2А
(2) интегрированная АС будет иметь класс защищенности 2Б
(3) интегрированная АС будет иметь класс защищенности 1А
(4) каждая из АС сможет сохранить свой класс защищенности
Упражнение 10:
Номер 1
Как называется совокупность программных и технических элементов систем обработки данных, способных функционировать самостоятельно или в составе других систем?
Ответ:
(1) автоматизированная система
(2) объект защиты информации
(3) объект информатизации
(4) средство вычислительной техники
Номер 2
В соответствии с каким документом классифицируются СВТ?
Ответ:
(1) РД “СВТ. Защита от НСД к информации. Показатели защищенности от НСД”
(2) РД “Защита информации. Специальные защитные знаки. Классификация и общие требования”
(3) РД “Автоматизированные системы. Защита от НСД к информации. Классификация АС и требования по защите информации”
(4) ФЗ “О техническом регулировании”
Номер 3
Сколько классов защищенности устанавливается для СВТ?
Ответ:
(1) 3
(2) 5
(3) 7
(4) 9
Упражнение 11:
Номер 1
Какому классу защищенности СВТ соответствует верификационная защита?
Ответ:
(1) 7 класс
(2) 6 и 5 класс
(3) 4,3,2 класс
(4) 1 класс
Номер 2
Реализация какого доступа необходима для всех классов СВТ?
Ответ:
(1) дискреционного
(2) мандатного
(3) верифицированного
(4) комбинированного
Номер 3
К какому классу СВТ отнесут СВТ, которые были представлены к оценке, однако не удовлетворяют требованиям более высоких классов?
Ответ:
(1) 1 класс
(2) 2 или 3 класс
(3) 4, 5 или 6 класс
(4) 7 класс
Упражнение 12:
Номер 1
Какой принцип контроля доступа реализован в операционных системах Windows?
Ответ:
(1) регистрируемый доступ
(2) дискреционный доступ
(3) мандатный доступ
(4) комбинированный доступ
Номер 2
Как называется принцип контроля доступа, который предполагает назначение каждому объекту списка контроля доступа, элементы которого определяют права доступа к объекту конкретных пользователей или групп?
Ответ:
(1) регистрируемый доступ
(2) дискреционный доступ
(3) мандатный доступ
(4) комбинированный доступ
Номер 3
Какой тип доступа предполагает назначение объекту грифа секретности, а субъекту – уровня допуска?
Ответ:
(1) регистрируемый доступ
(2) дискреционный доступ
(3) мандатный доступ
(4) комбинированный доступ

Статья о разграничении прав доступа в операционных системах Windows: дискретном и мандатном. В статье рассматриваются разграничения прав доступа к папкам и файлам на уровне операционной системы Windows и с помощью Secret Net.
Содержание:
- Разграничение прав доступа на уровне операционной системы (дискретное разграничение в Windows)
- Разграничение прав доступа с помощью Secret Net
Дискретное разграничение прав доступа
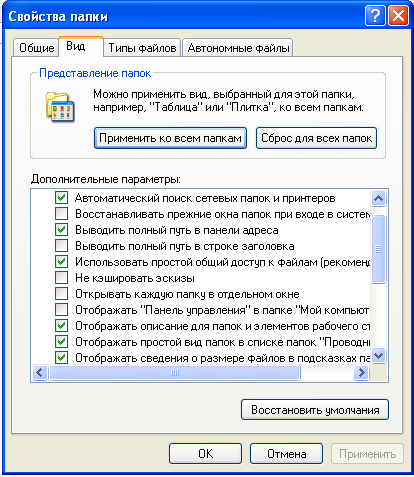
Для того, что бы настроить правила безопасности для папок нужно воспользоваться вкладкой «Безопасность». В Windows XP эта вкладка отключена по умолчанию. Для ее активации нужно зайти в свойства папки (Меню «Сервис» -> «Свойства папки» -> «Вид») и снять флажок «Использовать простой общий доступ к файлам».
Основные права доступа к папкам
В файловой системе NTFS в Windows XP существует шесть стандартных разрешений:
- Полный доступ;
- Изменить;
- Чтение и выполнение;
- Список содержимого папки;
- Чтение;
- Запись.
В Windows 10 нет стандартного разрешения «Список содержимого папки».
Эти разрешения могут предоставляться пользователю (или группе пользователей) для доступа к папкам и файлам. При этом право «Полный доступ» включат в себя все перечисленные права, и позволяет ими управлять.
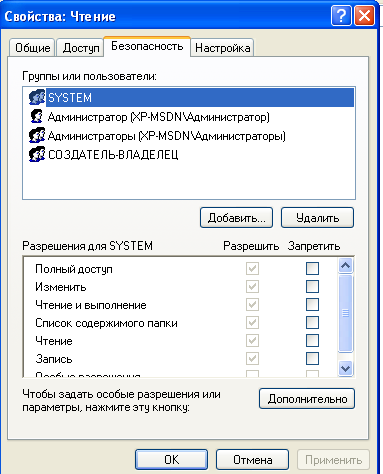
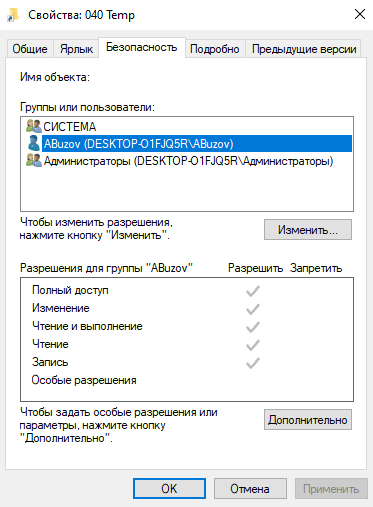
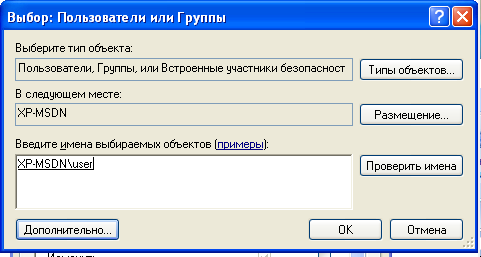
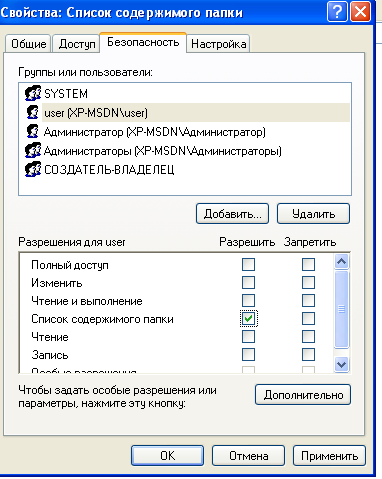
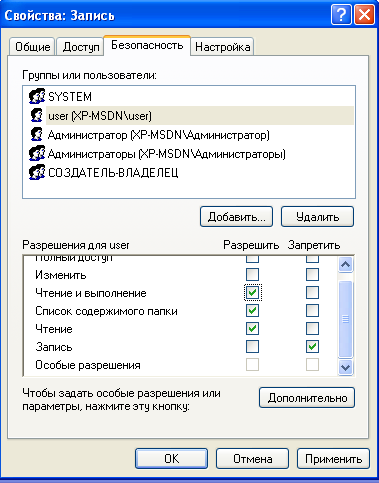
Права доступа назначаются пользователю для каждого объекта (папки и файла). Для назначения прав нужно открыть меню «Свойства» и выбрать вкладку «Безопасность». После этого выбрать необходимо пользователя, которому будут назначаться разрешения.
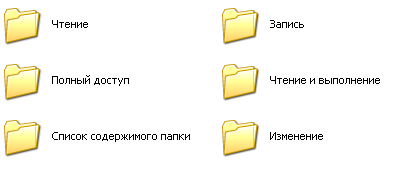
Создайте папки по названиям разрешений, всего у вас будет 6 папок для Windows XP и для Windows 10. Я рассмотрю на примере Windows XP, на «десятке» вам будет проще. Скачайте папки по ссылке и скопируйте в них содержимое (не сами папки, а то, что в них находится).
Отройте вкладку «Безопасность» в свойствах папки «Список содержимого папки». У меня есть пользователь user, вы можете добавить своего. Для того, что бы изменить право на объект нужно выбрать пользователя и указать ему разрешение, в данном случае «Список содержимого папки». Затем нажмите «Применить» и «ОК».
По аналогии установите права для соответствующих папок.
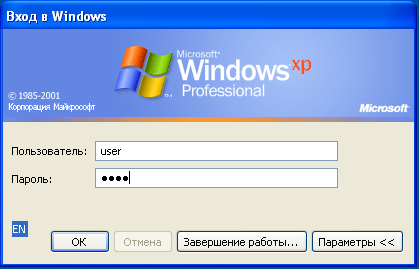
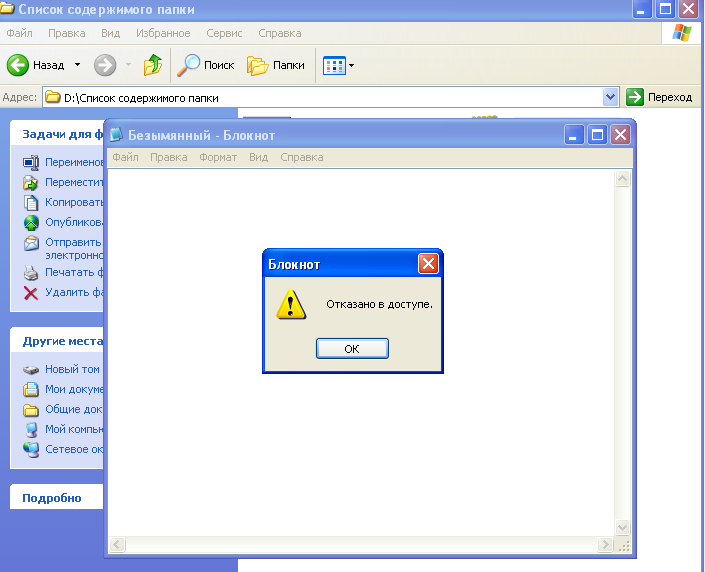
После установки прав доступа проверьте их. Для этого войдите в операционную систему под пользователем, для которого устанавливали права, в моем случае это user.
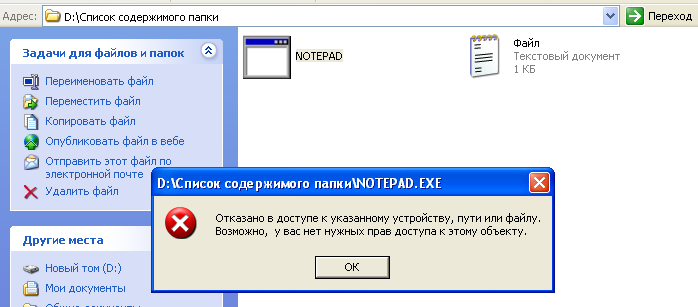
«Список содержимого папки» — предоставляет возможность просмотра файлов и папок в текущем каталоге. То есть вы можете посмотреть, что есть в папке, но запустить и открыть ничего не получиться.
«Чтение» — предоставляет возможность открывать в папке все файлы, кроме исполняемых файлов (например, с расширением .exe).
«Чтение и выполнение» — предоставляет возможность открывать в данном каталоге все файлы.
«Запись» — предоставляет возможность добавления файлов в папку без права на доступ к вложенным в него объектам, в том числе на просмотр содержимого каталога.
«Изменить» — предоставляет возможность открывать и создавать (изменять) файлы в папке.
«Полный доступ» — предоставляет все возможности для работы с папкой и вложенными файлами, включая изменение разрешений.
Откройте каждую папку и проверьте, что разрешения выполняются.

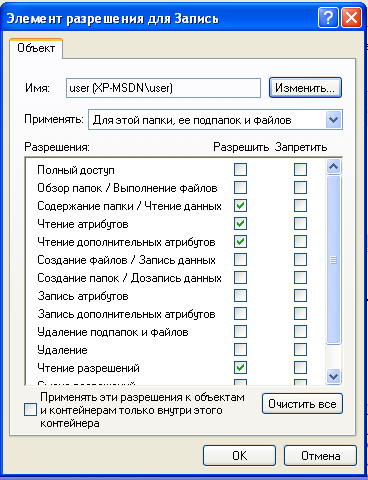
Элементы разрешений на доступ
Каждое разрешение состоит из нескольких элементов, которые позволяют более гибко настраивать систему безопасности. Войдите в операционную систему под учетной записью администратора.
Просмотреть элементы разрешений на доступ можно, нажав на кнопку «Дополнительно» во вкладке «Безопасность» и выбрав любой элемент разрешений.

Поэкспериментируйте с элементами и проверьте, как они работаю.
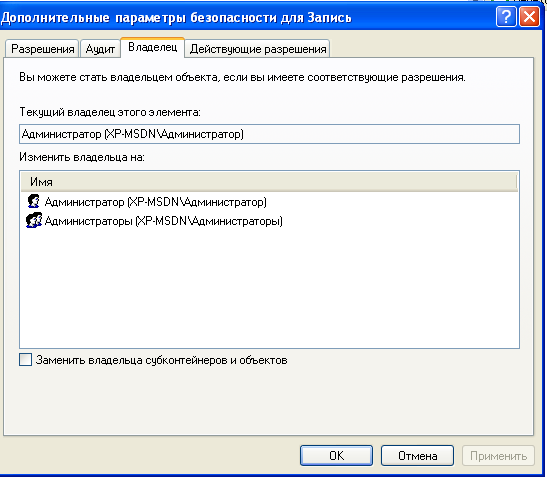
Владелец файла
В файловой системе NTFS у каждого файла есть свой владелец. Владельцем файла является пользователь операционной системы. Он может управлять разрешениями на доступ к объекту независимо от установленных разрешений.
Узнать, какой пользователь является владельцем файла или папки можно на закладке «Владелец» в дополнительных параметрах безопасности.
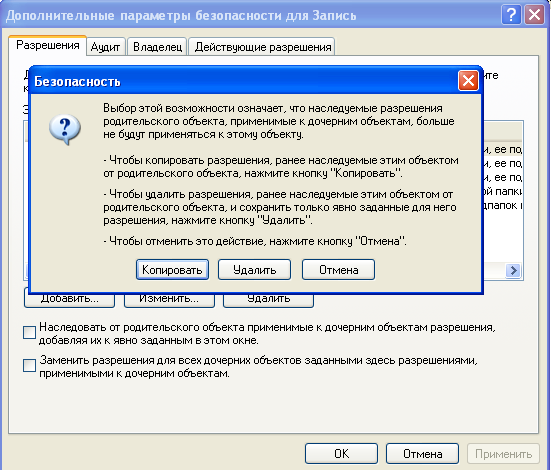
Наследование прав доступа
В файловой системе NTFS поддерживается наследование разрешений. Если вы устанавливаете разрешение на папку, то оно наследуется для всех вложенных файлов и папок.
При любых изменениях разрешений на родительскую папку они меняются в дочерних (вложенных) файлах и каталогах.
Для изменения унаследованных разрешений нужно открыть вкладку «Разрешения» в дополнительных параметрах безопасности. Там же можно отключить наследование разрешений.
Запреты
Кроме установки разрешений в файловых системах можно устанавливать запреты. Например, вы можете разрешить чтение и выполнение, но запретить запись. Таким образом, пользователь для которого установлен запрет и разрешения сможет запустить исполняемый файл или прочитать текстовый, но не сможет отредактировать и сохранить текстовый файл.
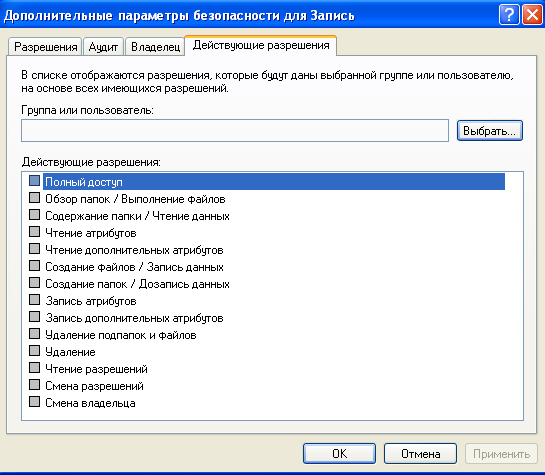
В дополнительных параметрах безопасности можно посмотреть действующие разрешения и для конкретного пользователя.
Разграничение прав доступа с помощью Secret Net (на примере версии 5.1)
При использовании Secret Net доступ к файлам осуществляется, в случае если пользователю присваивается соответствующий уровень допуска. В примере я использую Windows XP с установленным программным продуктом Secret Net 5.1.
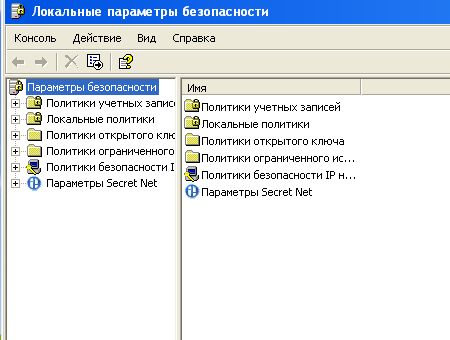
Первым делом нужно запустить локальные параметры безопасности от имени Администратора: «Пуск –> Программы –> Secret Net 5 –> Локальная политика безопасности».
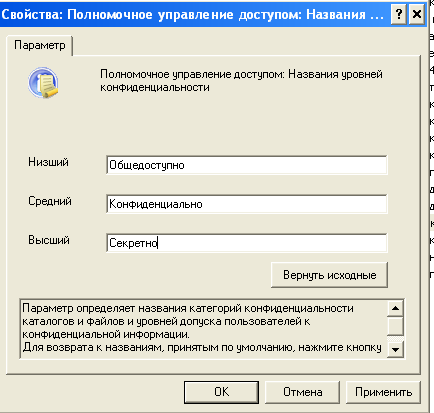
Далее необходимо перейти в «Параметры Secret Net» –> «Настройка подсистем» –> «Полномочное управление доступом: название уровней конфиденциальности».
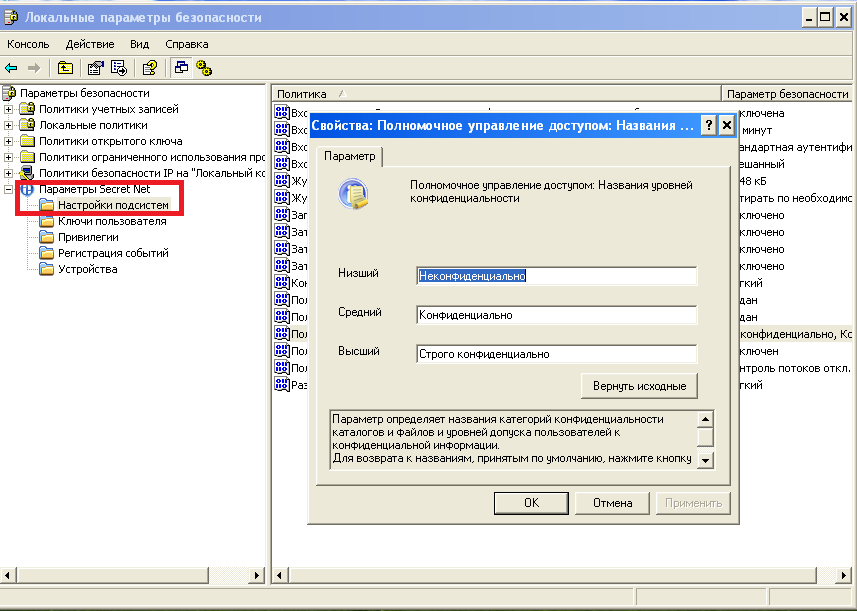
Введите названия уровней. У меня это:
- Низший – Общедоступно.
- Средний – Конфиденциально.
- Высший – Секретно.
Настройка субъектов
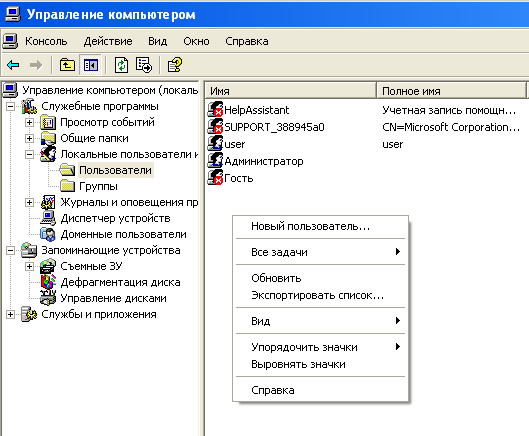
Настройка субъектов в Secret Net производится в группе «Локальные пользователи и группы». Зайдите в меню «Пуск» –> «Программы» –> «Secret Net 5» –> «Управление компьютером» –> «Локальные пользователи и группы» –> «Пользователи».
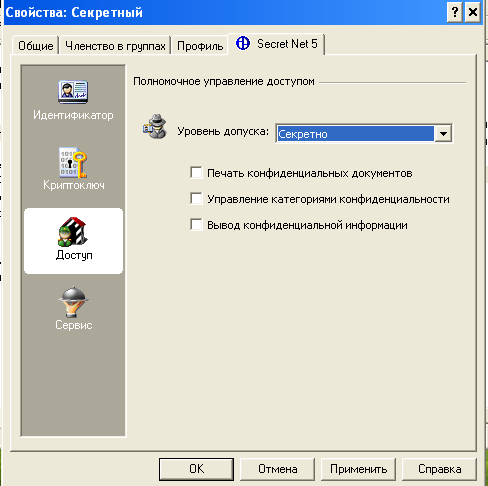
Что бы настроить права администратора нужно выбрать учетную запись «Администратор» и перейти на вкладку Secret Net 5. Установим уровень доступа «секретно».

Далее установите все флажки.
- Управление категориями конфиденциальности означает, что пользователь имеет право изменять категории конфиденциальности папок и файлов, а так же может управлять режимом наследования категорий конфиденциальности папок.
- Печать конфиденциальных документов означает, что пользователь может распечатывать конфиденциальные документы. Данная возможность появляется, если включен контроль печати конфиденциальных документов.
- Вывод конфиденциальной информации означает, что пользователь может копировать конфиденциальную информацию на внешние носители.
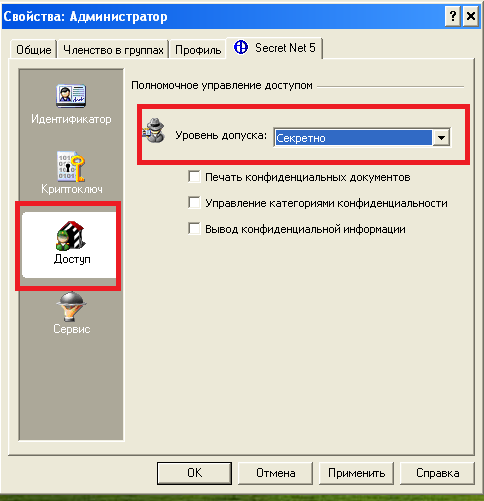
После установки всех флажков нажмите «Применить» и «ОК».
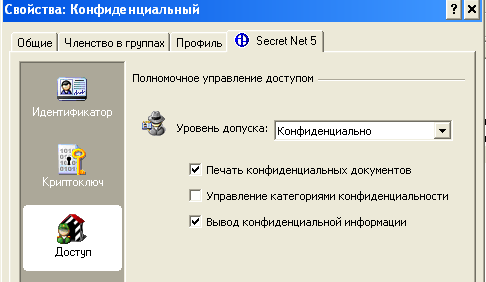
Создадим нового пользователя. Для этого нужно перейти «Локальные пользователи и Группы» –> «Пользователи». Создайте новых пользователей, я назову их «Конфиденциальный» и «Секретный». По аналогии с пользователем Администратор установите для новых пользователей аналогичные уровни доступа и настройки как на рисунках ниже.
Настройка объектов
Та или иная категория конфиденциальности является атрибутом папки или файла. Изменения этих атрибутов производятся уполномоченными пользователями (в данном случае Администратором). Категория конфиденциальности может присваиваться новым файлам или папкам автоматически или по запросу.
Автоматическое присваивание категории конфиденциальности можно включить или отключить в окне настройки свойств папки. Этот параметр может редактировать только пользователь, у которого есть права на «Редактирование категорий конфиденциальности».
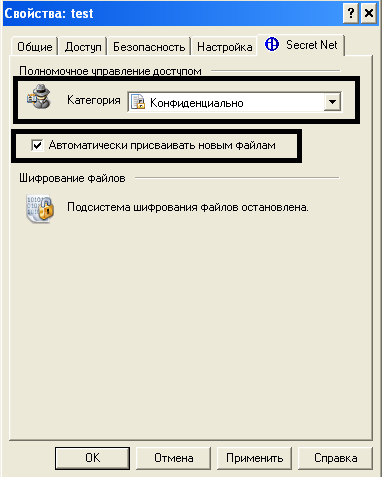
При этом стоит учесть, что категории конфиденциальности могут назначаться только папка и файлам в файловой системе NTFS. В случае если у пользователя нет такой привилегии, он может только повысить категорию конфиденциальности и только не выше своего уровня.
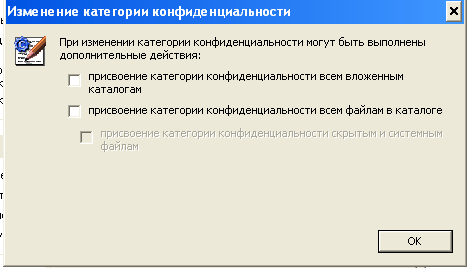
Попробуйте создать в паке новый файл или каталог, а после чего изменить ее уровень (повысить) и установить флажок «Автоматически присваивать новым файлам». У вас появиться окно «Изменение категорий конфиденциальности».
Выберите пункт «Присвоение категорий конфиденциальности всем файлам в каталоге» и нажмите «ОК» для присвоения категории конфиденциальности всем файлам кроме скрытых и системных файлов.
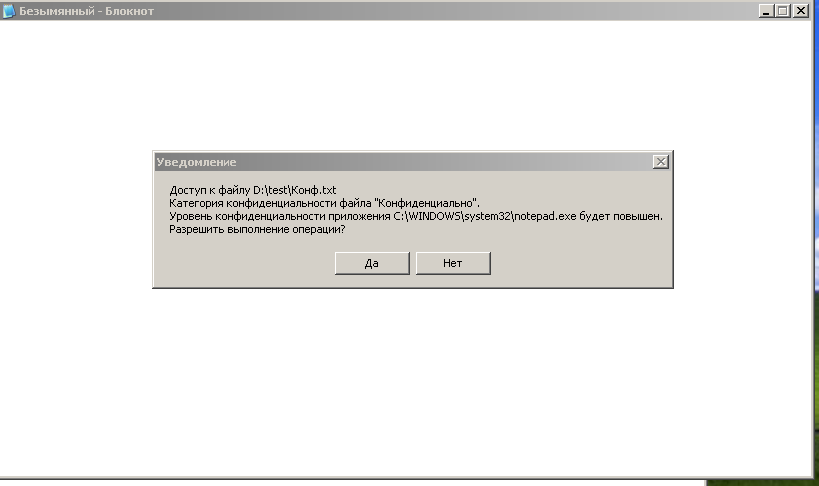
В случае если категория допуска пользователя выше чем категория конфиденциальности объект, то пользователь имеет право на чтение документа, но не имеет права изменять и сохранять документ.
Если пользователь с категорией «Общедоступно» попробует прочитать или удалить документ, то он получит соответствующие ошибки.

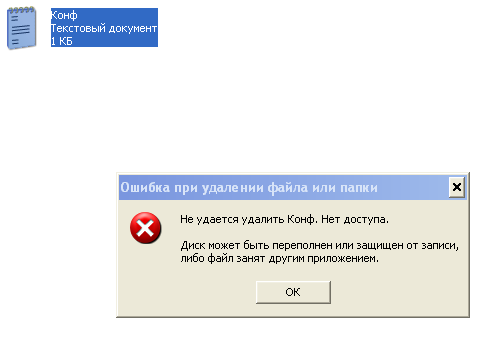
То есть пользователь не может работать с документами, у которых уровень конфиденциальности выше, чем у него.
Если вы зайдете под пользователем «Секретный» то вы сможете повысить уровень конфиденциальности файлов и работать с ними.
Не стоит забывать, что конфиденциальные файлы нельзя копировать в общедоступные папки, чтобы не допустить их утечки.
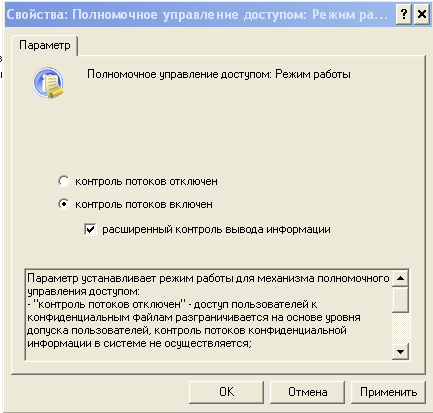
Контроль потоков данных
Контроль потоков данных используется для того, что бы запретить пользователям возможность понижения уровня конфиденциальности файлов.
Для этого нужно запустить «Локальные параметры безопасности»: «Пуск» – «Программы» –> «Secret Net 5» –> «Локальная политика безопасности», затем перейти в группу «Параметры Secret Net» –> «Настройки подсистем» и выбрать параметр «Полномочное управление доступом: Режим работы» и включить контроль потоков. Изменения вступят в силу после перезагрузки компьютера.
Если зайти (после перезагрузки) под пользователем «Секретный» появиться выбор уровня конфиденциальности для текущего сеанса. Выберите секретный уровень.
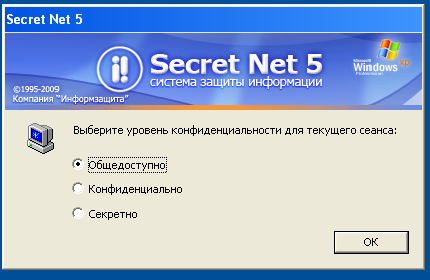
Если вы откроете файл с уровнем «Конфиденциально», отредактируете его и попробуете сохранить под другим именем и в другую папку, то вы получите ошибку, так как уровень сеанса (секретный) выше, чем уровень файла (конфиденциальный) и включен контроль потоков данных.
На этом все, если у вас остались вопросы задавайте их в комментариях.
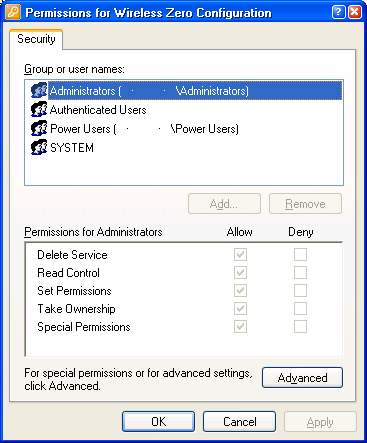
Figure 1: The ACL Editor
Introduction
In this series of articles, I will discuss the Windows Access Control model and its implementation in Windows NT and 2000. I intend this series to be four parts long. I originally intended this series of articles to be just one part long (I was only going to write about the Windows-2000 style ACL editor), but there is so much you need to know about Windows Access Control, I might as well devote an entire series dedicated to the topic.
This first article serves as an introduction to ACL-based Authorization (from a programming point of view) in Windows NT and how the access control model is implemented. If you have never programmed with Windows security, or are just starting, this first article is for you. Although this first article will display structures in C, you should read this article even if you aren’t programming in C. It contains concepts relevant to all programmers.
This series of articles isn’t meant as a primer on security administration (there are plenty of articles, websites, courses and books on that). Rather, it is intended to discuss the Windows NT Security model from a programmatic perspective. I will already assume you know how to set permissions on files, registry keys, and are quite proficient with the ACL editor. I will also assume you know what users are and what groups are.
Access Control is not available in 16-bit Windows or Windows 95/98/ME.
Table Of Contents
The table of contents is for the entire series.
- Part 1 — Background and Core Concepts. The Access Control Structures
- The Security Identifier (SID)
- The Security Descriptor (SD)
- The Access Control List (ACL)
- Choosing a good discretionary access control list
- Windows 2000 Inheritance Model
- The Token
- A Note on the Security Descriptor Definition Language
- Coming Up
- Part 2 — Basic Access Control programming
- Choosing your language
- Fun with SIDs
- Which Groups are you a member of?
- Enabling Token Privileges
- Dissecting the Security Descriptor
- Walking an Access Control List
- Creating an Access Control List
- Do I Have Access?
- Creating and Editing a Secure Object
- Making Your Own Classes Secure
- Toy Programs Download
- Part 3 — Access Control programming with .NET v2.0
- A history of .NET security.
- Reading a SID in .NET.
- Whoami .NET.
- Privilege handling in .NET.
- Running as an unprivileged user in .NET.
- Obtaining and editing a security descriptor in .NET, and applying it to an object.
- Access checks in .NET.
- NetAccessControl program and AccessToken class library.
- Part 4 — The Windows 2000-style Access Control editor
- Features of the ACL editor (ACLUI).
- Getting Started.
- Implementing the
ISecurityInformationInterface. ISecurityInformation::SetSecurity- Optional Interfaces.
- Presenting the interface.
- Filepermsbox — A program to display the security descriptor on an NTFS file or folder.
- History
Background
One of the original design goals of Windows NT was to provide a layer that can implement security for the operating system. The way Windows NT implemented security for its objects was through the Access control model. Even role-based security and the .NET classes could not replace this ACL-based security model. ACLs are far too embedded in the NTFS architecture objects, and the registry was to be rendered obsolete (so much so, that .NET v2.0 had to relent and end up supporting the ACL model too).
To start off, I will describe the different types of structures you may meet when programming for access control. This article is intended for all programmers (this part contains no code, just structures and programming concepts).
1. The Security Identifier (SID)
Before delving into the concepts of authorization, I should take a discussion about the Security Identifier (SID). We humans like to refer to a user by their user name (like «Administrator»). A computer must refer to the user in binary. It recognises a user by means of a hash (which is called a SID). When a user is created, the computer generates a SID for that user and from then on, it will refer to that user by its SID (not its username). To see a list of your own SIDs, open up regedit and expand the HKEY_USERS tree (you will see a list of the SIDs for the currently logged on users). You can convert the raw SID struct into a textual form by using ConvertSidToStringSid(). A textual SID (usually starts with S-1-5-21-…) consists of at least 3 dash-separated values (which stand for revision, authority, sub authority, ID and primary groups).
A SID can also represent a user group, a computer, a domain or even a forest. Windows maintains a list of hardcoded SIDs called the Well-Known SIDs (they represent accounts like the LocalSystem, or the NetworkService account). You can view a list of these SIDs in the WELL_KNOWN_SID_TYPE enumeration.
To convert a SID to a username, you would need to call LookupAccountSid(), and LookupAccountName() to convert a user name to a SID. However, most of the security functions accept either a SID or a username (they actually accept a TRUSTEE structure, which is a kind of union of the username and SID).
2. The Security Descriptor (SD)
Windows NT secures its objects by means of a structure called the security descriptor (SECURITY_DESCRIPTOR). The security descriptor is an integral part of the structure from which Windows objects are built. This means every object (be it file objects, registry keys, network shares, mutexes, semaphores, processes, threads, tokens, hardware, services, drivers…) recognized by Windows NT can be secured. The security descriptor structure exists in both kernel mode and user mode (and is identical in both modes). Although this allows for code reuse for both kernel mode and user mode security, it also means the SECURITY_DESCRIPTOR inherits some nasty quirks from kernel mode.
If you open up Winnt.h and scroll down to the SECURITY_DESCRIPTOR struct, you’ll see the structure of the security descriptor (Fig. 2). This SECURITY_DESCRIPTOR may actually be one of two structs, one is an absolute security descriptor (SECURITY_DESCRIPTOR), and the other is a self-relative security descriptor (Fig. 3 SECURITY_DESCRIPTOR_RELATIVE).
typedef struct _SECURITY_DESCRIPTOR
{
    BYTE Revision;
    BYTE Sbz1;
    SECURITY_DESCRIPTOR_CONTROL Control;

    PSID Owner;
    PSID Group;
    PACL Sacl;
    PACL Dacl;
} SECURITY_DESCRIPTOR, *PISECURITY_DESCRIPTOR;
Figure 2: The Absolute Security Descriptor.
Notice that a security descriptor consists of five members (excluding the two version control members):
- Discretionary Access Control List (
Dacl): This is where the permissions of the object are kept (who’s allowed access to the object, who’s denied). - System Access Control List (
Sacl): Specifies the type of auditing to be performed on the object. If an auditing event occurs, it will be stored in the Auditing Event Log. Owner: Specifies the owner of the object (as a SID). The owner of the object can always alter the security descriptor, regardless if someone else has locked out access.Group: Specifies the primary group of the object (as a SID). Windows mostly ignores this parameter (it was for POSIX compatibility, but its presence is rather vestigial now).Control: A bunch of flags that make up a 16-bit integer. It can be zero or more of the following flags:SE_DACL_PRESENT: TheDaclmember is valid.SE_SACL_PRESENT: TheSaclmember is valid.SE_DACL_AUTO_INHERITED: The DACL auto-inherits and gets entries from its parent included in itself.SE_SACL_AUTO_INHERITED: same asSE_DACL_AUTO_INHERITED, but it applies to the SACL.SE_DACL_PROTECTED: If the parent’s ACLs conflict with any ACL defined here, override the parent’s ACL. Useful for overriding inheritance.SE_SACL_PROTECTED: Same asSE_DACL_PROTECTED, but for SACLs.SE_DACL_DEFAULTED: TheDaclmember equals the default DACL for this object type.SE_SACL_DEFAULTED: TheSaclmember equals the default SACL for this object type.SE_GROUP_DEFAULTED: TheGroupmember equals the default Group for this object type.SE_OWNER_DEFAULTED: TheOwneris defaulted.SE_SELF_RELATIVE: Indicates this security descriptor is self-relative.
The last 4 entries of this structure are all pointers, and they point to the buffers where the ACLs etc. can be found. These pointers can point to any valid location in memory (not necessarily in a contiguous block). Because the security descriptors aren’t contiguous, it is going to be rather cumbersome to write the security descriptors to disk, or across processes. Microsoft solved this problem by introducing a new structure, called the self-relative security descriptor (Fig. 3 SECURITY_DESCRIPTOR_RELATIVE).
typedef struct _SECURITY_DESCRIPTOR_RELATIVE
{
    BYTE  Revision;
    BYTE  Sbz1;
    SECURITY_DESCRIPTOR_CONTROL Control;

    DWORD OwnerOffset;

    DWORD GroupOffset;
    DWORD SaclOffset;
    DWORD DaclOffset;

    struct SecurityDescriptorData
    {

        ...
        SID Owner;
        ...
        SID Group;
        ...
        ACL Sacl[];

        ...
        ACL Dacl[];
    } ;
} SECURITY_DESCRIPTOR_RELATIVE, *PISECURITY_DESCRIPTOR_RELATIVE;
Figure 3: The structure of the relative security descriptor
The self-relative security descriptor is much more complicated than the absolute security descriptor (so complex, that you cannot represent it in C++). Although the first three fields are the same as the absolute security descriptor, the security descriptors become very different after that. Following the Control member are four DWORDs (which represent offsets to the data). The data for the security descriptor all follow these four DWORDs. I’ve inserted padding bytes into the structure to illustrate that the data can appear anywhere in the buffer (simply change the Offset members to move the buffer). The four members do not need to appear in any particular order either. By choosing special offsets, you can make the Owner member appear after the group. At the expense of being horrendously complicated, the self-relative security descriptor occupies one contiguous block, making it suitable for transporting between application boundaries and storage media.
How can you tell the difference between an absolute and self-relative security descriptor? The difference is that with an absolute security descriptor, after the Control member are four pointers to the Group / Owner / SACL / DACL (in that order), and these four pointers point to separate locations in memory where the data can be found. With a self-relative security descriptor, after the Control member are four DWORDs which represent offsets to the Group / Owner / SACL / DACL. For example, if the group member has the value 0xf, then it’s telling Windows, «You can find the group SID 0xf bytes after me». 64-bit Windows makes this even more confusing when these two structures have differing sizes!
To make matters worse, Microsoft doesn’t distinguish between the absolute or self-relative security descriptor in their docs. Microsoft has reserved the right to make internal changes to the security descriptor, meaning you cannot rely on this structure being the same in future. Instead, if you want to manipulate a security descriptor, you should do so using the authorization APIs. Using the APIs encapsulate the complexity of these structures from you. So to distinguish between an absolute security descriptor and a self-relative one, call GetSecurityDescriptorControl(), and test for the SE_SELF_RELATIVE flag.
It’s important that you know which API expects an absolute security descriptor, and which ones expect a self-relative one. In Part 2 [^] of this series, you will get around to actually building a security descriptor.
3. The Access Control List (ACL)
Whenever you perform an action (e.g. a read) on an object in Windows NT, the action is encoded into a 32 bit integer (called the ACCESS_MASK). The ACCESS_MASK is specific to the object you are trying to create (if you read a file, the ACCESS_MASK would be FILE_GENERIC_READ). When you open the object with the requested ACCESS_MASK, Windows will get your username (inside your thread token) and then start reading the discretionary access control list (obtained from the security descriptor).
The DACL can be thought of as a table of user SIDs, ACCESS_MASKs, and access types. Don’t try to code it as an array of structs though. Use the low-level ACL functions GetAce(), GetAclInformation() & friends if you want to parse an ACL. In NT4, Microsoft provides a view of the ACL that looks exactly like a table of SIDs, ACCESS_MASKs and types (the EXPLICIT_ACCESS structure).
struct ACE
{
    BYTE AceType;
    BYTE AceFlags;
    ...
    ACCESS_MASK Mask;
    ...
    SID Sid;
} ;

struct ACL
{
    BYTE AclRevision;
    ...
    WORD AceCount;
    ...
    ACE AceList[this->AceCount];
} ;


typedef struct _EXPLICIT_ACCESS
{
    DWORD grfAccessPermissions;
    ACCESS_MODE grfAccessMode;
    DWORD grfInheritance;
    TRUSTEE Trustee;
} EXPLICIT_ACCESS, *PEXPLICIT_ACCESS;
Figure 4: An outline of the ACL and the ACE.
If the DACL is a table, then each row in the table is called an Access Control Entry. When an action is performed, Windows will enumerate this list of ACEs to find an entry that refers to you (you being the thread token). Windows enumerates the ACEs in the order they appear in the ACL. At first sight this goes against your intuition, the Help documentation, and what the MCP books say («I thought Windows walks the Deny ACEs first, then walks the Allow ACEs. Now you’re telling me this is wrong?»). Actually, we are both right. When Windows sets the DACL, it sorts the access control entries [^] so that deny ACEs do precede allow ACEs, and the access control model follows what you were taught.
If you make a call to the low level functions, you can circumvent the sorting, and make the ACEs appear in any order you like. The Cygwin tools utilise this technique to create DACLs unordered. However, these DACLs will not obey the access control rules, and you can make files with broken ACLs.
If you (your token) isn’t found in the ACL, then the open object function fails (Access denied). If you are found, Windows will look in the ACE to see what you are allowed to do. If the ACE allows you to open the object, you are granted access. If anything fails here, you are denied access (this is an example of a security best practice: «if anything goes wrong, make sure you fail securely»).
Now that you have been granted or denied access, Windows will now make a check on the other ACL, the System Access Control List. The difference between an SACL and a DACL is that DACL contains allow / deny entries, but an SACL contains audit entries. The SACL tells Windows which actions to log in the Security Event Log (audit successes / failures). Apart from that, you can treat the SACL / DACL as the same. If Windows finds an SACL which tells it to audit the access, then the access attempt is written to the Event log.
If you want to see if an ACL allows you access to the object, use the AccessCheck() API on the object.
4. Creating a good discretionary access control list
In almost every case, Windows has already decided a good discretionary access control list for you. When you encounter an API that asks for a security descriptor (or a SECURITY_ATTRIBUTES structure), simply pass in NULL for this parameter. Passing in NULL for either the SECURITY_ATTRIBUTES or SECURITY_DESCRIPTOR will tell the system to apply the default security descriptor. And that is probably what you were after.
If you need more advanced security, make sure you create a security descriptor that has a filled DACL. If you’ve initialized a security descriptor, but have forgotten to build up a DACL (and attach it to the security descriptor), you will get a NULL DACL. Windows sees this NULL DACL as an object that has the following ACE:
«Everyone: Full control»
Therefore, Windows will allow access to the object regardless of the action. This is one case where Microsoft broke its own best practices. When it encounters something unexpected, Windows should fail securely. In this case it doesn’t. So with a NULL DACL, everyone (including malware) will be able to do anything to the object (including setting a nasty rootkit-style DACL). For this reason, don’t create security descriptors with NULL DACLs.
Setting a NULL DACL isn’t the same as setting a NULL security descriptor. When passing a NULL security descriptor, Windows will replace it with a default security descriptor, and this security descriptor is secure, and allows enough access to the object. Setting a NULL DACL means passing a valid security descriptor, whose Dacl member happens to be NULL.
In a similar way, you probably don’t want to set a DACL that doesn’t contain any Access Control entries. In this DACL, when Windows attempts to enumerate the Access Control List, it will fail on the first attempt, therefore, it will deny access regardless of the action. The result is a completely inaccessible object (not much better than a non-existent object). You must have a filled DACL if you want to access the object.
So how do we build a Discretionary access control list?
Think about who you want to allow access to and who you don’t want to allow access. Is your DACL black list based (full of deny ACEs), or white list based (full of allow ACEs). If you are creating an ACL, you should prefer a white list approach to the security descriptor. How long is the object going to last? Is it a long running object (like the app mutex for a long running process), a short running object (like a synchronization event), or is it a permanent object (like a file)?
To determine a good security descriptor decide what you are going to do to the object. If you are securing a kernel object, you probably only need to synchronize, read and read the security on it. If you are securing a file, you’ll probably need all accesses available (one day).
Generally, for permanent objects you need at least two accounts to have access to the object. The first user is the LocalSystem account (restricting access to this account can lead to serious problems if it is a permanent object). The other is the object creator (or alternatively, the current owner) of the object. You should also consider giving administrators full control to the object. Another technique you can consider is only allowing the users read and execute access. When they want to delete the file, they will have to add the DELETE right themselves, then delete it.
For short running objects, you should apply the principal of least privilege to the object. For example, if all you are going to do with an object is read from it and synchronize it, then create a DACL that only allows read and synchronize access (you can even restrict the LocalSystem’s account this way if it is a short lived object).
If your object supports inheritance, then you don’t need a special DACL on the object (unless your file is special in terms of security), you can just apply the DACL for the parent (do this by setting the auto inherit flag in the Control member of the security descriptor). The default security descriptor will apply the inheritance flag for you.
And finally, if in doubt, ask the admins!
5. Windows 2000 Inheritance Model
Starting with Windows 2000, ACLs can be set to inherit from their parent. What this means is that the ACL of the parent will be applied to the child (e.g. the permissions for «Program FilesCommon FilesMicrosoft Shared» will be the same as «Program FilesCommon Files«). A special flag in the ACE will state that it is inherited.
As stated in the previous section, Windows walks the list of ACEs until it reaches the end or finds an ACE that matches you. If inheritance is enabled, when Windows reaches the end of the list, it will start walking the ACL of the parent folder to find a matching ACE. Therefore, the object will have the parent’s ACL applied to itself, automatically. This only occurs if the ACL is set to inherit from the parent object.
If the folder also has inheritance, Windows will walk up that folder too. This can continue all the way until Windows hits a folder that has inheritance disabled, or it hits the root of the drive. The result is that the resultant ACL is a merged view of the current object and its parent. The ACEs that come from the parent are called inherited ACEs, and the ACEs that come from the file itself are called the protected ACEs.
To support ACL inheritance, you must design your classes to have parent-child relationships (like a file/folder, or a registry key/value). The parent will be referred to as a container (e.g. folder), and the child will be referred to as an object (like a file).
For really advanced ACL control, Windows 2000 supports applying ACEs only to folders and not files (and vice versa). The ACE flag that controls inheritance also states which type of inheritance to apply. There are four flags:
OBJECT_INHERIT_ACE(OI): indicates the ACE gets inherited to child objects (e.g. files).CONTAINER_INHERIT_ACE(CI): indicates the ACE gets inherited to child containers (e.g. subfolders).INHERIT_ONLY_ACE(IO): indicates the ACE applies not to this object, but to child objects (e.g. child files/subfolders only).NO_PROPAGATE_INHERIT_ACE(NP): do not apply this ACE to grandchildren, just the direct children (e.g. apply files but not files in subfolders).
These flags can be (and usually are) combined. To make the ACE apply to every child object within yourself (including inside subfolders), specify (OBJECT_INHERIT_ACE | CONTAINER_INHERIT_ACE).
For a more complete description of ACE inheritance, check out Keith Brown’s book.
6. The Access Token
The final structure I will describe today is the Access token. I don’t want to delve too much into this structure otherwise I may stray off topic (it’s relevant not only to access control, but to privileges, policy, group membership as well as IPC across logon sessions). The access token forms an integral part of both the thread and process objects. The access token identifies who you are in the context of security. Windows NT maintains user information per process, as this allows processes and threads to run as a different user (if you wanted to know how Task Manager knows which user a process runs under, it’s in the access token). The access token is the feature that allows services, runas, and fast user switching to exist.
The access token can either be a process token, a primary thread token, or a thread impersonation token. Unless your thread is impersonating, your thread doesn’t have a token (you’ll be using the process token instead). Once you’ve made your thread impersonating, you’ll have an impersonation token associated with your thread. You can convert your impersonation token into a primary token (suitable for CreateProcessAsUser()) by calling DuplicateTokenEx()).
When you log in to Windows, your processes will have their tokens set to your username when run. If you open your own token and look inside it, you can find out the name of the user you are running as (all without needing to invoke GetUserName()).

Figure 5: An illustration of the access token.
There’s a lot of information you can gleam from a token via GetTokenInformation(). For example:
TokenUser: Which user the process runs as.TokenGroupsandPrivileges: Which groups the user belongs to (as well asTokenGroups,TokentRestrictedSids,TokenPrivilegesandTokenUser).TokenGroups: The complete list of groups to which the user belongs (gives more information than «net.exe user <user>«, WMI, User Management console, and «control userpasswords2«).TokenPrivileges: The list of privileges.TokenDefaultDacl,TokenOwner,TokenDefaultGroup: The definition of a default security descriptor.TokenType: Whether this token impersonates.TokenSource: The source of the access token.TokenRestrictedSids: The list of restricted SIDs.
For the purposes of access control, most of the information we need from the access token are in the TokenGroupsandPrivileges structure. With this value, you rollup the GetUserName(), NetUserGroups(), CheckTokenMembership() and LookupPrivilegeValue() APIs all in one. The token shows that being a member of the administrators group also makes you a member of the None group, the Authenticated Users group, the Users group, the Power Users group, and the LOCAL group. This is useful to you as you now have a list of user groups to which you belong, and can now search an ACL using this list. To see if an ACL grants you access:
- Open up your thread token.
- Get the list of groups.
- Obtain the
SECURITY_DESCRIPTORfor the object. - Get the ACL from the security descriptor.
- For each ACE in the ACL, lookup the SID associated with that ACE.
- Lookup this SID in the list of groups you created in step 2.
- If found, see if it is a deny or allow ACE.
- If it is an allow ACE, compare the
ACCESS_MASKwith your desiredACCESS_MASK. - If all accesses are allowed, you are allowed access.
- If an error occurs, you are denied access.
Add in error/parameter checking to the above list (and auditing), and you have just created yourself a pseudo AccessCheck() function.
You’ve probably already encountered the default security descriptor. Whenever you encountered an API that requested a SECURITY_ATTRIBUTES parameter, you most likely passed in NULL for that parameter (which means «default security descriptor»). By calling GetTokenInformation(TokenDefault*), you can find out what that default security descriptor is.
The privileges are a list of policies that must be enabled before you are allowed to perform certain system-critical functions (like shutdown the system, or install drivers). These privileges are configurable via group policy (user rights assignment), and are listed in your thread token. The privileges are disabled by default (exception: SeChangeNotifyPrivilege), so you must enable the privilege before you can use it. The Platform SDK provides a sample function SetPrivilege() that can enable and disable a privilege whenever you need it. I strongly suggest you add this function to your security utility library, because you are going to reuse that function again and again, especially with access control. Enabling a privilege then becomes a matter of adding two lines to your code:
...
SetPrivilege(SePrivilegeName, TRUE);


SetPrivilege(SePrivilegeName, FALSE);
...
Figure 16: Enabling and disabling a privilege using the Platform SDK sample function.
I don’t want to go into sandboxing or impersonation (since they are rather off topic for access control). If you want to know more about impersonation and privileges, look at this WindowsSecurity article, or Paul Cooke’s book.
7. A note on the Security Descriptor Definition Language
The Security Descriptor Definition Language is an attempt to represent a security descriptor in text form that both administrators and programs can understand. The full reference (and in my humble opinion, the only decent reference) to the SDDL format is located in the help documentation.
Briefly, the SDDL string contains the following parts: a group, an owner, the DACL and SACL. These sections are delimited by a one-letter label followed by a colon (O: delimits the owner, G: delimits the group, D: delimits the DACL, S: delimits the SACL). Following the group and delimiters are SIDs that denote the owner and group. Following the D: and S: delimiters are a list of bracket separated entries (each bracket represents an ACE in the list).
The ACE bracket consists of six semicolon delimited terms that represent ACE type, inheritance, ACCESS_MASK, GUID, inherited GUID, and user SID respectively. The ACE brackets are stacked up in the list to form the overall ACL. Prefixing the list of ACE brackets can be some other flags; these represent the control flags for the security descriptor. The following is an example SDDL we will dissect (I’ve separated the different sections for clarity):
O:AOG:DAS:D:(A;;RPWPCCDCLCSWRCWDWOGA;;;S-1-0-0)(A;;GA;;;SY)
First, tokenize this string using the delimiters:
| O: | G: | S: | D: |
AO |
DA |
(A;;RP WP CC DC LC SW RC WD WO GA;;;S-1-0-0) (A;;GA;;;SY) |
Figure 7a: The SDDL string tokenized into separate strings.
Next, expand the SID strings and ACE strings:
| Owner | Group | SACL | DACL |
| Account Operators | Domain Administrators | (A;;ADS_RIGHT_DS_READ_PROP | ADS_RIGHT_DS_WRITE_PROP | ADS_RIGHT_DS_CREATE_CHILD | ADS_RIGHT_DS_DELETE_CHILD | ADS_RIGHT_DS_LIST | ADS_RIGHT_DS_SELF | READ_CONTROL | WRITE_DAC | WRITE_OWNER | GENERIC_ALL;;; null SID)(A;;GENERIC_ALL;;;LocalSystem) |
Figure 7b: The SDDL string with the SID strings and ACE strings expanded
Finally, expand the constant strings:
| Owner | Group | SACL | DACL |
| Account Operators | Domain Administrators | Allow (null SID): 0x01e000bb Allow LocalSystem: 0x100000 |
Figure 7c: The security descriptor that the SDDL string specifies.
This is the meaning of the SDDL string specified. For a whole bunch of example SDDL strings, take a look at the %windir%securitytemplates*.inf files. This is what Windows Setup used to apply the default security descriptors for your Windows installation. See if you can decrypt the security descriptors for those strings. (To find out the answers, you can call the ConvertStringSecurityDescriptorToSecurityDescriptor() function on the security descriptor strings.)
Sorry about the poor explanation about SDDL strings. Like I said, the best reference for SDDL is in the SDK documentation, and I still stand by that statement.
8. Coming Up
In this part, you learnt how Windows NT secured its objects using security descriptors. You discovered that Windows recognizes users, groups and computers as SIDs. You learnt that security descriptors originally came from kernel mode, therefore they can be complex beasts. You were shown the parts of a security descriptor, the five components which make it up, and how it is stored in memory. You were then shown the two types of access control list. You discovered the structure of the ACL, how Windows reads an ACL, and how inheritance is implemented within the Access control model. The last structure you learnt about was the access token. You were taught what information can be read from a token, and finished off with enabling a permission.
In Part 2, you will start writing some example code for reading and writing security descriptors. You will also obtain information from the primary token to create a WhoAmI clone. Whilst you are waiting for the next article to come up, I want you to choose which technique you are going to program with. I am going to present four ways of programming with security:
- The low level way. If you need to program for NT3.5, and don’t have ATL, you’ll have no choice but to choose this method. This method makes direct calls to the low level ACL functions, and they are horrible! Not only is it nontrivial to program, this method is also excessively complex and error prone (no wonder Windows NT had so many security bugs [^]!). Unless you need to support backward compatibility (since when did you care about backward compatibility?), I strongly recommend you steer clear of this method if you can help it. If you want a preview of this method, check out the SDK docs on
SetEntriesInAcl()[^]. - The Windows 2000 way. Realising how difficult method 1 was, Microsoft invented an alternative API for creating security descriptors, the Security Descriptor Definition Language (SDDL). Initially, SDDL may not be much better than low level authorisation (just as complex, and not as compatible). However, being in text mode makes SDDL infinitely more readable, for both programmers and administrators. And if you look closely at a number of SDDLs, along with the corresponding ACLs, you’ll soon get the hang of it. Windows 2000 also introduces API helpers to automate repetitive tasks (like printing a SID in text form). If you want a preview, check out the SDK docs on
ConvertStringSecurityDescriptorToSecurityDescriptor()[^]. - The ATL way. As part of the Trustworthy Computing Initiative, Microsoft made a number of updates to ATL, culminating in the ATL security classes. If you have Visual C++ .NET, and don’t mind programming with ATL C++, you’ll want to choose this method. To see a preview, check out the
CSecurityDesc()[^] class from the Visual C++ help. - The .NET way. Starting with v2.0 of the .NET Framework, you can also choose to program security descriptors in a fully object oriented managed environment. Note, that I will not cover this in part 2 of the series. Instead programming security in .NET will have its very own part in this series (Part 3). If you have Visual Studio .NET 2005, you should strongly consider choosing this method. You can see a preview in the
System.Security.AccessControl[^].
History
The history and bibliography are now maintained in Part 4 [^].
Next Part… [^]
Figure 1: The ACL Editor
Introduction
In this series of articles, I will discuss the Windows Access Control model and its implementation in Windows NT and 2000. I intend this series to be four parts long. I originally intended this series of articles to be just one part long (I was only going to write about the Windows-2000 style ACL editor), but there is so much you need to know about Windows Access Control, I might as well devote an entire series dedicated to the topic.
This first article serves as an introduction to ACL-based Authorization (from a programming point of view) in Windows NT and how the access control model is implemented. If you have never programmed with Windows security, or are just starting, this first article is for you. Although this first article will display structures in C, you should read this article even if you aren’t programming in C. It contains concepts relevant to all programmers.
This series of articles isn’t meant as a primer on security administration (there are plenty of articles, websites, courses and books on that). Rather, it is intended to discuss the Windows NT Security model from a programmatic perspective. I will already assume you know how to set permissions on files, registry keys, and are quite proficient with the ACL editor. I will also assume you know what users are and what groups are.
Access Control is not available in 16-bit Windows or Windows 95/98/ME.
Table Of Contents
The table of contents is for the entire series.
- Part 1 — Background and Core Concepts. The Access Control Structures
- The Security Identifier (SID)
- The Security Descriptor (SD)
- The Access Control List (ACL)
- Choosing a good discretionary access control list
- Windows 2000 Inheritance Model
- The Token
- A Note on the Security Descriptor Definition Language
- Coming Up
- Part 2 — Basic Access Control programming
- Choosing your language
- Fun with SIDs
- Which Groups are you a member of?
- Enabling Token Privileges
- Dissecting the Security Descriptor
- Walking an Access Control List
- Creating an Access Control List
- Do I Have Access?
- Creating and Editing a Secure Object
- Making Your Own Classes Secure
- Toy Programs Download
- Part 3 — Access Control programming with .NET v2.0
- A history of .NET security.
- Reading a SID in .NET.
- Whoami .NET.
- Privilege handling in .NET.
- Running as an unprivileged user in .NET.
- Obtaining and editing a security descriptor in .NET, and applying it to an object.
- Access checks in .NET.
- NetAccessControl program and AccessToken class library.
- Part 4 — The Windows 2000-style Access Control editor
- Features of the ACL editor (ACLUI).
- Getting Started.
- Implementing the
ISecurityInformationInterface. ISecurityInformation::SetSecurity- Optional Interfaces.
- Presenting the interface.
- Filepermsbox — A program to display the security descriptor on an NTFS file or folder.
- History
Background
One of the original design goals of Windows NT was to provide a layer that can implement security for the operating system. The way Windows NT implemented security for its objects was through the Access control model. Even role-based security and the .NET classes could not replace this ACL-based security model. ACLs are far too embedded in the NTFS architecture objects, and the registry was to be rendered obsolete (so much so, that .NET v2.0 had to relent and end up supporting the ACL model too).
To start off, I will describe the different types of structures you may meet when programming for access control. This article is intended for all programmers (this part contains no code, just structures and programming concepts).
1. The Security Identifier (SID)
Before delving into the concepts of authorization, I should take a discussion about the Security Identifier (SID). We humans like to refer to a user by their user name (like «Administrator»). A computer must refer to the user in binary. It recognises a user by means of a hash (which is called a SID). When a user is created, the computer generates a SID for that user and from then on, it will refer to that user by its SID (not its username). To see a list of your own SIDs, open up regedit and expand the HKEY_USERS tree (you will see a list of the SIDs for the currently logged on users). You can convert the raw SID struct into a textual form by using ConvertSidToStringSid(). A textual SID (usually starts with S-1-5-21-…) consists of at least 3 dash-separated values (which stand for revision, authority, sub authority, ID and primary groups).
A SID can also represent a user group, a computer, a domain or even a forest. Windows maintains a list of hardcoded SIDs called the Well-Known SIDs (they represent accounts like the LocalSystem, or the NetworkService account). You can view a list of these SIDs in the WELL_KNOWN_SID_TYPE enumeration.
To convert a SID to a username, you would need to call LookupAccountSid(), and LookupAccountName() to convert a user name to a SID. However, most of the security functions accept either a SID or a username (they actually accept a TRUSTEE structure, which is a kind of union of the username and SID).
2. The Security Descriptor (SD)
Windows NT secures its objects by means of a structure called the security descriptor (SECURITY_DESCRIPTOR). The security descriptor is an integral part of the structure from which Windows objects are built. This means every object (be it file objects, registry keys, network shares, mutexes, semaphores, processes, threads, tokens, hardware, services, drivers…) recognized by Windows NT can be secured. The security descriptor structure exists in both kernel mode and user mode (and is identical in both modes). Although this allows for code reuse for both kernel mode and user mode security, it also means the SECURITY_DESCRIPTOR inherits some nasty quirks from kernel mode.
If you open up Winnt.h and scroll down to the SECURITY_DESCRIPTOR struct, you’ll see the structure of the security descriptor (Fig. 2). This SECURITY_DESCRIPTOR may actually be one of two structs, one is an absolute security descriptor (SECURITY_DESCRIPTOR), and the other is a self-relative security descriptor (Fig. 3 SECURITY_DESCRIPTOR_RELATIVE).
typedef struct _SECURITY_DESCRIPTOR
{
    BYTE Revision;
    BYTE Sbz1;
    SECURITY_DESCRIPTOR_CONTROL Control;

    PSID Owner;
    PSID Group;
    PACL Sacl;
    PACL Dacl;
} SECURITY_DESCRIPTOR, *PISECURITY_DESCRIPTOR;
Figure 2: The Absolute Security Descriptor.
Notice that a security descriptor consists of five members (excluding the two version control members):
- Discretionary Access Control List (
Dacl): This is where the permissions of the object are kept (who’s allowed access to the object, who’s denied). - System Access Control List (
Sacl): Specifies the type of auditing to be performed on the object. If an auditing event occurs, it will be stored in the Auditing Event Log. Owner: Specifies the owner of the object (as a SID). The owner of the object can always alter the security descriptor, regardless if someone else has locked out access.Group: Specifies the primary group of the object (as a SID). Windows mostly ignores this parameter (it was for POSIX compatibility, but its presence is rather vestigial now).Control: A bunch of flags that make up a 16-bit integer. It can be zero or more of the following flags:SE_DACL_PRESENT: TheDaclmember is valid.SE_SACL_PRESENT: TheSaclmember is valid.SE_DACL_AUTO_INHERITED: The DACL auto-inherits and gets entries from its parent included in itself.SE_SACL_AUTO_INHERITED: same asSE_DACL_AUTO_INHERITED, but it applies to the SACL.SE_DACL_PROTECTED: If the parent’s ACLs conflict with any ACL defined here, override the parent’s ACL. Useful for overriding inheritance.SE_SACL_PROTECTED: Same asSE_DACL_PROTECTED, but for SACLs.SE_DACL_DEFAULTED: TheDaclmember equals the default DACL for this object type.SE_SACL_DEFAULTED: TheSaclmember equals the default SACL for this object type.SE_GROUP_DEFAULTED: TheGroupmember equals the default Group for this object type.SE_OWNER_DEFAULTED: TheOwneris defaulted.SE_SELF_RELATIVE: Indicates this security descriptor is self-relative.
The last 4 entries of this structure are all pointers, and they point to the buffers where the ACLs etc. can be found. These pointers can point to any valid location in memory (not necessarily in a contiguous block). Because the security descriptors aren’t contiguous, it is going to be rather cumbersome to write the security descriptors to disk, or across processes. Microsoft solved this problem by introducing a new structure, called the self-relative security descriptor (Fig. 3 SECURITY_DESCRIPTOR_RELATIVE).
typedef struct _SECURITY_DESCRIPTOR_RELATIVE
{
    BYTE  Revision;
    BYTE  Sbz1;
    SECURITY_DESCRIPTOR_CONTROL Control;

    DWORD OwnerOffset;

    DWORD GroupOffset;
    DWORD SaclOffset;
    DWORD DaclOffset;

    struct SecurityDescriptorData
    {

        ...
        SID Owner;
        ...
        SID Group;
        ...
        ACL Sacl[];

        ...
        ACL Dacl[];
    } ;
} SECURITY_DESCRIPTOR_RELATIVE, *PISECURITY_DESCRIPTOR_RELATIVE;
Figure 3: The structure of the relative security descriptor
The self-relative security descriptor is much more complicated than the absolute security descriptor (so complex, that you cannot represent it in C++). Although the first three fields are the same as the absolute security descriptor, the security descriptors become very different after that. Following the Control member are four DWORDs (which represent offsets to the data). The data for the security descriptor all follow these four DWORDs. I’ve inserted padding bytes into the structure to illustrate that the data can appear anywhere in the buffer (simply change the Offset members to move the buffer). The four members do not need to appear in any particular order either. By choosing special offsets, you can make the Owner member appear after the group. At the expense of being horrendously complicated, the self-relative security descriptor occupies one contiguous block, making it suitable for transporting between application boundaries and storage media.
How can you tell the difference between an absolute and self-relative security descriptor? The difference is that with an absolute security descriptor, after the Control member are four pointers to the Group / Owner / SACL / DACL (in that order), and these four pointers point to separate locations in memory where the data can be found. With a self-relative security descriptor, after the Control member are four DWORDs which represent offsets to the Group / Owner / SACL / DACL. For example, if the group member has the value 0xf, then it’s telling Windows, «You can find the group SID 0xf bytes after me». 64-bit Windows makes this even more confusing when these two structures have differing sizes!
To make matters worse, Microsoft doesn’t distinguish between the absolute or self-relative security descriptor in their docs. Microsoft has reserved the right to make internal changes to the security descriptor, meaning you cannot rely on this structure being the same in future. Instead, if you want to manipulate a security descriptor, you should do so using the authorization APIs. Using the APIs encapsulate the complexity of these structures from you. So to distinguish between an absolute security descriptor and a self-relative one, call GetSecurityDescriptorControl(), and test for the SE_SELF_RELATIVE flag.
It’s important that you know which API expects an absolute security descriptor, and which ones expect a self-relative one. In Part 2 [^] of this series, you will get around to actually building a security descriptor.
3. The Access Control List (ACL)
Whenever you perform an action (e.g. a read) on an object in Windows NT, the action is encoded into a 32 bit integer (called the ACCESS_MASK). The ACCESS_MASK is specific to the object you are trying to create (if you read a file, the ACCESS_MASK would be FILE_GENERIC_READ). When you open the object with the requested ACCESS_MASK, Windows will get your username (inside your thread token) and then start reading the discretionary access control list (obtained from the security descriptor).
The DACL can be thought of as a table of user SIDs, ACCESS_MASKs, and access types. Don’t try to code it as an array of structs though. Use the low-level ACL functions GetAce(), GetAclInformation() & friends if you want to parse an ACL. In NT4, Microsoft provides a view of the ACL that looks exactly like a table of SIDs, ACCESS_MASKs and types (the EXPLICIT_ACCESS structure).
struct ACE
{
    BYTE AceType;
    BYTE AceFlags;
    ...
    ACCESS_MASK Mask;
    ...
    SID Sid;
} ;

struct ACL
{
    BYTE AclRevision;
    ...
    WORD AceCount;
    ...
    ACE AceList[this->AceCount];
} ;


typedef struct _EXPLICIT_ACCESS
{
    DWORD grfAccessPermissions;
    ACCESS_MODE grfAccessMode;
    DWORD grfInheritance;
    TRUSTEE Trustee;
} EXPLICIT_ACCESS, *PEXPLICIT_ACCESS;
Figure 4: An outline of the ACL and the ACE.
If the DACL is a table, then each row in the table is called an Access Control Entry. When an action is performed, Windows will enumerate this list of ACEs to find an entry that refers to you (you being the thread token). Windows enumerates the ACEs in the order they appear in the ACL. At first sight this goes against your intuition, the Help documentation, and what the MCP books say («I thought Windows walks the Deny ACEs first, then walks the Allow ACEs. Now you’re telling me this is wrong?»). Actually, we are both right. When Windows sets the DACL, it sorts the access control entries [^] so that deny ACEs do precede allow ACEs, and the access control model follows what you were taught.
If you make a call to the low level functions, you can circumvent the sorting, and make the ACEs appear in any order you like. The Cygwin tools utilise this technique to create DACLs unordered. However, these DACLs will not obey the access control rules, and you can make files with broken ACLs.
If you (your token) isn’t found in the ACL, then the open object function fails (Access denied). If you are found, Windows will look in the ACE to see what you are allowed to do. If the ACE allows you to open the object, you are granted access. If anything fails here, you are denied access (this is an example of a security best practice: «if anything goes wrong, make sure you fail securely»).
Now that you have been granted or denied access, Windows will now make a check on the other ACL, the System Access Control List. The difference between an SACL and a DACL is that DACL contains allow / deny entries, but an SACL contains audit entries. The SACL tells Windows which actions to log in the Security Event Log (audit successes / failures). Apart from that, you can treat the SACL / DACL as the same. If Windows finds an SACL which tells it to audit the access, then the access attempt is written to the Event log.
If you want to see if an ACL allows you access to the object, use the AccessCheck() API on the object.
4. Creating a good discretionary access control list
In almost every case, Windows has already decided a good discretionary access control list for you. When you encounter an API that asks for a security descriptor (or a SECURITY_ATTRIBUTES structure), simply pass in NULL for this parameter. Passing in NULL for either the SECURITY_ATTRIBUTES or SECURITY_DESCRIPTOR will tell the system to apply the default security descriptor. And that is probably what you were after.
If you need more advanced security, make sure you create a security descriptor that has a filled DACL. If you’ve initialized a security descriptor, but have forgotten to build up a DACL (and attach it to the security descriptor), you will get a NULL DACL. Windows sees this NULL DACL as an object that has the following ACE:
«Everyone: Full control»
Therefore, Windows will allow access to the object regardless of the action. This is one case where Microsoft broke its own best practices. When it encounters something unexpected, Windows should fail securely. In this case it doesn’t. So with a NULL DACL, everyone (including malware) will be able to do anything to the object (including setting a nasty rootkit-style DACL). For this reason, don’t create security descriptors with NULL DACLs.
Setting a NULL DACL isn’t the same as setting a NULL security descriptor. When passing a NULL security descriptor, Windows will replace it with a default security descriptor, and this security descriptor is secure, and allows enough access to the object. Setting a NULL DACL means passing a valid security descriptor, whose Dacl member happens to be NULL.
In a similar way, you probably don’t want to set a DACL that doesn’t contain any Access Control entries. In this DACL, when Windows attempts to enumerate the Access Control List, it will fail on the first attempt, therefore, it will deny access regardless of the action. The result is a completely inaccessible object (not much better than a non-existent object). You must have a filled DACL if you want to access the object.
So how do we build a Discretionary access control list?
Think about who you want to allow access to and who you don’t want to allow access. Is your DACL black list based (full of deny ACEs), or white list based (full of allow ACEs). If you are creating an ACL, you should prefer a white list approach to the security descriptor. How long is the object going to last? Is it a long running object (like the app mutex for a long running process), a short running object (like a synchronization event), or is it a permanent object (like a file)?
To determine a good security descriptor decide what you are going to do to the object. If you are securing a kernel object, you probably only need to synchronize, read and read the security on it. If you are securing a file, you’ll probably need all accesses available (one day).
Generally, for permanent objects you need at least two accounts to have access to the object. The first user is the LocalSystem account (restricting access to this account can lead to serious problems if it is a permanent object). The other is the object creator (or alternatively, the current owner) of the object. You should also consider giving administrators full control to the object. Another technique you can consider is only allowing the users read and execute access. When they want to delete the file, they will have to add the DELETE right themselves, then delete it.
For short running objects, you should apply the principal of least privilege to the object. For example, if all you are going to do with an object is read from it and synchronize it, then create a DACL that only allows read and synchronize access (you can even restrict the LocalSystem’s account this way if it is a short lived object).
If your object supports inheritance, then you don’t need a special DACL on the object (unless your file is special in terms of security), you can just apply the DACL for the parent (do this by setting the auto inherit flag in the Control member of the security descriptor). The default security descriptor will apply the inheritance flag for you.
And finally, if in doubt, ask the admins!
5. Windows 2000 Inheritance Model
Starting with Windows 2000, ACLs can be set to inherit from their parent. What this means is that the ACL of the parent will be applied to the child (e.g. the permissions for «Program FilesCommon FilesMicrosoft Shared» will be the same as «Program FilesCommon Files«). A special flag in the ACE will state that it is inherited.
As stated in the previous section, Windows walks the list of ACEs until it reaches the end or finds an ACE that matches you. If inheritance is enabled, when Windows reaches the end of the list, it will start walking the ACL of the parent folder to find a matching ACE. Therefore, the object will have the parent’s ACL applied to itself, automatically. This only occurs if the ACL is set to inherit from the parent object.
If the folder also has inheritance, Windows will walk up that folder too. This can continue all the way until Windows hits a folder that has inheritance disabled, or it hits the root of the drive. The result is that the resultant ACL is a merged view of the current object and its parent. The ACEs that come from the parent are called inherited ACEs, and the ACEs that come from the file itself are called the protected ACEs.
To support ACL inheritance, you must design your classes to have parent-child relationships (like a file/folder, or a registry key/value). The parent will be referred to as a container (e.g. folder), and the child will be referred to as an object (like a file).
For really advanced ACL control, Windows 2000 supports applying ACEs only to folders and not files (and vice versa). The ACE flag that controls inheritance also states which type of inheritance to apply. There are four flags:
OBJECT_INHERIT_ACE(OI): indicates the ACE gets inherited to child objects (e.g. files).CONTAINER_INHERIT_ACE(CI): indicates the ACE gets inherited to child containers (e.g. subfolders).INHERIT_ONLY_ACE(IO): indicates the ACE applies not to this object, but to child objects (e.g. child files/subfolders only).NO_PROPAGATE_INHERIT_ACE(NP): do not apply this ACE to grandchildren, just the direct children (e.g. apply files but not files in subfolders).
These flags can be (and usually are) combined. To make the ACE apply to every child object within yourself (including inside subfolders), specify (OBJECT_INHERIT_ACE | CONTAINER_INHERIT_ACE).
For a more complete description of ACE inheritance, check out Keith Brown’s book.
6. The Access Token
The final structure I will describe today is the Access token. I don’t want to delve too much into this structure otherwise I may stray off topic (it’s relevant not only to access control, but to privileges, policy, group membership as well as IPC across logon sessions). The access token forms an integral part of both the thread and process objects. The access token identifies who you are in the context of security. Windows NT maintains user information per process, as this allows processes and threads to run as a different user (if you wanted to know how Task Manager knows which user a process runs under, it’s in the access token). The access token is the feature that allows services, runas, and fast user switching to exist.
The access token can either be a process token, a primary thread token, or a thread impersonation token. Unless your thread is impersonating, your thread doesn’t have a token (you’ll be using the process token instead). Once you’ve made your thread impersonating, you’ll have an impersonation token associated with your thread. You can convert your impersonation token into a primary token (suitable for CreateProcessAsUser()) by calling DuplicateTokenEx()).
When you log in to Windows, your processes will have their tokens set to your username when run. If you open your own token and look inside it, you can find out the name of the user you are running as (all without needing to invoke GetUserName()).
Figure 5: An illustration of the access token.
There’s a lot of information you can gleam from a token via GetTokenInformation(). For example:
TokenUser: Which user the process runs as.TokenGroupsandPrivileges: Which groups the user belongs to (as well asTokenGroups,TokentRestrictedSids,TokenPrivilegesandTokenUser).TokenGroups: The complete list of groups to which the user belongs (gives more information than «net.exe user <user>«, WMI, User Management console, and «control userpasswords2«).TokenPrivileges: The list of privileges.TokenDefaultDacl,TokenOwner,TokenDefaultGroup: The definition of a default security descriptor.TokenType: Whether this token impersonates.TokenSource: The source of the access token.TokenRestrictedSids: The list of restricted SIDs.
For the purposes of access control, most of the information we need from the access token are in the TokenGroupsandPrivileges structure. With this value, you rollup the GetUserName(), NetUserGroups(), CheckTokenMembership() and LookupPrivilegeValue() APIs all in one. The token shows that being a member of the administrators group also makes you a member of the None group, the Authenticated Users group, the Users group, the Power Users group, and the LOCAL group. This is useful to you as you now have a list of user groups to which you belong, and can now search an ACL using this list. To see if an ACL grants you access:
- Open up your thread token.
- Get the list of groups.
- Obtain the
SECURITY_DESCRIPTORfor the object. - Get the ACL from the security descriptor.
- For each ACE in the ACL, lookup the SID associated with that ACE.
- Lookup this SID in the list of groups you created in step 2.
- If found, see if it is a deny or allow ACE.
- If it is an allow ACE, compare the
ACCESS_MASKwith your desiredACCESS_MASK. - If all accesses are allowed, you are allowed access.
- If an error occurs, you are denied access.
Add in error/parameter checking to the above list (and auditing), and you have just created yourself a pseudo AccessCheck() function.
You’ve probably already encountered the default security descriptor. Whenever you encountered an API that requested a SECURITY_ATTRIBUTES parameter, you most likely passed in NULL for that parameter (which means «default security descriptor»). By calling GetTokenInformation(TokenDefault*), you can find out what that default security descriptor is.
The privileges are a list of policies that must be enabled before you are allowed to perform certain system-critical functions (like shutdown the system, or install drivers). These privileges are configurable via group policy (user rights assignment), and are listed in your thread token. The privileges are disabled by default (exception: SeChangeNotifyPrivilege), so you must enable the privilege before you can use it. The Platform SDK provides a sample function SetPrivilege() that can enable and disable a privilege whenever you need it. I strongly suggest you add this function to your security utility library, because you are going to reuse that function again and again, especially with access control. Enabling a privilege then becomes a matter of adding two lines to your code:
...
SetPrivilege(SePrivilegeName, TRUE);


SetPrivilege(SePrivilegeName, FALSE);
...
Figure 16: Enabling and disabling a privilege using the Platform SDK sample function.
I don’t want to go into sandboxing or impersonation (since they are rather off topic for access control). If you want to know more about impersonation and privileges, look at this WindowsSecurity article, or Paul Cooke’s book.
7. A note on the Security Descriptor Definition Language
The Security Descriptor Definition Language is an attempt to represent a security descriptor in text form that both administrators and programs can understand. The full reference (and in my humble opinion, the only decent reference) to the SDDL format is located in the help documentation.
Briefly, the SDDL string contains the following parts: a group, an owner, the DACL and SACL. These sections are delimited by a one-letter label followed by a colon (O: delimits the owner, G: delimits the group, D: delimits the DACL, S: delimits the SACL). Following the group and delimiters are SIDs that denote the owner and group. Following the D: and S: delimiters are a list of bracket separated entries (each bracket represents an ACE in the list).
The ACE bracket consists of six semicolon delimited terms that represent ACE type, inheritance, ACCESS_MASK, GUID, inherited GUID, and user SID respectively. The ACE brackets are stacked up in the list to form the overall ACL. Prefixing the list of ACE brackets can be some other flags; these represent the control flags for the security descriptor. The following is an example SDDL we will dissect (I’ve separated the different sections for clarity):
O:AOG:DAS:D:(A;;RPWPCCDCLCSWRCWDWOGA;;;S-1-0-0)(A;;GA;;;SY)
First, tokenize this string using the delimiters:
| O: | G: | S: | D: |
AO |
DA |
(A;;RP WP CC DC LC SW RC WD WO GA;;;S-1-0-0) (A;;GA;;;SY) |
Figure 7a: The SDDL string tokenized into separate strings.
Next, expand the SID strings and ACE strings:
| Owner | Group | SACL | DACL |
| Account Operators | Domain Administrators | (A;;ADS_RIGHT_DS_READ_PROP | ADS_RIGHT_DS_WRITE_PROP | ADS_RIGHT_DS_CREATE_CHILD | ADS_RIGHT_DS_DELETE_CHILD | ADS_RIGHT_DS_LIST | ADS_RIGHT_DS_SELF | READ_CONTROL | WRITE_DAC | WRITE_OWNER | GENERIC_ALL;;; null SID)(A;;GENERIC_ALL;;;LocalSystem) |
Figure 7b: The SDDL string with the SID strings and ACE strings expanded
Finally, expand the constant strings:
| Owner | Group | SACL | DACL |
| Account Operators | Domain Administrators | Allow (null SID): 0x01e000bb Allow LocalSystem: 0x100000 |
Figure 7c: The security descriptor that the SDDL string specifies.
This is the meaning of the SDDL string specified. For a whole bunch of example SDDL strings, take a look at the %windir%securitytemplates*.inf files. This is what Windows Setup used to apply the default security descriptors for your Windows installation. See if you can decrypt the security descriptors for those strings. (To find out the answers, you can call the ConvertStringSecurityDescriptorToSecurityDescriptor() function on the security descriptor strings.)
Sorry about the poor explanation about SDDL strings. Like I said, the best reference for SDDL is in the SDK documentation, and I still stand by that statement.
8. Coming Up
In this part, you learnt how Windows NT secured its objects using security descriptors. You discovered that Windows recognizes users, groups and computers as SIDs. You learnt that security descriptors originally came from kernel mode, therefore they can be complex beasts. You were shown the parts of a security descriptor, the five components which make it up, and how it is stored in memory. You were then shown the two types of access control list. You discovered the structure of the ACL, how Windows reads an ACL, and how inheritance is implemented within the Access control model. The last structure you learnt about was the access token. You were taught what information can be read from a token, and finished off with enabling a permission.
In Part 2, you will start writing some example code for reading and writing security descriptors. You will also obtain information from the primary token to create a WhoAmI clone. Whilst you are waiting for the next article to come up, I want you to choose which technique you are going to program with. I am going to present four ways of programming with security:
- The low level way. If you need to program for NT3.5, and don’t have ATL, you’ll have no choice but to choose this method. This method makes direct calls to the low level ACL functions, and they are horrible! Not only is it nontrivial to program, this method is also excessively complex and error prone (no wonder Windows NT had so many security bugs [^]!). Unless you need to support backward compatibility (since when did you care about backward compatibility?), I strongly recommend you steer clear of this method if you can help it. If you want a preview of this method, check out the SDK docs on
SetEntriesInAcl()[^]. - The Windows 2000 way. Realising how difficult method 1 was, Microsoft invented an alternative API for creating security descriptors, the Security Descriptor Definition Language (SDDL). Initially, SDDL may not be much better than low level authorisation (just as complex, and not as compatible). However, being in text mode makes SDDL infinitely more readable, for both programmers and administrators. And if you look closely at a number of SDDLs, along with the corresponding ACLs, you’ll soon get the hang of it. Windows 2000 also introduces API helpers to automate repetitive tasks (like printing a SID in text form). If you want a preview, check out the SDK docs on
ConvertStringSecurityDescriptorToSecurityDescriptor()[^]. - The ATL way. As part of the Trustworthy Computing Initiative, Microsoft made a number of updates to ATL, culminating in the ATL security classes. If you have Visual C++ .NET, and don’t mind programming with ATL C++, you’ll want to choose this method. To see a preview, check out the
CSecurityDesc()[^] class from the Visual C++ help. - The .NET way. Starting with v2.0 of the .NET Framework, you can also choose to program security descriptors in a fully object oriented managed environment. Note, that I will not cover this in part 2 of the series. Instead programming security in .NET will have its very own part in this series (Part 3). If you have Visual Studio .NET 2005, you should strongly consider choosing this method. You can see a preview in the
System.Security.AccessControl[^].
History
The history and bibliography are now maintained in Part 4 [^].
Next Part… [^]