Printing and file sharing are the essential sectors for users, groups, organizations in a network. Like in a network, there are a large number of printers with different varieties and there are an enormous number of groups, users who need to use. As an administrator, you should know how to install and configure print services in Windows Server to manage tens or hundreds of printers in a network. As most of the modern printers have a network interface card and Internet Protocol (IP) address can be assigned to the printers. Therefore, all users through the network can access and use them. One of the most handful features in print services is print pooling by which a number of printers are added to a pool. When one is performing a print job, other printers perform the next print jobs sent to them. As you can grant priority access to a printer from 1 through 99. When there are two print jobs in the print server, the user with higher priority will get the job done before the another. In this lesson, we will learn + understand how to install and configure print services fully in Windows Server 2016. Let’s get started.
- Don’t Miss: Sharing files & folders in Windows Server 2016
- MCSA Lab Manual Articles.
Understanding Windows Print Architecture
Microsoft uses some terms referring to components of print services architecture, better to know for the certification exams or working with them. The Components involved with the print services are the following:
1. Print Device: printer device is actual hardware that produces hard-copy documents on paper.
2. Printer: It is the software interface through which a computer communicates with the print device.
3. Print Server: It is a server or a standalone computer which receives print jobs from clients that are attached locally or connected to the network.
4. Driver: It is a device driver that converts print jobs generated by an application to appropriate string of commands for a specific printer.
Attaching Printer Device
These are four fundamental configurations, you can configure a printer to work. As a result, the printer works depending on your configurations to print documents.
1. Direct Printing is the simplest way of using a printer device. That a printer is attached directly to a Server. The Server sends a print job to the printer, as a result, it produces the hard-copy document.
2. Local-attached printer sharing: Except direct printing, you also need to share printer and printer device with other clients on the same network. In this arrangement, the Server which is directly attached to the printer device works as a print server. Doing this, you can share the print server’s printer. Consequently, the clients can use the print device through server’s print interface. As a result, the advantage of this arrangement is that everyone from everywhere in the network has access to the printer device. Also, it is handful when you have light printing jobs.
3. Network-attached printing: Unlike the previous kinds of attaching the printer device with computer by USB or other port, here you don’t need to attach them. Instead, you can attach a printer device directly to a network. As a result of attaching printer device to a network, it becomes the network component. Most of the printer devices nowadays have network interface card (NIC) which allow you to attach a network standard cable to it. Due to this capability, a print device can have their own IP addresses. Also, you can buy NIC card separately and attach to a printer device. If the printer device has none of this capabilities a standalone print server is possible to be used.
Finally, by network attached printing you’ve to choose a computer to act as print server or let all or everyone uses the printer directly (or be print server) by sending print jobs and seeing their own queue. If you’ve chosen to be the print server everyone or multiple users then there are many disadvantages, which includes:
- Users examining the print queue see only their own jobs.
- Users are oblivious of the other users accessing the print device. They have no way of
knowing what other jobs have been sent to the print device or how long it will be until
the print device completes their jobs. - Administrators have no way of centrally managing the print queue because each client
has its own print queue. - Administrators cannot implement advanced printing features, such as printer pools
or remote administration. - Error messages appear only on the computer that originated the job that the print
device is currently processing. - All print job processing is performed by the client computer rather than being partially
offloaded to an external print server.
4. Network-attached printer sharing: In this method, you assign a computer as a print server and use it to serve clients means when you install a printer on a computer(that becomes the print server), you will share it on the network and configure it to access the printer directly through TCP (Transmission Control Protocol) port. When done, you just share the printer for the clients and manage them for accessing + managing.
First of all, we need to install Print and document services role on Windows server 2016. Consequently you can use Windows server print services.
Role Installation
1. Open Server Manger and click on Add roles and features to install Print and document services role.

2. In the Welcome we’ve got nothing to do at all. Click on Next button. In Select destination server page, elect the Select a server from the server pool. Select the server you want to install the role on from the list below. Click on Next button.

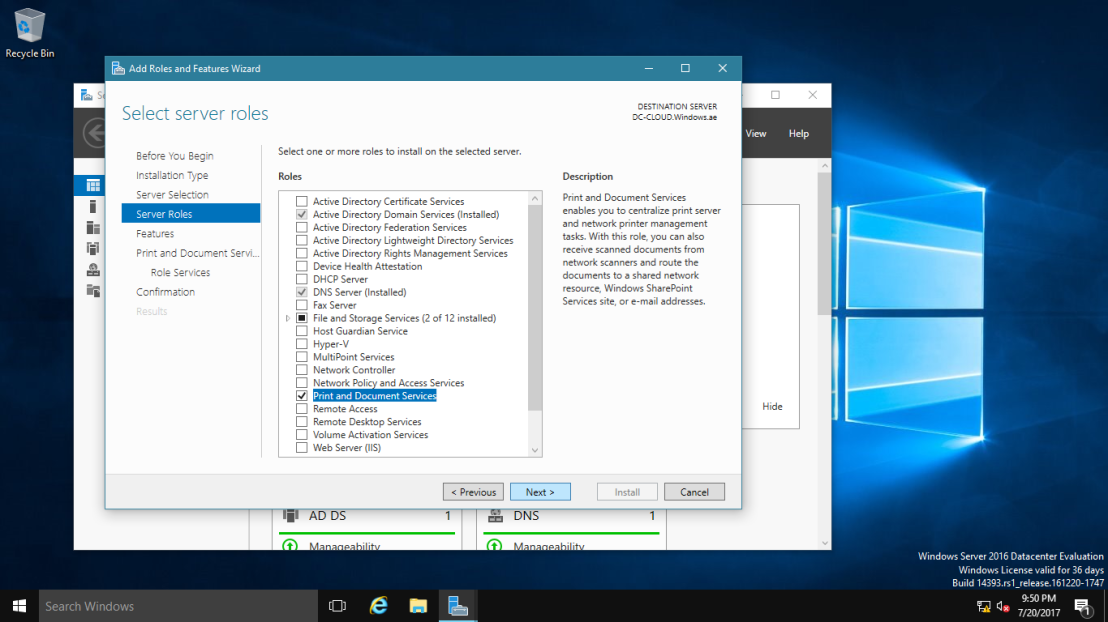
3. Put a check mark in the box next to Print and document services. A small windows pops up and wants you to add some features for print services management. Click on Add features to install management tools. If you don’t install the management features, you just install the core service.

4. In the Print and Document Services page, provided essential information about the services to be noted. Finally click on Next button.

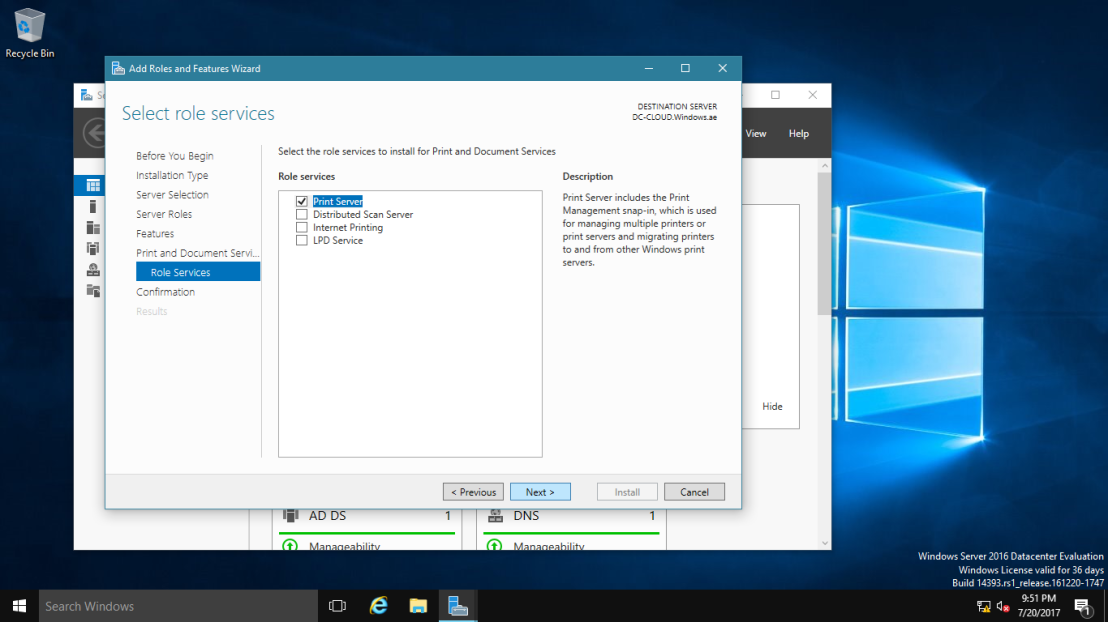
5. In the Select role services page four options are visible:
1. Print Server: It is the actual print server. Selecting this option you can manage print services components as printers and drivers and furthermore things.
2. Distributed Scan Server: allows you to send scanned images to specific users or groups in the domain.
3. Internet Printing: It creates a web page and gives the access to printer clients using printers through IIS web server.
4. LPD Service: This option enables UNIX clients running line printer remote (LPR) to send print jobs to Windows printers. I install only Print Server.

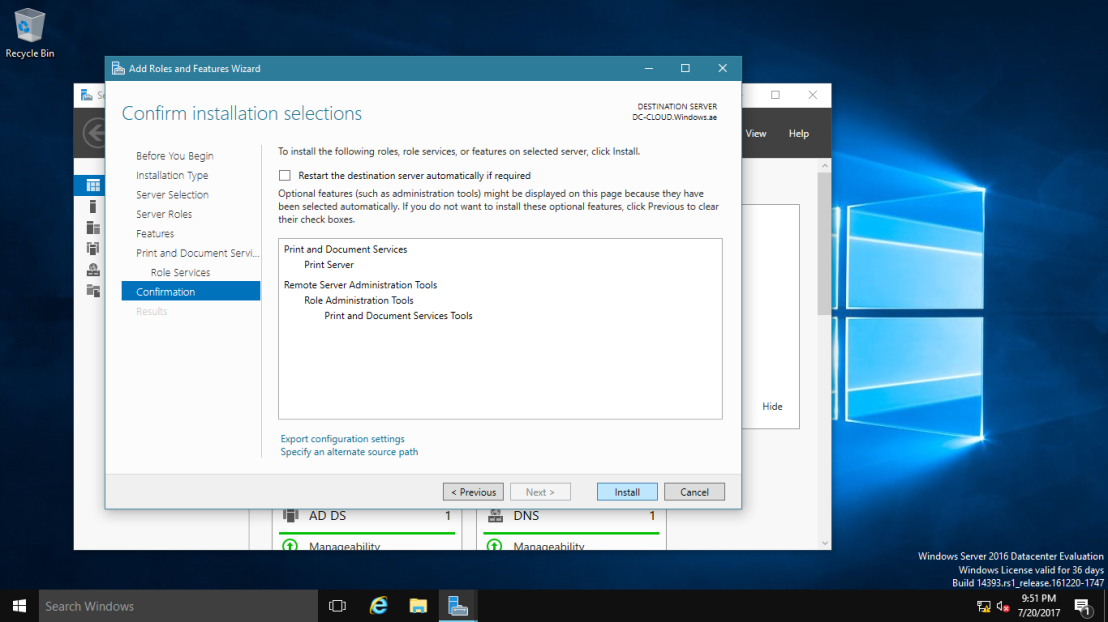
6. We’re almost done. Click on Install button for installing the role on server. No reboot is needed.

Configure Print Services in Windows Server
First of all we need to add some printers and drivers on the server and manage them.
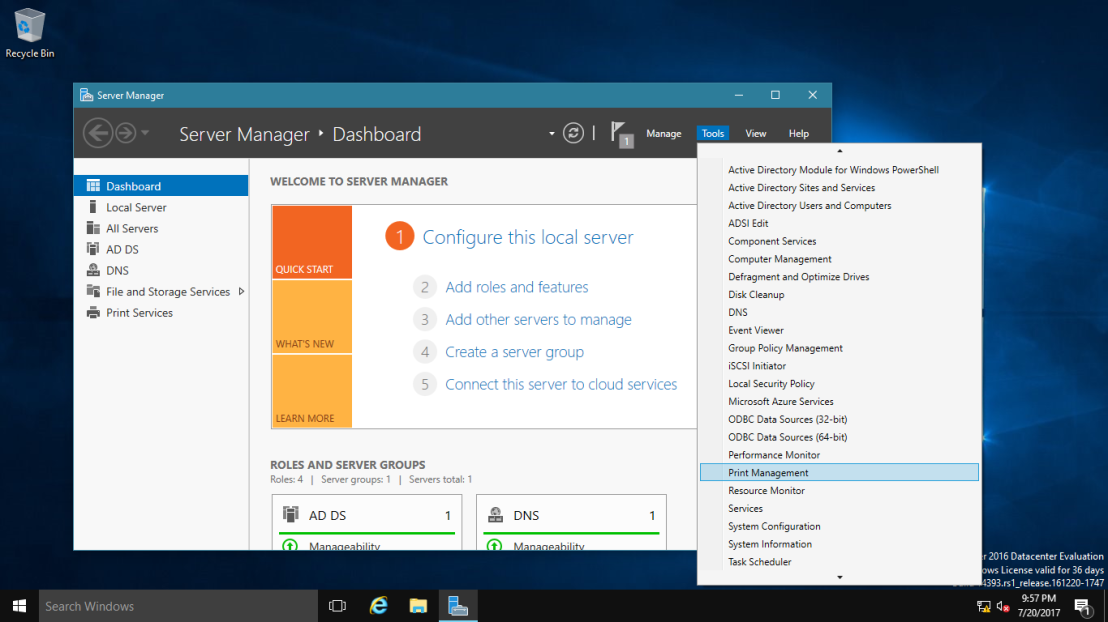
Open Server Manager, click on Tools dropdown menu and select Print Management services. Using this tool we can add and manage print services easily.

While Print Management tool is opened. Expand Custom Filters on the left pane to see the custom filters. You see four default filters:
- All Printers: It shows the list of all printer connected to the domain from all print servers.
- All Drivers: You can see a complete list of all drivers available for your clients through all the domain.
- Printers Not Ready: It shows you list the servers which are not available to clients. They don’t work, fix them.
- Printers With Jobs: Shows the list of printers currently doing print jobs.
Below Custom Filters another option is visible by the name Print Servers. Expand it to see all the print server in your domain. You can add all print servers in the domain here for easy management. Just right-click on Print Servers and select Add Server and go on.

You can see the same options like drivers and printer below the SVR-A server as the below Custom Filters. So the difference between this and the Custom Filter is that which the printers shown below the filter is the list of all printers in the domain. The printers below the Print Servers is the list of printers installed on each print server.
Add Printer
1. Print Management tool opened, expand Print Servers and right-click on the server and select Add Printer option.

2. In the Welcome page we’ve nothing to do so just click on Next button. In the Printer Installation page select the Add a new printer using an existing port. Elect a port and hit Next button.

3. In the Printer Driver page select Use an existing printer driver on the computer option. From the drop-down list select a driver that matches your printer device manufacturer and model.

4. Now you need to type a name for the printer in the box shown in the picture below. Below the Printer Name you can also see another option: Share this printer. As a result you can choose a share name and location for the printer. If needed you can leave a comment for users guidance.

5. Finally we are done with adding printer on a server. Just click on Finish button to finish the wizard. While finished the wizard you can find the printer in All Printers option in the left pane. If you would like to print a test page selecting Print a test page at the bottom of the wizard also you can add another printer by selecting Add another printer.

Add Driver
Maybe you need different kinds of drivers for client computers to use be able to use print device. So you need to have 32-bit and 64-bit drivers.
1. First of all you need to right-click on Drivers option below the server which you want to add driver to. Select the Add driver option.

2. In the Welcome page we have nothing to do. In the Processor Selection page you need to specify which kind of processors do your clients use. You can one or both of the options and hit Next.

3. In the Printer Driver Selection page you need to specify two things. First of all you should specify your devices’s manufacturer. Secondly specify the printer model. In addition to these you have one more useful option. If you have driver on a disk, you can click on Have Disk button and find path of the source and add it.

4. We are done and the driver was added to the server. So click on Finish button due to finish the wizard.

Conclusion
Ok, that’s all. For any kind of question feel free and leave a comment below the post. I answer you as soon as possible.
What Is Printer Pooling?
Printer pooling is a feature present in almost all latest versions of Microsoft Windows operating systems, and allows the printer administrators to create a single pool of multiple printers in order to reduce the workload from one printing device.
When a printer pool is created, all the printing tasks are equally distributed among all the participating printers on round-robin basis. For example, if there are three printers configured to form a printer pool, the first printing task will be sent to the first printer, the second task will be sent to the second printer, the third printing task will be sent to the third printer, and the fourth printing task will be sent to the first printer again, and so on.
You create a printer pool on a server by specifying multiple ports for a printer.
Each port is the location of one physical printer.
In most cases, the ports are an IP address on the network, instead of a local LPT or USB connection.
What Is Branch Office Direct Printing?
Branch Office Direct Printing reduces network costs for organizations that have centralized their Windows Server roles.
When you enable Branch Office Direct Printing, Windows clients obtain printer information from the print server, but send the print jobs directly to the printer.
The print data does not travel to the central server and then back to the branch office printer.
This arrangement reduces traffic between the client computer, the print server, and the branch office printer, and results in increased network efficiency.
Now lets go through how you as a Server Administrator can install & configure printer pool in windows Server 2016 for your infrastructure.
Infrastructure Requirement :
- 1 DC SERVER (DC-CLOUD)
- 1 Client PC running Windows 10 (CLIENT-10)
1 – Open Server Manager, click Add Roles & Features, then click Next 3 times. on the Select Server roles interface, click Print and Document Services and then click Next.
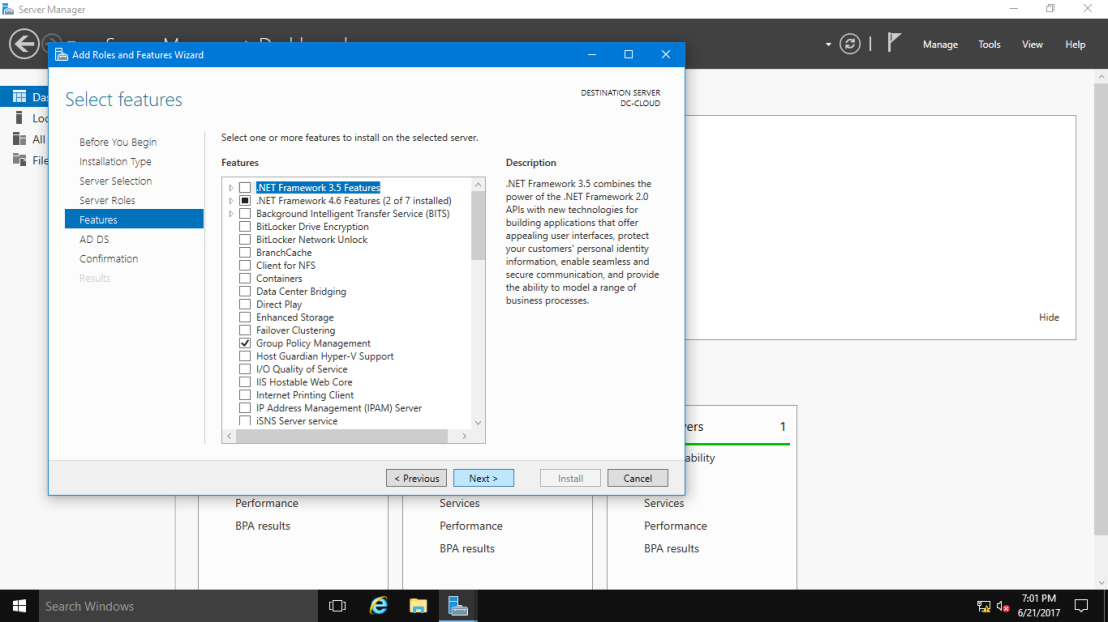
2 – On the Select Features interface, click Next.
3 – On the Print and Document Services interface, click Next.

4 – On the Select role services interface, in the Role services verify that Print Server check box is selected and then click Next.
5 – In the Confirm Installation Selections interface, click Install.
6 – On the Installation progress interface, click close.

7 – On DC-CLOUD.Windows.ae server, in the Server Manager, click Tools, and then click Print Management.
8 – Expand Print Servers, expand DC-CLOUD (local), right-click DC-CLOUD and then click Add Printer.

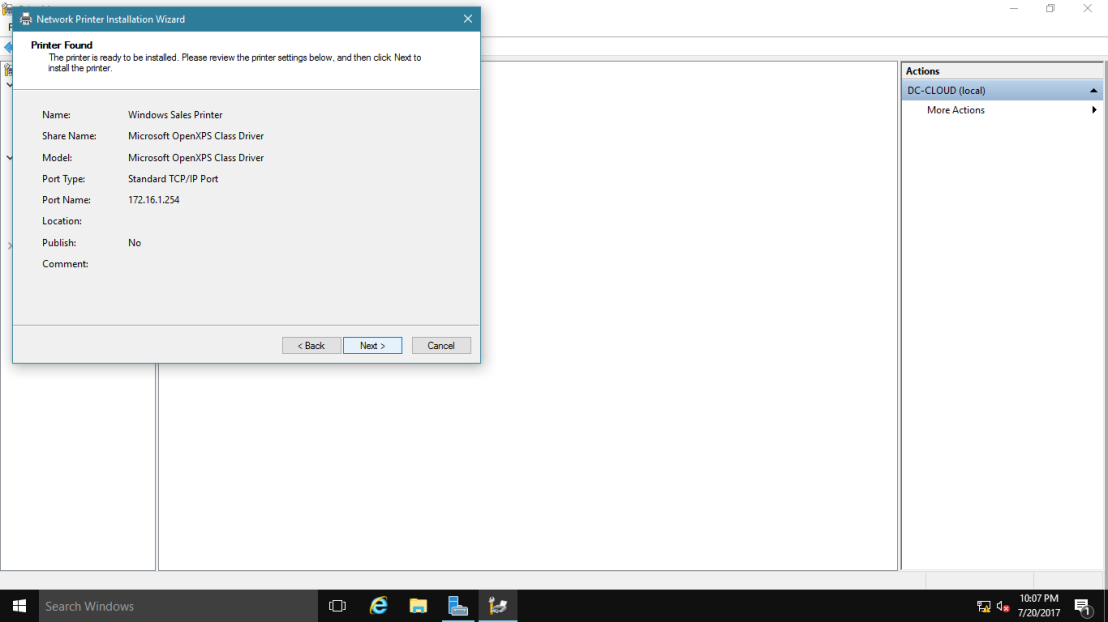
9 – On the Network Printer Installation Wizard interface, click Add a TCP/IP or Web Services Printer by IP address or hostname, and then click Next.

10 – On the Printer Address interface, change the Type of Device to TCP/IP Device, next in Host name or IP address, type 172.16.1.254, clear Auto detect the printer driver to use, and then click Next.
*_* 172.16.1.254 is just to simulate Network Printer IP Address.

11 – Under Device Type, click Generic Network Card, and then click Next.

12 – On the Printer Driver interface, click Install a new driver, and then click Next.

13 – On the Printer Installation interface, under Manufacturer, click Microsoft, under Printers, click Microsoft XPS Class Driver, and then click Next.
*_* I choose Microsoft OpenXPS Class Driver just to simulate the printer installation, in real production you should choose your own Printer.

14 – On the Printer Name and Sharing Settings interface, change the Printer Name to Windows Sales Printer, and then click Next.

15 – Click Next 2 times to accept the default printer name and share name, and to install the printer.
16 – Click Finish to close the Network Printer Installation Wizard.

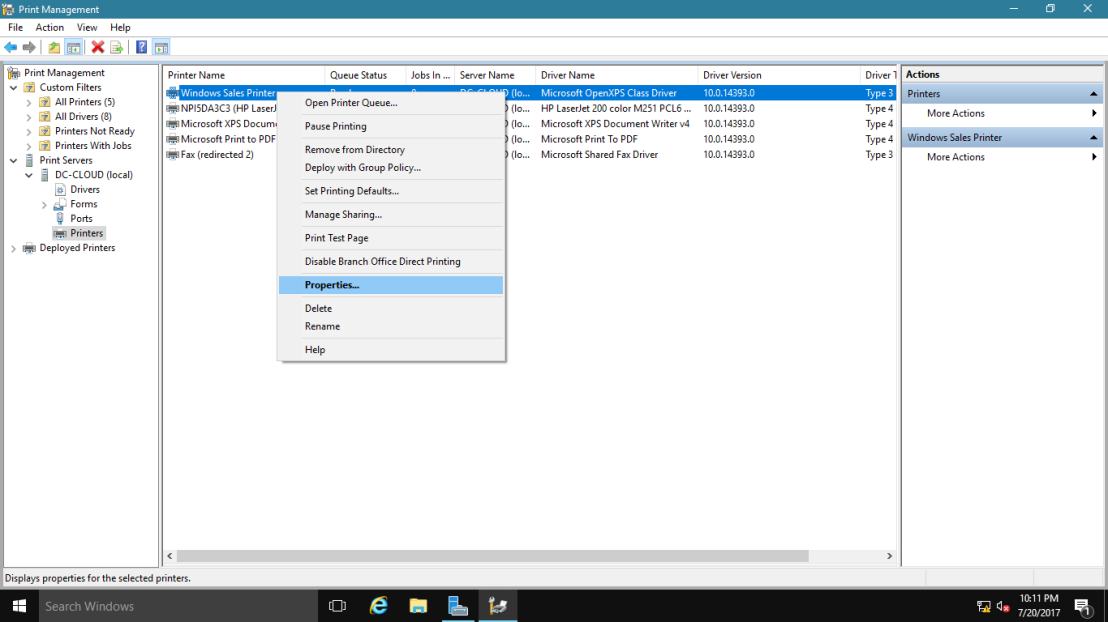
17 – In the Print Management console, right-click the Windows Sales Printer, and then click Enable Branch Office Direct Printing.

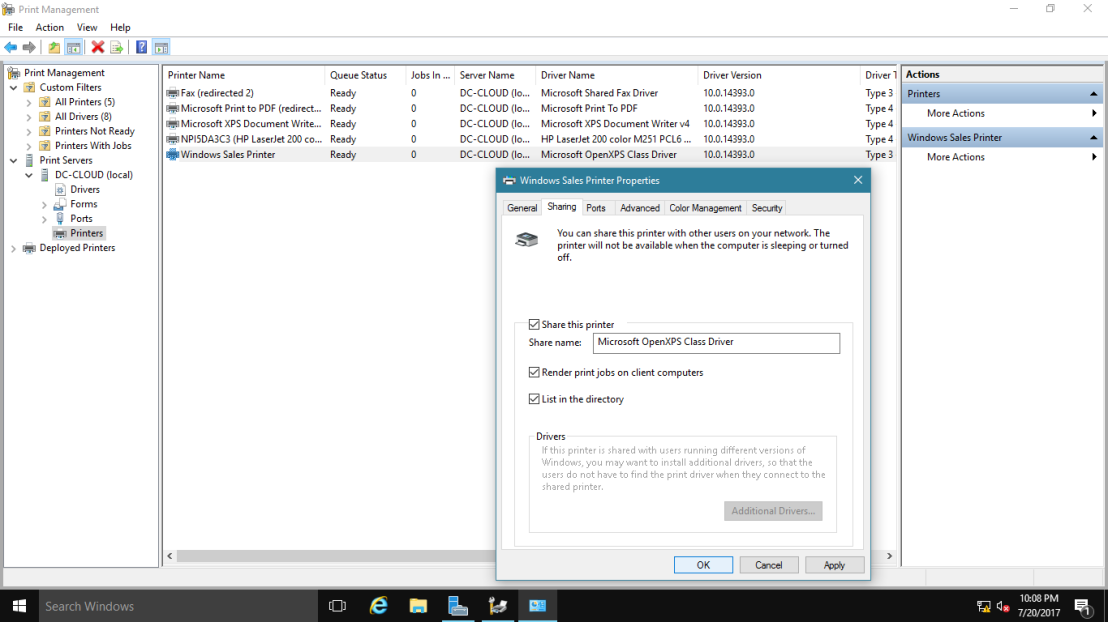
18 – right-click the Windows Sales Printer, and then select Properties.
19 – On the Windows Sales Printer properties, click the Sharing tab, select List in the directory, and then click OK.
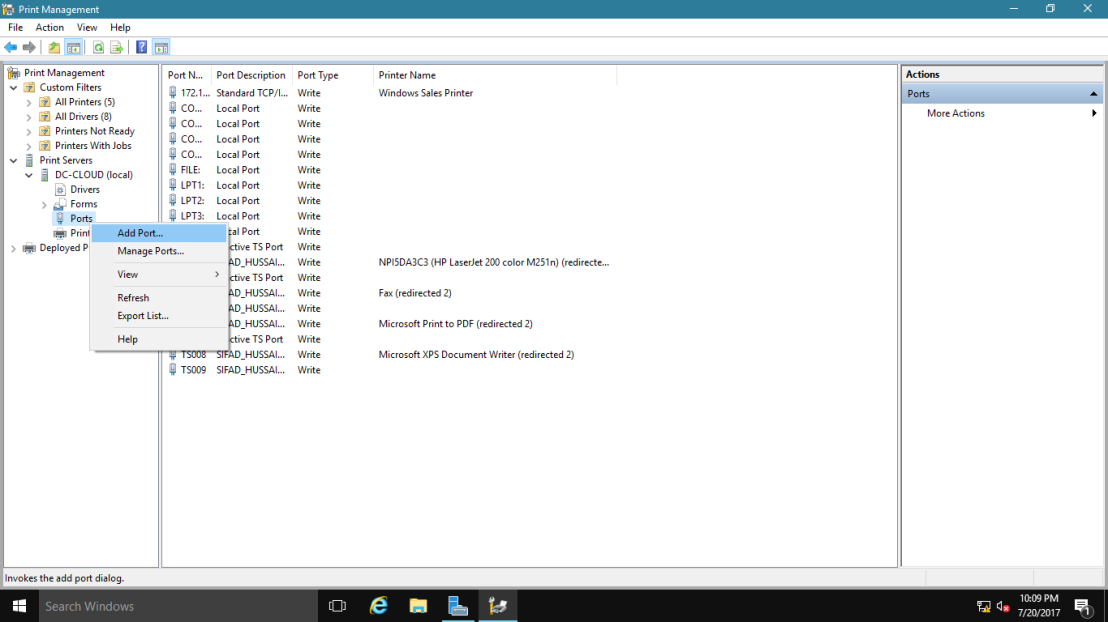
20 – Next, lets configure printer pooling, in the Print Management console, under SUB-01 Server , right-click Ports, and then click Add Port.
21 – In the Printer Ports dialog box, click Standard TCP/IP Port, and then click New Port.

22 – In the Add Standard TCP/IP Printer Port Wizard, click Next.

23 – On the Add port interface, in Printer Name or IP Address, type 172.16.1.200, and then click Next.

24 – In the Additional port information required dialog box, click Next.

25 – Click Finish to close the Add Standard TCP/IP Printer Port Wizard.

26 – Click Close to close the Printer Ports dialog box.

27 – In the Print Management console, right-click Windows Sales Printer, and then click Properties.

28 – In the Windows Sales Printer Properties dialog box, click the Ports tab, select Enable printer pooling, and then click the 172.16.1.200 port to select it as the second port.

29 – switch to your client PC, open Control Panel, then click Devices and Printers.


30 – In the Devices and Printers console, click Add a printer.

31 – On the Add printer interface, under searching for available printers, click your existing Printer name and then click Next. then the wizard will install the printer driver from the DC-CLOUD.Windows.ae server.

32 – On the Add printer interface (it will stated that “You’ve successfully Added Windows Sales Printer on 172.16.1.254”), click Next.

33 – click Finish.

34 – verify that you have Windows Sales Printer on 172.16.1.254 is listed in your Devices and Printers control panel.

that’s all for now.., any Doubts type a commend.. 🙂
- Remove From My Forums
-
Вопрос
-
День добрый.
Разворачиваю новый PRINTServer на windows server 2016 ( т.к. старый 2008 хотим вывести из эксплуатации)
сервер называется spb-srv-prn02
в днс сделал Сname имя spb-srv-prn02=print01
роль принтсервера уже стоит.
добавил принтер дрова опубликовал внес в AD

я хочу развернуть этот принтер через GPO на компьютеры.
и вот возникла делема, сделал GPO сделал группу в AD соответствующую,( в группу добовляю пк и те пк которые в этой группе на них развертывается принтер) жму на принт сервере, по принтеру развернуть с помощью групповой политики, но
вот не задача публикованный принтер развертывается с именем spb-srv-prn02,а я хотел бы сделать с CNAME именем Print01.
Подскажите как можно это реализовать? гуглил нечего толкового не нашел….
2 Вопрос. Если у меня этих принетров 1500 тысячи, группы бох с ним, создам, вынесу их в отдельную OU «принетры организации» но как быть с GPO не создавать же мне 1500 GPO? можно ли как то сделать 1 GPO ?
-
Изменено
19 февраля 2018 г. 8:09
-
Изменено
Ответы
-
В GPMC создайте новую политику, далее в Конфигурации пользователя:
Затем в окне добавления укажите путь к принтеру используя CNAME:
-
Изменено
Mikhail Efimov
19 февраля 2018 г. 9:16 -
Помечено в качестве ответа
Dedman2k3
19 февраля 2018 г. 13:28
-
Изменено
-
На той машине, откуда вы рулите политикой, должна стоять либо роль принт-сервера, либо консоль управления (отсюда)
:Seems you have to install print server role
- Server Manager, select Roles, click Add Roles
- Click Next and check Print and Document Services box
- Click Next and check Print Server box
- Click Next and Install to install printer server role.
-OR-
Add the «RSAT — Print & Document Services Tool» using «Add Features» in the Server Manager-
Помечено в качестве ответа
Dedman2k3
19 февраля 2018 г. 13:28
-
Вы не внимательно прочитали мой первый ответ ))
Конфигурация пользователяКонфигурация WindowsРазвернутые принтеры.
GPO необходимо накатить на пользователей, а не на компы. В политике добавляете все принтера, а разделение прав настраиваете на самом принт-сервере на каждом принтере во вкладке Безопасность:
В разрешениях на принтер убирать все группы кроме админов и системы + добавить группу AD с правами только на
печать, в которую добавлять нужных пользователей.Вам нужно будет создать группу для каждого принтера (или группы принтеров).
-
Помечено в качестве ответа
Dedman2k3
19 февраля 2018 г. 13:28
-
Помечено в качестве ответа
-
Будет, в этом случае на комп будут ставиться все принтера, указанные в политике. Тогда придётся плодить кучу отдельных политик для разграничения установки, если это нужно.
-
Изменено
Mikhail Efimov
19 февраля 2018 г. 13:21 -
Помечено в качестве ответа
Dedman2k3
19 февраля 2018 г. 13:28
-
Изменено
Это руководство содержит пошаговые инструкции по развертыванию сетевого принтера TCP / IP на рабочих станциях домена с помощью групповой политики в Active Directory 2016. После выполнения процедуры развертывания принтера, приведенной ниже, вы сможете печатать непосредственно на принтере. IP-адрес со всех ваших рабочих станций вашего домена.
Развертывая принтер с помощью групповой политики, вы выиграете время, потому что вам не нужно устанавливать драйверы принтера на каждую рабочую станцию отдельно, и вы упростите свою жизнь при управлении принтером, поскольку все изменения в настройках принтера могут быть сделаны в одном месте (на стороне сервера). Кроме того, вы убедитесь, что все сетевые компьютеры будут использовать один и тот же драйвер принтера и одинаковые параметры принтера.
Как настроить сетевой (TCP / IP) принтер с помощью групповой политики в Active Directory 2016. (Server 2016).
Шаг 1. Установите и предоставьте общий доступ к принтеру, который вы хотите развернуть на сервере 2016 года.
1. Прежде всего установите сетевой принтер на Server 2016. * Этот шаг необходим для того, чтобы все рабочие станции получали драйвер (ы) принтера с сервера при развертывании принтера.
* Заметки:
1. Вы можете установить принтер либо на сервер AD, либо на любой другой сервер, принадлежащий вашему домену.
2. Чтобы установить сетевой принтер (используя его IP-адрес) на Server 2016:
а. Перейдите к Панель управления -> Устройство и принтеры.
б. в разделе «Устройство и принтеры» нажмите Добавить принтер.

с. Тогда выбирай Нужного принтера нет в списке.

д. Выбрать Добавьте принтер, используя адрес TCP / IP или имя хоста и нажмите следующий.

е. На следующем экране введите принтер айпи адрес и нажмите следующий.

е. Затем перейдите к установке драйверов для принтера.

2. Когда вы завершите установку принтера, чек Поделиться этим принтером коробка, тип введите имя принтера и нажмите Подать заявление. *
* Примечание. Если у вас есть рабочие станции с 32-битной ОС, нажмите Дополнительные драйверы Кнопка для установки 32-разрядного драйвера принтера для рабочих станций x86.
3. Когда закончите, нажмите хорошо и затем перейдите к следующему шагу.

Шаг 2. Разверните сетевой принтер на рабочих станциях домена 2016.
1. Откройте панель управления диспетчера серверов и из инструменты откройте меню Управление принтером.

2. В разделе «Управление принтером» перейдите по ссылке: Серверы печати -> ServerName -> Принтеры.
3. Щелкните правой кнопкой мыши на принтере, который вы хотите развернуть, и выберите Развертывание с групповой политикой.

4. Щелкните значок «Создать объект групповой политики» и создайте новый объект групповой политики для принтера, который вы хотите развернуть.

5. Введите имя для нового объекта групповой политики (например, введите имя принтера, который вы хотите развернуть) и нажмите хорошо.

6. В параметрах «Развертывание с групповой политикой» выберите:
- Пользователи, к которым применяется объект групповой политики (на пользователя): если вы хотите установить принтер для определенных пользователей в вашем домене или…
- Компьютеры, к которым применяется объект групповой политики (на машину), если вы хотите установить принтер для всех пользователей, которые используют одну и ту же рабочую станцию.
6а. Когда закончите, нажмите Добавлять Кнопка.

7. Затем нажмите Подать заявление.

8. щелчок хорошо при появлении сообщения «Операция развертывания или удаления принтера выполнена успешно».

9. Теперь убедитесь, что сетевой принтер развернут в вашем домене:
а. Нажмите на Просматривать кнопка.
б. Щелкните правой кнопкой мыши объект политики для развернутого принтера и выберите редактировать.

с. На левой панели редактора «Локальная групповая политика» перейдите к:
- Конфигурация компьютера> Политики> Параметры Windows> Развернутые принтеры
д. В правом месте вы должны увидеть статус «Развернуто» рядом с принтером.

10. Наконец перезапустите все рабочие станции, чтобы завершить развертывание. (установить принтер на рабочие станции). После перезапуска рабочих станций развернутый принтер должен быть указан в группе «Устройства и принтеры» на каждой рабочей станции.
Это оно! Дайте мне знать, если это руководство помогло вам, оставив свой комментарий о вашем опыте. Пожалуйста, любите и делитесь этим руководством, чтобы помочь другим.