Update 8/5/2014 — Microsoft has just released the Microsoft Azure Active Directory Connect (Preview) which will help you configure DirSync and/or Federation in a wizard format.
This will be the official, engineering supported mechanism to do configurations moving forward.
http://blogs.technet.com/b/ad/archive/2014/08/04/connecting-ad-and-azure-ad-only-4-clicks-with-azure-ad-connect.aspx
Table of Contents
- Short URL
- Download
- Overview
- Introduction
- Objectives
- Audience
- Prerequisites
- What This Guide Does Not Provide
- Machine Configuration
- Step 1: Initial Software Installation
- Install the Microsoft Online Services Sign-In Assistant
- Install the Microsoft Online Services Module for Windows PowerShell
- Validate Readiness
- Step 2: Add and Verify the Domain Name in Windows Azure AD
- Add the Local Domain to Windows Azure AD
- Add the Domain Verification Record to External DNS
- Step 3: Enable Directory Synchronization (DirSync)
- Enable Directory Synchronization (DirSync) Support
- Step 4: Configure an On-Premises AD FS Server
- Enable the AD FS Role
- Create an AD FS Service Account in a Domain
- Create the AD FS DNS Alias
- Create or Validate the AD FS Server Certificate
- Export the Certificate for Future Use
- Configure AD FS to Use the Service Account and Certificate
- Confirm/Configure Windows Firewall
- Add the AD FS Server to the Local Intranet Zone
- Confirm AD FS is Working Correctly
- Step 5: Configure the AD FS Proxy
- Import and Trust the AD FS Certificate
- Install the AD FS Proxy Role
- Configure IIS to Use the Appropriate Certificate and Authentication
- Add the Local HOSTS File Entry
- Configure the AD FS Proxy Role
- Confirm/Configure Windows Firewall
- Confirm the AD FS Proxy is Working Correctly
- Configure External Connectivity to the AD FS Proxy
- External DNS Configuration
- External Basic AD FS Testing
- Step 6: Configure Windows Azure AD Federation Support
- Configure Windows Azure AD Connection to AD FS
- Create an AD FS/SSO Test User
- Confirm the Test User Can Sign In Through AD FS
- Step 7: Install and Configure DirSync
- Download and Install DirSync
- Configure DirSync
- Wait for Completion by Watching the Event Log
- Verify and Activate Newly Synchronized Users
- Step 8: Test on a Client
- Basic Test
- Optional: Install Self-Signed Certificate Issuer as Trusted
- Appendix 1: Force an Immediate Synchronization
- Appendix 2: Glossary of Terms
↑ Back to top
Short URL
Bookmark this page as: http://aka.ms/AD2AAD.
↑ Back to top
Download
The script is available at: http://aka.ms/AD2AAD-PS
↑ Back to top
Overview
You can continue to read the article and Wiki if you’d like to understand the technical steps which need to go on in a Windows Server 2012 (not R2) environment to accomplish an end-to-end DirSync + ADFS federation to your on-premises AD.
Azure Active Directory (Azure AD) is the fundamental authentication service for Microsoft Online Services such as Office 365 and Windows Intune. It supports both cloud authentication and single sign-on with on-premises Active Directory through Active Directory
Federation Services (AD FS). Single sign-on requires some additional hardware configuration but leads to substantial end-user satisfaction by removing another username and password for the user to remember and maintain.
The purpose of this quick start guide is to provide a general overview and additional requirements and configuration changes necessary to enable an on-premise environment to connect to Windows Azure-based applications and services. More complicated scenarios
are covered in detail in widely available documentation. Rather, this guide, it is hoped, will provide enough support and guidance so that you can configure a simple environment to meet the basic requirements for enabling connectivity to Windows Azure applications
and exploring their capabilities and advantages in greater detail.
This document supports a preliminary release of a software product that may be changed substantially prior to final commercial release. This document is provided for informational purposes only and Microsoft makes no warranties, either express or implied,
in this document. Information in this document, including URL and other Internet Web site references, is subject to change without notice. The entire risk of the use or the results from the use of this document remains with the user. Unless otherwise noted,
the companies, organizations, products, domain names, e-mail addresses, logos, people, places, and events depicted in examples herein are fictitious. No association with any real company, organization, product, domain name, e-mail address, logo, person, place,
or event is intended or should be inferred. Complying with all applicable copyright laws is the responsibility of the user. Without limiting the rights under copyright, no part of this document may be reproduced, stored in or introduced into a retrieval system,
or transmitted in any form or by any means (electronic, mechanical, photocopying, recording, or otherwise), or for any purpose, without the express written permission of Microsoft Corporation.
↑ Back to top
Introduction
Objectives
After completing this Quick Start Guide, you will have federated your on-premises Active Directory environment with Windows Azure Active Directory (Windows Azure AD) in a pre-production configuration. This will provide single sign-on capabilities to users
of Windows Azure AD clients such as Office 365 and Windows Intune. The guidance will walk you through using the accompanying script to perform the various tasks to do the necessary work.
If you are starting with an existing cloud service that uses Windows Azure AD such as an Office 365 account, you can later use the same account to add Windows Intune access, or vice-versa. It is strongly recommended that all of your Windows Azure AD services
share the same sign-in configuration by starting with one service, and then adding the other services to the same administrative account. This will substantially improve the end-user and administrative experience.
Audience
The audience for this document is an IT professional, tester, or presenter who has experience administering Windows Server 2008 R2 and Windows 7 client systems, as well as familiarity with Windows Server 2012 and Windows 8. This document assumes some familiarity
with Active Directory, Hyper-V, Domain Name Services (DNS), Public Key Infrastructure (PKI), and TCP/IP networking. Specific knowledge of Active Directory Federation Services (AD FS) is not required.
You should know, in particular, how to:
- Configure Active Directory User Principal Names (UPNs)
- Configure DNS zones and DNS records
- Configure firewall and network address translation (NAT) rules
- Configure external DNS records
- Initially create a cloud service (like Office 365 or Windows Intune) that utilizes Windows Azure AD
Prerequisites
The following is a list of mandatory prerequisites for completion of the tasks in this guide. If you cannot meet these requirements, you will not be able to use this guide to synchronize the on-premise environment with Windows Azure AD.
- Internet access. You need both inbound and outbound Internet access to and from the internal corporate network. This includes DNS queries from internal servers against external DNS servers. You will also need Internet access to download
software installers. - Active Directory. You need a working on-premises Active Directory environment. This document assumes that you will be starting with an on-premises Active Directory environment of a single-tree domain in a single forest (i.e. joined namespace
of corp.contoso.com and contoso.com). Multiple-tree domain forest (i.e. disjointed namespace of contoso.com and fabrikam.com) and multiple forest environments are out of scope.
WARNINGSome portions of the script assume only a single domain in use; in particular generation of the self-signed certificate assumes only a single UPN in use. - Administrative access. You must have full administrative access including Enterprise Administrator to the domain and forest.
- Three servers and one client. There are a total of four machines needed for building the environment. These machines can be physical or virtual.
- A domain controller for the source domain running Windows Server 2008 or later. IE Enhanced Security Configuration should be disabled for users and administrators to prevent download failures when the script tries to download support and integration tools.
- A domain-joined member server for the source domain running Windows Server 2012. After completing the steps in this guide, this server will run the AD FS role and DirSync. IE Enhanced Security Configuration should be disabled for users and administrators
on this server as well, for the same reason. - A server running Windows Server 2012 in a workgroup. After completing the steps in this guide, this server will run the AD FS Proxy role. IE Enhanced Security Configuration should be disabled for users and administrators. This machine will be published
to the Internet; thus, if a DMZ is in use, this machine should be in the DMZ. It should not be a domain member. - A client machine running Windows 7 or later (either x86 or x64) that has access inside the domain and outside the domain. The client is used to test that the configuration is working.
- Microsoft cloud service tenant. A tenant on a Microsoft cloud service that uses your Windows Azure AD tenant, such as an Office 365 E plan or Windows Intune. Both trial and production subscriptions are acceptable. An administrator account
will be necessary to sign in to the environment and will be used as part of the configuration steps. Your tenant should be created (i.e. sign up for a trial and sign in) before starting, but no other tenant configuration is required. - Internal DNS configuration for the desired UPN domain. The internal DNS configuration must include the UPN domain name as an internal zone. This zone must support dynamic updates; it is acceptable to only allow secure dynamic updates.
- Public DNS configuration access for the desired UPN domain. The UPN to be used must be a public domain name with a user-configurable public-facing DNS zone where you have the ability to add TXT records.
Important
Although Windows Azure AD supports MX records for the verification process, that is typically more complicated and error prone and can negatively impact production e-mail flow if done incorrectly. Therefore,
this guide and the supplied script do not support that scenario. - External firewall publishing access to the AD FS proxy server. You will need to be able to publish port 443 to the AD FS proxy server so external clients can authenticate.
What This Guide Does Not Provide
There are specific scenarios and limitations you should be aware of before you begin. This guide does not provide guidance for the following:
- Setting up an Exchange hybrid deployment (Office 365 only). An Exchange hybrid deployment implementation is outside of the scope of this document. If you are looking at an Office 365 deployment and have Exchange 2010 SP1 or later on-premises,
please review the details of a hybrid environment at
http://technet.microsoft.com/en-us/library/hh852414.aspx before continuing. - Synchronizing domains with more than 50,000 users.
This document primarily covers source Active Directory domains of under 50,000 users. For environments above 50,000 users, there are special procedures that must be followed. For more information on this, please refer to How to request a Directory Service quota
increase in Office 365 at http://support.microsoft.com/kb/2459803 and Computer Requirements athttp://onlinehelp.microsoft.com/en-us/office365-enterprises/ff652544.aspx.
- Configuring high availability. There is no redundancy in the Active Directory Federation Services (AD FS) environment created using this guide; therefore, there are single points of failure around that service. A large-scale
production implementation should include appropriate high availability around all components as is documented elsewhere (i.e.
http://technet.microsoft.com/en-us/library/jj151794.aspx). After you have configured your environment using this guide, it is possible to extend the environment to be highly available. - Purchasing your own SSL certificate. This document is designed to be a rapid implementation guide, so it does not require purchase of an external SSL certificate for AD FS access. A production environment would use a purchased certificate
from a trusted public certificate authority (CA). This guide allows you to perform basic validation of a production certificate for AD FS configuration, but does not provide guidance on how to obtain the appropriate certificate. If you don’t want to use a
production certificate, a self-signed certificate is automatically created and used. The self-signed certificate is not an appropriate production configuration but is sufficient for validation of the service and functionality. - Configuration of multiple top-level UPNs. This guide will support a single UPN domain suffix that matches the desired sign-in address for Windows Azure AD applications. Sub-domains with a joint-namespace under a top-level domain are supported
in this guide (i.e. corp.contoso.com and contoso.com) assuming you use this guide to configure federation of the top-level domain. Furthermore, clients who have manually assigned UPNs that are not a part of a forest are not in scope for this guide.
It is possible to use an environment with multiple, top-level UPN suffixes to complete all steps, but it is outside of the scope of this guide. For more information on multiple domain suffixes to federate, please see:
http://community.office365.com/en-us/wikis/sso/support-for-multiple-top-level-domains.aspx.
Machine Configuration
The script package consists of a single Windows PowerShell script (Menu.ps1) found at:
http://aka.ms/AD2AAD-PS. Create a folder on the soon-to-be AD FS server and place the file into that folder. You will later copy the contents of this folder to the AD FS proxy server, but other files will need to be placed
in there by the AD FS server process first.
 Note |
|---|
| All testing was done on servers running the United States English locale/language. |
 Important Important
|
|---|
| Each section of each process indicates the target machine and credentials for the section. You must follow the given direction or steps will fail. |
↑ Back to top
Step 1: Initial Software Installation
In this section, you will install basic pre-requisite software on the AD FS server.
![]()
Perform all steps in this section on the AD FS server logged in as a Domain Administrator in the on-premises domain and an Enterprise Administrator in the on-premises forest.
Install the Microsoft Online Services Sign-In Assistant
- Run the Menu.ps1 Windows PowerShell script as an administrator.
- When prompted, select choice 1 to Install Microsoft Online Services Sign-In Assistant.
- The installation should download and complete quickly. Review the output from Windows PowerShell to ensure it shows a successful completion.
Install the Microsoft Online Services Module for Windows PowerShell
- Select menu choice 2 from the Menu.ps1 script to Install Microsoft Online Services Module for Windows PowerShell.
- The installation should download and install. Review the output from Windows PowerShell to ensure it shows a successful completion.
|
Note |
|---|
| You can ignore a warning about automatic updating if you receive one. |
Validate Readiness
If you are configuring Windows Azure Active Directory for Office 365 use, then you should validate your environment before using DirSync. Users of other services (for example, Windows Intune) may also use the tool, but it may report issues that do not matter
for your implementation.
- Select choice 3 from the Menu.ps1 script to Download and run the Office 365 Deployment Readiness tool.
- Wait for the tool to finish; it will take a few minutes. You can watch the progress in Internet Explorer.
- Once the tool finishes, you will get a report. Review the report and ensure that you understand any warnings or errors. Some may be safely ignored, while others may require action. It is outside the scope of this document to describe every possible error
or warning, but the tool gives guidance on how to resolve any issues found.
|
Important
|
|---|
| Remember that if you are not using Office 365, some of the reported issues will not apply. |
↑ Back to top
Step 2: Add and Verify the Domain Name in Windows Azure AD
In this section, you will add your domain name to Windows Azure AD.
![]()
Perform all steps in this section on the AD FS server logged in as a Domain Administrator in the on-premises domain and an Enterprise Administrator in the on-premises forest.
Add the Local Domain to Windows Azure AD
- Select menu choice 4 from the Menu.ps1 script to Add local UPN suffix as domain in Windows Azure Active Directory.
- If you are prompted for credentials to connect to the Windows Azure AD tenant, type your administrator username (for example, admin@domain.onmicrosoft.com) and password.
NoteYou can ignore a warning about automatic updating if you receive one. - Select the UPN suffix you would like to add. Note that the tool only lists domains which have not yet been added to Windows Azure AD. If only one UPN suffix is active in the on-premises domain, the script will assume that is the one you wish to add.
NoteIf you have a multiple domain forest with a single tree, you would want to first add the top-level domain (for example, contoso.com) and then add the child domain names (for example, corp.contoso.com). - The script will add the domain to Windows Azure AD. Once it is done, it will display the domain verification information for the domain. Record this as you will use it in the next step.
Add the Domain Verification Record to External DNS
- If you did not record the verification information for any new domains:
- a. Select menu choice 5 from the Menu.ps1 script to Retrieve verification information for domains in Windows Azure Active Directory.
- b. If you are prompted for credentials to connect to the Windows Azure AD tenant, type your administrator username (for example, admin@domain.onmicrosoft.com) and password.
- For the added UPN suffix domain, add a text record for the domain that matches the verification information to external, public DNS. For more information on this process, including detailed steps for several popular domain name registrars, please refer
to http://technet.microsoft.com/en-us/library/jj151788.aspx.
↑ Back to top
Step 3: Enable Directory Synchronization (DirSync)
In this section, you will enable directory synchronization (DirSync) support in Windows Azure AD. This process can take up to 24 hours, although it rarely takes longer than an hour. You will enable the setting here, but not use it until later; this will
give Windows Azure AD time to complete processing the request while you continue with further steps.
![]()
Perform all steps in this section on the AD FS server logged in as a Domain Administrator in the on-premises domain and an Enterprise Administrator in the on-premises forest.
Enable Directory Synchronization (DirSync) Support
- Select choice 6 from the Menu.ps1 script to Enable directory synchronization (DirSync) support on the tenant.
- If you are prompted for credentials to connect to the Windows Azure AD tenant, type your administrator username (for example, admin@domain.onmicrosoft.com) and password.
- Confirm when prompted.

NOTE: The current cmdlets do not offer a way to avoid this confirmation prompt.- Once the request has been made, continue with the configuration process. Although enabling DirSync can take up to 24 hours, there are other process that can be done while waiting, so it makes sense to work on the next processes. You will verify that synchronization
is working later when it’s necessary.
 WARNING |
|---|
| If you previously had DirSync enabled and disabled it, this process might not work due to an apparent bug in the Windows PowerShell provider. If you see this behavior, use the administration portal for your service to enable DirSync. Details of that process are outside the scope of this document. |
↑ Back to top
Step 4: Configure an On-Premises AD FS Server
In this section you will create a basic on-premises Active Directory Federation Services (AD FS) server configuration. AD FS is used to support single-sign-on (SSO) with Windows Azure AD clients. Although a detailed explanation of this process is outside
of the scope of this document, the important thing to know as an IT professional is that at no point in the process are user credentials for the on-premises environment accessible to the Windows Azure AD client. Instead, authentication tokens with a limited
lifetime are used to represent the authenticated user. This is done using industry-standard processes and protocols and ensures the integrity of on-premises credentials while still supporting single-sign-on.
More detail on the SSO process can be found at
http://community.office365.com/en-us/wikis/sso/727.aspx, How Single Sign-On Works in Office 365. Although this is an entry in the Office 365 wiki, the details of the process are not specific to Office 365 and apply to all Windows Azure AD clients.
![]()
Perform all steps in this section on the AD FS server logged in as a Domain Administrator in the on-premises domain and an Enterprise Administrator in the on-premises forest.
Enable the AD FS Role
- Select choice 7 from the Menu.ps1 script to Add the ADFS role on the server.
- Wait for the role installation to complete.
|
Note |
|---|
| You can ignore any warnings about automatic updating and about finishing configuration of the server. |
Create an AD FS Service Account in a Domain
The AD FS installation process will create a simple AD FS farm. AD FS farms require the use of a service account.
- Select choice 8 from the Menu.ps1 script to Create a service account in the local domain for ADFS use.
- You will be prompted for the domain name (FQDN or NetBIOS will work), SAM account name, and password (with confirmation) for the new on-premises service account. The new account will be created with the Password never expires flag set.
|
Note |
|---|
| If you type the wrong domain name, then make sure to go back and input a new account, choosing [N]o to overwrite the existing credentials.
You can move the account from the default container in Active Directory later, if desired, with no ill effects. |
Create the AD FS DNS Alias
|
Note |
|---|
| you only need to do this if the member server’s name is not already adfs.domain. |
- Select choice 9 from the Menu.ps1 script to Create an internal DNS entry for ADFS.
- If you are prompted for credentials to connect to the Windows Azure AD tenant, type your administrator username (for example, admin@domain.onmicrosoft.com) and password.
NOTE: You can ignore a warning about automatic updating if you receive one.- If prompted, select the domain name to use for AD FS externally. This should match the UPN suffix active in the tenant. For instance, if you would like to use
user@contoso.com for your Windows Azure AD logins, then select contoso.com from the list. You will not be prompted if only one custom domain exists in Windows Azure AD.
Create or Validate the AD FS Server Certificate
The script does have limited support for using your own certificate. If you would like to do so, install it on the AD FS server in the Local ComputerPersonalCertificates store, and make sure it meets the following requirements:
- The friendly name of the certificate must be AD to AAD QuickStart ADFS Certificate, as that name is hard-coded into the script.
- The certificate’s private key must be marked exportable so the same certificate can be used on the AD FS server and the AD FS proxy server.
- The certificate’s subject must be “CN=adfs.domain”.
The script will validate the certificate if it exists.
- Select choice 10 from the Menu.ps1 script to create a new, self-signed SSL certificate or validate your own certificate.
- If you are prompted for credentials to connect to the Windows Azure AD tenant, type your administrator username (for example admin@domain.onmicrosoft.com) and password.
- If prompted, select the domain name to use for AD FS externally. This should match the UPN suffix active in the tenant. You will not be prompted if only one custom domain exists in Windows Azure AD.
-
NoteYou are using a self-signed certificate here for demonstration purposes. However, in a production environment, you would generally use a certificate issued by a public certificate authority (CA) such
as VeriSign, although if only internal domain-joined clients will be used to access services, then a private Enterprise CA would be acceptable. In either case, you need to make sure the common name (subject) of the certificate matches the AD FS alias and external
name (those will be the same), and the certificate must be exportable to support multiple machines using the same certificate.
NoteYou will be configuring the AD FS proxy server and a test client to trust this certificate later in the document. - If you have already created a certificate, or imported one, you will be prompted to validate the certificate. Choose to validate the certificate.
- If a certificate is not found on the local machine, you will be prompted to create one. If you have not created one yet, choose to create one. If you expected the script to find one, check the friendly name on the certificate to make sure it matches AD
to AAD QuickStart ADFS Certificate.
Export the Certificate for Future Use
The self-signed certificate must be available for multiple uses on other machines, so in this step you will create an export of the new certificate.
- Select choice 11 from the Menu.ps1 script to export the certificate. The certificate will be exported to two files in the same folder as the script: a PFX file with the private key, and a CER file without the private key. The certificate private key password
on the PFX file will be secret.
Configure AD FS to Use the Service Account and Certificate
- Select choice 12 from the Menu.ps1 script to Configure ADFS with basic configuration.
- If you are prompted for credentials to connect to the Windows Azure AD tenant, type your administrator username (for example admin@domain.onmicrosoft.com) and password.
- You will be prompted for service account credentials. If you have entered them in the same script session, you will be asked if you’d like to use the already-entered credentials instead of having to re-enter them. AD FS will then be configured.
-
WARNINGThis will remove any existing AD FS configuration on the system. - Wait for the process to complete. It will take some time; the steps will be reported as they occur. When done, you will have a complete local single-server AD FS farm installation.
|
Note |
|---|
| For ease of configuration and implementation the AD FS server is left with its default of Windows Integrated Authentication, but has NTLM prioritized over Negotiate in the provider list. This is not a default configuration but avoids potential Kerberos issues. In production, you would likely leave the default to keep the enhanced security offered by Kerberos. |
Confirm/Configure Windows Firewall
- Select choice 13 from the Menu.ps1 script to Confirm/configure Windows Firewall for port 443.
Add the AD FS Server to the Local Intranet Zone
|
Note |
|---|
| You will want to do this on any machine that will be using the federated service internally. You can also do these steps through Group Policy if desired; more information can be found at http://technet.microsoft.com/en-us/library/jj203438.aspx. |
- Start Internet Explorer.
- On the Tools menu, select Internet Options.
- Click the Security tab.
- Select the Local intranet zone, and then click Sites.
- If using Internet Explorer 9 or 10, click the Advanced button.
- In Add this website to the zone, type the URL for your AD FS server,
https://adfs.domain. - Click Add, click Close, and then click OK.
- Verify that the security level for the zone is set to the default setting of
Medium-low which enables integrated Windows authentication for Intranet zones. Click OK to close the Internet Options dialog box.
Confirm AD FS is Working Correctly
- Select choice 14 from the Menu.ps1 script to Launch test web pages.
- If you are prompted for credentials to connect to the Windows Azure AD tenant, type your administrator username (for example admin@domain.onmicrosoft.com) and password.
- If prompted, select the domain name to use for AD FS externally. This should match the UPN suffix active in the tenant. You will not be prompted if only one custom domain exists in Windows Azure AD.
- Three Internet Explorer windows/tabs will launch:
- a. https://adfs.domain/adfs/services/trust/mex, which will show an XML service description.
- b. https://adfs.domain/FederationMetadata/2007-06/FederationMetadata.xml, which will show a text service description (this is not expected to be human-readable text).
- c. https://adfs.domain/adfs/ls/IdpInitiatedSignon.aspx, which will show a sign-in page. You should be able to sign in without being asked for credentials.
↑ Back to top
Step 5: Configure the AD FS Proxy
![]()
Perform all of the steps in this section except firewall, external DNS changes,
and client testing on the AD FS proxy server logged in as a local administrator.
Import and Trust the AD FS Certificate
- Copy the entire folder with the Menu.ps1 script (including the exported certificate files) to the AD FS proxy server.
- Select choice 15 from the Menu.ps1 script to Import certificates for ADFS proxy.
Install the AD FS Proxy Role
1. Select choice 16 from the Menu.ps1 script to Add the ADFS Proxy role to this server.
|
Note |
|---|
| You can ignore any warnings about automatic updating and about finishing configuration of the server. |
Configure IIS to Use the Appropriate Certificate and Authentication
1. Select choice 17 from the Menu.ps1 script to Configure IIS SSL and authentication using the certificate you imported.
|
Note |
|---|
| Towards the end of the process, you may receive one or two error messages about a configuration value missing from the server. The output will indicate when this is an acceptable condition. |
Add the Local HOSTS File Entry
You will be updating the local HOSTS file to direct the proxy server to the internal AD FS server. This allows multiple DNS configurations to work as well as helps with supporting a workgroup member proxy server.
- Select choice 18 from the Menu.ps1 script to Add a HOSTS file entry for ADFS access from the proxy.
-
NoteYou can ignore any warnings about automatic updating. - If you are prompted for credentials to connect to the Windows Azure AD tenant, type your administrator username (for example admin@domain.onmicrosoft.com) and password.
- If prompted, select the domain name to use for AD FS externally. This should match the UPN suffix active in the tenant; you can go back to menu choice 3 on the AD FS Server if you forgot what UPN suffix you are using. You will not be prompted if only one
custom domain exists in Windows Azure AD. - When prompted, type the IP address of the AD FS server as accessed by the AD FS proxy server.
|
Important
|
|---|
| If there is NAT between the AD FS proxy server and the AD FS server, make sure you enter the IP address that would be used by the AD FS proxy, not the actual IP address of the AD FS server. |
|
Note |
|---|
| You can go through choice 19 again if you need to change this IP address. |
|
Important
|
|---|
|
You must be able to access port 443 on the AD FS server from the AD FS proxy server. This is the only port used for direct communication between the servers. |
|
Note |
|---|
| The current HOSTS file will be saved as HOSTS.backup. |
Configure the AD FS Proxy Role
- Select choice 19 from the Menu.ps1 script to configure the AD FS Proxy service.
- You will be prompted for service account credentials. If for some reason you already have entered those credentials in the same script session, you can re-use them.
- If you are prompted for credentials to connect to the Windows Azure AD tenant, enter your administrator username (for example, admin@domain.onmicrosoft.com) and password.
- If prompted, select the domain name to use for AD FS externally. This should match the UPN suffix active in the tenant. You will not be prompted if only one custom domain exists in Windows Azure AD.
Confirm/Configure Windows Firewall
- Select choice 20 from the Menu.ps1 script to Confirm/configure Windows Firewall for port 443.
Confirm the AD FS Proxy is Working Correctly
- Select choice 21 from the Menu.ps1 script to Launch test web pages.
- If you are prompted for credentials to connect to the Windows Azure AD tenant, type your administrator username (for example admin@domain.onmicrosoft.com) and password.
- If prompted, select the domain name to use for AD FS externally. This should match the UPN suffix active in the tenant. You will not be prompted if only one custom domain exists in Windows Azure AD.
- Three Internet Explorer windows will launch:
- a. https://adfs.domain/adfs/services/trust/mex, which will show an XML service description.
- b. https://adfs.domain/FederationMetadata/2007-06/FederationMetadata.xml, which will show a text service description (this is not expected to be human-readable text).
- c. https://adfs.domain/adfs/ls/IdpInitiatedSignon.aspx, which will show a sign-in page. You should be able to sign in at this time to the server directly from the server. Make sure you include the domain name in the user name when prompted.
Configure External Connectivity to the AD FS Proxy
On the external (edge) firewall, publish SSL port 443 on the AD FS proxy server on an external interface.
|
Note |
|---|
|
These steps must be done manually. There are too many variations possible in external access and DNS configuration to support automating these steps. If you are using Microsoft Internet Security and Acceleration (ISA) Server 2004 or 2006 or Microsoft Threat Management Gateway (TMG) 2010 as your edge firewall, you can find information on publishing the AD FS Proxy at http://blog.c7solutions.com/2011/06/publishing-adfs-through-isa-or-tmg.html. |
External DNS Configuration
On the external DNS provider, add the AD FS published address to the outside. Use the hostname adfs in the UPN suffix domain.
|
Note |
|---|
| These steps must be done manually. There are too many variations possible in external access and DNS configuration to support automating these steps. |
Help pages for common DNS providers for adding an A record (DNS address) include:
- o Network Solutions:
http://www.networksolutions.com/support/a-records-ip-addresses-2/ - o 1-and-1:
http://faq.1and1.com/domains/domain_admin/dns_settings/13.html - o Go Daddy:
http://support.godaddy.com/help/article/7920/adding-or-editing-a-records?locale=en
|
Note |
|---|
| You may need to wait for the DNS record you add to propagate. Be sure that you can resolve adfs.domain externally before continuing. |
External Basic AD FS Testing
![]()
Perform these steps on a client connected to an external network.
- Browse to
https://adfs.domain/FederationMetadata/2007-06/FederationMetadata.xml. You will receive certificate warnings because a self-signed certificate is being used. - Confirm you receive results similar to when you connected to this site internally.
- Browse to https://adfs.domain/adfs/ls/IdpInitiatedSignon.aspx.
- When the page appears, choose Continue to Sign In.
- Sign in with valid network credentials.
NOTE: You will need to enter credentials on a sign-in form. This is the default and recommended configuration for an AD FS Proxy. This is different from the internal AD FS server, which is configured to support Integrated Windows Authentication by default.- Confirm that the sign in worked.
↑ Back to top
Step 6: Configure Windows Azure AD Federation Support
You will next change the Windows Azure AD domain to use federation for SSO support. By default, Windows Azure AD manages accounts and sign ins independent from on-premises accounts. To use SSO, you need to configure the use of federation on the domain, and
then configure Directory Synchronization (DirSync). You are starting with federation, and then finalizing DirSync, as that is the recommended order. Remember that earlier in the process, you started with requesting DirSync to be enabled on the Windows Azure
AD side.
![]()
Perform all of these steps in this section except client testing on the AD FS server logged in as a Domain Administrator in the on-premises domain and an Enterprise Administrator in the on-premises forest.
Configure Windows Azure AD Connection to AD FS
- Wait for the DNS verification record you added previously to propagate. In most cases, this will be a short time (a few minutes), but this depends on the DNS server configuration for your local DNS server among other variables. Use this time to review the
next steps in the document. - If the AD FS server is able to look up DNS records on an external DNS host (not just on an internal server):
- a. Select menu choice 22 from the Menu.ps1 script to Check DNS records for TXT entries for unverified domains.
- b. When prompted, press ENTER to use the default external DNS server of 209.244.0.3, or type a different external DNS server’s IP address.
- c. If you are prompted for credentials to connect to the Microsoft Online Services tenant, type your administrator username (for example admin@domain.onmicrosoft.com) and password.
- d. Confirm you receive two Success messages – one for locating a single record and one for matching the expected record. If you do not, use the reported errors as a guide to correct the issue.
- Select choice 23 from the Menu.ps1 script to Configure Windows Azure AD connection to ADFS.
- If you are prompted for credentials to connect to the Windows Azure AD tenant, type your administrator username (for example admin@domain.onmicrosoft.com) and password.
- If prompted, select the domain name to use for AD FS externally. This should match the UPN suffix active in the tenant. You will not be prompted if only one custom domain exists in Windows Azure AD.
Create an AD FS/SSO Test User
- Select choice 24 from the Menu.ps1 script to Create a single sign-on test user.
- Type the new user’s credentials and other details when prompted.
Important
You are not prompted for the domain for the account; the account will be in the current logged-in domain. - If you are prompted for credentials to connect to the Windows Azure AD tenant, type your administrator username (for example admin@domain.onmicrosoft.com) and password.
- If prompted, select the domain name to use for AD FS externally. This should match the UPN suffix active in the tenant. You will not be prompted if only one custom domain exists in Windows Azure AD.
- Wait for the user to be created locally and in Microsoft Online.
|
Note |
|---|
| If you choose to replicate these steps manually, it’s important to know that you cannot simply create a pair of accounts (one on-premises and one in Windows Azure AD). There are rules around matching accounts when AD FS is used that require a specific configuration, namely that the ObjectGUID for the on-premises account must match the ImmutableId (as a Base64 string) for the Windows Azure AD account. The script does this automatically for the new user. New-MsolUser allows you to supply the ImmutableId on account creation, while Set-MsolUserPrincipalName allows you to change it after creation time. |
Confirm the Test User Can Sign In Through AD FS
![]()
Perform these steps on a client connected to an external network.
- On an external machine, browse to the appropriate portal for your service (for example
https://portal.microsoftonline.com/ for Office 365). You may receive a certificate error as the machine does not trust the self-signed certificate offered by the AD FS server; this is expected. - If you are presented with a different user pre-populated, choose Sign in with a different user:
- For User ID, type the UPN of the test user.
- Select Password. The screen should indicate that you are now required to sign in at the on-premises site.
- Choose the link to Sign in at domain:
- The default configuration for an AD FS Proxy is to use Forms-Based Authentication. Thus you should get a simple form:
- Type the test user name in the form of a UPN or DOMAINUSERNAME. Either should work.
- Type the test user’s password.
- Choose Sign In. You should be authenticated to the service successfully. You may receive an error screen indicating you do not have a license assigned (for example, Office 365 will show such a page). This is expected for the test user as in fact you have
not assigned a license to the test user.
↑ Back to top
Step 7: Install and Configure DirSync
Next, you will configure and activate Directory Synchronization (DirSync). DirSync is a custom, specialized implementation of Microsoft Forefront Identity Manager that is configured to synchronize accounts between your on-premises domain and a corresponding
Windows Azure AD domain.
![]()
Perform all steps in this section on the AD FS server logged in as a Domain Administrator in the on-premises domain and an Enterprise Administrator in the on-premises forest.
Download and Install DirSync
- Select choice 25 from the Menu.ps1 script to Download and install the DirSync tool. This will take some time; the download is approximately 100 MB, and when installing, it will install a local SQL Server 2008 Express instance to support the synchronization.
The installation for the most part will be invisible as it runs. - When it is complete, the script will prompt you to exit. Press ENTER.
- Sign out of Windows. You must do this to get your updated group membership to apply.
- Sign in again as the same user.
Configure DirSync
|
Important
|
|---|
| If you are in an environment running Exchange 2010 SP1 or later, and would like to configure a hybrid Office 365 deployment, you will need to configure DirSync manually, Run the wizard manually from the desktop to do so. |
- Select choice 26 from the Menu.ps1 script to Configure the DirSync tool.
- If you are prompted for credentials to connect to the Windows Azure AD tenant, type your administrator username (for example admin@domain.onmicrosoft.com) and password.
- When prompted, type your permanent Windows Azure AD synchronization credentials.
-
Important
This account will be used as the ongoing synchronization account, so if you don’t want to use the Online Services administrator account you’ve been using, this is a good time to go to your portal (for
example https://portal.microsoftonline.com/) to create a user specifically for this purpose. Make sure the user is not configured in the synchronized domain (the domain.onmicrosoft.com domain is a good choice),
and make sure it is set to not have its password expire. - When prompted, type your local Active Directory administration credentials.
NOTE: This account will not be used long-term; the wizard will create its own service account for ongoing use.- The configuration will complete. The script will then request an immediate synchronization.
Wait for Completion by Watching the Event Log
- Select choice 27 from the Menu.ps1 script to Get the latest Directory Synchronization events (event in the past thirty minutes). You should see the following events in order, typically at the bottom of the list:
|
InstanceID |
Text |
|
0 |
Starting synchronization now. |
|
1 |
Confirming Import has started. |
|
20 |
Running Full Import |
|
2 |
Confirming Import has completed. |
|
3 |
Export has started. |
|
5 |
The cumulative number of objects… |
|
4 |
Export has completed. |
Verify and Activate Newly Synchronized Users
- Sign in to the appropriate portal (for example
https://portal.microsoftonline.com/). - In the left-side navigation area, under Management, click Users or Users and Groups.
- In the View drop-down, select the option that represents currently inactive users (for example Unlicensed users for Office 365 or Not Windows Intune users for Windows Intune).
- Confirm the User name shows the appropriate single-sign on UPN for each user. If not, refer to the appendix on correcting a user’s UPN; it is strongly recommended that you do this before activating the user.
- Select all users that you would like to activate.
- Click the Activate synced users link.
- Complete the activation wizard as appropriate for the service you are using. Generally, this will include selecting one or more license check boxes and the choosing the users’ location.
- Wait for a few minutes before continuing to test to ensure the users are properly provisioned.
↑ Back to top
Step 8: Test on a Client
![]()
Perform all steps in this section on the client machine.
Basic Test
- Browse to the appropriate portal (for example
https://portal.microsoftonline.com/). You will receive a certificate error because the self-signed AD FS certificate is not yet trusted by the client. - Attempt to sign in as one of the synchronized users that you activated previously.
- Confirm a synchronized user is able to sign in. You should see the same process as when using the test user, including a prompt to use AD FS, an AD FS sign-in form, and then a redirect back to the portal as a signed-in user.
Optional: Install Self-Signed Certificate Issuer as Trusted
|
Note |
|---|
|
This is optional. If you are going to use a «real» certificate from a public certificate authority, or you are going to use an Enterprise Certificate Authority and a domain-joined machine, then you will not need to do this step. These steps are for a Windows 8 client. They will be different for other operating system, but the concepts will be the same. |
- Using a convenient transfer method (file share, USB flash key), copy the ADFSSelfSigned.cer file from the AD FS server to the client.
Important
Be sure to copy the .CER file and not the .PFX file. In Windows 7 and later it will be called a Security Certificate file and will look like this:
WARNINGDepending on operating system and UAC configuration, installing directly from a file share may be problematic. A local copy of the file is strongly recommended. This copy may be removed after the import
is complete. - Double-click the file to run it.
- In the Certificate properties window, click Install Certificate to begin the Certificate Import Wizard.
- Click Local Machine, and then click Next.
- If prompted by UAC, type local machine administrative credentials.
- Select Place all certificates in the following store, click Browse, and then click Enterprise Trust. Click OK, and then click Next.
- Click Finish to close the wizard.
- Click OK when a The import was successful message is displayed.
- Install the certificate again, this time into the Local Machine, Trusted Root Certification Authorities store.
NoteThe reason we are installing the root twice is to avoid a security feature of the Windows operating system. Recent versions of Windows automatically remove unknown third-party certificate authority entries
from the Trusted Root Certification Authorities store as a housekeeping task. Indicating the issuer is a local corporate issuer (by installing in the Enterprise Trust store) - indicates to Windows that it should not remove the third-party Trusted Root Certification Authorities store certificate.
- Click OK to close the Certificate properties dialog, and then launch the certificate again. This time, you should not see any warnings about an untrusted root.
- Navigate to the portal again in a clean browser session; you should not receive a certificate error.
↑ Back to top
Appendix 1: Force an Immediate Synchronization
In this appendix, you will see how to immediately synchronize your on-premise AD to Windows Azure AD. You will do this using a Windows PowerShell cmdlet to synchronize the change to the Windows Azure AD environment.
![]()
Perform these steps on the AD FS server logged in as a Domain Administrator in the on-premises domain and an Enterprise Administrator in the on-premises forest.
- Start an elevated (Admin) Command Prompt.
- Type cd /d %ProgramFiles%Microsoft Online Directory Sync.
- Type .DirSyncConfigShell.psc1.
- Wait for the Windows PowerShell session to launch. This should not take long.
- Type Start-OnlineCoexistenceSync.
- Using the Application event log, watch for the synchronization to complete. In most cases this won’t take more than a minute or two. Refer back to Wait for Completion by Watching the Event Log to see an idea of what events to expect from the Directory Synchronization
source (or use the choice in Menu.ps1 to review the log entries). - Once complete, launch your administration portal and confirm that the UPN shows as the new value under Management, Users.
↑ Back to top
Appendix 2: Glossary of Terms
Active Directory Federation Services (AD FS): A standards-based service that supports application authentication and authorization against a corporate Active Directory implementation while not exposing credentials to the requesting application.
Single Sign-On (SSO): A single username and password that administrators need to manage in a single location (for example, On-premise AD). End users are able to use this single username and password for authentication with on-premise and cloud applications
such as Office 365. Depending on the client configuration, they may need to type in those same credentials again to authenticate.
DirSync: A customized, limited version of Microsoft Forefront Identity Manager that supports copying selected account information (not including password information) from a corporate Active Directory environment to Windows Azure AD.
User principal name (UPN): A way of expressing the username/domain name combination first introduced in Windows 2000 Active Directory. It is formatted similar to an e-mail address for a user.
Windows Azure Active Directory (Windows Azure AD): A Microsoft-hosted directory service that supports authorization and optionally, authentication for Microsoft Online Services offerings such as Office 365 and Windows Intune.
↑ Back to top
| title | description | services | documentationcenter | author | manager | editor | ms.assetid | ms.service | ms.devlang | ms.tgt_pltfrm | ms.workload | ms.topic | ms.date | ms.subservice | ms.author | ms.collection | ms.openlocfilehash | ms.sourcegitcommit | ms.translationtype | ms.contentlocale | ms.lasthandoff | ms.locfileid |
|---|---|---|---|---|---|---|---|---|---|---|---|---|---|---|---|---|---|---|---|---|---|---|
|
Azure AD Connect: поддерживаемые топологии | Документация Майкрософт |
В этой статье подробно описываются поддерживаемые и неподдерживаемые топологии Azure AD Connect. |
active-directory |
billmath |
daveba |
1034c000-59f2-4fc8-8137-2416fa5e4bfe |
active-directory |
na |
na |
identity |
conceptual |
11/27/2018 |
hybrid |
billmath |
M365-identity-device-management |
8d3f8e9441064a5d2d1372e3f177534b8dfefb93 |
910a1a38711966cb171050db245fc3b22abc8c5f |
MT |
ru-RU |
03/19/2021 |
92359838 |
В этой статье описываются различные локальные топологии и топологии Active Directory Azure (Azure AD), в которых служба синхронизации Azure AD Connect используется в качестве основного решения интеграции. Здесь описываются и поддерживаемые, и неподдерживаемые конфигурации.
Ниже приведены условные обозначения для изображений в статье.
| Описание | Символ |
|---|---|
| Локальный лес Active Directory |  |
| Локальная служба Active Directory с фильтрацией импорта |  |
| Сервер синхронизации Azure AD Connect |  |
| Промежуточный режим сервера синхронизации Azure AD Connect |  |
| GALSync с Forefront Identity Manager (FIM) 2010 или Microsoft Identity Manager (MIM) 2016 |  |
| Сервер синхронизации Azure AD Connect, подробно |  |
| Azure AD |  |
| Неподдерживаемый сценарий |  |
[!IMPORTANT]
Мы поддерживаем изменение или использование служб синхронизации Azure AD Connect только в контексте официально задокументированных конфигураций или действий. Любая из этих конфигураций или действий может привести к несогласованному или неподдерживаемому состоянию Azure AD Connect синхронизации. В результате корпорация Майкрософт не может предоставить техническую поддержку для таких развертываний.
Один лес, один клиент Azure AD

Стандартная топология — один локальный лес с одним или несколькими доменами и один клиент Azure AD. Для аутентификации Azure AD используется синхронизация хэша паролей. Экспресс-установка Azure AD Connect поддерживает только эту топологию.
Один лес, несколько серверов синхронизации в одном клиенте Azure AD

Подключение нескольких серверов синхронизации Azure AD Connect (за исключением промежуточного сервера) к одному клиенту Azure AD не поддерживается. Такая схема не поддерживается, даже если эти серверы настроены для синхронизации с взаимоисключающим набором объектов. Возможно, вы рассматривали такую топологию, если у вас нет доступа ко всем доменам леса с одного сервера или если требуется распределить нагрузку на несколько серверов.
Несколько лесов, один клиент Azure AD

Во многих организациях есть среды, которые включают несколько локальных лесов Active Directory. Есть разные причины существования нескольких локальных лесов Active Directory. Типичными примерами являются проекты с лесами ресурсов учетных записей и лесами, появившимися в результате слияния или поглощения.
Если у вас есть несколько лесов, все они должны быть доступными для одного сервера синхронизации Azure AD Connect. Сервер должен быть присоединен к домену. Если необходимо получить доступ ко всем лесам, можно разместить сервер в сети периметра (также называется DMZ и промежуточной подсетью).
Мастер установки Azure AD Connect предлагает несколько вариантов консолидации пользователей, представленных в нескольких лесах. Каждый пользователь должен быть представлен в Azure AD только один раз. Есть несколько распространенных топологий, которые можно настроить в режиме выборочной установки в мастере установки. На странице Уникальная идентификация пользователей выберите вариант, соответствующий вашей топологии. Функция консолидации настроена только для пользователей. В конфигурации по умолчанию дубликаты групп не консолидируются.
Типичные топологии обсуждаются в разделах о отдельных топологиях, полной сетии топологии ресурсов учетной записи.
При стандартной конфигурации Azure AD Connect предполагается следующее.
- У каждого пользователя есть только одна включенная учетная запись. Лес, в котором располагается эта учетная запись, используется для проверки подлинности пользователя. Это предполагается при использовании синхронизации хэша паролей, сквозной аутентификации и федерации. Параметры UserPrincipalName и sourceAnchor/immutableID поступают из этого леса.
- У каждого пользователя есть только один почтовый ящик.
- Лес, в котором размещаются почтовые ящики пользователей, характеризуется наилучшим качеством данных для атрибутов, отображаемых в глобальном списке адресов Exchange (GAL). Если у пользователя нет почтового ящика, для передачи значений этих атрибутов может использоваться любой лес.
- Если у пользователя есть связанный почтовый ящик, то есть и другая учетная запись в другом лесу, которая используется для входа.
Если среда не соответствует этим предположениям, произойдет следующее:
- Если у вас несколько активных учетных записей или несколько почтовых ящиков, модуль синхронизации выберет одну учетную запись или один почтовый ящик и проигнорирует остальные.
- Связанный почтовый ящик, для которого нет другой активной учетной записи, не будет экспортирован в Azure AD. Учетная запись пользователя не будет представлена как член какой-либо группы. В DirSync связанный почтовый ящик всегда будет представлен как обычный почтовый ящик. Такое отличие в поведении является намеренным и служит для поддержки различных сценариев леса.
Дополнительные сведения см. в статье Службы синхронизации Azure AD Connect: рекомендации по изменению конфигурации по умолчанию.
Несколько лесов, несколько серверов синхронизации в одном клиенте Azure AD

Подключение нескольких серверов синхронизации Azure AD Connect к одному клиенту Azure AD не поддерживается. В порядке исключения можно использовать промежуточный сервер.
Эта топология отличается от описанной ниже тем, что подключение нескольких серверов синхронизации к одному клиенту Azure AD не поддерживается.
Несколько лесов, один сервер синхронизации, пользователи представлены только в одном каталоге


В этой среде все локальные леса рассматриваются как отдельные сущности. В любых других лесах пользователи отсутствуют. У каждого леса есть своя организация Exchange. Синхронизация GALSync между лесами отсутствует. Такая топология может возникать в результате слияний и поглощений, а также в организации, в которой все подразделения функционируют независимо. В Azure AD эти леса будут находиться в одной организации и отображаться в едином глобальном списке адресов. На предыдущем рисунке каждый объект в каждом лесу представлен в метавселенной в единственном экземпляре с объединением в целевом клиенте Azure AD.
Несколько лесов: сопоставление пользователей
Для всех сценариев этого рода характерно то, что группы рассылки и группы безопасности могут состоять из пользователей, контактов и внешних субъектов безопасности. Внешние участники безопасности используются в доменных службах Active Directory (AD DS) для представления элементов из других лесов в группе безопасности. Все внешние субъекты безопасности разрешаются в реальный объект в Azure AD.
Несколько лесов: полная сетка с дополнительным решением GALSync


Топология полной сетки позволяет пользователям и ресурсам размещаться в любом лесу. Как правило, между лесами образуются двусторонние отношения доверия.
Если Exchange присутствует в нескольких лесах, может быть доступным дополнительное локальное решение GALSync. Каждый пользователь будет представлен во всех остальных лесах как контакт. GALSync часто реализуется через FIM 2010 или MIM 2016. Azure AD Connect нельзя использовать в локальном решении GALSync.
В этом сценарии объекты удостоверений соединяются с помощью атрибута почты. Пользователь с почтовым ящиком в одном лесу объединяется с контактами в других лесах.
Несколько лесов: лес ресурсов учетной записи


В топологии леса ресурсов учетной записи у вас есть один или несколько лесов учетных записей с активными учетными записями пользователей. У вас также есть один или несколько лесов ресурсов с отключенными учетными записями.
В этом сценарии один (или несколько) лес ресурсов доверяет всем лесам учетных записей. Обычно в лесу ресурсов используется расширенная схема Active Directory с Exchange и Lync. Все службы Exchange и Lync, а также другие общие службы находятся в этом лесу. У пользователей есть отключенные учетные записи в этом лесу. С лесом учетных записей связан почтовый ящик.
Рекомендации по Microsoft 365 и топологии
Некоторые Microsoft 365 рабочие нагрузки имеют определенные ограничения на поддерживаемые топологии:
| Рабочая нагрузка | Ограничения |
|---|---|
| Exchange Online | Дополнительные сведения о гибридных топологиях, поддерживаемых Exchange Online, см. в разделе Гибридные развертывания в нескольких лесах Active Directory. |
| Skype для бизнеса | При использовании нескольких локальных лесов единственной поддерживаемой топологией является лес ресурсов учетной записи. Дополнительные сведения см. в статье Требования к среде Skype для бизнеса Server 2015. |
Если вы являетесь более крупной организацией, то следует использовать функцию Microsoft 365 PreferredDataLocation . Он позволяет определить, в каком регионе центра обработки данных расположены ресурсы пользователя.
промежуточного сервера

Azure AD Connect поддерживает установку второго сервера в промежуточном режиме. Сервер в этом режиме считывает данные из всех подключенных каталогов, но не записывает ничего в подключенные каталоги. Он использует обычный цикл синхронизации и поэтому содержит обновленную копию данных удостоверения.
При отказе основного сервера можно выполнить отработку отказа на промежуточный сервер. Это можно сделать в мастере Azure AD Connect. Второй сервер может находиться в другом центре обработки данных, так как он не делит инфраструктуру с основным сервером. Любые изменения конфигурации основного сервера следует вручную копировать на второй сервер.
Вы можете использовать промежуточный сервер, чтобы проверить новую пользовательскую конфигурацию и узнать, как она повлияет на данные. Вы можете просмотреть внесенные изменения и выполнить более точную настройку. Когда новая конфигурация будет завершена, вы сможете сделать промежуточный сервер активным и перевести старый сервер в промежуточный режим.
Этот метод также можно использовать для замены активного сервера синхронизации. Подготовьте новый сервер и переведите его в промежуточный режим. Убедитесь, что он работает правильно, и отключите промежуточный режим (сервер станет активным). Завершите работу текущего сервера.
Чтобы иметь несколько резервных копий в разных центрах обработки данных, можно использовать несколько промежуточных серверов.
Множество клиентов Azure AD
Мы рекомендуем использовать один клиент в Azure AD для всей организации.
Прежде чем использовать несколько клиентов Azure AD, ознакомьтесь со статьей Управление административными единицами в Azure AD (общедоступной предварительной версии). В ней описываются стандартные сценарии, в которых можно использовать один клиент.

Между сервером синхронизации Azure AD Connect и клиентом Azure AD устанавливается отношение 1:1. Для каждого клиента Azure AD потребуется установить отдельный сервер синхронизации Azure AD Connect. Экземпляры клиента Azure AD являются изолированными по своей природе. Это значит, что пользователям в одном клиенте недоступны пользователи в другом клиенте. Если вам необходимо это разделение, это поддерживаемая конфигурация. В противном случае следует использовать модель одного клиента Azure AD.
Каждый объект, повторяющийся только один раз в клиенте Azure AD

В этой топологии один сервер синхронизации Azure AD Connect подключается к каждому клиенту Azure AD. На серверах синхронизации Azure AD Connect необходимо настроить правила фильтрации, чтобы они обрабатывали взаимоисключающие наборы объектов. Например, каждый сервер может обслуживать определенный домен или подразделение.
Домен DNS может быть зарегистрирован только в одном клиенте Azure AD. Кроме того, имена участников-пользователей для локальных пользователей Active Directory должны располагаться в отдельных пространствах имен. Например, на предыдущем рисунке в локальном экземпляре Active Directory регистрируется три отдельных суффикса имен участников-пользователей: contoso.com, fabrikam.com и wingtiptoys.com. Пользователи каждого локального домена Active Directory используют различные пространства имен.
[!NOTE]
Синхронизация глобального списка адресов (GalSync) не выполняется автоматически в этой топологии. Для нее требуется дополнительная пользовательская реализация MIM, чтобы у каждого клиента был полный глобальный список адресов (GAL) в Exchange Online и Skype для бизнеса Online.
Эта топология налагает следующие ограничения на сценарии, поддерживаемые в других случаях:
- Не более 5 Azure Active Directory клиентов могут иметь гибридный Exchange с локальным Active Directoryным экземпляром. Этот сценарий описан в обновлении мастера гибридной конфигурации от сентября 2020.
- Сервер Exchange, на котором работает мастер гибридной конфигурации, должен иметь значение 2016 CU18 или 2019 И НАКОПИТЕЛЬНЫМ или более поздней версии.
- Каждый экземпляр Azure AD Connect должен выполняться на компьютере, присоединенном к домену.
- Чтобы отфильтровать пользователей из локального каталога, Azure AD Connect необходимо настроить с помощью параметра «Фильтрация доменов и подразделений». Использование этого параметра гарантирует, что пользователи будут отображаться только в одном интернет-клиенте Exchange.
- устройство под управлением Windows 10 можно связать только с одним клиентом Azure AD;
- параметр единого входа для синхронизации хэша паролей и сквозной аутентификации можно использовать только с одним клиентом Azure AD.
Требование относительно взаимоисключающих наборов объектов также применяется и к обратной записи. Эта топология не будет поддерживать некоторые функции обратной записи, так как они предполагают наличие одной локальной конфигурации. Эти функции включают в себя следующие.
- групповая обратная запись в конфигурации по умолчанию;
- обратная запись устройств.
Каждый объект, повторяющийся несколько раз в клиенте Azure AD


Следующие задачи не поддерживаются:
- синхронизация одного пользователя с несколькими клиентами Azure AD;
- изменение конфигурации таким образом, чтобы пользователи одного клиента Azure AD отображались в другом клиенте Azure AD как контакты;
- изменение настройки службы синхронизации Azure AD Connect для подключения к нескольким клиентам Azure AD.
Синхронизация GALSync с помощью обратной записи


Клиенты Azure AD являются изолированными по своей природе. Следующие задачи не поддерживаются:
- изменение настройки службы синхронизации Azure AD Connect для чтения данных из другого клиента Azure AD;
- экспорт пользователей как контакты в другой локальный экземпляр Active Directory с использованием службы синхронизации Azure AD.
Синхронизация GALSync с локальным сервером синхронизации

Для синхронизации пользователей (с помощью GALSync) между двумя организациями Exchange можно локально использовать FIM 2010 или MIM 2016. Пользователи из одной организации будут отображаться в другой организации как внешние пользователи или контакты. Затем эти локальные экземпляры Active Directory можно синхронизировать с их собственными клиентами Azure AD.
Использование неавторизованных клиентов для доступа к Azure AD Connect серверной части

Сервер Azure Active Directory Connect взаимодействует с Azure Active Directory через серверную часть Azure Active Directory Connect. Единственным программным обеспечением, которое можно использовать для взаимодействия с этой серверной частью, является Azure Active Directory Connect. Не поддерживается обмен данными с Azure Active Directory Connect серверной частью с помощью любого другого программного обеспечения или метода.
Дальнейшие действия
Больше об установке Azure AD Connect для этих сценариев можно узнать в статье Выборочная установка Azure AD Connect.
Узнайте больше о настройке службы синхронизации Azure AD Connect .
Дополнительные сведения об интеграции локальных удостоверений с Azure Active Directory.
Hands up if you like deploying Active Directory Domain Services. Hands up if you enjoy managing domain controllers and flexible single master operation (FSMO) roles and site replication. Hands up if you believe this work directly positively impacts your business’s revenue. Hands up if you’d love for there to be a managed service that gives you Active Directory without the pains of managing it.
Contents
- Prerequisites for Azure Active Directory Domain Services
- Create a new AADDS deployment
- Manage AADDS
- Author
- Recent Posts

David has been a consultant for over 10 years and reinvented himself a couple of times, always staying up to date with the latest in technology around automation and the cloud. He is a multi-year Microsoft MVP for Azure, a cloud architect at XIRUS in Australia, a regular speaker at conferences, and IT trainer.
If you put your hands up at the last question, there’s great news—Azure has something for you: Azure Active Directory Domain Services (AADDS), not to be mistaken for Azure Active Directory (AAD).
AADDS is an almost-feature-complete Active Directory with a few limitations, mainly:
- no domain admin privileges
- unable to extend AAD schema
- single virtual network (VNet) and single region only
- no failover to other regions for disaster recovery (DR)
- unable to join VM-based domain controllers to domains
- no direct access to domain controllers
- only one AADDS per Azure tenant
The most critical limitation in my opinion is the fact that AADDS is single-region only, and you can only have one per tenant, so unless your workloads’ functionality doesn’t rely on Active Directory, or you do not require a test AADDS instance, you’re good.
For the latter, you can obviously create a new AAD tenant and test with that. For the former, well, don’t rely on Active Directory. (I know, legacy…) Microsoft has documented a few more points to consider whether AADDS is right for you here.
Assuming all the above sounds okay to you, and you should seriously consider this service because a lot of the AAD-managing overhead just disappears, then how you do deploy AADDS?
Prerequisites for Azure Active Directory Domain Services
First, check that you are deploying the service into a supported region. In any of the supported regions, we will need to deploy a VNet because AADDS needs a dedicated subnet.
In your Azure PowerShell, follow these steps to put the prerequisites in place. This assumes you are deploying AADDS into a new resource group and a new VNet in the australiaeast region. Make sure that if this doesn’t fit your use case, you change these values.
New-AzResourceGroup -Name aadds -Location australiaeast
New-AzVirtualNetwork -Name aadds -AddressPrefix 10.0.0.0/8  ResourceGroupName aadds -Location australiaeast
$vnetConfig = Get-AzVirtualNetwork -Name aadds -ResourceGroupName aadds
$subnetConfig = Add-AzVirtualNetworkSubnetConfig -Name aadds  AddressPrefix 10.0.0.0/27 -VirtualNetwork $vnetConfig
$vnetConfig | Set-AzVirtualNetwork
With this created, we can now deploy AADDS.
Create a new AADDS deployment
The next steps we will complete in the Azure console because there is no Azure PowerShell support for deploying or configuring AADDS. There is Azure Resource Manager (ARM) template support, but we will keep it light for this article and stick to the portal.
Browse to your resource group and click the add button.
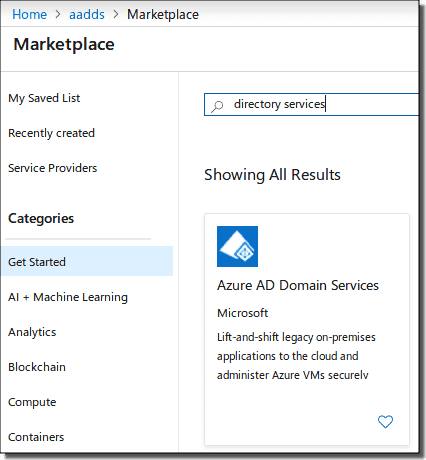
Search for AADDS in the marketplace
Search for directory services, click the tile here, and select create. In the next step, you will configure the basic settings for this domain.
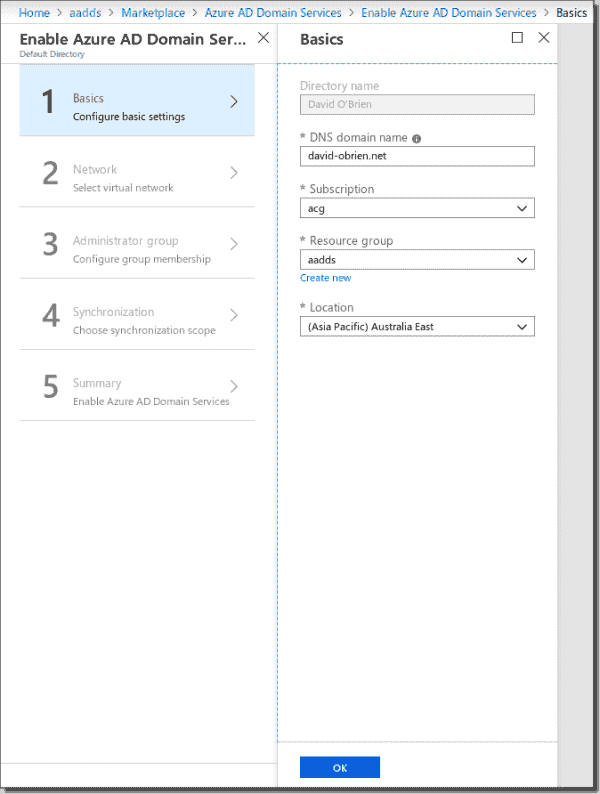
Create the AADDS basics
Make sure you configure the right DNS name for your domain. In the next step, you will select the VNet and subnet or network you already created previously.

Create the AADDS network
For the next two steps, you will just accept the defaults for this tutorial. The wizard will create a new AAD group called AAD DC Administrators, and to manage the domain going forward, you will need to be a member of this group.
You can configure this now or also later on. Leave the synchronization scope at All for now. However, you will not be able to change this setting once you deploy the domain. If you want to change the scope to only certain groups and users, you will have to delete the domain and redeploy it.
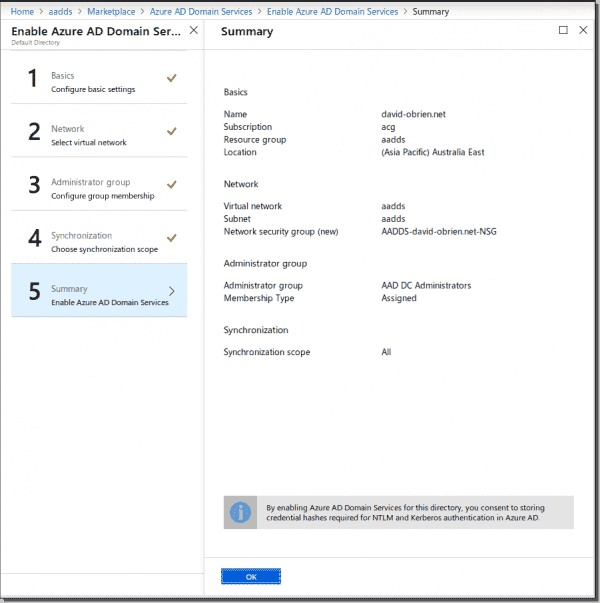
Create the AADDS summary
Check the summary screen, and if it all looks alright, hit OK. The deployment can take up to 60 minutes. So go and have a tea or 12.
Subscribe to 4sysops newsletter!
Manage AADDS
To start managing your new AADDS domain now, head over to the official documentation. In my next post, I will show you how you can join an Azure VM to AADDS.
AD FS provides simplified, secured identity federation and Web single sign-on (SSO) capabilities. Federation with Azure AD enables users to authenticate using on-premises credentials and access all resources in cloud. As a result, it becomes important to have a highly available AD FS infrastructure to ensure access to resources both on-premises and in the cloud.
Introducing Federation with Azure AD
Federation is a collection of domains that have established trust. The level of trust may vary, but typically includes authentication and almost always includes authorization.
We can federate your on-premises environment with Azure AD and use this federation for authentication and authorization. This sign-in method ensures that all user authentication occurs on-premises. This method allows administrators to implement more rigorous levels of access control.
Architectural Diagram

If we need highly available Federation, then we have to set up “password hash synchronization” option as a backup in case ADFS infrastructure fails.
ADFS configuration prerequisites
- Windows Remote Management
If the target server is domain joined, then ensure that Windows Remote Managed is enabled
In an elevated PS command window, use command
Enable-PSRemoting –Force
- SSL Certificate
It’s strongly recommended to use the same SSL certificate across all nodes of your AD FS farm and all Web Application proxy servers. The certificate must be an X509 certificate.
You can use a self-signed certificate on federation servers in a test lab environment. However, for a production environment, I recommend that you obtain the certificate from a public CA
The identity of the certificate must match the federation service name (for example, sts.contoso.com)
- Name resolution for federation servers
Set up DNS records for the AD FS federation service name (for example sts.contoso.com) for both the intranet (your internal DNS server) and the extranet (public DNS through your domain registrar). For the intranet DNS record, ensure that you use A records and not CNAME records. This is required for windows authentication to work correctly from your domain joined machine.
After configure the prerequisites, next we install Azure AD Connect tool.
Installation of Azure AD Connect
Download Microsoft Azure Active Directory Connect from here
- Sign in as a local administrator to the server you wish to install Azure AD Connect on. You should do this on the server you wish to be the sync server.
- Navigate to and double-click AzureADConnect.msi.
- On the Welcome screen, select the box agreeing to the licensing terms and click Continue.
- On the Express settings screen, click Use Customize settings.
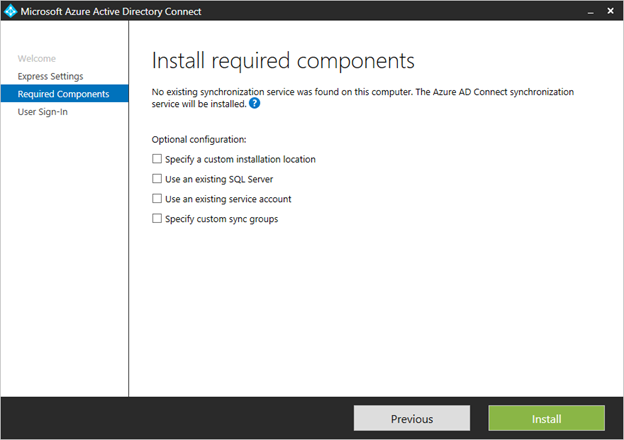
Install
required components
When you install the synchronization services, you can leave the optional configuration section unchecked and Azure AD Connect sets up everything automatically. It sets up a SQL Server 2012 Express LocalDB instance, create the appropriate groups, and assign permissions.
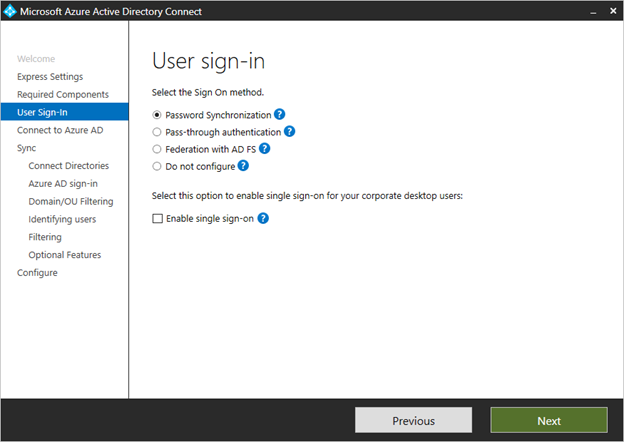
User sign-in
After installing the required components, you are asked to select your user’s single sign-on method. In our case, we’ll select Federation with ADFS.
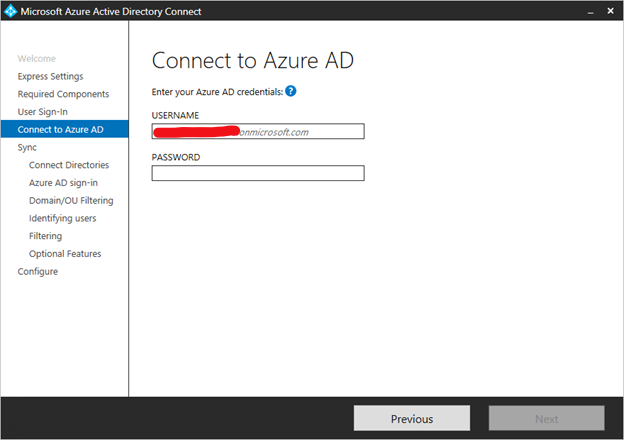
Connect to
Azure AD
On the Connect to Azure AD screen, enter a global admin account and password.
Connect your
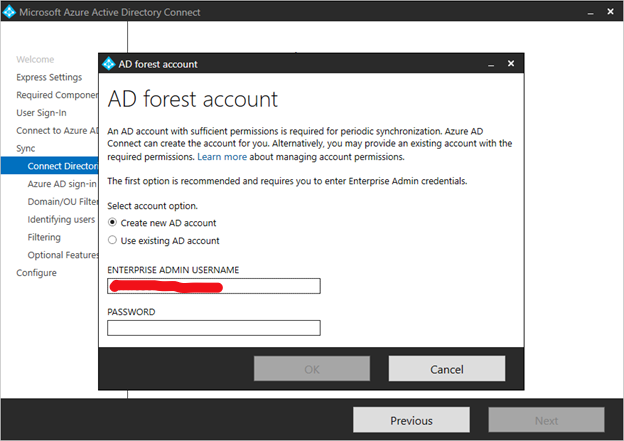
directories
To connect to your Active Directory Domain Service, Azure AD Connect needs the forest name and credentials of an account with sufficient permissions.
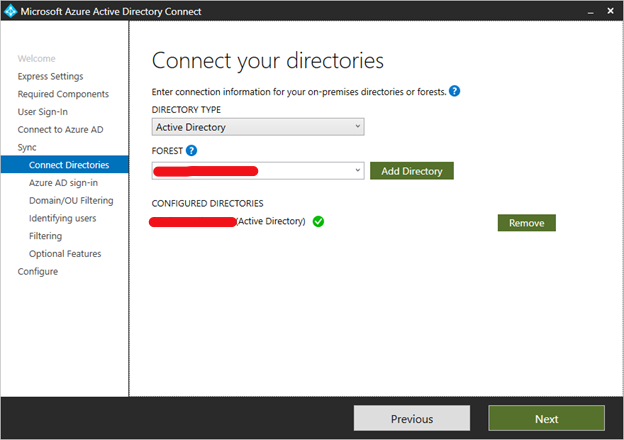
After entering the forest name and clicking Add Directory, a pop-up dialog appears and prompts to create a new account or use existing account required by Azure AD Connect for connecting to the AD forest during directory synchronization.
Azure AD
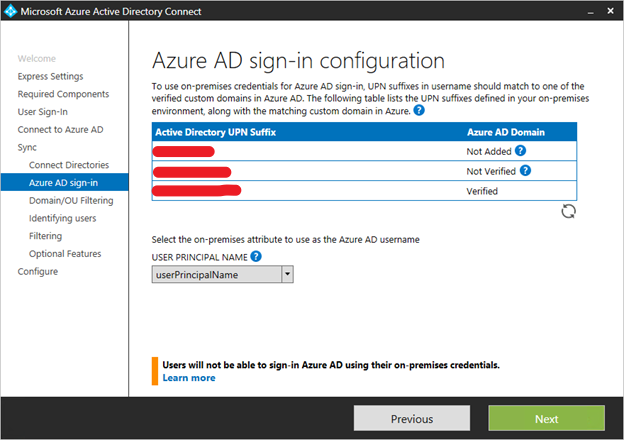
sign-in configuration
This page allows you to review the UPN domains present in on-premises AD DS and which have been verified in Azure AD. This page also allows you to configure the attribute to use for the userPrincipalName.
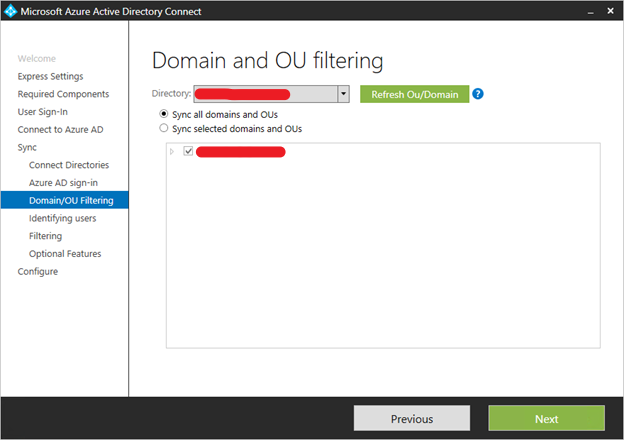
Domain and OU filtering
By default all domains and OUs are synchronized. If there are some domains or OUs you do not want to synchronize to Azure AD, you can unselect these domains and OUs.
Uniquely identifying your users
The Matching across forests feature allows you to define how users from your AD DS forests are represented in Azure AD. A user might either be represented only once across all forests or have a combination of enabled and disabled accounts. The user might also be represented as a contact in some forests.
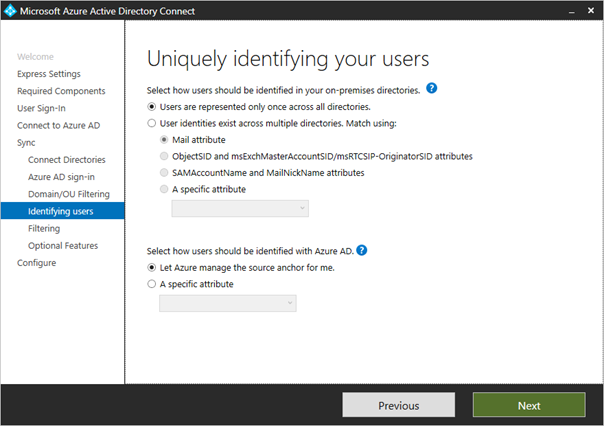
Sync filtering based on groups
The filtering on groups feature allows you to sync only a small subset of objects for a pilot. To use this feature, create a group for this purpose in your on-premises Active Directory. Then add users and groups that should be synchronized to Azure AD as direct members. You can later add and remove users to this group to maintain the list of objects that should be present in Azure AD. All objects you want to synchronize must be a direct member of the group. Users, groups, contacts, and computers/devices must all be direct members. Nested group membership is not resolved. When you add a group as a member, only the group itself is added and not its members.
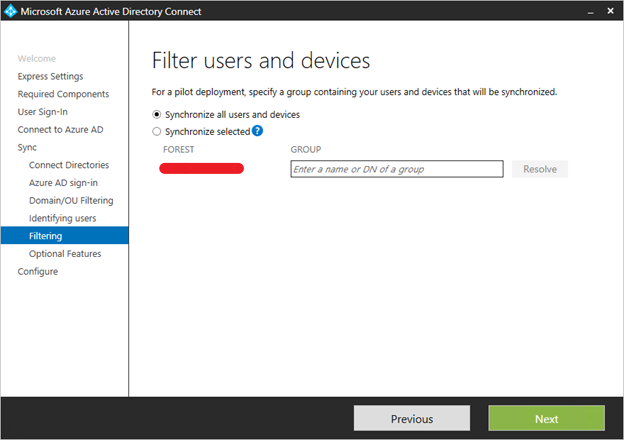
Optional Features
This screen allows you to select the optional features for your specific scenarios.
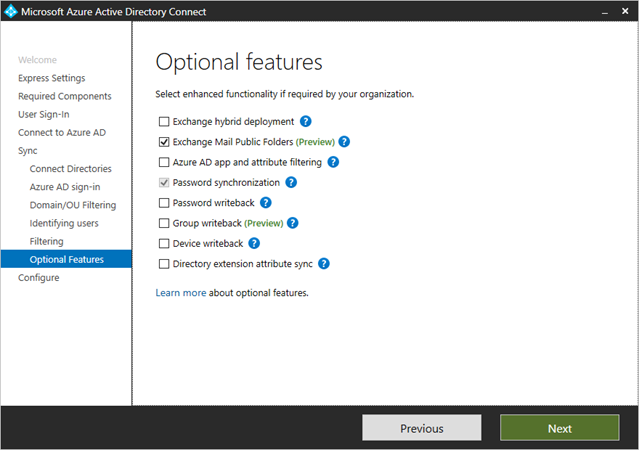
Create a new ADFS farm or use an existing ADFS farm
You can use an existing AD FS farm or you can choose to create a new AD FS farm. If you choose to create a new one, you are required to provide the SSL certificate. If the SSL certificate is protected by a password, you are prompted for the password.

Specify the ADFS Servers
Enter the servers that you want to install ADFS on.
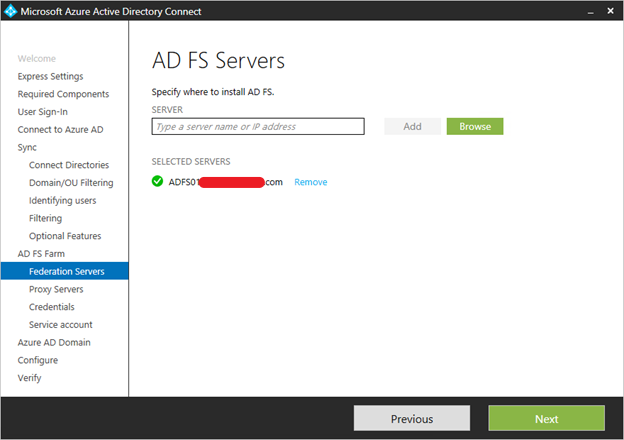
Specify the service account for the ADFS service
The AD FS service requires a domain service account to authenticate users and lookup user information in Active Directory.
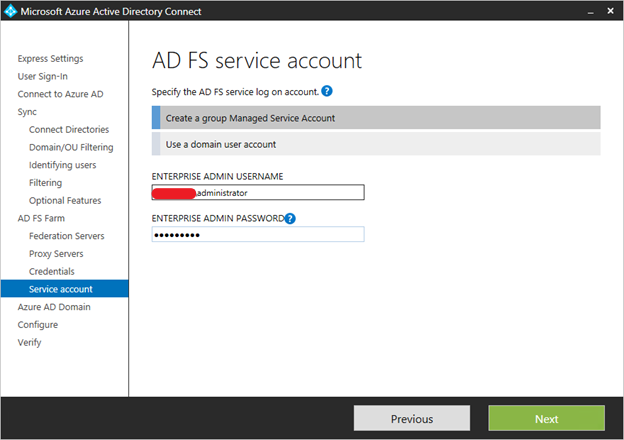
Select the Azure AD domain that you wish to federate
This configuration is used to setup the federation relationship between AD FS and Azure AD. It configures ADFS to issue security tokens to Azure AD and configures Azure AD to trust the tokens from this specific ADFS instance. This page only allows you to configure a single domain in the initial installation. You can configure more domains later by running Azure AD Connect again.

Verify the Azure AD domain selected for federation
When you select the domain to be federated, Azure AD Connect provides you with necessary information to verify an unverified domain. See Add and verify the domain for how to use this information.
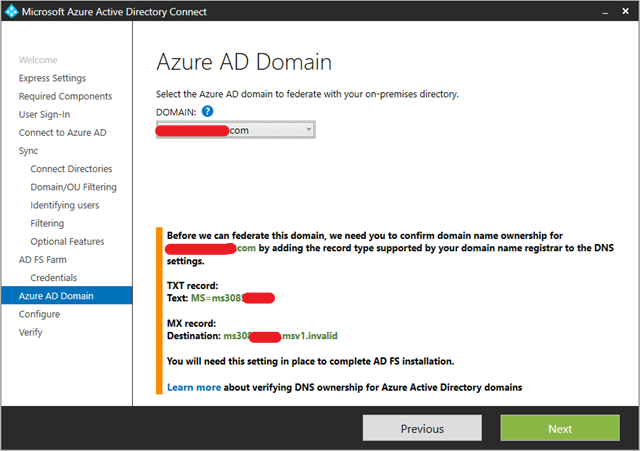
Configure and verify pages
Select start the synchronization as soon as possible.
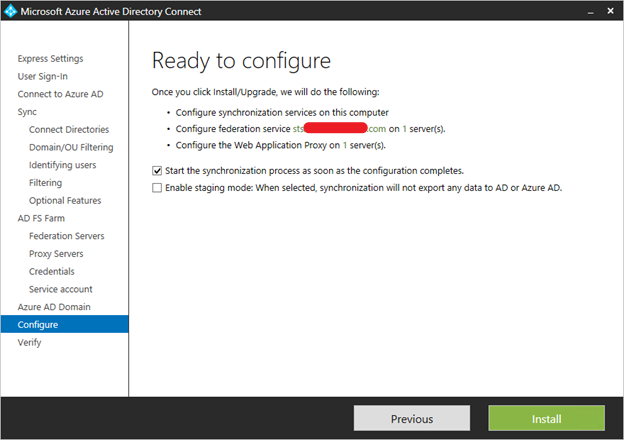
Verify your federation configuration
Azure AD Connect verifies the DNS settings for you when you click the Verify button.
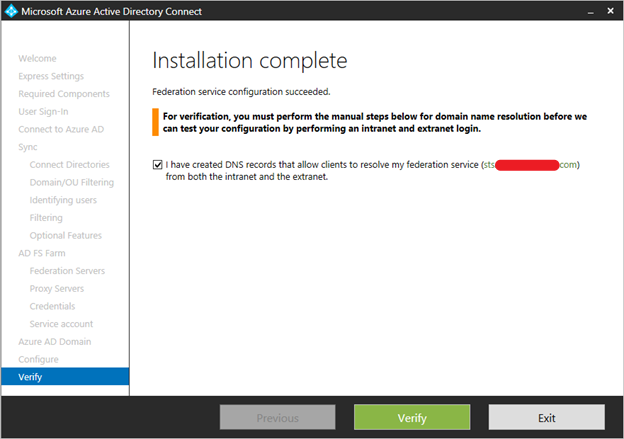
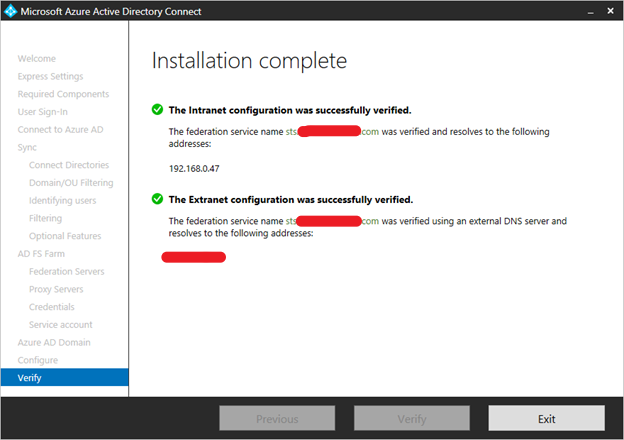
In addition, perform the following verification steps:
- Validate that you can sign in from a browser from a domain joined machine on the intranet: Connect to https://myapps.microsoft.com and verify the sign-in with your logged in account. The built-in ADDS administrator account is not synchronized and cannot be used for verification.
- Validate that you can sign in from a device from the extranet. On a home machine or a mobile device, connect to https://myapps.microsoft.com and supply your credentials.
- Validate rich client sign-in. Connect to https://testconnectivity.microsoft.com, choose the Office 365 tab and chose the Office 365 Single Sign-On Test
Please follow and like me:
Can anyone let me know, whether we can integrate complete on-premises AD to windows azure AD using this ? or only users and groups?
Yes, your on-premises AD can be integrated with Azure AD (AAD) with AAD Connect tool. The integration needs prerequisites you can refer here https://learn.microsoft.com/en-us/azure/active-directory/connect/active-directory-aadconnect-prerequisites. It means not all the cases can be done. For example, if you need to use password writeback functionality, your on-premises AD domain controller must be at least Windows Server 2008. Another prerequisite is that if your on-premises is using single label domain, it is not supported. Best to check the link above before the integration.
IF directory sync will not be helpful for complete AD integartion what methord will be used ?
AAD Connect provides set of features to help you build a comprehensive hybrid identity between on-premises AD and AAD. However, if this doesn’t meet your requirement, you can build some extensions programmatically to interact with AAD. I don’t know your preferred programming language, but here is the Authentication Library (ADAL) which is pretty much preferred for AAD development https://learn.microsoft.com/en-us/azure/active-directory/develop/active-directory-authentication-libraries
AAD not only supports user and group sync, but also for custom attributes, filtering, password sync & writeback or so on. Remember AAD Connect is purposely for synchronization. It does not offer too much for AAD interaction (saying that you need to manage, add more attributes or retrieve user attributes, 3rd integration…)