When it comes to choosing a suitable transfer software, there are three key factors that should be taken into consideration: transfer speed, photo quality, and storage space. A fast transfer speed can significantly reduce the waiting time; More photo quality choices enable you to transfer photos without losing quality; Unlimited free storage brings great convenience for transferring large photos.
It is hard to find one that can meet all your requirements, but you can choose the one that most matches your needs. If you’re looking for such a tool, here are some best free software worth a try!
How to Transfer Photos from iPhone to PC via EaseUS MobiMover
EaseUS MobiMover is the first utility we recommend. With this light iPhone data transfer tool, you can easily get all or part of the photos moved to a PC with several clicks. The best part of this tool is that it has no restrictions on the number of photos you can transfer and has no internet requirement. This undoubtedly makes the transfer process incredibly easy and convenient.
Beyond that, it has many other outstanding features:
- Easy to use
- Good transfer speed
- Unlimited storage (This depends on your computer’s storage space)
- No quality loss
- No internet required
Besides, it is also a good option if you’re struggling to copy photos from iPhone to iPhone. Now, you can free download it on your computer and start to transfer photos.
Step 1. Connect your iPhone to PC running Windows 7 or later. Run EaseUS MobiMover, choose «Phone to PC» and click the «Next» button on the screen. This mode allows you to transfer data from iPhone to PC in one click.

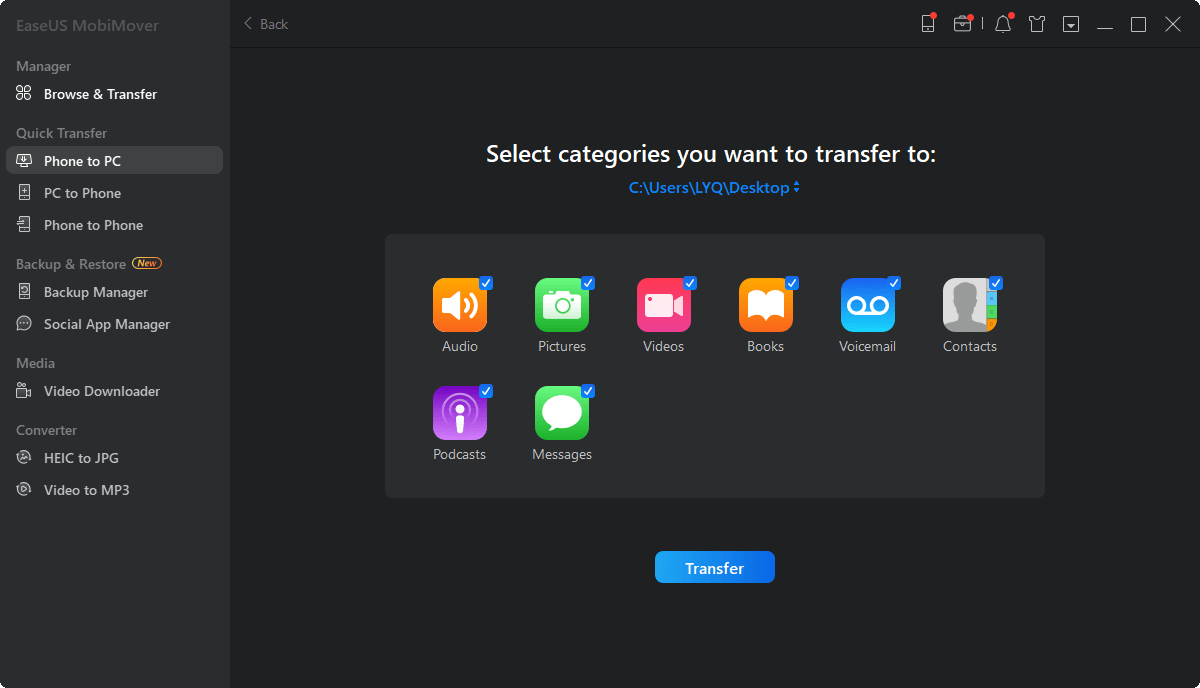
Step 2. MobiMover supports transferring audio, videos, pictures, books, contacts, messages, etc. from iPhone to PC. Here, choose «Pictures» only. MobiMover will save the files on your desktop by default. You can customize the path as you need.
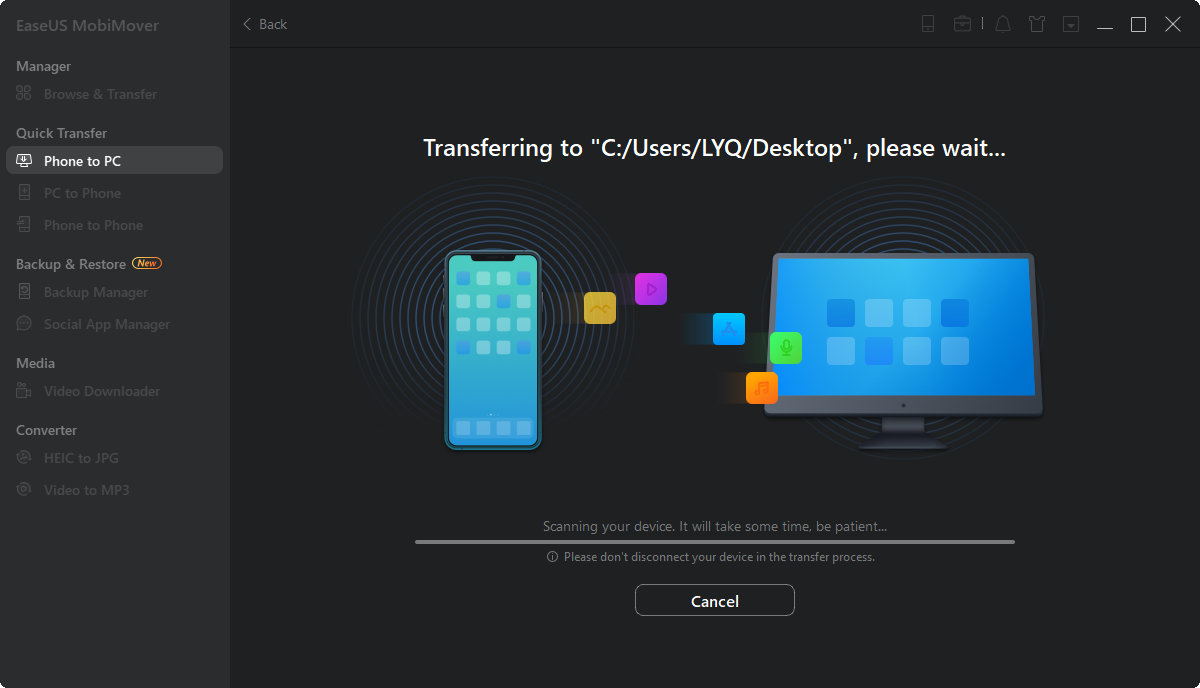
Step 3. Now, click the «Transfer» button to start transferring photos from your iPhone to PC. The transfer time depends on the file size. Wait patiently
How to Transfer Photos from iPhone to PC for Free via File Explorer
File Explorer, a file manager application for PCs, also does an excellent job transferring photos and videos between mobile phones and computers. It doesn’t require an internet connection and has no restrictions on the number of photos you can transfer.
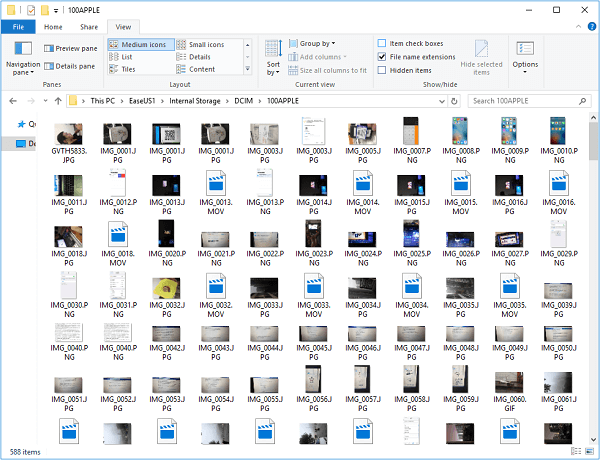
The only drawback of this way is that if you want to transfer photos selectively, you have to spend much more time selecting the items since all images and videos are stored in the folder in an unorganized way.
To transfer photos from iPhone to PC via File Explorer:
Step 1. Connect your iPhone to your PC via a USB cable.
Step 2. Open File Explorer on your computer. If you’re using Windows 8 or Windows 10, you can open it by pressing Windows key + E.
Step 3. Click on «This PC» in the sidebar. Then you will see your iPhone under «Devices and drives.» If you’re using Windows 7, then your iPhone is under «Computer.»
Step 4. Double-click your iPhone’s name and then click on «Internal Storage» then DICM.
Step 5. Find the folder that holds the photos you’d like to import and drag (copy) them to the folder you want to house them.
How to Transfer Photos from iPhone to PC with the Windows 10 Photos App
The Photos app is a free photo viewer and editor included with Windows 10. With it, you can free to view and manage photos on your computer or an external device. Only a USB is needed for this method.
To transfer iPhone pictures to a PC with Windows 10 Photos app:
Step 1. Open Photos on your PC from the Start Menu, desktop, or taskbar. Meanwhile, connect your iPhone to your PC.
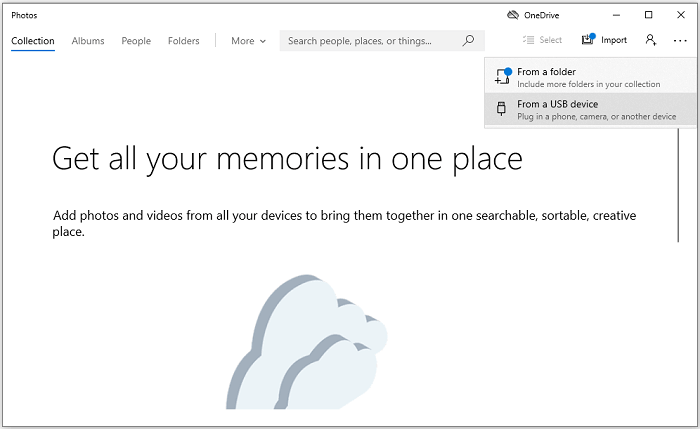
Step 2. Click «Import» in the upper-right corner.
Step 3. Click «From a USB device.»
Step 4. Choose the photos you’d like to import.
Step 5. Click «Continue.»
How to Transfer Photos from iPhone to PC via iCloud Wirelessly
iCloud for Windows is another application that is worth a try. Before making use of this application, several things should be noted:
- Make sure you’ve installed the iCloud application on your computer
- Make sure both your iPhone and computer have connected to a stable internet
- Make sure your iCloud has enough storage
To transfer photos from iPhone to PC via iCloud:
Step 1. First of all, you’ll need to enable iCloud Photo Library on your iPhone.
- Go to your Settings.
- Tap [your name].
- Tap «Photos.»
- Enable «iCloud Photo Library.»
Step 2. Then you can download photos from iCloud to your PC.
- Open the iCloud Control Panel on your computer.
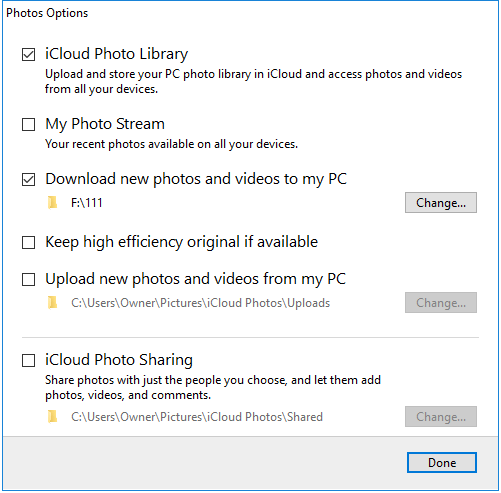
- Click «Options» next to Photos.
- Tick the box next to «iCloud Photo Library» and «Download new photos and videos to my PC.»
- Go to your computer to check the photos and videos from your iPhone.
If you didn’t install the iCloud Control Panel on your computer, you could go to the iCloud website to get the job done as well.
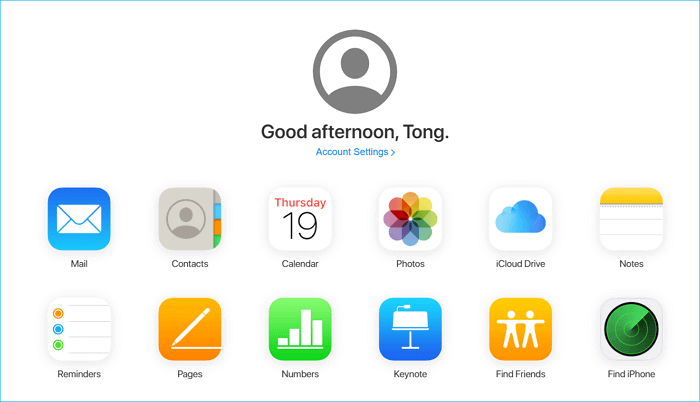
Step 1. Go to iCloud.com on your computer and sign in with your Apple ID and password.
Step 2. Select «Photos» to view all photos stored in your iCloud.
Step 3. Choose and download the items to your PC.
How to Transfer iPhone Photos to PC via iTunes
iTunes is also free software to transfer photos from iPhone to PC. But the images you backed with iTunes are not viewable unless restoring them to your iPhone or iPad, which will erase your current data on the iPhone.
Step 1. Plug your iPhone into the computer with a USB cable, then launch iTunes.
Step 2. Find the device icon on the menu and click the «Photos» tab under the Settings section.
Step 3. From the right side of iTunes, tick «Sync Photos.»
Step 4. Select «all photos and album» or specific files and click «Apply.»
Step 5. Wait for the syncing process to complete, and then click «Done.»
Step 6. Then, you can find your backup on the computer.
The Bottom Line
We hope you have successfully transferred photos from iPhone to PC with the five apps we offered in this post. If you have any questions about this topic, then you can contact us to help you out. During the process of transferring, you may meet data loss. If that unfortunately happens, don’t forget to find the lost photos back.
FAQ on Free Software to Transfer Photos from iPhone to PC
For more information about free software to transfer photos from iPhone to PC, check the following questions that people also asked.
1. Why can’t I transfer photos from iPhone to PC?
You are not allowed to transfer photos from iPhone to PC if you are only storing a smaller preview of your images on the iPhone. Your photos are actually stored on iCloud.
2. What is the fastest way to transfer photos from iPhone to PC?
Connect your iPhone to a PC with a USB cable and then follow the steps below:
- Unlock your phone and turn it on. In the event that the device is locked, your PC cannot locate it.
- On your PC, select the Start button > Photos to open it.
- Select Import > From a USB device, then follow the instructions.
3. How do I transfer large amounts of photos between iPhones?
It is strongly recommended to use an iCloud backup to transfer photos from an old iPhone to a new iPhone.
When it comes to choosing a suitable transfer software, there are three key factors that should be taken into consideration: transfer speed, photo quality, and storage space. A fast transfer speed can significantly reduce the waiting time; More photo quality choices enable you to transfer photos without losing quality; Unlimited free storage brings great convenience for transferring large photos.
It is hard to find one that can meet all your requirements, but you can choose the one that most matches your needs. If you’re looking for such a tool, here are some best free software worth a try!
How to Transfer Photos from iPhone to PC via EaseUS MobiMover
EaseUS MobiMover is the first utility we recommend. With this light iPhone data transfer tool, you can easily get all or part of the photos moved to a PC with several clicks. The best part of this tool is that it has no restrictions on the number of photos you can transfer and has no internet requirement. This undoubtedly makes the transfer process incredibly easy and convenient.
Beyond that, it has many other outstanding features:
- Easy to use
- Good transfer speed
- Unlimited storage (This depends on your computer’s storage space)
- No quality loss
- No internet required
Besides, it is also a good option if you’re struggling to copy photos from iPhone to iPhone. Now, you can free download it on your computer and start to transfer photos.
Step 1. Connect your iPhone to PC running Windows 7 or later. Run EaseUS MobiMover, choose «Phone to PC» and click the «Next» button on the screen. This mode allows you to transfer data from iPhone to PC in one click.
Step 2. MobiMover supports transferring audio, videos, pictures, books, contacts, messages, etc. from iPhone to PC. Here, choose «Pictures» only. MobiMover will save the files on your desktop by default. You can customize the path as you need.
Step 3. Now, click the «Transfer» button to start transferring photos from your iPhone to PC. The transfer time depends on the file size. Wait patiently
How to Transfer Photos from iPhone to PC for Free via File Explorer
File Explorer, a file manager application for PCs, also does an excellent job transferring photos and videos between mobile phones and computers. It doesn’t require an internet connection and has no restrictions on the number of photos you can transfer.
The only drawback of this way is that if you want to transfer photos selectively, you have to spend much more time selecting the items since all images and videos are stored in the folder in an unorganized way.
To transfer photos from iPhone to PC via File Explorer:
Step 1. Connect your iPhone to your PC via a USB cable.
Step 2. Open File Explorer on your computer. If you’re using Windows 8 or Windows 10, you can open it by pressing Windows key + E.
Step 3. Click on «This PC» in the sidebar. Then you will see your iPhone under «Devices and drives.» If you’re using Windows 7, then your iPhone is under «Computer.»
Step 4. Double-click your iPhone’s name and then click on «Internal Storage» then DICM.
Step 5. Find the folder that holds the photos you’d like to import and drag (copy) them to the folder you want to house them.
How to Transfer Photos from iPhone to PC with the Windows 10 Photos App
The Photos app is a free photo viewer and editor included with Windows 10. With it, you can free to view and manage photos on your computer or an external device. Only a USB is needed for this method.
To transfer iPhone pictures to a PC with Windows 10 Photos app:
Step 1. Open Photos on your PC from the Start Menu, desktop, or taskbar. Meanwhile, connect your iPhone to your PC.
Step 2. Click «Import» in the upper-right corner.
Step 3. Click «From a USB device.»
Step 4. Choose the photos you’d like to import.
Step 5. Click «Continue.»
How to Transfer Photos from iPhone to PC via iCloud Wirelessly
iCloud for Windows is another application that is worth a try. Before making use of this application, several things should be noted:
- Make sure you’ve installed the iCloud application on your computer
- Make sure both your iPhone and computer have connected to a stable internet
- Make sure your iCloud has enough storage
To transfer photos from iPhone to PC via iCloud:
Step 1. First of all, you’ll need to enable iCloud Photo Library on your iPhone.
- Go to your Settings.
- Tap [your name].
- Tap «Photos.»
- Enable «iCloud Photo Library.»
Step 2. Then you can download photos from iCloud to your PC.
- Open the iCloud Control Panel on your computer.
- Click «Options» next to Photos.
- Tick the box next to «iCloud Photo Library» and «Download new photos and videos to my PC.»
- Go to your computer to check the photos and videos from your iPhone.
If you didn’t install the iCloud Control Panel on your computer, you could go to the iCloud website to get the job done as well.
Step 1. Go to iCloud.com on your computer and sign in with your Apple ID and password.
Step 2. Select «Photos» to view all photos stored in your iCloud.
Step 3. Choose and download the items to your PC.
How to Transfer iPhone Photos to PC via iTunes
iTunes is also free software to transfer photos from iPhone to PC. But the images you backed with iTunes are not viewable unless restoring them to your iPhone or iPad, which will erase your current data on the iPhone.
Step 1. Plug your iPhone into the computer with a USB cable, then launch iTunes.
Step 2. Find the device icon on the menu and click the «Photos» tab under the Settings section.
Step 3. From the right side of iTunes, tick «Sync Photos.»
Step 4. Select «all photos and album» or specific files and click «Apply.»
Step 5. Wait for the syncing process to complete, and then click «Done.»
Step 6. Then, you can find your backup on the computer.
The Bottom Line
We hope you have successfully transferred photos from iPhone to PC with the five apps we offered in this post. If you have any questions about this topic, then you can contact us to help you out. During the process of transferring, you may meet data loss. If that unfortunately happens, don’t forget to find the lost photos back.
FAQ on Free Software to Transfer Photos from iPhone to PC
For more information about free software to transfer photos from iPhone to PC, check the following questions that people also asked.
1. Why can’t I transfer photos from iPhone to PC?
You are not allowed to transfer photos from iPhone to PC if you are only storing a smaller preview of your images on the iPhone. Your photos are actually stored on iCloud.
2. What is the fastest way to transfer photos from iPhone to PC?
Connect your iPhone to a PC with a USB cable and then follow the steps below:
- Unlock your phone and turn it on. In the event that the device is locked, your PC cannot locate it.
- On your PC, select the Start button > Photos to open it.
- Select Import > From a USB device, then follow the instructions.
3. How do I transfer large amounts of photos between iPhones?
It is strongly recommended to use an iCloud backup to transfer photos from an old iPhone to a new iPhone.
Семь бесплатных способов для разных ОС и на все случаи жизни.

1. Как перекинуть фото и видео с iPhone на компьютер по AirDrop
- Подходит для macOS.
Быстрый и очень простой способ передачи данных. Благодаря отсутствию ограничений на размер файлов одинаково хорош как для фото, так и для видео. iPhone, как и все iOS‑устройства, поддерживает функцию AirDrop, однако совместимость с этой технологией должен иметь и компьютер. Поэтому перекинуть медиафайлы так можно только на Mac.

Отметьте нужные фото и видео в стандартной галерее iOS, а затем тапните по кнопке «Поделиться». Выберите свой компьютер в списке предложенных или в меню AirDrop.
Через пару секунд (или минут, если файлов много) фото и видео появятся в папке «Загрузки» на Mac.
2. Как перенести фото и видео с iPhone на компьютер через «iCloud Фото»
- Подходит для macOS, Windows и Linux.
Если вы пользователь Apple One или имеете другую подписку, предоставляющую дополнительное место в iCloud, то функция «iCloud Фото» — один из самых удобных способов передачи. После включения синхронизации медиафайлы будут доступны в приложении «Фото» на Mac или в браузере на ПК с Windows и Linux.

Откройте системные настройки и перейдите в Apple ID → iCloud.

В разделе «Фото» включите тумблер «Фото iCloud» и подождите немного. Обратите внимание, что в облаке должно быть достаточно свободного места для выгрузки всех файлов. В противном случае будет доступна только часть из них — те, что поместятся.
В любом браузере на компьютере откройте iCloud, войдите в свой аккаунт и нажмите на «Фото».
Выделите нужные снимки или ролики, кликните по кнопке расширенного меню и выберите «Другие параметры загрузки».
Укажите один из вариантов и кликните «Загрузить». При выборе оригиналов файлы появятся в форматах HEIF и HEVC, при выборе наиболее совместимых форматов произойдёт конвертация в PNG и MP4 H.264.
3. Как перекинуть фото и видео с iPhone на компьютер через импорт изображений в Windows
- Подходит для Windows.
Когда нужно скопировать с iPhone большое количество фото и видео на Windows‑компьютер, удобнее всего воспользоваться встроенной утилитой импорта медиафайлов с цифровых камер и других носителей. Понадобится лишь кабель Lightning.
Подсоедините iPhone к ПК с помощью шнура и одобрите подключение на обоих устройствах.
В меню «Этот компьютер» в разделе «Устройства и диски» выполните правый клик по элементу Apple iPhone и выберите «Импорт изображений и видео».
Откройте «Дополнительные параметры».
Укажите папки, куда следует сохранить фото и видео, при желании задайте шаблон имени и включите опцию удаления файлов с iPhone после импорта.
Кликните «Выделить всё» или отметьте только нужные фото и видео, после чего нажмите «Импорт».
Дождитесь окончания процесса и просмотрите готовые файлы в папке.
4. Как перенести фото и видео с iPhone на компьютер через «Захват изображений»
- Подходит для macOS.
Подобная утилита также входит в состав macOS. Как и Windows‑аналог, она предназначена для импорта фото и видео с камер. Процесс переноса довольно прост и требует лишь кабеля Lightning.
Запустите «Захват изображений» через поиск Spotlight или из папки «Программы» в Finder.
Подключите iPhone к Mac с помощью кабеля, а затем разрешите доступ к данным на обоих устройствах.
Укажите папку, куда следует перенести файлы. При желании включите опцию «Удалить после импорта».
Отметьте нужные фото и видео и кликните «Загрузить» либо просто «Загрузить все». Дождитесь окончания процесса. Обратите внимание: если какие‑то из медиафайлов уже есть на компьютере, они будут помечены зелёной галочкой.
5. Как перекинуть фото и видео с iPhone на компьютер через облачные хранилища
- Подходит для macOS, Windows и Linux.
Ещё один вариант беспроводного способа передачи файлов — облачные хранилища. Практически в каждом из них есть функция автоматической синхронизации галереи, но даже если вам нужно разово перекинуть фото и видео с iPhone, этот способ подходит прекрасно. Можно использовать любой сервис, например Mega с 20 ГБ бесплатного пространства.
Зарегистрируйте бесплатный аккаунт Mega и установите мобильное приложение по ссылке выше.

В Mega на iPhone откройте любую папку, коснитесь кнопки «плюс», а затем «Выбрать из „Фото“».

Укажите необходимые файлы, тапните «Загрузить» и дождитесь окончания процесса.
Откройте облако в браузере на компьютере. Найдите свои фото или видео, выделите их и кликните кнопку загрузки.
Через несколько секунд или минут в зависимости от количества файлов они появятся в папке загрузок.
6. Как перенести фото и видео с iPhone на компьютер через Telegram
- Подходит для macOS, Windows и Linux.
Все современные мессенджеры поддерживают отправку фото и видео без сжатия, поэтому тоже вполне подходят, чтобы перекинуть медиафайлы с iPhone на компьютер. Рассмотрим процесс на примере Telegram, но по сути шаги будут теми же и в других мессенджерах.
Telegram Desktop →
Установите приложение, если у вас его нет.

Зайдите через поиск в «Избранное» в Telegram на iPhone и тапните по иконке со скрепкой.

Отметьте фото и видео, которые нужно перекинуть, а затем коснитесь кнопки расширенного меню и выберите «Отправить как файлы».
Откройте Telegram на компьютере или в браузере и зайдите в «Избранное» из строки поиска.
Кликните по медиафайлам, чтобы загрузить их на диск. Они появятся в папке «Загрузки».
7. Как перекинуть фото и видео с iPhone на компьютер по имейлу
- Подходит для macOS, Windows и Linux.
Если файлов немного, а вам совсем не хочется возиться со сторонними приложениями и сервисами, то старую добрую почту никто не отменял. У вас определённо есть ящик, привязанный к Apple ID. Так что остаётся лишь отправить фото и видео самому себе, после чего открыть их на компьютере и сохранить.

В приложении «Фото» отметьте нужные медиафайлы, а затем откройте меню «Поделиться» и выберите «Почту».

Введите в поле «Кому» свой собственный почтовый адрес, тапните «Отправить» и выберите вариант «Фактически» для передачи оригиналов без сжатия.
Зайдите в почту на компьютере, кликните по кнопке со скрепкой для скачивания вложений и выберите «Сохранить все».
Укажите папку, куда будут загружены файлы, и нажмите «Сохранить».
Читайте также 📲📴
- Что установить на новый iPhone или iPad
- Как посмотреть, сколько памяти осталось на iPhone
- Как скинуть видео с компьютера на iPhone
- Как удалить один, несколько или все контакты на iPhone
- 16 способов очистить Mac от всего лишнего
Перенос фотографий с iPhone на компьютер
-
Сначала подключите iPhone к компьютеру с помощью USB-кабеля, который позволяет передавать файлы.
-
Включите телефон и разблокируйте его. Ваш компьютер не сможет обнаружить ваше устройство, если оно заблокировано.
-
На компьютере нажмите кнопку Пуск , а затем выберите Фотографии , чтобы открыть приложение «Фотографии».
-
Выберите Импорт > С USB-устройства и следуйте инструкциям. Вы можете выбрать элементы для импорта и папку для их сохранения. Подождите некоторое время для завершения обнаружения и передачи.
-
-
Убедитесь, что фотографии, которые вы хотите импортировать, на самом деле находятся на устройстве, а не в облаке. Затем выполните действия, соответствующие типу вашего устройства.
См. раздел «Импорт фотографий и видео с телефона на компьютер»
Нужна дополнительная помощь?
Каждый пользователь гаджетов компании Apple тесно знаком с программой iTunes, с помощью которой выполняется синхронизация данных между устройством и компьютером. К сожалению, iTunes, особенно, говоря о версии для Windows, не самый удобный, стабильный и быстрый инструмент, в связи с чем данной программе появились достойные альтернативы.
iTools
Пожалуй, один из лучших аналогов iTunes, наделенный большим спектром возможностей. Программа обеспечивает простую и быструю синхронизацию iPhone с компьютером, позволяя легко переносить данные как с вашего портативного устройства, так и на него.
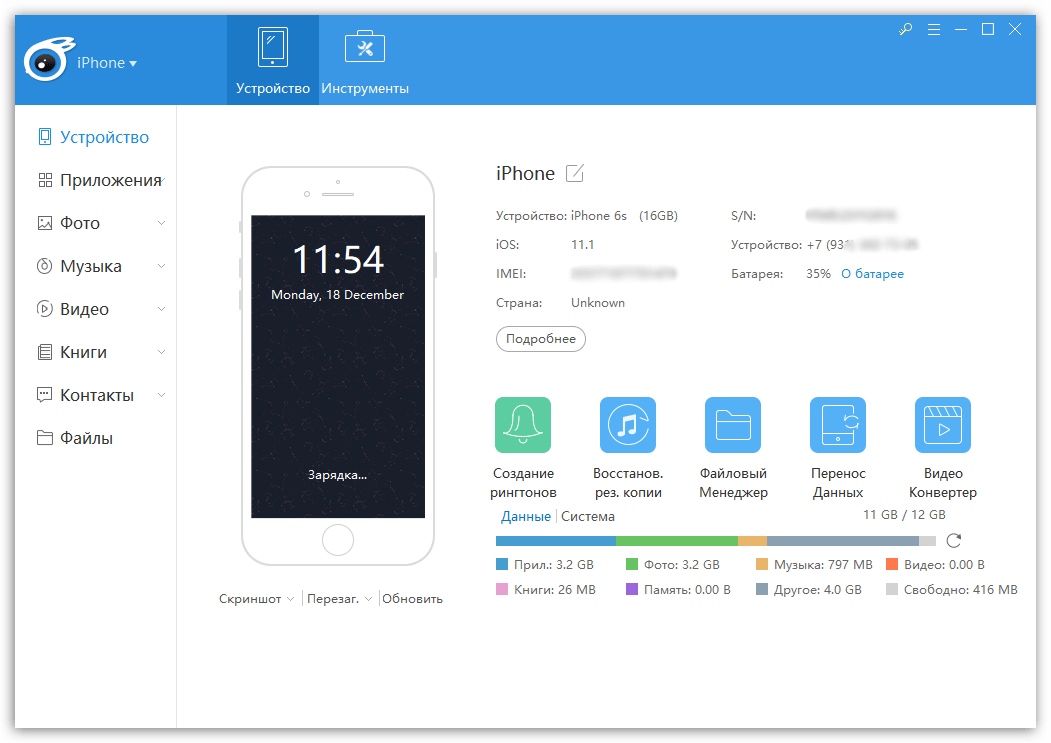
Помимо этого, имеются и другие интересные возможности, как, например, запись видео с экрана вашего устройства, функции файлового менеджера, встроенное средство для удобного создания рингтонов с последующим переносом их на устройство, восстановление из резервной копии, конвертер видео и многое другое.
Скачать iTools
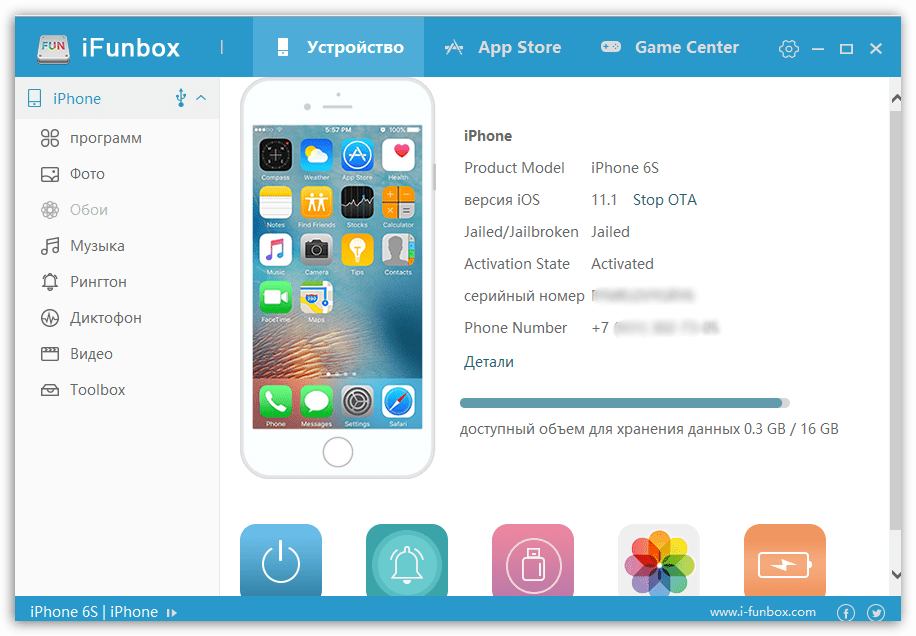
iFunBox
Качественный инструмент, который сможет составить серьезную конкуренцию iTunes. Здесь все интуитивно понятно: чтобы удалить файл из программы, его следует выделить, а затем выбрать иконку с корзиной. Чтобы перенести файл, его можно либо перетащить в главное окно, либо выбрать кнопку «Import».
В программу включен раздел «App Store», из которого вы можете искать игры и приложения, а затем устанавливать их на гаджет. В iFunBox присутствует поддержка русского языка, но она здесь частичная: некоторые элементы имеют английскую и даже китайскую локализацию, но, будем надеяться, данный момент вскоре разработчиками будет доработан.
Скачать iFunBox
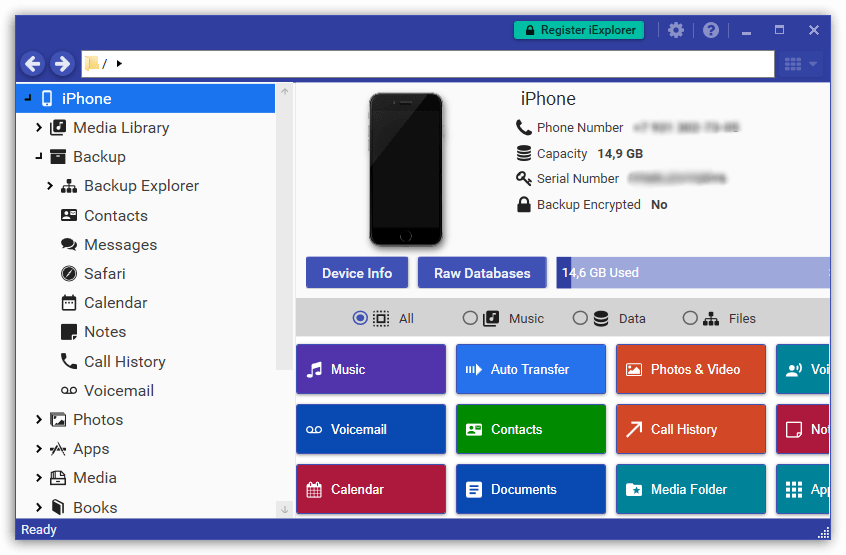
iExplorer
Платный, но полностью оправдывающий свою стоимость инструмент для синхронизации iPhone с компьютером, который позволяет комплексно работать с медиабиблиотекой, создавать и восстанавливать резервные копии.
Программа имеет простой, интуитивно понятный интерфейс, который, к сожалению, не наделен поддержкой русского языка. Приятно и то, что разработчики не стали делать из своего продукта «швейцарский нож» – он рассчитан исключительно на синхронизацию данных и работу с резервными копиями, благодаря чему интерфейс не перегружен, а сама программа работает довольно быстро.
Скачать iExplorer
iMazing
Amazing! Без этого яркого слова не обходится ни одна презентация Apple, и именно так и характеризуют свое детище разработчики iMazing. Программа выполнена по всем канонам Apple: имеет стильный и минималистичный интерфейс, даже начинающий пользователь сразу поймет, как с ней работать, а также это единственный экземпляр из обзора, оснащенный полной поддержкой русского языка.
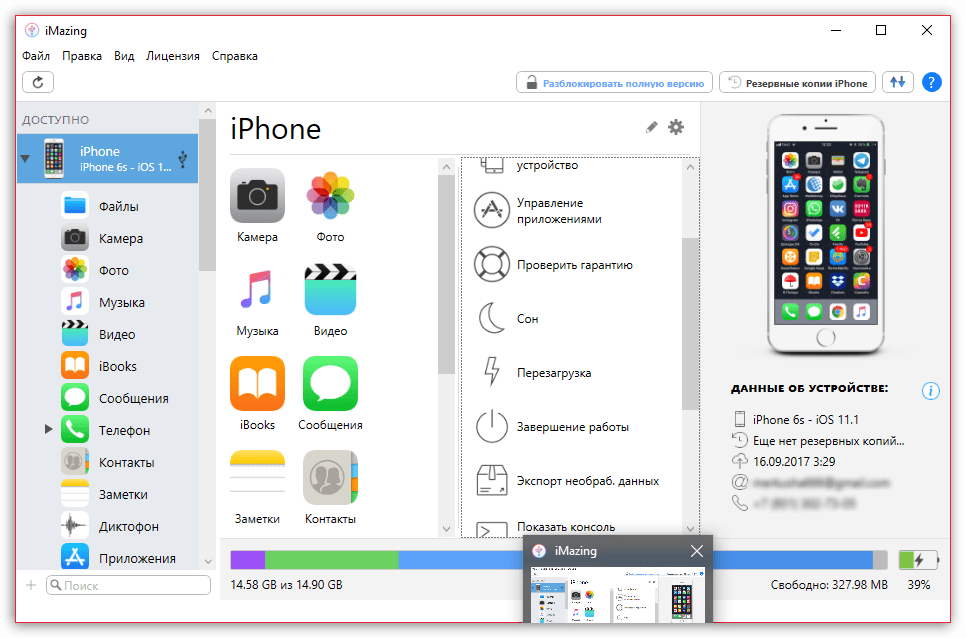

iMazing наделена такими возможностями, как работа с резервными копиями, управление приложениями, музыкой, фото, видео и другими данными, которые можно как переносить на устройство, так и удалять с него. С этой программой вы сможете проверить гарантию гаджета, выполнять полную очистку устройства, управлять данными через файловый менеджер и многое другое.
Скачать iMazing
Если у вас по каким-либо причинам не срослась дружба с iTunes, среди представленных выше аналогов вы сможете найти достойную альтернативу этой программе, чтобы удобно выполнять синхронизацию яблочного устройства с компьютером.