Здравствуйте, сегодня я расскажу об установке BMW standart tools как это делал я.
Полный размер
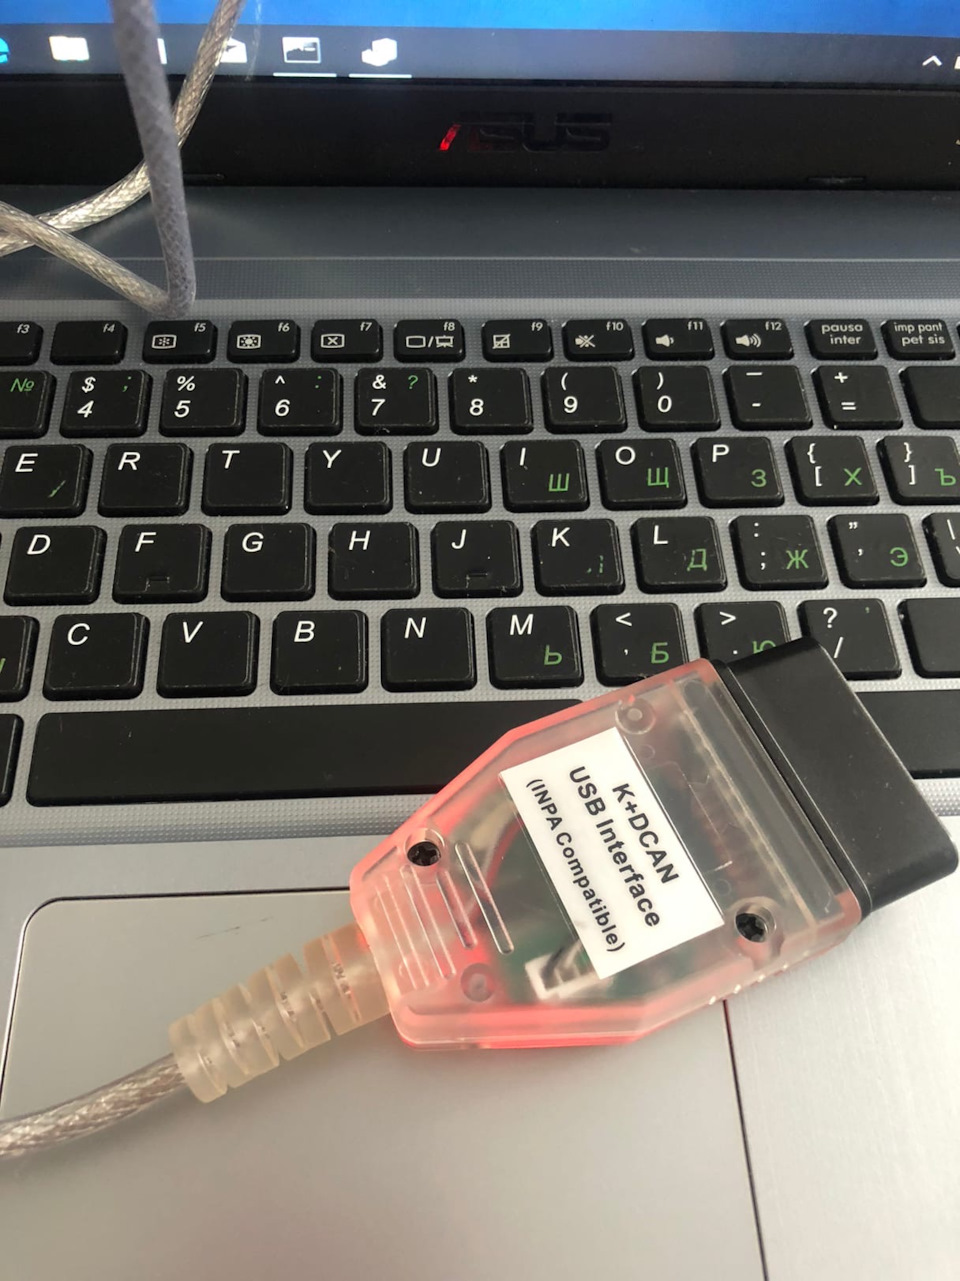
Понадобится вот такой вот шнурок с алиэкспресс.
Скачайте архивы:
Сама IMPA
Драйвер для шнурка.
Русик
Разархивируем BimmerGeeks Standard Tools. В папке находим St212.exe, правой кнопкой на нем и выбираем «исправление проблем с совместимостью»
Система может ругнуться, тогда ещё раз повторите действие или нажмите проверка программы и установка пойдёт. По умолчанию установка пойдёт на диск ц. Так и оставляйте. Потом перенесёте куда удобно.
Во время установки жмём далее и оставляем всё по умолчанию, кроме окошка где предлагают создать бэкап и ярлыки на рабочем столе, тут снимаем все флажки.
По окончанию установки нам предлагают перезагрузить систему, отказываемся. Установка завершена.
Далее идём на диск C: там находим папочки EC-APPS, EDIABAS & NCSEXPER и заменяем их папками EC-APPS, EDIABAS & NCSEXPER из архива BimmerGeeks Standard Tools.
Далее в архиве BimmerGeeks Standard Tools находим папку OCX там находим 3 файлика и копируем их в C:WindowsSyswow64 с заменой.
Теперь нам нужно открыть командную строку. Для этого в поиске windows вводим cmd кликаем на ярлычке командной строки правой кнопкой мыши и запускаем её от имени администратора.
В командной строке печатаем cd c: windows syswow64
(Нажмите Ввод)
regsvr32 mscomctl.ocx
(Нажмите Enter и дождитесь сообщения «Регистрация прошла успешно»)
regsvr32 msflxgrd.ocx
(Нажмите Enter и дождитесь сообщения «Регистрация прошла успешно»)
regsvr32 comdlg32.ocx
(Нажмите Enter и дождитесь сообщения «Регистрация прошла успешно»)
Это должно выглядеть так:
Поместите значок BMW из папки BimmerGeeks Standard Tools на рабочий стол. Ярлыки на все программное обеспечение находятся внутри.
Далее нам понадобится настроить наш шнурок, идём в диспетчер устройств. Открываем вкладку Порты(COM и LTP) Выбираем USB Sireal port (COM3) заходим в свойства, дополнительные параметры и меняем COM3 на COM1 а также время отклика (мсек) на 1. Возможно понадобится установить драйвер, тогда разархивируем архив с драйвером в любое удобное место, в настройках порта жмём обновить драйвер и указываем путь к папке.
При желании можно установить русик, тогда кидаем папки из архива на наш диск с: с заменой файлов.
Этот способ установки INPA на ноут с десяткой показался максимально удобным и быстрым. Если возникнут вопросы пишите.

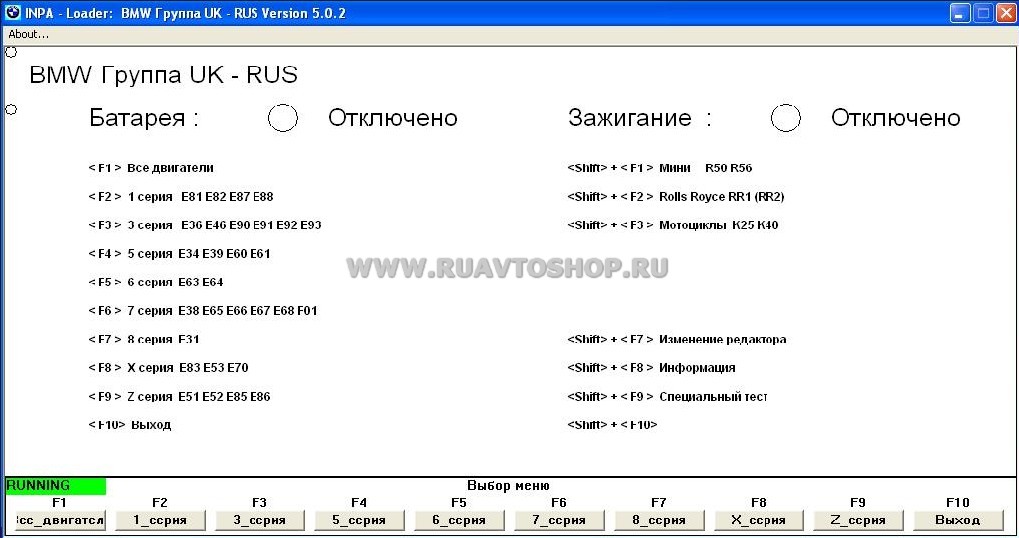
BMW INPA EdiaBas — программный комплекс для профессиональной программирования ЭБУ, кодирования и диагностики BMW, Rolls Royce и Mini.
Данный сканер может получить доступ к любому ЭБУ. Использование в BMW INPA EdiaBas чтения параметров в реальном времени позволяют проконтролировать любой исполняющий механизм.
Перечень автомобилей, поддерживаемых интерфейсом OBD BMW INPA: E36 (некоторые), E38, E39, E46, E52, E53, E60, E65, E83, E85, E87, E90, Mini R50, Rolls Royce RR1.
Модели, поддерживаемые интерфейсом BMW INPA ADS: E31, E32, E34, E36.
Модели, поддерживаемые интерфейсом BMW INPA D-Can: E60, E61 с 03/2007; E83 с 09/2006; E81, E87 с 03/2007; E90, E91, E92, E93 с 03/2007; E70; R56.
Поддерживаемые BMW INPA ЭБУ: все модели BMW, кроме F-серии. Начиная с F-серии можно использовать Rheingold.
Минимальные системные требования настолько незначительны, что программу можно запустить на самых слабых ноутбуках:
- Операционная система Windows® 98 / 2000 / XP / VISTA (в режиме совместимости с XP) / Windows 7 (в режиме совместимости с XP)
- Процессор не ниже Intel Pentium-II® 300МГц
- Оперативная память от 64Мб
- Свободное место на диске 400Мб
- COM-порт или USB-порт
Если вы ставите BMW INPA EdiaBas на виртуальную машину, то всё равно, какая у вас система, хоть Windows 10: главное иметь WMware определённой версии, способной работать с образом виртуальной машины.
- Чтение и удаление кодов неисправностей
- Кодирование ЭБУ
- Считывание параметров в реальном времени
- Эмуляция работы различных ЭБУ
- Считывание содержимого памяти ЭБУ
- Активация исполнительных механизмов
- Активация/деактивация инженерных функций
Установка BMW INPA EdiaBas
Установка зависит от выбранной версии. Ниже есть как чистые установщики (самостоятельная настройка), либо же VMware-версия с уже настроенными параметрами. В целом, выбор той или иной версии зависит от вашего мастерства. Так же стоит учесть, что эмулятор работает медленнее и потребляет больше ресурсов ноутбука, поэтому на медленных или старых устройствах рекомендуем ставить обычную версию (не VMware).
Скачать BMW INPA EdiaBas (+ .torrent)
Версия 5.0.2
В VMware-версии присутствует WDS (Wiring Diagram System) и TIS (Technical Information System). В раздаче так же присутствует SP-DATEN.iso весом 18Гб (качаете по необходимости, зачем нужен — читаем тут).
Установка WMware-версии:
- Устанавливаете VMware Workstation v10
- Зайдите в папку, куда скачивали раздачу, нажимаете Свойства (правой кнопкой мыши на папку), нажимаете на папку правой кнопкой, и в открытом окне снимаете галочку «Только для чтения»
- Запускаете VMware Workstation v10
- Выбираете пункт «Открыть виртуальную машину»
- Указываете путь до скачанной папки
- Запускаете образ
- Ждёте полной загрузки системы
- Подключаете DCAN к автомобилю и к устройству
- Запускаете Inpa с рабочего стола
- Обратите внимание на статус зажигания: должен появиться значок батареи
Если текущий статус «Отключено» — значит виртуальная машина не видит DCAN или в автомобиле отсутствует питание на разъеме (не включено зажигание).
Установка обычной версии подробно описана тут в двух PDF-файлах.
Версия 5.0
Подробная установка WMware-версии показана на видео ниже:
2.5 10 votes
Рейтинг статьи

cloud.mail.ru/public/HiF4/gP6vLPU9F
!Ссылка рабочая на 16.12.17!
.
.
.
Часто люди ищут и спрашивают про русификатор.рабочую INPA так же рабочую DIS 57 и весь софт! Все рабочее все диагностирует кодирует вшивает обнуляет запускает стирает читает выключает ахахаха
Закреплю это здесь полюбому кому то пригодится, скачиваем архив с облака и распаковываем, внутри все подробно написанно как установить и т.д. в каждой папке есть инструкция по установке как и самой inpa так и всех обновлений и русификатора!
Price tag: 0 ₽
Only registered users can participate in discussions.
All Comments
Да, программное обеспечение INPA работает с BMW серии Fxx, если у вас установлены файлы Fxx .IPO.
Программа будет использовать интерфейс, который вы указали в файле EDIABAS.ini, поэтому лучше иметь в своем распоряжении кабель BMW ENET.
А также, определенно сканер ICOM A2.
Программа INPA 5.06 со скриптами для серии Fxx:

INPA не обновляет прошивки SP=Daten, поскольку программа использует только файлы .PRG в комплексе EDIABAS и свои собственные файлы .iPO.
Здесь вы найдете полную версию программы INPA, в том числе для работы с BMW серий F и E, но никто, кроме вас, не несет ответственность за последствия ваших действий.
Загрузить полную версию INPA на Mega (под Вашу ответственность) можно по ссылке:
Установите в первую очередь программу BMW Standard Tools 212, которая включает в себя:
· EDIABAS v.7.30, Tool32 v.4.03, INPA v.5.06, WinKFP v.5.31 и NCS Expert v.4.01.
Затем установите INPA_Fxx_v.2:
- Скопируйте папку с программой INPA_Fxx_v.2 в C:EC-AppsINPA_Fxx_v.2 and EDIABAS, в C:EDIABAS, перезаписав существующую папку EDIABAS.
- Запустите файл INPALOAD.exe в папке INPA_Fxx_v.2 BIN (C:EC-AppsINPA_Fxx_v.2BININPALOAD.exe).
- Замечание: ОТКЛЮЧИТЕ БРАНДМАУЭР WINDOWS И АНТИВИРУСНУЮ ПРОГРАММУ.
- Замечание: для подключения программы диагностики BMW версии Exx необходимо заменить файл EDIABAS.ini
на «INTERFACE = STD:OBD» и отредактировать настройки СОМ-порта OBD.ini, чтобы они соответствовали настройкам СОМ-порта вашего ПК.
Экспресс-диагностика с программой inpa становится значительно проще и быстрее по сравнению с ista/d…., в том числе с точки зрения поиска zb-numbers …
03.05.2017
BMW INPA 5.0.2 — профессиональная программа для диагностики, кодирования и программирования автомобилей марок BMW, Mini, Rolls Royce. База BMW EdiaBas Inpa включает в себя такие подпрограммы как INPA, NCS-Expert tool, Tool32, WinKFP. Сборка полностью проверенная и рабочая. Поддерживается прибором BMW Inpa.
BMW INPA скачать
1) устанавливаем «dotNetFx40_Full_x86_x64» из папки «net framework 4.0»

2) устанавливаем галочку «Я прочитал и принимаю условия лицензионного соглашения» и нажимаем кнопку «Установить»

3) нажимаем «Готово»

4) Заходим в папку «Programminstallation» и находим файл «setup»

5) если установлен Windows 7 нажимаем на файл правой кнопкой и выбираем «Свойства», идем в раздел «Совместимость» и ставим галочку «Запустить программу в режиме совместимости с:» и нажимаем «Ок»

6) запускаем файл «setup» выбираем язык и нажимаем «Ок»

7) нажимаем «Next»

 ставим точку «i accept the agreement» и нажимаем «Next»

9) нажимаем «Next»

10) нажимаем «Next»

11) нажимаем «Next»

12) нажимаем «Next»

13) нажимаем «Next»

14) нажимаем «Next»

15) нажимаем «Next»

16) нажимаем «Next»

17) нажимаем «Next»

18) нажимаем «Next»

19) нажимаем «Install»

20) нажимаем «Skip» в следующих окнах


21) выбираем «Yes, restart the computer now» жмем «Finish» и ждем перезагрузки компьютера

22) заходим в папку «Referenz.2005INSTALL» и запускаем файл «Instprog»

23) нажимаем «Ок»

24) выбираем язык и нажимаем «Continue»

25) нажимаем «Continue»

26) нажимаем «Continue»

27) выбираем «BMW Group Rectification programs UK» и жмем «Continue» (на этом шаге может выбивать ошибку, нам помогло убрать пробел в названии папки с программой, было «Inpa 5.02» переименовали на «Inpa502»)

28) установить галочки напротив EDIABAS, INPA, NCS expert и нажимаем «Continue»

29) нажимаем «Continue»

30) нажимаем «Continue»

31) нажимаем «End»

32) запускаем «Referenz_Apr_2006» из папки «Referenz.2006»

33) ждем конец распаковки

34) повторяем все действия с 23 по 30 пункты и нажимаем «End»

Установка драйверов для BMW INPA:
35) отключить Windows Update, если он будет выключен, то установятся не те драйвера

36) подключаем BMW INPA, видим драйвера не были установлены

37) заходим в диспетчер устройств

38) нажимаем правой кнопкой и «Обновить драйверы…»

39) нажимаем «Выполнить поиск драйверов на этом компьютере»

40) Выбираем папку с драйверами «CDM v2.10.00 WHQL Certified» и нажимаем «Далее»

41) после установки в диспетчере появится новое устройство, с не установленными драйверами

42) выполняем с этим же устройством пункты 38-40. После установки появилось новое устройство USB Serial Port (COM3)

43) Заходим с «Свойства» порта через правую кнопку

44) заходим в раздел «Параметры порта» и нажимаем кнопку «Дополнительно…»

45) выставляем в настройках порт который был выбран в 18 пункте (это не обязательно должен быть COM1, главное что бы они совпадали в 18 и 45 пункте), так же выставляем «Время ожидания (мсек)» значение «1»

Теперь программа полностью готова к работе!
Если нету каких-то моделей, можно изменить главное меню программы (взято на форуме bmwpost.ru)
Вопрос:
«где скачать? дайте линку, чтобы e46 был…. плиз. Какая версия инпы должна быть? 5.0.1 или 5.0.2? от чего зависит есть или нет e46 в инпе? можно в 5.0.2 где нет e46, как-то дописать копированием файлов, чтобы e46 был?»
Ответ:
Откройте файл C:EC-APPSINPACFGDATinpa.ini, и там пишите, что вам надо…
Пример:
//************************************************** ********************
//*
//* Nacharbeitsauswahl INPA
//*
//* Datei INPA.INI
//*
//************************************************** ********************
//* Gall TI-430
//************************************************** ********************
[INFO]
VERSION = 5.01
DATUM = 28.03.2006
VARIANTE = ENGLISH.MET
[ENVIRON]
DRUCKER = WIN
PEM = JA
LANGUAGE = ENGLISCH
[SCRIPT]
EDITOR = WIN
SCRIPTSELECT = LIST
DEFINI =
[CONFIG]
TITEL = BMW Group Rectification programs UK
F2 = E46
F2_Text = E46
F2_ARCHIV = SGBD_E46
F3 = E53
F3_Text = E53
F3_ARCHIV = SGBD_E53
F4 = E60
F4_Text = E60 (E63, E64) / 5er, 6er
F4_ARCHIV = SGBD_E60
F5 = E65
F5_Text = E65 (E66, E67) / 7er
F5_ARCHIV = SGBD_E65
F6 = E70
F6_Text = E70 (E71, E72) / X5
F6_ARCHIV = SGBD_E70
F7 = E83
F7_Text = E83 / X3
F7_ARCHIV = SGBD_E83
F8 = E85
F8_Text = E85 (E86) / Z4
F8_ARCHIV = SGBD_E85
F9 = Sonder
F9_KNOPF = Special
F9_TEXT = Special tests
F12 = R50
F12_Text = Mini R50 (R52, R53)
F12_ARCHIV = SGBD_R50
F13 = R56
F13_Text = Mini R56 (R55, R57)
F13_ARCHIV = SGBD_R56
F15 = RR1
F15_Text = Rolls Royce RR1 (RR2)
F15_ARCHIV = SGBD_RR1
F17 = E87
F17_Text = E87 (E81, E82, E88) / 1er
F17_ARCHIV = SGBD_E87
F18 = E90
F18_Text = E90 (E91, E92, E93) / 3er
F18_ARCHIV = SGBD_E90
F19 = BMW_ALT
F19_KNOPF = Old F19_TEXT = Old modells
F19_ARCHIV = SGBD_BMW
[EXTRA]
SCRIPTS = *
Пример добавления кузова e46 под клавишу F3:


27.03.2020
Важно! Программное обеспечение является бесплатным только для покупателей данного интернет-магазина!
В данной статье четко и просто прописан каждый шаг, который потребуется выполнить при установке INPA для диагностического оборудования BMW INPA K Dcan. Также практически все действия по установке Inpa 5.0.6 подкреплены иллюстрациями. Что бы выполнить данные шаги Вам понадобиться начальный уровень знания персонального компьютера и пользования Windows.
Важно! Так же в статье будет ссылка, по которой возможно INPA K Dcan скачать бесплатно, но скачанный архив будет под паролем (INPA K Dcan Скачать). Важно! Вы можете приобрести пароль за символическую плату если подпишетесь на аккаунт одной из социальных сетей и напишите в ней просьбу с указанием наименования программного обеспечения, в том числе указывайте версию ПО:
— Instagram: xdiag.by — https://instagram.com/xdiag.by?igshid=tumuxztpoxxw
— VK: Автодиагностика XDIAG.by — https://vk.com/xdiagby
— Facebook: Автосканеры — XDiag.by
Так же Вы сможете попасть в социальные сети нажав соответствующую кнопку внизу страницы с права.
Важно! Если Вы незарегистрированы в социальных сетях, то напишите нам в чат и Вам сообщат стоимость услуги предоставления пароля.
Устанавливать INPA лучше на чистую Windows, которая имеет все сопутствующие компоненты. Иначе у Вас могут возникнуть трудности и решение придётся «Гуглить». Консультация оказывается нашими специалистами на платной основе.
В данном случае установка INPA производилась на операционную систему Windows 10.
1. Откройте папку под названием BMW Inpa с диска или скачанную по ссылке.
2. Вставьте прибор в разъем USB (подключать автосканер BMW Inpa K Dcan к диагностическому разъему автомобиля не требуется).
3. Для начала установим драйверы для BMW Inpa. Запустите приложение DRIVER из папки BMW Inpa.

4. Нажмите кнопку Extract.

5. Произойдет установка и за тем нажмите кнопку Далее.

6. Поставьте точку в строке «Я принимаю это соглашение» и нажмите Далее

7. Выполняется установка драйверов к BMW Inpa и после вы увидите, что два драйвера обновлены (напротив строк с названием должны стоять зеленые птички). Нажмите Готово. Установка Завершена.

8. Открыть диспетчер устройств (в меню поиска ввести диспетчер устройств и открыть его или использовать любой другой метод известный Вам).
9. Во вкладке Порты (COM и LTP) выбрать USB Serial Port (COM3) и нажать правую кнопку мыши или тачпада далее в открывшемся списке выбрать Свойства (нумерация COM port может иметь любую цифру).

10. В открывшемся окне открыть вкладку «Параметры порта» и нажать на кнопку «Дополнительно».

11. Установите номер Com port от 1 до 9. Я рекомендую Вам выбрать номер 9

12. Время ожидания установите 2 мсек и нажмите кнопку «ОК», расположенную в правом верхнем углу окна. Установка драйвера и настройка COM-port для BMW Inpa K Dcan завершена. Закройте все лишние окна.

Далее переходим непосредственно к установке программного обеспечения BMW Inpa.
13. В папке с диска или скачанную по ссылке (далее – рабочая папка) под названием BMW Inpa дважды нажмите левой кнопкой мыши по приложению BMW_Standard_Tools_Setup_2.12.0
Примечание! Если производиться установка на операционную систему Windows 8 или 10, то потребуется включить режим совместимости с Windows 7 (правой кнопкой по ярлыку и выбираем свойства. Далее переходим во вкладку «Совместимость» и ставим птичку в строке «Запустить программу в режиме совместимости с:» Windows 7 и жмем «ОК» внизу окна).

14. Выбираем язык: English и жмем «OK». В последующем жмем кнопку «Next>».

15. В новом окне установки ставим точку в строке «I accept the agreement» и жмем «Next>» в каждом новом окне жмем кнопку «Next>» до окна с выбором COM port. В данном окне выбираем Com 9. И жмем кнопку «Next>» и далее «Install».

16. В появившихся окнах нажмите «Skip» несколько раз до начала установки.

17. Нажать кнопку «Finish» и произвести перезагрузку компьютера.

18. С рабочей папки BMW Inpa все содержимое папки «Скопировать на диск С» копируем на диск С:. Программным обеспечением BMW Inpa можно пользоваться.
19. Завершающий штрих – вынесите ярлыки программ-помощников при кодировании, которые называются BMW Coding Tool.exe и NcsDummy.exe и находятся в одноимённых папка на Вашем диске С: (по ярлыку программы кликните правой кнопкой мыши и выберите пункт «Отправить» и далее выбрать пункт «Рабочий стол (создать ярлык)).
NCS Expert наполнен наиболее популярными моделями. WinKFP не наполнен.
Для наполнения нужно скачать SP Daten для интересующей модели. Скачать SP Daten можно по ссылке на диске «BMW — MINI — MOTO — SP-Daten 2.60 [2015].torrent». Скачивание производится через uTorrent (установочный файл на диске). Наиболее простой способ наполнения Standard Tool – это утилита BMW Coding Tool.
Важно! Также Вы можете приобрести флешку с виртуальной машиной и Вам не понадобиться устанавливать программное обеспечение BMW Inpa на Ваш компьютер. Если Вас заинтересовало наше предложение, то свяжитесь с менеджером сайта.
- Гаджет72.Ру
- Полезности

- Диагностическое оборудование
- BMW INPA 5.0.2 на русском языке

07 окт2017
BMW Standard Tools (INPA)
Установка последней доступной версии BMW Standard Tools 2.12, включающую Ediabas 7.3.0. Через эти программы можно читать и кодировать самые новые машинки, наряду со старыми. Для INPA и NCSExpert есть примитивные русификаторы.
1. Ссылка на скачивание: http://rutracker.org/forum/viewtopic.php?t=4336534 (не забудьте включить аномайзер, в google chrome дополнение Browsec)
Получаем папку INPA. В ней содержится много всего, понять где и что расположено непросто. Автор раздачи собрал в нее много разных версий программ, инструкций, написал свои пояснения «читаем.txt». Советую посмотреть на структуру папок, почитать вложенные инструкции, чтобы получить общее представление о том, что мы сейчас будем делать. Или скачать с нашего сайта конкретно для этой иструкции (ничего лишнего) — ссылка . Распаковать архив и далее по инструкции.
2. Запускаем INPAStandard_Tools_Setup 2.12Standard_Tools_Setup_2.12.exe. Устанавливаем с настройками по умолчанию. После окончания установки заменяем файл C:NCSEXPERBINNCSEXPER.exe одноименным файлом из папки. На 32 и 64 битах эта новая версия работает одинаково хорошо.
3. Итак, оболочка программ установлена, можно наполнять их данными.
Наполняем INPA.
Находим файл INPABMWGROUP.ENG.iso. Распаковываем его архиватором, например, WinRar. Получаем одноименную папку.
Теперь идем в в эту папку — INPABMWGROUP.ENG.
— Папку CFGDAT — копируем в C:EC-APPSINPA
— В папке BMWGROUP.ENG есть файлик INPA.ini — копируйте в C:EC-APPSINPACFGDAT
— Из папки BMWGROUP.ENGENGLISH IPO — все файлики копируй в C:EC-APPSINPASGDAT
— Из папки BMWGROUP.ENGENGLISH SGBD все файлы в C:EDIABASEcu
Наполняем NCSExpert. Идем в папку INPAISTAP 2.45 для обновления NCS Inpa, полученную распаковкой одноименного .iso файла.
— Идем в папку ECU и копируем файлы в /ediabas/ecu (замещаем существующие файлы новыми).
— Идем в папку sgdat и копируем все файлы в /NCSEXPER/SGDAT (замещаем существующие файлы новыми).
— Идем в папку Daten и копируем все содержимое /NCSEXPER/DATEN
— Можно обновить данные до еще более новой версии, если будем использовать NCS с машинками еще моложе. Идем в папку INPAISTA 2_48_0 NCS INPA и копируем папки оттуда в /NCSEXPER/DATEN/
Для удобства работы можно менять язык меню NCS и INPA. Идем в папку INPAINPA_RUINPA RUS.
Для NCS:
— Копируем файлик NCSEXPER.TXT в папку C:NCSEXPERCFGDAT. Лично я нашел в интернете перевод меню на английский. Если кому нужен NCSEXPER.TXT на англ., пишите, могу скинуть.
Для руссификации INPA:
— Папку BIN копируем сюда c:EC-APPSINPA с полной заменой всех файлов
— Папку CFGDAT копируем сюда c:EC-APPSINPA с полной заменой всех файлов
— Папку SGDAT копируем сюда c:EC-APPSINPA с полной заменой всех файлов
4. Качаем и устанавлеваем драйверы шнурка отсюда (WIN 7, 8, 10 x32 и x64): ссылка
5. Теперь настраиваем порт. В том же диспетчере устройств вызываем свойства порта и устанавливает COM1.


Вообще, можно выбирать любой номер порта. Главное, чтобы здесь в настройках и при установке Standard Tools были указаны одинаковые значения. У меня при установке программы был выбран COM1, он не был занят, поэтому в настройках я выбрал тоже COM1.
6. Теперь идем в C:EDIABASBIN, находим файлик obd.ini и копируем его в C:Windows.
Готово к использованию!
Источник: https://www.drive2.ru/l/3371935/
- Распиновка колодок
- Учебный курс — Диагностика
- OBD2 codes
- Расшифровка ошибок OBD
- Список наиболее употребляемых сокращений по OBDII
- OBD коды на русском
- Raspinovka.exe. Программа с распиновкой кодов разъемов диагностики автомобилей
ПРОГРАММЫ ПОД МАРОЧНЫЕ СКАНЕРЫ:
1. BMW INPA для Сканера BMW Inpa K+DCAN и BMW Inpa K+DCAN (с переключателем)
Софт <<скачать BMW INPA 5.0.6>> (<<скачать BMW Inpa 5.0.2 + RUS>>, <<скачать инструкция по установке>>) работает в паре с адаптером BMW Inpa K+DCAN и BMW Inpa K+DCAN (с переключателем) предназначен для чтения информации о состоянии узлов и агрегатов из бортового компьютера автомобиля, сброса ошибок, программирования.
Аппаратно-программный комплекс BMW INPA EDIABAS предназначен для профессиональной диагностики, кодирования и программирования электронных блоков управления автомобилей марки BMW, Rolls Royce и Mini. Сканер имеет доступ к любому ЭБУ автомобиля. Функции чтения параметров реального времени и теста исполнительных механизмов позволяют проконтролировать правильность работы любого органа управления.
В отличии от предыдущих версий Inpa/Ediabas v5.0, а также последующие версии (5.0.2 и другие) — полностью 32-битные приложения Windows, без проблем работающее в среде Win98, NT и XP, а также в VISTA и Win7 (в режиме совместимости с XP).
Перечень автомобилей, поддерживаемых интерфейсом OBD: E36 (некоторые), E38, E39, E46, E52, E53, E60, E65, E83, E85, E87, E90, Mini R50, Rolls Royce RR1
Перечень автомобилей, поддерживаемых интерфейсом ADS: E31, E32, E34, E36
Перечень автомобилей, поддерживаемых интерфейсом D-Can: E60, E61 с 03/2007; E83 с 09/2006; E81, E87 с 03/2007; E90, E91, E92, E93 с 03/2007; E70; R56
Перечень поддерживаемых ЭБУ: Все выпускавшиеся концерном BMW до настоящего времени (кроме последних моделей серии F)..
Возможности программного комплекса:
— Идентификация параметров ЭБУ
— Считывание кодов неисправностей
— Чтение и удаление кодов неисправностей
— Считывание параметров реального времени
— Считывание содержимого памяти ЭБУ
— Контроль соответствия кодов VIN и пробега автомобиля в памяти различных ЭБУ
— Кодирование ЭБУ
— Активация исполнительных механизмов
— Эмуляция работы различных ЭБУ
— Активация/деактивация инженерных функций
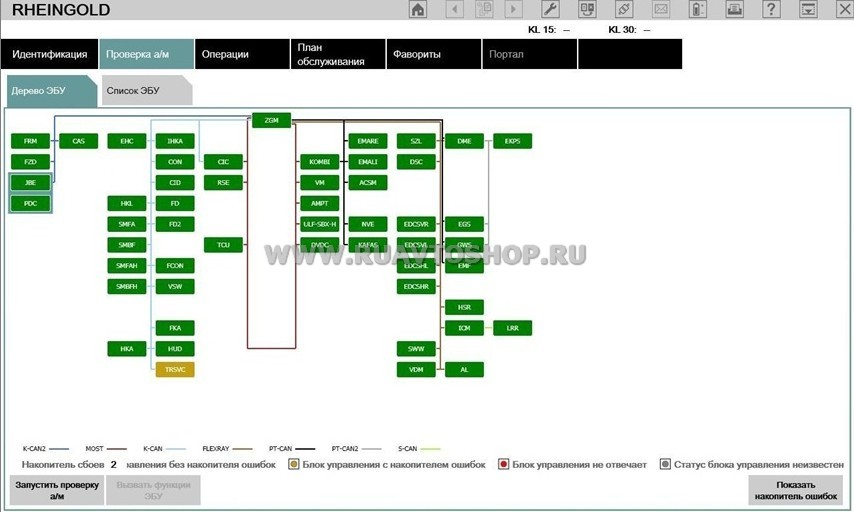
2. BMW ISTA/D Rheingold работает в паре с адаптером BMW Inpa K+DCAN и BMW Inpa K+DCAN (с переключателем)
Год/Дата Выпуска: 2014 / 2015 /2016 /2017 / 2018
Версия:
скачать 3.55.11 и скачать 3.47.10
скачать 4.03.13 magnet-ссылка
Доп. информация:
Для распаковки архивов используйте 7-zip 16.04
Инструкция по установке, настройке и решению возможных ошибок, находится в папке Tools (FAQ-RU.pdf и FAQ-EN.pdf), Для просмотра pdf файлов, используйте Adobe Acrobat Reader DC
ISTA-P — 112 Гб
Service Data (SDP) — 70 Гб
У кого нет ICOM, архив SDP можно не качать.
Работоспособность проверена на Win7 x64, Win8.1 x64 и Win10 x64.
скачать 4.11.22 magnet-ссылка
Доп. информация:
Для распаковки архивов используйте 7-zip 18.01
Инструкция по установке, настройке и решению возможных ошибок, находится в папке Tools (FAQ-RU.pdf и FAQ-EN.pdf).
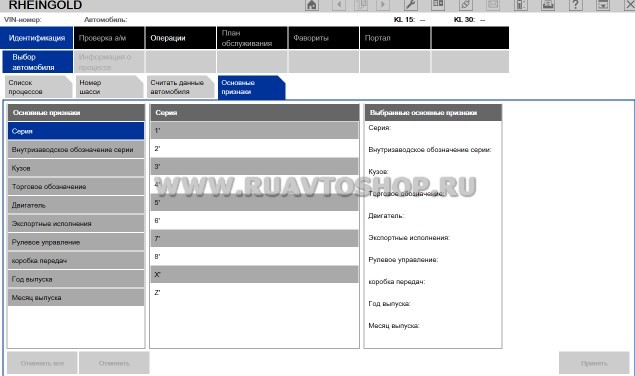
В этой версии вырезали меню «Основные признаки» !!!
Для просмотра pdf файлов, используйте Adobe Acrobat Reader DC
Системные требования: Windows XP x32 и x64, Windows 7 x32 и x64, Windows 8.1 x32 и x64
Язык интерфейса: EN, DE, RU
Описание: Новая система диагностики автомобилей BMW. Работает с E и F сериями. BMW Rheingold это замена диагностической программы
BMW ISTA/D версий 2.XX. В данное время поставляется на официальные дилерские сервисы и работает в паре с адаптером BMW INPA K+DCAN
3. BMW ISTA/P 2.53.5 Native + Expert Mode скачать
Год/Дата Выпуска: 09/2014
Версия: 2.53.5.003
Системные требования: Windows XP x32 x64, Windows 7 x32 x64, Windows 8 x32 x64. Работает на внешних дисках HDD.
Язык интерфейса: Многоязычный (русский есть)
Описание: Программирующая система ISTA/P является приложением сети ISPI и расшифровывается как Integrated Service Technical Application/Programming (Техническое приложение для интегрированного обслуживания/программирования). С помощью ISTA/P может осуществляться обслуживание всех кодируемых, программируемых и требующих ввода кода допуска блоков управления на автомобилях BMW Group, работает в паре с адаптером BMW Inpa K+DCAN и BMW Inpa K+DCAN (с переключателем)
4. BMW PSdZData Full 2.53.0 скачать
Год/Дата Выпуска: 06/2014
Версия: 2.53.0
Системные требования: минимум BMW E-Sys 3.23.4
Язык интерфейса: Английский + Русский
Описание: Обновляемые файлы программы BMW E-Sys для программирования, кодирования электронных блоков управления новых серий BMW.
А именно для Fxx серий F01/F02/F06/F07/F10/F12/F13/F16/F20/F25/F30 и тд.
5. BMW E-Sys 3.26.1 скачать
Год/Дата Выпуска: 08/2014
Версия: 3.26.1
Системные требования: Windowx XP, Windows7, Windows 8.1 x32 x64
Язык интерфейса: Английский + Немецкий
Описание: BMW E-Sys — инженерная версия программного обеспечения для программирования, кодирования электронных блоков управления новых серий BMW.
А именно для Fxx серий F01/F02/F06/F07/F10/F12/F13/F16/F20/F25/F30 и тд.
Доп. информация: Необходим интерфейс (кабель) ENET или ICOM. Использовать минимум версию PSdZData 2.54.0
6. BMW Scanner 1.36 скачать
BMW Scanner 1.4 скачать
BMW Scan 2.01 / 2.2 скачать
7. CarProg
Меню программы и авто, с которыми работает CarProg full
- Мануал CarProg
- CarProg 4.01
- CarProg 5.46
- CarProg 6.13
- CarProg 6.80
Год/Дата Выпуска: 2014
Версия: v6.80
Язык интерфейса: Английский
Описание: CarProg позволяет производить смотку спидометров, сброс критических ошибок Airbag, программирование ключей иммобилайзера, расчет кодов автомобильных магнитол, программирование EEPROM приборных панелей.
8. ChipLoader 1.96 скачать
ChipLoader — работает со сканером K-Line — VAG-COM 409.1 KKL CH340 / K-Line — VAG-COM 409.1 KKL FTDI
Программа-загрузчик ChipLoader 1.96, предназначена для чтения/записи FLASH и EEPROM памяти ЭБУ Январь-5.x, Январь-7.2, VS-5.1, Bosch M7.9.7, M7.9.7+, Микас-7.1, Микас-7.6, Микас-11 (автомобили ГАЗ), чтения/записи FLASH памяти ЭБУ Микас-10.3, Микас-10.3+ (Микас-11), Bosch ME 7.1 / ME 7.5, Kefico M7.9.7, чтения / записи области калибровок, записи FullFlash ЭБУ Bosch MP-7.0, которые устанавливаются на автомобили марки ВАЗ, ГАЗ, Daewoo Sens, ЗАЗ Славута, Hyundai, Kia, Chery, Geely, VAG.
9. OP-COM for OPEL / SAAB
Софт OP-COM работает в паре с адаптером OP-COM 1.45-1.59-1.60-1.70-1.99 предназначен для чтения информации о состоянии узлов и агрегатов из бортового компьютера автомобиля, сброса ошибок, программирования.
- Инструкция по Установке драйвера
- OCFlash — программа для прошивки* кабеля OP COM
- OP-COM 08-2010 RU
- OP-COM 08-2011 RU более глубокая руссификация
- OP-COM 09-2012 английский
- OP-COM 120309a прошивка* до 1.45 + Soft
- OP-COM 120309а (до 2014 года) прошивка* до 1.59 + Soft
* — прошивка контролера делается на свой «страх и риск» и лишь для определенной серии контроллеров, попытка прошивки адаптера автоматически снимает с Нас Все обязательства за дальнейшее состояние адаптера. Не правильные и не квалифицированные действия приводят к состоянию адаптера — «кирпич»
ПРЕДУПРЕЖДЕНИЕ!!! использование стороннего программного приложения, или же стороннего оборудования с Нашим программным продуктом (не с поставляемого диска) может привести к необратимым последствиям в работе данного диагностического комплекса — «горение» контроллера с последующим выходом из строя.
10. VAG 12.12 for VAG (AUDI, SKODA, Volkswagen, Porsche, SEAT, Bentley)
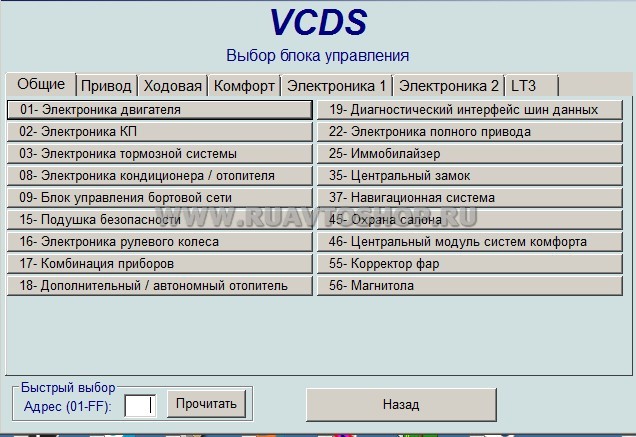
Диагностический комплекс VCDS 12.12.0 RU HEX + CAN предназначен для для осуществления полной диагностики всех автомобилей группы VAG (Audi, Volkswagen, Skoda, Seat) с 1988 по сегодняшний день.
Наше оборудование работает с Русской и Английской версией программы, а также легко работает с 32х и 64x разрядными операционными системами.
Инструкция по русификации купленного у Нас оборудования <<скачать здесь>>
Инструкция по устранению проблем с отображением шрифтов (или их называют «кракозябры»/»кракозяблики») купленного у Нас оборудования <<скачать здесь>>
ПРЕДУПРЕЖДЕНИЕ!!! использование стороннего программного приложения, или же стороннего оборудования с Нашим программным продуктом (не с поставляемого диска) может привести к необратимым последствиям в работе данного диагностического комплекса — «горение» контроллера с последующим выходом из строя.
11. Ford-VCM OBD (FORD, MAZDA, JAGUAR)
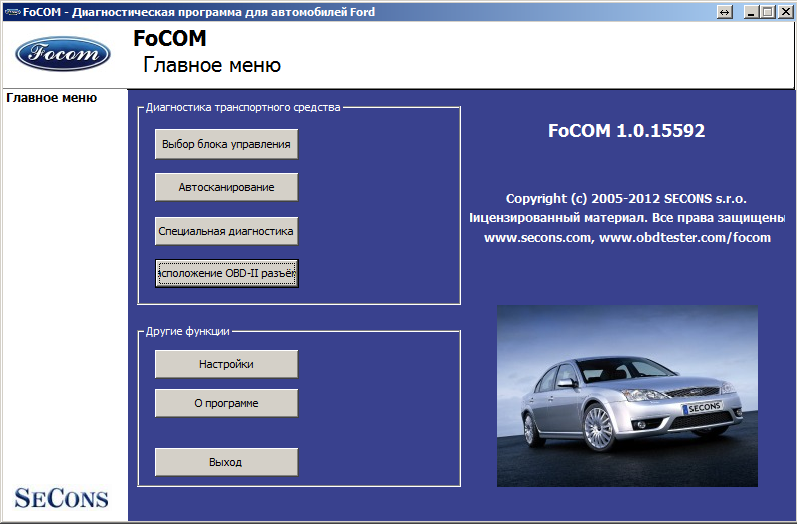
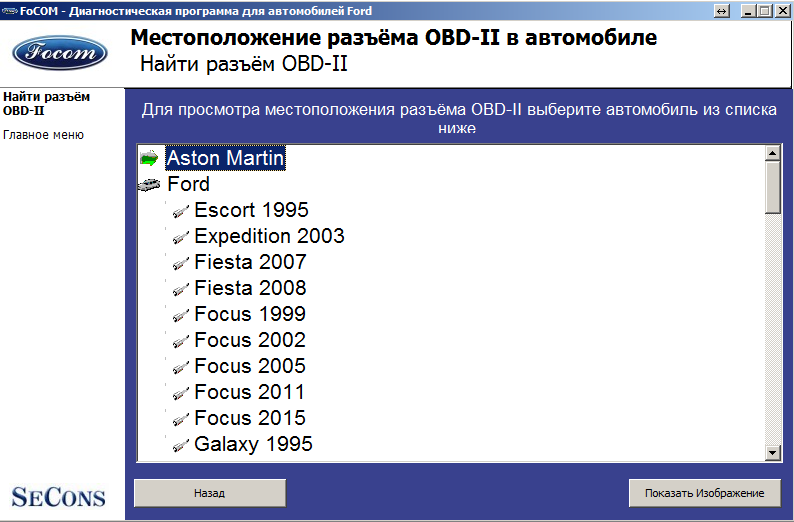
Диагностический комплекс FORD-VCM OBD предназначен для диагностики на дилерском уровне автомобилей Всех годов концерна FORD, MAZDA, JAGUAR
Скачать софт v.1.0.9670 для приобретенного у Нас оборудования можно по ссылке <<скачать здесь>>
Скачать софт v.1.0.15592 для приобретенного у Нас оборудования можно по ссылке <<скачать здесь>>
ПРЕДУПРЕЖДЕНИЕ!!! использование стороннего программного приложения, или же стороннего оборудования с Нашим программным продуктом (не с поставляемого диска) может привести к необратимым последствиям в работе данного диагностического комплекса — «горение» контроллера с последующим выходом из строя.
12. Toyota Mini-VCI (Toyota, Lexus, Scion)
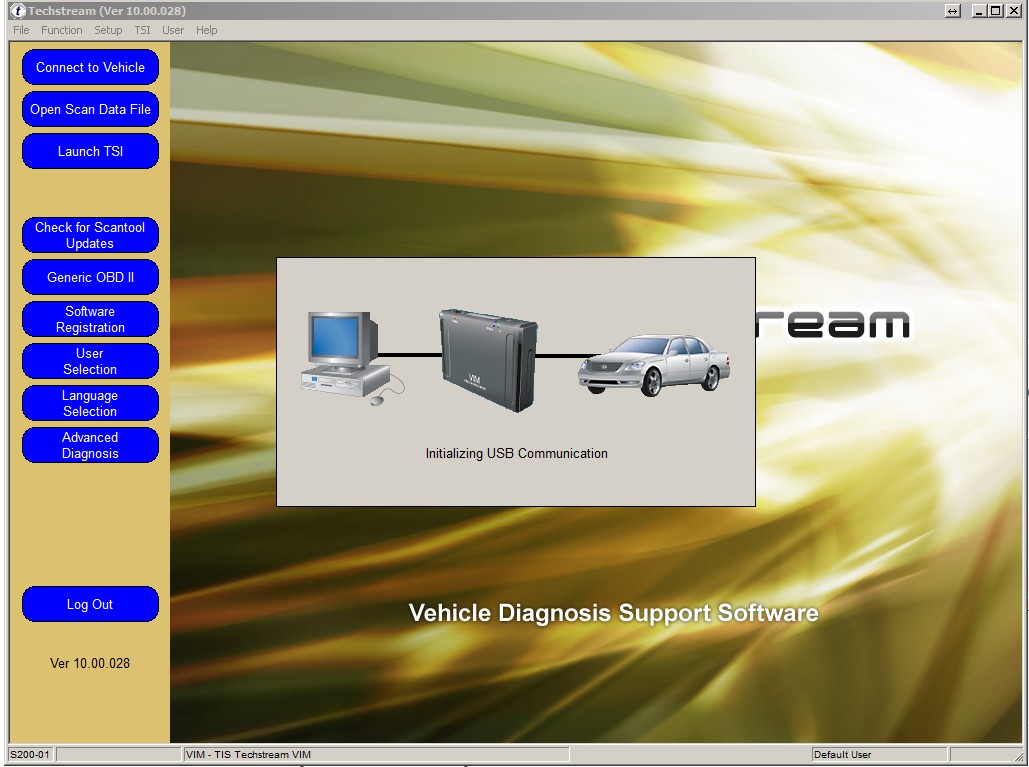
Диагностический комплекс Toyota Mini-VCI предназначен для диагностики на дилерском уровне автомобилей Всех годов концерна Toyota, Lexus, Scion.
Скачать софт Toyota Techstream v10.00.028 для приобретенного у Нас оборудования можно по ссылке <<скачать здесь>>
ПРЕДУПРЕЖДЕНИЕ!!! использование стороннего программного приложения, или же стороннего оборудования с Нашим программным продуктом (не с поставляемого диска) может привести к необратимым последствиям в работе данного диагностического комплекса — «горение» контроллера с последующим выходом из строя.
В этой категории нет товаров.
BMW INPA Ediabas 5.0.2 download, inpa 5.06 download, inpa 6.4.7 download here…and install it on Windows XP/ Vista or Windows 7/ 8/ 10 (32bit or 64bit), to get it work with K+DCAN USB cable.
INPA download
INPA 5.0.2 download (tested OK)
Inpa v5.0.2 Ediabas v6.4.7.rar
INPA 5.0.6.rar
INPA/ediabas 6.4.3 full.rar
ediabas 6.4.7 inpa 5.0.1.iso
More: INPA Ediabas download
BMW inpa cable
Basically, there are two methods for users to get the INPA K+DCAN usb cable, to buy a complete one or simply build one yourself. Read the following to get it.
One way is to build a cable yourself. Cost for this would probably range anywhere between 10 to 20 bucks. You will need to solder a bit but it’s nothing too serious if you follow the instructions to the letter.
Its actually very simple that any average person can do that has access to a drill and a soldering gun.
Tools needed..
1. Small philip screwdriver to take the D-can cover off
2 Radio Shack micro on/off switch (can be two prongs or three) and some wire 24 guage.
3. Soldering gun
4. Some type of glue gun or glue adhesive
5. Drill bit 5/16 to make hole in the D-can cover
Locate pin 8 which will have a number on the side of the board. One side will have the digit 1 and the other digit 8
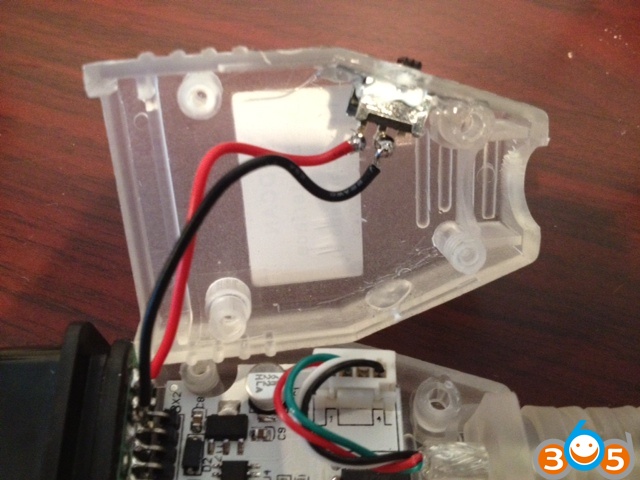
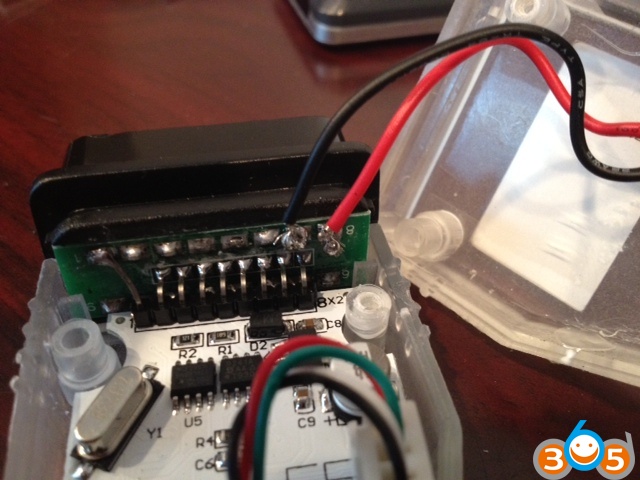
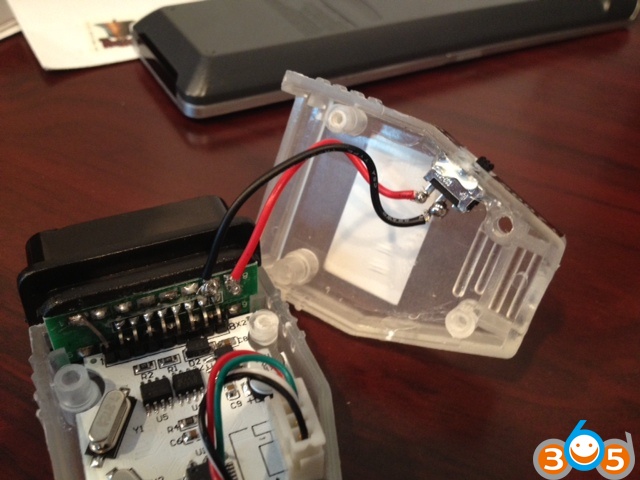
Once you locate pin 8, thats the pin we will be using as well as the next one over. Connect each pin 7 and 8 with a separate wire and then use the soldering gun and connect each wire to the micro on/off switch… If you bought a 2 prong on/off switch connect it to each side, but if you bought a switch with three prongs, connect the middle and one of the ends, doesnt matter which one. At the end there will be one prong end not used…Neatly place the wires snug so that the D-can cover can be closed without anything preventing it to make a closed seal and your done. Screw in the 4 philip head screws in their respected holes. Note which postion is on and which is off by some type of label on the outside of the cover…SImple! Note on my first pic, I have a switch with 3 prongs, but I snipped off the 3rd one just to make it easier to solder…

I modified my cable with a switch and have 7 and 8 bridged to work with a 2004 E46. INPA and Dis 44 work perfect but I cant get Progman to work. Progman starts to reads the FA/ZCS after you choose the car model and then after awhile it says it requires an Edic/Icom cable connection. What needs to be done to make connection with Progman SSS V32?? Do I need to change anything in the Ediabas configuration. I know my modified cable works fine now that I modified it because Dis 44 and INPA wasn’t communicating before I modified the cable. Thanks for the help. I am stumped as I want to code the car for my brother-in-law. I actually can use Dis 44 as I already went into the CKM coding menu, but Progman is much better to help him choose his features he wants as its pretty much offers a checklist with dots!
Took a pic of my success with my modified D-can cable connected to E46 using Progman. My brother-in-law had no idea he had so many features that were not turn on…He also turn off his daytime running lights which he hated!
(NOTE: this diy guide is from cn555ic at e90post.com, the professionals have not tried, put it here )
But if you are not interested in building one, buy a dedicated BMW cable instead. This is a site that has been confirmed working by some of E-series friends: http://www.obdii365.com/wholesale/bmw-inpa-k-can-with-ft232rq-chip.html .. I wouldn’t recommend other sites, although they may work, problem is that they have not been confirmed working yet. Functions of k+dcan cable at obdii365 has been tested for years (many discussion in forums).
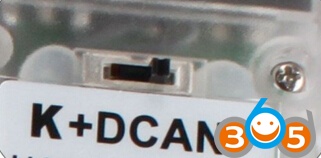
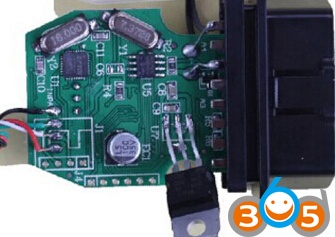
The version 2016 cable is great, designed with the FT232RQ chip and a switch to turn LEFT is for 7 pin or RIGHT for 8 pin (8 pin for K-LINE communication (old DCAN cables cannot do it) for BMW from 1998 to 2008)
the chips and switch on the cable….

INPA installation guide…Here you go…
Here, inpa installation guides for Windows XP, Windows Vista 32bit, Windows 7 32, Windwos 7 64bit, Windows 8, Windows 10 users. (click on the Operation System to get the how-to guide directly).
Note: INPA 5.0.2 is verified to work XP systems without any issues. For others, you need luck!
How to install inpa on windows xp
Inpa installation video made by obdii365.com officially
I’ve used this install method without fault on umpteen machines now and not had to amend any registry settings or anything, its worked first time every time this way..
there is a myth you have to use com port 1 with INPA this is total cobblers! you can use any com port number you like as long as the INPA OBD.ini file port selection matches your actual com port setting on the vagcom interface you have set..
First things to do is Download the 326MB version of BMW INPA from a torrent site or anyware you can get it ( and extract it to a folder on your machine..
you also may need to download the FDTI VCP (virtual com port) driver for windows XP for the Vagcom USB interface from the FDTI website, unzip it to a folder and copy this folder to the 326MB INPA installation software folder so you know where it is and for any future installations…
Virtual COM Port Drivers
- Insert your modded OBD-II-USB vagcom cable into your usb-port
-once it is detected by windows and prompts for the driver (at this point windows may find the drivers for you depending on the vagcom type) point it towards your FDTI vcp driver folder in the INPA folder if windows fails to find the drivers…
It will then install the drivers (it will probably go thru this process twice just repeat the process)
In the windows Device Manager, you should now see [Ports COM & LPT] ->> “USB Serial Port (ComX)
right click this and click properties/port settings /advanced.
at the top change your port number to your selection( if you do not wish to move or force a device on COM1 to another port because its already being used just select an unused port usually COM2 is unused) just remember your port selection for the INPAinstall.
Now change the transmit and receive settings in the drop down boxes to 2048 for both transmit and receive
Now change the latency setting from 16 to 1
Ok the changes and exit
The usb vagcom cable is now setup.
- Always use SAME USB-port from now on.
- Installing INPA
you must copy and paste your downloaded complete INPA installation software folder to your C drive.
in your INPA folders click programmisation then double click setup.
It should default to English so ok this.
Click next till you get to the selection for software to install.
Select or deselect in options boxes but as a minimum select INPA ,EDIABAS and NCS expert if you want it.
Click next you will be asked to backup and restore (I declined this , unticked the box and skipped it all)
Make sure quick launch and desktop icons are ticked.
Click next.
Now select STD-OBD in drop down box (should be by default).
Click next.
Now select the com port number you selected earlier from the drop down box and tick the USB to serial adaptor box.
Click next and install (if it ask for backup and recovery just click skip to these prompts if you wish)
Finish install
Reboot
Now go to C/ediabas/hardware/OBD/OBDsetup.exe
Double click OBD setup.exe
If all is well you should get a black DOS box up with various settings shown with a full house of ok’s on them, you may get the start one saying warning instead of an ok if you have selected an alternative com port just ignore it)
press any key to exit if the list is ok.
Reboot
Go to C/ediabas/bin..
Find the OBD.ini or OBD file and double click
Your settings will be dispayed make sure they read as below
PORT= COM? (your com choice entered and set earlier)
HARDWARE=USB
RETRY=ON
UBAT=OFF (type this command in manually in this position)
Exit and save
Right click andCopy the amended OBD.ini file and paste it into your C/windows folder
Now go back to the INPA install folder on C drive.
Open C/INPA folder/REFERENZ/INSTALL.
Double click instprog.exe
Ok the german writing page
Select English and continue.
At destination drive page make sure C drive is selected and continue.
Now select BMW “GROUP RECTIFICATION PROGRAMME UK” from the list and click continue
Now select the following:
Ediabas tick update box
INPA tick update box
NCS expert expert tick complete box
click continue
Tick the box “delete the old NCS expert “
Click install
double check that C:EDIABASBIN has been added to the path string in enviromental variables (right click my computer/properties/advanced/enviromental variables and select path in the list, click edit check its there and exit without changing anything)
That’s it. you should be done and ready to get diagnosing
Always use the SAME USB port on your laptop when using the software…
PS if you want to do recoding with NCS expert (highly doubtful like its in german and impossible) you need ignition sensing which you dont get with a Vagcom but you can flip the FDTI chip (FT232RL chipset) on the interface with Mprog software to fake the batt and ignition sensing so you can encode…
bmw inpa windows vista 32bit
here is my successful INPA install method for Vista (i have been told it works for WIN7 32 bit too)….
- Firstly again open up your £7 Vagcom interface by removing the 4 x phillips screws on it
Get yaself a fine soldering iron and with a blob of solder,solder pins 7 and 8 together on it and put it back together…
there is a myth you have to use com port 1 with INPA this is total cobblers! you can use any com port number you like as long as the INPA OBD.ini file port selection matches your actual com port setting on the vagcom interface you have set..
First things to do is Download the 326MB version of BMW INPA from a torrent site or anyware you can get it or just PM me If you want a known good working version to download, i have uploaded it zipped with WinRar with the FDTI drivers included just extract it to a folder on your machine…
IF YOU HAVE YOUR OWN COPY you also may need to download the FDTI VCP (virtual com port) driver for some windows OS’s for the Vagcom USB interface from the FDTI website, unzip it to a folder and copy this folder to the 326MB INPA installation software folder so you know where it is and for any future installations…
Virtual COM Port Drivers
.NOTE THIS INSTALL METHOD IS FOR WINDOWS VISTA 32 bit ONLY!
Insert your modded OBD-II-USB vagcom cable into your usb-port
-once it is detected by windows and prompts for the driver if it does not find the driver then point it towards your FDTI vcp driver folder in the INPA folder…
It will then install the drivers (it will probably go thru this process twice just repeat the process)
In the windows Vista Device Manager (computer/system properties/device manager), you should now see [Ports COM & LPT] ->> “USB Serial Port (ComX)
right click this and click properties/port settings /advanced.
at the top change your port number to your selection( if you do not wish to move or force a device on COM1 to another port because its already being used just select an unused port usually COM2 is unused) just remember your port selection for the INPAinstall.
Now change the transmit and receive settings in the drop down boxes to 2048 for both transmit and receive
Now change the latency setting from 16 to 1
Ok the changes and exit
The usb vagcom cable is now setup.
- Always use SAME USB-port from now on.
- Installing INPA
you must Copy and paste your downloaded complete INPA installation software folder to your C drive.
In your INPA folders double click the programmisation folder- then right click the setup icon and select “Properties/Compatibilty mode select XP service pack 2 and tick the box, click the apply button and exit now double click the setup icon and begin the setup.
It should default to English so ok this.
Click next till you get to the selection for software to install.
Select or deselect in options boxes but as a minimum select INPA ,EDIABAS and NCS expert if you want it.
Click next you will be asked to backup and restore (I declined this , unticked the box and skipped it all)
Make sure quick launch or desktop icons are ticked.
Click next.
Now select STD-OBD in drop down box (should be by default).
Click next
Select Com port number (you selected earlier) in the drop down box, tick the USB serial adaptor box
Click next and install (if it ask for backup and recovery just click skip to these prompts if you wish)
Finish install and Reboot
Now go to C/ediabas/hardware/OBD/OBDsetup.exe
Double click OBD setup.exe
If all is well you should get a black DOS box up with various settings shown with a full house of ok’s in Vista this will be full of errors and missing OK’s we shall address this later with a registry edit..
press any key to exit the list.
Reboot
Go to C/ediabas/bin..
Find the OBD.ini or OBD file and double click
Your settings will be dispayed make sure they read as below
PORT= COM? (your com choice entered and set earlier)
HARDWARE=USB
RETRY=ON
UBAT=OFF (type this command in manually in this position)
Exit and save
Right click and Copy the amended OBD.ini file and paste it into your C/windows folder
Now go back to the INPA install folder on C drive.
Open C/INPA folder/REFERENZ/INSTALL.
Right click Instprog.exe/Properties/Compatibilty select windows XP service pack 2 and tick box and apply and exit.
Double click the instprog.exe and install
Ok the german writing page
Select English and continue.
At destination drive page make sure C drive is selected and continue.
Now select BMW “GROUP RECTIFICATION PROGRAMME UK” from the list and click continue
Now select the following:
Ediabas tick update box
INPA tick update box
NCS expert expert tick complete box
Click continue
Tick the box “delete the old NCS expert”
Click install
Double check that C:EDIABASBIN has been added to the path string in enviromental variables.. (Computer/System Settings/Adavanced System Settings/Environmental Variables” click edit check its there and exit without changing anything)
You can now test INPA on your car it will work with the INPA diags only and you will get error warnings with Ediabas running because of the OBDsetup command errors earlier,to address this copy and paste the following below into a notepad folder, save the file to your desktop and name the file “serial.reg” and select all files and save…
- COPY and PASTE all registry data below…
Windows Registry Editor Version 5.00
[HKEY_LOCAL_MACHINESYSTEMCurrentControlSetServic esSerial]
“ErrorControl”=dword:00000000
“Group”=”Extended base”
“Start”=dword:00000002
“Tag”=dword:00000001
“Type”=dword:00000001
“ForceFifoEnable”=dword:00000001
“RxFIFO”=dword:00000008
“PermitShare”=dword:00000000
“LogFifo”=dword:00000000
“TxFIFO”=dword:00000008
[HKEY_LOCAL_MACHINESYSTEMCurrentControlSetServic esSerialParameters]
[HKEY_LOCAL_MACHINESYSTEMCurrentControlSetServic esSerialEnum]
“0”=”Root\LEGACY_SERIAL\0000″
“Count”=dword:00000001
“NextInstance”=dword:00000001
“INITSTARTFAILED”=dword:00000001
You must copy and paste all the above including the windows registry bit or it will not execute to the registry later.
You now need to backup the registry just in case so you can restore it if need be…
Click the windows icon start button bottom left on desktop and type in regedit in the small box and press enter to access the registry
Click file then Export and name the file something of your choice and select ALL in the export range box and save it to somewhere safe..
Now double click the serial.reg file and apply it to the registry (right click the file and open with registry editor if it opens in notepad by default)
Go back to to C/ediabas/hardware/OBD/OBDsetup.exe
Double click setup the blackbox should be clear of errors (you may get 1 if you have selected an alternative port number other than COM1 ignore it)
You now should be good to go with full functions and no error messages when using your INPA…
inpa installation windows 7 32bit
This DIY was tested with Windows 7 Home Premium Service Pack 1 (SP1) running on a circa 2008 Lenovo S10 netbook with a K+DCAN cable from one stop electronics.com. My netbook is used solely for coding and as such this DIY assumes that your computer is dedicated to this purpose as well.
I recommend starting with a fresh 32-bit Windows 7 installation in order to collect the necessary INPA 5.0.2 configuration files that you will need after installing BMW Standard Tools 2.12. I suggest disabling Windows Update automatic updates during the Windows 7 installation process. After entering your product key, the following screen will pop up security message.
Select “Ask me later”, this will prevent Windows 7 from automatically installing any updates.
If your installing from pre-SP1 Windows 7 media, I highly recommend that you manually install two Microsoft updates:
System Update Readiness Tool (KB947821):
http://www.microsoft.com/en-us/downl…s.aspx?id=3132
Windows 7 Service Pack 1 (KB976932):
http://www.microsoft.com/en-us/downl…s.aspx?id=5842
During testing pre-SP1 Windows 7 no longer displayed a mouse pointer after successfully installing EDIABAS & WinKFP and rebooting the system.
INPA 5.0.2 can be found here:
INPA-EDIABAS full English Edition
Installation Guide
Follow steps 2 through 6 of the installation guide. During the EDIABAS & WinKFP install (step 3), select Windows XP (this is not mentioned in the installation guide.) For all other selections, accept the default and click Weiter which is German for “further.”
The very first time you attempt to install EDIABAS & WinKFP (step 3), regsvr32 will fail to register two Windows ActiveX controls. This is normal, upon re-installation everything will work properly.
Click on OK and then click on the large red circle with a white X at the bottom of the screen to see the second regsvr32 error.
Click on OK to acknowledge the second error.
Press any key to exit the EDIABAS OBD setup program. Don’t be concerned about any registry key warnings, this installation of EDIABAS will never be used.
When prompted to reboot, select Nein for “No” and then click on Beenden or “End” to exit the installation program. Go to Control Panel and uninstall the program.
Once you have uninstalled the program, reinstall it. On the second attempt, the ActiveX controls will register properly.
This time, select Ja for “Yes” and reboot.
Even with SP1 installed, on occasion the system will no longer display a mouse pointer after rebooting the system at this point. If this happens, depress the Windows logo key (on some keyboards it may have an icon of a house instead) to display the Start menu. Depress the right arrow key once and then depress Enter to initiate a proper shutdown. When powered back on, the system should have a functional mouse pointer.
Continue with steps 4-6 in the installation guide.
At the completion of step 5, the Windows Program Compatibility Assistant may appear. Click on “This program installed correctly.”
At this point you could optionally install the latest EDIABAS/INPA update (ES-76) from FAL’s EA-90X distribution. I don’t recommend doing so as the latest INPA scripts are in German and not necessary for coding. Installation of the ES-76 update is outside of the scope of this DIY.
You now have the base INPA scripts and configuration files that you’ll need to get the latest version of INPA (5.0.6) up and running. Copy the the INPA CFGDAT and SGDAT folders to removable media for safe keeping. They are located in C:EC-APPSINPA.
If your curious, INPA 5.0.2 is operable at this point. If you were to install the K+DCAN drivers from Windows Update, set the cable to COM1, etc. the battery and ignition clamps are working properly.
That’s cool, but INPA 5.0.2 and friends are not totally compatible with the latest SP Daten files (i.e. 50.2), so let’s move on to installing BMW Standard Tools 2.12.
Links to BMW Standard Tools 2.12 and NCS Expert profiles can be found in this post:
http://www.e90post.com/forums/showpo…postcount=4476
SP Daten 50.2 can be found in this thread:
http://www.e90post.com/forums/showthread.php?t=882353
Blow away your previous installation of Windows and start over with a fresh install. INPA 5.0.2 and friends made changes to the Windows registry, etc. Now that we have the two folders needed to bootstrap INPA 5.0.6, it’s best to reinstall Windows. If your installing from pre-SP1 Windows 7 media, don’t forget to install the System Update Readiness Tool (KB947821) and Windows 7 Service Pack 1 (KB976932.) In addition, because this will hopefully be your final re-installation of Windows I suggest that you manually install one additional Microsoft update:
Microsoft .NET Framework 4.5.1:
http://www.microsoft.com/en-us/downl….aspx?id=40779
When the K+DCAN cable is initially plugged in, Windows will indicate that the device driver was not successfully installed.
Click on the white box circled above when it appears to change the driver update settings.
Click on “Change setting.”
Select “Always install the best driver software from Windows Update” then click on “Save Changes.”
Windows Update will install the latest FTDI drivers needed for the one stop electronics.com K+DCAN cable. Notice that the FTDI driver has defaulted to USB Serial Port COM3. You need to change this to COM1. Click on “Close.”
Click on the Windows Start button to display the Start menu. In the Start Search box type the following command and depress Enter to launch Device Manager:
Code:
mmc devmgmt.msc
When Device Manager opens, click on the arrow to the left of “Ports (COM & LPT)” to expand the Ports device tree. Double-click on “USB Serial Port (COM3)” to open the device properties.
Click on the “Port Settings” tab and then click on the “Advanced” button to display the Advanced Settings for COM3.
Change the COM Port Number to COM1 and the Latency Timer to 1 msec and click “OK.”
The USB Serial Port should be set to COM1. Close Device Manager.
Install BMW Standard Tools 2.12. Accept the defaults and click “Next.”
When prompted to select additional tasks, de-select the “Execute backup and restore wizard” selections under Data backup. You don’t have an existing installation of BMW Standard Tools to backup. Click “Next.”
Click “OK” to acknowledge that the backup wizard has been deactivated.
When the Hardware Interface Settings screen appears, select “USB to serial adapter” then click “Next.”
Click “Finish” to complete the BMW Standard Tools setup and restart your computer.
Please note: This section of the DIY could be improved for neophyte Windows users. It assumes that you understand command line syntax. In this context, X: denotes an unknown drive letter (i.e. the USB thumb drive that you saved your INPA CFGDAT and SGDAT folders to.) For example, if in Windows Explorer under Computer your USB thumb drive is denoted as Drive E:, then you should use E: instead.
Code:
C:Users808>copy E:CFGDAT*.ENG C:EC-APPSINPACFGDAT /v14 file(s) copied.
If you chose to store the CFGDAT folder in another folder named MyStuff, then you would have to include MyStuff in the source path.
Code:
C:Users808>copy E:MYSTUFFCFGDAT*.ENG C:EC-APPSINPACFGDAT /v14 file(s) copied.
The drive letter and path to the source file(s) is dependent on where you stored the files.
Click on the Windows Start button to display the Start menu. In the Start Search box type the following command. Right click on the Windows Command Processor (cmd) under Programs and select Run as administrator.
Code:
cmd
When the User Account Control dialog box appears, select Yes to allow the Windows Command Processor to make changes to your computer.
Copy the Windows ActiveX control MSFLXGRD.OCX to C:WINDOWSSYSTEM32 and manually register it.
Copy the Windows ActiveX control RICHTX32.OCX to C:WINDOWSSYSTEM32 and manually register it.
Overwrite the INPA initialization file in the C:EC-APPSINPACFGDAT folder with the INPA.INI from your saved CFGDAT folder.
Code:
C:>copy X:CFGDATINPA.INI C:EC-APPSINPACFGDAT /v /y1 file(s) copied.
Copy the INPA scripts and configuration files from your saved CFGDAT and SGDAT folders.
Code:
C:>copy X:CFGDAT*.ENG C:EC-APPSINPACFGDAT /v14 file(s) copied.C:>copy X:SGDAT*.IPO C:EC-APPSINPASGDAT /v468 file(s) copied.C:>copy X:SGDAT*.SRC C:EC-APPSINPASGDAT /v11 file(s) copied.C:>copy X:SGDAT*.TXT C:EC-APPSINPASGDAT /v2 file(s) copied.
Copy the group files from the SP Daten E89 folder to C:EDIABASECU.
Code:
C:>copy X:E89ECU*.GRP C:EDIABASECU /v80 file(s) copied.
Import your daten files into WinKFP using this guide (steps 2-8):
WinKFP Import.pdf
Create a C:NCSEXPERDATENE89 folder and copy the contents of the E89DATEN folder into it.
Code:
C:>mkdir C:NCSEXPERDATENE89C:>copy X:E89DATEN*.* C:NCSEXPERDATENE89 /v430 file(s) copied.
Copy the contents of the E89SGDAT folder to C:NCSEXPERSGDAT.
Code:
C:>copy X:E89SGDAT*.* C:NCSEXPERSGDAT /v224 file(s) copied.
Go to the E89DATEN directory and execute the LADEN.BAT script.
Code:
C:>cd X:E89DATENX:E89DATEN>laden.bat
You’ll receive errors at the end of the script due to the missing C:EC-APPSCARSERVER directory, ignore them.
Install the patched 32-bit NCS Expert from this thread:
http://www.e90post.com/forums/showthread.php?t=832476
Example:
Code:
rename C:NCSEXPERBINNCSEXPER.EXE NCSEXPER.OLDrename C:NCSEXPERCFGDATNCSEXPER.TXT NCSEXPER.GERcopy NCSEXPER.EXE C:NCSEXPERBIN /vcopy NCSEXPER.TXT C:NCSEXPERCFGDAT /v
Copy the NCS Expert profiles to the C:NCSEXPERPFL folder.
Example:
Code:
copy *.PFL C:NCSEXPERPFL /v
Your done, enjoy!
Source: http://obd365.blogrip.com/2016/03/08/install-bmw-standard-tools-2-12-on-win7-32bit/ (guides with pictures)
bmw inpa windows 7 64bit
- Buy a cable
I purchased a USB cable from china, it came with software but I didn’t use it and instead used online resources that I downloaded for which I’ll provide links. The cable I purchased is a USB to OBD2 connector that plugs into your BMW to the right hand side of the steering wheel, in the foot-well area.This is the specific cable that I purchased and that I can confirm works:
http://www.obdii365.com/wholesale/bmw-inpa-k-can-with-ft232rq-chip.html
- Download the software
There are many sources on the internet for INPA/EDIABAS, some seem to work, others do not – I used these specific downloads and they worked perfectly:
** UNFORTUNATELY THE DOWNLOAD LINKS ARE NO LONGER AVAILABLE – BUT I WILL SEE WHAT I CAN DO **
If for any reason the above links are missing/broken, PM me and I’ll see what I can do. Thank you to whomever is hosting the above files and I hope that you do not mind me providing these links.
- Setup/Configure your OBD2 USB Cable
Put the DVD that arrived with the cable into the DVD drive on your PC.
Plug in the cable into a USB port on your computer, you must ONLY use this USB port from here-on for this cable. If your computer is connected to the internet it should automatically search and install in the USB cable drivers. If your computer does NOT automatically detect the cable, you may need to use ‘Device Manager’ to manually update/select the driver.
Once installed, go to Control Panel -> System -> Then click on the Hardware tab, then click on Device Manager.
Locate the entry ‘USB Serial Port’ in the ‘Ports’ section of Device Manager. It should read ‘USB Serial Port (COMX)’.
Right-click on the above and select ‘Properties’, then click on the ‘Port Settings’ Tab and then click on ‘Advanced’.
Change the ‘Com Port Number’ entry to ‘COM1’.
Change the ‘Latency Timer (msec)’ to ‘1’.
Click on ‘OK’ and close all the windows, restart your PC to confirm all the changes.
- Install INPA/EDIABAS 6.4.3 and 4.4.7
Extract the contents of the downloaded file ‘INPA-6.4.3-full.rar’ and you’ll find a .NRG file. This is a CD image that you’ll need to either burn to a CD or extract to a folder using a tool such as ISOBuster.
Once extracted, go into the following folder ‘/REFERENZ/INSTALL/’, right-click on ‘INSTPROG.exe’ and select ‘Properties’, click on the Compatibility tab and change the dropdown to Windows XP SP3 as the Compatibility Mode, also tick ‘Run As Administrator’, then click ‘Ok’, then double-click the file to run the installation.
Select ‘English’ as the language and click ‘Next’.
Select ‘Next’ until asked for ‘Configuration’, scroll to ‘BMW Group Rectification Programs UK’, click ‘Next’.
Tick the option ‘Complete’ for all of the options shown.
Select ‘Next’ and allow the installation to start.
After a minute or so, installation will complete, close the Window.
- Verify environment variables
Go into Control Panel -> System -> Advanced System Settings.
Select ‘Environment Variables’ and then verify that the System Variables ‘TMP’ and ‘TEMP’ both contain the path ‘C:EDIABASBin’ within the ‘Value’ string – for instance “C:WindowsTemp;C:EDIABASBin”.
- Prepare Installation Files
Extract the contents of the downloaded file ‘INPA_502_Updated.rar’.
You’ll use the contents of this archive during the next three steps.
- Install BMW Tools
From the above extracted file set, find the file ‘Step 1_ Install BMW Tools.exe’, right-click on it and select ‘Properties’.
Click on the Compatibility tab and change the dropdown to Windows XP SP3 as the Compatibility Mode, also tick ‘Run As Administrator’, then click ‘Ok’
Double-click on the above file to start the installation.
Set the Destination Path C:BMW Tools (Don’t change this path) -> ‘Install’ -> ‘OK’.
Select ‘English’ -> ‘Continue’ -> ‘Continue’.
Select ‘C:’ -> ‘Continue’.
Select ‘Skip’ -> ‘Next’
Accept the defaults for programs to update, then click ‘Next’.
Select ‘Com1’, ‘OBD’ and ‘USB to Serial Adapter’ -> ‘Continue’ -> ‘Continue’.
The installation will begin and complete.
- Install INPA/EDIABAS 6.4.7 and 5.0.2
From the above extracted file set, double-click the file ‘Step 2_ Install INPA.exe’.
The Destination Path should be ‘C:temp’, leave as it is and click ‘Next’.
Choose ‘English’ and select ‘Continue’ and ‘Continue’.
Select ‘C:’ and then ‘Continue’.
Select ‘BMW Group Rectification Programs UK’ and click ‘Continue’.
Tick ‘Update’ for all options where not grayed out, then ‘Continue’.
Select ‘OBD’, then ‘Continue’ and ‘Continue’.
The installation will begin and complete.
- Install OBD Setup
From the above extracted file set, double-click the file ‘Step 3_Final Update.exe’.
The Destination Path should be left as it is, then select ‘Install’.
Select ‘Yes to all’.
Once completed, the window will close itself.
- Complete Installation
From the above extracted file set, double-click the file ‘serial port.reg’.
When prompted, select ‘Yes’ and ‘Yes’. You will receive confirmation that your registry has been updated.
Locate the file ‘C:EDIABASBinobd.ini’ and copy this file into your Windows folder.
Edit the file ‘C:EC-APPSINPACFGDATINPA.INI’ in Notepad, locate the section that starts with ‘//F3’, remove the slashes at the beginning of the three lines of text, and amend any instance of ‘F10’ to ‘E46’.
Reference:
bmw inpa windows 8
writing this to help others achieve INPA on their Windows 8.1 64bit laptop.
I’ve done it, verified it works.
FYI The installation of the first package will be in C: so you know
I’ll be hosting it on my dropbox for a little, if someone can mirror it, I would be grateful.
First download this INPA package.
https://www.dropbox.com/s/mn6n4bhej8…_INPA.rar?dl=0
unzip, go to programinstallationsetup.exe , run it in xp compatability mode press next all the way through then reboot
once rebooted go back into the unzipped folder, go to referenz2006 and then run the exe in that folder. choose english and then UK preferences , only update the first two. complete it.
No need for reboot
Next you need the e39.eng and e39.ger files to place in your INPACFGDAT
https://www.dropbox.com/s/ufov0h935y…FGDAT.rar?dl=0
this is CFGDAT zip , take the e39.eng e39.ger from this and place it in the folder above.
here is the e39 sp daten files. replace the ECU folder in the ediabas folder , replace the daten CFGDAT and SGDAT in the NCSEXpert folder with the ones from the zip.
https://www.dropbox.com/s/w8v1b8ysm2x7t5v/E39.rar?dl=0
Go into INPACFGDAT and double click inpa.ini , change any of the lines you wish to represent which F button it corresponds with “E39” for all three lines . FYI our S62 engine is hidden nicely under shift + f9 for old models under e52. You can also use the e39 profile under Shift + f9 for old models if you don’t want to edit your INI file
Example :
F6 = E39
F6_Text = E39
F6_ARCHIV = SGBD_E39
save it close it run inpa enjoy!
Feedback needed incase i missed a step, thanks!
Edit: If i’m missing any files let me know, i sort of want to revive the whole INPA tutorials since there aren’t any written for 8.1
EIDT: If the error pops up when try to program:
[22:21:59.916] [2014-07-01] [<WinKFP Tool] 2089 PABD/CABD 06FLASH Programmieren 2538
[22:21:59.916] [2014-07-01] [<WinKFP Tool] switching programming mode failed 10FLASH, DIAGNOSE_MODE (ECUPM): ERROR_ECU_SECURITY_ACCESS_DENIED__SECURITY_ACCESS_ REQUESTED
[22:22:07.279] [2014-07-01] [<WinKFP Tool] 2089 PABD/CABD 06FLASH Programmieren 2812
[22:22:07.279] [2014-07-01] [<WinKFP Tool] switching programming mode failed 10FLASH, DIAGNOSE_MODE (ECUPM): ERROR_ECU_CONDITIONS_NOT_CORRECT_OR_REQUEST_SEQUEN CE_ERROR
[22:22:07.328] [2014-07-01] [<WinKFP Tool] 2089 Error COAPI2.CPP coapiRunCabd 6
[22:22:07.328] [2014-07-01] [<WinKFP Tool] switching programming mode failed SG_PROGRAMMIEREN
[22:22:07.329] [2014-07-01] [<WinKFP Tool] 2089 Error COAPIKF.CPP coapiKfProgSgD2 19
[22:22:07.329] [2014-07-01] [<WinKFP Tool] switching programming mode failed
SOLVED…
just in-case someone else stumbles upon this with the same problem.
Check your settings, in device manager, set com port to 1 and latency to 1. check your ediabase.ini is set to Interface =STD:OBD
check your obd.ini is set to Port=Com1
Hardware=USB
then reboot. I had all those setting correct and the cable was communicating through IPNA. The reboot fixed it. the alpina b3 flash is the titties!
bmw inpa windows 10
Note: It’s a customer solution! Try on your own risk
install the drivers for INPA K+D-CAN cable (version with FTDI FT232RL chip only)
disconnect from the Internet because it is possible that the drivers are installed from Windows Update (if you want to use the latest home FTDICHIP then disconnect or reinstall)
why run the executable CDM 21216_setup.exe; It is compatible with 64-bit versions of Windows 7,
If necessary, you can download the latest version according to the OS on the site FTDICHIP
http://www.ftdichip.com/Drivers/VCP.htm
This is an interface / cable VCP (Virtual COM Port) so there are two features and therefore an installation in 2 phases if done manually
1 – Cable driver
2 – VCP driver
if using the automatic executable (.exe) offered on the site, then the 2 self install a result it’s easier and without going through the Device Manager =>
then plug the INPA cable into a USB port
NOTE WELL PORT IDENTIFY THIS CAR ALONE WILL WORK AFTER SETTING IT WILL THEREFORE ALWAYS CONNECT THE CABLE ON THE PORT
in Device Manager there will be a new entry: “COM and LPT ports” / sérial USB Port (COM3) eg for now
Then you must configure the port that will emulate the virtual COM port 9 (eg. Default for Ediabas 7.3 patched) but it’s tune to your install
Open Device Manager, choose COM Ports / USB serial port / port settings / advanced / set “COM 9” and the latency to “1”
finally install BMW Standard Tools, all versions are not compatible with win 7 and 64-bit architectures, so use the BMW STD Tools version 2.12, which includes a recent version INPA 5.0.6 and 7.3.0 Ediabas.
Here go cases… Running inpa software on BMW E46, E90
INPA on BMW E46
Purpose: reset BMW E46 airbag light
Tools for use:
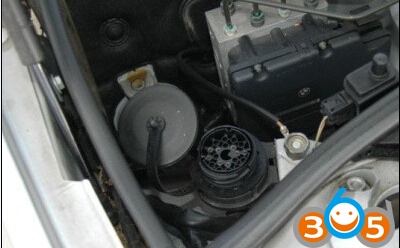
The E46 is before 2000 without the OBD2 port and the DLC port is a round 20 pin connector while INPA cable has only 16 pin connector, so I need a 20 pin to 16 pin connector

The DLC port location on BMW E46:
Test procedure:
Run INPA software on WIN XP. Turn on the ignition and click the “F2” button. And choose “Body” section then “Airbag”.
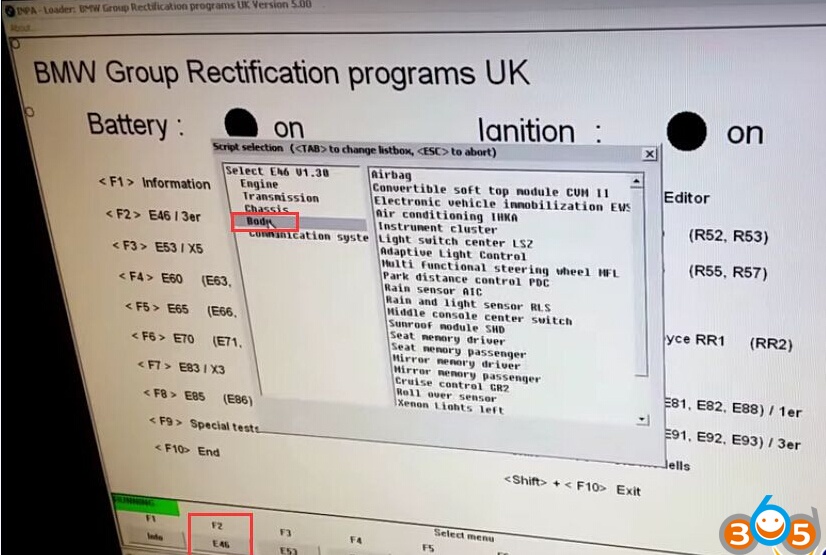
Go to the Error Memory: click the “F4” button.
Go to clear error memory: click the “F2” button.

Error was cleared!
reset BMW E46 airbag light successfully!

inpa bmw e90
Purpose: Code BMW E90 (2008) Injector
Tools to use: k+dcan cable
Test process:
connect the INPA cable with my E90 N54 via OBD port
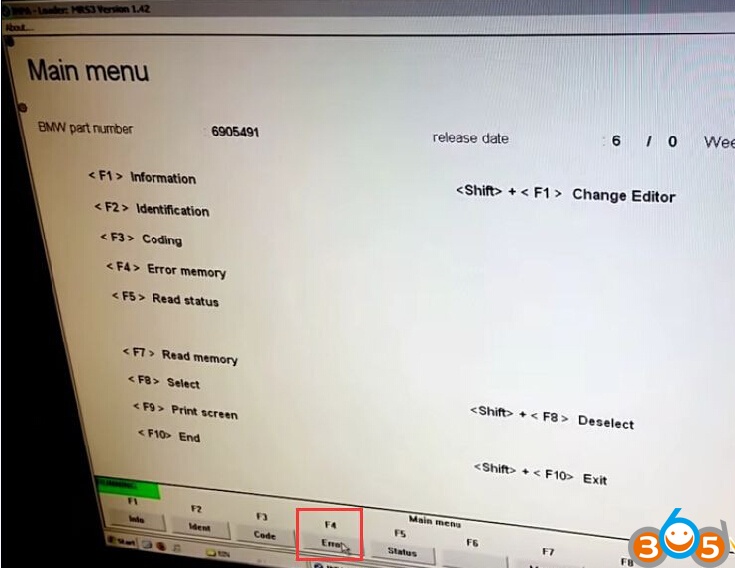
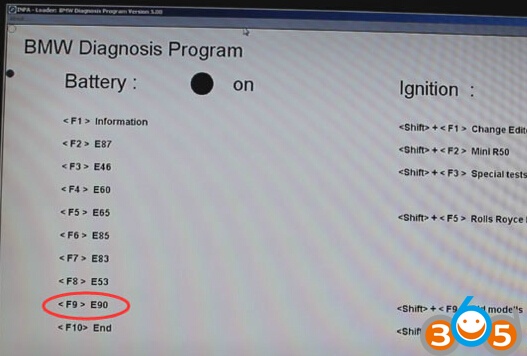
run INPA software. And pressed F9 on the keyboard to select vehicle model E90
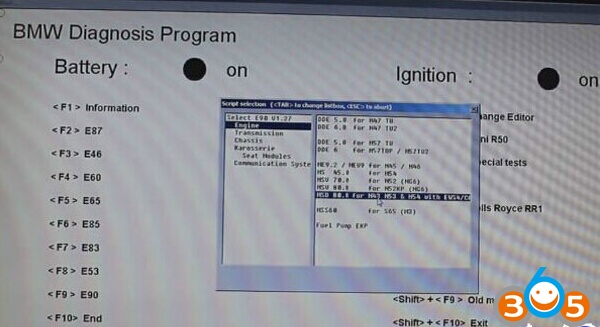
select Engine option -> MSD80 concerning option
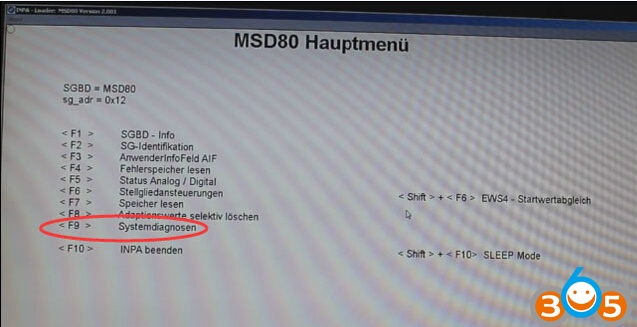
press F9 system diagnostic
press [shift+F4] EOL injector option
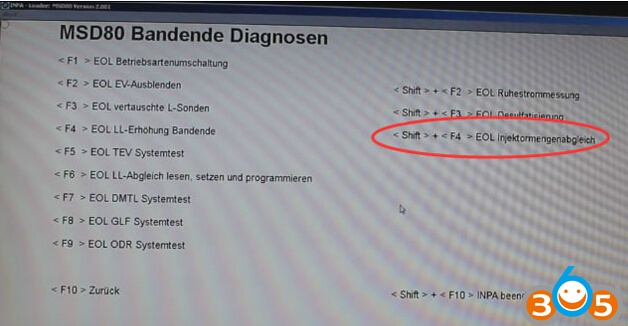
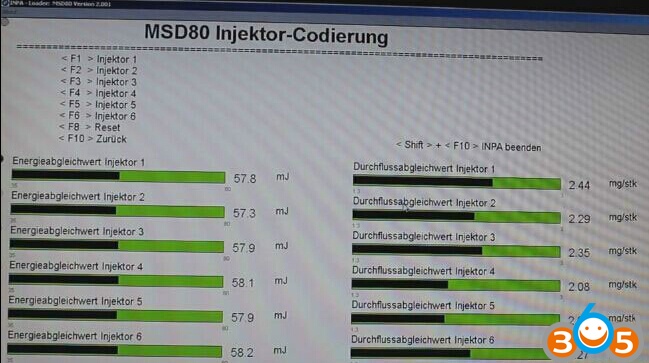
The interface of MSD80 injector coding program, Check the injector parameters
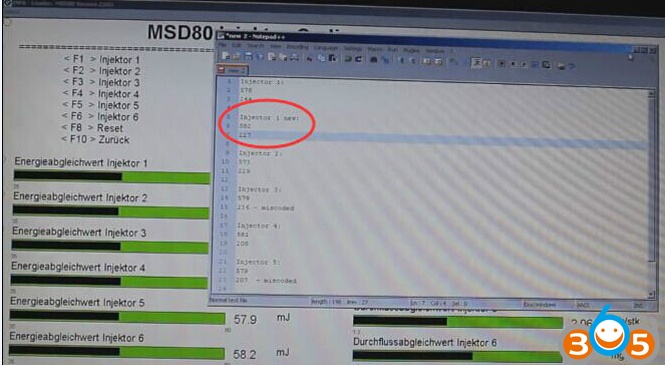
copy and paste the injector code and pressed OK to continue
Notice that the injector code are stamped onto the injector in white, there will be 2 rows of 3 numbers, for example, here: 582 227
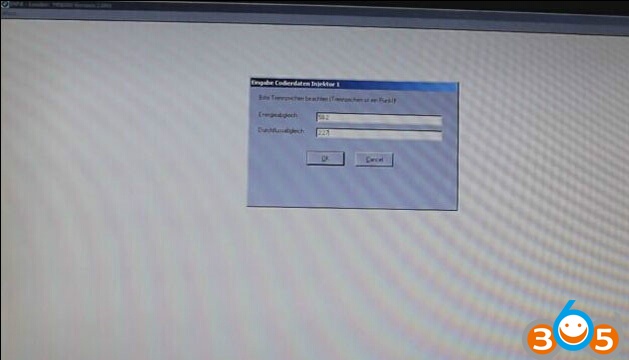
Finally check the injector value and press [clear] to reset it.