Windows 10, Windows 7, Windows 8
- 20.06.2019
- 17 139
- 3
- 21.06.2019
- 43
- 43
- 0
- Содержание статьи
- Восстановление панели быстрого запуска
- Комментарии к статье ( 3 шт )
- Добавить комментарий
Панель быстрого запуска — это один из элементов панели задач, который присутствовал в Windows начиная с Windows 95, и заканчивая Windows Vista. Однако, в Windows 7 подход к размещению ярлыков на панели задач изменился, и панель задач отправилась в забытие — вместе с такой полезной кнопкой, как «Свернуть все окна». И хотя кнопка «Свернуть все окна» осталась, просто изменила свой вид и местоположение (подробнее можно прочитать в этой статье), но многим пользователям по прежнему не хватает хорошо знакомой и узнаваемой панели быстрого запуска. Однако это поправимо — и сейчас Вы узнаете, как можно вернуть панель быстрого запуска в новых версиях Windows.
Восстановление панели быстрого запуска
Для возвращения старой доброй панели быстрого запуска на её законное место в панели задач, нужно проделать следующее:
Не смотря на то, что в качестве примера используется Windows 7, данный способ работает так же и в Windows 8 и Windows 10.
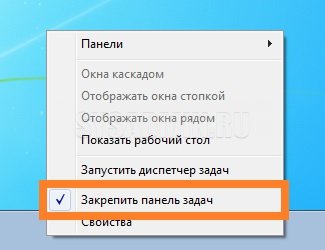
- Нажимаете правой кнопкой по панели задач, и в появившемся меню убираете галочку с пункта «Закрепить панель задач«, просто щелкнув по нему левой кнопкой мыши.

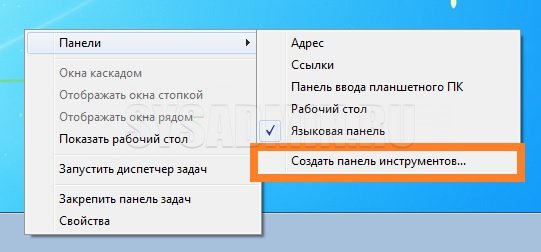
- Снова нажимаем правой кнопкой мыши по панели задач, и выбираете пункт «Панели — Создать панель инструментов«.

- Теперь от Вас потребуется указать местонахождение папки, содержимое которой будет использоваться для отображения панели инструментов. В поле «Папка» вводите следующее:
%appdata%MicrosoftInternet ExplorerQuick Launch, и нажимаете кнопку «Выбор папки«.

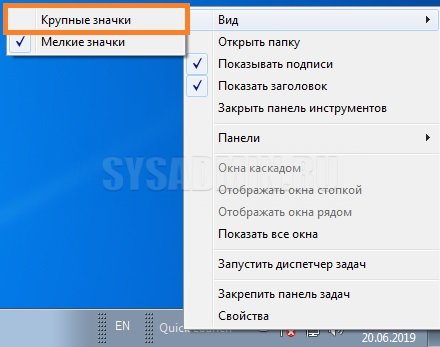
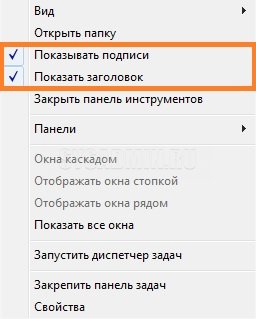
- В правой части панели задач появится надпись «Quick Launch» с ссылками на кнопки «Переключение между окнами» и «Свернуть все окна». Так как это немного не то, что было в ранних версиях Windows, то наведем в этом порядок. Нужно нажать правой кнопкой мыши по надписи «Quick Launch», и выбрать пункт «Вид», и переключить на «Крупные значки».

Так же нужно в этом же меню поснимать галочки с пунктов «Показывать подписи» и «Показывать заголовки«.

- После этого панель станет выглядеть так, как должна — осталось вернуть её на левую сторону панели задач. Для этого нужно левой кнопкой мыши зажать на пунктирную линию слева от панели быстрого запуска, и «протащить» не отжимая левой кнопки мыши через всю панель налево. В итоге должно получится следующее:


84
84 people found this article helpful
Tired of pinning apps? You can get your quick launch toolbar back!
Updated on August 4, 2021
What to Know
- The quick launch toolbar has been gone since Windows 7, but you can bring it back.
- Right-click the taskbar and navigate to Toolbars > New Toolbar to add a quick launch toolbar.
- Consider using the pin feature if you want easy access to a handful of commonly used apps.
This article explains how to add a Quick Launch toolbar to the taskbar in Windows 10.
How to Add the Quick Launch Toolbar in Windows 10
Microsoft added the quick launch toolbar in Windows XP to provide an easy way to access common apps from your taskbar, but it disappeared with the introduction of Windows 7. If you miss the quick launch toolbar and pinning apps to the taskbar isn’t good enough, it’s pretty easy to add a quick launch toolbar yourself.
Here’s how to add a quick launch toolbar to the taskbar in Windows 10:
-
Right-click your taskbar to bring up the menu.
Make sure to click a blank area. Don’t click an app icon, the search field, the system tray, or anything other than a blank area of the main taskbar.
-
Navigate to Toolbars > New toolbar.
-
Enter %APPDATA%MicrosoftInternet ExplorerQuick Launch into the navigation field at the top of the window, and press Enter.
-
Click Select Folder.
-
You now have a quick launch toolbar on your taskbar. However, it’s on the right side, and the original quick launch was on the left. If you prefer it on the left, continue following these directions.
-
Right-click the taskbar, and make sure the taskbar is unlocked.
If there’s a check next to Lock the taskbar, click the check to unlock the taskbar. If there is no check, it’s already unlocked.
-
Click the vertical line that’s located to the right of the search field and Cortana button, and drag it all the way to the right.
If you do this successfully, it will push the quick launch menu to the left side of the taskbar.
-
The quick launch bar is now on the left.
-
To hide the icons, click the vertical line that’s between your quick launch icons and the rest of the taskbar, and drag it left.
-
You now have a quick launch toolbar on your taskbar. Click the >> icon to access your quick launch toolbar.
-
If you want to hide the quick launch text, right-click the quick launch toolbar and click the checkmark next to Show title. When the checkmark is gone, the quick launch text will disappear from your taskbar, leaving just the >> icon.
-
For a more classic Windows XP look and feel, right-click the taskbar and navigate to Search > Hidden to hide the search box. Then click the checkmarks next to the Show Cortana text and Show task view button.
-
You now have a quick launch toolbar directly next to the Start menu, just like Windows XP, either with or without the quick launch title text, depending on your own preference.
Why Was the Quick Launch Toolbar Removed?
While the Quick Launch toolbar was quite helpful, and many people liked it, the ability to pin apps to the taskbar took its place in the default Windows design. If you don’t already take advantage of app pinning, it’s pretty useful in its own right. You can right-click any app on your taskbar and choose to pin it to either the start menu or taskbar for easy access.
If you have a set of apps that you use regularly but don’t necessarily want them to run on startup, consider pinning them to the taskbar. The quick launch menu is better if you have more than a handful of apps you want easy access to, but pinning is convenient for a handful of your most commonly used apps.
Thanks for letting us know!
Get the Latest Tech News Delivered Every Day
Subscribe
Как известно, в Windows XP была удобная Панель быстрого доступа или Quick Launch. Из более новых версий Windows ее убрали непонятно зачем и некоторые пользователи могут испытывать ностальгию по данному инструменту.
Для тех, кто скучает по панели быстрого доступа я покажу, как ее вернуть в Windows 10. Для Win7 эта инструкция тоже подойдет. Итак, приступаем!
Кликните по Панели задач правой кнопкой мышки, выберите Панели и затем Создать панель инструментов…
Но перед этим скопируйте в буфер обмена адрес, он вам дальше понадобится:
%userprofile%AppDataRoamingMicrosoftInternet ExplorerQuick Launch

Можете, конечно, вручную пройти по маршруту:
Users[ваш username]AppDataRoamingMicrosoftInternet ExplorerQuick Launch,
но это долго и неспортивно. К тому же, должен быть включен показ скрытых папок и файлов.
Теперь предстоит выбор папки для Quick Launch. Для того мы и копировали адрес на первом шаге, чтобы сейчас его вставить в поле Папка внизу и нажать кнопку Выбор папки.

Когда мы нажали на Выбор папки, окно закроется и появится панель быстрого доступа внизу справа.

Чтобы сделать Панель быстрого доступа более компактным можно убрать заголовки и подписи. Кликните правой кнопкой по панели Quick Launch и в меню снимите галочки с пунктов Показывать подписи и Показывать заголовок.

Теперь панель приобрела знакомый вид. Теперь ее можно растянуть, зажав мышкой две вертикальные палочки слева от панельки. Если их нет, то проверьте, что Панель задач не закреплена (Правой кнопкой мыши по панели задач -> Свойства -> Закрепить панель задач). Чтобы перетащить Quick Launch ближе к кнопке Пуск, зажмите мышкой и тащите влево до упора (см. рис.)

Когда упор закончится, вид будет примерно вот такой. На неё можно мышкой перетаскивать иконки программ для добавления, удалять, тасовать мышкой между собой, в общем, вам понравится)

А вы соскучились по Quick Launch?