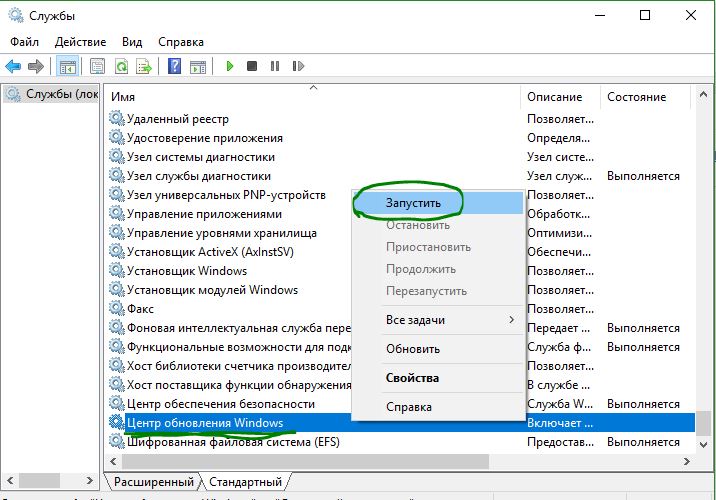
Заходя в службы services.msc Windows 11/10, можно обнаружить, что нет в списке службы Центра обновления Windows, тем самым получая ошибку, что она не запущена.
Отсутствие службы центра обновления Windows может быть связано с повреждением записей реестра вредоносным ПО или вы применили программу по отключению данной службы, чтобы Windows 11 или 10 не обновлялись.
В этой инструкции о том, как восстановить службу Windoows Update, которая пропала из списка и не может быть запущена в Windows 11/10.
1. Восстановление некоторых записей реестра
В первую очередь сделайте резервную копию реестра и создайте точку восстановления. Далее скачайте reg файл, распакуйте его и запустите WU missing.reg, после чего перезагрузите ПК. Далее:
- Нажмите Win+R и введите services.msc
- Найдите службу Центр обновления Windows
- Запустите её, если она остановлена
- Убедитесь, что проблема решена
2. Сканирование на вирусы
Воспользуйтесь сканером DrWeb для нахождения вредоносного ПО, которое может быть виновником за отсутствие службы WU.

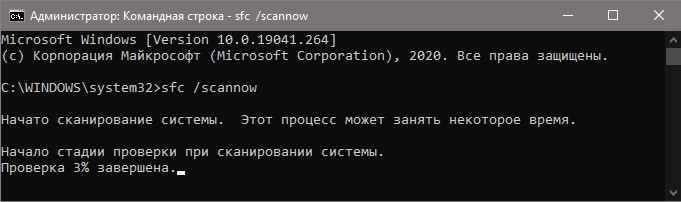
3. Восстановить системные файлы
Из-за поврежденных системных файлов может не оказаться службы центра обновления windows в списках служб. Чтобы проверить целостность системы, запустите командную строку от имени администратора и введите ниже команды по порядку:
sfc /scannowDISM /Online /Cleanup-Image /RestoreHealth
! Перезагрузитесь и проверьте, появилась ли служба Windows Update
Смотрите еще:
- Служба обновления завершает работу при установке обновления
- Ошибка 1058: Служба не может быть запущена в Windows
- Ошибка NET HELPMSG 2182. Служба BITS уже запущена
- Служба в настоящее время не может принимать команды
- Пользовательская служба Push-уведомлений перестала работать в Windows
[ Telegram | Поддержать ]
Содержание
- Способ 1: Средство устранения неполадок
- Способ 2: Очистка кэша
- Способ 3: Альтернативные источники
- Вариант 1: «Помощник по установке»
- Вариант 2: Каталог Microsoft
- Способ 4: Обновление драйверов
- Способ 5: Удаление конфликтного ПО
- Способ 6: Восстановительные утилиты
- Вариант 1: Проверка диска
- Вариант 2: Реконструкция системных файлов
- Способ 7: Reset Windows Update Tool
- Шаг 1: Создание точки восстановления
- Шаг 2: Использование программы
- Вопросы и ответы

Прежде чем приступать к решению проблемы, необходимо понять, действительно ли она настолько серьезна. Поэтому в первую очередь перезагрузите систему, затем убедитесь, что на компьютере стабильное интернет-соединение, а на системном диске достаточно места. Кроме того, рекомендуется отключить в этот момент все внешнее оборудование, например, жесткие диски, док-станции и т.д.
Способ 1: Средство устранения неполадок
Операционная система Windows поддерживает инструменты, которые помогают ей справляться с разного рода ошибками. Среди них есть и средство устранения неполадок в Центре обновления (ЦО), поэтому в первую очередь пробуем запустить его.
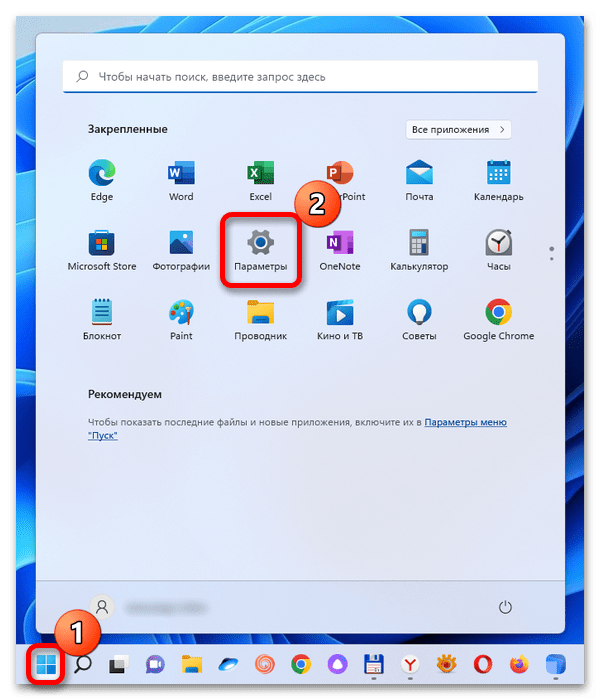
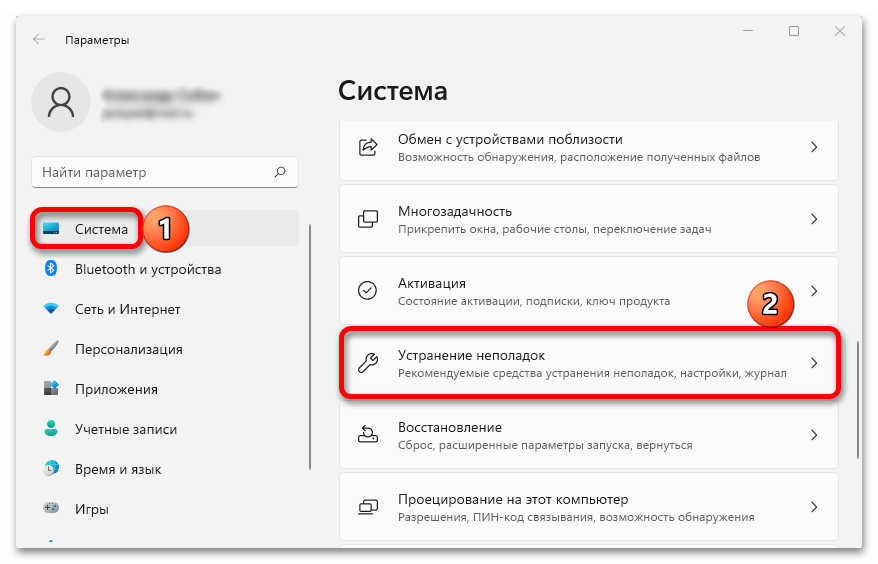
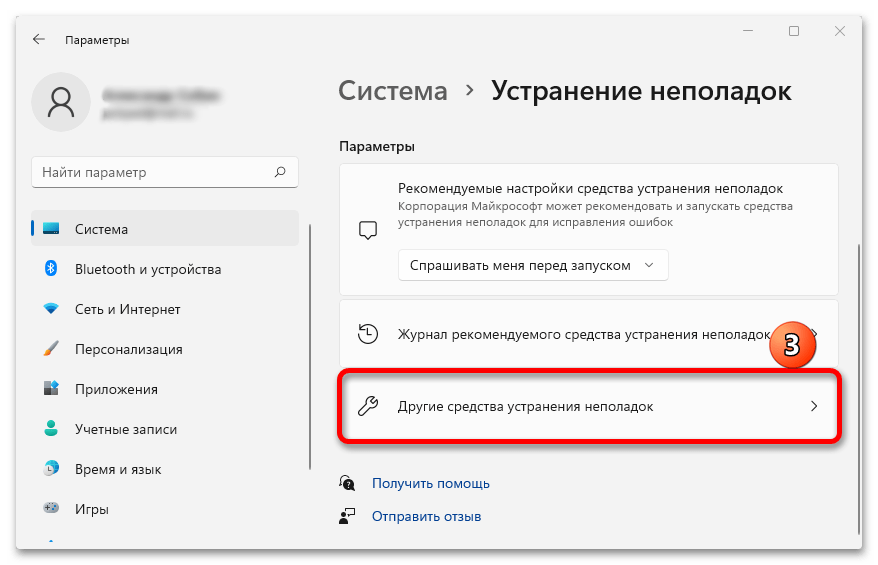
- Через меню «Пуск» вызываем «Параметры» системы.
- В разделе «Система» открываем «Устранение неполадок»,

затем «Другие средства УН»,

находим инструмент диагностики/восстановления ЦО Виндовс и запускаем его.
- Средство работает в автоматическом режиме, поэтому если что-то найдет, постарается внести изменения, чтобы все исправить. Нам после этого останется только перезагрузить устройство.

Способ 2: Очистка кэша
Сначала апдейты загружаются на компьютер, а уже затем устанавливаются. И если проблема возникает на этом этапе, то иногда помогает очистка накопленного кэша и пересоздание предназначенных для него папок.
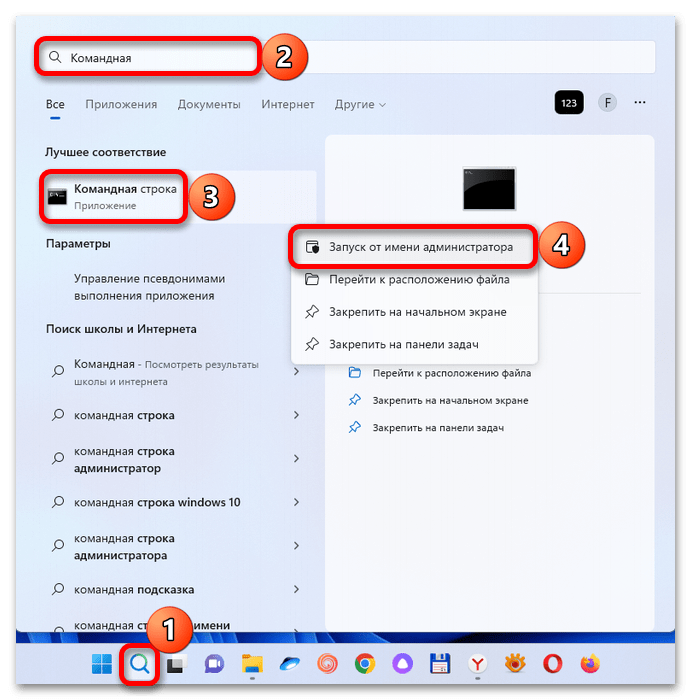
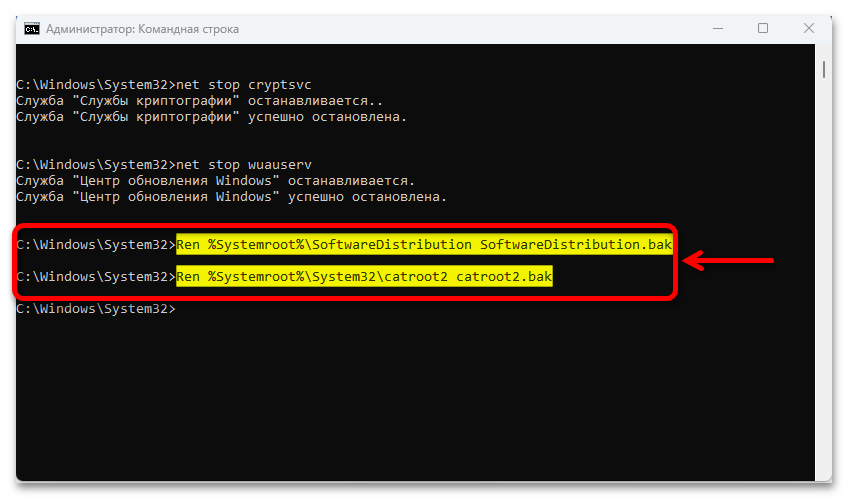
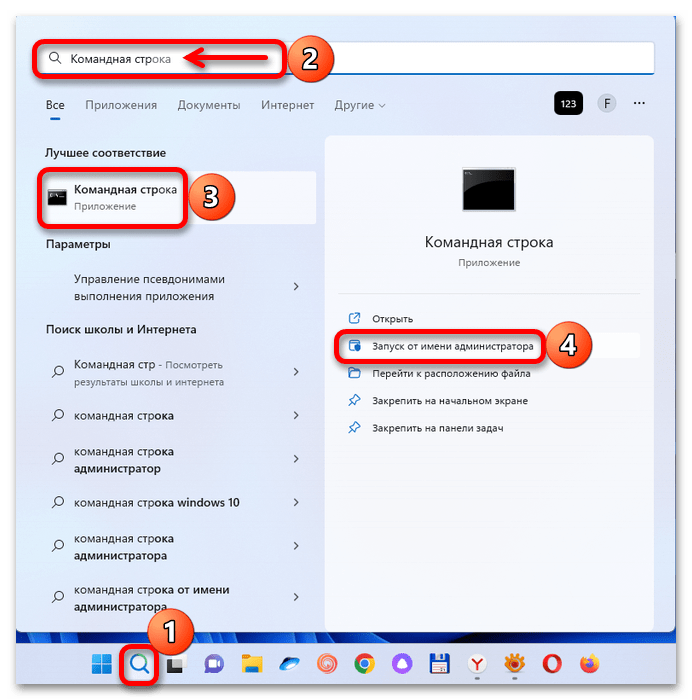
- Открываем поиск Виндовс 11, находим «Командную строку», кликаем по ней правой кнопкой мышки и открываем с повышенными правами.
- Службы, связанные с папками обновлений, могут блокировать наши действия, поэтому мы их на всякий случай отключим. Вводим по очереди следующие три команды и после каждой нажимаем «Enter».
net stop bitsnet stop cryptsvcnet stop wuauserv - С помощью следующих команд переименуем два каталога на системном диске и таким образом создадим резервные копии:
Ren %Systemroot%SoftwareDistribution SoftwareDistribution.bakRen %Systemroot%System32catroot2 catroot2.bak - Снова запускаем отключенные службы.
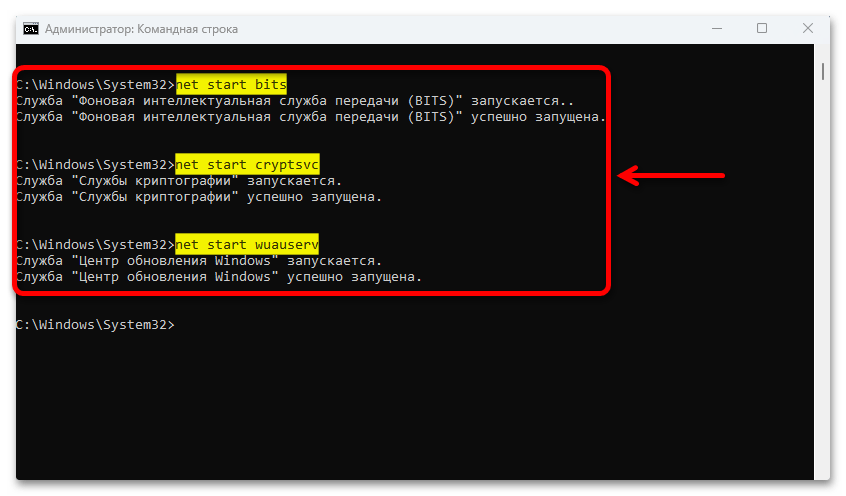
net start bitsnet start cryptsvcnet start wuauserv
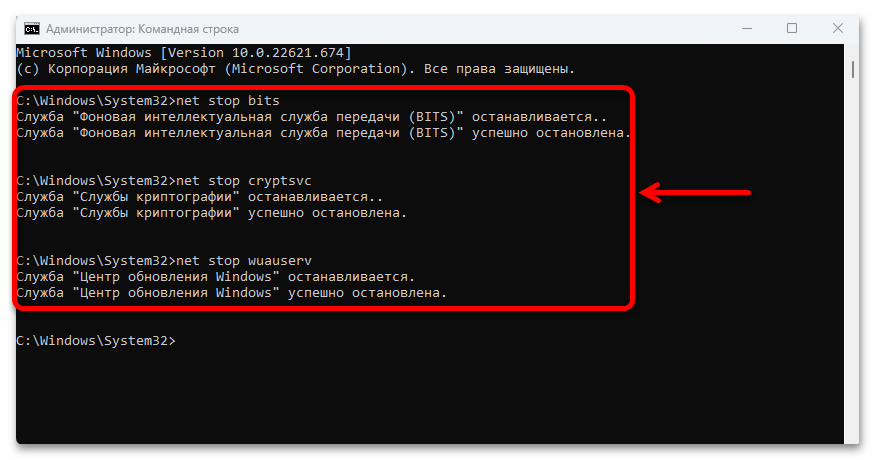

После переименования папок ЦО Виндовс 11 потеряет их, поэтому практически сразу создаст новые и начнет загружать туда обновления. Такой способ часто помогает решить нашу проблему.
Способ 3: Альтернативные источники
Если в данный момент обычным методом не получается устранить неполадки, есть еще по крайней мере два варианта обновить систему.
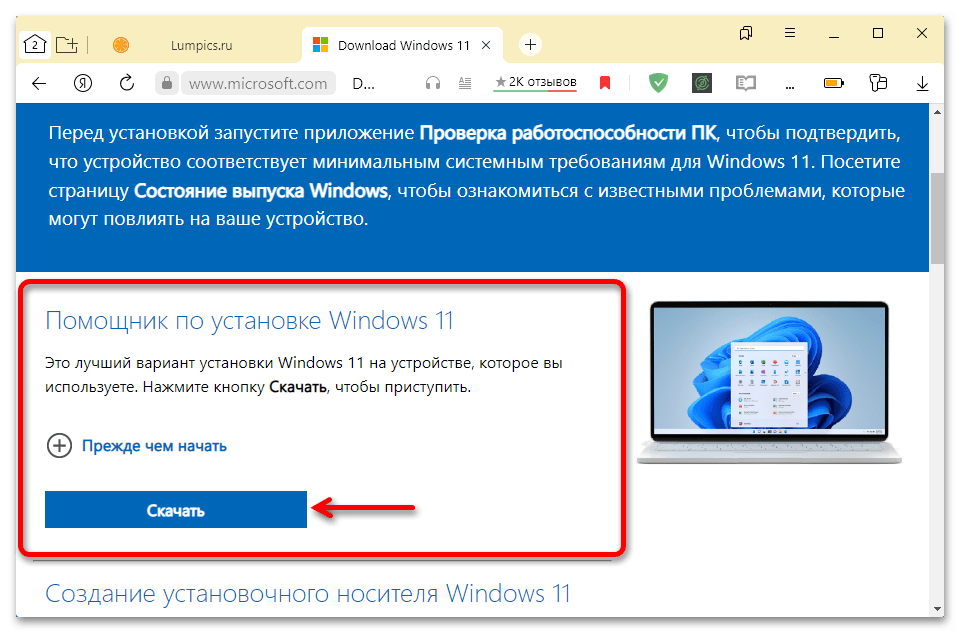
Вариант 1: «Помощник по установке»
Microsoft поддерживает «Помощник по установке», который обычно используют для перехода с одной версии операционной системы на другую или для получения крупных обновлений. Особенно он удобен, когда встроенный инструмент, Windows Update, пока ничего не предлагает или работает некорректно.
Скачать Installation Assistant с официального сайта
- Переходим по ссылке выше и загружаем на компьютер «Помощник по установке» Виндовс 11.
- Теперь просто запускам загруженный файл. Как видно, на нашем компьютере установлена последняя версия системы.
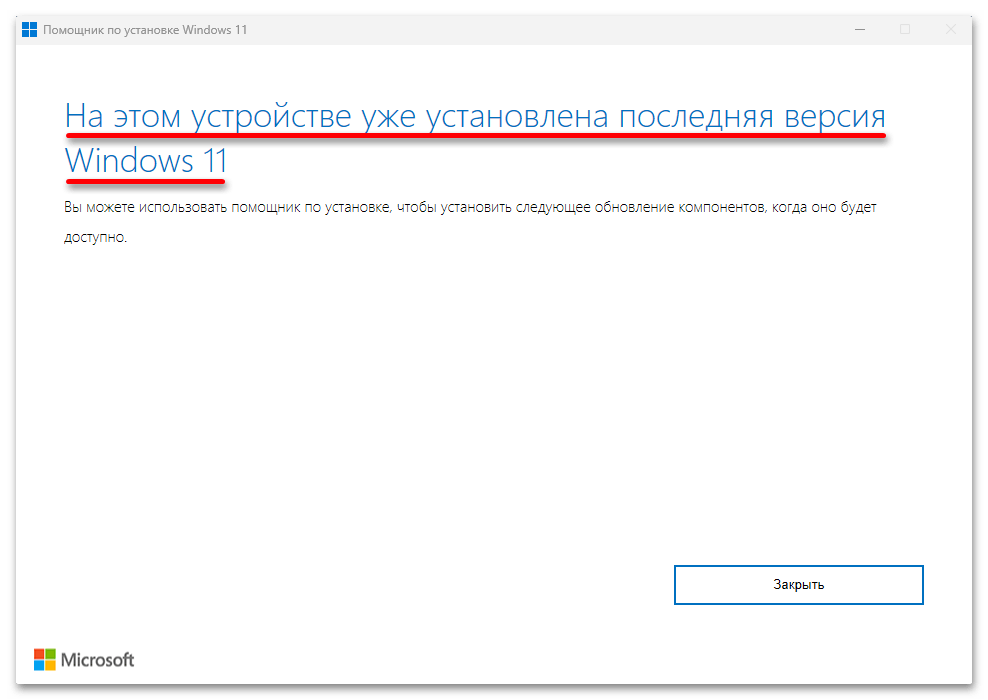
Если обновления все-таки найдутся, утилита проверит совместимость, загрузит необходимые данные и установит их автоматически без вашего участия.
Вариант 2: Каталог Microsoft
Бывает, что проблемы возникают с установкой каких-то определенных пакетов. В этом случае можно попробовать вручную загрузить их из официального хранилища.
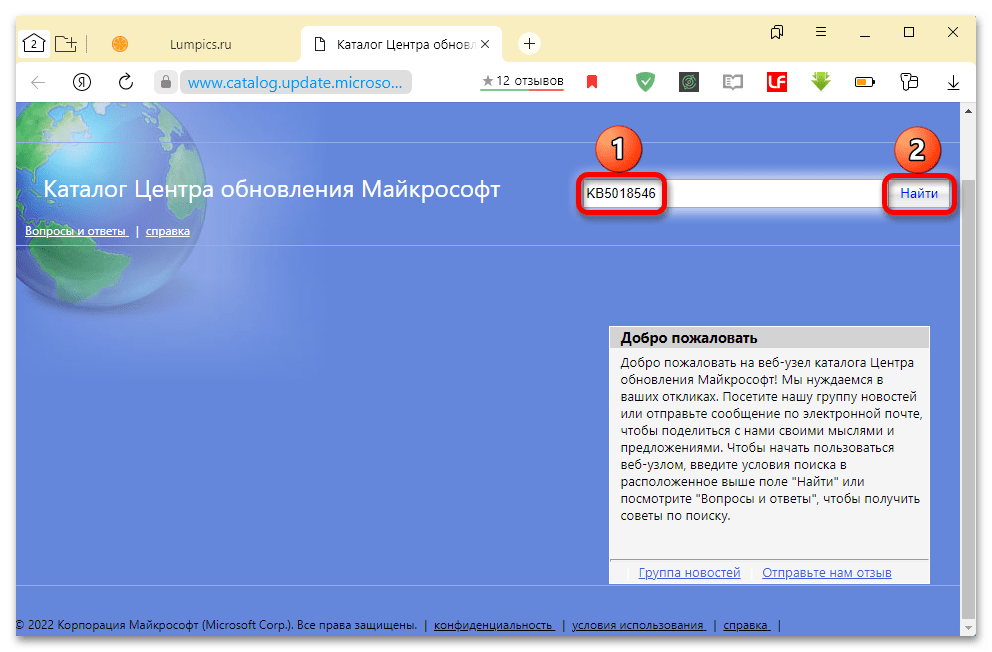
Перейти в Каталог Центра обновления Microsoft
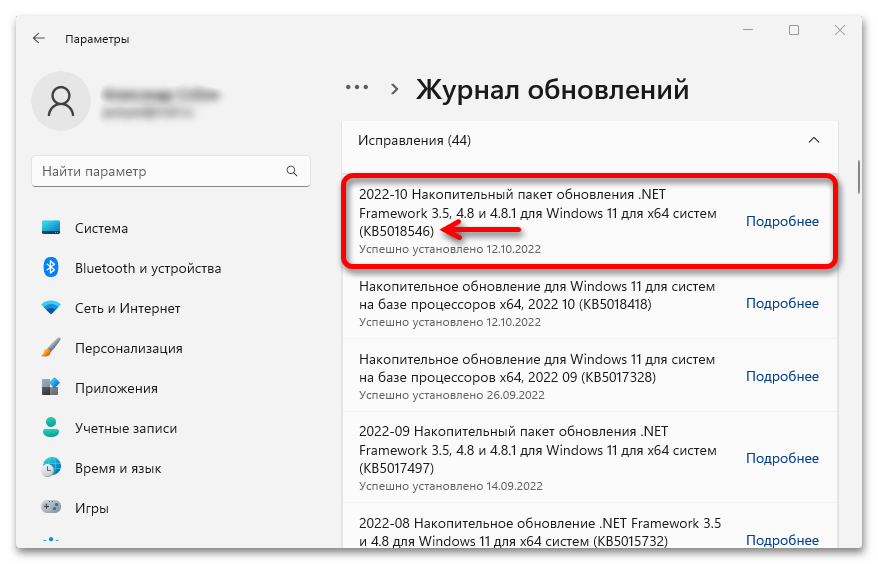
- У каждого пакета есть свой номер, по которому его можно найти. Посмотрите, как это выглядит на скриншоте ниже. Выделенный апдейт мы и используем в качестве примера.
- Кликаем ссылку в начале инструкции, а когда загрузится главная страница каталога, в поле поиска вводим номер нашего пакета и нажимаем «Найти».
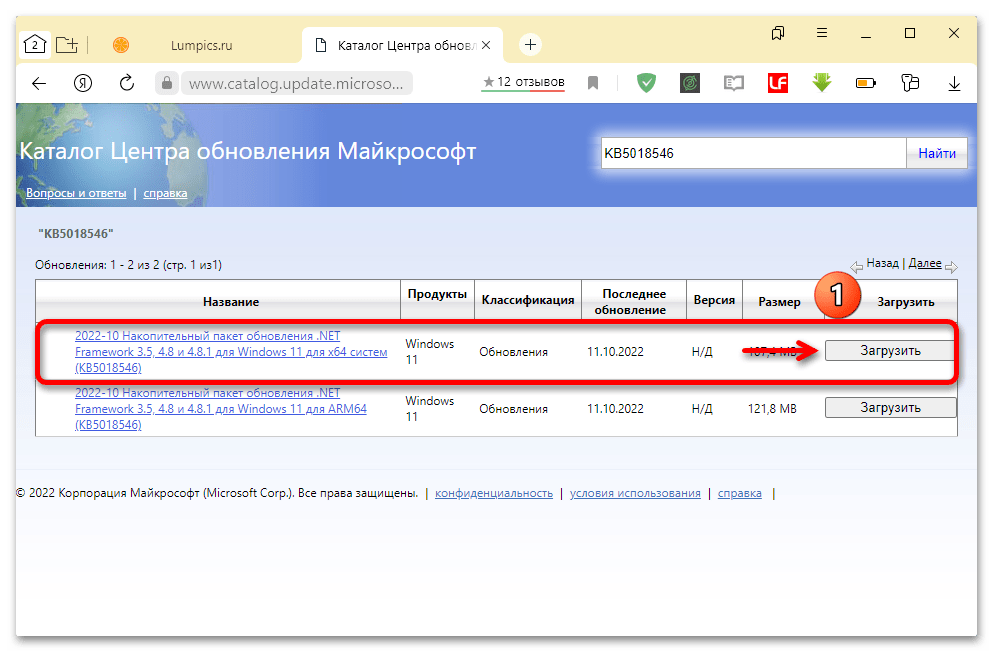
- В результатах выбираем нужную версию и жмем «Загрузить».

В данном случае предложены обновления для разных сборок Windows 11. Если первое не подойдет, можно будет попробовать установить второе. Загружаем файл, находим его на компьютере, кликаем по нему дважды и ждем завершения установки.

Способ 4: Обновление драйверов
Обязательно следует проверить наличие и актуальность всех драйверов для оборудования, установленного в компьютере. В данном случаем есть выбор – сделать это вручную через «Диспетчер устройств» или воспользоваться специальными программами. Оба варианта подробно описаны в статьях, опубликованных на нашем сайте.
Подробнее:
Установка драйверов стандартными средствами Windows
Как обновить драйвера на компьютере
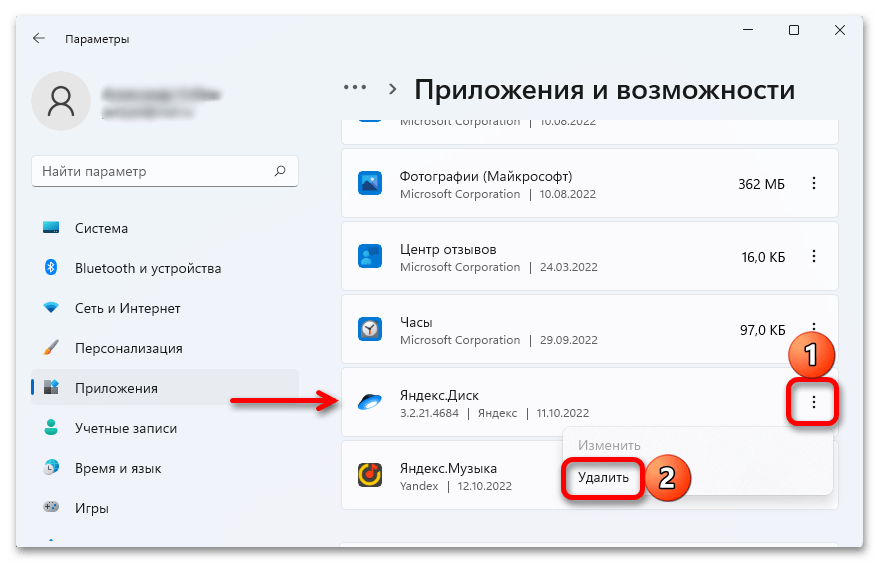
Способ 5: Удаление конфликтного ПО
Понятно, что всегда существует стандартные способы устранения тех или иных неисправностей, но иногда проблемы вызывают самые неочевидные факторы. Судя по комментариям в сети, ошибки в Центре обновлений может спровоцировать установленный на компьютере софт, а если быть конкретнее, то, например, у некоторых пользователей все начинало работать после удаления программного обеспечения «Крипто Про». Поэтому просто попробуйте удалить недавно инсталлированные игры и приложения. На нашем сайте как раз есть специальная статья, где подробно описан этот процесс.
Подробнее: Удаление программ в Windows 11
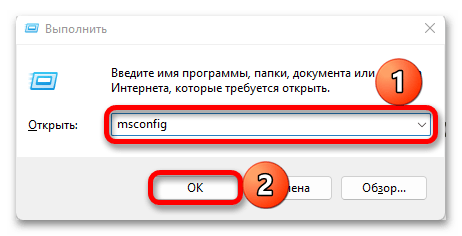
Если удаление программ не помогло, можно выполнить чистую перезагрузку, в результате которой система перезапускается с минимальным набором параметров и процессов. Это немного напоминает «Безопасный режим», но дает дополнительный контроль над тем, какие службы и компоненты будут после запуска выполняться.
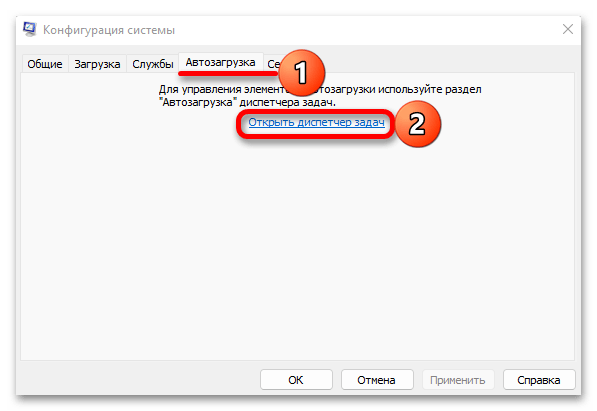
- Вызываем окно «Выполнить», используя сочетание клавиш «Windows+R», вводим команду
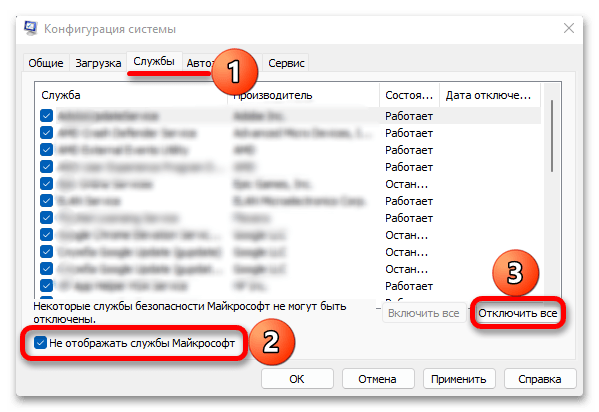
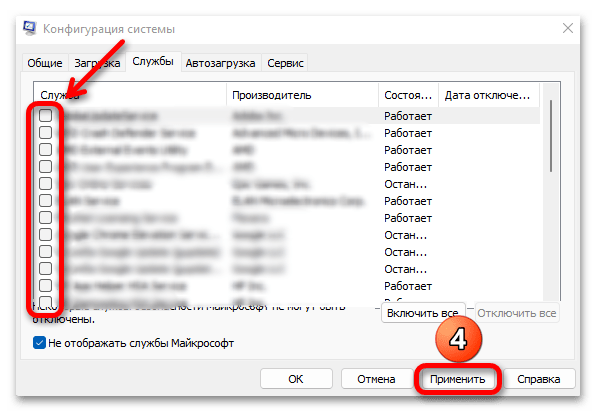
msconfigи подтверждаем ее. - Во вкладке «Службы» сначала запрещаем отображать службы Microsoft, затем отключаем оставшиеся,

а когда галочки рядом с ними пропадут, применяем изменения.
- Перемещаемся во вкладку «Автозагрузка» и нажимаем «Открыть Диспетчер задач».
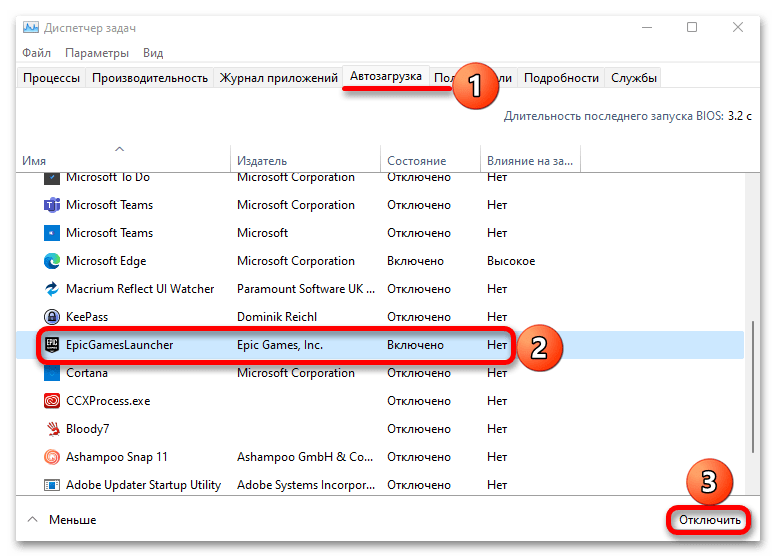
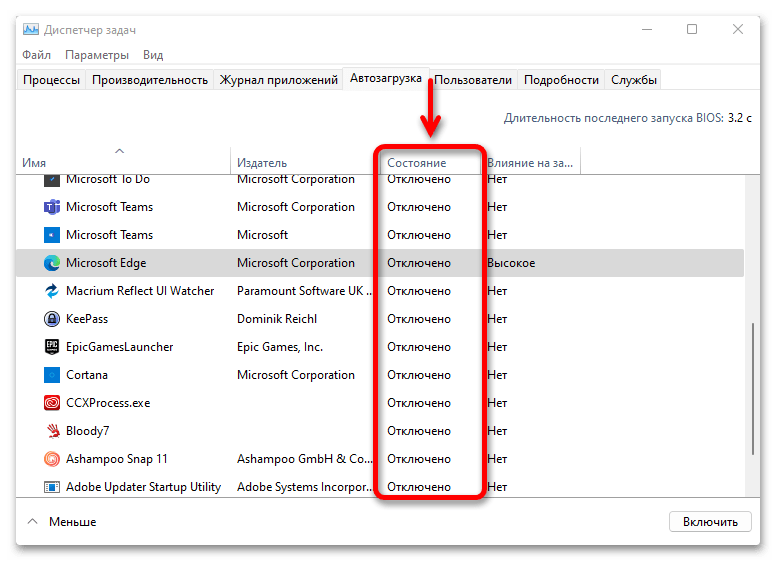
- Мы должны отключить автозагрузку всех элементов по очереди. Для этого выделяем каждый из них и нажимаем «Отключить».

Таким образом деактивируем автозапуск каждого приложения.
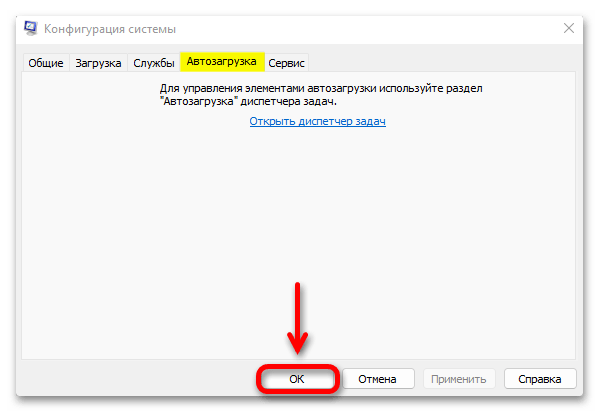
- Закрываем ДЗ, в окне «Конфигурация системы» нажимаем «OK»
и перезагружаем компьютер.

После этого Виндовс 11 загрузится только с собственными службами без фоновых процессов сторонних программ. Если ЦО начал работать, значит, один из отключенных компонентов все же вызывал конфликт и осталось только выяснить, какой. В данном случае можно действовать по-разному, например включать по одной службе и перезагружать компьютер или сразу половину, чтобы попробовать сократить время поиска.
Способ 6: Восстановительные утилиты
Если предыдущие действия не помогли, есть вероятность, что проблема связана с некорректной работой жесткого диска/SSD-накопителя или повреждением системных файлов. На этот случай операционная система поддерживает специальные «лечебные» утилиты.
Вариант 1: Проверка диска
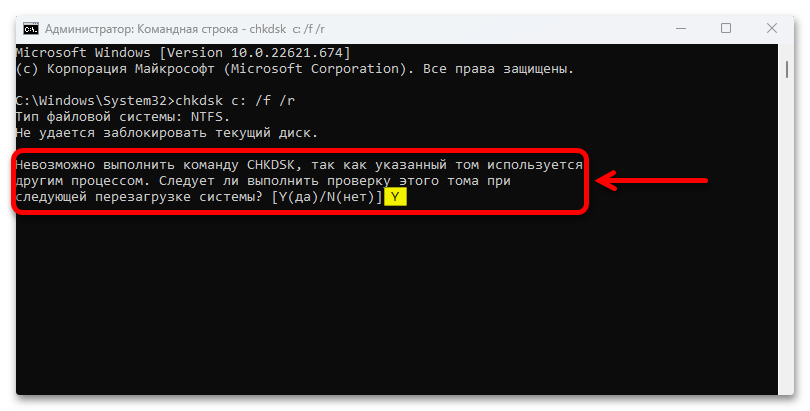
- Снова запускаем «Командную строку» с административными правами.
- Для проверки файловой системы на наличие логических и физических ошибок используется утилита «chkdsk» с дополнительными параметрами. Поэтому в область консоли вводим команду:
chkdsk c: /f /rгде С – буква логического диска, параметр «/f» исправляет все найденные ошибки, а «/r» ищет поврежденные сектора и восстанавливает удобочитаемую информацию, но для SSD-накопителей этот параметр можно не вводить, так как там поиском и переназначением битых секторов занимается контроллер. Нажимаем «Enter» для запуска команды.
- Обычно проверка начинается сразу, но в данном случае мы проверяем системный раздел, поэтому утилита запустится только после перезагрузки системы. Так что ставим значение «Y», жмем «Enter», перезагружаем компьютер и ждем, когда завершится проверка.
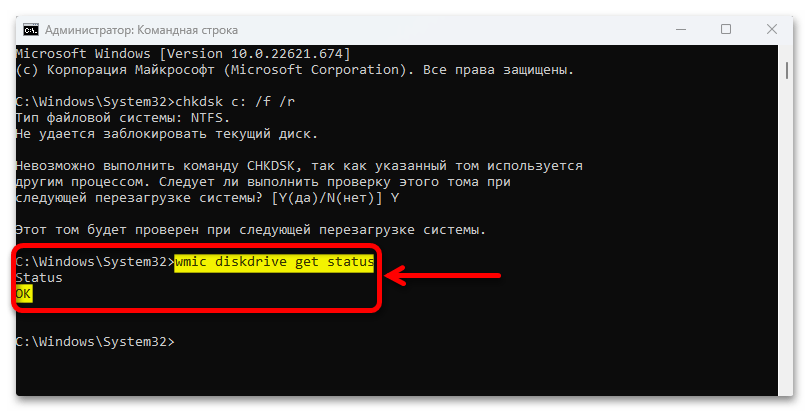
- Также можно проверить состояние накопителя на основе данных, переданных технологией S.M.A.R.T. Для этого вводим команду
wmic diskdrive get statusЕсли все в порядке, мы увидим статус «OK».

Вариант 2: Реконструкция системных файлов
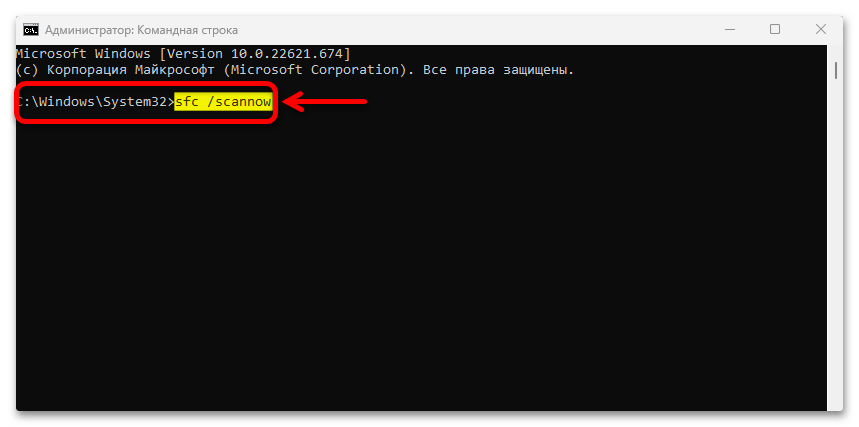
- В «Командную строку» с привилегированными правами вводим команду:
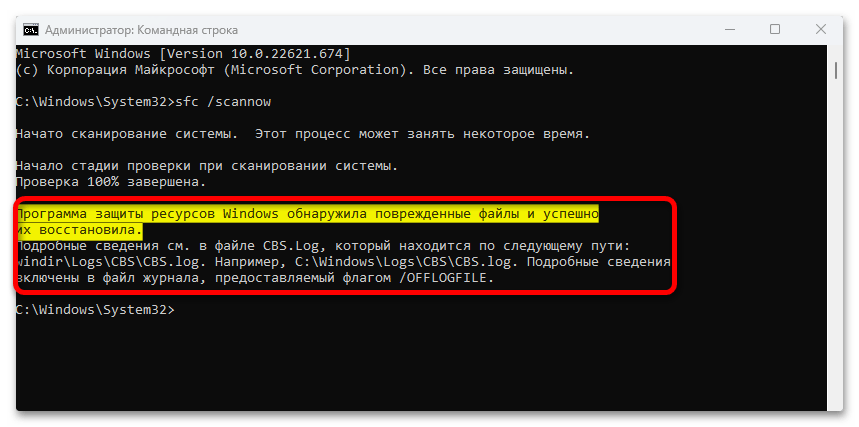
sfc /scannow
Ждем результаты сканирования. Сейчас нам повезло – программа обнаружила поврежденные файлы и сразу восстановила их.
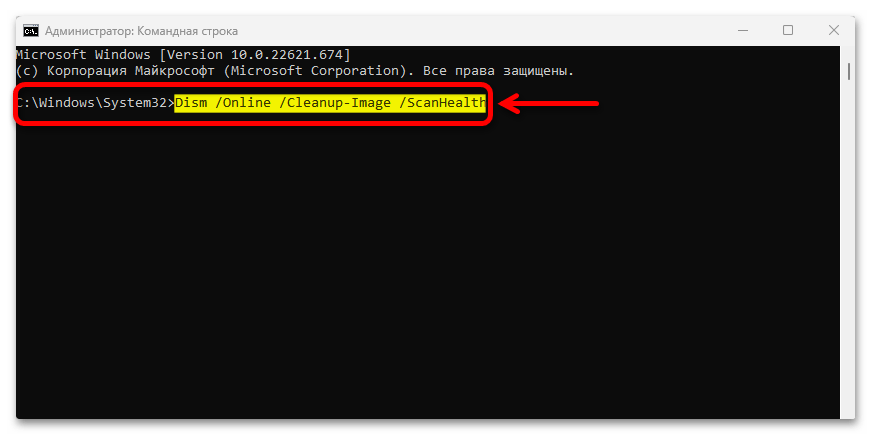
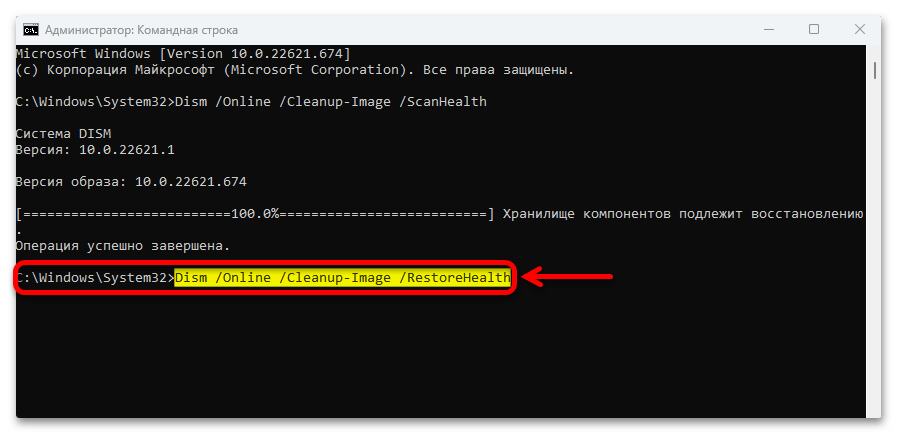
- Теперь запустим поиск повреждений хранилища компонентов Windows 11. Вводим команду:
Dism /Online /Cleanup-Image /ScanHealth
Ожидаем окончания сканирования.
- В данном случае наше хранилище подлежит восстановлению, поэтому выполняем следующую команду:
Dism /Online /Cleanup-Image /RestoreHealth
Ждем завершения процесса восстановления хранилища.


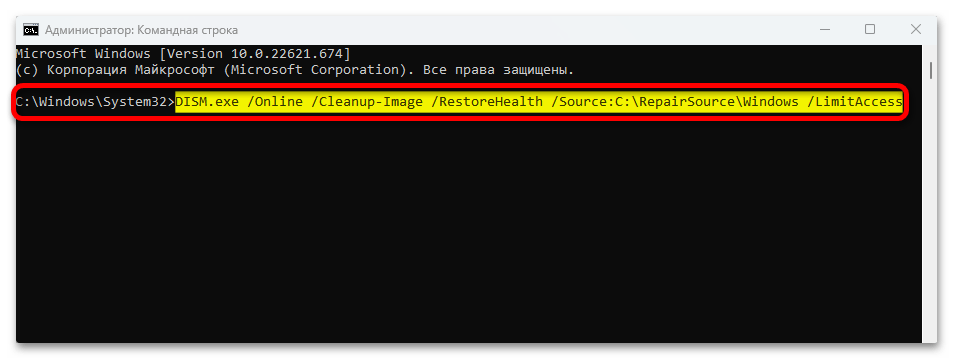
При работе с этими утилитами есть масса нюансов. Например, команда «Dism» для восстановления компонентов обращается к Центру обновления Windows, но если он тоже поврежден, придется использовать другой источник, например образ системы, загруженный на съемный носитель. Подробно о разных вариантах применения описанных выше утилит вы можете узнать в отдельной статье.
Подробнее: Использование и восстановление проверки целостности системных файлов в Windows
Способ 7: Reset Windows Update Tool
RWUT – это, скорее, не дополнительный способ, а возможность автоматизировать многие операции, которые можно сделать и вручную. В частности, нас интересует сброс ЦО Windows. Правда, разработчики вряд ли готовы нести ответственность за любые проблемы, полученные в результате использования софта, поэтому сначала лучше создать точку восстановления (ТВ).
Шаг 1: Создание точки восстановления
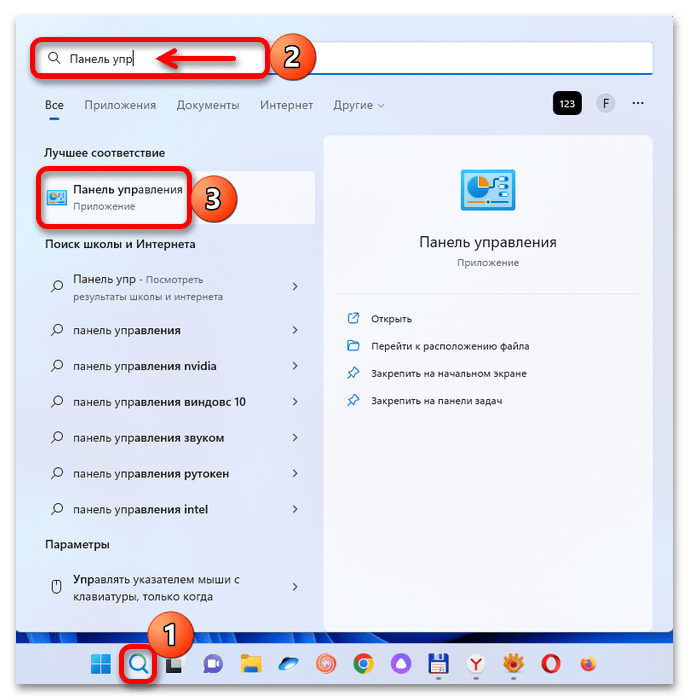
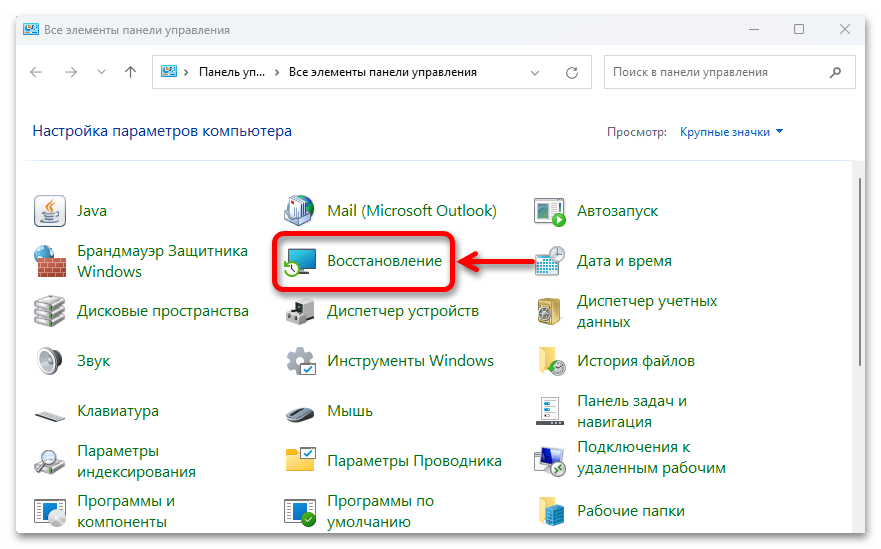
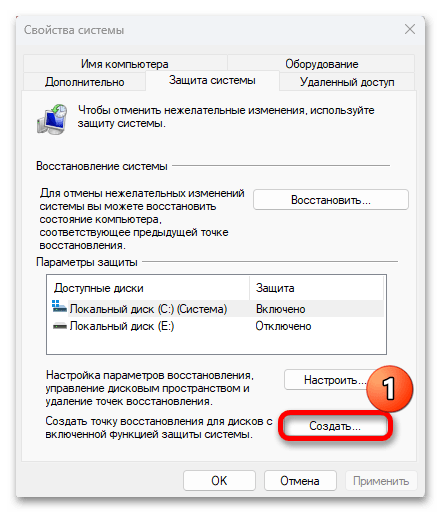
- С помощью поиска открываем «Панель управления».
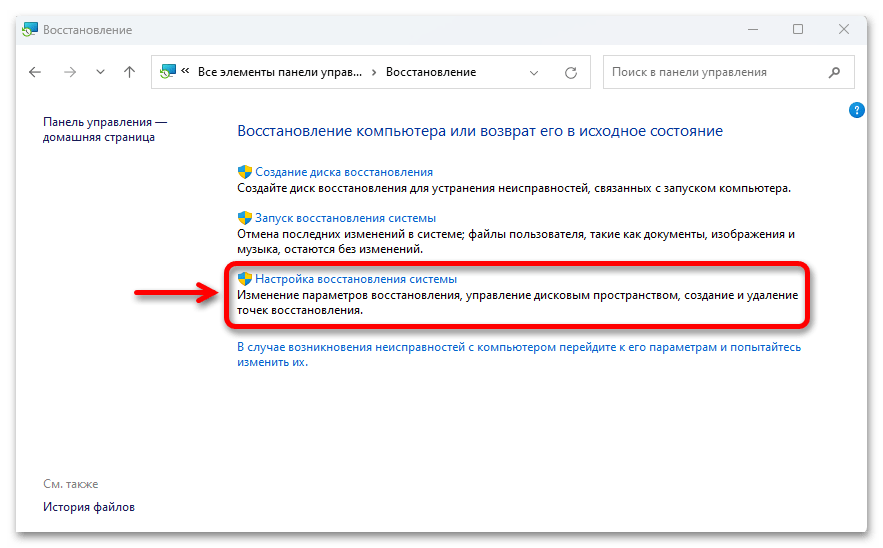
- Переходим в раздел «Восстановление»,

а затем открываем настройки восстановления системы.
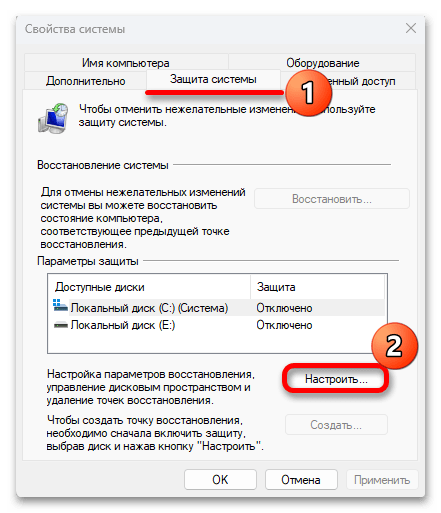
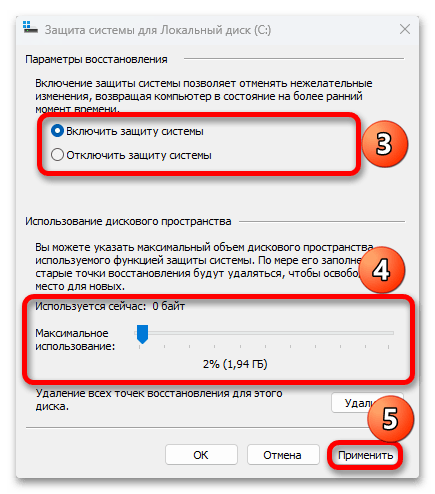
- Во вкладке «Защита системы» нажимаем «Настроить»,

включаем защиту Windows, при необходимости устанавливаем объем пространства под ТВ и нажимаем «Применить».
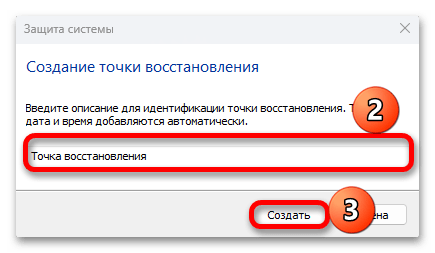
- Теперь кликаем «Создать»,
вводим имя точки восстановления и подтверждаем ее создание.
Шаг 2: Использование программы
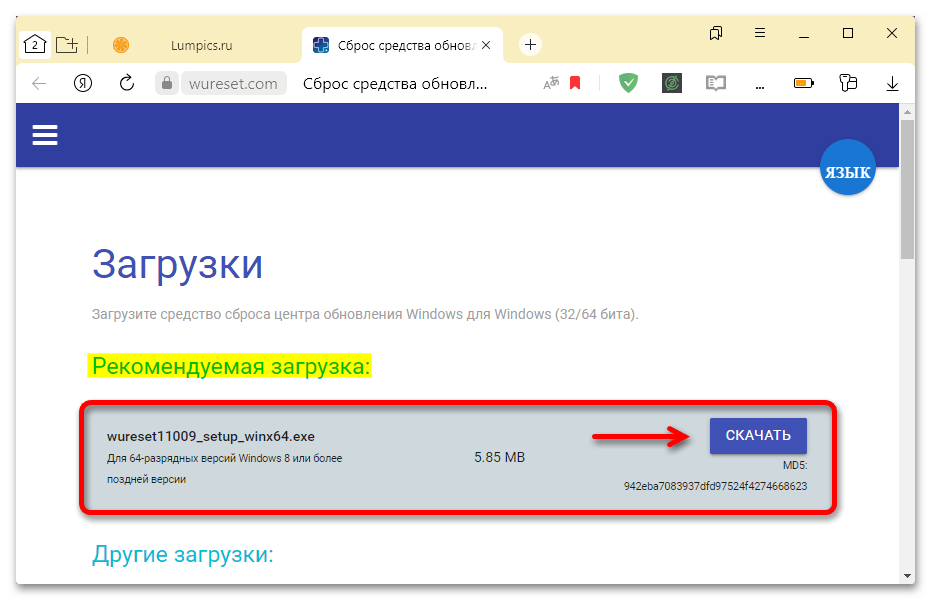
Скачать Reset Windows Update Tool с официального сайта
- Загружаем Reset Windows Update Tool по ссылке выше.
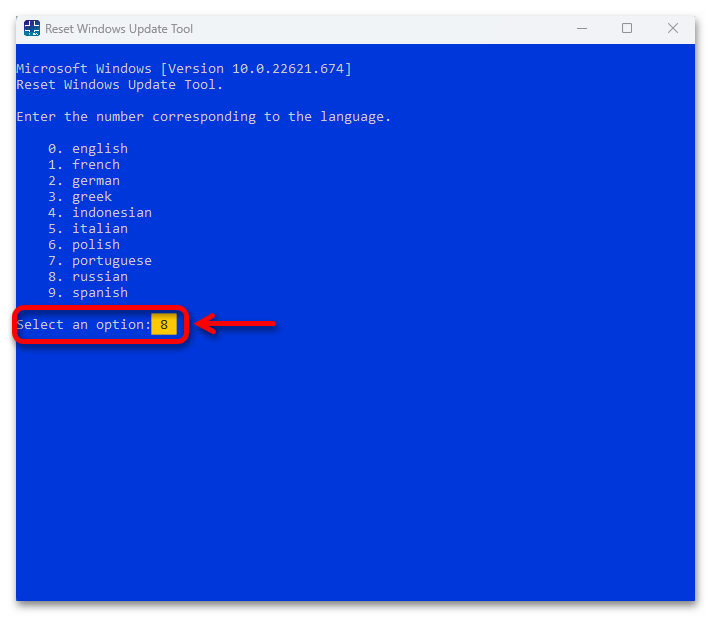
- Устанавливаем софт и запускаем с правами администратора. На первом экране нам предложат выбрать язык. В нашем случае нужен русский, поэтому вставляем значение «8» и нажимаем «Enter».

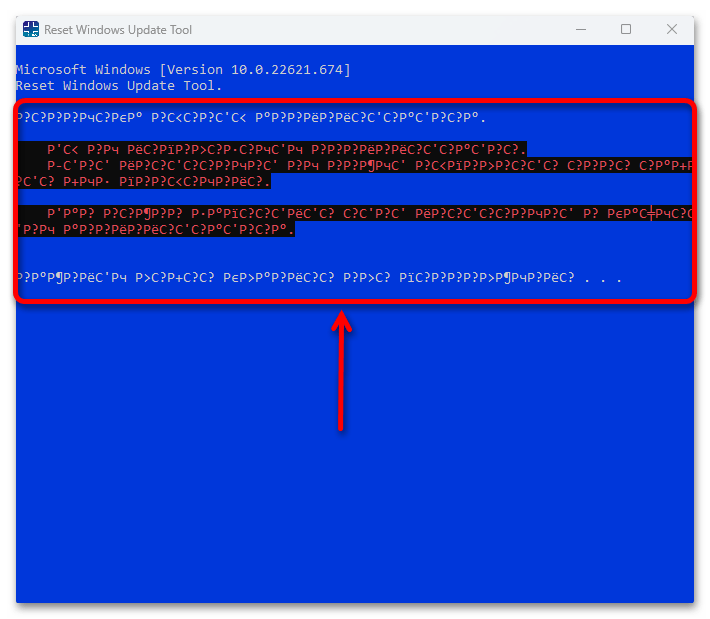
Если перевод некорректный, закрываем программу.

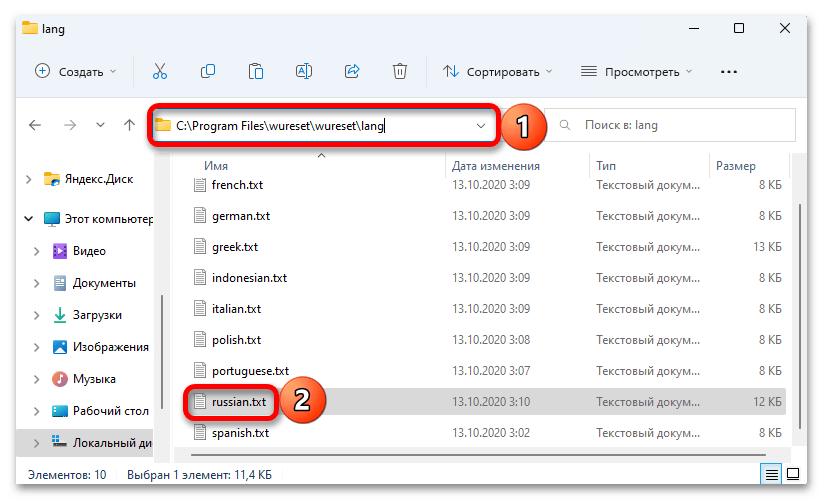
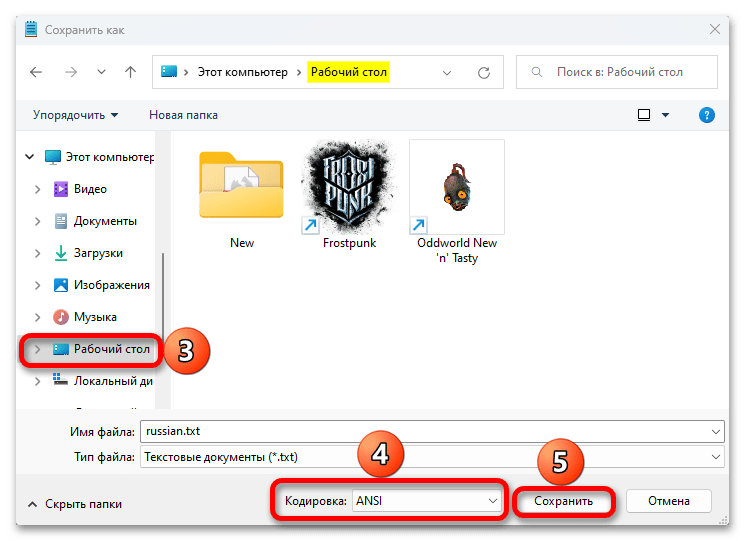
Находим расположение языковых файлов и двойным кликом открываем «Russian.txt» в блокноте.

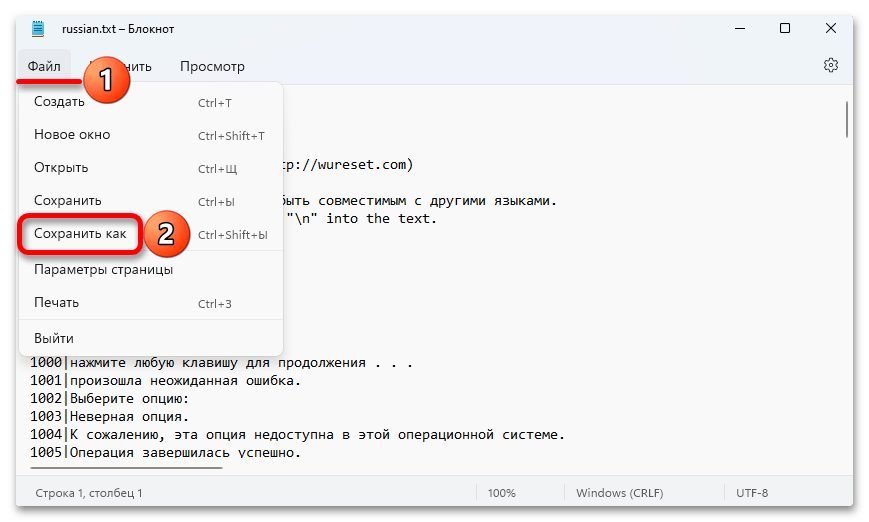
Теперь во вкладке «Файл» выбираем «Сохранить как»,

меняем кодировку с «UTF-8» на «ANSI» и сохраняем его в любое другое место, например на Рабочий стол, так как у нас нет прав на изменение этих файлов. После этого перекидываем сохраненный файл из нового места в исходную папку, т.е. заменяем его.
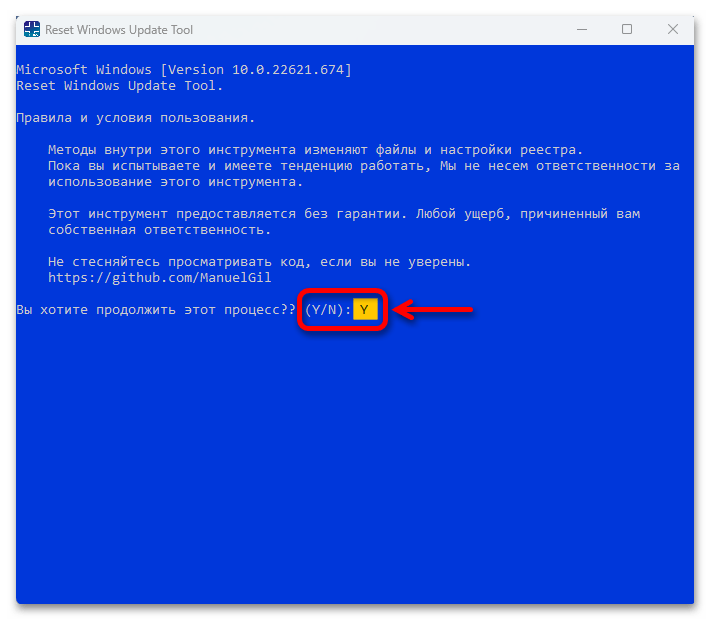
- Снова запускаем программу с повышенными правами, а чтобы подтвердить ее использование, выбираем «Y» и жмем «Enter».
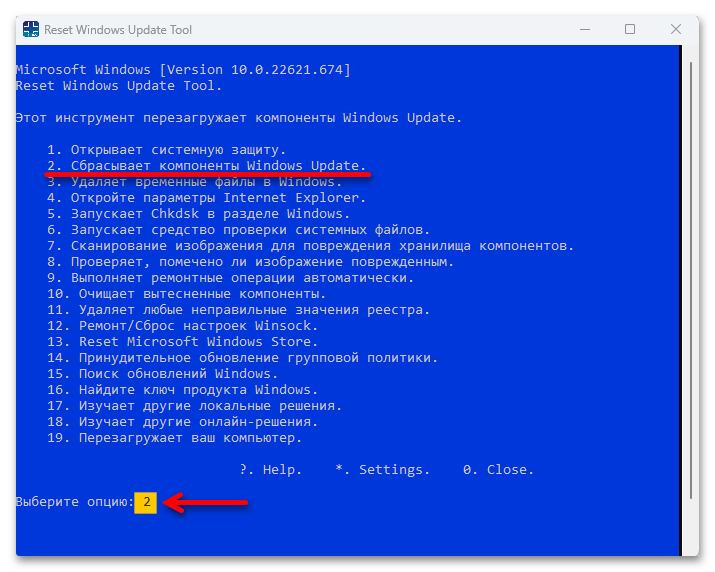
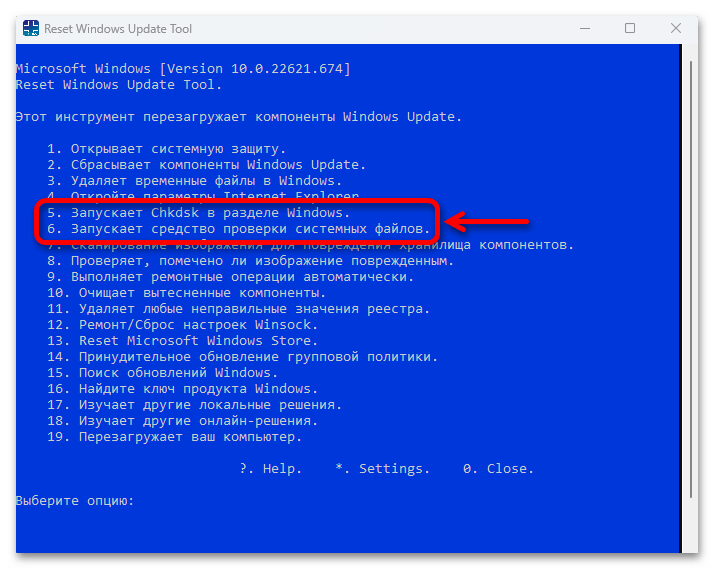
- Перед нами откроется список действий, которые может выполнить RWUT. В данном случае нас интересует «Сброс компонентов Windows Update», поэтому ставим цифру «2», нажимаем «Enter».

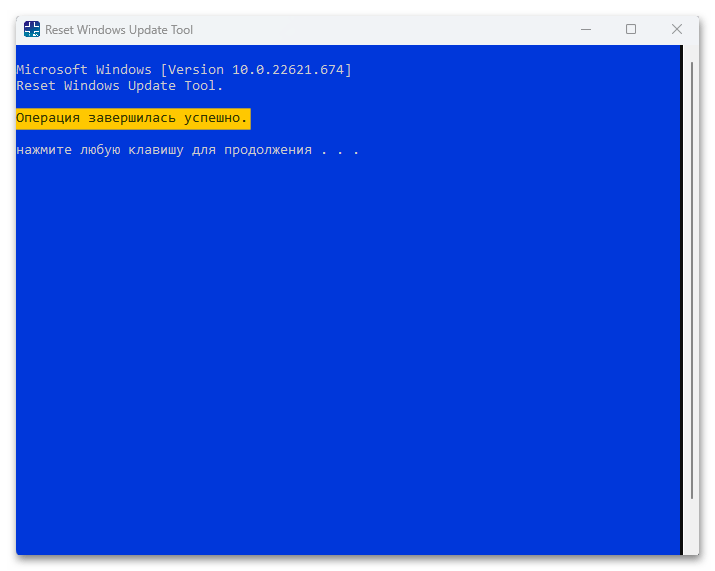
В результате мы увидим, что операция завершилась успешно. Для возвращения к списку необходимо нажать любую клавишу.
- Как видно, с помощью этого приложения можно выполнить некоторые действия, описанные в нашей статье, а именно, запустить утилиты «Chkdsk» и «Dism».
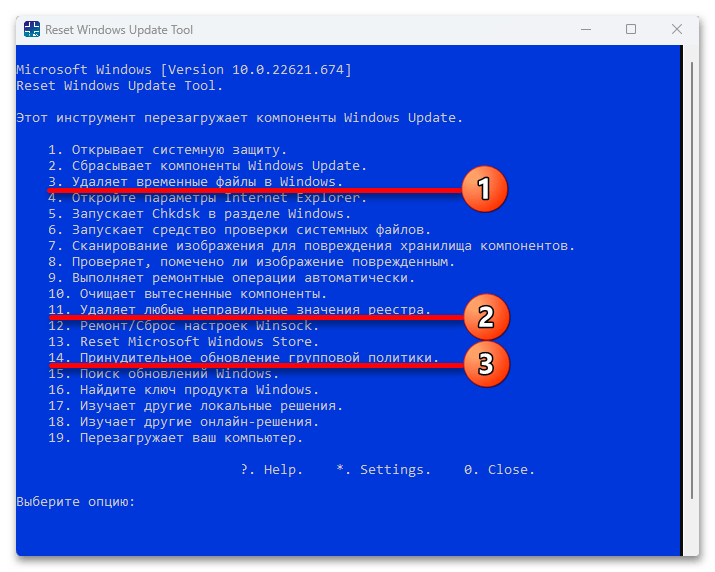
- Также при отсутствии положительного результата можно удалить временные файлы (3), неправильные значения реестра (11), обновить групповую политику (14) и т.д.
![]()
Сообщение от dubikvlad

пропала служба «Центр обновления Windows»
ну так восстановите, в чём проблема?
скачиваете ProcessHacker (в zip, распаковываете и запускаете от имени администратора).
в опциях выставляете галочку Enable kernel-mode driver, на соответствующих запрос перезагружаете программу.
далее Tools -> Create service..
в имени пишите wuauserv
в display name пишите Центр обновления Windows
в type выставляете Share process
в start type выставляете Demand start
в error control выставляете Normal
в binary path указываете путь до svchost.exe таким образом C:WINDOWSsystem32svchost.exe -k netsvcs -p
нажимаете OK
переходите во вкладку Services и ищите созданный сервис wuauserv
щелкаете 2 раза ЛКМ
на вкладке Recovery в поле First failure выставляете Restart the service (и ставите единички если их там нет)

на вкладке Triggers выставляете 2 триггера для запуска сервиса (кнопка New и выбираете как скриншоте)
на вкладке Other добавляете привилегии (кнопка Add и выбираете эти)
SeAuditPrivilege
SeCreateGlobalPrivilege
SeCreatePageFilePrivilege
SeTcbPrivilege
SeAssignPrimaryTokenPrivilege
SeImpersonatePrivilege
SeIncreaseQuotaPrivilege
SeShutdownPrivilege
SeDebugPrivilege
SeBackupPrivilege
SeRestorePrivilege
SeSecurityPrivilege
SeTakeOwnershipPrivilege
SeLoadDriverPrivilege
SeManageVolumePrivilege
SeSystemEnvironmentPrivilege
SeCreateSymbolicLinkPrivilege
SeIncreaseBasePriorityPrivilege
нажимаете OK
снова на вкладке Services нажимаете ПКМ на wuauserv и выбираете Open key попадаете в реестр
переходите в Parameters (если нет этой папке, создайте её) и создаёте три параметра как на скриншоте
строковый параметр ServiceDll — %systemroot%system32wuaueng.dll
параметр DWORD 32 бита ServiceDllUnloadOnStop — 1
строковый параметр ServiceMain — WUServiceMain
перезагружаете компьютер и проверяете сервис на работоспособность.
Skip to content
- ТВикинариум
- Форум
- Поддержка
- PRO
- Войти
Пропал Центр обновлений [Решено]

Цитата: esvikey от 04.11.2022, 20:26Добрый день. После обновления десятки до 22H2 и установки твиков (хотя не уверен в этом) пропал Центр обновлений. Его нет в «Обновлении и безопасности» «Параметров», при нажатии в верхнем меню параметров не открывается. Откатывал все твики, не помогает. Как можно решить?
Добрый день. После обновления десятки до 22H2 и установки твиков (хотя не уверен в этом) пропал Центр обновлений. Его нет в «Обновлении и безопасности» «Параметров», при нажатии в верхнем меню параметров не открывается. Откатывал все твики, не помогает. Как можно решить?
Цитата: esvikey от 04.11.2022, 20:39Поправлю. Откатывал все службы в W10T. Проблема решилась откатом всех твиков.
Поправлю. Откатывал все службы в W10T. Проблема решилась откатом всех твиков.

Цитата: Сергей от 04.11.2022, 20:54esvikey, добрый вечер 🖐
Вы указали в Службах, что не пользуетесь обновлениями. Помимо простого отключения Служб, Win 10 Tweaker под капотом полностью отключает и скрывает Центр обновления Windows.
Если он Вам нужен, откатывайте Службы, не забудьте перезагрузиться, а затем настройте заново под себя, исключая категорию обновлений в Службах.
esvikey, добрый вечер 🖐
Вы указали в Службах, что не пользуетесь обновлениями. Помимо простого отключения Служб, Win 10 Tweaker под капотом полностью отключает и скрывает Центр обновления Windows.
Если он Вам нужен, откатывайте Службы, не забудьте перезагрузиться, а затем настройте заново под себя, исключая категорию обновлений в Службах.
Цитата: esvikey от 04.11.2022, 21:02Сергей, именно это я первым делом и проверил, службы обновления не были отключены. Более того, откат всех служб не помог. Пункт с обновлениями появился только после отката всех твиков в программе. Сейчас снова настроил все твики и службы, Центр обновлений пропал. Не знаю, какая галка высекает Центр обновлений, но проблема точно не в службах.
«Службы», «Обновления и безопасность»
Сергей, именно это я первым делом и проверил, службы обновления не были отключены. Более того, откат всех служб не помог. Пункт с обновлениями появился только после отката всех твиков в программе. Сейчас снова настроил все твики и службы, Центр обновлений пропал. Не знаю, какая галка высекает Центр обновлений, но проблема точно не в службах.
«Службы», «Обновления и безопасность»
Цитата: esvikey от 04.11.2022, 21:04Мда, сейчас увидел свою слепошарость. Прошу прощения за мозготрёп.
Мда, сейчас увидел свою слепошарость. Прошу прощения за мозготрёп.
Цитата: esvikey от 04.11.2022, 21:09Выключение обновлений активируется после отключение «Киоска». Может, стоит это указать в описании?
Выключение обновлений активируется после отключение «Киоска». Может, стоит это указать в описании?
Цитата: Сергей от 04.11.2022, 21:24esvikey, когда Вы в первый посещали Службы, Win 10 Tweaker предложил Вам посмотреть это видео, где объяснялось про такие моменты.
esvikey, когда Вы в первый посещали Службы, Win 10 Tweaker предложил Вам посмотреть это видео, где объяснялось про такие моменты.
Центр обновления Windows — важная услуга, предоставляемая Microsoft. Кроме того, каждое обновление устраняет проблемы, предоставляет новые проблемы безопасности и обновляет различные функции Windows. Отсутствие службы обновления Windows означает, что служба «wuauserv» или «Центр обновления Windows» отсутствует в списке служб в services.msc. Эта проблема обычно приводит к ошибке. При установке обновлений возникли некоторые проблемы, но мы попробуем позже с кодами ошибок 0x80070006, 0x80080005 или 0x80070424. Более того, нет определенных причин, по которым возникает эта ошибка или почему служба обновлений удаляется. Обычно подозреваются сторонние приложения или повреждение файлов обновлений Windows.
Ошибка службы обновления Windows
Несмотря на то, что пользователи могут откладывать обновления или предпочитать не обновлять, приложения, связанные с Windows, могут перестать отвечать. Microsoft Store, например, перестает работать, если у вас слишком много версий от текущей. Более того, даже сторонние приложения сталкиваются с проблемами во время работы или могут вообще не запускаться из-за отсутствия важных файлов в Windows.
Перезагрузите ПК
Это решение следует использовать, когда на вашем диске нет важных файлов. Кроме того, этот метод устанавливает чистую установку Windows из приложения настроек Windows. Точно так же есть вероятность, что вам, возможно, придется удалить все ваши файлы, потому что они могли быть повреждены. Однако этот вариант также дает возможность сохранить ваши данные. Но на всякий случай всегда следует создавать резервную копию своих данных. Чтобы перезагрузить компьютер:
- Сначала нажмите клавишу Windows и введите Настройки.
Настройки Windows
- Щелкните Обновление и безопасность.
Обновление и безопасность
- Затем перейдите в Recovery
- После этого нажмите «Начать работу» в разделе «Сбросить этот компьютер».
Сбросить этот компьютер
- Наконец, выберите либо сохранить личные файлы, либо удалить все.
- Наконец, Windows перезагрузит ваш компьютер. Ваш компьютер может перезагружаться несколько раз.
Создать запись в реестре
С другой стороны, если вы не разбираетесь в технологиях или не хотите рисковать потерять свои данные, вы можете попробовать это решение. Доказано, что он работает на всех форумах и не имеет никаких рисков. Дело в том, что в большинстве случаев ключ обновления Windows отсутствует в системном реестре Windows. Для сравнения, этот метод так же прост в применении, как и предыдущий, без риска потери данных. Чтобы воссоздать ключ реестра:
- Сначала создайте новый блокнот или текстовый файл.
- Скопируйте следующий текст в файл.
Редактор реестра Windows версии 5.00
[HKEY_LOCAL_MACHINESYSTEMCurrentControlSetServiceswuauserv]
«DependOnService» = hex (7): 72,00,70,00,63,00,73,00,73,00,00,00,00,00 «Описание» = «@% systemroot% system32 wuaueng.dll, -106 «» DisplayName «=» @% systemroot% system32 wuaueng.dll, -105 «» ErrorControl «= dword: 00000001» FailureActions «= hex: 80,51,01,00,00 , 00,00,00,00,00,00,00,03,00,00,00,14,00,00, 00,01,00,00,00,60, шт., 00,00,00, 00,00,00,00,00,00,00,00,00,00,00,00,00,00,00 «ImagePath» = hex (2): 25,00,73,00,79,00, 73,00,74,00,65,00,6d, 00,72,00,6f, 00,6f, 00, 74,00,25,00,5c, 00,73,00,79,00,73 , 00,74,00,65,00,6d, 00,33,00,32,00,5c, 00,73, 00,76,00,63,00,68,00,6f, 00,73, 00,74,00,2e, 00,65,00,78,00,65,00,20,00,2d, 00, 6b, 00,20,00,6e, 00,65,00,74,00 , 73,00,76,00,63,00,73,00,20,00,2d, 00,70,00,00, 00 «ObjectName» = «LocalSystem» «RequiredPrivileges» = hex (7): 53 , 00,65,00,41,00,75,00,64,00,69,00,74,00,50,00,72, 00,69,00,76,00,69,00,6c, 00,65,00,67,00,65,00,00,00,53,00,65,00,43,00,72,00, 65,00,61,00,74,00,65,00 , 47,00,6c, 00,6f, 00,62,00,61,00,6c, 00,50,00,72,00,69, 00,76,00,69,00,6c, 00, 65,00,67,00,65,00,00,00,53,00,65,0 0,43,00,72,00,65,00, 61,00,74,00,65,00,50,00,61,00,67,00,65,00,46,00,69,00 , 6c, 00,65,00,50,00,72, 00,69,00,76,00,69,00,6c, 00,65,00,67,00,65,00,00,00, 53,00,65,00,54,00,63,00, 62,00,50,00,72,00,69,00,76,00,69,00,6c, 00,65,00,67 , 00,65,00,00,00,53,00,65, 00,41,00,73,00,73,00,69,00,67,00,6e, 00,50,00,72, 00,69,00,6d, 00,61,00,72,00, 79,00,54,00,6f, 00,6b, 00,65,00,6e, 00,50,00,72,00 , 69,00,76,00,69,00,6c, 00,65, 00,67,00,65,00,00,00,53,00,65,00,49,00,6d, 00, 70,00,65,00,72,00,73,00,6f, 00, 6e, 00,61,00,74,00,65,00,50,00,72,00,69,00,76 , 00,69,00,6c, 00,65,00,67,00,65, 00,00,00,53,00,65,00,49,00,6e, 00,63,00,72, 00,65,00,61,00,73,00,65,00,51,00, 75,00,6f, 00,74,00,61,00,50,00,72,00,69,00 , 76,00,69,00,6c, 00,65,00,67,00,65, 00,00,00,53,00,65,00,53,00,68,00,75,00, 74,00,64,00,6f, 00,77,00,6e, 00,50,00, 72,00,69,00,76,00,69,00,6c, 00,65,00,67 , 00,65,00,00,00,53,00,65,00,44,00,65, 00,62,00,75,00,67,00,50,00,72,00,69, 00,76,00,69,00,6c, 00,65,00,67,00,65,00, 00,00,53,00,65,00,42,00,61,00,63,00 , 6b, 00,75,00,70,00, 50,00,72,00,69,00,76, 00,69,00,6c, 00,65,00,67,00,65,00,00,00,53,00,65,00,52 , 00,65,00,73,00,74,00, 6f, 00,72,00,65,00,50,00,72,00,69,00,76,00,69,00,6c, 00,65,00,67,00,65,00,00, 00,53,00,65,00,53,00,65,00,63,00,75,00,72,00,69,00 , 74,00,79,00,50,00,72,00, 69,00,76,00,69,00,6c, 00,65,00,67,00,65,00,00,00, 53,00,65,00,54,00,61,00,6b, 00,65,00,4f, 00,77,00,6e, 00,65,00,72,00,73,00,68 , 00,69,00,70,00,50,00,72,00, 69,00,76,00,69,00,6c, 00,65,00,67,00,65,00,00, 00,53,00,65,00,4c, 00,6f, 00,61, 00,64,00,44,00,72,00,69,00,76,00,65,00,72,00 , 50,00,72,00,69,00,76,00,69,00, 6c, 00,65,00,67,00,65,00,00,00,53,00,65,00, 4d, 00,61,00,6e, 00,61,00,67,00,65, 00,56,00,6f, 00,6c, 00,75,00,6d, 00,65,00,50 , 00,72,00,69,00,76,00,69,00,6c, 00, 65,00,67,00,65,00,00,00,00,00 «ServiceSidType» = dword: 00000001 «Старт» = двойное слово: 00000003 «SvcHostSplitDisable» = двойное слово: 00000001 «SvcMemHardLimitInMB» = двойное слово: 000000f6 «SvcMemMidLimitInMB» = двойное слово: 000000a7 «SvcMemSoftLimitInMB» = dword20: 00000058 Тип:
[HKEY_LOCAL_MACHINESYSTEMCurrentControlSetServiceswuauservParameters]
«ServiceDll» = шестнадцатеричный (2): 25,00,73,00,79,00,73,00,74,00,65,00,6d, 00,72,00,6f, 00,6f, 00, 74,00,25,00,5c, 00,73,00,79,00,73,00,74,00,65,00,6d, 00,33,00,32,00,5c, 00, 77 , 00,75,00,61,00,75,00,65,00,6e, 00,67,00,2e, 00,64,00,6c, 00,6c, 00,00,00 «ServiceDllUnloadOnStop» = dword: 00000001 «ServiceMain» = «WUServiceMain»
[HKEY_LOCAL_MACHINESYSTEMCurrentControlSetServiceswuauservSecurity]
«Безопасность» = шестнадцатеричный: 01,00,14,80,78,00,00,00,84,00,00,00,14,00,00,00,30,00,00,00,02, 00 , 1c, 00,01,00,00,00,02,80,14,00, ff, 00,0f, 00,01,01,00,00,00,00,00,01,00,00, 00,00,02,00,48,00,03,00,00,00,00,14,00,9d, 00,02,00,01,01,00,00,00,00,00, 05,0b, 00,00,00,00,00,18,00, ff, 01,0f, 00,01,02,00,00,00,00,00,05,20,00,00,00 , 20,02,00,00,00,00,14,00, ff, 01,0f, 00,01,01,00,00,00,00,00,05,12,00,00,00, 01, 01,00,00,00,00,00,05,12,00,00,00,01,01,00,00,00,00,00,05,12,00,00,00
[HKEY_LOCAL_MACHINESYSTEMCurrentControlSetServiceswuauservTriggerInfo]
[HKEY_LOCAL_MACHINESYSTEMCurrentControlSetServiceswuauservTriggerInfo]
«Type» = dword: 00000005 «Action» = dword: 00000001 «Guid» = hex: e6, ca, 9f, 65, db, 5b, a9,4d, b1, ff, ca, 2a, 17,8d, 46, e0
[HKEY_LOCAL_MACHINESYSTEMCurrentControlSetServiceswuauservTriggerInfo1]
«Type» = dword: 00000005 «Action» = dword: 00000001 «Guid» = hex: c8,46, fb, 54,89, f0,4c, 46, b1, fd, 59, d1, b6,2c, 3b, 50
- Во-вторых, установите Тип файла: для Все файлы.
Сохранить как файл .reg
- Затем сохраните файл с любым именем, но добавьте расширение .reg.
- Кроме того, где бы файл ни был сохранен, он будет отображаться со значком редактора реестра.
Файл реестра
- Запустите файл. В диалоговом окне безопасности нажмите Да.
Щелкните Да
- Затем проигнорируйте проверку безопасности.
Щелкните Да
- Ваш ключ добавлен.
Ключ реестра добавлен
- Вы также можете скачать файл из Вот.
- После этого запустите файл. Затем в диалоговом окне безопасности нажмите Да.
- Наконец, повторите шаги 8 и 9.
![]()
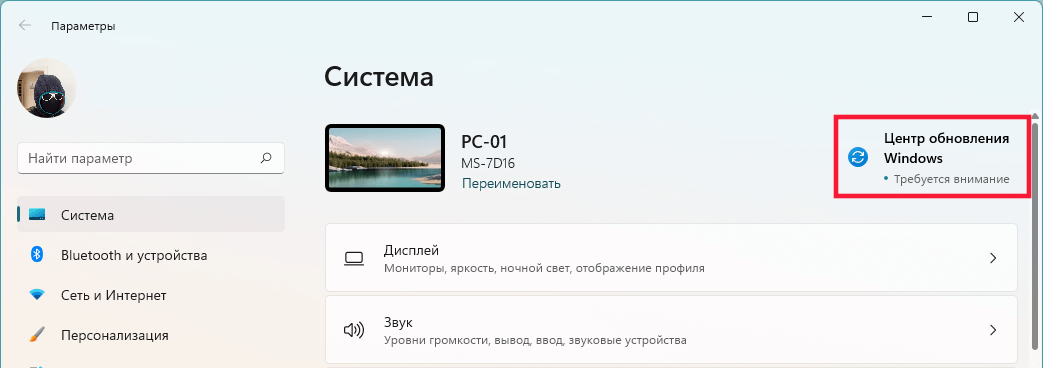
На многих компьютерах под управлением Windows 11 стала наблюдаться проблема с запуском центра обновления. В системных настройках висит уведомление, что требуется обратить внимание на обновления, но открыть настройки не удаётся. Ничего не происходит и при нажатии на пункт в системных настройках.
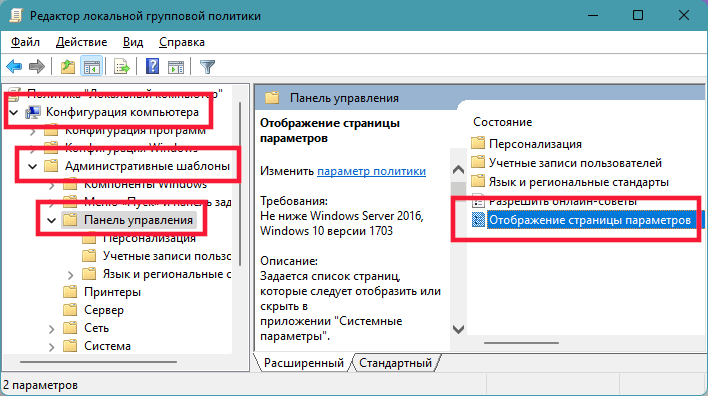
Для исправления потребуется изменить конфигурацию локальной групповой политики.
-
Открываем редактор локальной групповой политики. Проще всего это сделать через стандартный поиск Windows. Вводим запрос «Локальная политика безопасности» или часть «Редактор локальной групповой политики».
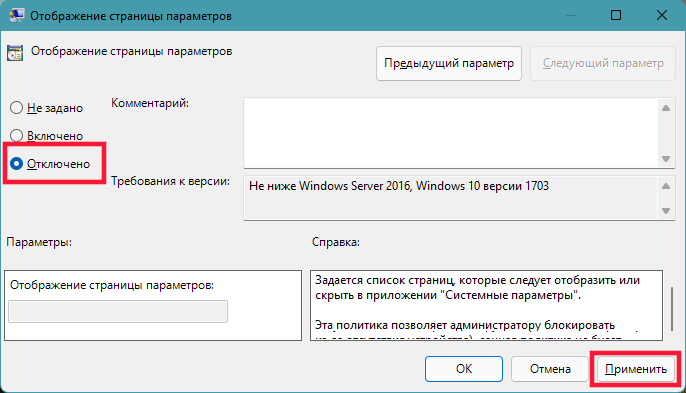
В левом окне выбираем «Конфигурация компьютера» — «Административные шаблоны» — «Панель управления». В правом окне — «Отображение страницы параметров».
-
Отключим настройку. Не забываем нажать кнопку «Применить».
-
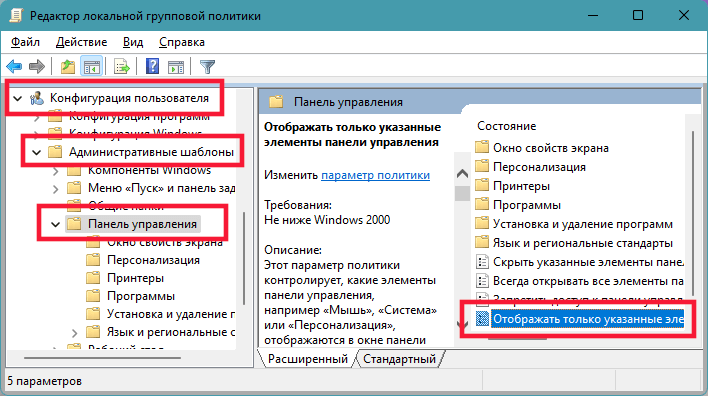
Теперь находим аналогичную настройку в «Конфигурация пользователя» — «Административные шаблоны» — «Панель управления».
В правом окне — «Отображать только указанные элементы панели управления».
-
Отключаем.
-
Перезагружаем компьютер.
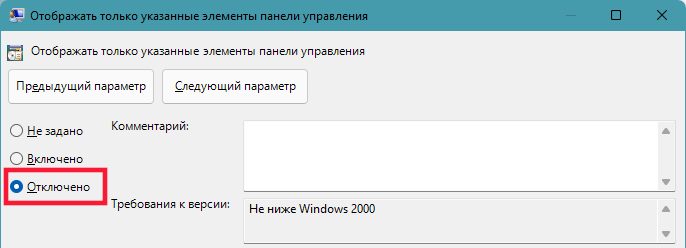
После перезагрузки можно открыть центр обновления.
This issue prevents the installation of the new OS
by Kazim Ali Alvi
Kazim has always been fond of technology, be it scrolling through the settings on his iPhone, Android device, or Windows. And at times, unscrewing the device to take… read more
Published on November 28, 2022
Reviewed by
Vlad Turiceanu

Passionate about technology, Windows, and everything that has a power button, he spent most of his time developing new skills and learning more about the tech world. Coming… read more
- A lot of users have reported being the Windows 11 update not showing in Windows 10 on the Windows Update tool.
- If you using a PC that meets that minimum requirement, you should receive the update in a while since the roll-out is in a phased manner. However, there are ways to make the jump even sooner.
- Check for any issues with the Windows Update, namely, if they are paused, stuck, or the presence of conflicting programs.
- Also, learn how to install Windows 11 on unsupported PCs.
XINSTALL BY CLICKING THE DOWNLOAD FILE
- Download Restoro PC Repair Tool that comes with Patented Technologies (patent available here).
- Click Start Scan to find broken files that are causing the problems.
- Click Repair All to fix issues affecting your computer’s security and performance
- Restoro has been downloaded by 0 readers this month.
Windows 11 has been rolled out for users, though in a phased manner. PCs that are compatible should receive an update in the days to follow. However, many users have reported Windows 11 not showing up in Windows Update.
The Windows 11 update not showing up issue could be due to a bunch of reasons, some related to your computer’s compatibility while others to the phased rollout. Whatever the case, there are ways you can get your hands on the latest Windows iteration from Microsoft.
If you have been checking the Windows Update section time and again to upgrade but to no avail, read ahead to find out the various ways you can install Windows 11 on your computer.
Why don’t I see the Windows 11 update?
A large number of computers wouldn’t be able to upgrade to Windows 11 owing to the strict system requirements. And Microsoft has its reasoning for that.
Can my PC run Windows 11?
To check whether a computer can run Windows 11, Microsoft has released the PC Health Check app. Just download and install the app, run it, and you will find out whether or not your system is compatible.
If you get the message This PC meets Windows 11 requirements, your computer is compatible. Head over to the next section to find out ways to make the upgrade even if Windows 11 is not showing up in Windows Update.
For those of you who see This PC doesn’t currently meet the Windows 11 system requirements, you wouldn’t be receiving the upgrade via Windows Update. Head over to the end to find out how you can install Windows 11 on an unsupported PC.
What can I do if the Windows 11 update is not showing up?
- Why don’t I see the Windows 11 update?
- Can my PC run Windows 11?
- What can I do if the Windows 11 update is not showing up?
- 1. Resume Windows Update
- 2. Reboot the computer
- 3. Run the Windows Update troubleshooter
- 4. Repair Windows Update components
- 5. Restart the Windows 11 update
- 6. Disable or uninstall conflicting apps
- 7. Use the Installation Media
- Can I use the Windows 11 Installation Assistant to upgrade?
- What do I do if my PC doesn’t meet the system requirements for Windows 11?
1. Resume Windows Update
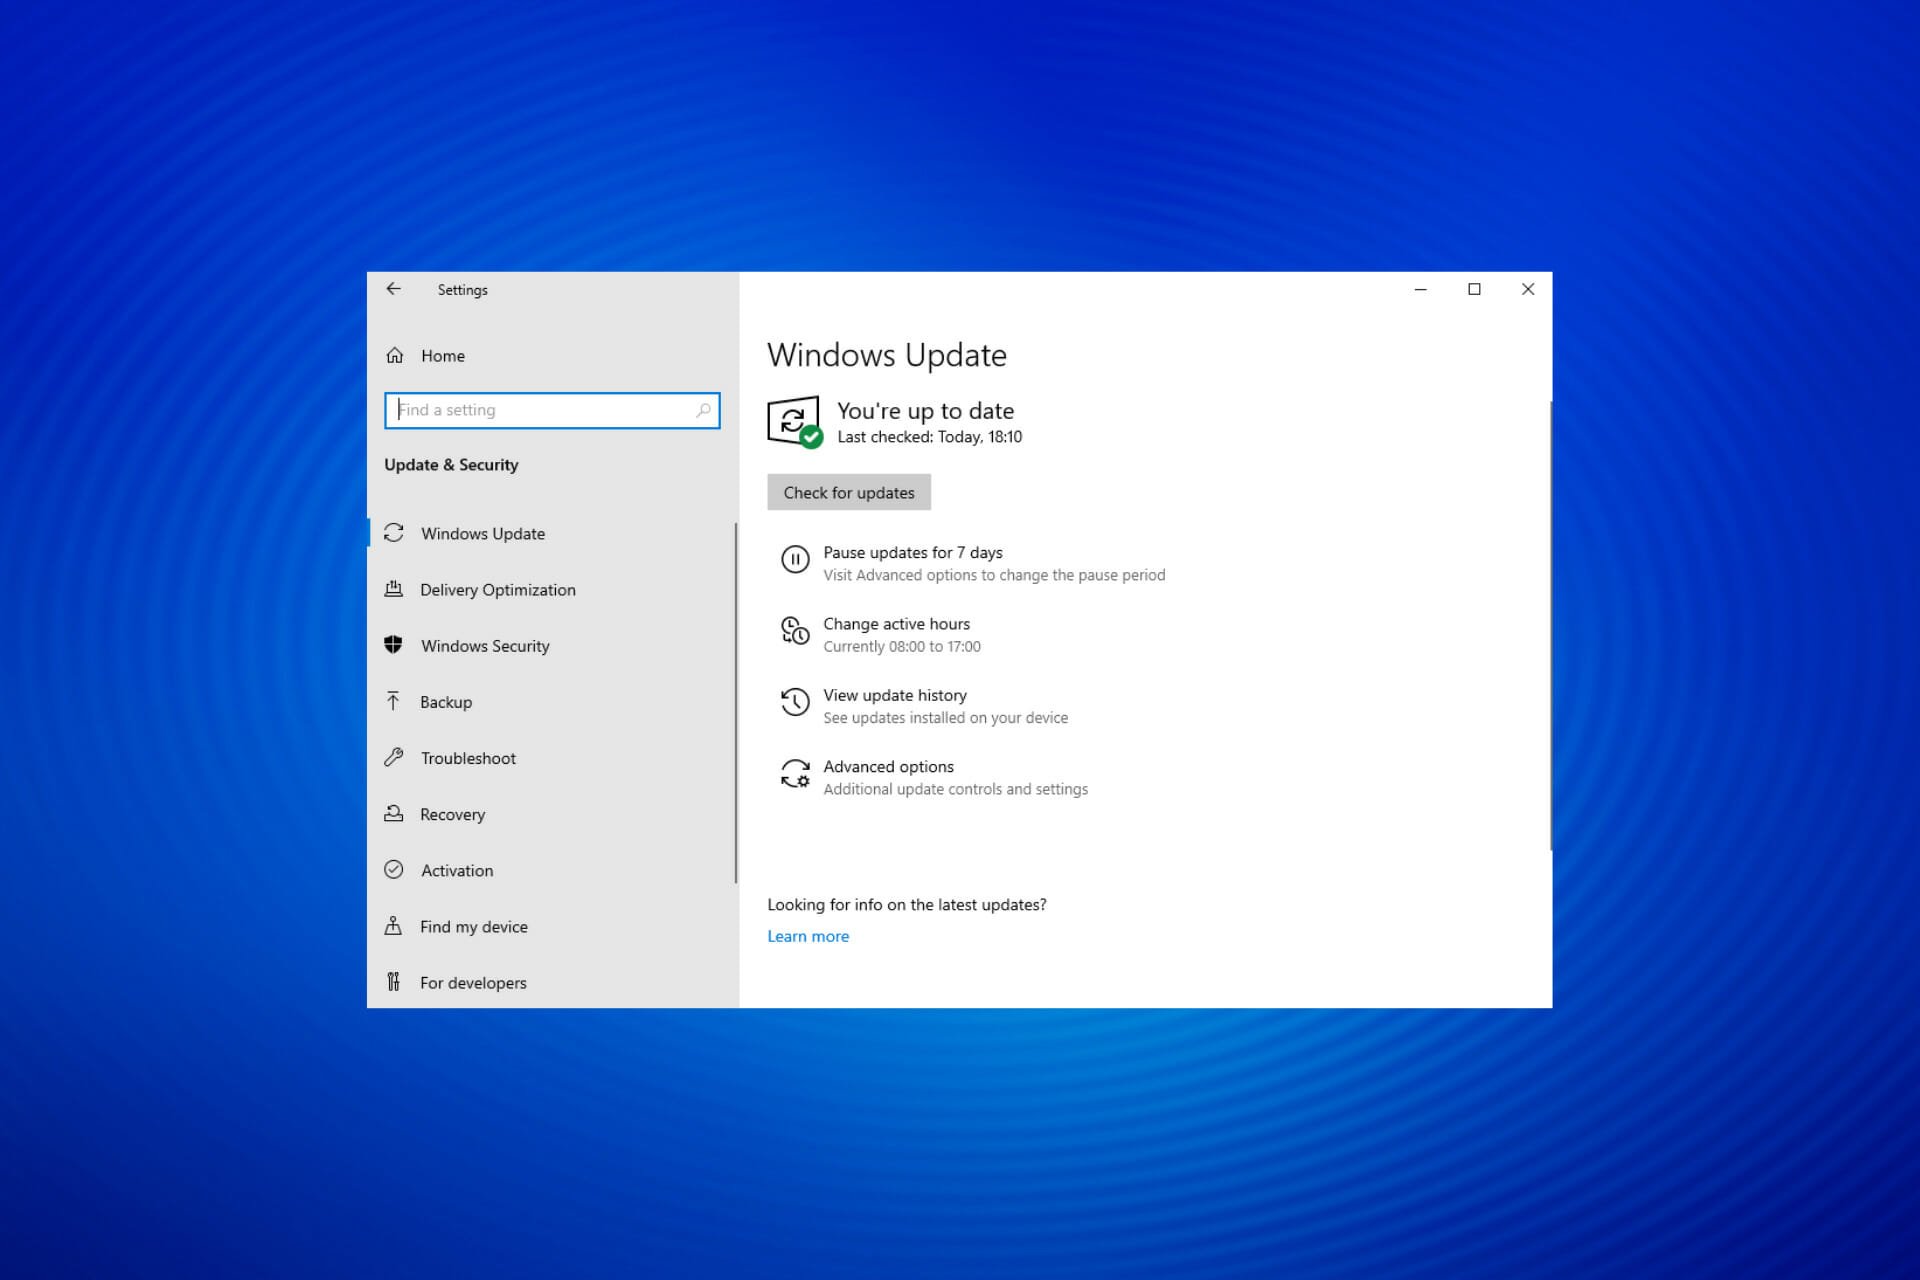
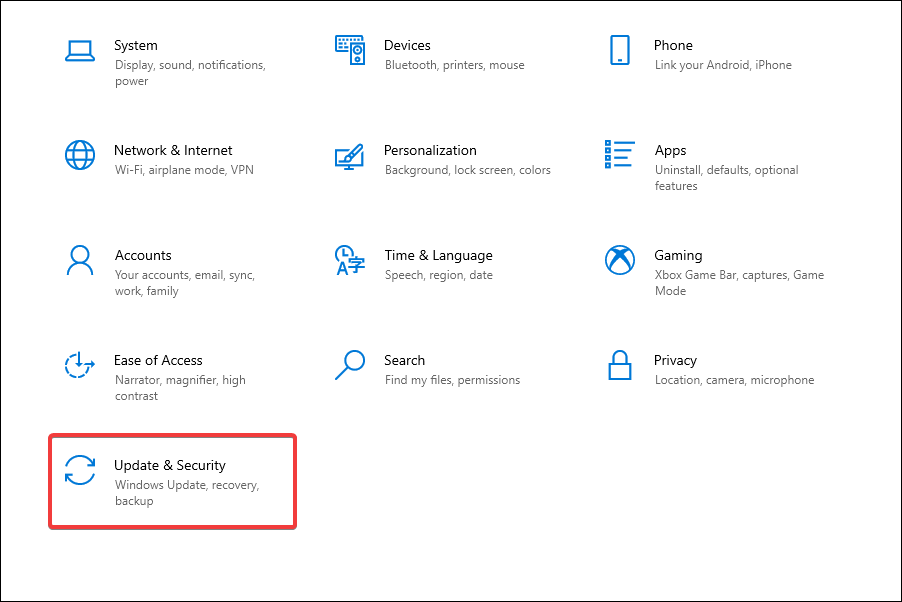
- Press Windows + I to launch the Settings app.
- Select Update & Security from the various options listed here.

- In the Windows Update tab that opens by default, check if there is a Resume Updates button on the right. If there’s one, click on it to start receiving updates.

- Your system will now automatically start scanning for any available update including those for Windows 11.

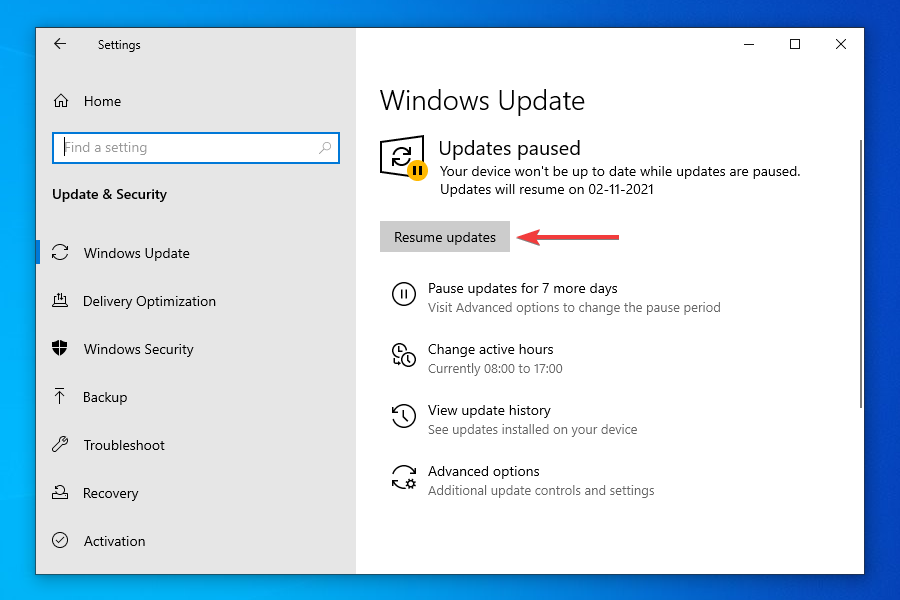
If you have paused updates, you wouldn’t be receiving any, including the one for Windows 11. Even if you don’t remember doing it, there’s no harm in cross-checking before we proceed further.
After you enable updates, if an upgrade for Windows 11 is available, it would be shown in Windows Update, and subsequently, downloaded and installed on your computer.
2. Reboot the computer
- Navigate to the desktop and press Alt + F4 to launch the Shut Down Windows box.
- Click on the dropdown menu and select Restart from the list of options.
- Click on OK to restart the computer.
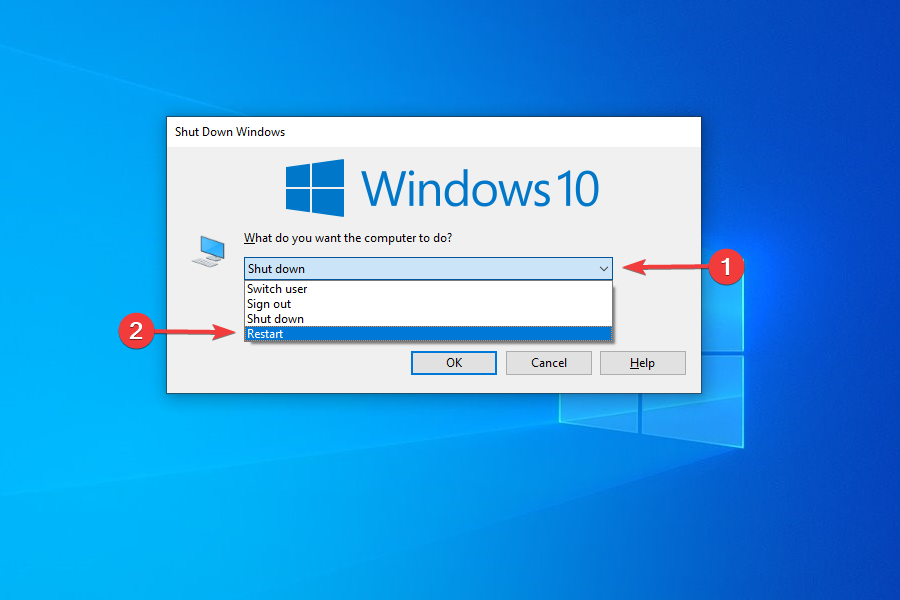
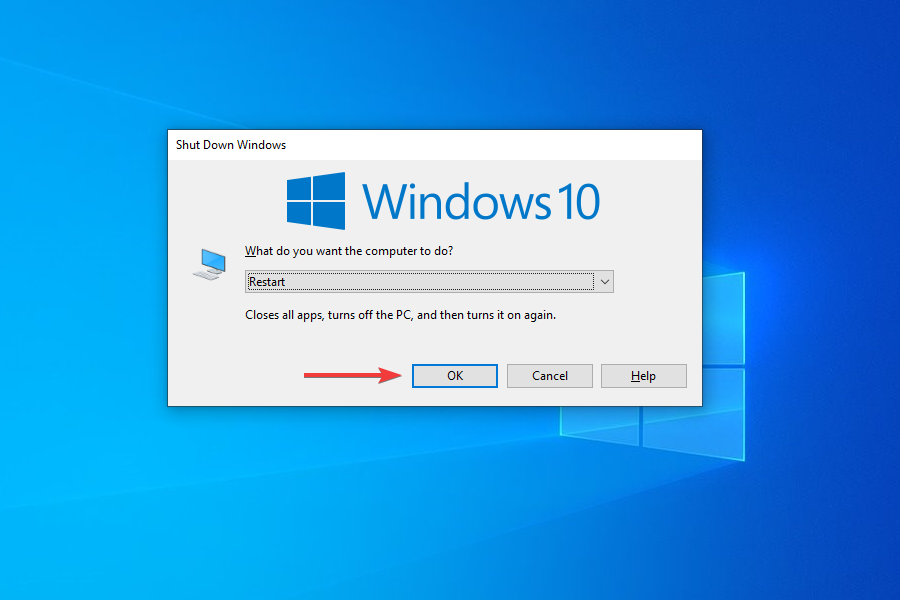
Before restarting, make sure to save any open files to avoid data loss. Rebooting the computer restarts the OS and fixes any trivial bugs that may be interfering with the Windows 11 update.
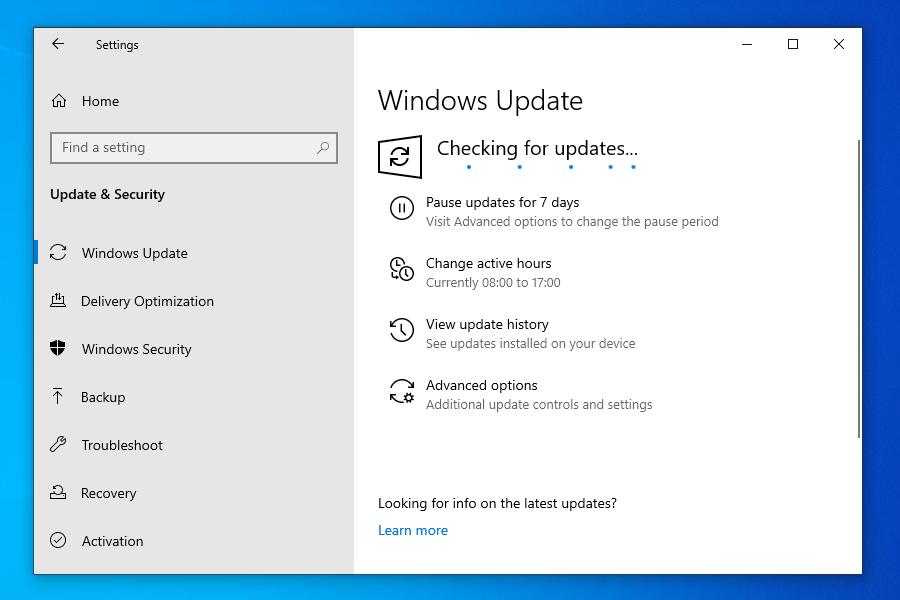
3. Run the Windows Update troubleshooter
- Press Windows + I to launch the Settings app.
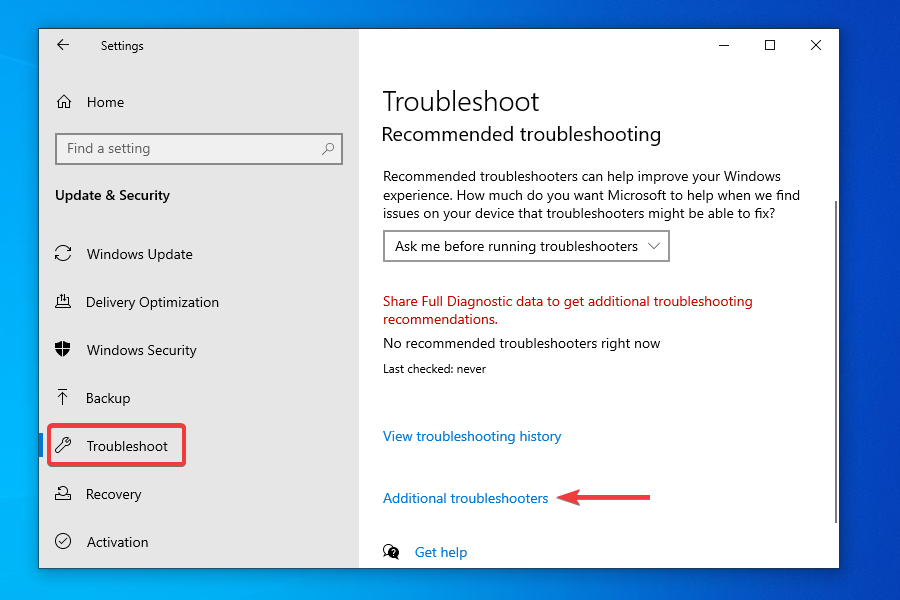
- Select Update & Security from the list of options listed in the Settings.
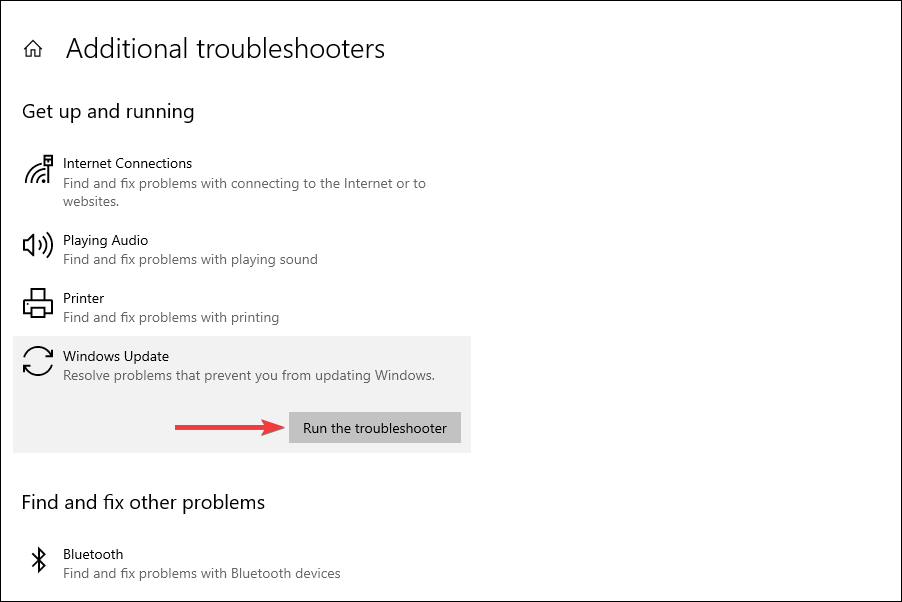
- Select Troubleshoot from the tabs listed in the navigation pane and click Additional troubleshooters on the right.
- Click on Windows Update.
- Click Run troubleshooter to diagnose and fix issues preventing your PC from receiving the update for Windows 11.
- The troubleshooter will now start running. Follow the instructions and choose the appropriate response, if and when prompted, to complete the process.

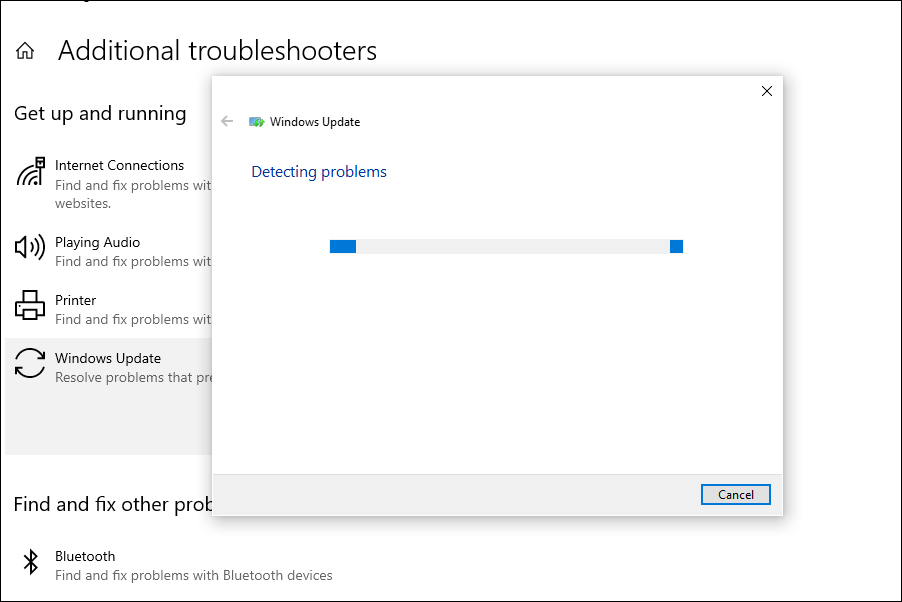
The built-in troubleshooters offered by Microsoft are excellent in identifying and fixing small bugs, misconfigured settings, and other issues. After the troubleshooter is done running, check if Windows 11 is now showing up in Windows Update.
4. Repair Windows Update components
Although you are required to repair or reset Windows Update components when encountering an error, it may also help you get the Windows 11 update in this case.
If they have become corrupt or have run into a bug that is leading to the Windows 11 not showing up in Windows update issue, repairing or resetting them should come in handy.
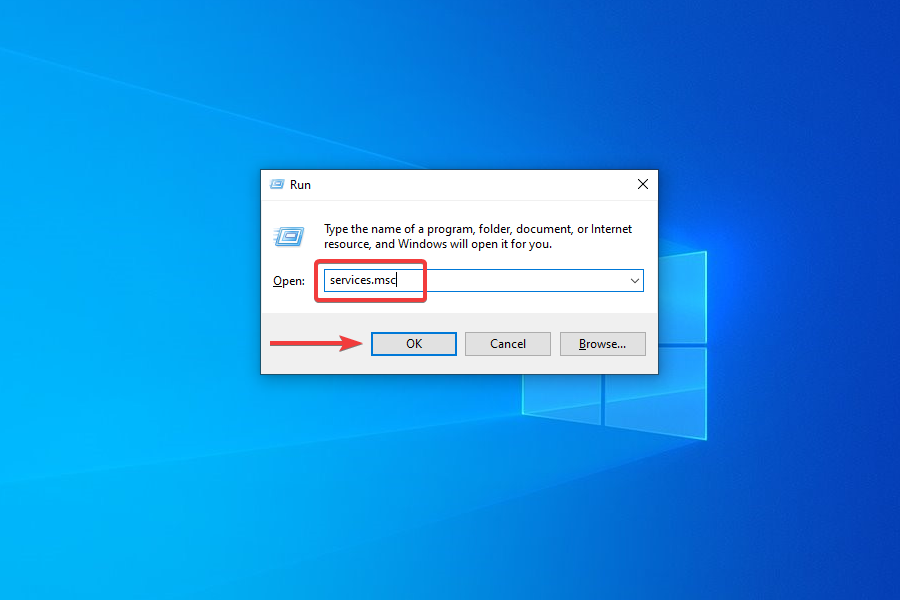
5. Restart the Windows 11 update
- Press Windows + R to launch the Run command.
- Type services.msc in the text field, and either click on OK or press Enter to launch the Services app.
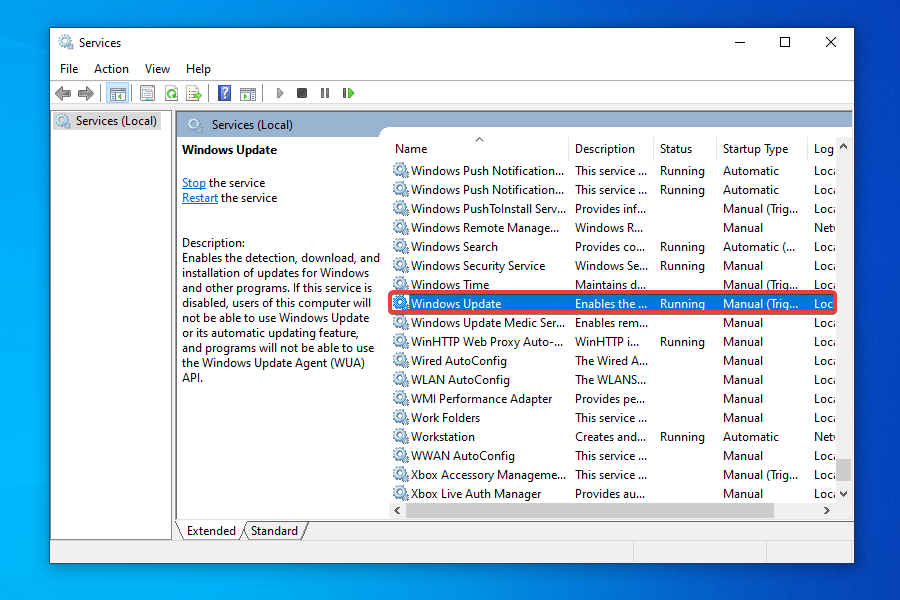
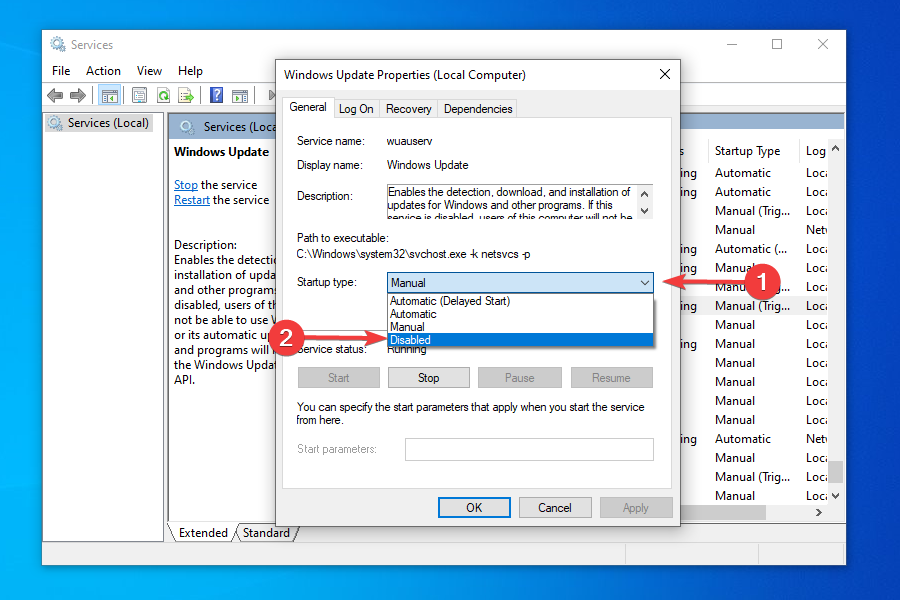
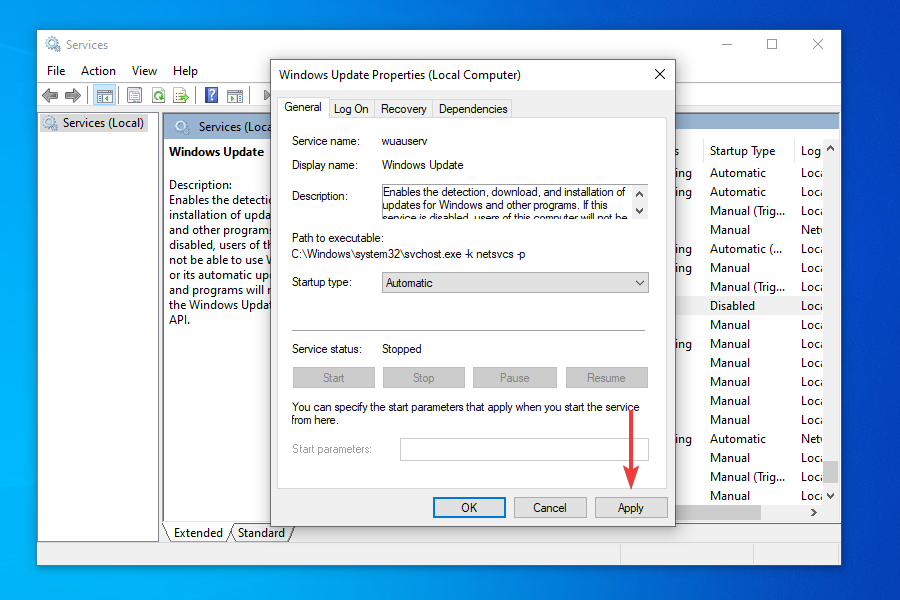
- Locate and double-click on the Windows Update service.
- Click on the Startup type dropdown menu and select Disabled from the list of options that appear.
- Click on Apply to save the changes.
- Next, click OK to close the properties window.
- Close the Services app.
- Now, you need to reboot the computer. To do that, press the Windows key, click on the Power button, and select Restart from the menu that appears.

- Press Windows + E to launch the File Explorer, and navigate to the following path or paste it in the addressbar at the top and hit Enter.
C:WindowsSoftwareDistribution - Press Ctrl + A to select all the files saved here, and hit the Del key to delete them.
- Choose the appropriate response in case a confirmation box pops up.
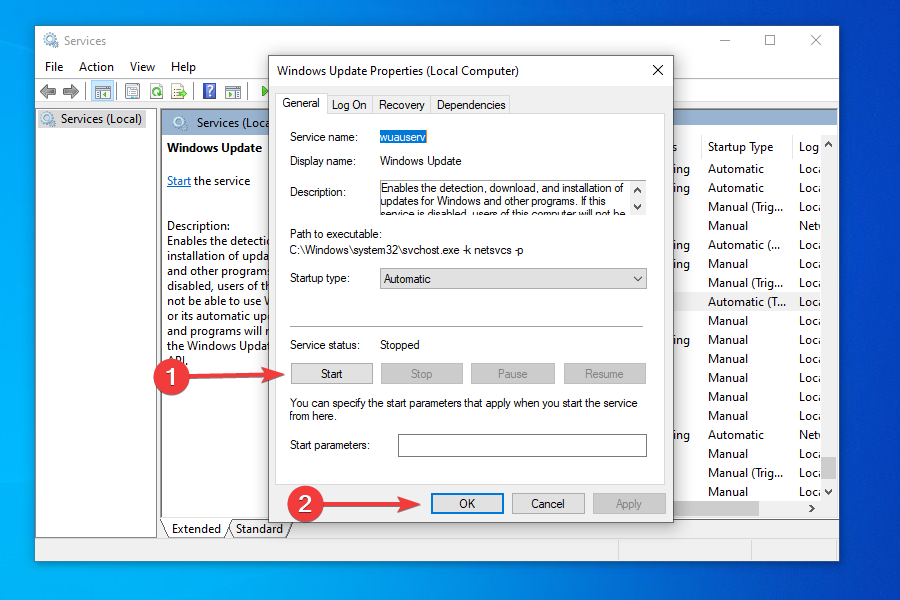
- Now, again launch the Services app as you did earlier, and double-click on the Windows Update service.
- Select Automatic from the Startup type dropdown menu this time.
- Click on Apply to save the changes.
- Click on Start under Service status to run the service, and then click on OK at the bottom.
- Go to the Windows Update section in Settings and check if you can now install Windows 11.

In some cases, the update for Windows 11 may seem stuck at 100% for hours without any progress. In such cases, following the steps mentioned here will get things up and running and allow you to upgrade.
6. Disable or uninstall conflicting apps
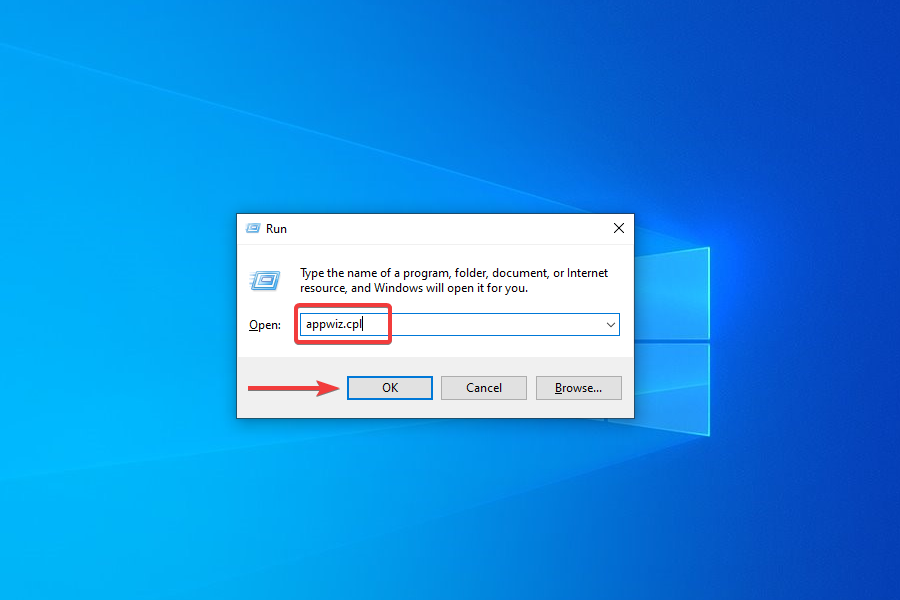
- Press Windows + R to launch the Run command.
- Enter appwiz.cpl in the text field and click on OK or hit Enter to launch the Programs and Features window.
- Locate and select the app you want to remove, and click on Uninstall at the top.
- Choose the appropriate response in case a confirmation box pops up.

To disable an app, you can go to its built-in Settings and turn on/off the required toggle or choose the appropriate response.
The method to disable each app is different and there should be an option for it somewhere in the app’s built-in Settings. Search the FAQ section on the official website for the program to find out the exact steps.
Some PC issues are hard to tackle, especially when it comes to corrupted repositories or missing Windows files. If you are having troubles fixing an error, your system may be partially broken.
We recommend installing Restoro, a tool that will scan your machine and identify what the fault is.
Click here to download and start repairing.
If disabling the app didn’t work or you couldn’t find the option for it, follow the steps above to uninstall the app.
Certain programs are known to block the Windows Updates, thus leading to the current issue.
You should look out for third-party firewalls and disable or uninstall them. Also, apps like Pi-hole or other similar ones, have been found to be the culprit, and uninstalling them fixed the problem.
Once you are done disabling or uninstalling the problematic apps, check if you are able to find and install Windows 11 from Windows Update.
7. Use the Installation Media

NOTE
For this method, you will require a USB flash drive with more than 8 GB of storage to create a bootable USB for installing Windows 11.
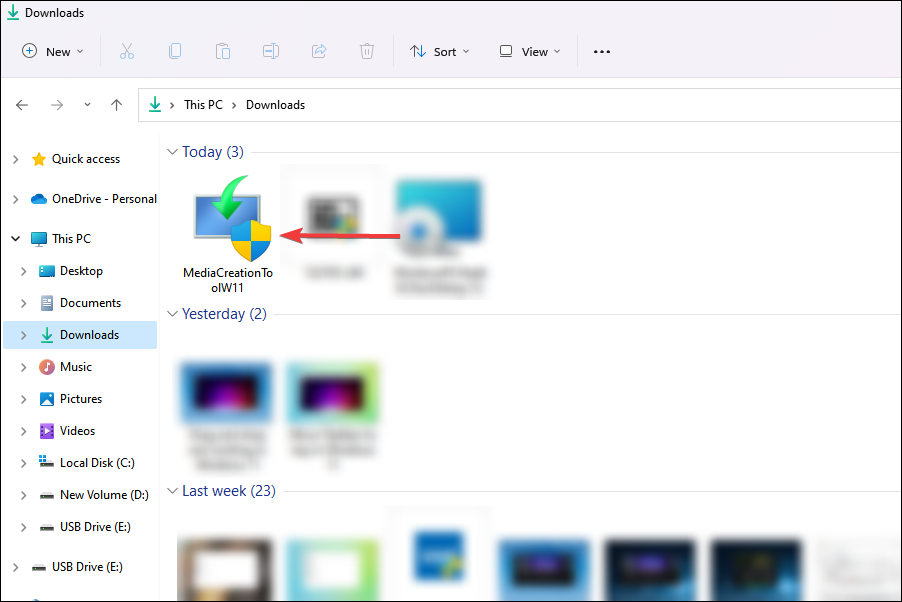
- Plug in the flash drive to your sytem.
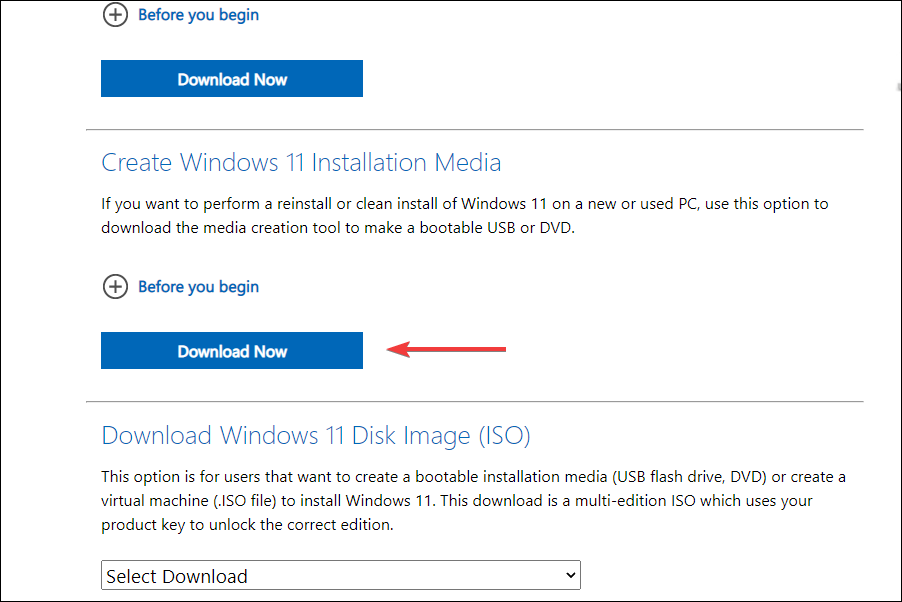
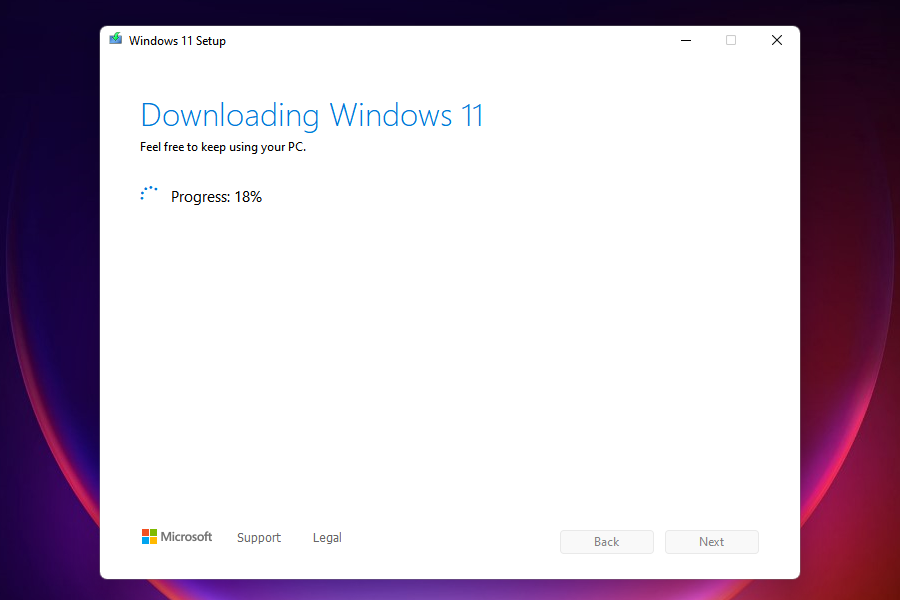
- Go to the download page for Windows 11 and click on Download Now under Create Windows 11 Installation Media.
- Navigate to the location where the downloaded file is saved and double-click on it.
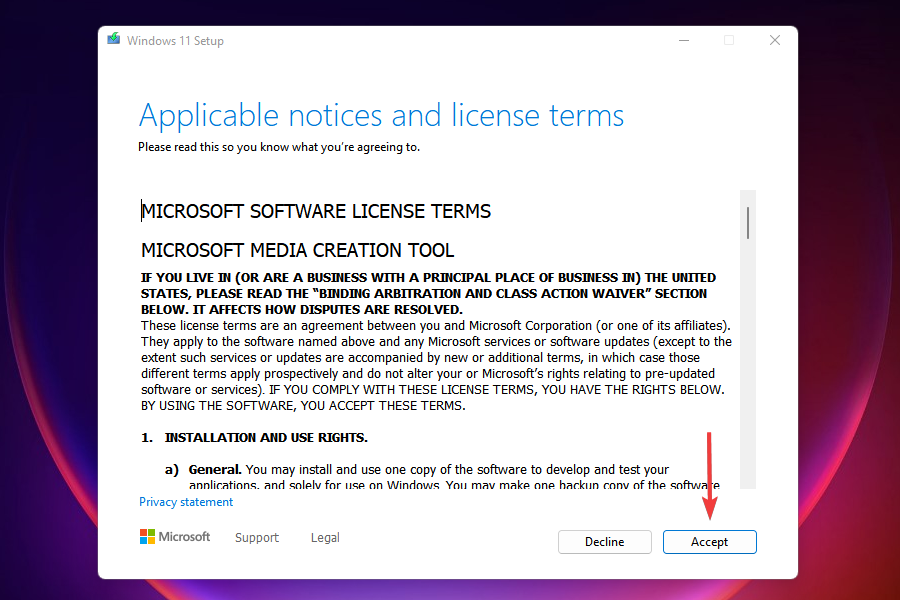
- Click Yes on the UAC prompt that appears.
- The setup will take a few moments to get things ready.
- Click on Accept to agree to the license terms.
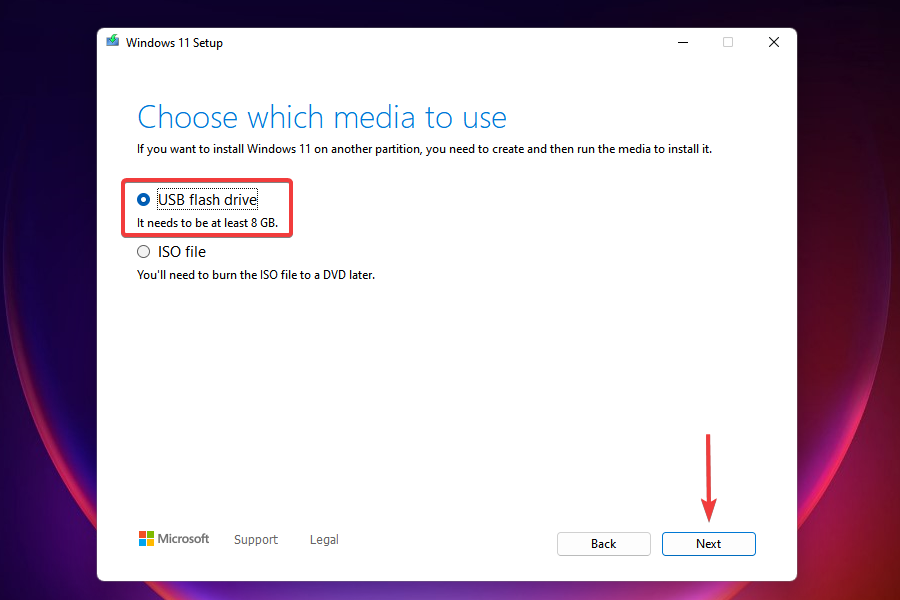
- Now, you will find the recommended language and edition already selected. In case you want to make any changes, untick the checkbox for Use the recommended options for this PC and choose the appropriate settings. Finally, click on Next.
- Choose the USB flash drive option and click Next.
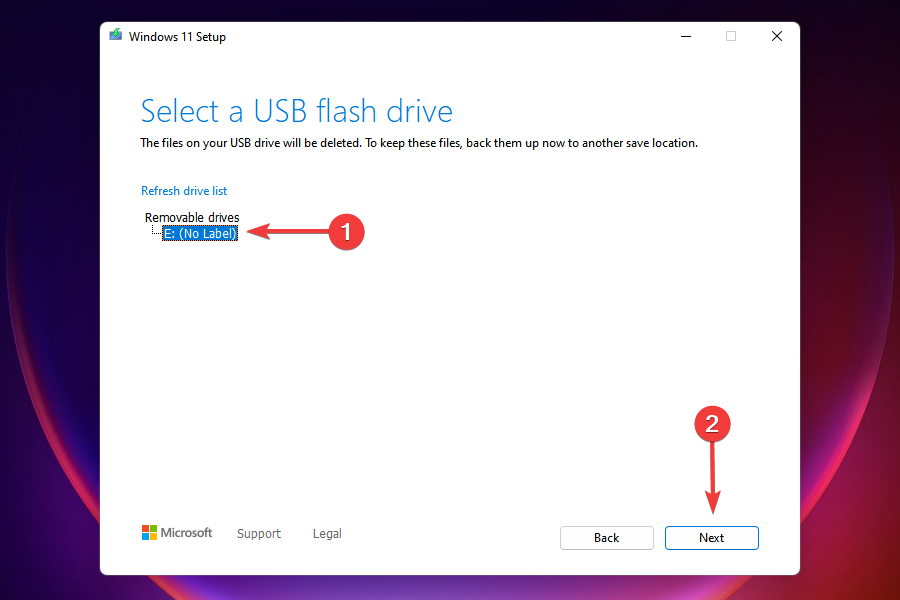
- Select the removable drive that you earlier plugged in from the list and click on Next.
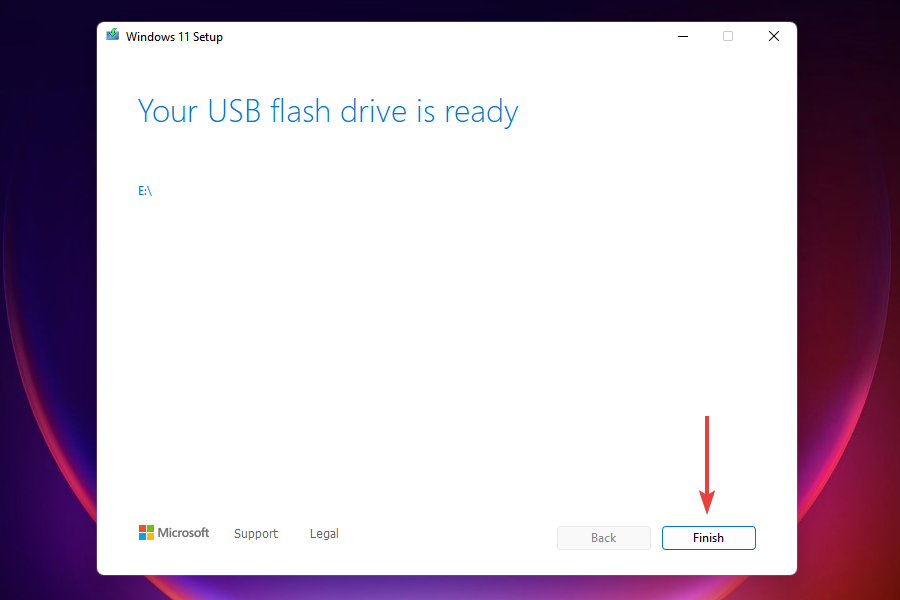
- Wait for the setup to create a bootable USB drive. You can monitor the progress in this window.
- After the bootable flash drive is created, click on Finish to close the setup.

Once done, you can now easily install the OS from the bootable USB drive. Although the guide is for Windows 10, it would assist you when installing Windows 11 as well, since the process remains the same.
After the flash drive is booted, follow the on-screen instructions to complete the installation process.
A major advantage of this method is that you will always have a bootable USB at your disposal, which would make things a lot easier in case you have to reinstall Windows 11.
We’ve written extensively around the issue of people either not being able to complete the upgrade process to Windows 11 or not seeing the option, at all. Here are some resources we’re suggesting for you to check out:
- How to fix Windows 11 Windows Update errors
- How to fix Windows 11 errors after update from Windows 10
- How to make Windows 11 update after restart
- How to fix Windows Update troubleshooter in Windows 11
- How to fix a stuck Windows 11 download
- How to solve Windows 11 installation woes
Can I use the Windows 11 Installation Assistant to upgrade?
Yes, the Windows 11 Installation Assistant is another tool at your disposal to upgrade to the latest iteration. However, you cannot use it if the PC doesn’t meet the minimum system requirements, since the Installation Assistant wouldn’t run.
You can download and use the Windows 11 Installation Assistant with the help of our guide. Simply, go to the How to use the Windows 11 Installation Assistant? heading and follow the steps listed there.
What do I do if my PC doesn’t meet the system requirements for Windows 11?
As promised earlier, we would now list out the ways you can install Windows 11 on an unsupported PC. However, Microsoft has stated that such PCs may have compatibility issues and might not receive updates, including those for security. You will thus be exposing the system to a major risk.
Though if you have made up your mind, you can install Windows 11 after bypassing SecureBoot and TPM checks. This would require making some minor changes to the Registry.
It’s also possible to install Windows 11 without TPM, another workaround users had been looking for due to the TPM 2.0 requirement.
If you are still unsure, learn how to install Windows 11 on a Virtual Machine, try it out and then make the upgrade. Nevertheless, if you have already made the jump, it’s easy to roll back from Windows 11 to Windows 10.
By the time you reach the end of this article, you know a bunch of ways to install the latest iteration from Microsoft on both supported and unsupported PCS. Also, the Windows 11 not showing up in Windows Update issue would be fixed.
Let’s know which method worked for you and your experience thus far with Windows 11.
![]()
Newsletter
This issue prevents the installation of the new OS
by Kazim Ali Alvi
Kazim has always been fond of technology, be it scrolling through the settings on his iPhone, Android device, or Windows. And at times, unscrewing the device to take… read more
Published on November 28, 2022
Reviewed by
Vlad Turiceanu
Passionate about technology, Windows, and everything that has a power button, he spent most of his time developing new skills and learning more about the tech world. Coming… read more
- A lot of users have reported being the Windows 11 update not showing in Windows 10 on the Windows Update tool.
- If you using a PC that meets that minimum requirement, you should receive the update in a while since the roll-out is in a phased manner. However, there are ways to make the jump even sooner.
- Check for any issues with the Windows Update, namely, if they are paused, stuck, or the presence of conflicting programs.
- Also, learn how to install Windows 11 on unsupported PCs.
XINSTALL BY CLICKING THE DOWNLOAD FILE
- Download Restoro PC Repair Tool that comes with Patented Technologies (patent available here).
- Click Start Scan to find broken files that are causing the problems.
- Click Repair All to fix issues affecting your computer’s security and performance
- Restoro has been downloaded by 0 readers this month.
Windows 11 has been rolled out for users, though in a phased manner. PCs that are compatible should receive an update in the days to follow. However, many users have reported Windows 11 not showing up in Windows Update.
The Windows 11 update not showing up issue could be due to a bunch of reasons, some related to your computer’s compatibility while others to the phased rollout. Whatever the case, there are ways you can get your hands on the latest Windows iteration from Microsoft.
If you have been checking the Windows Update section time and again to upgrade but to no avail, read ahead to find out the various ways you can install Windows 11 on your computer.
Why don’t I see the Windows 11 update?
A large number of computers wouldn’t be able to upgrade to Windows 11 owing to the strict system requirements. And Microsoft has its reasoning for that.
Can my PC run Windows 11?
To check whether a computer can run Windows 11, Microsoft has released the PC Health Check app. Just download and install the app, run it, and you will find out whether or not your system is compatible.
If you get the message This PC meets Windows 11 requirements, your computer is compatible. Head over to the next section to find out ways to make the upgrade even if Windows 11 is not showing up in Windows Update.
For those of you who see This PC doesn’t currently meet the Windows 11 system requirements, you wouldn’t be receiving the upgrade via Windows Update. Head over to the end to find out how you can install Windows 11 on an unsupported PC.
What can I do if the Windows 11 update is not showing up?
- Why don’t I see the Windows 11 update?
- Can my PC run Windows 11?
- What can I do if the Windows 11 update is not showing up?
- 1. Resume Windows Update
- 2. Reboot the computer
- 3. Run the Windows Update troubleshooter
- 4. Repair Windows Update components
- 5. Restart the Windows 11 update
- 6. Disable or uninstall conflicting apps
- 7. Use the Installation Media
- Can I use the Windows 11 Installation Assistant to upgrade?
- What do I do if my PC doesn’t meet the system requirements for Windows 11?
1. Resume Windows Update
- Press Windows + I to launch the Settings app.
- Select Update & Security from the various options listed here.
- In the Windows Update tab that opens by default, check if there is a Resume Updates button on the right. If there’s one, click on it to start receiving updates.
- Your system will now automatically start scanning for any available update including those for Windows 11.
If you have paused updates, you wouldn’t be receiving any, including the one for Windows 11. Even if you don’t remember doing it, there’s no harm in cross-checking before we proceed further.
After you enable updates, if an upgrade for Windows 11 is available, it would be shown in Windows Update, and subsequently, downloaded and installed on your computer.
2. Reboot the computer
- Navigate to the desktop and press Alt + F4 to launch the Shut Down Windows box.
- Click on the dropdown menu and select Restart from the list of options.
- Click on OK to restart the computer.
Before restarting, make sure to save any open files to avoid data loss. Rebooting the computer restarts the OS and fixes any trivial bugs that may be interfering with the Windows 11 update.
3. Run the Windows Update troubleshooter
- Press Windows + I to launch the Settings app.
- Select Update & Security from the list of options listed in the Settings.
- Select Troubleshoot from the tabs listed in the navigation pane and click Additional troubleshooters on the right.
- Click on Windows Update.
- Click Run troubleshooter to diagnose and fix issues preventing your PC from receiving the update for Windows 11.
- The troubleshooter will now start running. Follow the instructions and choose the appropriate response, if and when prompted, to complete the process.
The built-in troubleshooters offered by Microsoft are excellent in identifying and fixing small bugs, misconfigured settings, and other issues. After the troubleshooter is done running, check if Windows 11 is now showing up in Windows Update.
4. Repair Windows Update components
Although you are required to repair or reset Windows Update components when encountering an error, it may also help you get the Windows 11 update in this case.
If they have become corrupt or have run into a bug that is leading to the Windows 11 not showing up in Windows update issue, repairing or resetting them should come in handy.
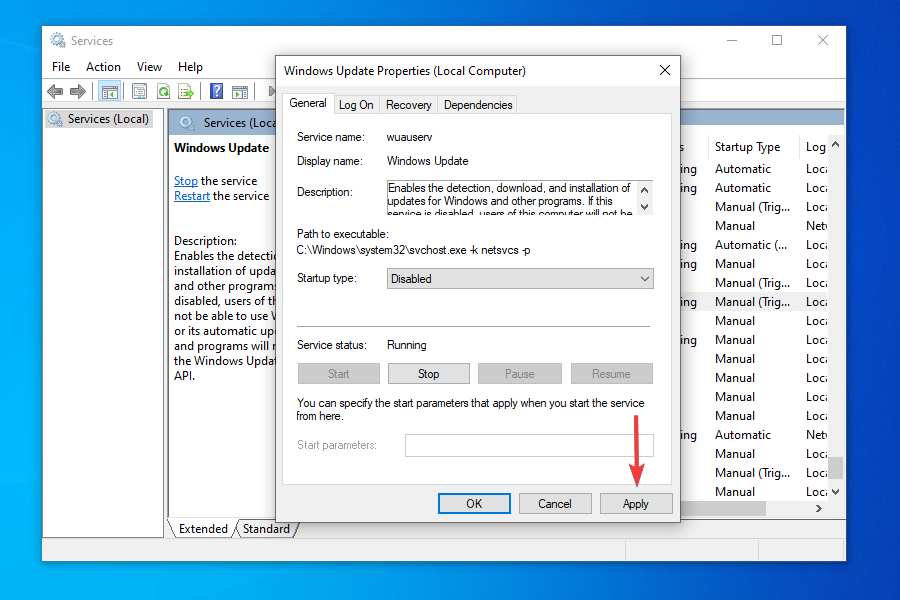
5. Restart the Windows 11 update
- Press Windows + R to launch the Run command.
- Type services.msc in the text field, and either click on OK or press Enter to launch the Services app.
- Locate and double-click on the Windows Update service.
- Click on the Startup type dropdown menu and select Disabled from the list of options that appear.
- Click on Apply to save the changes.
- Next, click OK to close the properties window.
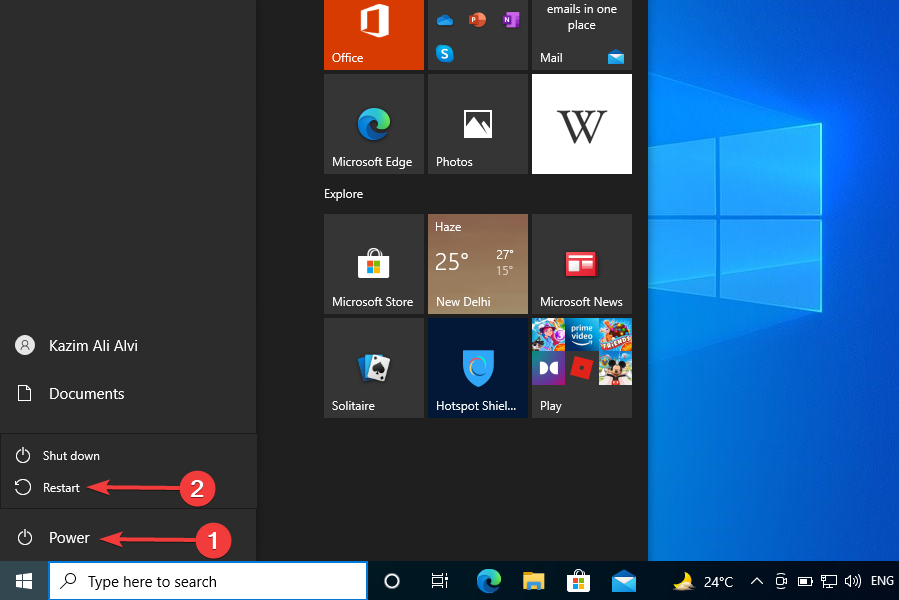
- Close the Services app.
- Now, you need to reboot the computer. To do that, press the Windows key, click on the Power button, and select Restart from the menu that appears.
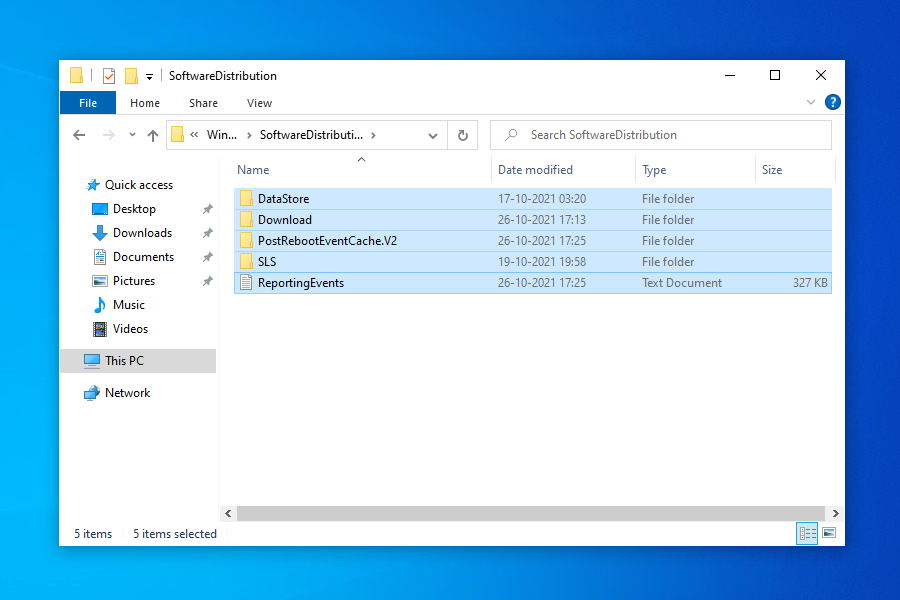
- Press Windows + E to launch the File Explorer, and navigate to the following path or paste it in the addressbar at the top and hit Enter.
C:WindowsSoftwareDistribution - Press Ctrl + A to select all the files saved here, and hit the Del key to delete them.
- Choose the appropriate response in case a confirmation box pops up.
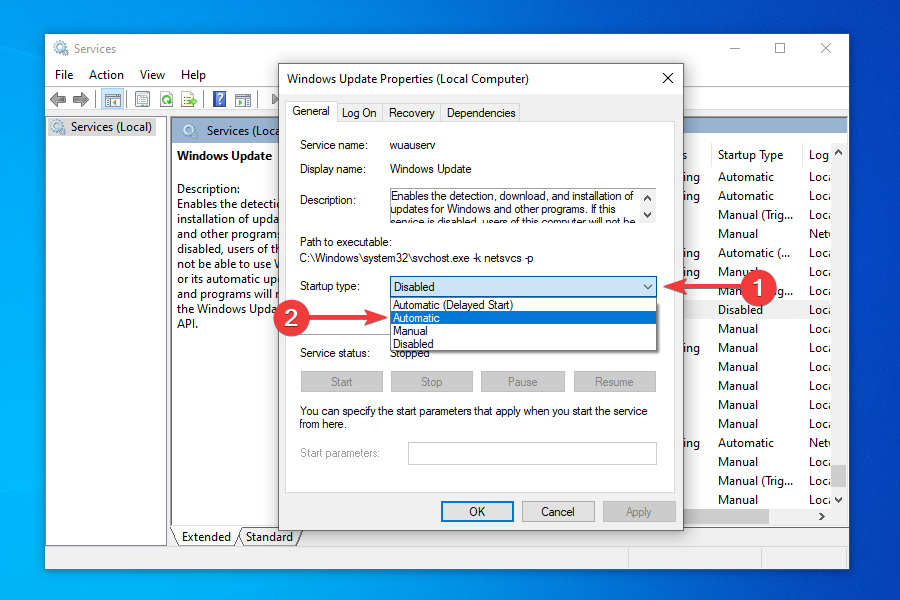
- Now, again launch the Services app as you did earlier, and double-click on the Windows Update service.
- Select Automatic from the Startup type dropdown menu this time.
- Click on Apply to save the changes.
- Click on Start under Service status to run the service, and then click on OK at the bottom.
- Go to the Windows Update section in Settings and check if you can now install Windows 11.
In some cases, the update for Windows 11 may seem stuck at 100% for hours without any progress. In such cases, following the steps mentioned here will get things up and running and allow you to upgrade.
6. Disable or uninstall conflicting apps
- Press Windows + R to launch the Run command.
- Enter appwiz.cpl in the text field and click on OK or hit Enter to launch the Programs and Features window.
- Locate and select the app you want to remove, and click on Uninstall at the top.
- Choose the appropriate response in case a confirmation box pops up.
To disable an app, you can go to its built-in Settings and turn on/off the required toggle or choose the appropriate response.
The method to disable each app is different and there should be an option for it somewhere in the app’s built-in Settings. Search the FAQ section on the official website for the program to find out the exact steps.
Some PC issues are hard to tackle, especially when it comes to corrupted repositories or missing Windows files. If you are having troubles fixing an error, your system may be partially broken.
We recommend installing Restoro, a tool that will scan your machine and identify what the fault is.
Click here to download and start repairing.
If disabling the app didn’t work or you couldn’t find the option for it, follow the steps above to uninstall the app.
Certain programs are known to block the Windows Updates, thus leading to the current issue.
You should look out for third-party firewalls and disable or uninstall them. Also, apps like Pi-hole or other similar ones, have been found to be the culprit, and uninstalling them fixed the problem.
Once you are done disabling or uninstalling the problematic apps, check if you are able to find and install Windows 11 from Windows Update.
7. Use the Installation Media
NOTE
For this method, you will require a USB flash drive with more than 8 GB of storage to create a bootable USB for installing Windows 11.
- Plug in the flash drive to your sytem.
- Go to the download page for Windows 11 and click on Download Now under Create Windows 11 Installation Media.
- Navigate to the location where the downloaded file is saved and double-click on it.
- Click Yes on the UAC prompt that appears.
- The setup will take a few moments to get things ready.
- Click on Accept to agree to the license terms.
- Now, you will find the recommended language and edition already selected. In case you want to make any changes, untick the checkbox for Use the recommended options for this PC and choose the appropriate settings. Finally, click on Next.
- Choose the USB flash drive option and click Next.
- Select the removable drive that you earlier plugged in from the list and click on Next.
- Wait for the setup to create a bootable USB drive. You can monitor the progress in this window.
- After the bootable flash drive is created, click on Finish to close the setup.
Once done, you can now easily install the OS from the bootable USB drive. Although the guide is for Windows 10, it would assist you when installing Windows 11 as well, since the process remains the same.
After the flash drive is booted, follow the on-screen instructions to complete the installation process.
A major advantage of this method is that you will always have a bootable USB at your disposal, which would make things a lot easier in case you have to reinstall Windows 11.
We’ve written extensively around the issue of people either not being able to complete the upgrade process to Windows 11 or not seeing the option, at all. Here are some resources we’re suggesting for you to check out:
- How to fix Windows 11 Windows Update errors
- How to fix Windows 11 errors after update from Windows 10
- How to make Windows 11 update after restart
- How to fix Windows Update troubleshooter in Windows 11
- How to fix a stuck Windows 11 download
- How to solve Windows 11 installation woes
Can I use the Windows 11 Installation Assistant to upgrade?
Yes, the Windows 11 Installation Assistant is another tool at your disposal to upgrade to the latest iteration. However, you cannot use it if the PC doesn’t meet the minimum system requirements, since the Installation Assistant wouldn’t run.
You can download and use the Windows 11 Installation Assistant with the help of our guide. Simply, go to the How to use the Windows 11 Installation Assistant? heading and follow the steps listed there.
What do I do if my PC doesn’t meet the system requirements for Windows 11?
As promised earlier, we would now list out the ways you can install Windows 11 on an unsupported PC. However, Microsoft has stated that such PCs may have compatibility issues and might not receive updates, including those for security. You will thus be exposing the system to a major risk.
Though if you have made up your mind, you can install Windows 11 after bypassing SecureBoot and TPM checks. This would require making some minor changes to the Registry.
It’s also possible to install Windows 11 without TPM, another workaround users had been looking for due to the TPM 2.0 requirement.
If you are still unsure, learn how to install Windows 11 on a Virtual Machine, try it out and then make the upgrade. Nevertheless, if you have already made the jump, it’s easy to roll back from Windows 11 to Windows 10.
By the time you reach the end of this article, you know a bunch of ways to install the latest iteration from Microsoft on both supported and unsupported PCS. Also, the Windows 11 not showing up in Windows Update issue would be fixed.
Let’s know which method worked for you and your experience thus far with Windows 11.
![]()
Newsletter
По словам некоторых пользователей Windows 11 и Windows 10, они не могут обновить свою ОС. Когда они идут в Настройки> Центр обновления Windows и попробуйте сделать то же самое, они увидят код ошибки загрузки 0xCA00A009. Если вы один из этих пользователей и хотите исправить ошибку Windows Update 0xCA00A009, то это ваш пункт назначения. В этой статье мы увидим, почему вы видите этот код ошибки и как его решить.
Почему я вижу ошибку Центра обновления Windows 0xCA00A009?
Ошибка обновления может быть вызвана множеством причин. Чаще всего это довольно распространенная ошибка, и если вы опытный пользователь, то, возможно, уже знаете, что это печально известные проблемы. Помимо этого, проблема может возникать из-за поврежденных системных файлов или данных папки SoftwareDistribution и Catroot2. Файлы могут быть повреждены ожидающими перезагрузками или неправильной загрузкой пакета Windows Update. Мы увидим, как их восстановить, позже в этой статье. Проблема также может быть из-за конфликтующих групповых политик или неисправных компонентов WU. Их довольно легко исправить, и вы сможете сделать это с помощью этого руководства.
Если вы видите ошибку Центра обновления Windows 0xCA00A009 в Windows 11 и Windows 10, то вам необходимо сделать следующее:
- Используйте средство устранения неполадок Центра обновления Windows
- Удалите папку SoftwareDistribution и Catroot 2
- Обновить групповые политики
- Запустить SFC
- Восстановление ОС с установочного носителя
Поговорим о них подробнее.
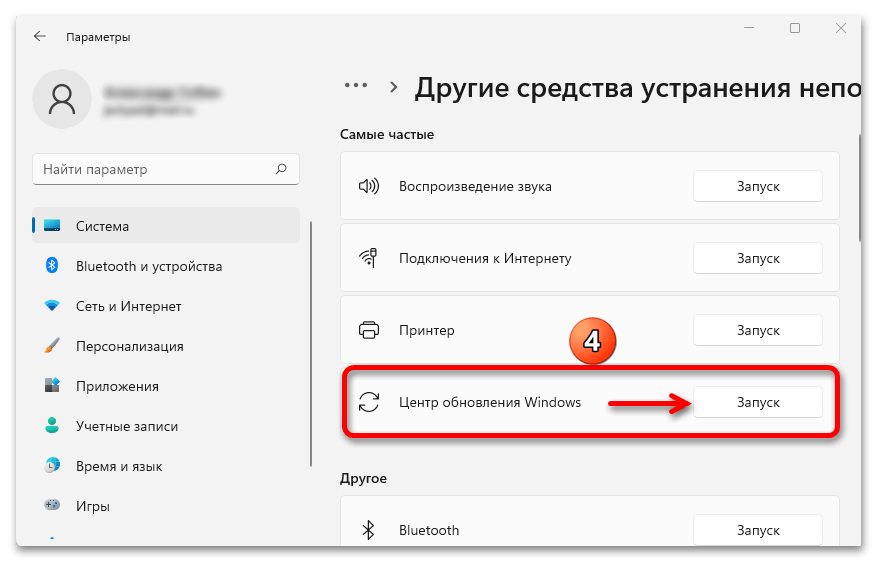
1]Используйте средство устранения неполадок Центра обновления Windows
Начнем с самого простого решения. Использование средства устранения неполадок Центра обновления Windows — отличный способ решить некоторые простые проблемы с Центром обновления Windows, и вы можете запустить их с помощью следующих шагов.
Для Windows 11
- Открыть настройки.
- Перейти к Система> Устранение неполадок> Другие средства устранения неполадок.
- Запустите средство устранения неполадок Центра обновления Windows.
Для Windows 10
- Открыть настройки.
- Перейдите в Обновление и безопасность> Устранение неполадок> Дополнительные средства устранения неполадок.
- Теперь выберите Центр обновления Windows и нажмите Запустите средство устранения неполадок.
После запуска средства устранения неполадок проверьте, сохраняется ли проблема.
2]Удалите папку SoftwareDistribution и Catroot 2.
Как упоминалось ранее, эти две папки могут вызвать рассматриваемый код ошибки. Итак, лучший способ решить их — переименовать их. Это не повлияет на ваш компьютер, и Windows автоматически создаст новые папки, как только они будут переименованы.
Перед переименованием папок нам нужно остановить некоторые процессы. Итак, откройте командную строку от имени администратора и выполните следующие команды.
net stop wuauserv net stop cryptSvc чистые стоповые биты net stop msiserver
Теперь выполните эти команды, чтобы переименовать обе папки.
ren C: Windows SoftwareDistribution SoftwareDistribution.old ren C: Windows System32 catroot2 catroot2.old
Как только вы закончите с этим, пора перезапустить службы, которые мы остановили.
net start wuauserv net start cryptSvc чистые стартовые биты net start msiserver
Наконец, перезагрузите компьютер и проверьте, сохраняется ли проблема.
3]Обновить групповые политики
Если у вас возникла эта проблема после обновления до Windows 11 из более старой версии Windows, возможно, ваши групповые политики устарели, и вам придется сделать это вручную. Следуйте приведенным ниже инструкциям, чтобы сделать то же самое.
- Открыть диспетчер задач Win + X> Диспетчер задач.
- Нажмите Параметры> Запустить новую задачу.
- Галочка Создайте эту задачу с правами администратора и нажмите Просматривать.
- Теперь перейдите к «C: Windows System32».
- Найдите CMD.exe и откройте его.
- Ваш каталог будет зарегистрирован. Теперь добавьте пробел, добавьте ‘-Обновить’, и нажмите ОК.
- Наконец, выполните следующую команду в окне командной строки.
gpupdate / force
Подождите, пока процесс будет завершен, и, надеюсь, проблема будет решена.
4]Запустите SFC
Проблема может быть из-за поврежденного образа системы, и лучший способ решить ее — запустить команду. Итак, откройте командную строку администратора из меню «Пуск» и выполните следующую команду.
sfc / scannow
Это займет некоторое время, поэтому подождите несколько минут, затем перезагрузите компьютер и проверьте, сохраняется ли проблема.
5]Восстановление ОС с установочного носителя
Если ничего не работает, вам необходимо восстановить Windows с помощью установочного носителя. Это особенно полезно, если проблема связана с поврежденным образом Windows. Итак, сделайте это и проверьте, сохраняется ли проблема.
Надеюсь, вы сможете решить проблему с помощью данных решений.
.